bcochran
-
Posts
615 -
Joined
-
Last visited
Content Type
Profiles
Forums
Gallery
Events
Everything posted by bcochran
-
 As per my Constitution, I broke the bow point off it, so I need to start over. I want to use the Hismodel deck on it. I won't detail the gun deck because you can't see it. Only the part you can see. In model planes and ships, modeler's go to great lengths to detail some places that will never be seen once the hull or fuselage is buttoned up. At least they know it is there. Anyone who wants to understand the last voyage of the USS Constitution in 1815 should get the book "The USS Constitution's Finest Fight, 1815" Edited by Tyrone G Martin. It is the actual journal of Acting Chaplain Assheton Humphreys, US Navy, while on that voyage. He titled it "Recapitulatory Journal" of Assheton Y. Humphreys, Acting Chaplain, USS Constitution 17 December 1814 - 26 March 1815. You can't get better descriptions than first-hand knowledge. I haven't read it in a while, but I seem to remember that the Constitution was disguised as a British frigate. Her stripe along the gun ports was yellow, as were her masts. Also, she did not have covers over her gun ports so that it was wet much of the time on board since the crew's hammocks were below the gun deck, and it leaked. I am slowly getting back to my Cutty Saark after some days off. I need to finish the port bulwark and pin rails, add the boats and bowsprit then begin rigging. I am still worried about reeving the deadeyes. They look too small and close to the bulwark to work with. I know one modeler rove them off the ship by holding them in clamps. I might do that.
- 481 replies
-
- 1
-

-
- Cutty Sark
- Revell
- (and 2 more)
-
Radimir at HISmodel is sending me a free replacement set of etchings. I don't understand his directions. I guess you could also use scotch tape to apply them. Stick it to the front side of the etching when you cut them off the set, but you would have to be careful not to get glue on the tape. Most likely the tape would be too tacky. He says that here is the url for instructions: http://www.hismodel.com/ornaments On the stern ornament the badge that says "Where there is a Willis a way" is very fragile and beds easily and breaks off, as are the two arrow shaped parts pointing down and the lower part of the curl on the ends. If you have bumble fingers like me, you'll break them off. You need to handle them with tweezers or something. I think putting them on the transfer paper before cutting them out then trimming around the paper then put on the glue would prevent this.
- 481 replies
-
- 1
-
-
- Cutty Sark
- Revell
- (and 2 more)
-
Here is Hismodel's directions to apply the etchings: We recommend using gel second adhesive for gluing. You can find a detailed procedure for gluing the ornaments in our workflow here: https://www.hismodel.com/ornaments Description of use is here, too: First Clean ornament with an alcohol cleaner and spray it by gold paint. Pay attention to spray a very fine layer. Then paint relevant spots by blue color and by mat black color paint fine sticks, which holds a letters of name of ship. Then cut ornament from a plate by scalpel. Try placing of these parts on relevant place on model. Unstick transfer foil from paper which you have in plastic bag. Put ornament on paper from transfer foil and spread gel superglue on the back of side of ornament. Then put ornament on sticky side of the transfer foil for easier manipulation. Finally with a help of transfer foil to glue ornament on its place.
- 481 replies
-
- 2
-
-
- Cutty Sark
- Revell
- (and 2 more)
-
Well, I failed for the third time to put the photo etch on the stern. I don't know what to glue it with. It is too fragile for me to handle. Several parts of it can bend and break off by handling it. I'd much rather put on the decals if I had a good set, but since the model is so old either the decals are useless or not available. I have reached a frustration point where I should give it a rest. What do the wood kits use for the stern decoratons?
- 481 replies
-
- 2
-
-
- Cutty Sark
- Revell
- (and 2 more)
-
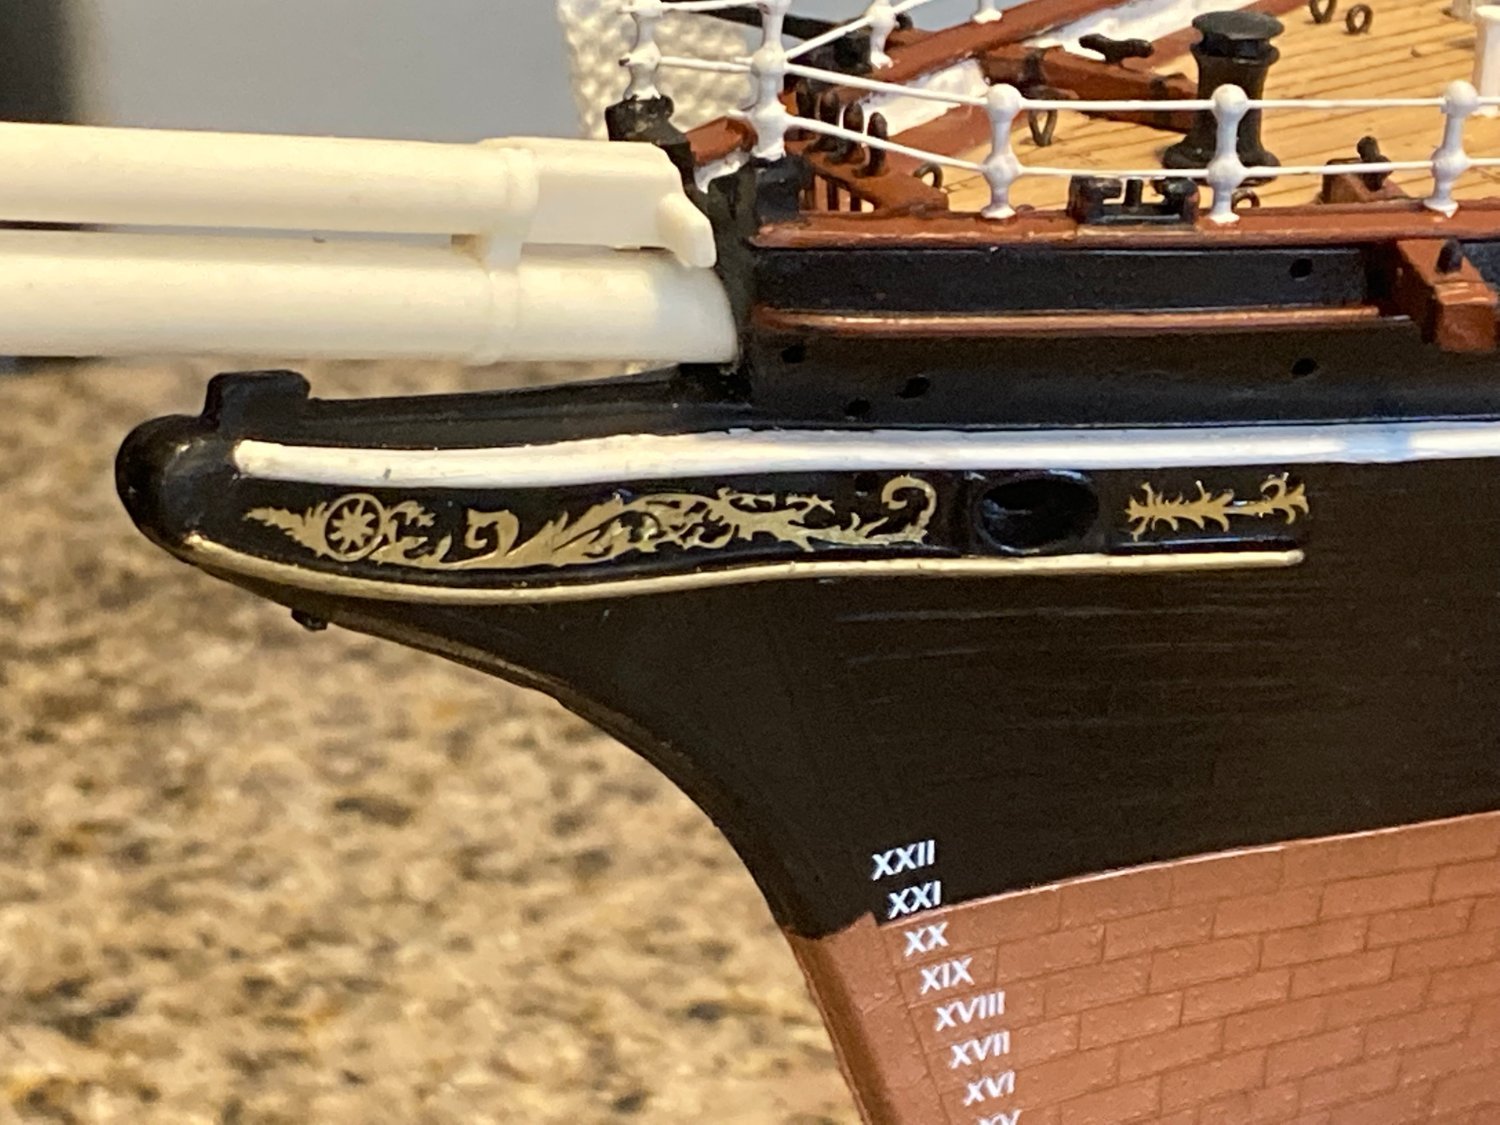
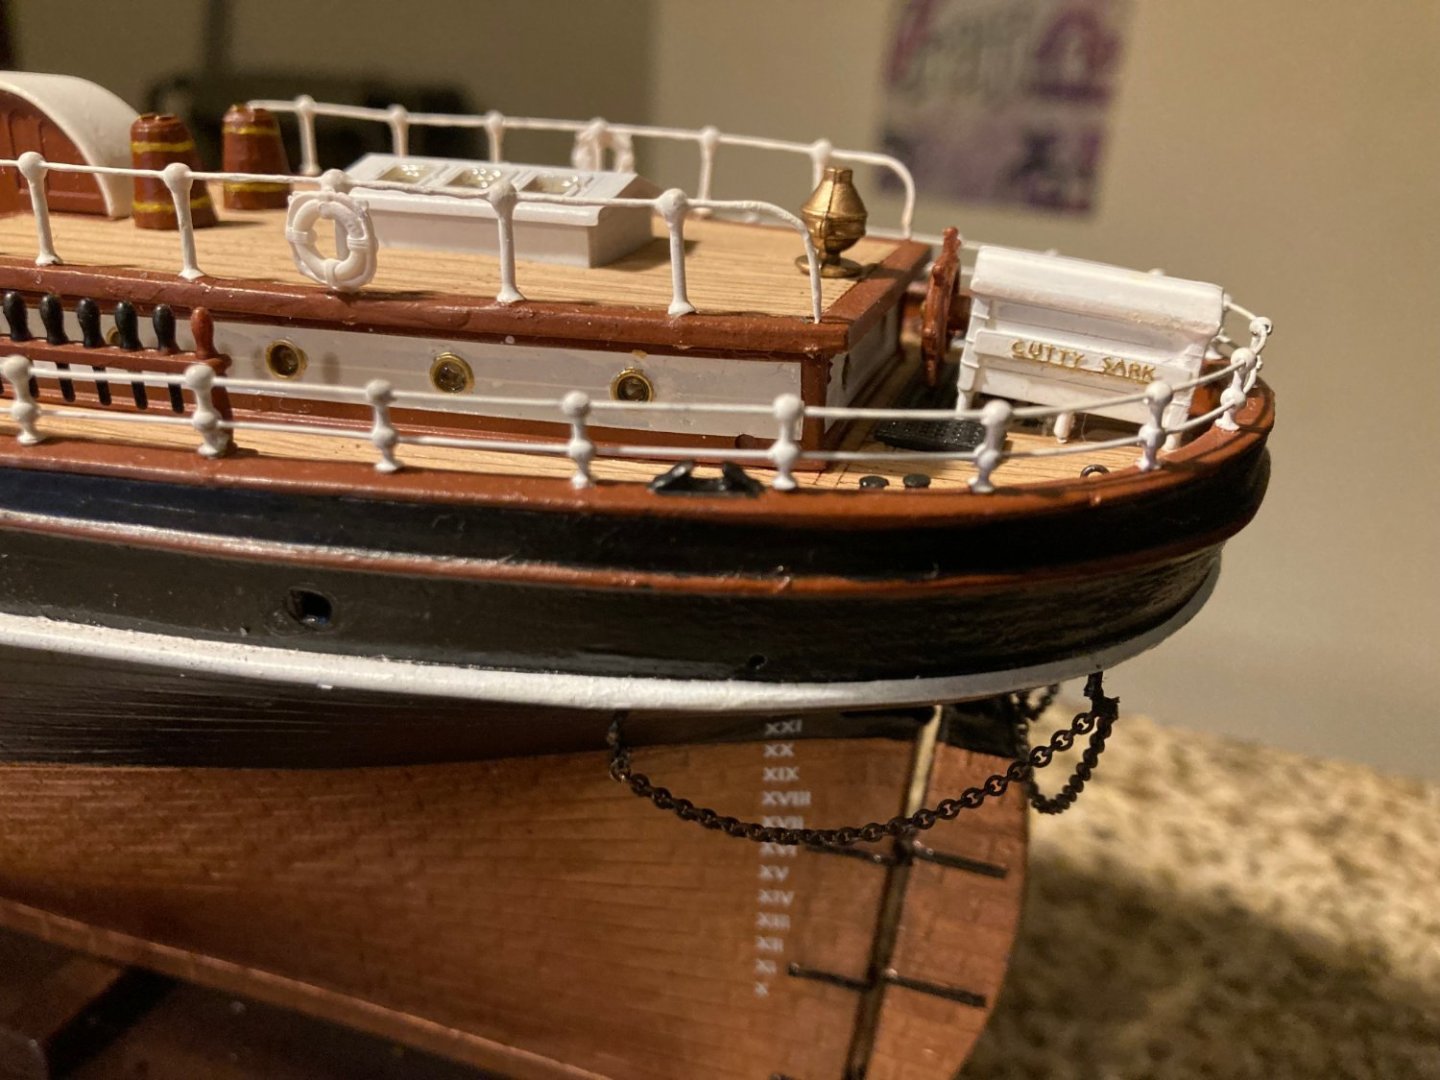
Here is a pic of my bow etching held on with 5 minute epoxy.

- 481 replies
-
- 4
-
-
- Cutty Sark
- Revell
- (and 2 more)
-
I used Microscale decals. I cut perpendicular across the sheet to get a bunch of them. I touch the corners of each one with a tiny bit of the background color to make them look rounded on the ends. At a distance, they look rounded.

- 481 replies
-
- 2
-
-

-
- Cutty Sark
- Revell
- (and 2 more)
-
I am not sure who that is addressed to. I am using the photo etch set sold by HisModel.
- 481 replies
-
- 1
-
-
- Cutty Sark
- Revell
- (and 2 more)
-
Pledge is not acting like glue does. I think it can only hold very light things, like the Cutty Sark lettering on the wheelhouse. As it dries, it solidifies around the lettering, thus holding it. I used 5 minute epoxy to hold the etched scrolling on the bow. I laid the ship on it's side and coated the back of the etching with epoxy and put it in place on the bow. I think it was important that I bent the etching first so that it laid flat on the ship. I've failed with the stern etching twice. I tried the 5-minute epoxy there, but it is slippery, I destroyed the etching by trying to keep it in place. I think next time I will superglue the center badge part in place to hold it then work my way down the length with superglue behind the large shapes. I think I will have to curve it first to the shape of the hull.
- 481 replies
-
- 2
-
-
- Cutty Sark
- Revell
- (and 2 more)
-
I probably will not finish them. I am coming close to the end of my time to model.
- 481 replies
-
- 1
-
-
- Cutty Sark
- Revell
- (and 2 more)
-
The white cabin and deck house panels were there during Cutty Sark's wool ship days. I am pretty sure the panels were varnished teak during her tea clipper days and today. I don't know whose idea it was to paint them, but the reason, I understand, was to cut down on the labor it took to varnish all the teak. It is the same reason the masts were shortened, the spars were shortened, and the stunt sail booms were taken off. So it depends on what period you want to model, since the Cutty Sark's appearance changed over its life. I am trying to model her during the late 1880's when she set most of her speed records. Also, during that time all the spars, wood masts and bowsprit were painted black. So that's how I will model her, no stunt sail booms and black spars, wood masts and bowsprit boom. I am no expert on the Cutty Sark so what I am saying I got from other people online and from pictures taken in the 1880's. I don't know if Revell's masts and spars represent the cut down versions or not. I guess you could measure them if you can convert 1/96 measurements to feet and inches.
- 481 replies
-
- 1
-
-
- Cutty Sark
- Revell
- (and 2 more)
-
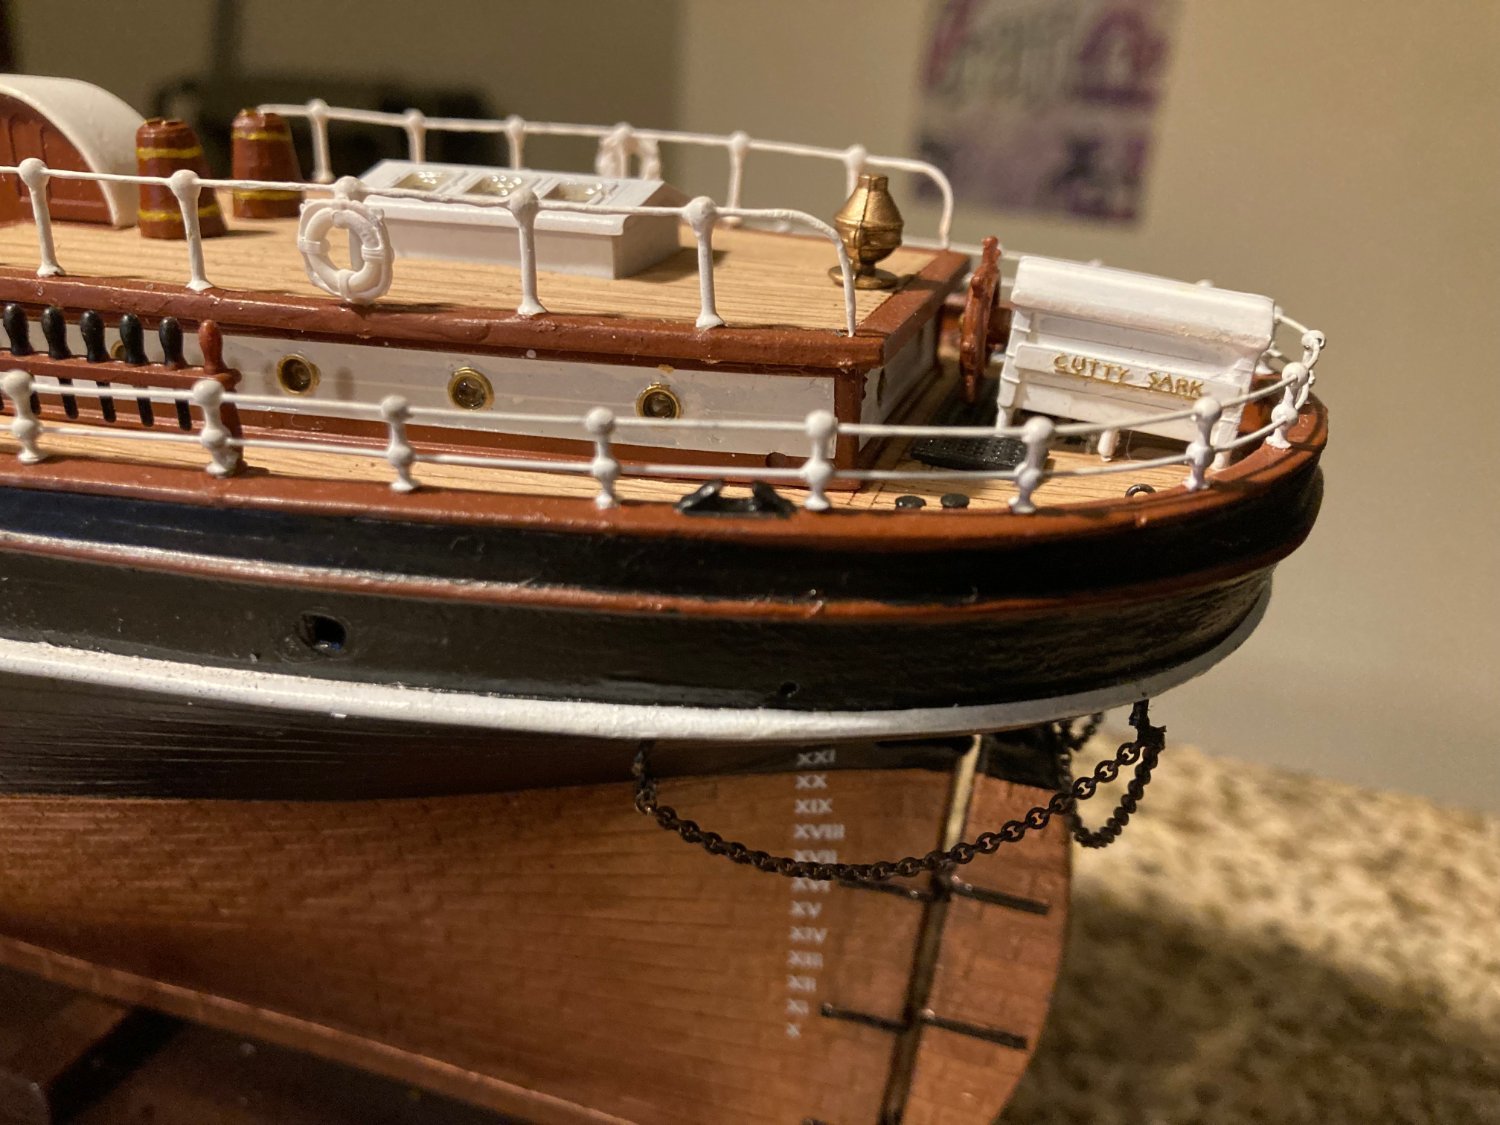
I put the HisModel brass "cutty Sark" on the wheelhouse. It's held on with Pledge Floor Care liquid. It is basically a clear, thick acrylic liquid that is tacky until it dries. After it dried, I painted another coat of Pledge over it. I am not sure how permanent it will be, but I won't be touching it. I learned to use acrylic liquid, putting clear lenses on model cars and canopies on model planes.
- 481 replies
-
- 3
-
-
- Cutty Sark
- Revell
- (and 2 more)
-
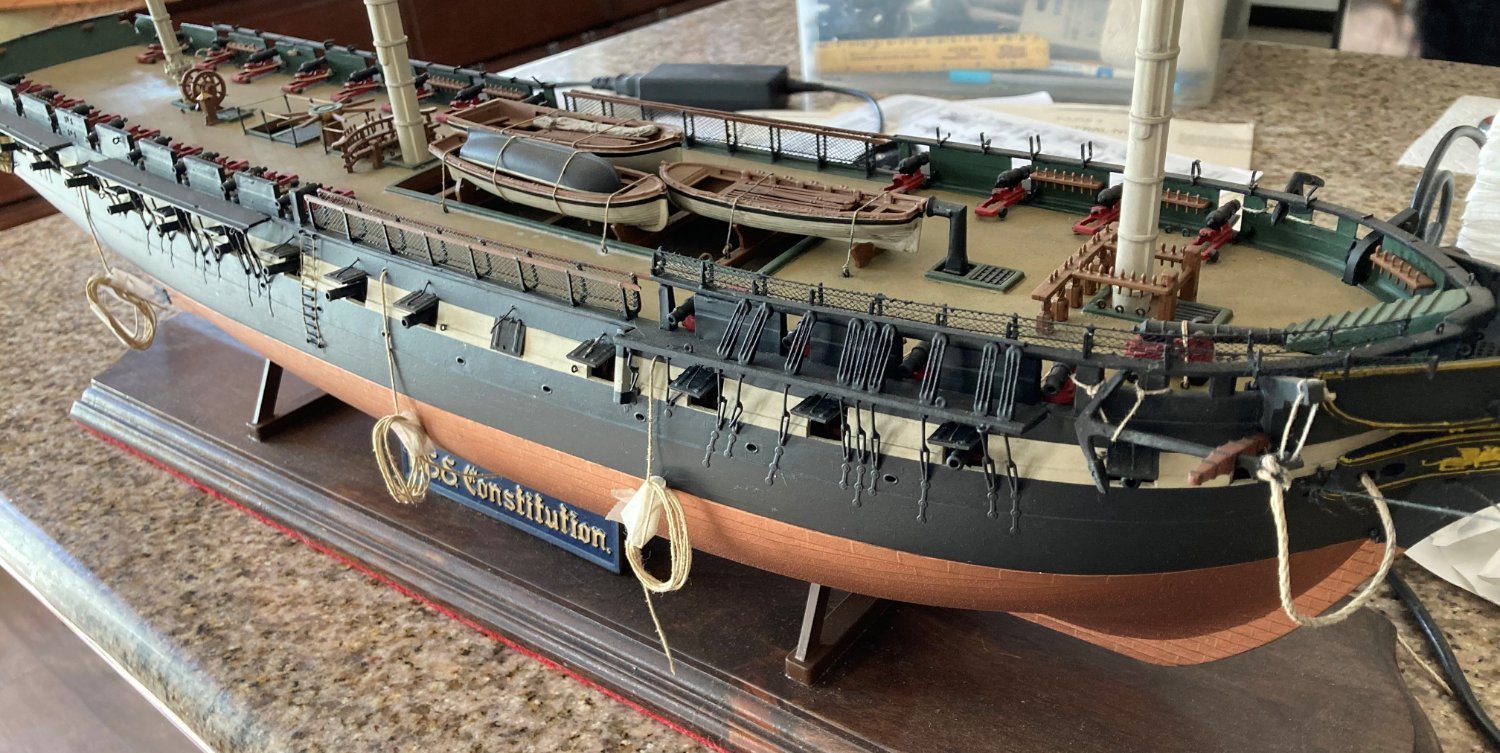
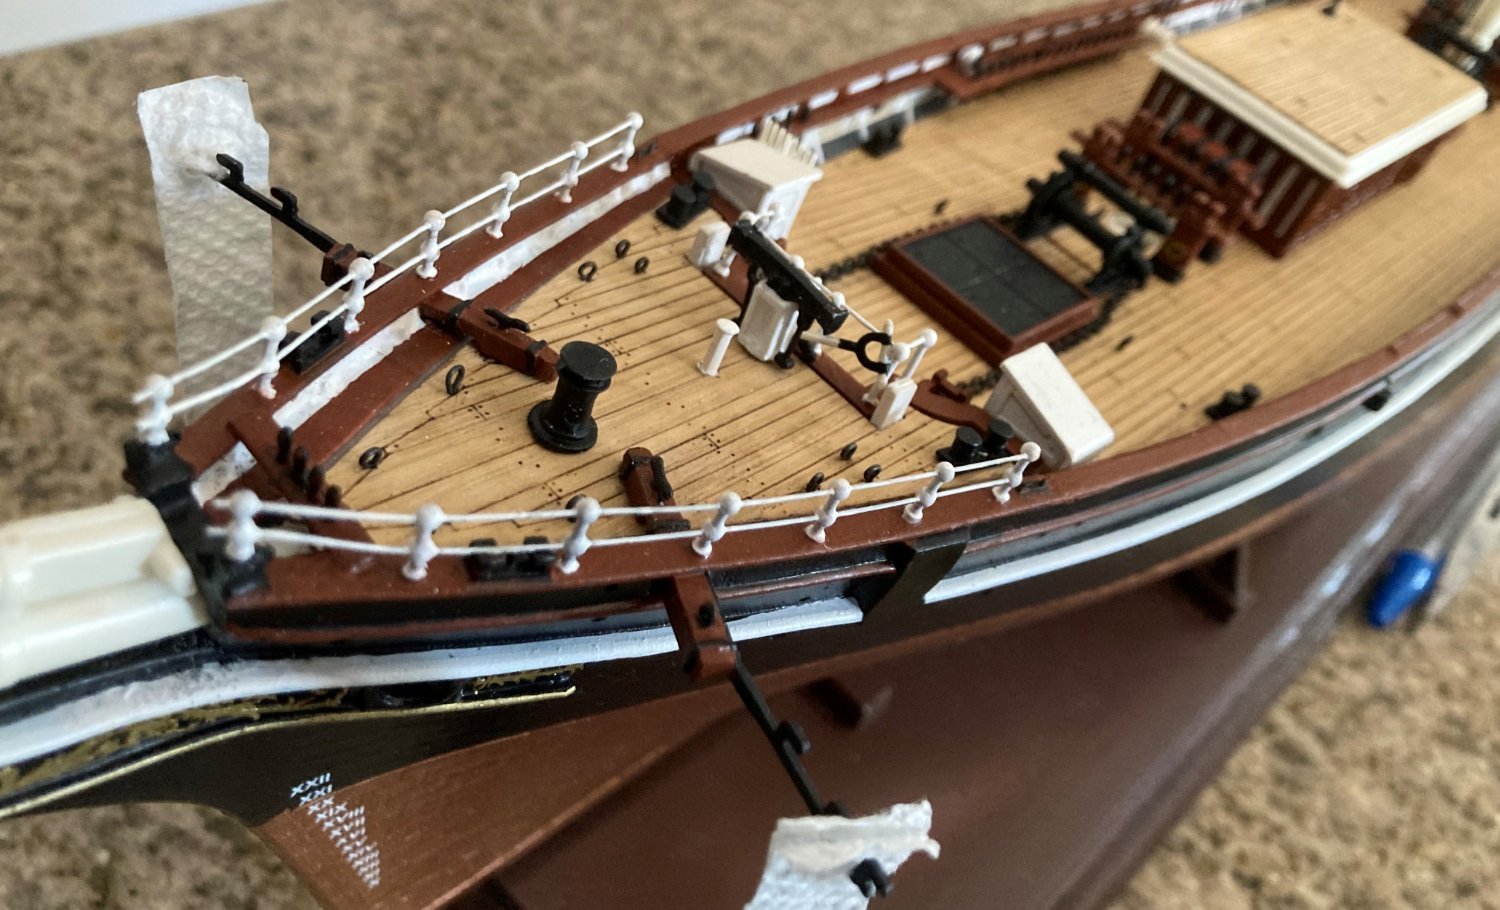
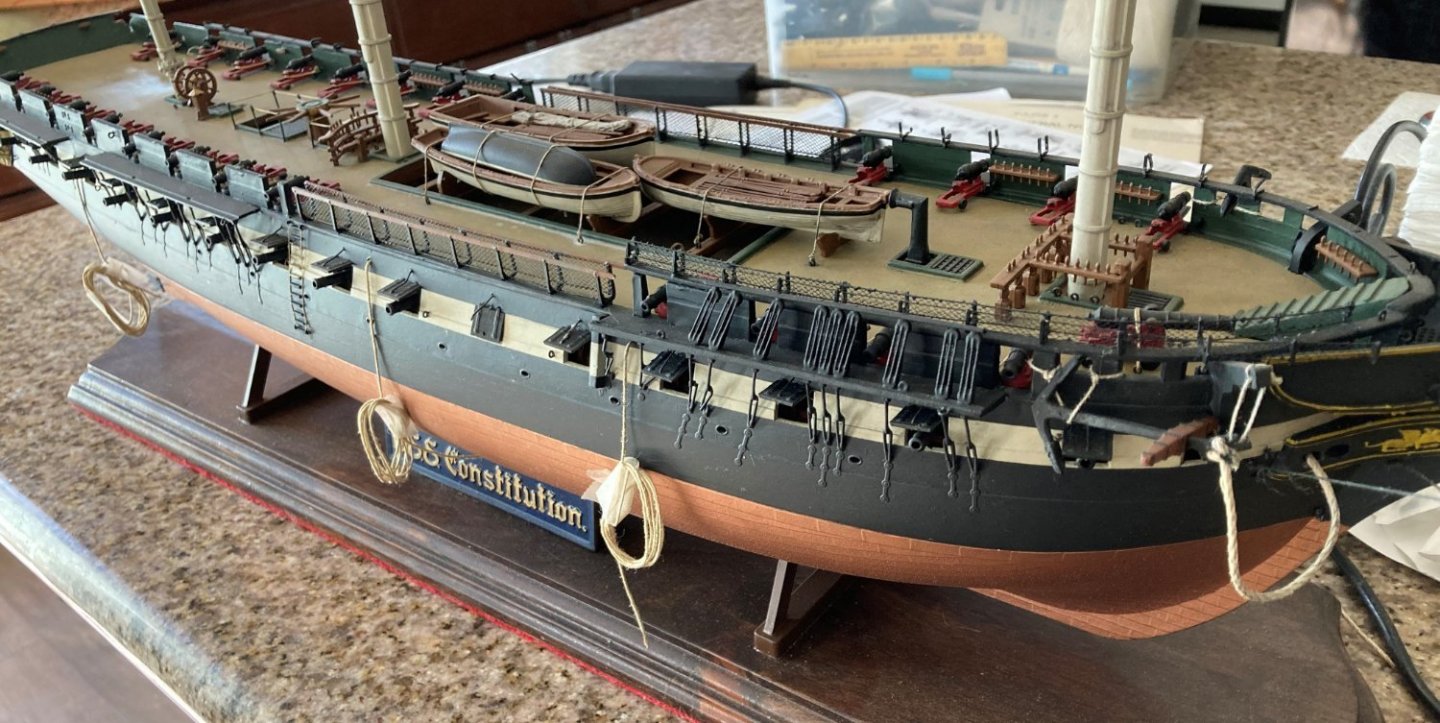
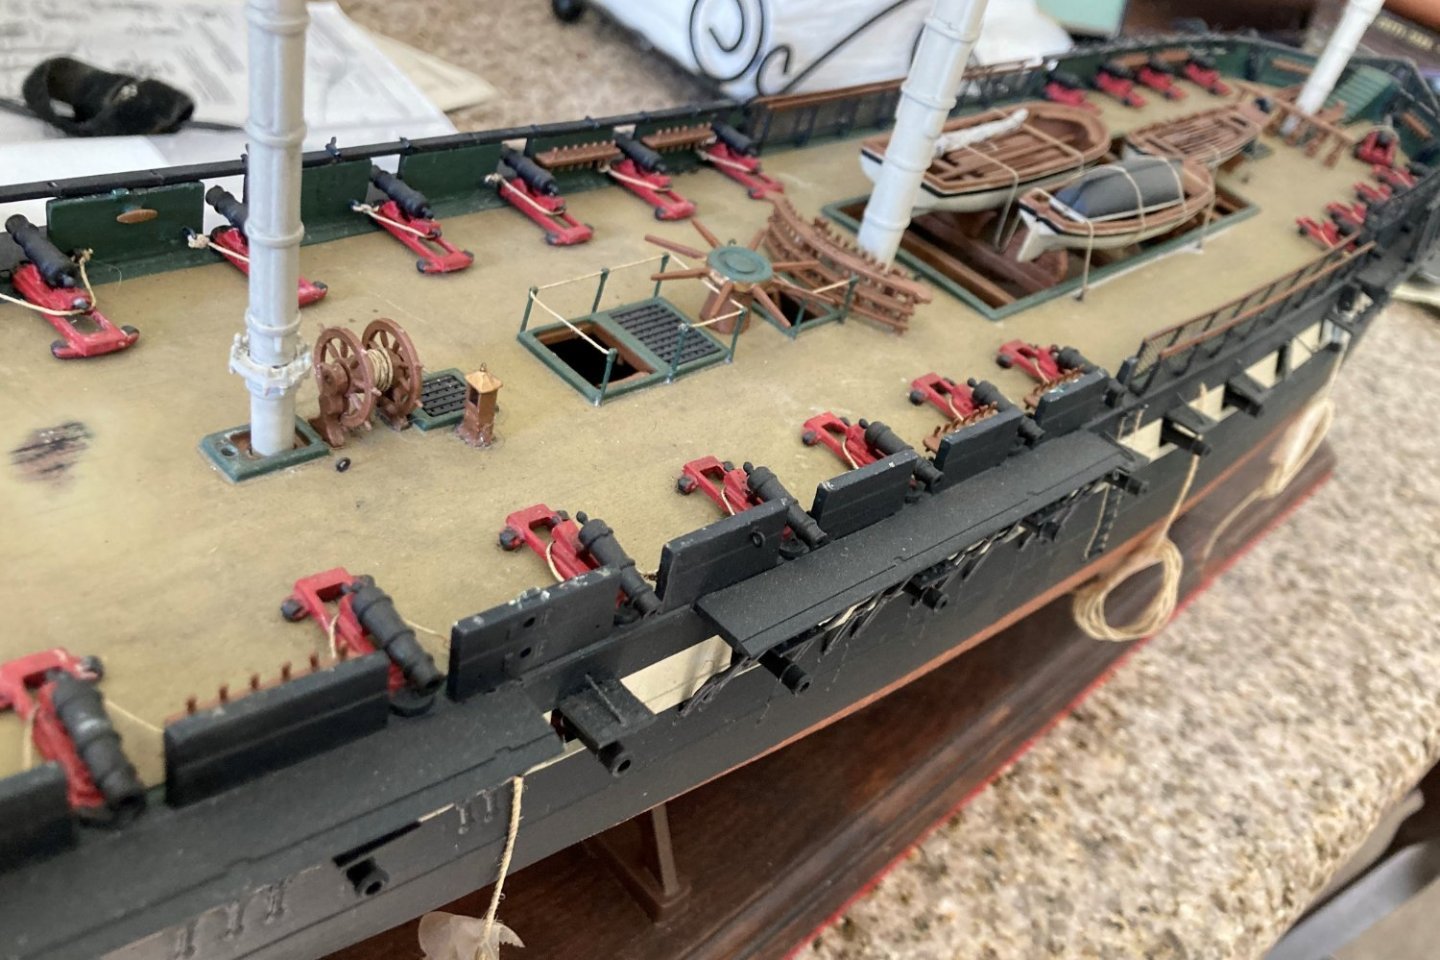
Here are a few pics of the Revell USS Constitution I was working on before I started breaking parts off. I could not get the deck to look the way I wanted. I detailed the gun deck, even though you can't see it. I am anxious to do another one if and when my Cutty Sark is finished. I keep the busted Constitution on hand for inspiration. In my stash of large ship models, uncompleted are the Heller Victory, Santa Maria, the Revell Yacht America, Kearsarge, Constitution and Lindberg Sea Witch.


- 481 replies
-
- 6
-
-

-
- Cutty Sark
- Revell
- (and 2 more)
-
Cutty Sark(Revell 1:96) rigging confusion
bcochran replied to Terry Foster's topic in Masting, rigging and sails
I am building the same kit. I haven't come to the rigging yet, but I am planning for it. I have several sources for rigging clipper ships that I am reading. I think it is good to know your subject before going ahead and trying it. My references say that most clippers were rigged basically the same. Sailing ship rigging has a definite purpose for each type of rig. My suggestion is to get some references about rigging clipper ships and understand the purpose of each line, then you can decide for yourself where each line starts and ends. I know when it comes time for me to rig my model, I will have every source I can read and understand why and where each line goes. -
As I am not going to materially change my Revell kit, you might say the Revell kit is my plan. I have the Campbell plans and I like reading them. I have mostly looked at photos of the ship in its wool days. I can imagine Woodget deciding for me what colors the ship should be.
- 481 replies
-
- 2
-
-
- Cutty Sark
- Revell
- (and 2 more)
-
Hi Kevin, I thought I would drop over to your build. This isn't the first time here. My impression is, even if you don't finish, the components of your ship are fantastic models in their own right.
- 444 replies
-
- 2
-
-
- Cutty Sark
- Revell
- (and 2 more)
-
I ordered from Amazon some 26 gauge white floral wire. I think it would look good with black deadeyes on the pin rails.
- 481 replies
-
- 1
-
-
- Cutty Sark
- Revell
- (and 2 more)
-
I’ve seen some completed wood Cutty Sark models online where most of the fittings, deck houses, monkey poop cabin are all out of proportion. The rigging may be correct or not I couldn’t say yet. But these are considered fine builds and reproductions of the real thing. My Cutty Sark will fall into that category because I don’t want to put in the time and effort to research and fix every item that is out of proportion and I lack the talent. All the fun would be gone, and I’d feel I was on a quest or something. The search for the most accurate Revell Cutty Sark. That ain’t me. I do admire those who do, though. Their work is amazing. Once I entered a model airplane in a model contest. I did an exceptional job turning a not to detailed model into a very detailed one. I did not know about dipping canopies into clear floor polish to get perfectly clear canopies. Mine were not clear, all the others were. I was not even in the honorable mention. Boy did I feel dejected. Ever since, I developed the good enough for me attitude. If other people like it, that is icing on the cake. As for the rigging, I am reading a lot about it. I like the idea of learning something new in my old age. I will be 76 next month. I understand there is a reason for every line, and knowing that I want to again represent “harbor” rigging just as I want to represent the bulwarks. Not to perfection, but pleasing to my eye. Most of the people who would look at my finished model if it gets that far will see a bunch of string going this way and that, but I will know there is a method to that mess of string.
- 481 replies
-
- 1
-
-
- Cutty Sark
- Revell
- (and 2 more)
-
I am going to strop the deadeyes with wire which will be long enough to pass through the pin rail and waterway, where I will superglue them at both places, that way the pull or strain will not be on the pin rail,
- 481 replies
-
- 2
-
-
- Cutty Sark
- Revell
- (and 2 more)
-
I have snapped a bunch of the belay pins off just painting and attaching the pin rails to the bulwarks, I drilled out the place where they were and put in plastic rod.
- 481 replies
-
- 1
-
-
- Cutty Sark
- Revell
- (and 2 more)
-
Everything you posted so far on my build is ok by me. I like your sense of humor, too.
- 481 replies
-
- 2
-
-
-
- Cutty Sark
- Revell
- (and 2 more)
-
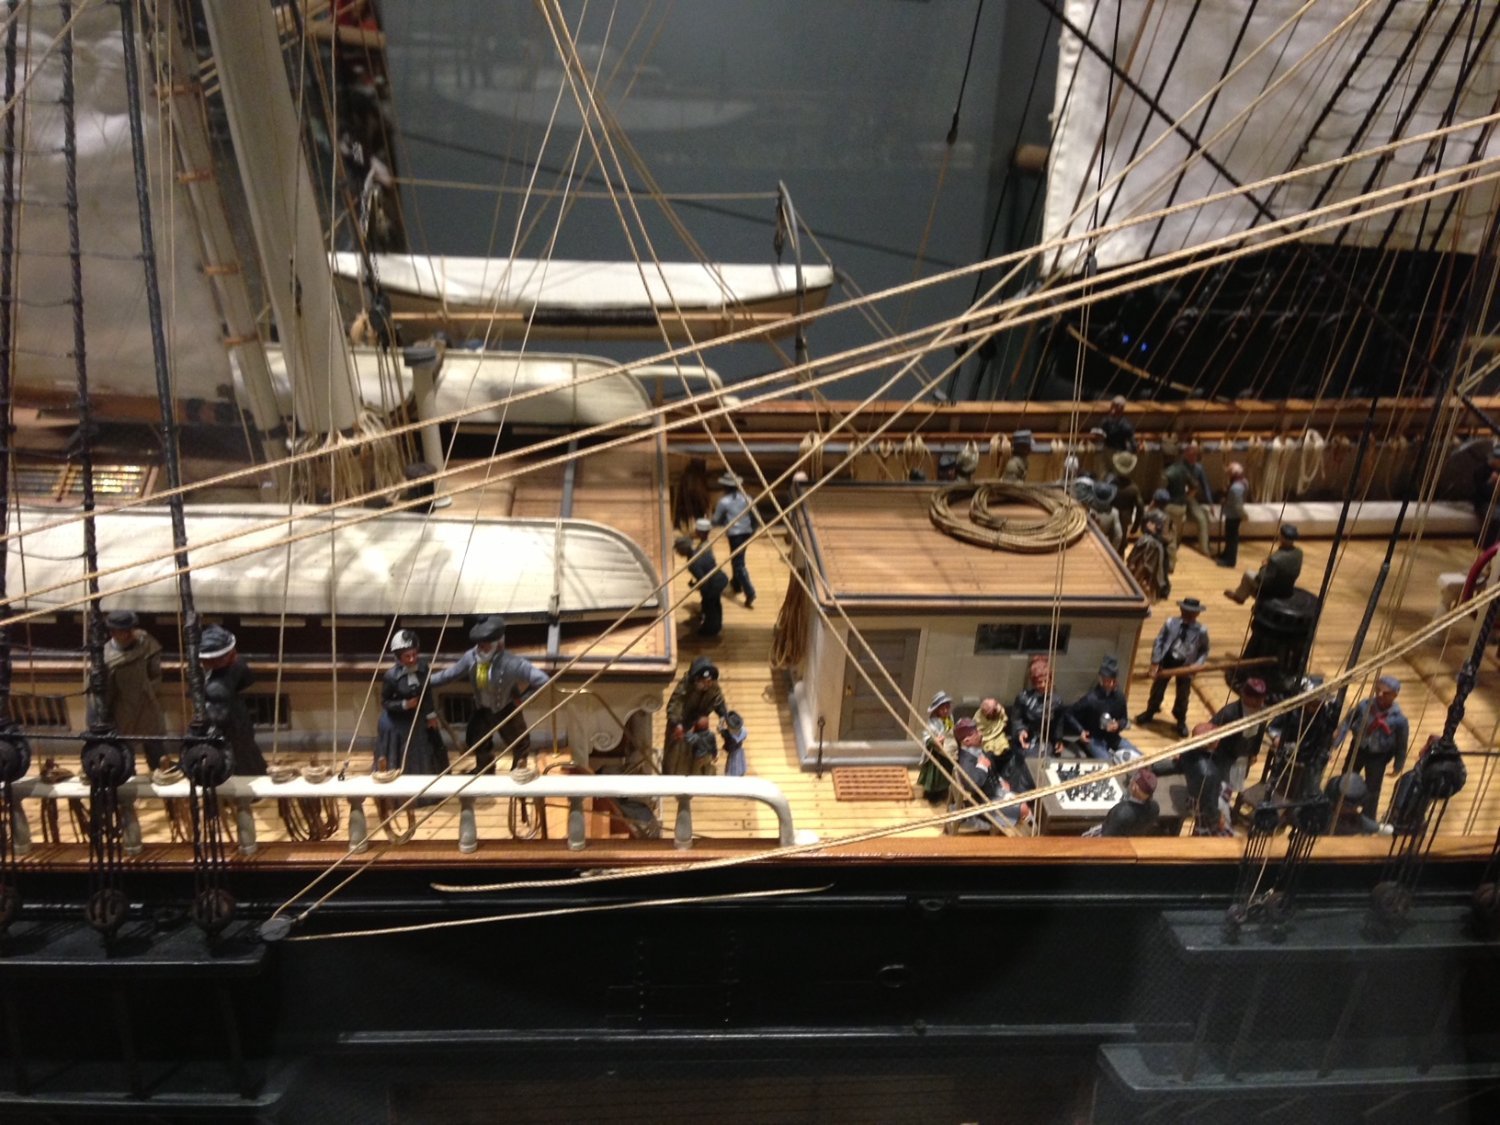
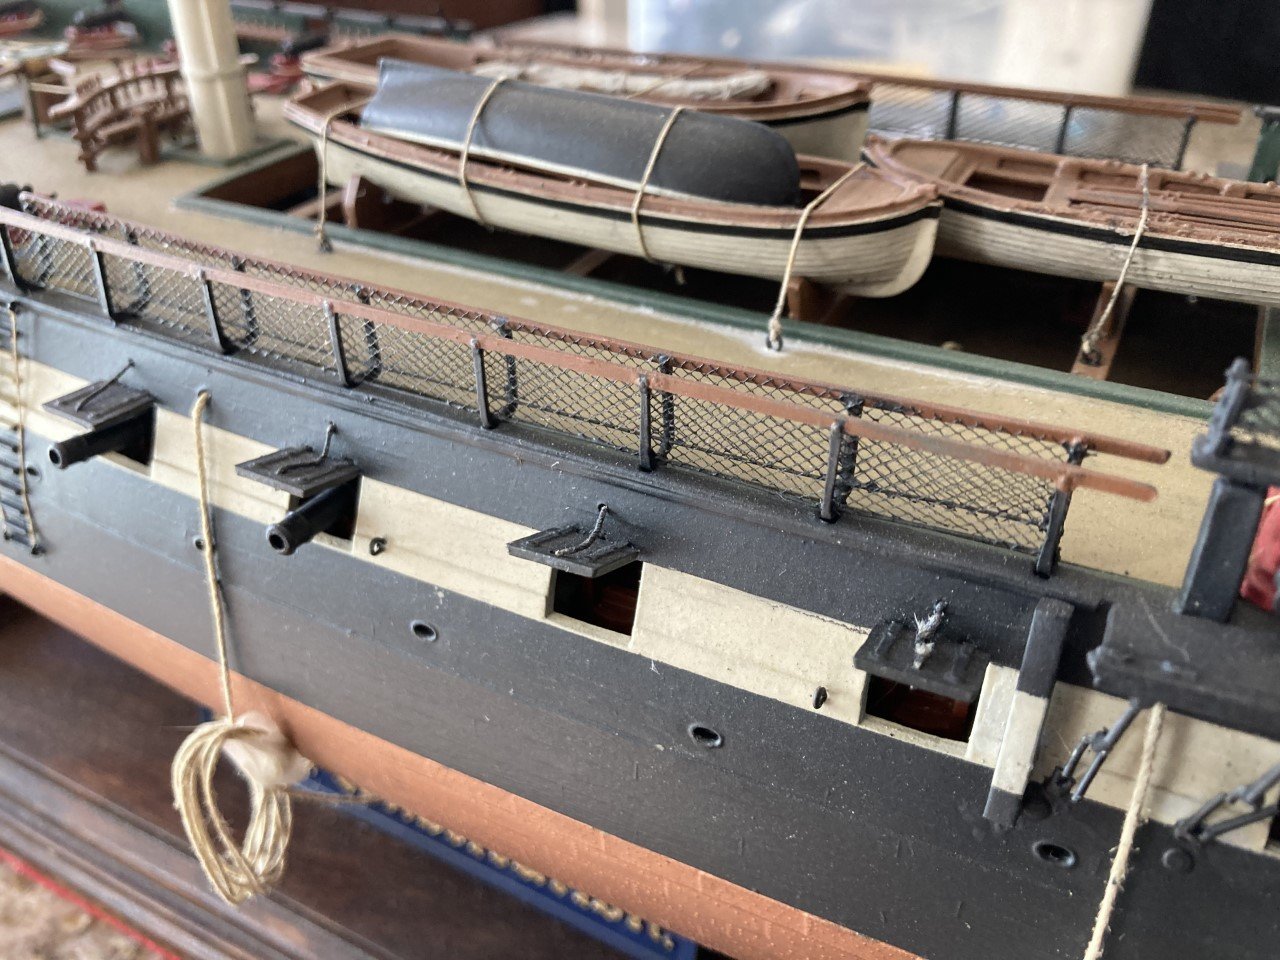
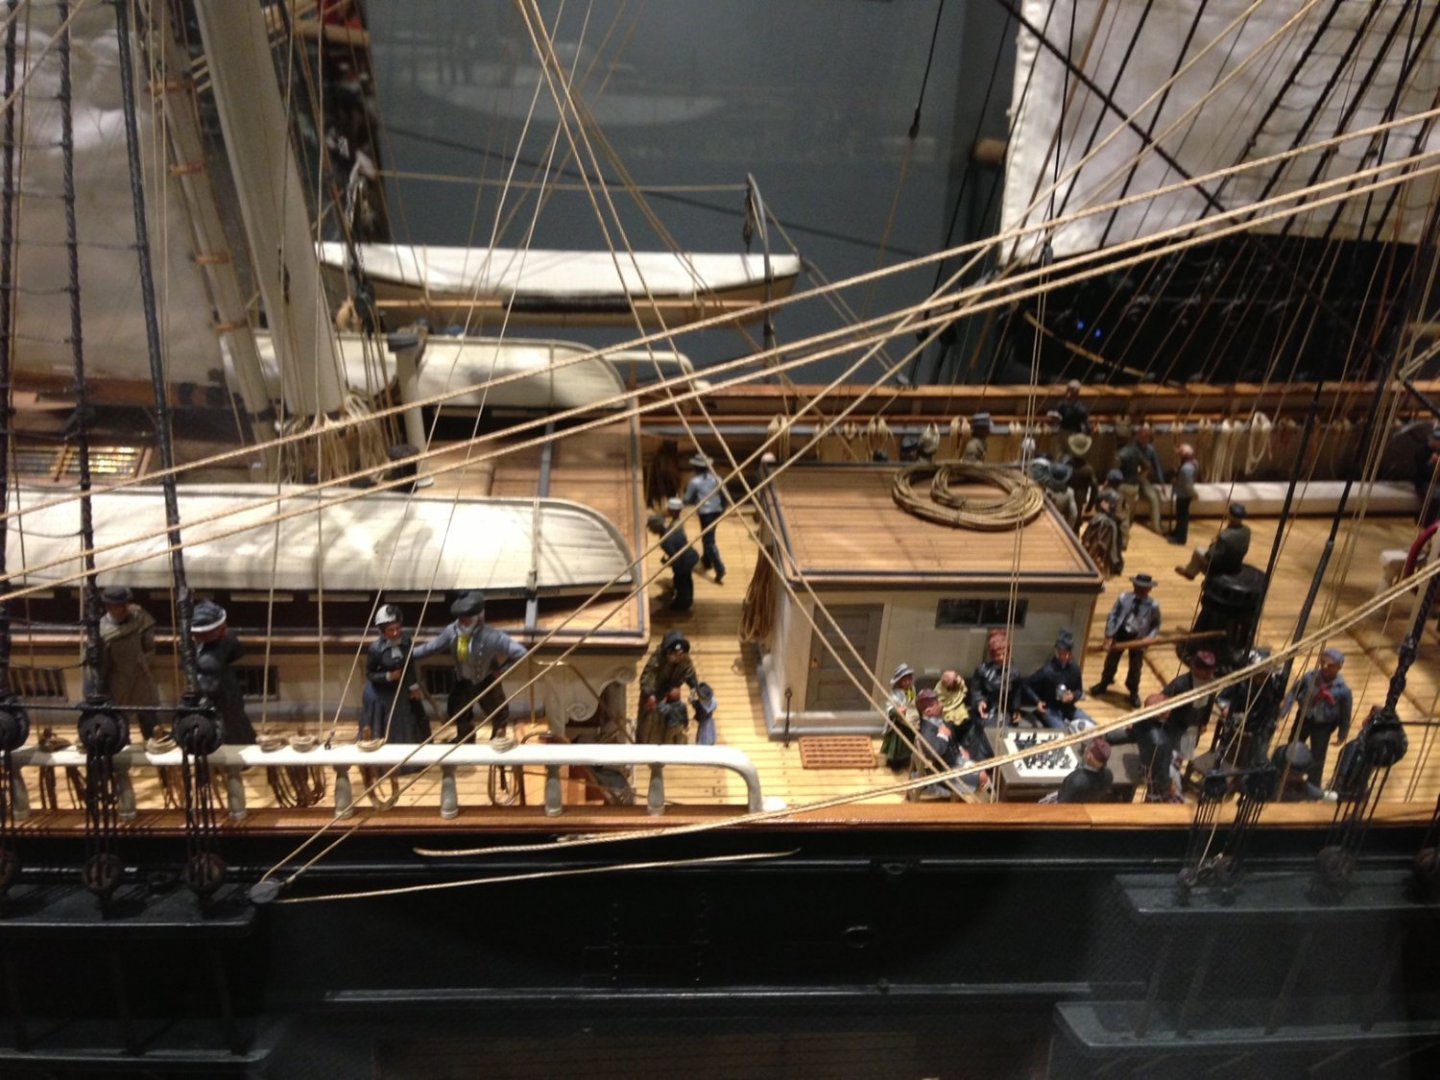
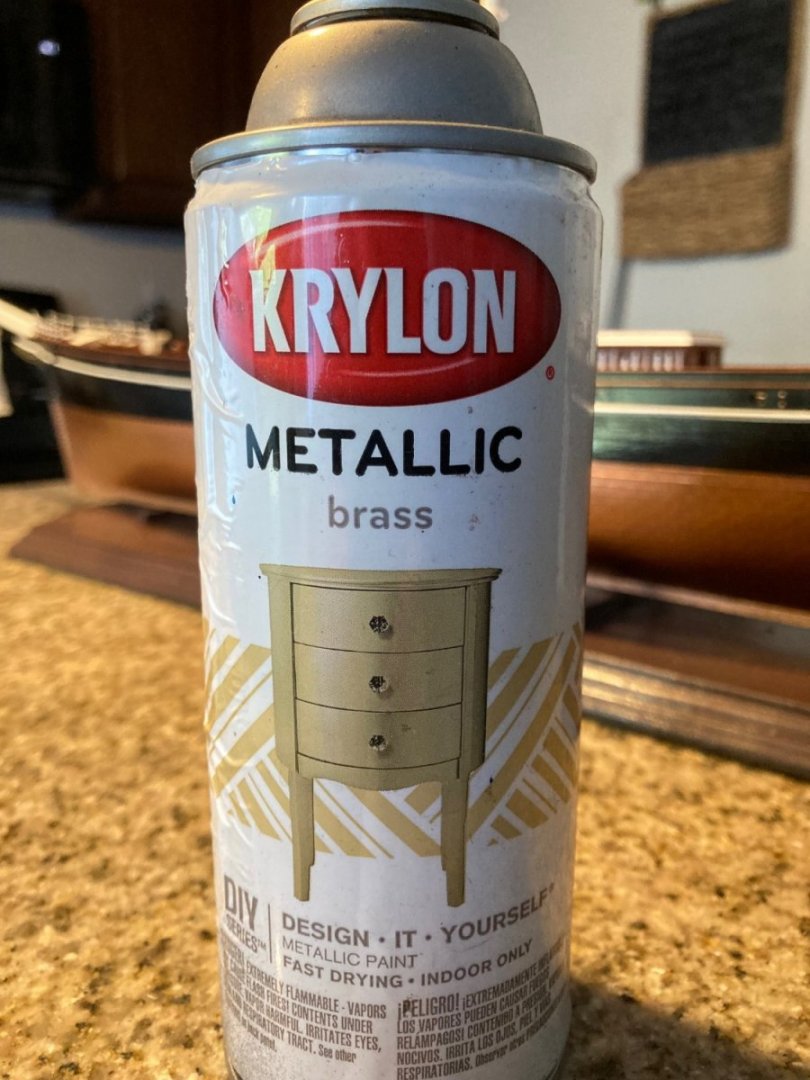
Hello Kevin, Per Longridge the Cutty Sark had 26 bulwark stanchions per side. There were 5 different types. I wasn't going to go into that much detail making 5 different types and I did not add the horizontal bar portion to them. Here is how I judge what I am doing and how much work I want to put into it. If I can look at my model in any particular place and feel that it looks "shippy" all though it is just a representation, I am happy with it. Those wedges just did not look right, nor did the bulwarks without the lozenges. I have the starboard side done, and I get the right feeling when I look at them. The other major thing that I think doesn't look right are the Revell deadeyes. I look at some builds using them and there is an angle to the plastic deadeye and the rope tied to it, rather than a straight line from the lower deadeye to the point on the mast where it ends. So I am going to attempt to use individual deadeyes. I used Krylon metallic bras spray paint on the binnacle. I like all the detail you are putting into your model, and feel much of it is beyond my talents. I know nothing about 3D printing. I wanted the deck to look better than what I could have done with the plastic. The rest of the detail just would not be so pleasing to my eye if the deck didn't have the same level of detail. The pictures I am including with this post is a model that is in the Mormon museum in Salt Lake city. It has always been my inspiration to build a ship model. I needed my deck to have the same level of detail.


- 481 replies
-
- 2
-
-
- Cutty Sark
- Revell
- (and 2 more)
-
I am not going to replace the belay pins. I read most of the other builds where the correctness of the Revell Cutty Sark kit is discussed. I am amazed I made it this far. I almost completed the large Revell USS Constitution up to the beginning of the rigging and spent a lot of time agonizing about the correctness of that kit, including what color she was in 1812 on her last voyage, did she have gun port covers or not? I added hammock netting, railing around the deck openings, thickened the hull around the gun ports and lots of other things until it got too boring and time-consuming. This time I decided not to do that, or I would never finish.
- 481 replies
-
- 3
-
-
- Cutty Sark
- Revell
- (and 2 more)