HOLIDAY DONATION DRIVE - SUPPORT MSW - DO YOUR PART TO KEEP THIS GREAT FORUM GOING! (83 donations so far out of 49,000 members - C'mon guys!)
×


cdrusn89
-
Posts
1,915 -
Joined
-
Last visited
Content Type
Profiles
Forums
Gallery
Events
Everything posted by cdrusn89
-
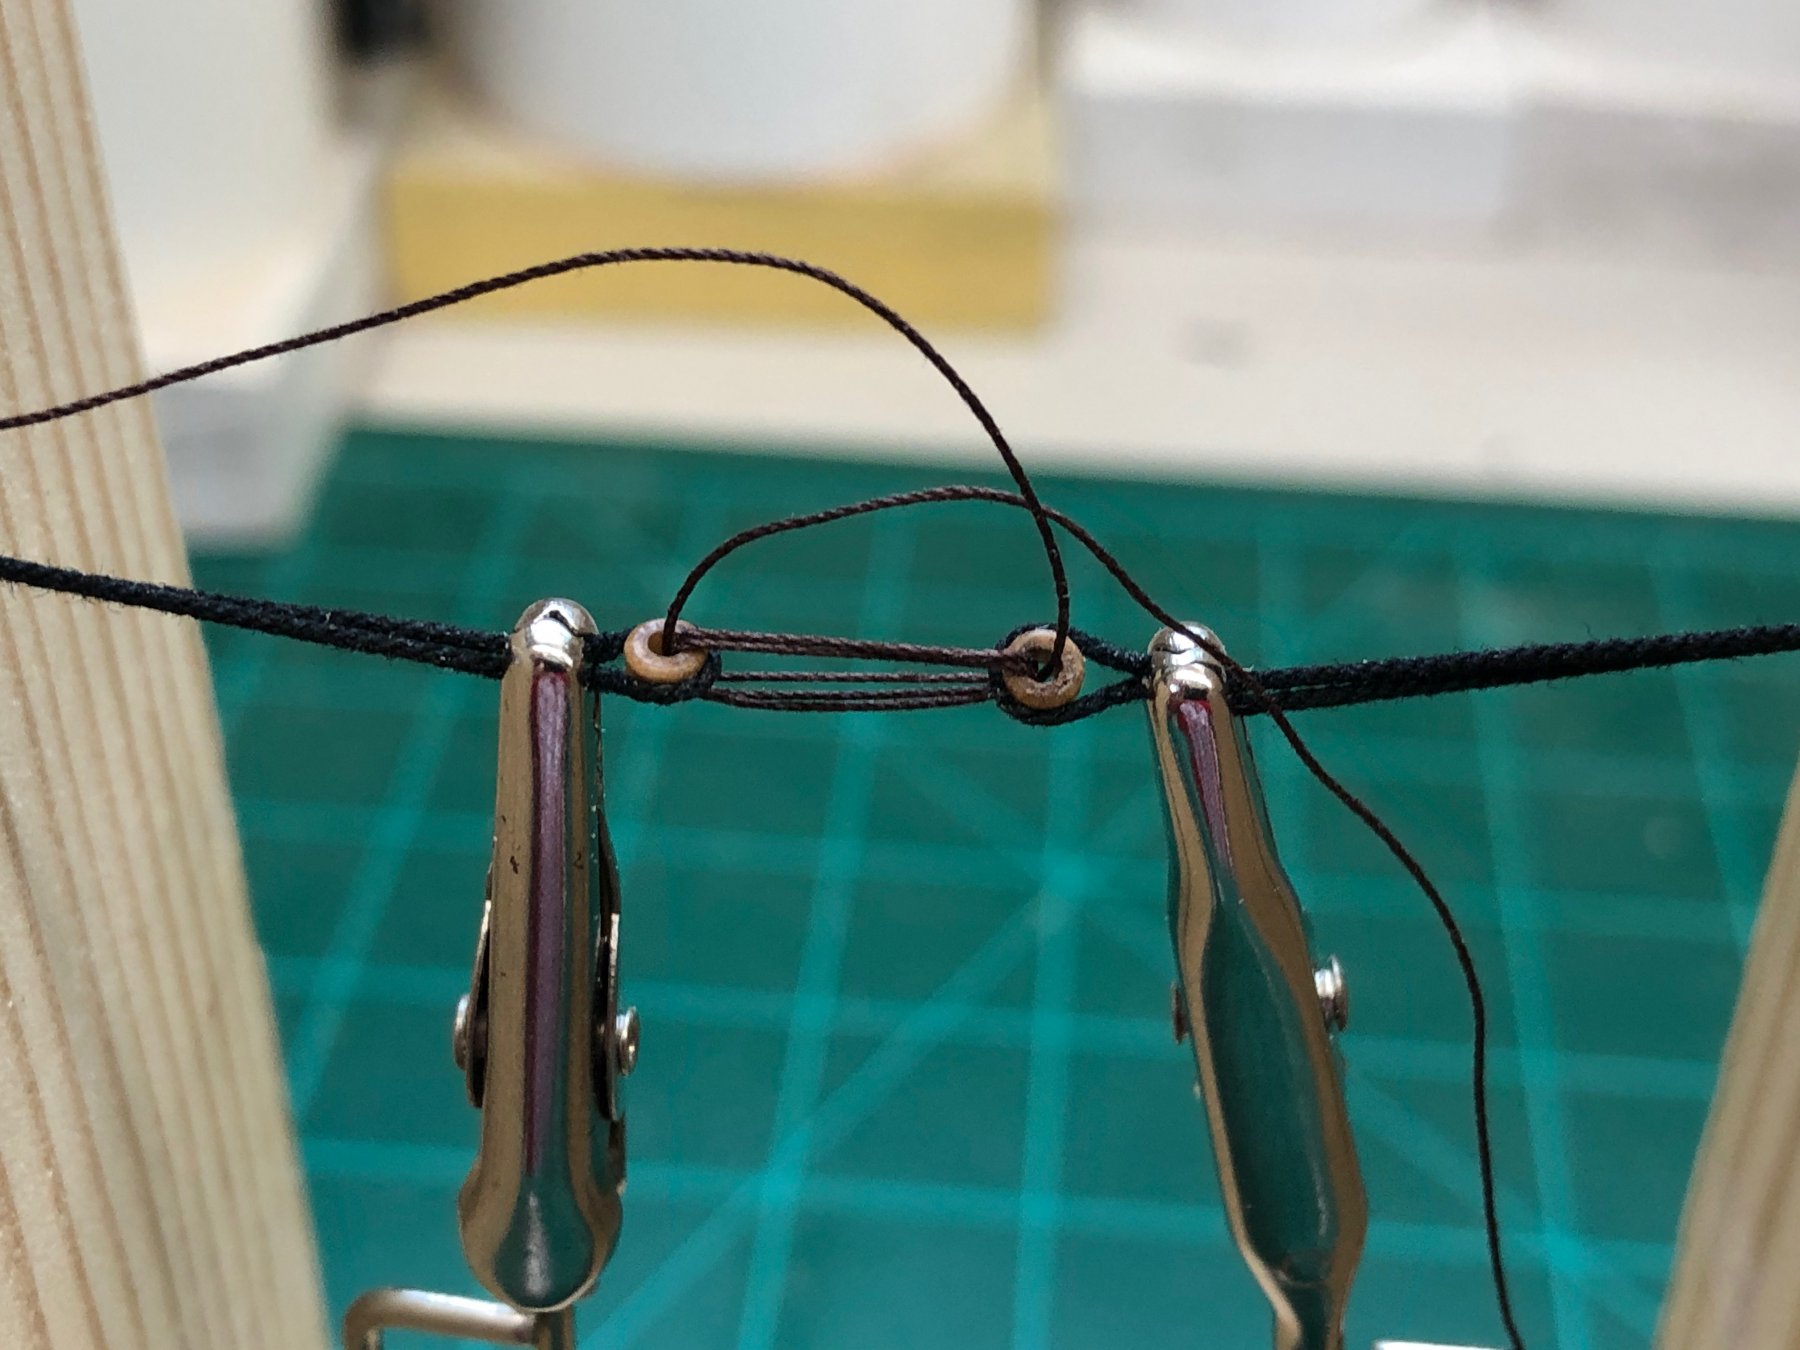
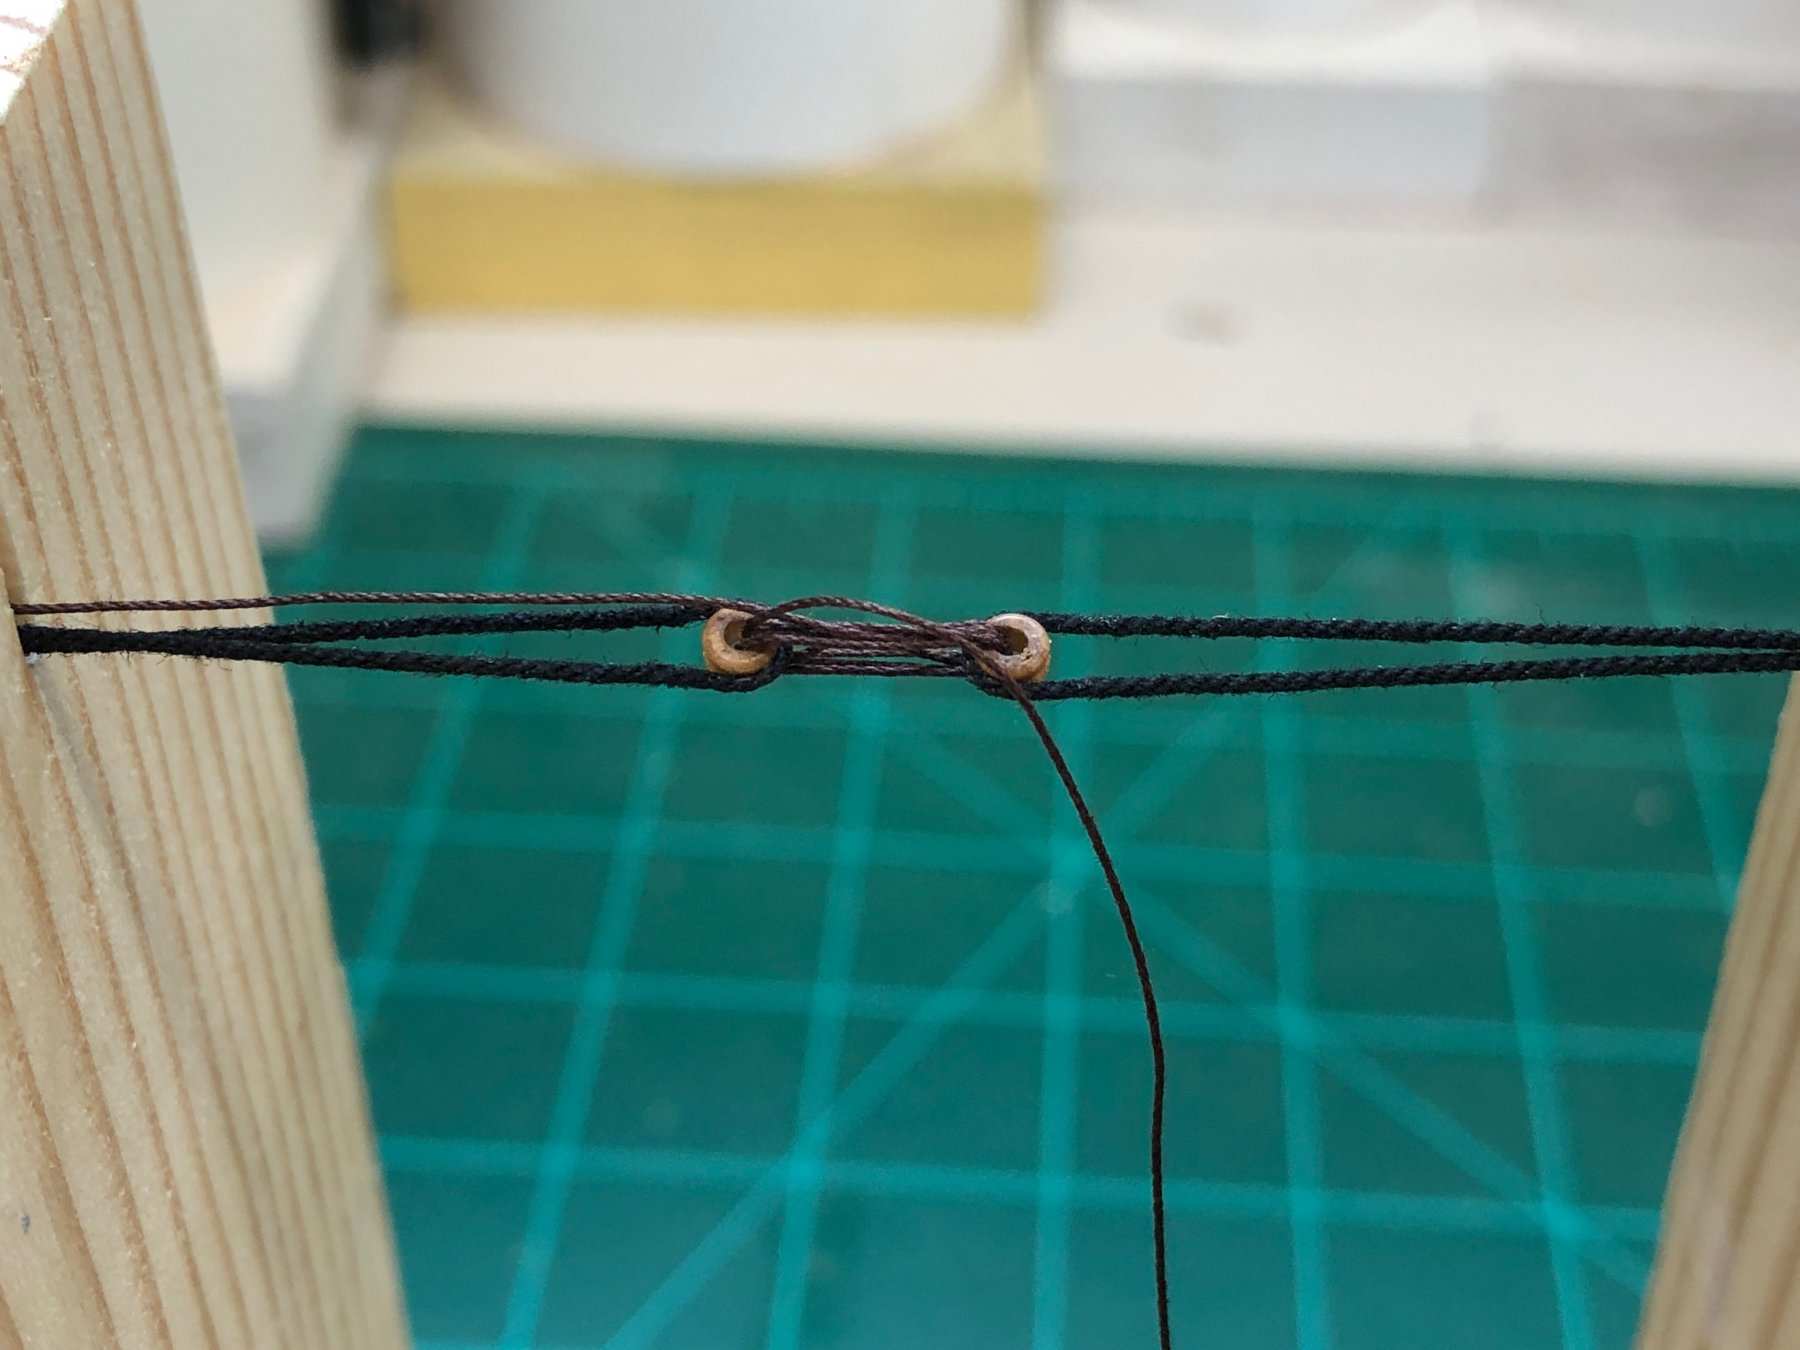
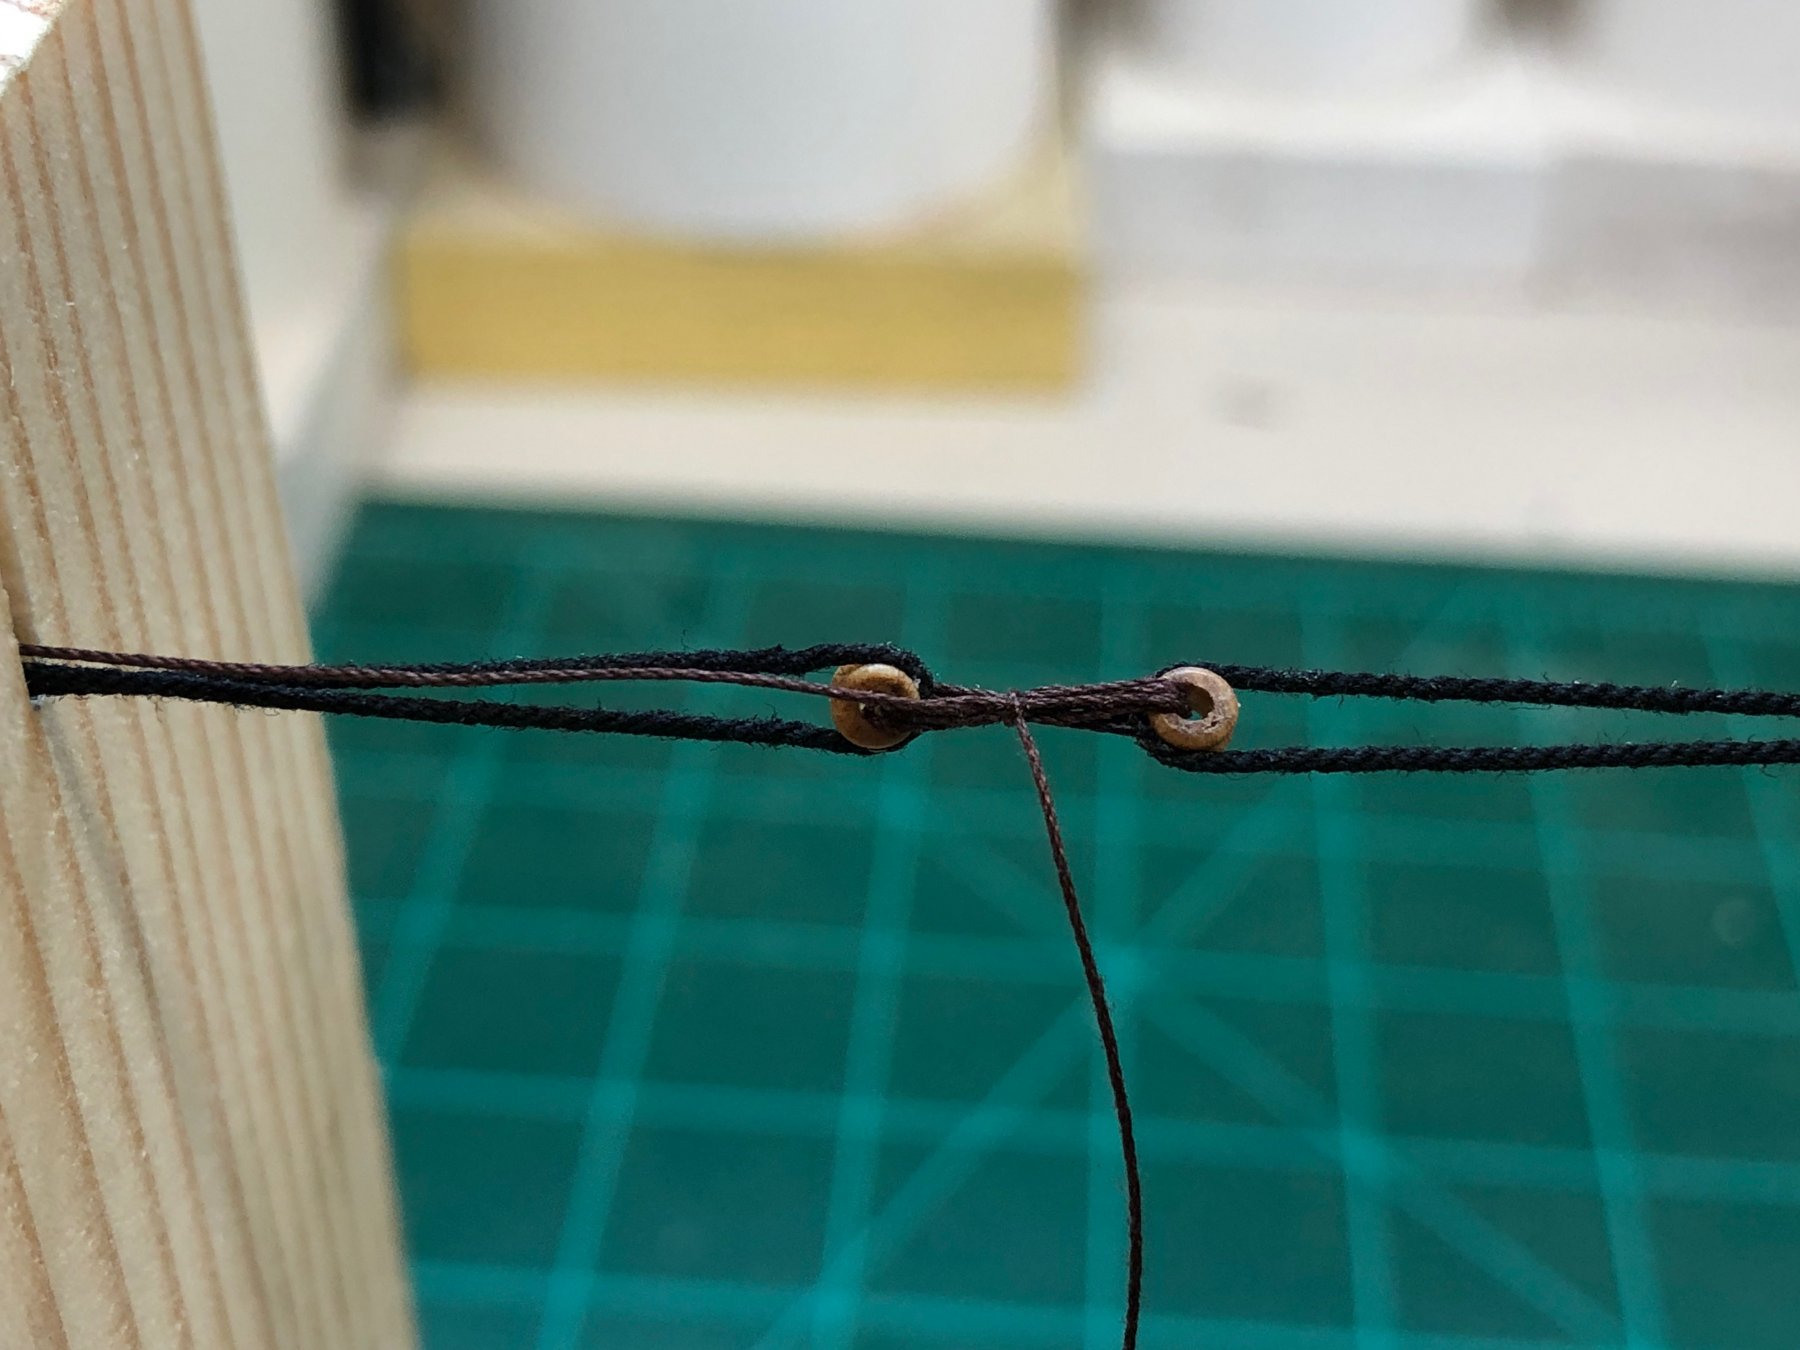
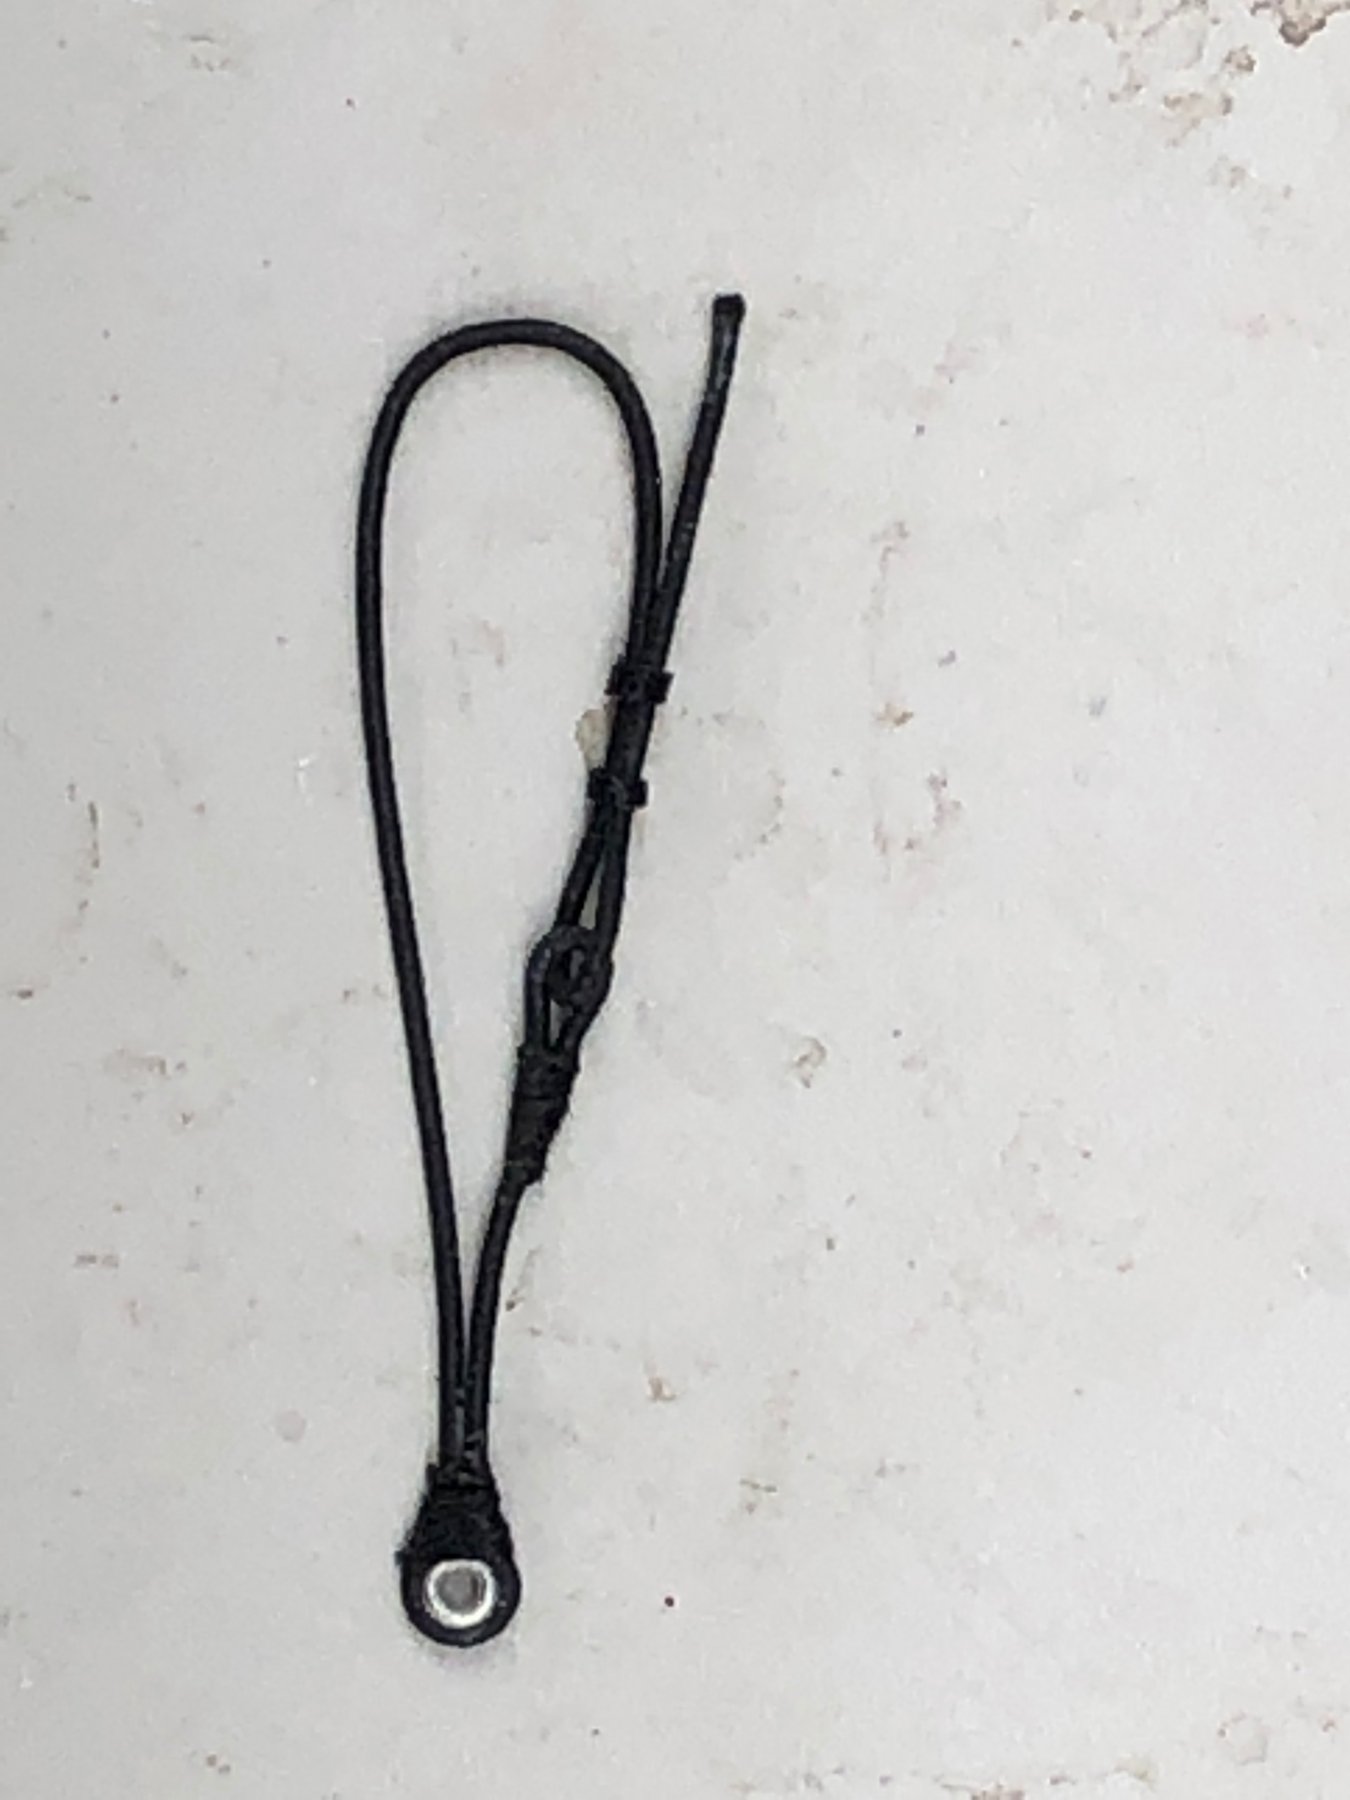
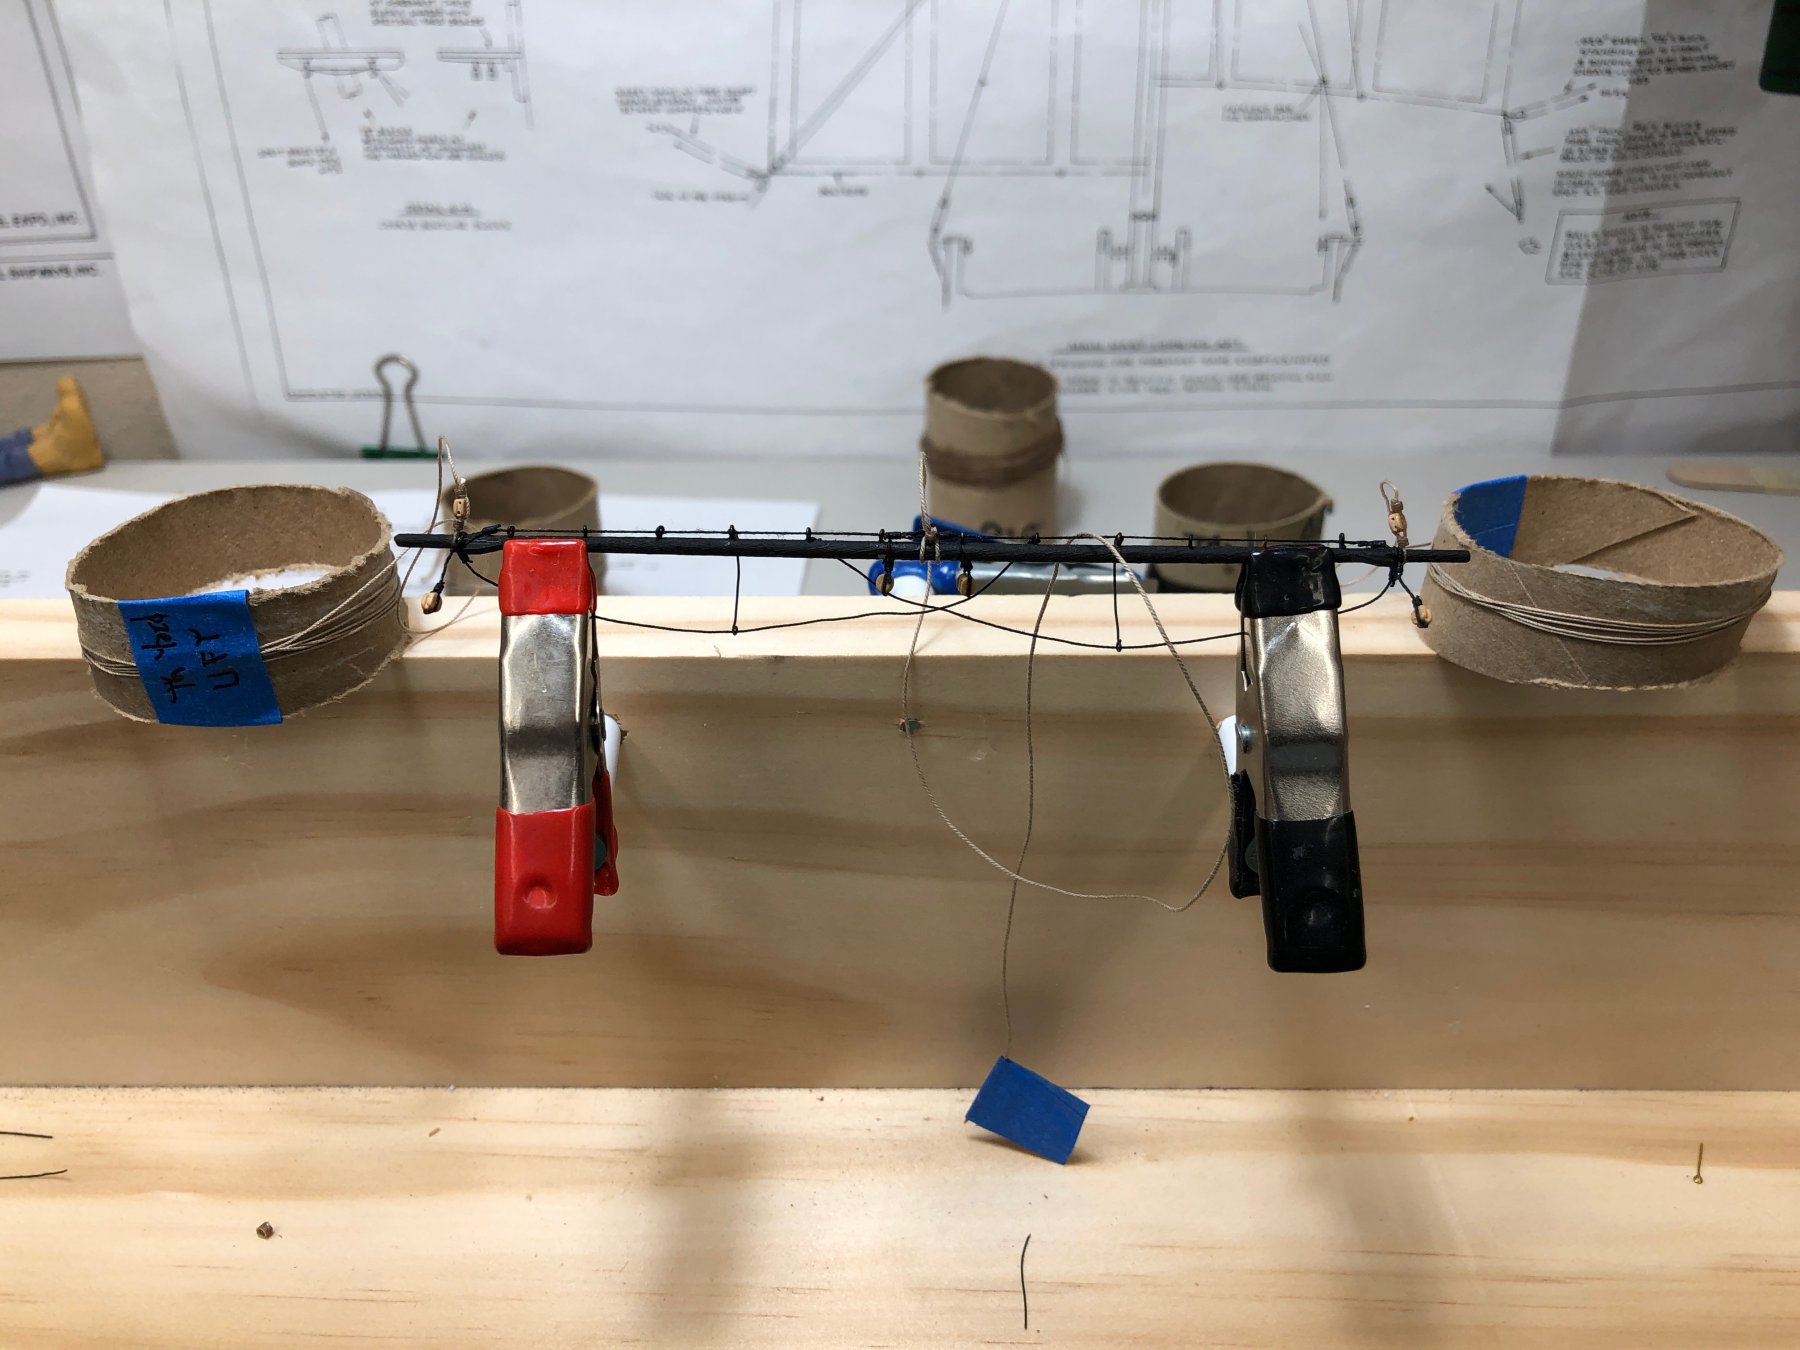
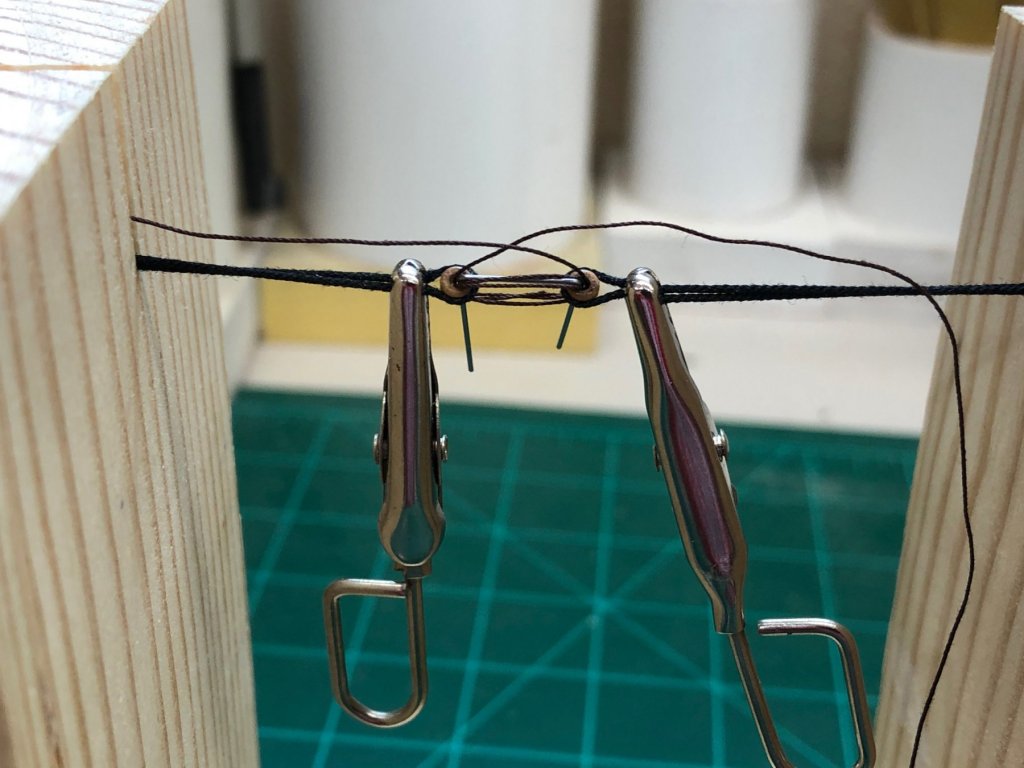
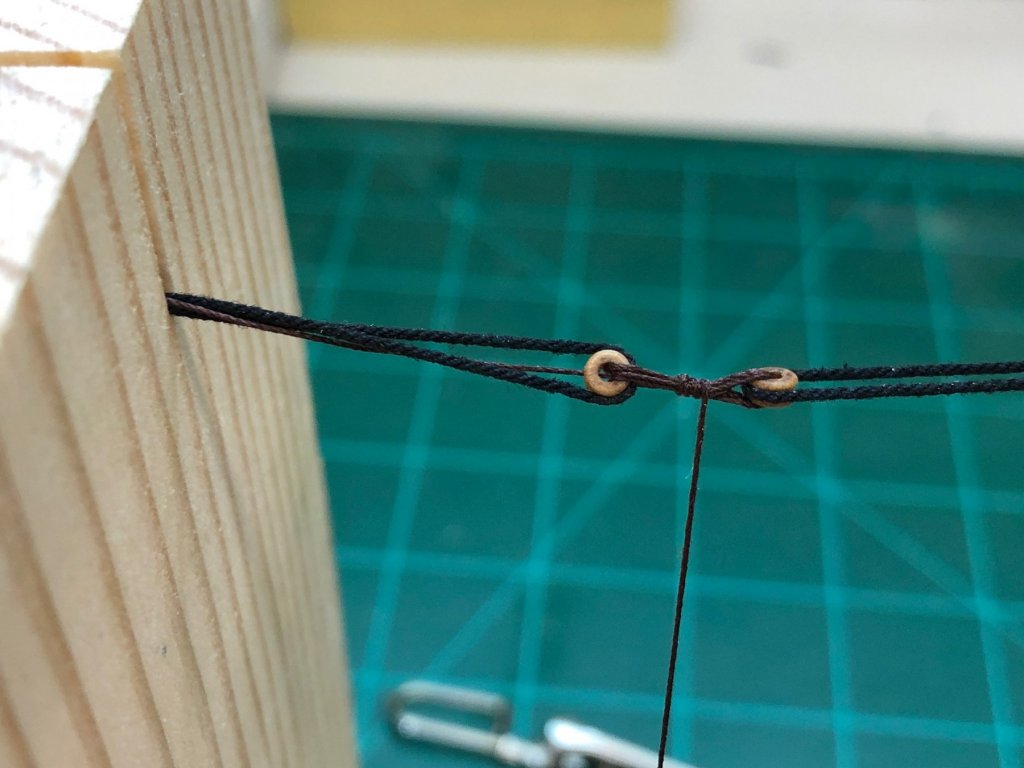
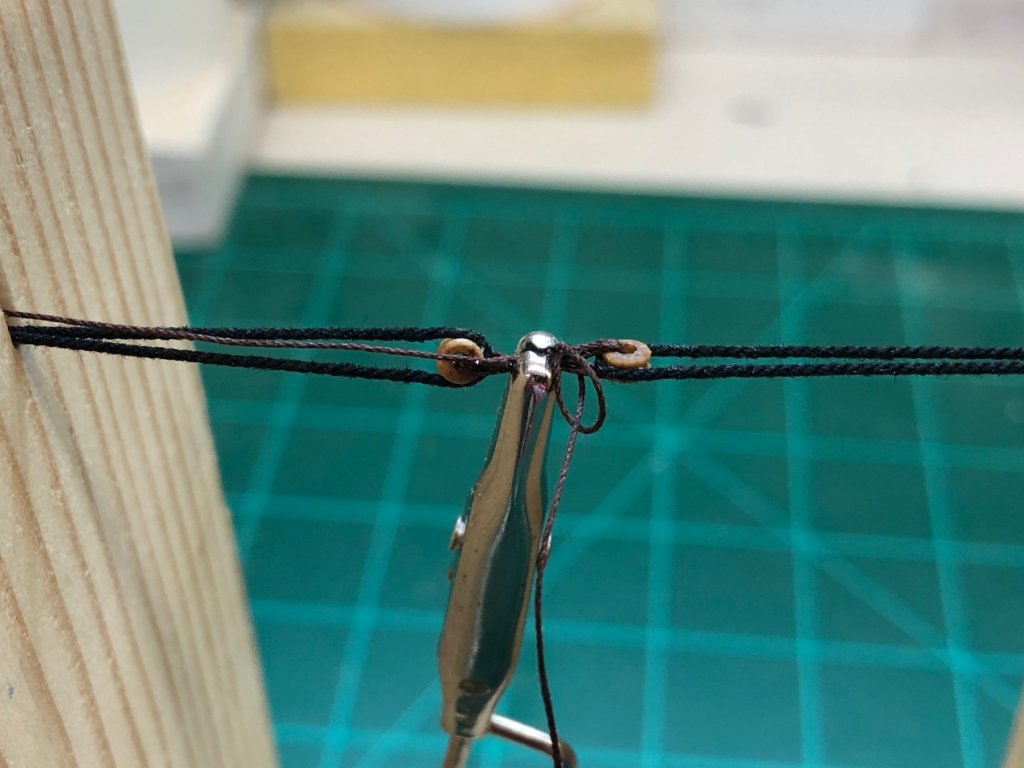
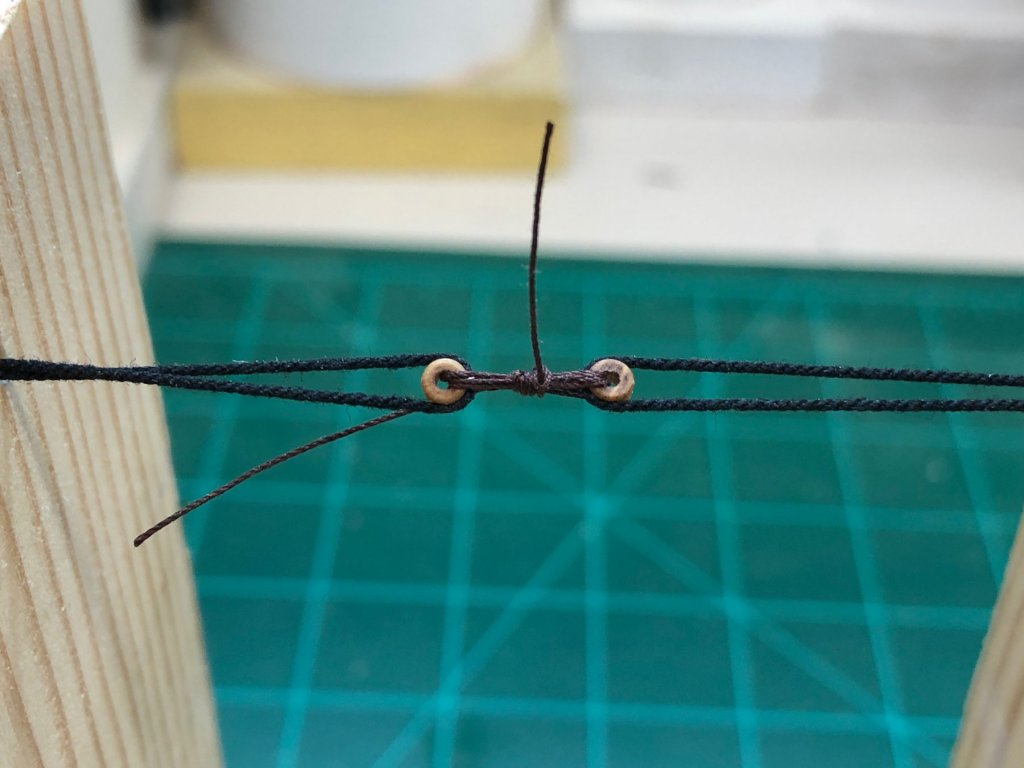
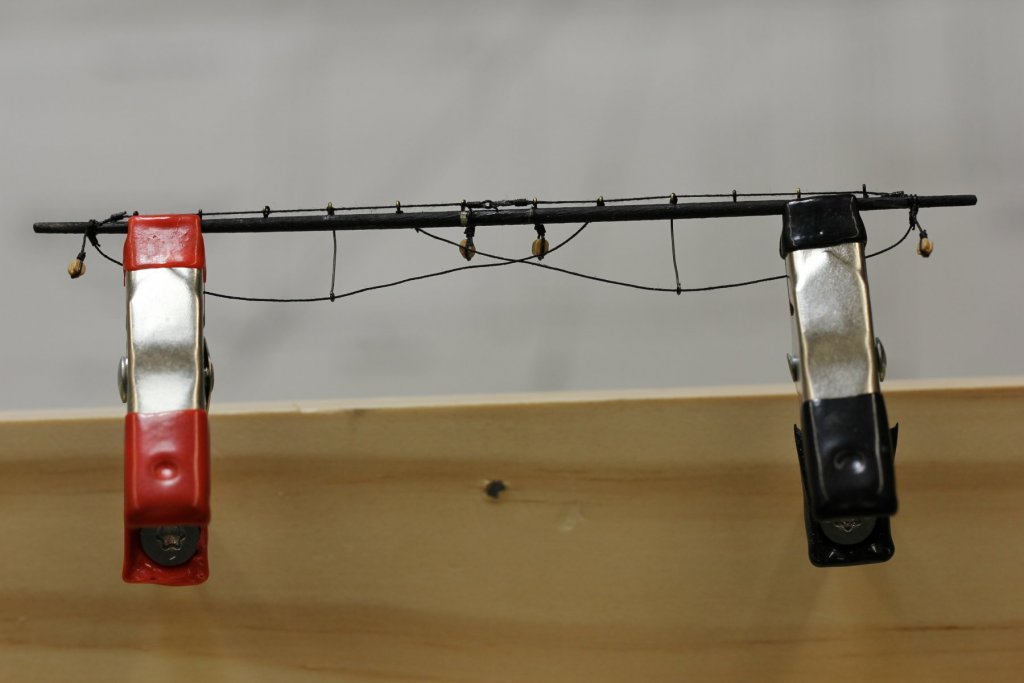
 Since there are twelve sets of bullseye required I decided to make a jig to build them (hopefully) consistently. I used 2.5mm walnut bullseyes from Model Shipways. The plans call for mostly 3/32 but some 1/16 bullseyes - My old hands can't deal with 1/16 bullseyes so I used all 2.5mm (which is pretty close to 3/32) I started with an old jig I built but now can't remember what I used it for - anyway I cut slots in both the end pieces and used .025 line and alligator clips to capture the bullseyes. The line leads through the slots where more clips maintain the spacing set by the wire spacer (.025 piano wire) that connects the bullseyes. I used .008" Syren brown (not light brown) line and made three passes through the bullseyes with the spacer in place. Using the thin wire makes getting the line through with the spacer in place not an issue (mostly). The spacer is removed and any slack taken out of the lines and one more pass made (total four) and remove the alligator clips to allow the bullseye to orient themselves in a common plane (the alligator clips can force them into different planes. I also move the end not being used through one of the slots so it will be captured in the next step. I make a half hitch around the lanyards with the hitch more or less centered between the bullseyes. Make three or four loops around the lanyards trying to make them lie next to each other. Grab the loops with a alligator clip then tie another half hitch. Coat with 50/50 white glue and water. Trim ends of line when glue is dry. Mount to eyebolts and when needed capture the outboard bullseye with the appropriate line/stay.


- 367 replies
-
- 5
-

-
- model shipways
- niagara
- (and 1 more)
-
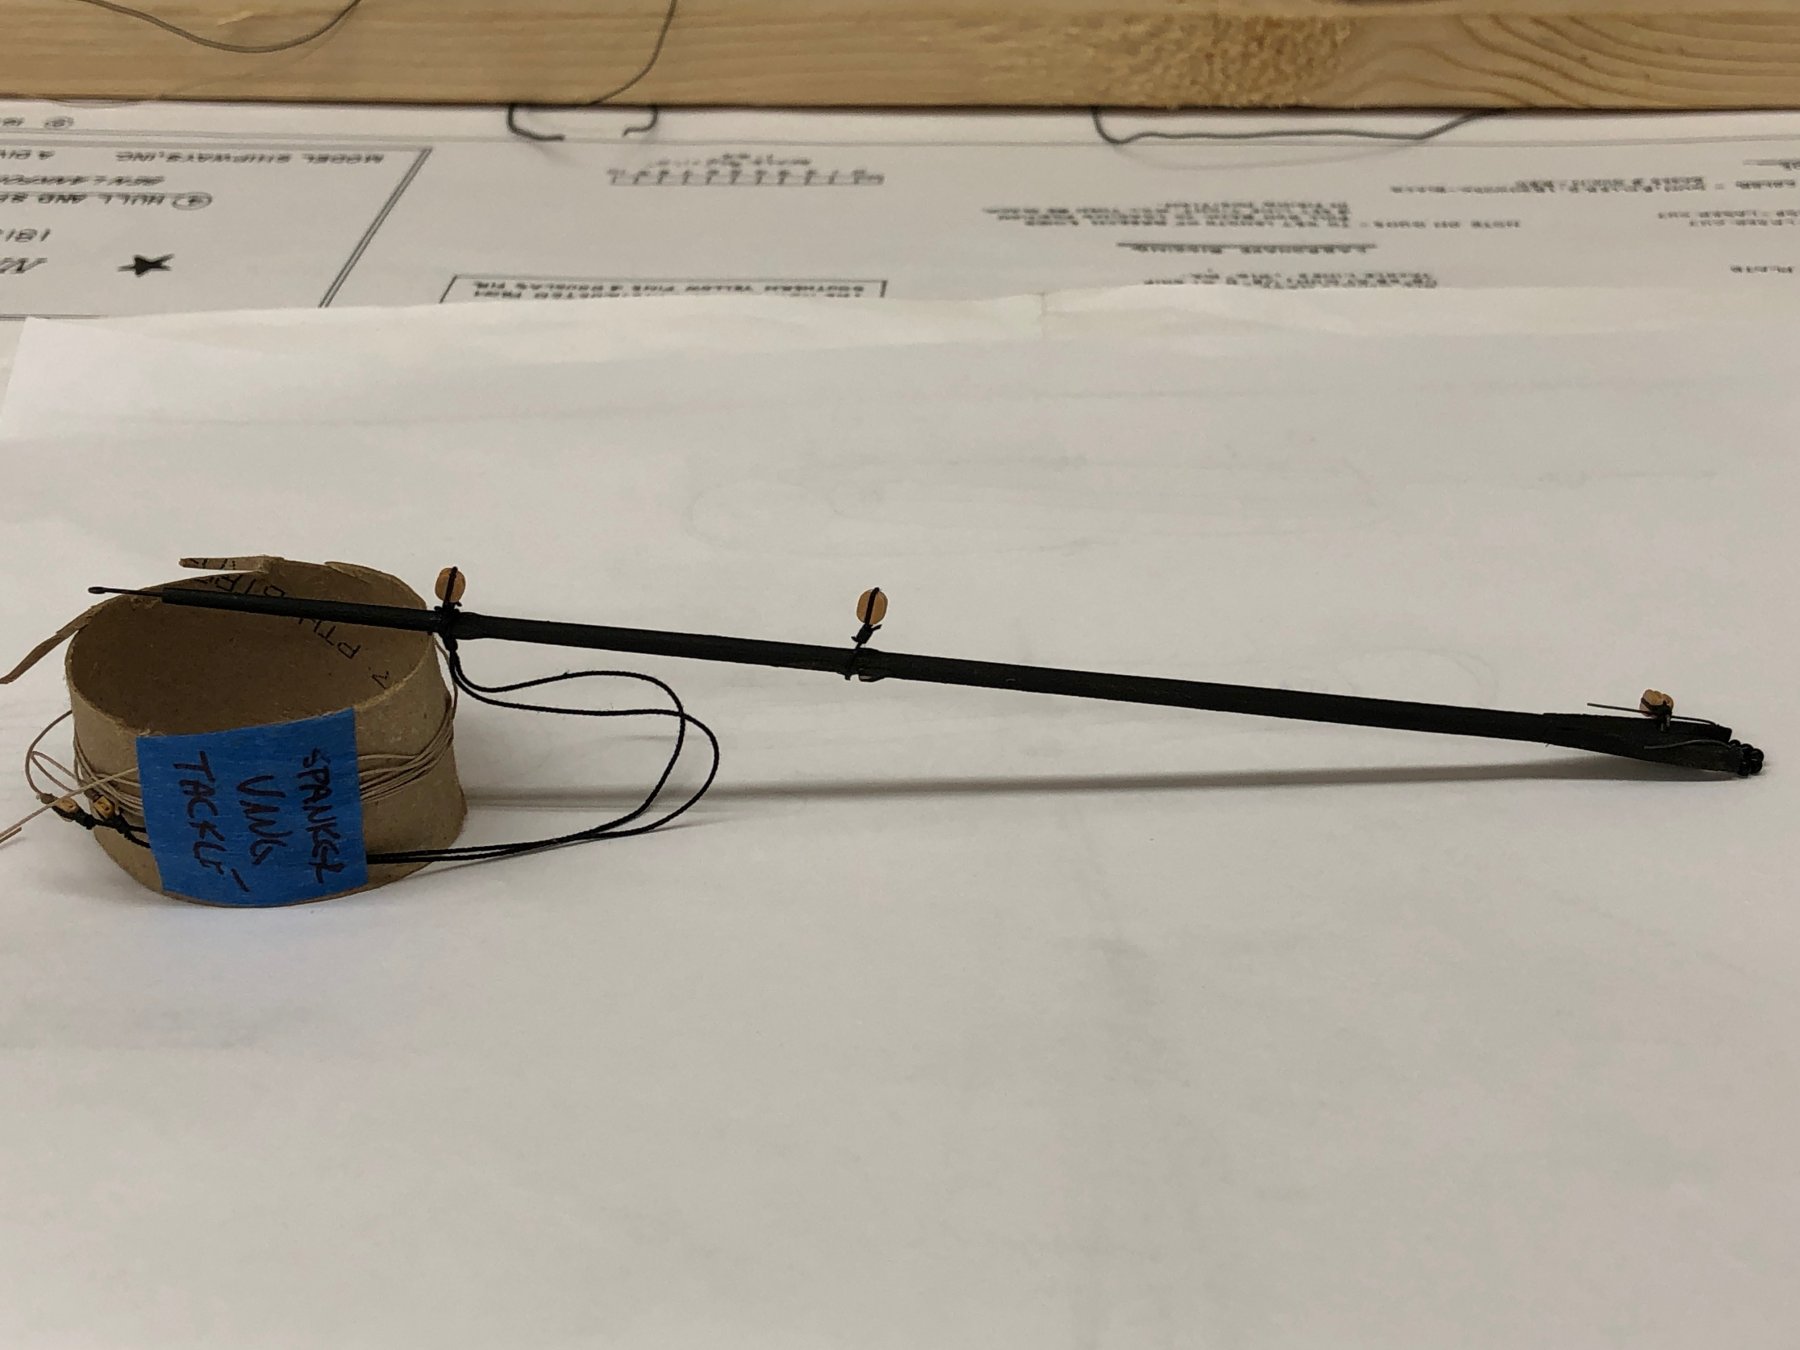
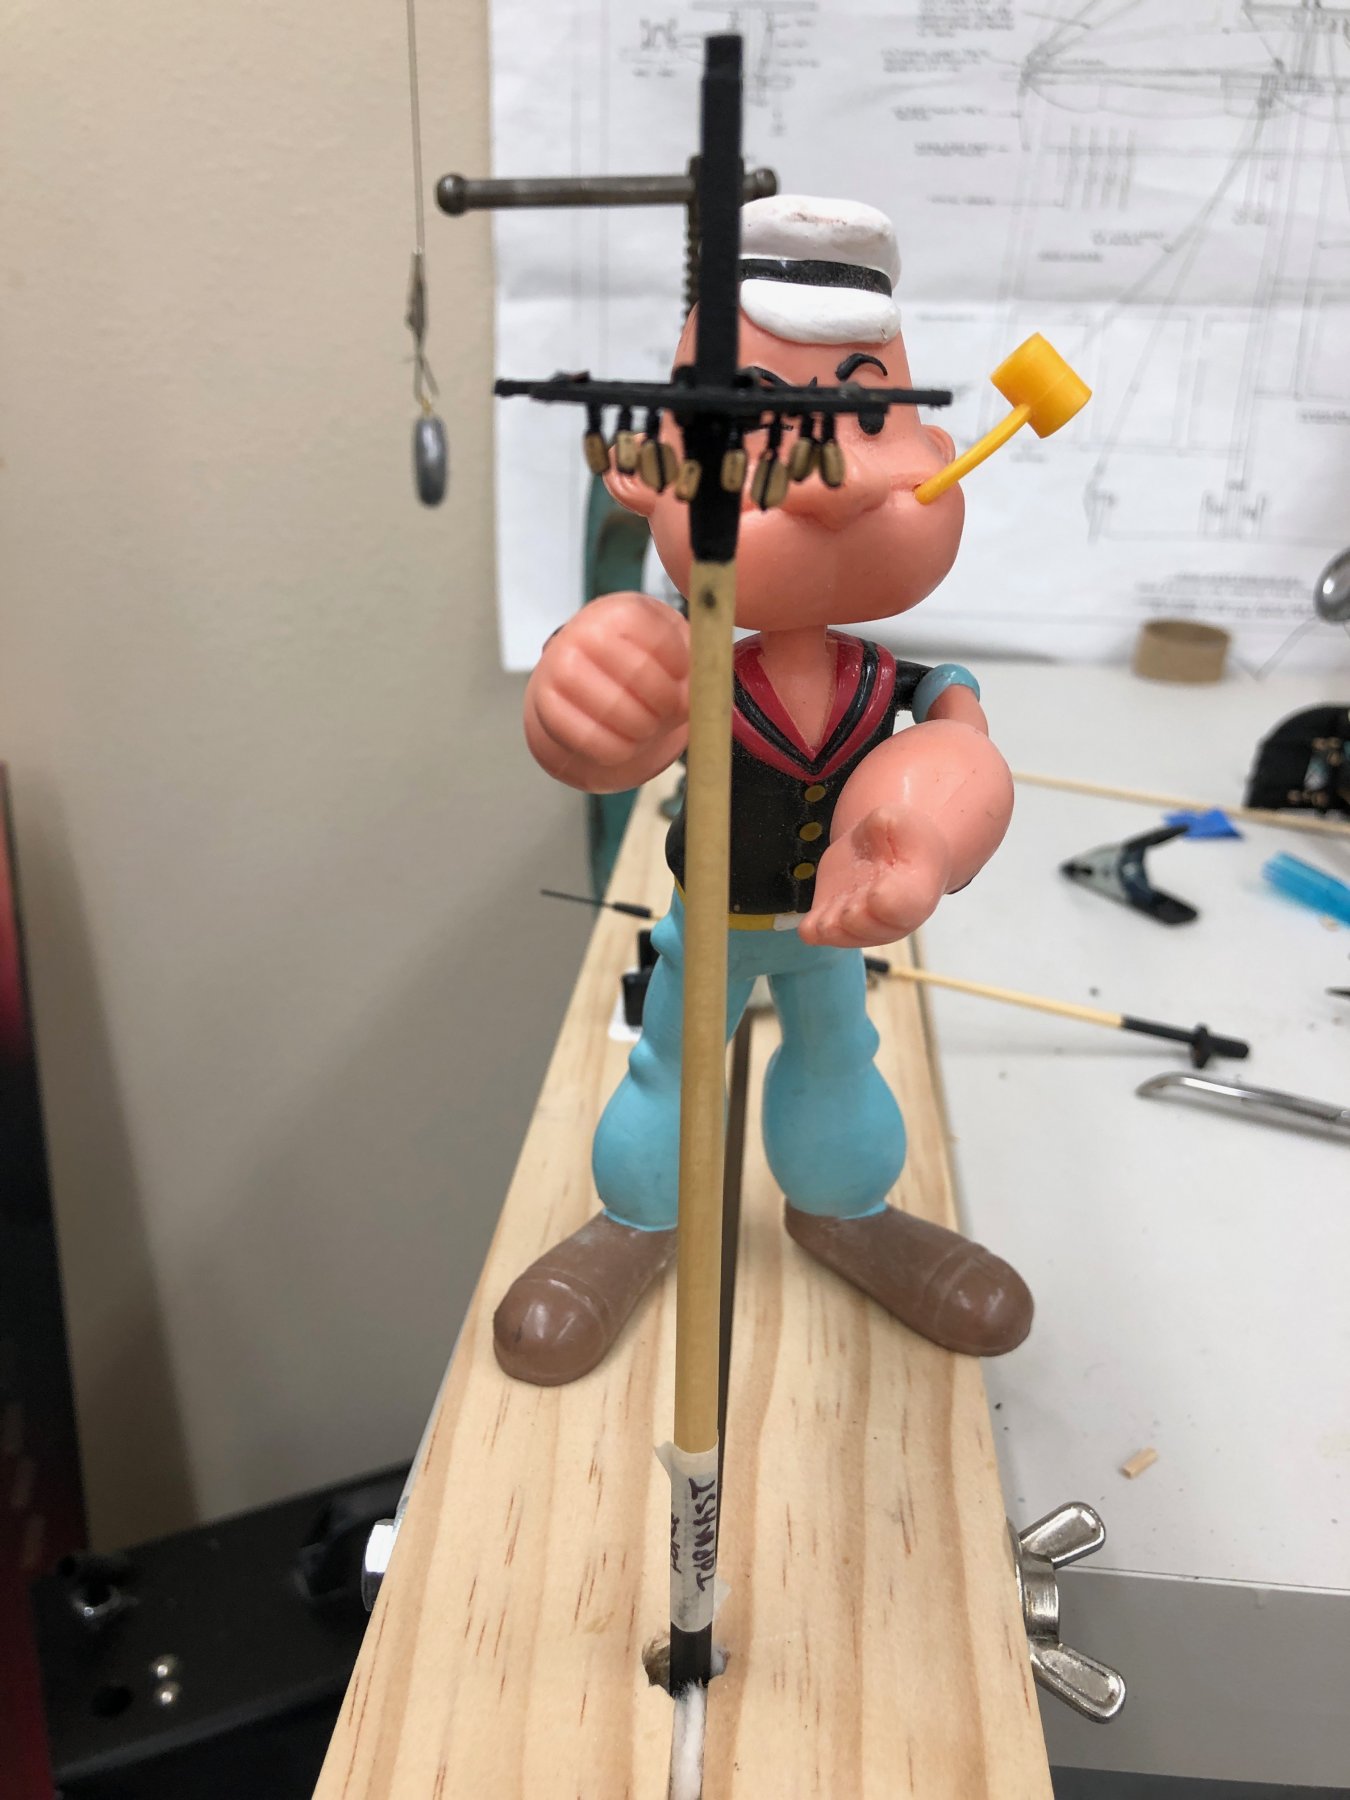
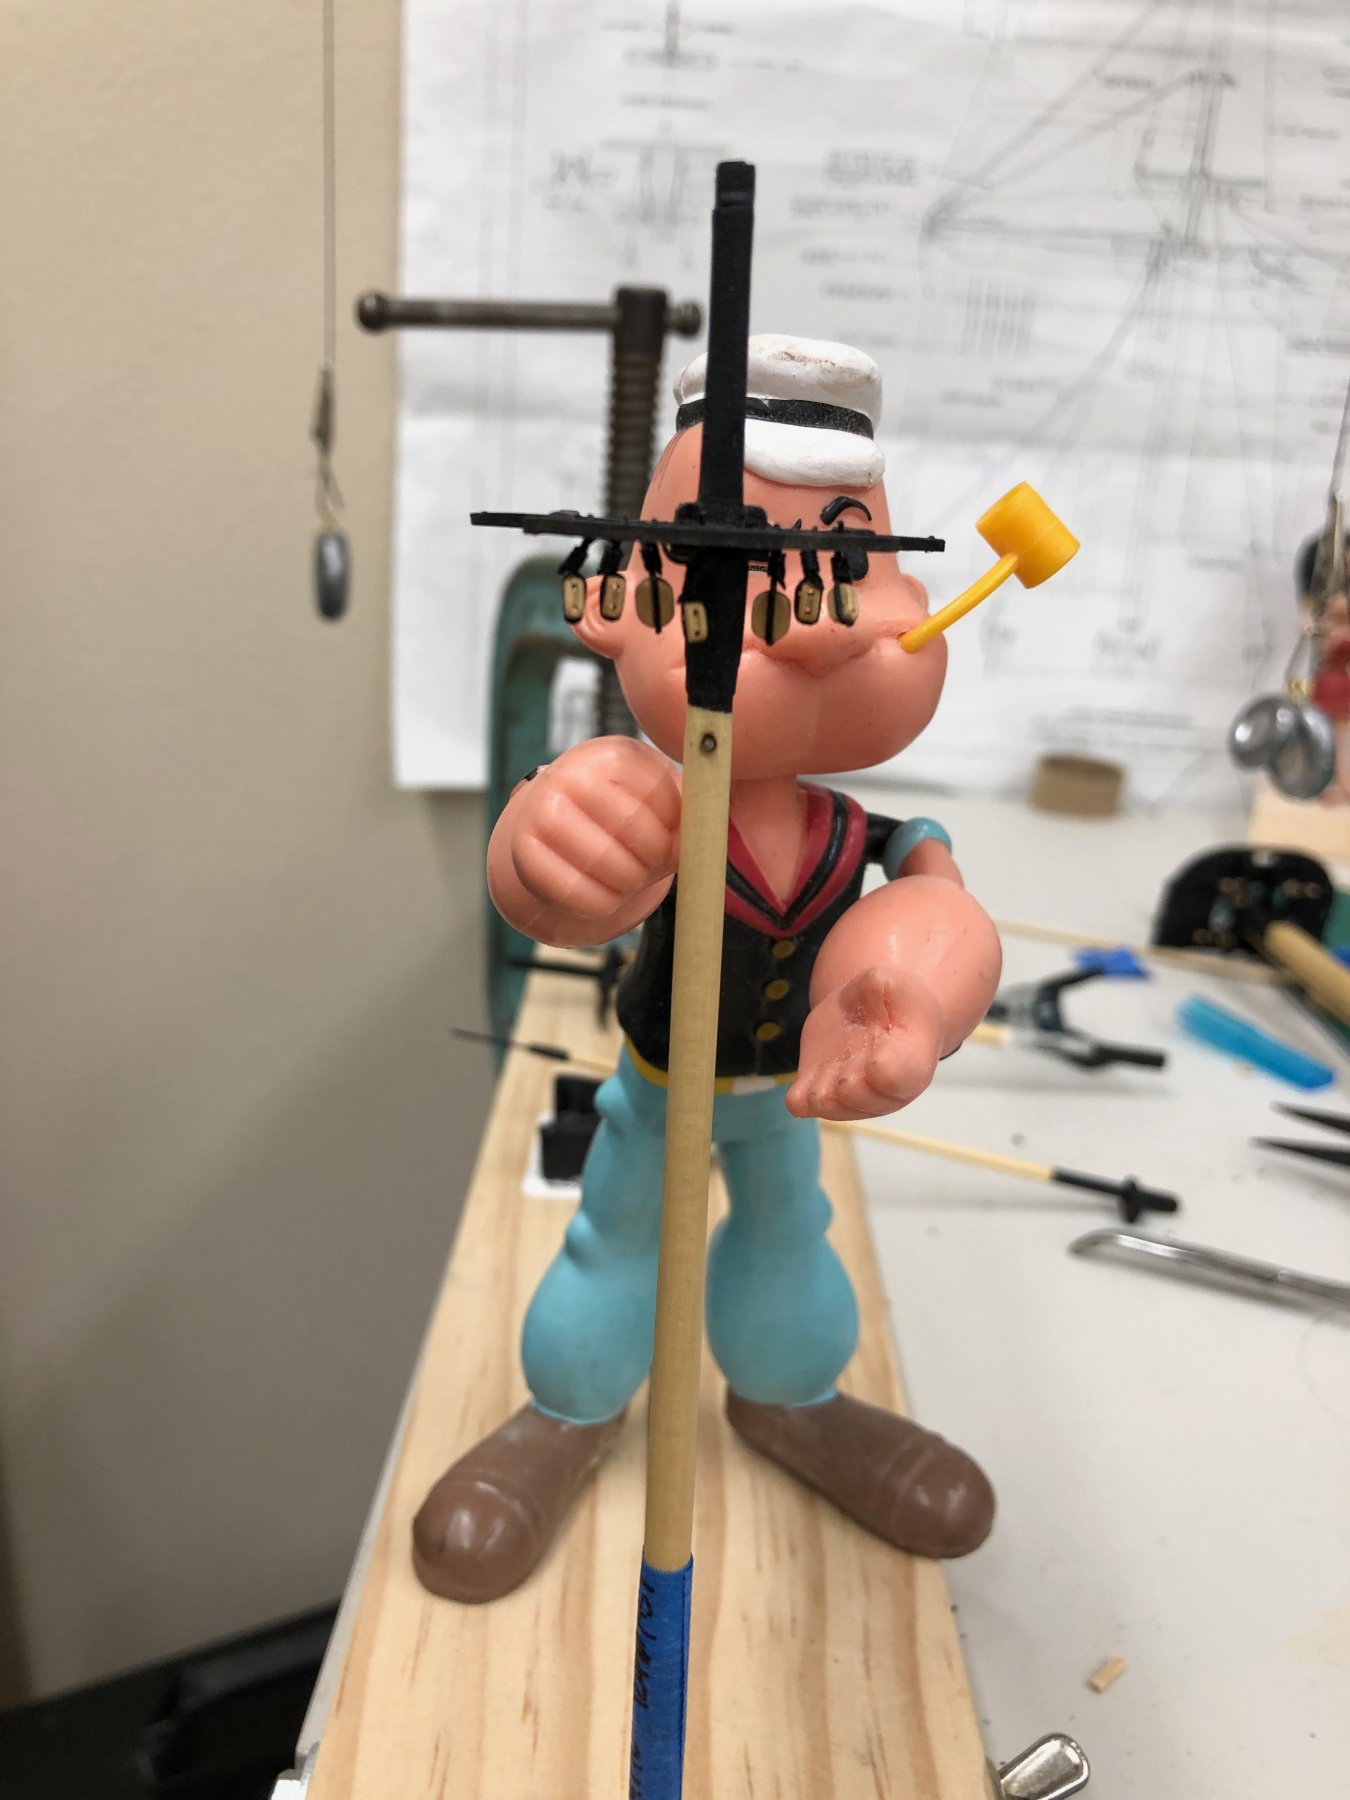
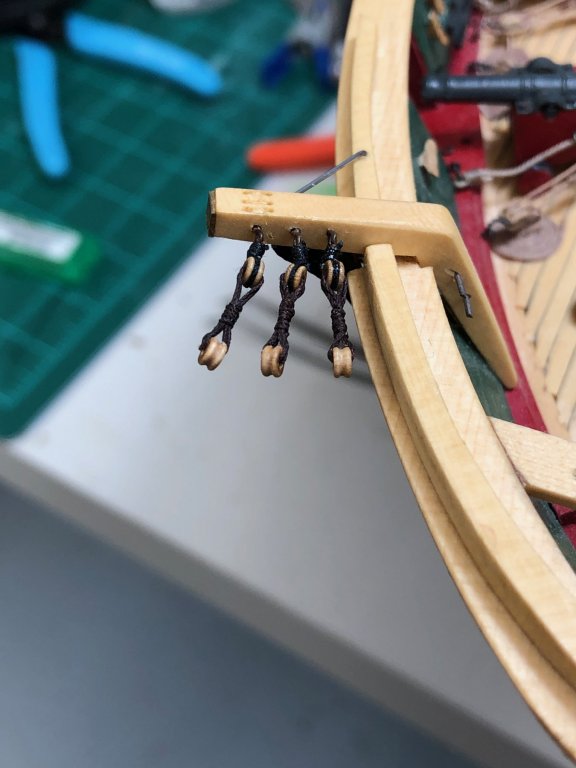
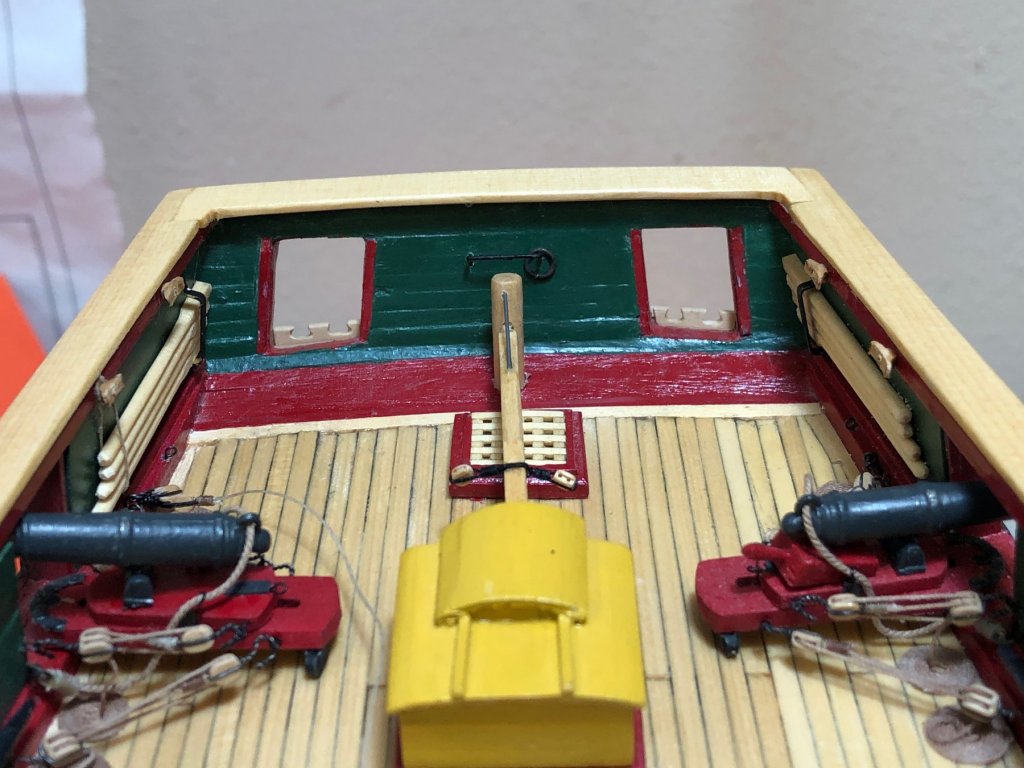
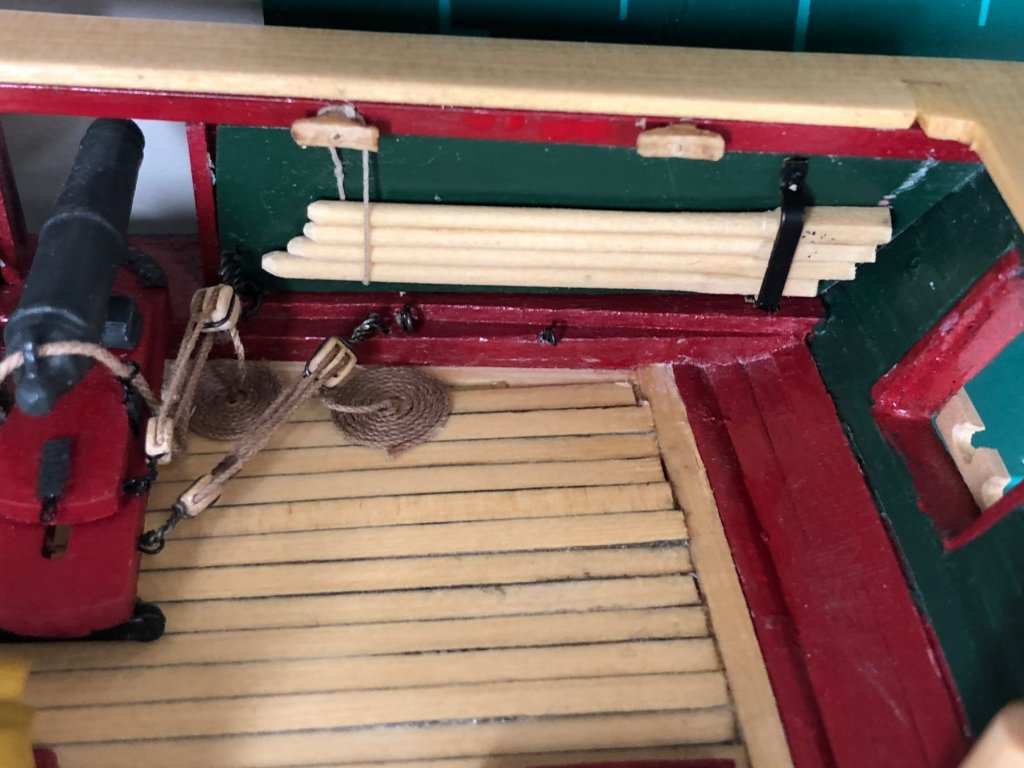
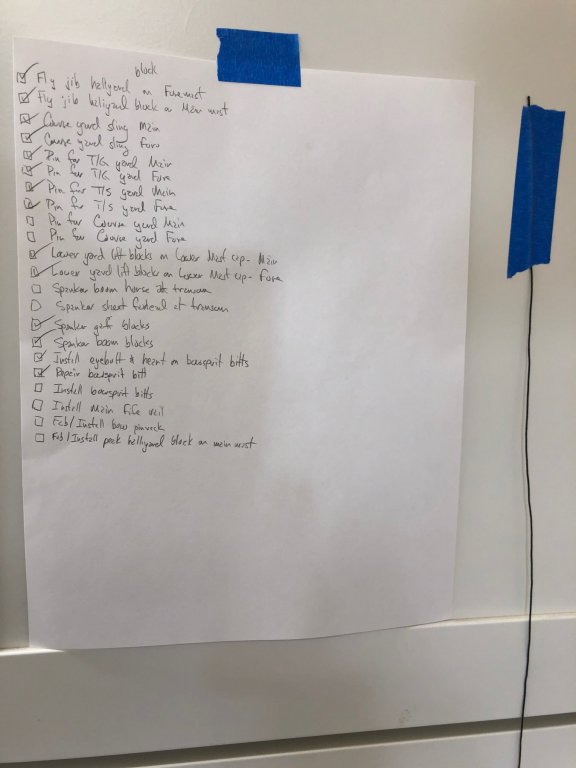
I am continuing to work off the items on the "to do" list. After working on the rigging spreadsheet I can now easily check off the blocks and rigging needed and decide what can/should be done now and what must wait until the masts/bowsprit are mounted. Among the items completed recently are the spanker vang blocks (and associated tackle line wrapped around the tube) and the halliard blocks for the Inner Jib , Outer Jib and Main Topmast Staysail (with assist from Popeye). The new blocks are the one (or two) closest to the mast.


- 367 replies
-
- 2
-
-
- model shipways
- niagara
- (and 1 more)
-
Tom, As I suspected I just found one addition to the spreadsheet (Spanker sheet). Updated version below. Niagara Rigging - for distribution ch 1.xlsx
-
Tom, Here is the spreadsheet. I purposely did not include the square sail sheet lines, spanker brails or flag halliards - I am not planning on rigging them at this point. By my count there are over 100 running rigging lines without them. Standing rigging lines are in bold, running rigging not. Hope this helps when you get to that point. Niagara Rigging - for distribution.xlsx
-
Tom, I found a few more lines I need to add. It will be a few m ore days before I am satisfied - and I am sure to have missed something(s).
-
Tom, I have made a spreadsheet of all the standing and the running rigging that I am going to include (which is most of it even if the clews, bunt and leech lines are tired off at the blocks). If you are interested I will be glad to send you a copy. I am almost ready to start the mast assembly process, just need a few more lines served and some more blocks stroped.
-
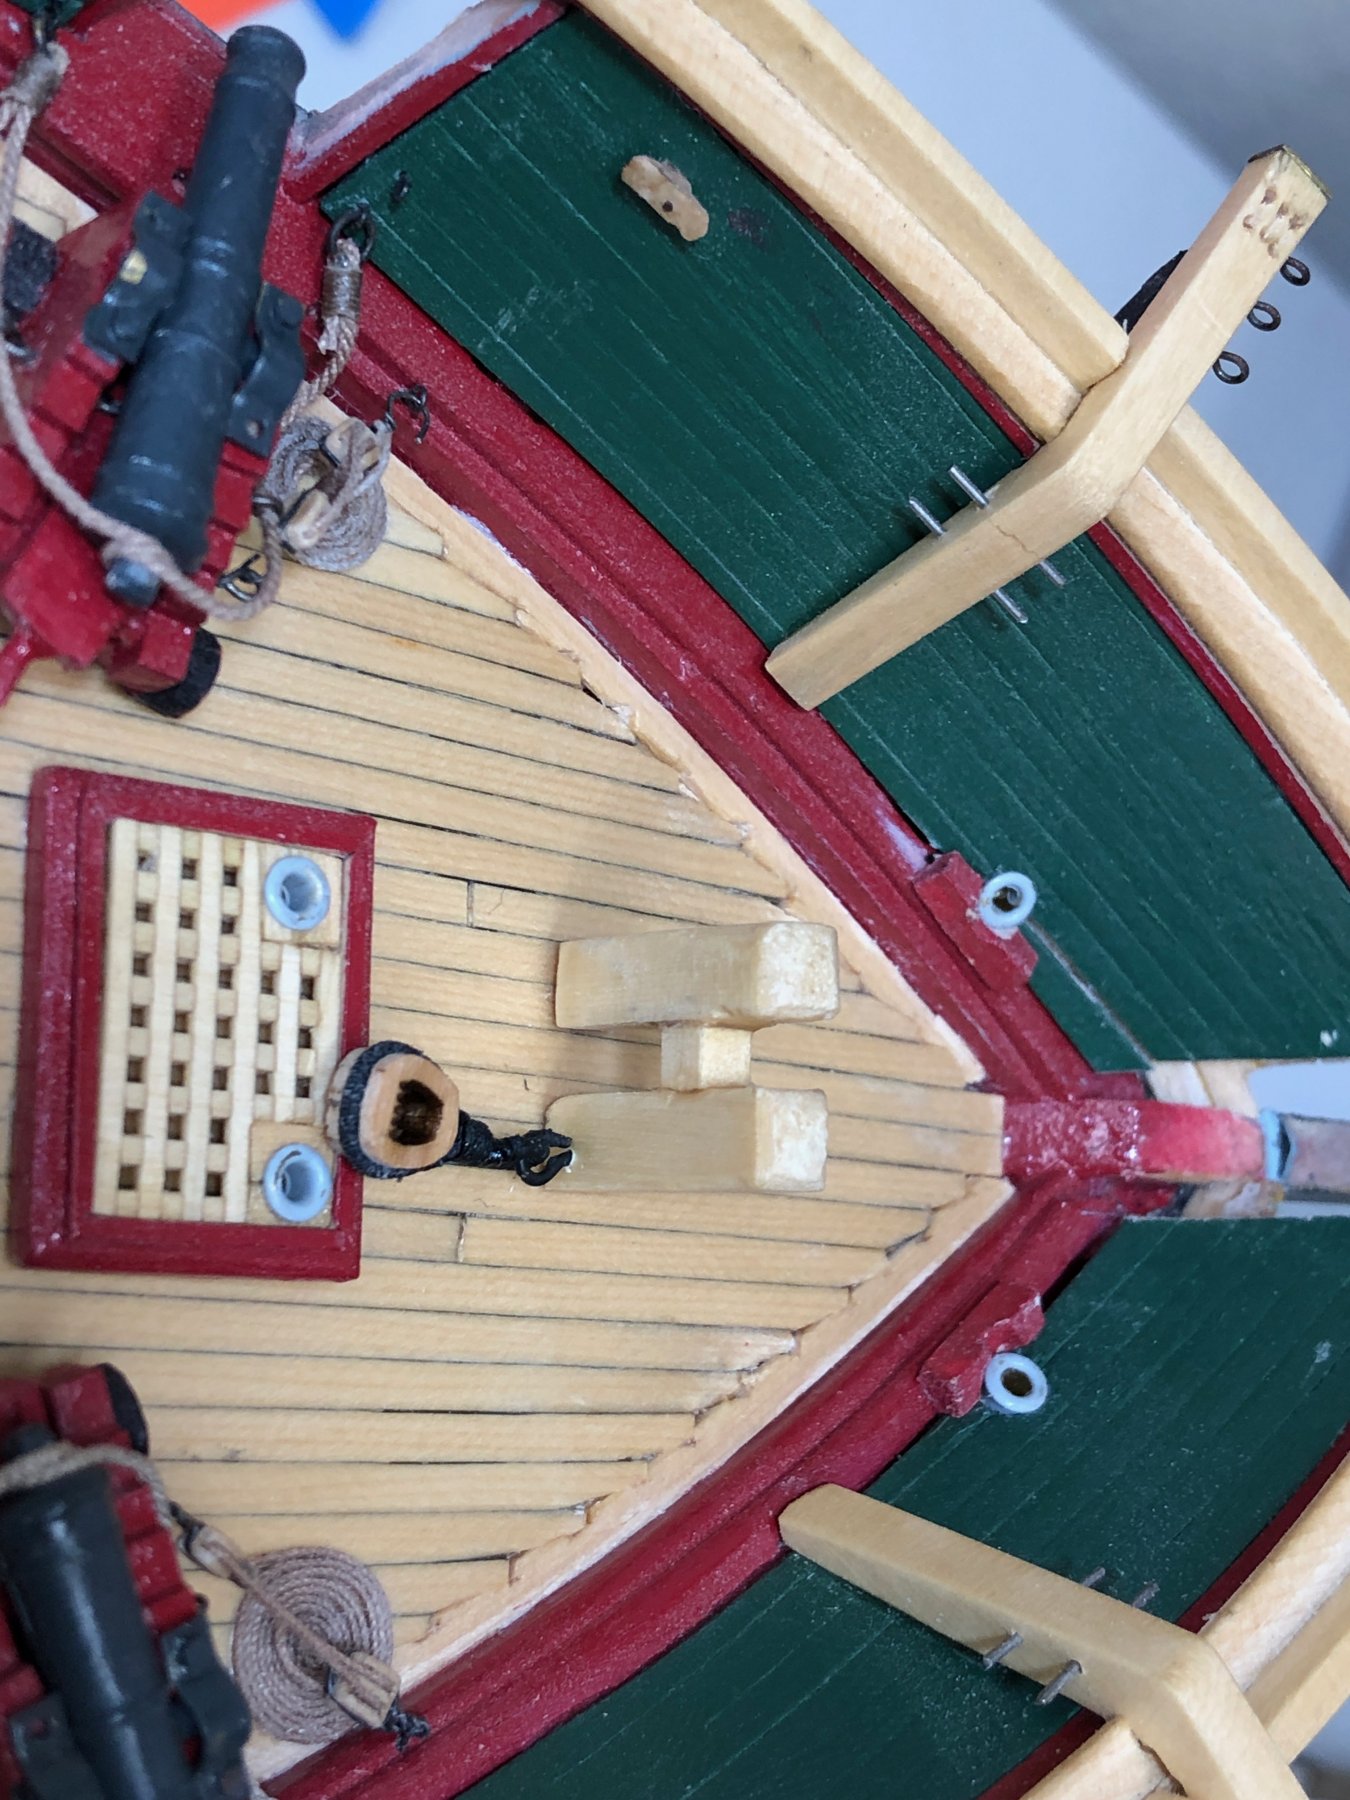
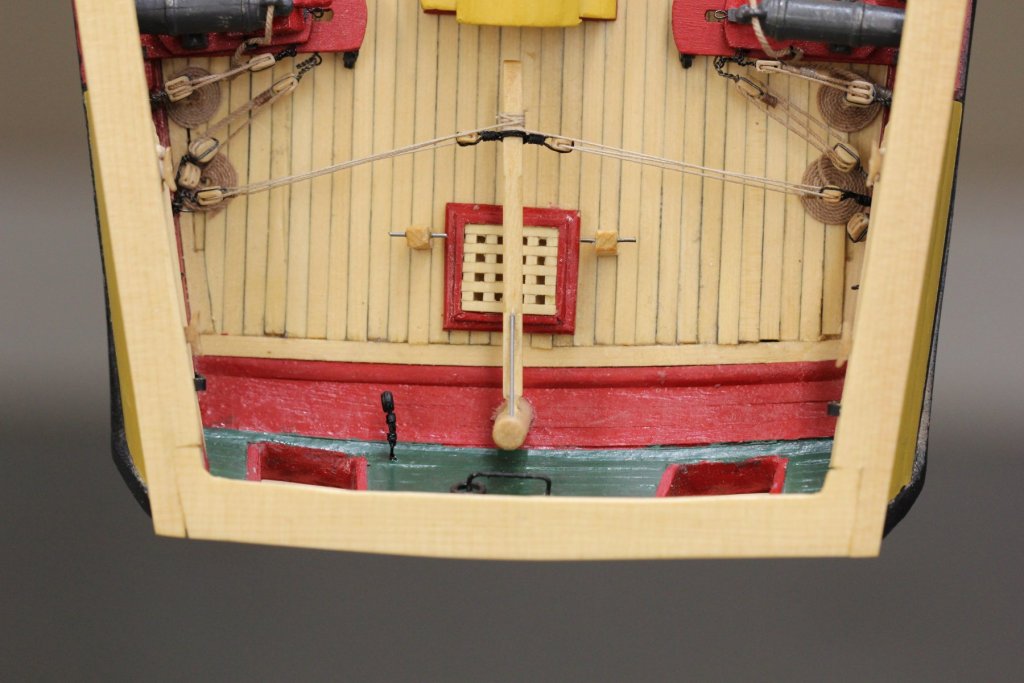
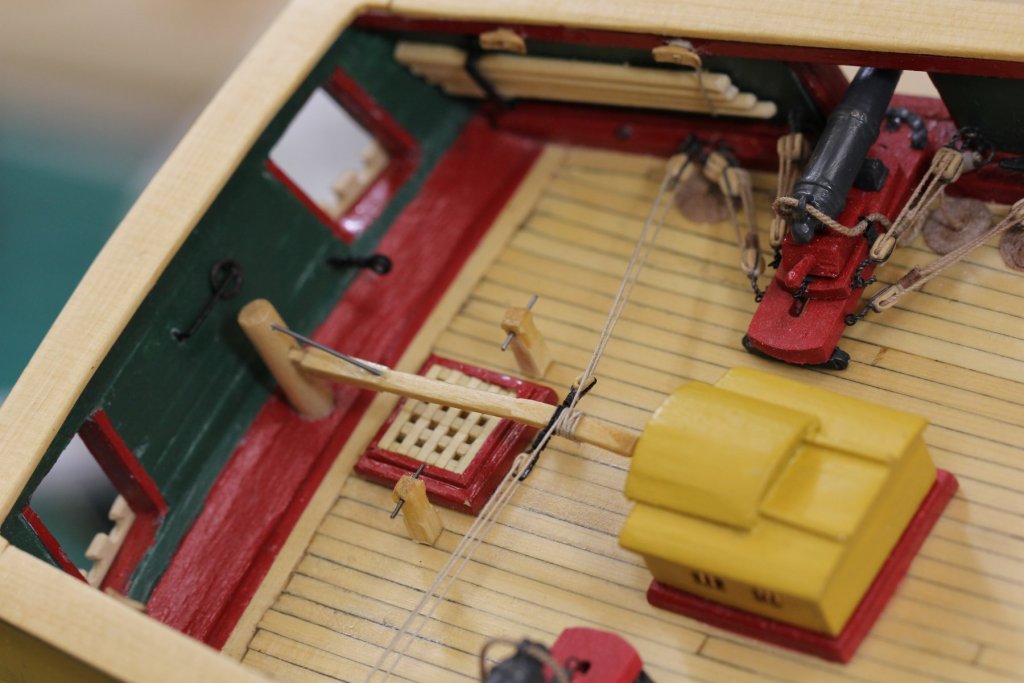
Here is the completed (I think) stern area. I added the tiller tackle (and boom guy blocks - although those are hard to see in these photos). The stern bitts The tiller running rigging The spanker sheet fairlead I took several more pictures but am having depth of field issues with my 100mm macro lens. I guess I need to get the manual out now that I have exhausted my very limited knowledge of the multitudinous setting on the camera and lens.
- 367 replies
-
- 4
-
-
- model shipways
- niagara
- (and 1 more)
-
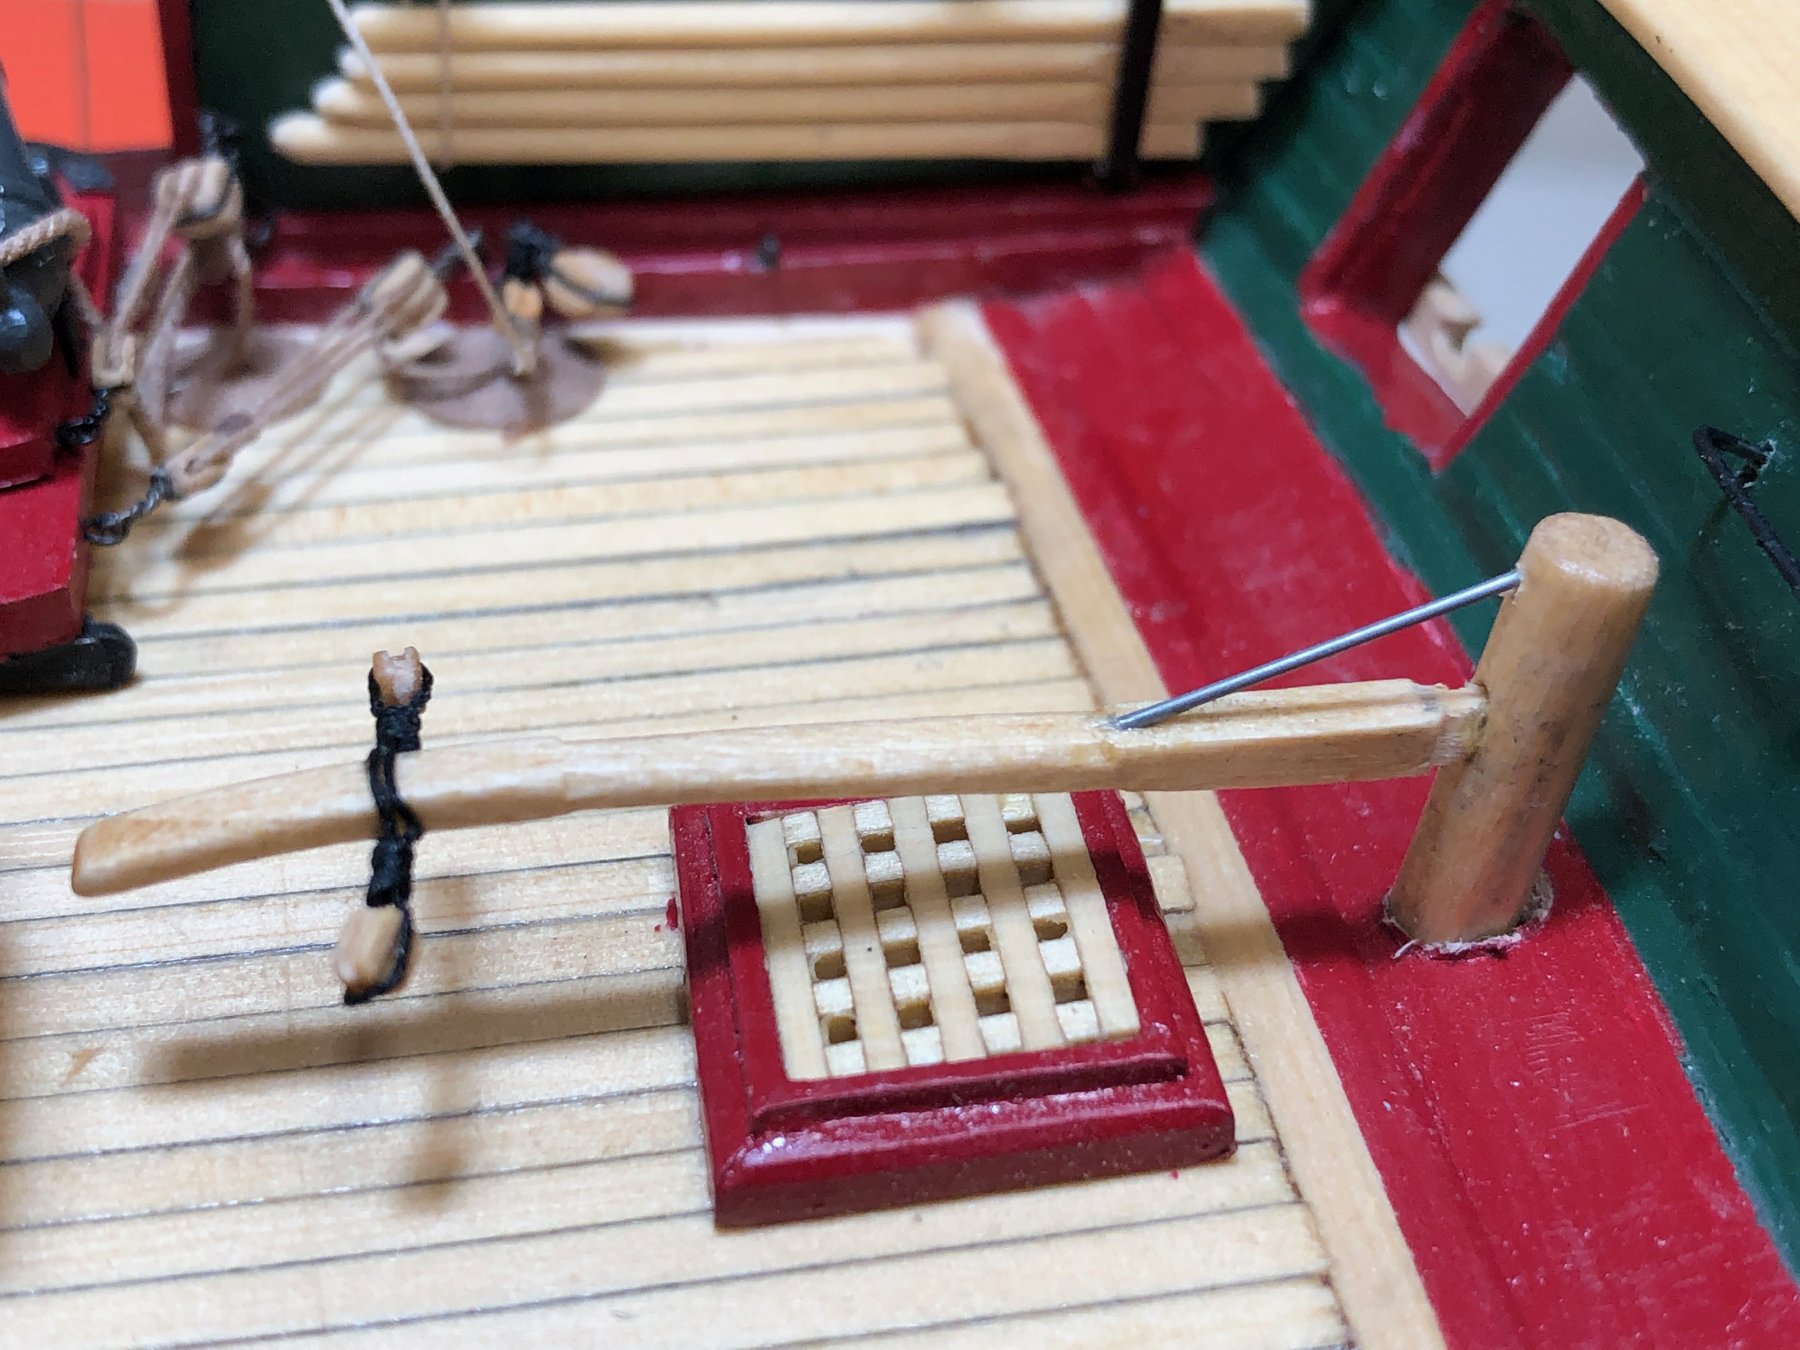
Continuing to work off the to do list items at the stern. Got the stbd side capstan bars installed but need to get the line on that side rigged. Also installed the horse and ring for the spanker sheet, the tiller with the blocks for the tiller tackle installed. Am working on fabing the aft bitts and will install them before rigging the tiller tackle.

- 367 replies
-
- 1
-
-
- model shipways
- niagara
- (and 1 more)
-
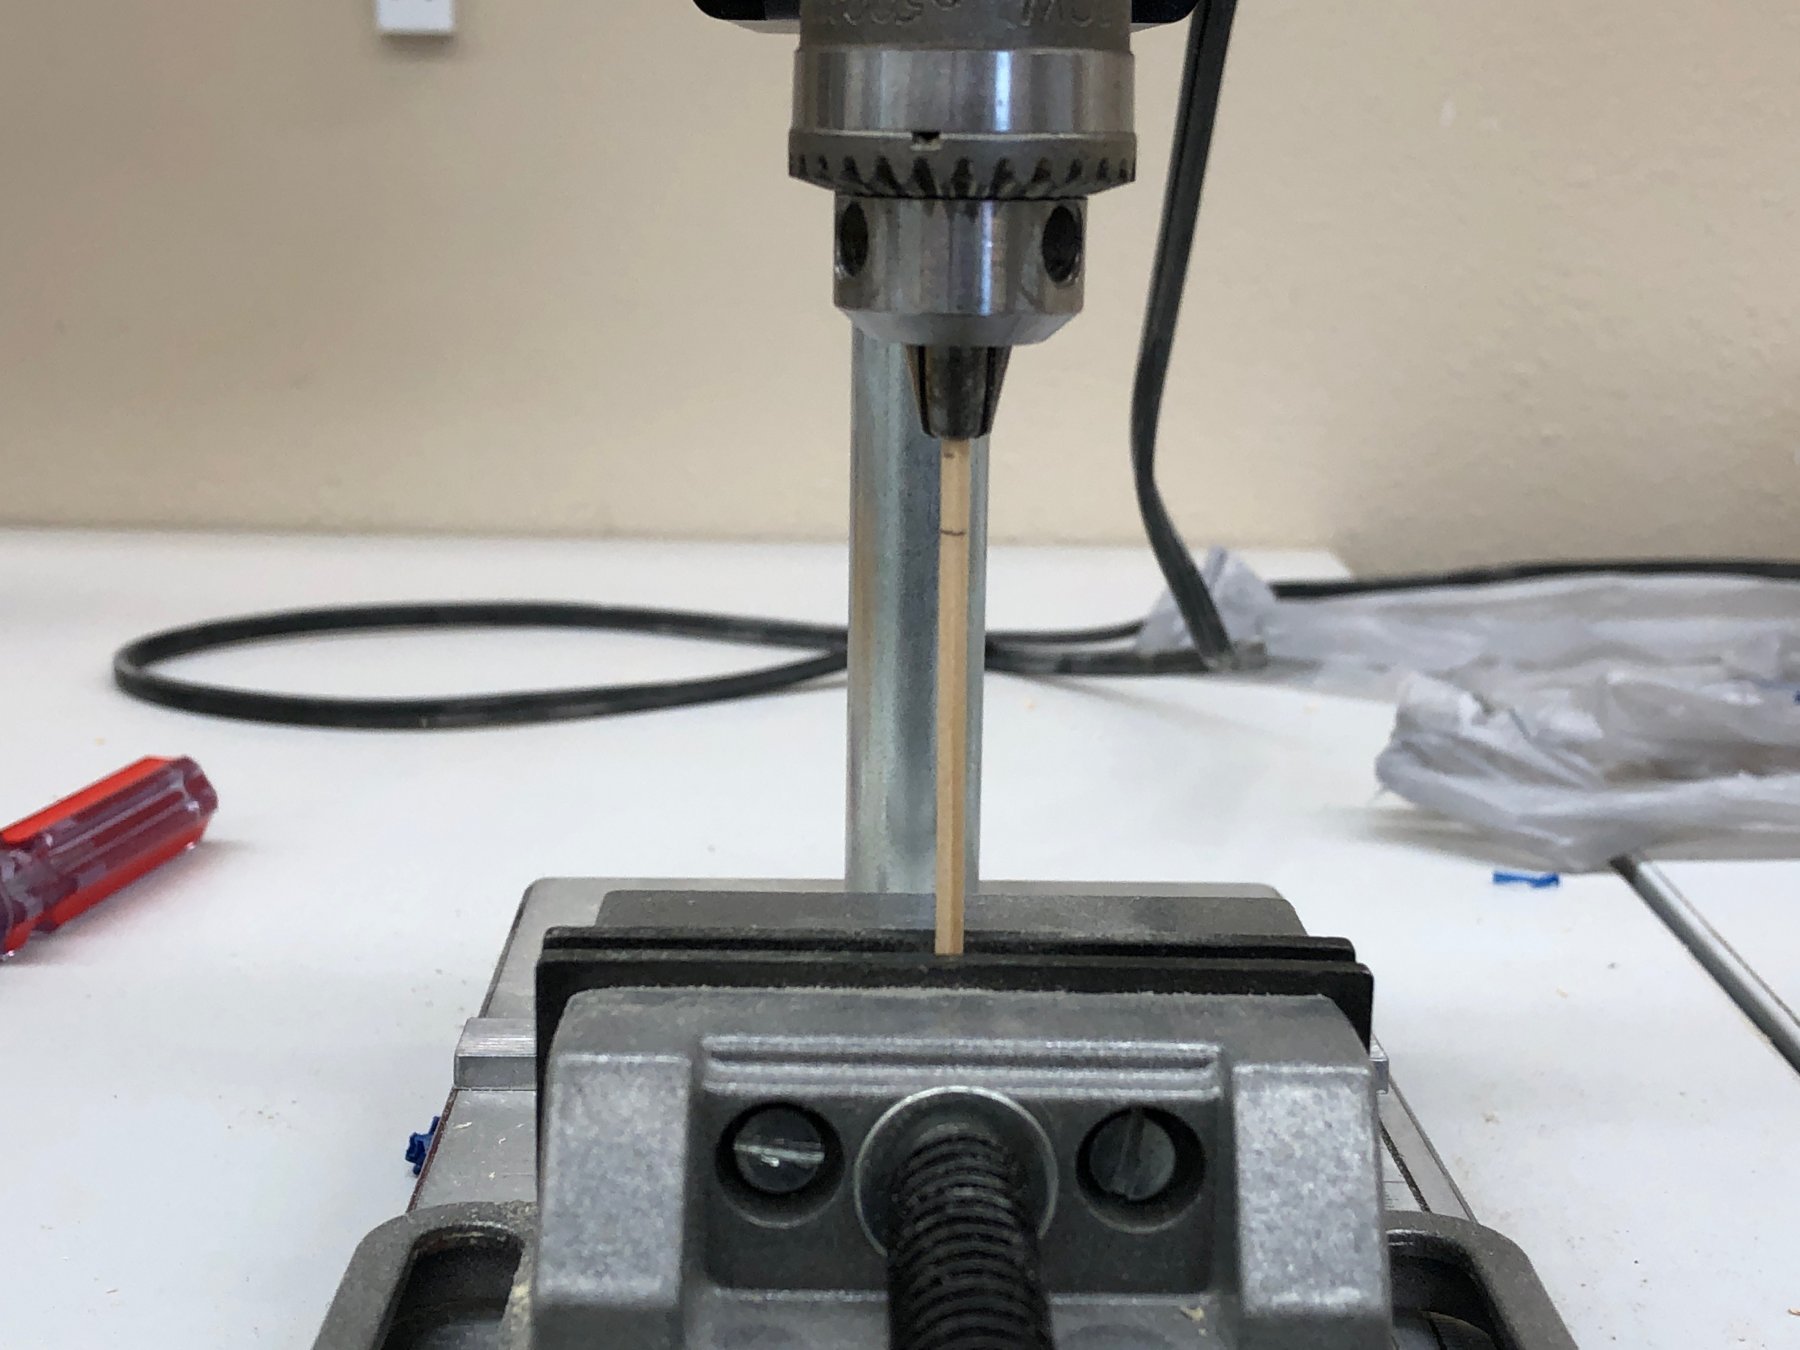
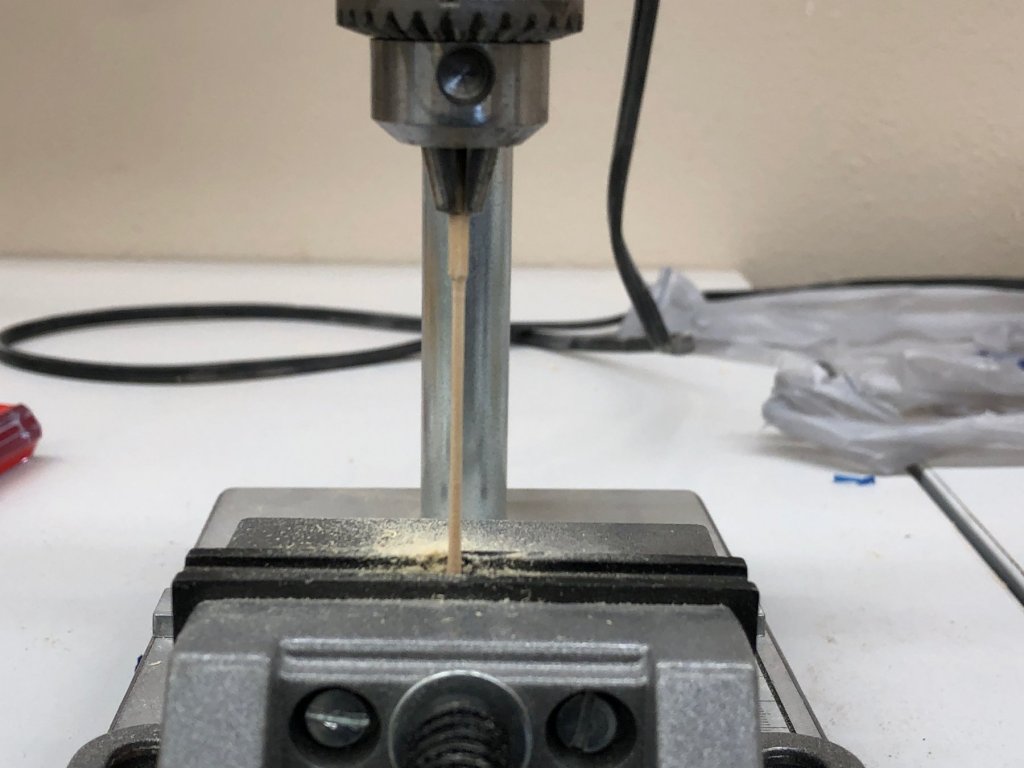
I started working on the capstan bars. Not having a lathe, and not will to try to freehand turning 1/16 X 1/16" stock into 3/64 diameter I decided to use the poor mans lathe (aka drill press). I cut stock well over size, marked a spot sufficiently down the piece to allow for the possible manging of the piece by the drill chuck and used a 100 grit sanding stick (actually made from a tongue depressor) to take the square section down to a circle (more or less). I finished with a 220 sanding "stick then cut to length and rounded the end. It took several tries to get an acceptable bulkhead bracket but I finally succeeded. Here is a before and after in the drill press and the first side as installed. Looking at this area again and noting that two blocks (boom guy and tiller tackle need to attach approximately where the gun train tackle is and that the eyebolt that is there is too far aft to support these items I added and additional eyebolt just aft of the gun train one. Hopefully this will make getting the blocks for the tiller and boom guy easier to install. Not sure how I would have gotten three blocks one eyebolt without it looking very strange.

- 367 replies
-
- 1
-
-
- model shipways
- niagara
- (and 1 more)
-
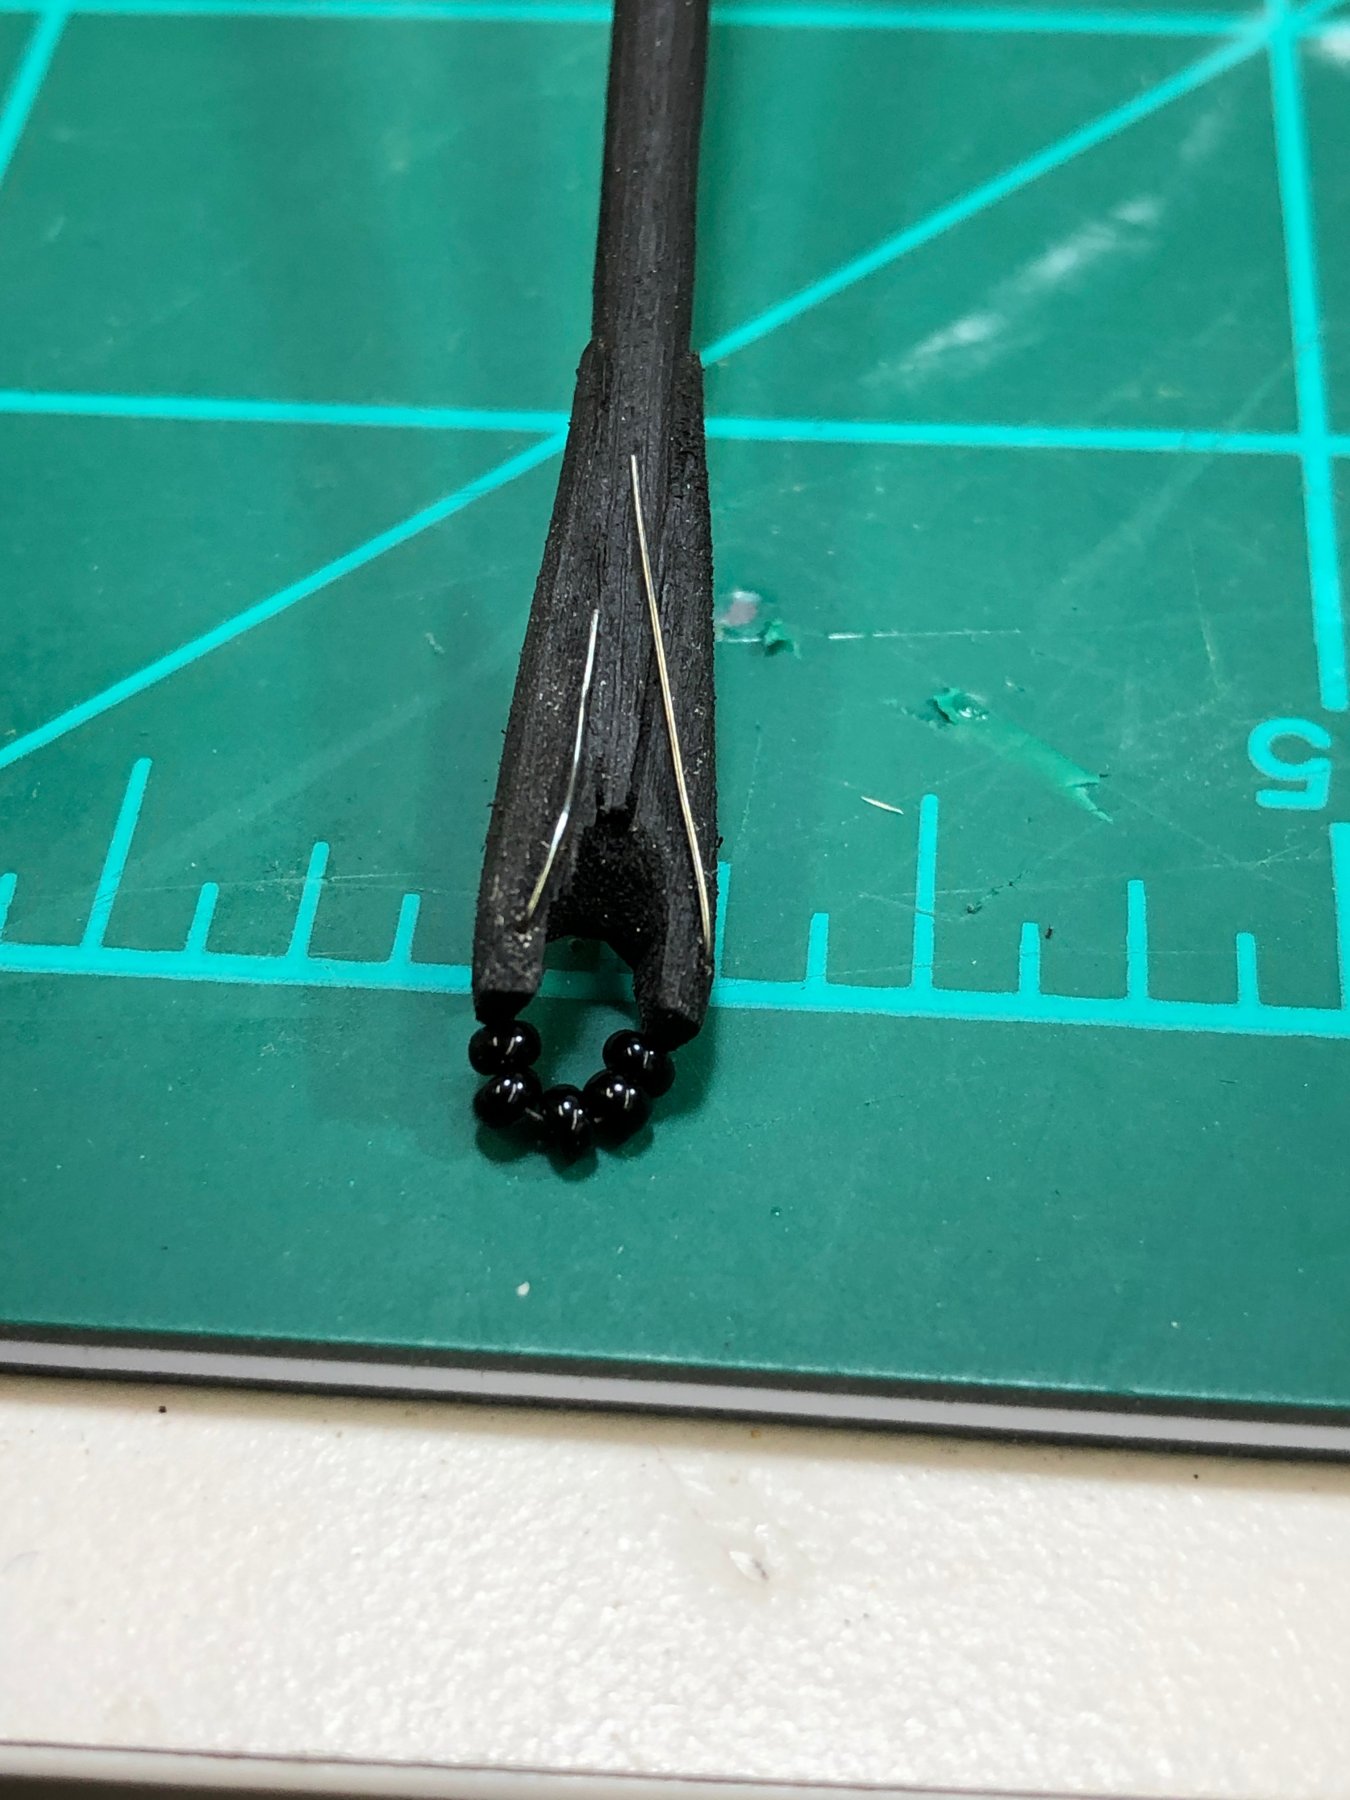
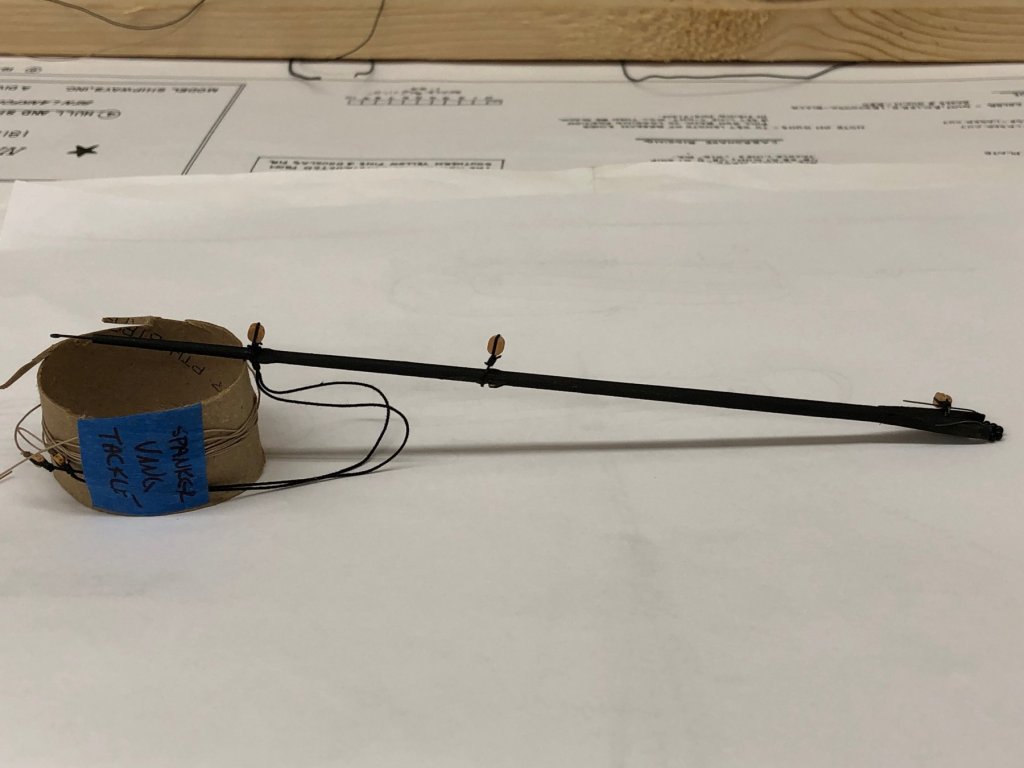
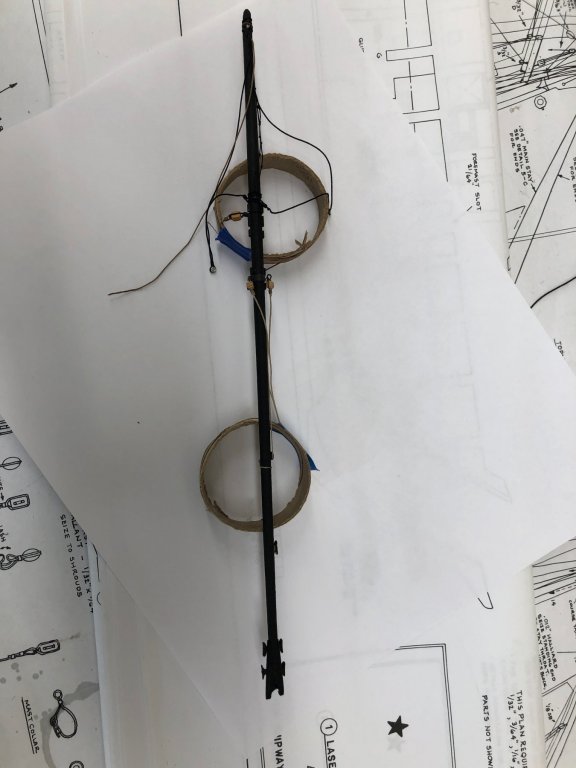
Here are some better pictures of the Spanker Boom and the Bowsprit Bitts as they will be installed. I also completed the Spanker gaff, including the parrel beads but will have to "undo" them to get the gaff installed on the Spencer mast so I left plenty of wire so the beads don't fall off during install. The dreaded "To DO" list


- 367 replies
-
- 4
-
-
- model shipways
- niagara
- (and 1 more)
-
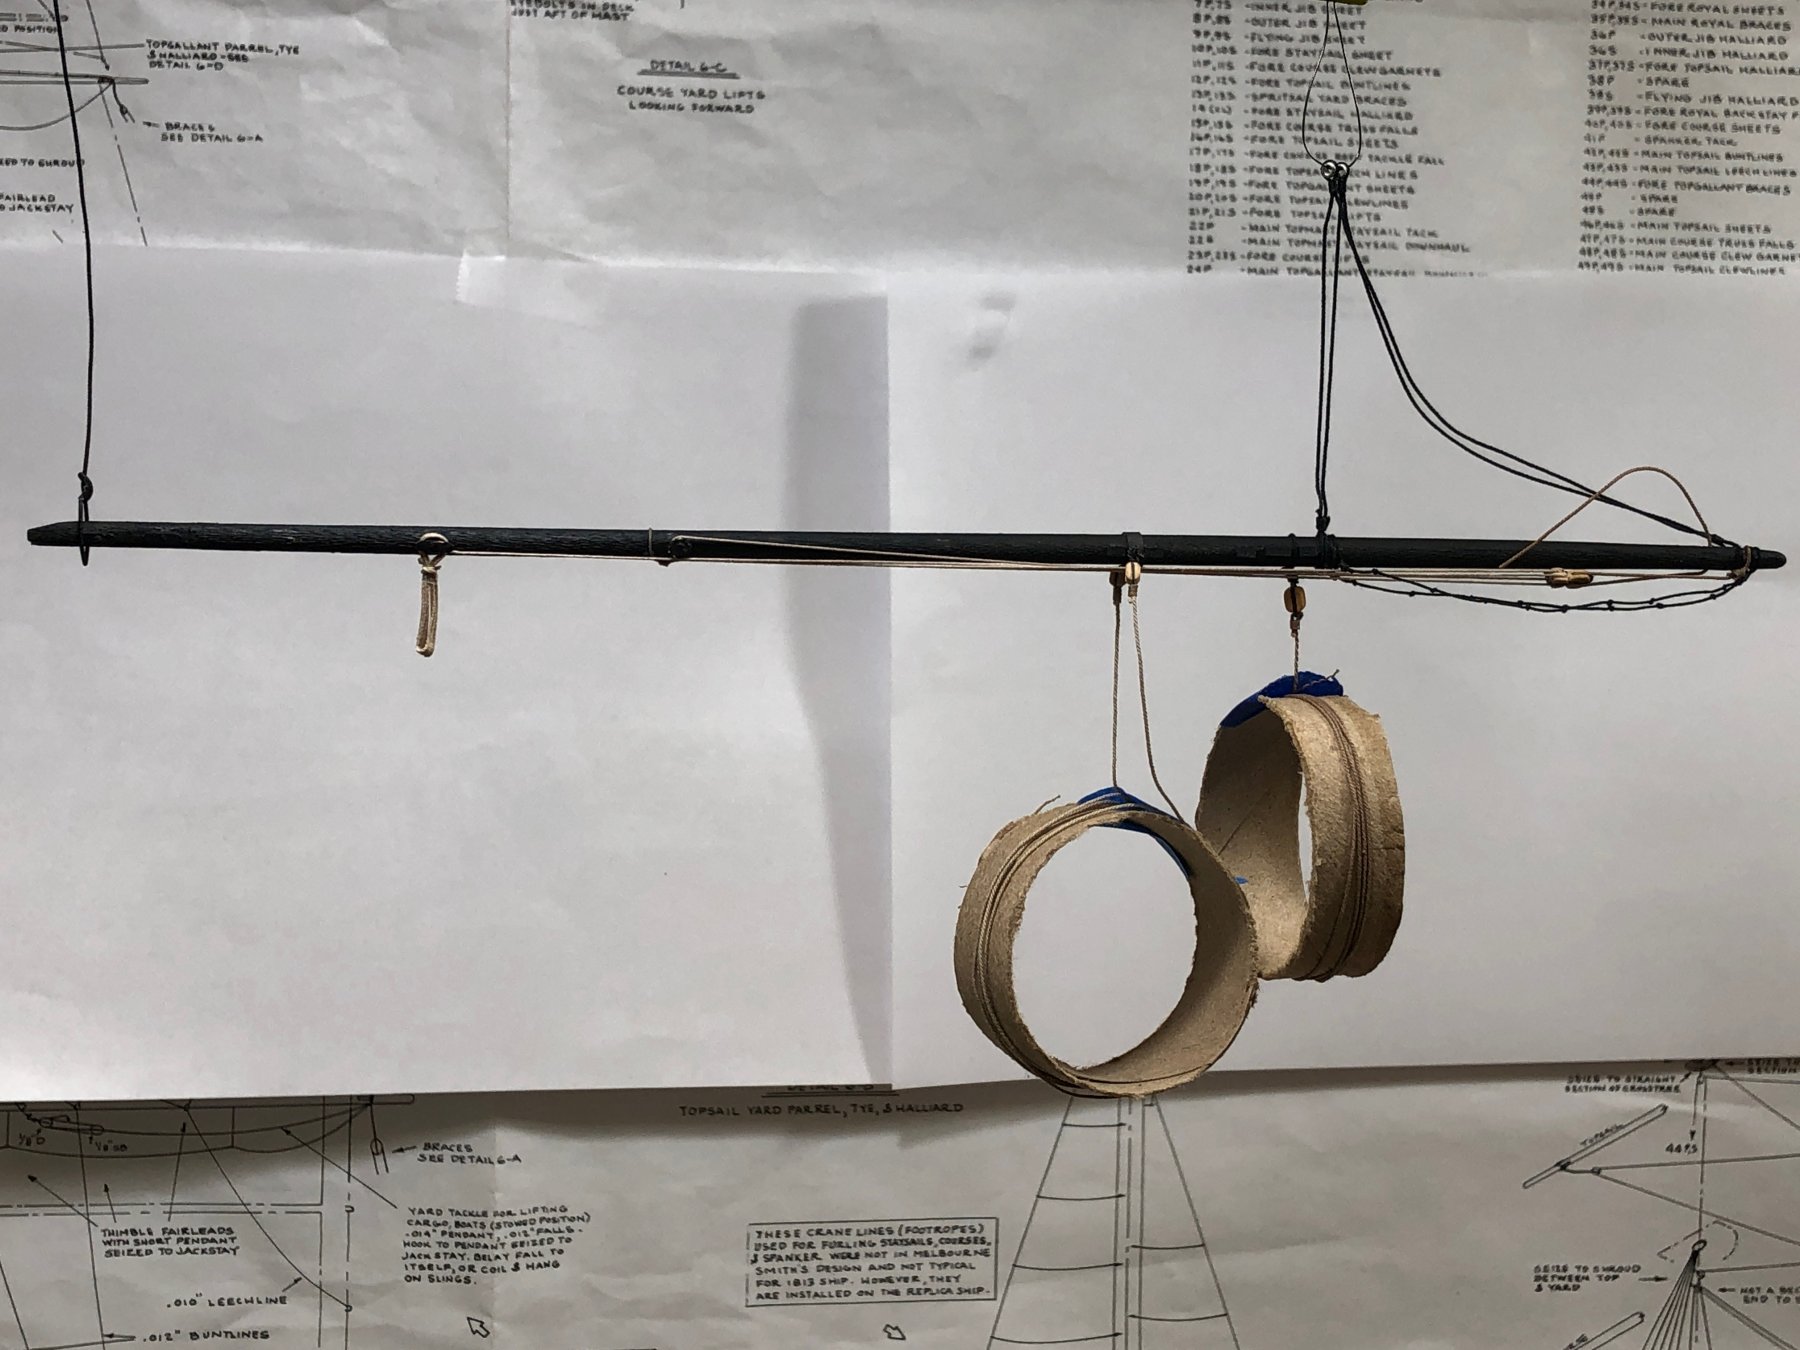
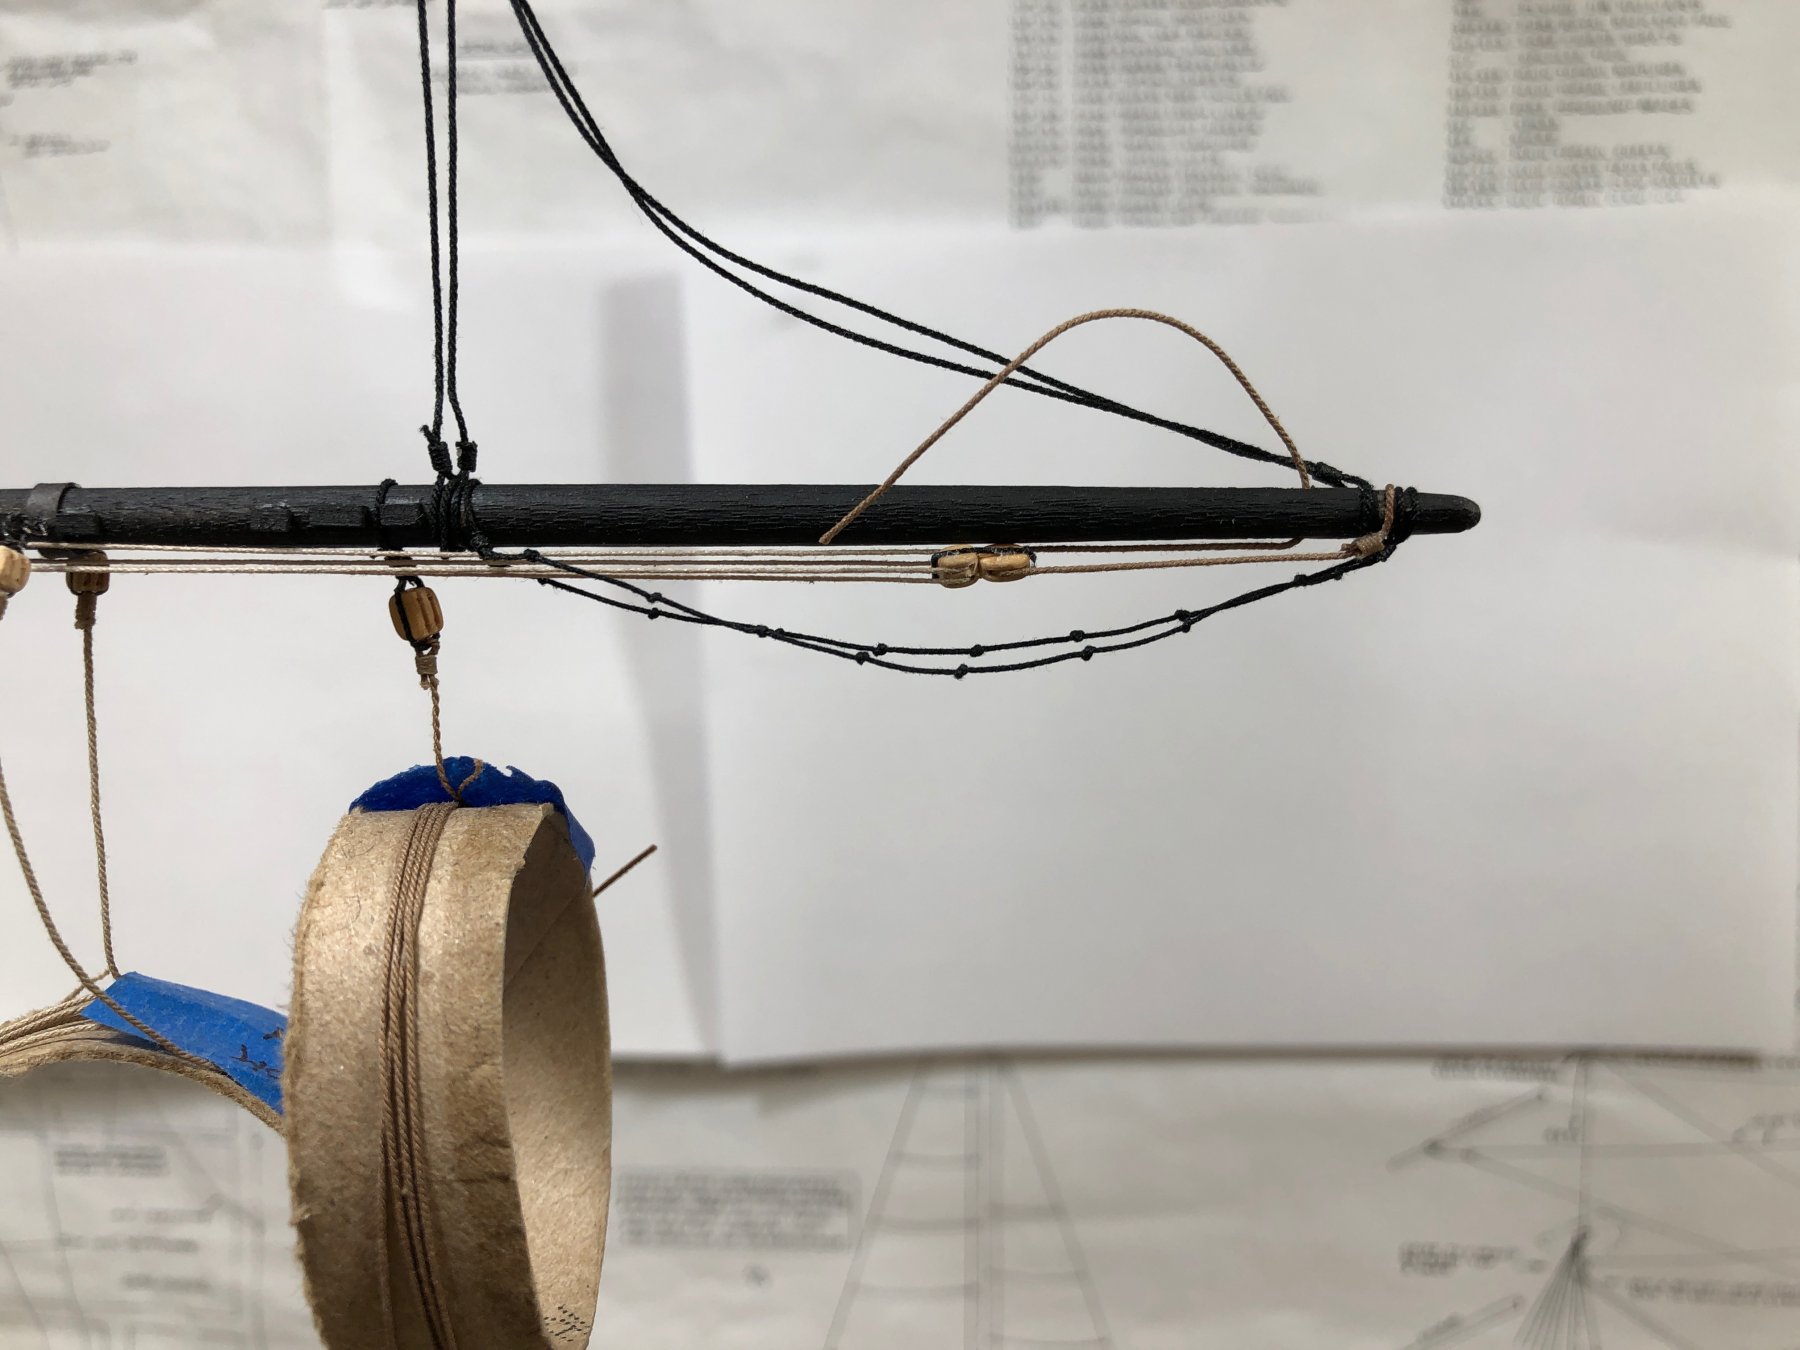
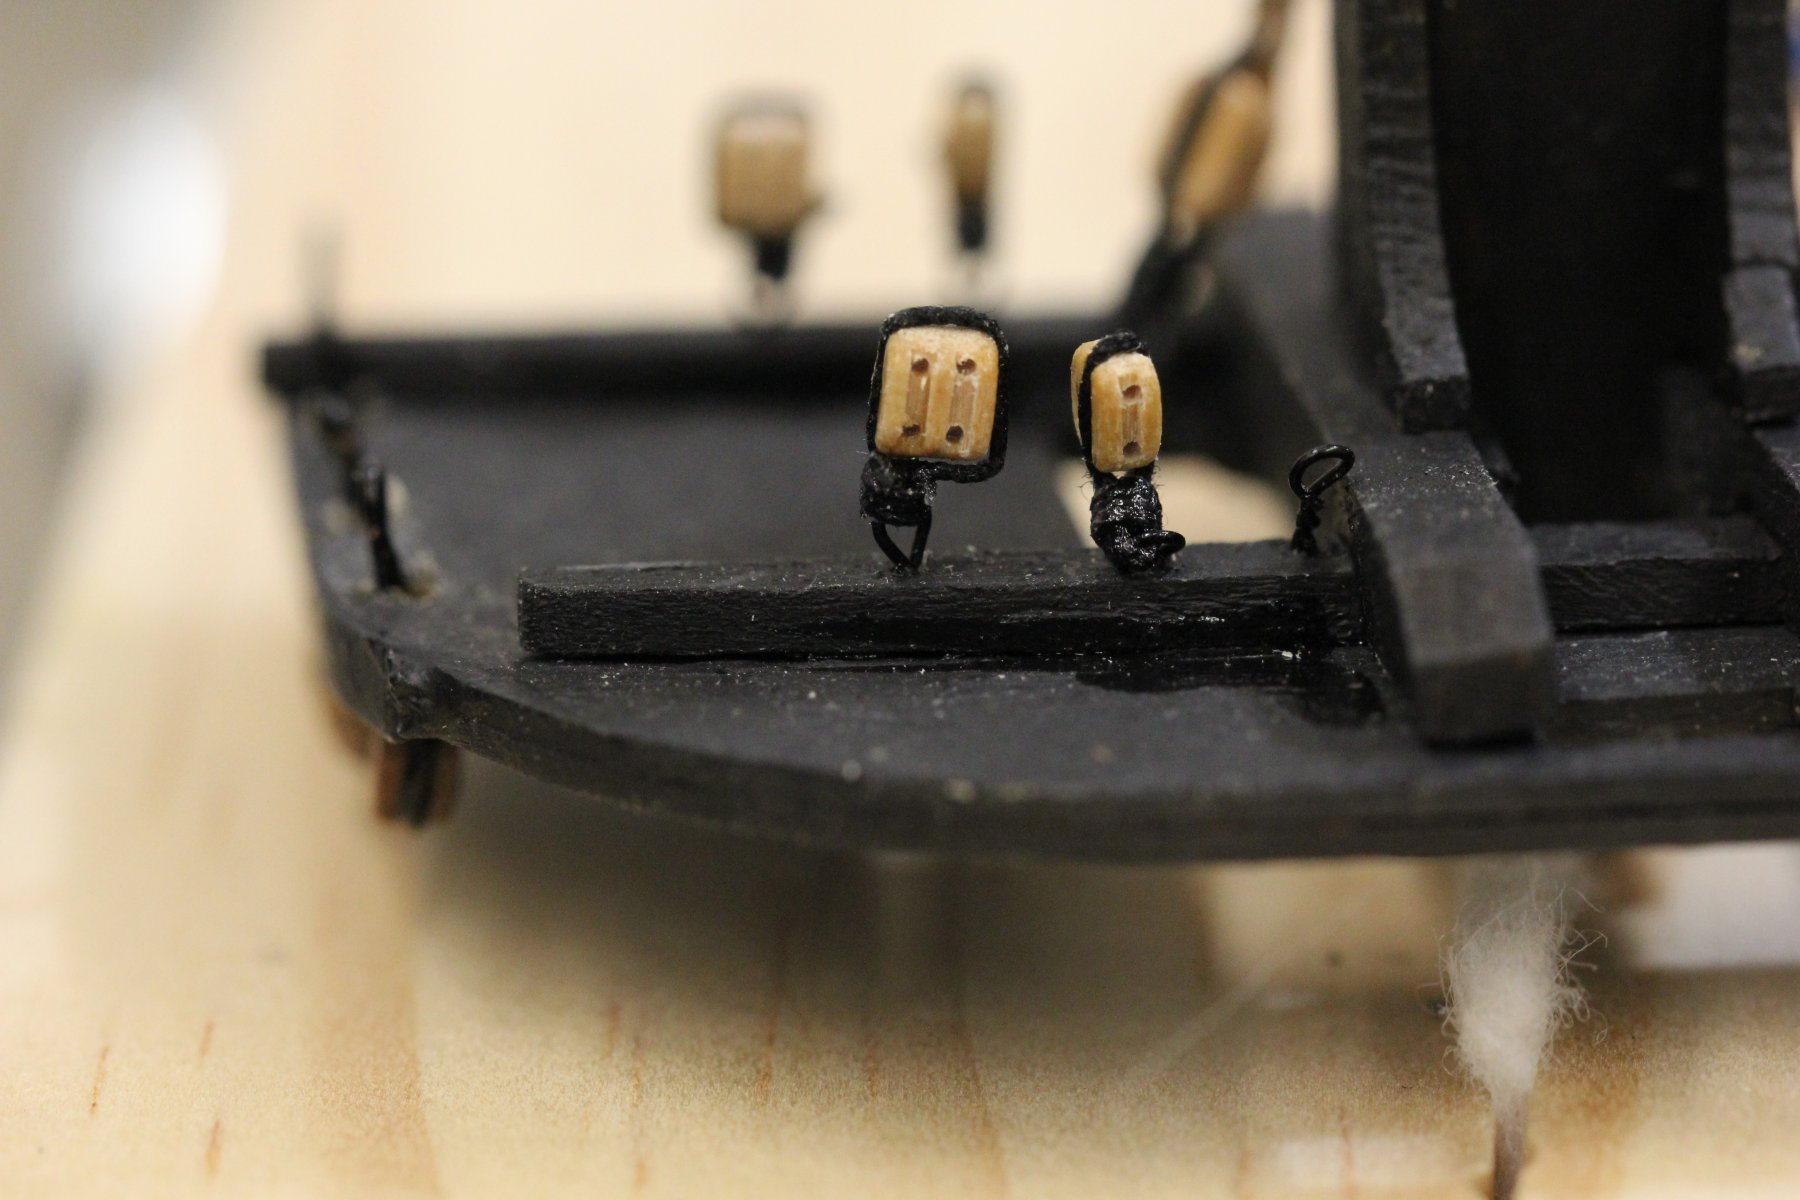
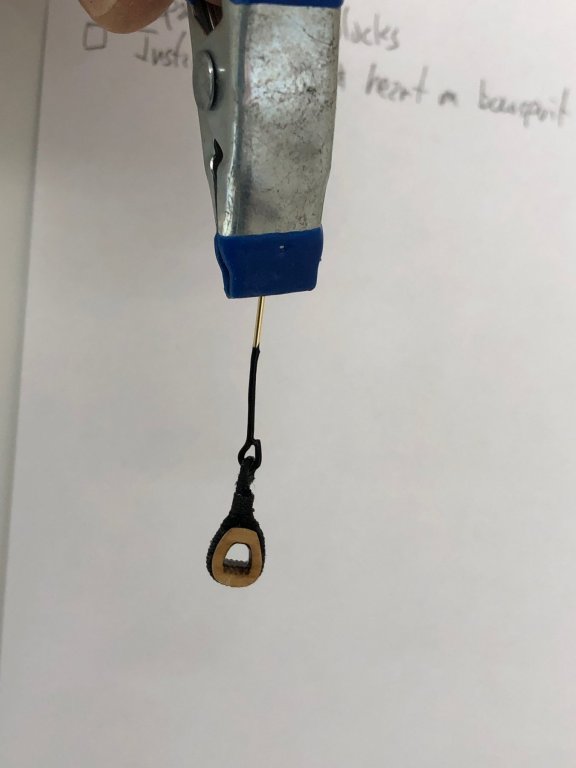
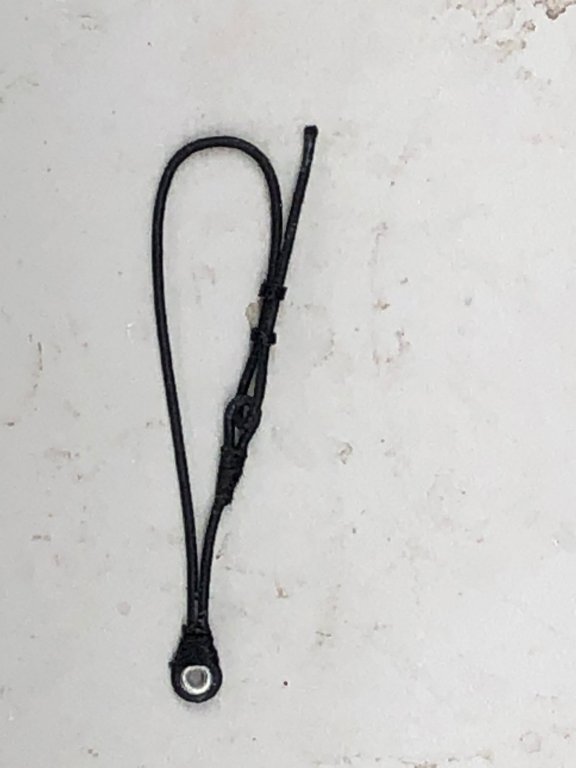
Continuing to work down the to do list. Fabricated the Main Preventer Stay connection to the bowsprit bitts. I used the Syren closed heart instead of the kit provided heart. The eyebolt goes through the stbd side bitt. I am going to put a bolt head (similar to what I used on the top of the capstan) on the other side of the bitt. There is enough strain on this eyebolt to justify bolting it completely through the bitt IMHO. I also completed the hardware on the Spanker boom. The two toilet paper tubes hold the running line for the boom sheet and the boom guys. The tan line on the left is the spanker outhaul which will be knotted off when the boom is installed. The black line with the Britannia bullseye (aka thimble) is one of the two spanker boom topping lift "trusses" (the other can be seen on top of the upper paper tube. Although not visible the foot ropes and the rest of the outhaul tackle are also installed. I will work on getting a better picture of the boom when I have to gaff done as well (hopefully tomorrow - but there is that "other" to do list...).
- 367 replies
-
- 1
-
-
- model shipways
- niagara
- (and 1 more)
-
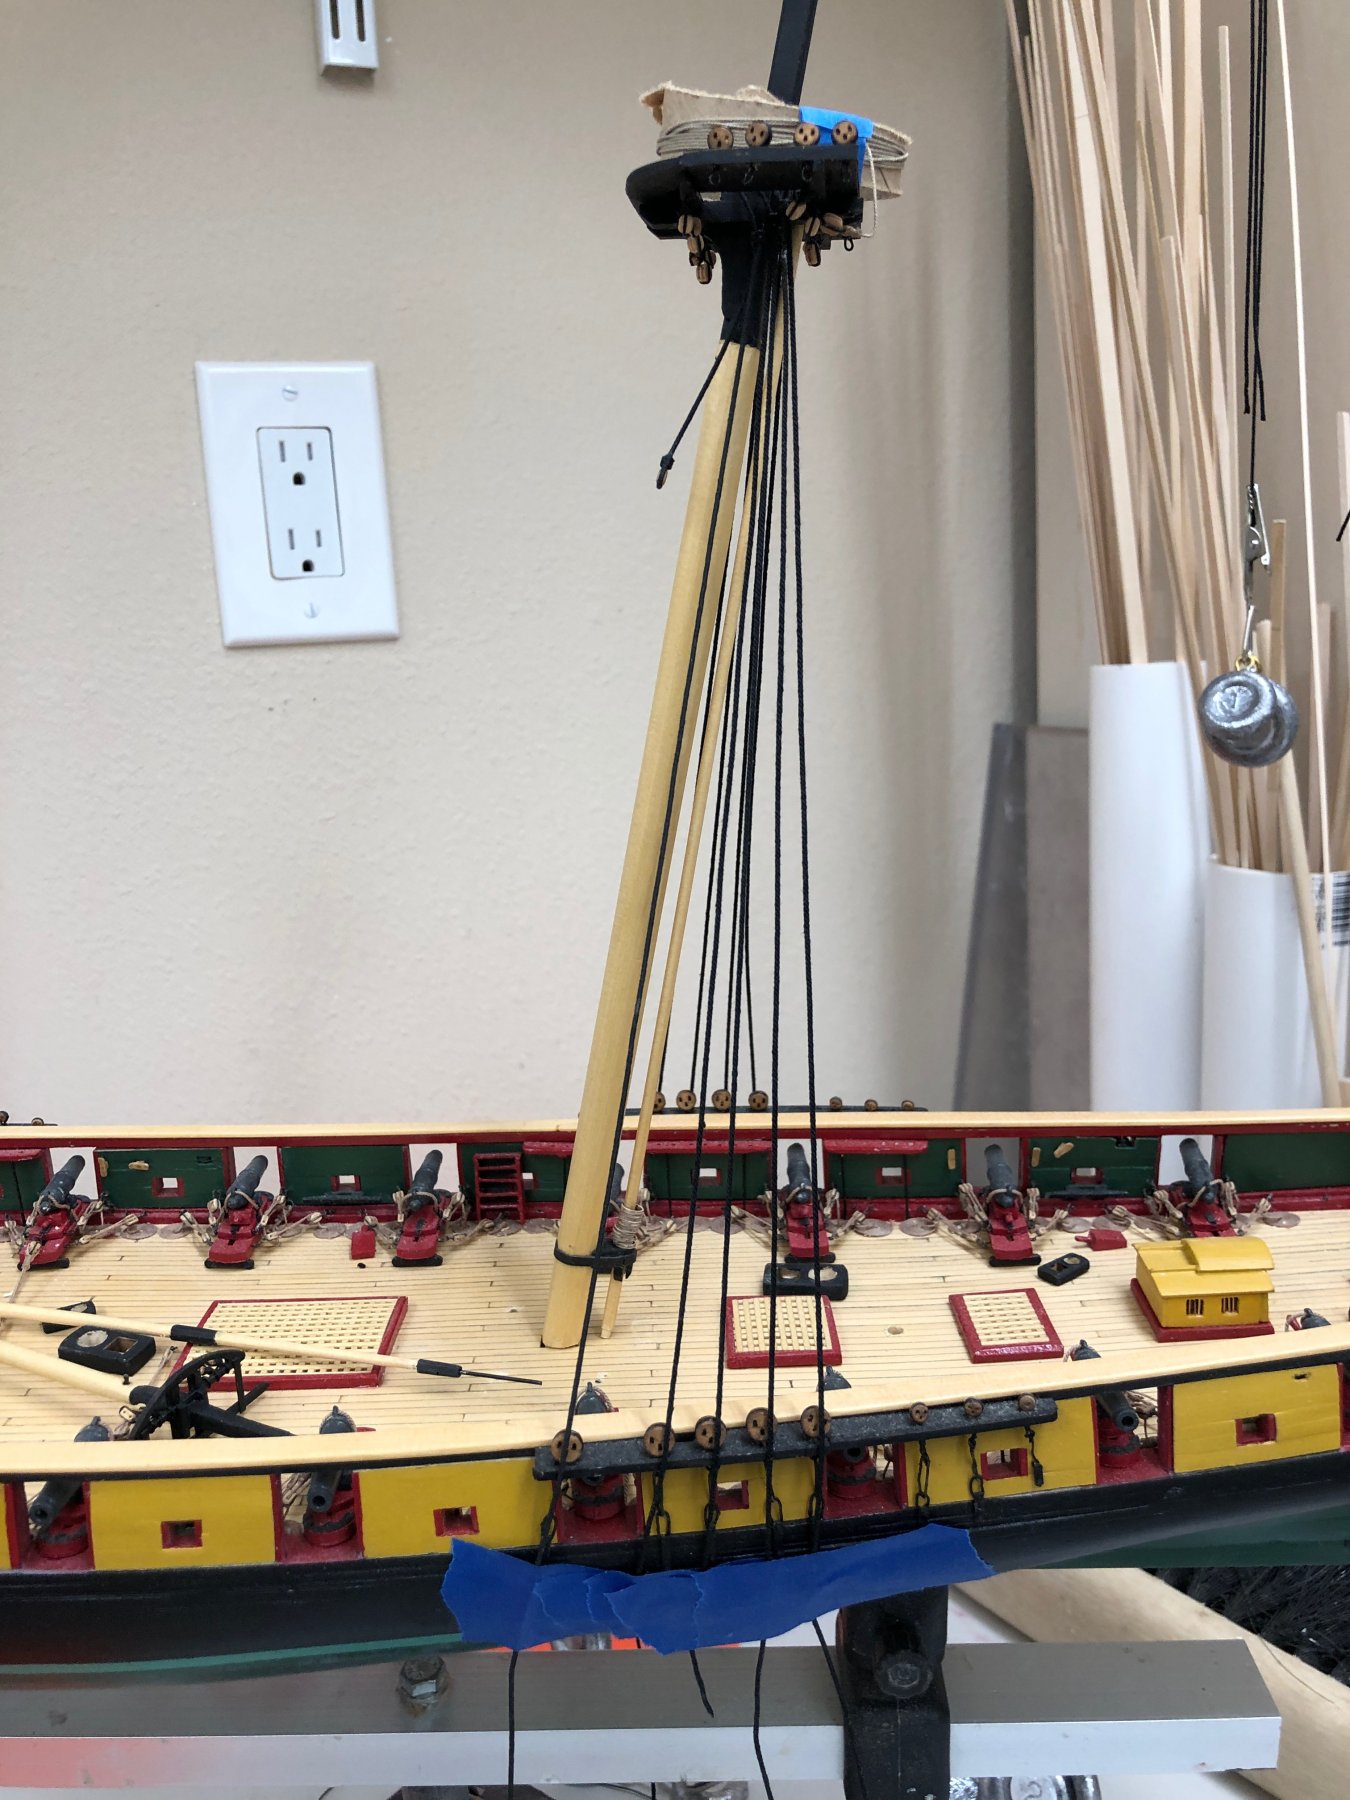
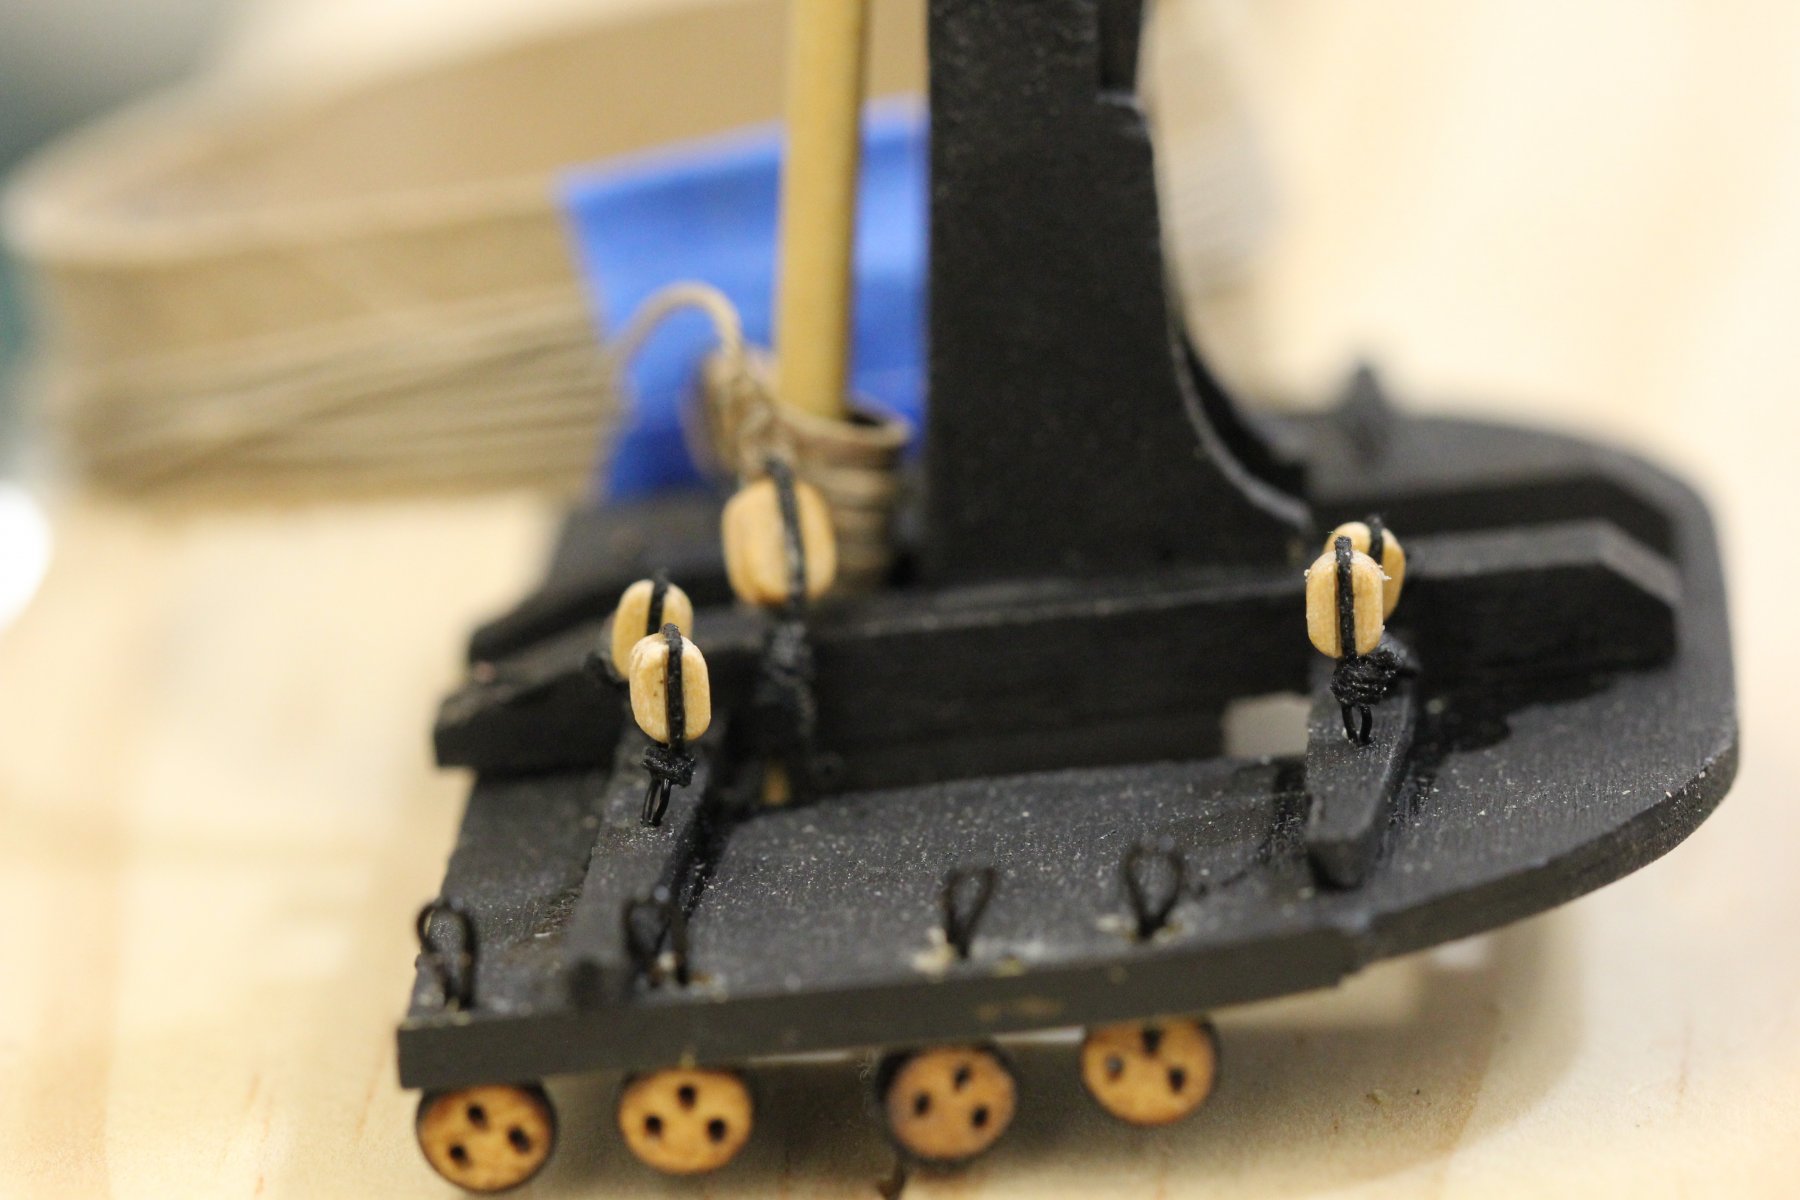
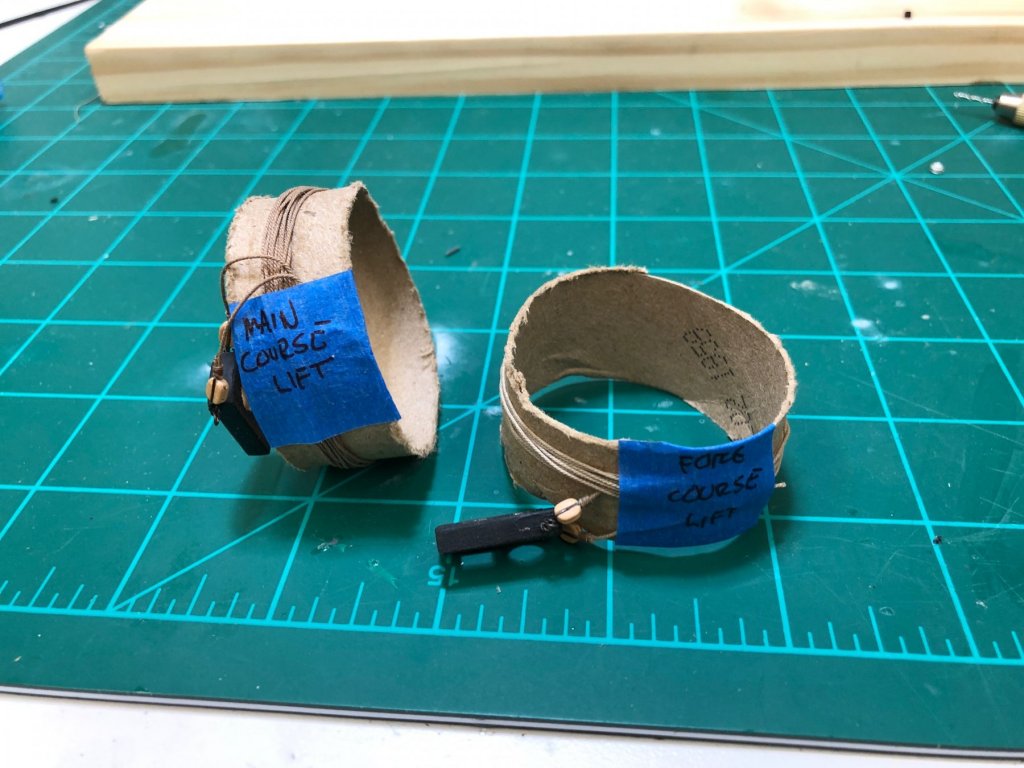
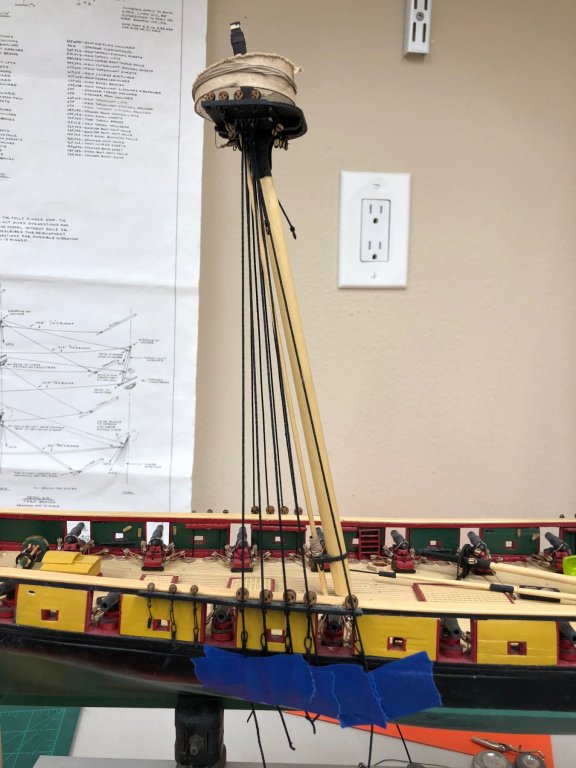
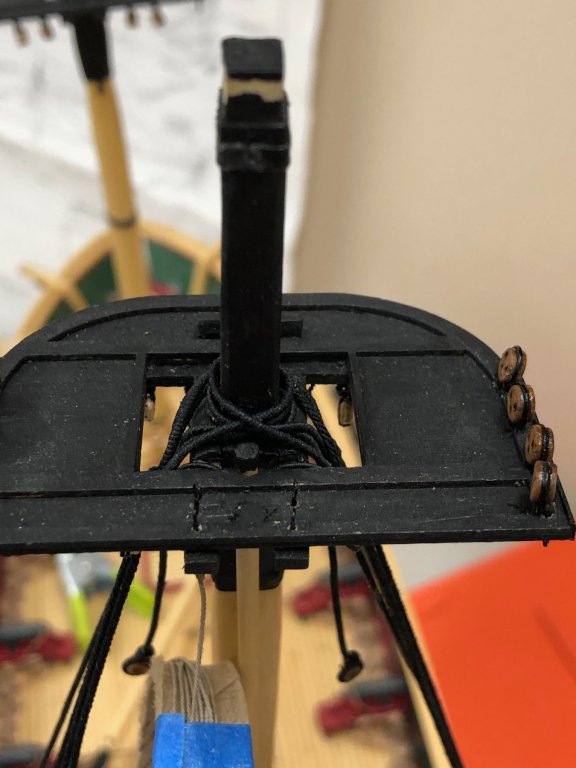
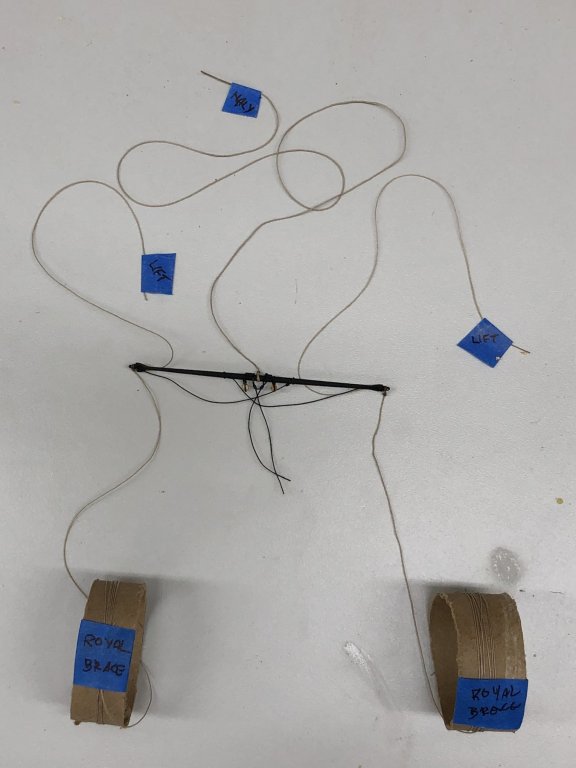
Continuing to work my way down the seemingly never ending "yet to do" list. I got one of the two course yard slings completed although I believe I have to wait until it is installed to adjust the final length. Since it passes through the forward most opening in the mast top I think it goes on the masthead after all the stays and shrouds are in place and thus it is hard to know exactly where on the masthead it will lay, and thus exactly how long it needs to be. I have the line for the other one served and am waiting for the 50/50 glue mix to dry before working the other sling. While studying the drawings for what seems like the 1000st time I noticed that the course yard lifts have blocks attached to the mast caps. These 5/32" blocks are the starting point (aka the blocks have beckets with the standing end of the running rigging attached) for the lift lines so I used some 5/32" blocks that I had stropped with wire and put eyebolts in the mast caps to hold the blocks. That is not exactly as shown in the plans but as has been stated many times "it is MY ship". The running lines (attached to the toilet paper tube) are extra long.
- 367 replies
-
- 2
-
-
- model shipways
- niagara
- (and 1 more)
-
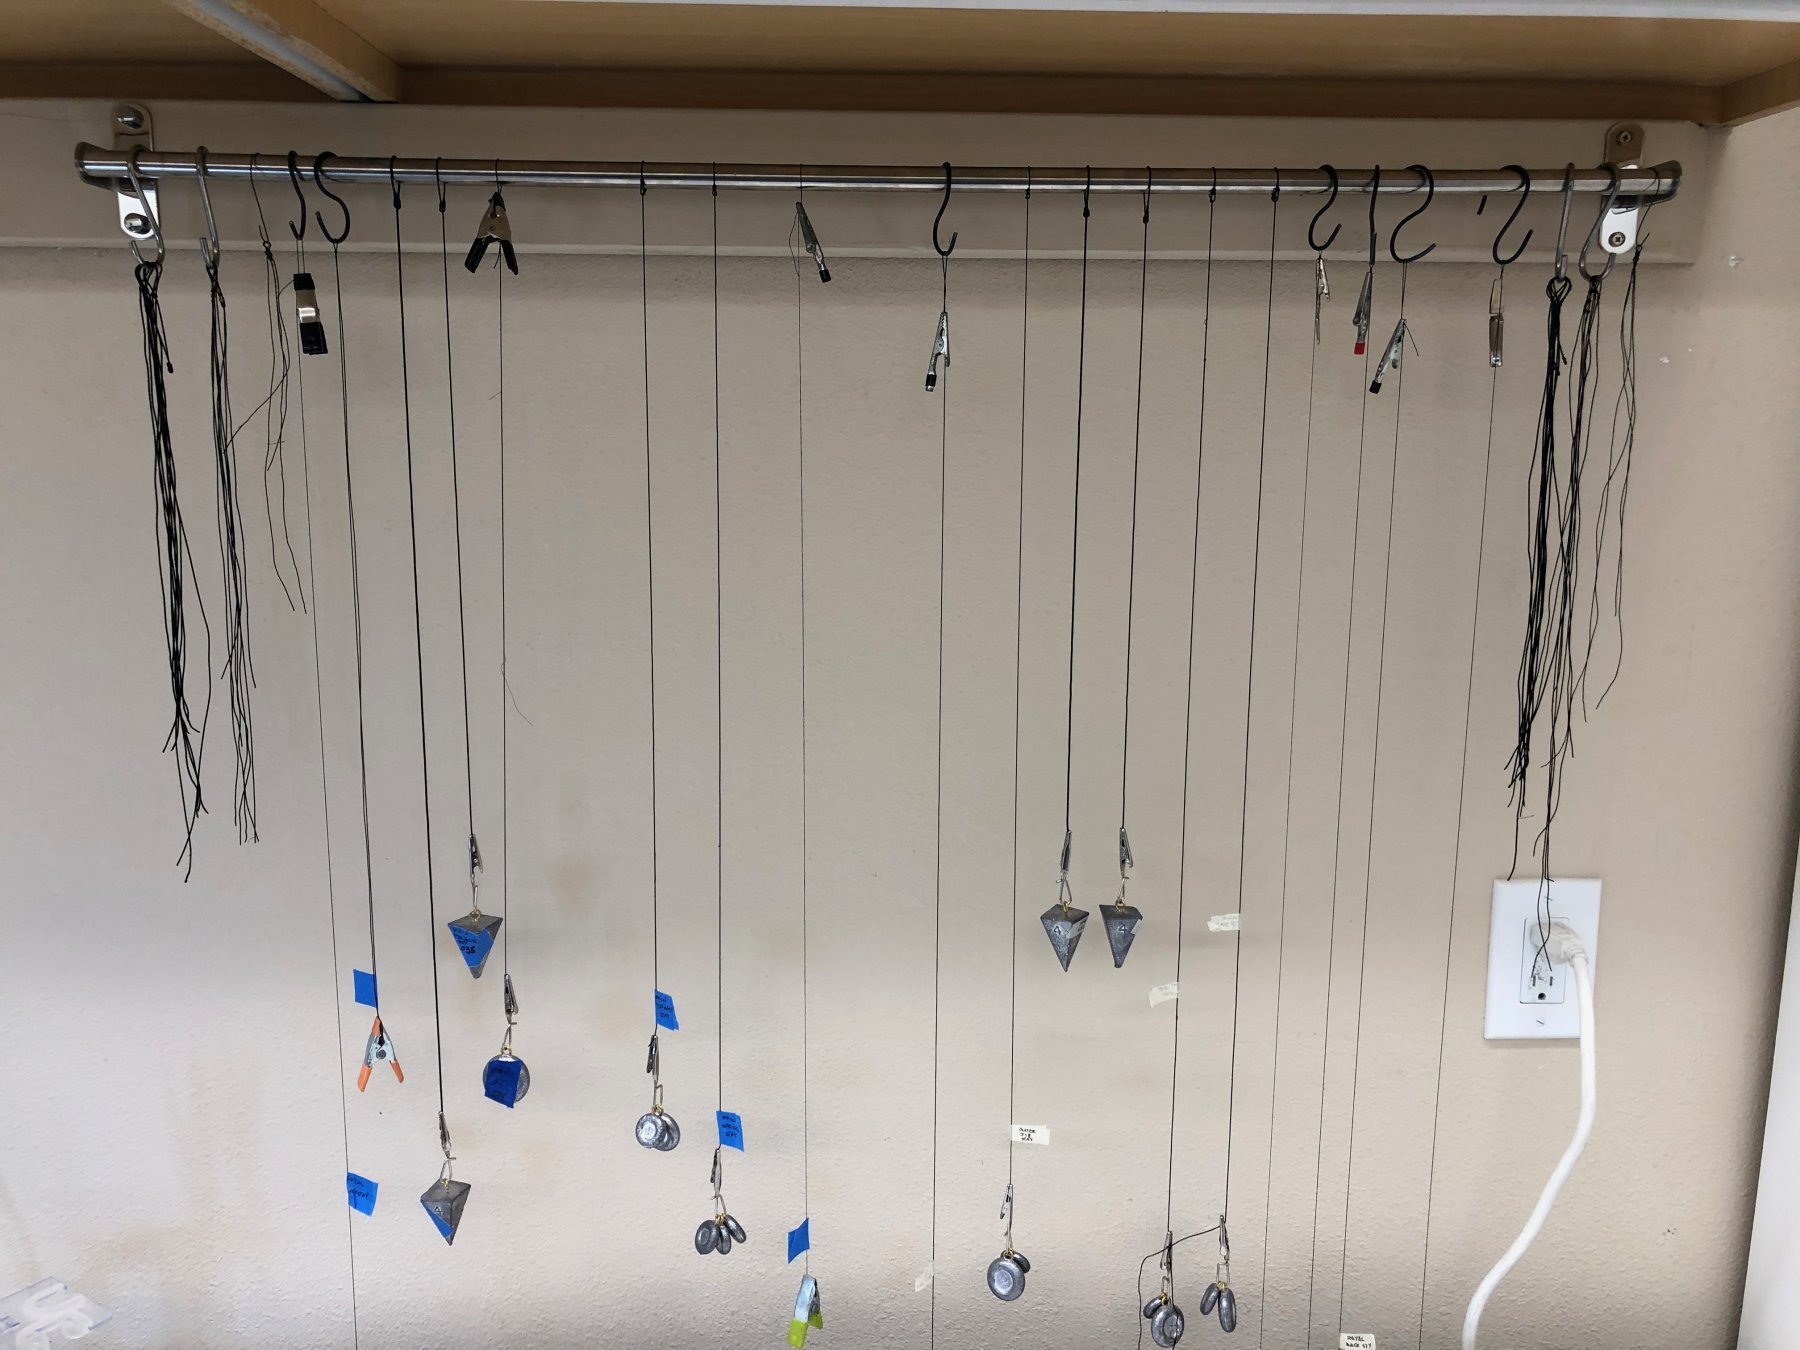
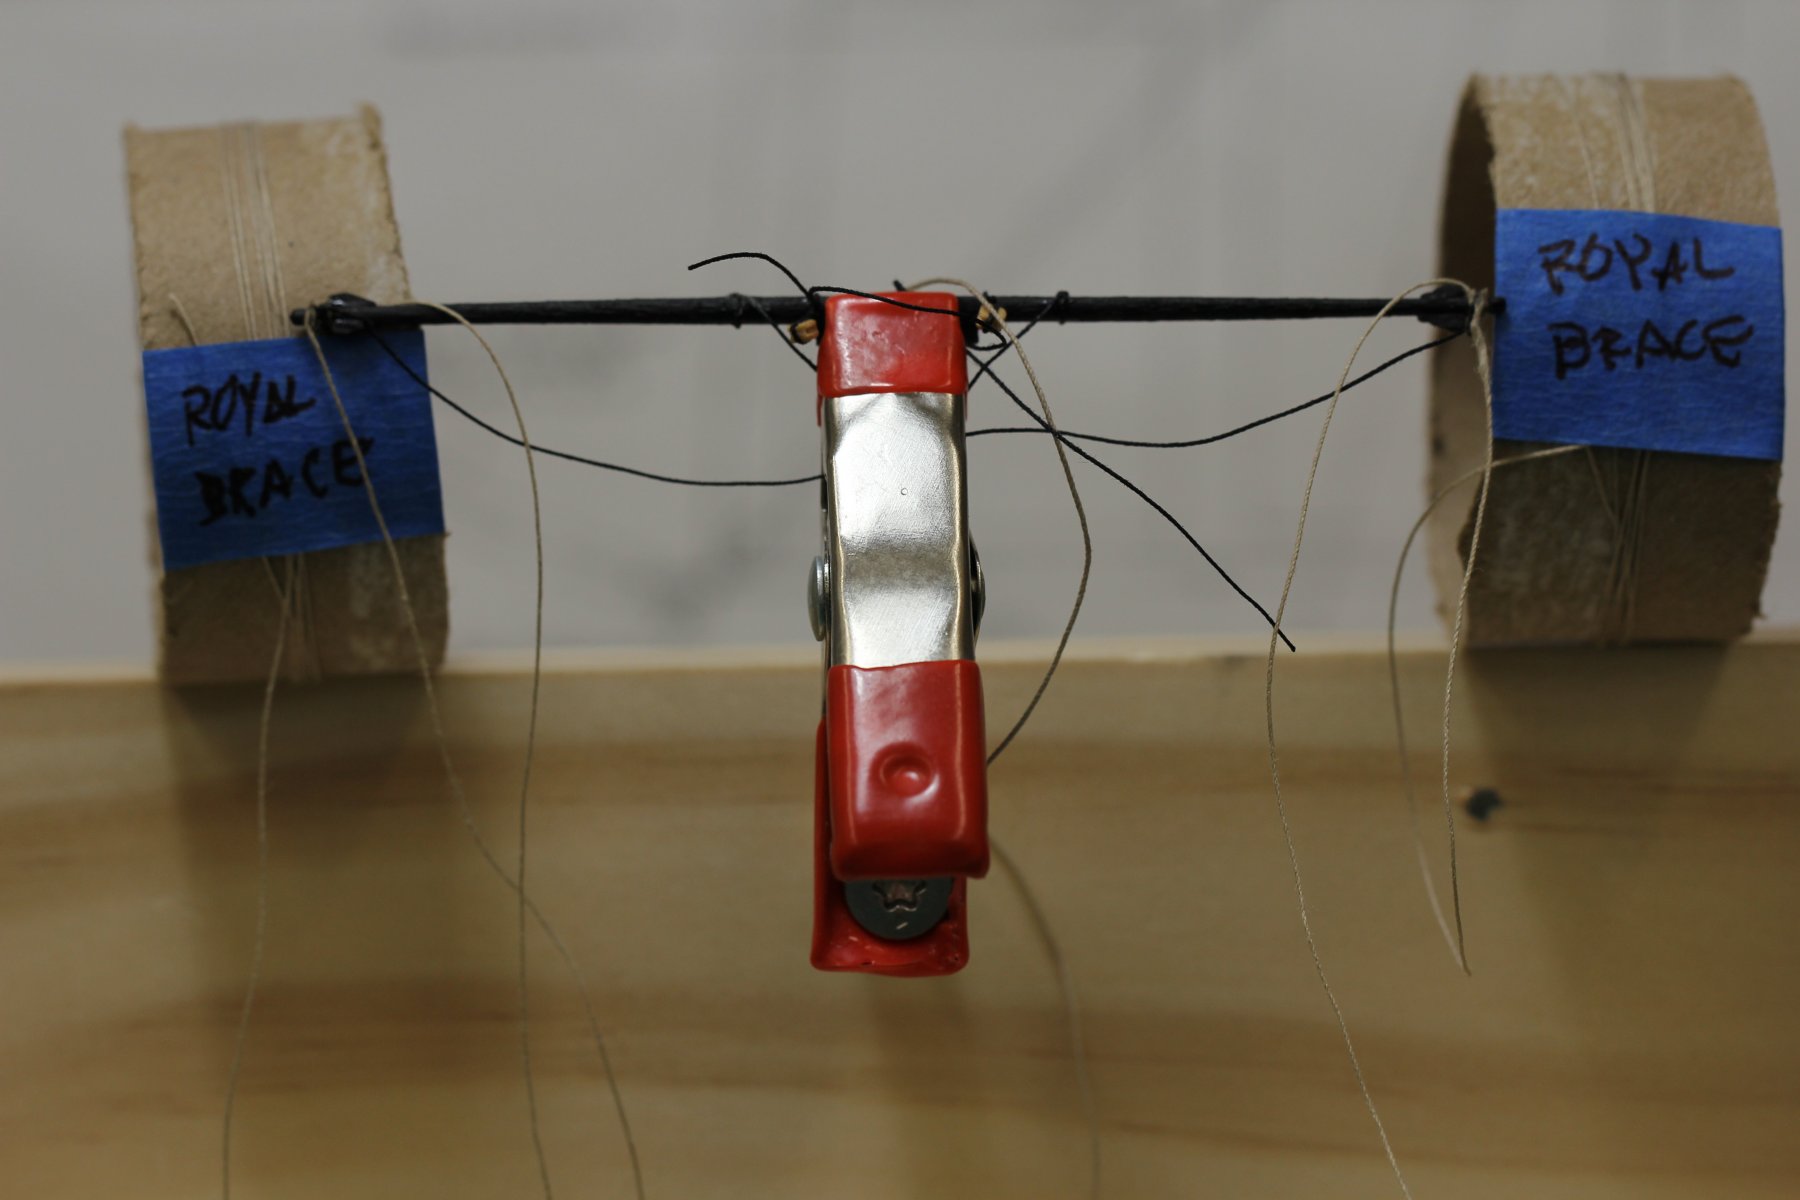
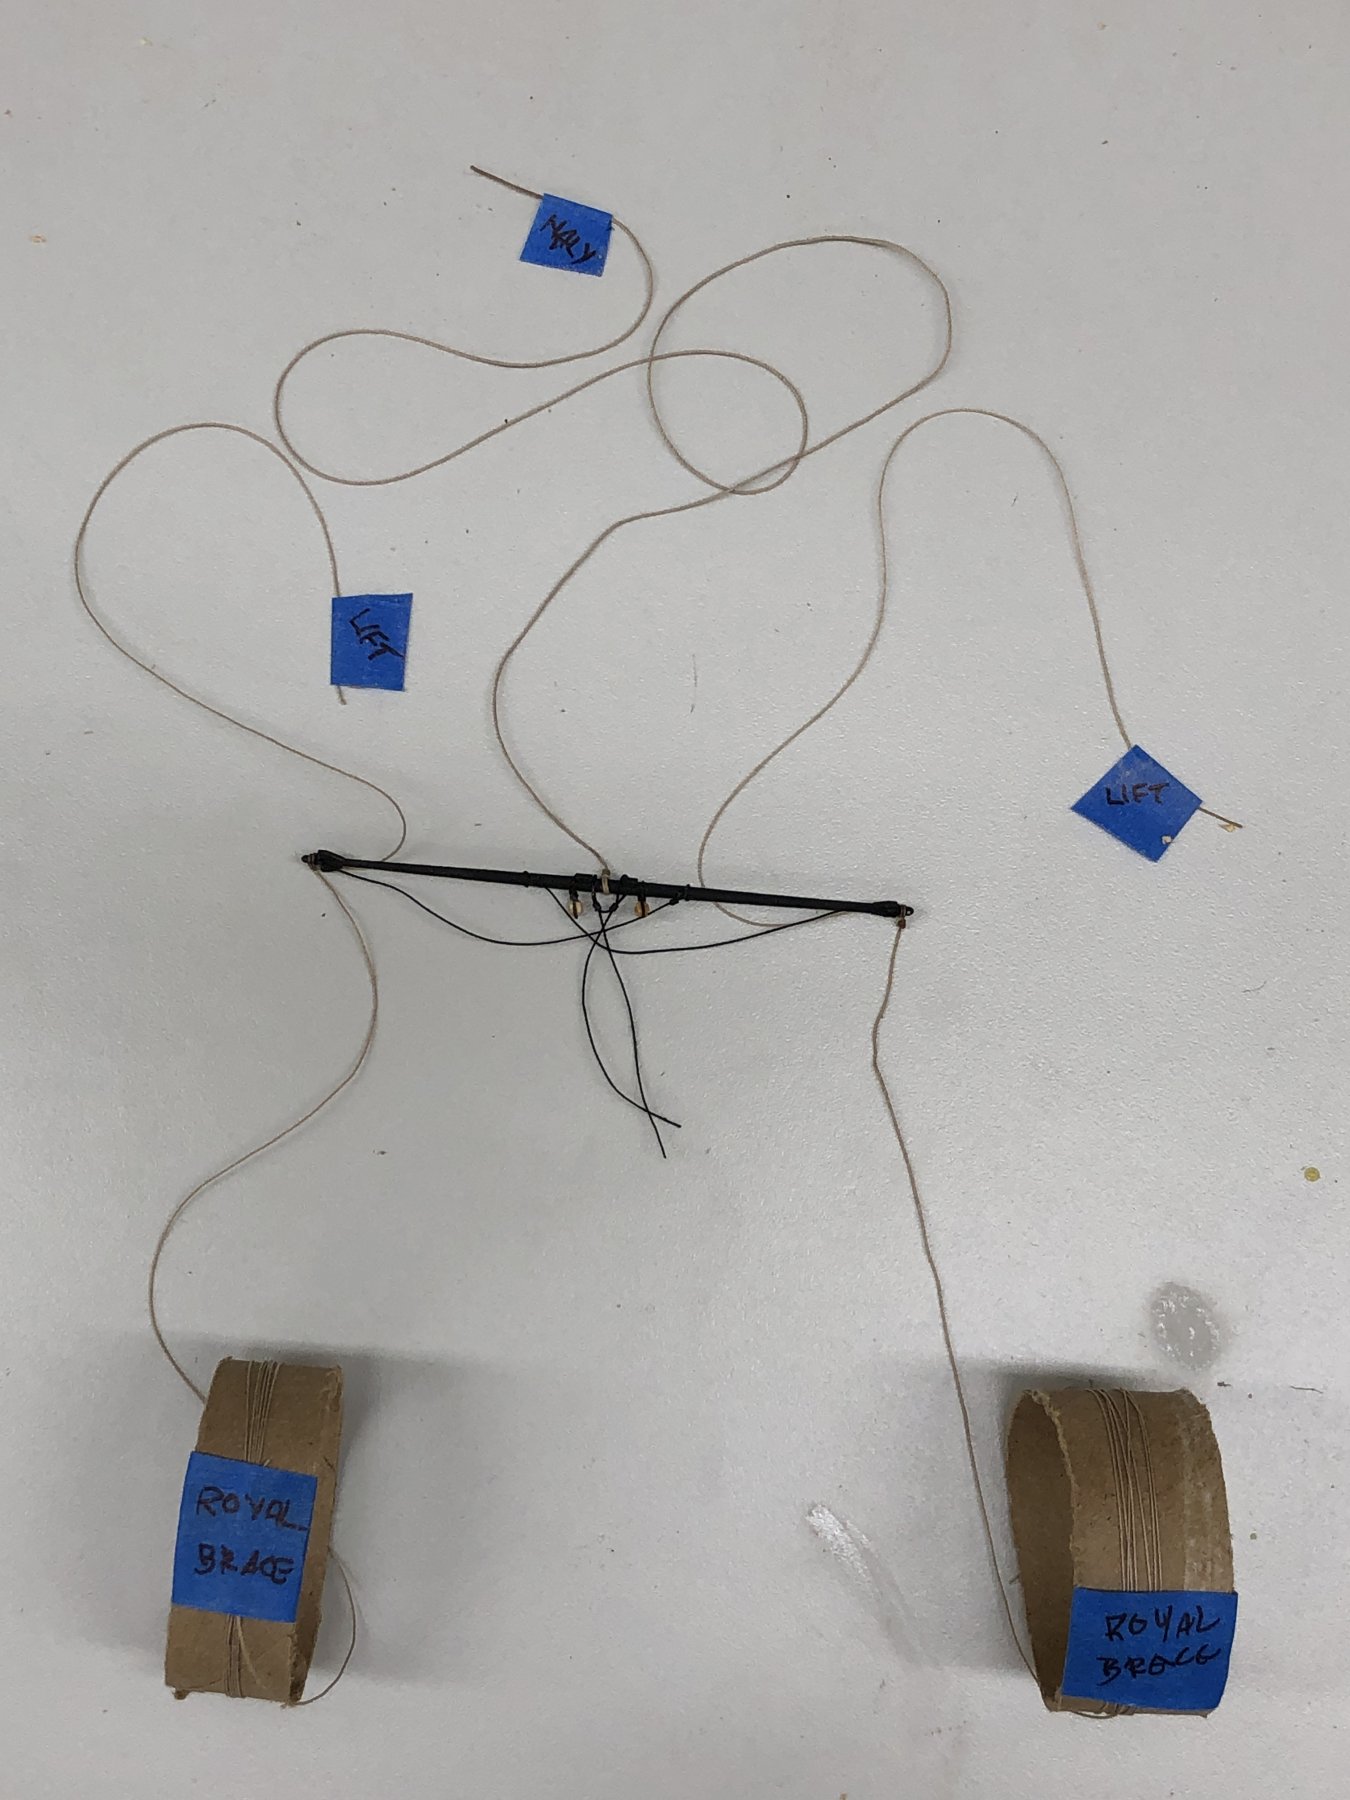
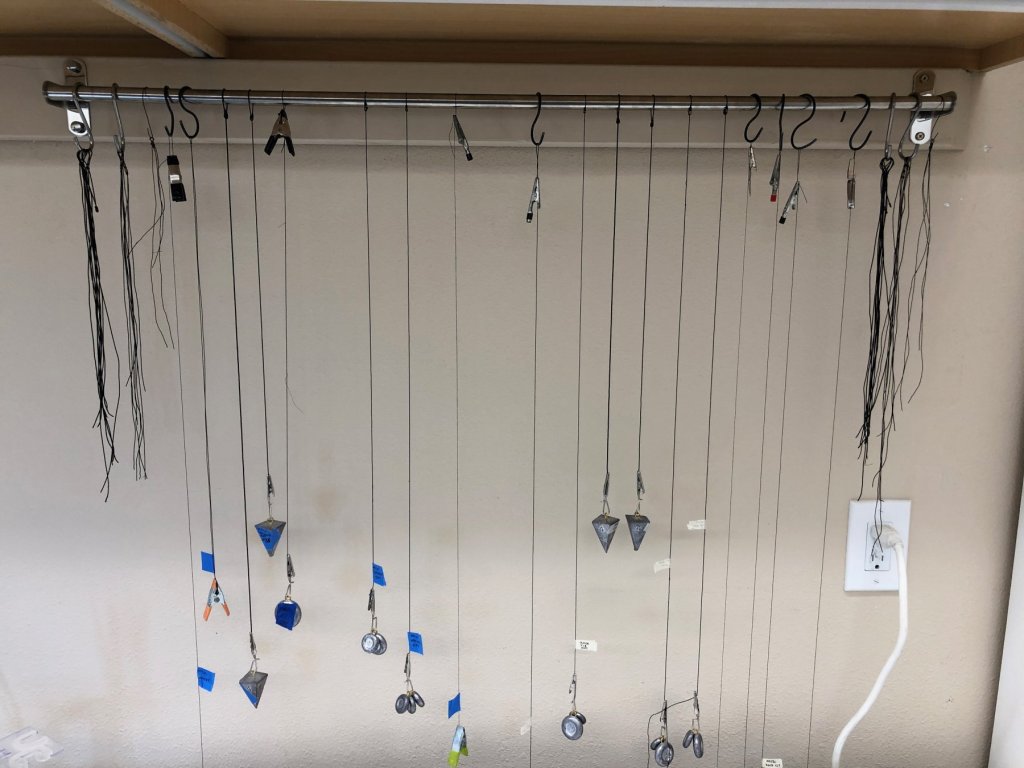
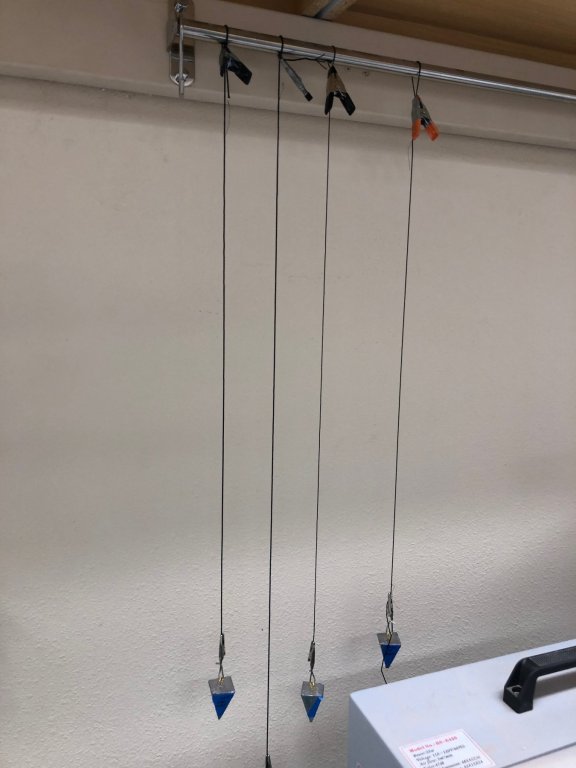
Since restarting work last Saturday I have been concentrating on getting the shrouds and stays served (using the Syren Serv-O-Matic) and otherwise ready for installation. That effort is now complete (pending one more review of the plans) and the shrouds and stays are shown hanging over the work bench getting the kinks introduced by the serving pulled out. The main mast's are on the left with blue masking tape labels, the fore mast on the right with tan labels. The shrouds are on the extreme right and left and at this stage are interchangeable between the masts. The plan going forward is to now focus on adding all the additional items to the hull (mostly eyebolts and such and finish the outfitting of the spanker gaff and boom. After that I intend to start putting the shrouds and stays on the masts, stating from the top and working my way down. I have not figured out yet how to keep all the lines from creating a huge mess and would appreciate any suggestions the followers might have.
- 367 replies
-
- 2
-
-
- model shipways
- niagara
- (and 1 more)
-
It has been almost two and a half months since I last worked in the shipyard and posted on this site. Unlike those in more temperate climates we Floridians have to get our outside work done in what is typically winter elsewhere. Otherwise you battle heat, humidity and afternoon thunderstorms trying to get those outside projects completed. Down here we do those in February - April. So now that the outside (other than the routine maintenance that has to be done on a more or less continuous basis) work list has been completed it is time to get back to ship building. I completed the lower shrouds for the main mast. Following the lead of others on this site I served entire length of only the forward most lower shroud (which is a single shroud with a Burton Pendant). On the others I served the center 2" which covers the portion that goes around the masthead and down to just below where they are joined. I did a test fit with the lower main mast and that is shown below. I am not going to step the masts until I have them as complete as I can get them (less the yard arms) which is going to be awhile yet.

- 367 replies
-
- 3
-
-
- model shipways
- niagara
- (and 1 more)
-
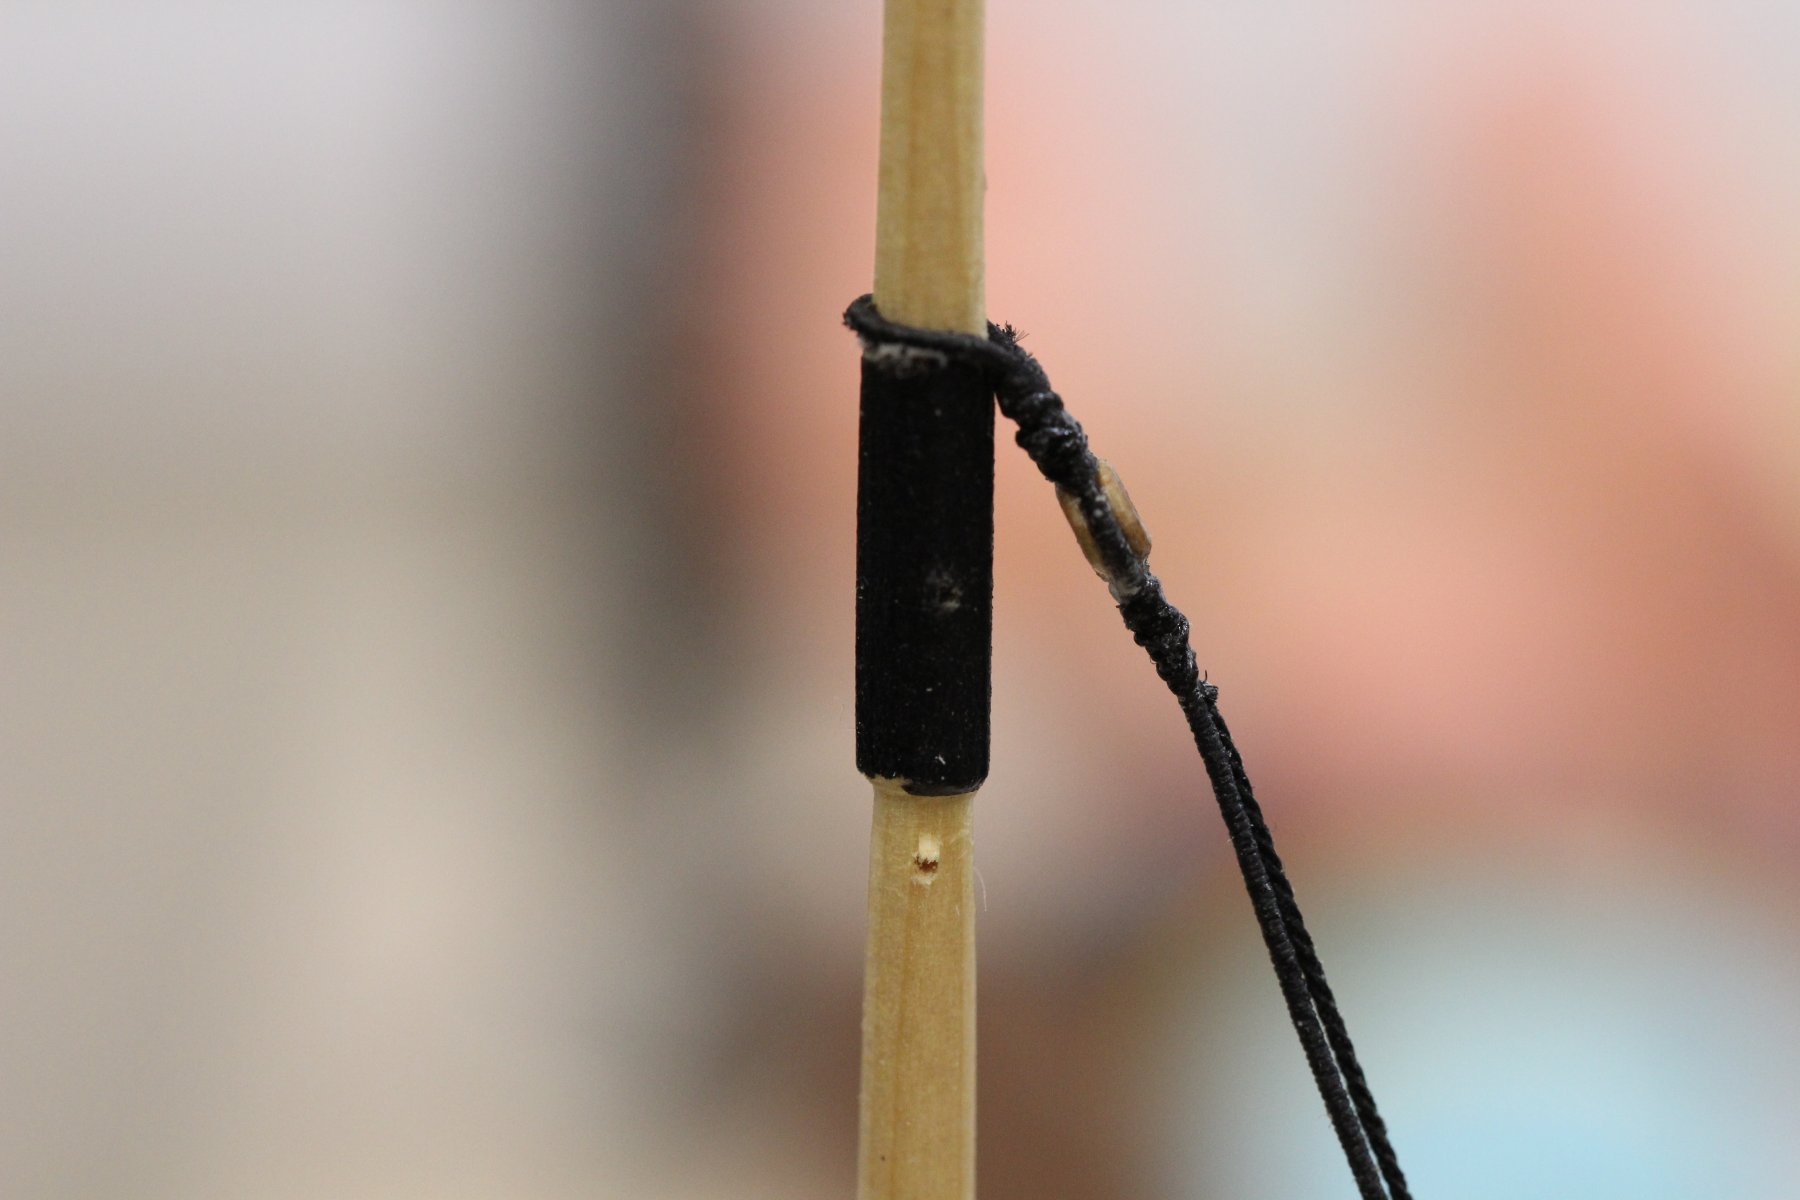
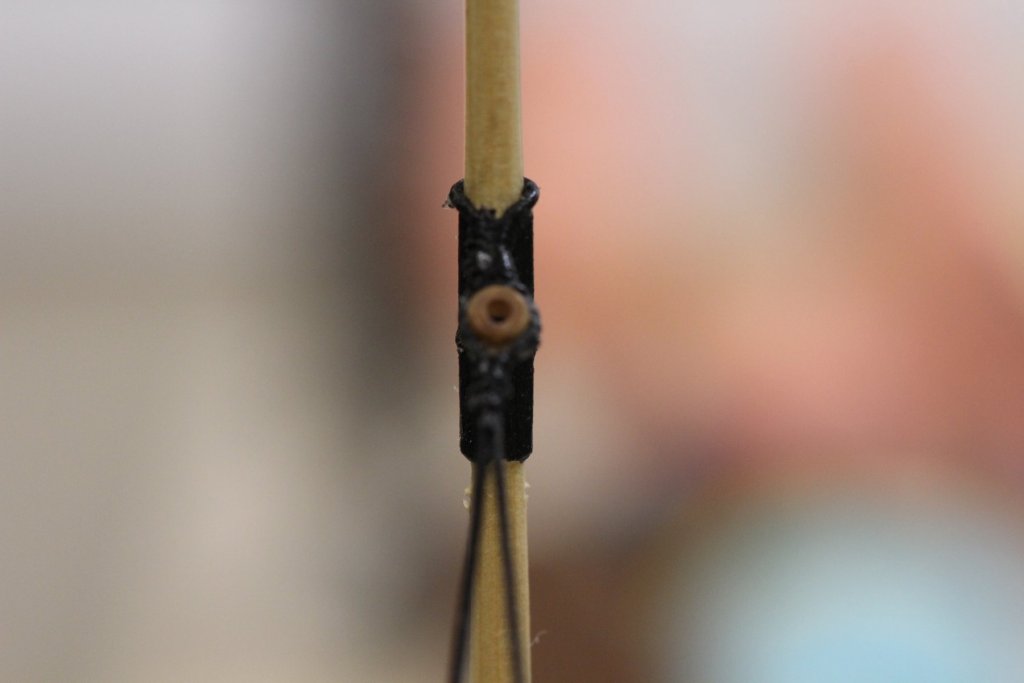
Test fit of first TG shroud to TG Mast. In the first image the served shroud is on the left. Since these are .018" line thr serving makes a significant difference in the overall diameter. I used 80 WT quilters thread as the serving thread. I used 100% polyester to seize the eye and "thimble" (actually a 1/16" wooden deadeye) in the shroud. Now all I need is to serve another TG shroud (there are only two so I get off easy on this one). Still having problems with depth of field. I'll see if I can get a clearer picture of the shroud eye and thimble.

- 367 replies
-
- 1
-
-
- model shipways
- niagara
- (and 1 more)
-
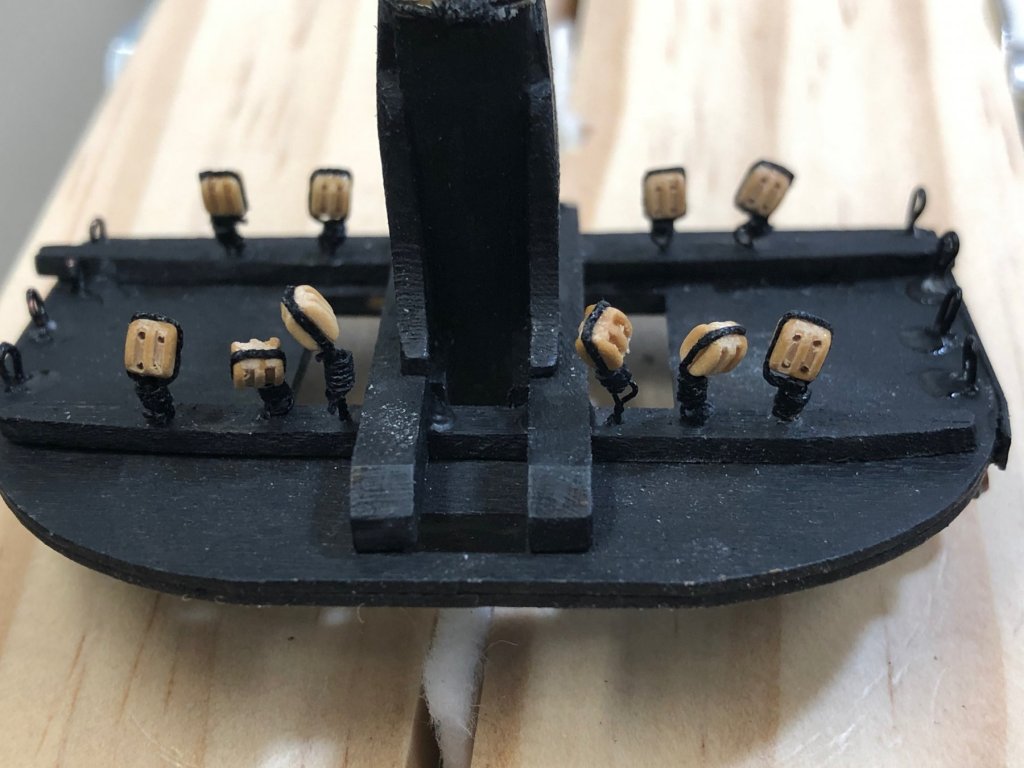
I added the four additional 1/8" single blocks for the bunt and leech lines to the fore and main top masts. It is getting pretty crowed up here. Should be fun at rigging time. I am reviewing the drawings again to see what additional items are required on the upper masts. Experimenting with techniques for incorporating the thimbles and blocks that are integrated with the TG and TS shrouds. This will be a first for me. All my previous builds had blocks attached to shrouds not integrated into the shroud as is done here.
- 367 replies
-
- 1
-
-
- model shipways
- niagara
- (and 1 more)
-
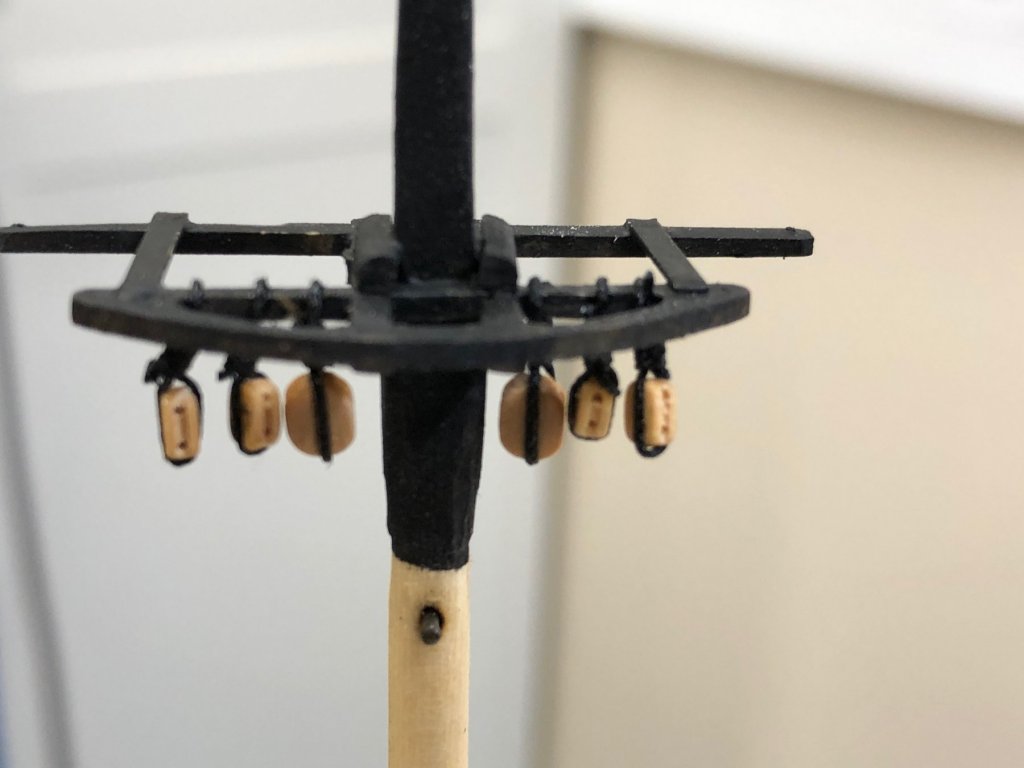
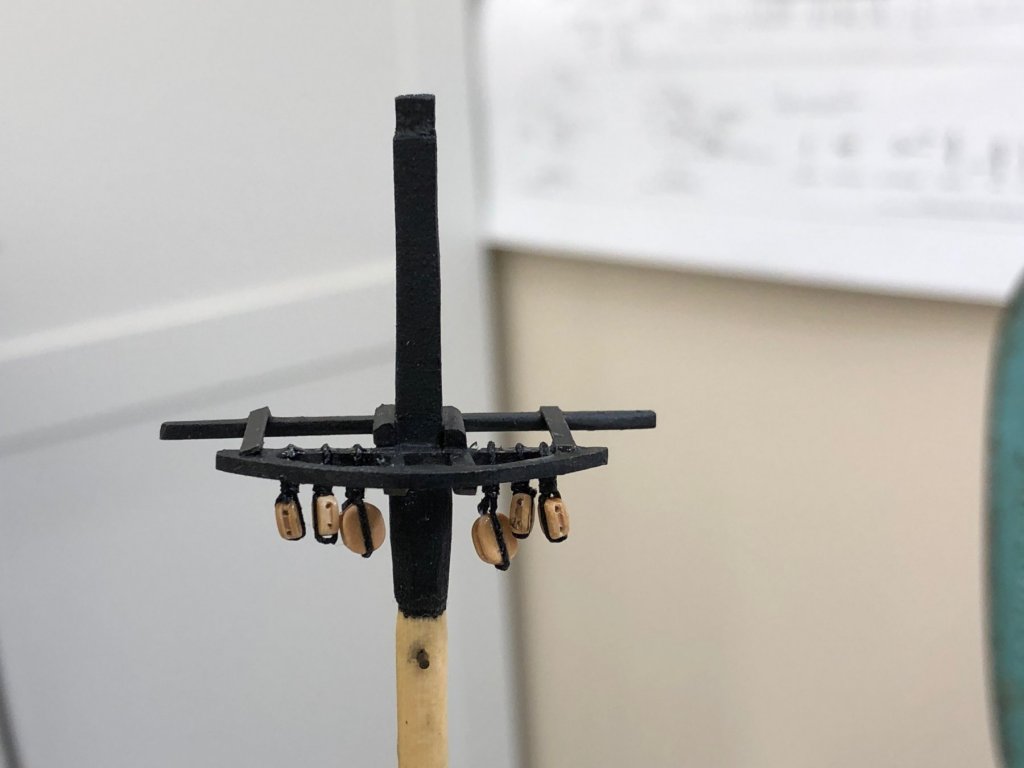
Finished adding the ten 1/8" double blocks to the underside of the Fore Mast top. Eight for bunt, clew and leech lines and two for the course yard lift. Now on to the Topmast where there are eight 1/8" singles - four on each mast.
-
When I assembled the "fighting tops" and started adding the blocks under the top for the clew, leach and bunt lines my intention was to use some extra blocks that I made up when rigging the cannons. Those blocks used wire strops and had hooks (made from twisting the wire on either side of then block together at the top and then forming a hook from the twisted wire. After thinking about it again, I decided to use rope strop and rig the blocks through the eye bolts instead of hooks. I can imagine a block coming unhooked or the hook breaking (don't ask me how I know about these things) at some point near the end of rigging where getting in there would not be very easy. The lower shrouds, topmast shrouds, carpathians, and some other stuff will all be in the way. So here are the blocks under one side of the platform, doubles on the outside per the plans. Still working on getting the depth of field worked out on the macro lens. At about two feet from the subject I can't get both the front and back of the platform in focus at the same time.

- 367 replies
-
- 2
-
-
- model shipways
- niagara
- (and 1 more)
-
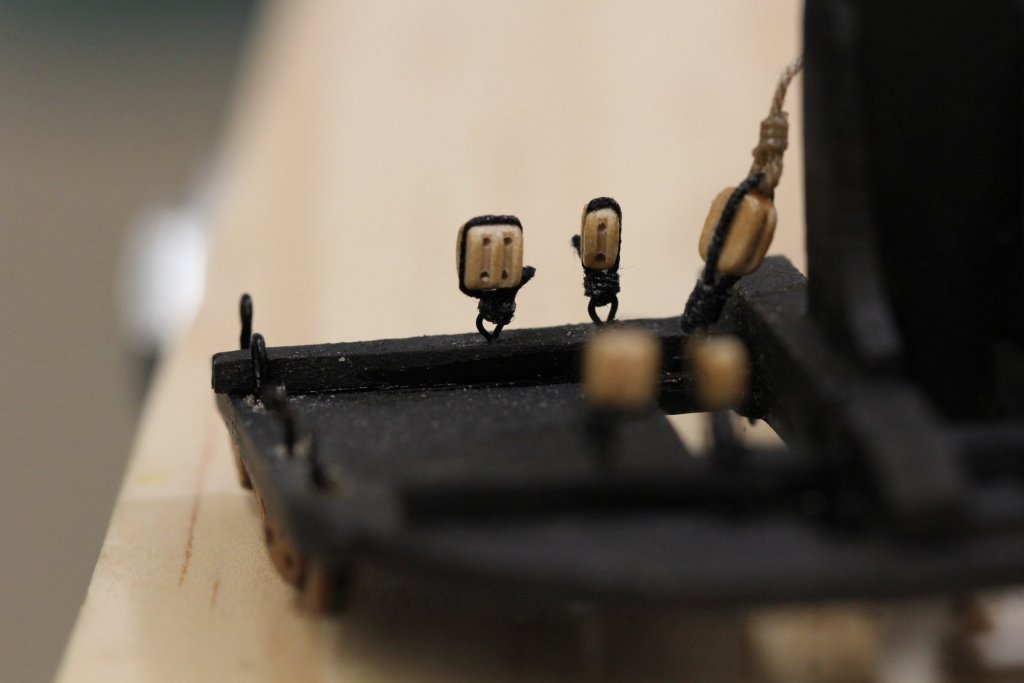
The final yardarm (Main Royal) complete, or as complete as I am going to make it before it is installed on the mast. And this is the first picture not taken with my iPhone X. Form now on I will try and capture photos using my Canon 60D with 100mm Macro Lens. Hopefully my model making skills will be forced increase since the pictures are more likely to show the flaws with the increased resolution and sharpness (I can't tell much difference on the computer screen but maybe those of you with higher resolution displays can see some difference. According to the site this picture is about twice the size (4 Meg) of the typical iPhone photo (2 Meg). I am going to concentrate for the next few days on serving the line needed for the shrouds, starting with the topmast shrouds since I in tend to assemble the masts from the top down, at least until that proves unworkable for some reason.

- 367 replies
-
- 2
-
-
- model shipways
- niagara
- (and 1 more)
-
Completed one (Fore since the braces lead aft) Royal Yard. Included the parrel, halyard, lifts and the clew blocks. One more yard to go. I also started to serve the shrouds. I decided to completely serve the forward most shrouds at all three levels on both masts. These are the ones most likely to be chafed by the yards. For the others I will serve the portions that wrap around the mast and over the bolsters. Am considering what to do about serving the stays. The Main and Fore Stays and Preventers were, I think, served their entire lengths so I am preparing to do that. I would think the stays that actually carry sails (like the Flying Jib Stay) would have at least the portion of the stay that carries the sail served as the hanks would be a constant source of chafe with each variation in the wind speed or direction. Also some of the stays (Fore Top Gallant for instance) have a sheet line that crosses of the stay which would also tend to chafe the stay as the sheet lines move with the sail. I have the Syren Servo-Matic and can serve a 15" length of .035 line (shroud size) in about 15 minutes. I hang the lines up with a 4oz fishing sinker attached and apply another coat of 50/50 glue-water and let it hang while it dries. You have to coil the line on the Servo-Matic (it does about 7" of line at a time) and this leaves some bends in the served line that seems to come out if you let it hang awhile. One more yardarm to go!!
- 367 replies
-
- 1
-
-
- model shipways
- niagara
- (and 1 more)
-
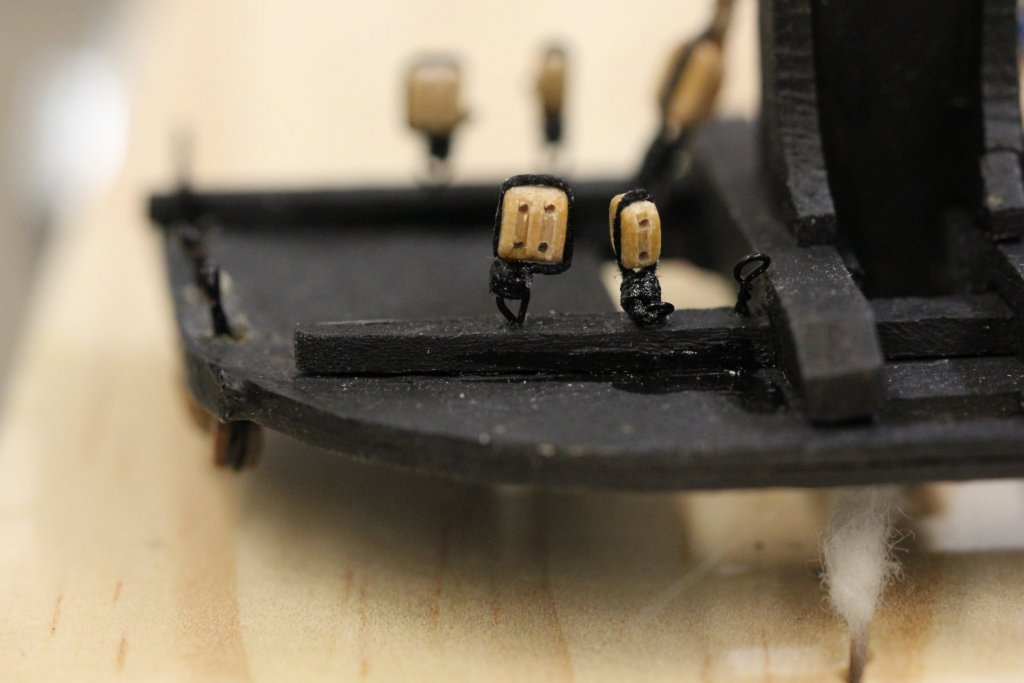
I got the second TG Yard outfitted today so I have the two Royal yards yet to go. Based on a preliminary look at the plans they should be the easiest of all. Here are both yards with the lift lines and halyards already attached. I spent part of yesterday putting the bunt and leach line thimbles on those yards. I have decided to put the blocks for these lines on the mast/shrouds but tie off the lines at these thimbles (so I have 6 more thimbles on each course yard, and two on each TG yard which I thought I just finished). On the Top Sail yards I used .010 wire and a 1/16 Bluejacket bull eye for the thimble. That was a challenge getting the wire threaded around the bulls eye. If I have to do 18 more I think I will just form an eye in the end of the wire. It seemed like it was way more effort than is warranted. So on to the Royal Yards

- 367 replies
-
- 2
-
-
- model shipways
- niagara
- (and 1 more)
-
Spent most of the day (except for that afternoon nap) working on the Fore Top Gallant Yard. I think I got all the blocks and line required installed and will move to the Main TG Yard tomorrow. Two pictures below show the yard in two stages of completion. With and without the lift and halyard. I used .010 annealed steel wire for the stirups on this yard instead of the Syren line as I did on the lower yards. Seems to look okay and I will consider this for future builds. Getting an eye in the Syren line that is small and not too noticeable is something I have not mastered. Especially difficult when you get to the smaller (.012 and .008) sizes.

- 367 replies
-
- 2
-
-
- model shipways
- niagara
- (and 1 more)
-
I took a few days off to accompany some friends from the frozen North (Minnesota) on a short cruise to the Bahamas and upon return found that whatever the issue with the pictures has apparently been resolved. I can get the pictures into the preview frame successfully at any rate. I did however get the Canon 100mm macro lens for my digital SLR but it is going to take some practice (and finally reading the camera manual) before I can get the picture I intend. So no work has gotten done for a week but the shipyard has reopened and I think I remember what I was doing - yardarms I think.
- 367 replies
-
- 1
-
-
- model shipways
- niagara
- (and 1 more)
-
I tried to upload some old photos from my Canon EOS 60D (about 4-5 Megs each) and have run in to the same problem. Not sure what I can do at this point but assume it is a site problem that hopefully gets fixed sometime soon.
-
I also tried using both Safari and Firefox and got the same results with both so it is not a browser issue. Something is different with the photo images but I have no idea what that might be.