sheepsail
-
Posts
109 -
Joined
-
Last visited
2 Followers


-
 Canute reacted to a post in a topic:
Billy 1938 by Keith Black - FINISHED - 1:120 Scale - Homemade Sternwheeler
Canute reacted to a post in a topic:
Billy 1938 by Keith Black - FINISHED - 1:120 Scale - Homemade Sternwheeler
-
sheepsail reacted to a post in a topic:
Gjoa 1872 by Jond - 1:48 scale - Amundson's Cutter
-
sheepsail reacted to a post in a topic:
Billy 1938 by Keith Black - FINISHED - 1:120 Scale - Homemade Sternwheeler
-
vvvjames reacted to a post in a topic:
Billy 1938 by Keith Black - FINISHED - 1:120 Scale - Homemade Sternwheeler
-
Ryland Craze reacted to a post in a topic:
Billy 1938 by Keith Black - FINISHED - 1:120 Scale - Homemade Sternwheeler
-
 Keith Black reacted to a post in a topic:
Billy 1938 by Keith Black - FINISHED - 1:120 Scale - Homemade Sternwheeler
Keith Black reacted to a post in a topic:
Billy 1938 by Keith Black - FINISHED - 1:120 Scale - Homemade Sternwheeler
-
 As others said, great work. I am going to miss the progress reports on this one. It truly is inspiring. Even if I am a bit stuck on my main project. -julie
- 393 replies
-
- 4
-
-
-
- Billy
- sternwheeler
- (and 1 more)
-
sheepsail reacted to a post in a topic:
SY Aurora (1876) by Tecko - 1:80 scale - diorama
-
 sheepsail reacted to a post in a topic:
Endurance by GeneralNuisance - OcCre - 1:70
sheepsail reacted to a post in a topic:
Endurance by GeneralNuisance - OcCre - 1:70
-
sheepsail reacted to a post in a topic:
USS Bagley (DD-386) by catopower - 1/200 - Avangard - CARD
-
catopower reacted to a post in a topic:
Forester 1900 by sheepsail - Model Shipways - 1:128
-
Keith Black reacted to a post in a topic:
Forester 1900 by sheepsail - Model Shipways - 1:128
-
Looking forward to it. Progress is slow. I still need to work out the stern. Probably rushed some of the planking. I did do some more work with the laser program last week. -julie
-
sheepsail reacted to a post in a topic:
Forester 1900 by sheepsail - Model Shipways - 1:128
-
catopower reacted to a post in a topic:
Forester 1900 by sheepsail - Model Shipways - 1:128
-
catopower reacted to a post in a topic:
Forester 1900 by sheepsail - Model Shipways - 1:128
-
sheepsail reacted to a post in a topic:
Gjøa 1872 by Harvey Golden - Roald Amundsen's Cutter built at Rosedahl, Norway
-
sheepsail reacted to a post in a topic:
Endurance by Pierre Greborio - OcCre - 1:70
-
sheepsail reacted to a post in a topic:
USS Bagley (DD-386) by catopower - 1/200 - Avangard - CARD
-
sheepsail reacted to a post in a topic:
Endurance by Pierre Greborio - OcCre - 1:70
-
Tecko reacted to a post in a topic:
Forester 1900 by sheepsail - Model Shipways - 1:128
-
You are sore tempting me to this ship. While before my time I love the SF connection. The SF Chronicle has a photo archive. A friend of mine has used it to get high quality photos from the SF Fox which was a theater scrapped too soon. The paper also advertises that old photos are available. From time to time reporters will find interesting unpublished photos. I am not sure how much of this is scanned. Might be possible to locate a high quality version of the deck photo. The halftone, like the only know photo of the Saginaw is pretty course so even this could possibly be cleaned up a bit. -julie building a Forester lumber schooner.
- 63 replies
-
- 2
-
-
- Northwest passage
- Norway.
- (and 2 more)
-
The kit parts are done with a 3 color halftone process. I did a lot of testing of that in the 1990s when I worked for Apple. Between Apple contracts I also worked for a company what was working on solving the process of archive scanning mechanically screened halftones. This was a merger of several companies and included Itek what did the cameras on the Moon, Apollo and Mars missions. (a story in itself.) The scanner was the size of a refrigerator (valid unit of measure, like garages, tennis courts and football pitches.) took 20 minutes to boot and calibrate. Could take a full sheet of The USA today and rotate it. I thin though the resolution remained 300dpi, which was about 8 times to low. As I recall the images were over a gigabyte. and stored on zip drives. Too bad we did not have terabyte drives back then. The company failed while I was in New Hampshire. When I had returned they had removed and sold the multi gigabyte drive I was using for testing along with all the test data. I was lucky that I was on non refundable flight, or I would have been Stuck in NH as they were looking to cash in the return ticket. Ironically I returned to the failing Apple, but we were able to save Apple, and the rest as they say is history.) Anyway, I sometimes play with the research that was salvageable. Part of why I collect 1990s Kodak scanners and reverse engineer the driver code, which Kodak intentionally destroyed. The problem is that the halftone screens only work at the frequency and more importantly the phase they are cut at. So scanning adds all sorts of aliasing. Compression destroys any correlation. The phase intentionally removed as it is perceptual noise. So when the image is scaled, even if the halftone frequencies are removed, they jump back in. Most math geeks throw away the phase data, since it is too abstract and random. Way off topic here. Although I find it interesting. (and You have met me in person so know how I can info dump.) Square pixels (and square wave audio.) Are finite infinities. These can be represented by the sums of sins and cosine waves. The sums are unbounded infinities. So the resulting pixel (singularity) can not be completely recovered. This is actually what is underneath the hood of AI. Again, the phase is tossed out with the bathwater, in the brute force models that pass these days for lottery tickets. In the case of multi color printing (can be done with 3, commercial is done with 7 or 11 and include florescent inks to capture the purples and other abstractions in vision perception.) The pixels are blobs. Such just look like images of stellar objects (which are also infinite point sources.) Ideally they have sharp square edges. (The Saginaw images does have some nice square edges.) So it takes a microscope (1200 to 1600 dpi) (I use dpi but it is actually cycles per radian.) To capture the edges of the pixels.) Most images are free of ink. (or saturated black point.) Prepress operators know almost intuitively how to set the color traps. The colors in the kit image do show the rosettes, so the halftone screens are probably fairly low. Macro shots (even with compression can capture some of this data.) Not sure if anyone ever solved the problem that caused Network Picture Systems to fail. The datasets needed are ginormous, and the desire is for low resolution stuff that can be transferred over the net. Some illusions could probably be done with AI. Either way baeysian estimators and other statistical models are used to capture the low level data in complex number space. aka the square root of -1 which is not really imaginary (being the singularity at the center of a lens as well as a myriad of other things like what shocks you when touching a battery or capacitor. ) Did not mean to digress so far. The short version is you need to microscope photograph the original rotated to the phase of the halftone screens under color filter, then in theory the separations could be recovered and used to produce new images. I think modern printers use the low resolution (300/600/1200) stochastic screens to image the results. Which is good news for those making quality models, as it is difficult to pirate or replicate the quality that purchasing a model from those who know how to do proper prepress and printing can do. -julie (who is building a Forester, and really wants to work on the Saginaw instead.)
-
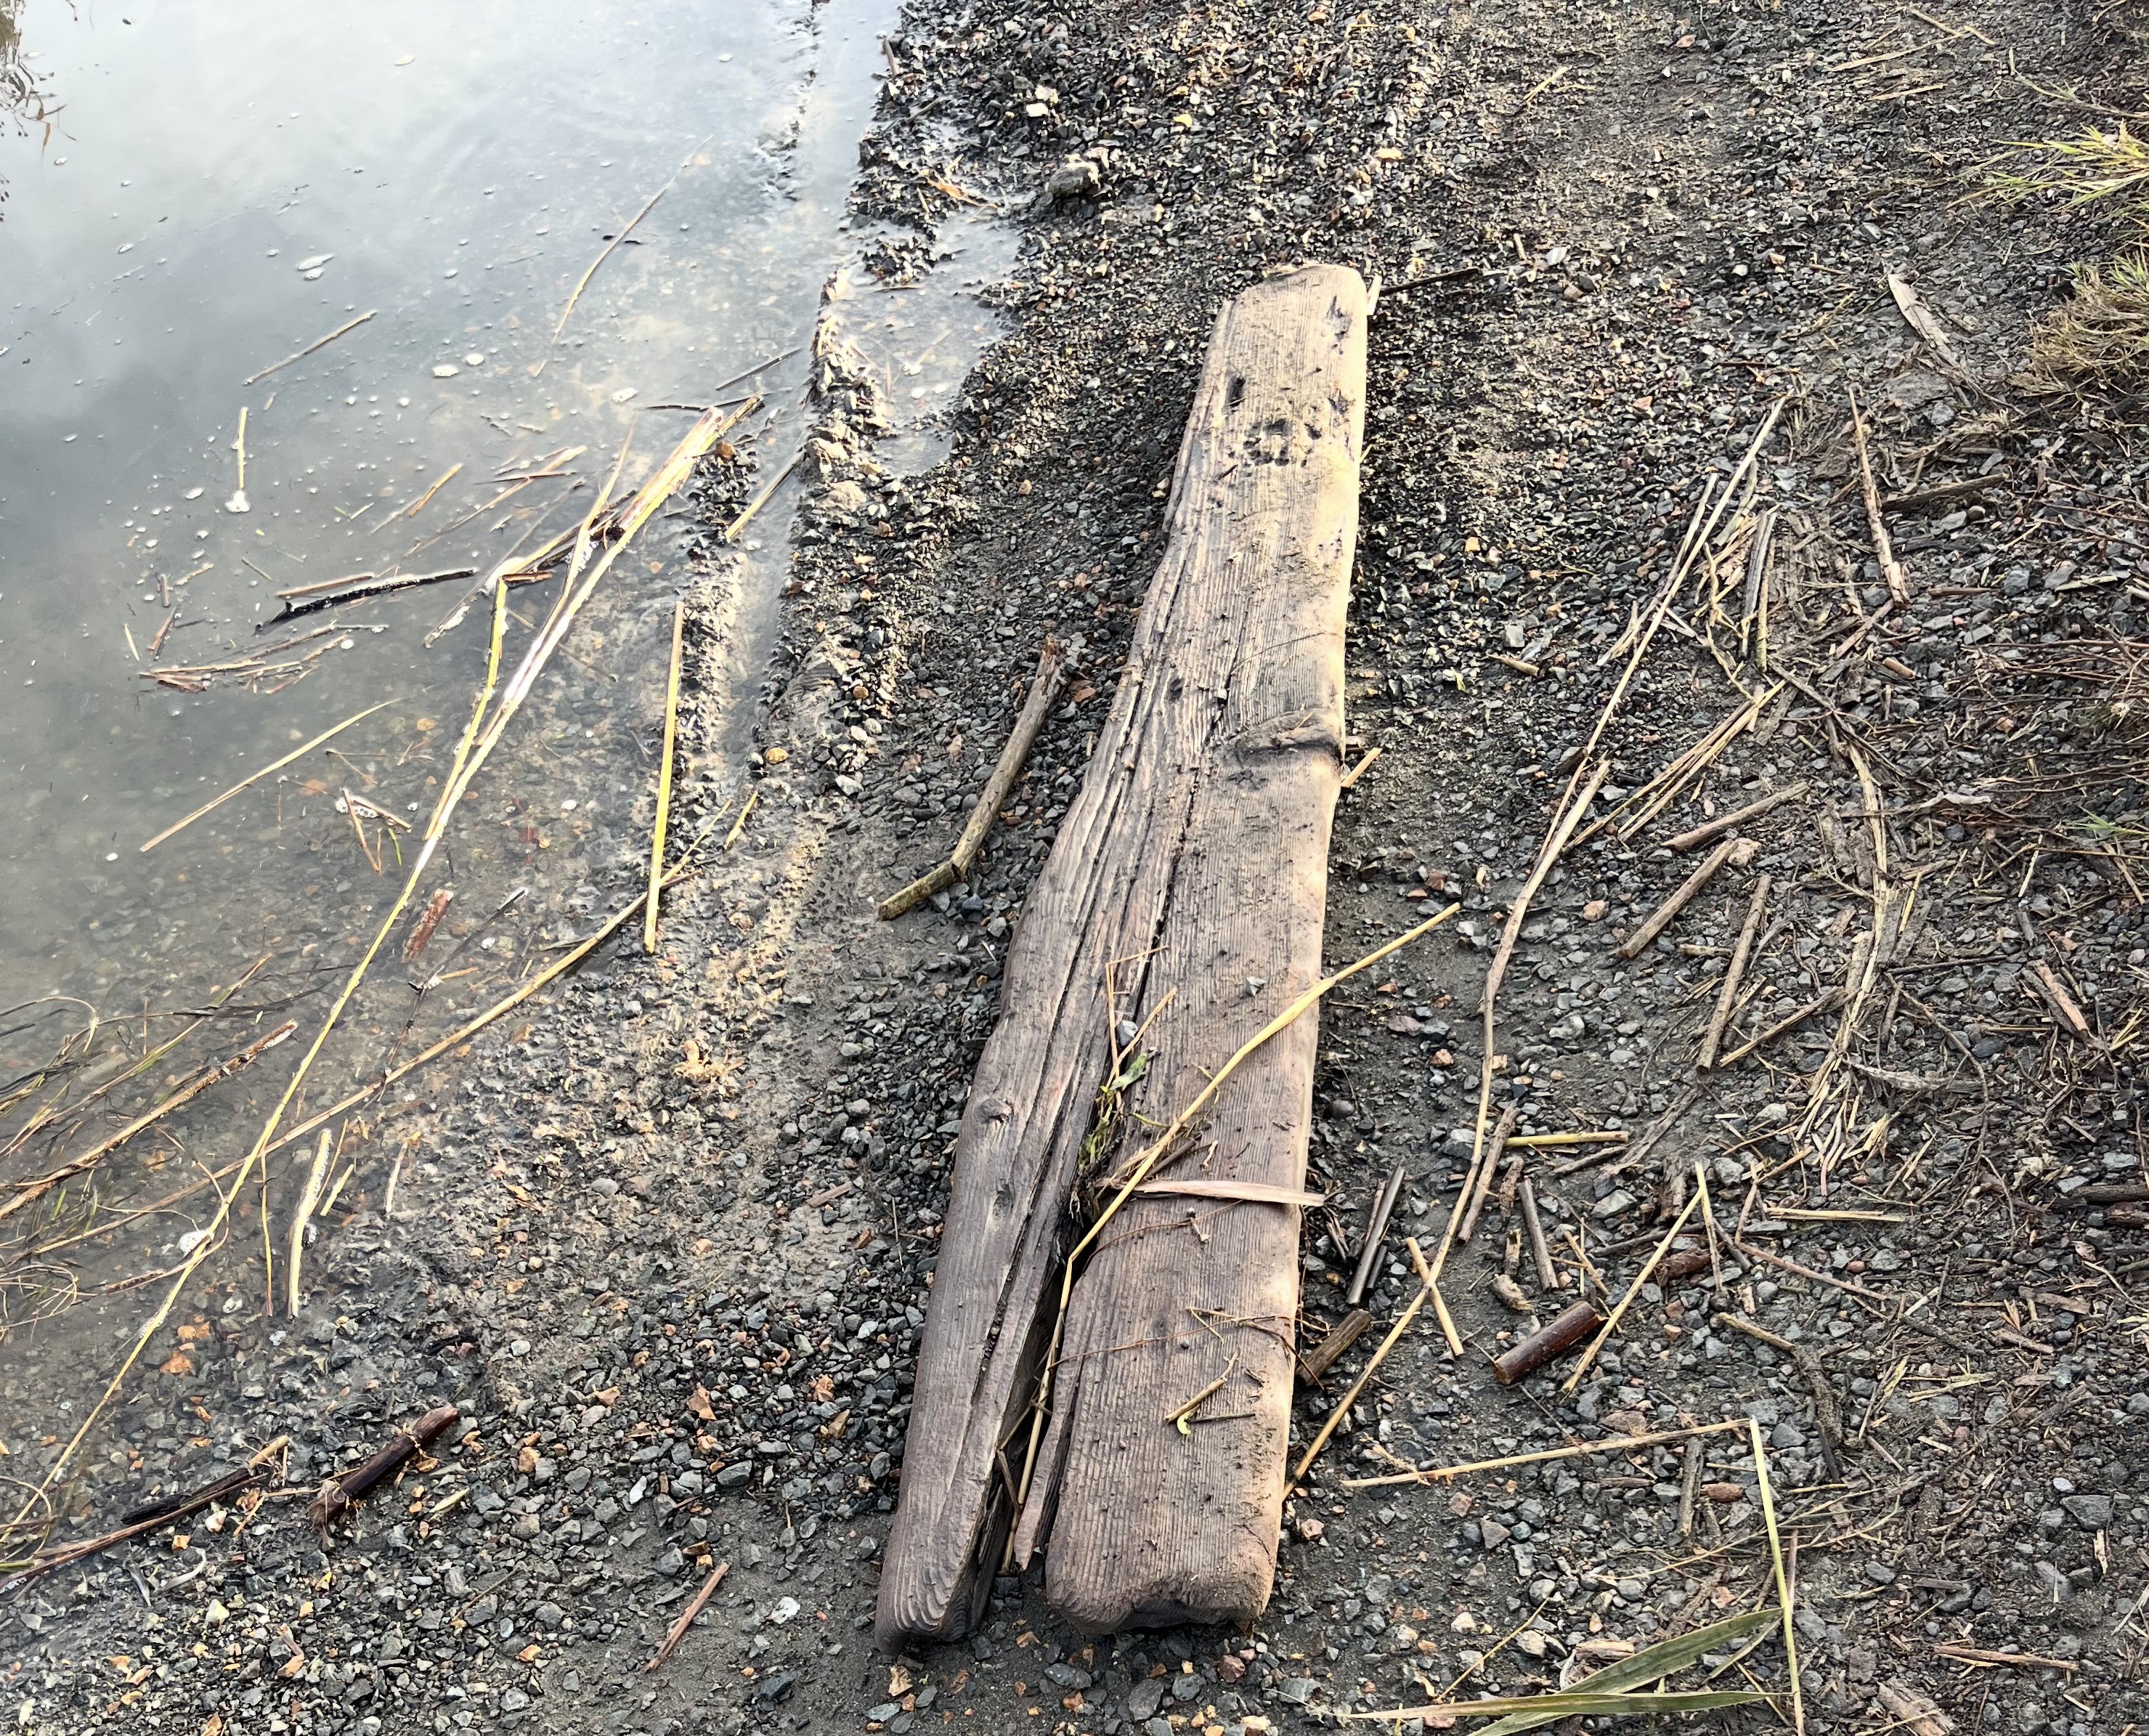
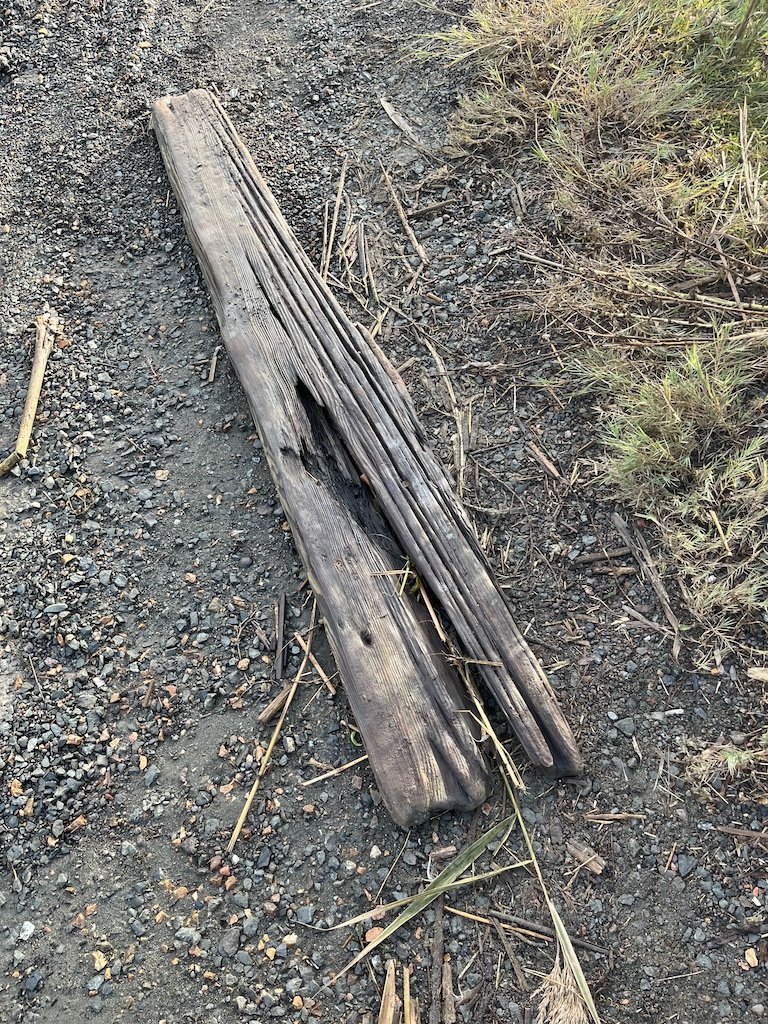
Not much model progress. Not sure where the time goes at this time of year. (Dickens fair? Home maintenance? Too much time watching holiday films and social media?) I did visit the wreak site and photographed a timber at high tide. The board is about a meter long and probably 8 or 10 inches wide. ( I am multi lingual when it comes to measurments. Just to not ask how many football fields or tennis courts this is.) If this is ships timber, it is really nice clear grained wood. -julie

-
Starting in Rhino 8
sheepsail replied to GioMun's topic in CAD and 3D Modelling/Drafting Plans with Software
AutoCad and Solid Works were pretty much perfect. But young people can not sell perfection. -
I get busy with the Dickens Fair at this time of year. This is a large show what takes over much of the San Francsico Cow Palace exibition halls on the weekends. Seems like I have been doing this for over 40 years. (where does the time go?) -julie (who actually looked at the Forester model today.)
-
Starting in Rhino 8
sheepsail replied to GioMun's topic in CAD and 3D Modelling/Drafting Plans with Software
I took classes myself. Found though that there is a difference between Art and craft. Industry usually wants craft. Those who can turn the creativity on and off when the bell rings are the most successful. It becomes about following the lead of others. The other frustration was the cost of tools. I was trained in a popular tool. Yet when working they simply wanted a typist, since the engineers did not want to type the parametric in the program. Not the actual creativity. I wound up spending 1000s on the program, and the company now wants me to subscribe and spend thousands more. On the other hand If I really do need to use it I have the old program what works just as good. For me it is about solving the problem with the tools at hand. These days it is much better. There is a lot of open source stuff. I have a friend who is a top amusement park ride designer. It is much as noted in the quote above. He could take something like Google blocks and create amusement ride walk through with it. We were chatting last year how we get to many questions as to what is the best program to learn. So much of this is now open source. Yet people want the 'Name.' I guess to put onto the old resume. I have been having a lot of fun with Delft Ship which is free, And lightburn which is like 150 bucks. Big packages like Renderman are free if one wants to spend the time learning. I sort of ignored Rhino. A simple free program called Art of illusion started the whole 3d printer craze. I did experiment with Fusion 360, but found one has to log into different machines wich makes it useless for taking into the shop. Especially when they consider 2FA to the phone to be insecure. Most of the big boys figure a designer will be working on a team. Doing piecework. So the design programs which are front ends to databases (now cloud based) really are set up to have a single project or sub project open at any given time. Still the cutting edge stuff is out there. Much of it is so far past the edge of the cut the heads are way off the shoulders as noted. The problem with the schools is that by the time it becomes in style there are too many in the class and the market is saturated with those who can draw a circle in postscript. Saw a lament by another friend who is a 2D hand drawn animation instructor, that the kids just want to learn the prompts to make their work look old skool. -julie (who likes procrastinating on working on her Forester model today.) -
I tested fonts at Apple. So I keep wanting to make this myself. Hand lettering is done by rulers and templates. So there probably would have been a lot of pencil lines for guides. The other thing often used is stencils, where the guides are traced using a set of lettering curves. Serifs really do make a difference. These were tool marks back in the day letters were carved into stone and metal. The curves on the serifs really do make it easier for the eye to glide over the glyphs. A lot of font design is getting this right. Much of this was also protected by patents (now expired) and trade secrets. Like anything else it is hours of practice. Most of our testing though was mechanical. Missing glyphs, bad kerning tables, bugs what could crash hardware (fonts are program subroutines.) One time a printer was shipped with a missing font, Which was how I got hired, to test for things like that. Perspective plays a large part in font design as well. Without rulers handwriting tends to tail off on one side do to changes in perspective. This can also be used conversely for giving things a hand lettered look. When in High school even in the 1970s and before electronic bill boards, every week a sign painter would paint the advertising sign on the corner at the entrance into the school. Mostly public service. I used to watch him work with fascination. I guess he did it to keep his skills sharp. -julie (Who is still pretending not to work on her Forester model.)
- 393 replies
-
- 8
-
-
- Billy
- sternwheeler
- (and 1 more)
-
I make watch straps and other things from old leather Usually pipe organ leather. So I see an image like this and say oooh look at the watch straps. This is an actual advertisement from my copy of Dickens' Little Dorrit, was printed in 1855. We have fun replicating this at the Dickens Fair. -julie (Who is pretending to build a model of the Forester, While acting in the Dickens Fair at the San Francisco Cow Palace.)

- 63 replies
-
- 2
-
-
- Northwest passage
- Norway.
- (and 2 more)
-
Good 'Hobby Quality' Metal Lathes
sheepsail replied to tmj's topic in Modeling tools and Workshop Equipment
I also have both Taig and a Sherline lathes with many attachments which I use interchangeably. At the moment these are boxed up. My main lathe though is a Präzi from East Germany. These were dumped in the US in the 1980s, and 1990s. When they were replaced by the Swiss lathes. The lathe is not so much about the lathe itself. It is about the attachments and tooling. The collets and such what hold the work. Some of the best come from Cowels in England which make some excellent stuff. My other hobby is watchmaking so I have a few of warchmaker lathes as well. I had a friend who had a Sears Atlas lathe which I loved. Ironically to best make the tiny watch parts a big tool and die lathe is something I dream about. With a big lathe one can make the fixtures for the small lathe. As I get deeper into model ship building I am looking forward to seeing if I can use this equipment to turn toothpicks into the tiny fixtures the model so demands. Woodworking and watchmaking prior to World War 1 in the 1920s was done with hand held tools. (there were stories of master watchmakers making lathes from three large horseshoe nails.) So it becomes about sharpening the gravers. The critical thing about a lathe is a parameter called run out. the other is swing. Runout is how round you can make the part and is determined by the bearings. Air bearings are the best. Babbit works surprisingly well. Babbit is tin lead solder so it is liquid when the bearings are spinning and creating heat. So a cheap lathe or dremel will have cheap bearings. So one side will be out of round where the tool catches. Swing is the largest item that can be turned without banging into things. Lead screws are what allow items to be replicated. Such were done with patterns. This was industrialized in the 18th century. (1700s) Milling is also considered lathe work. This is also when the punch cards came about then the paper tapes, which could create the rivets and such. Cams could move the tooling and such in amazingly complex patterns. Someone realized that everything could be created with an infinite number of sin and cosine waves. These were called "imaginary" numbers. Alan Turing used this abstraction to make a machine which could move a string (finite infinity) back and forth and make marks on it. Then use the marks to move the string. Such is what a machinist does when turning the handles of a lathe (2D) or a mill (3D) Good machinist are great at arithmetic, pretty much human computers (what the word originally meant.) They can feel all of this intuitively. (the cards (digital) /cams(analog) record what they do for playback.) What a lot of people do not know about a guy named Babbage in the 1830s and designed the first computer. First he had to make (or invent) a lathe to make it. Leonardo da Vinchi had documented the lathes used by the Greeks and Romans (and Egyptians) and made the Antikythera device. According to Archimedes a screw is an inclined plane or triangle. (which is what a sine wave looks like when graphed) So Babbage had to find the perfect screw. (rimshot) His mechanics Clement and Withworth fought over who actually invented the machine 19th century lathe. Whitworth got the credit. And screws are all now standard shaped. In reality all three invented the modern lathe. Ego can sometimes set thing back a generation or more. As a child I met Frank Oppenheimer. (yes him.) Who was working on a lathe behind a wooden partition I could hardly look over at the ExplOritiorum. He told me a lathe was a special tool since It could make a copy of itself. In other words It could make anything. Such statements like that keep me up at night. Ironically AI, uses this same statistical math. To make copies of ideas. Like a panto-graph, which lathes and milling machines use to make things larger and smaller. This device shows that everything is an infinite sum of waves around a circle. I guess what the Theosophist call vibrations. This is called a space time transform. Often called a Fourier transform after some 18th century dude who was good with lathes and estimating things like the population of France was after they cut the head off the leaders. He and his friends also measured exactly how large the coastline of France was. Ben Franklin was doing similar things in America with Kites and governments. (did you know Franklin invented the spark plug? Fun at parties, Volta used it to light farts on fire. Which is why electricity is measured in volts. Steam engines and internal combustion engines are also abstractly lathes.) In the 1960s and 1970s this math was done with a computer. Some guys named like Cooly and Turky made Fourier transforms fast. GPUs use matrix math billions of times a second to display images. Now abstract ideas. Even more so that there is some weird thing called spin, what creates magnetism or polarization in light. So I think Mr Oppenheimer was right. That the universe is some sort of quantum lathe. Not sure how to fit one other useless abstract bit of info into this digression. A way of visualizing Fourier's singularity. Which is a pixel. In space a pixel looks like a square or cube. In time it looks like a Mexican hat with wide brim or probably a better image ripples on the surface of a pond. These things also have sound. (and color) what we call frequency. This is also what happens at the center of a lens where all the light ray meet. One can make a lens with a lathe. So we come about here in a full circle. AI is simply simulating what is happening at the center of a lens. (and we know what happens when one uses magnifying glass and the sun. Pirates only have one eye as they had to learn how to properly use a sextant or spyglass. Do not look at sun with remaining eye.) None of which answers what brand lathe is best. Personally I'd give emphasis on anything Swiss, since that is what the other countries aspire to. (no AI was used in the creation if this ramble. -- otherwise it would make sense.) -julie -
I've noted before, to be suspicious of any Butterworth painting. Especially ones that have something which does not fit the narrative. Or adds new information. Forgers like to fill in missing gaps in the scholarship to prove province. Ken Perenyi forged dozens of them. Designed to fool 'experts' In the book Caveat Emptor he gives specific descriptions of how such is done, using stencils and replicating ships and flags from one to another. Also how old materials and chemistry is used to fool the experts. There is also implications that auction houses are in on some of this as they need material to sell. -julie (who should be working on the Forester model.)
-
You are making me do weird online searches like "1930s era obscure Mississippi sternwheel homemade houseboat barge made from tractor parts named billy" Google keeps asking my location and if I am a robot. Then there are all the permutations of 'A' Names Arthur Adolf Alexander Albert Andrew Anatole Anthony and then Oliver Oscar Orenthal OompaLumpa OrangeJuce OngoBoingo and so forth. I did learn there is something called a shantyboat. It is driving me nuts that there are no starboard views of Billy. Guess that is what make this build interesting.
- 393 replies
-
- 6
-
-

-
- Billy
- sternwheeler
- (and 1 more)
-
That green looks exactly like the green that some of the rooms in our house were painted when we moved in. Now the underpainting in most of the rooms. Was a real popular color in the 1950s. I think the upstairs bathroom still has walls that color. -julie
-
Still pretty new to model ship stuff. Probably be a while before I am ready for any rope. I have quite a bit of thread left over from sewing projects, including some vintage silk stuff which has no tensile strength left. does remain useful for embroidery. A few months ago when this subject arose I spent a morning or a better part of a day looking at rope walks. What lead me to move forward on making model ships is access to a laser engraver. I for one would love a nice set of easy to cut templates for a laser cut rope walk. Could probably come up with something based on all the stuff I found online. Which do include home made designs. Having the tool is not the same as knowing how to use the tool. -julie