


bhermann
-
Posts
535 -
Joined
-
Last visited
Content Type
Profiles
Forums
Gallery
Events
Posts posted by bhermann
-
-
Hi Elia - thanks for stopping by. It IS a rather large sail, isn't it. I have done up the foresail as well and done a very rough attachment to the model. I'll post a picture tomorrow if I get a chance.
Once I figured my ay around in LibreCAD, I was very happy with the functionality. Of course I am only using it in a 2D fashion so I can't say how useful it might be in a frame building or lofting scenario. f I ever get to that stage, I'll be looking for recommendations from the more experienced modelers here. It does have exactly the toolset I was looking for to make sails. I will continue to use it as is for the time being and if something simple 3D comes up down the line that I'd like to expand how I use it, I'll certainly give it a shot.
I guess I should draw up a template for something simpler, one of the jibs perhaps, and use that to start seeing how this all translates into cutting and making a sail out of cloth.
Thanks,
Bob
-
...Continuation
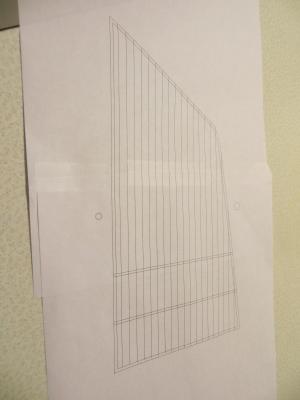
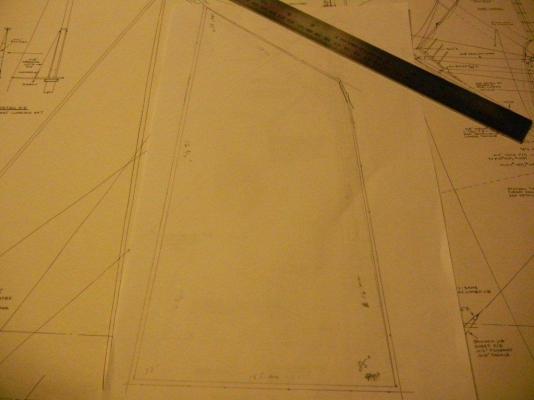
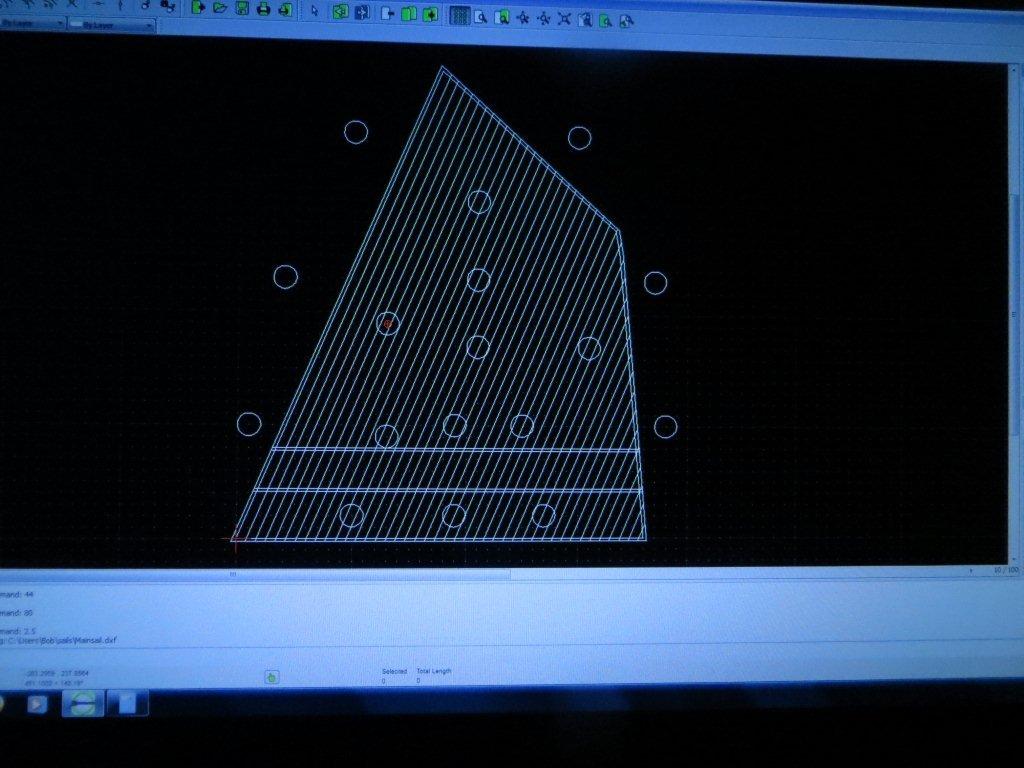
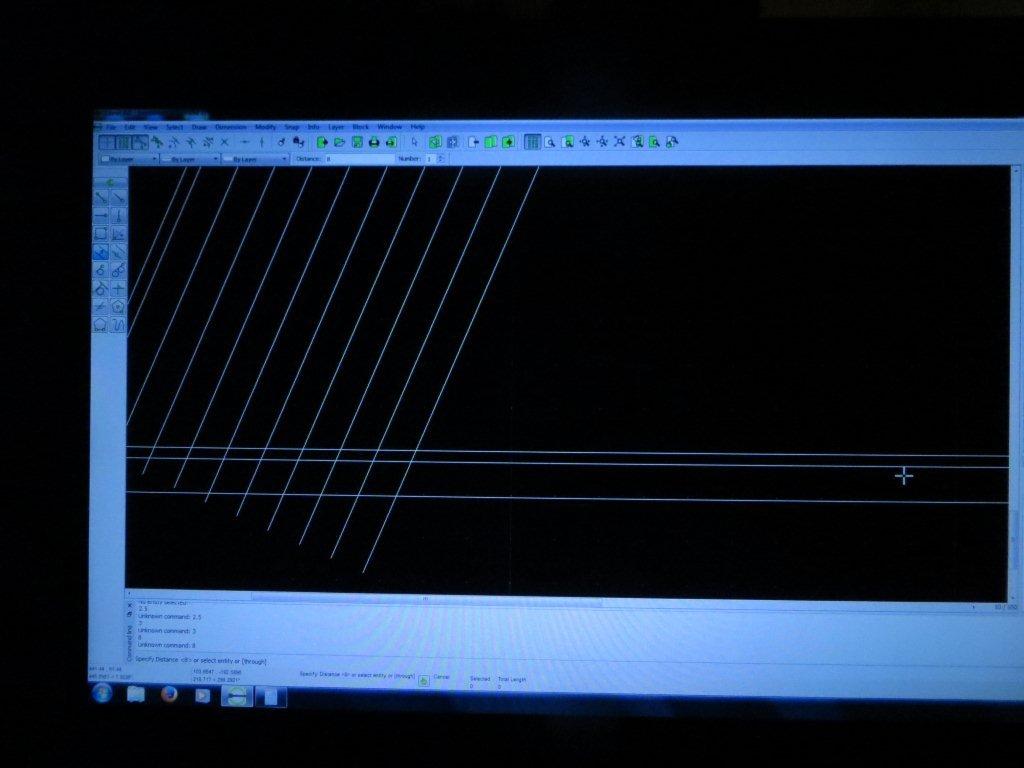
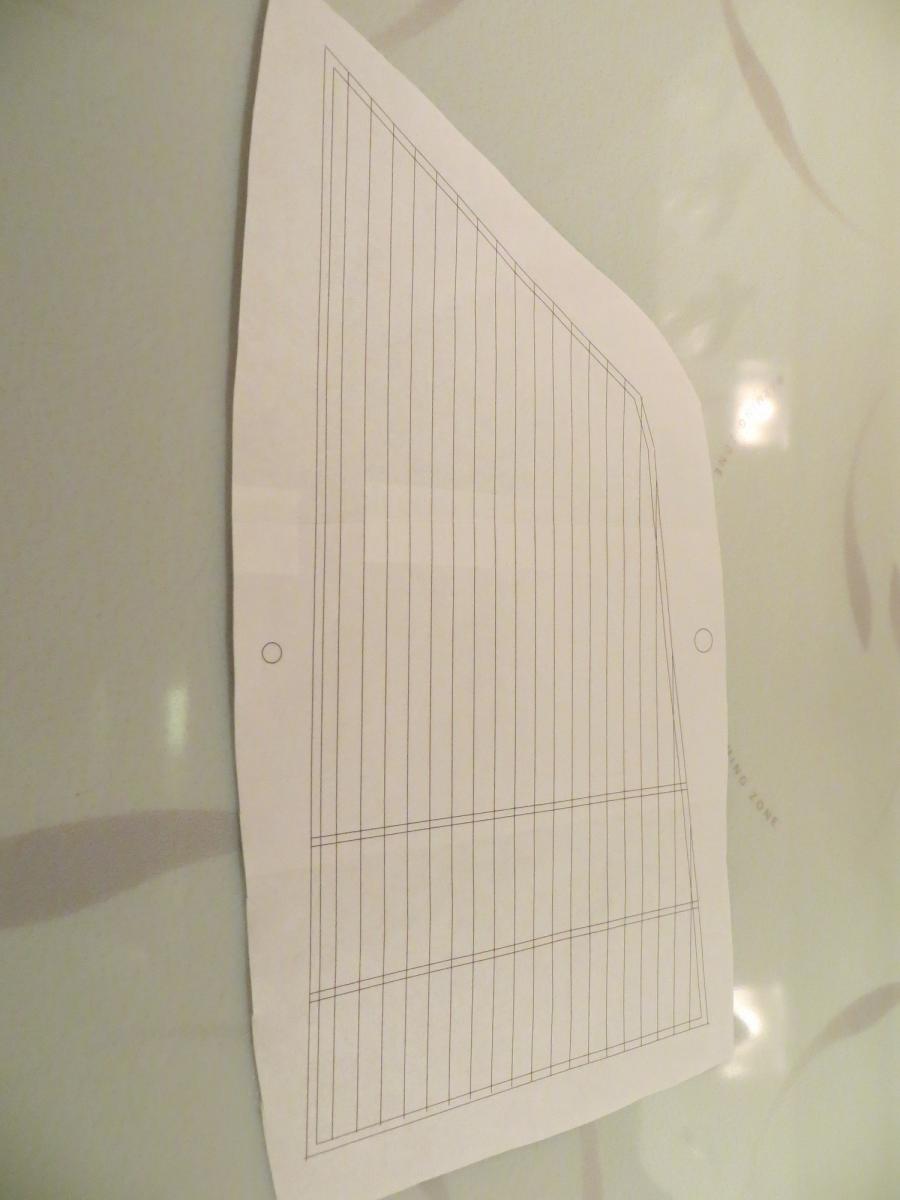
After all the seam lines are trimmed, this is the result.

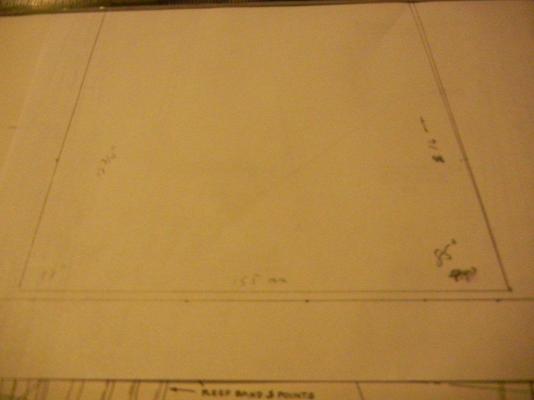
The parallel function is used one more time to draw in the reef bands, parallel to the foot of the sail; once placed they too are trimmed.
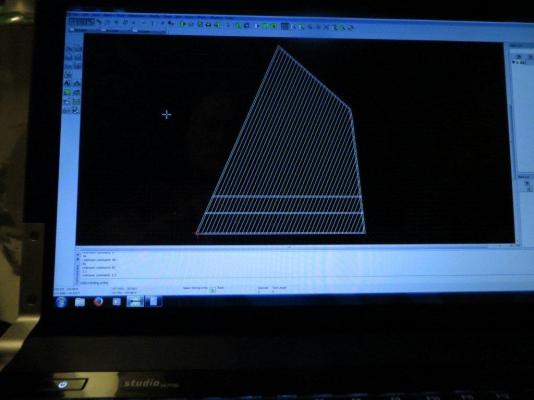
Since this sail is going to be larger than my letter-size paper, I then set up a series of circles to use as registration marks when putting the printed sail pieces together. I may have gone a bit overboard, but I wanted to makes user I had two circles available when lining up any two pages.

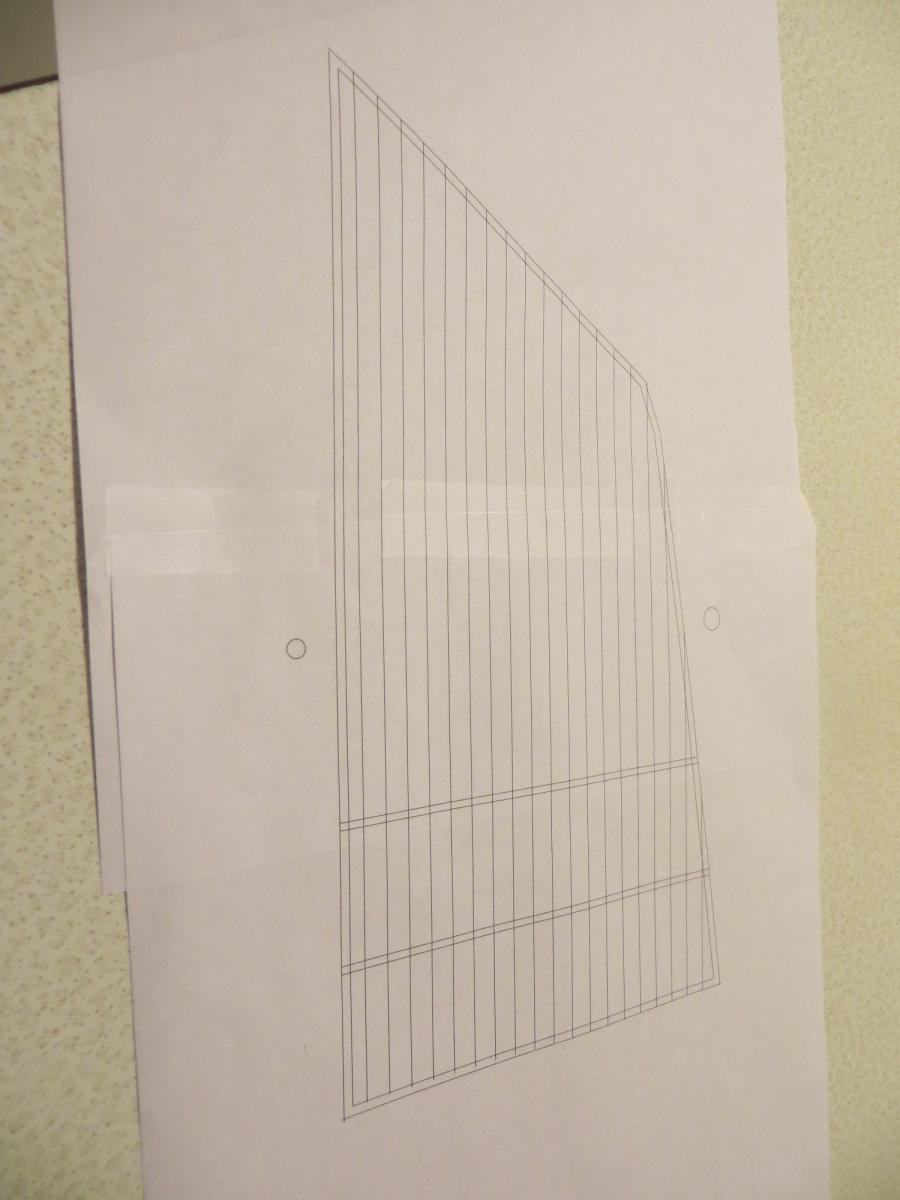
The programs print function allows you to position which portion of the sail will wind up on the printed page.
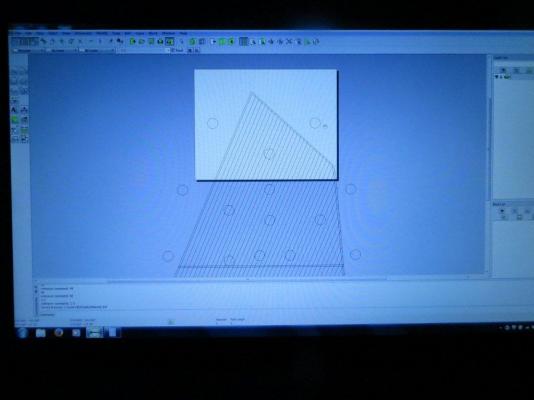
I wound up with 5 pages for the mainsail and assembled them using the registration marks, then taped them together.
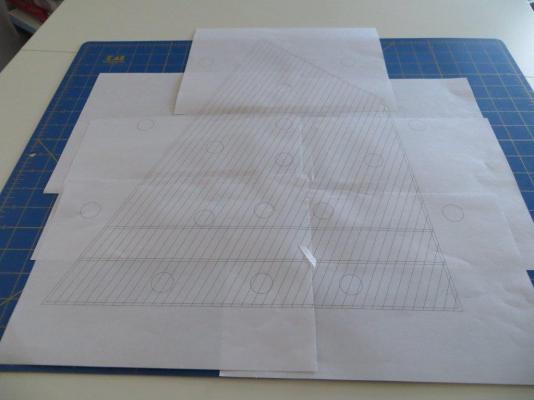
After trimming along the edges this is the end result.
Any questions/comments are appreciated.
Thanks,
Bob
-
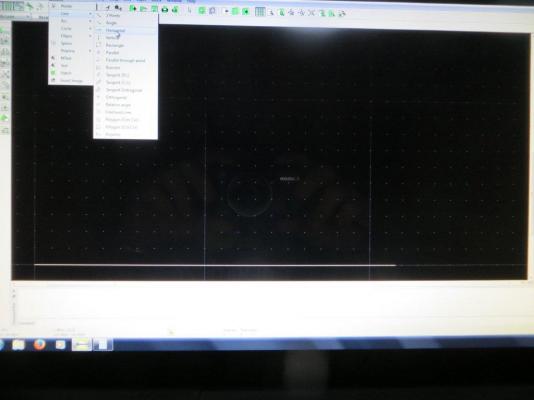
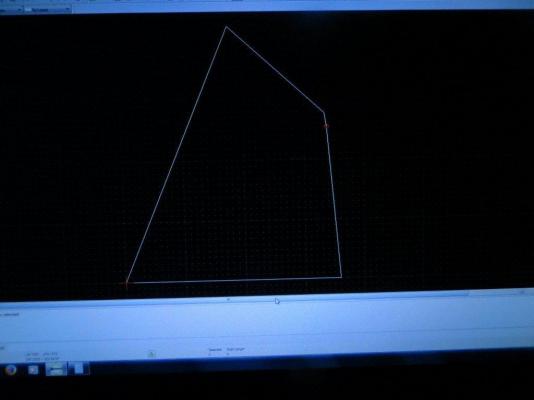
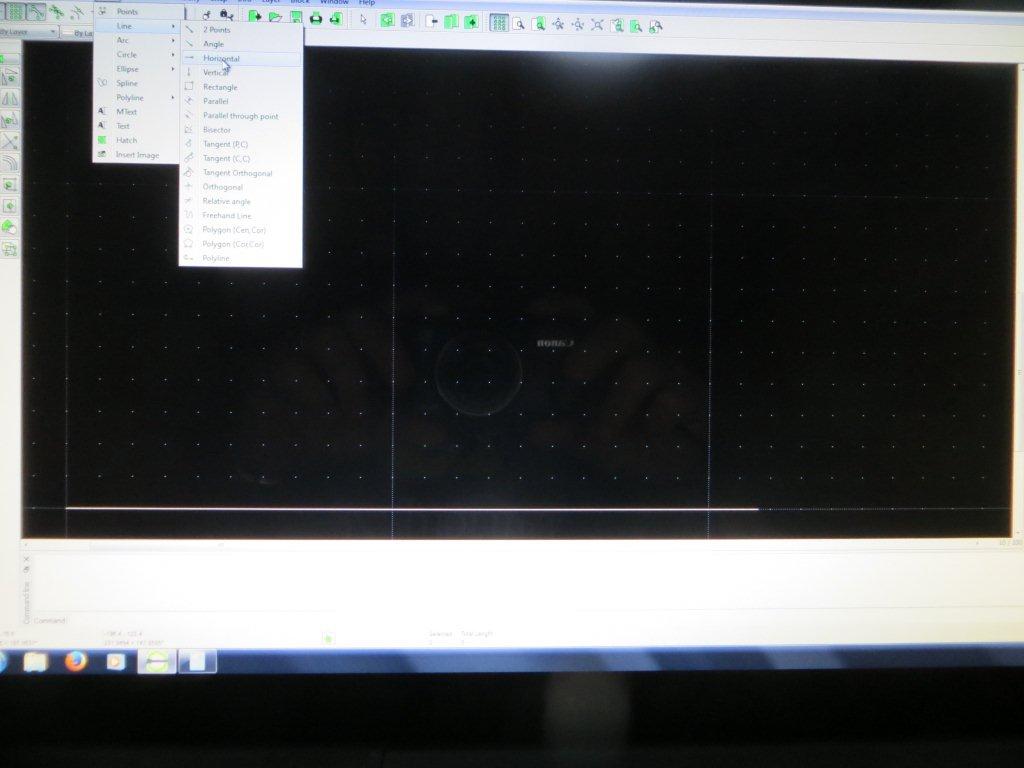
I was not pleased with my attempts to draft sail templates by hand and didn't relish the need to do it 8 times, so I went looking for a CAD program to do it for me. I chose LibreCAD, a free download. This entry and the next will document the process I used to draw the main sail.
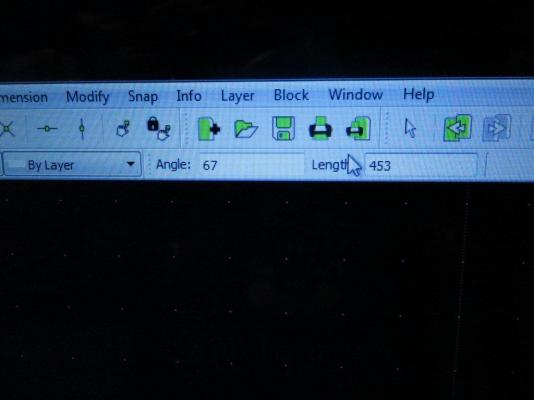
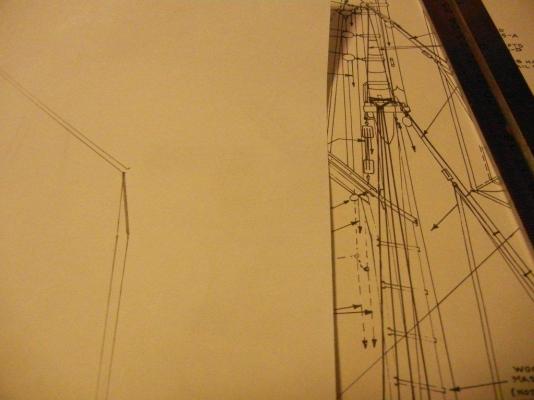
Most of the LibreCAD functions I used were found in the line drawing menu of LibreCAD, which is shown in the first photo. Up first - draw a horizontal line to draw the foot of the sail. The "horizontal" function allows input of the length of the line to be drawn - and here it is:
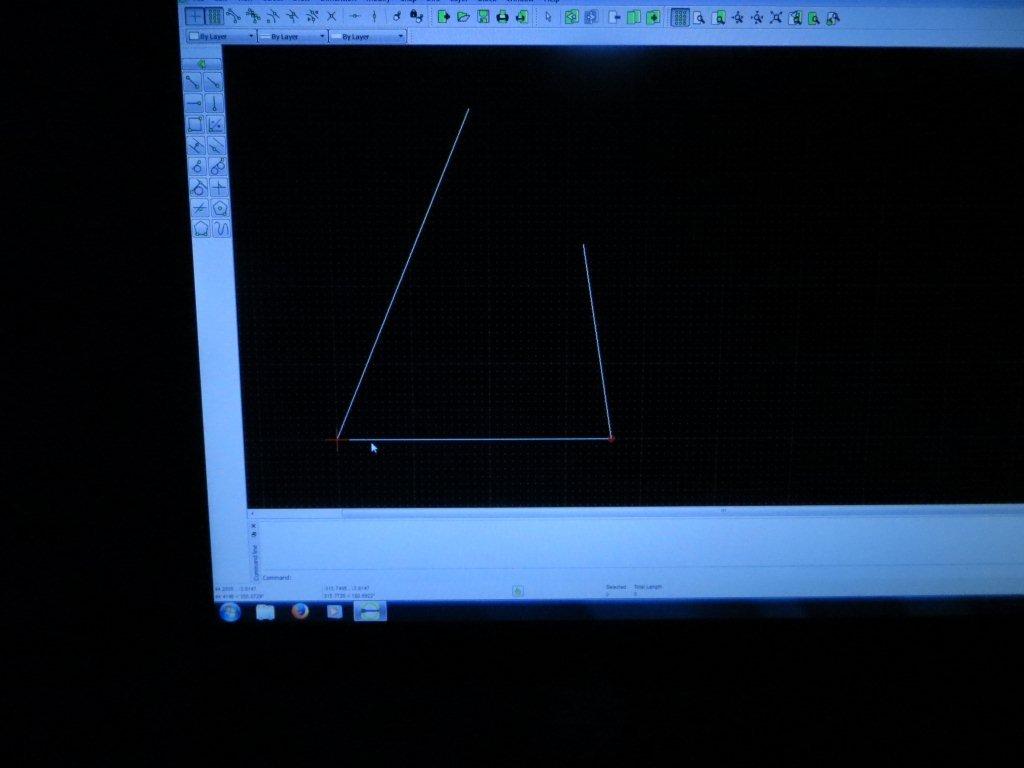
The "angle" function is then used to add the leech line. The angle from the foot and the length of the leech are input, then it's a matter of clicking the aft end of the foot to place the line.
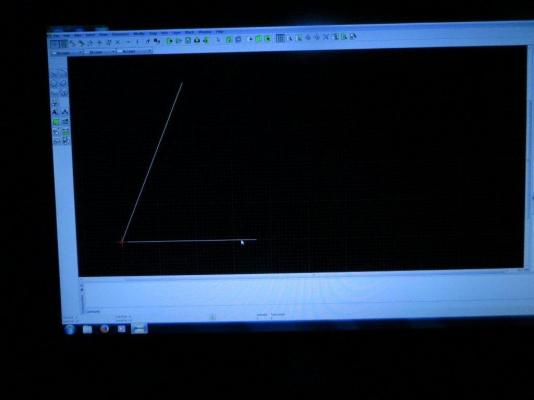
The angle function is used again to draw in the luff line.

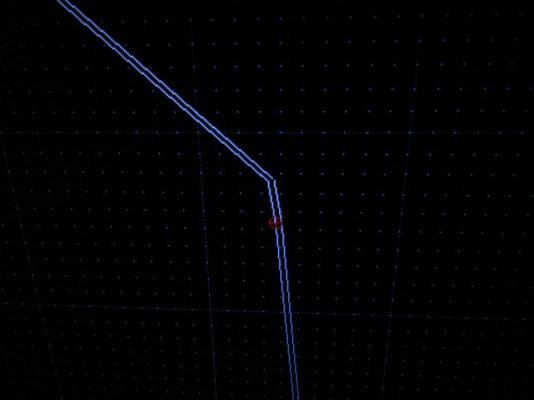
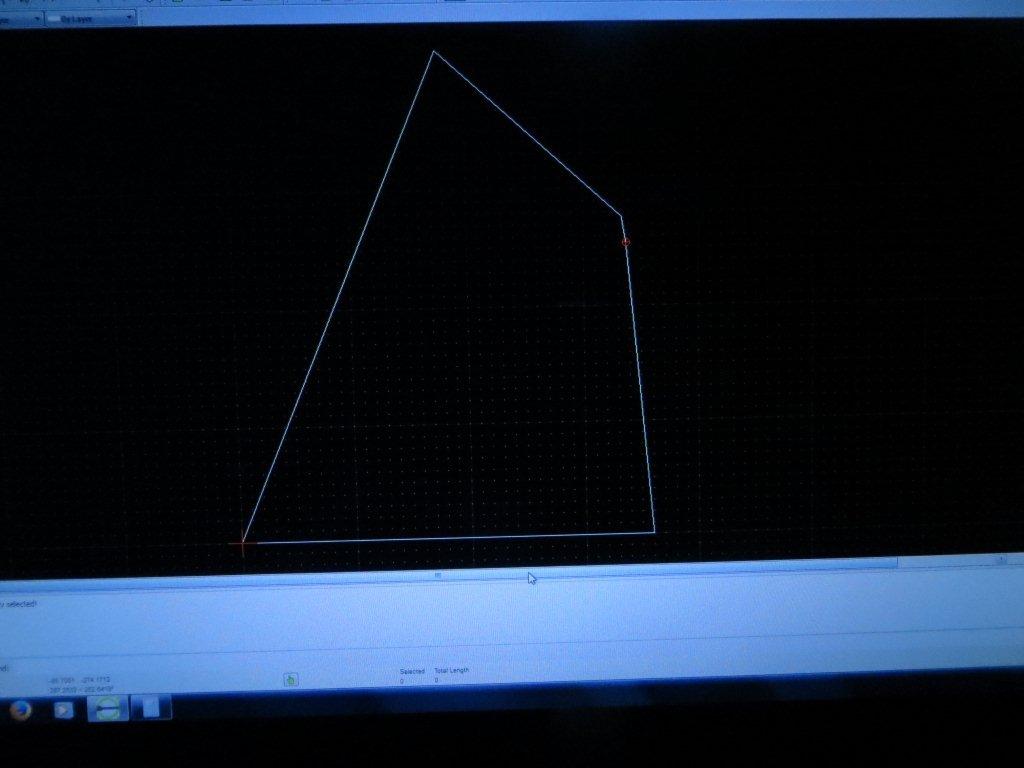
Then the head is drawn at an angle from the leech. This leave a small gap that is closed using the point to point function to represent the piece of the luff that that deflects away from the mast just below the gaff.
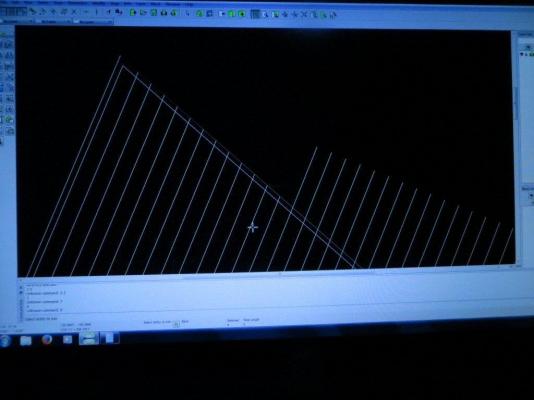
The "Parallel" function is then used to draw the lines for the sail tabling external to the existing sails. That function allows you to specify the distance between the base line and the new line, then the mouse is used to select the side the parallel line will be drawn on.
There is a function to extend the tabling lines so they form a nice corner (not shown in the next photo).

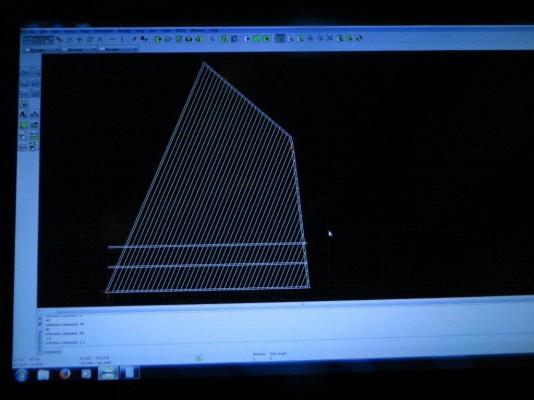
The parallel function is then used to place the seam lines for the sail panels. the plan calls for them to be parallel to the leech.
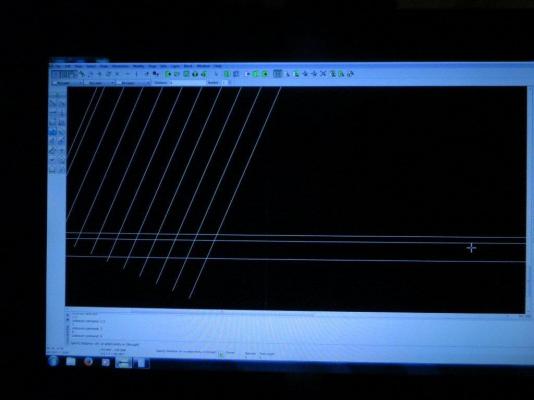
After all the parallels are drawn, it looks like this.
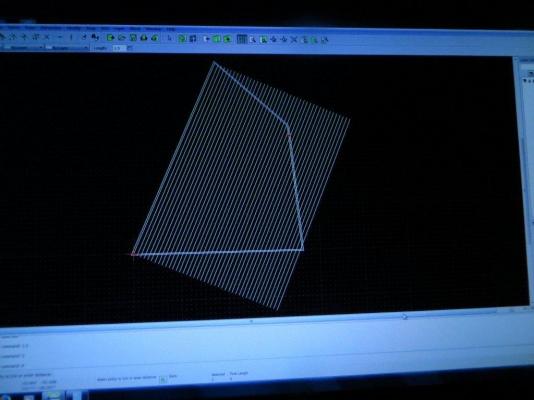
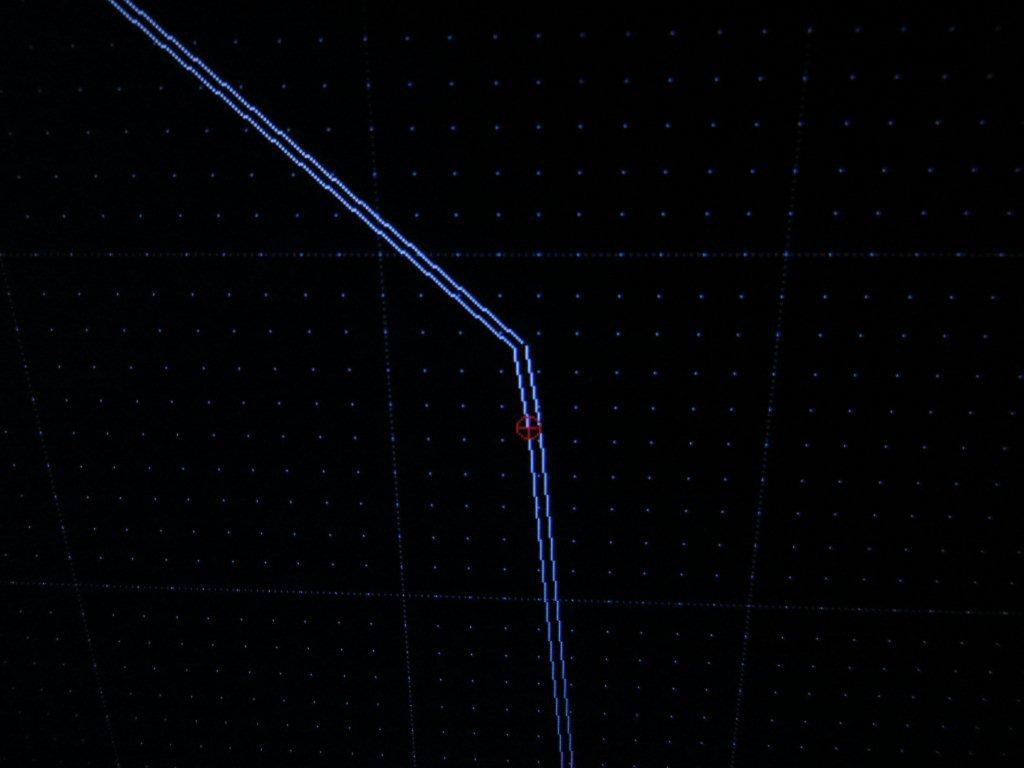
Then the trim function is used to clean up the line ends. That function allows you to identify which line will be used to mark the end of the seam line, then click on the seam line to trim the seam. This photo shows the process in operation.
The next post will show the remainder of the process and the result.
Thanks,
Bob
-
The Hunt practicum was very useful to me as a first time builder for getting the hull and deck planked. I think I also used the method there for building the transom. I started moving away from it when it cam to deck furniture and the painting scheme. I think Mr. Hunt misinterpreted the plans when it came to how the rails and upper sides of the hull were colored. As Floyd said, if I'd been aware of MSW at the time, I might not have purchased the practicum at all, but having a detailed plan for planking the specific model I was building was a BIG help. I didn't consider tree-nails or scale length planks at the time, I don't know that I would do one without the other.
It looks like you have a nicely shaped hull going. Great job on that!
Bob
-
Sweet, John! Great details - I will be taking a real close look at the coils on the belaying pins when I get to a real screen tomorrow. Can't wait for the next one.
Bob
-
That's a nice looking set of templates, Jack!
Bob
-
I bought one a while back - it is still sitting in the box unassembled. I don't know when I would ever find the time to do rope, I have enough trouble finding time to work on my build!
Bob
-
Thanks for asking the question, Fred, and to Dave for looking up the photo. I see another thing to be built in my future

Bob
-
Bob; you pointed out that you attach the sails before stepping the masts. The photos I posted were with the top masts in place. These have not been glued in place yet and are easily removed. I shall do so and continue.
Jack - in a perfect world I would attach the sails to the mast hoops before locking the hoops in place on the mast. In my case, that realization came too late. I already have the hoops in place between the boom rest and the trestle tree, so I will be attaching the sails to the mast hoops before stepping the mast, but later than I would if I still had accessibility to the hoops. It may not be too late for the top masts, though. I haven't glued the fids in yet, so if I can sneak the top mast past the bails, I may still be able to get the topmast hoops on the sails before locking the hoops in place on the mast.
Bob
-
Jack - for the foresail, the mainsail and the topmast sails (in short, everything that ties to the mast hoops), I agree that earlier in the process is better. I am in the process of making the sails at this point, so can't speak from experience, it just feels right. Lacing the sails to the mast hoops feels like the most difficult part of the process. If it could be done off the model, great. If not, it may be a bit finicky working inside the shrouds. I'm not sure I see as much of a need for early on the various staysails. At one time I thought about adding the hanks and getting the sails on the stays before attaching the stays, but as this is my first build it feels like an extra complication that would make setting up the stays that much more difficult.
In any case, I would definitely attach the "mast" sails before doing the ratlines, and if possible, before stepping the masts in place.
Bob
-
Thanks for stopping by, John. I have been enjoying your tales of travel through the Northeast.
Bob
-
I am seeing Amati soon, so I'll see what's going on regarding future projects...
Chris - if you are wiling, maybe you could ask them about Cutty Sark plans
I may be ready for that one in about 8 years!Great work on Victory!
Thanks,
Bob
-
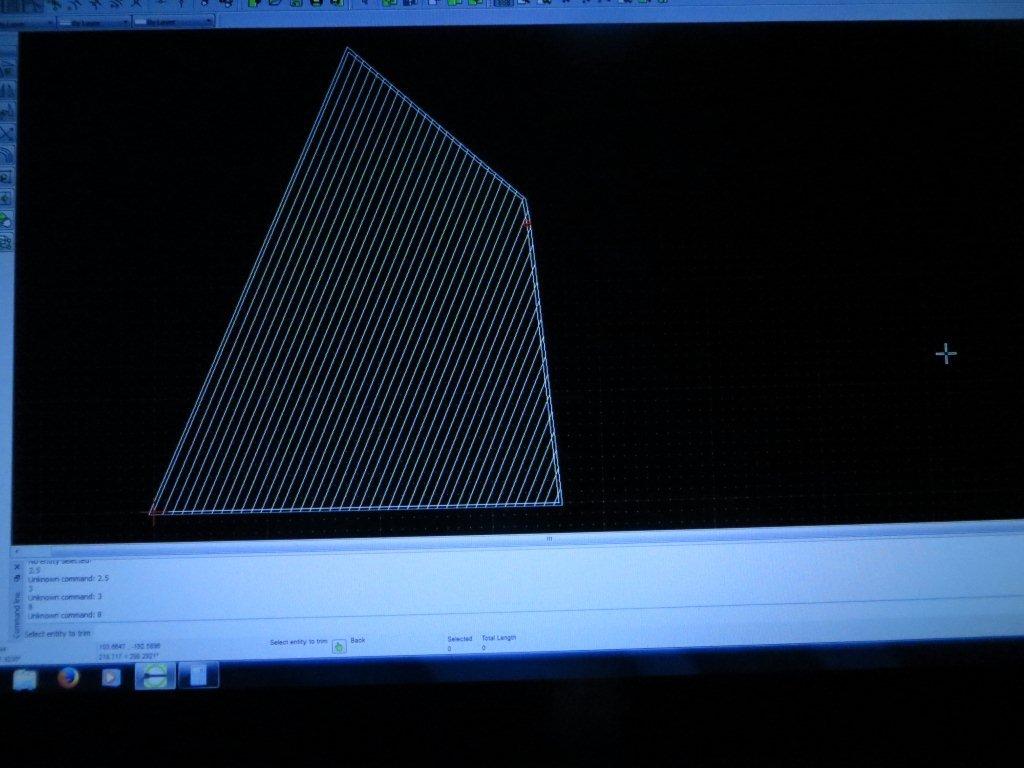
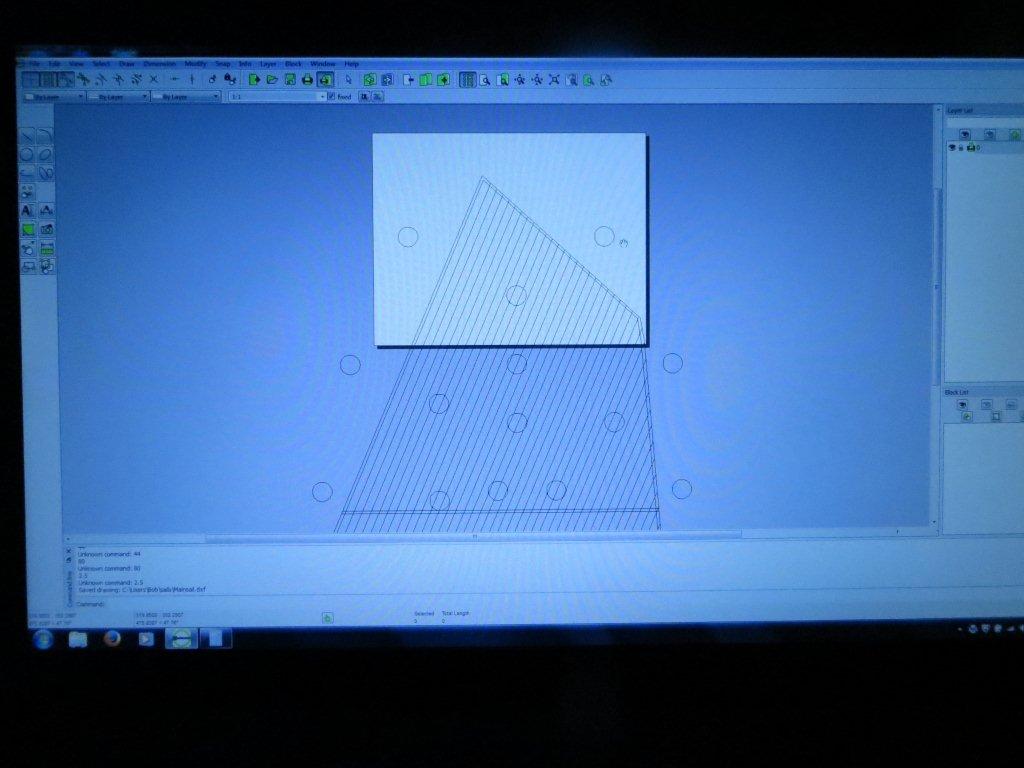
I was able to spend a little more time with LibreCad this evening - I misspoke when I said I was using DraftSight earlier. I figured out how to get different portions of a drawing to print by sliding the paper around in the "print preview" view and how to widen the lines a bit so they would be more visible when printing. I added a couple of circles to the foresail drawing to use as registration marks for lining up the two pages and also added the lines for the reef bands to the drawing, again using the parallel line feature to get them positioned properly. Here is what the sail template looks like now.
Then I did some rough trimming:
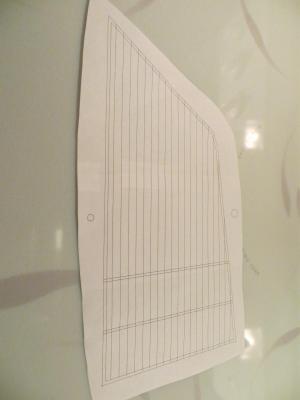
I figure I can use this to get the actual shape completed and then trace it to something a bit stiffer to use in cutting the sail cloth.
Bob
-
Dave - I decided to go with the quilters cloth - more body, tighter weave, and more of it for when I screw things up. I have been looking into Fray-Check and have seen some of the concerns about how stiff it makes the cloth. I did read on a sewing forum (the things we do for our hobby) that if you take a steam iron to it while it is drying that the stiffness is eased somewhat. I doubt I am going to attempt that with the Admirals iron!
I downloaded a 2d CAD program called DraftSight and drew a sample foresail. using the measurements and angles from the plan. It came out much closer than my freehand drafting. The program also has the ability to put in parallel lines at a set distance from a reference line, which is very handy for the tabling and drawing in the seams. The only problem I am having at the moment is printing sail patterns for larger than letter-size sails. The program doesn't have many tuning knobs for printing (no margin setting, for example) so I am trying to figure that out.
Finally I am considering scrapping the kit-supplied rigging thread and going with Chucks product. I need to figure out what sizes I need and roughly how much of each size. If I ever locate the parts list again I will check if it has the amount on each spool. If not I'll just unroll one of them and measure!
Bob
-
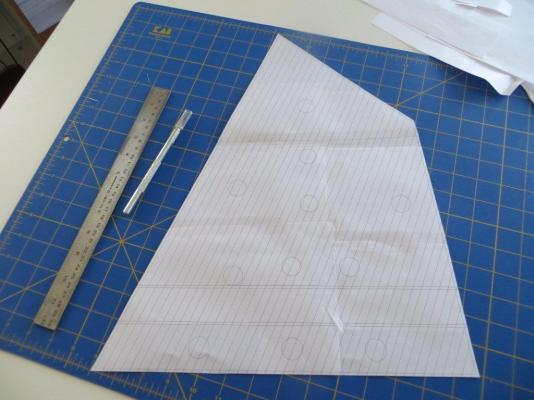
Time to get serious about sails. After much mulling and thinking and re-thinking I have decided to do stitch-less sails as a first attempt. I have heard over and over that it is better to make things underscale rather than overscale if there is a choice between the two and stitching on a sewing machine feels overscale to me. The first thing to do is to make templates for the sails. I was able to use the plan and my flatbed scanner to get some of the jib sails copied but it was not a pleasant experience, so I decided to resort to something a bit lower tech.
Using a ruler and a protractor, I lifted lengths and angles from the plan and drew the foresail out on a piece of legal-size paper.
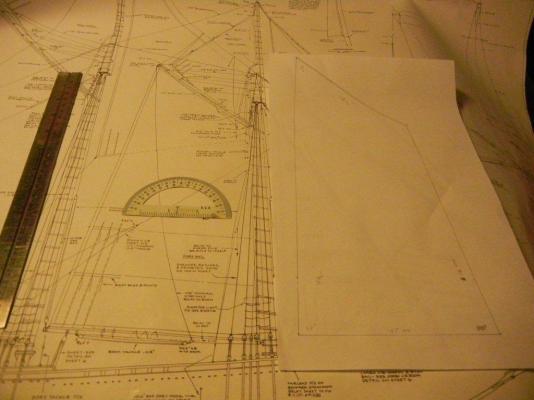
My drafting skills aren't the best so I had a bit of a miss at the corner under the gaff and needed to make a correction to match the plan.
Then I added the hem allowance to the drawing by marking the width from the plan on my drawing and connecting the dots.
The finished drawing came out like this:
My thought is to cut out the pattern and trace it onto the sail cloth. I will draw the seam lines in pencil, then fold over the hem and use fabric glue to fasten it to the sail. I will add the reef bands the same way, glueing them across the face of the sail.
As I was doing this drawing I found myself wishing for a 2D CAD program that would allow me to input line lengths and angles and have the sail pattern generated that way. All the available free programs I looked at seemed too complicated for such a simple task. If anyone has experience I'd love to hear about it.
I also have a question about the drawn-in seams - do they need to be drawn on both sides of the sail or will drawing on one side be enough? I guess I'll get my own answer when I actually do the work.
Thanks,
Bob
-
There was a lengthy discussion of this item in my log on MSW1. The general consensus was that it was a lazarette for storing who knows what, but no definitive answer was found. The MS plans describe it as "unidentified object - this could be a scuttle or deep tub for stowage of main sheet hauling end". Without any clear purpose found for it, I decided to leave it off for now. If one of the experts comes through, I still have room to add it in.
Bob
-
Thanks for the kind words, John. It's nice to know this can be useful to others, definitely one of my goals for the log. BTW, Bluenose is my first "real" wood build as well. I encourage you to start a log for your build, it is a great way to share the journey, get input from those in the know, and help keep you motivated when the doldrums strike.
Bob
-
Looking good, Rod. She is beautifully displayed now!
Bob
-
Ed -
I have been following along in the Crothers book as you go. I purchased it a couple of years ago in preparation for my next build. I have to say, with the explanations you are providing, it is making more sense to me than it did at the first read-through. You are almost inspiring me to do things like put extra bulkheads into the kit keel to make fairing go more smoothly
. I will be following every detail of this one!Thanks,
Bob
-
Ed
I just signed up to follow along on this build. Your work on Naiad was fabulous and I am sure this will be as well. Not to mention that the Clippers were the first ships that caught my eye many years ago. Your curiosity and details help our community understand the possibilities in a build and give us insight into how things were done on the real thing. Thanks you for your commitment to deepening our understanding!
Bob
- Elia and harvey1847
-
 2
2
-
Hesitation at the prospect of making mistakes is more damaging than fixing them after woods. Better to keep going and learn to fix problems than agonize over them instead of building.
Richard - I think you have stated one of the keys to becoming a successful modeler with this statement. As an over-analytical person (as the Admiral is happy to remind me), I find myself spending months at a time considering how to do the next step. It would probably be better to jump in and give something a try, trash it if it doesn't work out, and try something else. In the long run, there is more experience to be gained by giving it a shot than by sitting and thinking about it.
Your planking is looking very good so far - I will be following along as you get further into the build.
Bob
-
I was going to say I didn't run across this in the early stages of the Bluenose build. Then I looked at the billets all the laser cut pieces came out of - and none of them are ply in my kit, so I just don't have any history to go on. *shrugs shoulders*
Bob
-
Thanks for sharing, Dave. I've been wondering how to make this happen and this is very timely. I can see from the photo what a cow hitch is - I guess it will be a visit to animatedknots to figure out what overhand and square knots look like (can you tell I was never a Boy Scout
).I think veterans assume this sort of info is obvious to everyone, so they don't think it worth posting, but I am glad you decided to share! I'd be curious to see what the 'full-size' attachment looks like, if you have any info on that.
Thanks,
Bob
-
Dave - I looked back at my MSW2 restart of the log and noticed that the helmsmans grating is included there in a post dated February 19. I've been mulling over the sails for the last little bit. I think I will attach the main and fore sails and topsails before stepping the masts, so I am trying to figure out just what I am doing with them before proceeding. The thought of connecting the mast hoops with the masts in place doesn't strike me as a good place to be. Hope to be starting up again soon as the weather starts to turn.
Bob


Bluenose by bhermann - Model Shipways 2130 - 1:64
in - Kit build logs for subjects built from 1901 - Present Day
Posted
Floyd - in this case I am working under the assumption that what is provided in the plans IS a 2D sail template. In short, my CAD drawings don't take this into account, they assume that a bunch of flat strips of cloth were sewn together to make a bigger flat sheet. I will shape the finished product into wind-filled sails after cutting them out and adding details. I don't know how I'll do that just yet, but there are lots of interesting approaches to be found on MSW.
Pete - thanks for stopping by and for the kind words. I love the quote in your signature.
As promised, I temporarily attached the the main and fore sails to check for rough fit and to get a feel for where I might be headed with them. Here are the photos.
Thanks,
Bob