


Craigie65
-
Posts
410 -
Joined
-
Last visited
Content Type
Profiles
Forums
Gallery
Events
Posts posted by Craigie65
-
-
Add some scale roman marines and you could have the bones of a wonderful diorama
-
I have an airbrush as like you I also build aircraft and armour. It was one of the best investments I made. However depending on what i am painting a hairy stick can be best. For my Granado I airbrushed the hull below the waterline. Just too big an area to get wrong. I also airbrushed the wales. For the interior I used a brush and I find 2 or 3 coats of thinned acrylic paint is just fine.
If I just built ships I am less convinced that an airbrush would be a sound investment but with over 60 aircraft built and a dozen or so tanks well.....
-
I was wondering as well Craig. Think it may be this:http://www.taimen.com/en/se/product/stonefly-bobbin-threader_99931416/103887
Got it now - I was figuring out why I needed waders to thread a line

-
interesting link - what are we looking for?
-
-
It also helps to hide the laminated walnut that the carriages are made out of
-
Bit of both. Instructions neutral but I think red looks better and I think I read it somewhere on this forum that red would have been a likely colour.
-
I should start a log Craig, haven't done one before as it's my first build and I guess wasn't sure if anyone would be too interested given the quality of others in the forum. Will try and get something together.....
I'll be interested for one
-
Always room for more sanding. Did you fit the foaming with the chimney in place? It'll help get a nice fit.
Yes I tacked the chimney in place and measured the coaming around it. I have taken it off as I want to modify it with a screen for the front
-
Just noticed that the last picture shows the coaming that surrounds the chimney needs a bit of sanding

-
Hi Mick
Are you starting a build log? Always good to see how fellow builders are getting on
-
Timmo
Thanks for the heads up as I am starting on the headrails this weekend. Might try a test fit to see if I have tHe same issue.
-
There are three articles pinned to the start of the section you have posted this thread in.
-
There are some good primers in the resources section on how to plank. We worth a read first. Takes a bit to get straight in your mind- well it did for me. But well worth the effort
-
Perhaps posting a few pictures in a log might allow you to get some additional advice from the planking gurus on the site. They can usually give you advice to sort most things
-
-
Managed to find time to post an update
I have re done the blocks of the two cannon under the forecastle
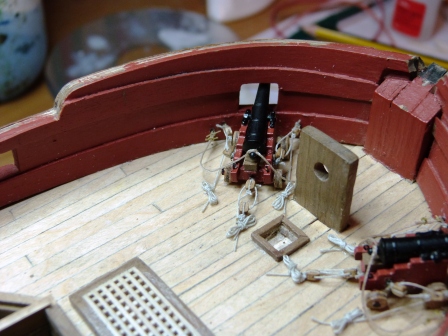
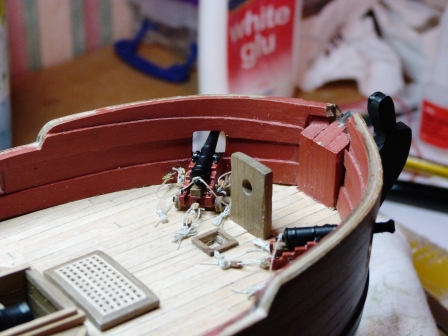
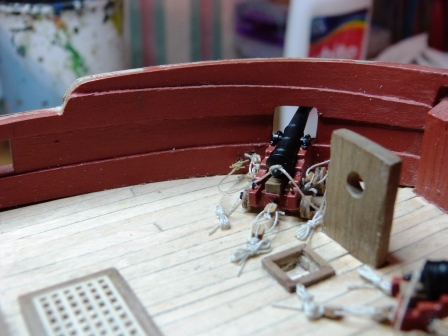
Thanks to all who helped me get this right
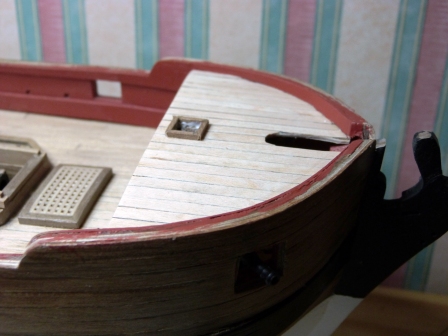
The forecastle deck has been added and planking has been completed and the combing for the galley chimney added. I like Timmo's additions to the chimney and plan to do the same. The bow sprit opening could have been better. I do wonder if this would have been caulked to make it a little more watertight - any input would be welcome.
Chimney and capping rail next
-
very cruel and only partly trueAnd that differs from summer there how, Craig? Oh yes, I remember......the rain is warmer in summer!!!
 :P
:P 
-
Mick no need to apologise actually my turn for calling you Mike. I think these logs are as much about learning as anything else. If I had not asked for help on the blocks .... Well it would be a disaster later
-
I can only echo Grant - amazing BBQ. Very jealous as it is mid winter here which means rain and wind
looking forward to seeing your build progressing -
Mick thanks. As Timmo has suggested quite a bit of sanding was required to get the shape right at the bow. When I test fitted the planks close to the keel I decided to take even more off those filler blocks to make the lines smooth.
Timmo thanks for the kind words. At the time I could have cursed the paint to NZ and back. However looking at the hull now I am so glad I stripped it back.
As for the blocks I found the smaller ones hiding at the bottom of the box - how foolish did I feel! The packet they were in had fallen out of the bubble wrap bag
I have removed the wrong ones and refitted the right ones. Looks much better. I will try and post some pictures over the weekend. -
I reckon most of it could be sprayed and details picked out with a hairy stick
I tend to go for sub assemblies which I spray and then attach to the deck or superstructure
- dgbot and Spaceman Spiff
-
 2
2
-
Eric
Nice to see the detail resin can bring to a kit. Do you have pictures of the hull or contents of the kit?
-
USS Constitution by CaptainSteve - Model Shipways - 1:76.8 scale
in - Kit build logs for subjects built from 1751 - 1800
Posted · Edited by Craigie65
I often use a magnifying lamp to paint the detail. As for finding a 1 mm part........