


kruginmi
-
Posts
629 -
Joined
-
Last visited
2 Followers


Recent Profile Visitors
2,540 profile views


-
 GrandpaPhil reacted to a post in a topic:
Jylland by kruginmi - Billings Boats - 1:100
GrandpaPhil reacted to a post in a topic:
Jylland by kruginmi - Billings Boats - 1:100
-
GrandpaPhil reacted to a post in a topic:
Jylland by kruginmi - Billings Boats - 1:100
-
GrandpaPhil reacted to a post in a topic:
Jylland by kruginmi - Billings Boats - 1:100
-
kruginmi reacted to a post in a topic:
Jylland by kruginmi - Billings Boats - 1:100
-
Keith Black reacted to a post in a topic:
Jylland by kruginmi - Billings Boats - 1:100
-
JacquesCousteau reacted to a post in a topic:
Jylland by kruginmi - Billings Boats - 1:100
-
JacquesCousteau reacted to a post in a topic:
Jylland by kruginmi - Billings Boats - 1:100
-
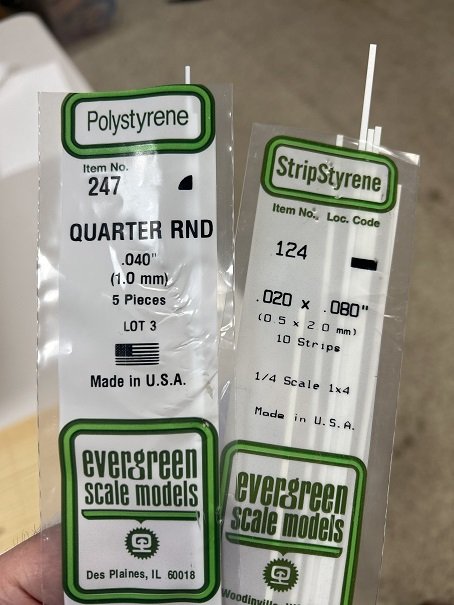
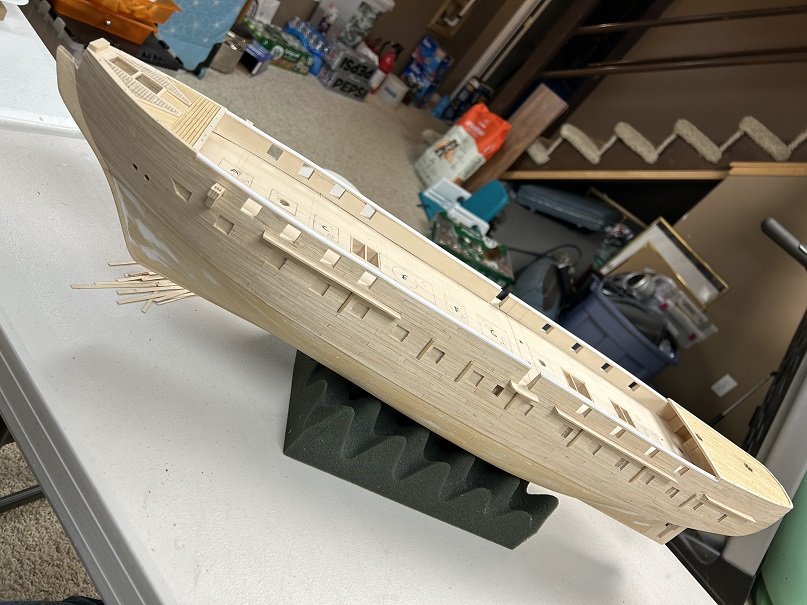
 The waterways needed some pizzazz so at this scale (and that the bulwarks will be painted) grabbed some molded plastic: That went into place pretty straightforward (superglue) and really did the trick: Working towards the application of sanding sealer so I can paint it up. The list is shrinking but still a ways to go. Mark
-
kruginmi reacted to a post in a topic:
Jylland by kruginmi - Billings Boats - 1:100
-
Keith Black reacted to a post in a topic:
Jylland by kruginmi - Billings Boats - 1:100
-
vossiewulf reacted to a post in a topic:
Jylland by kruginmi - Billings Boats - 1:100
-
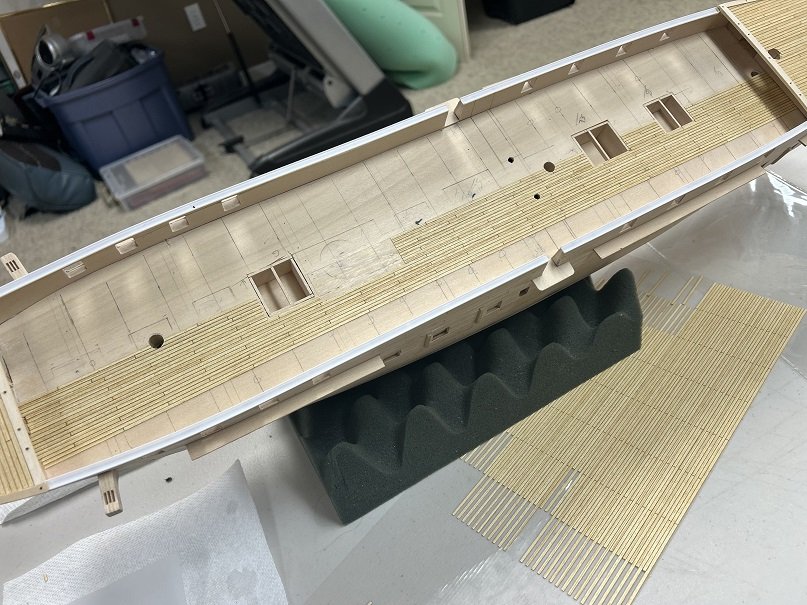
Getting into the flow of planking when time allows. Gone this weekend but the goal is to have this part done next week. I have cut away the planks underneath the deck fixtures for a more solid fit. I am liking the result. For each plank I am putting Titebond glue on the underside. Mark
-
Nearshore reacted to a post in a topic:
Jylland by kruginmi - Billings Boats - 1:100
-
Keith Black reacted to a post in a topic:
Jylland by kruginmi - Billings Boats - 1:100
-
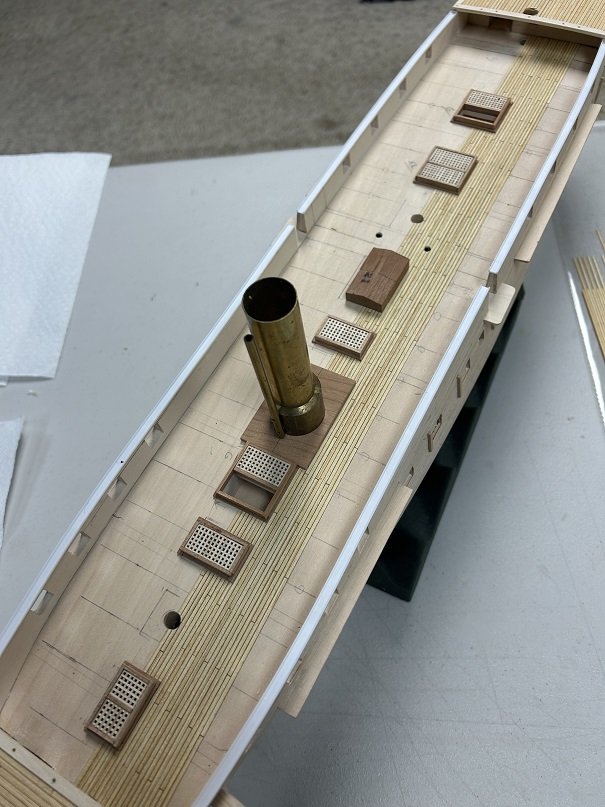
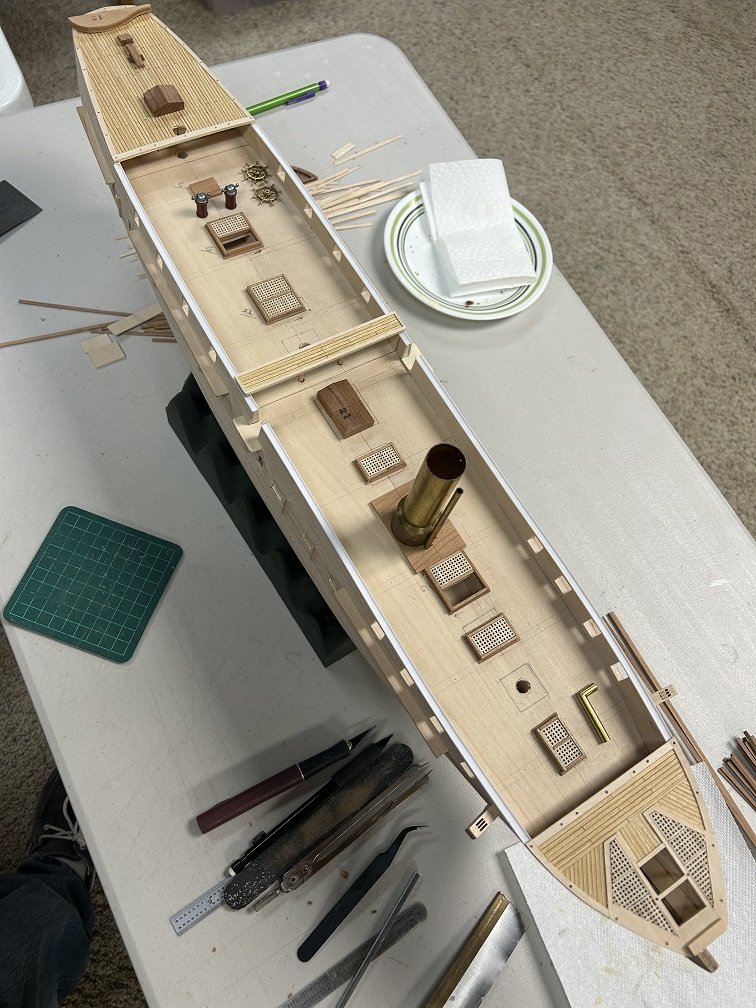
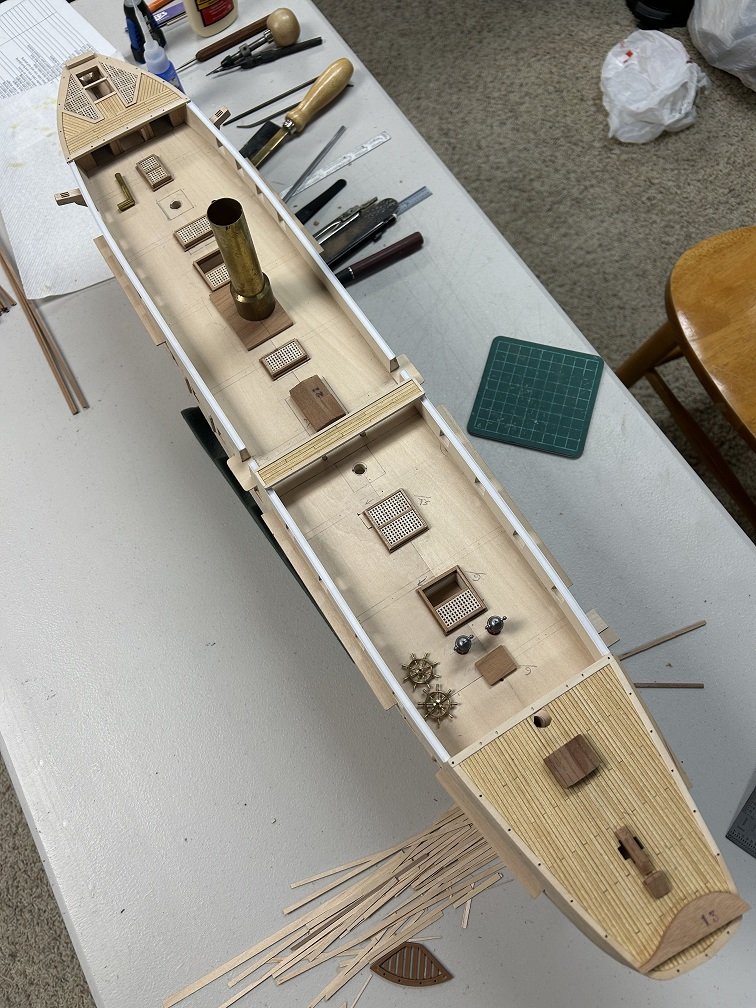
One of the reasons you do these trial setups is to verify. Well, I was pondering the picture I took and suddenly realized something was very 'odd.' The height of the supplied binnacles was way too large. They measured 3/4". In 1-100 scale this equates to over 6 feet tall. Well, I guess I am replacing those after all (the kit strikes again haha). As these were very different in design on the actual ship I had been going this way regardless. I need to make some scale figure stand ins so these type of errors jump out immediately. That will also help with the ladders to be made. Since I am doing an update I also wanted to provide the kit provided deck furniture verse what I came up. Given the age of the kit this did not surprise me. Reminds me of the numerous balsa wood kit airplanes I built in the 70's. Big difference is now I have access to other sources of wood and skills to use them. Now to figure out how best to make skylights for this scale. Mark

-
kruginmi reacted to a post in a topic:
Jylland by kruginmi - Billings Boats - 1:100
-
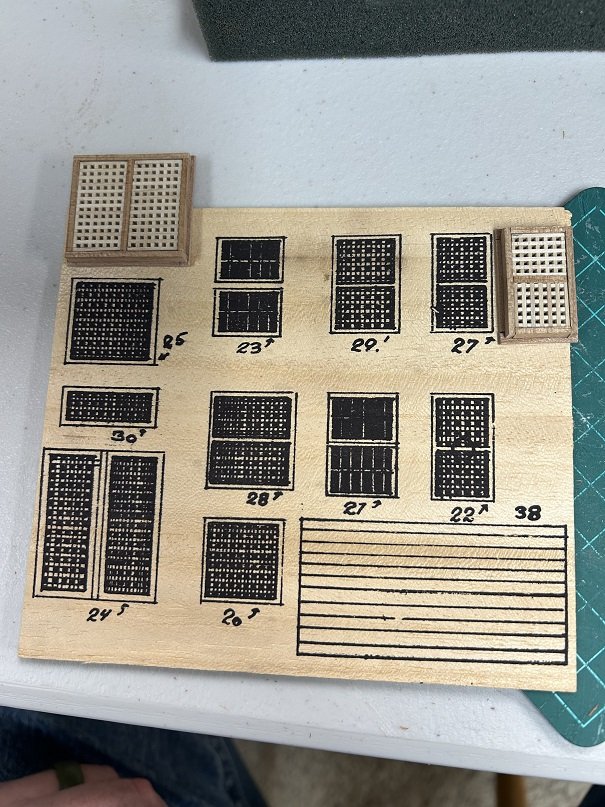
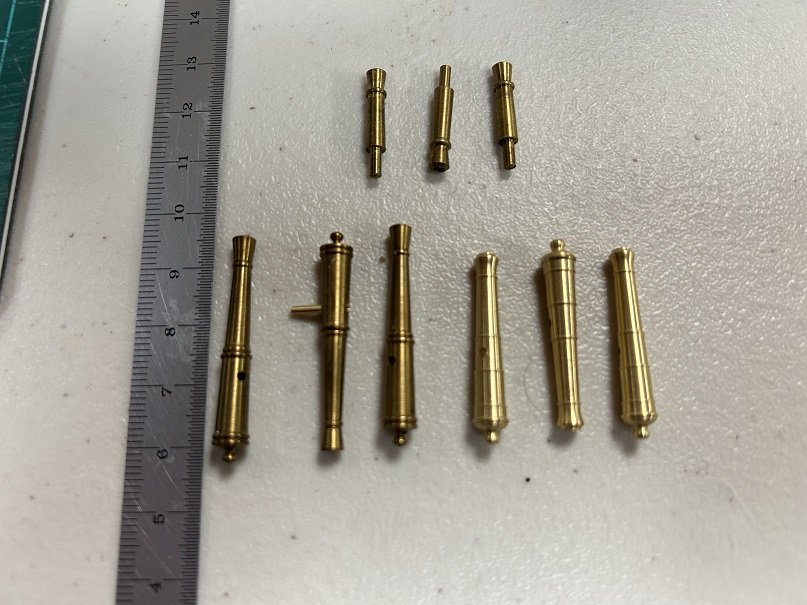
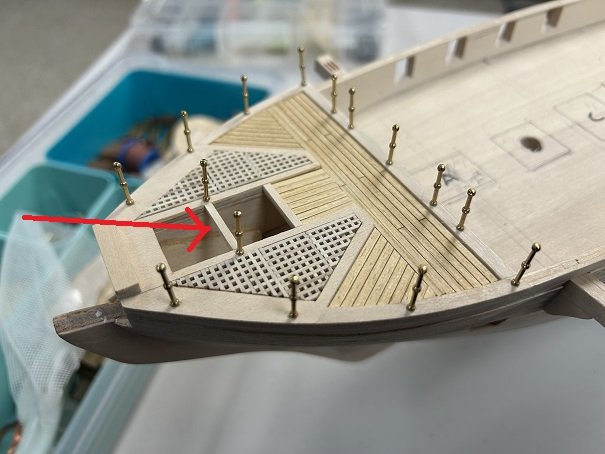
Working through my view of how to do the deck fixtures. I think I am happy with the result. Getting these set will allow me to begin planking the deck. Notes: - The skylights (2) are currently placeholders. They will be replaced with better examples. - The binnacles (plastic) will have their posts replaced. May keep the top part. - All the belaying pin mounts are still TBD. Using cherry wood means I do not have to paint these. The funnel base is the one exception - black. Cheers, Mark
-
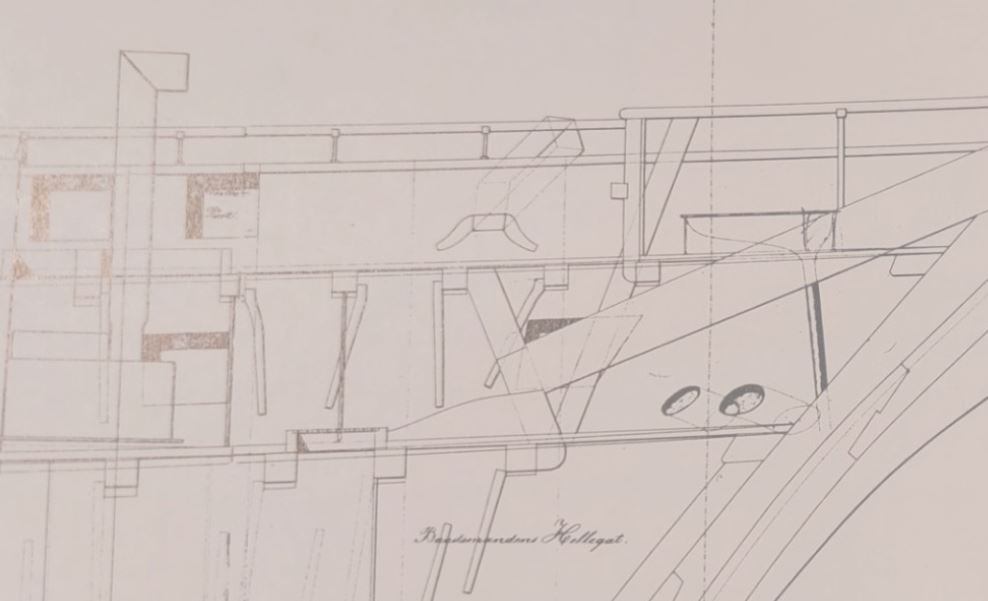
The chase holes and such were modeled after this piece of plan that Anders has shown previously. The ship has undergone a lot of modification and somewhere a line in the sand (or hull haha) had to be drawn. I based the chase port off of the leading edge of the forward top deck - not the forward stem. To get this to my Uncle and move forward I am going to leave things as assembled. I also think some camera distortion in the pic is making things look stranger. Mark
-
kruginmi reacted to a post in a topic:
Jylland by kruginmi - Billings Boats - 1:100
-
kruginmi reacted to a post in a topic:
Jylland by kruginmi - Billings Boats - 1:100
-
Thanks Martes, but this is a conundrum of the original kit and not realizing how off the kit was. They were baked into the build before I realized how different the two were (reference the deck fixture observations above). I should re-iterate this kit is from the 60's-70's and not the latest incantation. Pushing forward. Mark
-
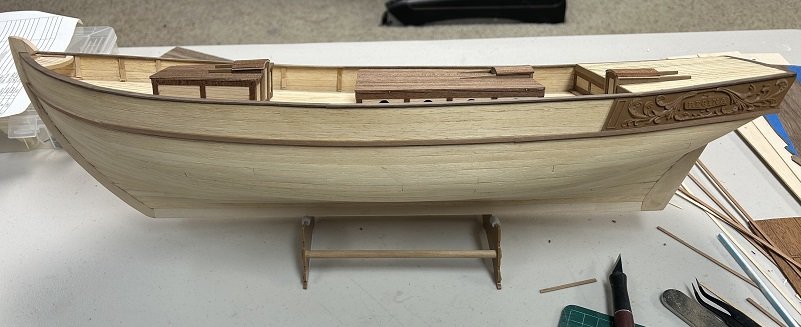
The port side planking is complete. Next step is getting the deck fixtures set and get the main deck down. Weather is warming up so getting the sanding sealer on isn't too far off. Mark
-
kruginmi reacted to a post in a topic:
Regina by Kruginmi - Billings Boats - 1:30
-
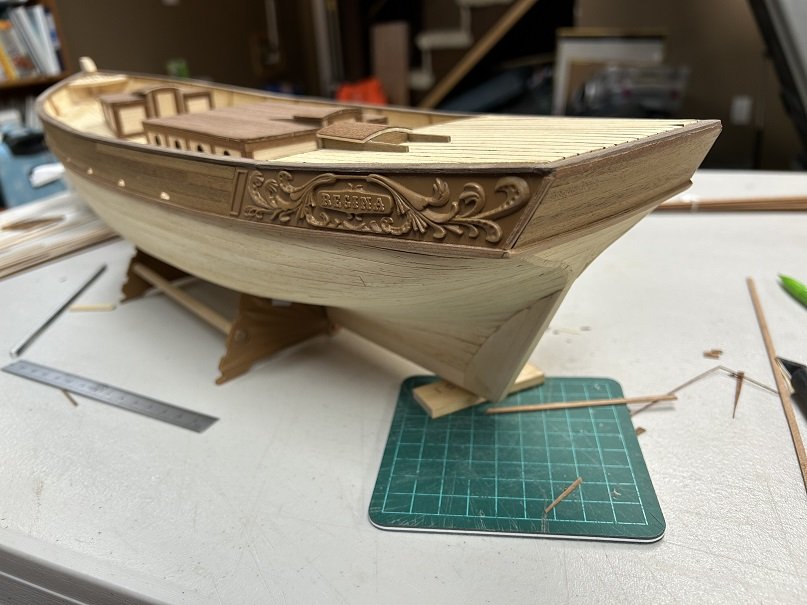
With my new direction, I have continued to Krugify (veer from the plans) on the look of the ship. Decided to veneer the outer bulwarks and since I always like the look of scuppers, added 5 of them each side for a pop of contrast and interest. I have also decided to replace (once again) the inner bulwark supports with cherry, replacing the basswood for a deeper color contrast. This is in progress. You can see one in the pic second from aft. Once I put the finish on it will pop a lot more. I also wrapped this around the stern. There is a plastic decoration that goes in this location, might go with something different. I will probably switch back the the Jylland to complete it's main deck next. Hopefully won't take too too long. Mark
-
kruginmi reacted to a post in a topic:
Regina by Kruginmi - Billings Boats - 1:30
-
Thanks Mark, that was the direction I was headed (deck wise at least). With the hunk of plastic on the side, pretty much forced to do some painting. My initial thought is the external hull will be painted. Water line and below - dark green. Plastic piece strip - dark green. In between - white. My unknown is the bulwark walnut railing / cherry 'wales'. Like to keep them natural but think the cherry will have to be painted white. Color is not my natural skill so suggestions welcomed. I do not feel restricted to the box art of the kit. From my Army background: If it moves - salute it, if it doesn't - paint it white. Mark Update: Wife came by (she originally picked this kit) and asked for the plastic piece to be painted and leave it at that.
-
kruginmi reacted to a post in a topic:
Regina by Kruginmi - Billings Boats - 1:30
-
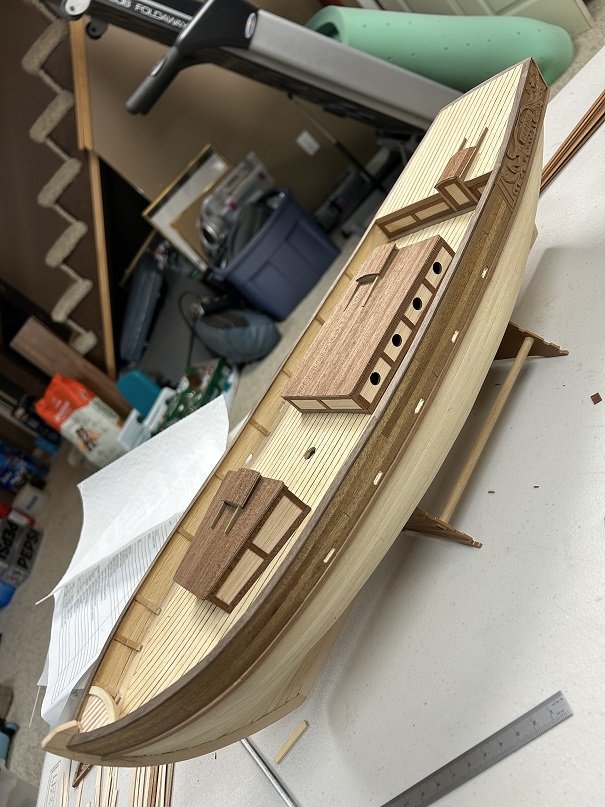
Ever forward. I met my goals for this week by getting the basic hull complete. Still some fine tuning. The forward grating plastic piece did not fit into the space without modification. Thought it was just easier to make the whole thing out of wood. Finished up the laminated cherry 'wales' and the walnut railing. All three deck house entry ways were also finished off as well as the remaining trim. Still need the skylights (3 total), which are half plastic. Next step is figuring out how the forward bowsprit intersects with the stem head and butt joins to the winch. I need to construct the winch and see how this fits together. Then the forward and stern raised railing can be affixed. Mark
.JPG.dbcd67e0b1033523511e9746f25d2306.JPG)

.JPG.95614274e94529105de874700e57f6fc.JPG)
-
Snapshot of progress. Not a play by play of everything I have done. Happy to answer any/all questions if any. As I get into the finer details I am not a stickler for the plans in a kit like this, just looking to enjoy myself. For example, the bulwark rail is shown to be a lighter wood (like the hull). Decided I wanted a darker (natural) look so brought in some 1/16" walnut for the job. I have only completed the back half of the rail to allow me to plank the upper stern deck. I like the result. For the trim piece below the side decoration I substituted in some cherry I had on hand. To allow it to fit into the bow area (bending wise) I used 1/32" strips and laminated 2 together. Still need some sanding but all good. On a side note, the deck houses in the kit had the location lines for the trim marked on them. I was concerned some would be visible in the final product so actually build the main boxes for each inside out. I like having a clean palette. I actually liked the idea of putting the access door in the house to starboard, causing the rearmost cabin door to move port. When this is shown next to other Regina's (haha) easy to pick mine out. Next up is finishing the rail and replacing the plastic belay pin rail at the bow. My resultant hull differs from the plastic outline enough that it justifies just making a new one. Mark
.JPG.d7c558906cd9dac80a1b2694222cb55f.JPG)
.JPG.e9acdcf2e5a4e595892b3f4868b38d41.JPG)
.JPG.f8bbeea8a8a37c4cb8b90303b30abf0a.JPG)
.JPG.996a51e84a436977aaa960fc1e4b7599.JPG)
-
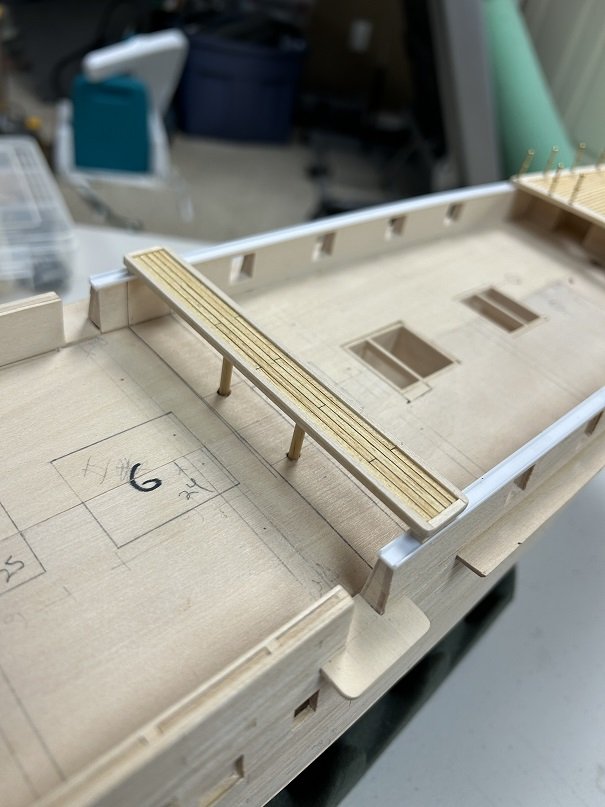
One feature that pops out is the mid-ship walkway so decided to knock the base structure out. Still need the guard rails but that can come later. Affixed the plastic c-channel on top of the bulwarks to finish the look. This walkway is easily removed. This gives the ship an overall look of: Decided to look closer at the cannon: The bottom row left three are from the kit. That flared out muzzle sure make them look older than the mid to late 1800's. All supplied cannon are the same type. For the main gun deck you get the top row guns which affix to the hull. For comparison I grabbed in my stash a set of 18 pounders which I showed as the three shiny right hand ones. My basic research shows the ship used (1864) 8-18 pounder, 4-12 pounder and 32-30 pounder guns. The top deck has 16 gun ports with 12 guns identified so that is another question on what goes where. I am toying with the idea to use some of my 18 pounders (obviously only on the top deck). Have to ponder that one. The guns on display at the museum definitely look more like the 18 pounder version than that supplied by Billings. To ramble some more I am seriously considering having this ship put back into my list of ships to do once this is complete. I have the next three projects waiting but think I could take what I have learned, research some more and produce a set of plans (and a list of assumptions) that would produce a better ship. I would definitely need to find that book referenced at the start of this project. The old girl is growing on me and I would like to do her justice. Mark Up next is to finish the planking on the starboard side and fabricate the missing deck furniture. Masts/Spars are quickly coming up.

-
Ever forward. Updated the bow based on new information. The highlighted 'brace' I hereby declare as the Steggen Brace. I had no idea it existed until his pic. As it be said, let it be done. Looks much better overall with the added center platform. Finally decked the stern area. That took a minute. Obviously deck furniture to be added. Figured out my missing deck height on the main deck. Looked at the cannon and for this kit they are very bare bones - only the carriage and gun which they want glued to the deck. Well.....I can fancy them up and add wheels which will give me the necessary height addition. Now to sort out the main deck furniture so I can start laying out the deck and where planking is required. Mark

.JPG.50eeeade0cd7431964983a3bf2a70e84.JPG)
.JPG.9a06c18b2b357344421a46f939f345f9.JPG)
-
kruginmi reacted to a post in a topic:
Jylland by kruginmi - Billings Boats - 1:100
-
kruginmi reacted to a post in a topic:
Jylland by kruginmi - Billings Boats - 1:100
-
First off - Peter: Thanks for the kind words, just (trying) to have some fun. Now to define why all the questions / rabbit holes. This ship has gone through (it seems) so many big changes externally. Add a deck, stretch the deck, change the deck furniture (maybe). I had no idea when I started what a can of worms that would be opened. Every time I look at a specific topic and compare the plans I have, the updated plans from Billings, pictures I can get from the web, plans from the archives and finally the input from this great group I have quite a few different answers. Since I didn't know this from the beginning I have baked in some specifics variables from my re-draw of the hull plans. Again, the bulkhead pieces were seemingly hacked out of the wood with a dull butter knife and the plans as shown did not have a right angle and could not be used fix the pieces (this kit from the 70's, not the replacement one available now). I laughed this evening because I finally gave a close look at the deck fittings. Let's start from the stern looking at the original plans: Pictures clearly show the ship's wheel is sitting on a grating (makes sense). No such thing as defined on this model. Looking at images, the next item up should be a skylight then a grating. These are switched (or are they as defined originally?) Under the ships boats there should be a skylight as exists today. Would the ships boats still fit here? Moving forward: The funnel has a secondary tube. Shown on the plans aft of the funnel. Pics of the current ship show it forward. The stairs down to the gun deck seemingly should be forward of the grate. Even the funnel in the forward grate can be seen pointing forward and aft. Is this all time period dependent? Was Billings this sloppy or did they design off one set of procured source material. I have looked at the 'new' 'improved' deck plans of their updated Jylland kit (real expensive) and they are not much different. I think the answer is to rename the ship the Krylland (get it - Krug and Jylland - I crack myself up) and get'r done (joke). This ultimately is for my Uncle so I will proceed making choices for aesthetics / function / and finally ~accuracy. As always, I welcome any and all input just know I will probably make choices that will cause your eyelid to twitch a little. This ship deserves a well made set of plans (or maybe 2 or 3 based on date). A great ship. Thanks again to all, I will endeavor to persevere Mark
.JPG.8b12460d8ea61e5d306ffd6593507eb2.JPG)
.JPG.1f28d95985d8213155216199bf530469.JPG)
-
That helps a ton. Marching to completion. One additional question (for now haha): Is there any rake to the masts? They 'look' at ninety degrees to water line (and at this scale that may be good enough). Mark
