

Jeronimo
-
Posts
729 -
Joined
-
Last visited
Reputation Activity
-

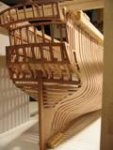
 Jeronimo reacted to rekon54 in Le Fleuron 1729 by rekon54 - 1:24
Good Sunday to all
advances Fleuron
rekon54
-
Jeronimo reacted to EdT in HMS Naiad 1797 by EdT - FINISHED - 1:60 - 38-gun frigate
1:60 HMS Naiad 1797
Part 178– Boomkins, Scuttle Hinges
The boomkins – or if you prefer, bumkins – were the only spars included in the construction contract. This is only mentioned because in determining how far to go with the model, I decided to take it to the state required by the building contracts of the time. There are a few exceptions. For example, I included the stove, although that was not included in the contract. I did not include swivel gun mounts, which were included. I believe the latter had been discontinued by Naiad’s time.
The boomkins were substantial spars extending out from the head to secure the block of the fore course tack. The lengths of these were not specified, except to say that they needed to extend out to plumb with the end of the fore yard when fully braced. This required some calculations, which yielded boomkins longer than any I have seen on contemporary models, so I made them slightly shorter but still longer than those seen on Minerva and Leda in the Rogers Collection.
In the first picture, a square of boxwood is being converted to a tapered octagon shape with a Stanley #92 plane. The spar will then be planed to 16 sides and finally rounded with a flat file.
The boomkins slanted down and were curved. In the next picture, two pieces with significant extra length have been boiled and are held in the final downward curve by the orange clamps and the “clamped squares” that are fixed in the t-trak.
After drying out, these were cut to length and installed as shown in the next picture.
The boomkins are bolted to the first hawse timbers outboard of the bollards. Eventually they will be held down at the false rail with iron clamps. The next picture shows another view of these.
One of the final chores was to install hinges on the ventilation scuttle just above the wale along the finished side. These were made as simple shapes, photo-etched. They are quite small and when blackened and installed on the black planking, almost invisible. The next picture shows a few.
Two of these still have some mask attached. The next picture shows on of these glued on with CA glue.
Ed
-
Jeronimo reacted to Gaetan Bordeleau in Le Fleuron by Gaetan Bordeleau - FINISHED - 1:24
Thank you Peter even if you have some exaggerated words.
Here is an idea of the outside representation with the black still wet.
Asphalt powder diluted in turpentine plus tung oïl
Black water tint Samona
-
Jeronimo reacted to RKurczewski in Stern gallery of Santissima Trinidad
Thank you for all kind words, gents. When it comes to 3d printing- in my opinion it is a bit of "cheating" but... at the same time it is easiest way to create low run "upgrade kits" for models that would otherwise be very hard to complete.
Back to Santissima: my goal is that stern and let me explain why.
All the plans and all the model kits on market show "simplified" (to not say "butchered") version of ship stern, borrowing heavily on british Agamemnon class (which is- to degree- justified). Of course we can make a "bare" stern, with close to no decoration, saying that since we do not have enough data, let us go simplest possible way. That's of course an option, but why would all the sudden all of us take that particular route and this one only ? Now- to my very best knowledge there is no single resource from era, nothing that would justify that approach. Nothing suggests removal of stern figures. We know above model, we have few written sources from Trafalgar (all of them mention magnitude of sculpted, white figures). We know that figurehead was severely damaged at Sao Vincente and most likely replaced later on (that's different, also quite fascinating story). So- my choice is copying stern from Museo Naval. 3d model you can see (and manipulate) from the very first link in first post is a base of course, I will be upgrading it as work goes along.
Central part of stern decoration, portrait of Carlos II, ready for printing.
-
Jeronimo reacted to qwerty2008 in Block question
After looking at pictures of blocks online I decided that my problem was that the grooves I cut into the block were at the wrong angles so I sanded then deeper and retried it worked this time thou the spanish windlass still did get in the way it wasn't as bad this time and I was able to get it really tight thank you so much for the information.
Lextin.
-
Jeronimo reacted to qwerty2008 in Block question
I made the grommet and served the eye then I tried how you said to tighten it for the seizing but the spanish windlass kept breaking and when I made it strong enough not to break it was too big and got in the way of the seizing how should I proceed?.
Thank you.
Lextin
-
Jeronimo reacted to qwerty2008 in Block question
I am making a block and am wondering how would the rope that wraps around the block be made for a full size block? would the whole rope be served or just the eye? how is the rope spliced on the bottom? would there be a thimble in the eye or not?
It is a single block that is 5 inches tall with a 3 inch diameter sheave wheel.
Also, its a bit late now but did I make the right choice in making this block from hardwood or were real blocks made from a softwood like pine?
-
Jeronimo reacted to EdT in HMS Naiad 1797 by EdT - FINISHED - 1:60 - 38-gun frigate
1:60 HMS Naiad 1797
Part 177– Port Side, Lower Stern
At the time of the “Great Crash” I was working on the unplanked port side of the model and anticipating completion of the entire model within weeks. It eventually took longer, perhaps without the pressure to keep posting – or perhaps it was resisting crossing the finish line.
Anyway, the first picture shows the two additional ribbands installed – one at the height of the wale and the second at the height of the sheer rail. In this picture the planksheer along the waist and the roughtree rail along the topsides of the quarter deck are also in place.
The next picture shows a closer view pf the planksheer and the gangways installed along the waist. The tops of these decked walkways is flush with the tops of the planksheers.
Part of the final work on the port side was to locate and insert all the missing bolts that were left uninstalled during work on the knees, spirketing, and other internal members that bolt through the hull.
The next picture shows a closer view of the port gangway and one of the ladders into the waist.
Only the basic structure of the quarter gallery on the port side was installed. This included the stools, the rim with its stanchions and the upper and lower finishings. The next picture was taken after bolting in the lower finishing on the port side with the model inverted.
While in this position, the final applications of wax finish were applied to the lower stern and the lower hull framing.
The next picture shows work on the lower parts of the starboard quarter gallery that were also installed at this time.
In the next picture the model has been righted and all of the lower parts of the quarter gallery are in place.
Ed
-
Jeronimo reacted to Rheinschiffer in LE BONHOMME RICHARD by Jeronimo - FINISHED
Hi Karl,
I follow your content since a few month and I have to say that I' am speechless. You work in such a high quality and so fast!!
Wonderful!
Regards
Holger
-
Jeronimo reacted to Michel in LE BONHOMME RICHARD by Jeronimo - FINISHED
Hello Karl,
Beautiful work !! 3 pièces is a good idea.
Michel
-
-
-
Jeronimo reacted to rekon54 in Le Fleuron 1729 by rekon54 - 1:24
hi advances work Fleuron
following more photos rekon54 -
-
Jeronimo reacted to archjofo in La Créole 1827 by archjofo - Scale 1/48 - French corvette
Hello Dear Friends,
Thank you for the motivating comments.
Here is an update of my Report.
It's about the manufacturing of gun carriages for the carronades.
These are made of serviceberry.
-
Jeronimo reacted to Dan Vadas in HMS Vulture 1776 by Dan Vadas - FINISHED - 1:48 scale - 16-gun Swan-class sloop from TFFM plans
I've made and fitted the final three pieces of the Rudder Head Trunk. Some slight sanding still needs to be done to get the joints flush :
Danny
-
Jeronimo reacted to garyshipwright in HMS Montague 1779 by garyshipwright - 74-gun Alfred-class
Thanks guy's. Just to let you know that Montagu isbeing worked on here is some pictures out of sync with the rest of the build photos,showing the build up of her 32 pound gun. Am in the research phase of figuring out the sizes of every thing that fits with the gun. It does seem that not every one agree's on the sizes of the fittings that fits with this type of gun. One item that I have been looking for and just a matter of time before I find it, is the size of the hooks that the block and tackle used. Just like the blocks, some say 6 inch blocks and other say 8 inch blocks, which is probably what I go with. Any way here is some photo of how the cannon looks minus the rigging which as soon as I get the right type of end mill to make the blocks, they will be rigged to the cannons. One thing is for sure, there sure is a lot of parts and pieces to them. Gary
-
Jeronimo reacted to garyshipwright in HMS Montague 1779 by garyshipwright - 74-gun Alfred-class
Hi Guys. Another update for you and this time as far back as we can go on the orlop, but has more to do with strengthen the transom's more then the Orlop deck. Some call them sleeper beams and Goodwin call's them transom knee's, which you can see on page 108 in his book Sailing Man of War,1650-1850.In the photo's you will also see the last beam of the gun deck along with knee's for the deck transom and the knees for the last deck beams. Most 3rd rates had three of them per side. Hope you enjoy the photo's folks.
-
Jeronimo reacted to garyshipwright in HMS Montague 1779 by garyshipwright - 74-gun Alfred-class
Thanks guys. There is a couple of places around here that's up for sell Clipper. At the moment the closes ship modeler lives about two hours away. Hopping maybe just maybe I can get to the NRG get together this year but will have to wait and see at the moment.
Thanks Robin, I also like Ed T's build log. He has given me some great ideals that has help me with some area's that I have come across.
Thanks Ed, but does seem that you are a little on the nice side but do enjoy your build very very much. Also look fwd to your next book when it comes out.
Hi Guy. Your very welcome sir and if there are any other pleaces that you wish to see, just let me know sir.
To show more on her Orlop deck going aft, this shows the last of the store rooms on this deck. One thing that I did detail on these store rooms was the windows and the door knobs. One can just feel how hot it got down here with only the gratings suppling air flow. Reminds me of being in the attic running circuts for some ones house.
-
Jeronimo reacted to EdT in HMS Naiad 1797 by EdT - FINISHED - 1:60 - 38-gun frigate
1:60 HMS Naiad 1797
Part 171– Head Continued - Figurehead
Posted 1/10/13
Based on the comments I guess I glossed over the actual carving of the figurehead so I will offer this still abbreviated description of the process. I hope to document the whole process in much more depth in volume II. Again, I don’t represent this process as ideal, but merely the one I used. I believe I covered the maquette in the previous part.
The first picture shows the “composite” side pattern pasted to a block of European Boxwood (buxus sempervirens). This is an outstanding carving wood – hard, dense grain, polishes well.
The three patterns used can be seen to the right in the photo. They were created by tracing over the 3D rendered images seen at the left, then overlaid on the drawing of the bow for final sizing, orientation, addition of hair and drapery and any needed adjustments. This was done in the CAD program. These patterns were used for the maquette.
The “composite” pattern was made by superimposing the two side patterns to outline the maximum extent of the figure for cutting the overall shape. This was done on the scroll saw. The next picture shows the block having been cut out in both planes.
After cutting out the side shape, patterns were pasted on each side and a rough front view sketched in pencil on to the forward side of the block. The side shapes were then roughed out on the scroll saw. These side cutoffs were useful in positioning various features on the carving later. Measurements were also taken from the maquette to locate features.
In the next picture the head and upper torso have been given a general shape with the carving clamped in the vise.
The head was done first with enough facial detail to assure that the final face could be finished successfully – before moving on to the torso. This preliminary work was largely done with rotary tools and burr cutters or powdered diamond abrasive bits. Getting the face shaped is a critical step and can be difficult. Females – especially attractive young females – are challenging. Overly prominent features, sagging jowls and deep-set eyes all make the figure seems older – and sometimes even masculine. Most of this work was done with hand tools once the basic head was shaped and the eye sockets defined with a small spherical diamond grit rotary tool.
The next pictures show the rotary tools used.
I have two of these Wecheer tools because I use them so often for drilling and sometimes buffing. They can be held like a pencil. Various bits are shown to the left. The four bits to the left side are diamond abrasive shapes. The tiny burrs in the yellow case are Fox burs. These are very tiny. The rotary tool to the right is fitted with a screw mandrel. A small circle of Scotchbrite pad has been screwed onto the end and is used for buffing. Small sanding boards and flexible sanding strips up to 2000 grit were also used for polishing.
The next picture shows the rough carving with the maquette.
Some adjustments were made to the final head shape and pose. The upper torso is pretty well shaped in this picture.
The next picture shows some of the hand tools used for carving and final detailing.
A surprising amount of rough paring could be done with a simple modeling knife but straight chisels were used quite a bit for that as well. The tools to the left are small gouges made from drill rod. The very tiny gouge at the far left was made from a bit of syringe tubing. The small abrasive files were very useful for shaping and veining. They can be used in any direction and are good for smoothing out gouge cuts. The Two Cherries tool is a very mall curved gouge. I also used a similar v-gouge quite a bit.
In the next picture the roughed out figure has been fitted to the bow.
The mounting slot was cut with a saw and square files. A major portion of carving block behind the figure remains. This allows it to be clamped in the vise. Once the figure was fit into place this could be removed as shown in the next picture.
The figure is almost complete in this picture. There is still some final work to do on the hands, feet, face, etc. Closeup photos like this one – or closer - are very helpful in finding areas for further work. There will be a short extension of the lower cheek with a scroll installed on each side just behind the figure’s foot.
The last picture shows the figure at this stage from the other side.
Because the figure represents a swimming nymph, there is not a lot of drapery; so the area behind the torso had to be filled in. I did this by extending slightly the upper part of the lacing timber. This is visible in both these last pictures. Doing this in pear helped define the slender shape of the figure.
Ed
-
Jeronimo reacted to EdT in HMS Naiad 1797 by EdT - FINISHED - 1:60 - 38-gun frigate
1:60 HMS Naiad 1797
Part 170– Head Continued
Posted 1/4/13
Things slowed down a bit over the holidays, but I was able to continue work on the head structure. In the first picture the assembled upper cheek on the port side is being attached.
The two parts of these assemblies were glued together first while clamped in place, but not glued to the beakhead. The assemblies were then aligned to the back of the lacing and glued on one at a time.
Since there was wait time being gluing these parts together I started work on the figurehead. The next picture shows the beginning of work on a maquette made with an epoxy molding compound – MagicSculpt.
I have used this material extensively for making patterns for casting of 1:60 military figures. It is applied over a copper wire armature pushed into a cork to enable handling. The material is then built up progressively and shaped using fancy tools like round toothpicks.
The design of the figure took some research and some drafting time. It is supposed to represent a water nymph (a naiad) swimming. As I have mentioned earlier, there is no decoration plan for Naiad, so the carvings are all speculative. To complicate the decoration decisions, Naiad was under construction when the Admiralty issued its 1796 order to reduce decoration and eliminate full figures. This second part was very unpopular and may have been ignored at least for a time. I feel reasonably safe with the level of decoration on the Naiad model – no one can know for sure.
The next picture shows the almost-completed model posing near the head.
In this picture a template scrap is being used to position the figure. The next picture shows the finished maquette mounted on the head.
In the picture the bolster is also being glued in place under the hawse holes. The gammoning knee assembly has also been made with a scarph joint joining its two parts. It is glued in between the gammoning piece of the head and the stem.
The next picture shows the structure as the trailboard was being fit between the two cheeks.
After it was installed, holes were drilled from the opposite side at the ends of the gammoning slot. This opening was then filed out as will be seen in some of the later photos. The opposite side can then be done in the same way.
In the next picture, the carving of the final figurehead is well along.
There were a lot of steps to get to this point that I will not take space here to describe. The three views on the pattern sheet and the maquette were of course used as a guide and to transfer measurements as the carving progressed.
The next picture shows the unfinished figure being fit to the structure.
The figure is not yet finished except for the shaping of the torso and the face. The face was done first to save work in case it didn’t turn out. Fortunately only one try was needed, so I have spared myself the agony of wasting a good sized block of Euro Boxwood – so far. A slot in the figure to fit on the structure was cut with files and a small chisel after being roughed out on the scroll saw.
The next picture shows the figure fit temporarily into place.
With the width of the slot determined, the lower legs can be finished. The arms, hands, hair and drapery still need to be carved as well. This can now be done with the position of the figure and its intersection with the underlying structure established.
Although carving is a nice diversion, there is still a lot of interesting work to do on the head structure and that is still the priority right now.
Ed
-
Jeronimo reacted to archjofo in La Créole 1827 by archjofo - Scale 1/48 - French corvette
Hello,
here an update ...
-
Jeronimo reacted to archjofo in La Créole 1827 by archjofo - Scale 1/48 - French corvette
Hi Karl,
Thanks for the nice comment.
And here's a little update.
-
Jeronimo reacted to Alex M in HMS Sphynx 1775 by Alex M - Scale 1/48 - English 20-Gun Frigate
Hello,
here the making of chain plates for deadeyes, step by step in images.
To be continued, now in real time
Alexander
-
Jeronimo reacted to Alex M in HMS Sphynx 1775 by Alex M - Scale 1/48 - English 20-Gun Frigate
Hello,
the next task is to make deadeyes. I have tried to photograph each step, and hope the images are self explainable.
One end rounded with "truck tool"
Turned and cutted
Holding tool for drilling
Truning of the holder
The first deadeye
One side done, shaped witn fine grind paper
Ready deadeye
And here are these
This was the last post from me before crash, so the re-building of the log is now done.
To be continued
Alexander