HOLIDAY DONATION DRIVE - SUPPORT MSW - DO YOUR PART TO KEEP THIS GREAT FORUM GOING! (Only 13 donations so far - C'mon guys!)
×

molasses
-
Posts
455 -
Joined
-
Last visited
Content Type
Profiles
Forums
Gallery
Events
Everything posted by molasses
-
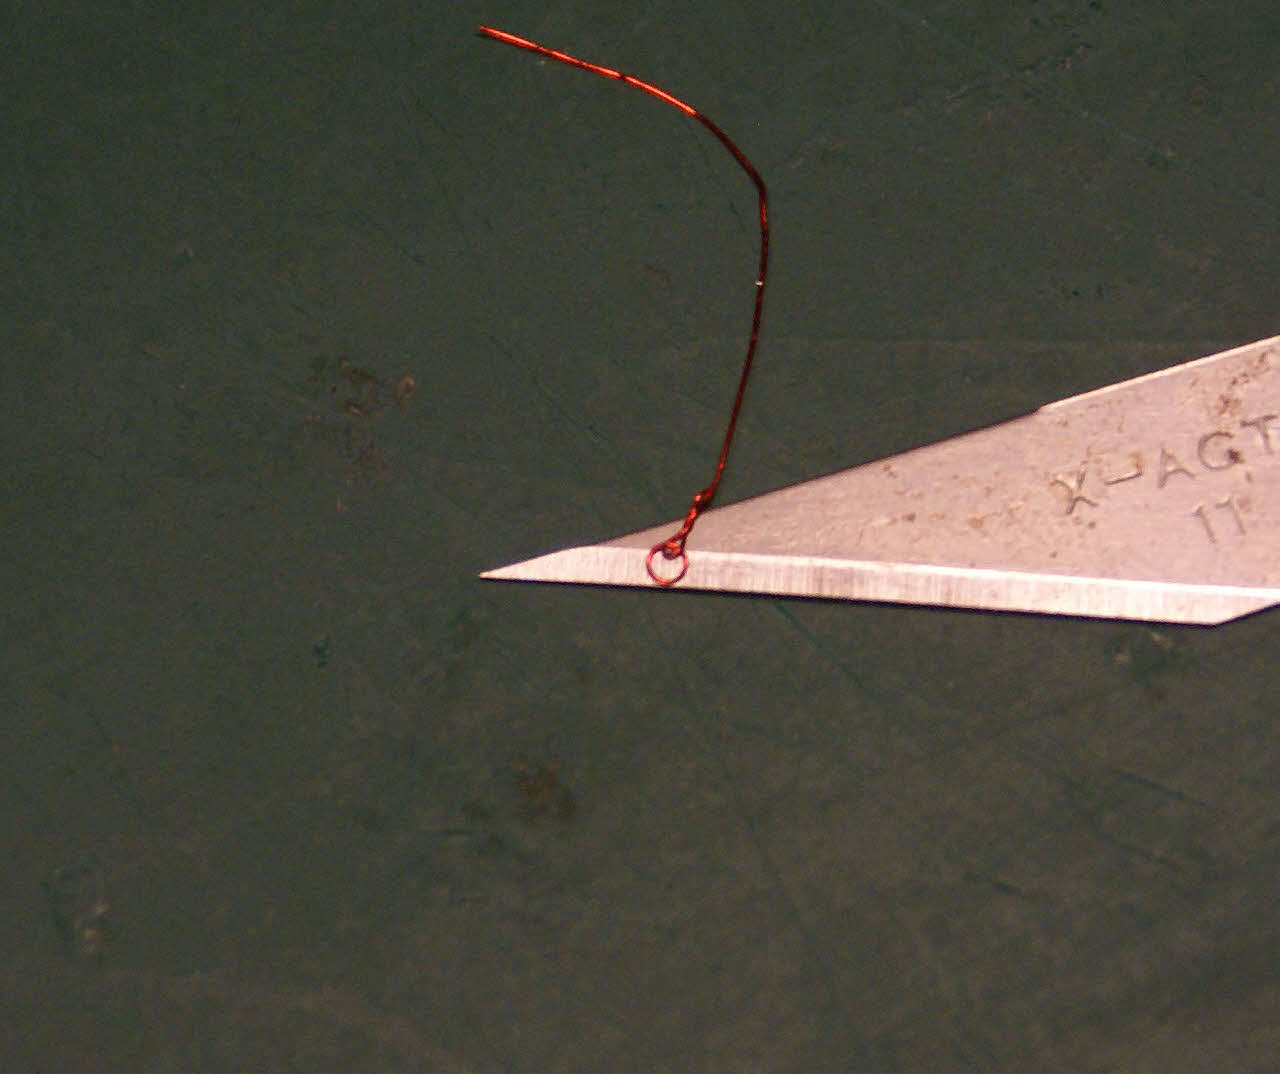
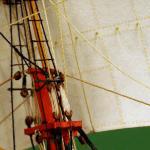
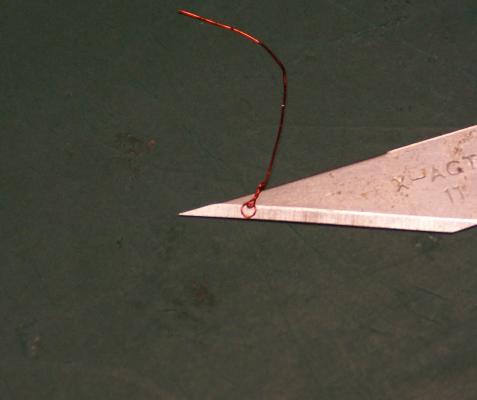
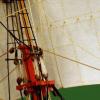 I used the technique described by Chuck to make some ring bolts. I twisted 40 gauge (.0055 inch / 0.14mm) copper wire around .010 inch (0.25mm) piano wire to make the eye bolt. [is that "crazy small" enough for you, Chuck?] I made rings .030 inch (0.75mm) inside diameter, fished the ring into the eye, brought the ends into contact and glued them with ca transferred on the point of a needle. Here's a completed ring bolt. I made a total of twenty of them and, yes, they were very fiddly.
-
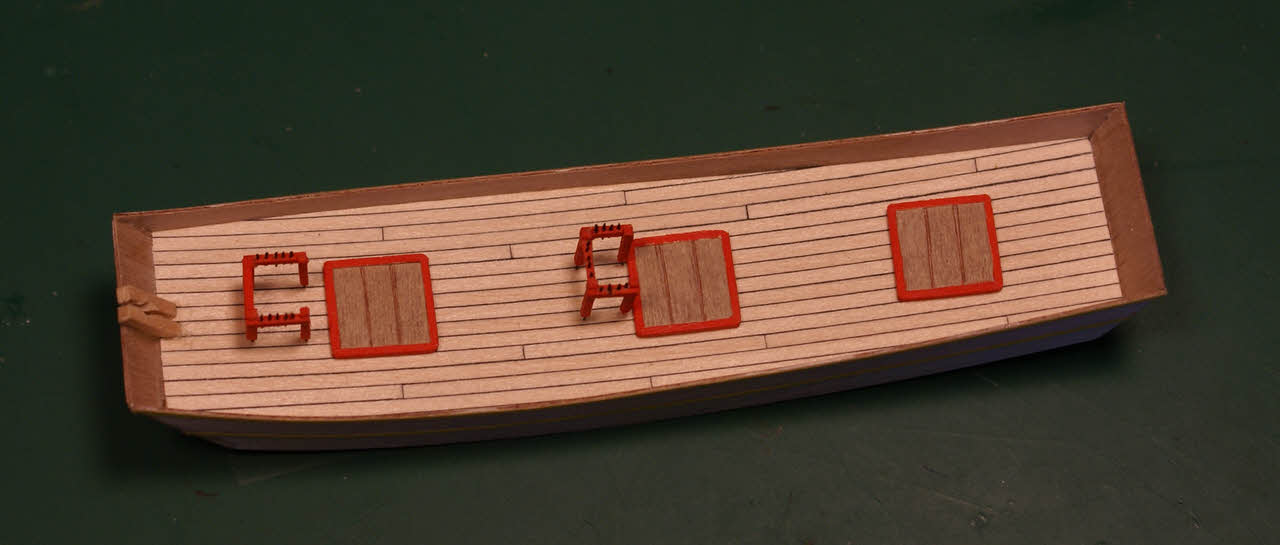
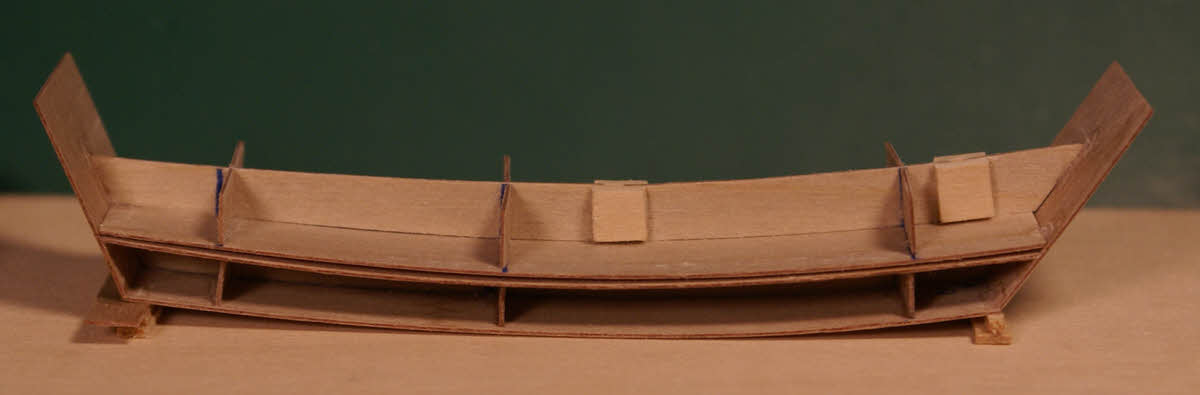
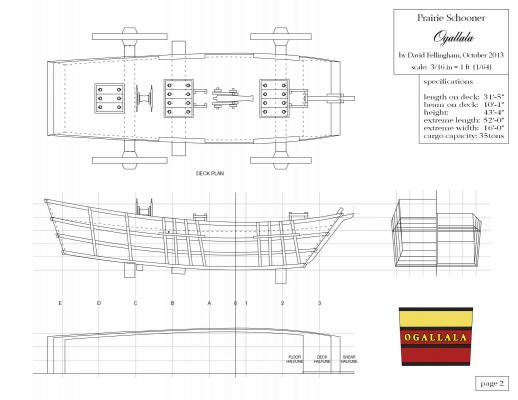
Welcome! I worked on several parts of Ogallala - the undercarriage components, several deck detail items and some of the wagon detailing. The four undercarriage components that will be assembled inside the bottle set in place on the bottom of the lower hull section - from left: front axle, axle tiller, brake / tiller attachment beam and rear axle. The three cross pieces have pegs that fit into holes in the hull section. The tiller fits in a hole in the front axle. I did a mock fit-up in an imaginary bottle with a toilet paper tube neck to check that it can be assembled working through the neck. That test went well, I hope the real assembly will be as easy. The front and rear wheels will be attached to the axles before the axle assemblies go in the bottle. Hatch frame with cover planks, and fore and main pinrails. The fore pinrail will also serve as the bits for the bowsprit. The belaying pins were cut from .010 inch (0.25mm) entomology pins. Each pinrail leg has a belaying pin reject glued into the end that will glue into holes in the deck upon assembly. Deck details in their approximate positions for a photo. Each cargo hatch has three simulated planks that need handles to use when they are removed for loading and unloading. I decided to try making ring bolts as handles. Here's the first one made from 40 gauge wire (.0055 inch / 0.14mm) with a ring that is 4 scale inches (100mm) in diameter - 1/32 inch (0.08mm) on the model. Yes, it was very fiddly. Just 17 more to make. No photos yet on the exterior hull detailing, still in progress. Thanks for viewing.

- 170 replies
-
- 7
-

-
- ogallala
- praire schooner
- (and 2 more)
-
You found me out, Bob. Seriously, thank you.
-
Welcome! I decided to post a photo of the port lights. At this point I decided to leave the drilled holes unpainted thinking that they are a little more subtle by letting the natural shadows "color" the holes. I can easily change my mind. The holes in the lower row are .020 inch diameter (0.50mm) and the holes directly below the deck line are .025 inch (0.65mm). The lay-out of the holes took considerably longer than drilling them. I find with this macro photo (as usual) that I still have a bit of touch-up to do. The photo also shows one of the photo-etch anchors installed back in May. The port side is also done and looks the same. Compare this photo to the one of Esmeralda at the top of this page. By the way, the cheap hobby drills I used didn't entirely cut through the paint but pushed up a bit of a ring around each hole simulating the ring on the real port lights.

- 84 replies
-
- 8
-
-
- esmeralda
- training ship
- (and 1 more)
-
Not really poor health, Daniel, just one of the many "fun" things that happen with age. Changing the medication took care of the undesirable side effect. The hard part was convincing the doctor that the shaking he could barely see was objectionable - even with my medicine induced shakes my hands were steadier than his - until I showed him some of the photos of what I was accustomed to doing before taking the medicine and couldn't do while taking it.
-
Donald McNarry in Shipbuilding in Miniature described the process I used for those rails using French polish as a glue for both thread and wire rails. It took me some time to learn that French polish is shellac flakes dissolved in wood alcohol - true shellac, not the substitutes available today. True shellac is made from the carapaces (shells) of a specific species of beetle and is almost unavailable today and is only used in very high end antique furniture restoration by the few artisans who know how to use it and are willing to put in the extensive labor required. Also, the wood alcohol fumes are dangerous and detrimental to health. As tedious as it may seem, I don't think there is any shortcut for making sure every intersection is glued. McNarry specifically mentions this in his description. I planned to try several substitutes for the French polish but didn't get to them. I haven't done much to Esmeralda - partly because medications from the doctor made my hands "vibrate", partly because the wire on the jig sagged (probably the result of repeated temperature changes during the time the doctor and I sorted out the vibration problem) and partly because I felt somewhat overwhelmed by the project itself and discouraged by my shakiness. The problem has been relieved by changing my meds and improving my diet. I found that the shakes can come from a potassium deficiency and now I eat a banana every day or two which seems to help more than the med change, but I'm now back to normal and working on both of my SiB projects. I will report on my progress on Esmeralda soon (port lights are done). I have never left a project unfinished and I won't have one now. The only unfinished project I'll ever have is the one I'm working on when I die.
- 84 replies
-
- 1
-
-
- esmeralda
- training ship
- (and 1 more)
-
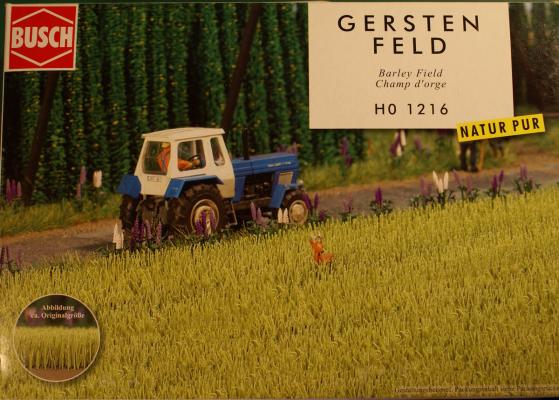
Thank you for taking the time to look in and make a suggestion, Andy. I do appreciate it. I'm trying to depict the wild buffalo grass of the pre-Civil War prairie - a species that is now almost extinct except for a few stands of it maintained in State and National Parks in the prairie states. Buffalo grass grew 4 feet or more tall. I looked at those same mats (and many others) but they were all too short at 2mm to 5mm - 8 to 18 inches at the scale I'm working with. Even those 10mm barley stalks are kind of short at 37 inches to scale, but the best match I could find to what I need. Believe me, I spent several hours looking at the various products available to depict grasses and grass-like field crops until settling on what I purchased.
-
Tom: I saw dyed hair for tall grass but went with the plastic grass because it seemed easier and better adaptable to use inside a bottle. I'll post some progress in a few days.
-
They're not in the kit but a good idea. Little seagulls in flight glued to the inside of the bottle are done on some SIBs. I had in mind to try some crows, but some deer or bison or curious Indians on horseback would be cool. I have to see what I can find. Thanks!
- 170 replies
-
- 1
-
-
- ogallala
- praire schooner
- (and 2 more)
-
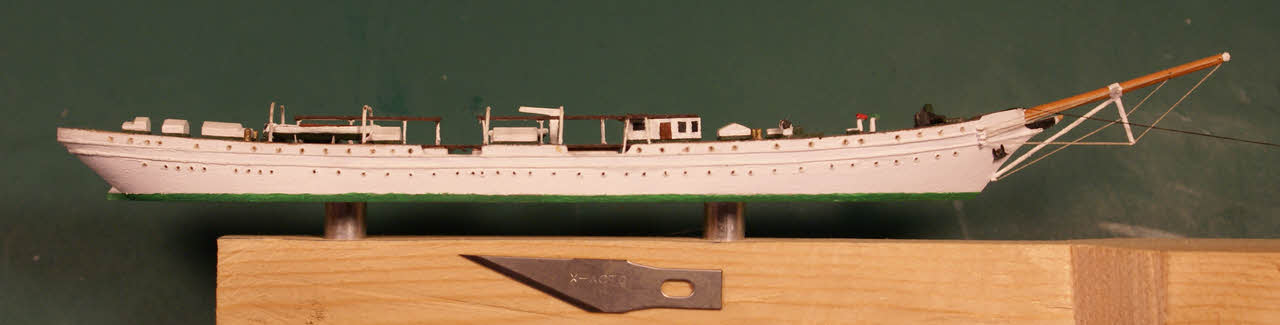
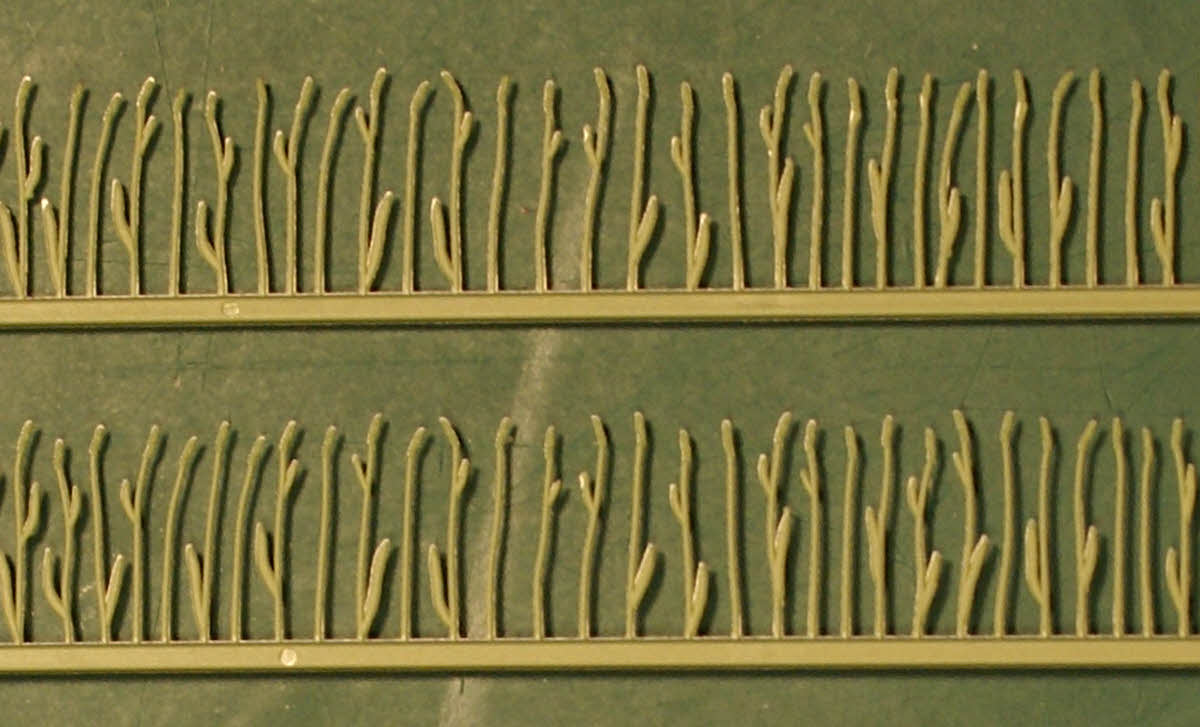
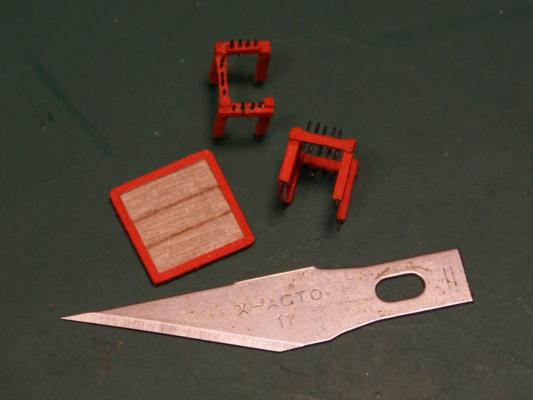
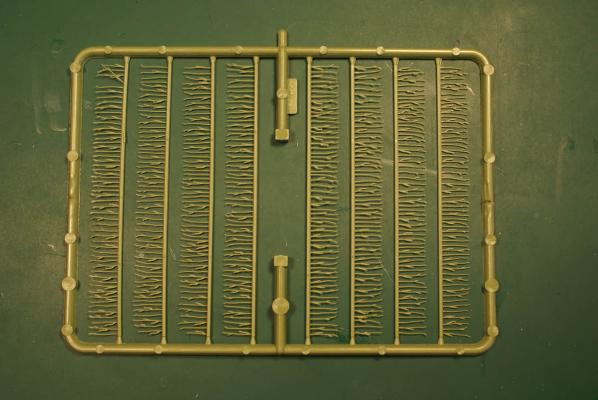
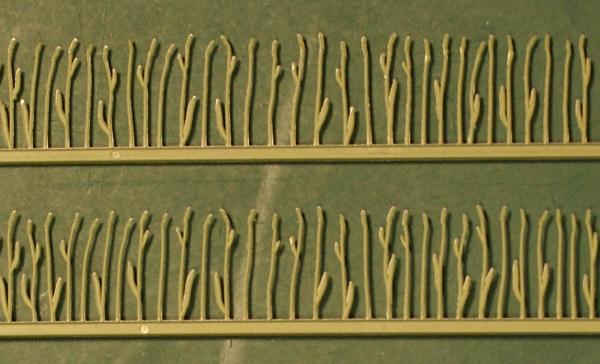
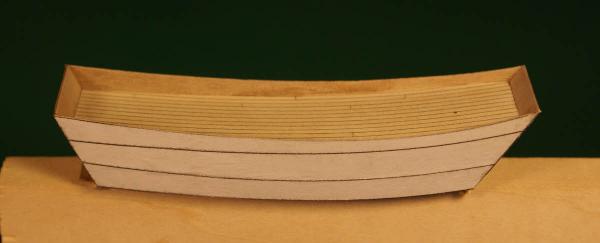
Sorry, I tend to forget to include a size reference when I take the photos, I'll try to remember on the rest of my posts. I like to use an X-acto blade - I suspect it's more universal than even a US cent to this crowd. The hull is 4 inches (100mm) long with a beam of just under an inch (25mm). The bottle is a gallon jug. The model itself will be 6 1/2 inches long X 5 3/8 inches tall (165mm X 137mm). It's a nice change for me to work on a model this big at this large a scale. I made some progress. View from port side with deck installed and hull planking complete. It's still planking even if one plank covers the entire side, isn't it? Starboard side planking with the freezer paper still in place. The upper line matches to the deck and the lower line is the cut line to divide the hull into upper and lower sections. I cut the plywood about half way through on the sides and ends before gluing them in place. I admit that I'm pleased with myself - and surprised - that all those pieces actually fit the way they were planned and drawn on my three-view plans. After taking those photos I discovered that my "sea of grass" materials had arrived in the mail. After inspecting them I decided to post my progress. I found this HO scale mini kit on a model railroad supply website and bought two of them. The photo on the box blew me away, it's exactly what I was looking for. (I hope I don't get banned from the "dark side" for using kits for a small portion of my scratch build.) The kit is made up of ten of these to cover an area 4 inches square (100mm x 100mm). I intend to use very small amounts of thinned yellow and darker green paint to give the "sea of grass" a little irregularity in color. The strips with the plants will be glued edge to edge (like planks) to build up a field. Close-up of grass stalks showing the detail. By giving individual plants a twist and/or bend they will be more three dimensional. The same company molds these in a straw yellow to depict a harvest-ready wheat field but I went for the green of a barley field to better depict wild buffalo grass. Individual stalks are .40 inches (10mm) tall. According to the description each kit has 5000 stalks. More to come, soon.

- 170 replies
-
- 4
-
-
- ogallala
- praire schooner
- (and 2 more)
-
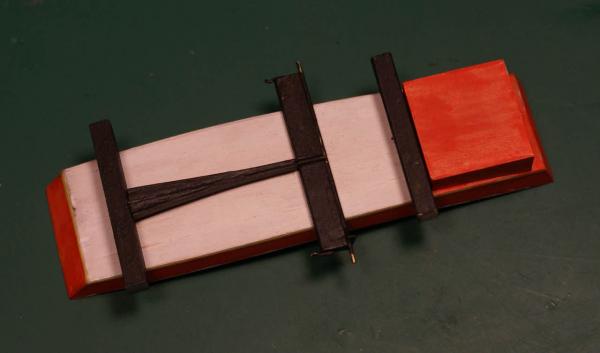
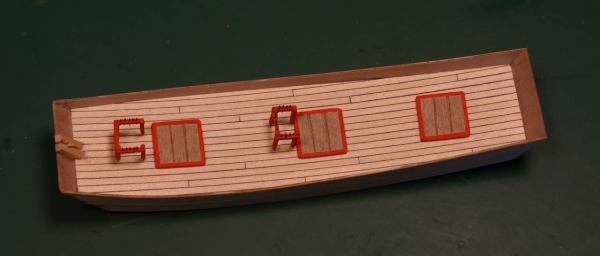
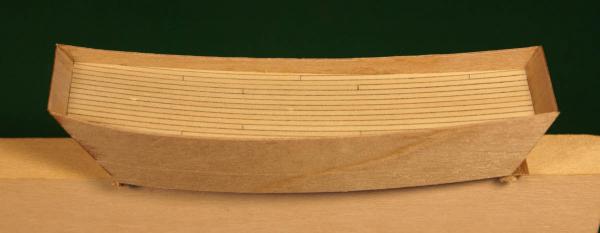
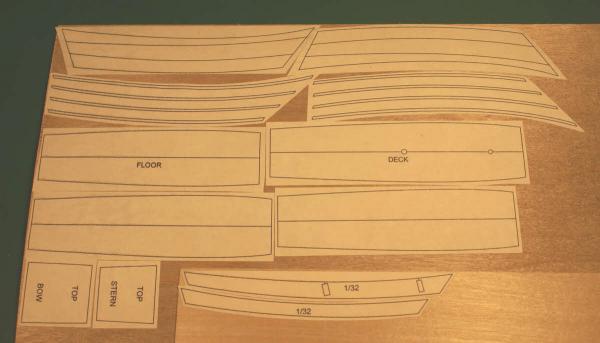
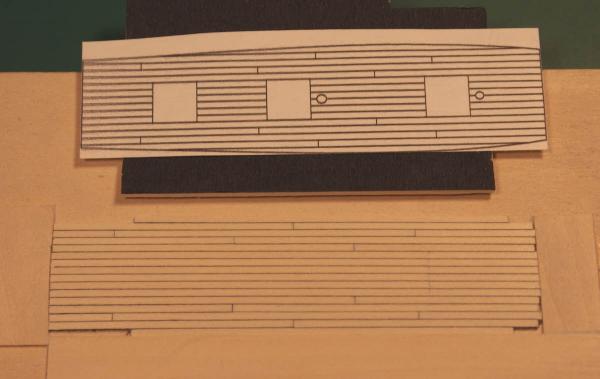
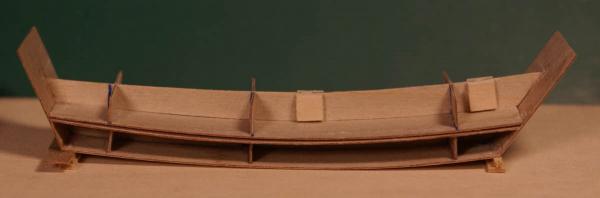
Glad to have you aboard, Mark. Made some progress. Click an image for the full size photo. Image of Ogallala inside the bottle. The blue tape indicates the planned "waterline" (actually soil line) inside the bottle. Good fit with about 3/8" (9mm) clearance between the masthead and the bottle. Hull piece templates attached to 1/64" (.4mm) and 1/32" (.8mm) plywood. Templates were printed onto the paper side of freezer paper, arranged on the plywood, then ironed (waxy side down) to the ply. The pieces will be cut out with scissors and sanded to size. During assembly the paper is easily removed. Hull under construction, plank on bulkhead technique - never mind that individual planks cover the entire bottom, sides and ends. The two inner decks are spaced about 1/64" apart - the upper and lower hull sections will be separated between those decks at a later stage of the construction. Decking section, print-out of decking plan and the left over piece of raw deck material. Planks were made from 1/16" (1.6mm) basswood with thin black paper glued (thinned white glue) to one side then the wood cut into strips about 1mm thick. After cutting planks to match the decking plan they were glued black edge to wood edge. Black paper was glued to the end of one plank at the butt joints. Ordinary transparent tape applied to the assembly fixture's bed prevents gluing the planks to the fixture. After the glue dried the deck was sanded to less than 1/32" thickness, ready to glue to the deck former after it is in place. Thanks for looking. Dave

- 170 replies
-
- 7
-
-
- ogallala
- praire schooner
- (and 2 more)
-
Cruizer-class Brig-Sloops of the Royal Navy
molasses replied to molasses's topic in Nautical/Naval History
It seems likely to me that James confused the two Primroses and thought of them as the same brig. -
Bob and Wayne: Your seats are reserved and welcome aboard, I'm very pleased to have you along! It may be a week or so before posting again - I'm still working on the plans and waiting for delivery of some materials.

-
I just came across this thread and I believe that hot guns jumped more than cold ones because of the heat transfer from the gun to the powder. Heated black powder will burn faster than when at normal temperatures, and so will modern smokeless powders, some types more then others. In the past I was very seriously involved in firearms marksmanship with several different firearms including black powder cartridge rifles. I noticed that my points of impact were always higher on the target, and sometimes that the recoil was noticeably heavier, on hot days than on cold days or when I left the ammo on the shooting bench in the sun, heating it. The same effect when applied to muzzle-loading cannon seems quite reasonable to me and the most likely primary cause of heavier recoil from hot guns.
-
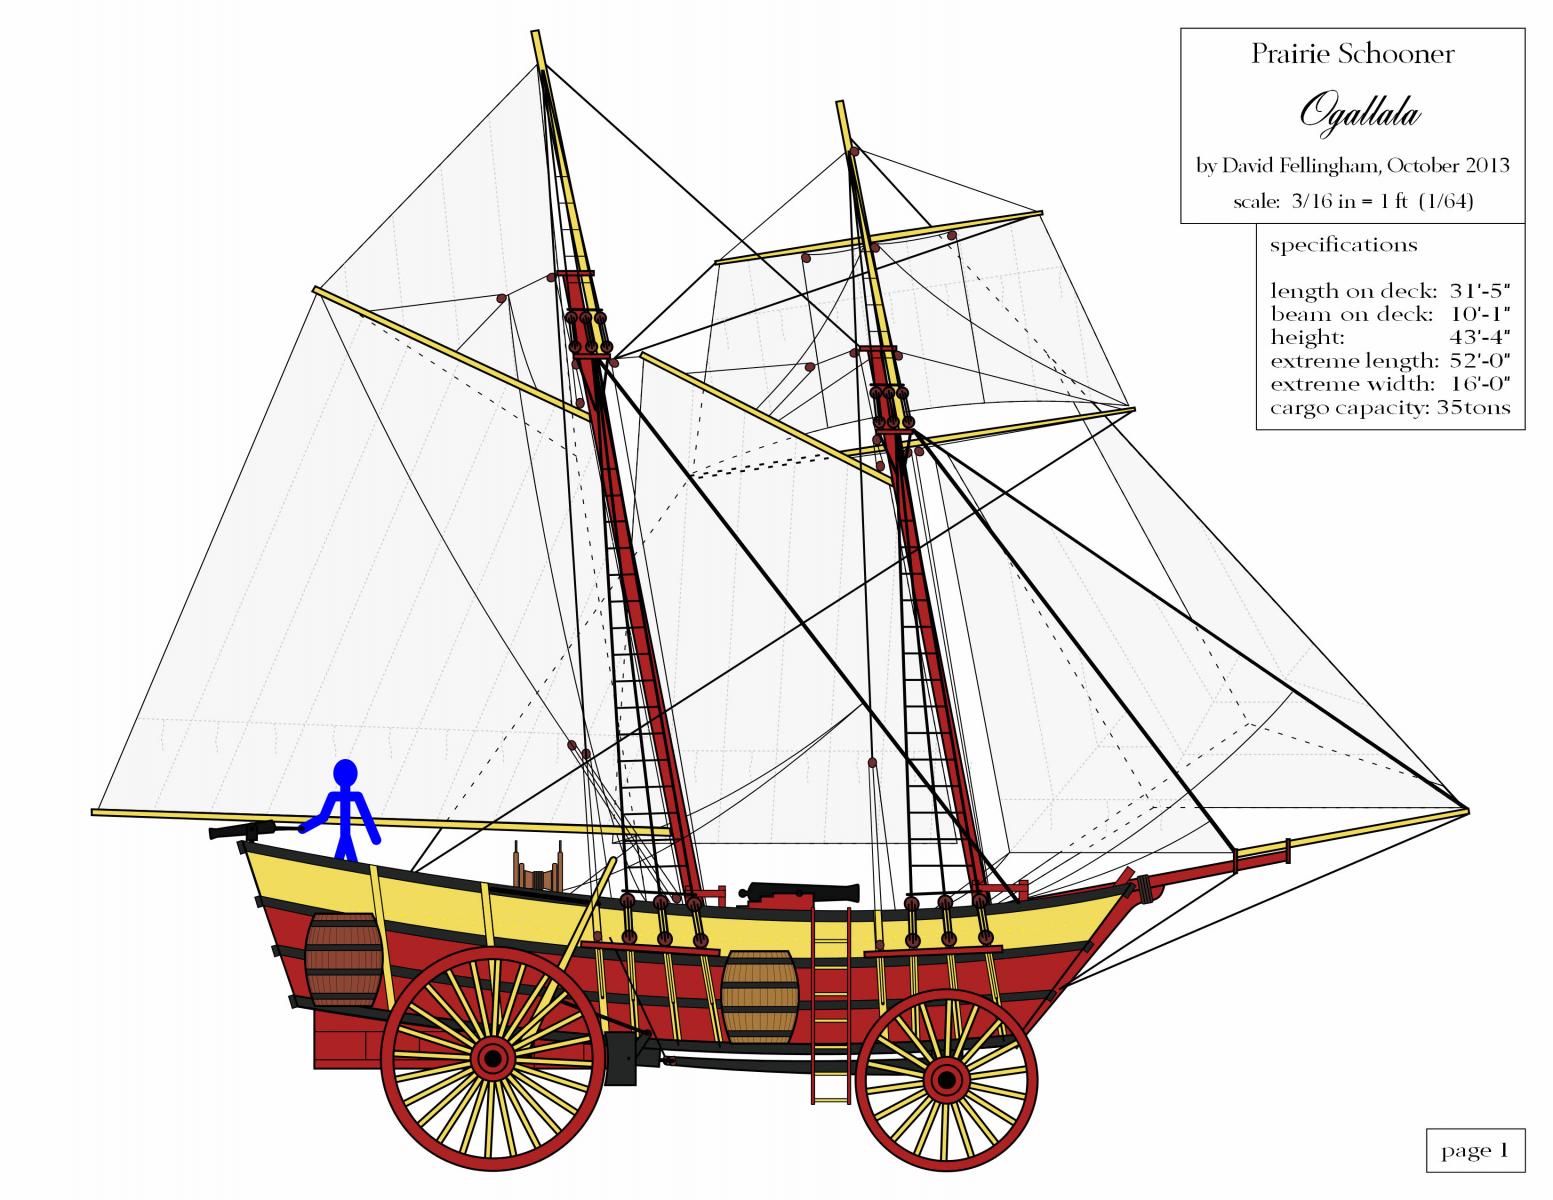
Thanks for dropping by and posting, Piet and Augie. Ogallala is also the name of a small city (pop. 5000) in western Nebraska near the north east corner of Colorado which was a significant rail head during the western expansion. The name comes from a tribe of the Sioux Nation, but now spelled differently. I used the name Ogallala with all three of those connections in mind. Yippee-ki-yay and a yo-ho-ho!
- 170 replies
-
- 4
-
-
- ogallala
- praire schooner
- (and 2 more)
-
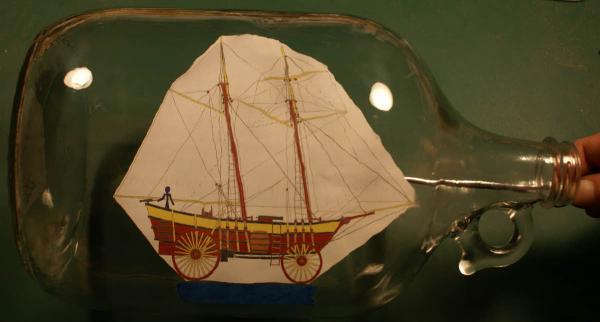
On 5 October, National Ships in Bottles Day, the Ships in Bottles Association of America (SIBAA) announced the start of a group build of Fantasy Ships. The only criteria is that the ships are depictions from art, films, books, movies, cartoons, etc, or from the creators imagination. My first thought was one of Hornblower's ships but decided against any of them. Then I remembered that the covered wagons from the western expansion of the United States were sometimes called "prairie schooners" because of their very loose resemblance to ships at sea. That triggered a visualization of a large Conestoga Wagon "hull" fitted with masts and sails from a Baltimore Clipper and I set to work on drawings to work out the details. When I posted my drawings on the SIBAA facebook page several people mentioned a Disney animated short "The Saga of Windwagon Smith" presented as a classic tall tale like the Paul Bunyon stories. As soon as I saw the beginning of this cartoon I remembered seeing it in the theater when I was about 9 or 10 years old and that my inspiration for Ogallala must have come from it, so I'm giving credit to Walt for my inspiration. My intention is to present Ogallala as if it was real including the "real" dimensions, correct rigging, deck details, wheels and necessary wagon details like brakes and steering. In the time since preparing these preliminary drawings as jpeg images, I found the bottle I'm going to use which requires reducing the drawings from 1/64 scale to 1/96 and preparing individual detail drawings of the components, now in progress. I learned by doing how to generate the usual three view line drawings of the hull from my very simple hull. I have reduced the beam a little so the hull will fit through the bottle neck. The hull will be divided into an upper and lower section with separate wagon frame components all to be assembled inside the bottle. My first problem is how to depict a "sea" of chest high prairie grass but I'm finding information on how model railroaders do fields of tall grass or grain crops. Please, don't try to tell me that a "prairie schooner" or "windwagon" is impossible. I know and I don't care - it's a fantasy build and just for fun. I hope you join in the fun by following the build. Yippee-ki-yay and a yo-ho-ho! Dave

- 170 replies
-
- 8
-
-
- ogallala
- praire schooner
- (and 2 more)
-
John: I just came across this log and look forward to seeing your progress. Thank you very much for your kind words regarding my research on the Cruizer-class brig sloops. I merely compiled information from multiple sources about the history of several of them while gleaning all I could find on their appearance and armament. In that topic I discussed the incorrect assertion that the Cherokee-class brigs (115 ordered but only 102 built) were the most numerous sailing vessels ever built by any navy in the world and show that more Cruizers (108 ordered / 105 built not counting the identically hulled but ship-rigged Snakes) were actually built. I also found two Snakes built 30 years after the first Cruizers and Snakes that were not previously listed with the class. I have built numerous miniatures (in bottles) and agree with your comments about out of scale details, particularly spars. In many cases it is necessary to allow for the thickness of the paint when making the part so they don't "grow" too much when painted, especially white which always makes the parts appear larger. Finding thread fine enough for the scale can be a nightmare, but much easier now than it was 30 years ago. I've un-layed 20/0 fly-tying thread into its three strands to get "rope" the right size needed. I agree that Donald McNarry's Shipbuilding in Miniature is indispensable to the ship miniaturist. Although most of the products and sources mentioned in this 70 year old book no longer exist, the techniques are still very, very useful. I look forward to seeing posts of your progress. Dave
-
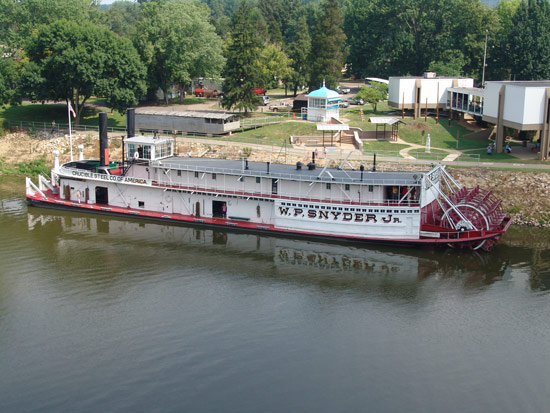
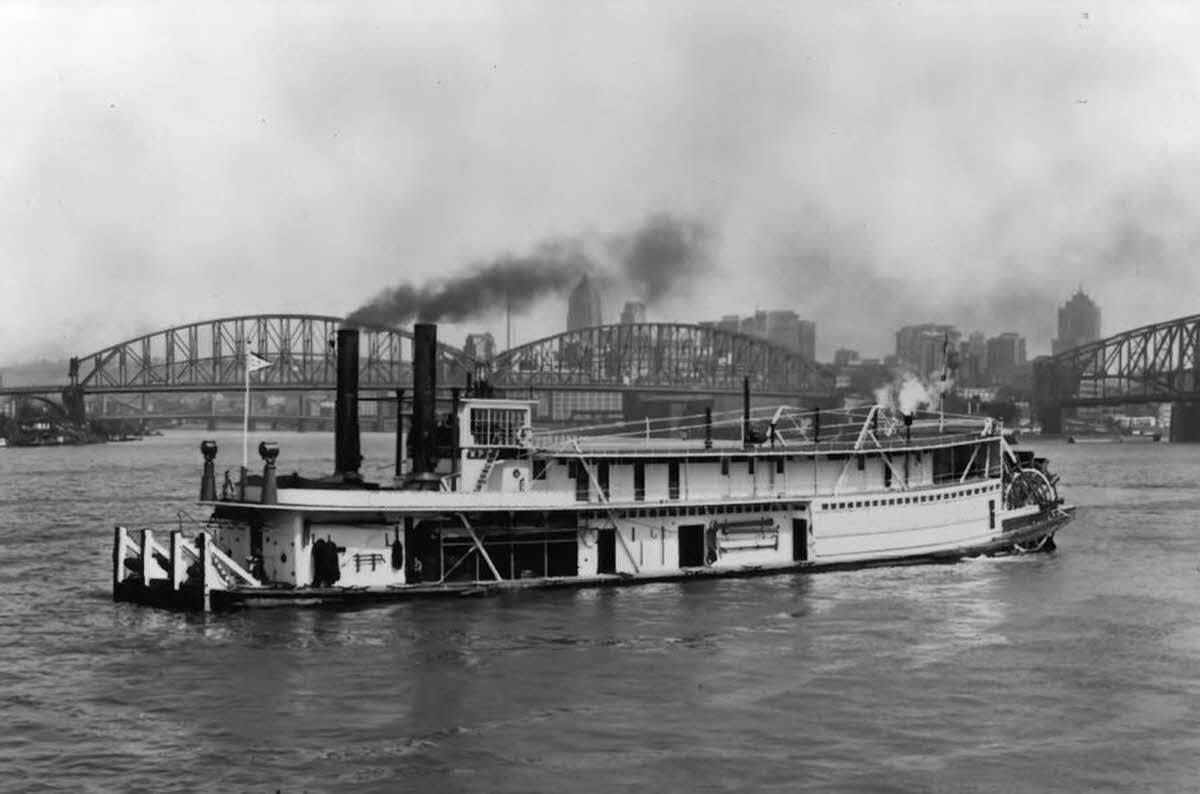
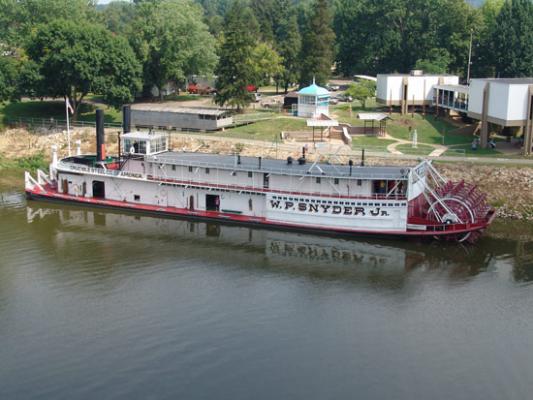
W. P. Snyder, Jr is correct, David, a "pool-type" towboat specifically constructed to clear low bridges including hinged and counter-balanced stacks and flag staffs fore and aft that slip fit in sockets for easy removal. She was renamed for the president, William P. Snyder, Jr., of Crucible Steel Company of America (formerly Shenango Furnace Company) when purchased in 1945. Mr. Snyder donated W. P. Snyder, Jr to the Ohio Historical Society in 1955 and it is now the center-piece of the Ohio River Museum in Marrieta, Ohio. Here's a recent photo. Your turn, David.
-
Two clues: 1) The towing knees on her bow should tell you how she was used. 2) The photo is from 1945, shortly after she was sold and renamed to the name she carries today; she is the only one of her kind in existence. Dave
-
No problem, Andy, very understandable. Name the Ship: Retouched to remove the ship's and owner's names. Good luck! Dave

-
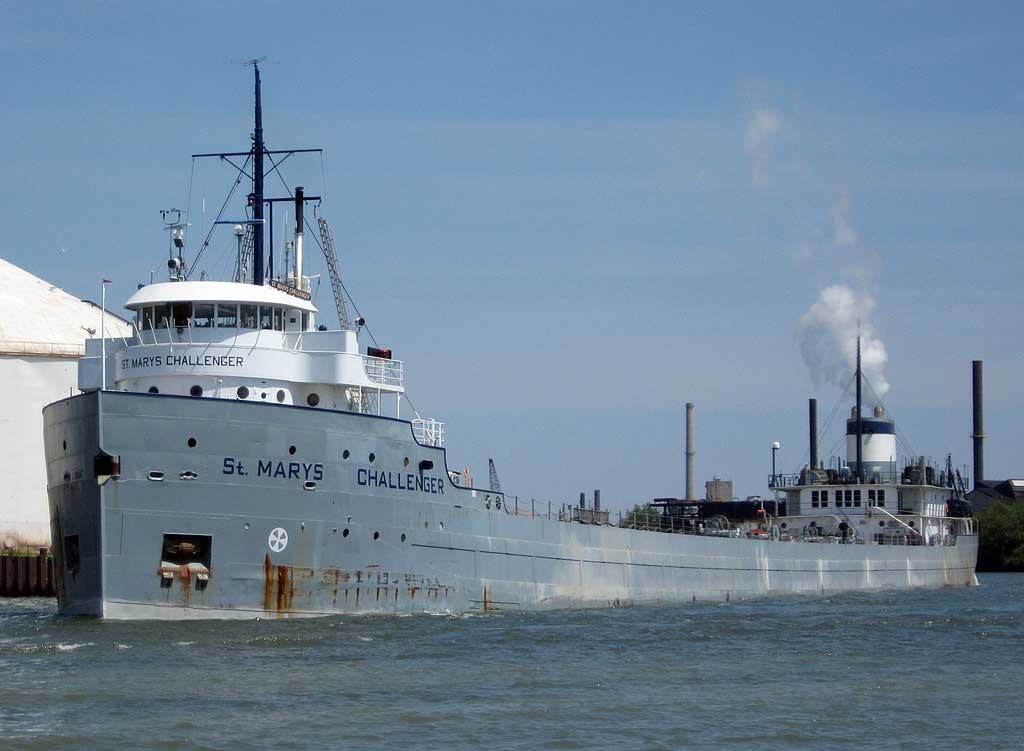
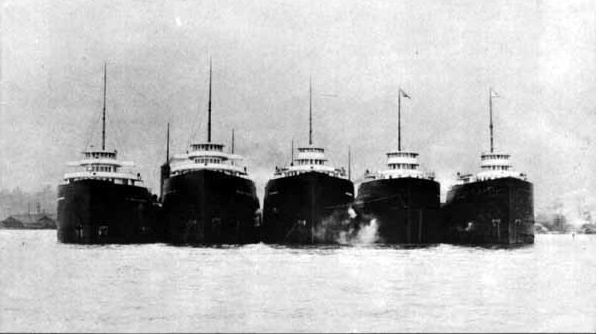
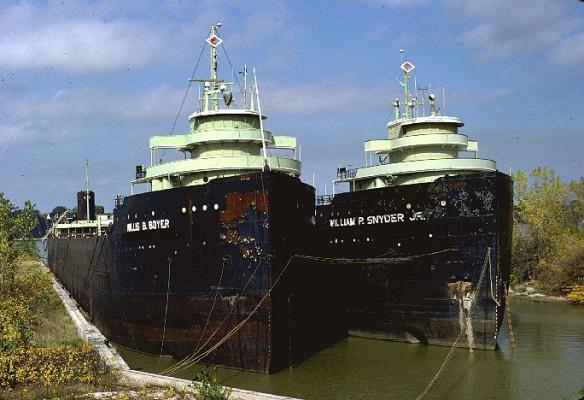
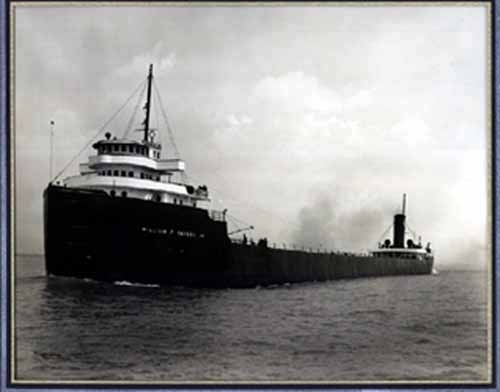
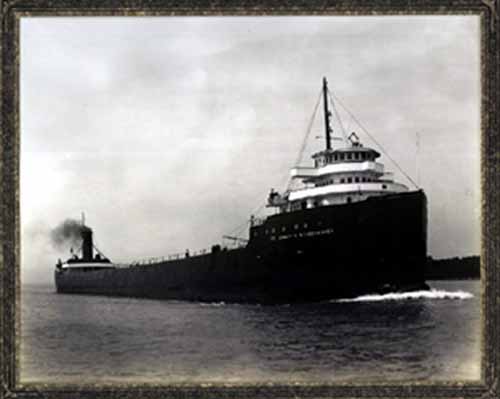
Jan: I think you're confusing the William P. Snyder (2006), currently St. Mary's Challenger, with the William P. Snyder, Jr. (1911), the name connected with the photo you posted, scrapped in 1988. Snyder Jr and Schoonmaker both had wings on the bridge and were 591 and 617 feet long, respectively, while Snyder didn't have the wings and was 551 feet long. Here's a photo of the Shenango Furnace Company fleet taken between 1913 and 1925, approximately the same time as the photo you posted. (Left to right) Col. James M. Schoonmaker, William P. Snyder Jr., Shenango, William P. Snyder and Wilpen. St. Mary's Challenger in 2009. Notice the lack of bridge wings compared to those in the photo you posted, the current photo of Col. James M. Schoonmaker, and the above photo. Schoonmaker (named Willis B. Boyer at the time) and Snyder Jr in 1984. Notice the similar bridge wings that are different from those on St. Mary's Challenger. The photo you posted, identified as William P. Snyder Jr., with the name intact. Although the name isn't legible it looks more like "William P. Snyder Jr." than "William P. Snyder". I'm waiting for confirmation that my guess of William P. Snyder Jr. for the photo you posted is correct and that it is not William P. Snyder, as you claim, before I post my next mystery ship. I decline the "win" if I'm wrong. Dave P.S. My source for the old b&w photos of Snyder Jr, Schoonmaker and the Shenango Company fleet was http://www.oocities.org/thetropics/1965/shenhist.htm I was able to confirm the information presented there at several other websites.

-
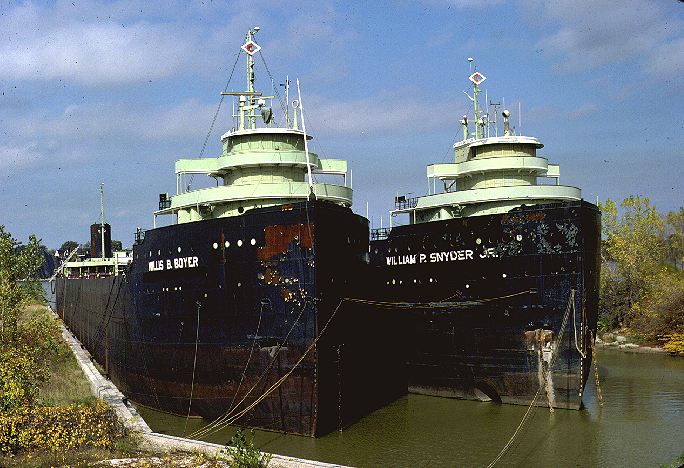
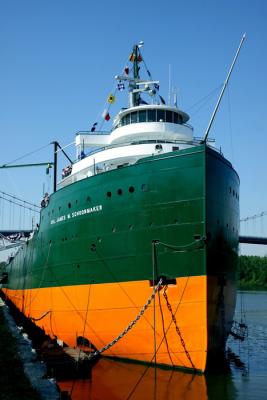
William P. Snyder, Jr (1912) and its sister Col. James M. Schoonmaker (1911), both owned and operated by the Shenango Furnace Company (William P. Snyder, Sr, owner), were the two largest bulk freighters in the world until 1937. They were sold in 1968 and 1969, respectively. Snyder, Jr was scrapped in 1988 and Schoonmaker is scheduled to open as a museum ship next April in Toledo, Ohio. I believe this is Snyder, Jr. but I can't distinguish between the two other than by the name that is mysteriously absent from the photo. Here's Schoonmaker. See what I mean? Here she is again restored to her original colors and riding high. Dave
-
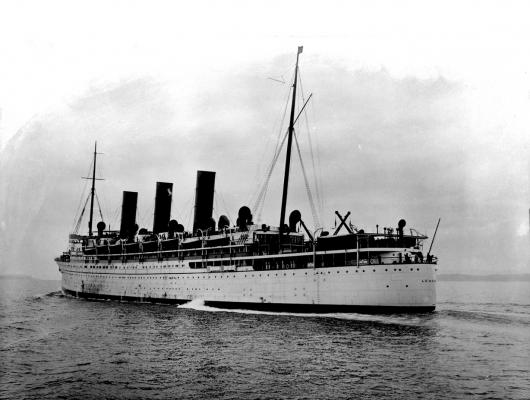
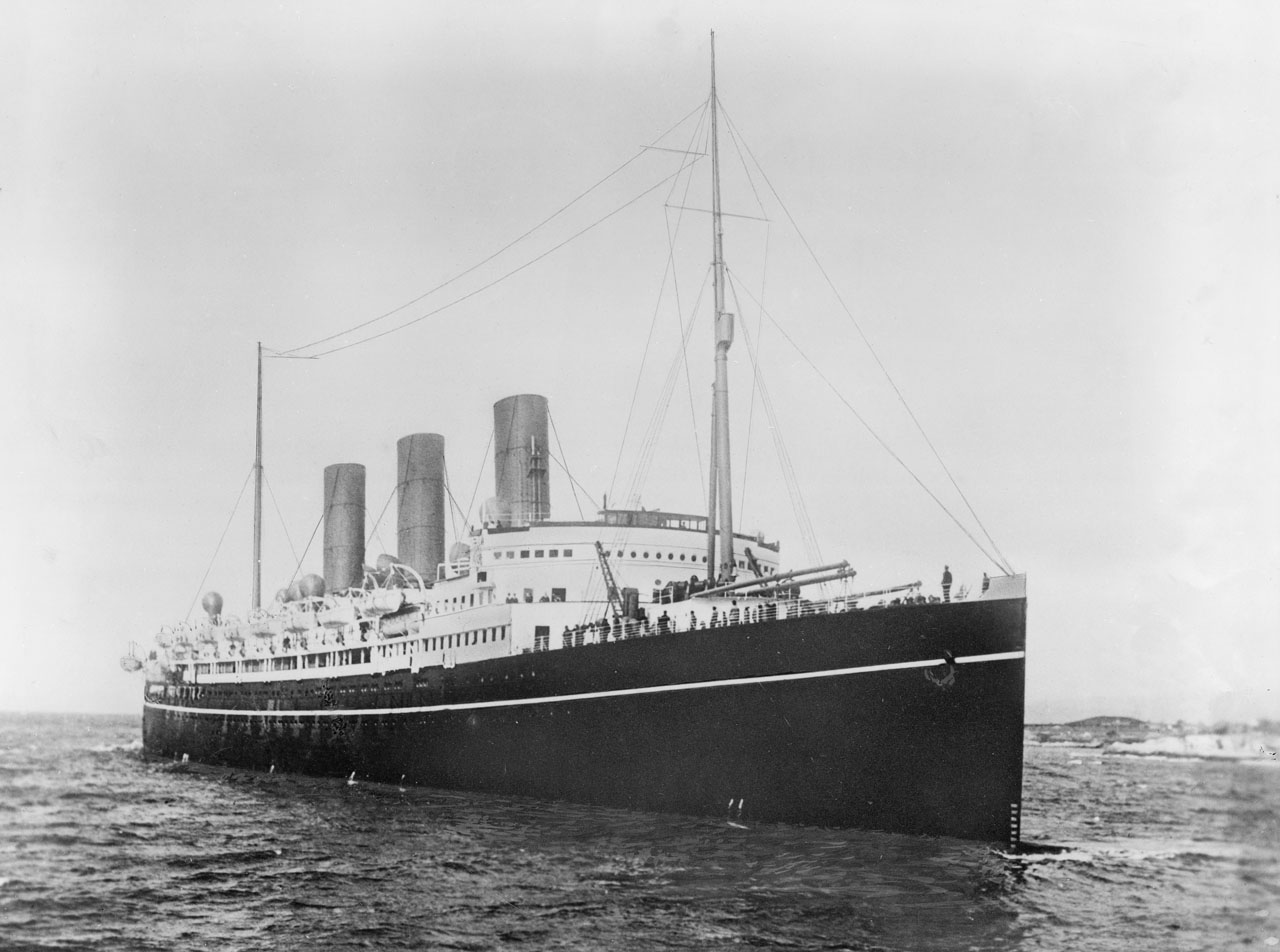
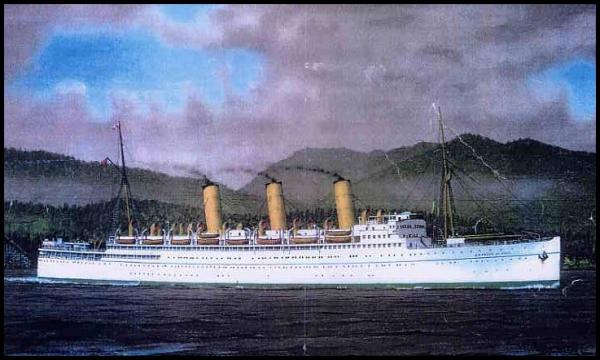
Empress of Asia is correct. In February 1942, she was part of a convoy bound for Singapore in an attempt to prevent the Japanese from capturing the city and port (the defense subsequently failed). On 5 February, the convoy was attacked in the approaches to Singapore from the air with dive bomber attacks concentrated on Empress of Asia carrying about 1900 Canadian troops and a hold full of arms and munitions. She took several hits amidships from incendiary bombs and was immediately set ablaze from the bridge to about the third stack. Only her master's quick thinking and ordering of the troops to assemble at their muster stations in the bow and stern as the Japanese planes approached prevented a far larger loss of life than the 16 men who died in the attack. 1884 men were rescued with the master being the last to leave. She sank the following day. None of the cargo was salvageable. Here's a pre-war photo of her. Your turn RWS.
-
Jan: her name did not end in "-ic". David: I saw the pair of opposite end photos of her and couldn't resist.
-
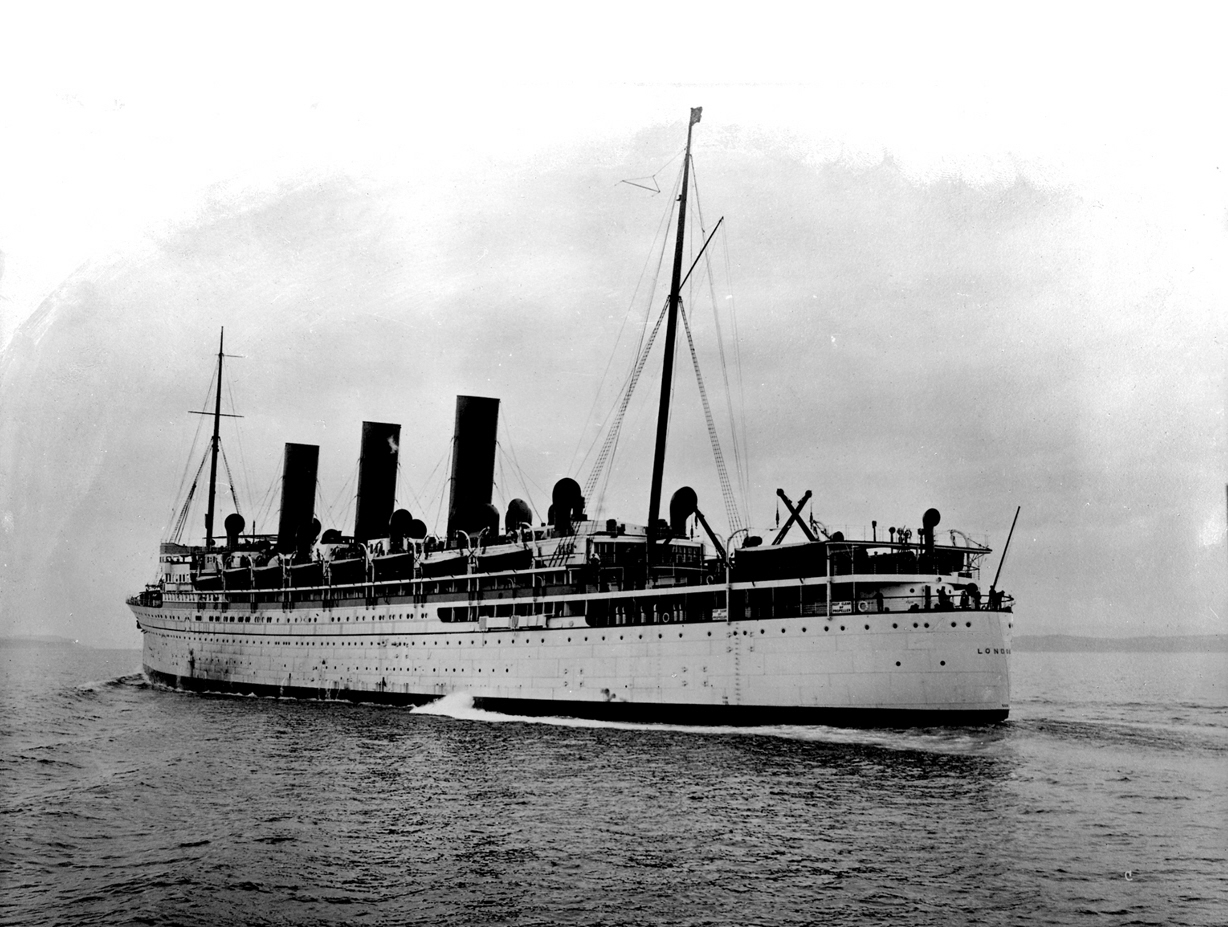
Here's two photos of the same ship. Port quarter view taken during sea trials. (Retouched to remove her name above LONDON across the stern.) Starboard bow view taken after her parent company reorganized soon after WW1 and changed the company paint scheme. Notes with the negative of this photo state that the narrow white stripe was retouched; it may not be as prominent on other photos of this ship. More photos from a later periods show her with other paint schemes. Good luck! Dave