HOLIDAY DONATION DRIVE - SUPPORT MSW - DO YOUR PART TO KEEP THIS GREAT FORUM GOING! (Only 13 donations so far - C'mon guys!)
×

molasses
-
Posts
455 -
Joined
-
Last visited
Content Type
Profiles
Forums
Gallery
Events
Everything posted by molasses
-
 Thank you, Daniel. Those oars were a spur of the moment. They solved my problem with the empty boats (and the thwarts I wasn't entirely pleased with) and were easier to make than I expected - other than being fiddly, but I'm used to that. Been watching and waiting for your next post on Santa Maria. It's coming along very nicely.
 -
I've tried human hair on a ship in a bottle. I doesn't work very well: It's very stretchy, it's as difficult to tie as fishing monofilament, it doesn't absorb glue or coloring agents well, it's subject to temperature and humidity induced dimensional changes and its seldom round.
-
I was considering building Caldercraft's Cruizer, did a little basic research on her on Wikipedia and found that there were 106 of these brig-rigged sloops built. I quickly realized a modeler could build any one of these vessels with only very slight modifications to the kit. Many of these large Cruizer-class brig-sloops had very mundane, unremarkable careers. Others came to tragic ends through shipwreck on uncharted or incorrectly charted rocks and shoals or departed for a destination, never arrived and were presumed to be lost at sea. Several had very distinguished and brilliant careers and a few had engaged in historically significant ship-to-ship duels during the Napoleonic Wars and the War of 1812. I'm going to focus on eight1 of them that intrigued me as subjects for a model: seven1 that engaged US Navy sloops of war in the War of 1812 and one that had been modified with an innovative experimental arrangement of her armament. HMS Raven - Launched 25 July, 1804 Raven was commissioned in August with Commander William Layman in command. Layman was a protege of Lord Nelson with whom he had served on three previous assignments. With Nelson's support he changed Raven's armament by planking over the two forward gun ports and the two transom gun ports, removed two 6 pounder chase guns and built platforms at those two locations where he mounted 68 pounder carronades on transverse (pivoting) mounts on the ship center line which gave each a field of fire of as much as 180 degrees or more. I have not been able to find the use of pivoting mounts on another vessel larger than coastal and fresh water gunboats prior to Raven in 1804. Otherwise Raven was typical of her class. Length: 100 ft 2 in (gundeck), 77 ft 6 in (keel) Beam: 30 ft 6 in Tonnage: 384 (burthen) Armament: 16 x 32 pounder carronades + 2 x 6 pounder chase guns (before modification) 16 x 32 pounder carronades + 2 x 68 pounder carronades on transverse mounts (after modification) Complement: 121 Raven arrived near Cadiz to join Nelson's squadron with dispatches on the evening of 29 January 1805. Layman ordered Raven hove to, took a sounding (no bottom with an 80 fathom lead), left orders with the officer of the watch that the lead be cast every half hour and went below. At about midnight the officer of the watch woke Layman and reported the lights of the squadron, then returned in minutes with the news that the lights were Cadiz. Layman started the lead finding 18 fathoms shoaling to 5 fathoms as he turned Raven about. Daylight found Raven close inshore with the Spanish fleet at anchor on one side and the shore batteries on Santa Catalina on the other. Layman worked Raven over the shoals but was forced to anchor after increasing winds caused the main yard to break in the slings. The winds further increased to gale force, dragging the anchors, and drove Raven onto the beach at Santa Catalina. Raven was unsalvageable and her crew was taken into custody by the Spanish. While in custody, Layman made inquiries among the crew and learned that his orders for soundings to be made every bell were ignored. He also learned that the officer of the watch was in his quarters, drunk, when the lights of Cadiz were reported by the look-outs. After an officer exchange, Lieutenant Layman reported his findings to Lord Nelson in Gibraltar who advised him not to blame his officers for the loss of Raven. Nelson feared that the officer of the watch would be executed for his conduct and assured Layman "You will not be censured." Nelson had misjudged the situation. On 9 March 1805 Layman was severely reprimanded and lost all his seniority. He appealed his court martial but the Admiralty was not willing to overturn the court's verdict. Nelson was killed at Trafalgar before further action could be taken. Layman's only powerful friend could no longer help him. It appears that Layman had annoyed many senior officers with his outspoken advocacy for improvements to the Navy and its ships and his career was destroyed in consequence. Subsequent courts martial found Layman's master negligent in not monitoring Raven's movements and in not taking regular soundings. Layman's second lieutenant, the officer of the watch, was dismissed from the service. Layman remained in the service but never received promotion to captain. He committed suicide on 22 May 1826. [sources: "HMS Raven (1804)" - Wikipedia and the bibliography for that article; Dictionary of National Biography, 1885-1900; http://aboutnelson.yuku.com/topic/808/Captain-Layman-new-thread ] I find HMS Raven an interesting subject for a model as much for the injustice done to an energetic and intelligent young officer as for the innovation in the arrangement of her armament. Raven is also interesting for having the shortest life of any of the Cruizer class brig-sloops.2 I'll continue with one or more of the Cruiser-class engagements of the War of 1812 in a day or two. Dave Edits: 1 Increased the number by one when I realized I had overlooked one engagement that occurred after the Treaty of Ghent had been ratified 17 February 1815 in which neither combatant knew of the end of the war. 2 Added information
-
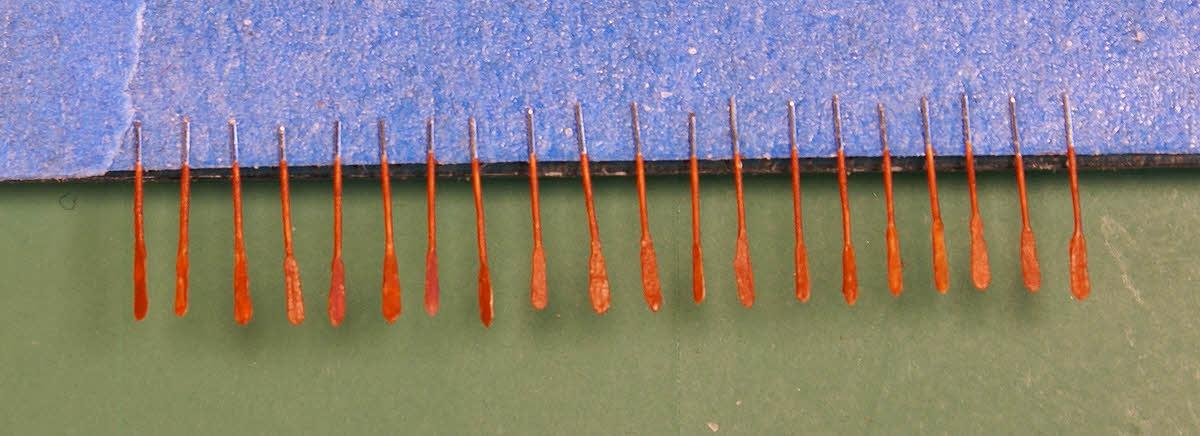
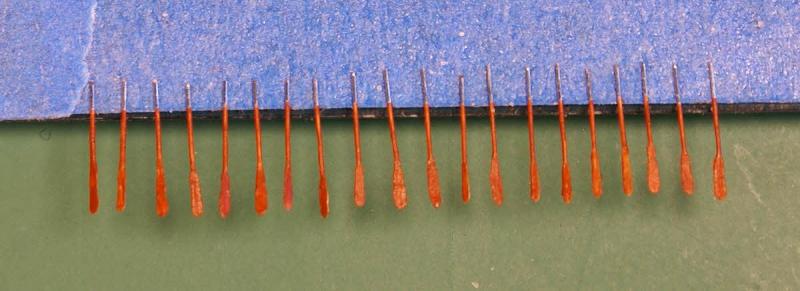
There is more variation in the blades from oar to oar than I noticed through the OptiVisor. Perhaps I'll stop cropping down my photos so much. Like many of the things I've done on this build these are the first oars I ever made. I'm glad you didn't notice that they don't have handles and that the looms aren't square. They're also about 25% oversize. I finally found a source for wire finer than 32 gauge and bought 2 oz. spools of 36, 40 and 45 gauge. 32 gauge is .008 inch (0.2 mm) while 45 is .002 inch (0.05 mm) and 2 oz is over 2.3 miles in length. Thanks for looking in and pointing out my screw ups.
-
I've looked at Juliers' Period Ship Handbooks. I will definitely get the one that covers a kit I'm buying. For example, I'm seriously considering Caldercraft/Jotika's Cruizer and when I do buy it I'll order the appropriate Handbook, but at present I'm researching several of the other 105 Cruizer-class brig-sloops I could build from that kit with minor mods. I'm inclined towards building one of the six that were captured or sunk by US ship-sloops during the War of 1812, perhaps HMS Epervier which was captured by USS Peacock and subsequently became USS Epervier.
-
I just wanted to advise users of Google books for pdf downloads that I've found some books that weren't available for download on the English language Google site were available on the German language site and probably on other language sites as well.
-
Thank you all for your suggestions. I ordered used copies of the following: The Construction and Fitting of the English Man of War: 1650-1850 by Peter Goodwin [$74.50] The History of the American Sailing Navy: The Ships and their Development (1998 edition) by Howard Chapelle [$9.92] The Search for Speed Under Sail, 1700-1855 by Howard Chapelle [$22.00] Architectura Navalis Mercatoria by Fredrik Chapman [$9.66] The Young Sea Officer's Sheet Anchor: Or a Key to the Leading of Rigging and Practical Seamanship by Darcy Lever [$5.36] The Ship Model Builder's Assistant by Charles Davis [$3.72] American Sailing Ships: Their Plans and History by Charles Davis [$2.50] Used books are a terrific bargain. For example, new copies of Construction sell for $210 up to $499.50. For two of the books I'm paying more for the postage than I am for the book. As a result of finding these bargains I'm still open to more suggestions and I'm sure others reading this topic will find them as useful as I am.
-
After finding MSW I quickly learned about Chuck's work (and Greg's) and now follow everything they post as well as those of several others. Chuck's Winchelsea has been an eye-opener for planking a hull for me. He definitely has a knack for clearly explaining methods for accomplishing complex tasks, unlike some people I've known who couldn't explain how to open a jar of model paint without omitting a key, but elementary, step or making it overly complicated. After googling most of the titles suggested I've added several to my wish list. Nearly fell off my chair when I saw the price for a used copy of Steel's Elements... at over $1000 plus shipping. As the result of searching titles I found and downloaded pdf files for The Sea Gunner's Vade Mecum (Simmons) and an article, "Carronades" by Spencer C. Tucker, published in Nautical Research Journal (Mar. 1997). I discovered that books in the public domain listed on Google Books that aren't available on the English language website as electronic downloads are frequently available on their other language sites. I received the two McNarry books mentioned above yesterday and can't put them down. Together they were less than $65 total, including shipping, and are used library discards but they are still in good shape. Ship Models in Miniature covers 65 of his models with descriptions and photos, many in color. He mentions his research in each description and lists NMM, Chapelle and Chapman most frequently. Shipbuilding in Miniature is a practicum of building in miniature which is useful for my present build and my interest in ships in bottles but can also be applied to details for larger models. For example, he discusses plating a hull with .001 inch copper plates, .080 inch x .020 inch (50' = 1" scale), more thoroughly and historically accurate than I've seen covered on MSW with much larger plates at a larger scale. He references The Cutty Sark: The Ship and the Model by C. N. Longridge (available in two volumes or as a combined volume).
-
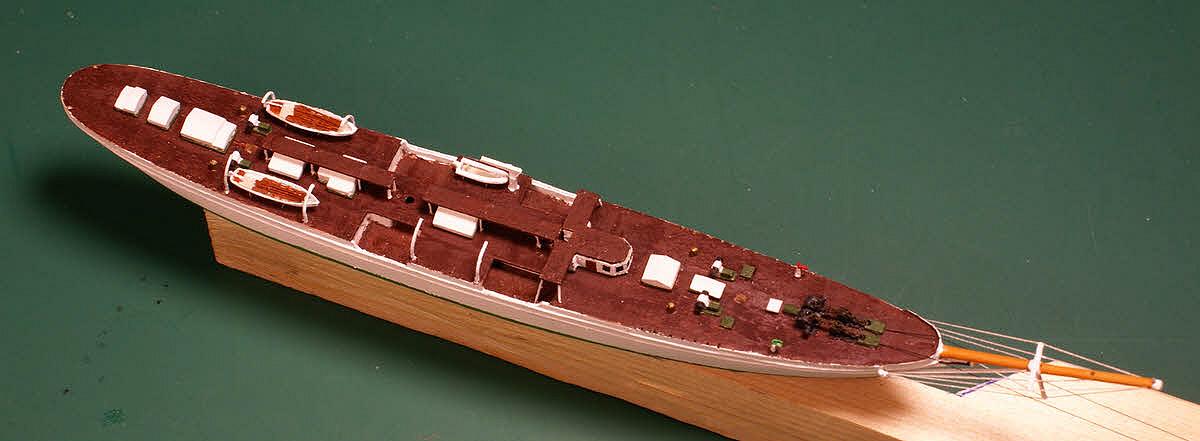
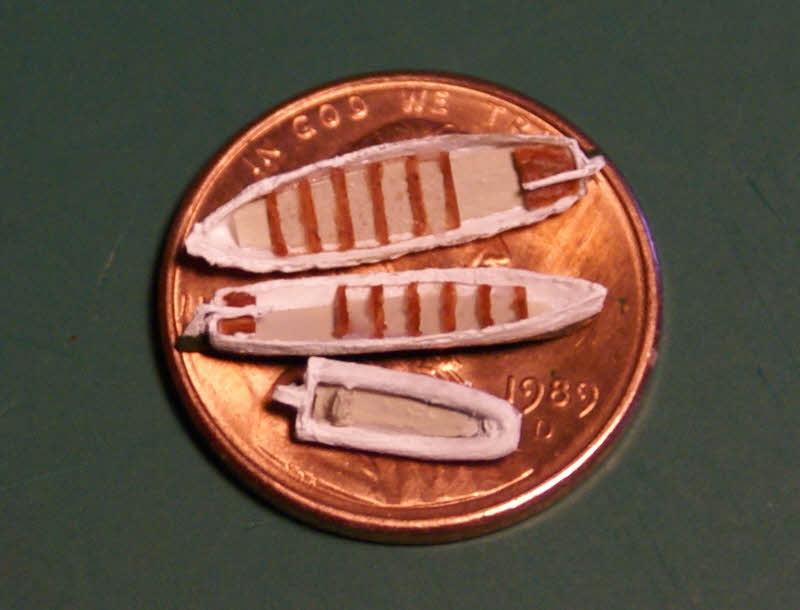
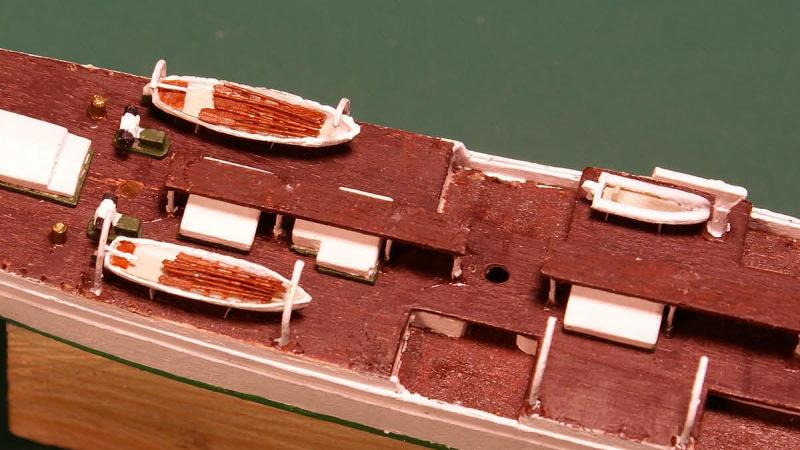
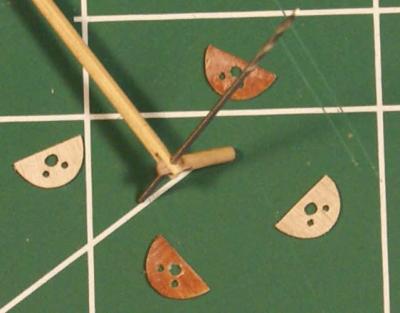
Welcome back! After a bit of research for oar details I cut pieces of 32 gauge (.008 inch / .2 mm) wire and flattened one end so it looked something like an oar blade and painted them. Oars partially painted. I made four brass painted bits as capstans and fabricated the red and green running lights then glued them in place. After the paint dried on the oars I glued them to the thwarts of the long boats, cut bits of cya stiffened paper as cradles for them and the zodiac and glued the boats in place on deck. More fiddly bits stuck to the deck. I also managed to get the green waterline painted. Close-up of boats. I find these photos interesting because the magnification is higher than I have with my OptiVisor when I'm doing the work, especially the close-ups. Thank you all for your kind words.

- 84 replies
-
- 2
-

-
- esmeralda
- training ship
- (and 1 more)
-
I considered Pickle as a future build and had the same objection to Jotika's treatment of the stern. I approve of your solution; very well done. I like what you did rigging the guns, the correction of the relationship of the gaff and spreader, the correction of the ratlines and the changes you made in some of the running rigging. Very well done indeed. Thank you very much for sharing your build.
-
Thank you, John, BE and robbl, for your assistance. With a source for the oar length and dimensions of the blade I googled The Art of Making... (Steel), found the book on Amazon which had the book available on line for perusal, found the tables and got the information I needed. Here's the result, made from 32 gauge wire with the blades peened, in the process of being painted. The oars are for the two ship's boats in my avatar, posed on a US cent. Thanks again for your help.

-
Thank you, Mark, for your response. I can see that I need to refine my question somewhat. I think I can do that by pointing out the two books from your list that caught my eye: Period Ship Modelmaking (Reed) and Sailing Ship Rigs and Rigging (Underhill). Both of these, based on their titles, appear to address voids in my library and in my ship modeling education. Dave
-
I'm going to spend some money on reference books so I'm curious which books MSW members consider to be essential for a ship modeler's library (other than MSW itself). I have: The Ship and Sailing Ships by Bjorn Landstrom The Age of Fighting Sail by C. S. Forester a book about building ships in bottles I bought 35 years ago an old Neophyte Ship Modeler's Jackstay I'm waiting for delivery of Ship Models in Miniature and Shipbuilding in Miniature by Donald McNarry. I'm going to buy The History of the American Sailing Navy: The Ships and Their Development and The Search for Speed Under Sail by Howard Chapelle, and possibly his History of American Sailing Ships. I recall seeing an article about one of these Chapelle books that discussed different editions stating that one edition was better than the others (Here on MSW?) but I can't find it or remember which book was discussed. Any help with that? (I guess that now makes two questions.) Thank you in advance for your suggestions.
-
Those external ribs are very well done. As for details to include, that's up to you. After all there is still some argument among naval historians whether Santa Maria was a carrack or a caravel. Anything beyond that is a guess, even the painted cross on the main sail. I'm also curious how you will rig her. Fly tie thread?
-
MSW and its members are awesome! I spent three hours on the internet looking for an answer to my question without finding what I need. I post my question on MSW and have two good answers in 30 minutes. Thank you.
-
I recall seeing a chart relating the length of oars and their parts for various sizes and descriptions of small boats, but I can't remember if it was on MSW 1.0 or somewhere else. I'm looking for information on the oars for a 30 ft longboat or launch of twelve oars for my Esmeralda build. Can anyone help me with this?
-
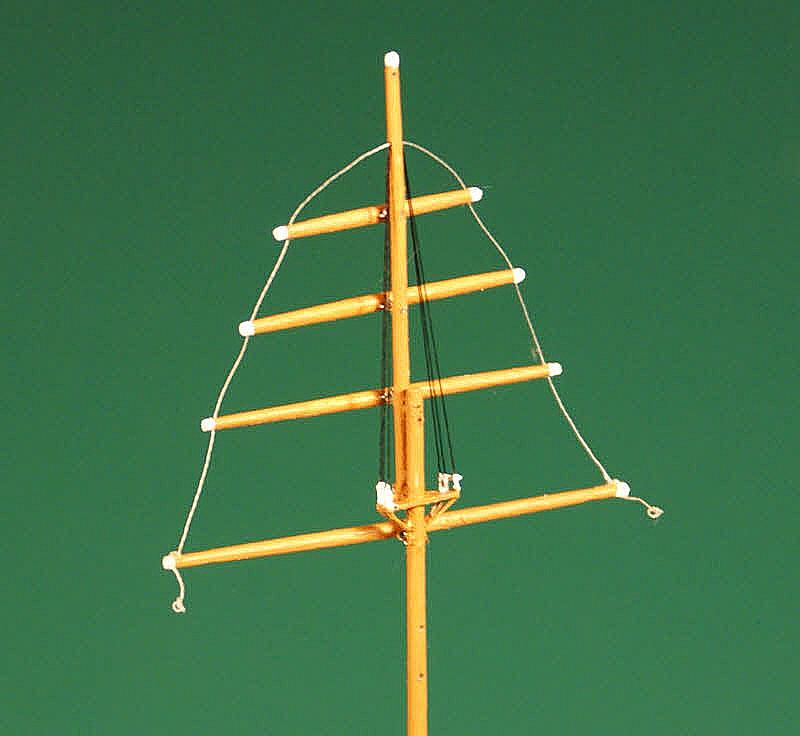
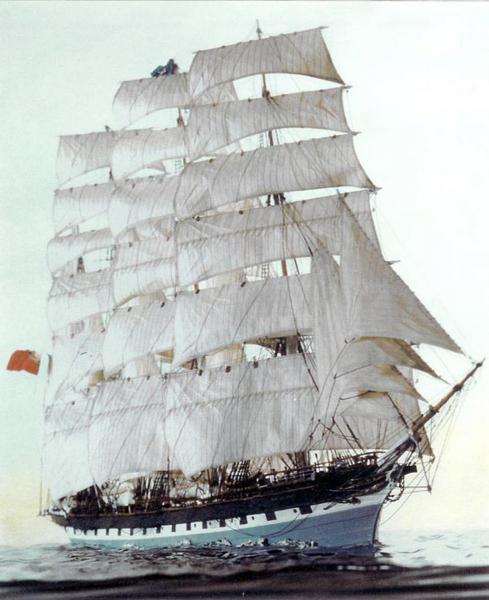
Here's a photo of Donald McNarry's Port Jackson, an 1882 4 masted windjammer. The model is 32' = 1" scale (1/384) and is 11.5" (292mm) long. Port Jackson 1882, 32' = 1" scale Here's the link to his website: http://www.facebook.com/l/aAQEzXWhP/donaldmcnarryshipmodels.com/menu.html I can only aspire to this quality of detail.
- 84 replies
-
- 2
-
-
- esmeralda
- training ship
- (and 1 more)
-
I am very flattered by your kind words, but I find that even the suggestion of a comparison between the master works by Mr. McNarry and my clumsy attempts is . . . . I don't know what to say. I'm pleased that you enjoy the log. Dave
-
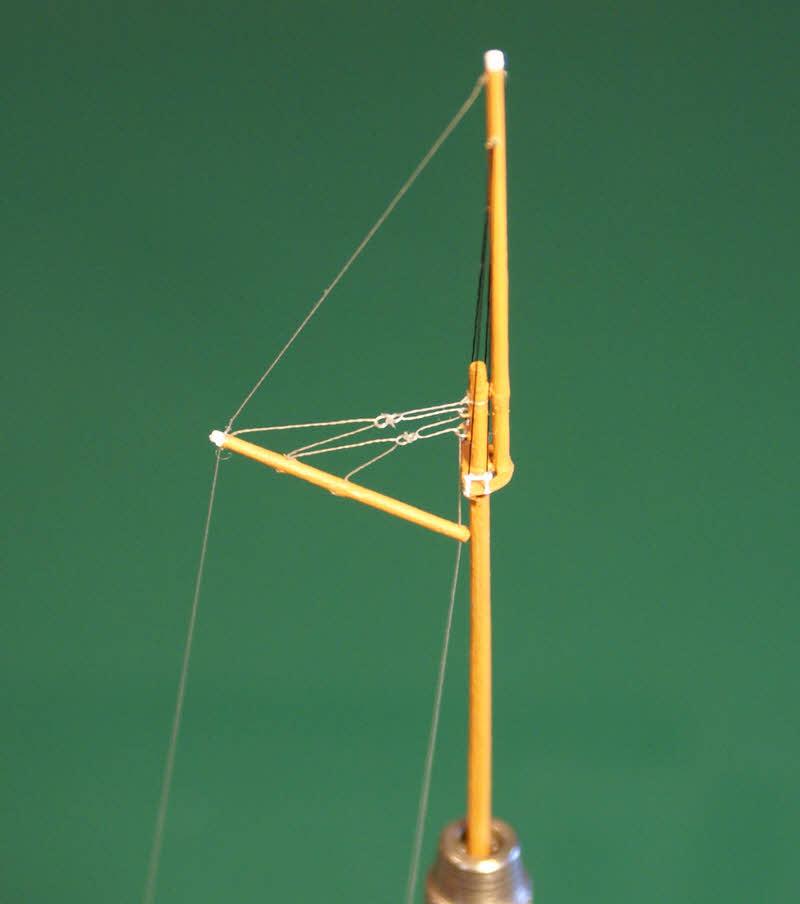
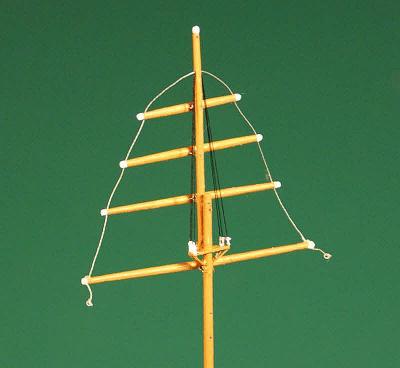
At this scale even the finest fly tying thread is 50% to 100% oversize for much of the running rigging. This and other factors require that the rigging be simplified while still being able to perform the functions and have some of it operate during the set-up inside the bottle. This is my first attempt at four-part peak halyards with bridles. Prior to this I simplified with a single peak halyard from gaff tip to mast head which isn't functionally possible on a real ship except at an aft mast. I'm satisfied with how the peak halyards look now; we have yet to see how well they work inside the bottle. Thank you for the compliment on the boats. I admit I am pleased with them considering their size.
-
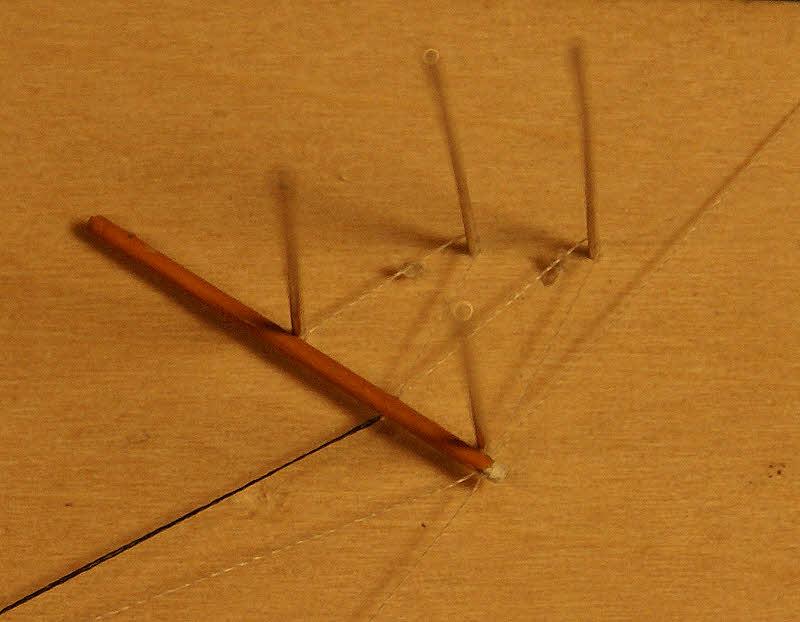
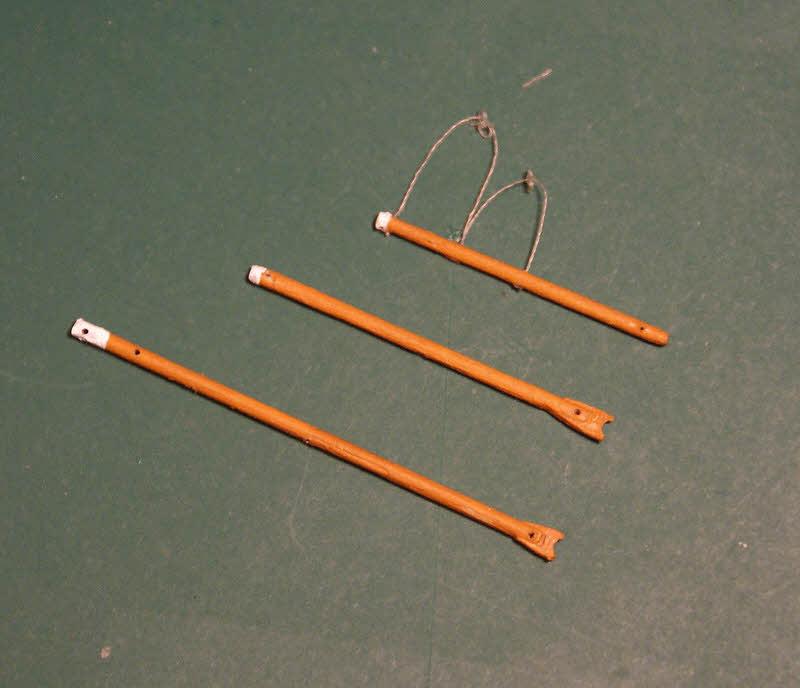
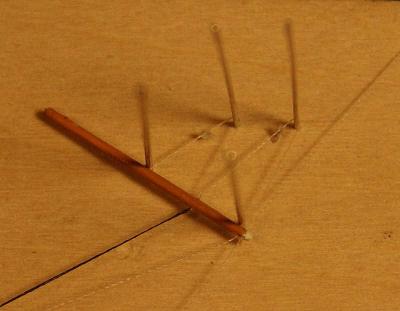
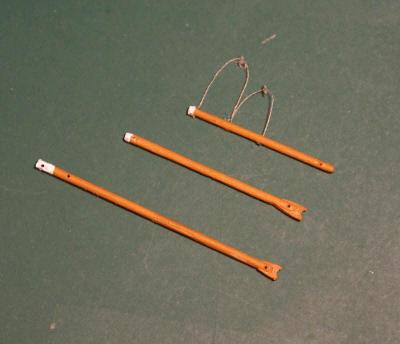
Thank you all for your kind comments, they are very flattering and encourage me to continue to push my limits. I finished three of the six ship's boats - two long boats and a zodiac. Using the same technique used to make the hulls of the long boats I laid up a partial hull for the zodiac. I bent a piece of .030 inch brass wire as the inflatable portion of the zodiac and trimmed the hull to fit, glued it to the wire, added a transom and outboard motor, floor board and a helm station. I cut floor boards, stern sheets, and made a rudder with tiller and glued them to the long boats then painted them both. Three of the six boats needed. I wanted to add the six thwarts to each boat but found that cutting uniform strips .015 inch (.40 mm) wide was difficult and realized that getting them equally spaced and glued in place was going to be even more difficult - if not almost impossible. I then came up with the idea to paint all six thwarts on a single piece of clear .010 inch (.25 mm) plastic and glue the clear plastic in place. Later I'll add twelve oars in each boat cut from 32 gauge wire (.008 inch / .20 mm) with one end flattened like an oar blade, painted and glued to the clear plastic to cover part of the sloppily painted thwarts. Tired of working on teeny-tiny fiddly bits, I decided to work on merely small fiddly bits, the gaffs and booms for the three fore-and-aft rigged masts. After fabricating them and drilling holes for rigging I painted them and cleared the holes of paint after it dried. The gaffs and the booms are identical on the two middle masts while those on the spanker mast are longer. Spanker and mizzen/main boom with jaws and a gaff with two halyard bridles and two double thread blocks. Thread blocks are used to replicate the function and/or appearance of blocks. They are made by tying a knot around the point of a needle then gluing it. I usually tie a left-handed bowline so that the tail comes out the side of the knot, making it much easier to trim, rather than a conventional bowline with the tail coming out into the loop. By the way, here's a good site about knots: http://www.animatedknots.com/ A double thread block is tied on two needle points. I have a small block of wood with two holes very close together into which I glued the eye end of two needles. The needles touch at the beginning of the tapers to the points. Route the thread around the needle points in a figure 8 with both ends on the lower side of the crossover and tie a half knot there with each end coming out on opposite sides of the "8". Then slide the thread block toward the points to size the loops, bring the two ends from each side over the top, tie a square knot, glue it and slip the block off the points. Trim one end close and the other long (about 1/4 inch so you can handle the block) after the glue has dried. Trim the handle after the block is rigged. Fixture for rigging the bridles on the gaff. I think this photo is mostly self-explanatory except for the black thread. It's a loop that holds the middle of the bridles in place until glued. After rigging bridles on the first gaff I found I had omitted a thread that goes through the end hole. The end at upper right will be glued to a hole through the top of the mast, the end at center right will go through a hole at the tip of the boom. The left thread in the tip of the gaff from the bridles will be trimmed flush to the gaff. Rigging the gaff to the mast. I'm sure the previous description makes more sense with the gaff in place and the peak halyard rigged. Both threads go to the boom, through the hull and under it to the large hole in the fore deck and out the bottle. The thread to the boom tip is to be glued; the thread through the gaff and boom ends near the mast will be glued when the ship is in the bottle and the assembly is in place and adjusted correctly - the only place it is glued until then is where the end is tied near the top of the lower mast. Like many model shipwrights I prefer to do as much of the mast rigging as possible before stepping the masts.


- 84 replies
-
- 3
-
-
- esmeralda
- training ship
- (and 1 more)
-
Thank you for posting your Spray build log. I didn't notice it on MSW 1.0.
-
Thank you Mark, Carl and Dan for your kind comments. Building the longboats on a plug is a variation of a method used to make fiberglass boats but with paper and glue substituted for glass fabric and resin. I was pleasantly surprised with the results since it was my first try with this technique. Other than the strips of wet newsprint being fiddly the second boat was surprisingly quick and easy - about 20 minutes to lay it up. I'm sure glad MSW is back - I was in withdrawal.
-
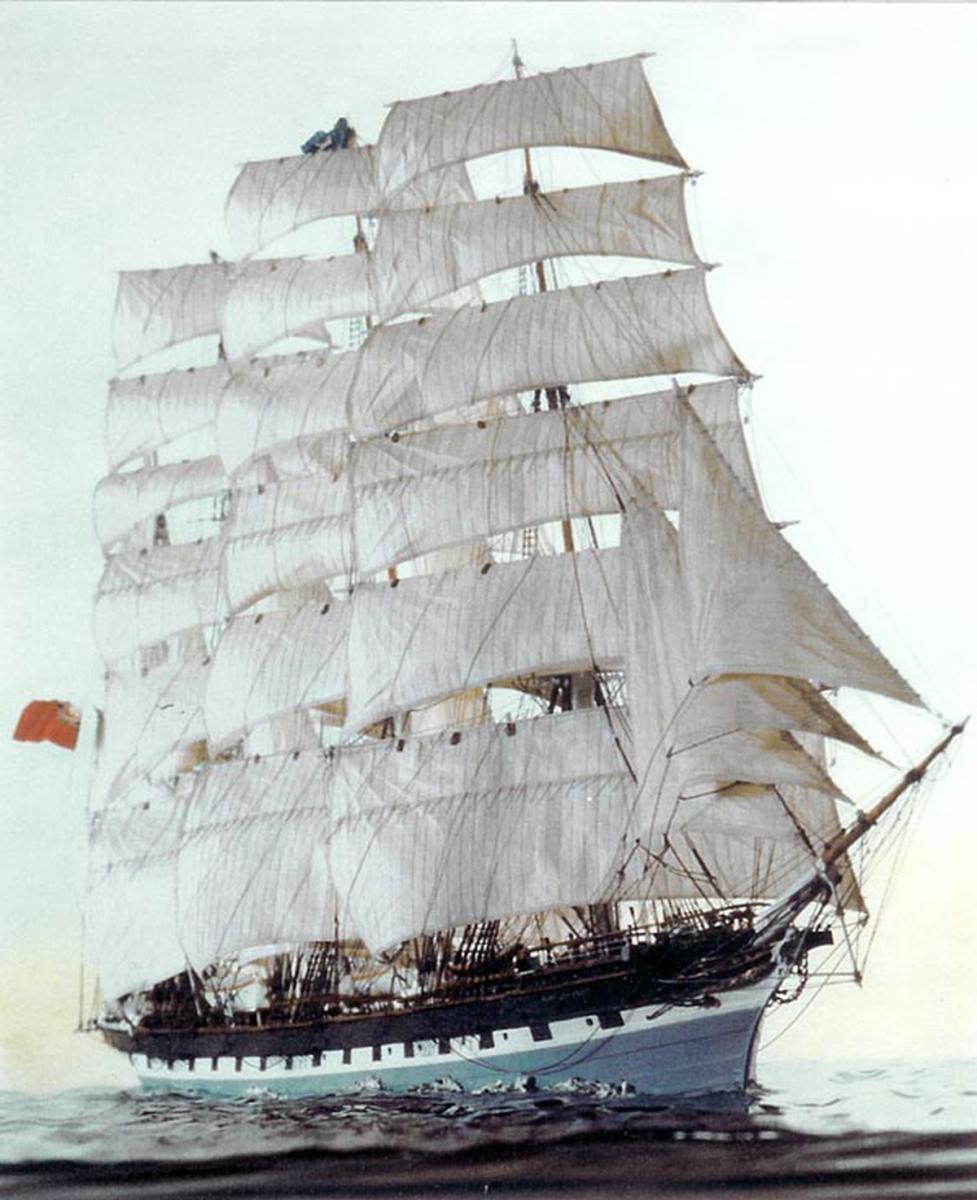
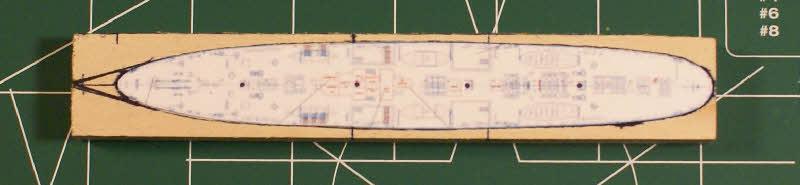
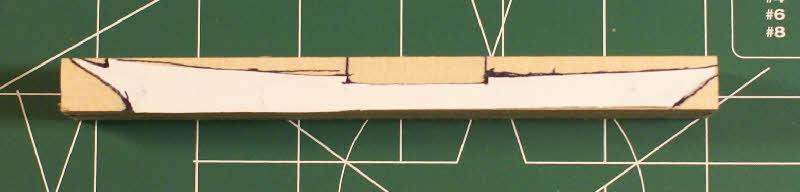
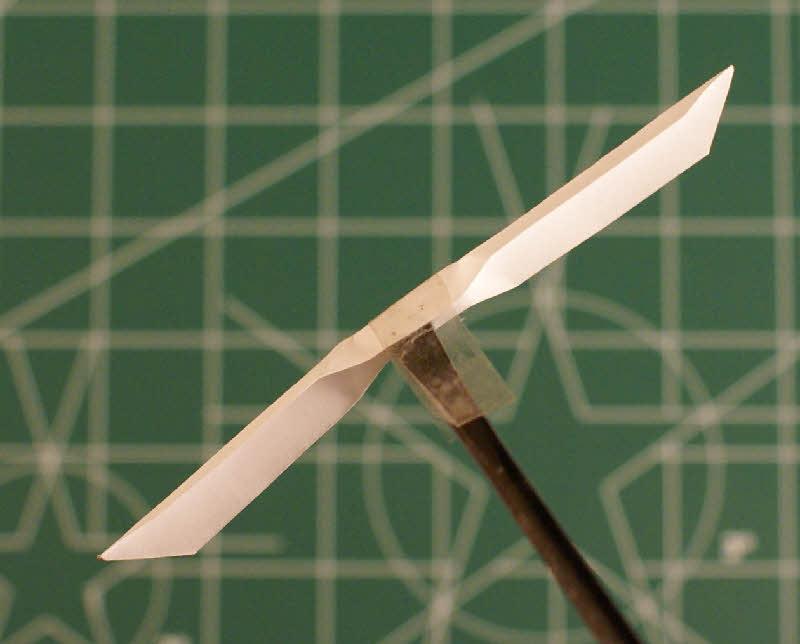
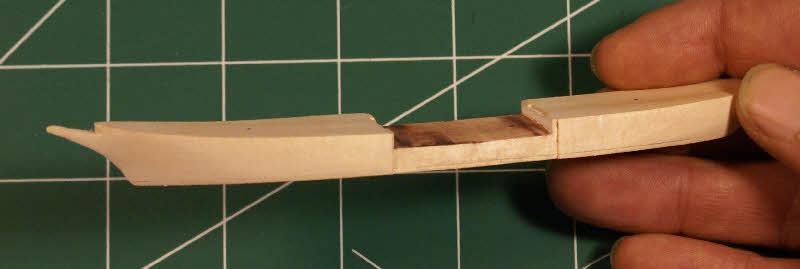
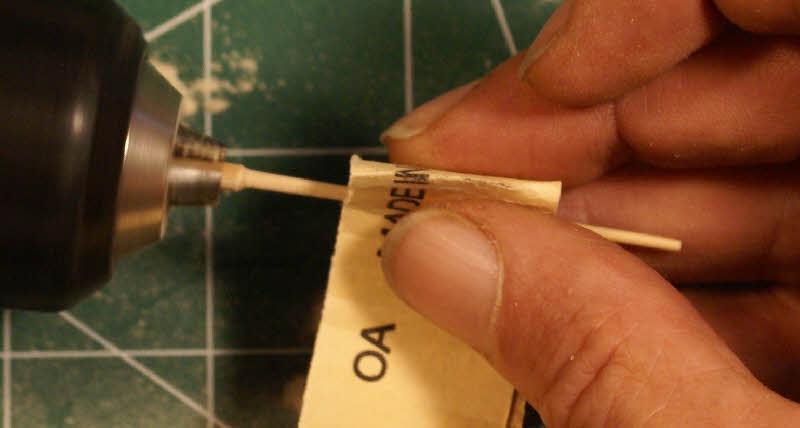
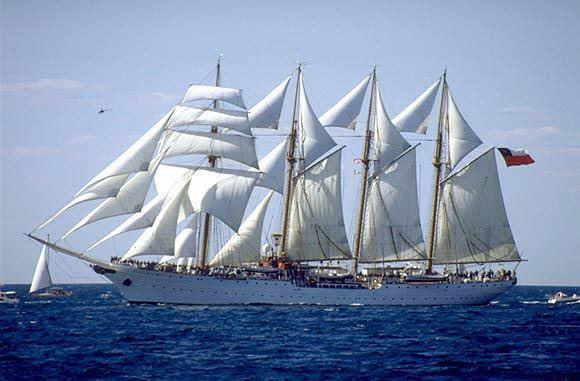
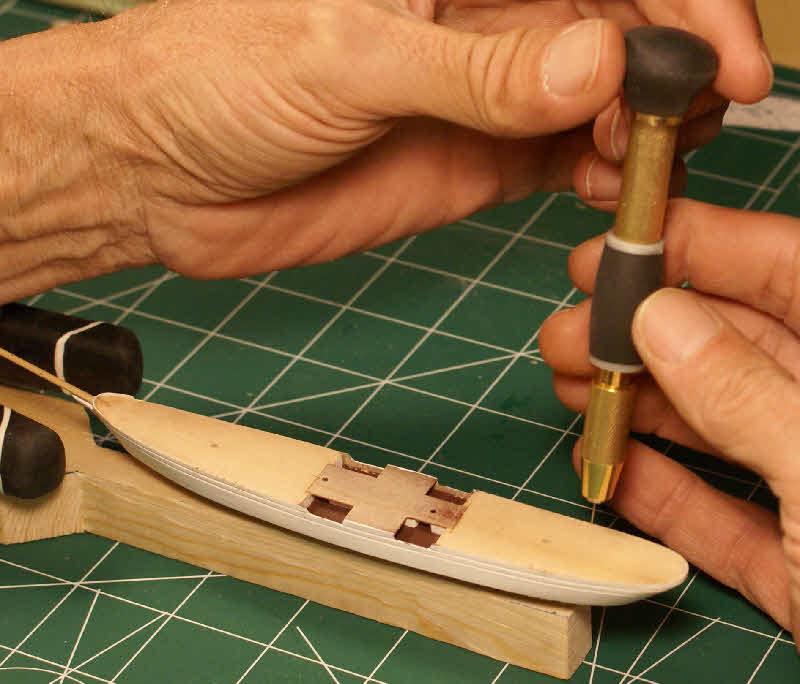
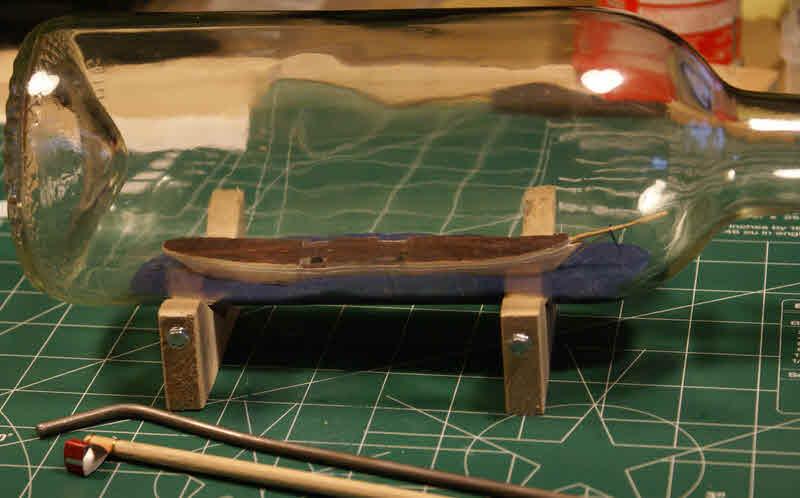
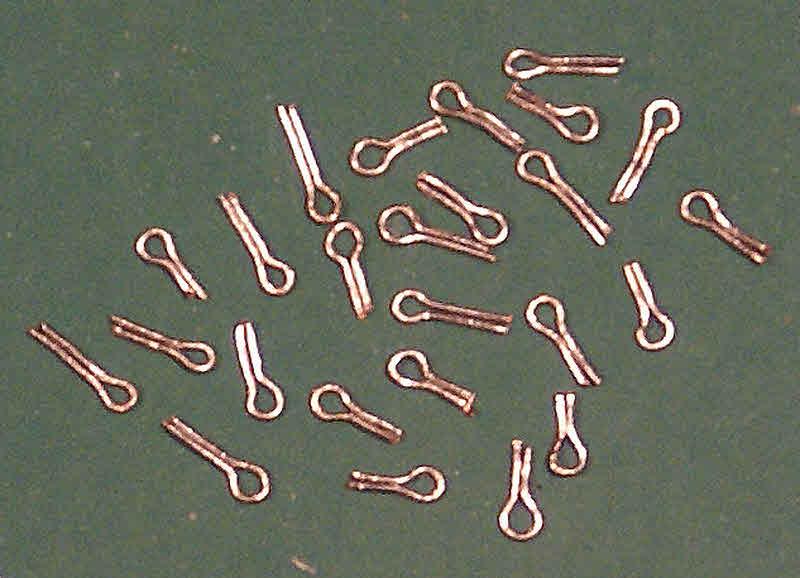
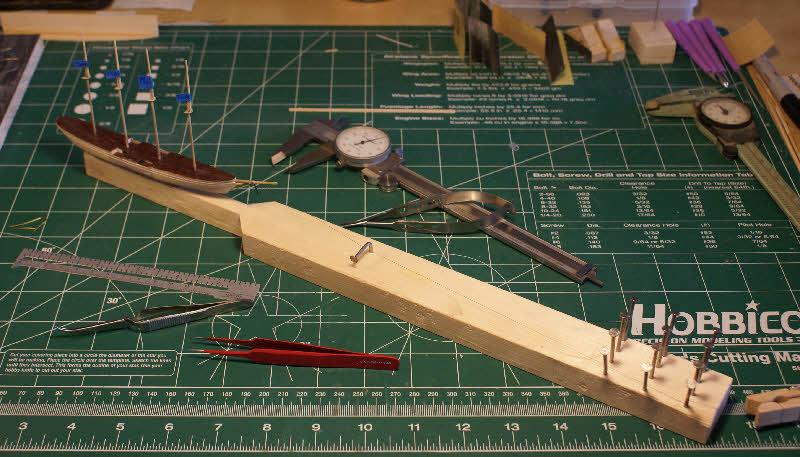
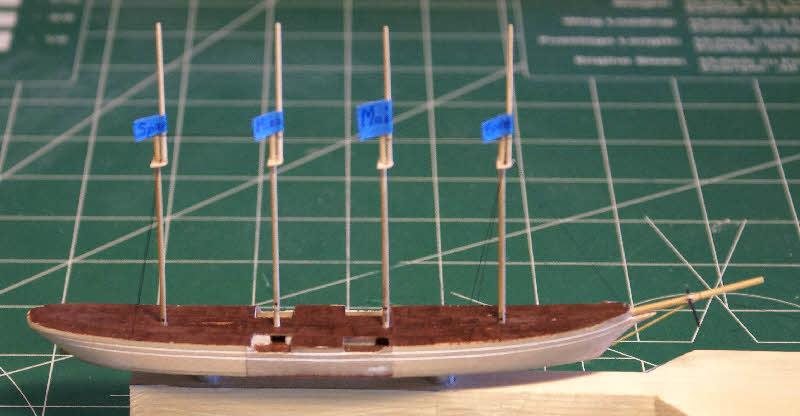
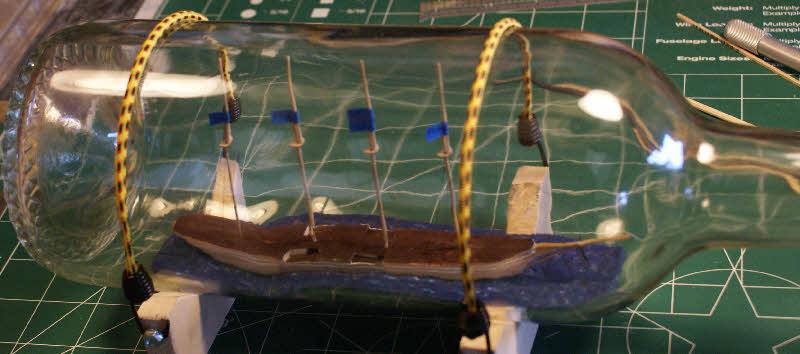
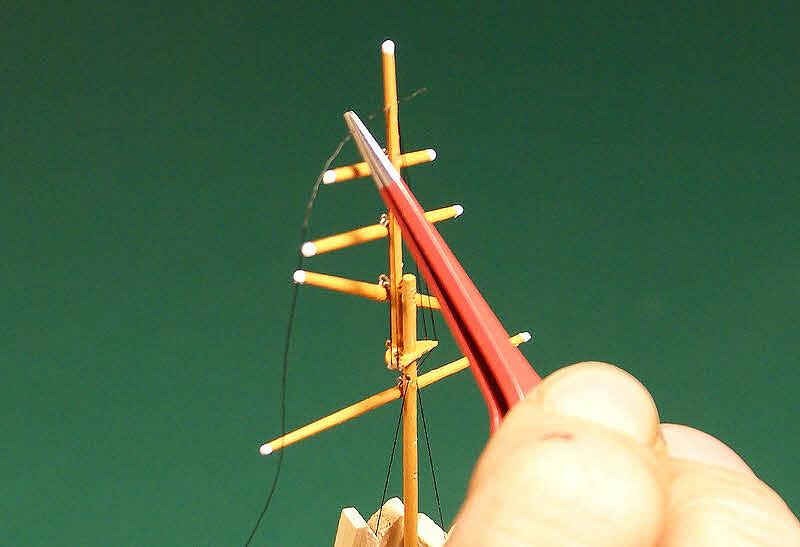
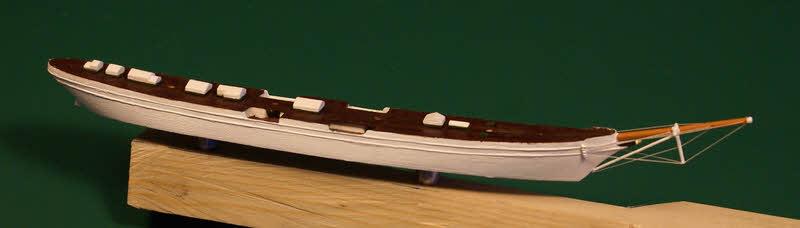
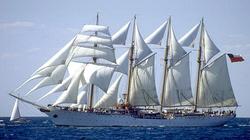
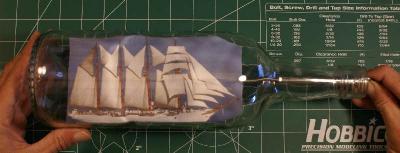
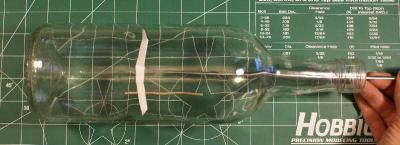
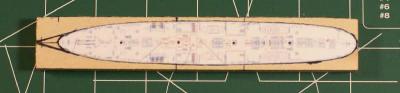
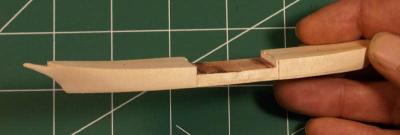
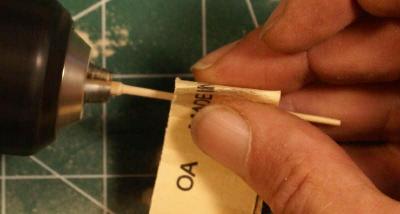
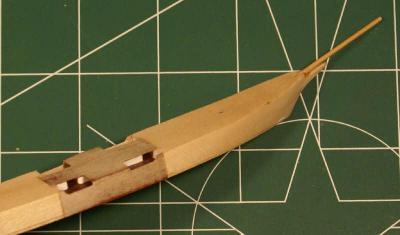
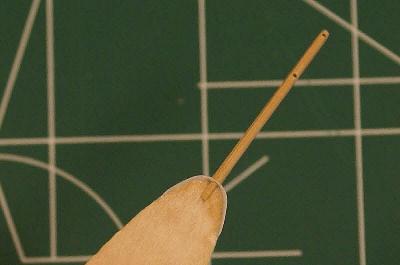
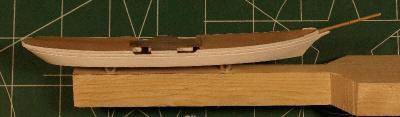
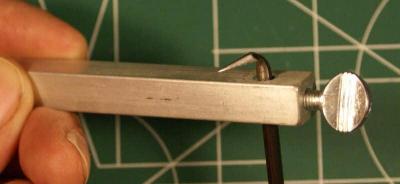
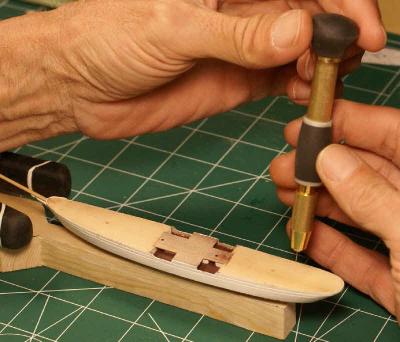
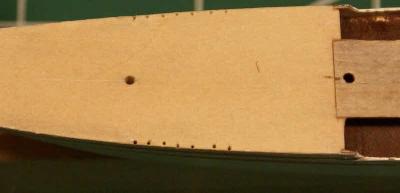
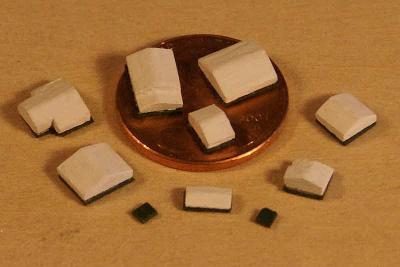
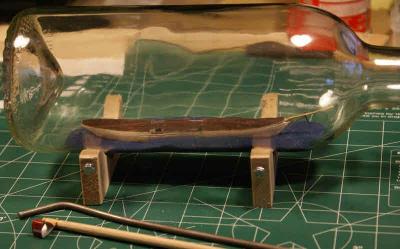
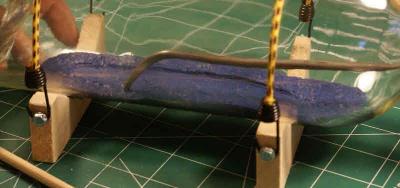
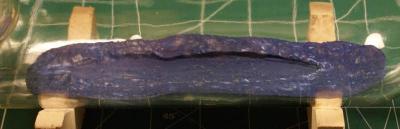
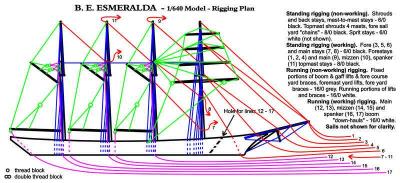
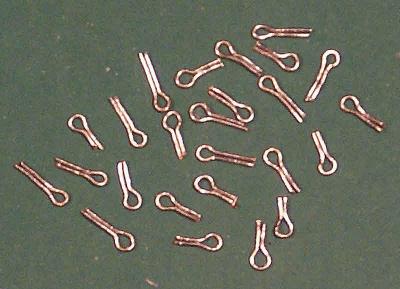
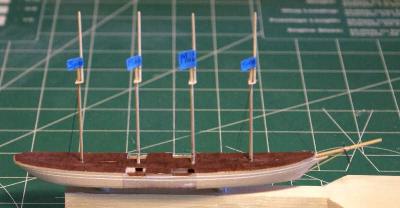
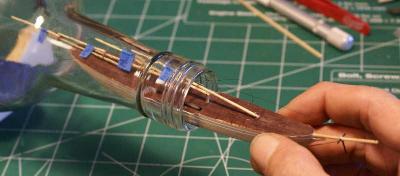
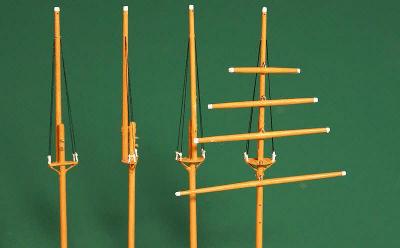
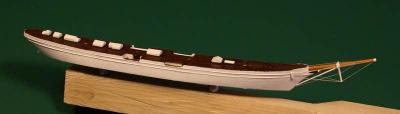
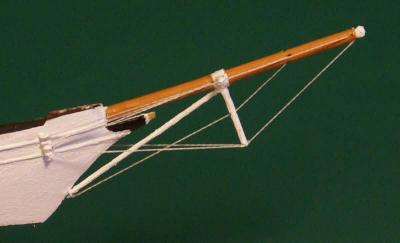
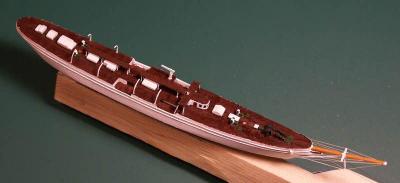
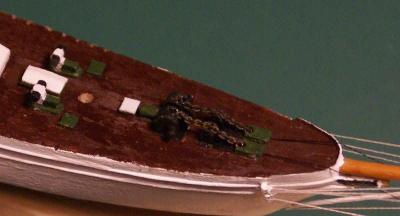
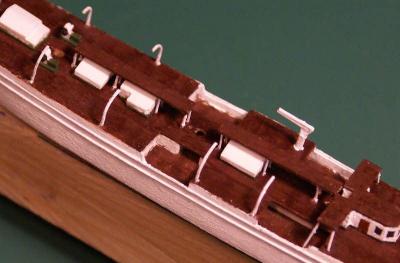
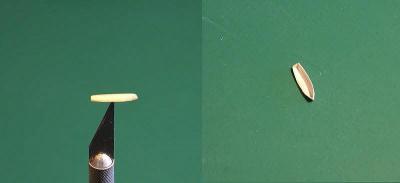
Welcome to my reconstructed build log for ESMERALDA, the existing Chilean Navy Training Ship, built at 1/640 scale in a bottle. Recent photo of Esmeralda - "The White Lady" - under sail. History of Esmeralda Esmeralda's construction started in 1946, under a different name, by Spain as the sister ship to Juan Sebastian Elcano, Spain's current school ship. Work was halted in 1947 after she was damaged in a ship yard explosion. In 1951 Chile acquired her as partial payment for Spanish debts and was launched, as Buque Escuela (school ship) Esmeralda in 1954. In the 1970's her rig was changed from a topsail schooner to a barquentine by replacing the fore gaff sail with two main stay sails. Since her commissioning, Esmeralda has been a training ship for the Chilean Navy. She has visited more than 300 ports worldwide acting as a floating embassy for Chile. She participated in Operation Sail in New York in 1964, 1976 and 1986, and the Osaka World Sail in 1983. She also participated in International Regattas of Sail in 1964, 1976, 1982 and 1990 winning the coveted Cutty Sark Trophy in the last two participations. Esmeralda is the second longest and second tallest conventional sailing ship in the world. Characteristics Length: 113 meters Beam: 13.11 meters Mast height: 48.5 meters Sails: 21 total with a sail area of 2,870 m2 on four masts Crew: 300 crewmen and 90 midshipmen Top sail speed: 17.5 knots The Model I acquired a 1.5 liter wine bottle, emptied it (which I enjoyed very much!), then cleaned and dried it. I measured the inside dimensions using a piece of paper attached to a rod, trimming the paper until it would just touch the bottle at the narrowest point. Gauge for measuring the inside of the bottle. Gauge in use. I subtracted the planned sea thickness and clearance for the masts from the minimum inside dimension. I used that amount to determine the model length based on the ship's characteristics and printed a photo to match the model length and height then taped that photo to a rod to test how the model will look inside the bottle. Photo of Esmeralda inside the bottle. A model this size will fill the bottle very well. I also cut a strip of paper to the beam of the model to verify the bottle's neck inside diameter. This is important because most necks of long neck bottles have an inside dimension that is smaller than the mouth - something I learned the hard way years ago when I assumed the mouth of a bottle was the smallest part of the neck and my ship wouldn't fit through the neck even though it cleared the mouth easily. I then generated a deck plan and waterline hull elevation and laid out the plan and elevation on a block of basswood. Deck plan and hull elevation laid out. I used a razor saw to make a series of cuts at about 1/16th inch (1.5 mm) intervals to the profile lines on three sides of the block. After getting the rough shape by breaking off the "fins" I sanded the hull to shape. Hull cut out ready for more detailing. Esmeralda has a partially open area between the main and mizzen masts which will be detailed with two blocks for the two structures in this "waist" (for lack of a better name) and three pieces of .5 mm ply for bulwarks and deck. I also decided to make and install the bowsprit. Tapering the bowsprit with my "mini-lathe". Waist deck houses, bulwarks, weather deck over the waist and bowsprit glued in place. Esmeralda has a low bulwark (a little less than knee height) at the bow. I made this from a piece of paper slightly lapped over the hull, glued with cya to stiffen the paper then sanded to feather it in to the hull. It was trimmed to .025 inch high (approximately 15 inches to scale). Completed low bulwark at bow. Note the two holes in the bowsprit for rigging. Esmeralda has two half rounds running from the bow, along the sides and around the stern parallel to the deck. I used a scribing gauge to slightly cut grooves into the hull which were then deepened slightly with a triangular riffle. A wire or monofilament will be glued into these grooves later then painted over to replicate the half rounds. Scribing tool. Hull with scribed grooves mounted on my work board. I started work on the masts and some of the deck details. The masts have a box hinge instead of the usual piece of wire through the base of the mast bent into a "U" with the two ends glued into holes in the deck. The box hinge will be nearly invisible whereas the bent wire would be obvious. I also made the four identical tops for the masts from .5mm ply sanded to remove one layer of ply (about .015 inch thickness). The skylights were made from basswood painted white glued to a base of .5mm ply painted green. Two hatches were made from the plywood and painted green. Mast with box hinge and four tops. Drill is a #73 Skylights and hatches. I finished the rigging plan I'd been working on since making the decision to build Esmeralda. Rigging plan for the Esmeralda model. Blue and green lines represent the standing and running rigging that will be completed outside the bottle and aren't used for moving the masts and spars into position inside the bottle. Red and magenta represent the standing and running rigging that will be set up but not glued in place outside the bottle and are used for locating the masts and spars inside the bottle then glued and trimmed. I laid out the holes for the masts and rigging and started drilling them. Drilling holes at the edge of the weather deck for shrouds and back stays with a #80 (.35mm) drill. The holes at the edge of the deck need to be drilled at an angle so they don't come out the side of the hull. I had one hole out near the end of the fan tail that needed to be over 45 degrees from vertical. I didn't quite have the angle right and the hole came out the side of the hull but it was easily repaired, but redrilling the hole from the same starting hole was somewhat difficult. I also had to change to a larger diameter drill because the smaller drill wasn't long enough to drill all the way through to the bottom of the hull. Close-up of holes for fore mast shrouds and back stays. Holes for main mast shrouds and back stay are visible next to the bulwark in the "waist" at upper right. Work in general had progressed to the point that I felt getting the sea in the bottle was necessary. I used Fimo Classic modeling clay (a polymer based compound - Sculpey, Pendo and Plasticine are possible substitutes - but Fimo has a navy blue that comes very close to the color of deep water ocean). I formed it into a piece 7 inches by 2 inches by about 1/4 inch thick tapering to zero around the edges to fit into the cylidrical bottle and leave the top surface of the sea roughly level. I then put the hull on top of the clay in the position needed then pressed it firmly into the clay with a steel rod. Hull pressed into the sea to leave an impression. The steel rod is 3/16 inch diameter with the end ground, filed and sanded to a hemispherical tip then bent as needed. The gouge is a similar sized dowel with a slot cut in the end to hold a strip of aluminum soda can then wired tight. After determining the needed angle of the gouge by trial it was glued. After the hull was removed I used the gouge to remove some of the clay from inside the impression of the hull. I used the removed clay to build up a wind swell running from near the near left corner to near the far right corner (replicating the sea with a wind from about 60 to 70 degrees off the starboard bow). Using the gouge to remove clay from the hull impression. I put the hull back in the sea, pressed it down, removed it and gouged out more clay until the hull fit snugly in the depression. After that was done I used the rounded tip of the steel rod to cover the surface of the sea with little overlapping dimples except for the ship's wake which was smoothed with the tip. Sculpting the surface of the sea. I made one more check of the hull in the depression for it in the sea then added some white Fimo to simulate the agitated white water at the bow, along the sides, in the wake and for a few wind blown white caps. I placed flecks of the white (or a partial mix of blue and white) on the tip of the steel rod to transfer them to the sea then feathered them into the blue. Finished sea. I completed basic mast assembly - lower masts with hinges, tops and upper masts - and set them into the appropriate holes in the hull. Esmeralda in progress on the working board with some of the tools being used. Then I rigged her with one pair of back stays on the fore and spanker masts, a single fore stay and the mast to mast stay that connects all four masts at the mast splices. This was done in order to do a trial fit of the hull and masts to verify that the completed assembly will fit in the sea with clearance for the masts to stand erect. I calculated my dimensions very closely with about 1/16th inch clearance between the mast tips and the inside of the bottle. Esmeralda with minimal rigging. The rigging is tied off but not glued. It will be removed after the trial fit. On a previous build I neglected to do a trial fit on a ship that I had also calculated very closely. I got that ship in the bottle and in place in the sea. I had pulled up the fore mast and positioned all the fore mast yards and had glued most of the fore stays and working lines to achieve this, then moved on to the main mast. The mast tip hit the inside of the bottle before it was in its correct position. I had to cut all the glued lines to get the fore mast to fold back down so I could remove the model. Even at that two fore mast yards snapped because I could not get them arranged the way they were when I put the ship in the bottle. I NEVER omit a trial fit after that experience no matter how confident I am with my calculations. Esmeralda going into the bottle. Esmeralda in place in the sea with masts all erect. There is about 1/16th inch clearance between the mast tips and the bottle. This trial fit also gives me a chance to trouble shoot the insertion process. In this build the deep dimple in the base of the bottle prevents me from simply setting the model in place then erecting the masts. I'll have to start erecting the masts when the bowsprit is still partly in the neck of the bottle. Another good reason to do a trial fit with bare poles and minimal rigging. Now that I know my masts are all correct it's time to detail them. I made some ring bolts out of 32 gauge (.008 inch) wire by bending the wire around the tip of a needle, forming the two ends next to each other then cutting the ring bolt from the length of wire. I had so much fun doing them I made 25 of them before I realized I only needed 12. Ring bolts. I made the fore mast yards, drilled the holes needed in all the masts and yards then painted them. I decided that I could make use of the extra ring bolts by linking two of them together, eye to eye, to use to connect the yards to the fore mast. I glued one ring bolt in a hole in the center of the yard then glued the other linked ring bolt in a hole in the mast. After that I rigged the topmast shrouds, three pairs on the fore mast, two pairs on the other three topmasts. Rigging the fore topmast shrouds. Note the linked ring bolts connecting the yards to the mast. I also added an extra ring bolt to the forward edge of the top on the fore mast to use to tie off the two fore stays that start there. After rigging the topmast shrouds I glued a crossbar of thread to the shrouds about 1 mm above the top. I painted the threads from the crossbar to the top white to simulate the turnbuckles used on Esmeralda instead of deadeyes and lanyards. The futtocks were painted to match the masts. Masts with completed shrouds. I then rigged the fore mast yards with one thread through each yard end, through the mast then through the other end of each yard. The two ends terminate with a thread block - in this case a bowline tied around the point of a needle then glued - to simulate a block used in the actual rigging of Esmeralda. The only place where the thread is glued is at the course (lowest) yard which allows the yards to turn so they are nearly parallel to the mast so the assembly (with sails in place) will pass through the bottle's neck. Foremast with some of the running rigging. Note that the linked ring bolts merely locate each yard. I worked on the hull as well by gluing 28 gauge wire in the previously cut grooves in the hull, installing four ring bolts on each side of the bow and rigging the bowsprit stays. Then I gave the hull the final coat of white and glued the deck details that were ready in place. Some of the deck details installed. I then painted the figure head - an Andean Condor. Close-up of figure head and bowsprit stays. This brings us up to date on my progress reports on Esmeralda prior to the MSW shut down for the software change. In that time work continued on deck details. Davits for three of six ship's boats, crane for the zodiac, the bridge, two catwalks, four winches and the anchor windlass and associated details in place. Close-up of midship section. Davits were made from 28 gauge wire bent to shape and glued in holes in the deck. Crane made from three pieces of wood and styrene. Bridge made from a .5 mm ply base and roof, wood between, with 32 gauge wire legs at the wings. Catwalks from .5 mm ply with eight 32 gauge wire legs glued into holes in the ply and deck. Winches made from two pieces of wood on a ply base. Close-up of windlass, bits and hawser hole covers. The anchor windlass was fabricated from eleven pieces of .010 and .020 inch styrene and three pieces of wood on a base made from paper stiffened with cya glue. The windlass isn't glued down yet. That will be done inside the bottle to cover a hole through which six lines pass after they are glued and cut. You may have noticed two threads coming from under the green covers. They will be used to pull the two chain ends into place during the windlass positioning. The chain is copper, 42 links per inch, blackened with the product from Model Expo. I know it's a bit over size (by about 50%) but I could not resist putting it in. With davits on deck I need to make some boats: two longboats, two smaller boats similar to old whaling boats (pointed bow and stern, narrow beam), a zodiac and another power boat similar to a modern Boston whaler. I haven't seen this boat in any of the photos of Esmeralda I've found, I may just have to make my best guess and wing it. I can infer the length from the davits and the beam and length from Esmeralda's deck plan which shows the outline of this boat on deck but nothing more. I started with the longboats. I made a plug from basswood, dipped it in warm paraffin wax (so glue wouldn't stick to it) and wiped away the excess wax. After attaching it to the tip of an Xacto knife I covered the plug with narrow (less than 1 mm) strips of wet newsprint laid lengthwise, edge to edge, like planks. I painted a layer of thinned wood glue over that layer then added a layer of wider strips laid across the plug, again edge to edge with another coat of thinned glue over it. After the glue thoroughly dried I lightly sanded the outside of the paper hull then trimmed the overhang flush to the plug. It popped right off the plug at that point. The second longboat hull is drying now. Longboat plug and hull. Now that I'm all up to date I'll end this report. I welcome any comments and questions. Edited title of topic to reflect a change to my display name.


- 84 replies
-
- 7
-
-
- esmeralda
- training ship
- (and 1 more)