HOLIDAY DONATION DRIVE - SUPPORT MSW - DO YOUR PART TO KEEP THIS GREAT FORUM GOING! (Only 20 donations so far - C'mon guys!)
×


newbee
-
Posts
180 -
Joined
-
Last visited
Content Type
Profiles
Forums
Gallery
Events
Everything posted by newbee
-
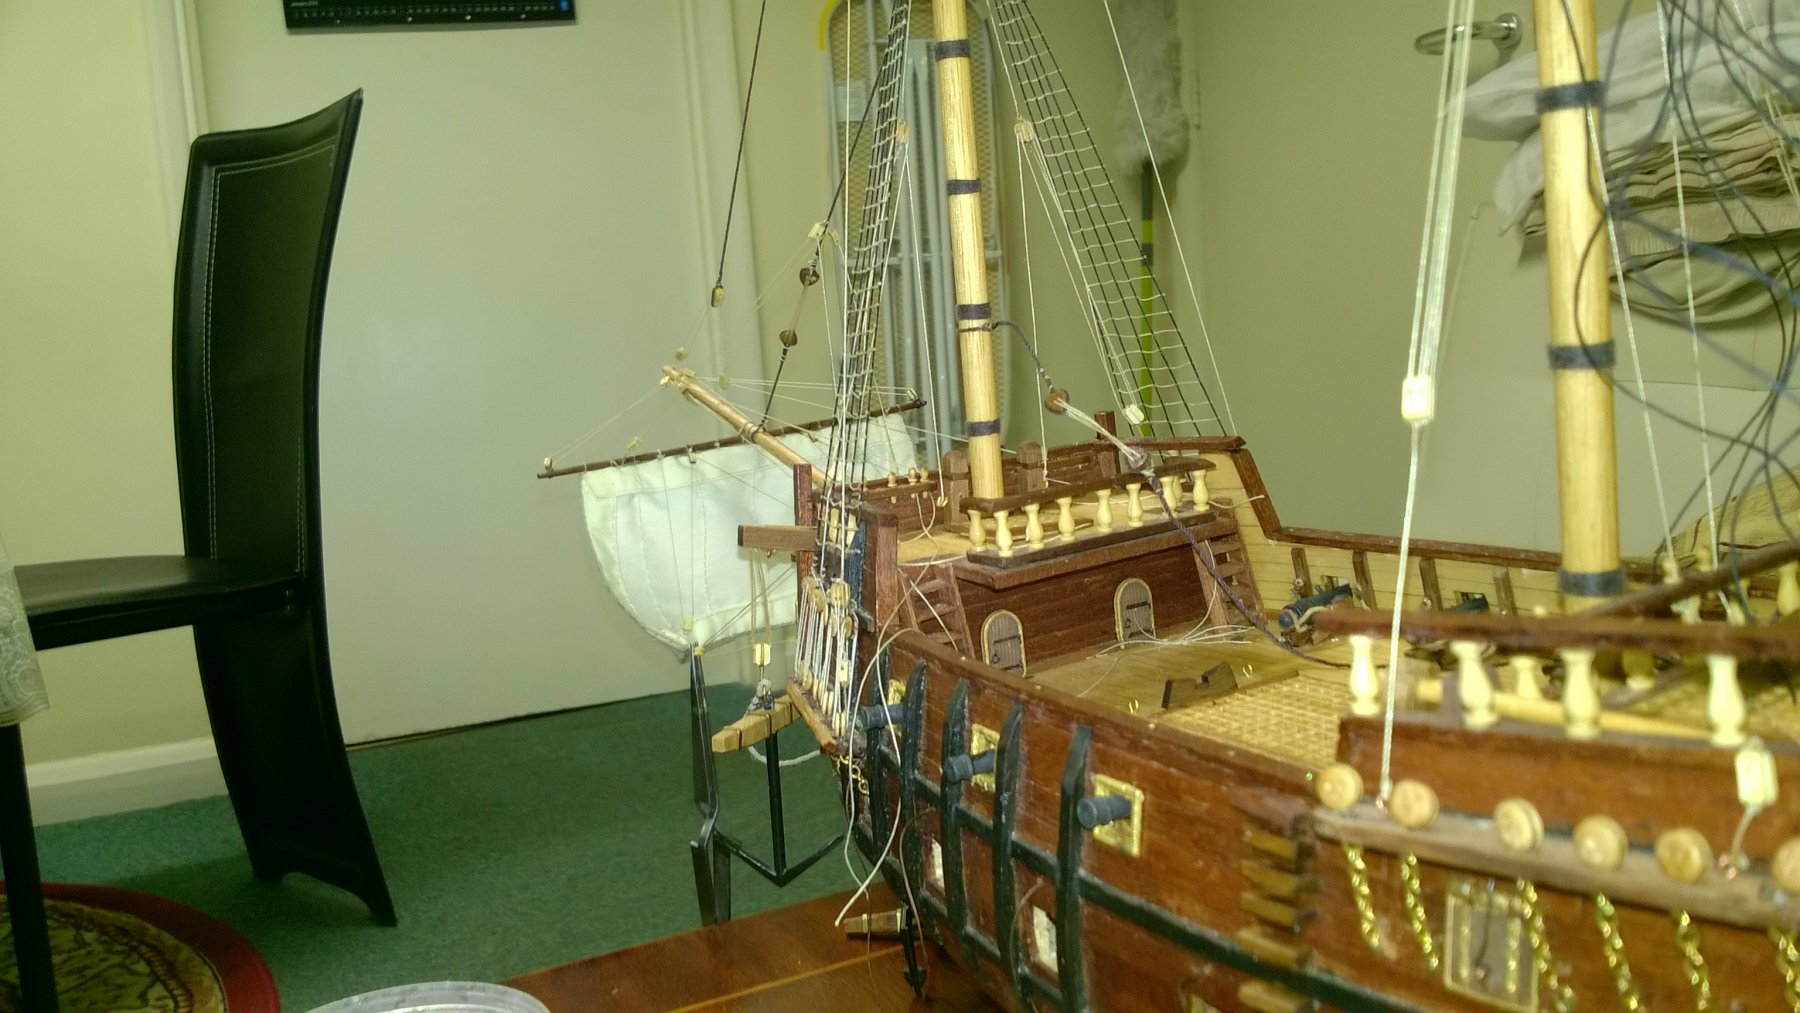
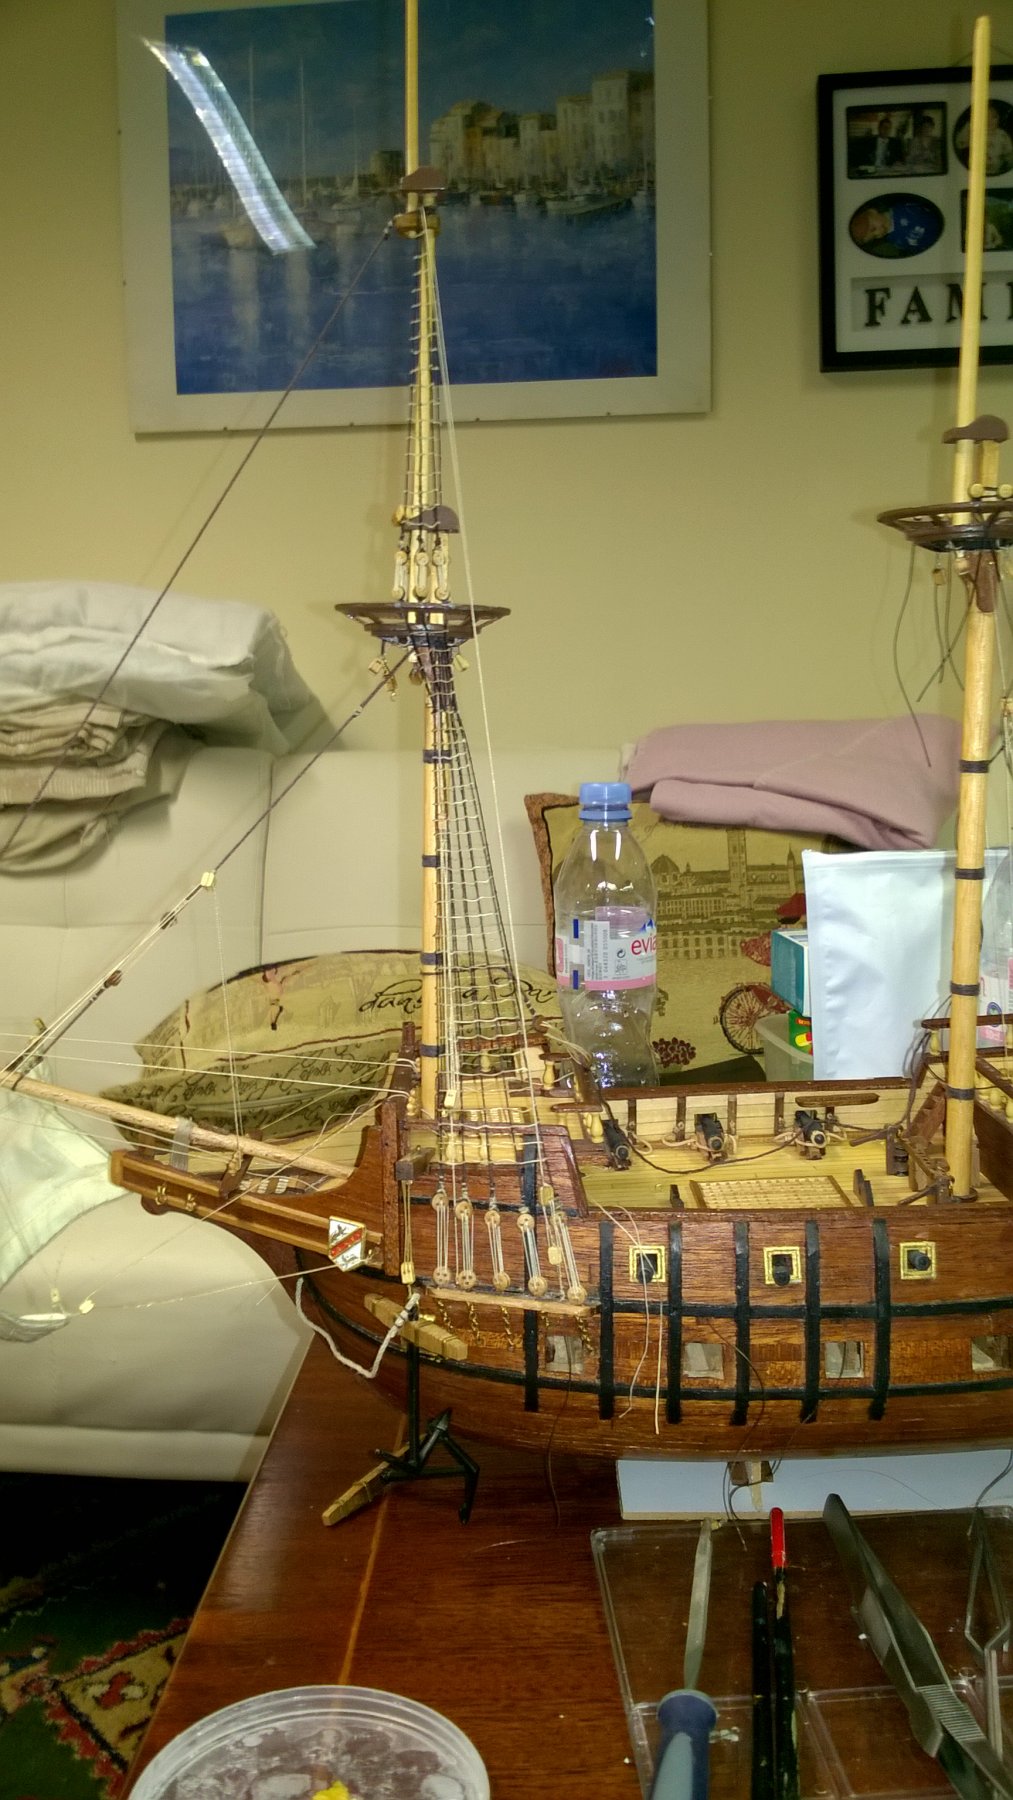
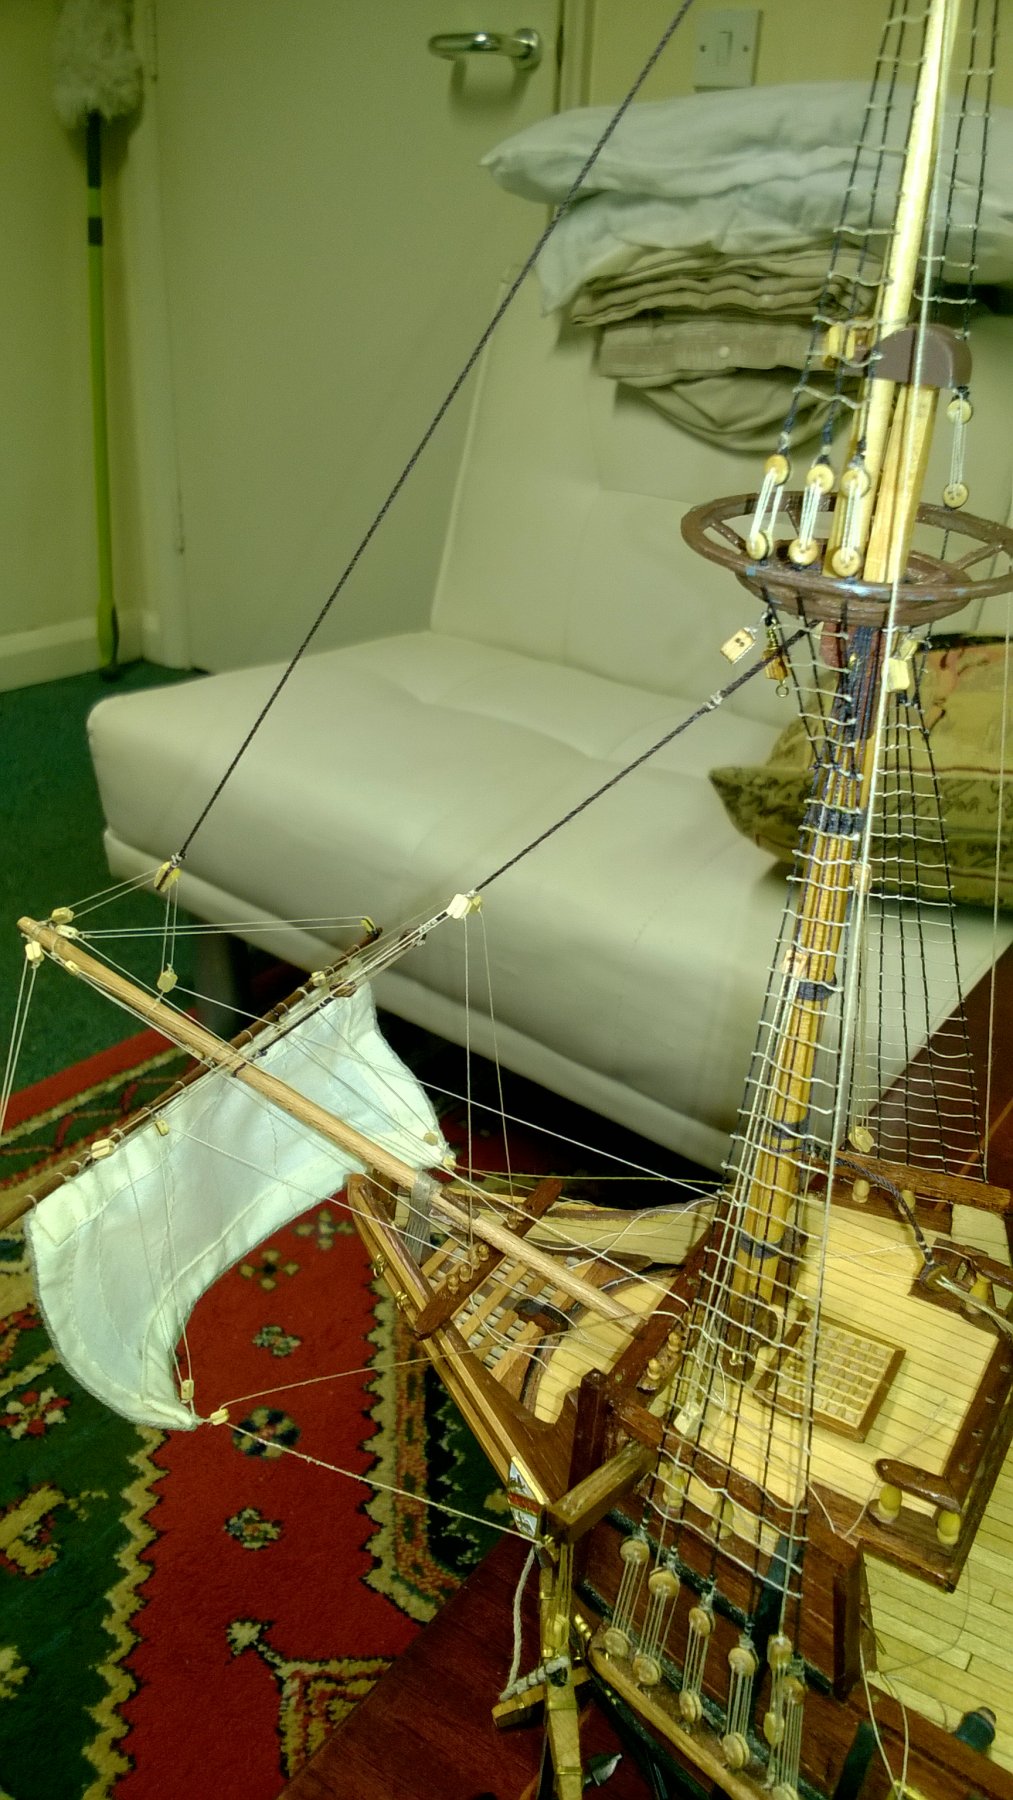
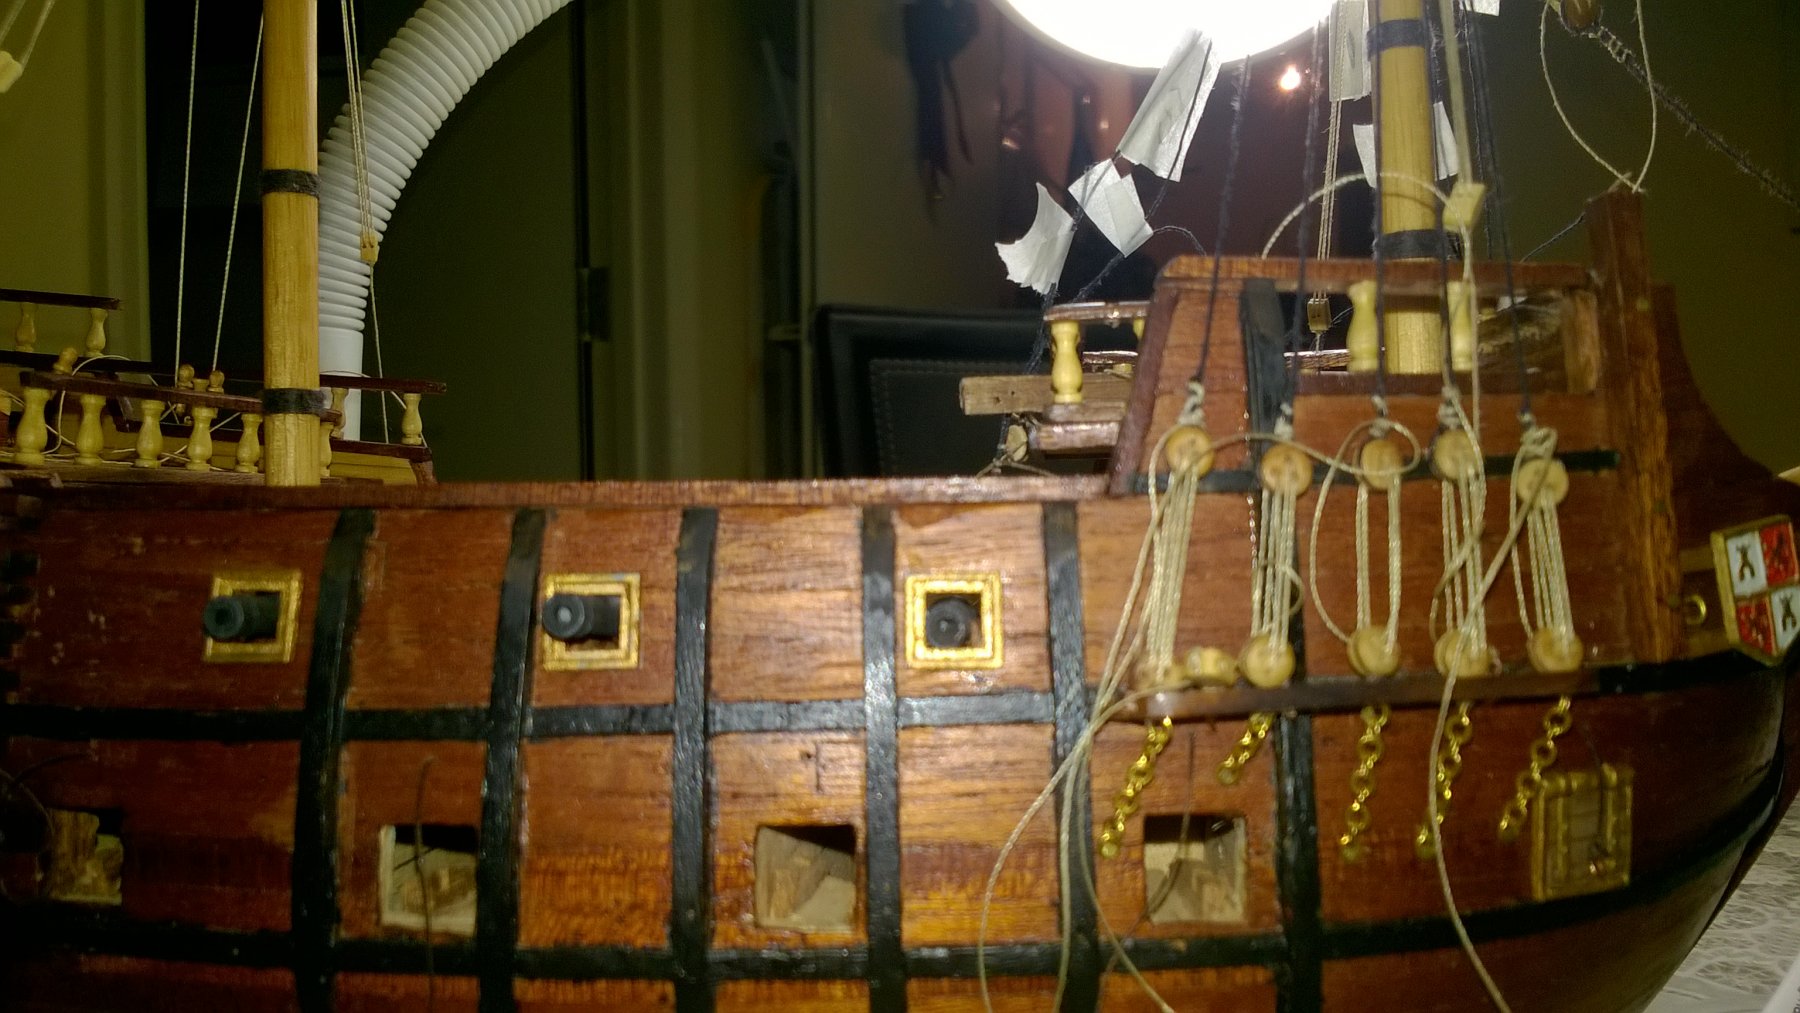
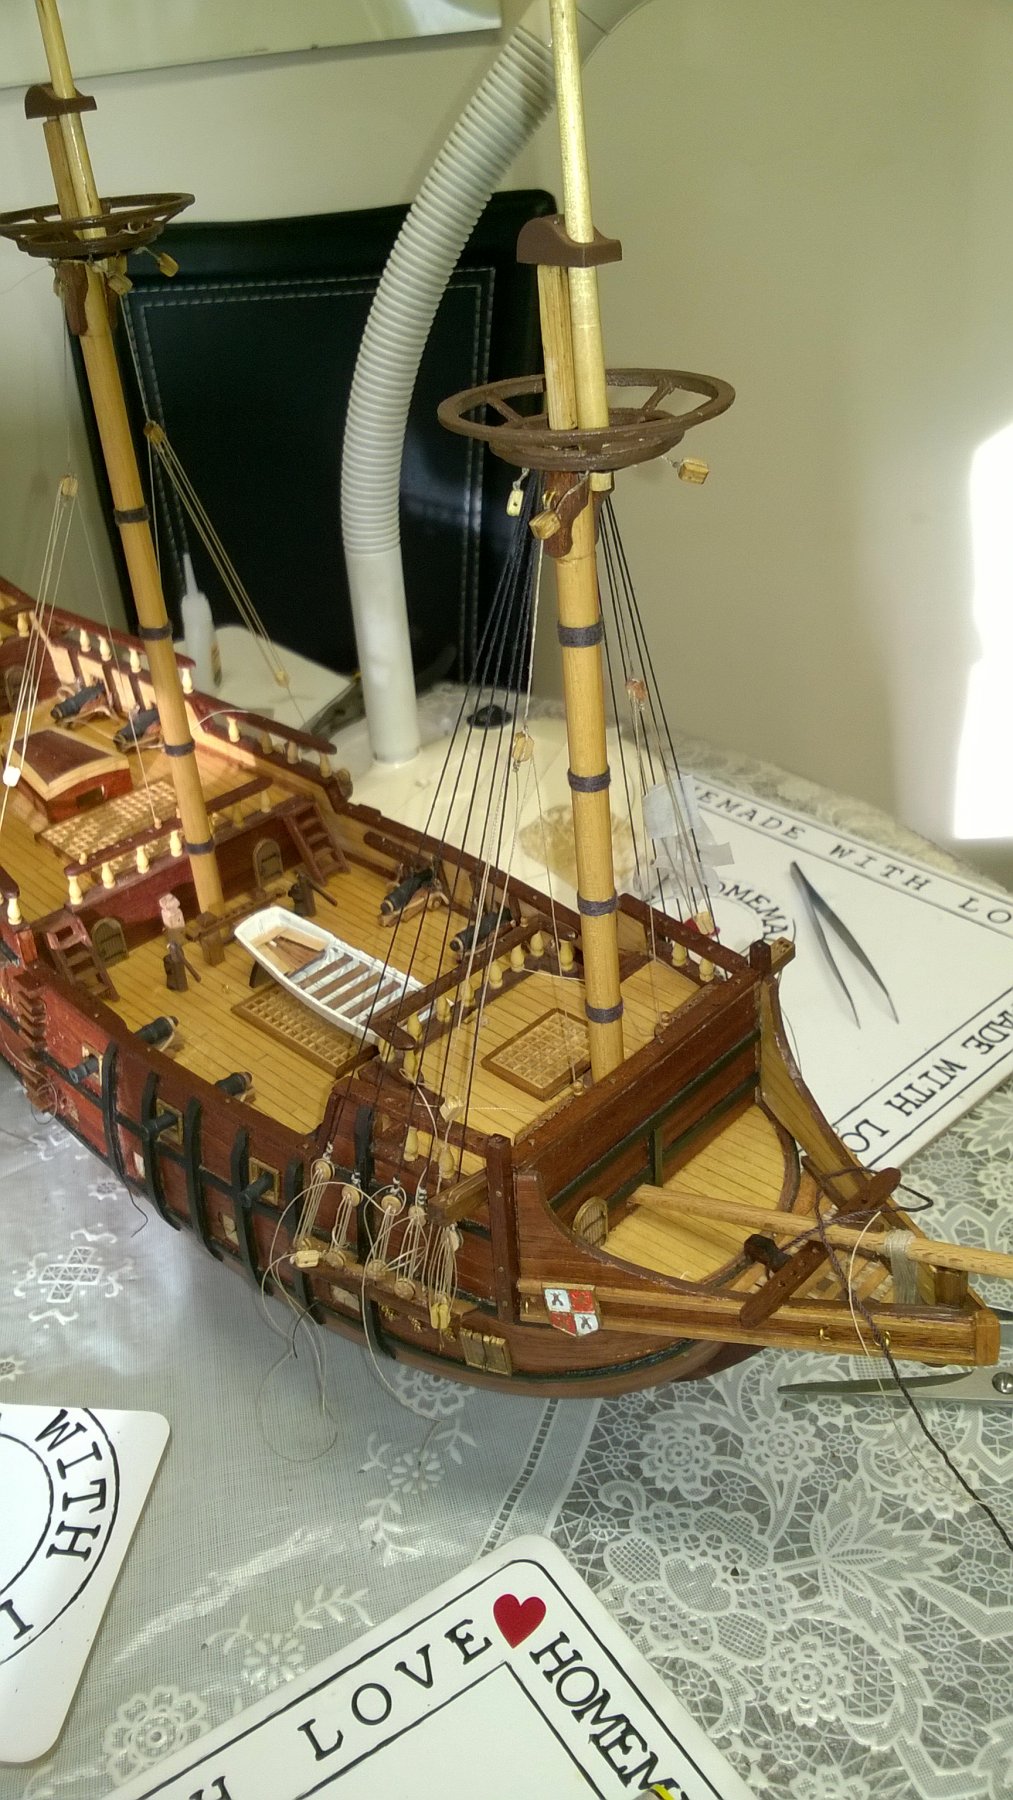
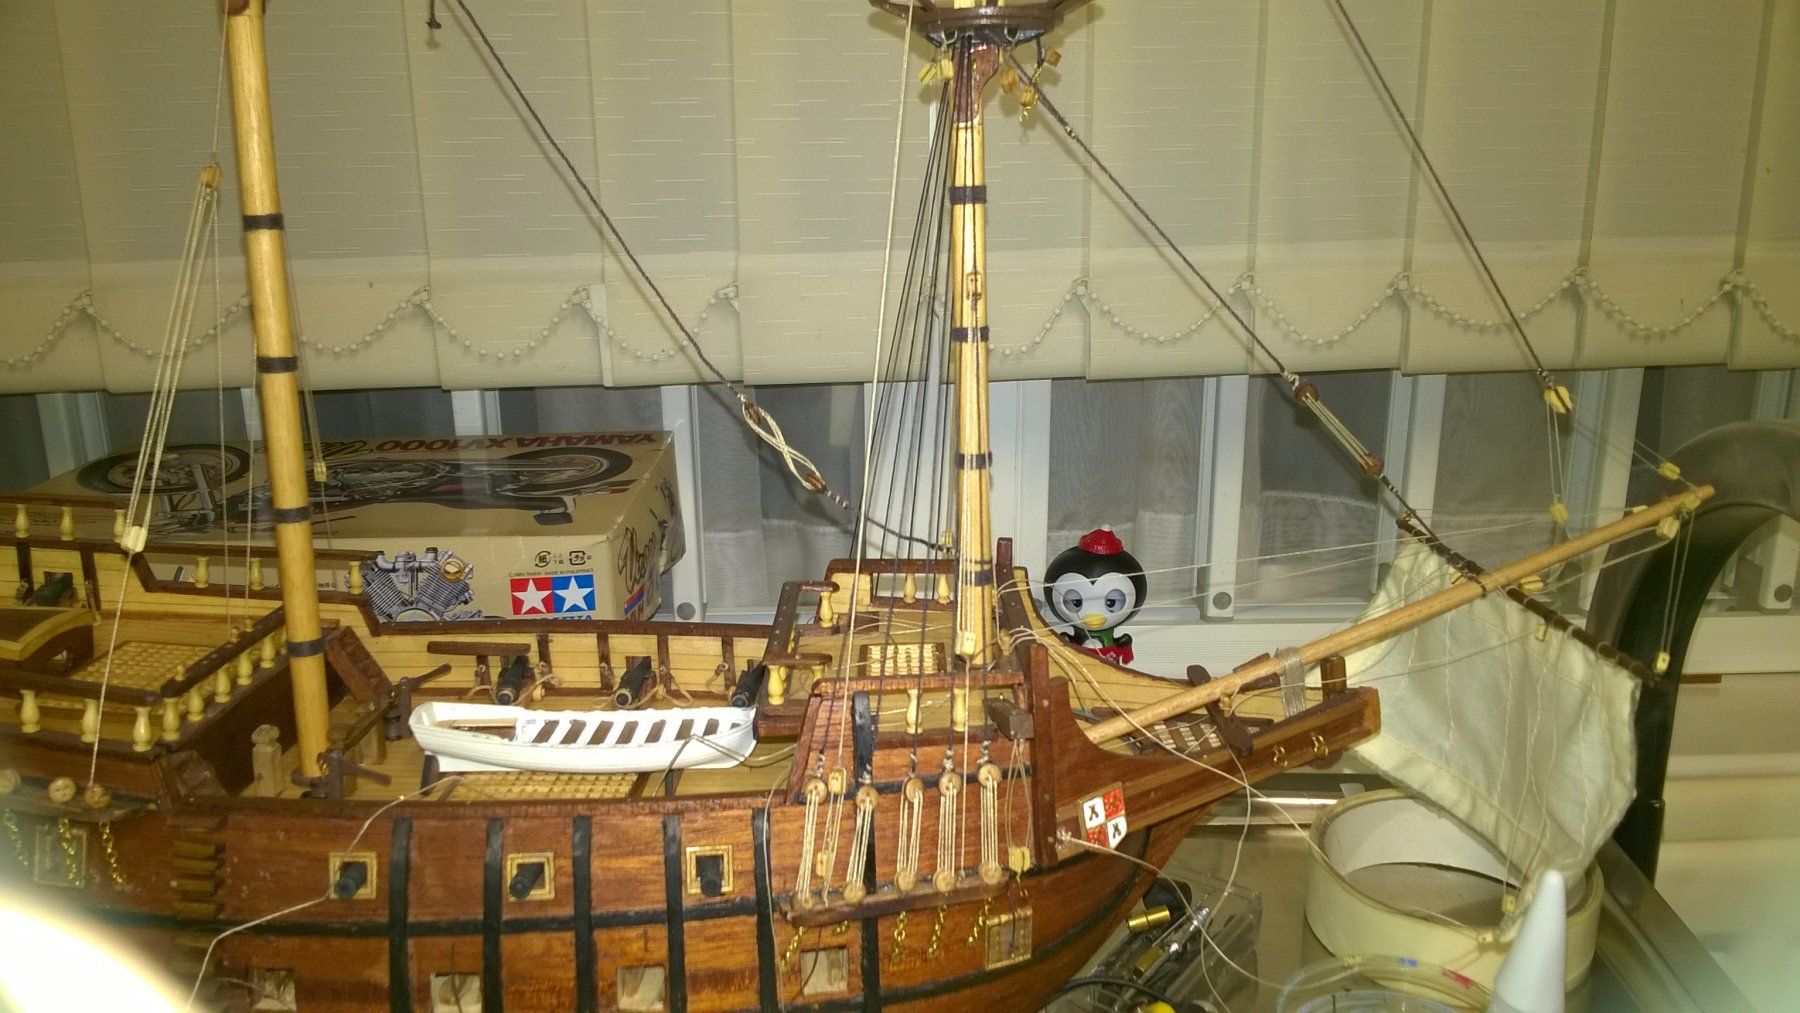
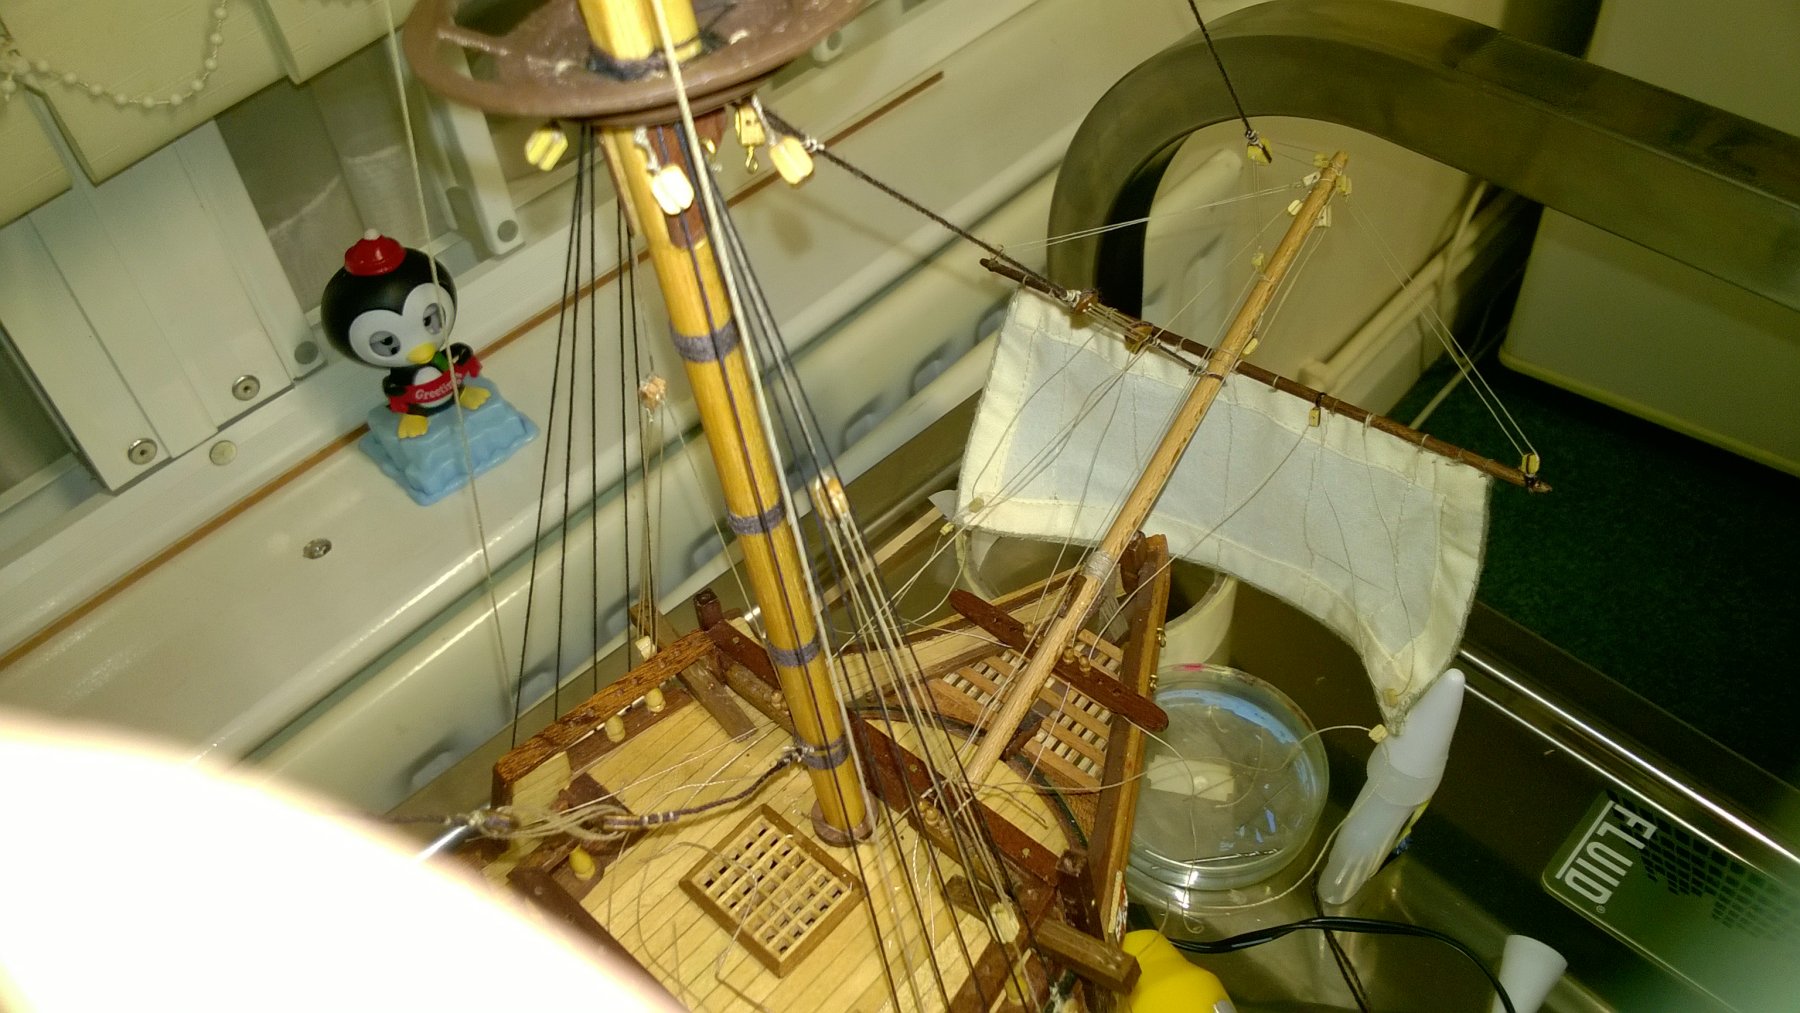
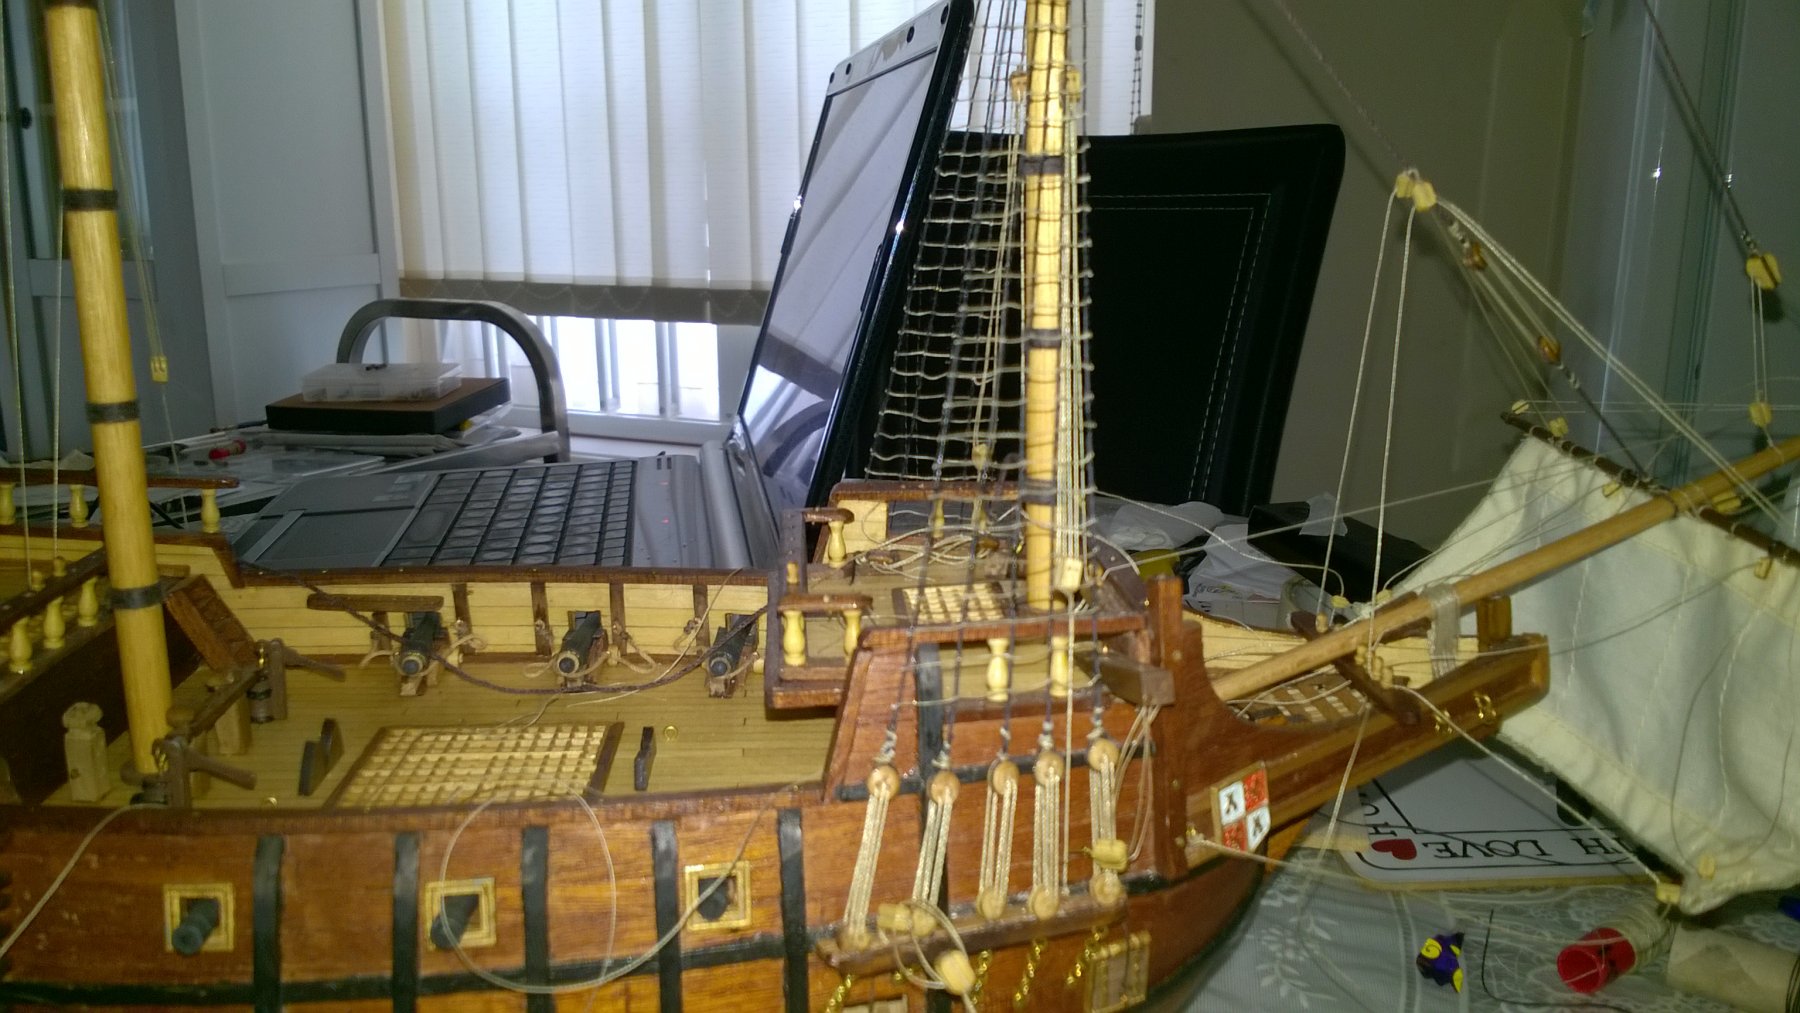
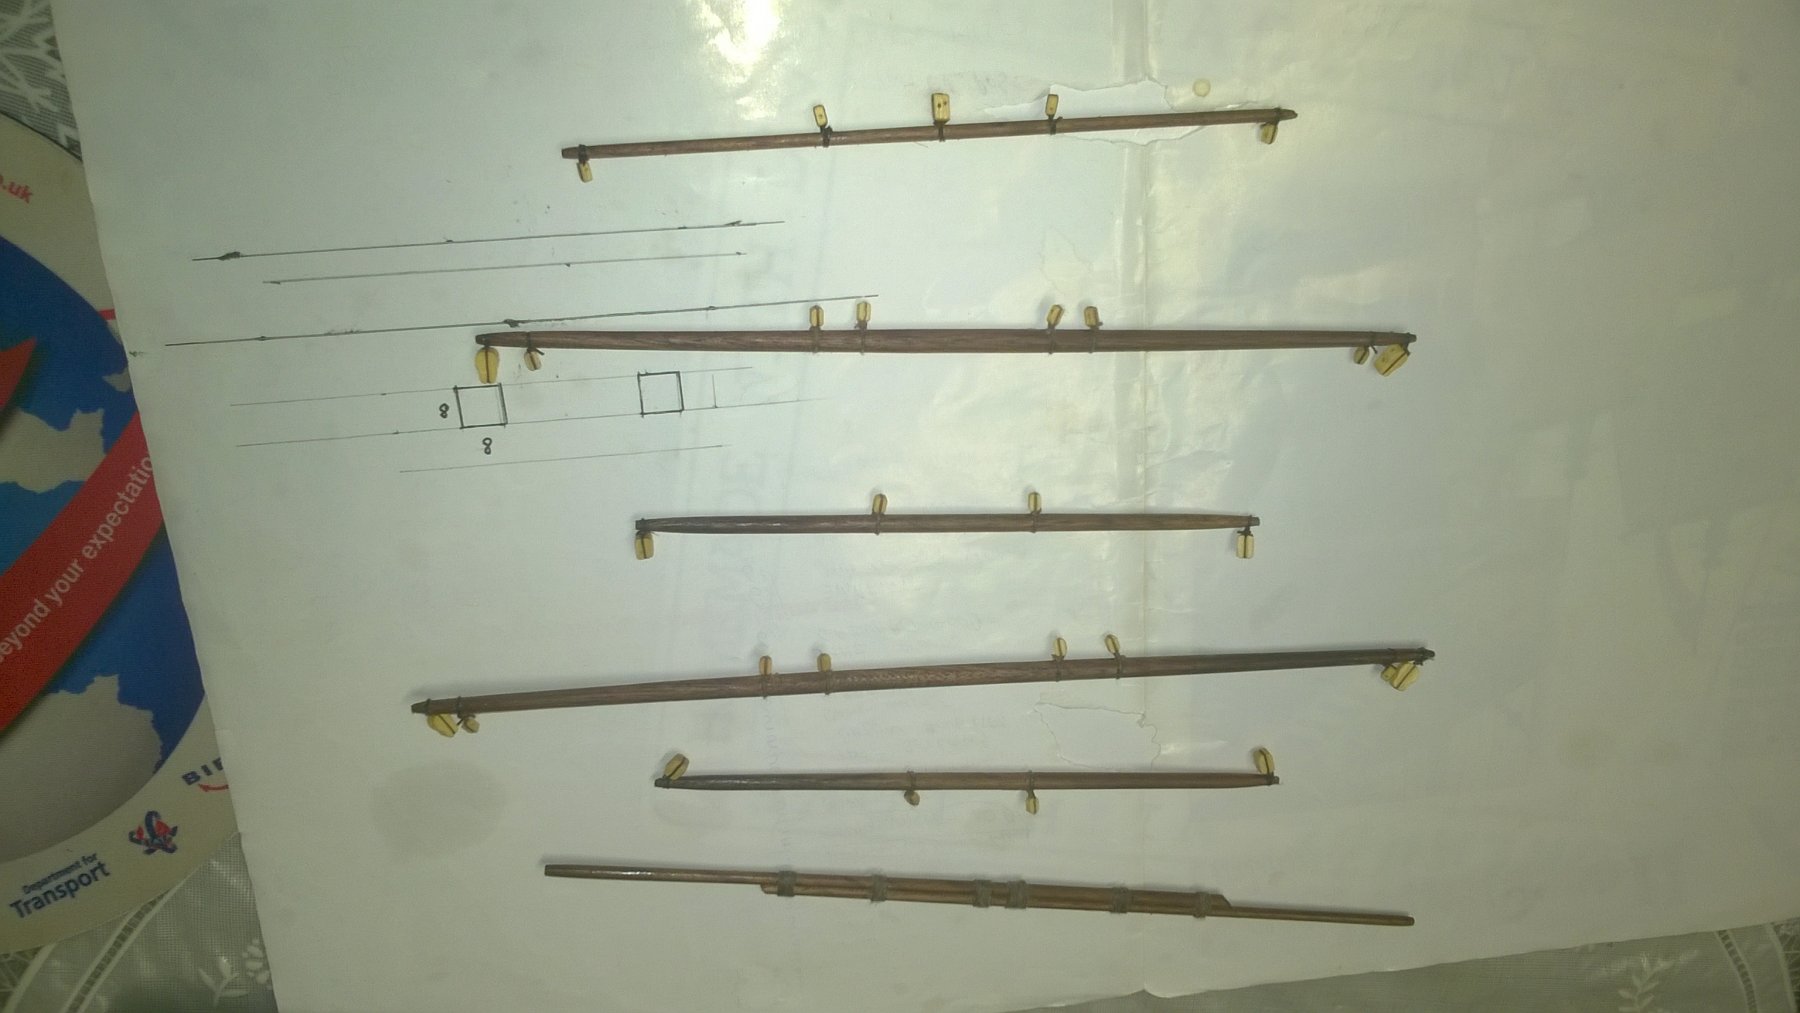
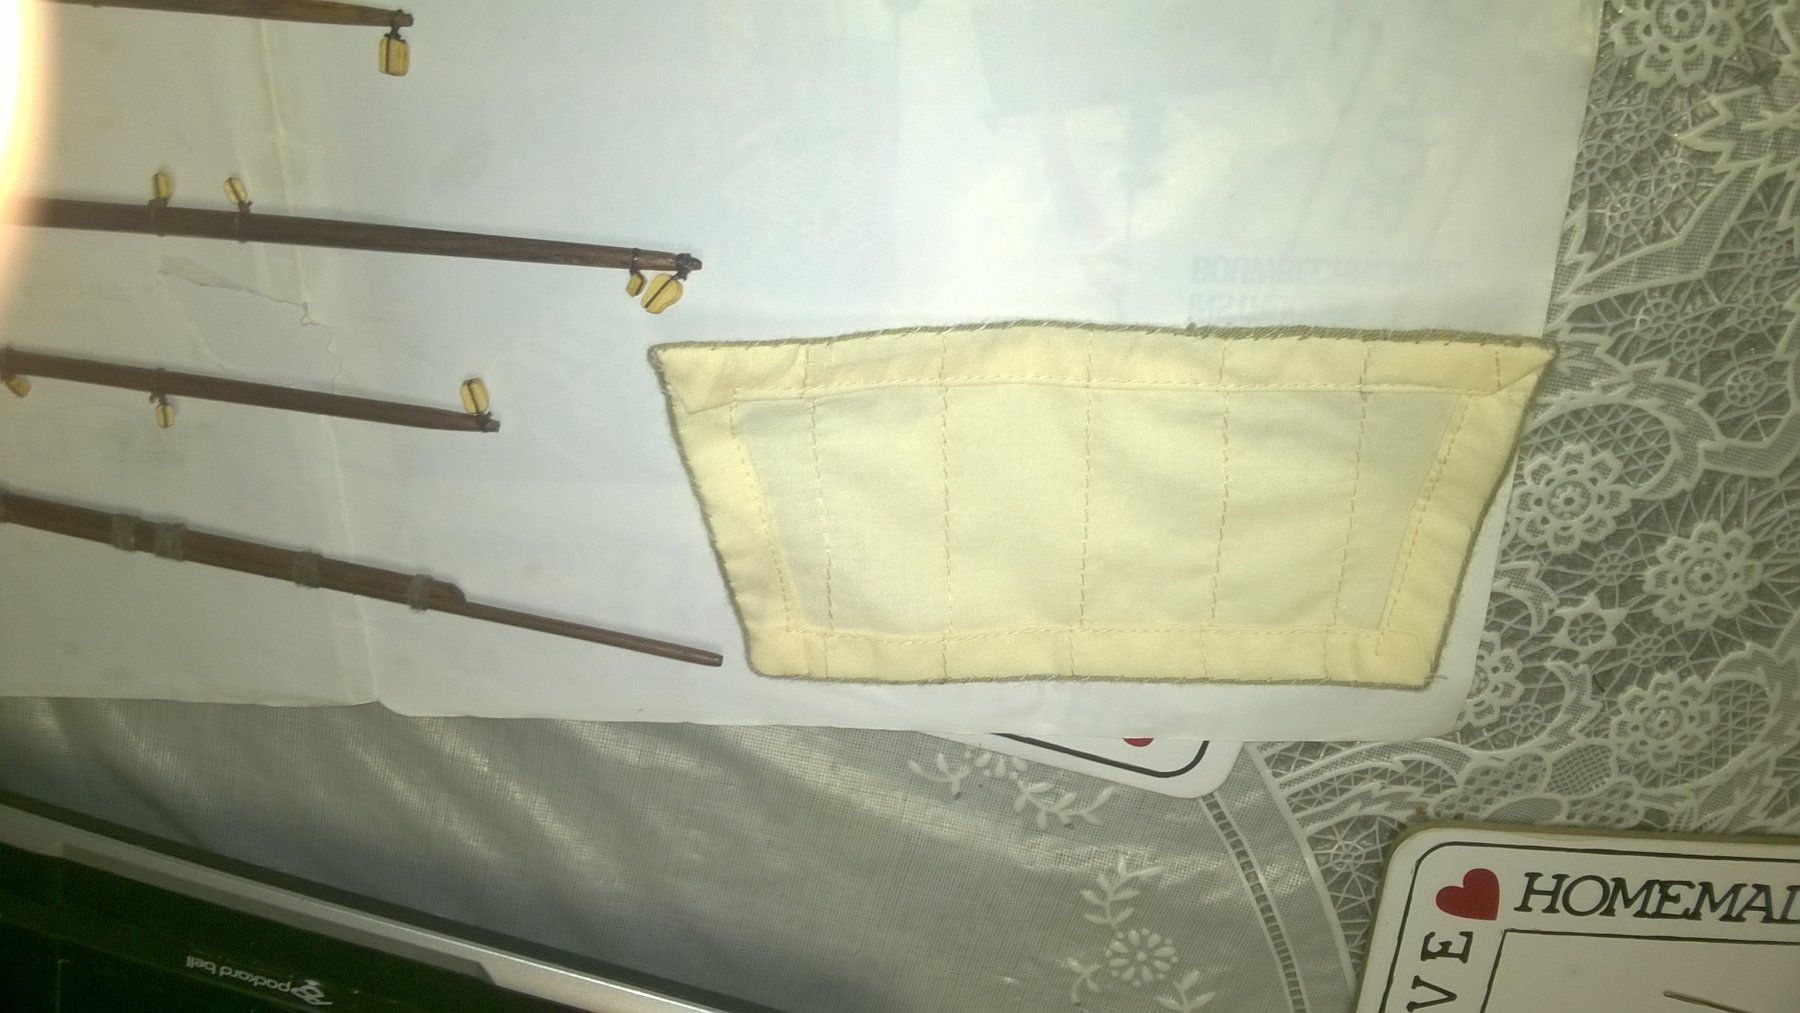
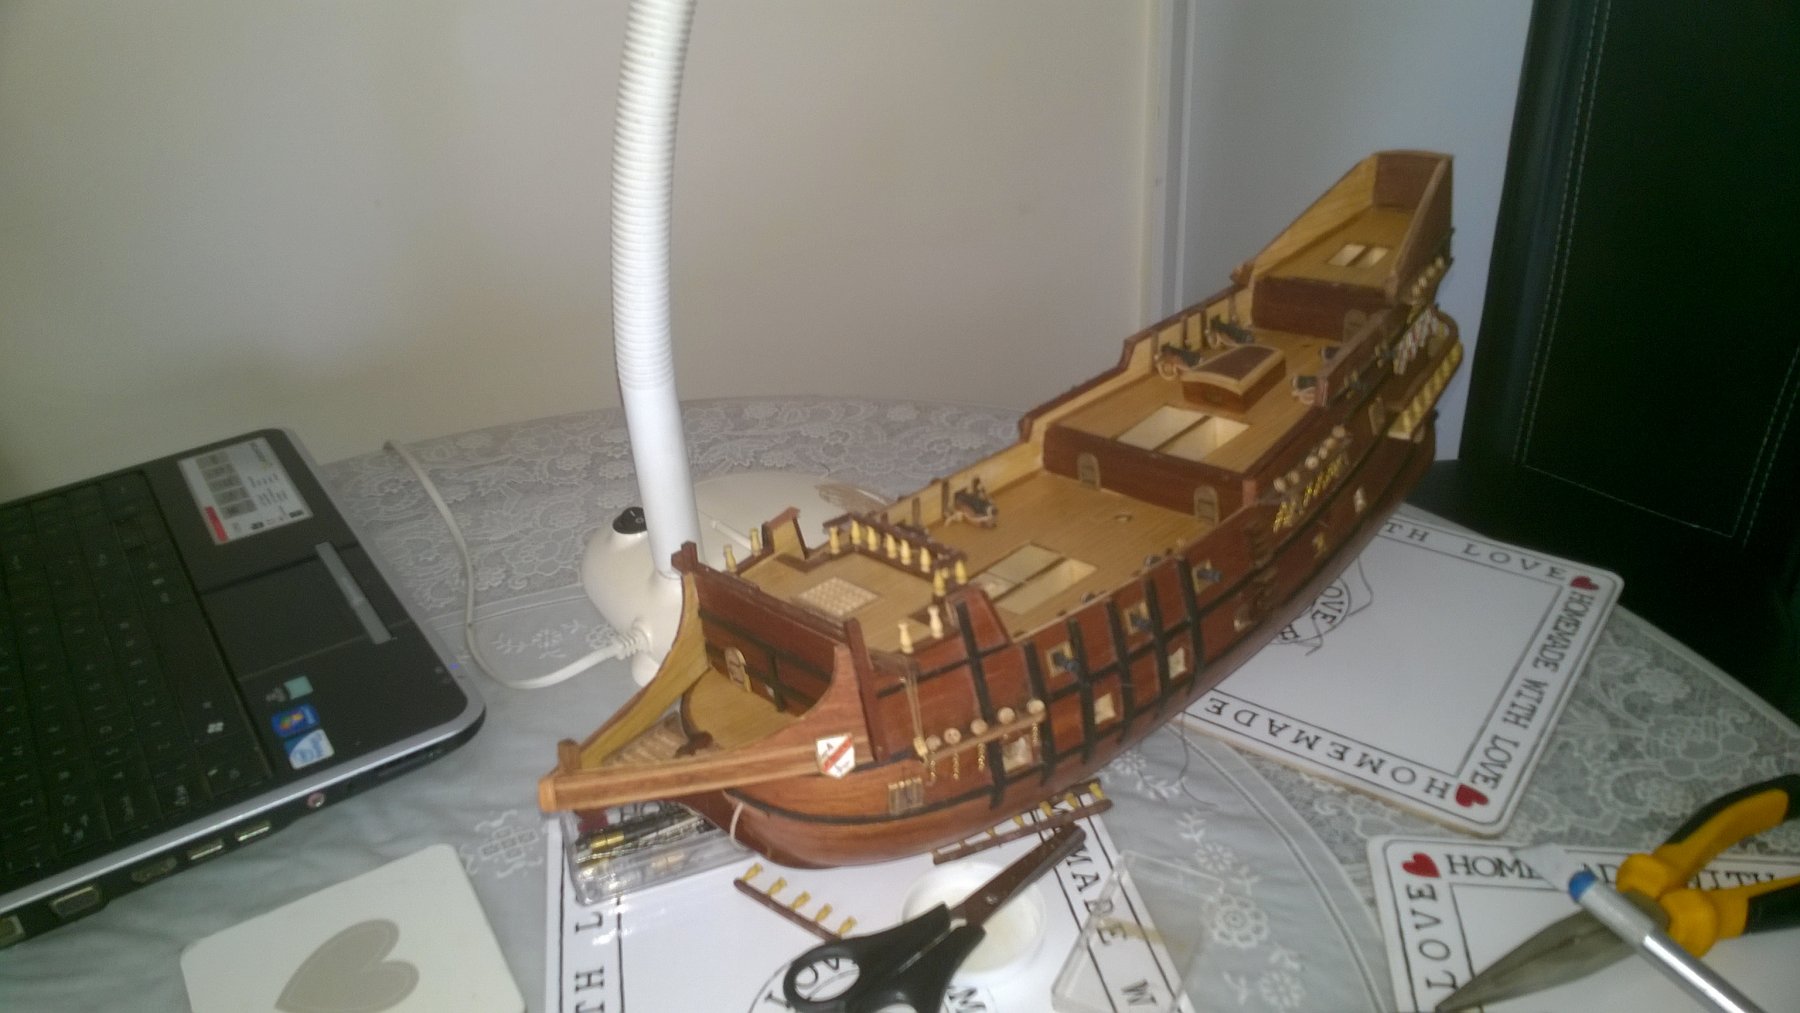
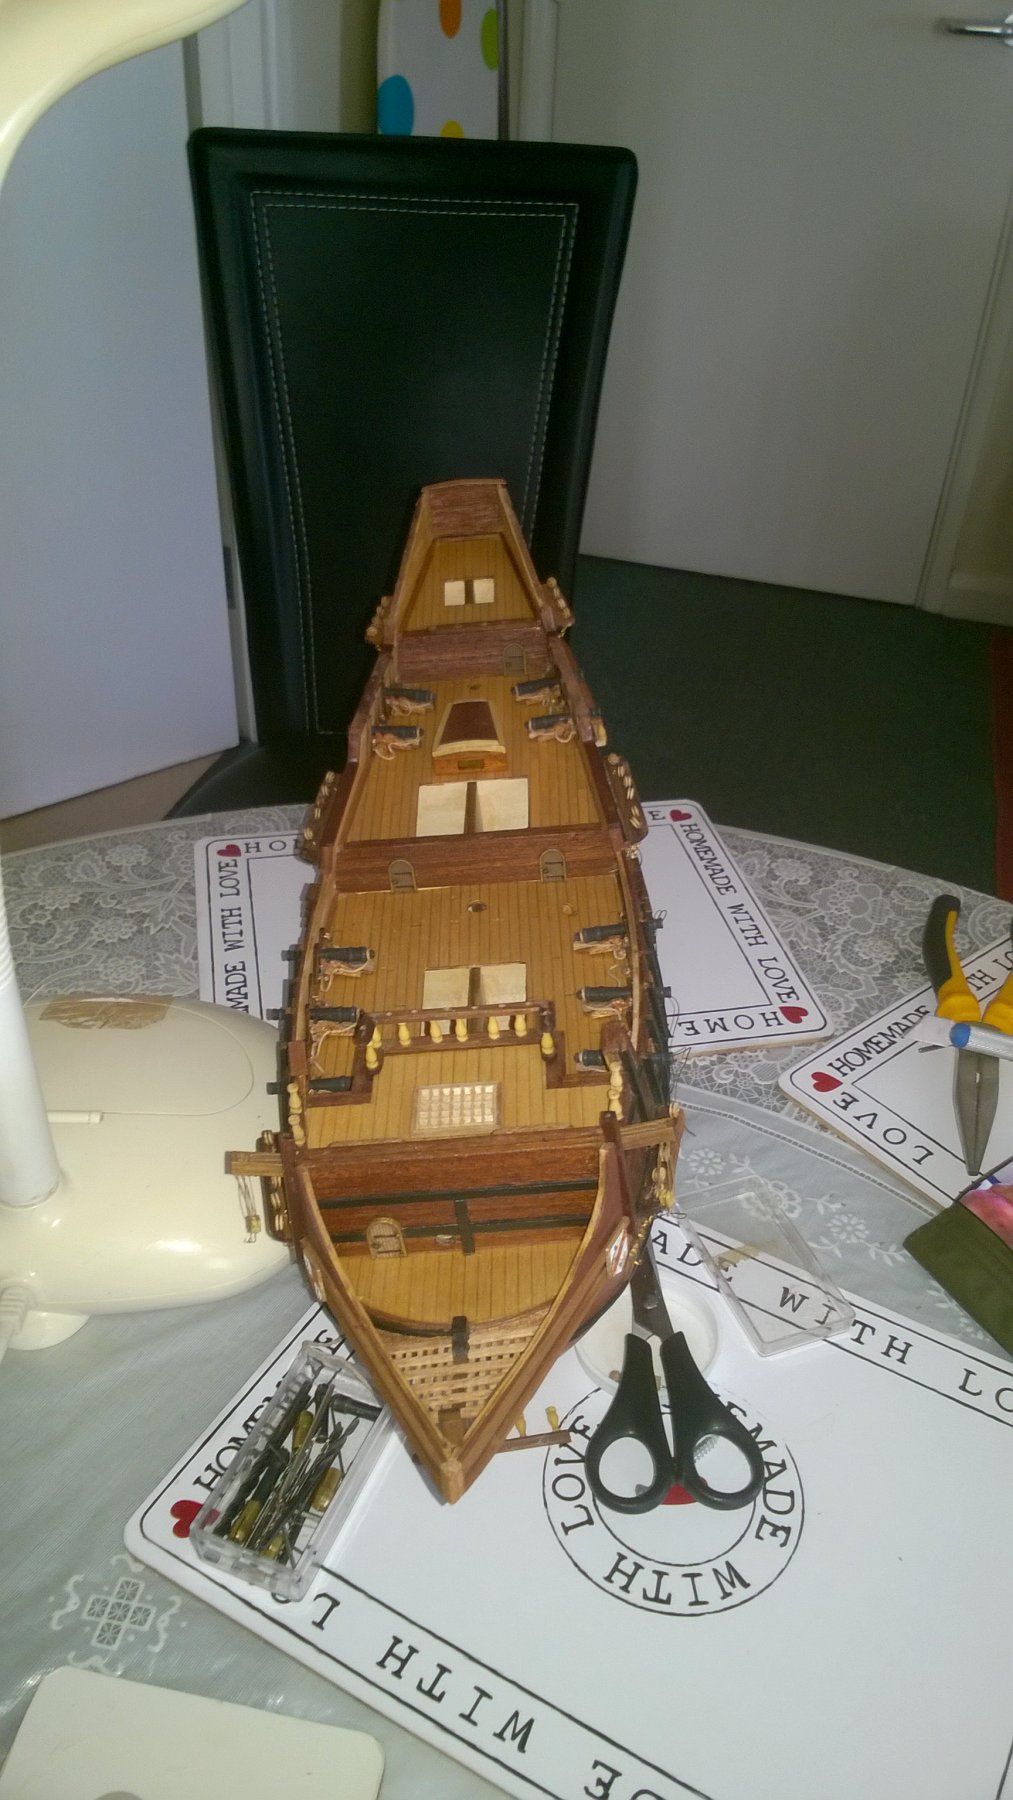
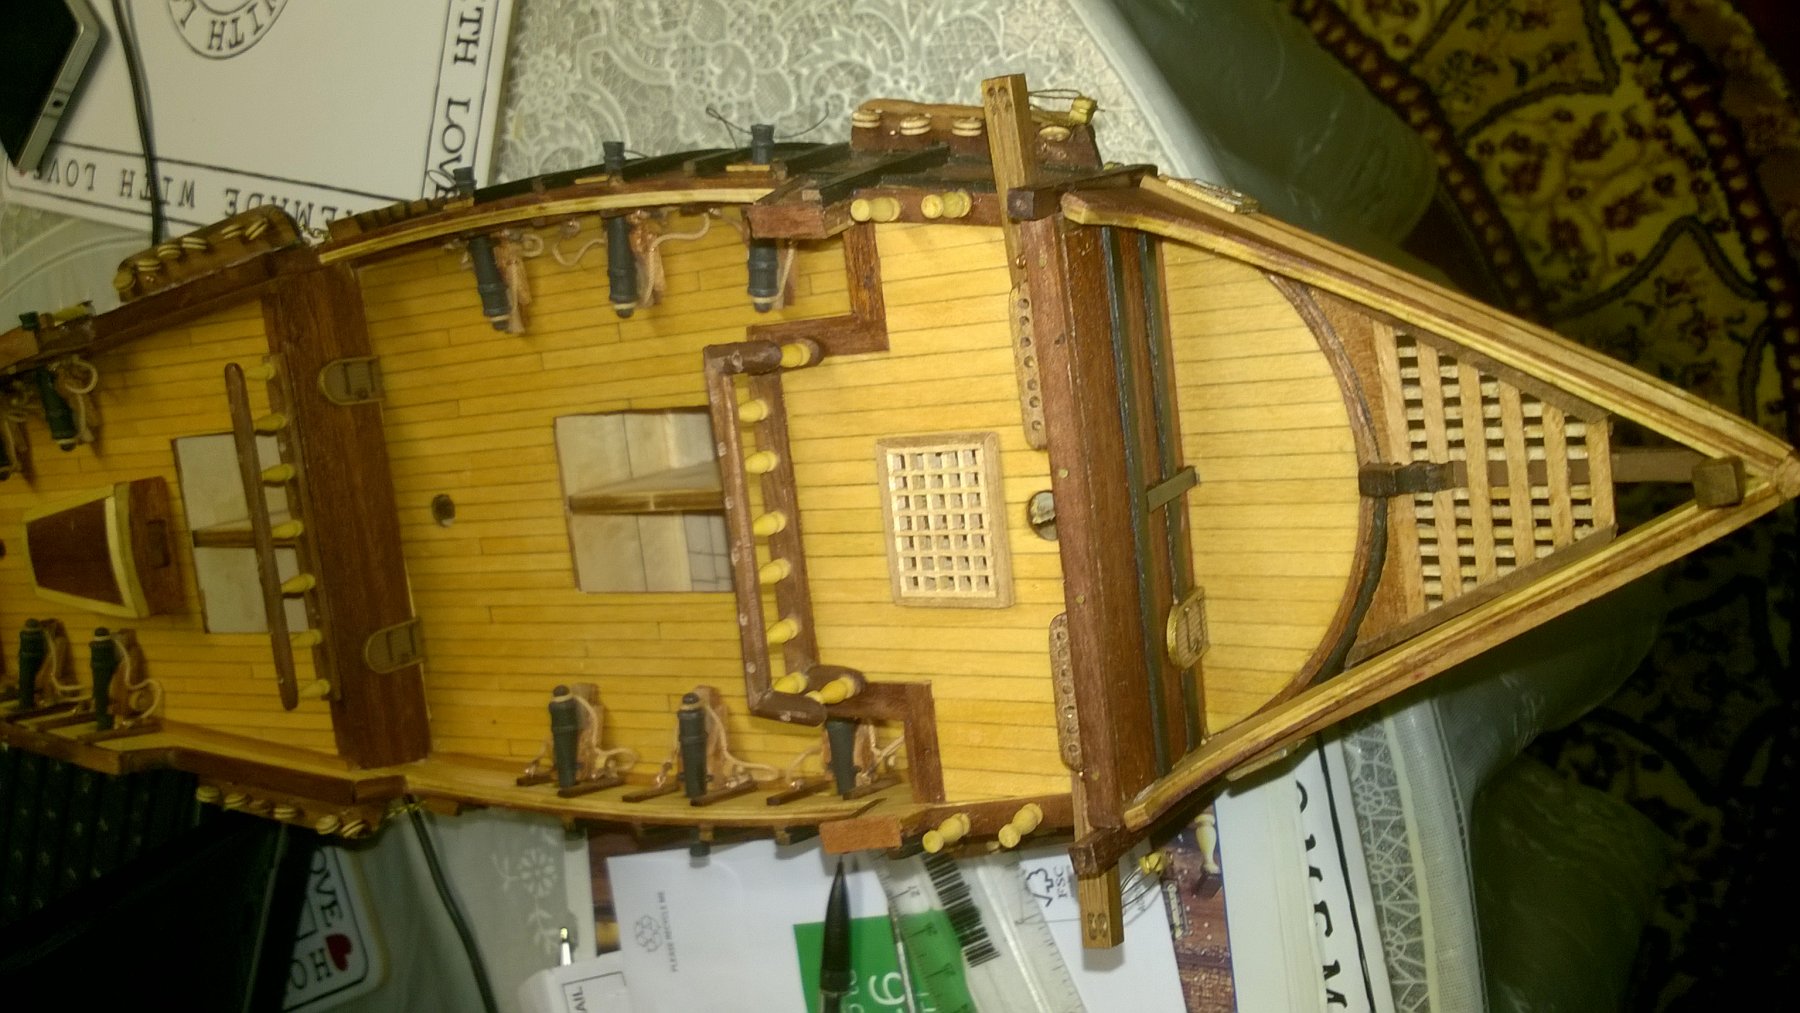
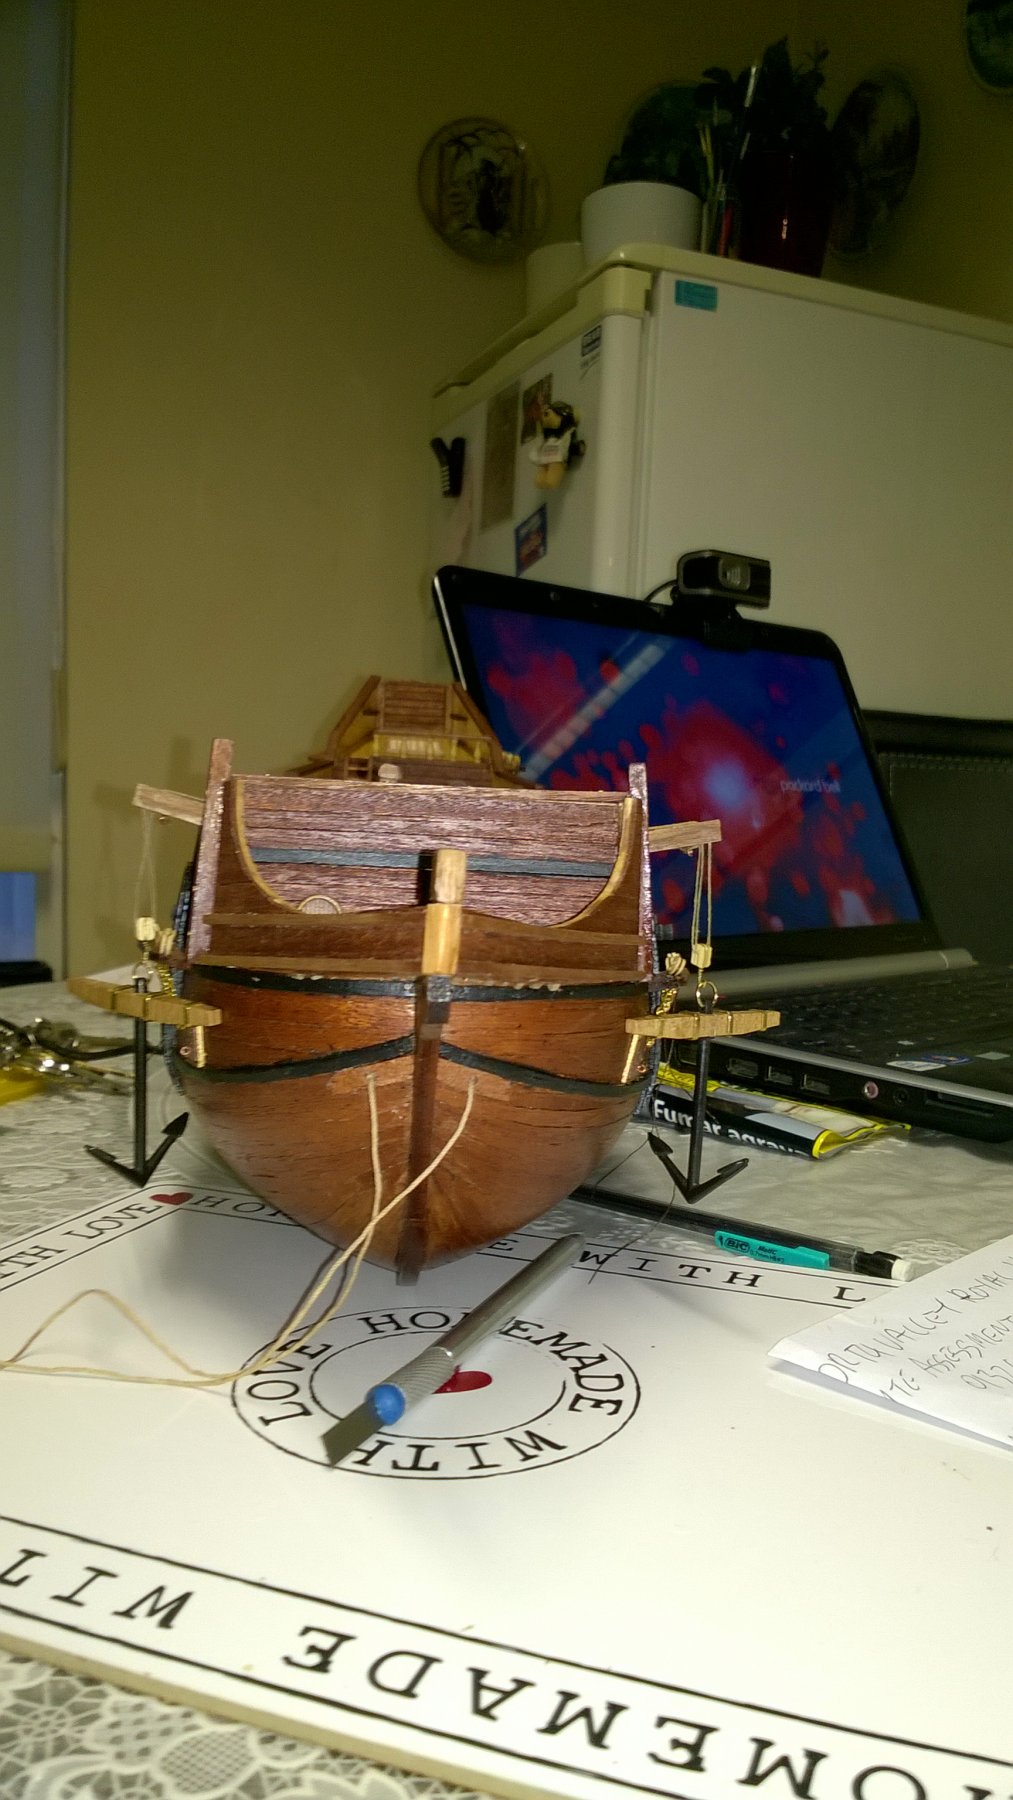
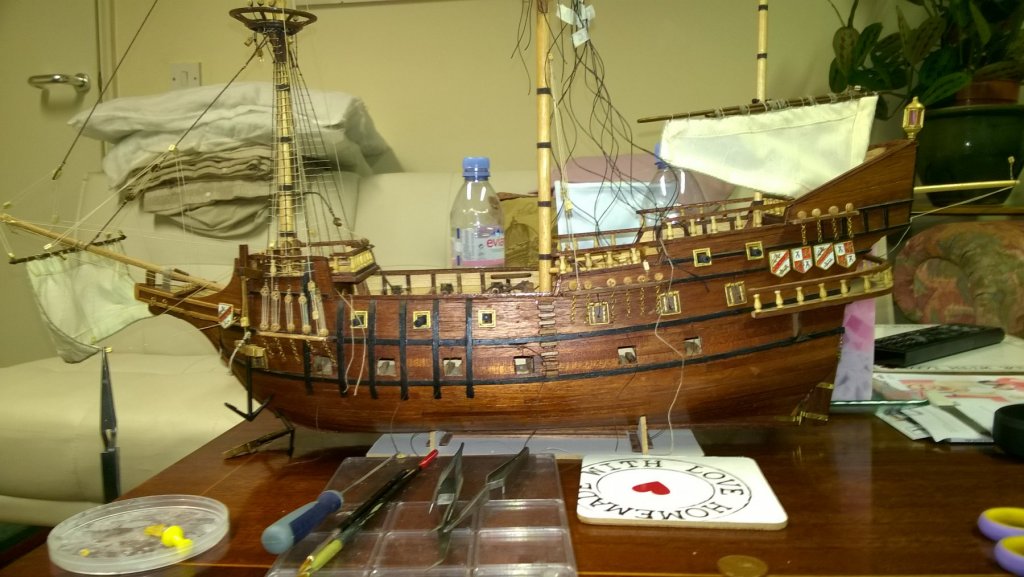
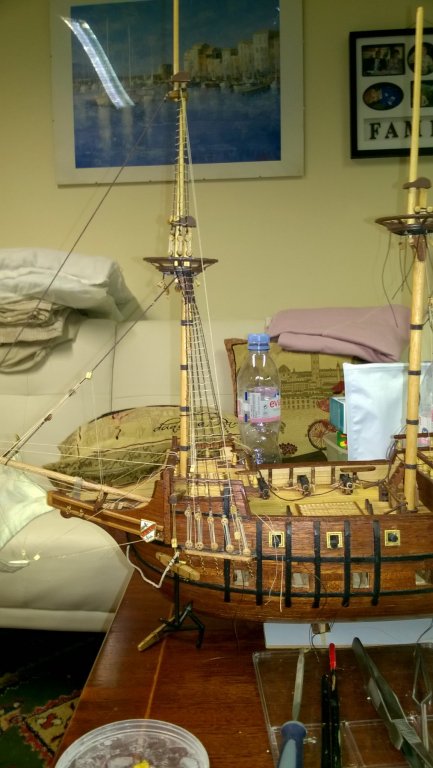
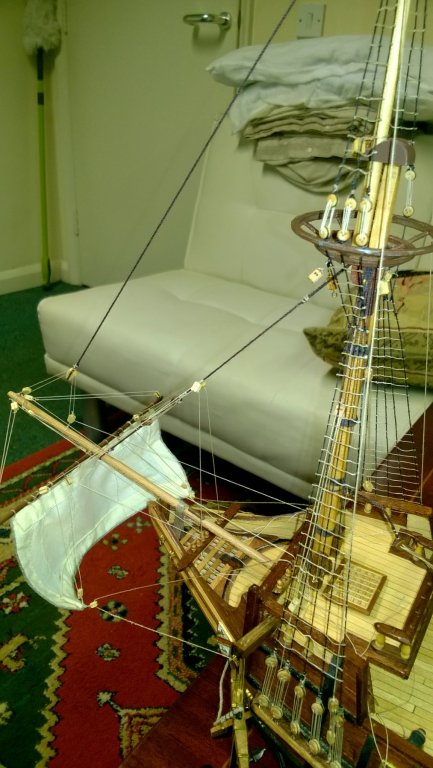
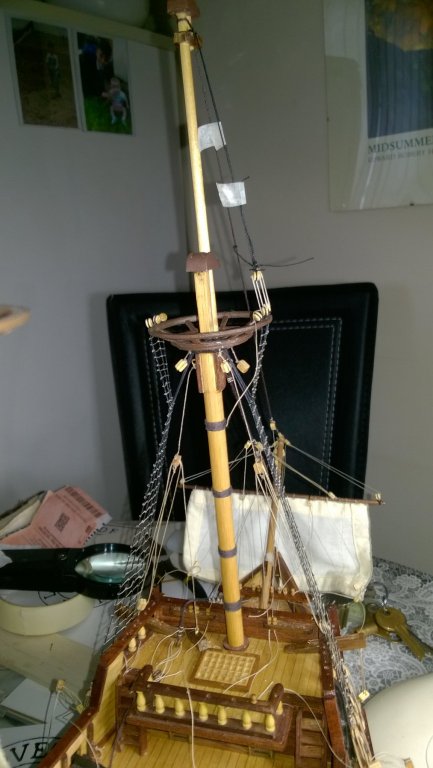
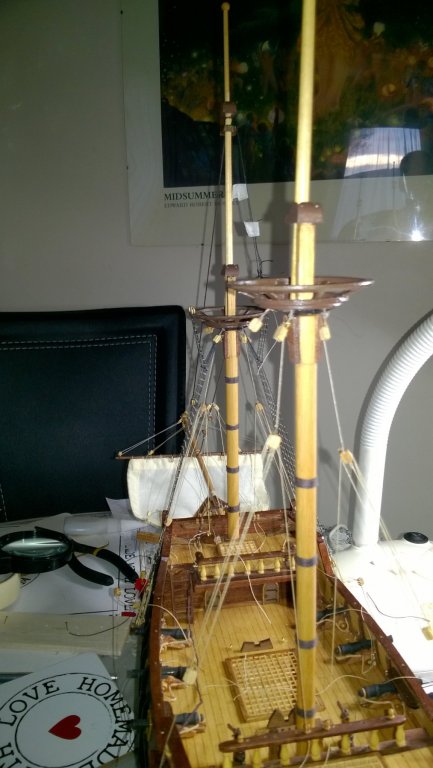
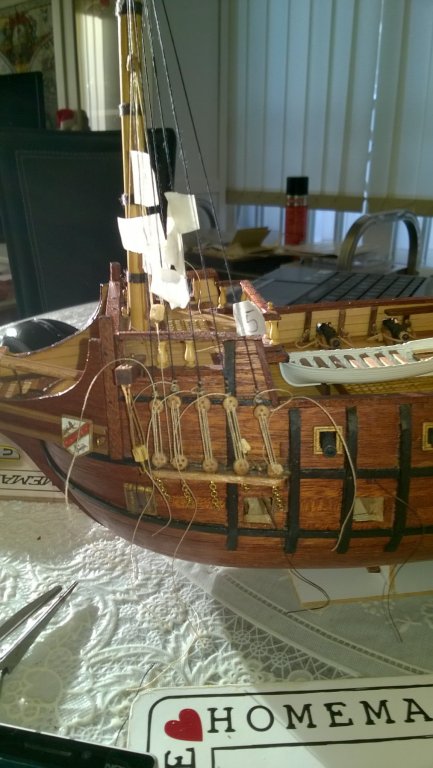
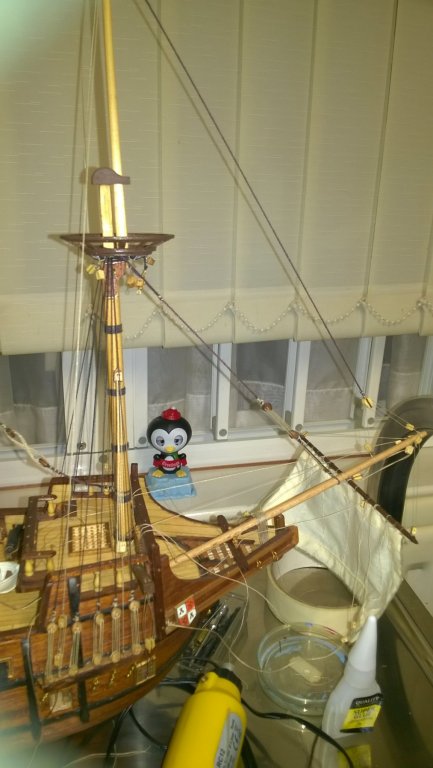
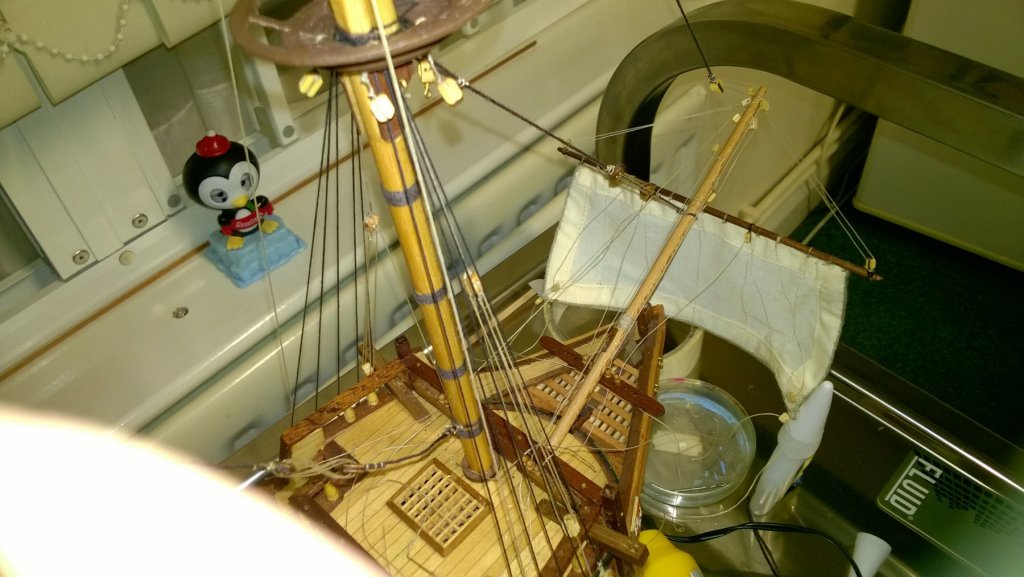
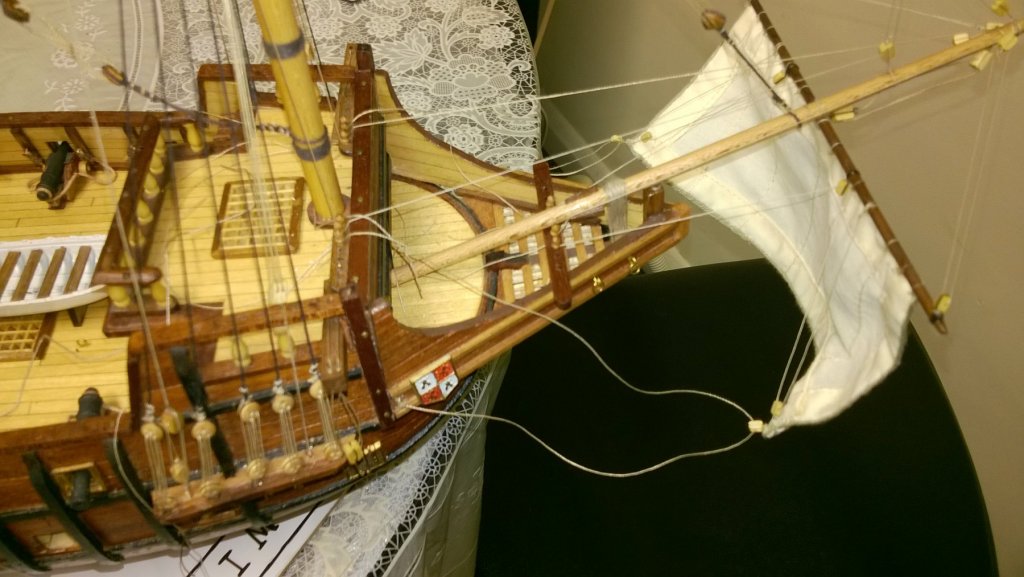
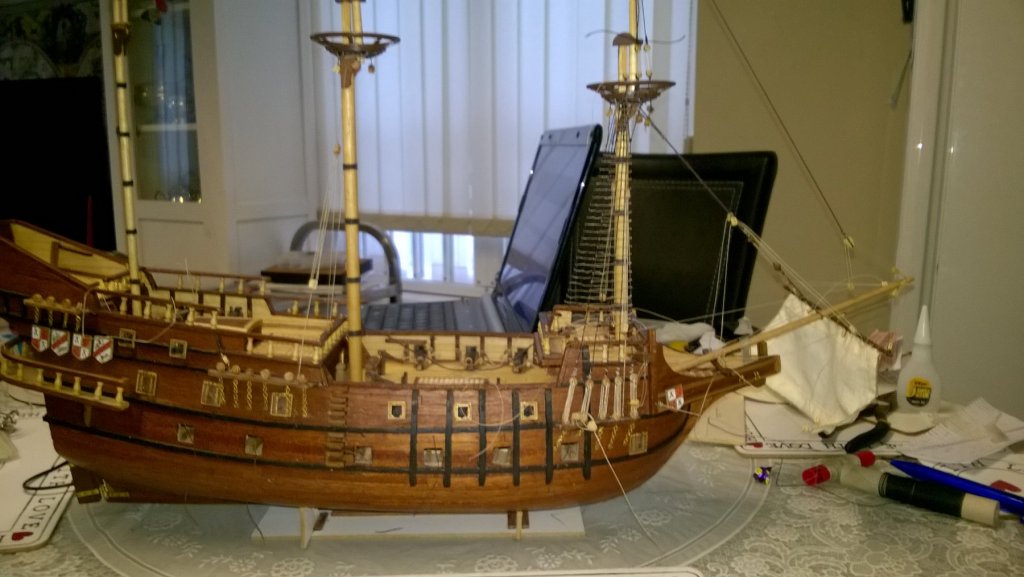
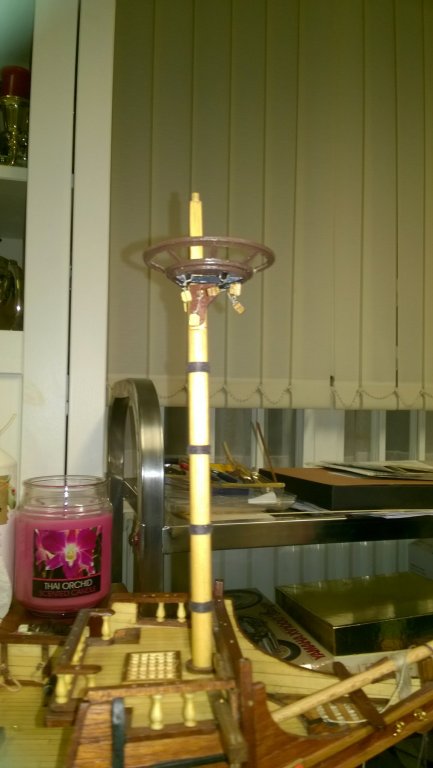
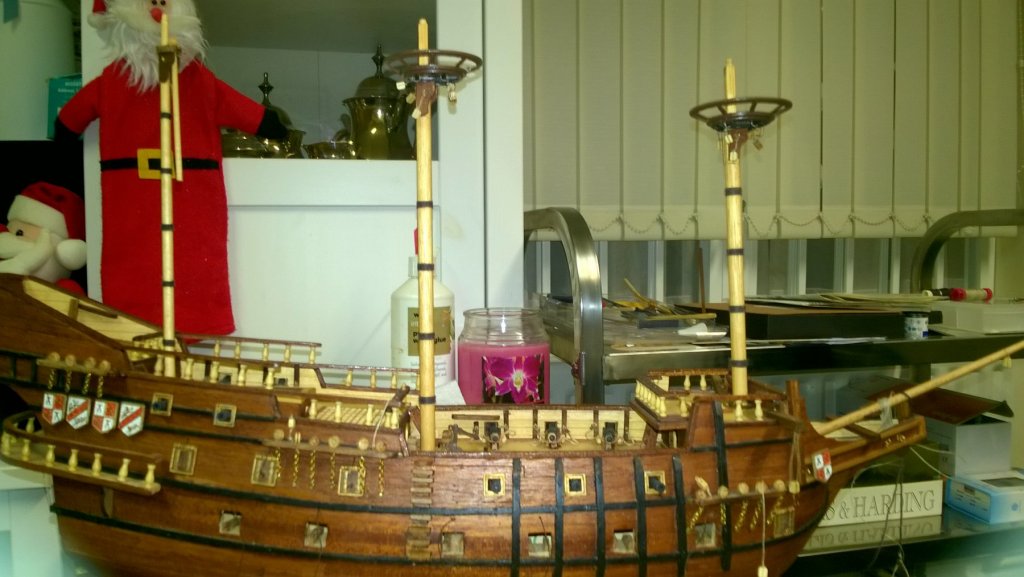
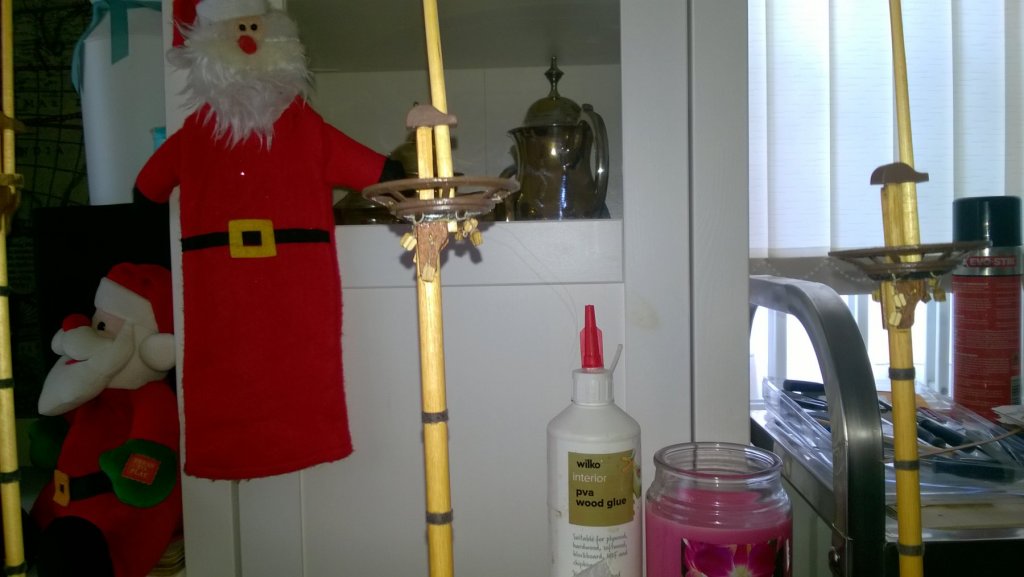
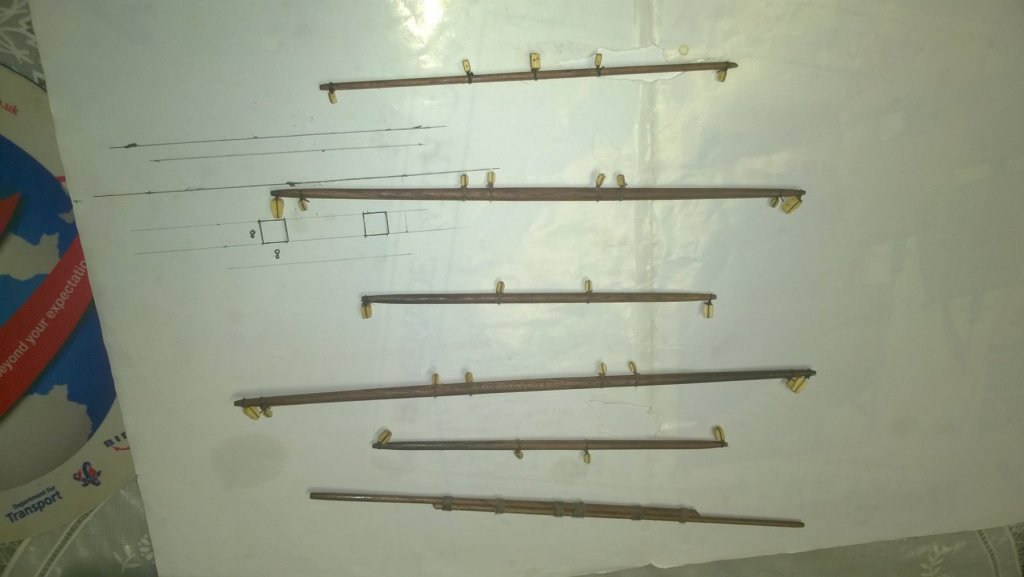
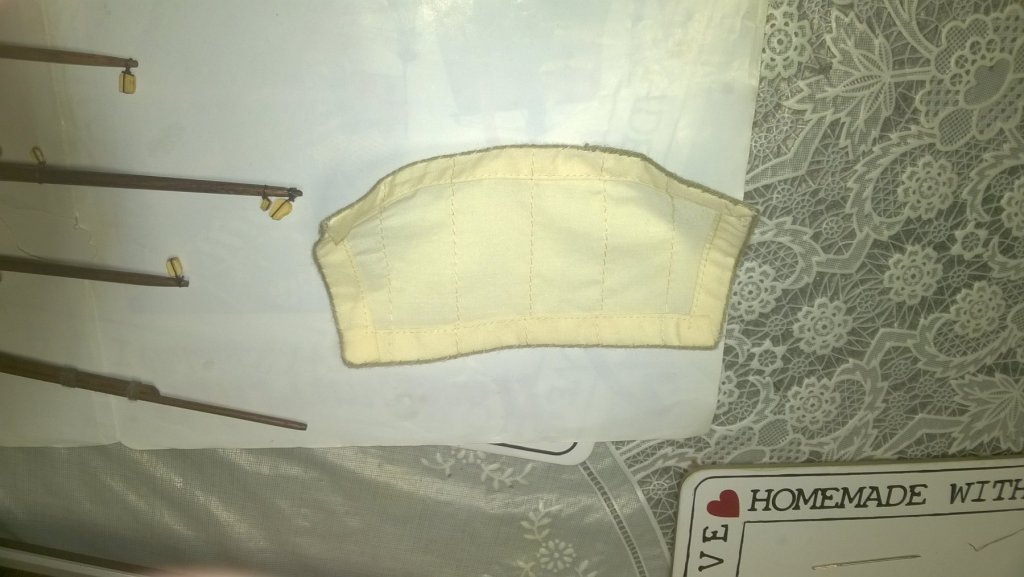
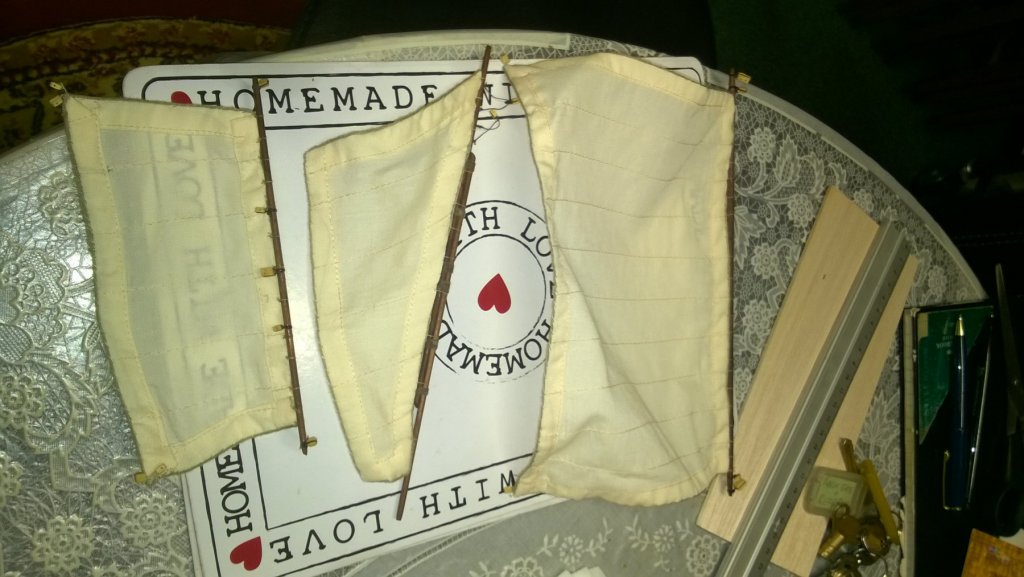
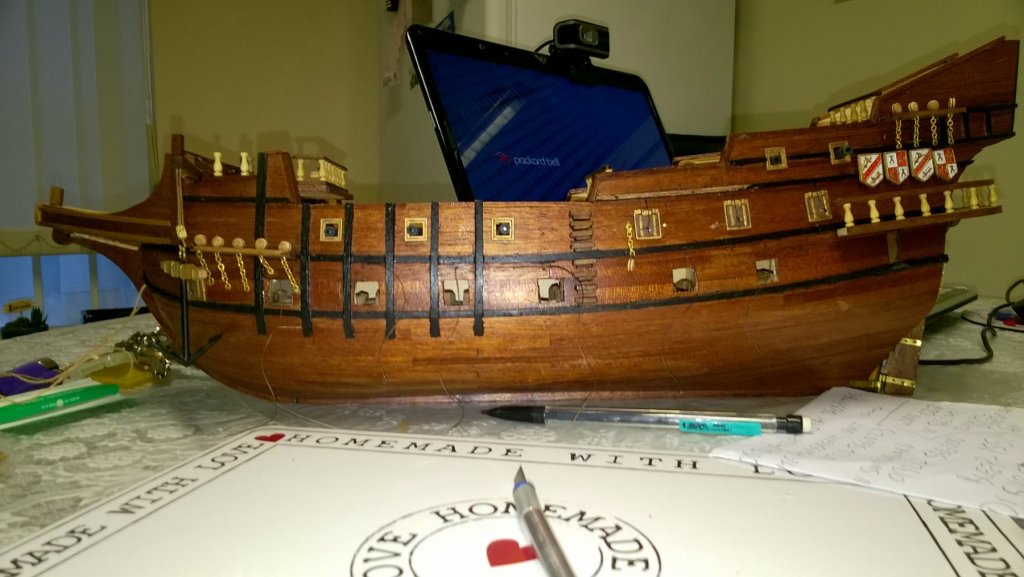
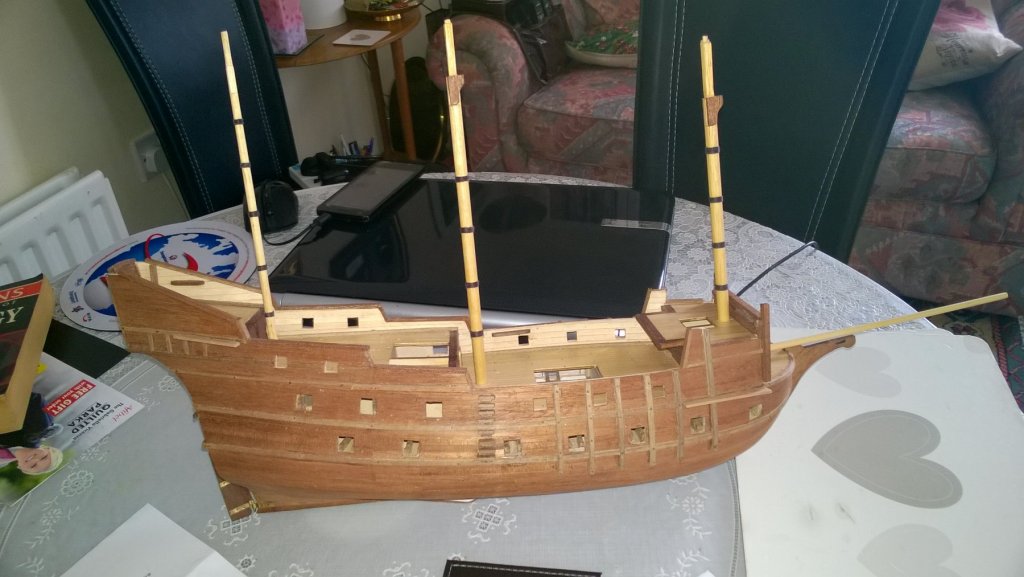
I finally bit the bullet and cut off the lanyards at the top and bottom of the shrouds as well as the on the crows nest. I have now re-done them but have got them a little tighter than they were. All going well the ratlines will look much better when I rig the tops now. This photo shows the original problem. Having redone the lanyards at the bottom of the shrouds I re did the upper shrouds. Over the last few evenings I have completed the ratlines on both sides of the fore mast but was not able to tighten the upper shrouds too much as the dead eyes were lifting off the crows nest slightly. I had tried attaching them to the crows nest but the holes I had drilled were not large enough for the knots used to tie the deadeyes to the shrouds. I have been able, however, to tie the deadeyes to the main mast crows nest so at least that one won't be as problematic. I ordered more 0.1 mm and 0.25 mm rigging thread along with what i hoped would be better gold paint. Humbrol and revell used to be good years ago but now their gold looks very dull and too yellow. These arrived mid week and I have been able to redo all the gun ports, lids and shields. I have left the door frames as they were as, without removing, them will be impossible to do. I have now completed rigging the bow sprit and sprit sail. I have dry fitted the lateen sail annd added the bitts to the fore deck. The next step will be ensuring I have everything in place before attaching the yards and sails to the fore mast. I found that the lateen sail has 10 parrel beads in the instructions but found that only using 9 fits better. I am expecting the yards to be similar.

- 68 replies
-
- 1
-

-
- san francisco ii
- artesania latina
- (and 1 more)
-
Thanks for your comments EJ. I really appreciate them. I thought the rigging was coming along ok too. Funny how everything looks good until you think you have finished. Need to decide now whether to leave it as it is or try to redo the top shrouds, or worst case scenario redo the whole thing. I prefer for it to look right rather than just ok. Will see how it goes over the weekend.
-
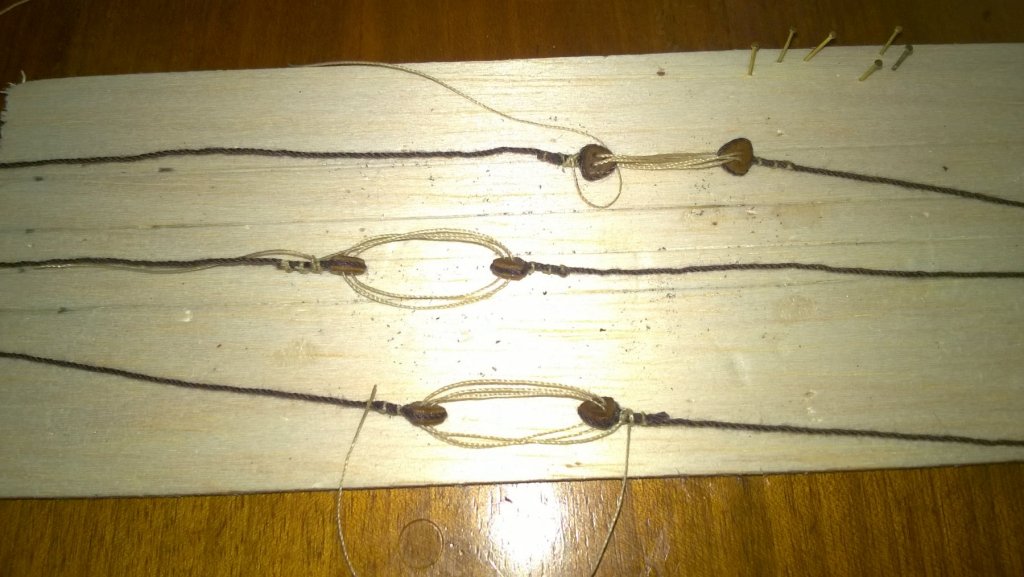
Once the shrouds had all been fitted I tightened them as much as I could with the halyards before tying them off. I then drew a series of lines 5 mm apart as a guide for the ratlines. I then worked my way up each side with 0.1 mm thread. After many attempts at tying clove hitches I gave up. This was mainly due to them unraveling and becoming half turns. I realize that the reason for clove hitches is to have the ratlines running straight but I found that as the thread is so thin it actually looked better this way. Once I was happy with the positioning I added a drop of super glue to each knot, and, Cut off the ends with a sharp knife. After I had added the shrouds to the crows nest dead eyes I noticed that the shrouds had not been as taught as I had thought and are noticeably lifted up and out from the top of the lower mast
- 68 replies
-
- 2
-
-
- san francisco ii
- artesania latina
- (and 1 more)
-
Finally I've returned with a progress update. I am still in the process of making the oars for the ships boat, however, over the last few weeks I've concentrated on rigging the fore mast and bowsprit. These can be rigged now as it wont affect the space between the fore and main masts. On the bowsprit I found that I needed to remove the rear most double block and tie it the center of the yard. on the drawings it was shown attached to the bowsprit. The fore top stay was also changed with the addition of a violin block and 2 double blocks. All the lines were put through the belaying pin holes and a pin tapped in to hold them in place. This will allow me to make any changes later.Once I am happy with their positions they will be glued in position. The yard and sail were then attached to the bowsprit and rigged ensuring the rigging lines did not obstruct each other. At this point I am not sure if my belaying points will be even similar to the plans though I am not sure they are accurate anyway. For me the main thing is that all the lines run freely and are symmetrical on port and starboard. I was not sure whether to rig the shrouds and rat lines before the yards were attached to the foremast or leave them til after After consideration I decided whichever I did first would still complicate the last so I started on the shrouds. As these were done I numbered each with small strips of masking tape.Attaching the dead eyes was really fiddly but I found that by tying 3 small bits of thread above the dead eyes I could maneuver them higher or lower without the dead eye falling out of the loop. I made up a jig using 2mm piece of wood and pinned the dead eyes in position and started to rig them However, I found that even with this they finished up being slightly uneven.


- 68 replies
-
- 2
-
-
- san francisco ii
- artesania latina
- (and 1 more)
-
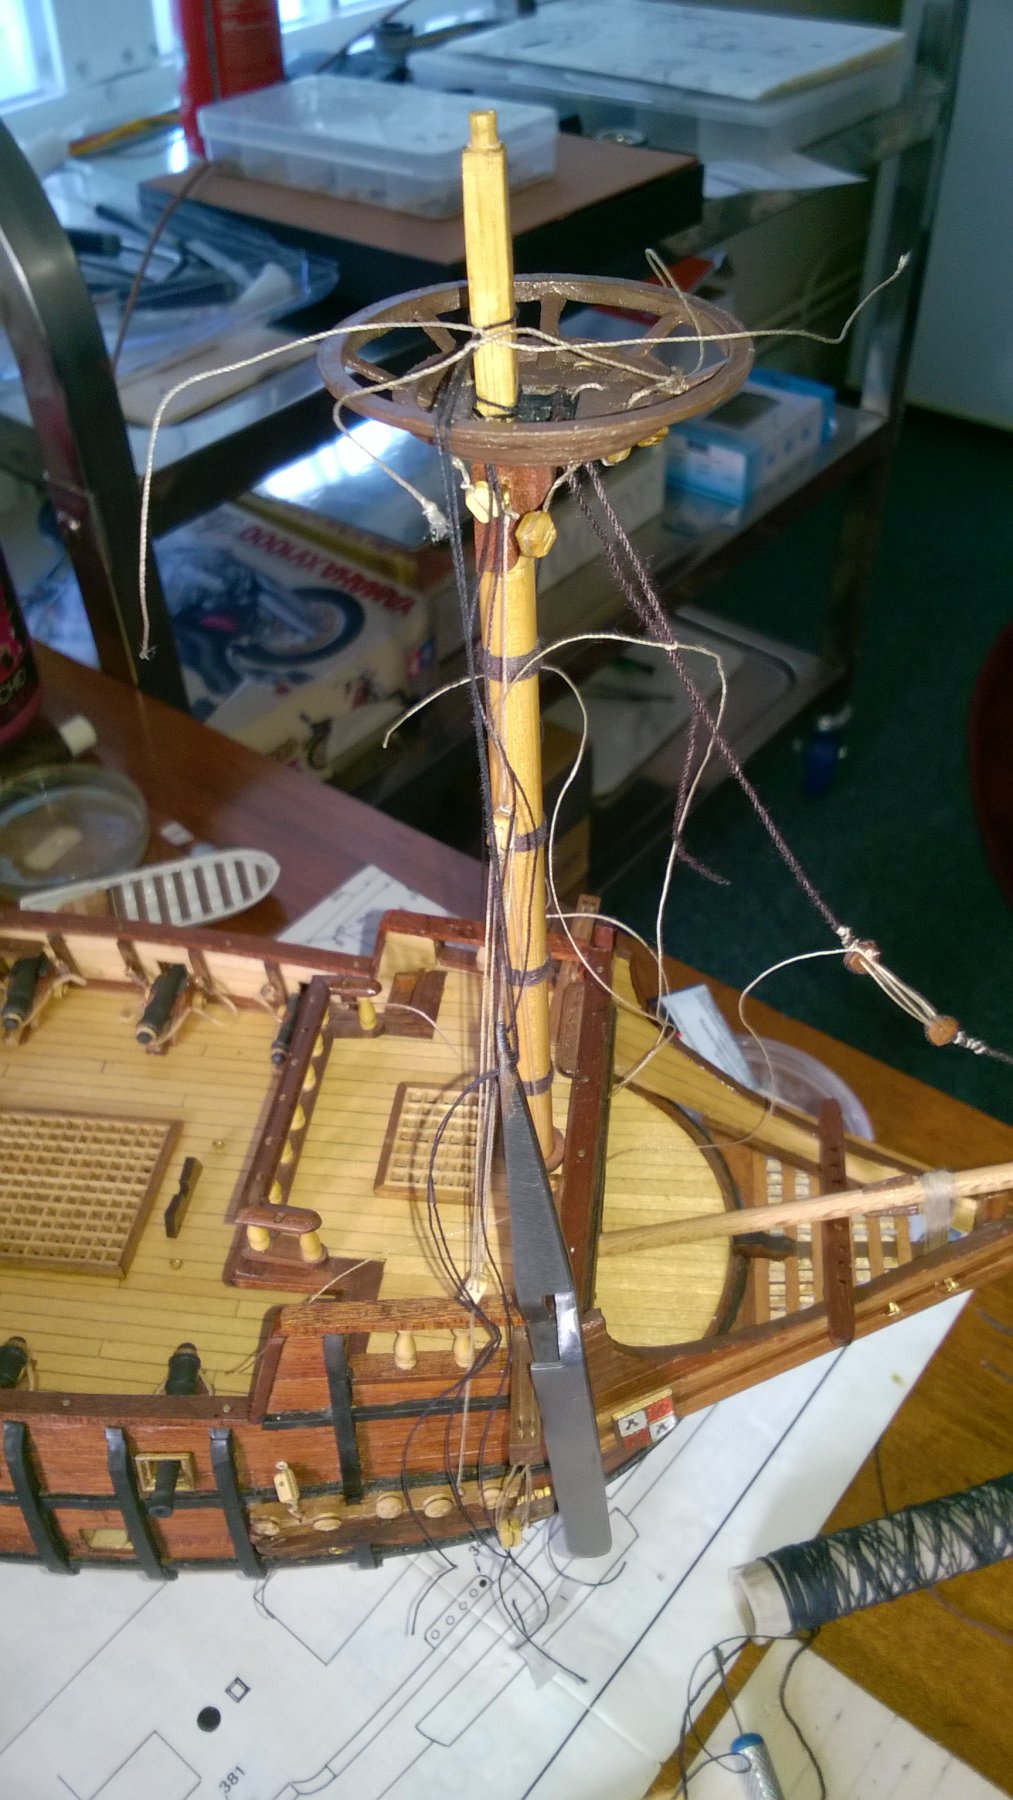
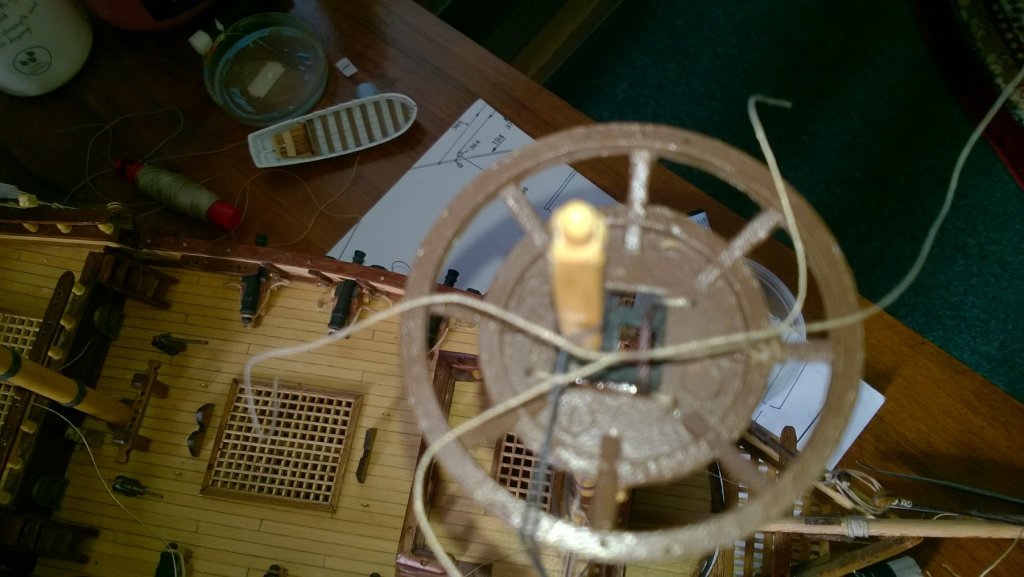
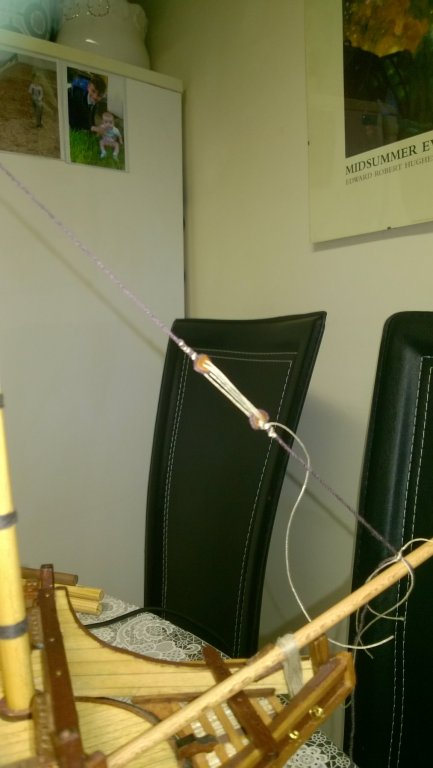
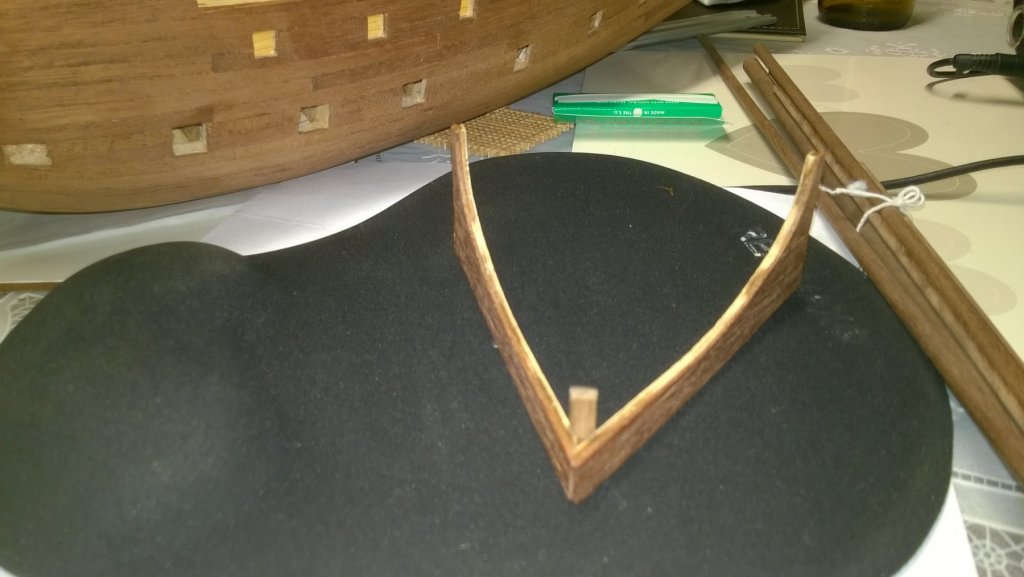
I have now knocked up a decent base to at least hold the ship in position. I still need to finnish off the boat. The oars are holding me up. I have decided to start on the rigging The instructions for this stage, both in the book and the plans are pretty much hopeless other than a very basic guide. I am attempting to combine ideas from previous posts, (Shaz, Vulcan Bomber and Desertwolf especially. Thanks in advance to you guys even after so many years. My ship won't quite be up to your standards but will still look good I think.) I am also incorporating the rigging plans from Mamoli's Golden Hind. along with AL's. I have put together the main stays. When dry fitting the main stay to the bowsprit I have found the fore mast is in the way. I am not sure if this is my fault or not. However I have decided to Have the stays running from the fore mast to the bowsprit and have the main mast running down to the fore mast. I have also drilled 5 holes in the crows nest and tied a block through each of them. 2 double block fore and 2 single block aft. The double block for the yard tackle has been added in the middle hole. I also have an eye pin inserted in each of the cheeks which will have a single block with an eye to run the line from the channels up to, and down to the deck. The parrels have been made up but I am not sure whether to fit the yards with sails before the shrouds(which looks like will complicate adding the rat lines. Or fit the shrouds and rat lines which will complicate rigging the yards to the masts. I will try dry fitting both and see which way is best.

- 68 replies
-
- 1
-
-
- san francisco ii
- artesania latina
- (and 1 more)
-
Hi Warnerade. Just come across your build log. Sorry if I forgot to say hi to your addition to my post a while ago. I am still reading up on techniques for future reference as well as finding out what I could have done better. Firstly I kind of wish I had waited 2 years before choosing this kit as a present. I have wasted many months figuring out how to make the gun carriages never mind the boat and the channels. Like Y.T. mine were very crude metal. The photo etch parts, pre-made channels etc kit parts look so much better now. Building my kit in the living room wasn't a great idea either, too many distractions never mind on-call interruptions. You seem to have made good progress with the planking. My version came as single plank hull using 2 X 5mm strips. Luckily I had plenty of 1 X 5mm strips to double plank instead. Even 1.5 mm lime was hard to bend and shape on my first build. If you find you need to change your mind you will find it a lot easier with 1mm thickness doubled. Your ships boat does look very impressive. I didn't use any wood stain or oil on my build. I have only added a coat or two of varnish. Good luck with the rest of your build. I look forward to seeing how she progresses.
-
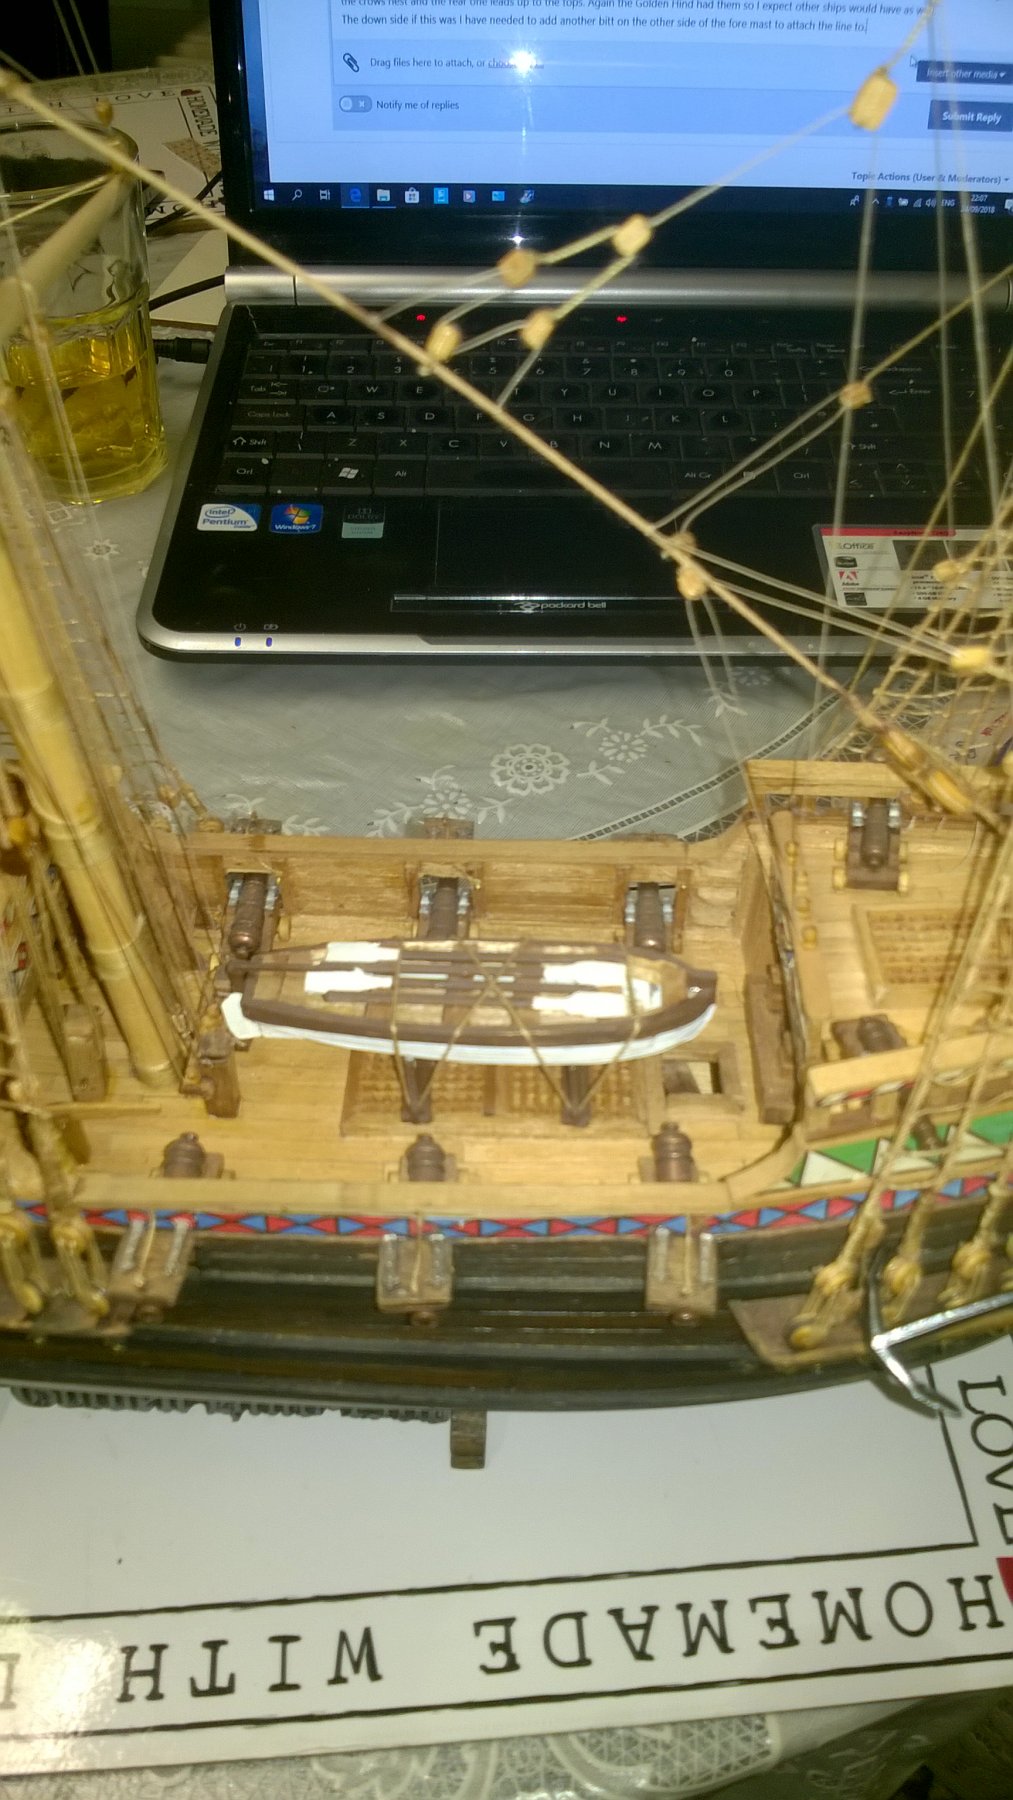
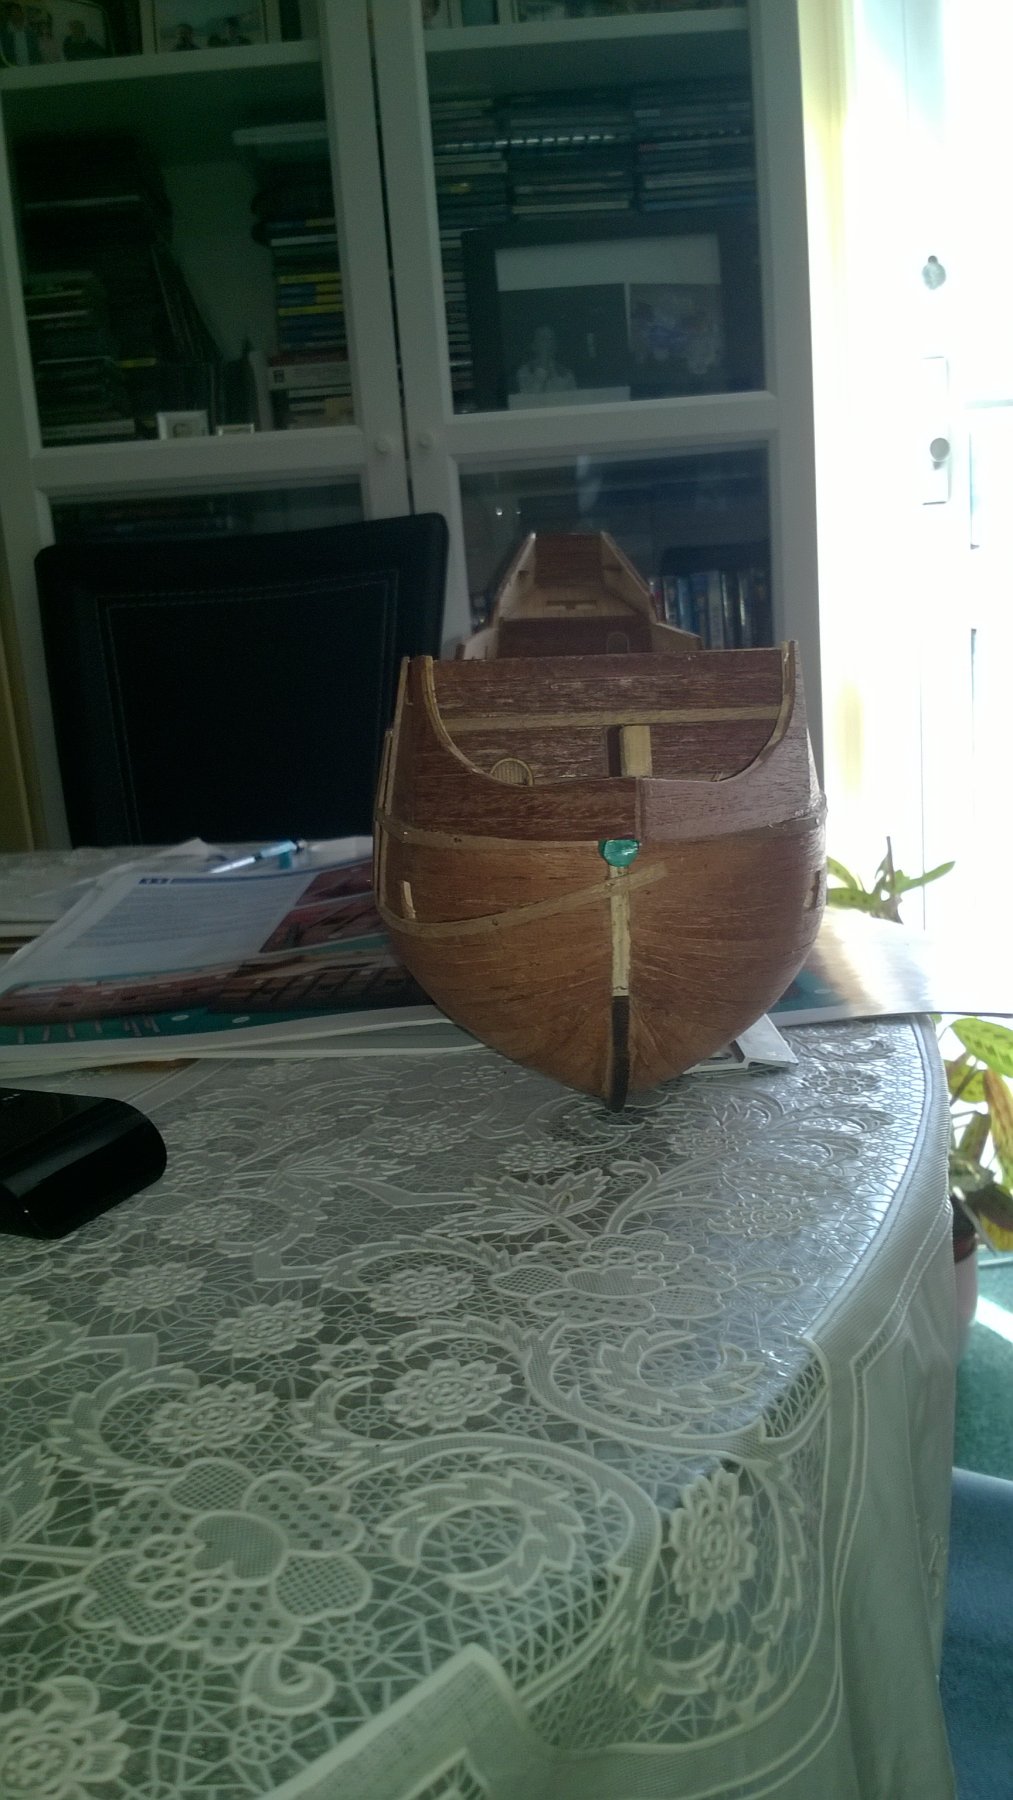
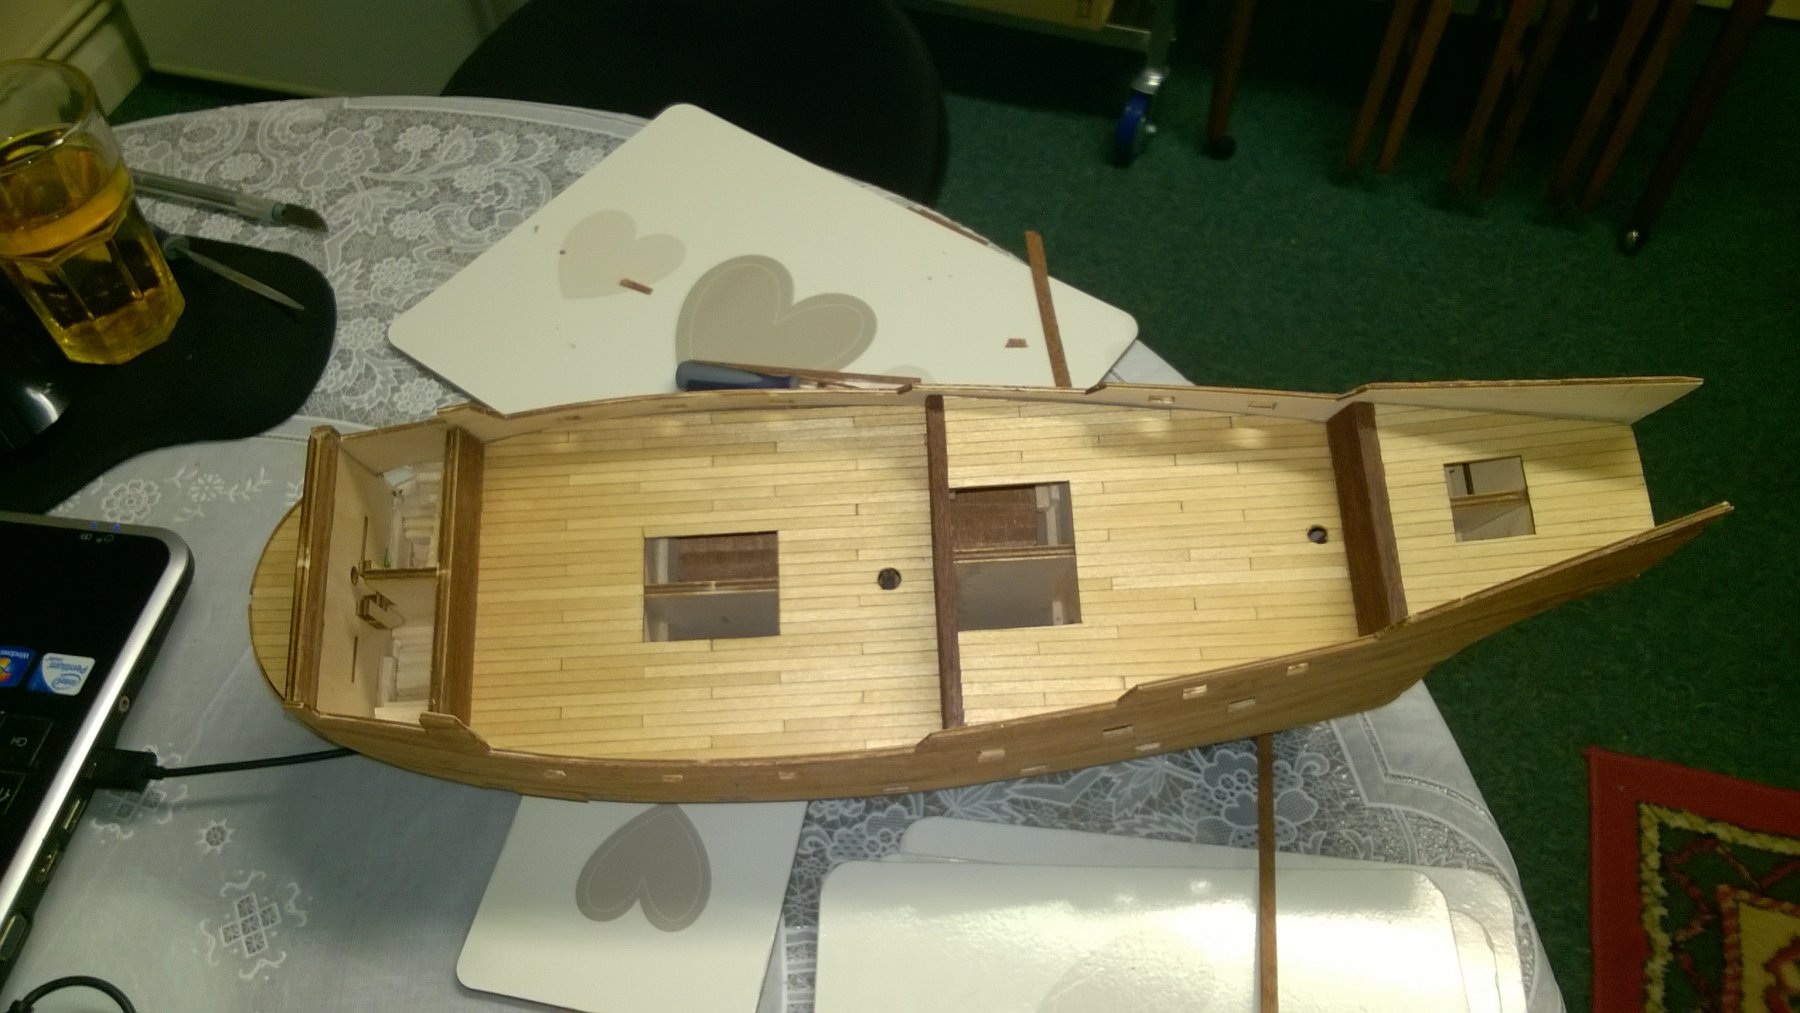
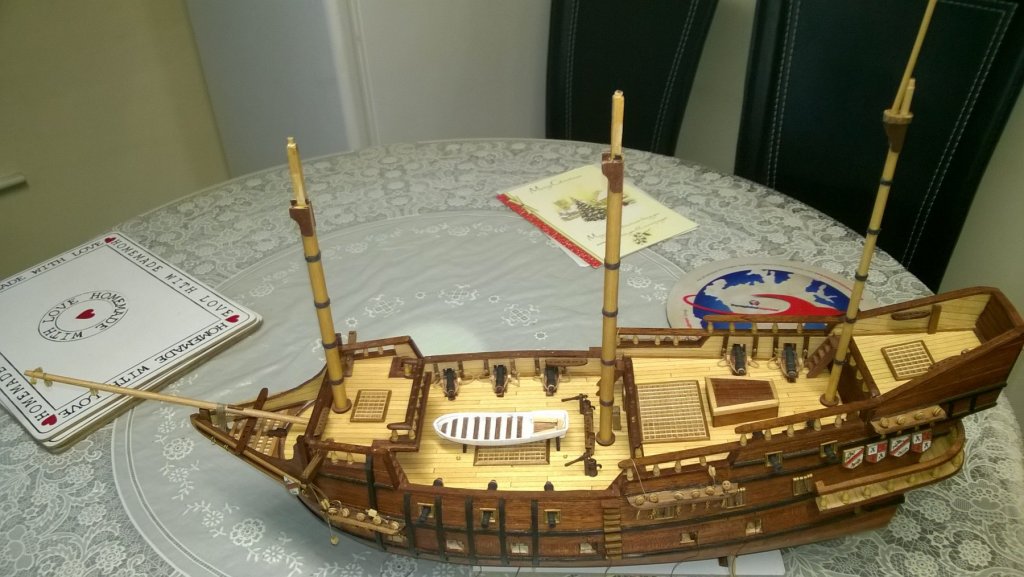
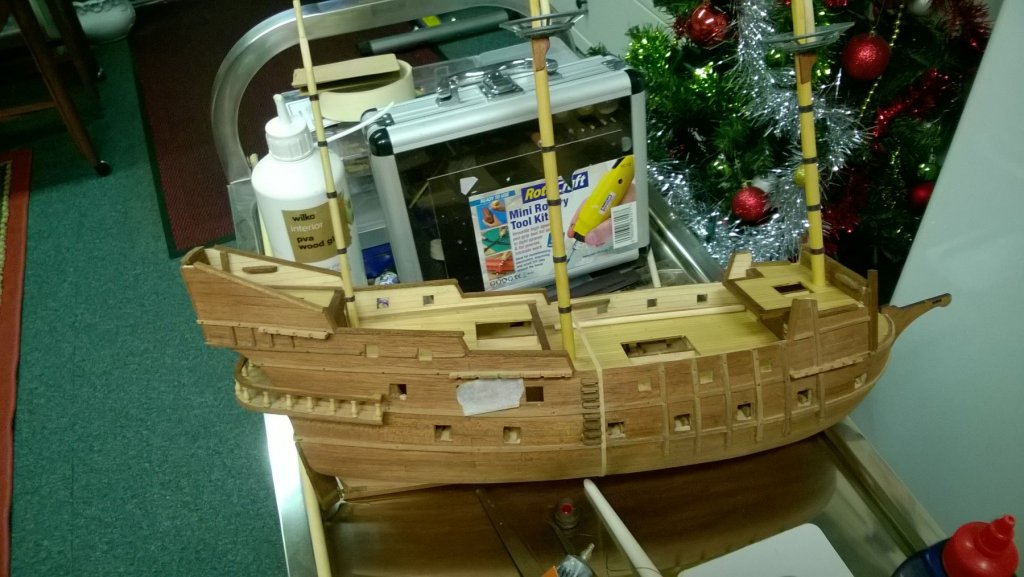
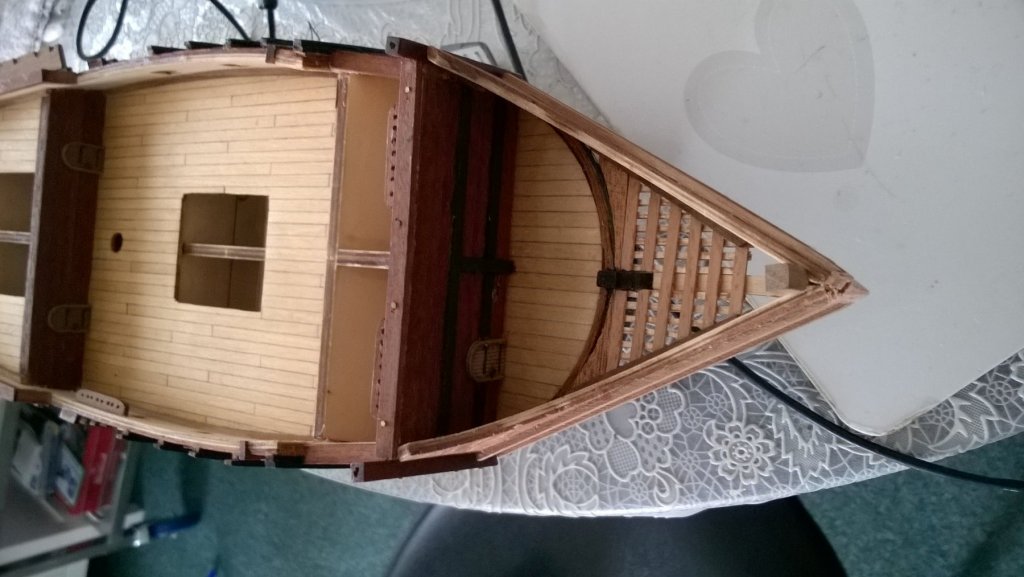
By the end of October I had finally managed to complete the hull. However, we thought we were going to have to move on November the 5th. Everything was boxed up ready to go and then found out we would be staying for a while longer. Everything is now unboxed again and I can show the progress. The masts and yards have been constructed but not yet stuck together. I have also mounted the sails to the yards. I have insurted thin brass wire into the seams using a needle. This seems to give the sails a realistic look I think. I have decided to replace the ships boat with an Amati 90mm version which looks much better when placed on the deck. The bitts are still not glued in place as I am hoping to partially rig them after dry fitting the masts. Trying to tie line onto them with the masts in place will be too troublesome. I will see if this works out or not over the next couple of months. Before attempting any rigging I want to construct a firm base to hold the ship in place. The boat will also need to be finished and fitted before then.


- 68 replies
-
- 1
-
-
- san francisco ii
- artesania latina
- (and 1 more)
-
I forgot to mention that the top of the rubbing strakes were filed to a curve before I added the rails. and also the bitts have been added but temporarily as I may need to rig them prior to fitting permanently. The modified bowsprit deck has also now been added. The bowsprit pin rack is also now attached.
- 68 replies
-
- 1
-
-
- san francisco ii
- artesania latina
- (and 1 more)
-
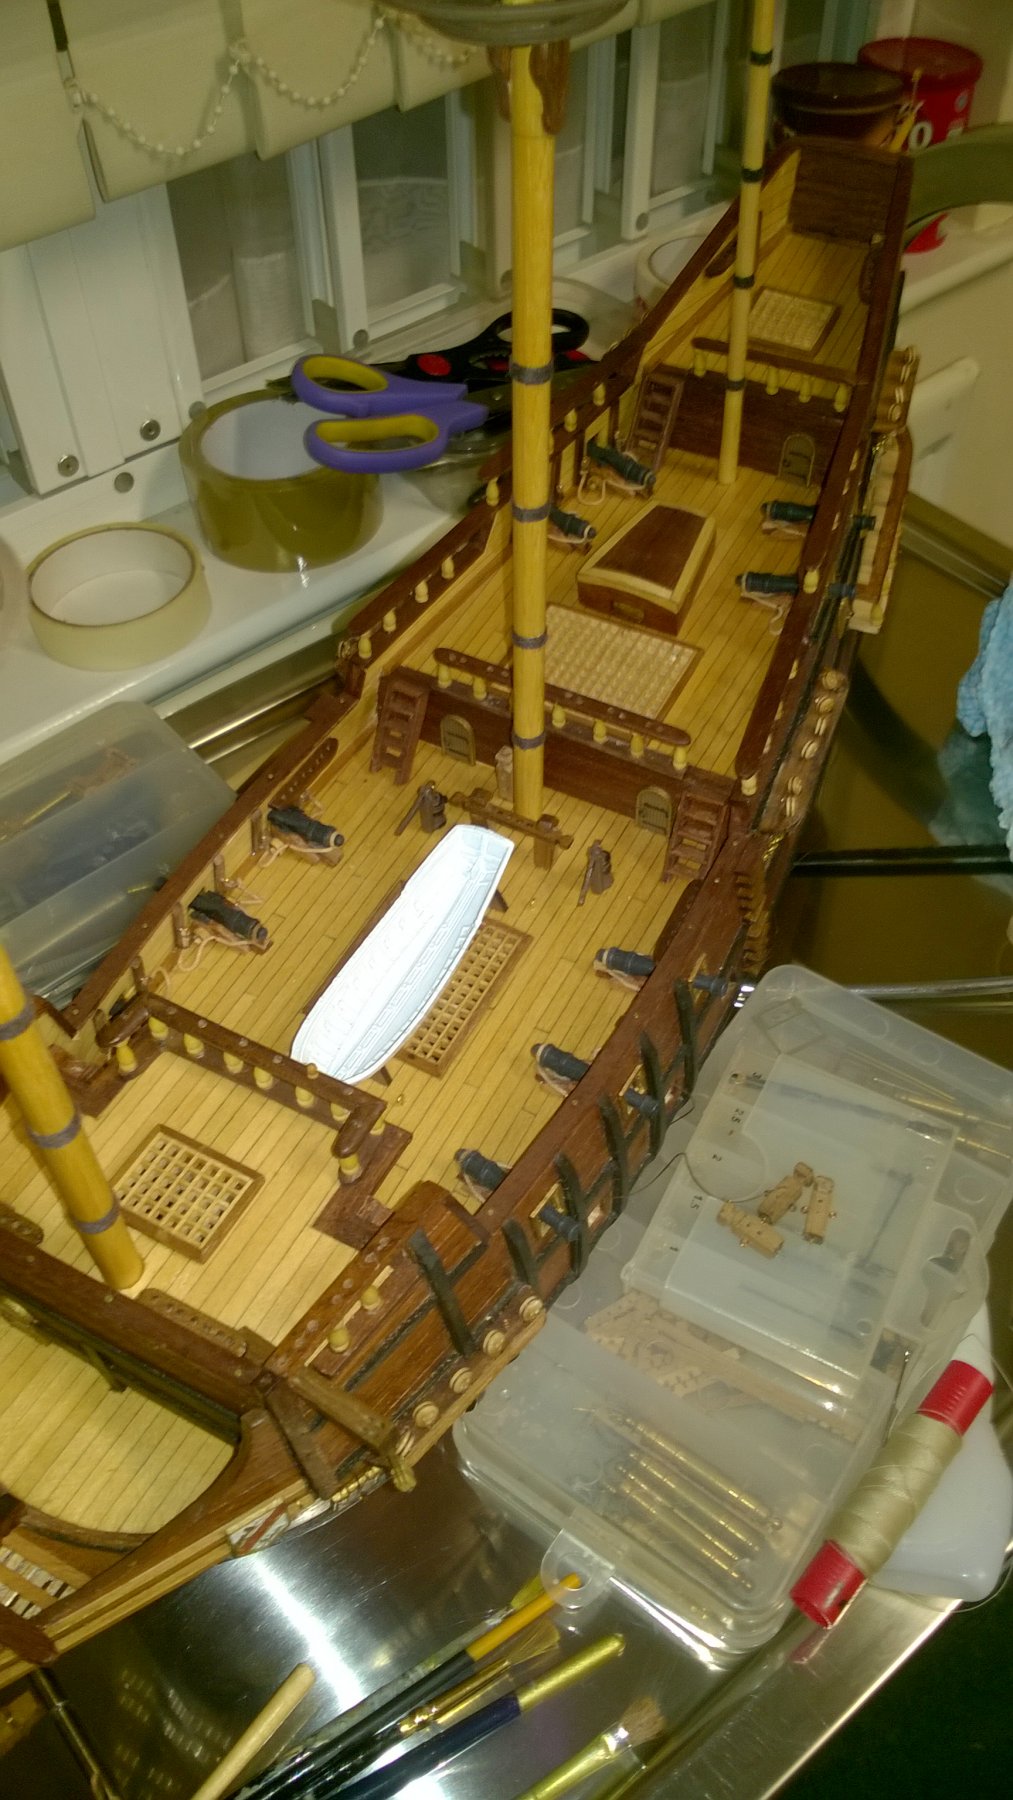
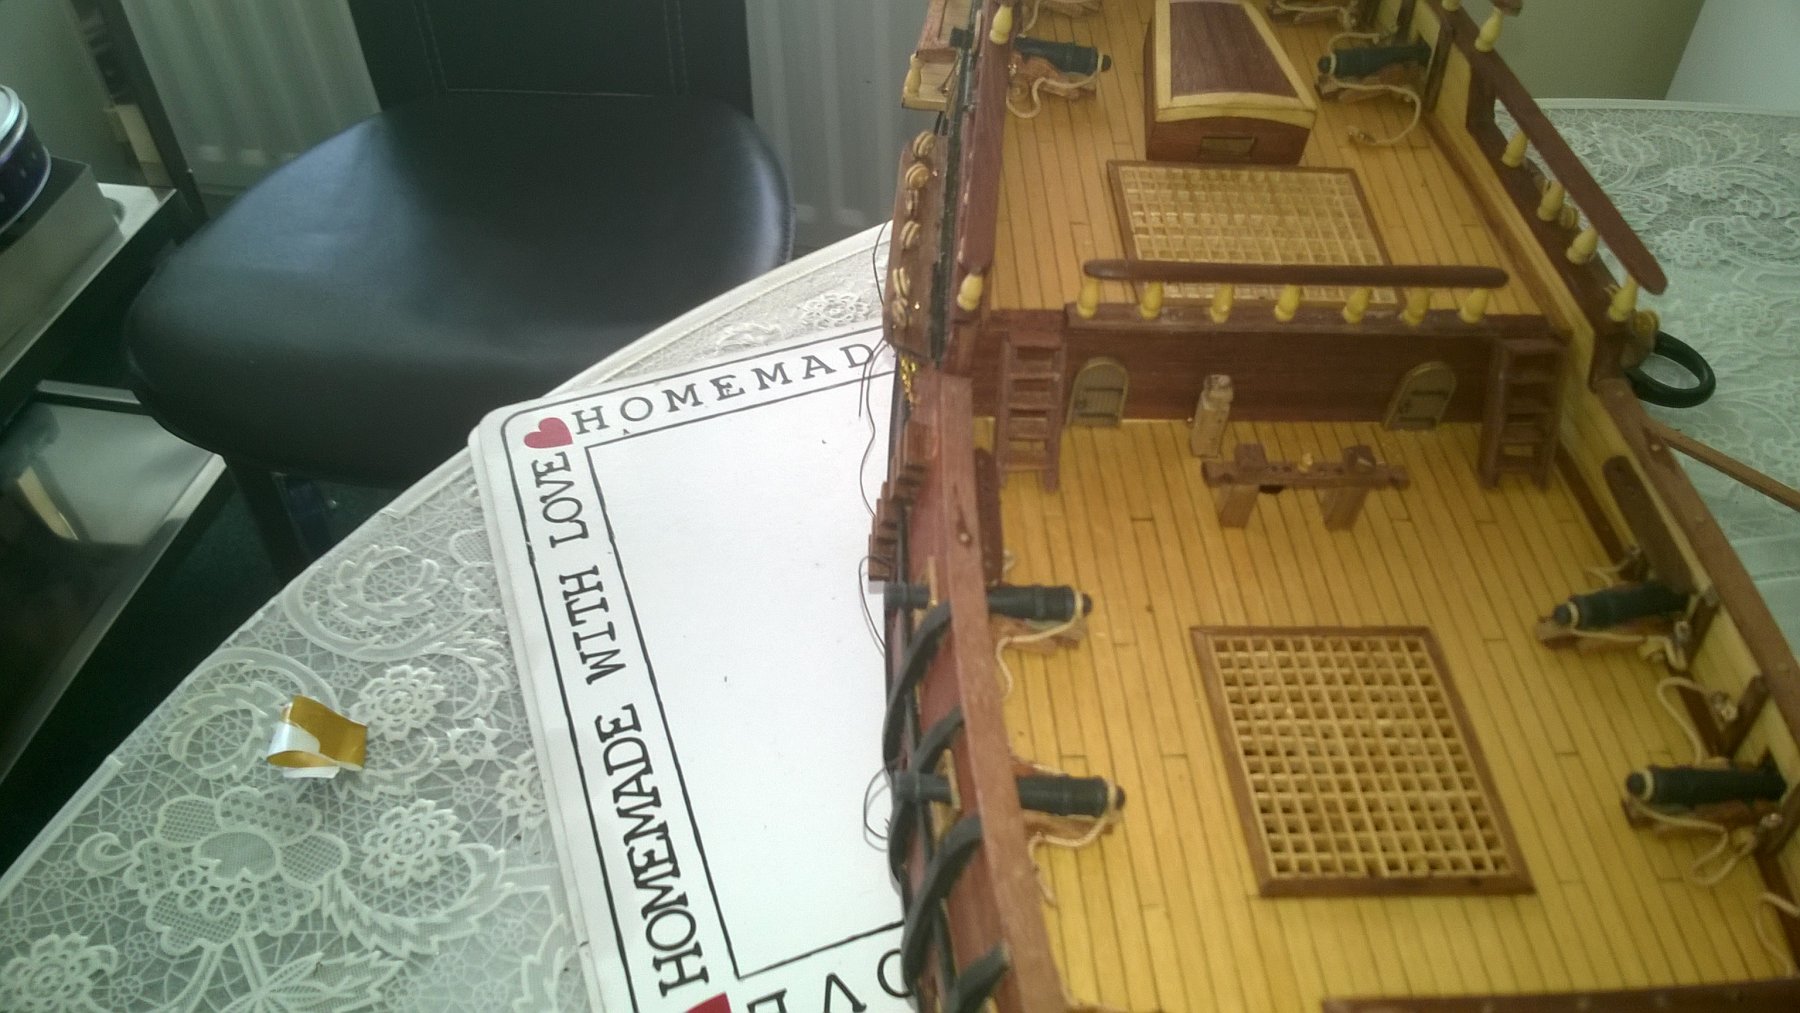
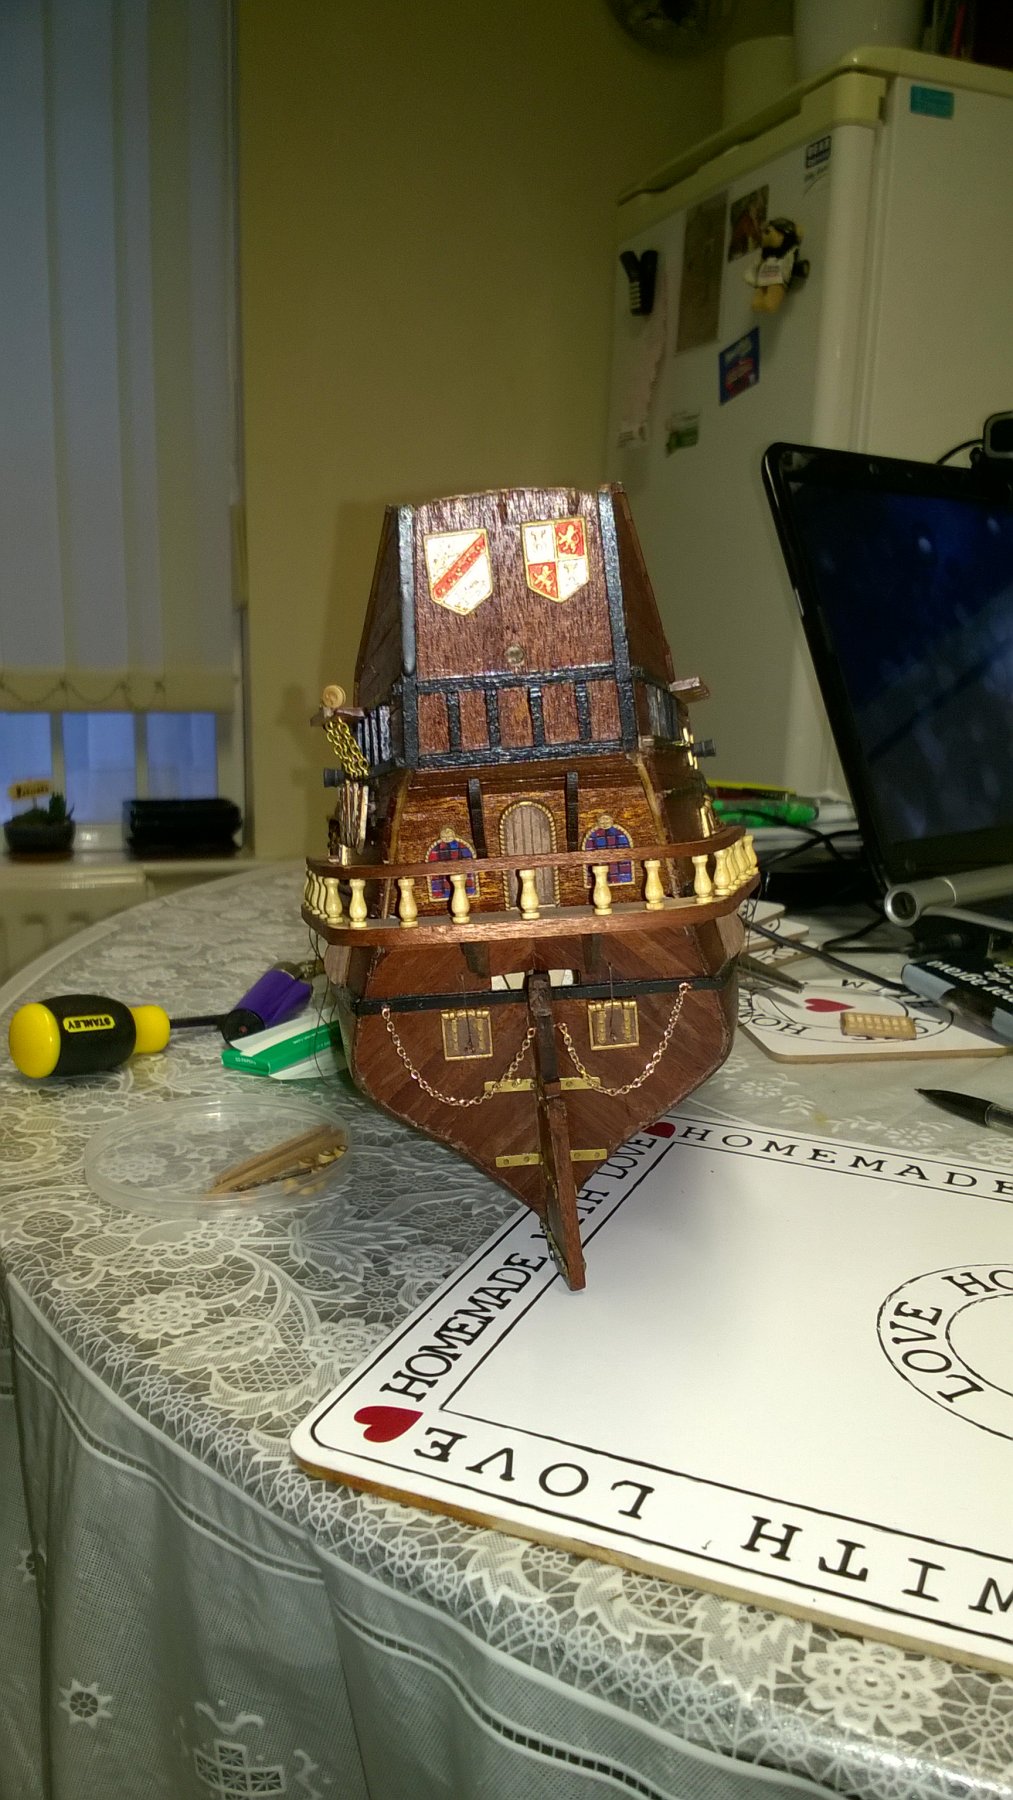
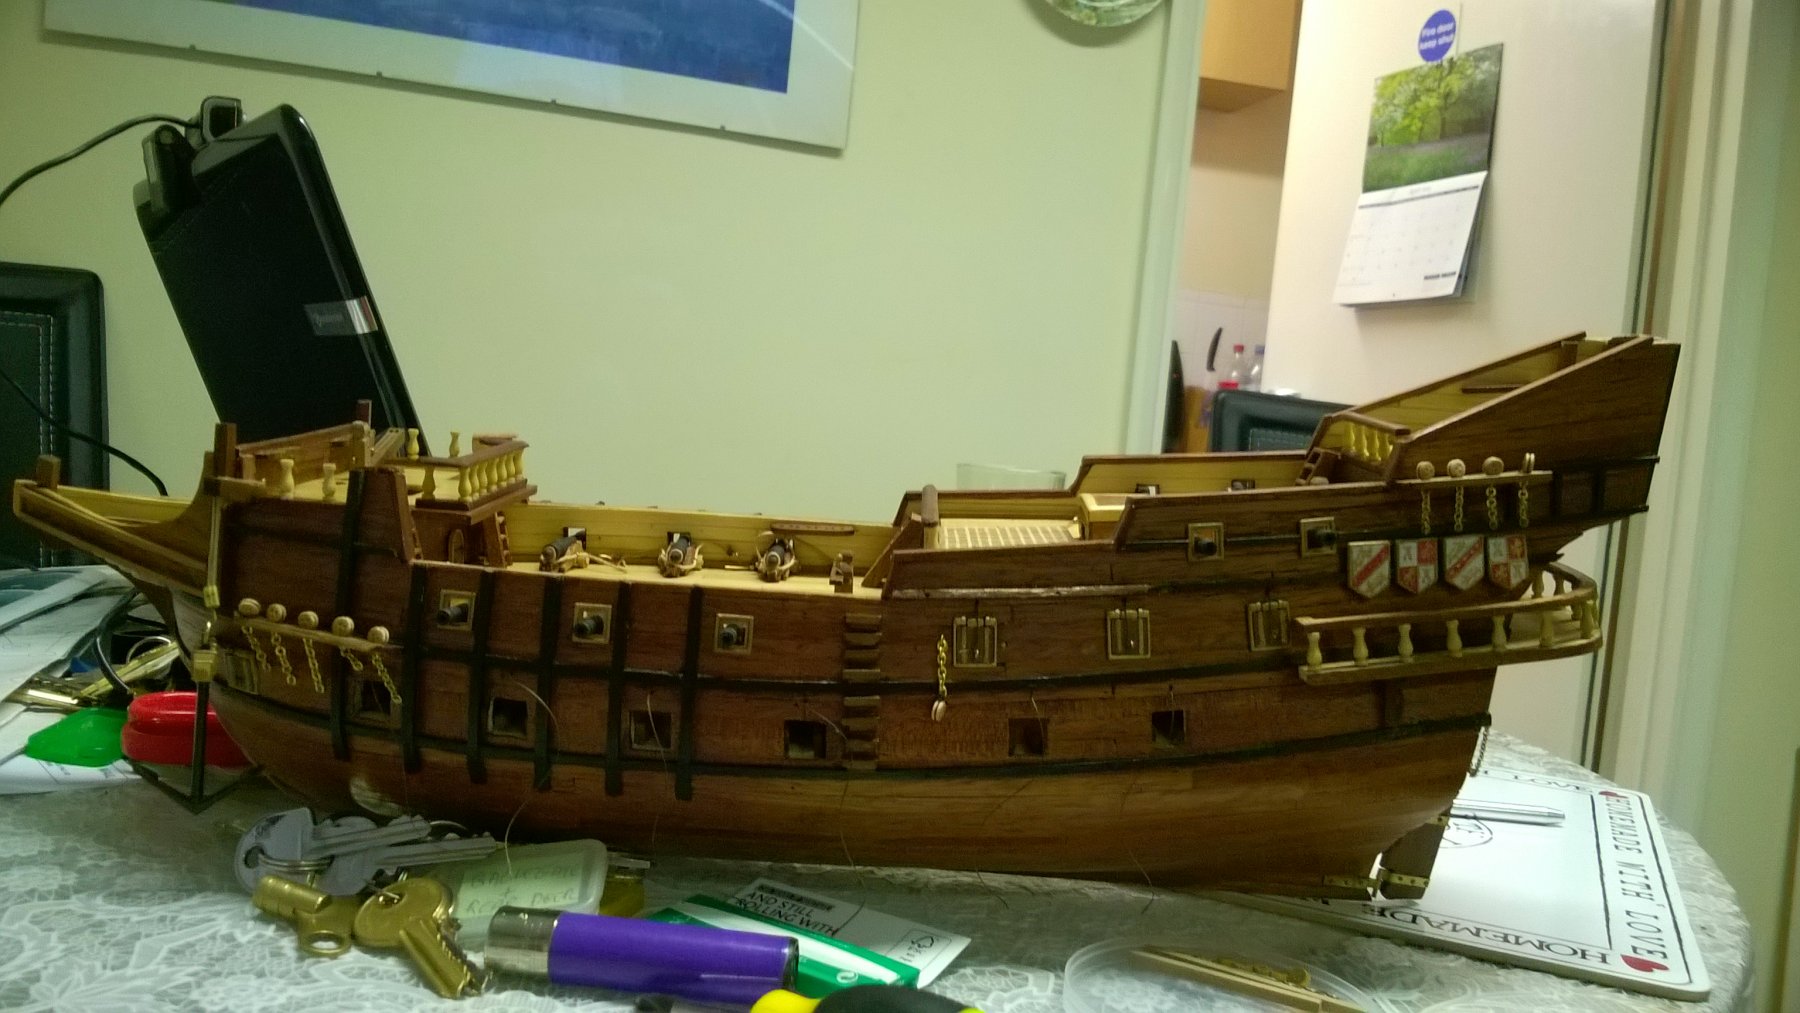
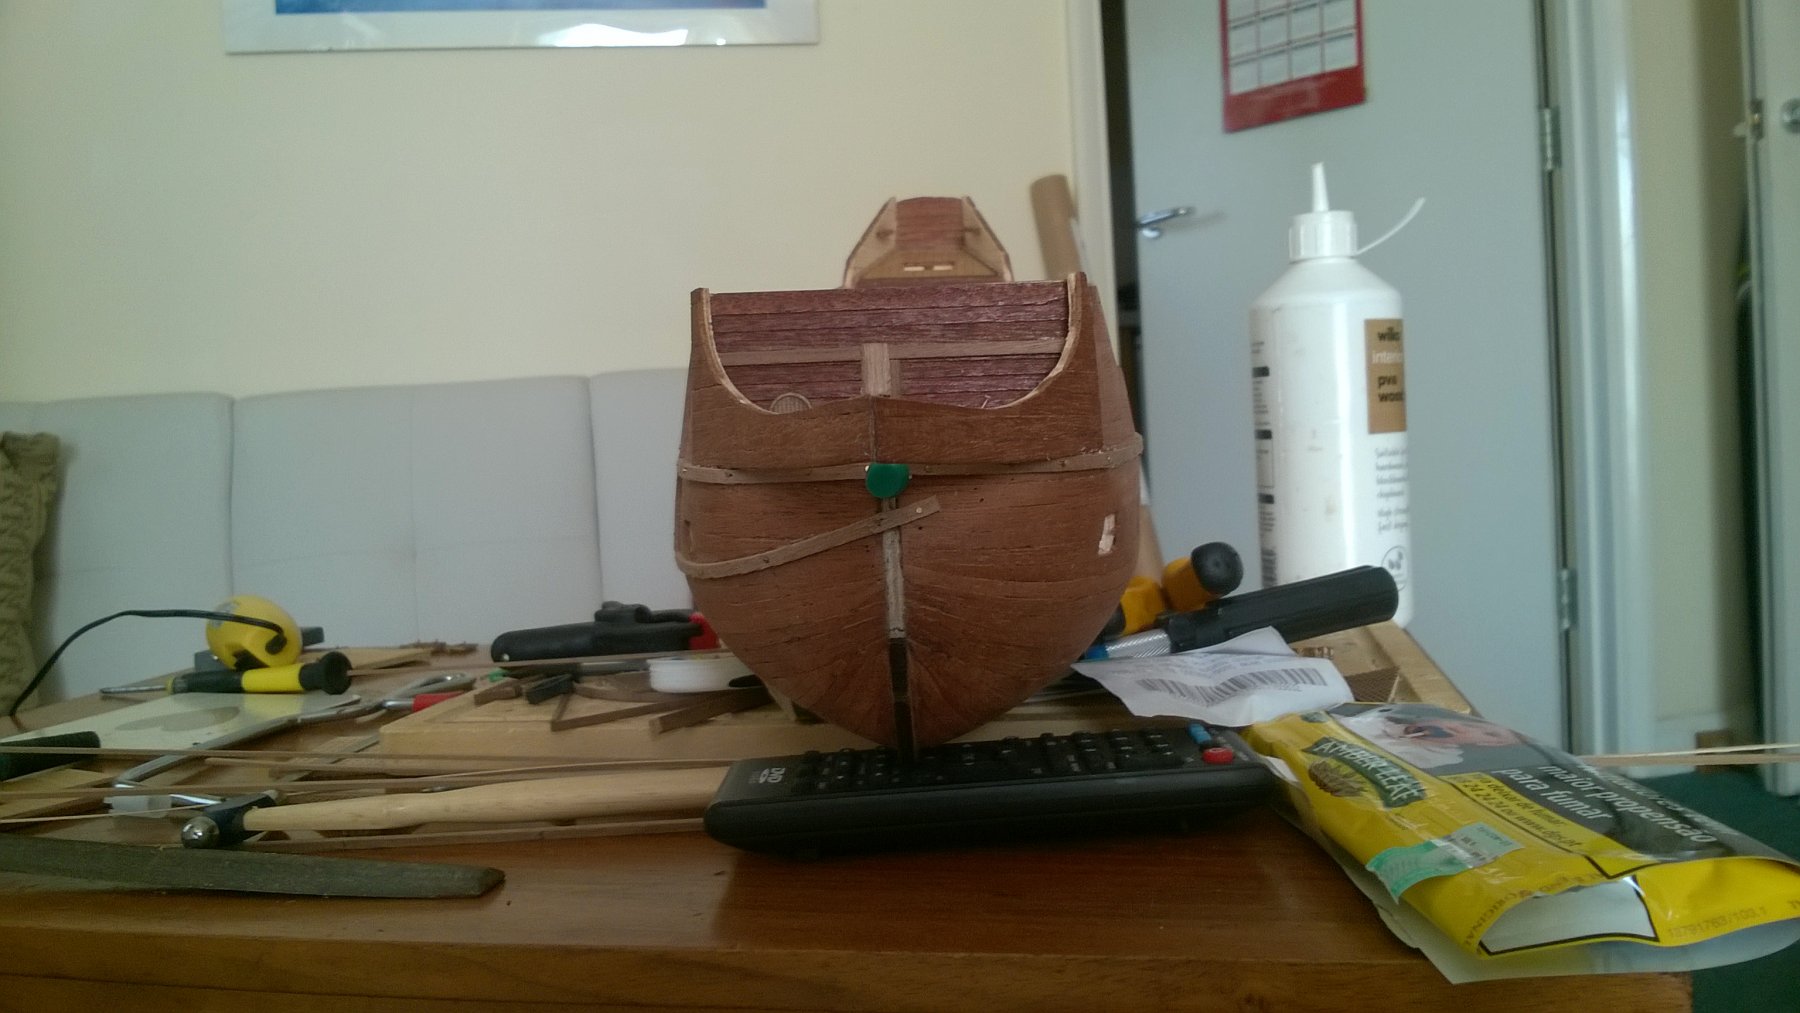
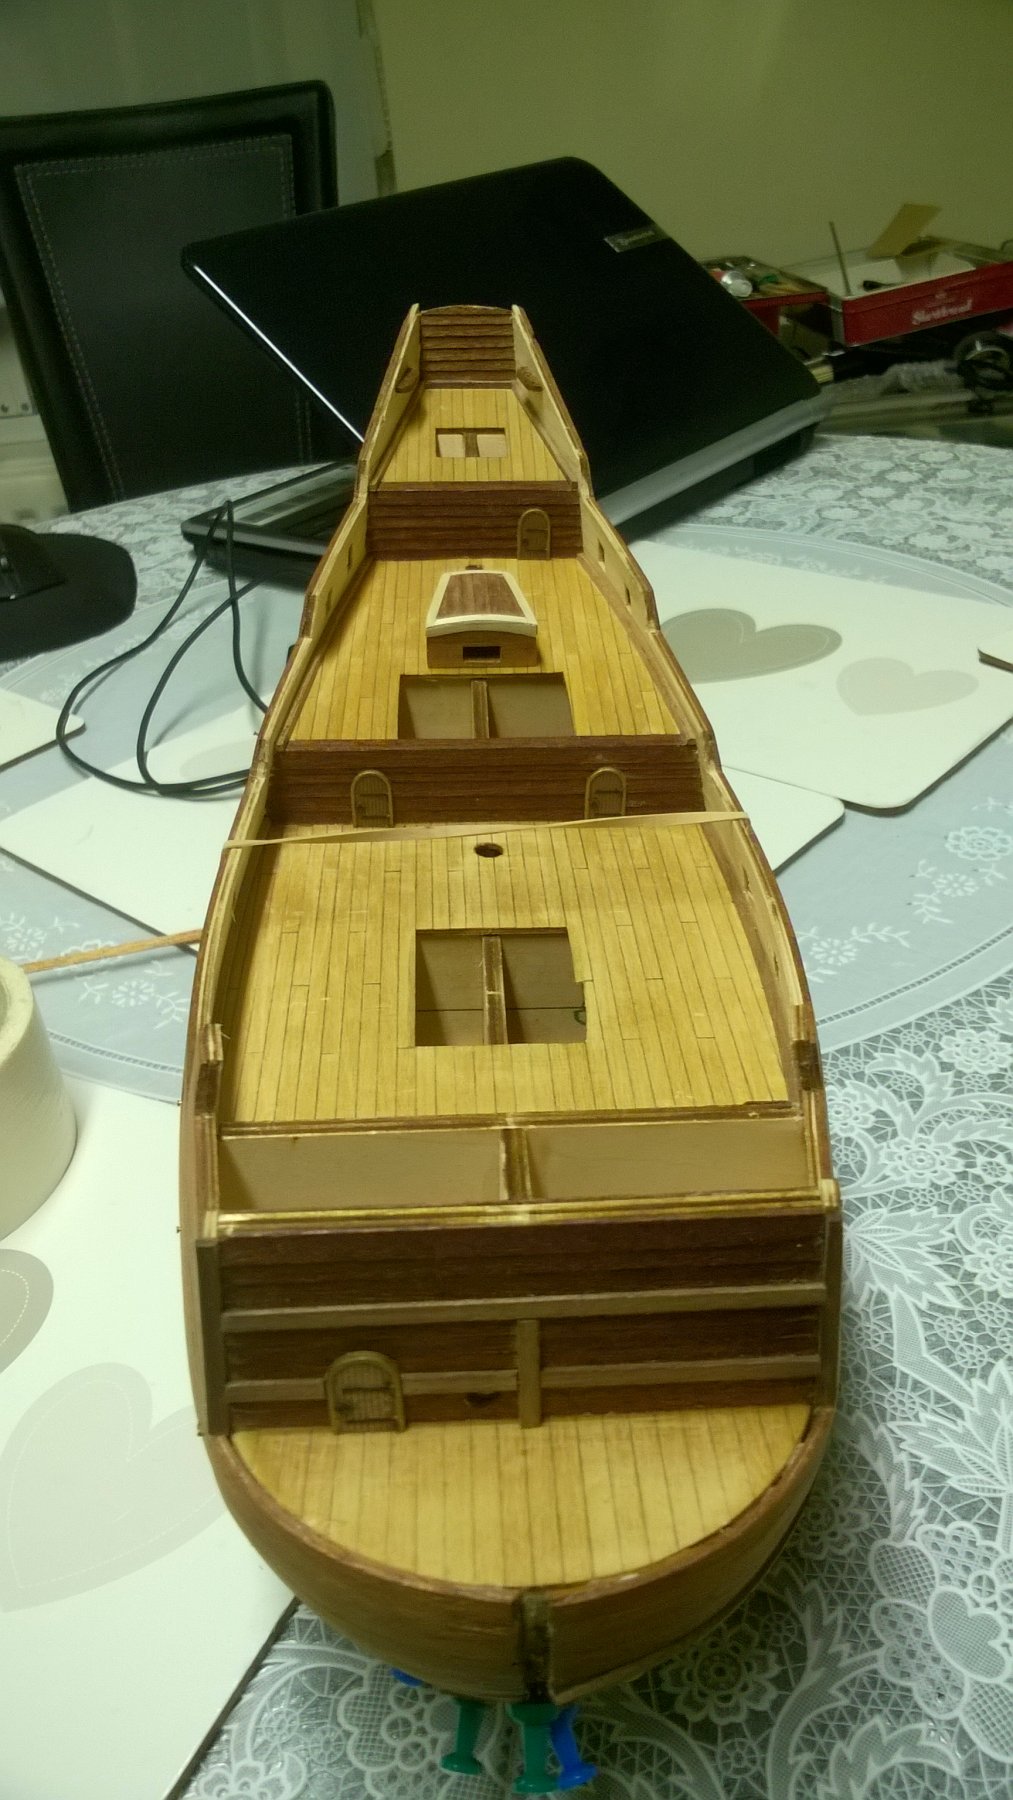
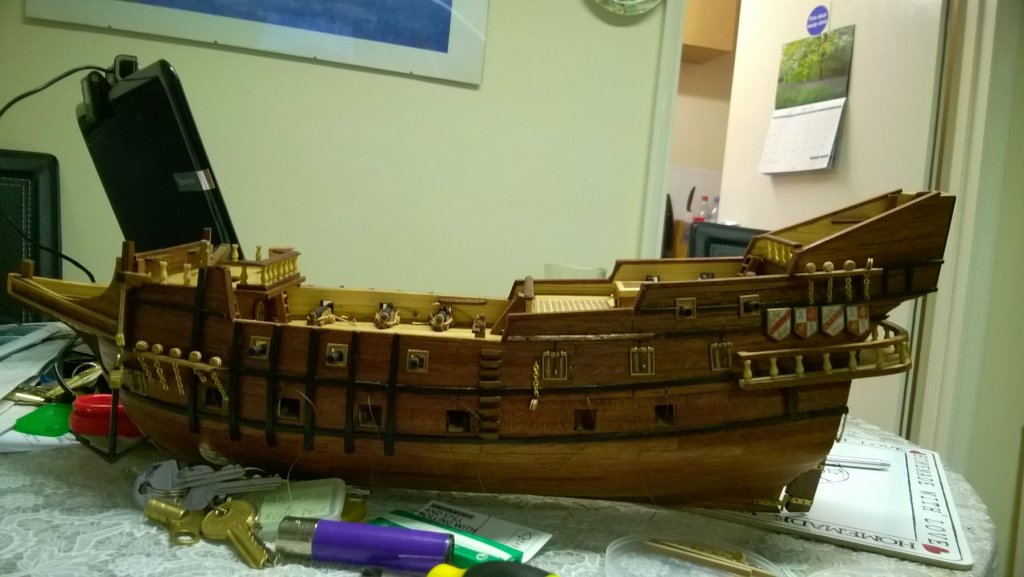
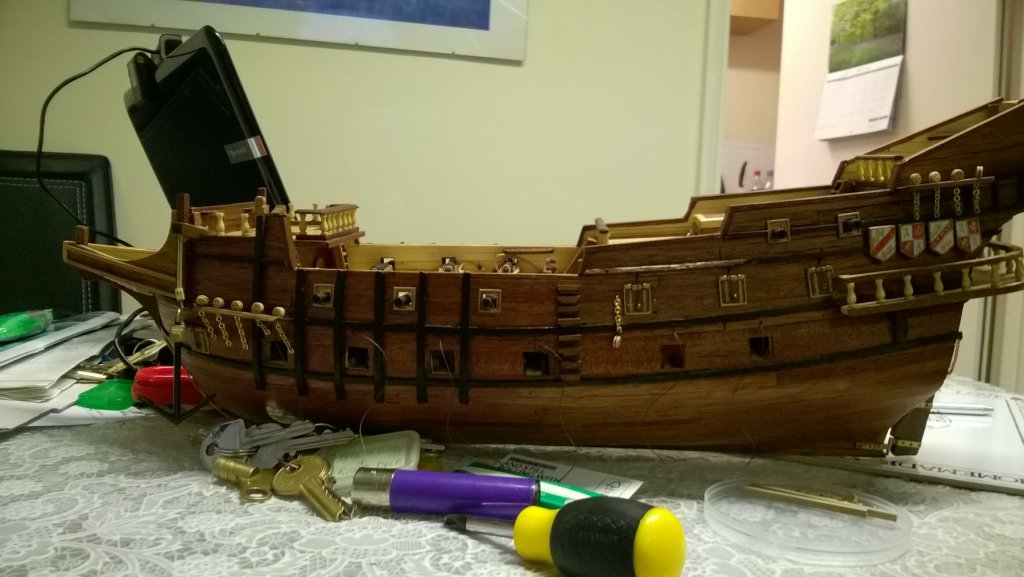
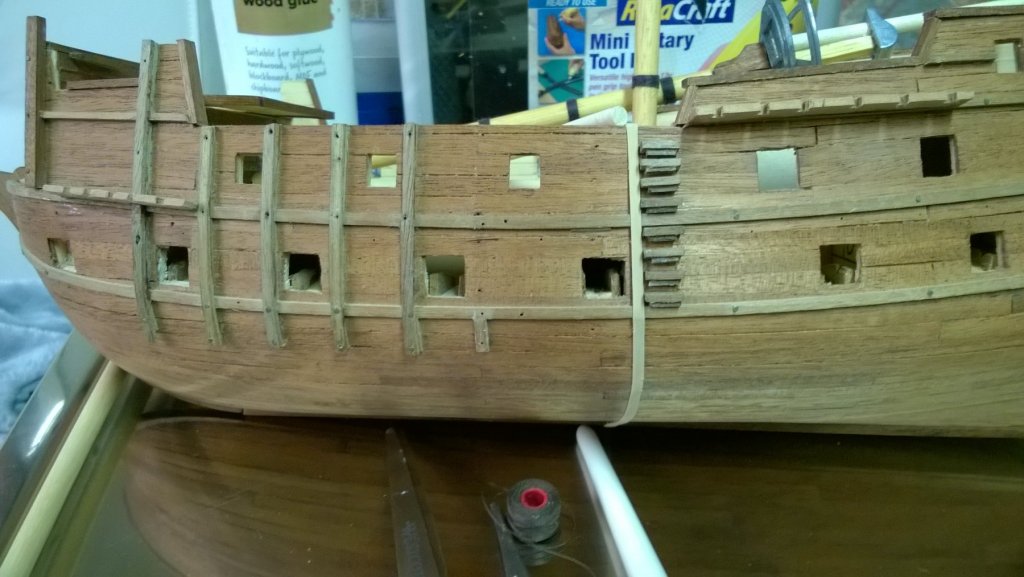
Well at last I have returned to update my progress. At least mostly progress. Amongst other things while looking at the rigging plan I noticed the quarterdeck handrail needs 12 holes where I only had 6. I have now re done the top rail with 2 holes between columns. The main deck rails have also now been added. It finally occurred to me to trace the shape on grease proof paper, stick on my cutting board and pin a long strip of 5 by 2mm over this, I then laid another beside it butting up close and pinned a third next to that one, then repeated this again to make 2 pieces. I then removed the middle batons and soaked them in boiling water and after an hour fitted them back between the 3 pinned batons. I left these in place overnight and, in the morning found I had maintained the basic curve I needed. There was still enough play to bend them slightly further so they were then cut slightly overlength and filed down to the correct fit. I also found that there was a big gap between the top of the rail and the top step so I added another step on each side. I spent a good part of the weekend trying to scratch build the ships boat but by yesterday afternoon I gave up. I was running out of scrap wood as well as patience. I am not too happy with the size of the metal boat supplied. I have seen other builders have not been happy with the quality of this metal version either, however the golden Hinds boat was also crude metal but I made a decent job of that one so will go with the provided one instead. I have been able to improve the stairs I had made by simply sanding them down further so these have now been added. The quarterdeck handrails have now also been added on each side. The columns had to be filed down slightly top and bottom for the rails to fit but I think they look really good. I have added eye bolts to the main and fore channels to be able to attach the mast stays (I think that's what they are called) The front one will go to the crows nest and the rear one leads up to the tops. Again the Golden Hind had them so I expect other ships would have as well. The down side if this was I have needed to add another bitt on the other side of the fore mast to attach the line to.

- 68 replies
-
- 2
-
-
- san francisco ii
- artesania latina
- (and 1 more)
-
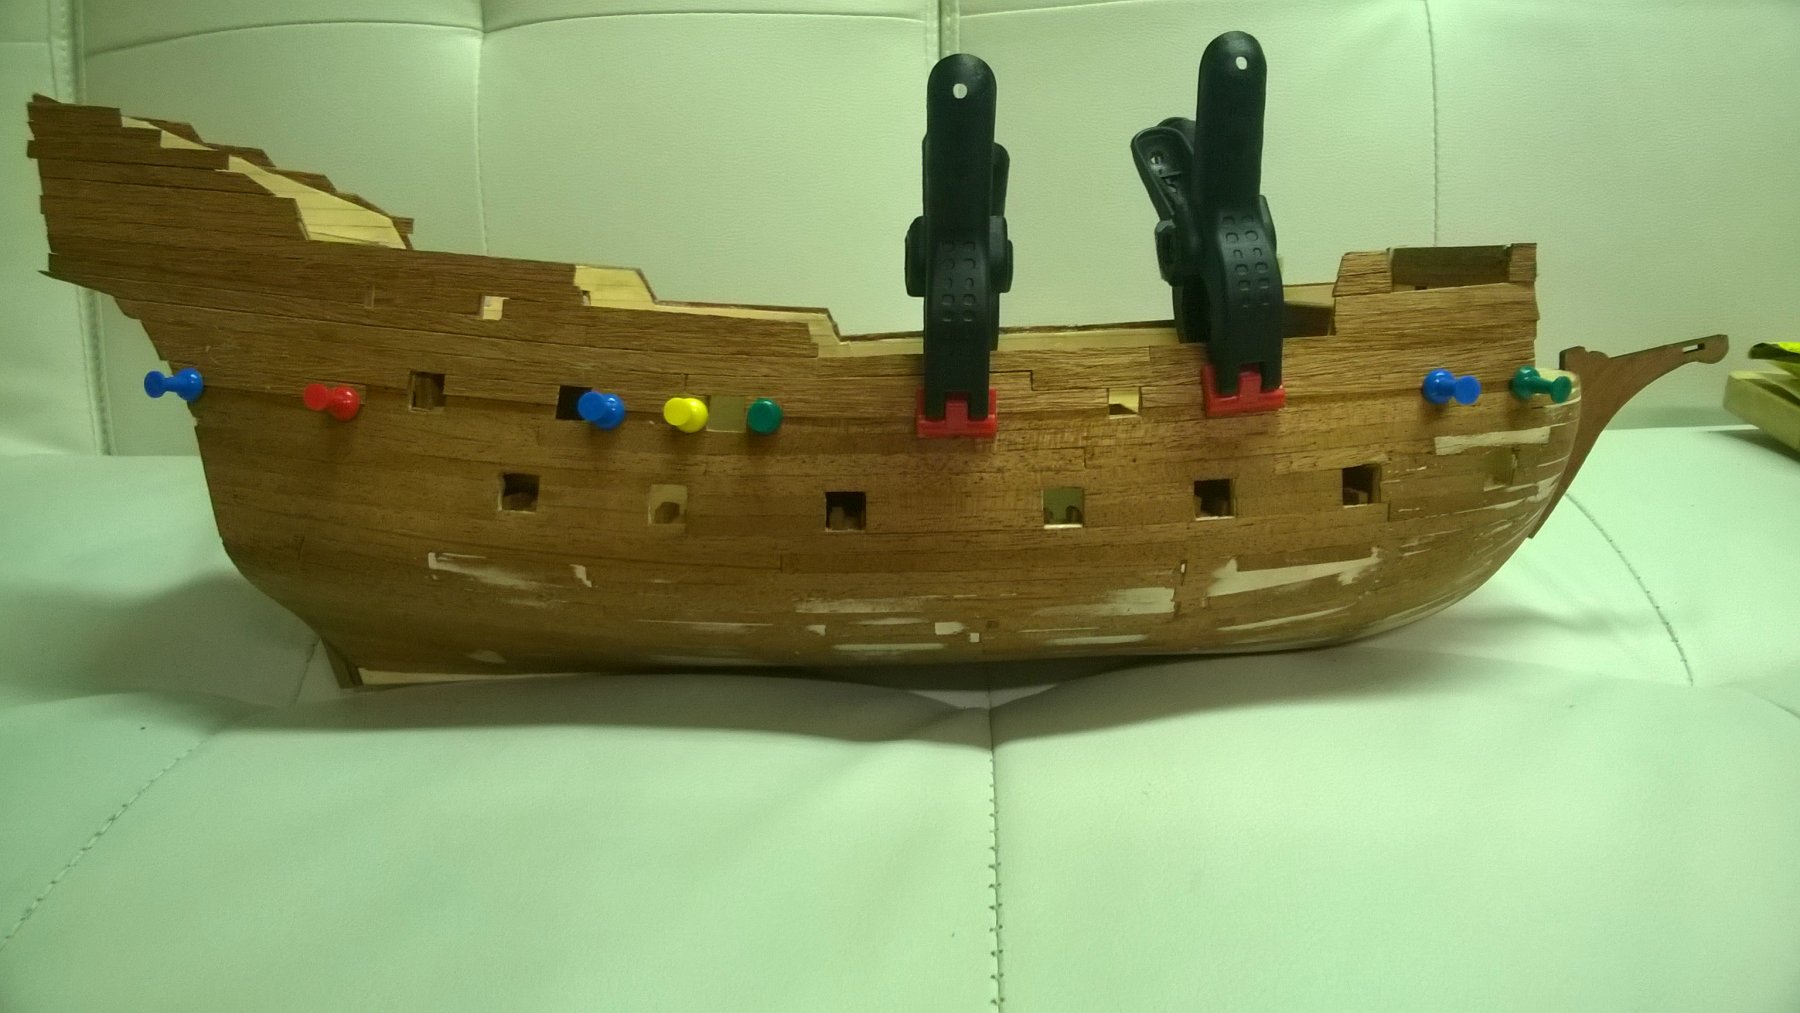
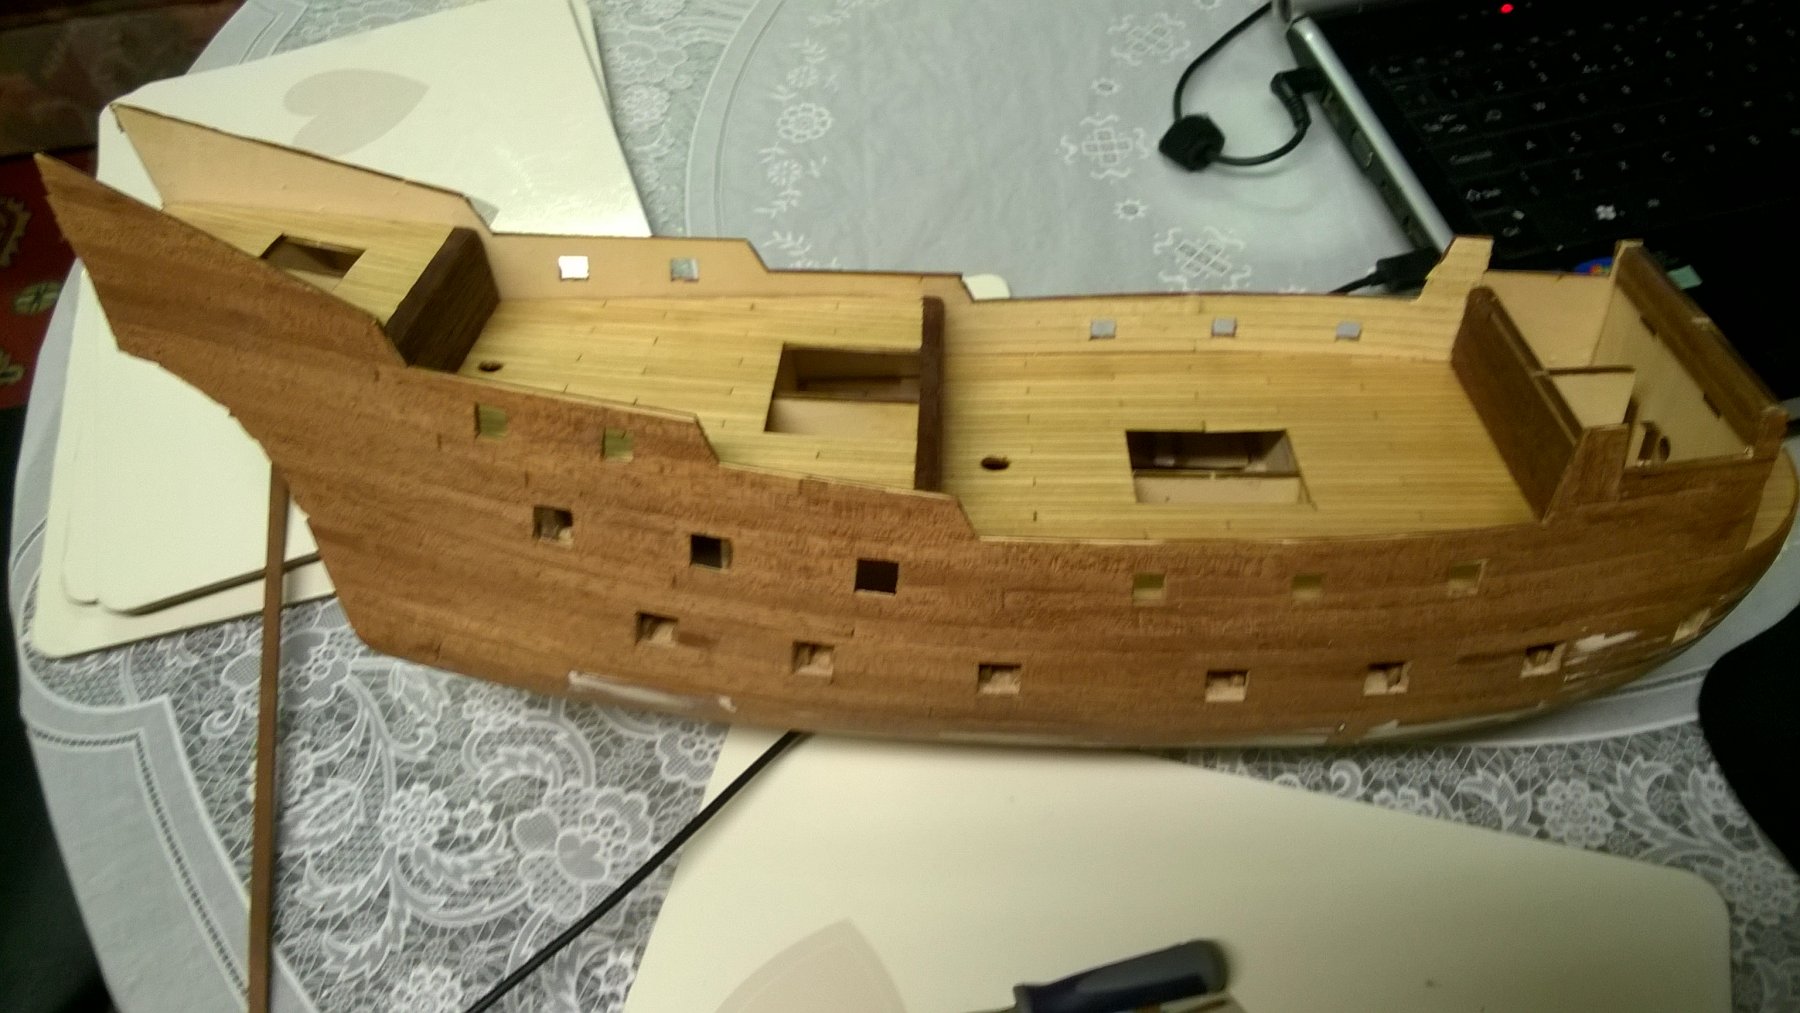
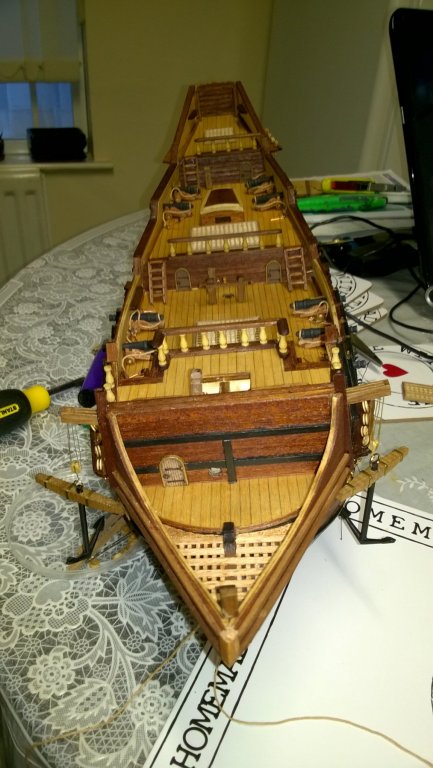
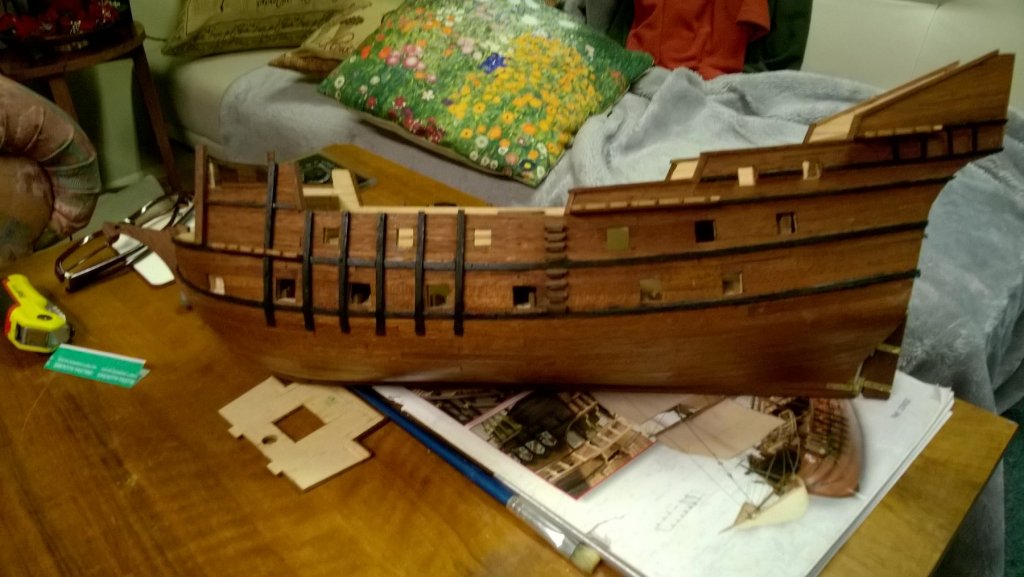
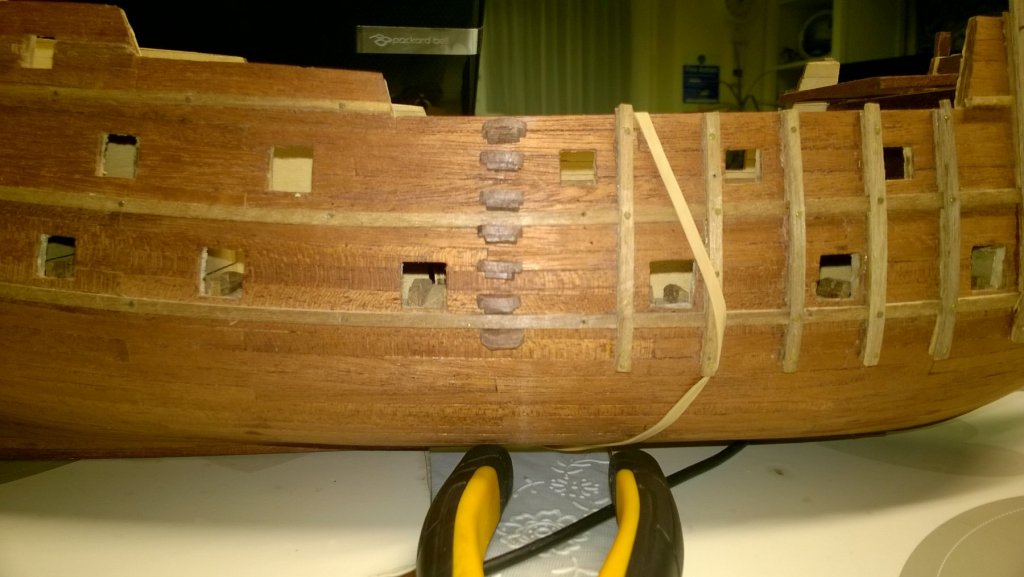
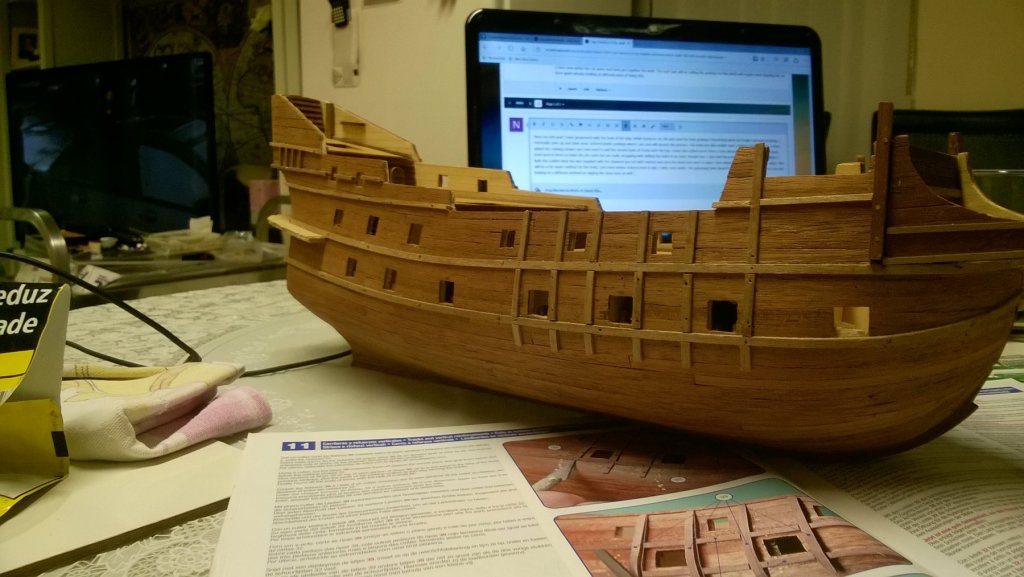
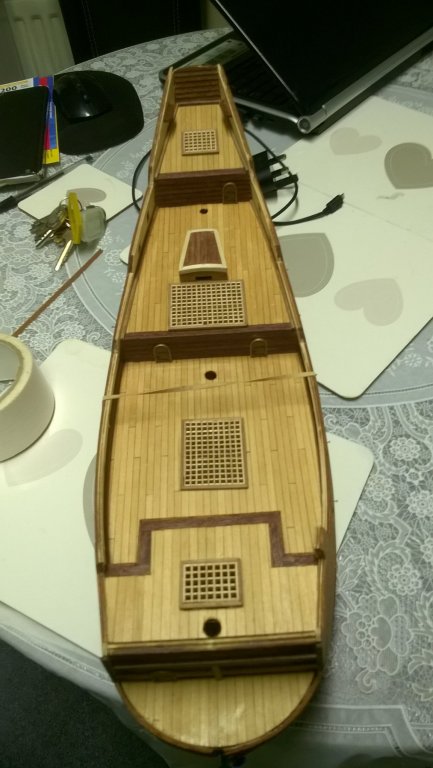
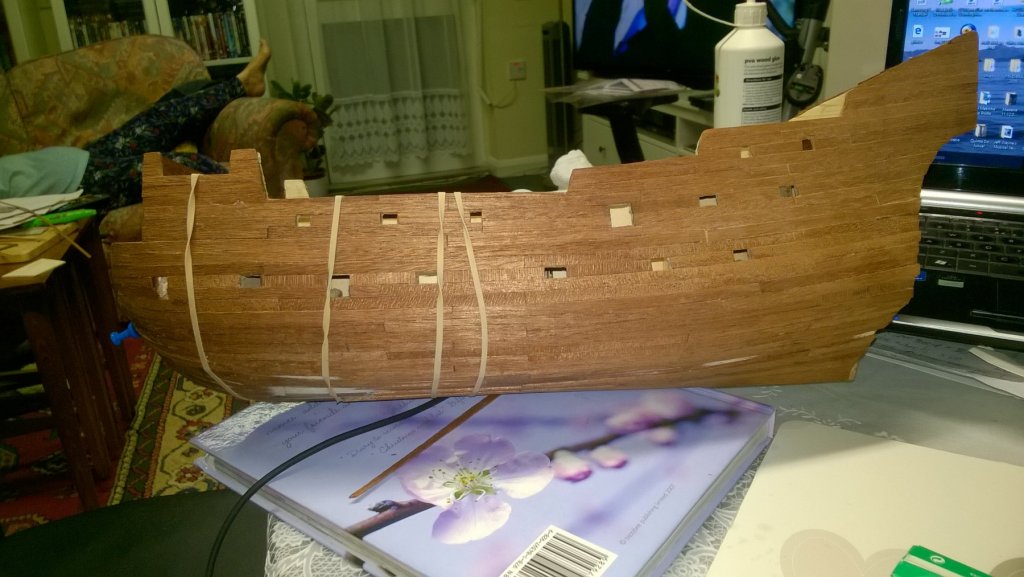
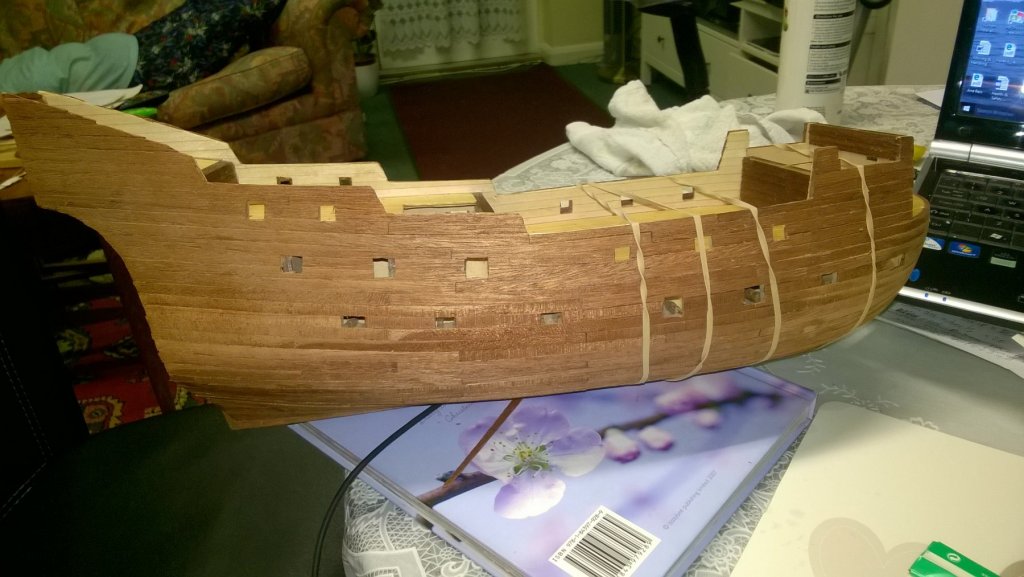
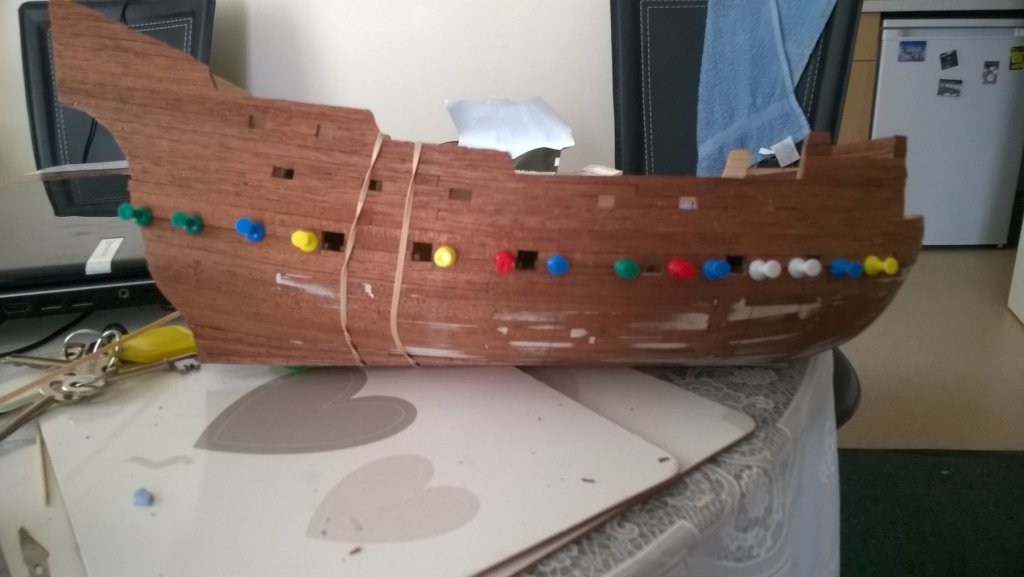
I finally got back to work on the ship last week although I have also started removing a few things I am not happy with. The steps are going to be redone if I can improve them, The handrails on the poop deck have been removed and I will probably also remove the quarter deck ones, fit the columns and then re fit the rails. After much thought I have added the main mast channels but have reduced the gap between chain plates to avoid the gun ports. I have finally managed to add the upper guns although I found trying to drill holes in the hull for the rigging eyes impossible I added 1.5mm X 2mm strips either side of the gun ports with pre drilled holes. I was then able to insert the eye pins into them all be it very fiddly. The handrails on the decks have had holes drilled in between each column for extra belying pins should I need them. These were also removed and still need sanding and varnishing before I glue them back into place. Along with the main channels, the main deck hand rails were the greatest reason for taking time out for the last few months. I still have to deal with the handrail problem but, have at least got the channels and chain plates finished. Although I am fairly happy with the deck gratings I have still to varnish and attach them. I am aiming to have the hull completed within the next 3 weeks so hope to add another post or 2 during this time.


- 68 replies
-
- 1
-
-
- san francisco ii
- artesania latina
- (and 1 more)
-
Thanks for your comment Geoffrey. With patience I am sure yours will be as good and probably better. For me this is a challenging build. I seem to spend more time figuring out what to do 3 steps ahead of what I should be concentrating on. The most important thing seems to be to dry fit and triple check everything before fixing in place. Even then mistakes can happen. A proper workspace and decent tools are a definite bonus. I have an old coffee table and a trolley in my living room. My captain is always complaining about wood chips, pins etc. on the carpet. I try to do all the sanding outside. She will be less happy when I start the rigging and have strands of thread hanging everywhere, but will worry about that when the time comes.
- 68 replies
-
- 1
-
-
- san francisco ii
- artesania latina
- (and 1 more)
-
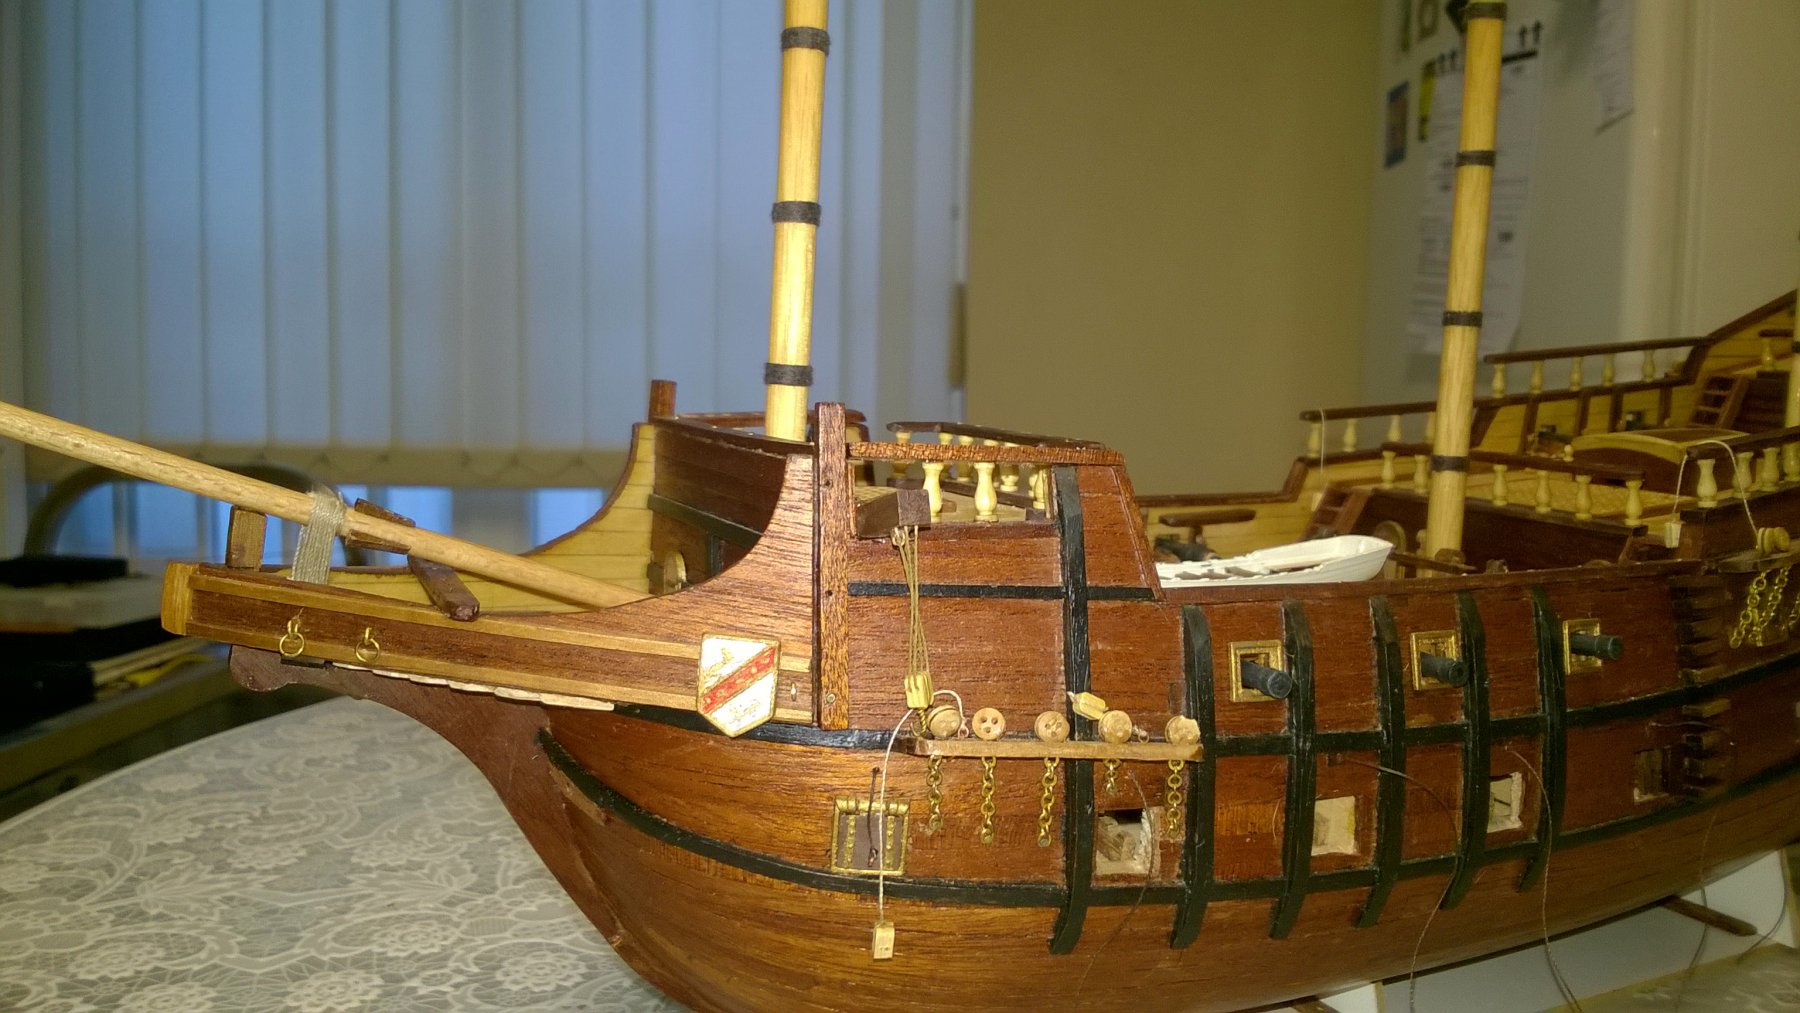
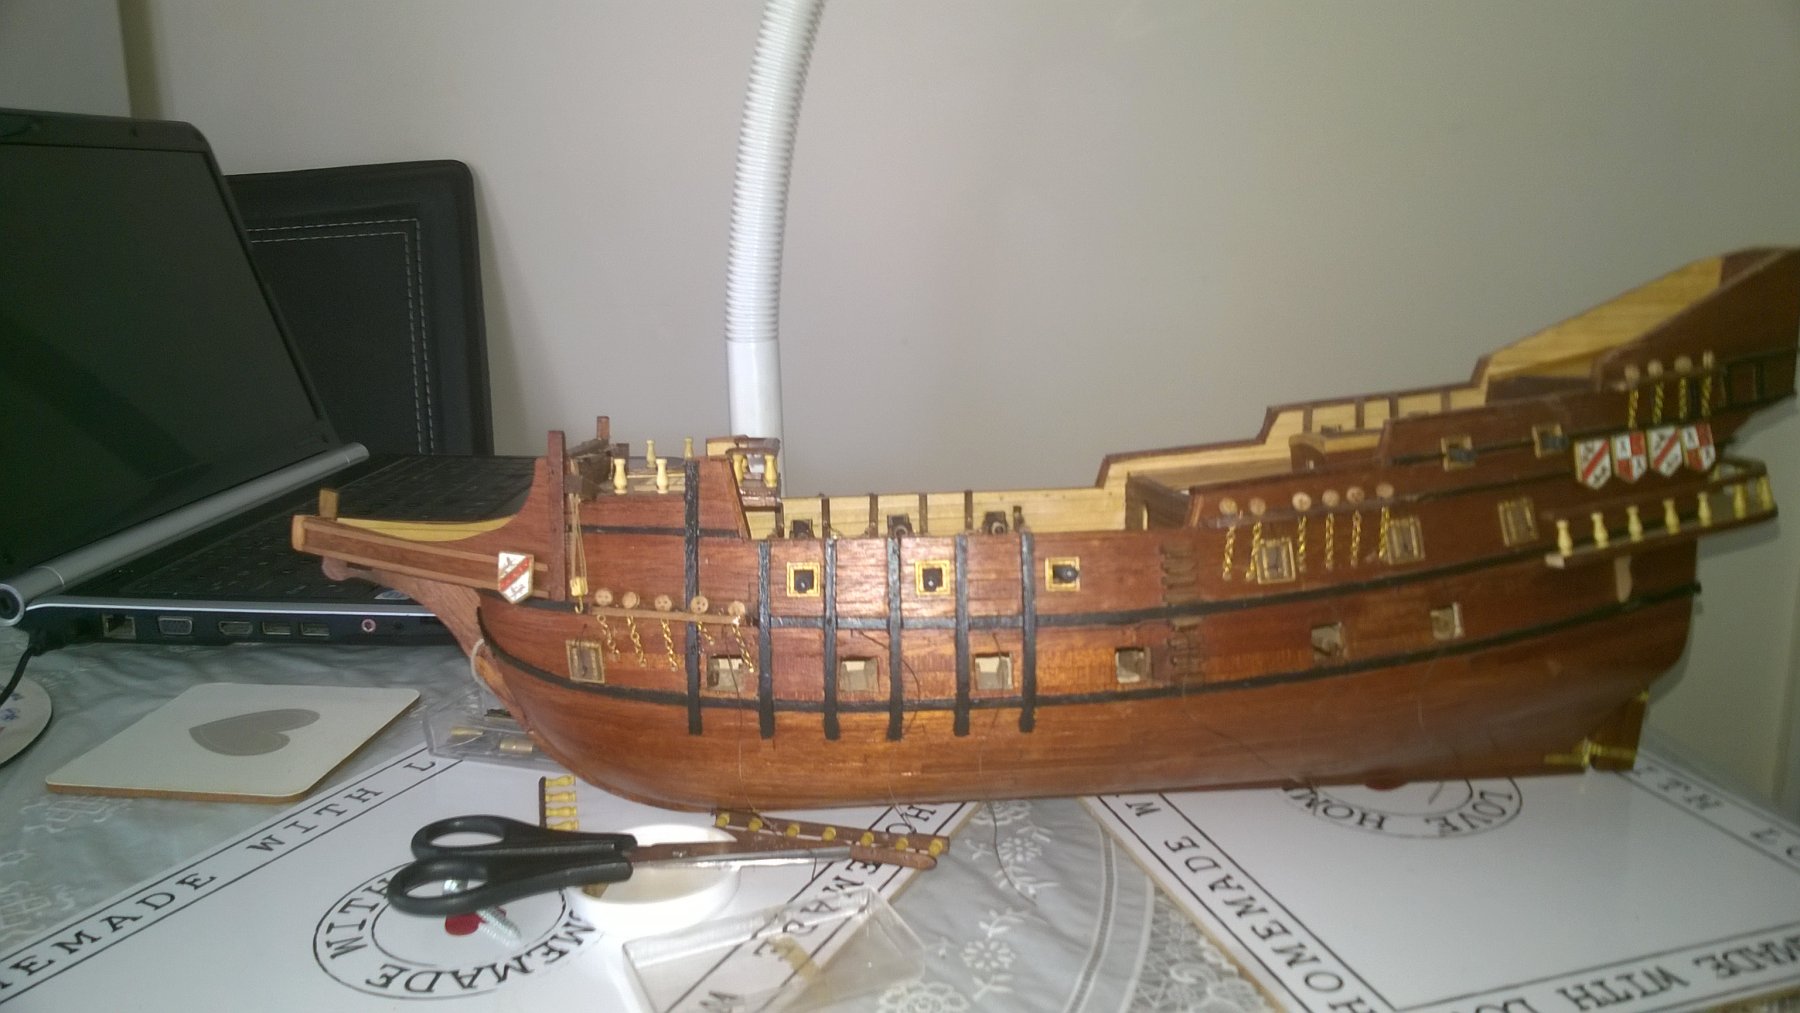
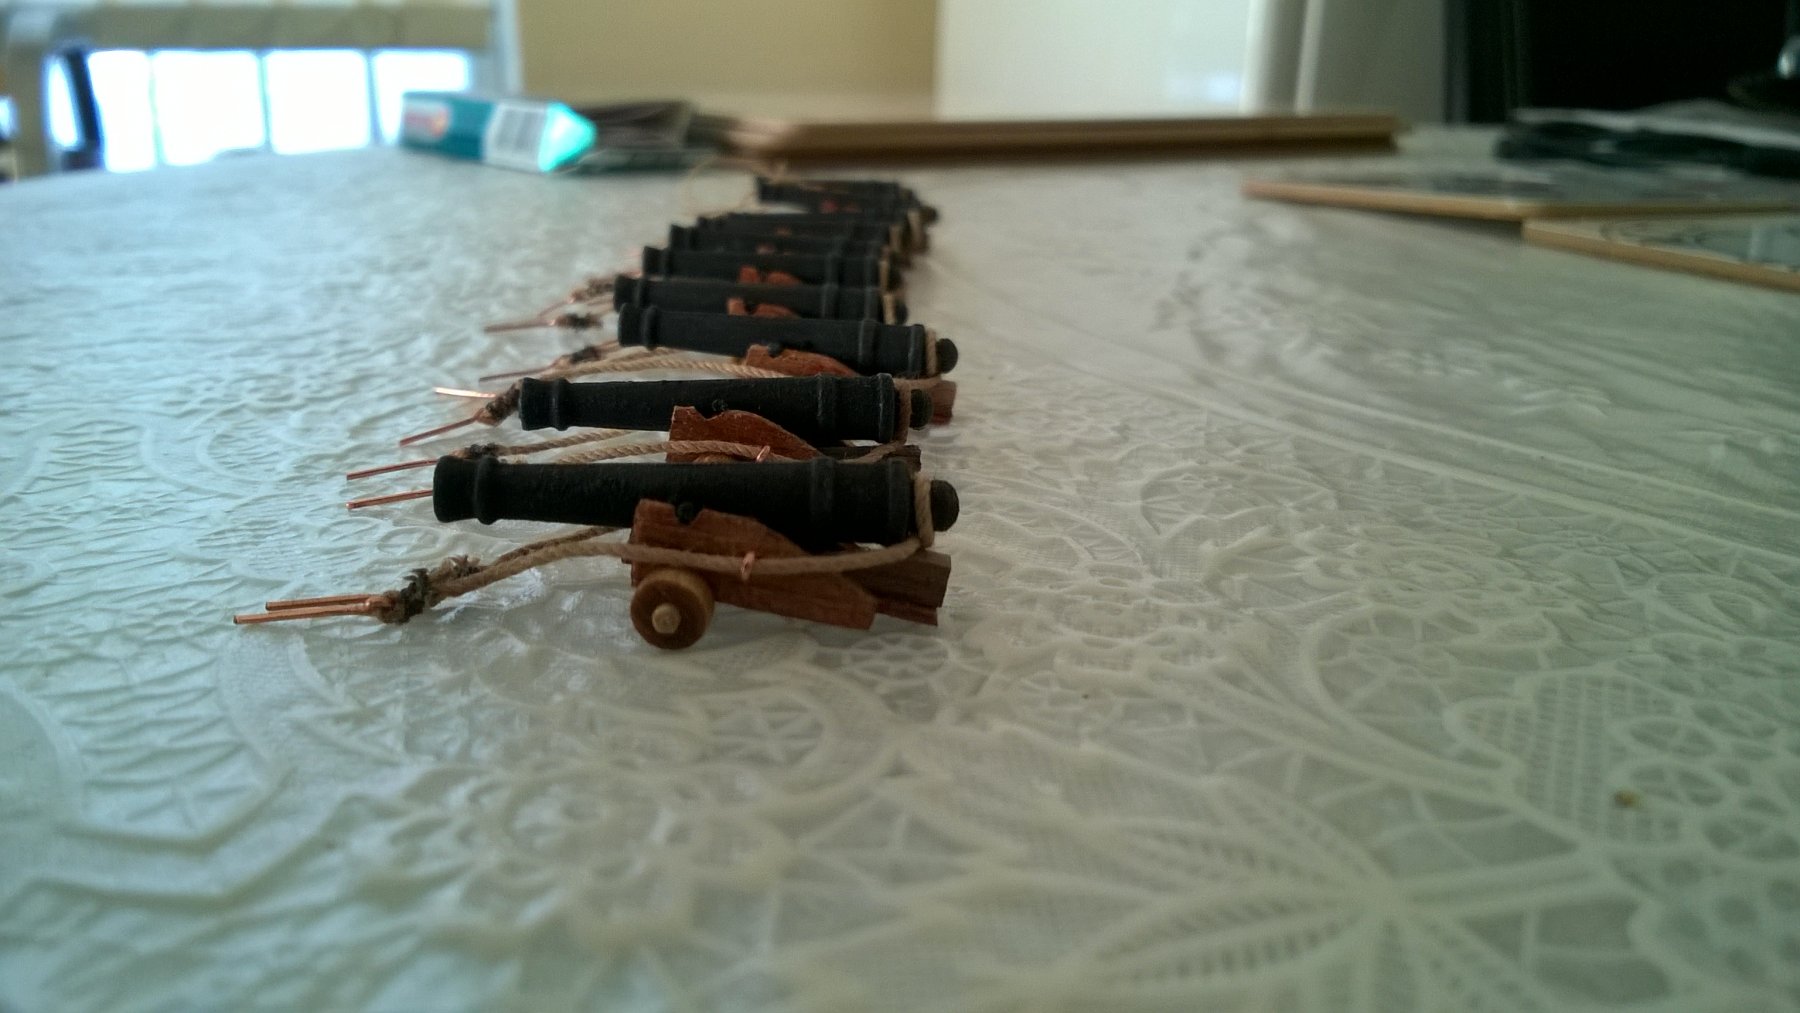
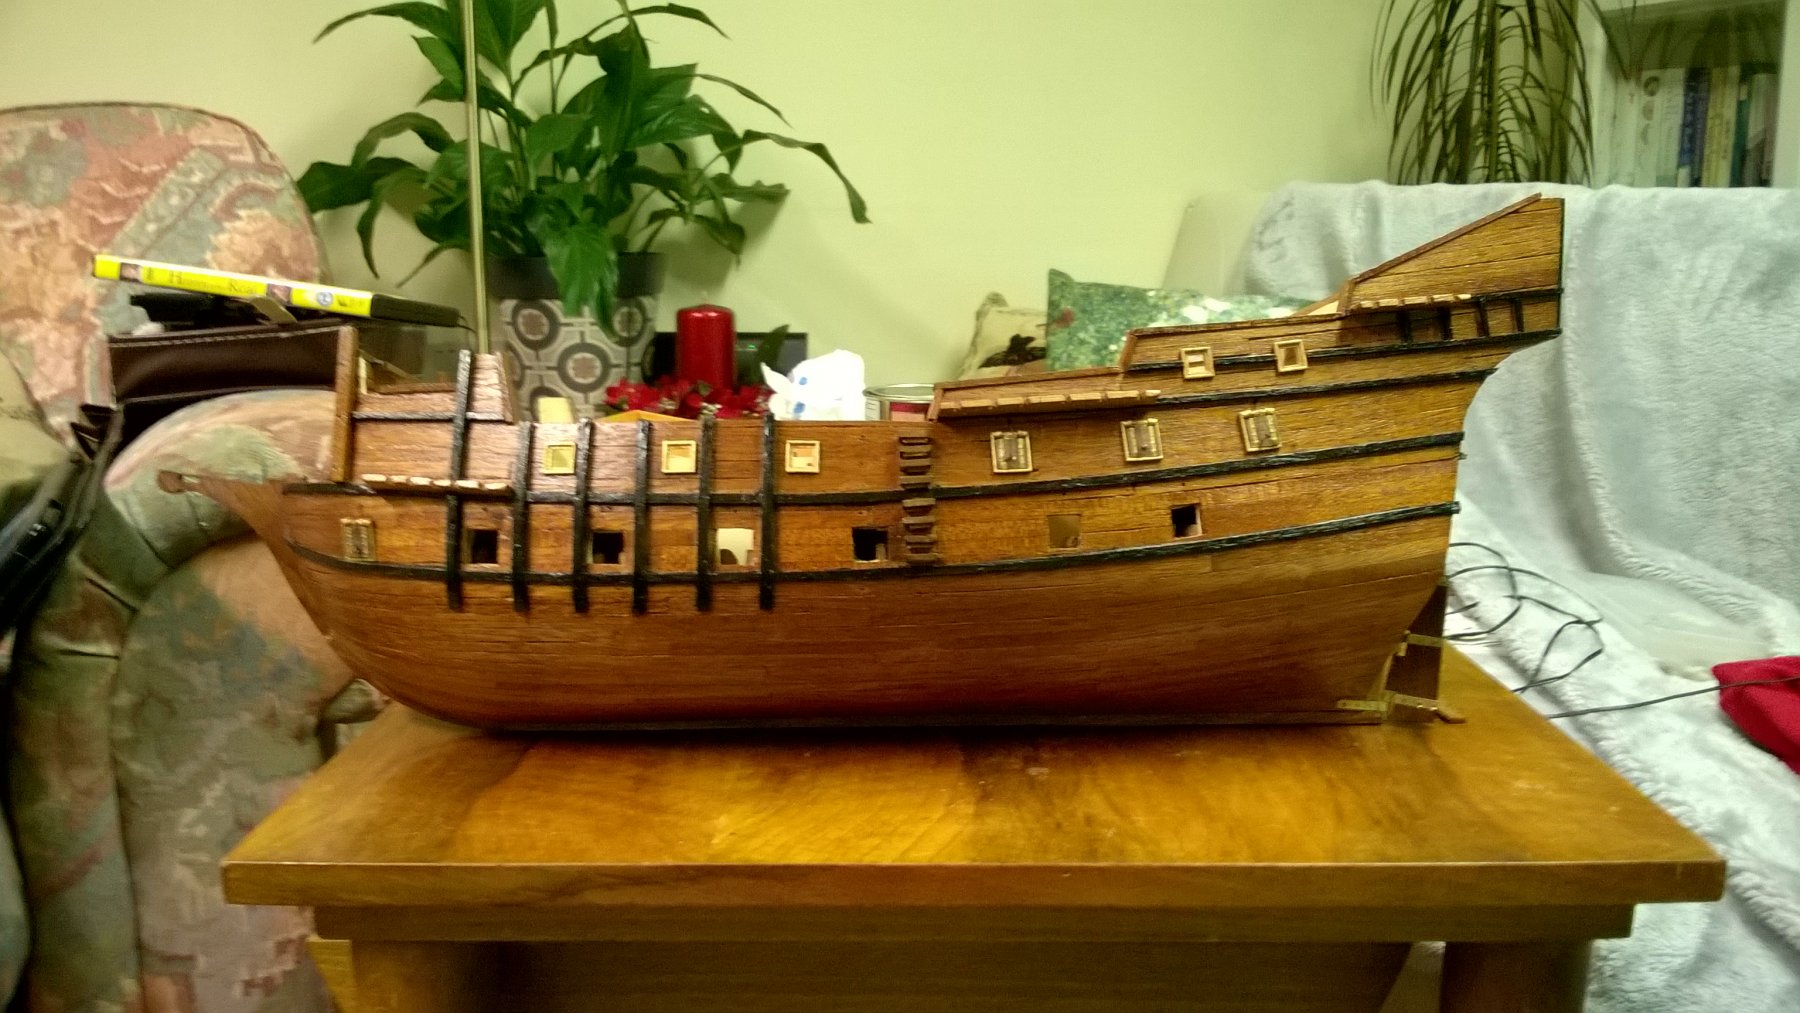
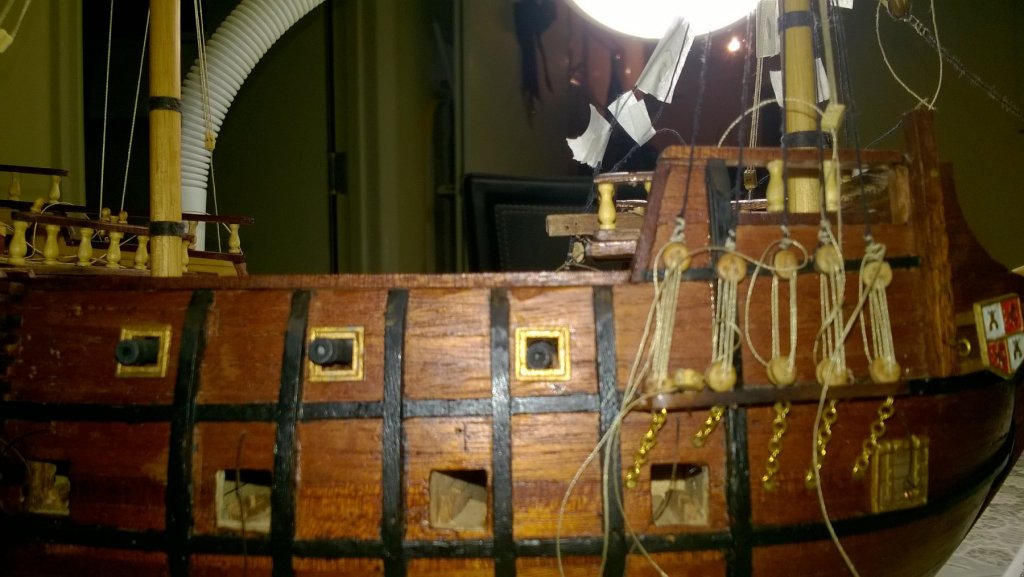
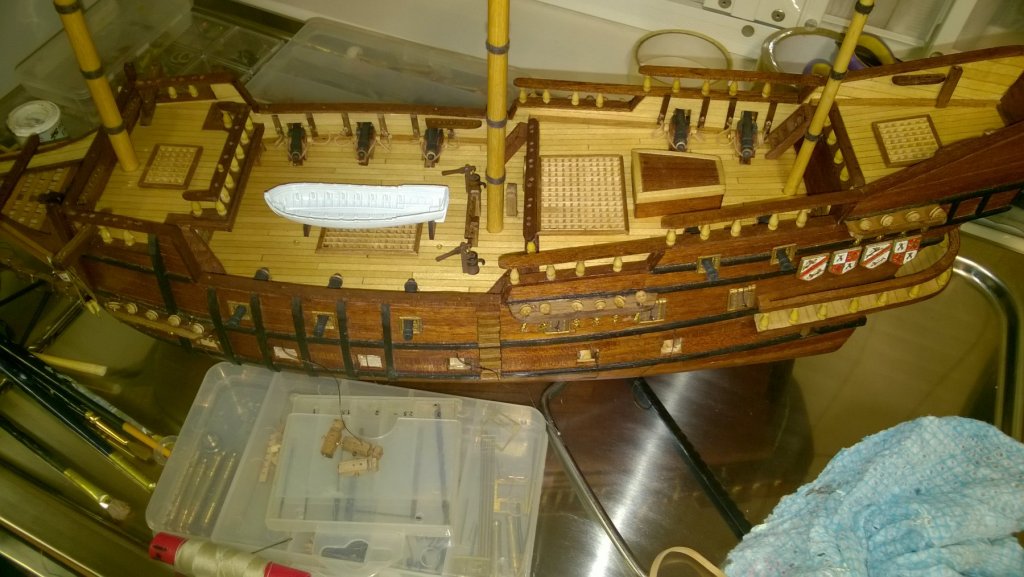
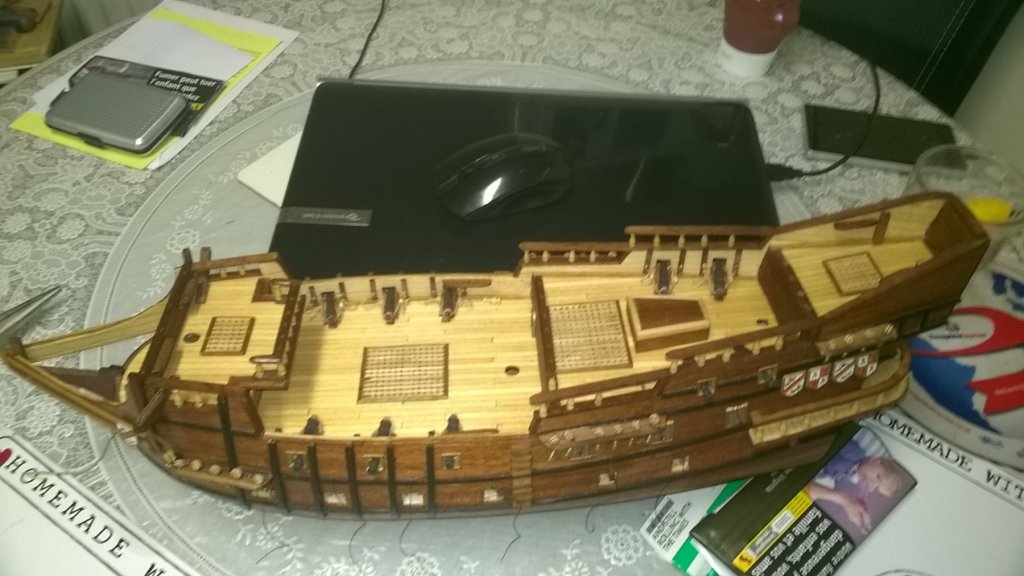
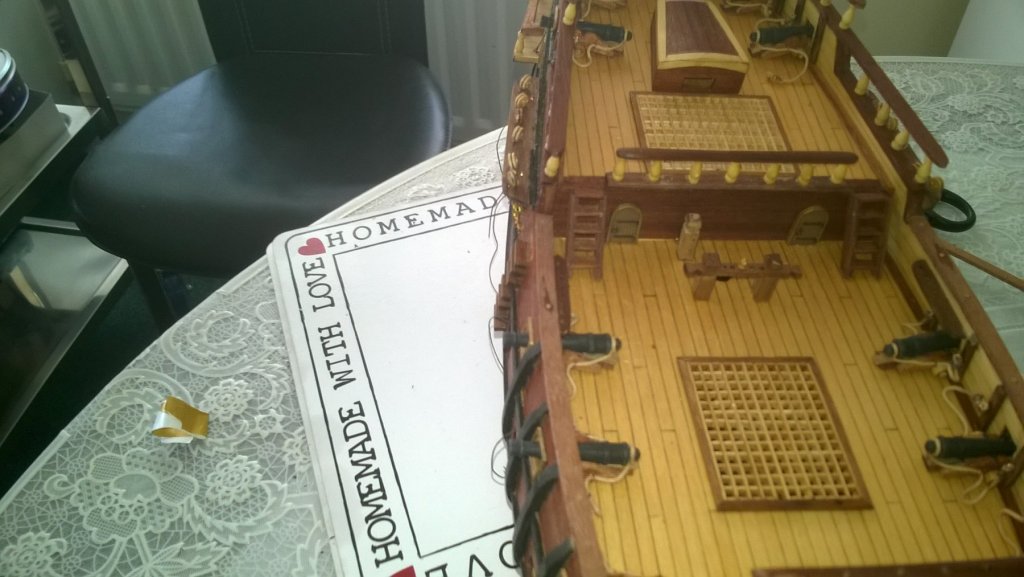
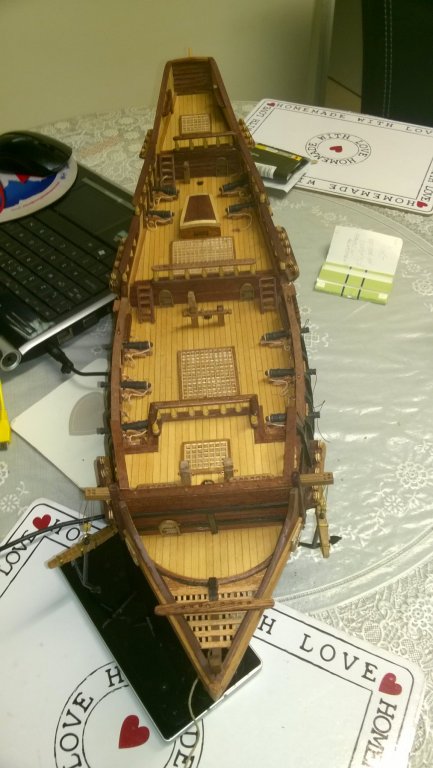
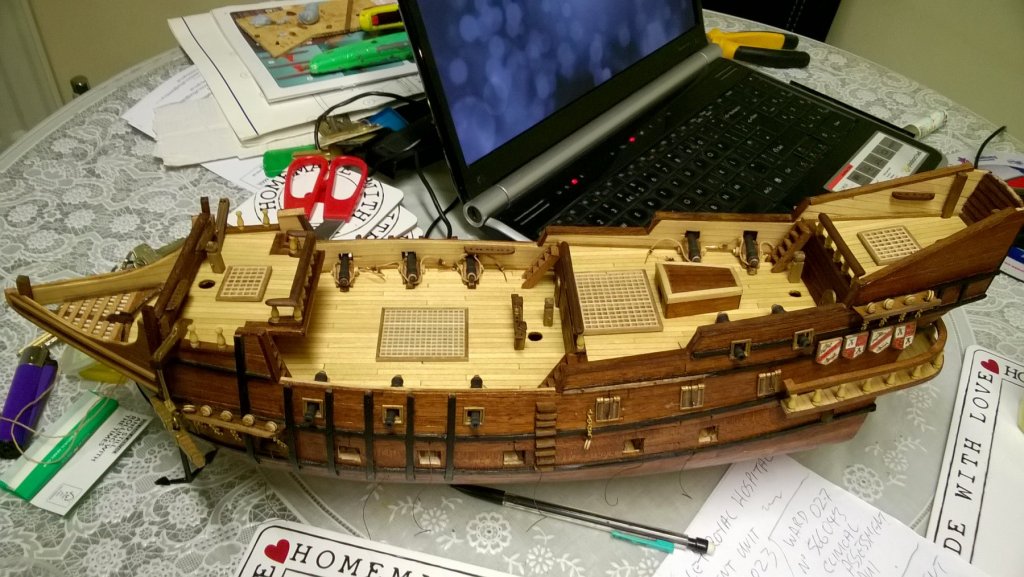
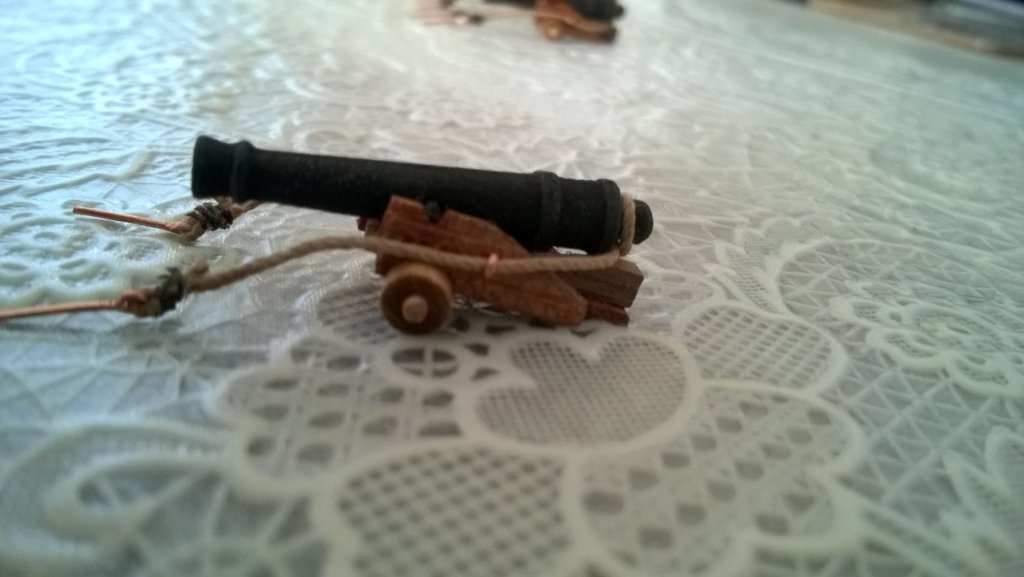
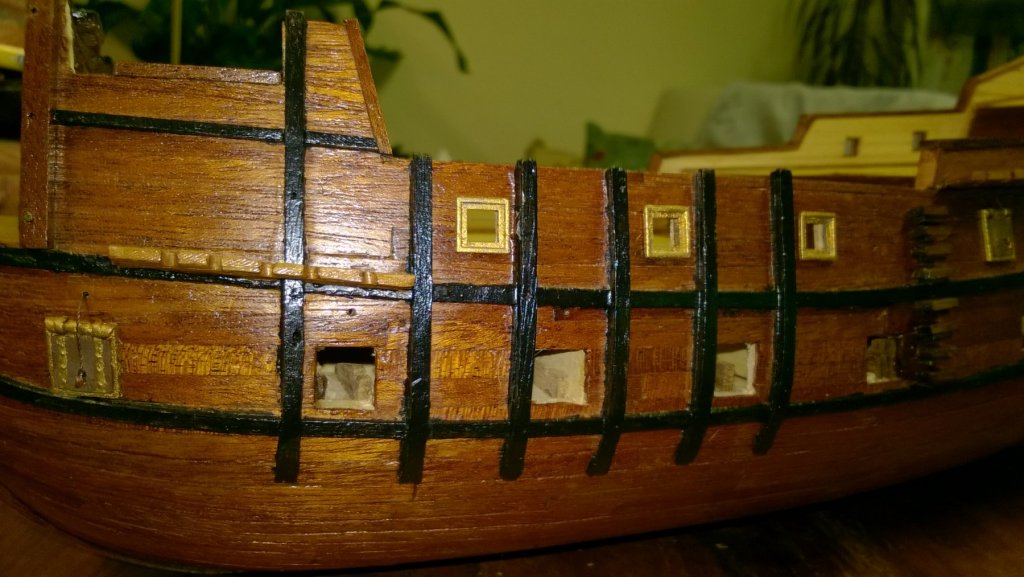
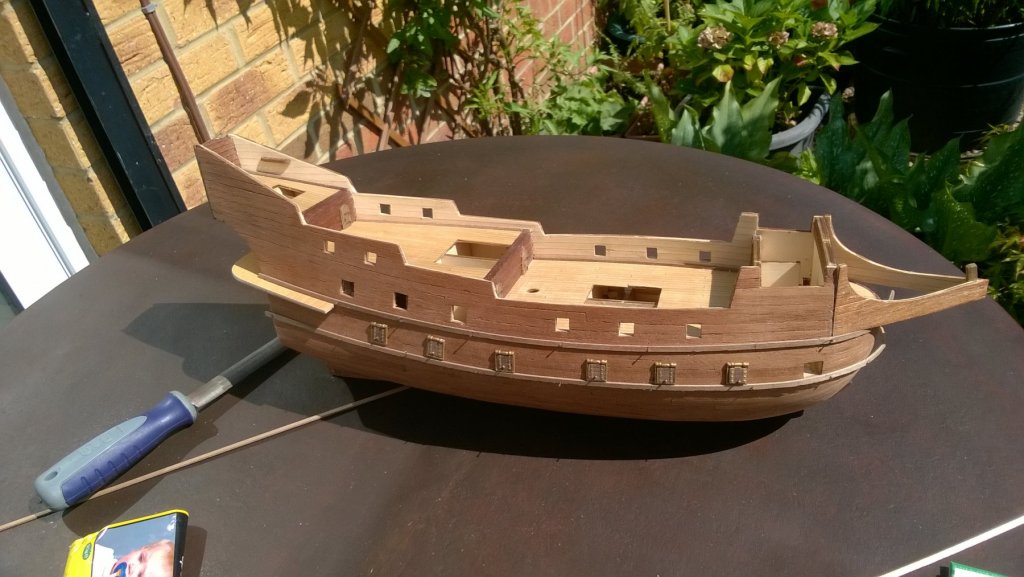
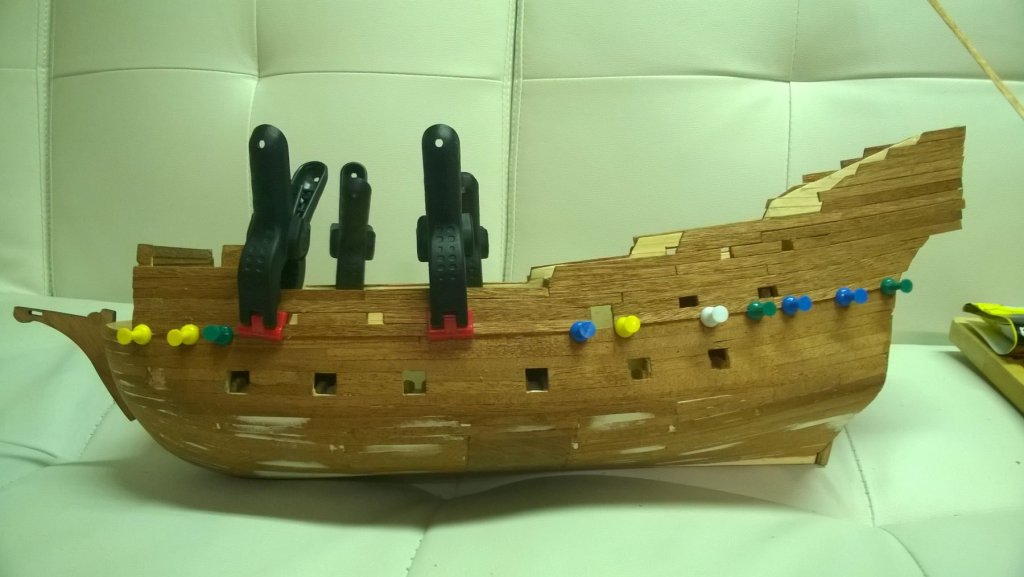
I really like the idea of having shiny brass cannons to adorn the ship but have decided to go for a more realistic effect. I first painted the barrels matt black and the dry brushed with a very dark grey to highlight the edges. Pretty happy with the result though am happy for ideas to improve them. The railings for the fore, quarter deck and poop deck are now in place as well as steps and the wheel house. The gratings are dry fitted along with the bitts. These still need to be varnished. I have not been sure what to do about the captains cabin windows. I decided to paint them gold and then paint the internal squares with gloss red and blue paint to simulate stained glass. As I have now glued them in place it is too late to change my mind now. I must admit they look better without the camera flash. The fore mast channels are complete and the mizzen need to be finished. After 3 attempts I have removed the main mast channels again. I hope to replace them this week or next month after I come back from holiday. The Hauser plates have also been added to the bows but, as the lower whale curves up at the bows I have placed them below the whales instead of above.

- 68 replies
-
- 1
-
-
- san francisco ii
- artesania latina
- (and 1 more)
-
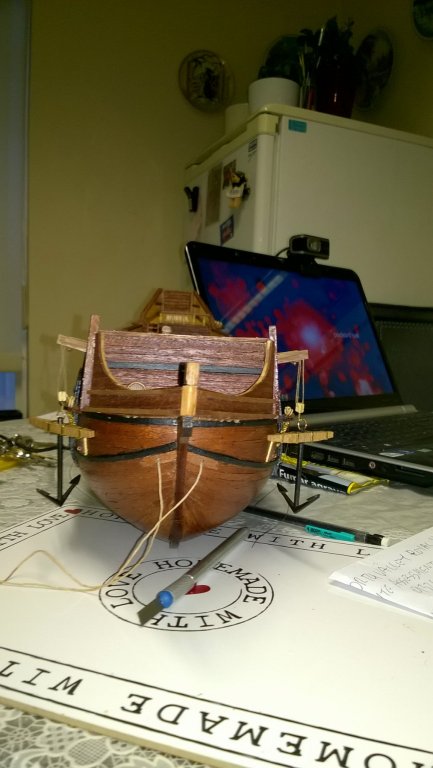
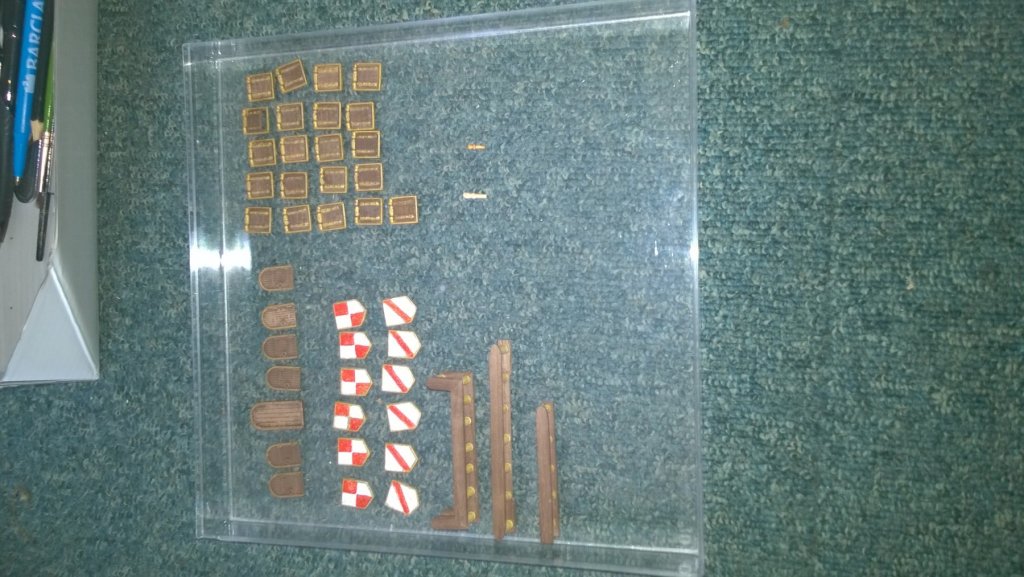
I have found it hard to concentrate on the build for the last 3 months but have been working on bits and pieces during this time. The stern gallery has been completed and I have added the shields on the stern and port side. The cat davits and beak have also been glued in place. I spent a while trying to research how the davits should be rigged and, not finding any info, tried several times to find a method that looked ok. Over the last 6 months I have also been searching for ideas for the deck cannons. Again I gave up and finally, last weekend completed the 10 I needed. I read somewhere on this site about using masking tape on the sides of the pieces of wood and then using PVA glue to stick them together to create identical pieces. I was a little skeptical but it worked a treat. I stuck 6 or 7 gun carriage sides together and the filed the edges down to get 20 identical sides.

- 68 replies
-
- 2
-
-
- san francisco ii
- artesania latina
- (and 1 more)
-
I have also made a start on the chain plates. These are very fiddly and have been done by first tying thin rigging thread around the dead eye and tying this to the end of the piece of chain. Once these have all been made they will be glued into the notches in the channels and a strip of 2x2mm strip added across them. I still have not decided on the cannon carriages yet but have cut the sides for them and am cutting the notches for the trunnions and axles. I will probably only have front wheels attached though. I have also re made the steps provided as I was not happy with how the originals looked.
- 68 replies
-
- 1
-
-
- san francisco ii
- artesania latina
- (and 1 more)
-
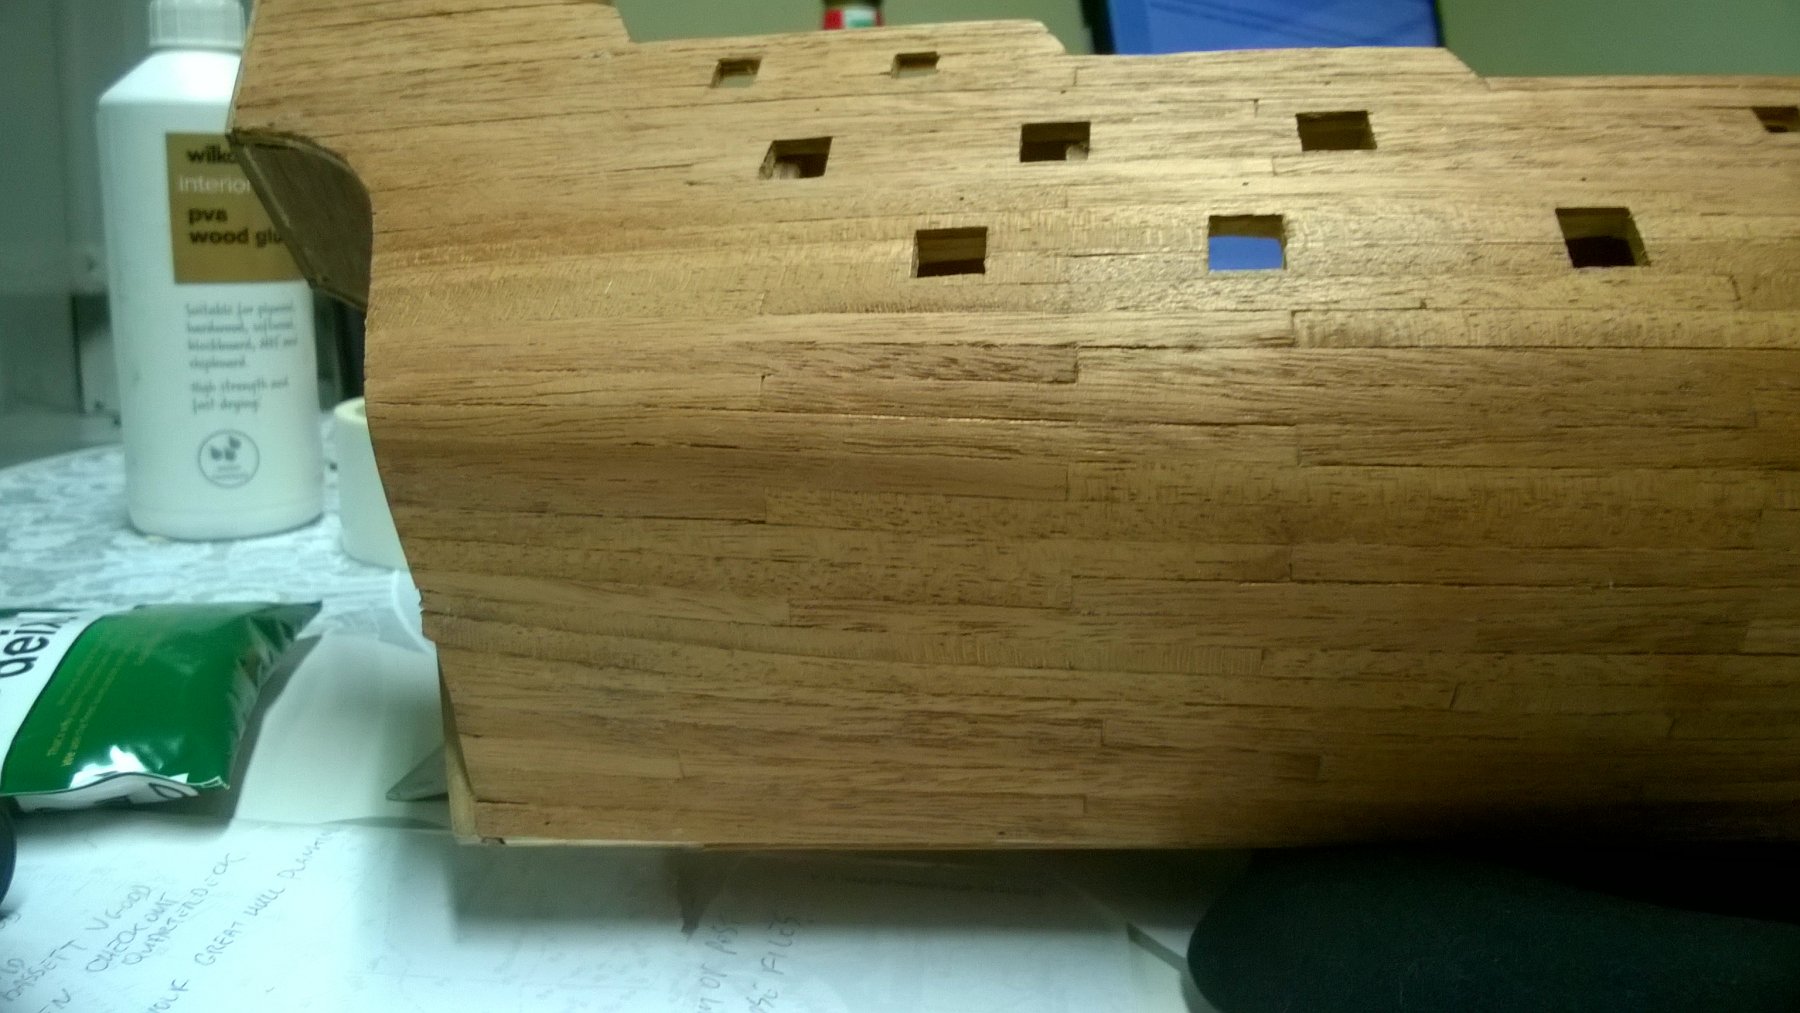
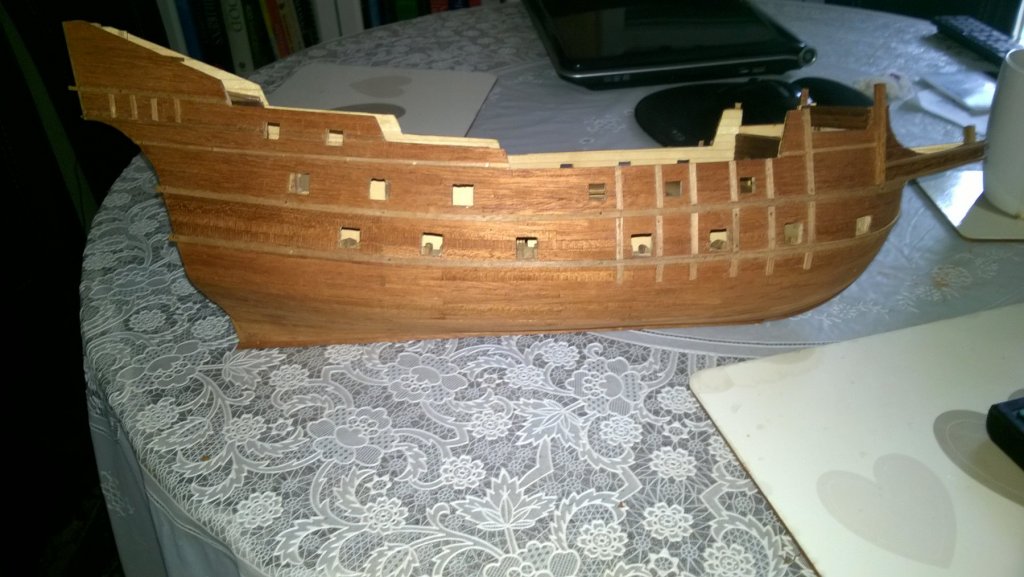
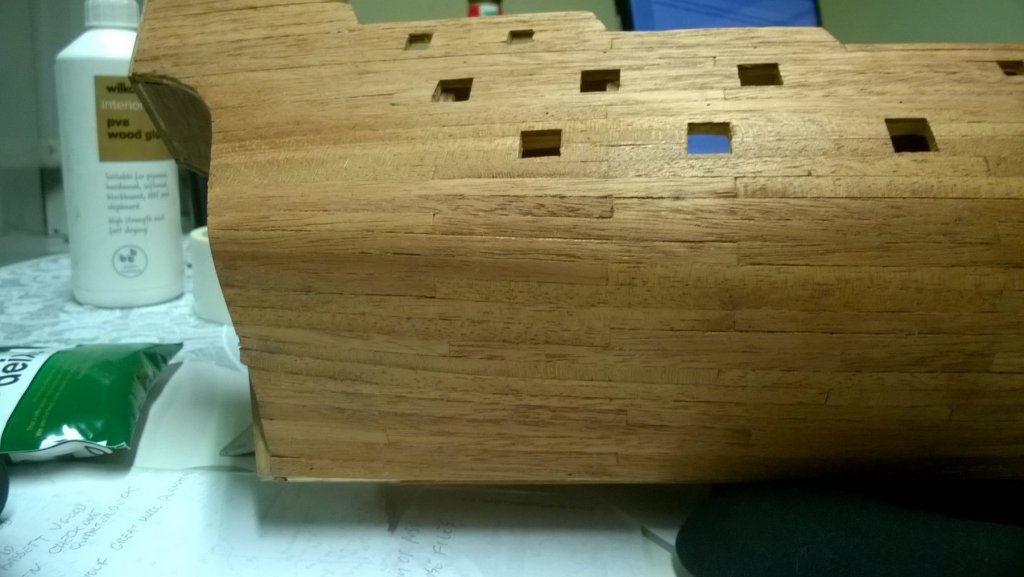
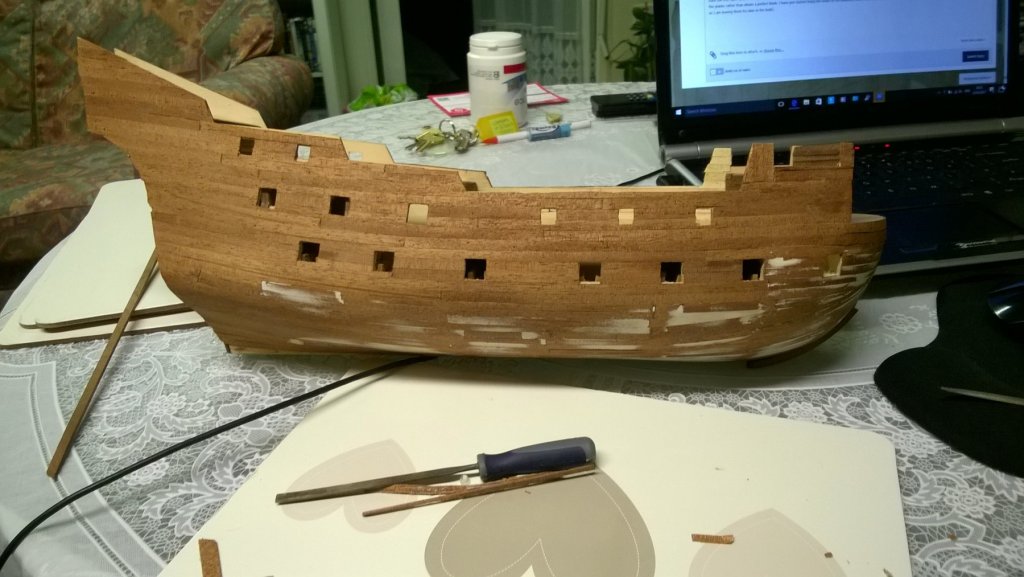
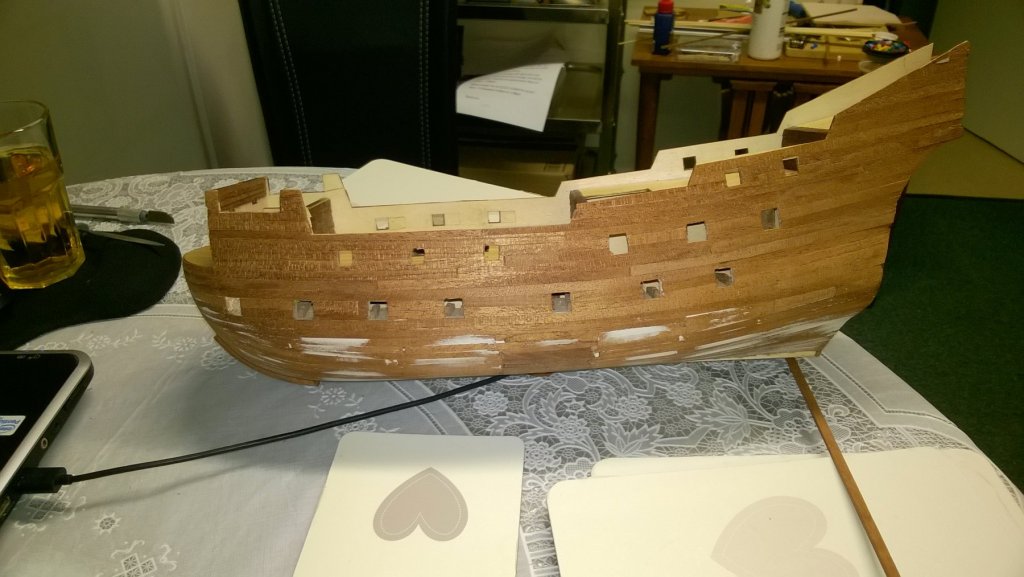
Finally I have got back to adding some more photos and updating the post. Progress has been slow over the last couple of months but things have progressed a little. I have given the hull it's 1st coat of varnish and painted the rubbing strakes and gunwales black. The upper gun ports have also been added along with the gun ports that will be closed.. I have given up on making gratings for the bow, mainly because I have run out of them as well as them constantly breaking while being cut. and have improvised instead. Once the beak is fitted they should look good.


- 68 replies
-
- 1
-
-
- san francisco ii
- artesania latina
- (and 1 more)
-
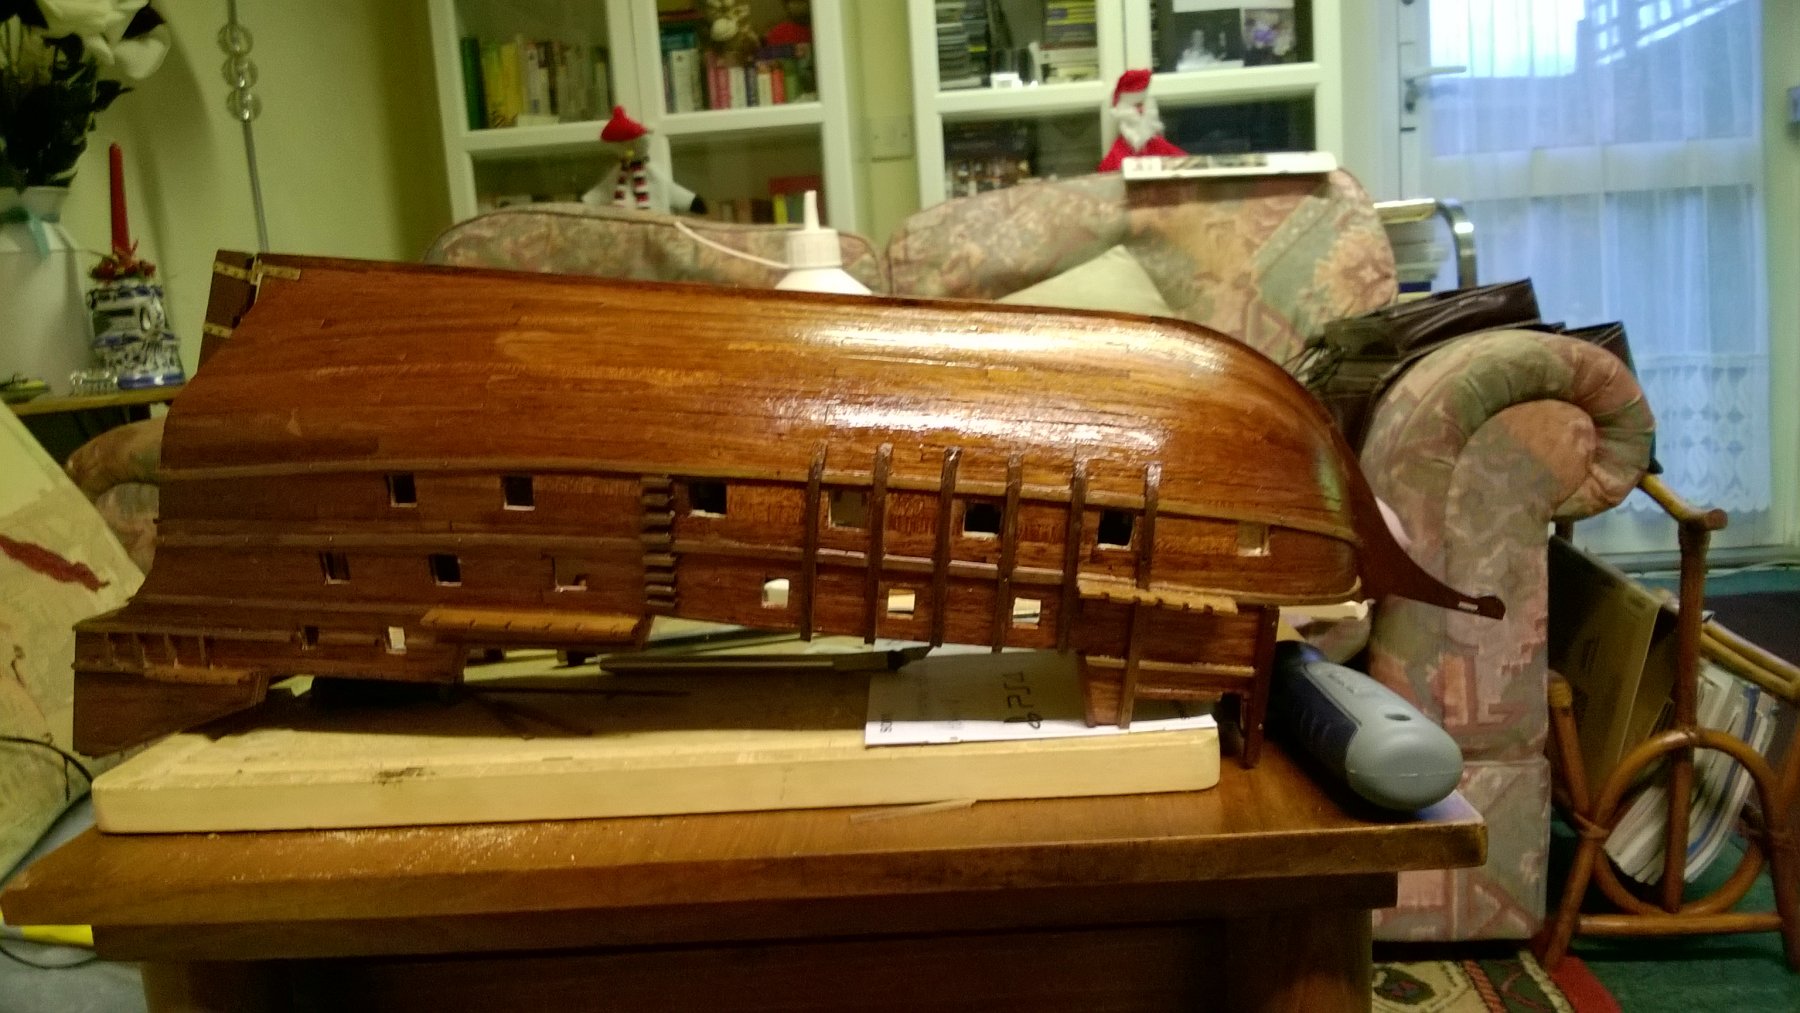
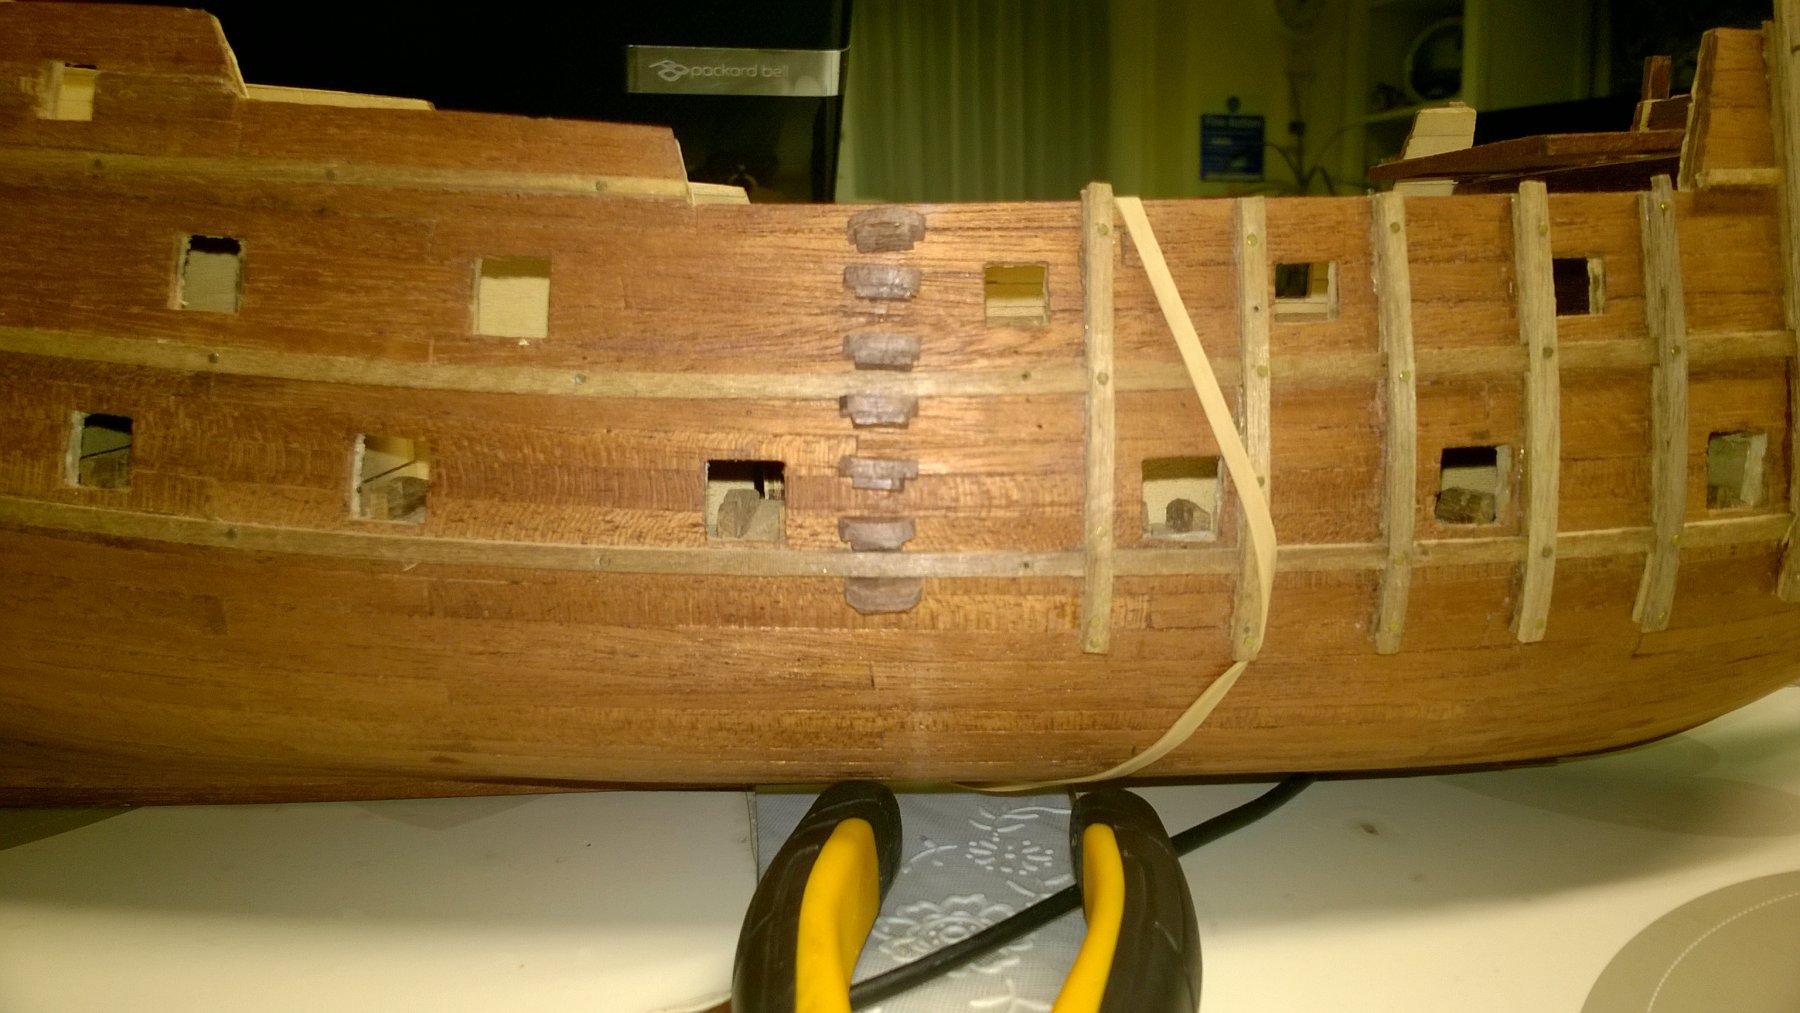
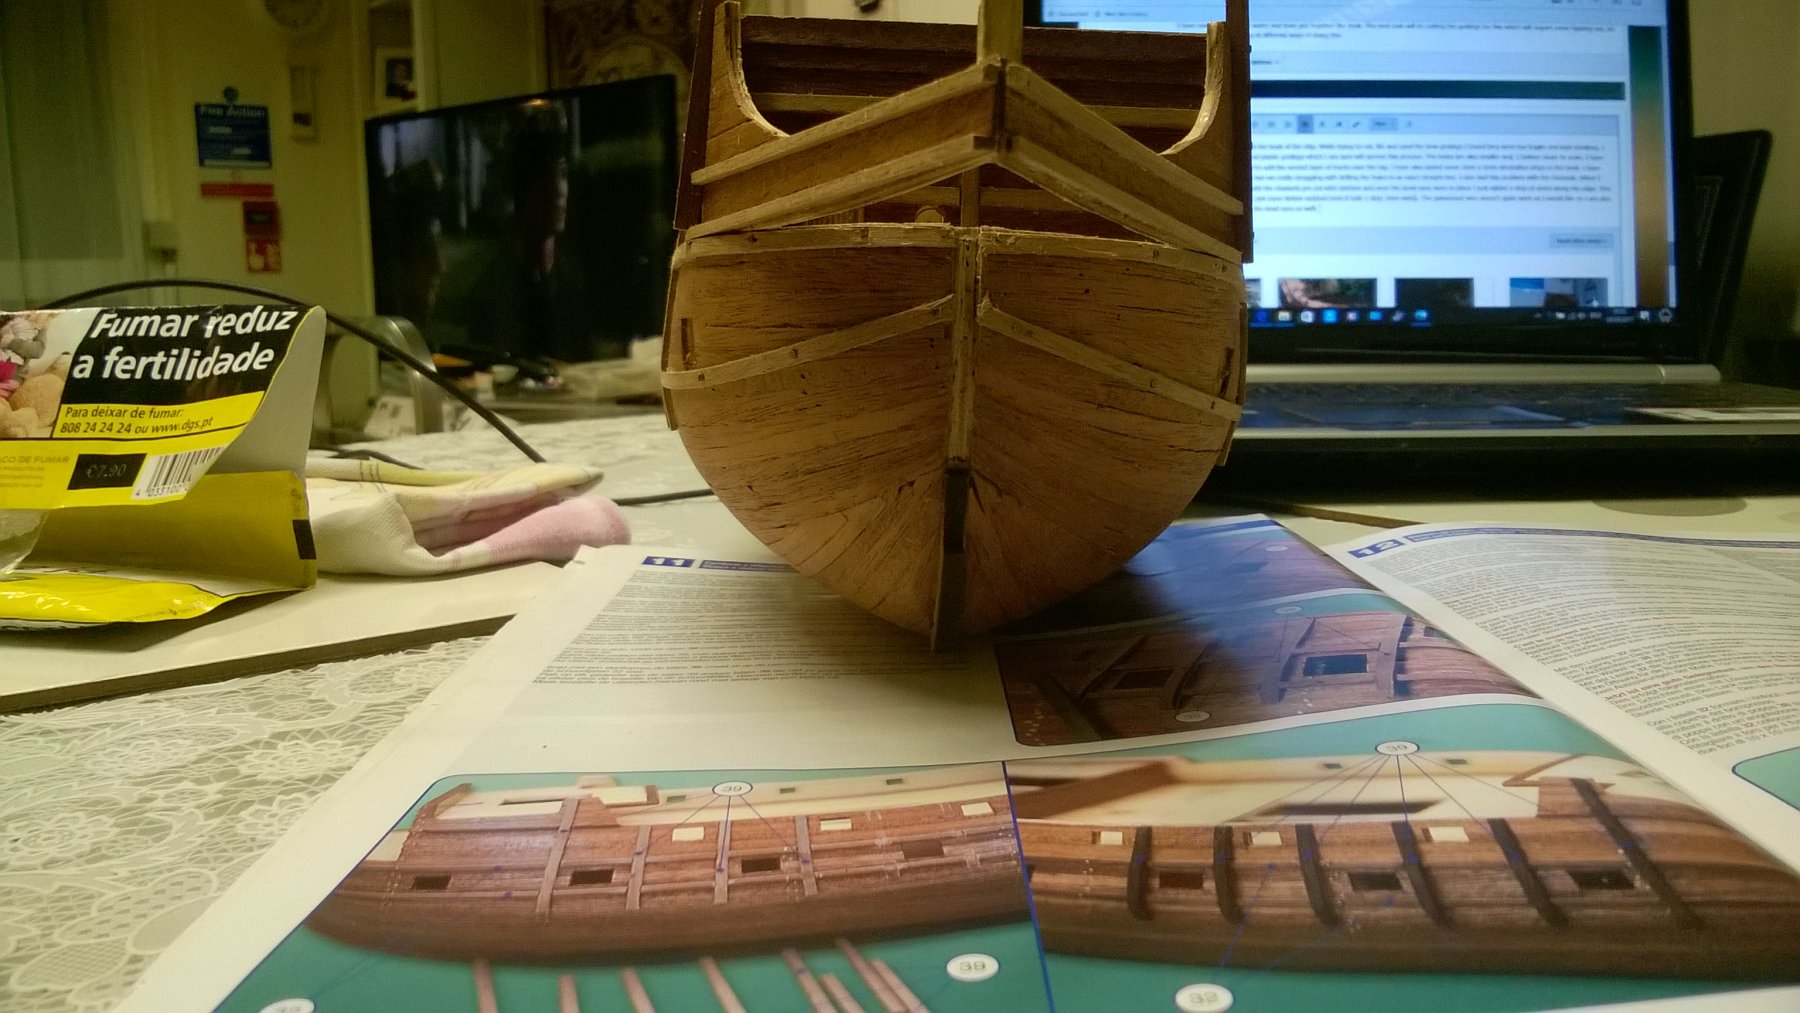
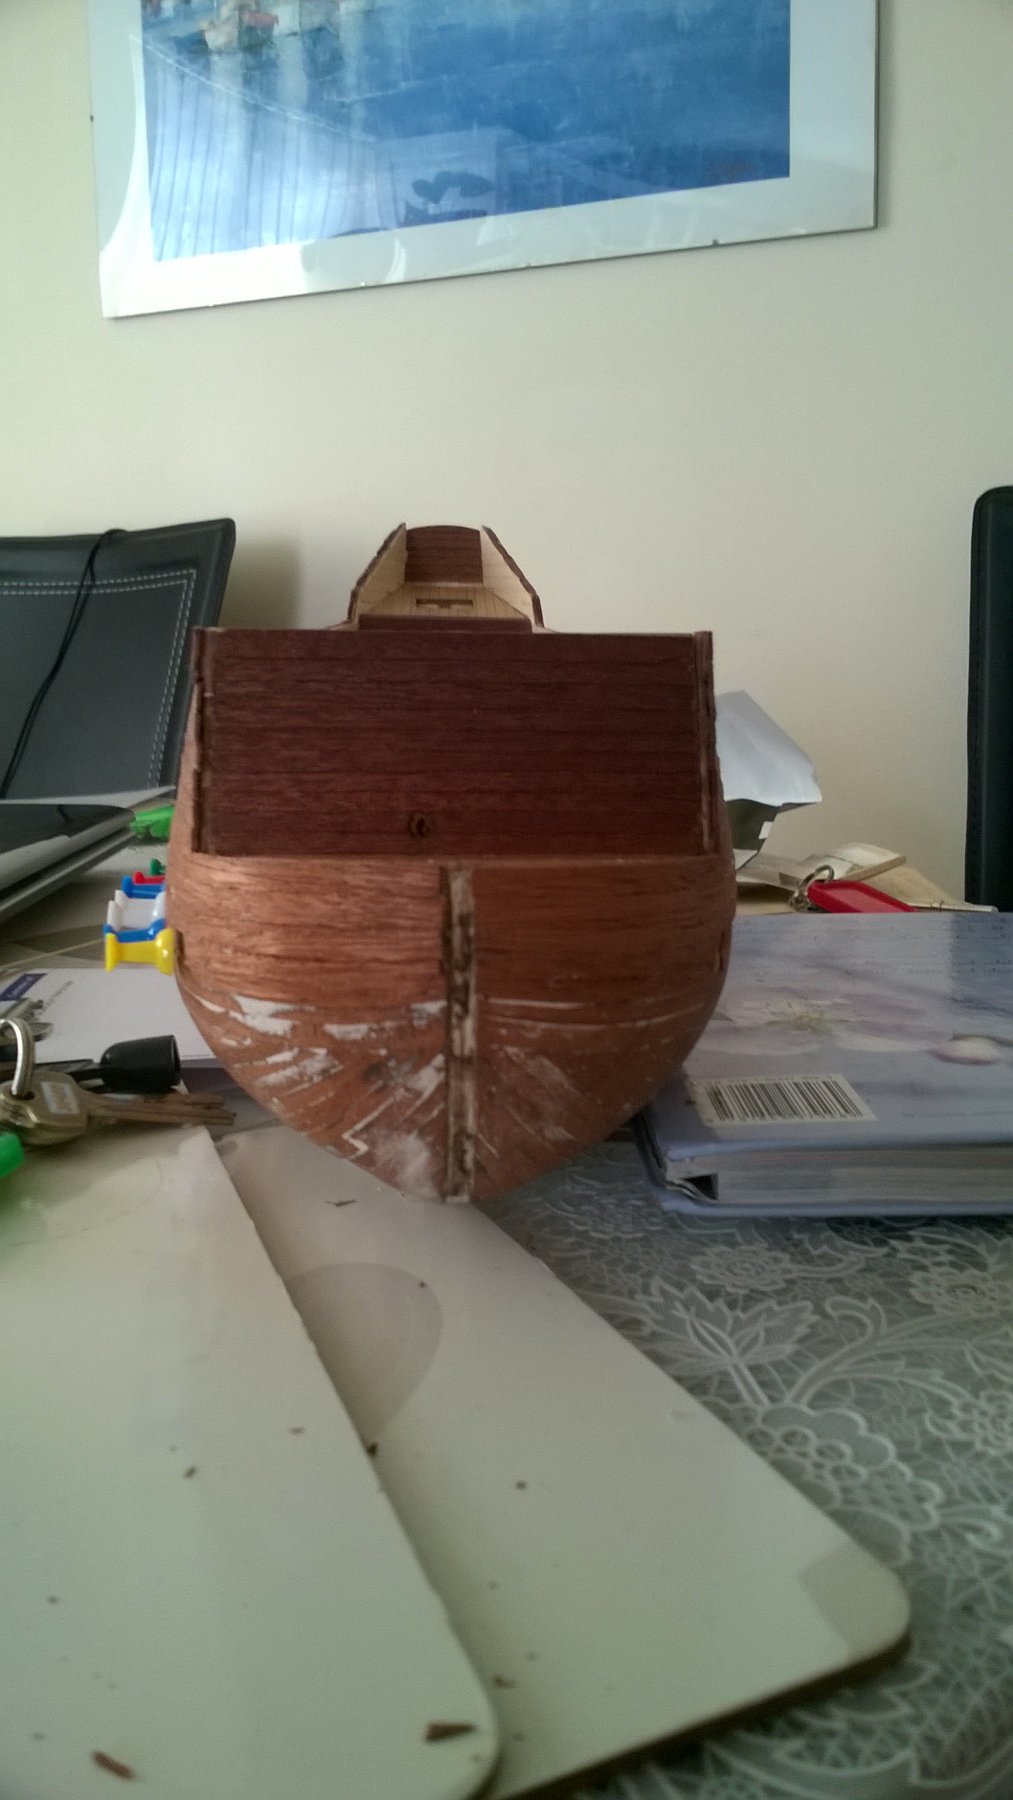
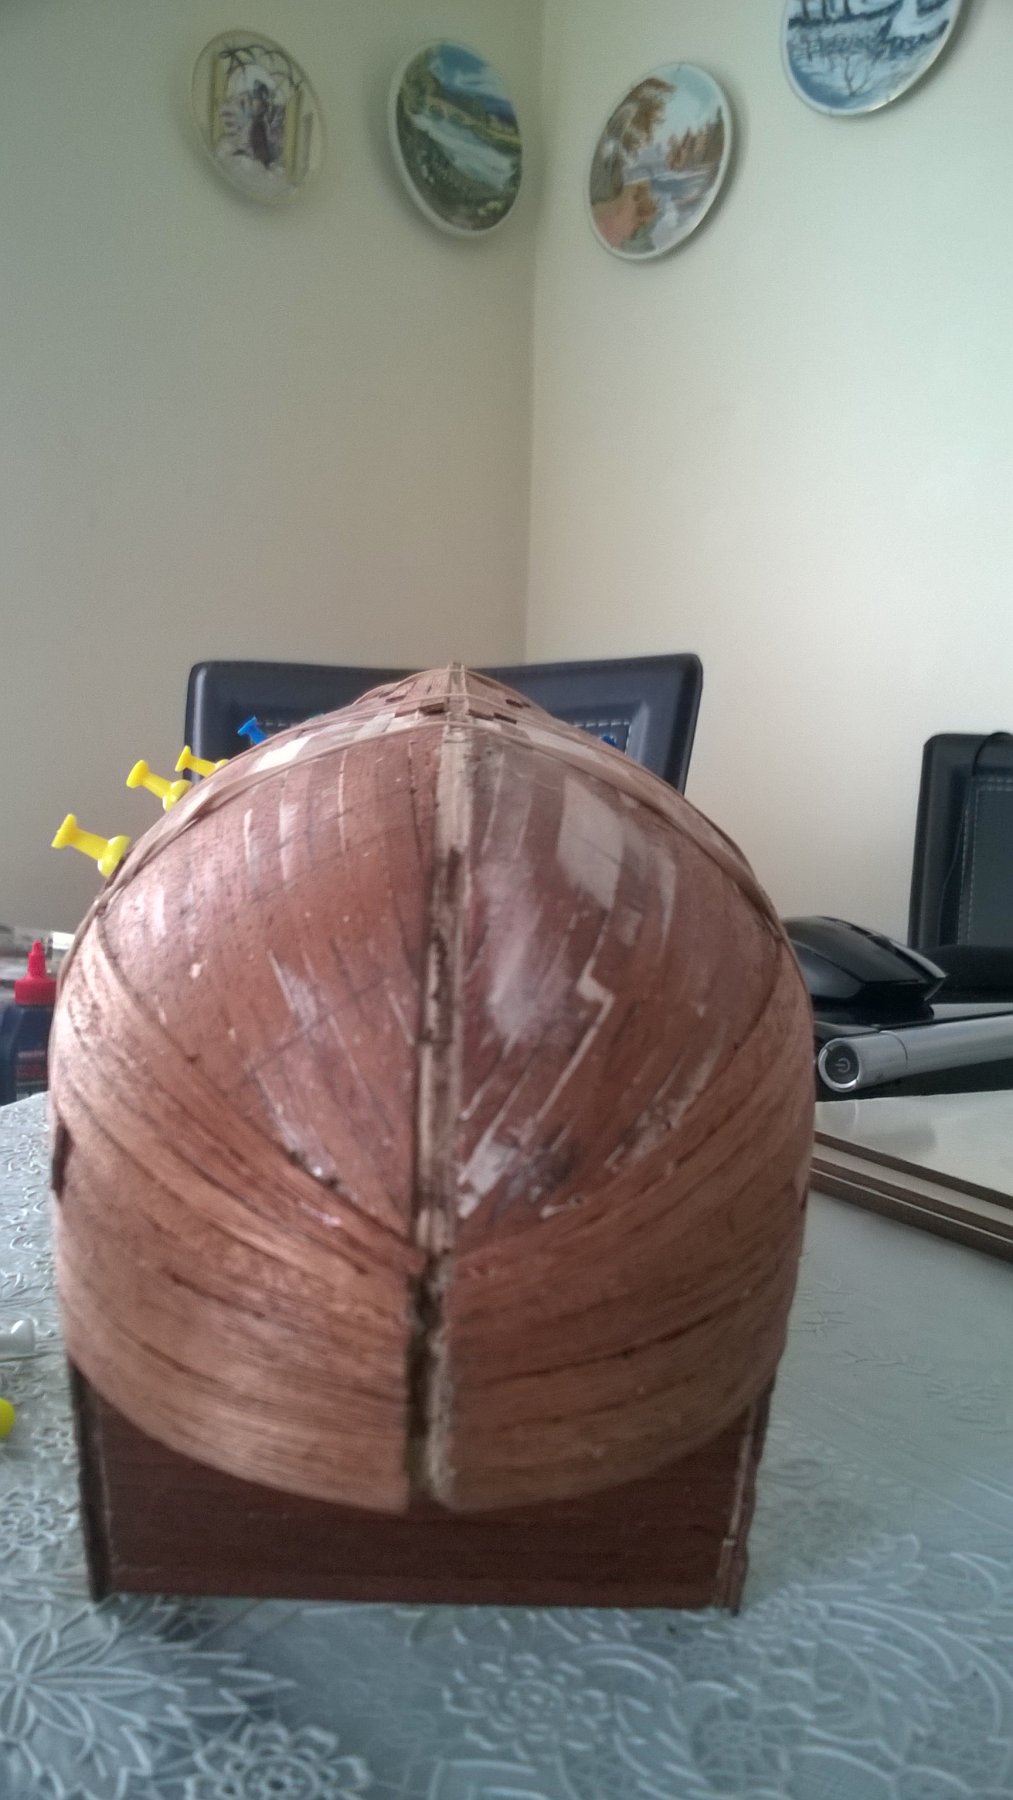
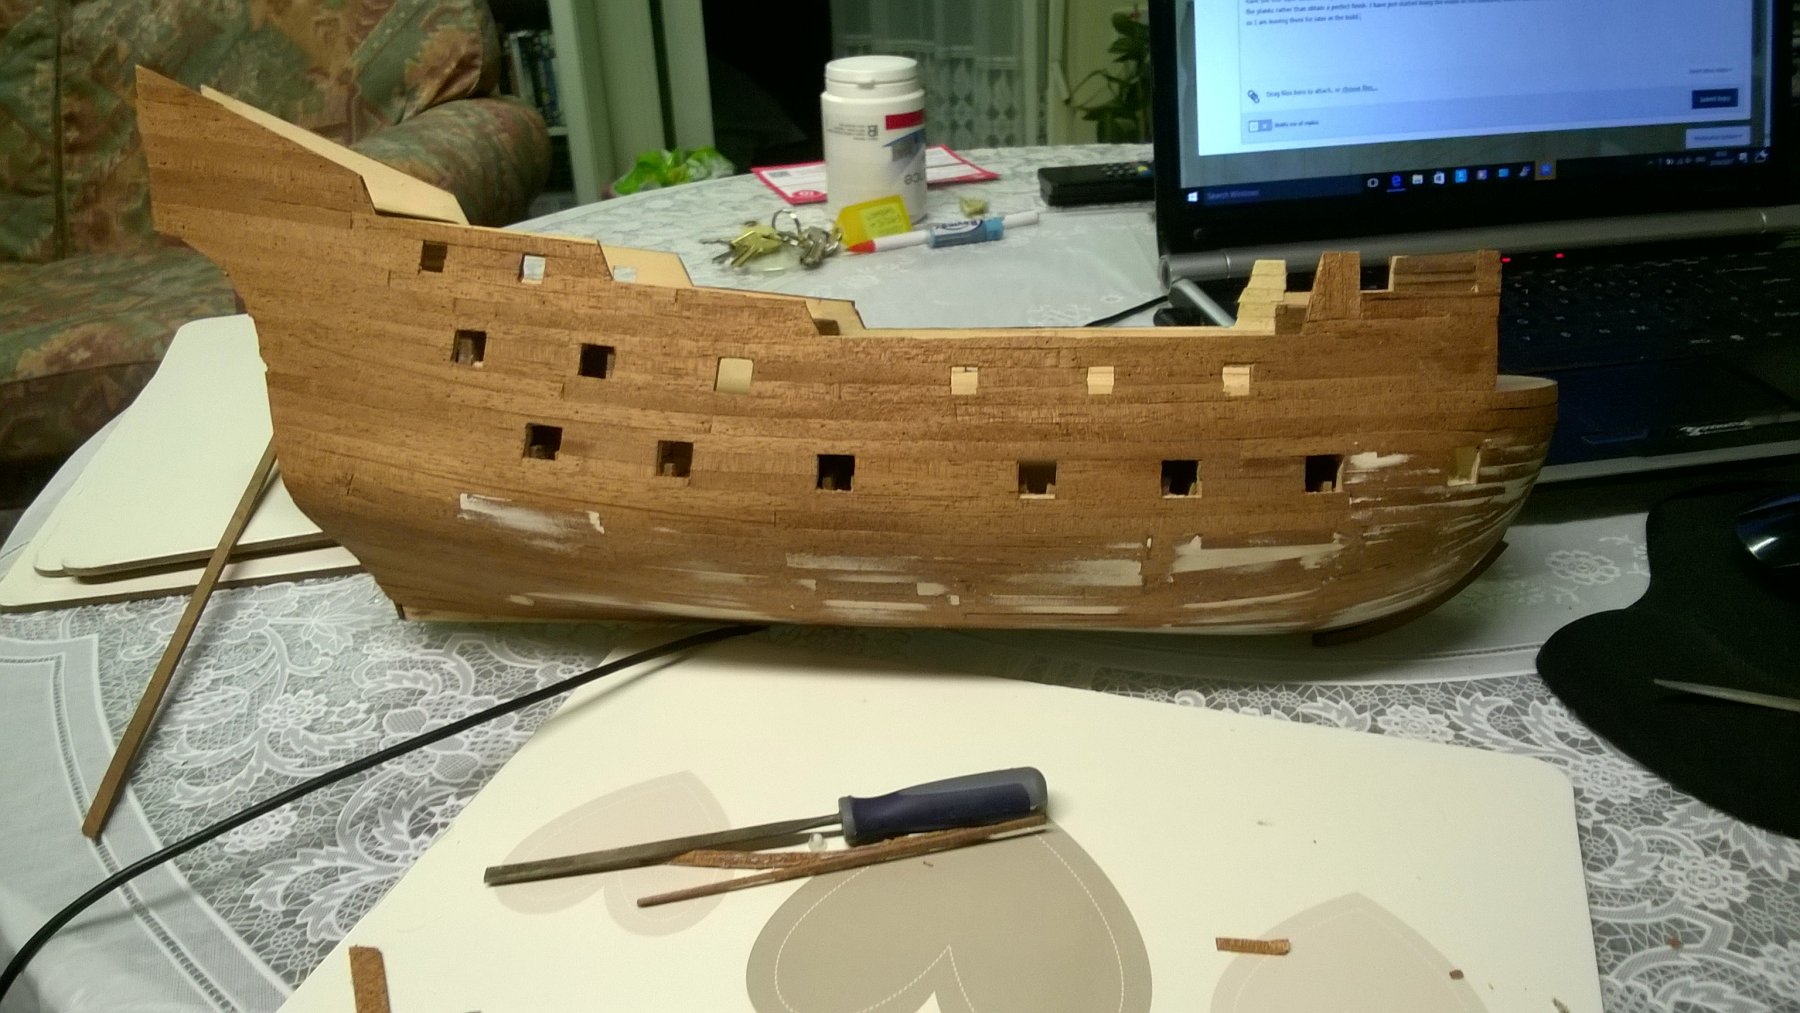
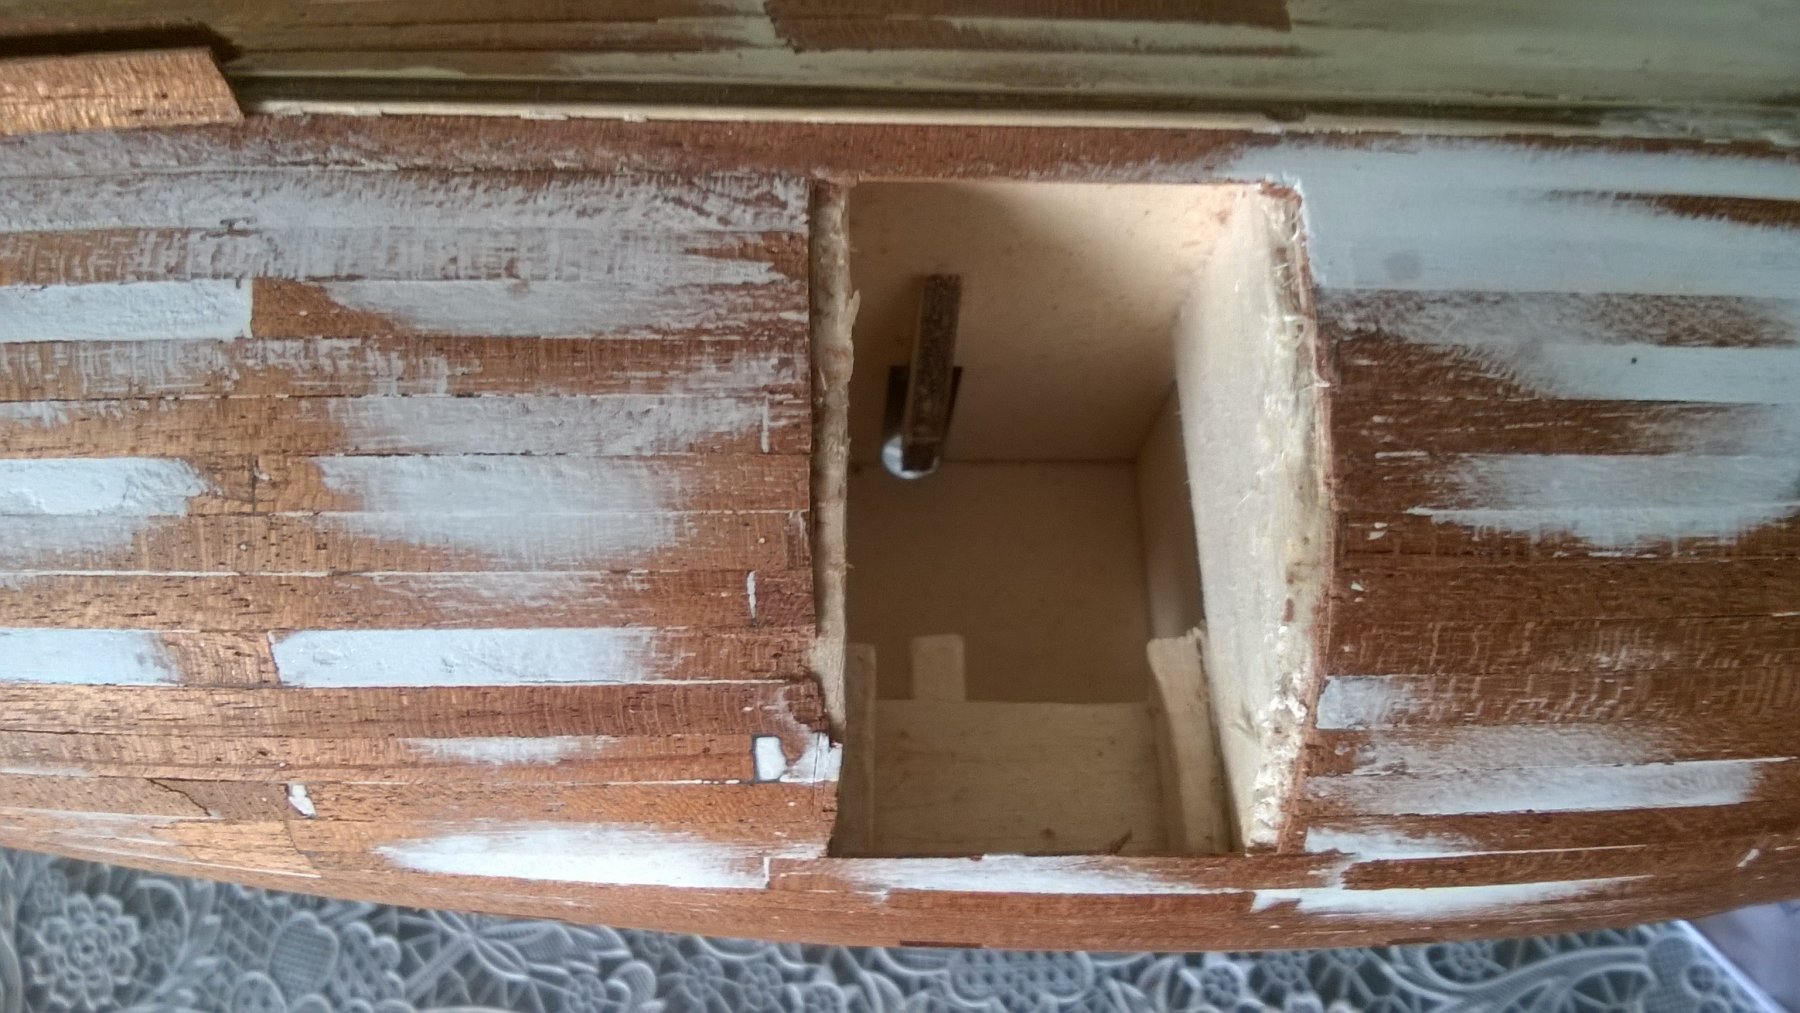
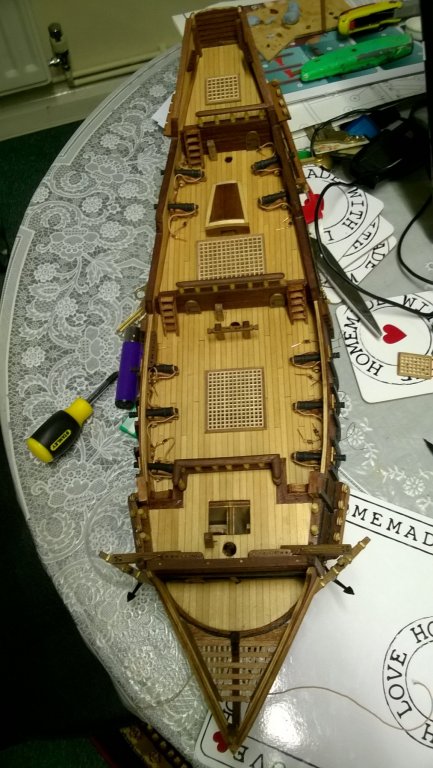
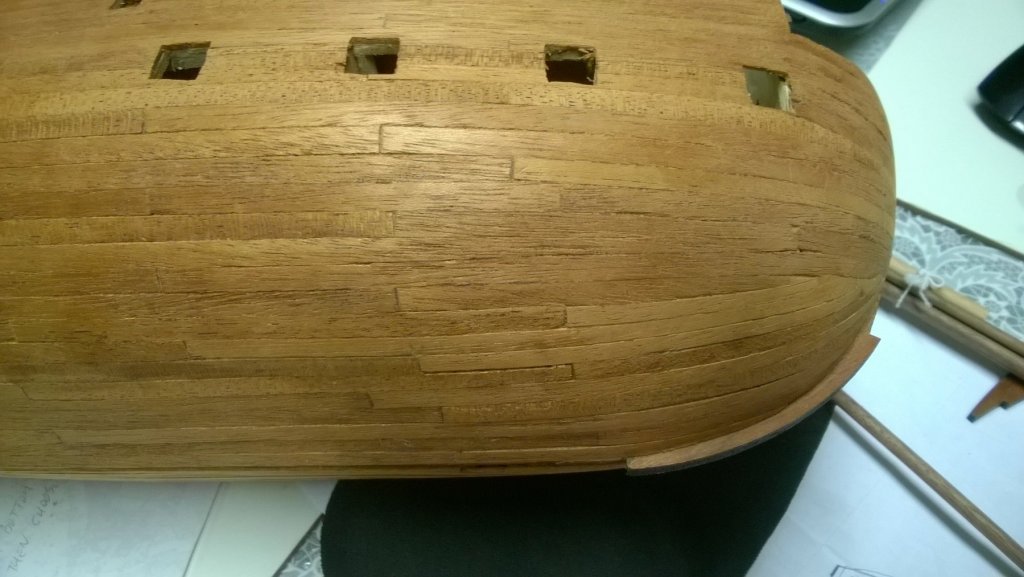
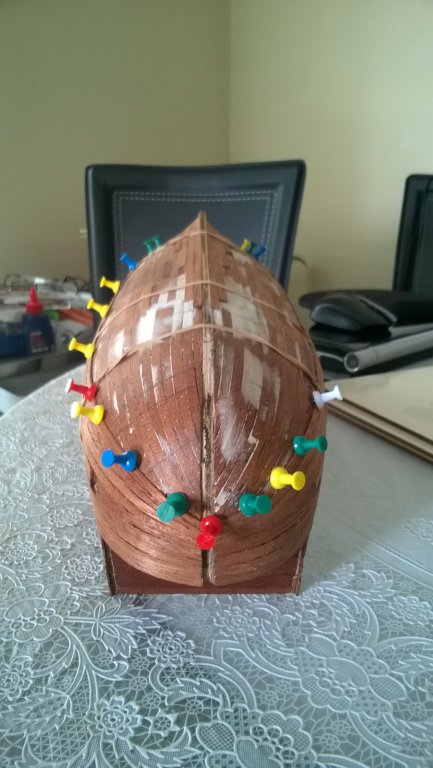
Finally I have returned to this post. I have taken some time out and continued researching without much luck. There seems to be very little information regarding 16th century Spanish cannon carriages or anything else. I have also spent more time reading up on the rigging and have now fitted the channels. I have cut out notches for the dead eyes which will be enclosed by 2 X 2mm strips. I have no idea how I managed it but when I added the hull steps to the sides I found that I had cut out one of the gun ports where the steps should go .This error occurred on both sides. I tried adding the steps further forwards but this meant that they ran up and would interfere with the main mast pin rack. I had no choice but to redo the gun port in the correct position and plank over the wrong one. I thought this would be almost impossible but was actually much easier to fix. First I had to cut out the planks between the 2 gun ports and move the dummy gun carriages to their correct location. Then I added 2 batons with a blob of glue top and bottom and, with tweezers pulled them into place inside the wrong gun port and the edge of the new one. I then cut 2 strips of 2 X 5mm to fit and pushed them onto the batons. Once they were dry they were sanded smooth and the steps attached. The notches cut into the channels were done after dry fitting the lower masts and running line from the crows nest to the channels and aiming not to have the chains obstructing the gun ports. The after most rubbing strake still needs to be re done as I was not happy with the way it looked. I also still have a few gaps between planks along the hull to fill in. The wales are going to either be stained or painted black but I've not decided which yet. Again the holes from the pins will need to be filled first. The bow gratings are also posing a problem for me to get them symmetrical without filing them down too much. I have also been looking to see if gratings were actually used at this time as well but with no success. It is a shame that cameras were not invented that long ago. Research would be so much easier.

- 68 replies
-
- 3
-
-
- san francisco ii
- artesania latina
- (and 1 more)
-
Thanks EJ. Sorry it's been a while since last post. I am back to again reading more than building. The lower gunwales in the instruction book appear to be almost parallel to the upper one but, try as I might I could not avoid it turning up more at the bow. After seeing most posts looking the same, I have left them as they are. I really want to finish the outer hull before I start on finalising the in board details. At present though I am looking at adding the channels. I am worried about the fore mast ones as in most pictures of sailing ships the main and fore channels are level with each other. On this kit the main channel is higher up than the fore. I Don't know if, whether to me, this doesn't look right or feel right. It seems that with this build you really have to be thinking two (or 10) steps ahead of what you are currently working on. My only other wooden kit the instructions also said the channels should be put together during the hull construction. I found, however, that there was so little space for me to rig the dead eyes, that I then removed the channels and rigged the deadeyes before re gluing them after I had dry fitted the lower masts. This would now result in me having to prepare the lower masts before I have completed the hull. Also, at present, I still haven't decided where to place the fore channel but I will be using chain instead of twisted wire. I have added the rudder. This was also a complicated procedure as the brass strips need to be carefully squeezed around the brass rod. I also had to add 4X2mm mahogany strips between the gaps as the hinges produced too large a gap between the rudder and the stern post. I now realise that I should have found a way to cut the brass to length required before attaching them to the rudder as it is very hard to file them down after fitting. More photos will follow next time.
-
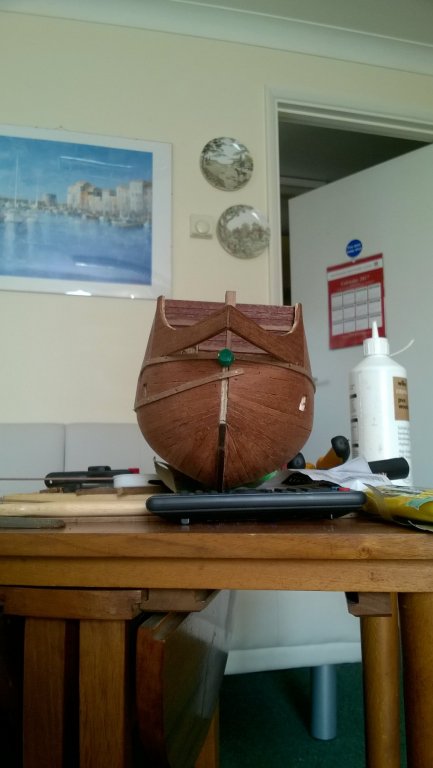
Since my last post I have progressed with the beak of the ship. While trying to cut, file and sand the bow gratings I found they were too fragile and kept breaking. I eventually gave up and have since ordered plastic gratings which I am sure will survive this process. The holes are also smaller and, I believe closer to scale. I have added the rubbing strakes and now need to add the second layer of tracks over the top. I have also added some 2mm x 2mm decorative strips to the beak. I have tried several times to make the pin racks but am really struggling with drilling the holes in an exact straight line. I also had this problem with the channels. When I built the Golden Hind she was supplied with the channels pre cut with notches and once the dead eyes were in place I just added a strip of wood along the edge. This will be a far easier method for this build, (yet more timber ordered even if only 1 strip 7mm wide). The galvanised wire doesn't quite work as I would like so I am also looking at a different method for rigging the dead eyes as well. I also tried to have the lower rubbing strake running parallel with the upper But could not get it to fit and so have allowed it to rise up at the bow.


- 68 replies
-
- 1
-
-
- san francisco ii
- artesania latina
- (and 1 more)
-
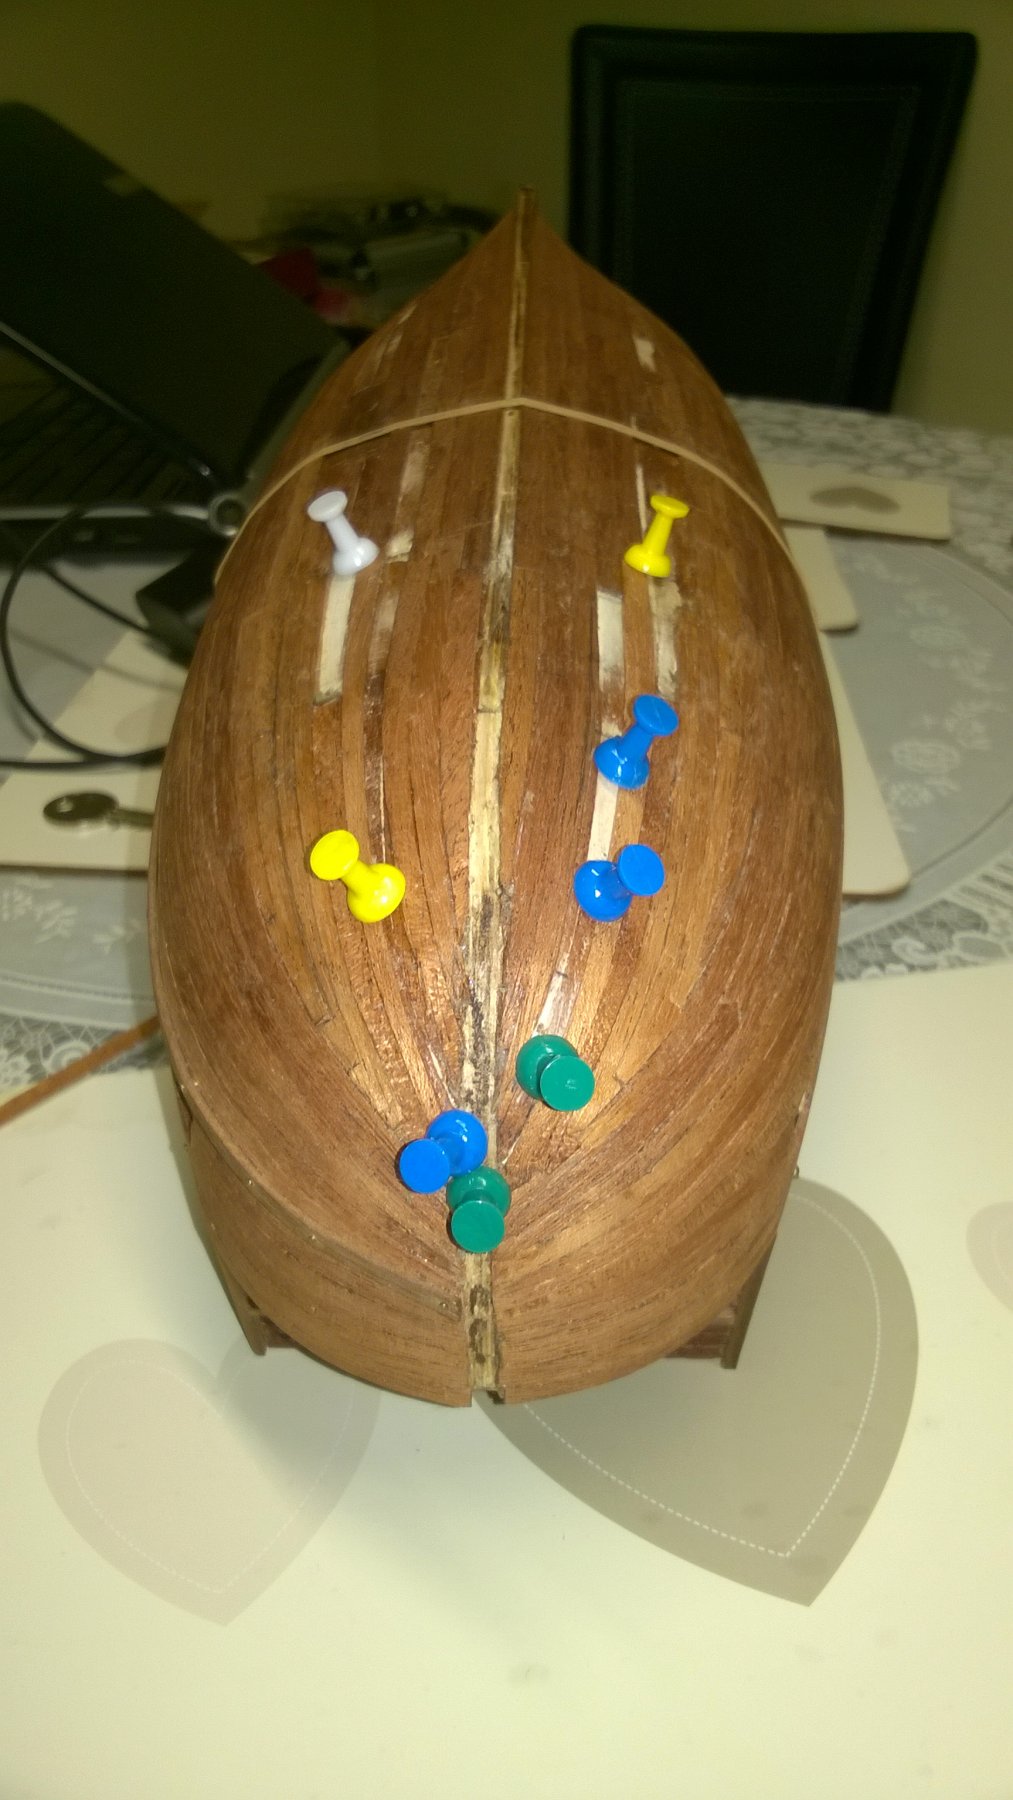
I still have not figured out how to edit the post and put text after adding photos I am simply replying to my previous post. The second planking is now complete (phew, at long last) I don't think it looks too bad but I did end up with an odd shape left between strakes about a third of the way up the hull though more towards the stern.. I managed to shape a couple of strips to fill in this space which, again, I don't think looks to noticeable. Just another fine sanding down to do. I have now added the cut water and have put together the beak. The next task will be cutting the gratings for this which will require some figuring out. An hour spent already looking at different ways of doing this.
-
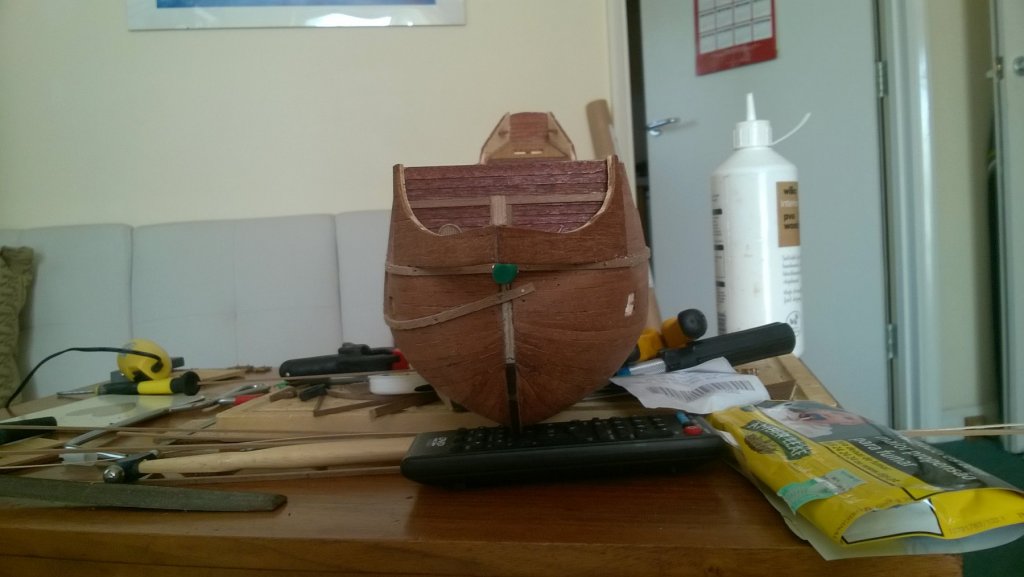
Finally I have got back to add to this post. Since last time I continued with the second layer of planking. I was hoping that the 1mm mahogany sheet could be cut into 2 cm wide planks which I would be able to be cut to shape. However, having cut the first one, grain of the wood did not allow it to curve to fit. Instead I decided to still use the sheet but taper and shape the planks. I have seen photos of the technique but have no idea what the term for these joints would be. I found that as I was only laying a plank either side at a time I was able to work on other details while the glue was drying. I started painting the kit cannons which I plan to use on the upper decks. I found that the paint, as it had dried out since the last use, was now more shiny. I re painted the door frames, gun port frames and hinges which now look better. I have seen a lot of members have re made the doors which are supplied but, at the moment I neither have the tools nor work space to do this properly and have fitted them as supplied. I dry fitted the rubbing strakes on the port side to get a feel of how the sides were shaping up. I also drilled the holes for the gun port lid ropes to pass through and will put pins through them when I come to sand and varnish the hull. I have fitted the "deck stringers" along the joins between the inner hull and the decks and have started on the pin racks. The first of these are the mizzen which I found fairly easy. After 4 attempts at the main mast racks I am still unable to drill 8 1mm holes in a perfect straight line so am still working on these. I have also built up the wheelhouse although I was not comfortable with the 2mm square lining around the roof, I improvised with .6 mm ramin, supplied for the decks. It looks a little hand made but I am quite happy with it.

-
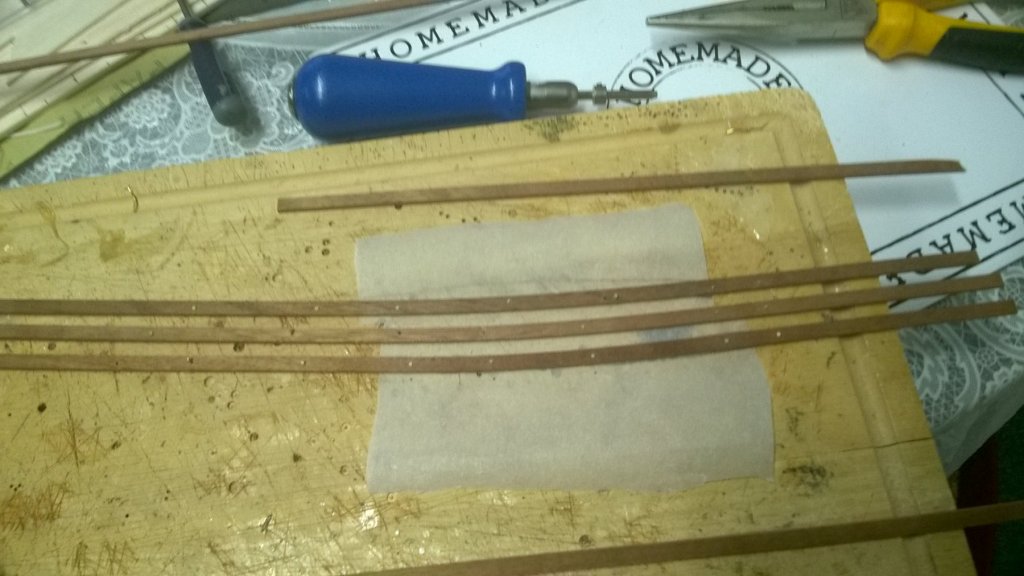
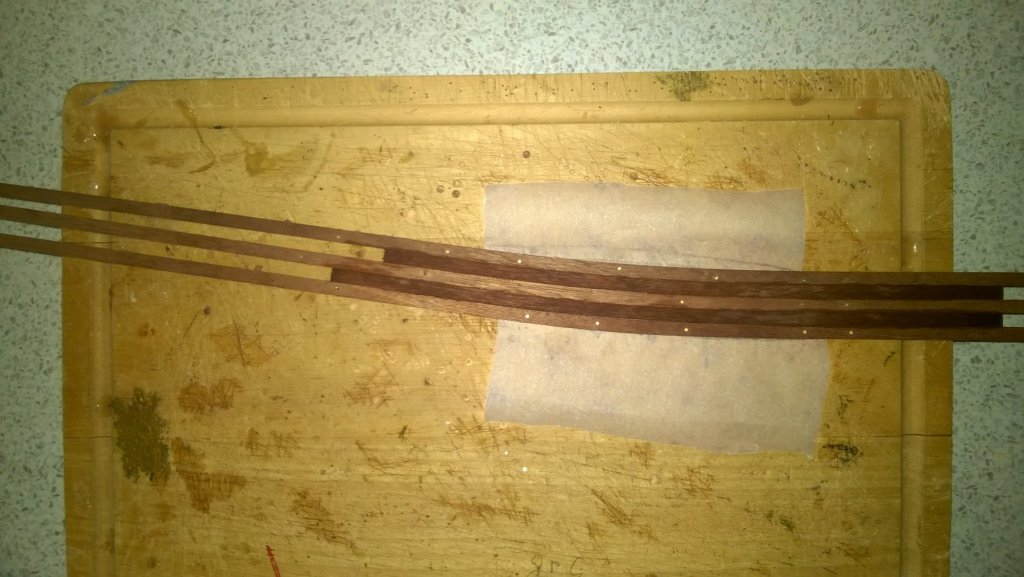
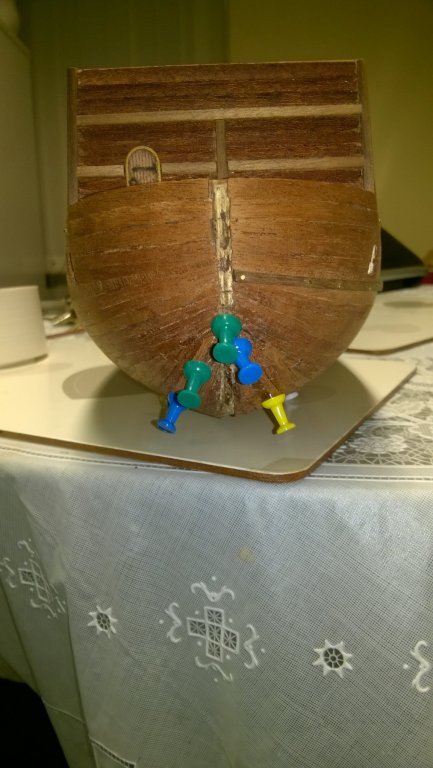
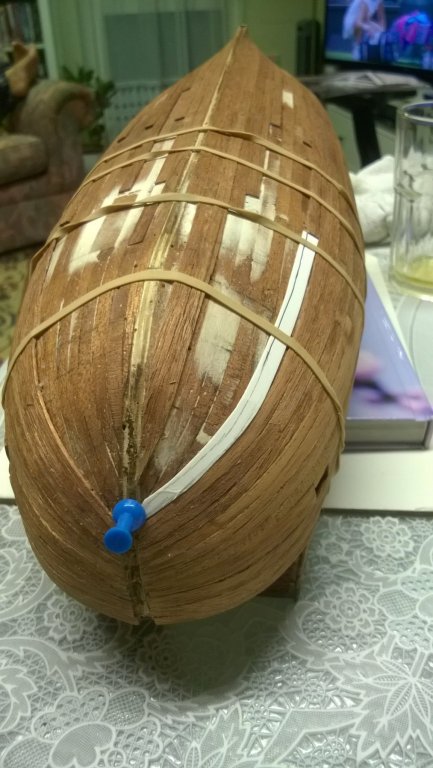
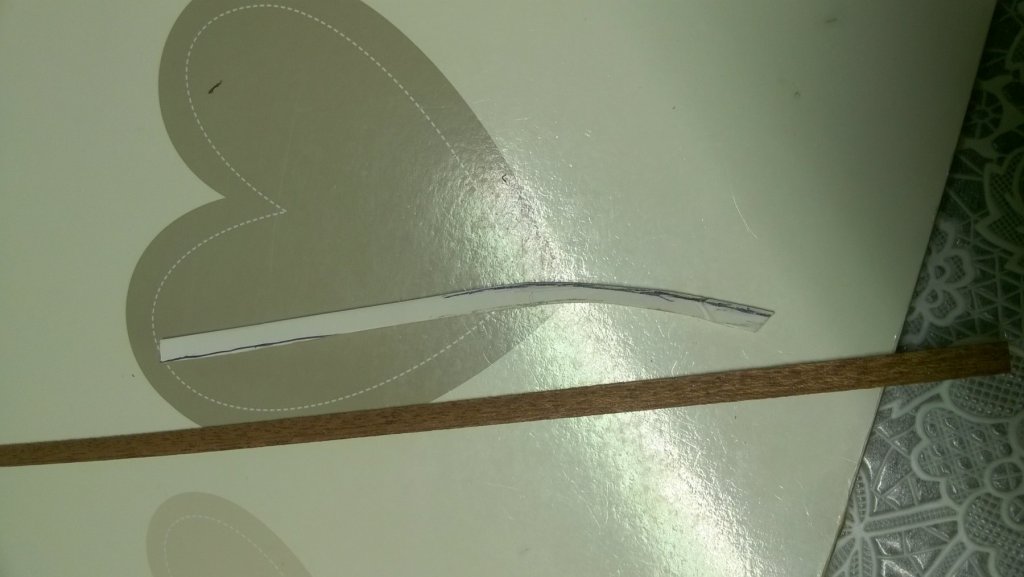
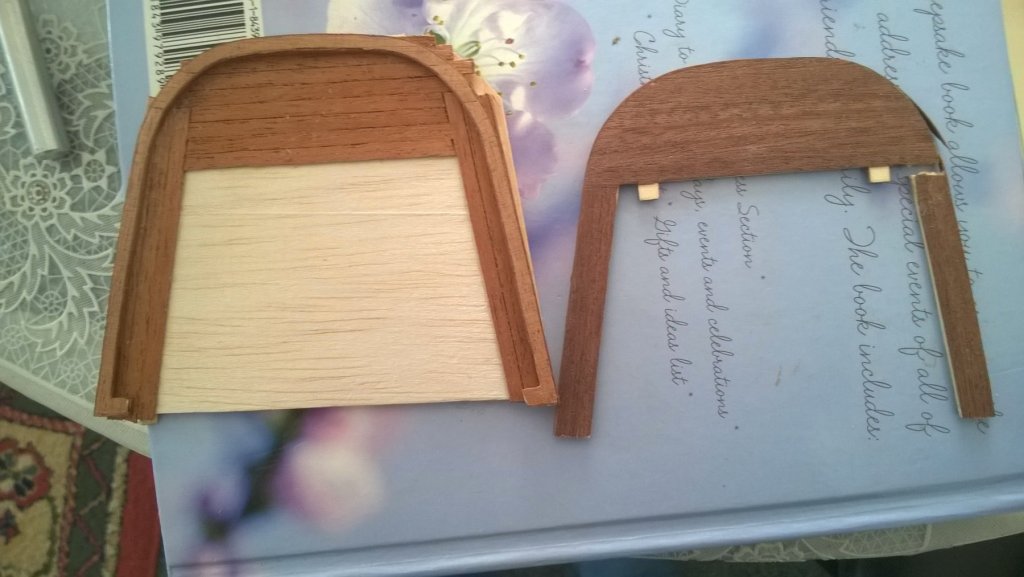
I realised after adding the previous post that I should have said drop planks rather than stealers. Having added another strake below the drop plank I am unable to continue planking without shaping the next few strakes. The planks at the bow are now curving too much to allow the planks to bend. At this point I have ordered a mahogany sheet 1mm X 100 mm which I shall endeavour to cut into 20mm wide planks and cut them to the desired shape. I have cut a thin strip of cardboard as a rough template as shown. I have changed the orientation of the second layer to, I had hoped, to strengthen the hull a little and also to avoid laying 1 strake above the other. Should I attempt another build after this one I will definitely add balsa wood between every bulkhead from top to bottom, rather than just on the edges of each bulkhead. This will allow me to place more pins to hold the planks in place after gluing them and not damaging the planks underneath. Another thing I was going to do was to mount the cannon rigging eyes to the inside of the hull before adding the second layer. However, I got carried away with the second layer and will now have to be much more careful when I fit them in place so as not to drill right through the hull. While I am waiting for the additional timber I still have plenty of things to do. The gun-ports need to be squared off, I can make the pin racks and maybe decide whether to leave the gratings as they are or paint them black. I still haven't decided which way to finish them.ish them.
- 68 replies
-
- 3
-
-
- san francisco ii
- artesania latina
- (and 1 more)
-
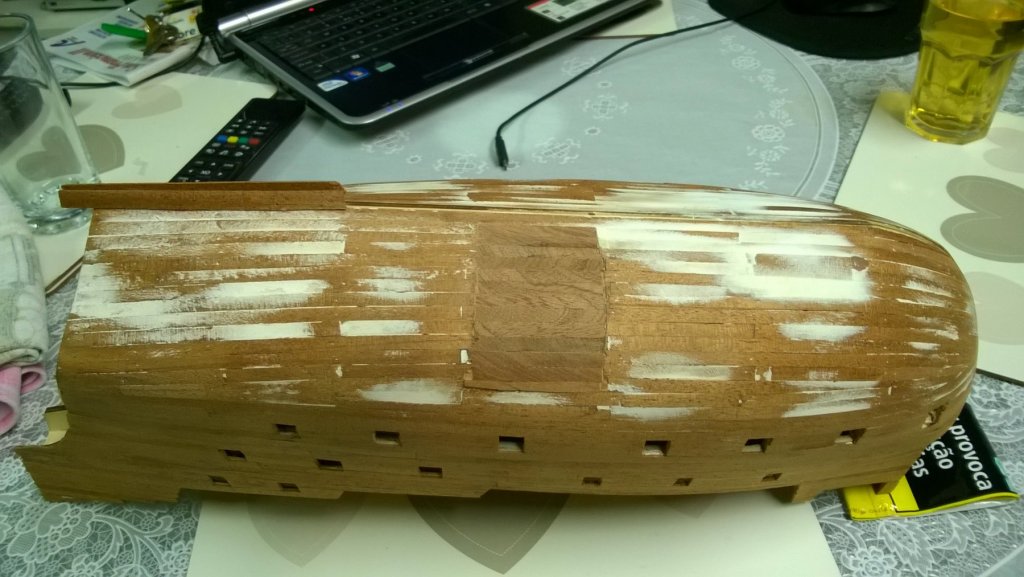
After a couple of mishaps I have finally got around to updating the post again. The second layer of planking has progressed quit well but rather slower than I had hoped. The upper hull is complete and most of the stern to mid-ships as well. The bows are presenting the problems I expected and are slowing me down further. While checking the fit of the stern gallery the deck snapped again. The first time this happened I thought I had reinforced it well enough but apparently not. As I was not happy with the original width port and starboard I used a sheet of balsa and planked top and bottom and also made the widths 2mm wider. This still needs rounding off. When the handrail supports are glued on there will be a little extra space between them and the hull. When I had completed the first layer of planking I found that there was a small bulge under frame 6. The keel at this point was level with the garboard rather than being sunk in. I have filed the false keel a little but still need to do a little more with it for the second layer to fit correctly as well as the cut water. I am now concentrating on adding the first stealer at the bows 10 strakes down from the bow sprit deck. I am wondering now if it should have been added a little further up though. Sorry I can't seem to get the text/photo's the way I want them.


- 68 replies
-
- 1
-
-
- san francisco ii
- artesania latina
- (and 1 more)
-
I have finally got around to updating this post. I spent some time on paining gun ports lids as well as the doors and starting on the shields. I have also started the second layer of hull planking along with lining the bulwarks and the stern balcony. It looks like I will need to be careful when planking around it as it does not fit as well as I hoped. I have new smaller belaying pins which should look closer to scale than the kit ones which look far too big.


- 68 replies
-
- 1
-
-
- san francisco ii
- artesania latina
- (and 1 more)
-
Thanks Spellapeaka. Second layer will be started in a week or two when I get a new order of mahogany strips. I am looking forward to starting the second planking with a little trepidation. I should have the first layer sanded completely smooth by then and hope to have the second planks fitting better than the first. My main aim with the first layer was to cover the hull and practise shaping the planks rather than obtain a perfect finish. I have just started lining the inside of the bulwarks, while I still have to fit the stern sections in place I am still not sure how well they are going to fit so I am leaving them for later in the build. These are the latest photos of my progress


- 68 replies
-
- 1
-
-
- san francisco ii
- artesania latina
- (and 1 more)
-
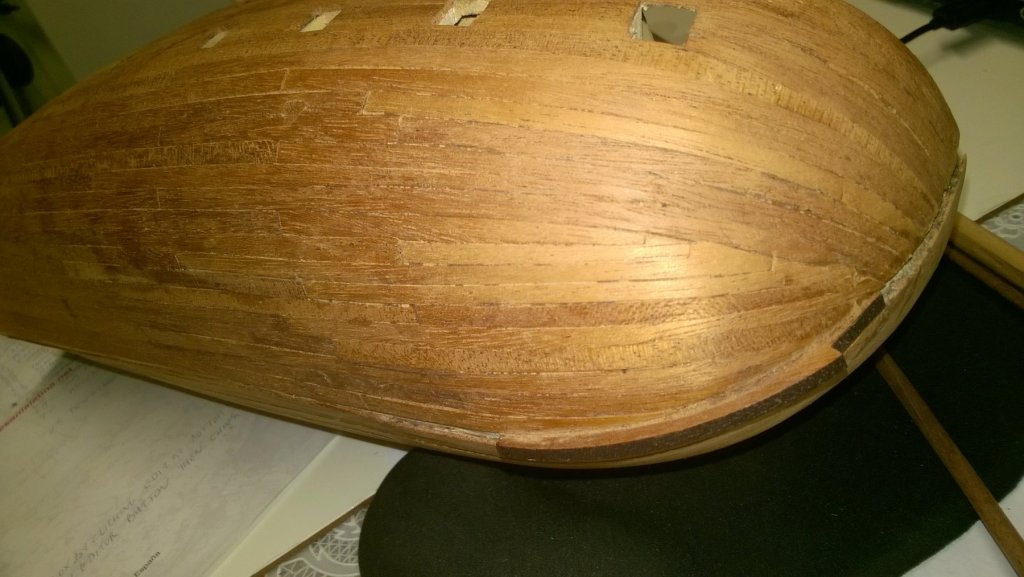
After my last post I have taken time out for a few weeks. I maybe should have taken a little longer as having added the plywood bulwarks and completed the first layer of planking I made the mistake of standing outside in the sun to file the gun ports when she slipped from my fingers and hit the side of a table. This resulted in 12 planks between bulkheads 8 & 9 being crushed. Luckily the extra balsa I added to all the bulkheads meant that it was not too hard to cut the damaged planks back and file down to 2 mm depth so I could add lengths of the 2mm strips that haven't been used until now. Unfortunately I can't find the photos taken before the accident but have some of the repair.

- 68 replies
-
- 1
-
-
- san francisco ii
- artesania latina
- (and 1 more)