

scratch
-
Posts
86 -
Joined
-
Last visited
Reputation Activity
-

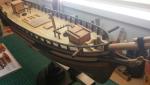
 scratch reacted to Dan Vadas in HMS Vulture 1776 by Dan Vadas - FINISHED - 1:48 scale - 16-gun Swan-class sloop from TFFM plans
Topmast Ratlines
Nothing real different here, just more ratlines. At this stage I only have most of the ratlines on the main topmast left to do.
Here are the foremast ones :
And the mizzen topmast :
Danny
-
scratch reacted to yamsterman in hms triton; first attempt at plank on frame
hi all
just a quick update to show current progress.
pretty much finished with the majority of the woodworking just got to make the various ladders and gun carriages.
ordered some brass canons from rb models in poland as ive just got rid of my cheap chinese made lathe.
considering purchasing a peatol/taig , reviews seem good, any thoughts?
metal work for the gangboard supports , stanchions for entry ropes and stanchions for gangboard rails are made and blackened but not overly happy with the blackening process so they will be cleaned off and redone.
cheers.....mick
-
scratch reacted to yamsterman in hms triton; first attempt at plank on frame
hi all
been doing some metal working for a change
more photos later
cheers,,,,mick
-
scratch reacted to Gaetan Bordeleau in Le Fleuron by Gaetan Bordeleau - FINISHED - 1:24
I wanted some kinds of flowers on the ceiling.
I looked in the past, to find a solution in the present.
This vase from b J.C. Delafosse has the same style, few years too late but the curve of the profile is what I was looking for.
-
scratch reacted to mtaylor in Licorne 1755 by mtaylor - 3/16" scale - French Frigate - from Hahn plans - Version 2.0 - TERMINATED
Thanks for looking in, everyone.
Port side, first three strakes. Not too bad to my eye and I'm happy. The pics, though tell me that I'll have to do some sanding and shaping still around the joints and also to fair and smooth things out a bit. The big challenge here is the where the plank thickness changed and also where the hull shape changed due to the tumblehome. I'll fix things with some sanding and then finally scraping to get the ebony dust out of the Swiss pear grain.
Onto the starboard side....
-
-
-
-
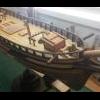
scratch reacted to guraus in HMS Victory by guraus - scale 1:48 - plank on frame
For the moment I gave up on the windows after several unsuccessful attempts. I am not happy with those that are now in place but I said I can change them later if I can make a better version. In the mean time I decided not to install any masts and started the upper deck framing but got lazy with the posting till somebody reminded my of it (thanks Bob ) and here it is the past due update:
-
scratch reacted to Remcohe in HMS Kingfisher 1770 by Remcohe - 1/48 - English 14-Gun Sloop - POF
Thanks all for your very kind compliments and likes!
So time to get back inside the hull. All beams were cut to size previously and here they are test fitted with all the lower deck details temporary in place. I'm not too pleased how the upper well discolored overtime. In the beginning I have used minwax and it made the wood a bit greenish. I also need to check the dimensions of the louvers as they look a bit thick to my eye compared to the other details. Ah well I'll just make an other one in due time.
Before I proceed to install the carlings and ledges I made the hammock battens, al bit of mass production as there are quite a few to be made of different sizes. Preliminary shape (the last bit is in front of the pile af battens) was made on the table saw and then the battens were cut to size and further refined using files and sandpaper. The drilling and installing of the tiny bolts (0,3 mm) took some time. The last step was to bend the longer battens to conform with the curving of the deck beams. The outer bolts will be installed when the battens are fixed permanently in place and will help to pin the battens to the deck beams.
Port side has been done starboard side is still in the clamping jig ...
Remco
-
 scratch got a reaction from mobbsie in Bomb Vessel Granado 1742 by mobbsie - FINISHED - 1/48 - cross-section
Lovely work Mobbsie Great explanations on your methods.
David
-
scratch reacted to mobbsie in Bomb Vessel Granado 1742 by mobbsie - FINISHED - 1/48 - cross-section
Hi Guys,
I thought it was about time I put pen to paper and came up with an update, just to let you know I haven't fallen of the planet.
All the frames are now glued onto the keel and that showed my first problem, not all the frames fitted the jig fully, a few were as much as 2mm in from the outside of the jig, this presented a problem when it came down to sanding the inside of the frames, they need to be tight so there is no rocking when sanding.
The problem was solved by using Spanions method which is to place elastic bands around each frame and fix to a point of your choosing, this holds the frames tight to the jig edge. I chose to drill the jig from the top and place round head pins in, the bands were then pulled tight around the pins, great, until you don't pick the jig up by the sides, I now have nicely punctured finger tips.
I glued the first 8 frames and when the glued had dried they were sanded down, I have one frame which is a little out of line and it was a case of either cut the Futtock Rider to fit or make up a new frame, I tried adjusting the Rider which worked well so that worked out ok. Once the first 8 frames were sanded I then fitted the final 4 frames and fared them down. There is a small rise in frames 9 to12 and they have to be sanded at a slightly different angle.
With the inside completed I turned my attention to the outside, first job was to mark the height, frames D1 TO 4 ( 9 frames ) are level and flat, frames 5 to 12 are sloped with frame 12 being the highest. There is still a fair bit of movement in the frames which needs to be reduced to virtually nothing, this was achieved by placing 2.5mm blocks between each frame at a point above the water line where the hull planking will cover them up, the tops of the frames were also blocked at this time, this also served to strengthen some of the weaker frames.
Next up was the Gunport Sills, Sweep Sills and Filling Lintels, more problems, these were down to my c--p joinery skills and not the drawing's. If I put the sills in place without any work they would end up looking like a mountain range, so measurements and levels were taken and out came the sanding sticks and files which were applied to the Port side. The Sills were the first to receive the treatment with new levels being made, most of the notches which had been pre-cut were sanded back, so with all the mistakes removed the Sills and Linings were added to the Gunports and Sweep Sills, The Filling Lintels were next to be attacked, as it happens they turned out to be quite easy to make and so in they went. A little more sanding and an acceptable finish was reached bearing in mind that this work will all be covered with planking. The Portside took 3 days to repair so I have the same to look forward to on the Starboard side.
Whilst waiting for glue to dry and the need to change tasks I made the following, Keelson, Mortar Pit Deck Clamps ( Upper and Lower Strakes ) and the Upper Deck Clamps ( Upper and Lower Strakes ). I also cut out on the scroll saw the Futtock and Floor riders, these are not finished yet because they will require fitting individually.
At this point I want to thank Grant for keeping me on the right track regarding the timber, I got a little confused with what timber to use and so consulted my mentor, things were explained and backsides kicked, thanks mate. At this point mate I decided to keep you on.
I should imagine your about ready for some pics, if your not suicidal by now.
Portside clamped up waiting for the glue to dry on the blocks
Just a few more clamps on the Starboard side.
This is Spanions method of holding the frames.
Profile of the frames prior to sanding down.
You can see the nature of my problem.
The finished Portside, bearing in mind it is to be planked over.
So there we are guys, your right up to date. Next job is to finish the Starboard side, fit the Keelson and work on the Futtock and Floor riders.
Be Good
mobbsie
-
-
scratch reacted to Dan Vadas in HMS Vulture 1776 by Dan Vadas - FINISHED - 1:48 scale - 16-gun Swan-class sloop from TFFM plans
Main Topmast Stays
There is a preventer stay as well as a main stay for the topmast. These were made in similar fashion to the mizzen topmast stay. There is a Violin block attached to the lower end. I made these from one piece of stock the same way I make the Sister blocks :
The stays are served where they go around the mast head and for a few scale feet below the mouse. A Collar is used to hold a lead block to the mast. The preventer stay block is fitted just below the foremast hounds. This would have been considerably easier to fit on the bench before I'd fitted the mast top :
Here are a few pics of the main topmast stay ready for fitting :
And some more of both stays fitted. The preventer stay goes on first :
The lead block for the main topmast stay has a collar which could be slipped over the fore mast head. This pic was taken well after I'd fitted the stay - the fore topmast and shrouds had been fitted when I took the pic :
The sister blocks and their tackle at the foot of the fore mast. Hooks are used to attach the lower blocks to the eyebolts in the deck :
Danny
-
scratch reacted to Dan Vadas in HMS Vulture 1776 by Dan Vadas - FINISHED - 1:48 scale - 16-gun Swan-class sloop from TFFM plans
Thanks for the comments John, Shaun, Juergen and Ray .
Main Topmast Shrouds
Before fitting any of the shrouds the topmast Burton Pendants needed to be made and fitted. These are served all over I turned the thimbles on the lathe :
The four sets of shrouds were made up and fitted the same as the mizzen topmast shrouds. Once again the foremost ones are served for their entire length and the others for the uppermost parts :
The Backstay is separate from the shrouds and terminates on the aft section of the channel :
A Sister Block is lashed between the two foremost shrouds. I made these from a single piece of stock in the same way I make "normal" blocks. After first cutting the basic shape on the table saw most of the finish shaping work was done with an Xacto knife :
Danny
-
 scratch got a reaction from gjdale in Bomb Vessel Granado 1742 by gjdale - FINISHED - 1/48 - Cross-Section
Very nicely done Grant They look great.
David
-
scratch reacted to gjdale in Bomb Vessel Granado 1742 by gjdale - FINISHED - 1/48 - Cross-Section
Thanks Augie, Jack, Mobbsie, David (Scratch) and Mike, and all of the "likes".
Well, the frames are finally complete. Here they are prior to having the WOP finish applied:
All of the gunport and sweep port sills have been pre-cut, again thanks to Mobbsie for showing me the method for this:
And here are all the frames test-fit in the jig:
All appears to be in order. I marked all the reference lines from the frame drawings on the individual frames, and they seem to be fairly well aligned and in roughly the right place, so I think I'm good to glue up. If anyone spots any glaring errors, please let me know before I break out the glue!!!
-
scratch reacted to tlevine in HMS Atalanta 1775 by tlevine - FINISHED - 1:48 scale - from TFFM plans
Greg,here is a picture of the display case. These wrap around two corners of the room. Hannah in the center of the picture with her NRG medal. To the left is an incomplete model of Amati's Prince which I started back in 1984-ish and never completed because of the inadequacy of the plans. The reflected ship is Dapper Tom. I forget which kit manufacturer.
I have finished the rest of the hull friezes. Extra material was left around the quarter badge, as I am not sure how this will exactly fit.
-
scratch got a reaction from gjdale in Bomb Vessel Granado 1742 by gjdale - FINISHED - 1/48 - Cross-Section
Excellent work on both projects in the last picture Grant .
David
-
scratch reacted to gjdale in Bomb Vessel Granado 1742 by gjdale - FINISHED - 1/48 - Cross-Section
I thought it was about time I posted an update, just to show "proof of life" in the shipyard............
I thought it timely to do some testing of finishes to make sure I was happy with the result, as I will need to finish the fore and aft faces of the frames before permanently installing them. I plan on using Minwax Wipe-On Poly (WOP), in a satin finish, following the lead of some more experienced scratch builders here. I was very satisfied with the result (and ease of use). For the Australians on the forum, I did find Minwax in Bunnings here but they carry only a very limited range of products. I visited the new Masters home improvement centre recently and was delighted to see that they carry an extensive range of Minwax products.
Anyway, here's a shot of the test frame with two coats of WOP. An untreated test frame is in the top of the picture. Unfortunately, the photograph doesn't really do it justice, but to the naked eye, it is a very pleasing colour.
i have also rough cut all of the remaining single frames. I managed to cut all of these - 12 frames (60 component pieces) from a single 24" x 3" billet of Swiss Pear. That provided me with lots of tricky scroll saw practice but I managed it without any boo-boos along the way. In fact, I think it took me longer to lay out the pattern pieces to make them fit on the board, than it did to cut them out! Here they all are:
And I have managed to custom fit the chocks to the first three of these frames. Having finally settled on a reliable method for making these, they are really not difficult and don't take much time at all. Again, I have to pay tribute to my mate Mobbsie for putting me onto a great method for making the scarph joints - this is half the battle for getting a good mating joint with the chocks.
Oh, you may notice something in the background of this shot that might help to explain the apparent lack of progress lately!
-
scratch reacted to tlevine in HMS Atalanta 1775 by tlevine - FINISHED - 1:48 scale - from TFFM plans
I took everyone's warnings to heart regarding the frieze and was determined to stretch some paper. I am not at home this week and therefore have no access any tools to attempt a frame like Michael demonstrated. I had been using masking tape to hold the paper and decided to try gummed packing tape, as recommended in TFFM. The local Staples does not carry it. Something about "Nobody has used that for years". I tried a series of clamps instead of tape but did not get equal pull across the edge of the paper. So, with nothing to lose but time and patience, I decided to make the friezes from the paper painted with enamel.
In examining the draughts and a photo of a contemporary model of Atalanta, it appears the shear plank is much narrower than that called for in TFFM. The lower row of friezes buts up against the inferior edge of the shear plank. Consequently, the lower frieze is positioned too low and does not extend across the top of the gun port openings. This left me with four options: 1) remove the shear plank and all the planking down to the lower edge of the gun port, resizing the width of four rows of planking, 2) redraw the lower frieze so that it is 2 mm narrower, approximating the width of the upper row of the frieze, 3) keep the dimensions of the lower the frieze and install it below the too-thick shear plank or 4) skip the frieze. Well, number 1 was not going to happen and I really wanted that splash of color the frieze would provide. I felt that narrowing the lower frieze would make the decoration seem out of balance. That left me with option 3, installing the frieze below the shear plank, knowing it extends too low on the hull. After carefully examining the draughts, I did not see any problem in proceeding with this last option.
After a little experimentation, the technique that worked the best for me was to cut the piece of frieze a little long to overlap the gun port openings. Next, apply a thin layer of undiluted yellow glue to the back of the frieze. Grasp the end of the frieze with a watchmaker's forceps and position the end at the edge of the gunport. Slowly place the rest of the frieze in position. Moisten the surface to remove any excess glue. Finally, gently burnish it in place with a piece of planking. This has to be done quickly because the glue is set within a minute. Once completely dry, the edges of the gun port are cleaned up with an 11 blade. The slivers of blue above the gun ports were added separately.
-
scratch reacted to Jack Panzeca in Bomb Vessel Granado 1742 by Jack Panzeca - 1:48 Scale - Cross-Section
I have been working on the keel. The lower false keel is ebony and the upper false keel, keel and hog are swiss pear.
The ebony piece was cut from a roughly 1" x 1" x 1' piece I found in a local Woodcraft store. Ebony sure makes a mess. I used an extractor on the saw and I am still cleaning up fine black dust a week later. It should be a real mess turning the mortar.
I used the Grant method of cutting the hog. ¼" end mill to cut the notches and level the tops. I used a ¼' x 1" piece of pear to give me something to grip with the vice and than cut it to size when it was finished. I started out to use this keel as a test but it turned out so well that decided to keep it.
I have been really worried about cutting the rabbet and once again went for the Grant method. It is essentially a 90 degree V groove placed in a mill. The rabbet runs straight about ⅔ of the way and turns up slightly. I can't imagine cutting this by hand. Great job on your end mobbsie.
After the rabbet the ends were cut to the proper length and a pass or 2 through the thickness sander and here we are.
Test frames coming up. Starting late on this group build has the advantage of me being able to have the benefit of all that previous experience. It sure does help. Thanks Grant, mobbsie and Lou.
-
scratch reacted to mobbsie in Bomb Vessel Granado 1742 by mobbsie - FINISHED - 1/48 - cross-section
Hi Guys,
About time for an update, it's been a while.
Now what was I doing ? Ahh yes that's it, FRAMES, well frame production is still going on all be it slowly what with the holidays and all but I'm pleased to say I only have 1 single ( 11 ) and 1 double ( 12 ) to do, they are all cut out and ready for final adjustments and making up.
Talking with Grant there has been a change in the method of holding these frames while being constructed, where I used pins to hold the pieces in place I am using Grants method using double sided tape.
This method allows for more frames to be made at once because no pin board is required, I only have a single pin board. I don't have a picture of the new method but should anybody want to see it Grant has posted some in his log.
I also had a problem when the frames were placed direct onto the template in as much as I was getting ink in the joints when gluing the frames together, I got around this by using a piece of celotape over the template joint. This has cured that problem so all I need to concentrate on is getting a good fit with the wedges, (still trying to get them right ).
Grant and I were also discussing which finish to use because each stage will need to be finished before moving on. Minwax Satin seems to the favoured choice but unfortunately it's not sold in the UK, at least to my knowledge, so I thought I would use Tung oil, I applied some to a practice frame made from Swiss Pear and although it looked OK it is quite dark, I looked to see what is the UK equivalent to Minwax and it turned out to be Clear Polyurethane, I already had some of this and tried it out although it was gloss and I wanted satin, it's a lot lighter and does look better so another trip to the hardware store and that's now sitting waiting to be used.
I only have a few pics mainly because frames are frames and have been shown before.
My old system of frame holding
The next 3 pics are where I am at the moment
On the right is the Tung oil, left is Polyurethane
So that's it guys, a bit disappointing really, I will post again when all the frames are complete although there will still be a fair bit of work to do on them before moving onto the next stage.
Be Good
mobbsie
-
scratch got a reaction from mobbsie in Bomb Vessel Granado 1742 by Jack Panzeca - 1:48 Scale - Cross-Section
I have the plans sitting here ready so i will be watching you 3 lads with interest.
Dave
-
scratch reacted to Dan Vadas in HMS Vulture 1776 by Dan Vadas - FINISHED - 1:48 scale - 16-gun Swan-class sloop from TFFM plans
Mizzen Topmast Shrouds
There are three pairs of shrouds on the mizzen topmast and one backstay which is the 2nd "leg" of the aftmost pair of shrouds. These are fitted around the mast top in similar fashion to the lower shrouds :
The backstay is fitted to a small stool aft of the mizzen channel :
Danny