


Captain Al
-
Posts
613 -
Joined
-
Last visited
Content Type
Profiles
Forums
Gallery
Events
Posts posted by Captain Al
-
-
So you've blown your own cover. I really thought you were speedy Gonzales (that's an old American expression which I hope, nowadays, isn't too politically incorrect). What you're saying is that some of the pictures were taken months ago. OK, but still, working a few hours a week seems like you get a lot done when you do have the time. So I have a couple of questions. First, how many staircases does your model have? Mine provides 5 sets of material to build 5, but the instructions indicate only making up 4 and the pictures only seem to show those 4. I'm wondering if the 5th is extra? The other question I have is your technique of planking the main deck. Were those pins used as spacers between planks so you will have somewhere to put caulk? I thought at first you were using the pins to hold down the planks but they look like they are inserted between them. If so, what will you be using to caulk the seams? And finally, it looks like you plank over all the hatch and grate openings. What do you then do? Do you turn it up side down and cut out the holes? So far on the two lower decks I've done I have planked around the openings. It has worked out that most of the time its only the length of a plank that needs to be cut. The width of the planks seem to have been planned to come right to the edges of the holes and not much further. Maybe just enough to smooth out with a file or sand paper. I've been afraid to do it your way, thinking that any tool I have to cut through the underside of the planks will leave a mess of splinters up top.
-
-
My Lord Theo you have caught up to me in 3 days. Its taken me 3 months to get that lower deck cabin and stairs in. I suppose you'll be working on pot racks next and be ready for your main deck by Monday. Your work looks good. I'm impressed with how well your beams lay and how tight the deck appears to be laying on them. I have had to use shims here and there to make the beams and deck level. I'm curious as to how you made up your windows. We had a discussion on my log on various ways to do it. I scored the acetate and used a wet erase marker to darken the lines. Are you going to build in any type of railing around your stair well and a hand hold of some sort? I want to do this as I can't believe the real ship did not have something. Pretty good fall for even a hearty sailor down into the bilge. Just about 2 meters.
But that's just me again looking for something to do to avoid the hard work of decking and planking that is to come. You are getting along nicely. I tip my cap to you mate.
-
What an eerie reminder of my work -- except for the experiment with caulking. Like many others I just penciled the edge of the planks (actually used a magic marker) for caulking and drilled holes for trenails.
-
You got me. I didn't want to seem too macho so I made up both stories. I actually banged it up bad when I was trying to save a woman's life as a car she was changing a tire on slipped off the jack and pinned her down. I came along and being the he-man I am, I lifted the car up from the bare wheel hub. Just when she wiggled free I lost it and the car fell on my thumb. So now you all know the truth.
-
After I posted this pic I knew someone would comment. It looks a lot worse than it really is. What looks like blood is only nail polish...I was looking for a color to "paint" some buckets on Bounty and I thought nail polish would adhere to the slick surface. I looked in my wife's cabinet and found 20 colors. I wanted to test this one but had nothing to test it on (she would not have appreciated me using the countertop for this) so I used my finger nail. As for the scar down the center of the thumb. That came from a dog bite 50 years ago. Never does grow in normal.
-
To both Capt. Fisher and Kannon, take my advice and I'm sure it would be seconded by many on here ... inventory all your parts before you do anything. It was also helpful for me to identify all the laser cut parts by number and put those numbers right on the part itself while its still in its template. Its a great time saver when looking for something and the numbering will come right off with an eraser or swipe of sandpaper. Another hint which will make this easier... there should be two versions of printed pages showing these parts in their templates. One is a big one, 1:1 scale and the other is small, on a 8x11 sheet. I didn't find the big one til I had almost given up trying to read the numbers on the small sheet. Look for the big one; its part of the rigging plans I believe. Finally, find a good way to measure your sticks. Most of them are big enough to measure with any metric device, be it a ruler or calipers or ??. But some are very small, like 1.5 x 1.5 mm and its tough to tell that from 2 x 2 or 1.5 x 2 with the naked eye. It may turn out that you do not have what they say you should. In my case I swear there is no 1.5 x 1.5 African Walnut, only 2 x 2 mm AW. Now it could be that I'm just not measuring accurately, but I've used different tools and that was my conclusion. This is no big deal, however, you must make some adjustments to the dimensions given for building some pieces to account for the added .5 mm. I didn't and my log explains the consequences. But hopefully you will find the 1.5s. I sorted all strip wood and labeled them by size and type. Now its very easy to find the right wood for a part. Nothing more to add except have fun.
-
Never thought of that, but yeah that works for me.
-
As regards the stiff pins....mine is brand new, never used. So I am hoping the pins will loosen up somewhat. I used some metal lube on it and that worked to loosen them but not enough to make the tool really easy to use. I have to run right now and my wife has the camera. I'll put up the pics later today. My plank bending jig is still all in my mind. When I do it I will post a picture. Whether I use the tool or some other method of transferring the curve shape, I can't think of a better way to do a jig than the dowels or nails in a homemade pegboard.
-
Same box as mine Theo. Mine was sitting idle in a neighbors garage for 6 years before they gave it to me. I hope your's doesn't have any of the warpage problems mine has had.
-
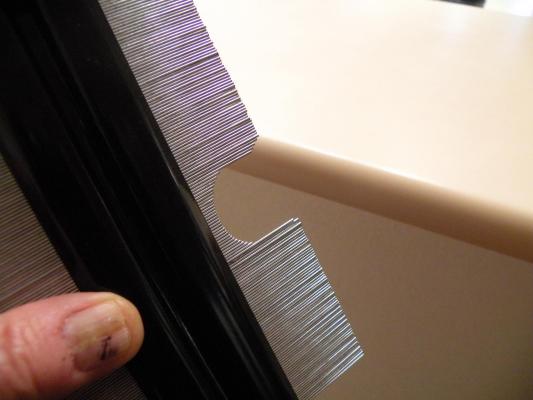
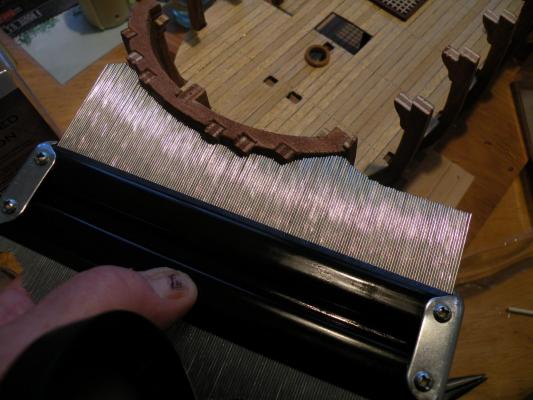
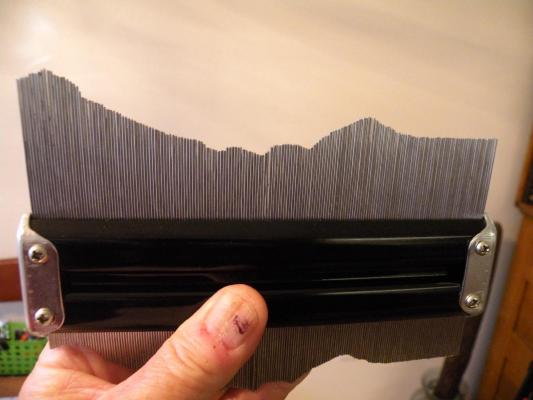
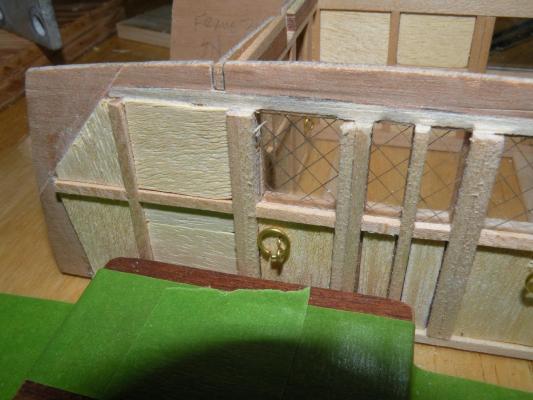
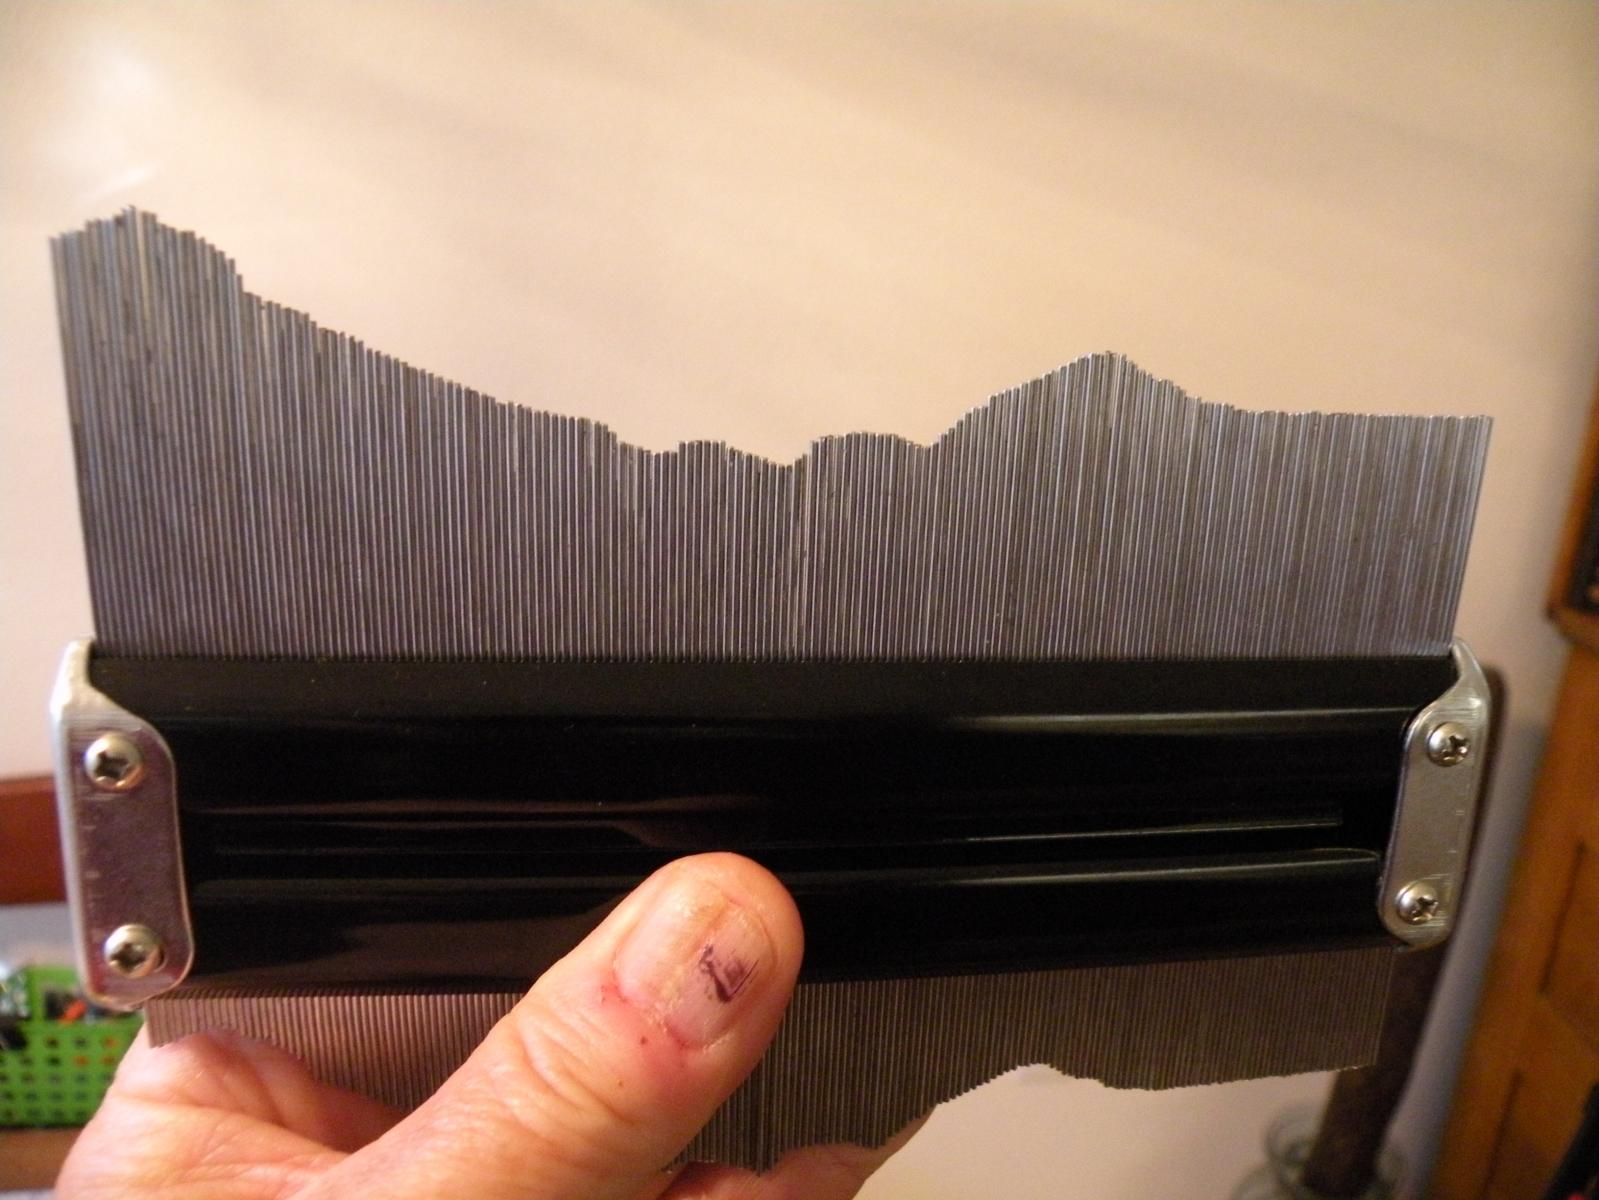
Has anyone ever used (what is known here in the states as) a contour duplicator to reproduce the shape of a hull or part thereof? I awoke this morning to remember I have one of these tools (which I'll take a picture of later and post) and thought it might work really well to transfer the curvature of the hull to a flat board where dowels could be inserted, making a nice drying jig for planks. If there's been any experience with this device (which is as simple as hundreds of sliding pins that are pushed or pulled out so they just touch the surface of what they're duplicating) I'd love to hear about it before I spend the time to make it all work (or not which might happen).
-
Hey thanks guys for the foliage pics. And really the funny thing is that the plants were on board only about 24 days from the time of leaving Tahiti to the time of the mutiny. I am going by what I saw in the movie where they tossed the plants immediately. In the movie version it was the plants themselves and the water that was denied the crew in favor of the plants that was the tipping point for the mutiny. But history also says the crew just got real used to the life style of the Polynesians and that was all there was to it. Interesting psycho drama. As for reproducing these.... as you say Dan, the problem with real foliage is scale. Right now our azaleas come as close to having the right size leaf but even they are way too big. The color and texture match up well with the fatsia japonica, but those leaves are like 8 inches wide. I'm going to try to cut up one of these into small bits just big enough to include a vein. I think I will spray them with lacquer rather than drying them (which I fear will lose their color). If that doesn't work, Dan, your tin foil sounds good, as does the silly putty which would be a bit less messy to work with than silicon caulk.
-
Good thoughts Dan. I put some of my wife]s nail polish on one pot and I immediately decided against painting. It looked like a fire hydrant. As for the plants, I think I will. On another log (cannon fodder) I saw what he did and thought it looked good. But CF later said that breadfruit was more of a broad leaf plant. So I've been contemplating how to make it look real. Do you think it would work to lacquer some real foliage? I don't know what others may be using as soil, I was thinking a dab of brown silicon caulk that would dry semi solid but stiff enough to hold the plants up. I'll probably get my wife to thread those little holes; she's a professional seamstress and pattern maker. Thanks as always for your interest. I truly appreciate it.
-
-
Hi CF. I didn't know you'd moved on from the Jolly boat. This one looks like a fun build. I read through the log and I wonder if warped wood and mis labeled parts (mostly I refer to wood that isn't the dimensions they say) is endemic to AL? In building their Bounty I am finding these two things to be the most troublesome. You've done the deck planking pretty much as I have been doing on Bounty. And I agree, its fun. I did a very simple layout, symmetrical as your's and added trenails using a 76 drill. That size scaled up to about an inch or inch and a half nail or peg through planking that would be about 9 or 10 inches. Trying to be accurate to the scale in this instance may not have been worth while. The holes were too small to get anything into them so I just left them as holes and the varnish I put on filled them up. When I was doing it I thought about pencil lead but again, the head of a sharp pencil was too big. But I'm still using the 76 drill bit after over hundreds, maybe a 1000 holes. I'm thinking though of going bigger on the main deck. The AL instructions suggest simply using the sharp pencil to make a little dot. Not good.
-
The old saying is that discretion is the better part of valor. In the case of sanding down my cabins, it goes more like, discretion is the better part of fear. I took the advice given above and began to gingerly sand the cabin surfaces. I was using 400 grit cause its the finest I have and its raining and well that's what I used. The edges were fine but when I tried getting into the crevices and corners in the inside of the cabin I found I was putting too much pressure on the glued edges. I have a tendency to exert too much pressure in sanding, cutting, filing etc., so I finally decided that I would live with fuzzies to assure I wouldn't be regluing these pieces tomorrow or ever. The advice though was well taken. I should have sanded the parts before gluing up. In the future I will and especially with parts that will be more visible.
So I went ahead and varnished first coat and I think it'll turn out OK -- on the same scale as the holding well did. The camera in close up magnifies things well beyond our unaided vision.
While waiting for varnish to dry I started building the pot racks. Finally a simple job. Just some sanding and, note, rounding the corners of the two racks. There's no sharp corners on a ship/boat. I notice that there are handle holes in the pots. Most of the pictures I've seen don't show a rope handle. I'd like to do them. Would a brown cotton thread work well? I'd also like to paint the pots some color. Anyone have a suggestion as to what color? I'd just stain them but I doubt stain will penetrate the slick surface of these pots. And finally, do most builders glue in the pots or trust that the model won't ever get turned upside down. They sit pretty secure in the rack, but would fall out if the ship turned turtle or we had a nice California earthquake.
-
Didn't mean to slight you Dom.
 Theodor, if your reading this, Fifthace has one of the best going. And moreover, Dom is one of the most helpful guys around.
 -
Dom, thanks for the suggestion re sanding. I have been undecided as to whether or not to varnish this cabin structure but my wife makes the final call and she said absolutely. So yeah, I need to sand off the roughness. I will do the varnishing as well prior to installing.
Theodor: Welcome to MSW and to our Bounty community. Are you actually building the kit by Artesiana Latina or Bounty by another kit manufacturer? There are a lot of Bounty posts on MSW, most of them being other manufacturers. But there are some good ones by AL that have been posted. You should also look at the others even though they may not be exact. Bounty by Mike Dowling is in progress and has good photos and explanations of do's and don'ts. You'll learn a lot by just looking at other builds. Is this really your first post? Been a member since last Sept and not had any questions? That's doing quite well, and independently at that. I hope you start your own build log and I look forward to seeing your progress. Have you done other ships in the past or is this your first attempt at ship modeling?
-
Talk about hours of work. I guess no-one said this was going to be easy. I think challenging was the operative word.
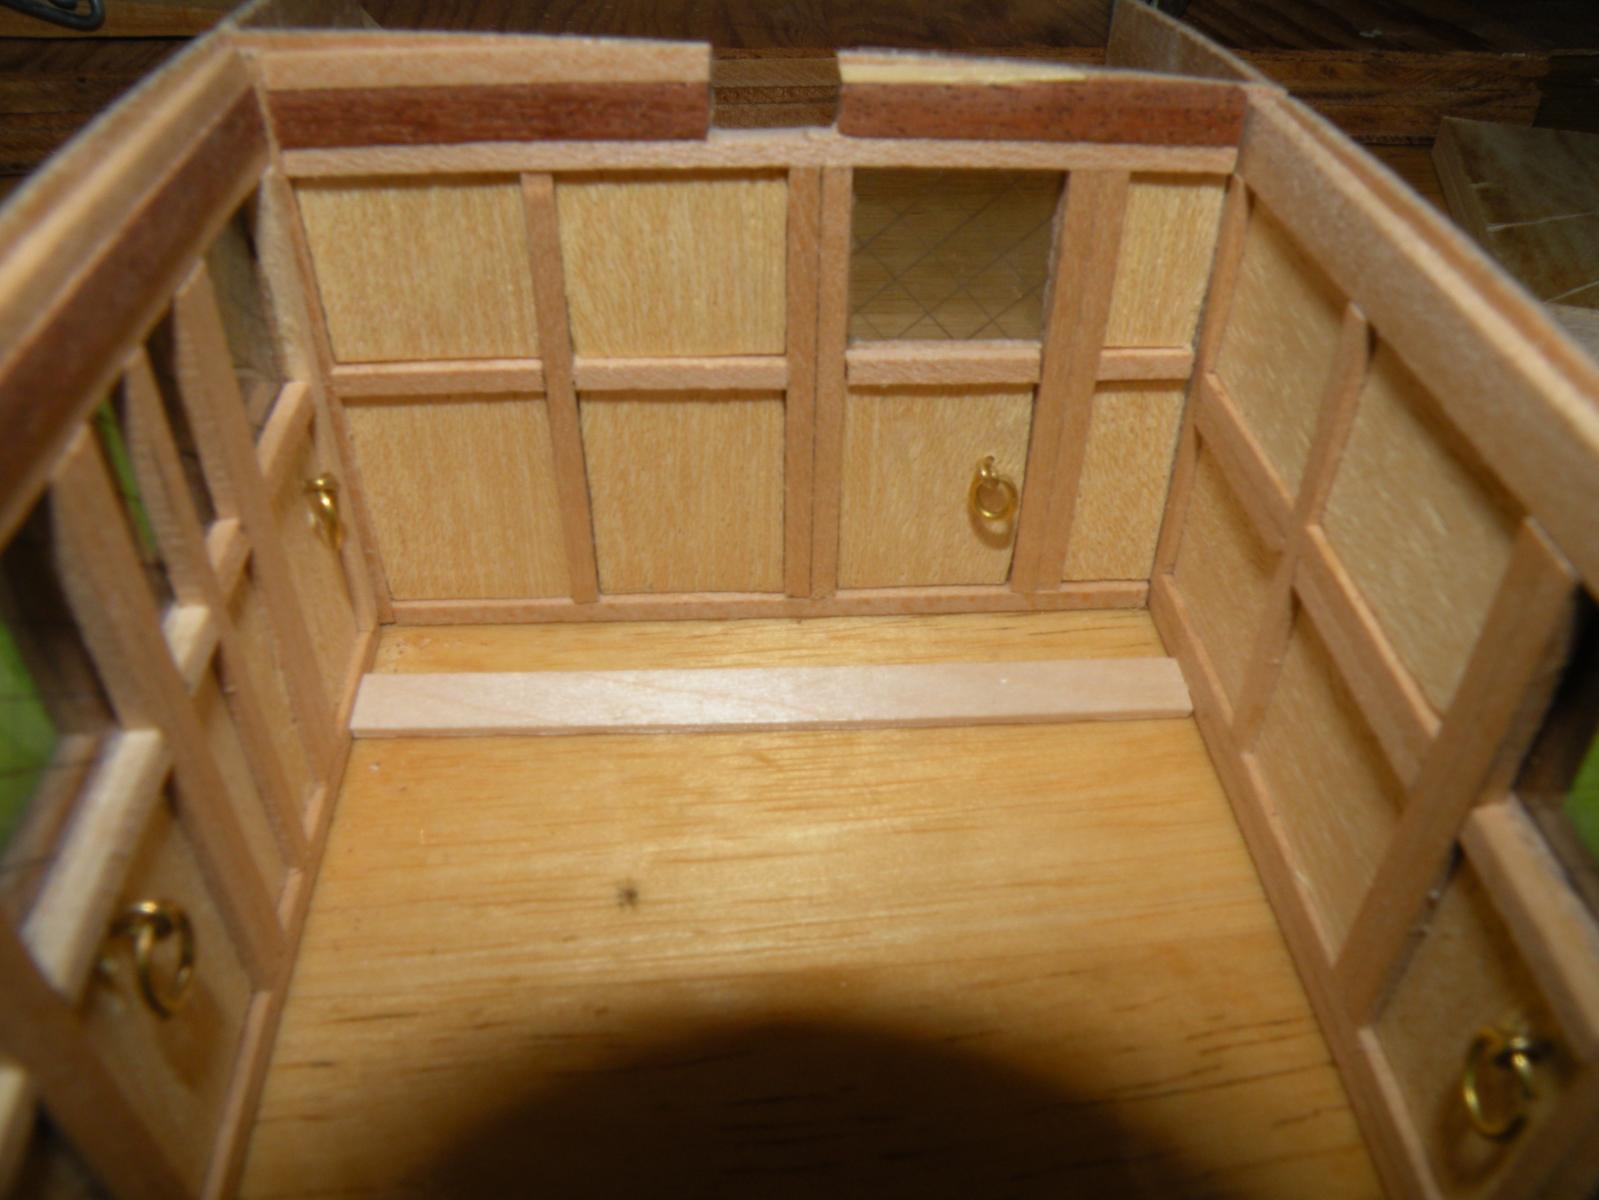
I spent 9 hours yesterday figuring out and solving the problem of why my beautiful little cabin would not fit under the beam and why it did not lay flush against the two outer beams it is supposed to glue to. Problem stemmed from the use of 2 x 2 material when the whole thing was engineered for 1.5 x 1.5. At least I had not yet glued the cabin together, so my destruction work was kept to a minimum.
Just when I was thinking the cabin was done, with all 3 bulkheads finished inside and outside, and I was figuring out whether to glue them together first and then glue the whole thing onto the ship, or whether to glue into the boat piece by piece. I realized the second wouldn't work cause of the little inserts, so now I'm ready to rig up a square jig and glue together. As I usually do, I thought I would one last time check all things out and how future pieces would go in when the cabin was there. Only the overhead beams for the main deck would be impacted so I went and popped out those 3. Holding each bulkhead in place and placing the beam into its respective crotch, I found that (1) the beams 34 and 36 that the bulkheads glue to would not lay down flat on the crotch (knee might sound better), and (2) that beam 35 that runs through the center of the cabin did not square up with the notch in the rear bulkhead.
It took some time, hours to be honest, to realize that the pictures I was looking at as to how it went together had a pretty bad perspective on it. I had been thinking for days, while building this piece, that the whole thing would sit just under the fore and aft beams. I thought that the only gluing surfaces would be on the surfaces that met the frames and of course on the underside where it sits on the deck. After looking at pictures, plans (no luck here) and taking measurements over and over again (my dilemma was that I had not in any way altered the dimensions of the ply backing) to assure myself that the overall dimensions of the cabin were correct, I was becoming quite frustrated. Then I reversed the process. Instead of holding in the cabin bulkheads and trying to place the beams on top of them, I first placed the beams in place where I knew they ultimately had to sit, and then looked closely at the bulkheads. That's when I realized the bulkheads were going to sit up against the beams and not under them. And that's when I realized that those darn pieces of 2x2 (instead of 1.5s) framing had made the upper horizontal frames 1.5mm too high. There was supposed to be enough raw ply left exposed so the piece would sit flush next to the beam. Instead my door and window frames were contacting the beam.
I had two possible ways to fix this. The first was to cut a dado into the beams. There was plenty of wood to do that, but my practice runs using the dremel and a chisel and (I even thought maybe) a file/sandpaper, were useless. I knew I'd destroy the beams in the process. So the second and most practical way was to remove that top 2x2 framing. That's what I did. But stupidly I forgot that the glue could probably be loosened with either alcohol or even water, so I proceed to remove them by whittling them away bit by bit with an exacto knife. Dumbness on my part in several ways caused me this all day work. I had made adjustments to the horizontal size of the doors and windows when I discovered I was using larger wood than called for. But I didn't make the same adjustment vertically. Actually to save some face, those pieces were in place before I discovered the wood size issue. But not to have seen how the piece would eventually lie in the ship prior to building the pieces was inexcusable -- and won't happen again.....at least for a few more days.
Oh, my last problem was the beam that wouldn't sit in the notch. At first I thought it was cause my frames were off. Lining them up with a t square across the keel I found they lined up quite well. So I think the problem comes down to just a minute amount of warp in the underlying ply. I simply cut the notch open a millimeter and now I think that works.
So I am ready once again to glue up the cabin and then glue it in. But I think I'll varnish it in pieces and then glue it up. Maybe not (as he thinks aloud)... if I get varnish on any gluing surface (of which there is scaresly enough to begin with), that will inhibit the glue. So maybe glue up and then varnish.
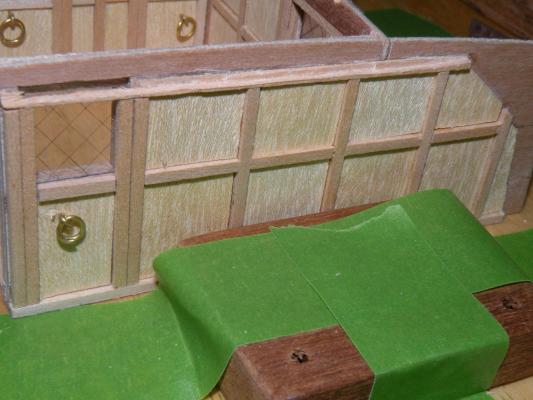
Here's a couple pictures of my "bashed" cabin bulkheads. An earlier post showed them in the before condition.

-
Talk about hours of work. More on this tomorrow. I guess no-one said this was going to be easy. I think challenging was the operative word.
I spent 9 hours today figuring out and solving the problem of why my beautiful little cabin would not fit under the beam and why it did not lay flush against the two outer beams it is supposed to glue to. Problem stemmed from the use of 2 x 2 material when the whole thing was engineered for 1.5 x 1.5. But like I said, more on this tomorrow. At least I had not yet glued the cabin together, so my destruction work was kept to a minimum.
-
Those were my thoughts exactly too, Dom. Pretty nice work for a guy who was so scared to start.
- FifeModels and Eddie
-
 2
2
-
Bill you are dating yourself with your terminology. Peace brother and power to the people...right on!
- src, Jaxboat, justsayrow and 1 other
-
4
-
-
Thanks all for the kind words. Anthony, you're right about viewing this more as a scratch build. The work on fixing problems, adding something structural that AL didn't provide, making it a bit more to scale and authentic, those are the things that I like to do the most and which keep me glued (ha ha, I don't use CA) to my seat for hours. I hope when I get to the planking of the hull I don't ruin a good thing.
 I'm sure its going to work out well.
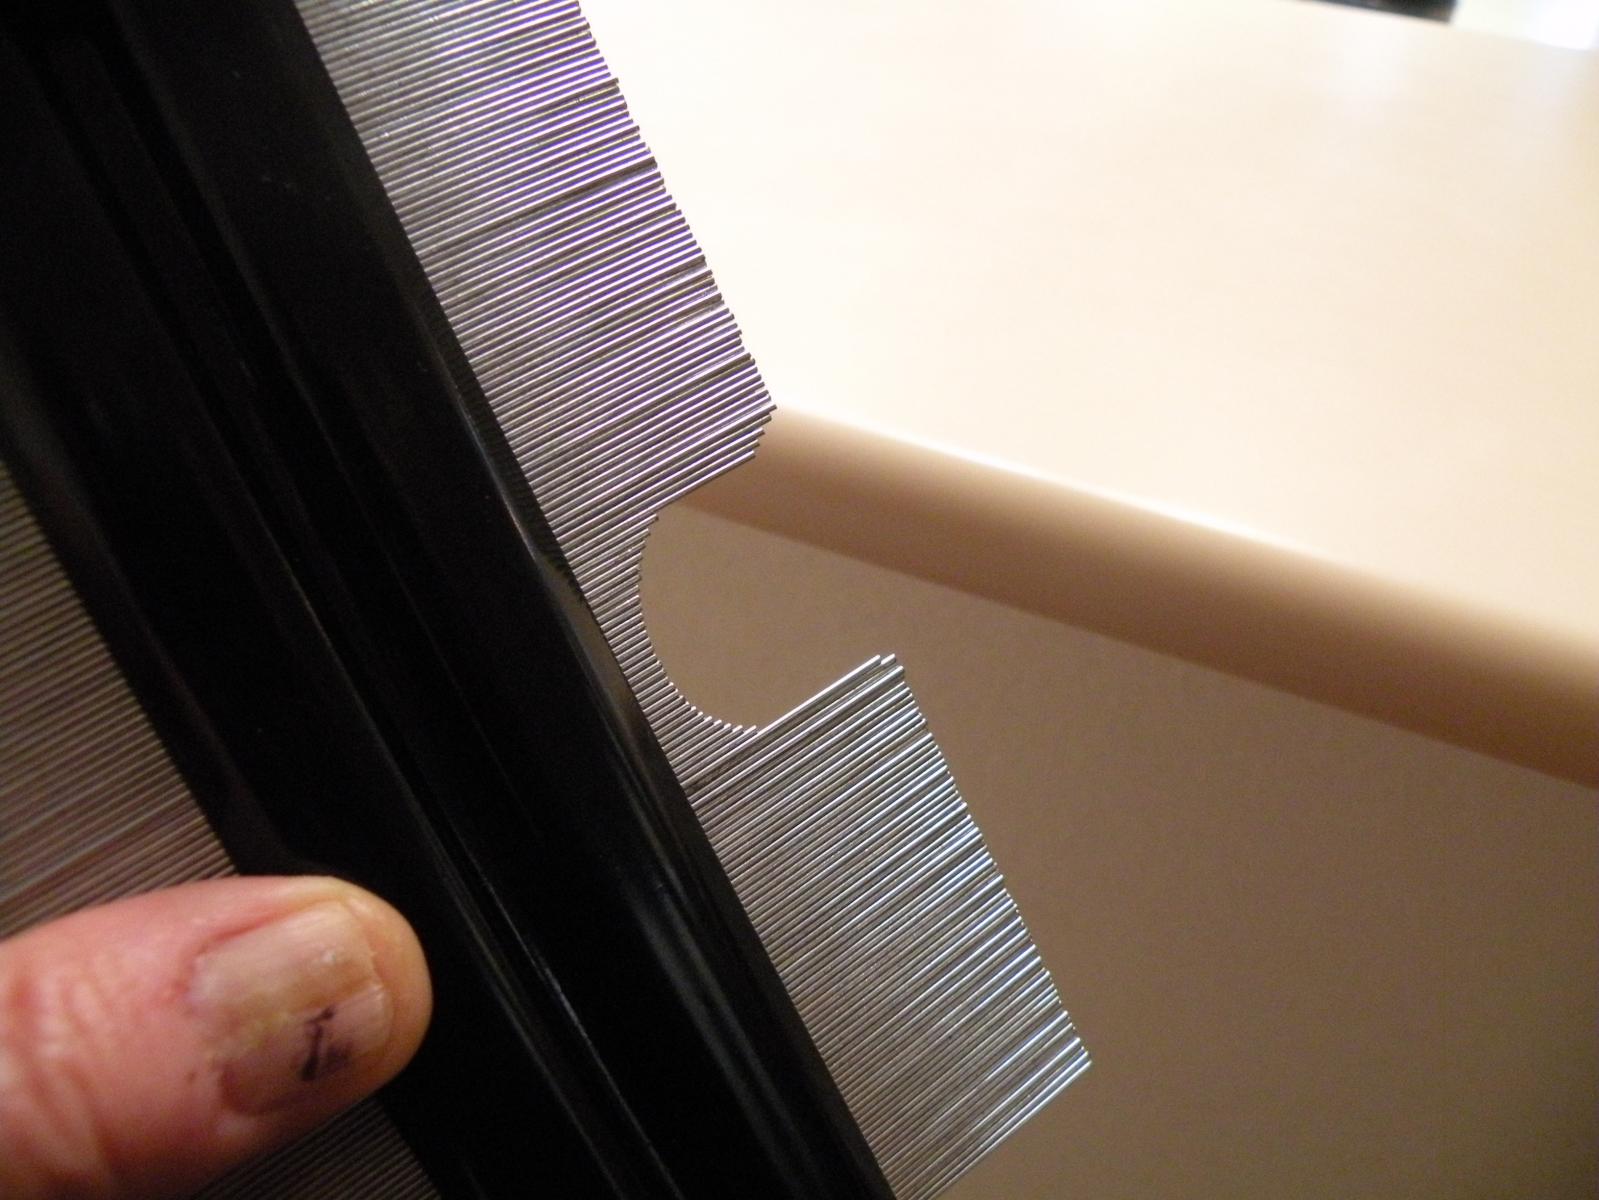


Bounty by Mike Dowling - FINISHED - OcCre - 1/45
in - Kit build logs for subjects built from 1751 - 1800
Posted
Mike, it seems you have found the trick of planking the transom. It looks fantastic. I have wondered for awhile what to do with all the exposed edges of plywood that we'll have. Especially the frames. Just when I think about painting or veneering over them, I look at someone like Dan's Bounty and I don't think he worried much about that. Maybe just a very dark stain put on those that remain exposed after all is done. In my case, many of the frames will already be covered by added material to make them fair with the rest of the hull, and on the opposite side many will have been sanded down pretty smooth for the same reason. Question of the day -- where are your breadfruit pots?