


Captain Al
-
Posts
613 -
Joined
-
Last visited
Content Type
Profiles
Forums
Gallery
Events
Posts posted by Captain Al
-
-
Very interesting post and very timely. Both Mike Dowling and I are working on Bounty and have been discussing the lack of instructions for rigging and masting. Based on my kits instructions so far, it would not surprise me if Mamoli simply left something out. I've come across that with my Artesiana latina instructions a couple times already.
-
Mike it looks like you did a good job on fairing the frames. What tool(s) did you use? When I get to that crucial step I'm wondering if a dremel with a sanding disk or barrel would be dangerously effective. Maybe files? Or just sandpaper. Did you have to support the inside of the frames in order to apply enough pressure to make it work?
-
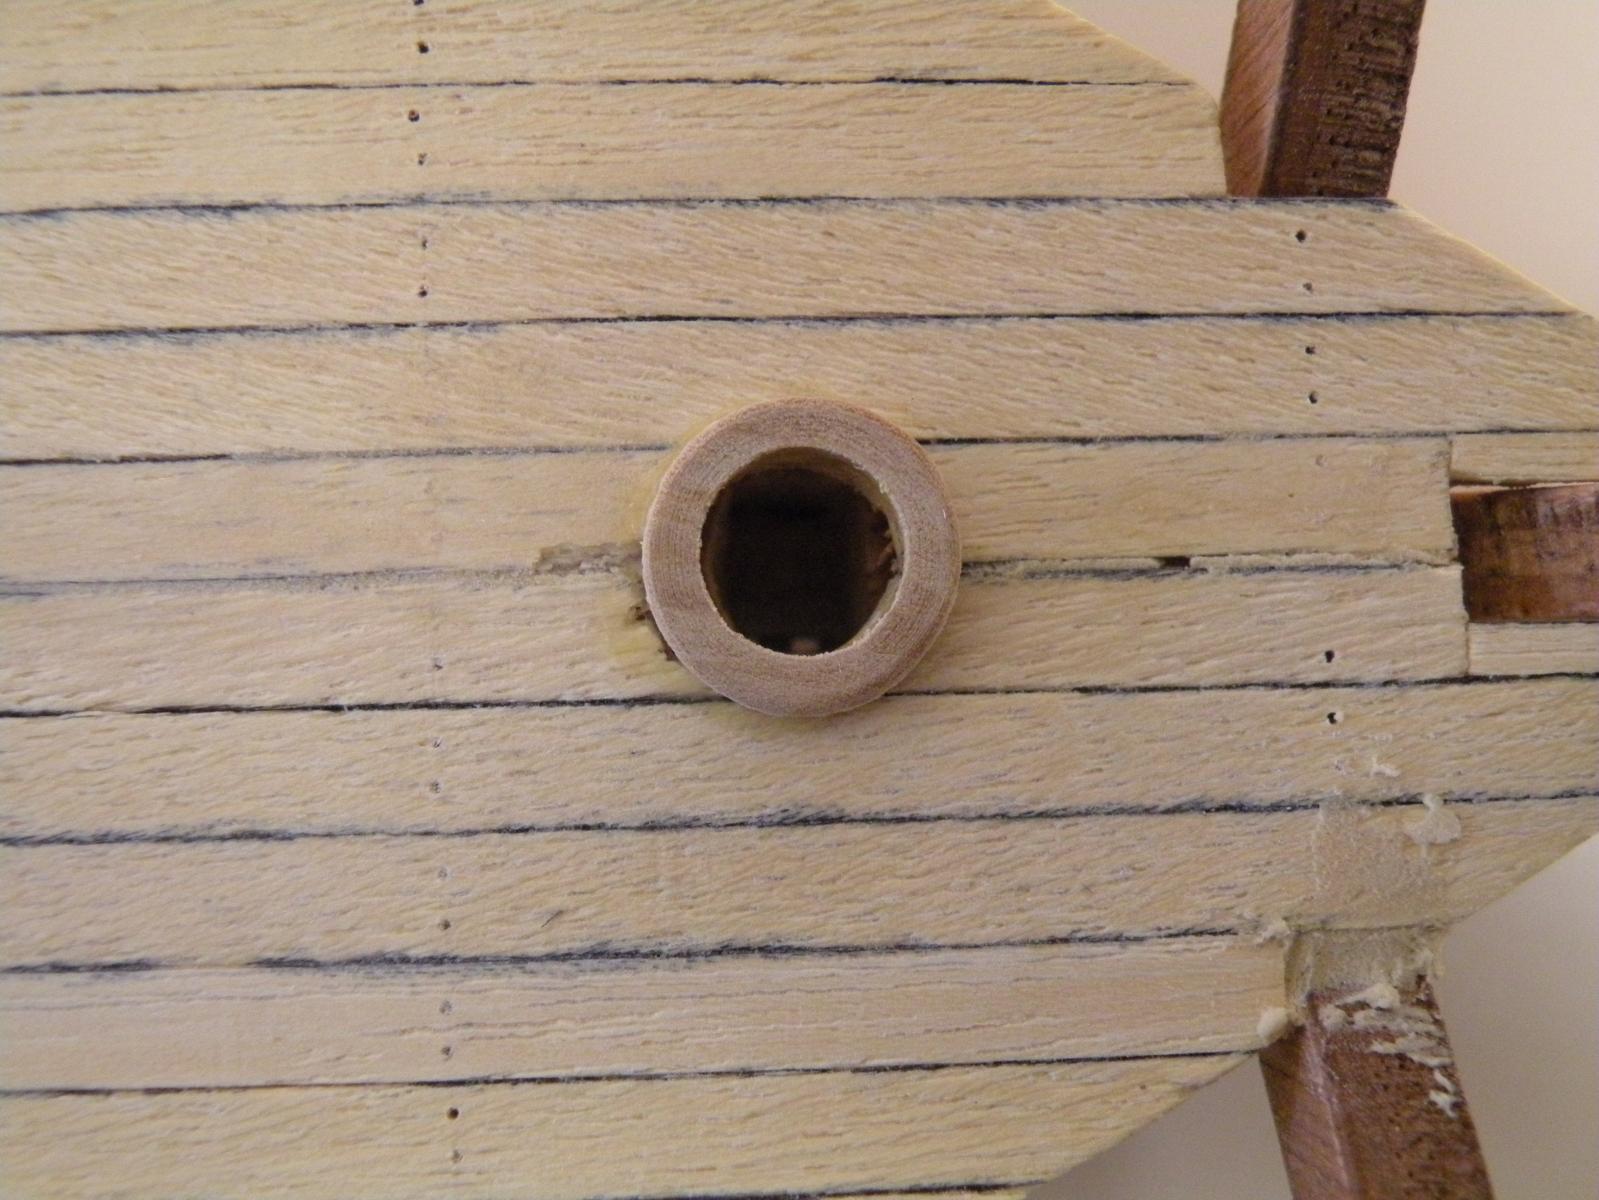
Mike, have you tested your masts lately? I found (thankfully in time) that with all the manipulation I was doing to fit the second deck in that when I went to put the masts down through this second deck and then through the holding platform and into the mast step that I was off by a bit on two of them. As I said, thankfully I haven't put down the second half of the second deck yet so I still have pretty good access to the holes that I have to work on. I had to ream out the mizzen mast hole in the holding platform (used sandpaper wrapped around a chopstick), same for the main mast hole in the second deck (though with the second half of that deck not yet on it was only a half hole to ream out). I am still having a hard time getting the masts to sit perpendicular in all planes to the keel, but what I think the final answer will be is that I am going to take a bit of wood off the last 8 mm of the mast itself. I have to square off the mast down there anyway (does your model necessitate that?) to get the round peg (mast) into the rectangle hole (mast step). So I think making the rectangle just a wee bit lopsided is going to get it into the hole. This work has prevented me from completing the second deck which I thought would be done last Thursday. Not to mention that the grass is now growing, shrubs are needing fertilizing, and I've put off re-varnishing my park bench all winter. Hoping to resume work on Bounty right now. Oh, and one more reason for posting....you're doing quite well it seems. Keep it up and just keep coming up with solutions to the inevitable problems. My kit suggested the pencil for the simulated trenails but I kept breaking the points. So I have been drilling holes (#76 bit) and not even filling them. Then letting the varnish (urethane) fill them. I also cut them all close to size, then nipped them to exact size before laying each one down one by one. I used white glue -- used a artist brush to spread it thinly on the ply first then on the strip. One by one. Very tedius but rewarding in the end. The key is (I guess you know) to get the first one on perfect, then the rest just press up against that one.

-
Thanks all you dope heads for bringing me up to speed. I just finished gluing in half of my lower deck (pictures will follow soon on my own build log) and if valium qualifies as dope, please send me some. I knew the warpage of the ply was going to be my Achilles heel. I had to use like 20 clothes pins, five C clamps and six weights (from my wife's knitting machine) to make the whole thing sit tight on the beams. I was going to do both halves at once but found it impossible cause I have clamps on the inside center line. Probably better anyway to let it all dry and then make a go of the second half (the open side should be easer; more flexible). I continue to wonder and ask: is there a tried and true method of flattening out a piece of warped ply? I tried wetting and clamping between two pieces of flat wood. No success. Maybe not wet enough?
- Eddie and Cannon Fodder
-
 2
2
-
Good luck Mike. I'll be keeping my fingers crossed for you -- but not while I'm building. Just curious: cover the hull in tissue paper and dope? What kind of dope? Don't get arrested. Today I will glue in my lower deck. I know I've procrastinated too long on this. Built a cradle yesterday, something I should have done on day 1. Pretty crude but it works. Anyway, enough computers and now for some fun.
-
-
Dan, thank you for your input. I was not meaning to stain the top surface of the decks, but the ply underneath (which the real thing didn't have). I would not have given it a second thought except for the fact that with the open hull design it is easy to see underneath these decks, and I don't like the pinkish color of this ply. So I went ahead (just two minutes ago) and stained the underside. A lot subtler or marine like, but still plywood.
I am so glad to hear from you and know that you are following this build from time to time. I've already learned a great deal from you. More so though, I hope you are feeling well and getting through your medical issues in stride. You seem like the kind of guy who can face life's obstacles as they present themselves. I faced a similar problem with a lymphoma node touching my spine. Talk about pain. But the docs do wonders now and I'm sure you're in good hands. Be well my friend.
-
I answered this on your log but I'll repeat. Decided not to add anything that the kit doesn't call for. Unless of course its for strength or to correct some error (either mine or theirs).
-
I like your sense of humor. It will serve you well I think in the days and weeks to come. My wife and I were just poring over the pictures and plans that come with the kit and its very weird. The pictures on the huge box that it all comes it has something down there, whether or not its a deck or not is hard to tell. But the instructional photos show nothing more than a fwd/aft running beam that is fixed to the inner side of frames 8 and 9 (just forward of the holding well box. The picture shows a lot of barrels and bales heaped inside, resting only on the hull planking. I suppose this beam is to hold these barrels in (but they'll be glued). And in reality, I don't think these heavy barrels would have been allowed to sit just on the planking. But the plans show nothing; neither a deck or a beam. So just like you said, why make things more complicated than they already are. I'm going to move on with the work that I have in front of me and follow the plans/instructions as they've been written. Maybe someone with more naval history can provide an answer re the ballast cause I am still curious about that. And if they actually used something like stones (which they did), it would be easy enough to throw some pebbles in there.
- Mike Dowling, Larry Cowden and Eddie
-
3
-
I've got my model here at the computer and comparing your lower works to mine. Since I already have beams installed and these holding platforms there is no way I can put in any kind of half deck. Unless I did it with narrow strips which I could insert sideways through the frames and under the platform. This also brought to mind the question of ballast. What was used as ballast and where did it go? More likely for my build would be those compartments on the holding platform level. Until I put down the next deck it will still be possible to build and insert them. I'm just wondering if I want to add what would probably be weeks of work to do this or just move along with the kit as is.
-
Will do. Same here re posting pictures etc. I am trying to figure out how to put a caption or sentence beneath each picture rather than have them all run together.
-
Hey Mike, hang in there. Like Bindy just said above, its a great feeling when you do something right and its really cool to look at. If you haven't already, take a look at the topic "fixing mistakes" (or something just like that) which not only gives some great tips and tricks to actually remedying mistakes but also shows that even the top modelers make boo boos; and some pretty significant ones. I share your attitude. This is fun and we're only first timers. Besides, I think both of us have chosen to start at the top. These two versions of Bounty are not really for beginners. But I concluded that with enough time, patience, research and mistakes I will come out with the pretty decent (if not perfect) model and maybe it'll be all down hill from there.
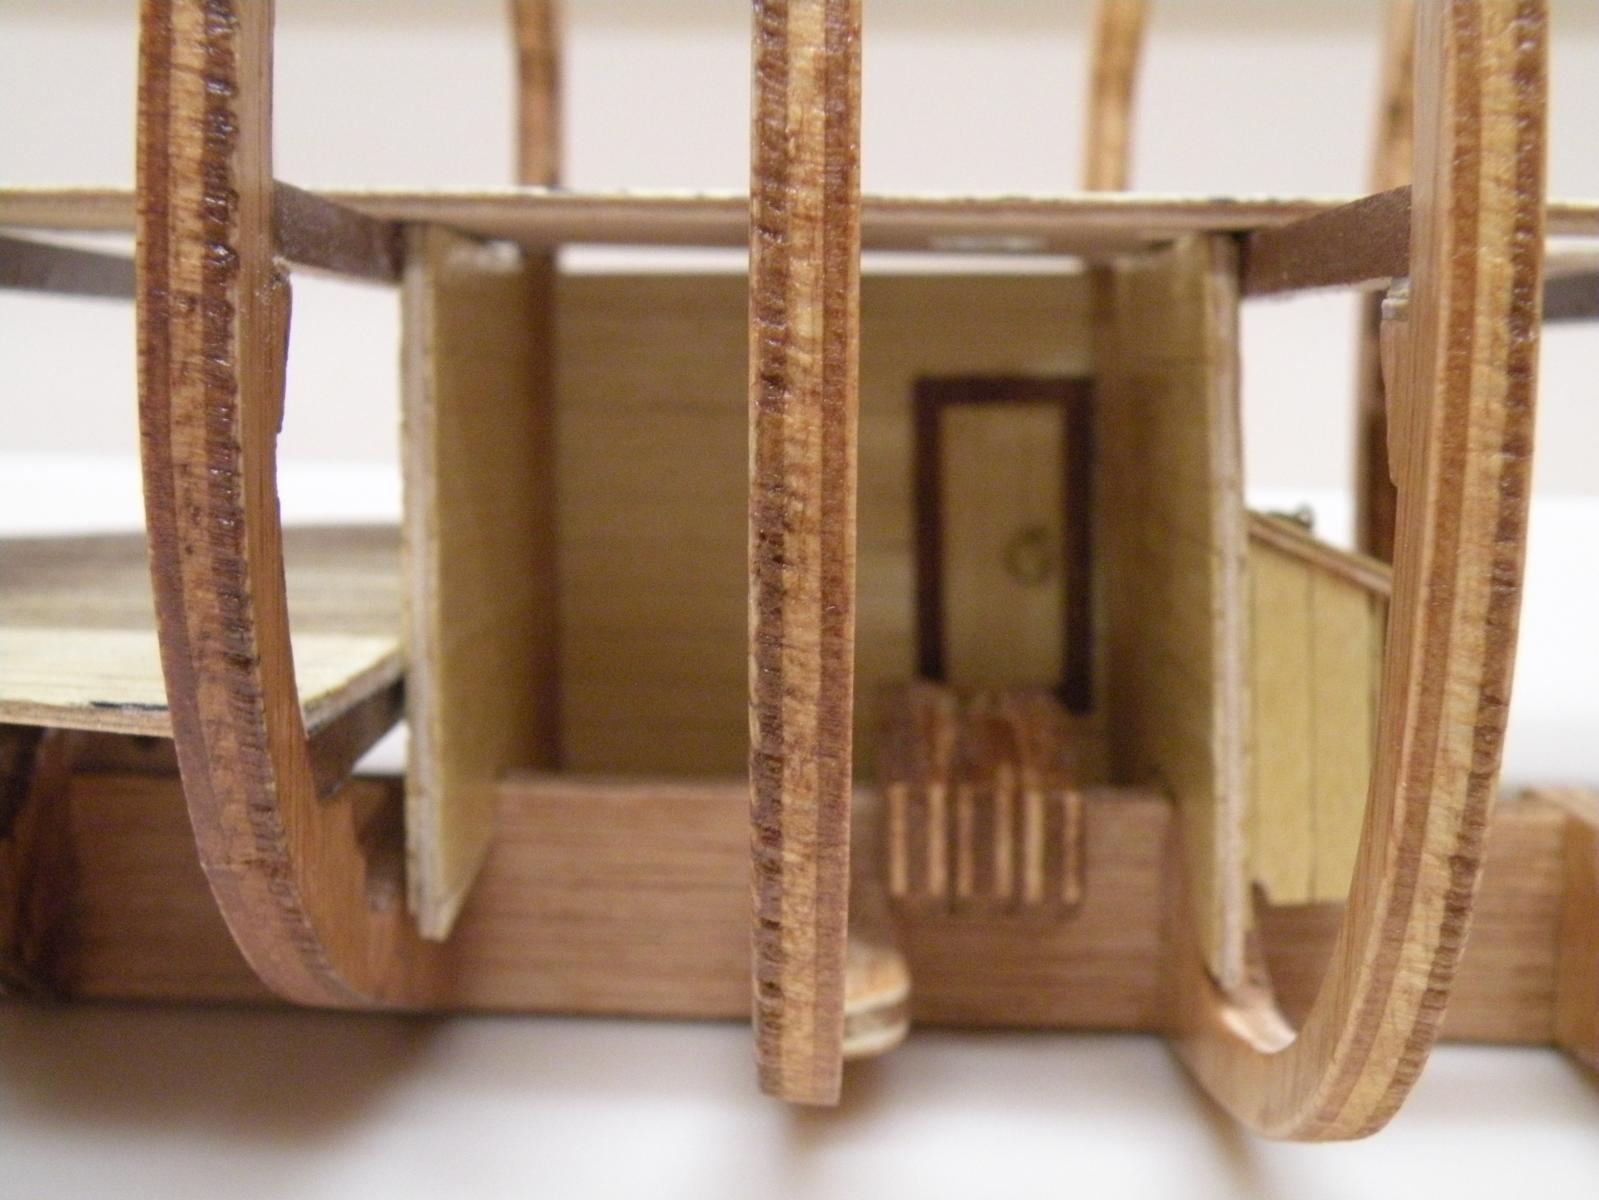
Now, here's a question. I came back here to your build to take a look at the stairwell openings you mentioned were framed. I am definitely going to do the same. Funny how a kit can be so detailed in one area and then leave another untouched. Anyway, in looking at your pictures (which, btw make me say you are doing a great job so far) I see that your Bounty has two compartments on the lower deck level (my kit calls this level the holding platform) fore and aft of the holding well. Each of these has doors which will be clearly visible from the open hull. My kit does not have these compartments. I only had parts to fab the holding well. It has seemed to me that the real Bounty would have had more structure down there and that your's is more authentic. So I am thinking now about adding those (it will take some scratch building but I have the materials) to my lower deck. Do you know if in fact Bounty had these? I am going to look on other builds and do some googling. I need to decide on this before I glue on my second deck (which my kit calls the lower deck) which I thought I might do today or tomorrow. See, this for me is the fun of it all....making decisions and devising ways of doing the construction.
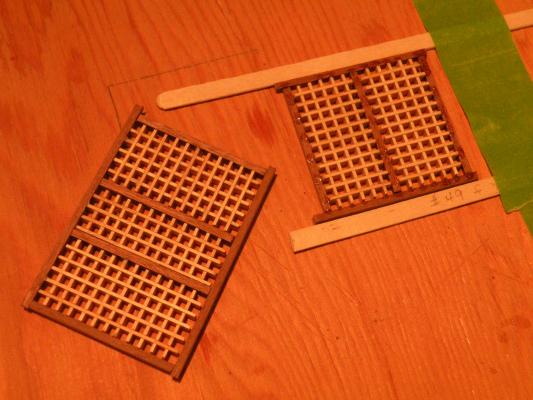
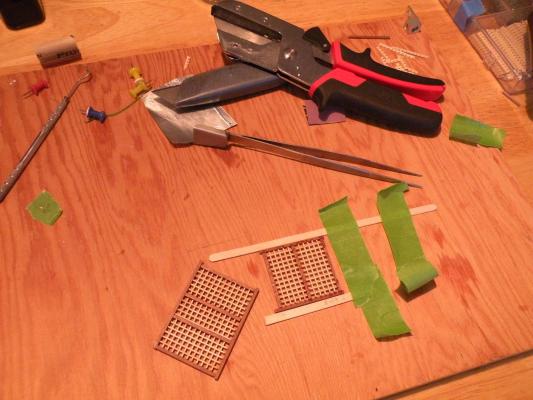
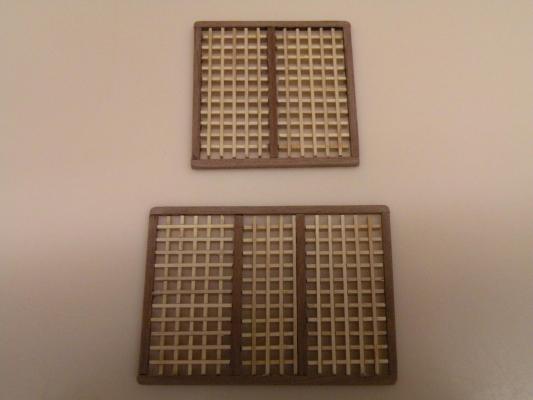
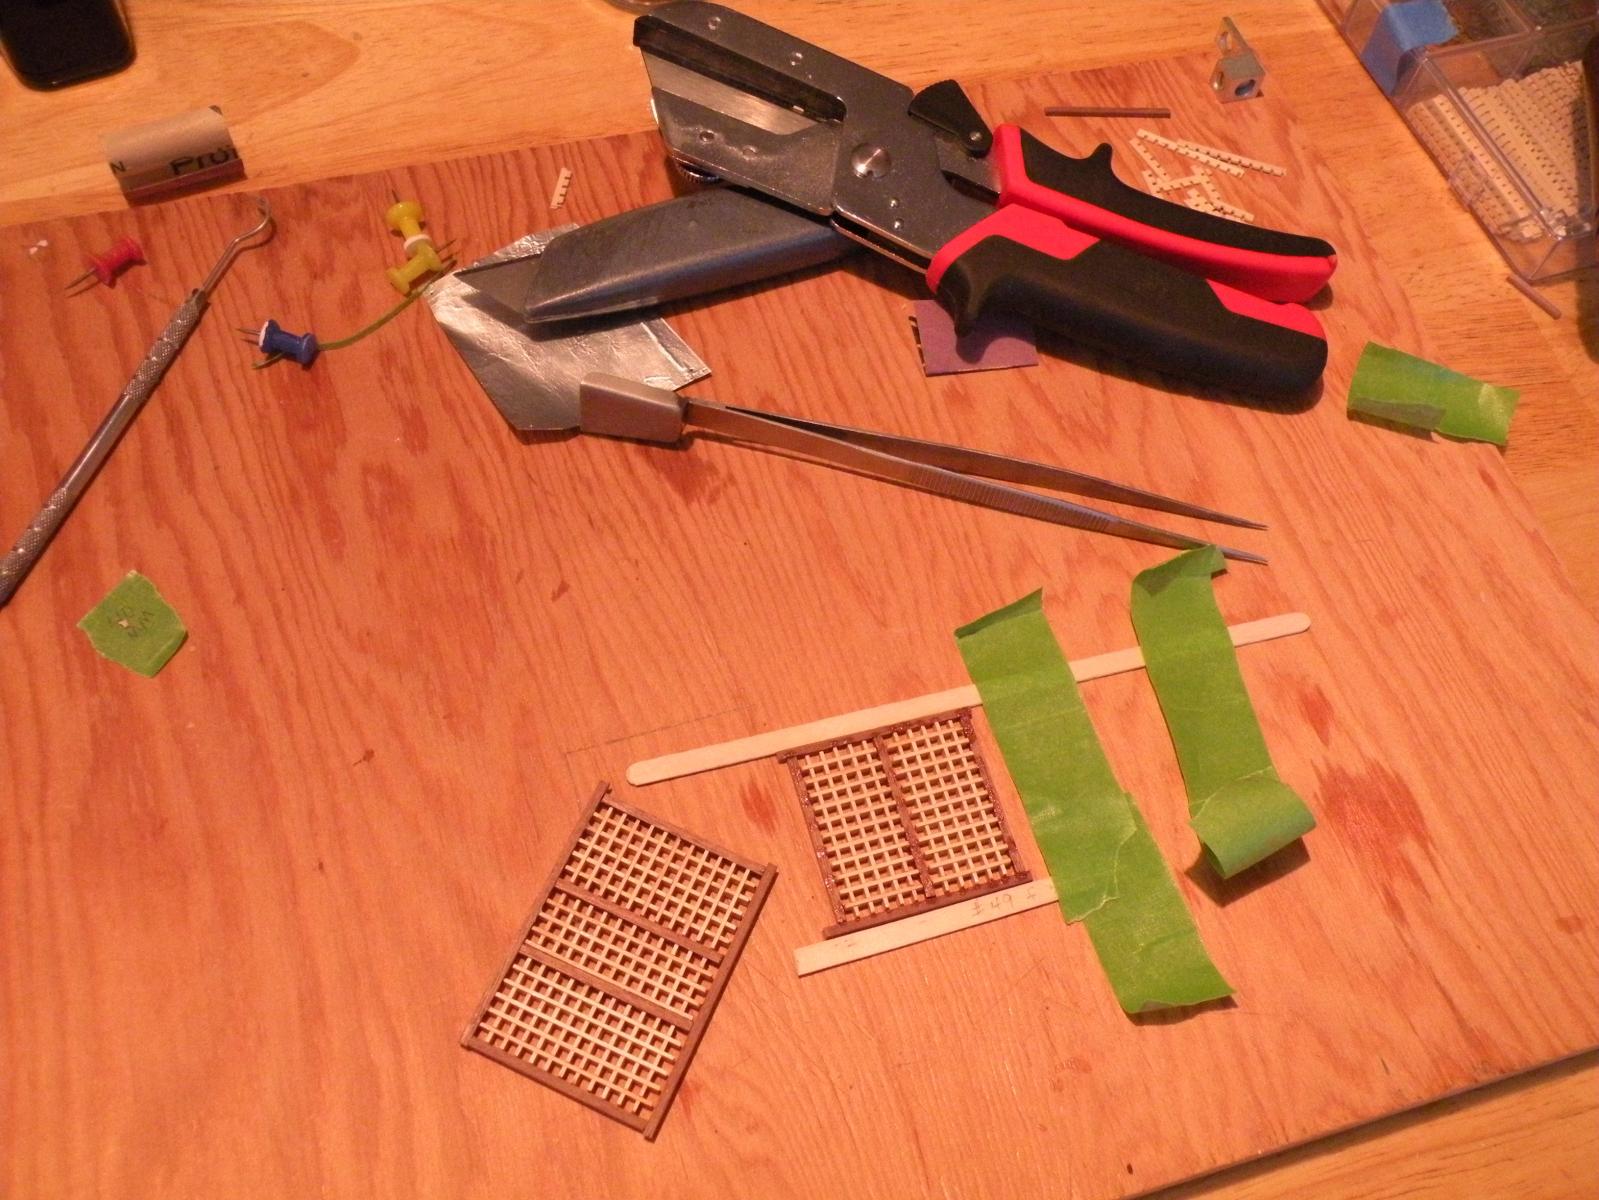
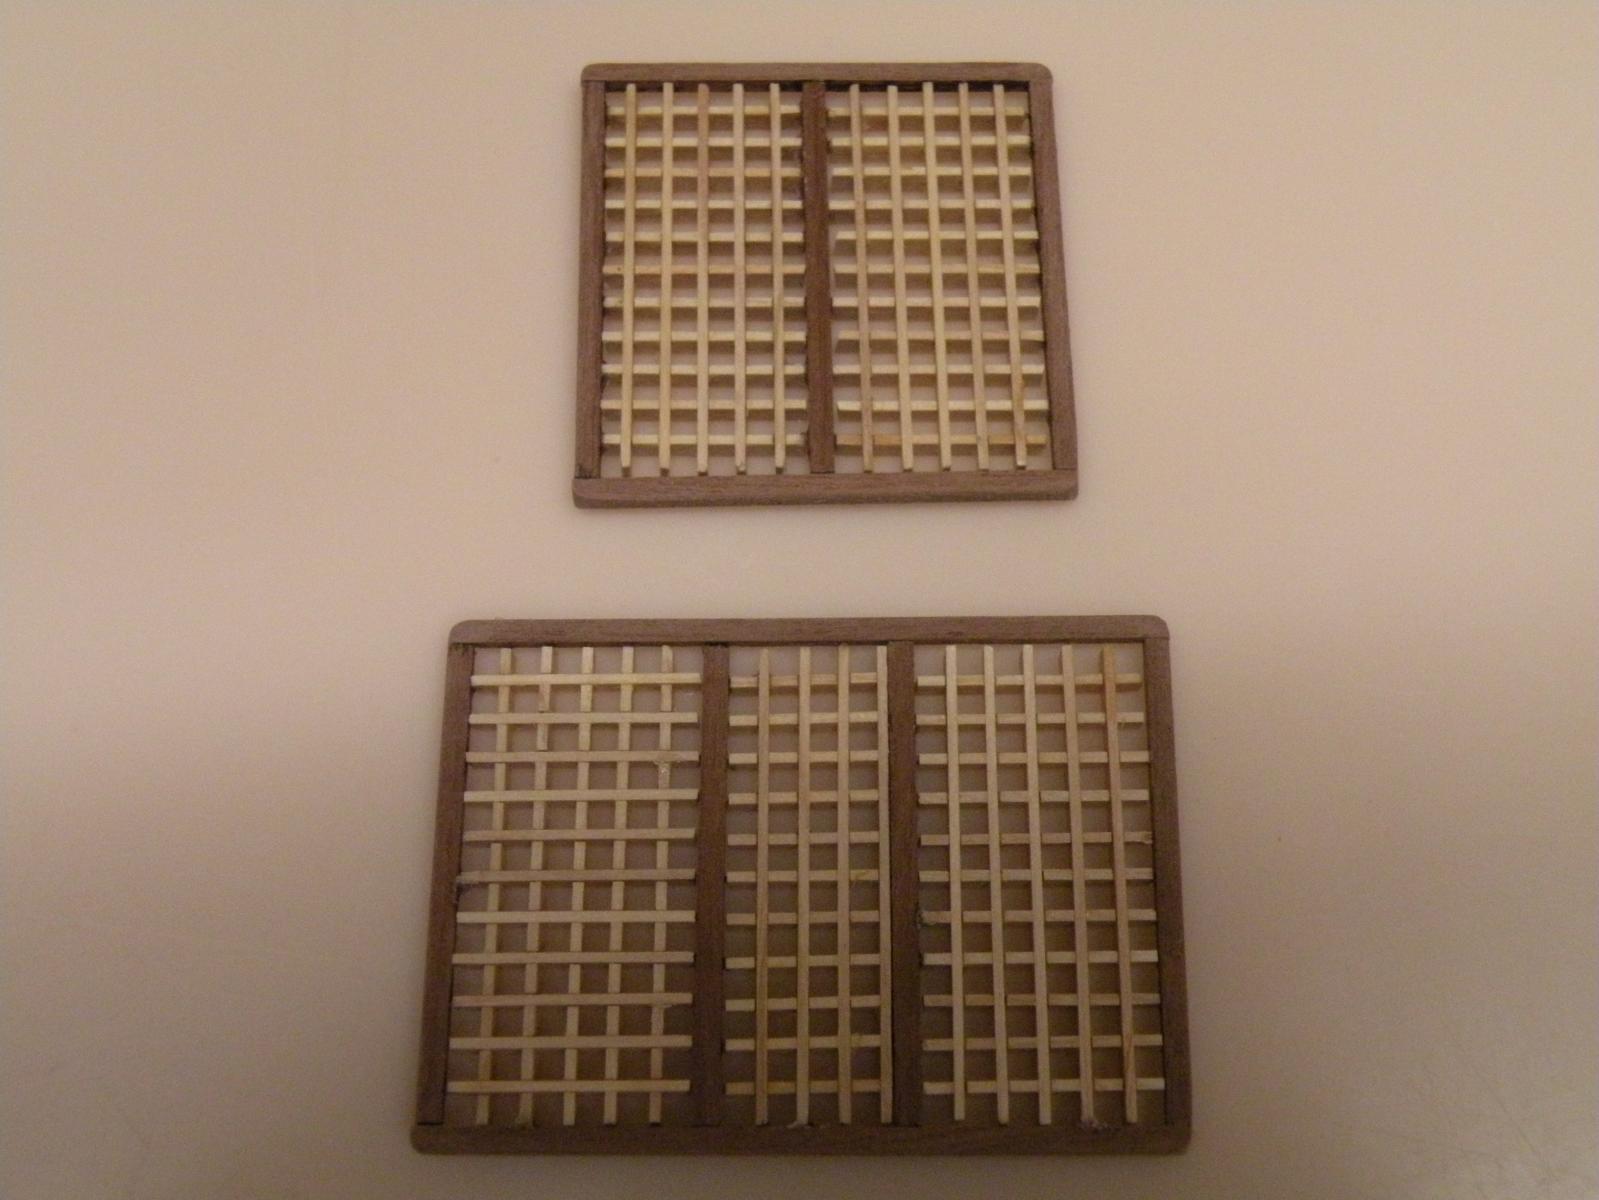
Another question. Regarding constructing the grates. Did you cut all the cross pieces one by one by hand? I did. The instructions said to build it from full pieces and then "trim" it to the indicated sizes needed. I thought it easier to measure, mark and clip these pieces to size before putting the waffle together. It worked but it was time consuming and, I found out, I couldn't make all these cuts precisely the same.....pretty hard to do when .1 mm makes a difference. If they were all perfect it would make the gluing of the frame around it much tighter. I am going to try a new way when I do the grates for the main deck. I'm going to bundle all the pieces of each size -- maybe tape them tightly together -- and then cut them as one on my Dremel scroll saw. I'm just curious if there is a better way than that.
-
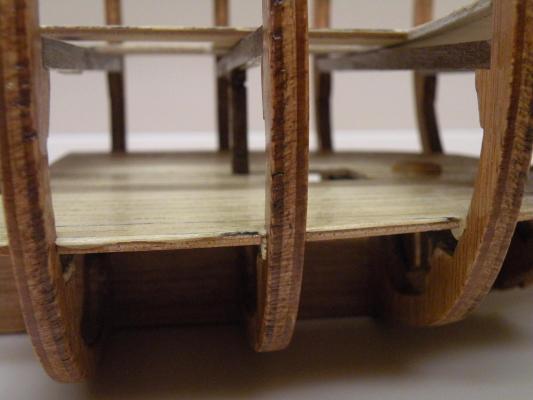
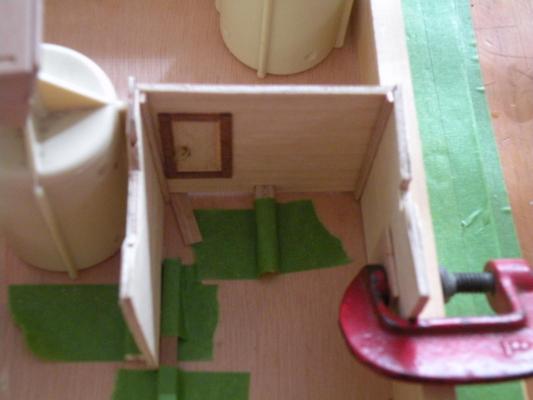
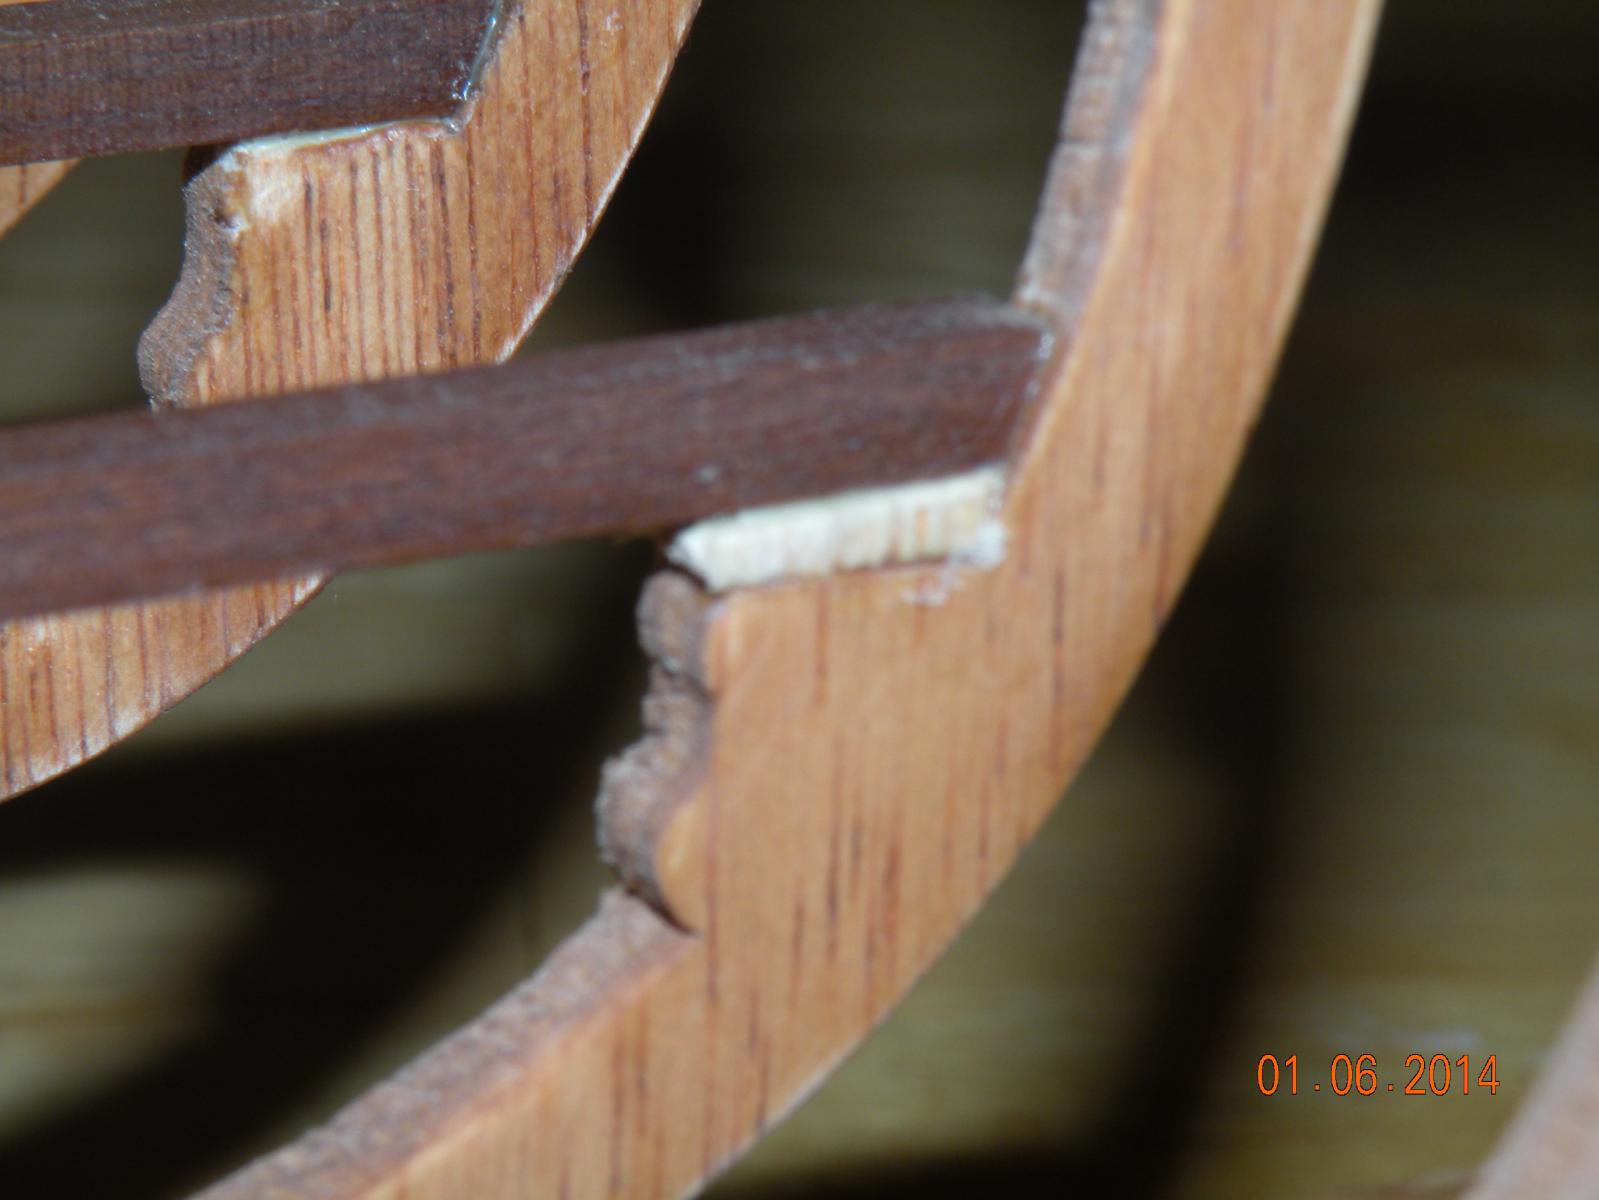
A word of explanation (and apology for out of focus shots).... notice some additions I've made to the beams (third and second to last photos). The first one, which I call a joist, is in order to give those two parts of the two deck pieces that jut out between the two grates somewhere to sit and be glued down. Otherwise only one edge of the piece had any support and I didn't like the feel of that. The second to last photo shows three little knobs glued to the edge of the beams. These are to support some things (at the moment I can't remember what) which were supposed to be stopped on the beam itself. In measuring and testing I did not think that these pieces would hit the deck (due of course to my mis-aligned frames) and would then just slide down into the hold. So just to be on the safe side I added these.
I'm wondering about the ladder openings. Nothing in the plans or instructions indicate any framing or molding around the opening. I may be thinking too modern, but it would seem that there ought to be something more than raw deck planking. I think I might add something just to hide the plywood false decks.
-
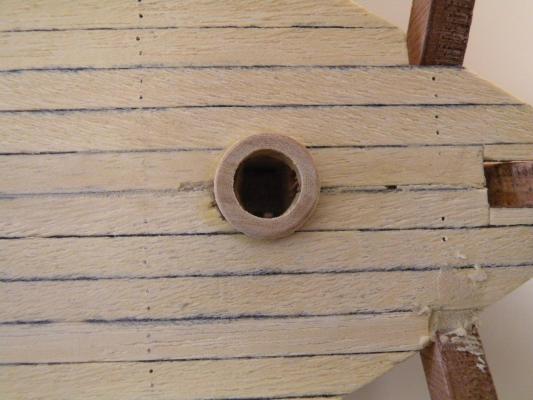
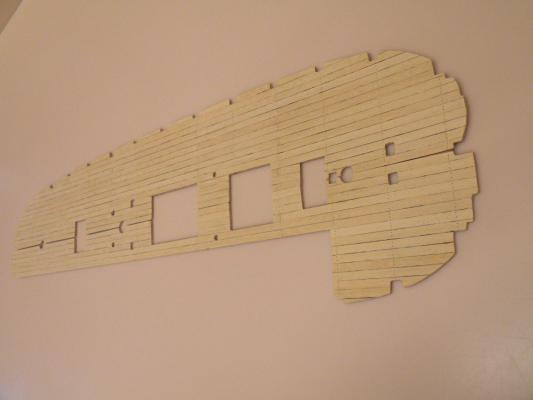
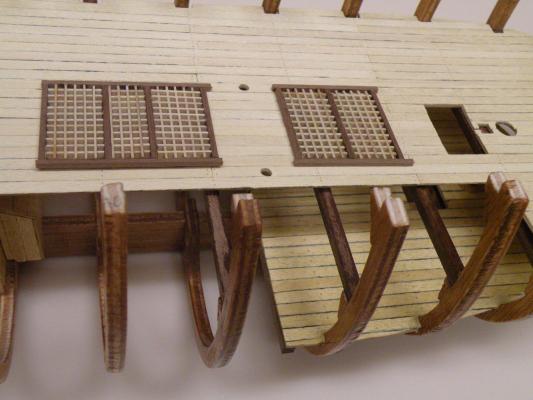
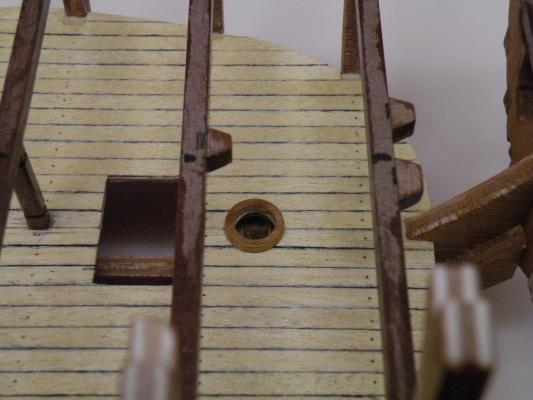
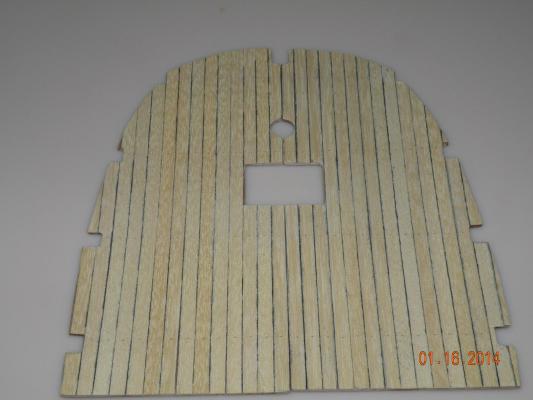
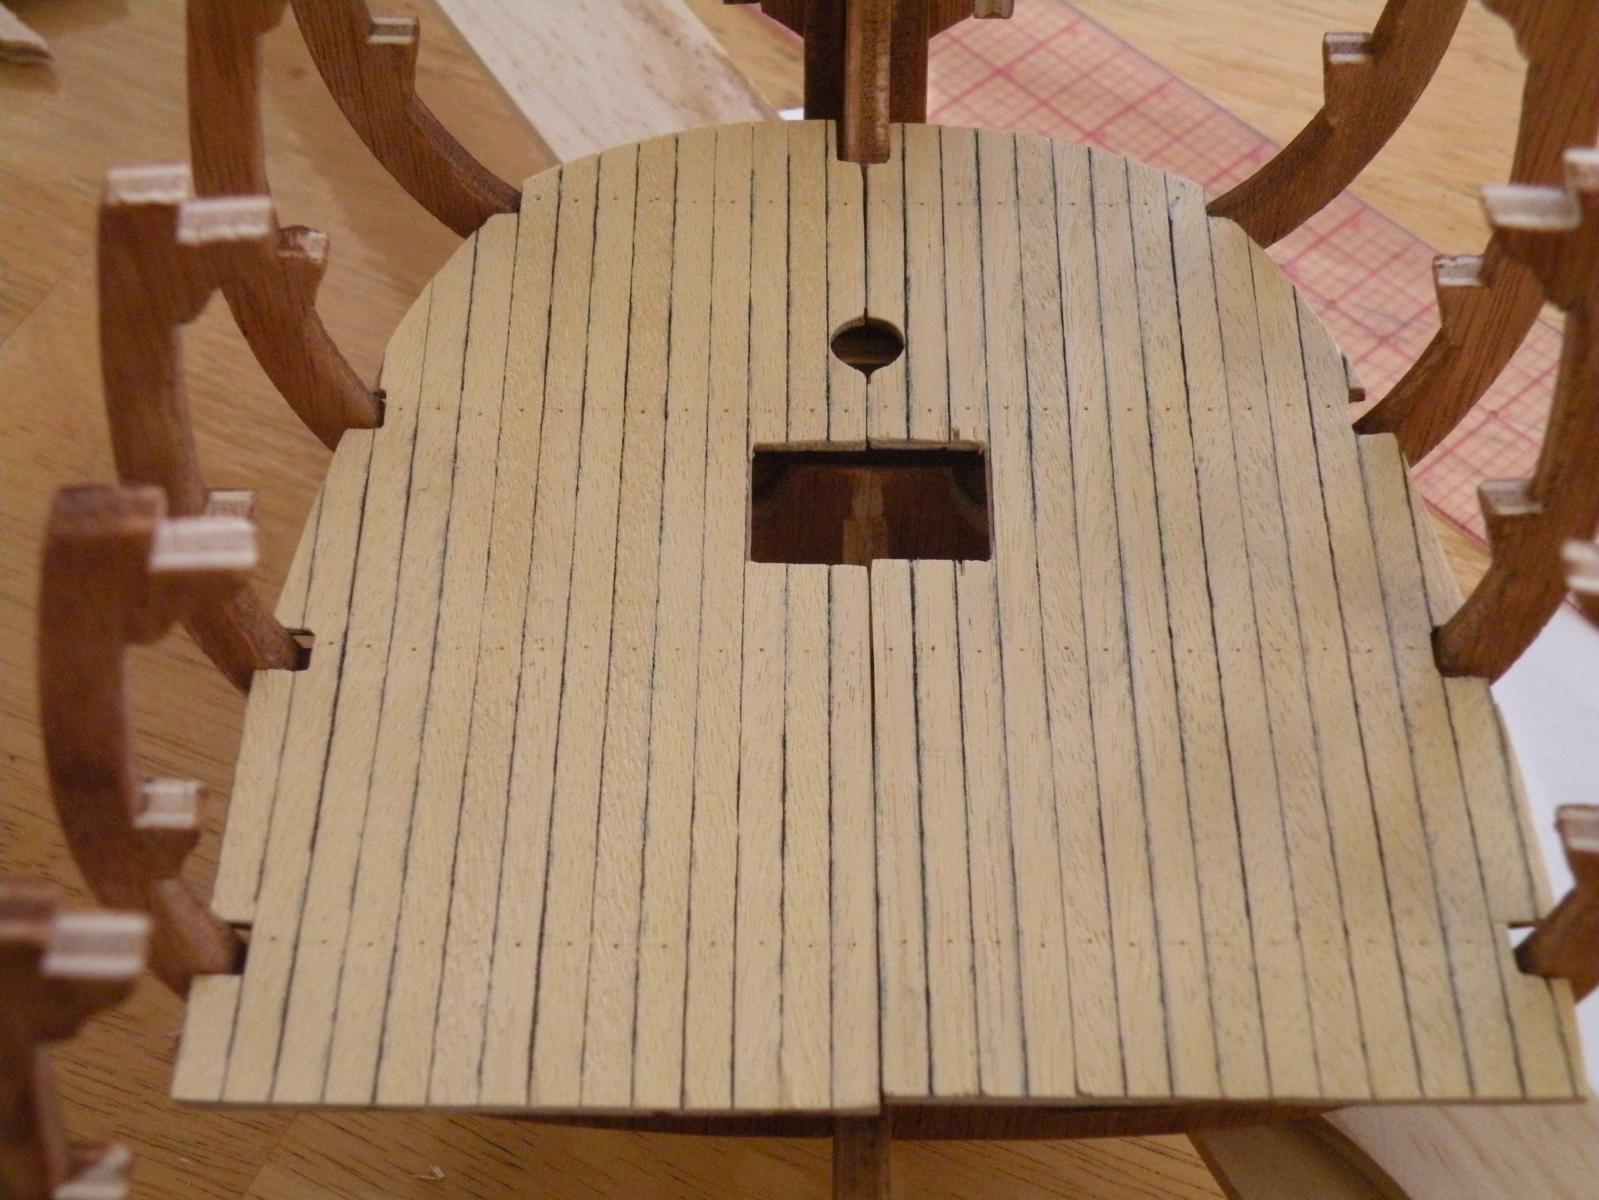
Progress made on cut outs (holes) for the lower deck grates, hawse pipes, stairs, and masts. This two part decking makes everything a little bit trickier. Especially getting the center line lined up when planking them. My pictures will show that I've not been perfect but I am satisfied with the deck planking. As with the holding platform, I decided not to try to fill the trenails. I just drilled holes (used a #76 bit) blew the dust out of them. The varnish on the holding platform not only filled the holes but brought them out a lot. I don't know if I'll use that same technique on the more visible main deck but we shall see. For now I'm trying to decide whether to stain the deck before varnishing. Didn't on the hold platform, but this one is more visible (with the open frames). What color?? Only stain I have on hand is what I used for the frames. Moving forward, it took me two days and about 10 hours to complete these grates, but I think they turned out grate (ha ha). The trick was (I discovered) to use CA glue for the four corners so as to get it rigid and square, and then use a minute dab of Elmers in each of all the other joints. Most of the time was spent reducing them in size by 1 mm width. I have now learned not to assume that adding up all the dimensions of the grates, plus the inside frames (in other words following instructions and parts list) will guarantee something fits -- in this case the grating would not fit into the deck holes and had to be fixed. 18 mm wide grates would have worked. 19 did not. So that's where I stand for tonight. I'll stain, varnish and then glue in the decks, then put these grates in place and the other small deck ornaments and be ready to move on. I'm sure hoping the decks fit in well. The pictures shown are dry fitted. The decks themselves are warped a bit and will need clamping or weighting down onto the beams.


-
Thanks for the tips DS. I have seen that plank bender in my hobby store and have just been waiting til I actually need one. That day is approaching. Thanks also for trying to make it less daunting. I don't have any scrap planks from an older kit.....this is my first. But I think I have plenty of em. That's one thing that AL does right (at least for mine); plenty of wood to spare.
-
Mike, you got to be kidding (from one newbie to another). I'm just flying by the seat of my pants and making things work when they don't want to. The little things inside (like the holding well) are easy to get right. The structural components, frames, beams, decks are my downfall even though in the end I think I'm making it all look OK in pictures. I said way earlier that some of my "problems" may stem from bad materials in the kit (the false decks are particularly bad -- warped, and I believe even some of the frames were not cut with precision). Despite all the efforts I've made to make sure things were perpendicular, level, right angled etc., I've had to shim a couple of the knees that take the beams in order to achieve a level beam, and I've also had to shim the beam itself (using a coffee swizzle stick from Starbucks) to allow the deck to lie flat and provide gluing surface. Because the framing was done without the use of a jig (jigs are essential but most of the time I can't figure out how to make one or how they work), and possibly cause of bad factory cuts, the decks I've put in so far or am just getting ready to glue in have had to be "modified" a lot -- the indents (or whatever they're called) needing to be enlarged here and there. I may be naïve but I don't think this should be necessary and it leaves some pretty big gaps between the framing and the deck edge. I also think that fairing the frames and beveling them for planking is going to be a very "interesting" project. I'm jealous of you if that step has been done with a fair degree of success. Bottom line on this my first build is that I'm learning from it and doing the best I can. I doubt it will end up a museum piece but it will show appreciation of the art of modeling. And when I go onto my next one (like in a year or more) I will have a solid grounding of what works and what doesn't and what pitfalls to look for before even starting. I know I will read the plans a lot more carefully and not treat them as nice line drawings. I've already begun to refer to them more and more when I have a question about spacing and positioning of parts (as in my earlier post re. the windlass stanchion). But if you are impressed, I will accept the compliment graciously and with humility. I'm more impressed with your build, so we're even. Two newbies having fun. That's why we're doing it.
-
That makes sense and it would work well to not waste it. I'm probably harking back to when I was mixing up batches of resin and catalyst for surfboard repairs and the two ingredients weren't mixed in anything like a true proportion. You had to judge and experience how much catalyst to put in or the stuff would burn up (which was sometimes fun to do deliberately -- when you're seventeen). With the epoxies I'm guessing its strictly one to one so a little dab of one and the same dab of the other and you got a good mix.
-
DS, thank you much for your photos and offer of help. I will undoubtedly be needing lots. Great minds think alike. I've planned from the start to add breadfruit to my empty pots (meaning the voyage is close to being commandeered). Your build looks great.
-
Quick answer Mike; yes this will be open on starboard side. Which in itself poses lots of issues (in planking and other areas) which I have been warned of. But I move forward undaunted (if naively). Later today I plan to upload some pics which will bring my log up to date. Thanks for your kind words.
-
Mike, looks like you're making good progress and approaching each step with proper caution. I am working on a similar build (AL's Bounty) and have reached the point of installing the second deck. In the process of planking it I noticed that there is a square cutout just aft of the foremast. This cutout sits directly on top of a beam. It is for the windlass stanchion which (in my model) extends through the main deck and into this cutout on the second deck and rests on the beam. Problem though is that the pictures that come with the instructions do not show this cutout, leading me to think that the stanchion should just rest on the deck. But why then the cutout in the false deck? Looking at the plans (if I read them correctly) that is what they would have me do. Looks like the stanchion sits on the deck and does not insert into the planking, false deck and sit on the beam. Since I have already cutout the planking and have the hole in the deck I began to worry that the stanchion would sit too low and throw off the alignment of the pawl into the windlass. I thought I might fill the hole. But after measuring the length of the stanchion and the position of the pawl I have come to the conclusion that the cutout is proper and should be there (it will certainly add strength to the fixing of the stanchion) and that it is AL's problem in not updating their pictures and plans to include it (my kit is probably 10 years old). Now, in looking at your main deck I see that your's does not have a cutout just aft of the foremast for this stanchion. Kits are different, but I believe for authenticity they would both have the windlass in the same place. What is in store for your windlass/stanchion? Will it just sit atop the main deck?
I am facing a lot of fairing issues and the process of planking the hull is keeping me up at night. But I'm determined which is half the battle. I will post some more pics on my build log soon. Meanwhile, I hope I haven't injected an unneeded issue into your thinking. Keep up the good work.
- Eddie and Larry Cowden
-
2
-
When using the two part epoxies, how small a quantity can be mixed? My experience with epoxies is that they come in pretty large size containers and extracting the minute quantity needed to be mixed, of each part, would be rather difficult. Mixing more than needed would waste a lot of expensive stuff.
-
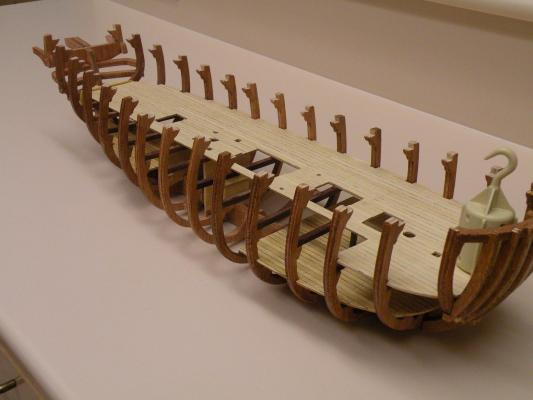
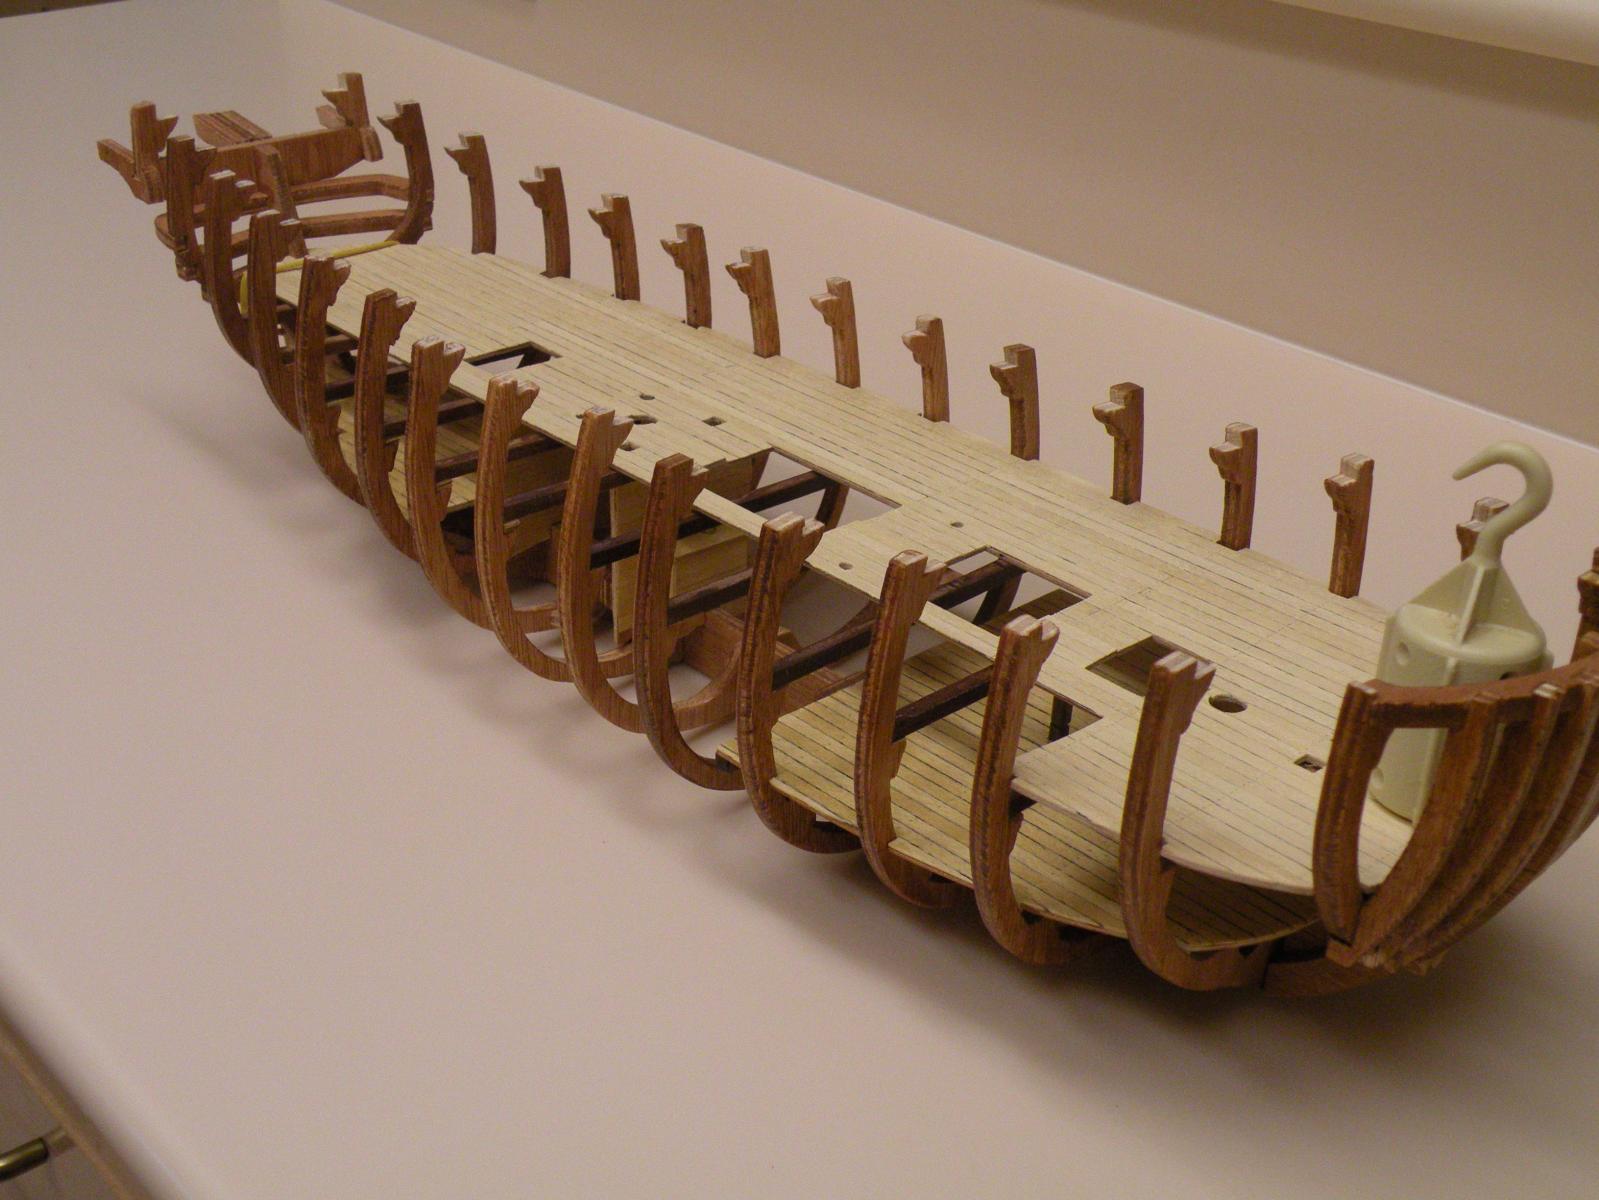
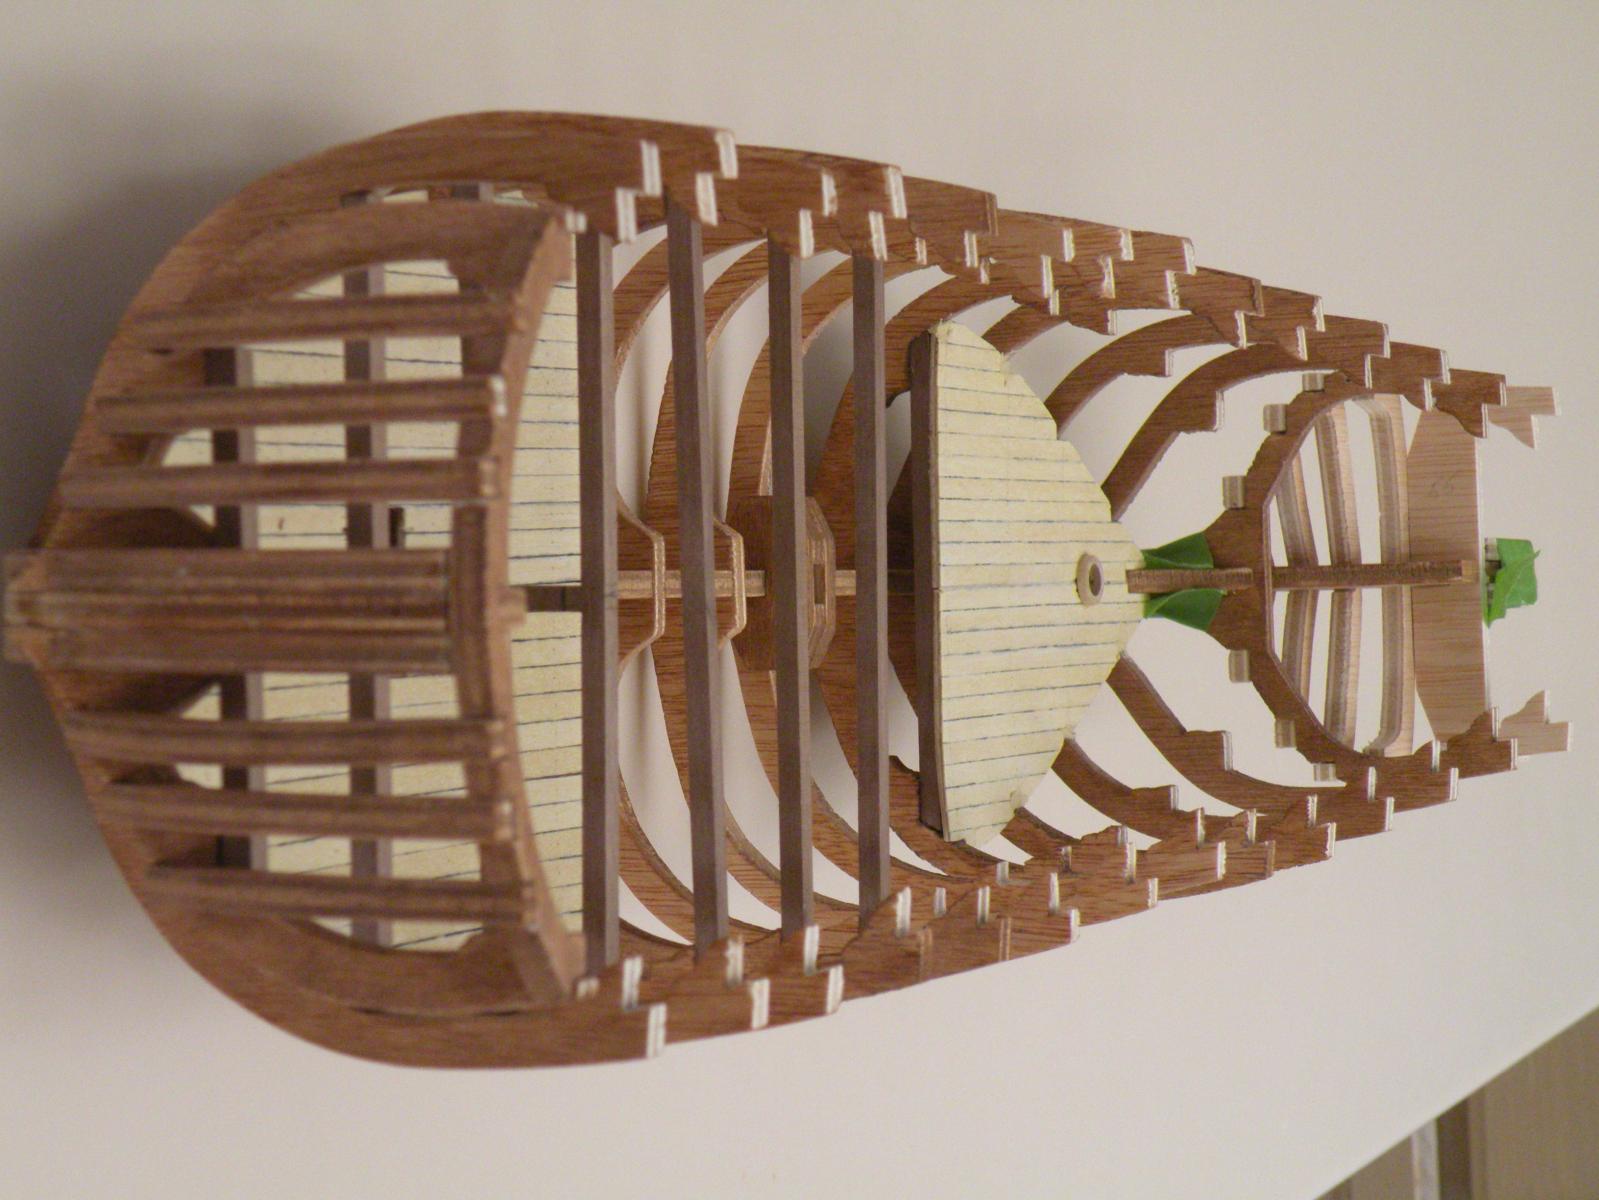
 Its been almost 2 months since I updated my log. More a case of fumbling with Photoshop and Windows 8 than with the build itself. I have been working diligently and hopefully intelligently to make this first build something worthwhile. I probably made some serious error in the first stages of putting the frames to the false keel. I thought I had them all lined up and squared properly, but not so. Perhaps some flaw in the manufacturing, but not likely. I should have built a jig and done it much slower. But, having said that, there are only two or three frames that seem out of whack and I anticipate I can correct things in the pre-planking process. I will add some material (swizzle sticks from Starbucks) to those that are "indented" and file/sand down the ones on the opposite side that stick out. Since the ship will be open on the starboard side, I may not even find the need to make those frames perfectly fair.
 Another issue that may have resulted from improper placement of the frames, or again, from poorly cut knees in the frames, was that several of the beams for the lower deck did not sit level. I had to shim them. Easy enough and pretty invisible (except maybe on the starboard open side).
Other than these two problems its going better than I even expected ..... (other than that Mrs. Lincoln, how was the play?). Planking the holding platforms got pretty tedious. Now that I am ready to start planking the lower deck I'm wondering if there is a better technique for cutting out the framing notches and (on the lower and later the main decks) the open spaces for grates, stairs, masts, stanchions etc. than I used on the hold platform. For the most part I filed the notches out, being careful to hold the piece tightly between my fingers, and sometimes putting the piece in the vise. Between filing, sanding and careful use of the Moto Tool, I got them done. I still don't know what the most effective way is though. For large openings (eg the grates on the lower deck) I plan to cut my planks to stop at the edges of the openings. For the small round holes I plan to plank over them and then drill them out using a backing underneath to avoid splintering the .6mm planks. For the small square cut outs I will probably drill them out then use a file to square them up.
I chose to use urethane over the hold platform. I also used a black marks-a lot on the edges to simulate caulk. That much worked fine. When it came to the trenails I was dumbfounded. I drilled tiny holes (using a #76 bit which is .02" approximately. With the scale being 1:48 this means about an inch diameter hole/pin/plug in the actual ship. That seems reasonable. But having drilled the holes, I couldn't get a toothpick into them and filler just smeared over them and didn't make any noticeable impression. In the end I opted to just leave them alone. After applying the urethane finish to the wood, the holes stood out more and look OK (I think). Moving upwards to the lower deck soon and later the main deck, I am in need of advice as to how to do this work properly. Perhaps a bigger hole is called for to insert the head of a toothpick?
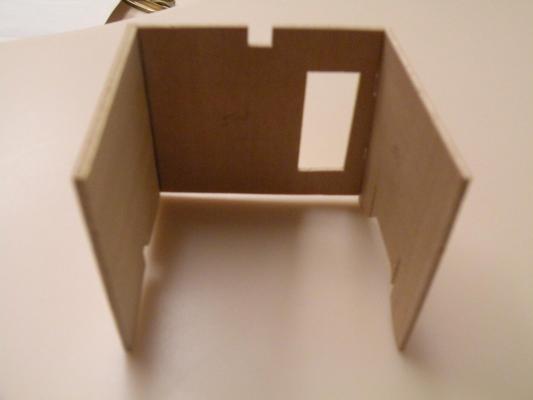
Building the hold well and box (what did that box usually contain?) was a challenge. I'd never worked with miniature before. The joints do not provide much gluing surface and I found it couldn't be done well with a square jig. You can see below what I concocted. I took the precaution of adding a 1.5mm molding to the inside of the well just to give more gluing surface.
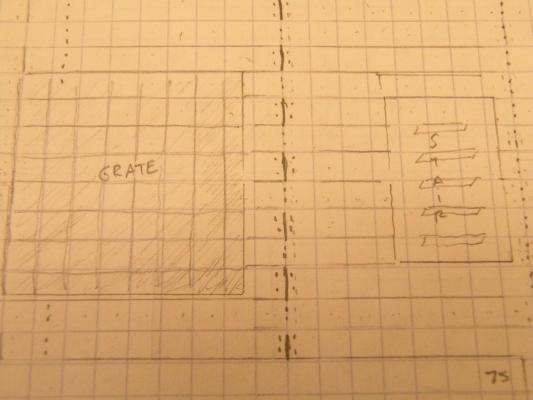
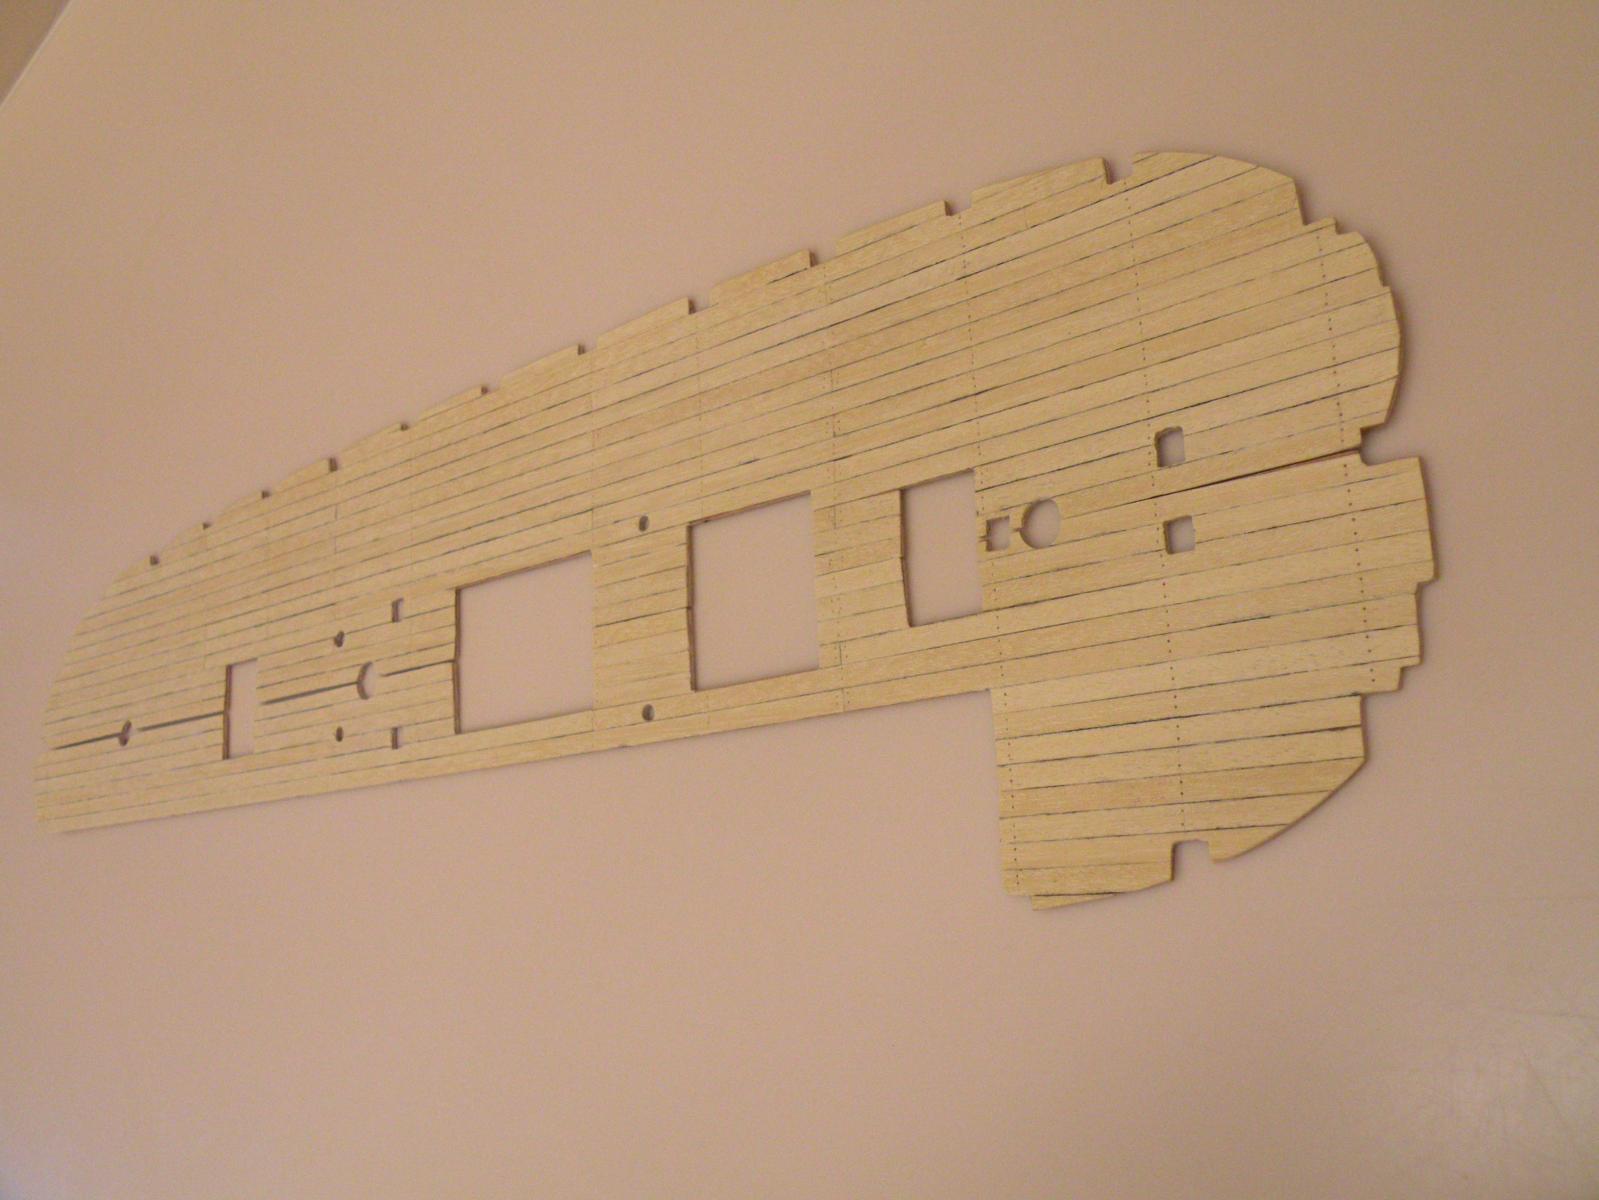
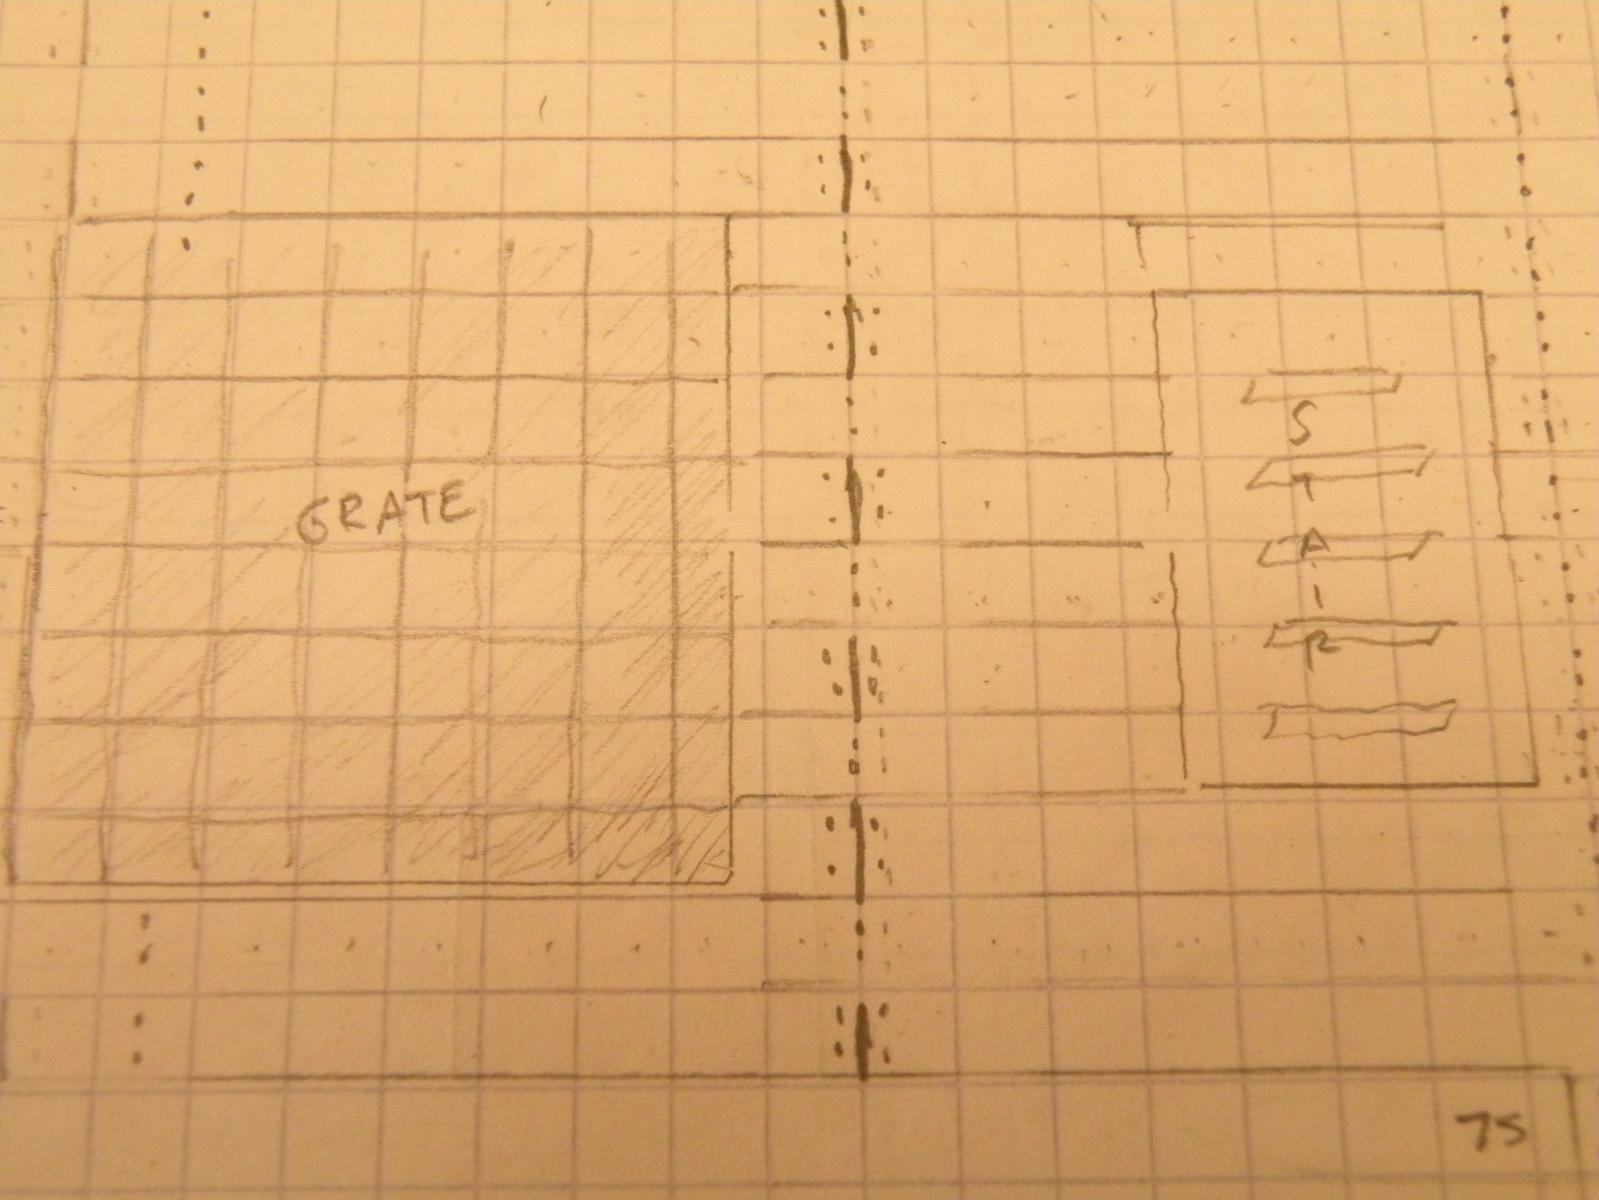
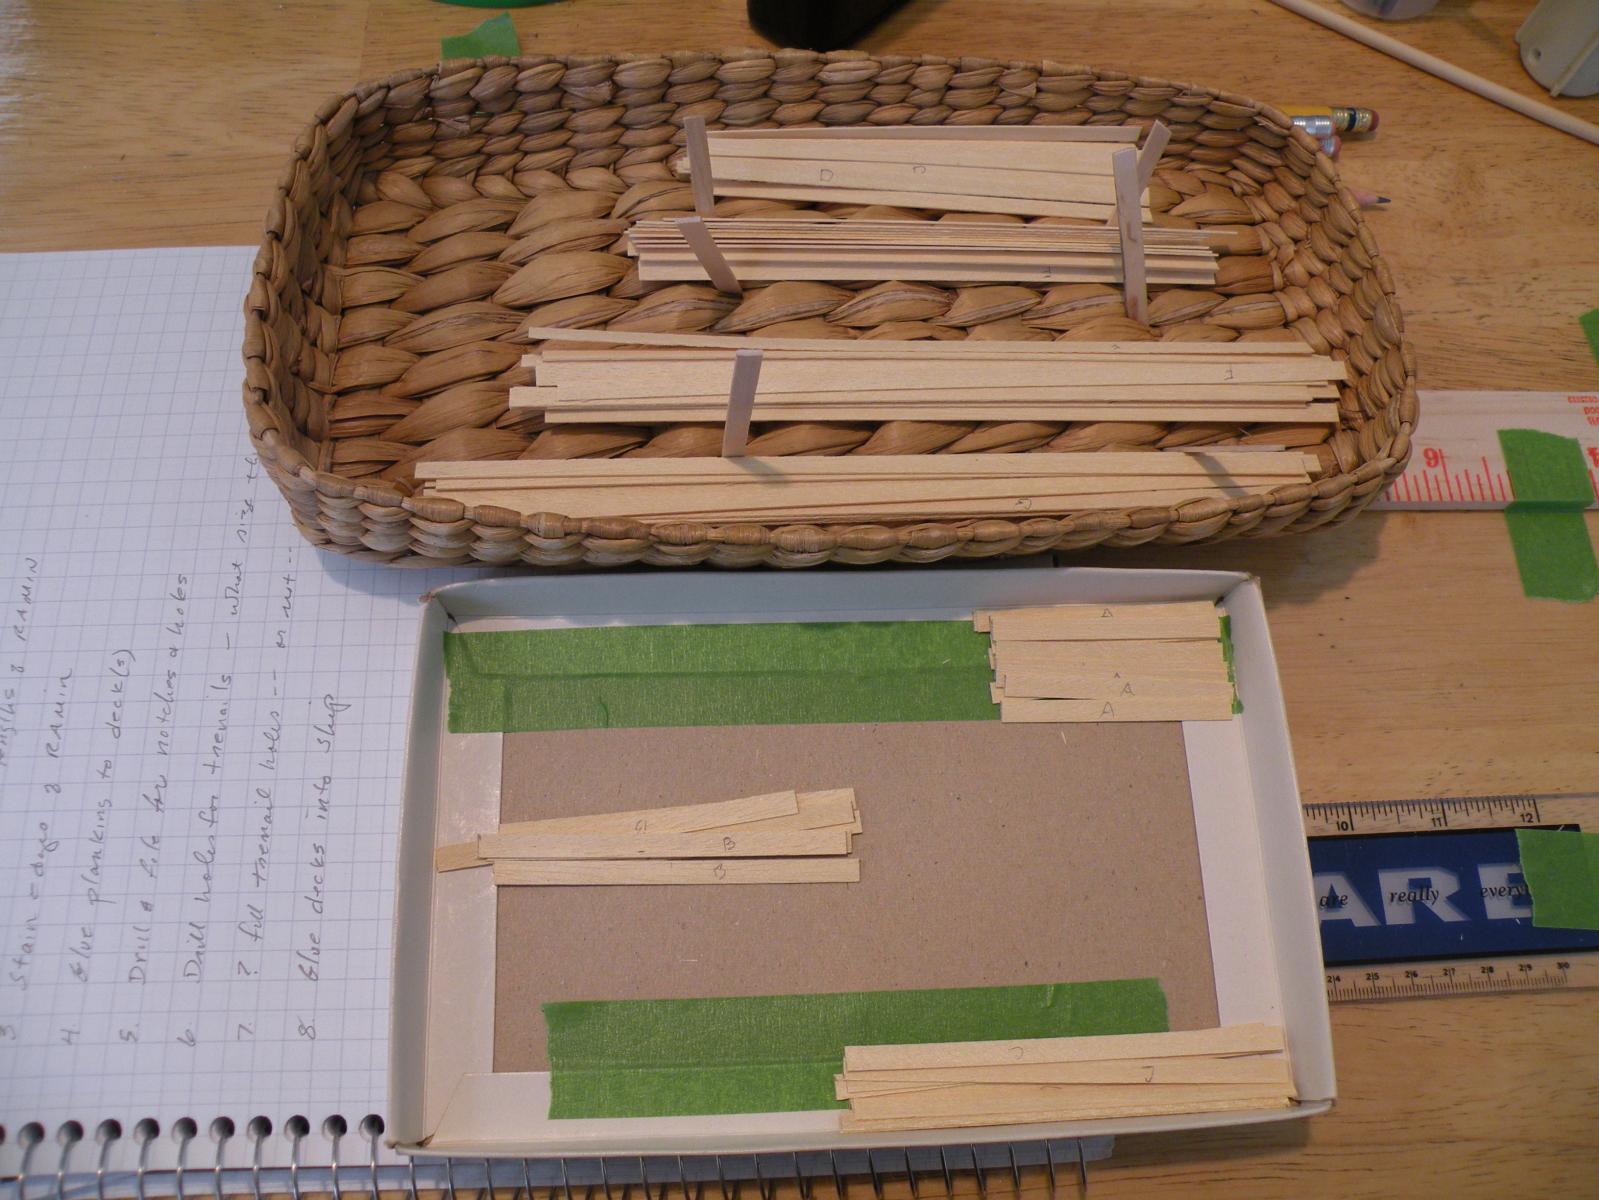
I am now working on planking the lower deck (with all the aforementioned cutouts). I like to do things in a planned, controlled method, so I first traced out the outline of the deck onto 5 mm square graph paper. This was very convenient to have as the planks are 5 mm wide. I don't want to run one plank the full length of the ship (not authentic), so I planned out a scheme and broke it into 3rds for the most part. I then counted squares and figured out how many of each length plank I would need to cut. I have just finished cutting the planks with about 5 mm of leeway to each plank which I will trim off upon gluing up.
Here are some pictures. I welcome any and all criticism, tips and warnings.


-
Mikr, I also wonder about the sufficiency of the wood provided, so I am careful to take a good inventory before I start using any particular type and size. I've gone through the Parts List and categorized each as to how many pieces and lengths will be needed for each part or process. Its a painstaking job but it gives me confidence to use the wood as needed and familiarizes me with what is coming up. I have found that so far AL seems to provide more than enough. I can't of course speak for your kit. I take a very conservative approach to using it up anyway. For example, AL's instructions and parts list show it takes 26 pieces of .6 x 5mm Ramin to complete the lower deck. They mean 26 pieces which are 700 mm in length. But I've laid out a planking scheme which makes use of smaller runs (eg 170 mm, 3 times rather than a full 510 mm run) offset so the breaks are staggered, and along with the holes for grates and ladders I believe I will only use 14 strips of this Ramin v. their 26. I don't know what they expect you to do with all the scrap they'd have you produce, but I prefer to leave as many 700 mm strips intact rather than have a lot of small pieces. Besides, the reality is that no ship of 140 or so feet was ever planked with one continuous plank of that length.
I've been remiss in getting some of my own build onto the log but I will try.
- Larry Cowden and Eddie
-
2
-
Mike, welcome to the forum (I sound like an oldtimer which I am not). Your kit looks similar to my Bounty in that it has mostly open framing. Your's has a few solid bulkheads in the bow and stern which mine does not. So with these (flexible) open frames you will probably encounter similar challenges. However careful I thought I was being, still various alignment problems came up. I was naïve in thinking that if the rebates (notches) connecting the frames to the false keel were tight that the alignment of the frame fore and aft had to be square. Not. I have several that for some reason did not square up, even though at the keel they are perfect. This could be cause of warpage (my kit sat in a garage for 6 years before it was given to me). I've also found that the knees for the decks are not perfectly level (hold platform and lower deck) and I've had to add shims to some. Anyway, my big takeaway from it so far is that you can't trust the kits to be perfect and its a good idea to read the plans as well as the instructions. I look forward to following your progress, and hope you take a look at mine. I've not posted much to my build log lately, but I plan to catch up this weekend.
- Mike Dowling, Eddie and Larry Cowden
-
3


Bounty by Mike Dowling - FINISHED - OcCre - 1/45
in - Kit build logs for subjects built from 1751 - 1800
Posted
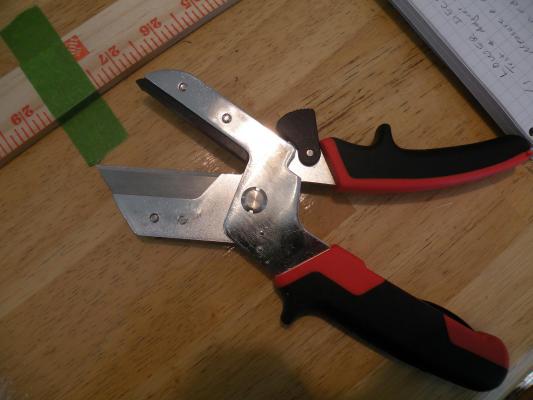
Well you are looking pretty darn good; I hope I can catch up to you some day and have my Bounty (which my wife wants me to call 'Lil Walter' in honor of the gentleman who gave it to me and passed away two weeks ago) looking as good. Actually drilling the holes wasn't a big deal; took about 1 hour on the holding platform and 2 on the lower deck. I don't know what I'll be doing on the main deck but I'm thinking something more visible and authentic like actually filling the holes with trenails. Below decks won't be seen much. I guess I am lucky that the planking strips in my kit are perfectly 5 mm each. Made it quite easy to get straight lines. What I need to learn to do (or get a better tool that allows me to do it) is nip these buggers at perfect 90 degree angles. Seems like no matter how straight it looks in the cutter tool its off by a little. Is that what is known as the parallax view? My perspective on the cutting edge isn't 90 degrees so it only appears to be aligned right? I also have that problem when I try to file or sand down to a right angle. I don't know for sure if your solution to the round peg / square hole is what the kit and other builders would recommend. I'm just thinking aloud and offering up an idea for the future. I thought of doing that, and of course I'd have had to do it immediately upon installing those steps on the false keel. But here's my thought: a round peg in a round hole can twist. Even with glue down that hole I didn't want to risk it. And I wondered about how the real ship was stepped. On the boats I've owned there has always been blocking or the mast shape was not the same as the step. So I went ahead and cut (actually filed) tenons into the lowest 10 mm of the mast. Now it can't twist no matter how much strain is put on it. Now, after all the work, Dominic says the main and mizzen should rake back slightly. I didn't see that in the plans -- though I did look -- so now its back to look again and if necessary, make some more adjustments. Will I ever get to gluing in that lower deck?