


Captain Al
-
Posts
613 -
Joined
-
Last visited
Content Type
Profiles
Forums
Gallery
Events
Posts posted by Captain Al
-
-
Nice work Dom. I am working out the planking scheme for the top deck of my Bounty so your pictures and words were very useful. At first I was going to cut planks to 75mm, but when I drew that out on a paper outline of the deck it looked far too small with way too many butt joints. I started wondering what length of plank the real Bounty would have had and I found in McKay's book that they were probably around 20 feet long. I'm only going by a line drawing which was labeled 1:96
Worked down to my 1:48 scale this comes to 127mm. I plan to go now with approximately that length. I was thinking of staggering them every 3 planks (so that plank 1 and 4, 7 etc. have parallel butt joints) and making the stagger equal to real Bounty's 8 foot stagger. But I like your 4 plank scheme. It looks less cluttered. Mind if I steal it? A question out of all this: it looks like you trenailed only the joints and not across every beam. In reality there would be pegs or nails across all beams, is that not correct? Doing all the beams just for realism would also mean that the planks need to butt up on a beam. This would make devising the layout much trickier. Since our faux trenailing is for effect only, I think your way makes sense. Down below on the other 2 decks I followed directions and simulated nailing across all beams as well as doubling where two planks met. I think now I will follow your lead.
-
Yeah I have that one too. It does seem like the most practical. If your hand is really steady you might try a router bit. I have one that is exactly 5 mm and you might come down from top to bottom in one swoop. Either tool, be careful. I wonder if you might be able to rig up a "fence" from top to bottom which would prevent you from sawing into the good part of the planking. I know from experience that those coffee stirrer sticks that they use in Starbucks (do you have Starbucks in Bulgaria?) are very pliable -- a little soaking and they will bend nicely to the shape of the hull. You could pin one on (they are pretty long to start, about 8 inches) each side of the 5mm groove you want to cut. Just a suggestion for a goof preventer -- if its possible.
-
I suppose it is mathematically. The posts are 10mm which would be 480mm which would be about 19 inches or, like you say 1.5 feet. However, I think visually it is about right. I couldn't really get behind it when I used longer and thicker diameter posts. Somehow that looked out of scale the other way. Maybe the stairs themselves aren't in good scale? I will be keeping my eye out in the future for any railings I add to the companionways off the main deck. But I would imagine that those are provided in the kit.
-
Back to the previous remarks I made re the stem. What tools do you think you'll use to cut away that 5mm space?
-
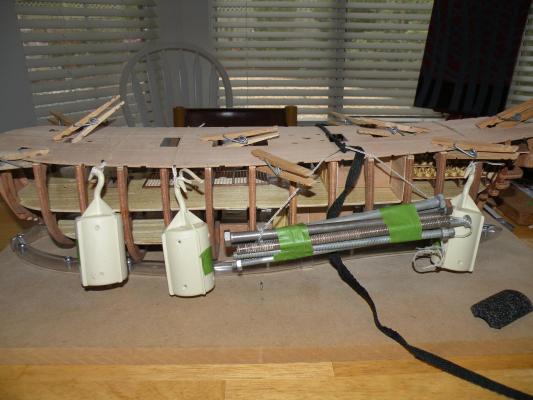
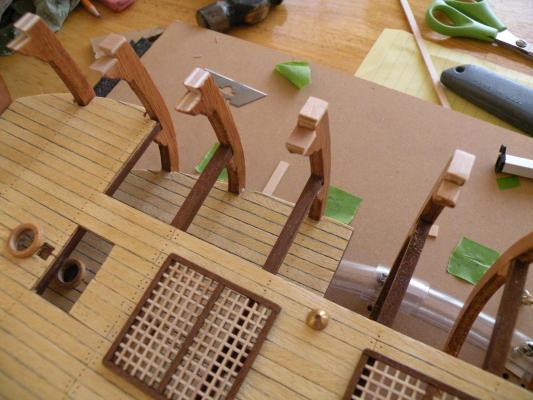
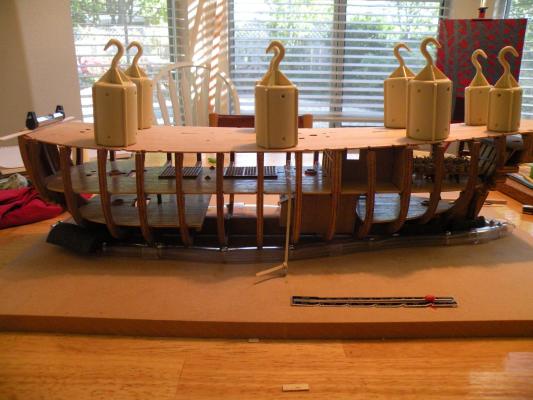
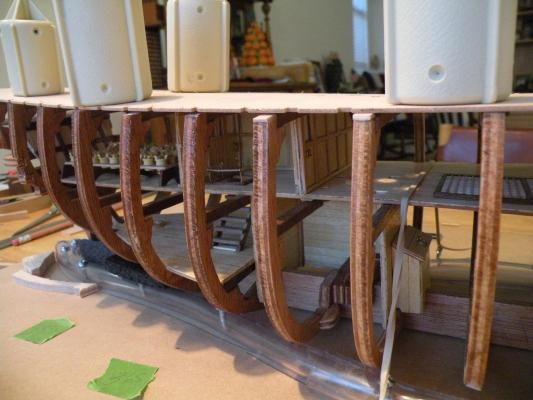
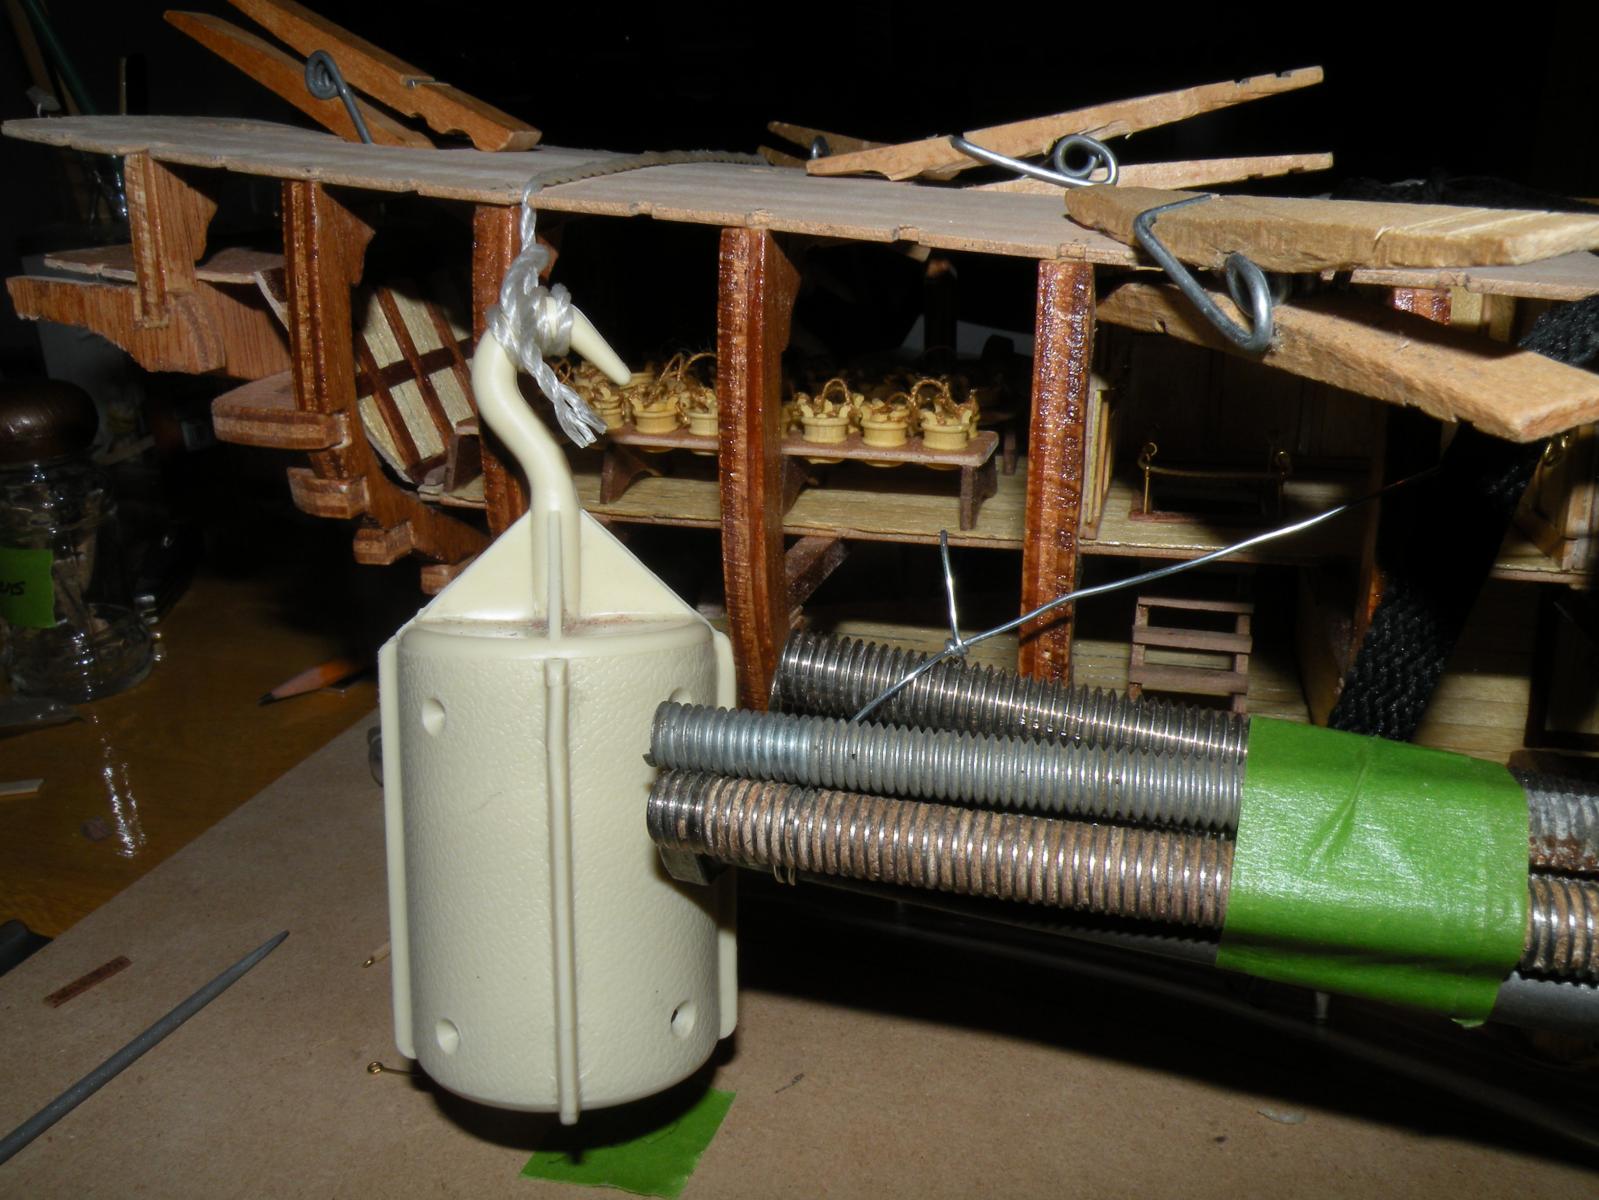
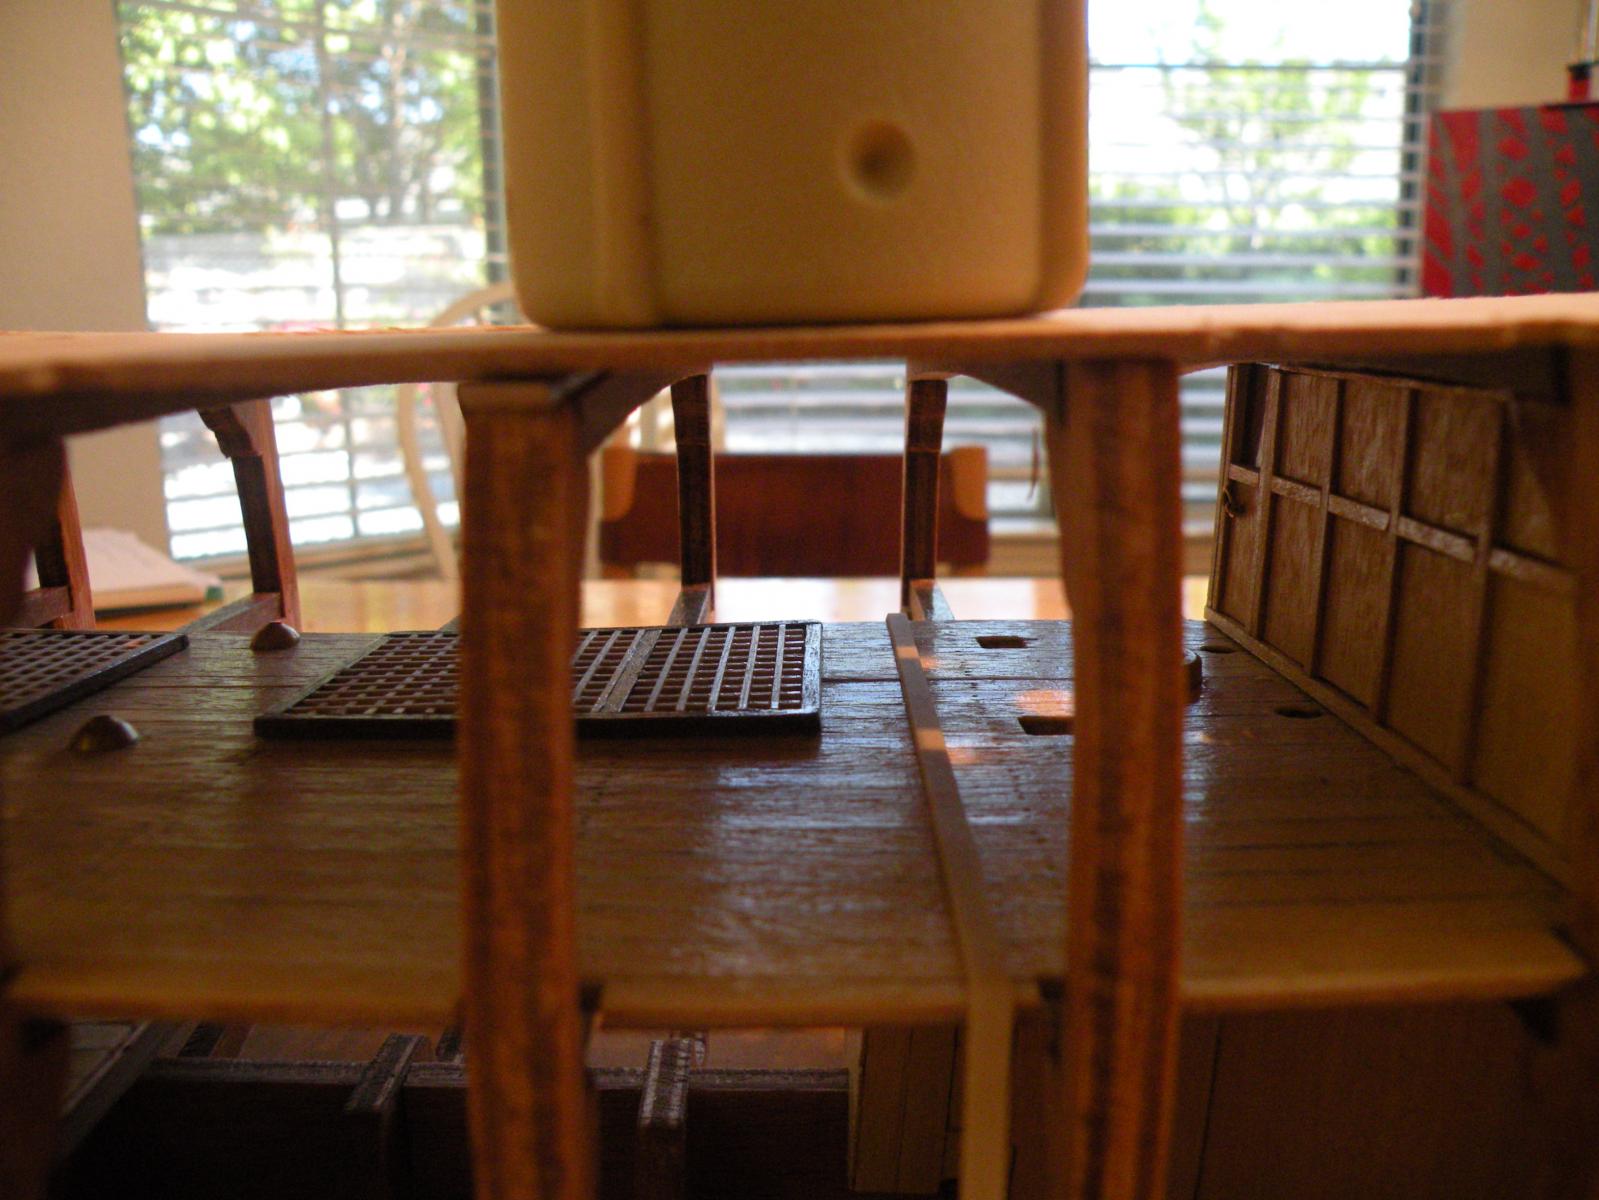
There was now nothing left to do but glue on the beams and then the deck. All I wanted was a way to make sure I could hold the deck securely down onto the beams. I had decided not to use pins except if absolutely necessary. Weights and clamps were my choice. But no matter how many weights I used there was always a frame tip that wouldn't hold tight. I realized that it was cause the actual point of pressure was not on the tip. Clamps would have been better at the edges but I couldn't figure out how to make a clamp or pair two clamps up and get them to hold the deck to the frame. I think there is a whole art to clamping, and I don't know it yet. And I didn't want to take the time to go out and buy more specialized clamps, so I improvised. The best way to describe what I did is visually, so take a look at the pics. In the end, this afternoon I finally glued down the deck. There is a lot of fairing of frames to do (some frame tips are actually sticking out beyond the deck) and to my horror the masts don't run down now through three decks. They did when the main deck was only sitting dry on the beams, but now, glued down they don't. I think its cause when I tested them last, I hadn't done the shimming of the frames. That little bit of difference has made the sweep of the deck just different enough that the holes on the top/main deck are now a millionth of a mm out of alignment. I'm praying that I only need to ream out the hole a wee bit and it will line up.
I have to laugh whenever I see how the weights are being used. But it is sure an effective way to get equal pressure across the whole of the deck, and apply that pressure right up to the edge.
Tomorrow morning we'll see how tight the deck really sits.


- Mike Dowling and cristikc
-
 2
2
-
Plenty of progress. Plenty of obstacles overcome (hopefully). And I'm sure plenty more to come.
My last post concerned my preparation for putting on the main deck. My problem was that my frame tips were out of whack. Some too high, some too low. I decided to ignore the specs/plans and just work to create the contour for the deck in the easiest and safest way. I really didn't want to take a saw to any frames (remember, these are ribs, not bulwarks)or do much rough filing and sanding. As it turned out I was able to shim up all the low frames, a little here a little more there and produce the sloping I wanted. For shims I just cut already measured thickness wood and laminated one or two together and made the heights of these frame tips what I needed. For each tip that was raised in this way I also had to put in a shim on the notch that would hold the beam.
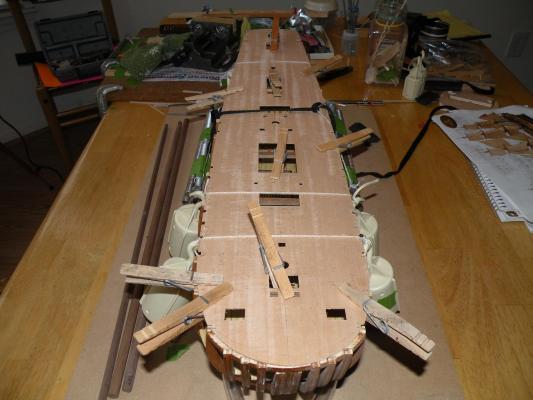
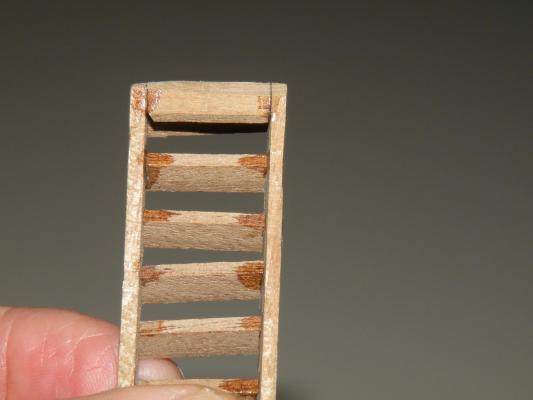
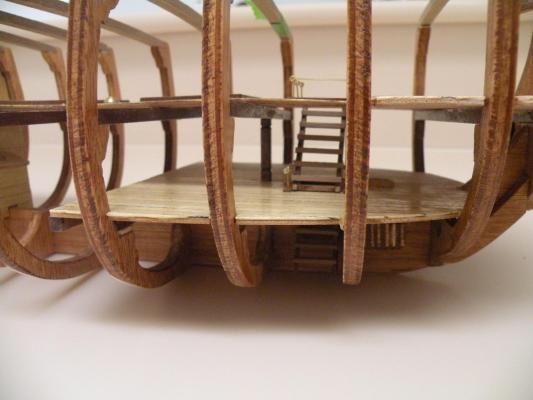
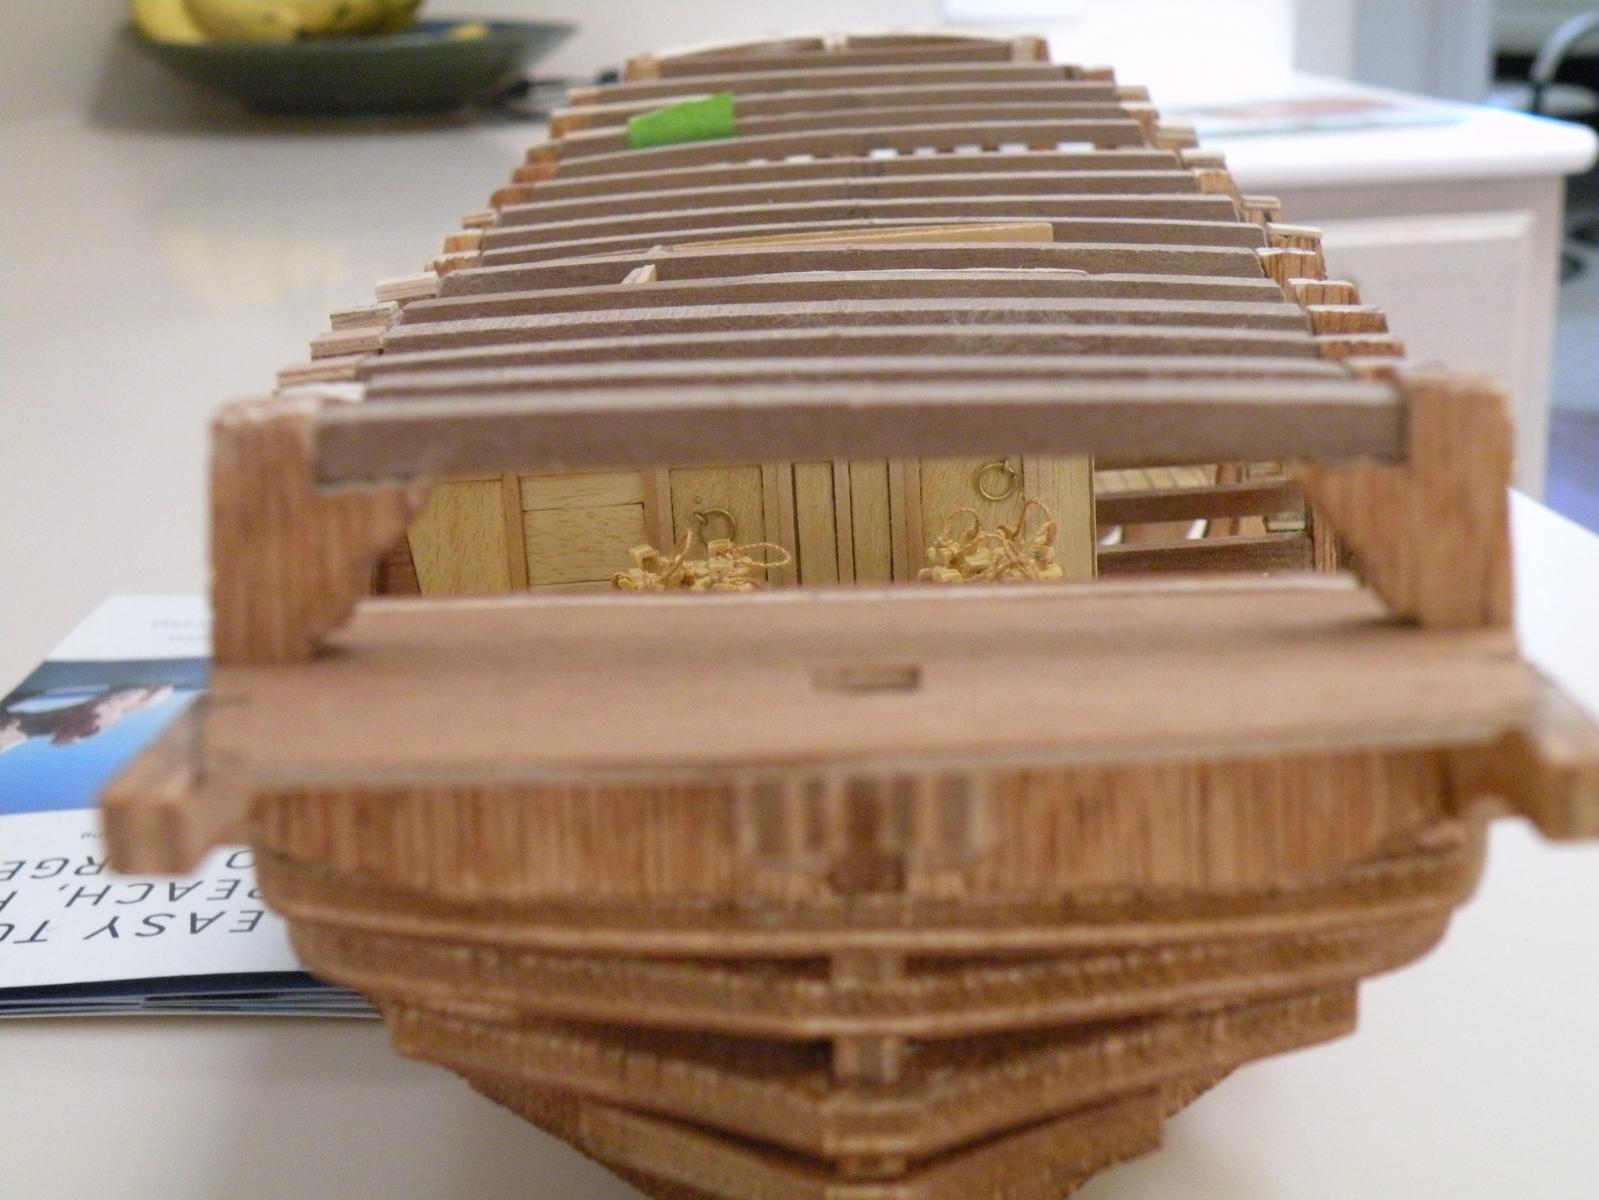
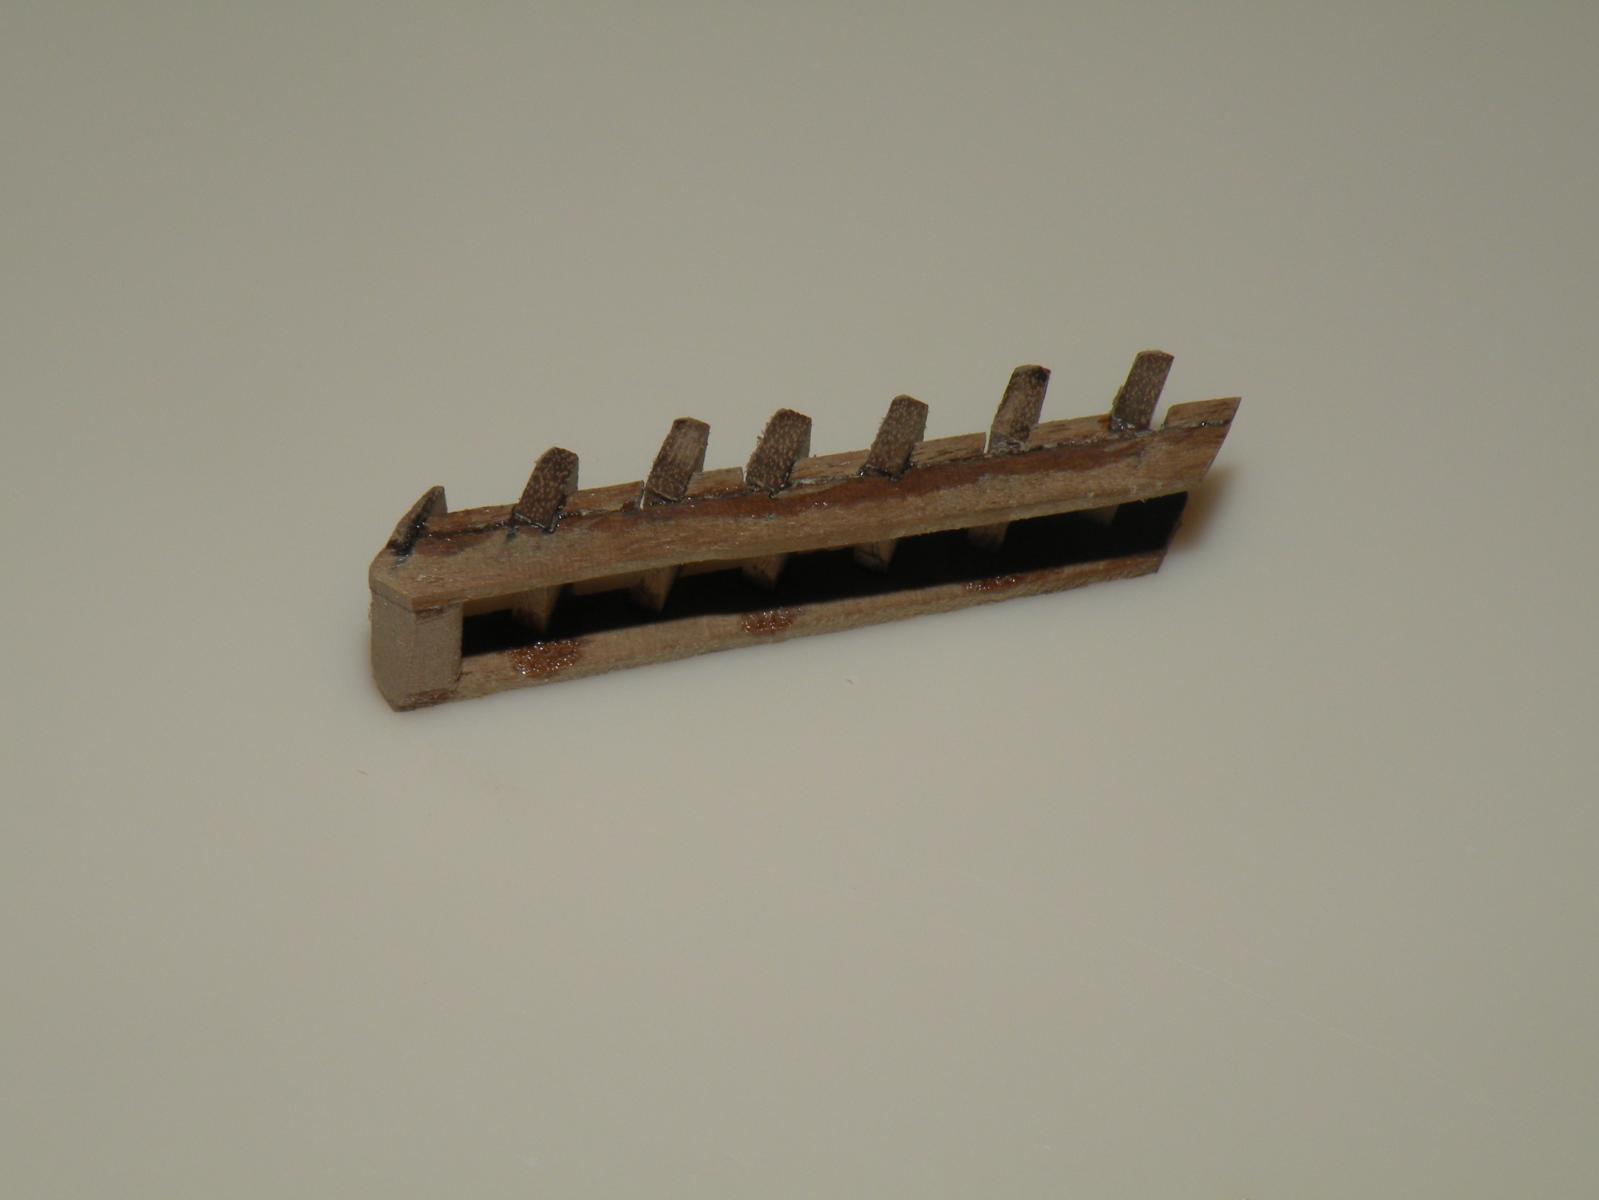
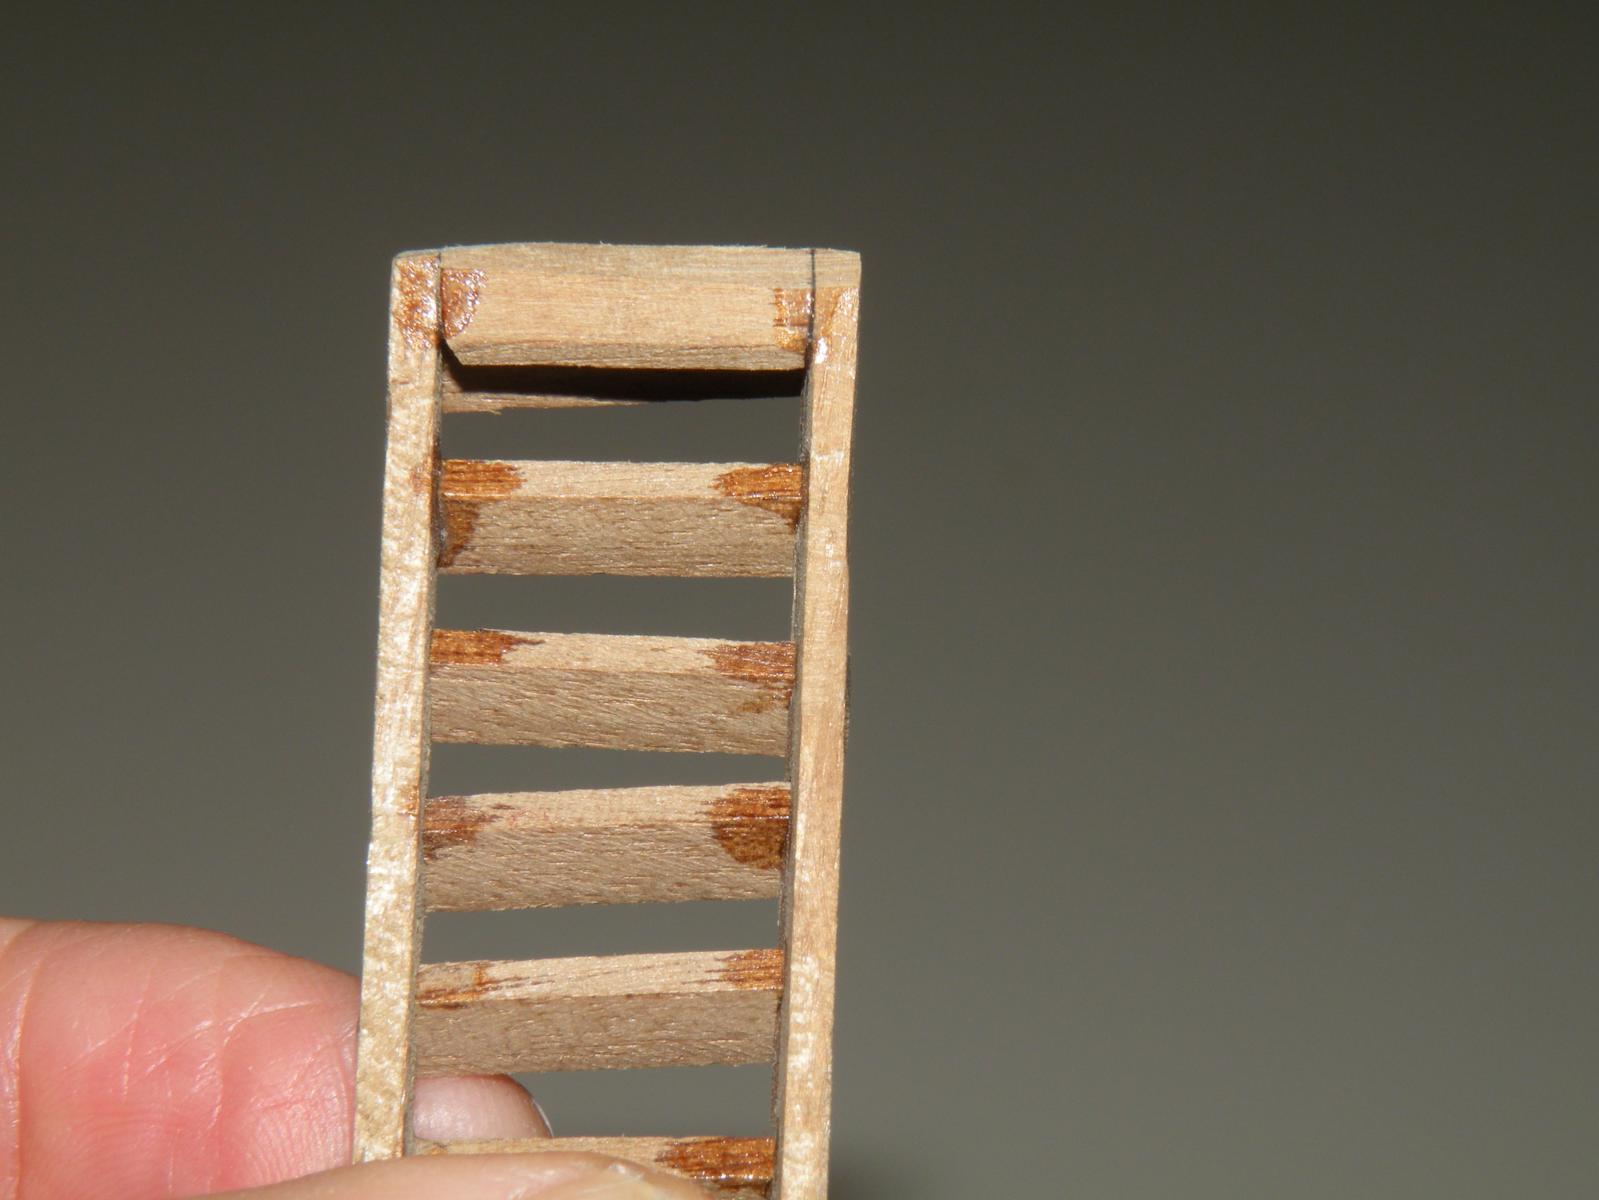
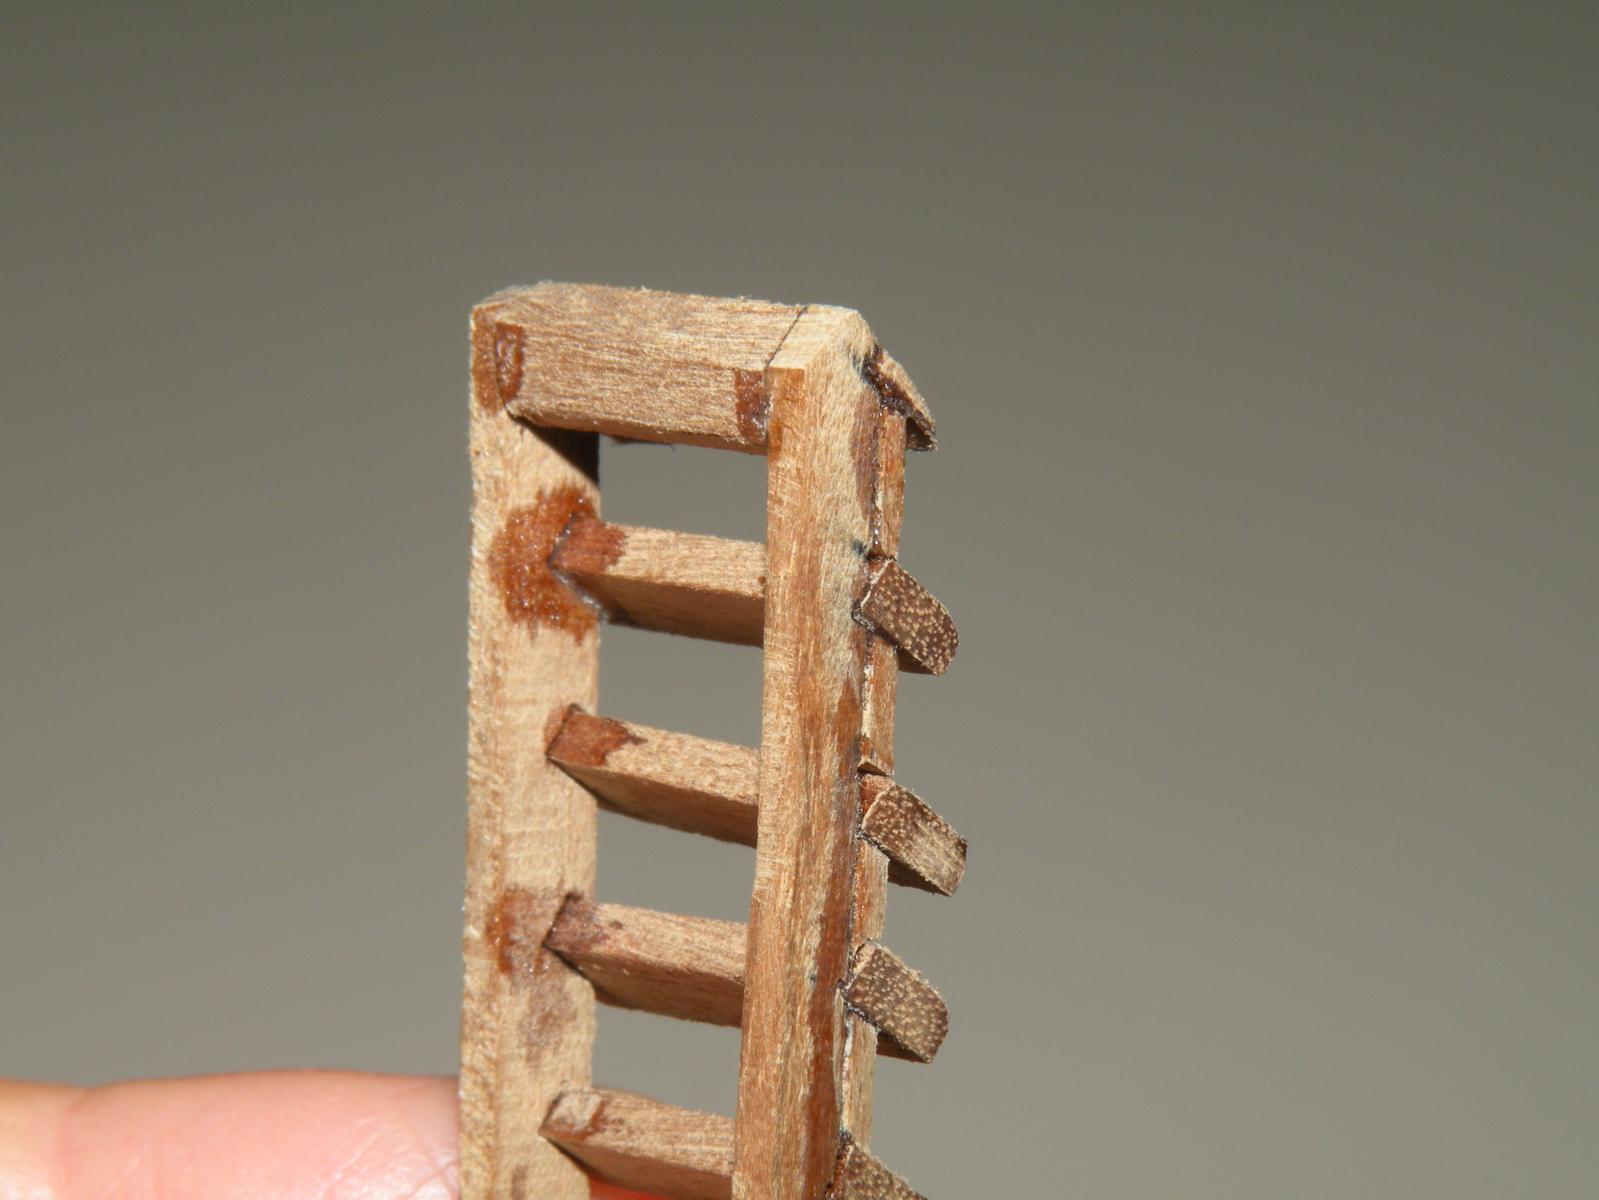
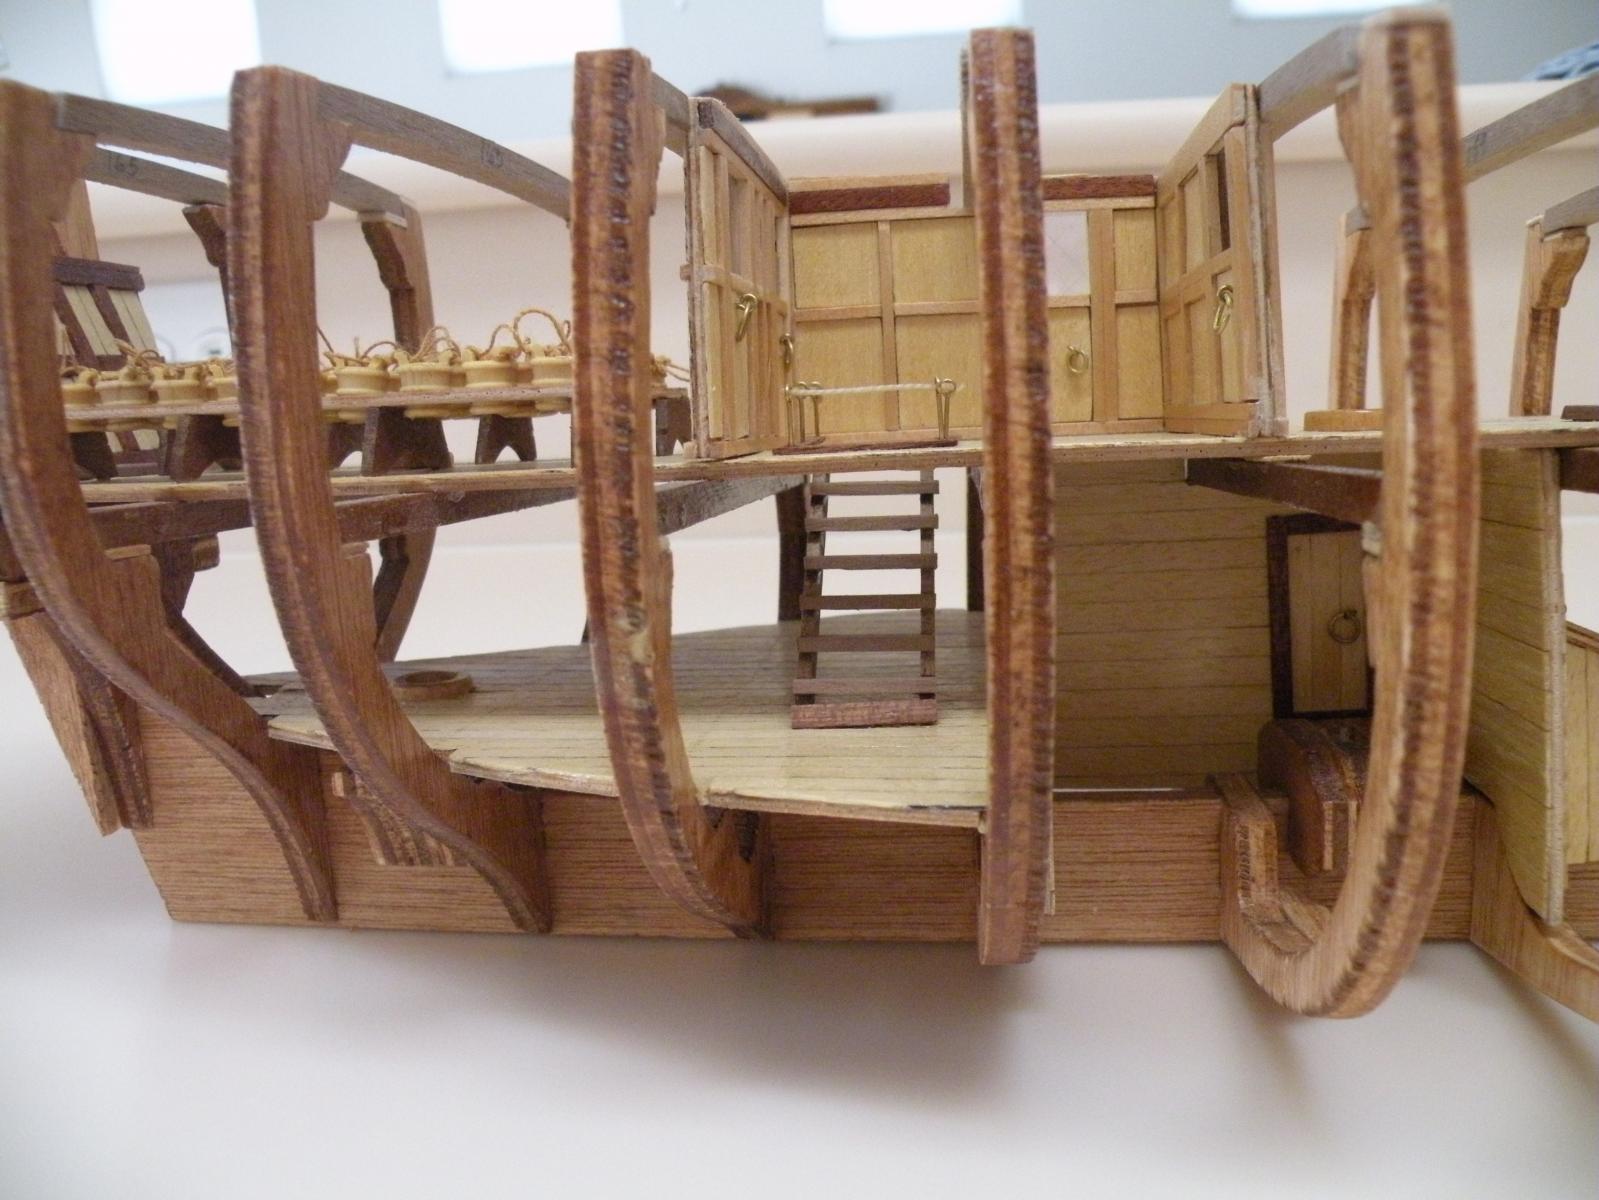
Then I decided to deviate a bit from the sequence of steps the instructions gave and install the stairways below deck before putting on the deck. I had finally found where the fifth step would go and this was both good news and bad. Good that I knew where it went, bad that the stringer for that fifth set of stairs had been destroyed getting it out of its template. So I had to rebuild the stringer. That was actually fun and in the end not disappointing. I used my Dremel scroll saw to cut the stringer's notches. I wasn't completely accurate, a couple steps came out pretty cockeyed but sanding them down made them almost look level. I need to find a better way to apply CA glue....I just dripped it directly from the squeeze bottle and obviously way too much comes out. I've been researching applicators and will try the sewing needle with the end snipped off next. Also maybe a sewing basting pin that has a little round ball at the end. Anyway, the pics show my work. And I still don't know how to insert pictures between paragraphs, so they are all at the end of this post I guess.
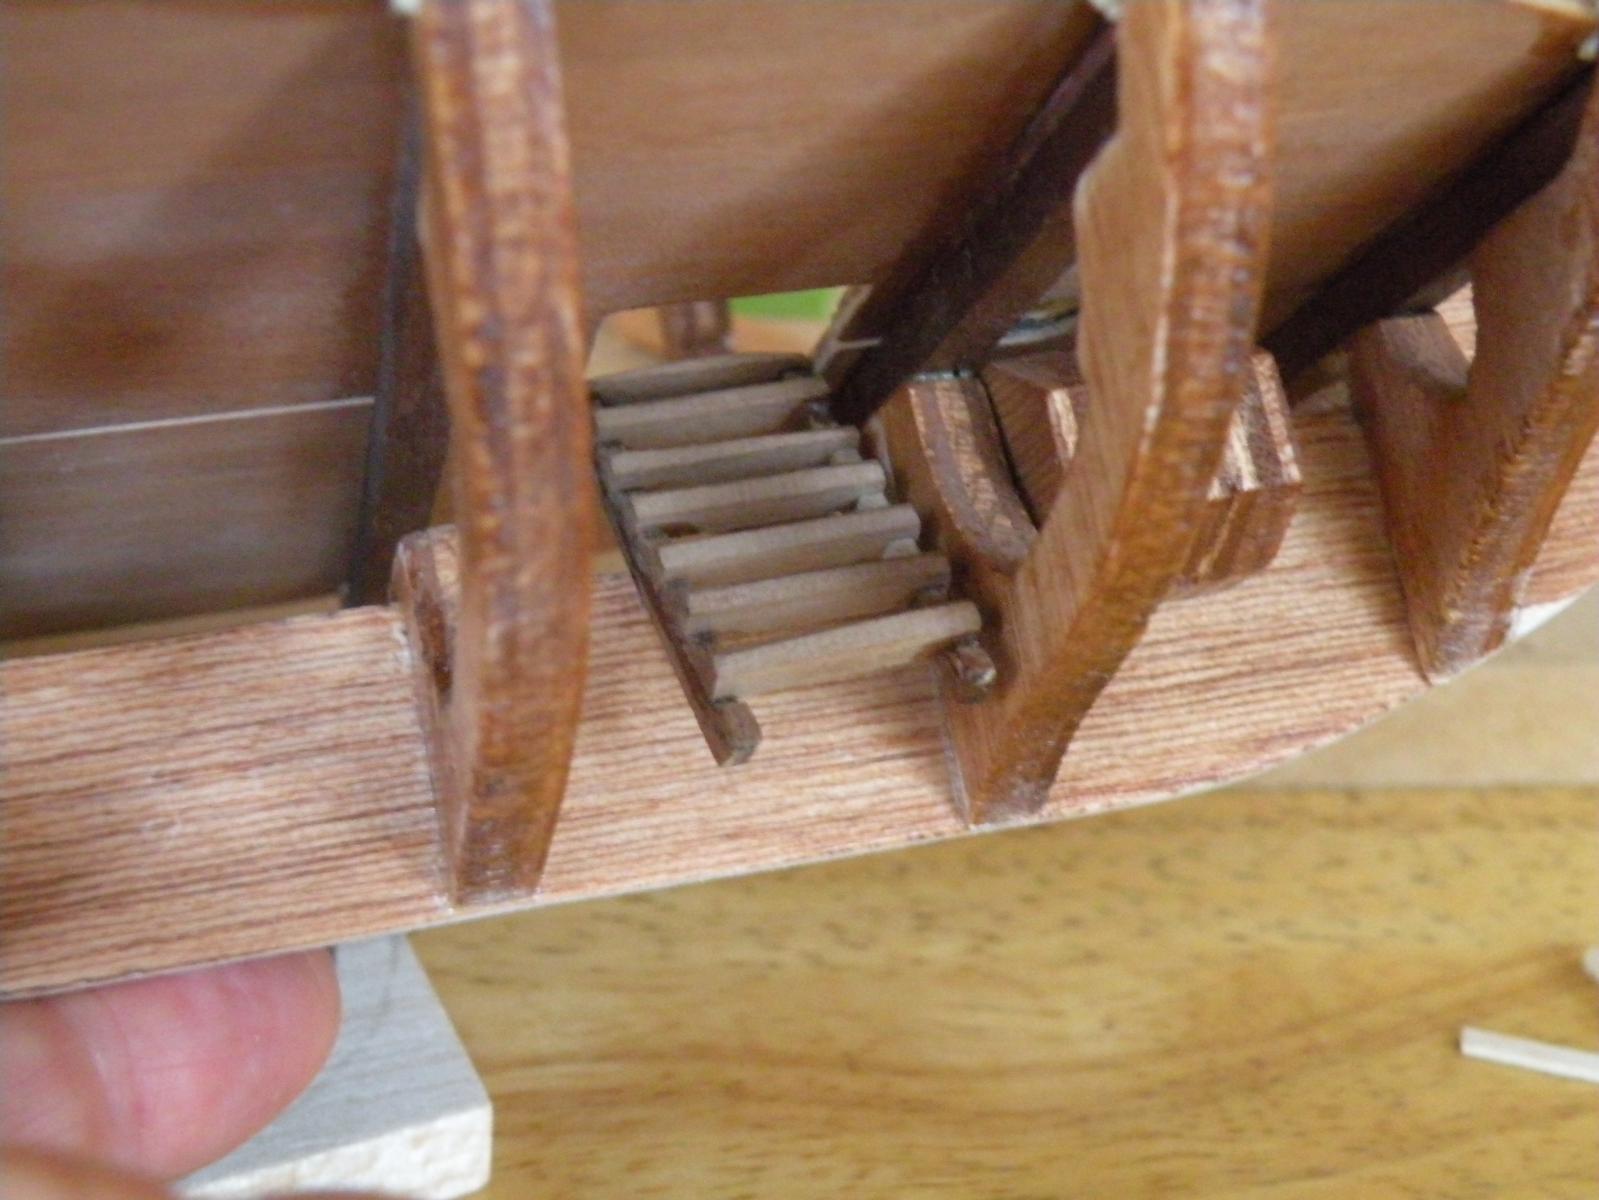
Getting that broken stairway in place and making it stay was another trip. Since my Bounty doesn't have planking over the bilge there was nothing to glue to at the bottom. Its supposed to just hang there, resting on the keel and propped up against the lower deck. Not much glue surface. So I added a little cross piece at the head of the stairs between the stringers, enabling me to glue across an inch or so instead of just the two little stringer tips. With the repair work I'd done to these stairs, they weren't precisely parallel stringers I guess and so they sat askew on the keel. I killed two birds with one stone by filing a little notch in the keel into which the left hand stringer fit, leveling the stairs and making the install more secure.
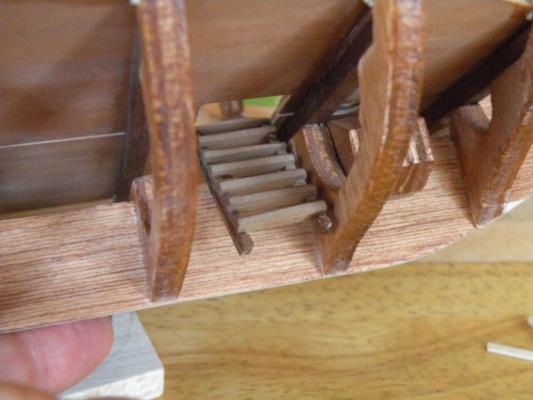
The other stairs from the lower deck down to the holding platform was a piece of cake cause it wasn't broken to begin with and cause it had a deck to sit on. So easy that I decided to embellish it and the lower stairs with the same type of railings that I made for the previous stairs installed a few years (it seems) ago.
With that I'm going to end this post and start a new one.


- Aussie048 and Mike Dowling
-
2
-
Thank you all for the endorsements of both Jeff and PayPal. I need to look more into it as I didn't realize you could link it to either a cc or bank account -- or, for that matter, it seems you can just put money on deposit with PayPal and then draw it down like you do any checking account.
-
I understand what you've done at the bow. Makes sense if you feel you can cut a straighter line. I have more luck cutting the planks down to a very close tolerance before I put them on, and then leaving only the final sanding to make it perfect (like I've ever achieved perfection). And I'm just referring to the process I've used in planking up to a hatch or companionway cutout on a false deck. It may be very different trying to get the curved plank of a hull to end squarely with its mates. Thanks for your response. Keep on sanding my friend. I have finally finished my basic interior work (stairs, rails) and have glued down the main deck beams. Today I hope to get the lid put on. I'll post something later on.
-
Would it be truly insane to try to use a Dremel router bit freehand? Theoretically that would be the perfect tool, but practically speaking, one slip and its all over.
-
Ahoy Capt. F.,
Did you purposely disregard the instructions to "leave a 6mm opening" for the stem at the bow end of the keel? Where the starboard and port planking come together? Maybe I'm seeing your photos wrong or reading the instructions wrong, but I understood it to mean there would be like a 2mm (the thickness of the planking) groove for the stem to nestle into.
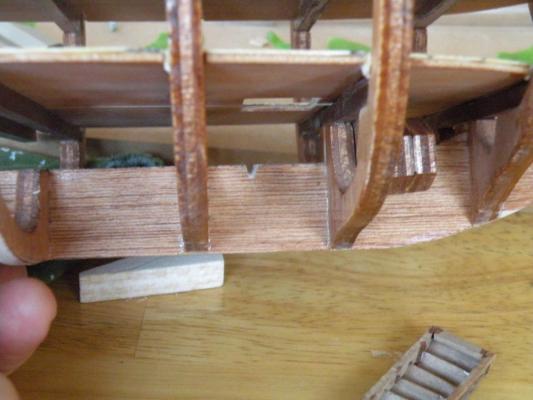
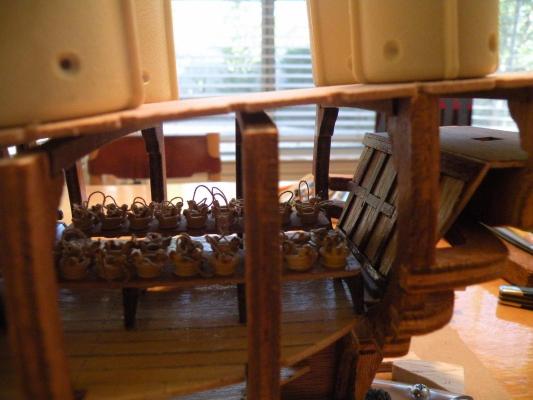
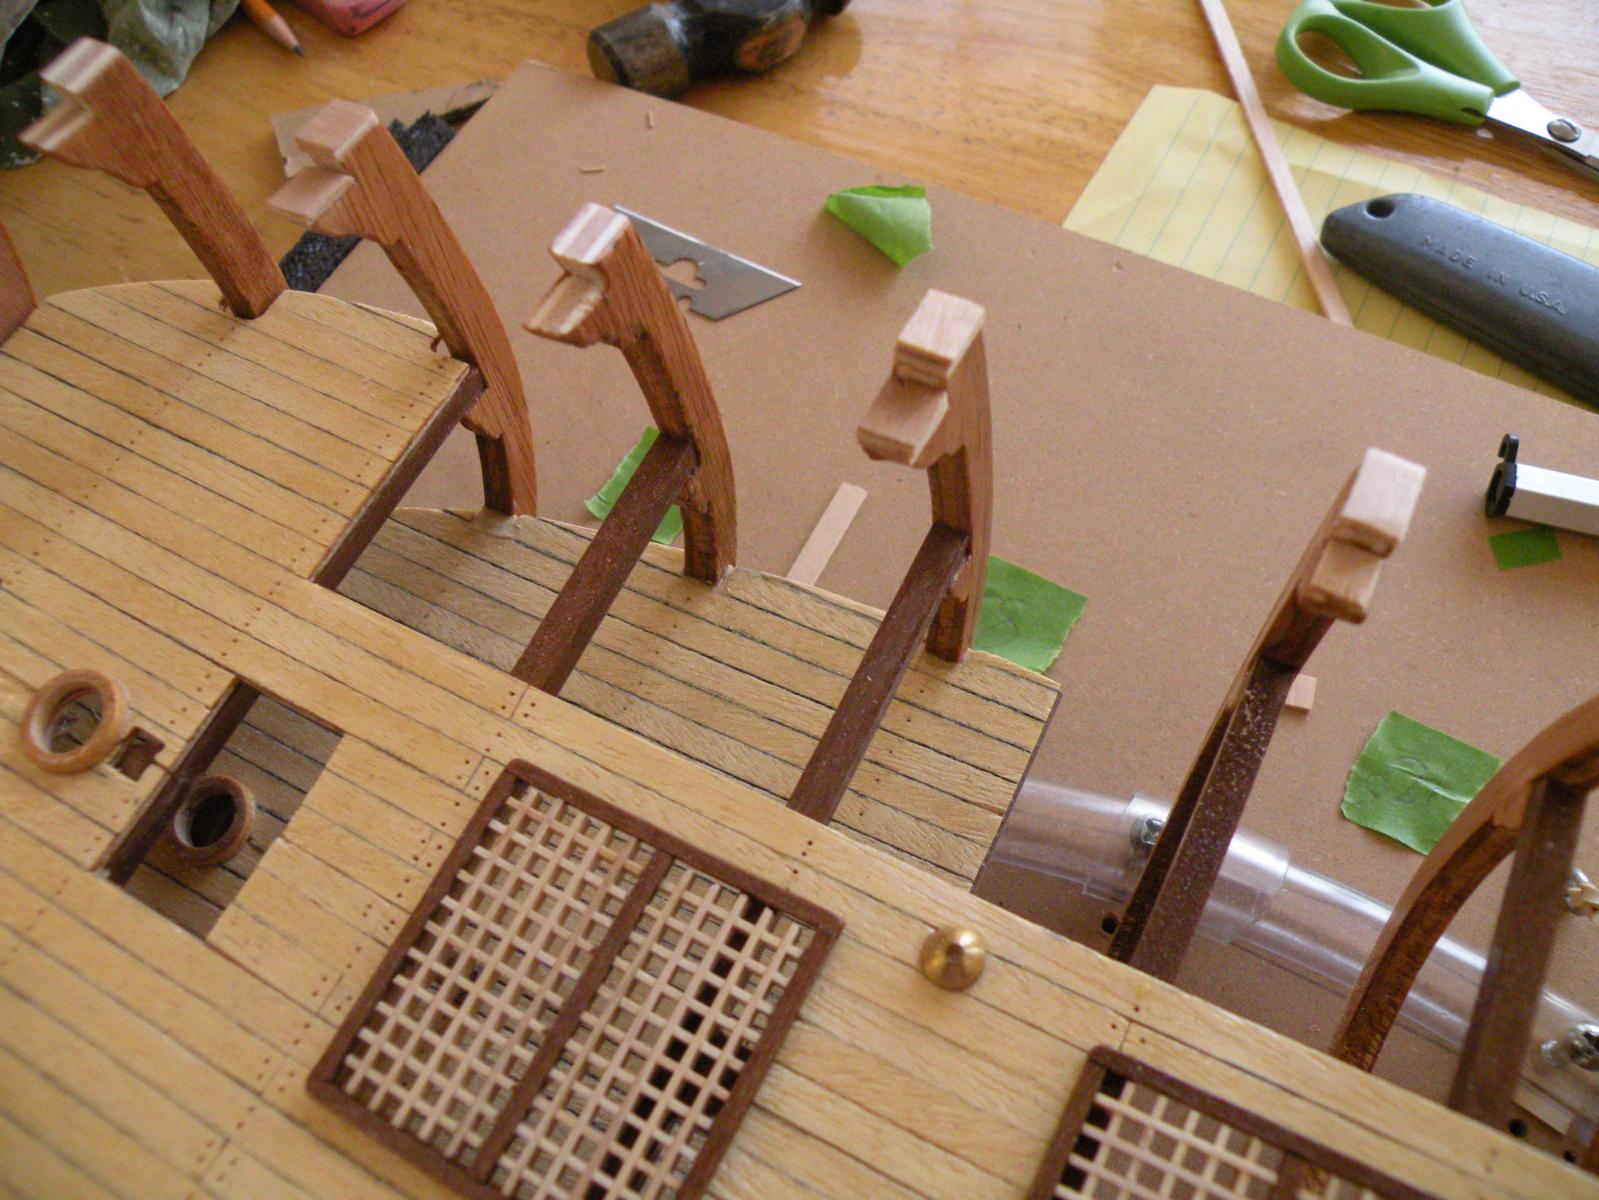
Have you worked back up to the waterways, Samson posts, timbers etc. that attach to the edge of the deck? I'm not there yet but I have been looking at pictures and instructions and cannot figure out what piece goes where and how these posts stay in place. My last reading of it makes me inclined to think the posts glue up to the sides of whatever the pieces are called and are installed after. I originally thought the posts were there to support that piece and had to therefore be put in beforehand. But that meant there is nothing to support them.
Are you as confused as me as to how many of these cutouts and posts there are supposed to be? The number of cutouts on the deck does not jive with the number of posts (including all 3 kinds) shown in the parts list. Parts list shows too many. I'd appreciate if you could touch on this when you get there, which will be well before I do.
-
Tell me more about Pay Pal. I live in the dark ages. I have a cell phone but not much more. A computer of course. So lots of internet businesses are asking me to pay by PayPal, and I've resisted. To me its just another way for someone to hack in and get either information or actually steal money. Am I wrong? How does it all work and what are the protections? Is it really worth having an account for maybe two to ten purchases a year?
-
You know me Mike. Of course I'm serious. Its kind of like asking an obese person if they want a cherry on top of their hot fudge sundae.
-
God why did you give me a brain? I've been told I think too much and worry too much. Both are obviously true. Anyway, it is what it is. So here's a follow up question regarding planking the main deck. One of the reasons for planking after its is installed I would think is that since the main deck has an arch, forcing that arch would break open the joints between each plank and create gaps. Planking after the arch is in place means the planks can sit tight against each other. But because there is this angle between them, slight as it might be, the planks won't sit perfectly flush to one another. So the question is: should each plank be beveled slightly to fit its neighbor? Or is the angle so slight that sanding will bring down the surface and they'll disappear?
-
Thanks for your kind words Dan. Its comforting to know when one is making the best of bad situations. Overall I'm pleased with the results of each of my "fixes." I hope I can continue making them work and I hope they remain in places that are not going to be seen. I will later post some pictures and explanations of the work I had to do to repair a stairway.
Continuing the thoughts you just raised re planking the main deck after its put on. I agree. The instructions even note that and even though I am deviating now from the instructions from time to time (getting pretty bold I'd say) this is not going to be one of them. But I don't fully understand your reasoning for not planking before installing. You mention the bulwarks being in the way, but I didn't think they'd be built til well after the planking's done and sanded and varnished. Then you note the numerous cutouts being "all over the place" with gaps in many places if you plank beforehand. I don't understand this well. It raises to my mind the question of whether to plank around cutouts or plank over them and somehow mark where they are and cut through the planking to expose them. We had this discussion on Mike or Capt. Fisher's build log and some say to plank over the holes. I think I prefer to plank around the holes (and particularly I'm referring to big holes for grates and hatches and companionways). I think I can cut my planks square enough and to precise lengths that it will be pretty clean. And I intend to put moldings or coamings around every hole in the deck anyway. Now in the case of the numerous and small cutouts in the false main deck, I don't know really what to do about planking over them or around them. And then your reference to them in the context of sanding down the planking makes me wonder if I'm not missing another something.
Thanks again Dan.
-
Ahoy Capt. Fisher,
Good work! It looks a fright but so does most construction before finishing. I will probably look at your pictures a hundred times when I get to my planking. If I ever get to my planking.
From my own selfish perspective, I focused on one particular picture because it confuses me regarding stairways (I should start calling them companionways now that I have my copy of Mackay Anatomy). On my build log weeks ago we discussed if there are 4 or 5 companionway stairs in total. I couldn't locate the 5th, but there was material enough to build five. Well I finally found where the fifth will go and spent a whole day repairing the broken stairs (that I thought before I wouldn't have to worry about cause it wasn't needed) and figuring out how to place and secure it (more on this on my build probably tonight). Now I look at your hull, from the open starboard side and I see that either you don't have that last companionway stairs, or you've planked up from the keel high enough so that it is not visible. The stairs I refer to go from the hold platform down into the hold or bilge, and begin just to the right of where the companionway stairs from the lower deck terminate on the hold platform. So which is it? Did your A.L. kit not include that stairway? Or is it in place, just not visible? I hate to think I've gone through the repair and install process only to cover it up behind planking.
-
I did all of the varnishing of my inside adornments and lower decks before putting a cover on them. In fact, I varnished the cabin and holding well and little box before I even glued them in. I've since then done a modest amount of sanding on the frame tips and other areas, and I've been able to huff and puff and blow the dust away. But I have been thinking of the same thing: what to do with all the major dust to come. Since I'm already varnished it does blow away pretty well. So if I can't humanly do it, I will probably either reverse my shop vac and stand a few feet away, or get one of those aerosol cans that high tech people use to clean computers. The long term dust question was raised somewhere on msw and asked how to keep normal household dust from getting to all the deck stuff and into the rigging. The answer was a huge Plexiglas box, but who has the room for that?
-
Received my 'used' copy today. Like new. Great book. Thanks again for referring me to the used book department at Amazon.
-
Gotcha. I think I have it now (took all day of shimming and trimming) where the low point is at frame ten and the deck lies in a smooth arc up to the bow and transom. All the beams are making good contact with the underside of the deck, and there is a nice, smooth arch from the midline to the deck edges (is that called the gunwales; pronounced gunnels?). I've discovered a couple cosmetic details I want to do on the middle deck, so I will probably not glue down the main for another day. Thanks all for your pointers. For better or worse I can't wait to get this deck laid. Please, no comments on that last sentence.
-
Good question Jud. I am a novice at reading plans, and the only drawing in my array of plans that would seem to answer this is the one that I took the heigts of the frames from. If, in the end, after all the adjustments and shims etc. that I have been doing in order to get the sheer right, the frames actually are lower at their tops than they should be, then the arch of the precut false deck would have to be greater. But for the most part the arch conforms nicely to the arch of the beams. The edge of the deck, however, extends a bit over the frames, again indicating that the arch is OK but the frames are low. I'm going to have to deal with that as part of the process of fairing the frames for planking. Like much of this adventure, I am going on the theory that if there's a way to make it work, I will find it. Whatever may have been the source of these problems, I've surely learned some valuable lessons. POF is definitely more challenging than POB.
-
Sound advice Danny. No way will I argue with that. I have a question for you. Since you did the A.L. Bounty you are qualified to answer this -- and please be brutally honest, cause I expect nothing less. What should I have done up front to avoid all these "adjustments" and work arounds? Are they all due to my imprecision in laying in the frames or is it possible that bad laser cutting or warping (after all, the kit sat in the box for six years in a garage) caused some of it? I have probably learned more from making all these adjustments, and have come to realize aspects of modeling that I had never even thought of, so it hasn't been for nothing. And in the end, I still hope to construct something worth while.
-
Mike, didn't receive any PM either via direct email or here on msw.
Dom, another thing that works great for weights is bird shot in small bags or bottles or cans.
-
Dom, are you saying to predrill the holes across the deck where the pins will go? Rather than putting the deck in place and then starting the pinning process? I was thinking of the latter, but I can see how its a lot easier to do it on a flat surface, and it would mean getting those pins in a lot quicker. So you would drill along the lines drawn (center line of the beams), then put down the deck and drill through those holes into the beam a bit. Then take the deck off and apply the glue. Then put the deck down, weight it down to the beams and frame tips, and then put in the pins. My only worries would be that I couldn't see the drilled holes very well cause they're so small. But that would be true if I waited to drill them and went one pin at a time. The other worry is that the slightest movement from when the holes were driven into the beams through the predrilled deck holes, and where they would line up when the deck was replaced with glue. The very slightest difference in placement would throw every tiny hole off.
-
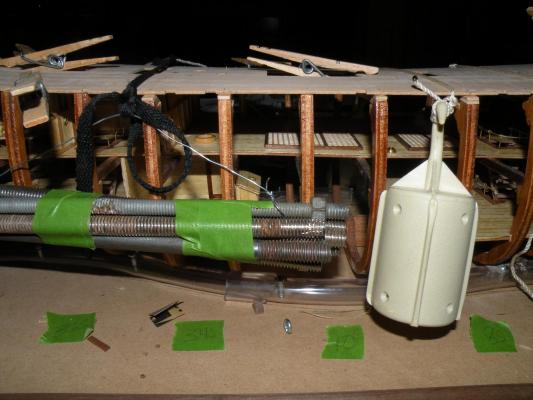
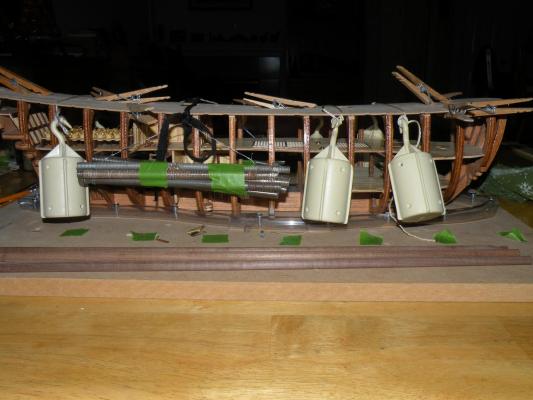
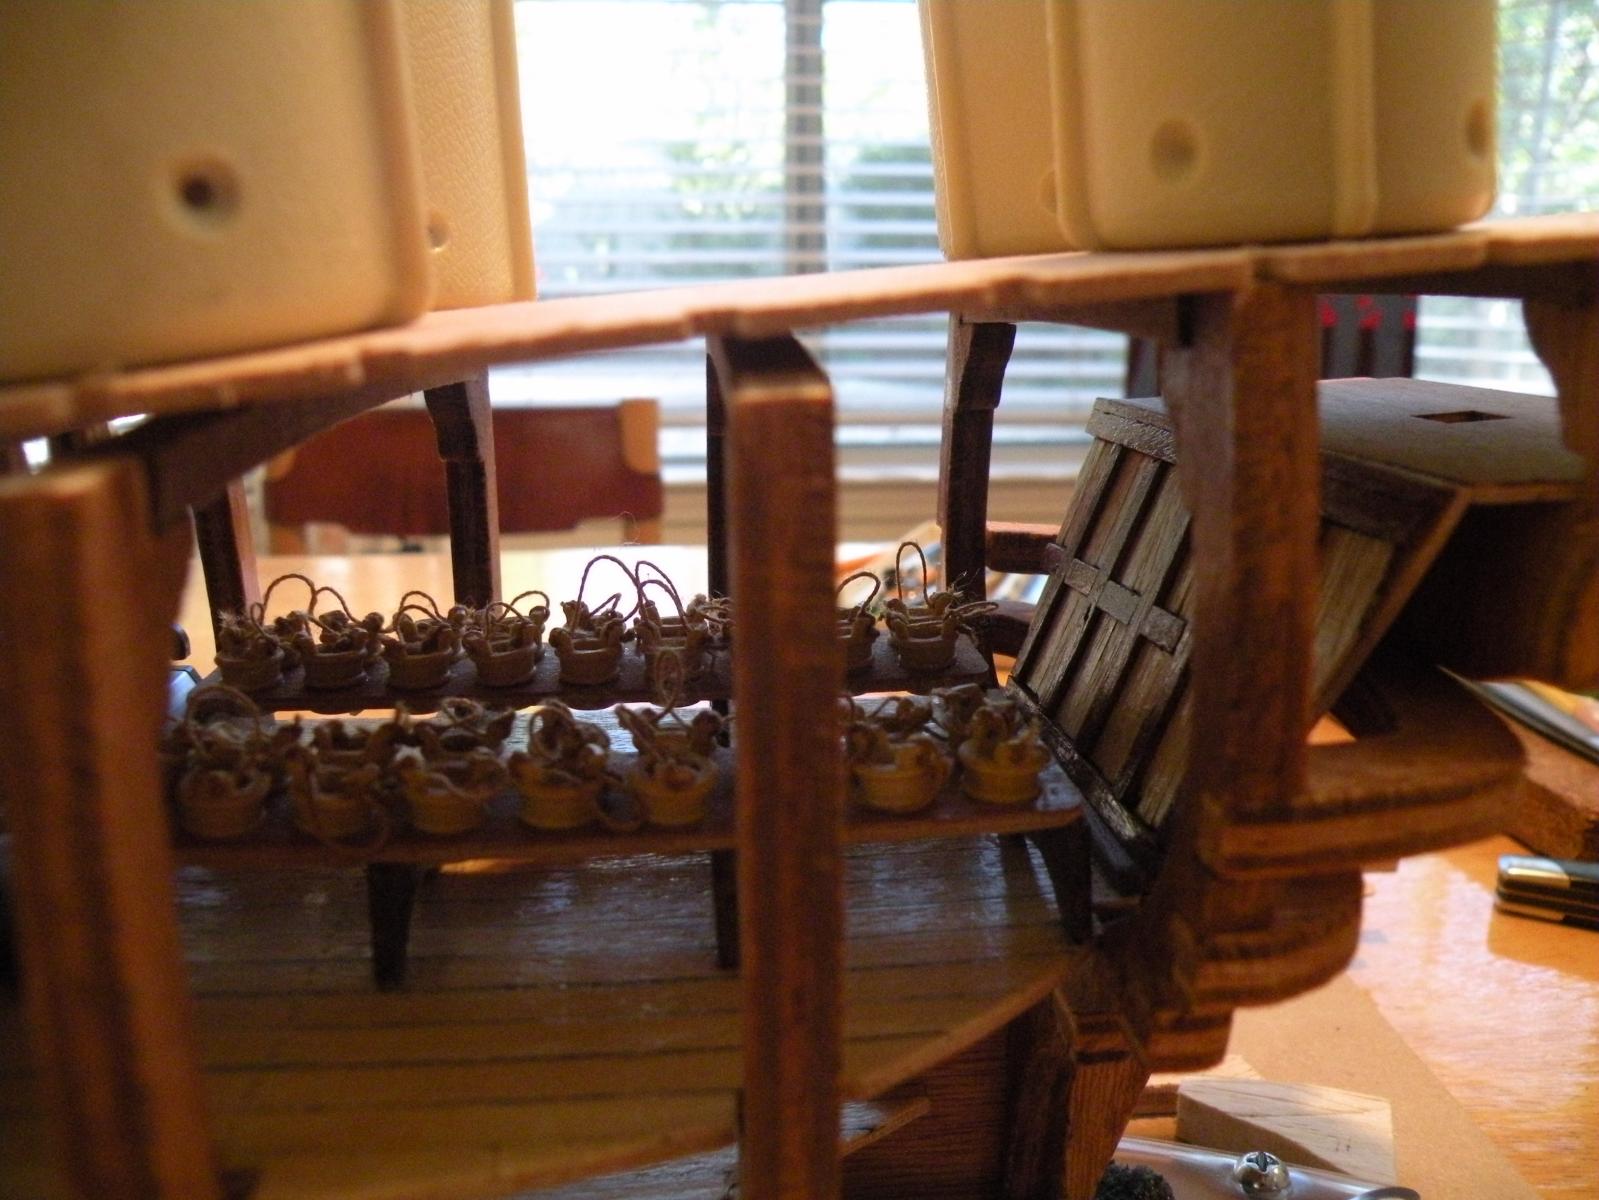
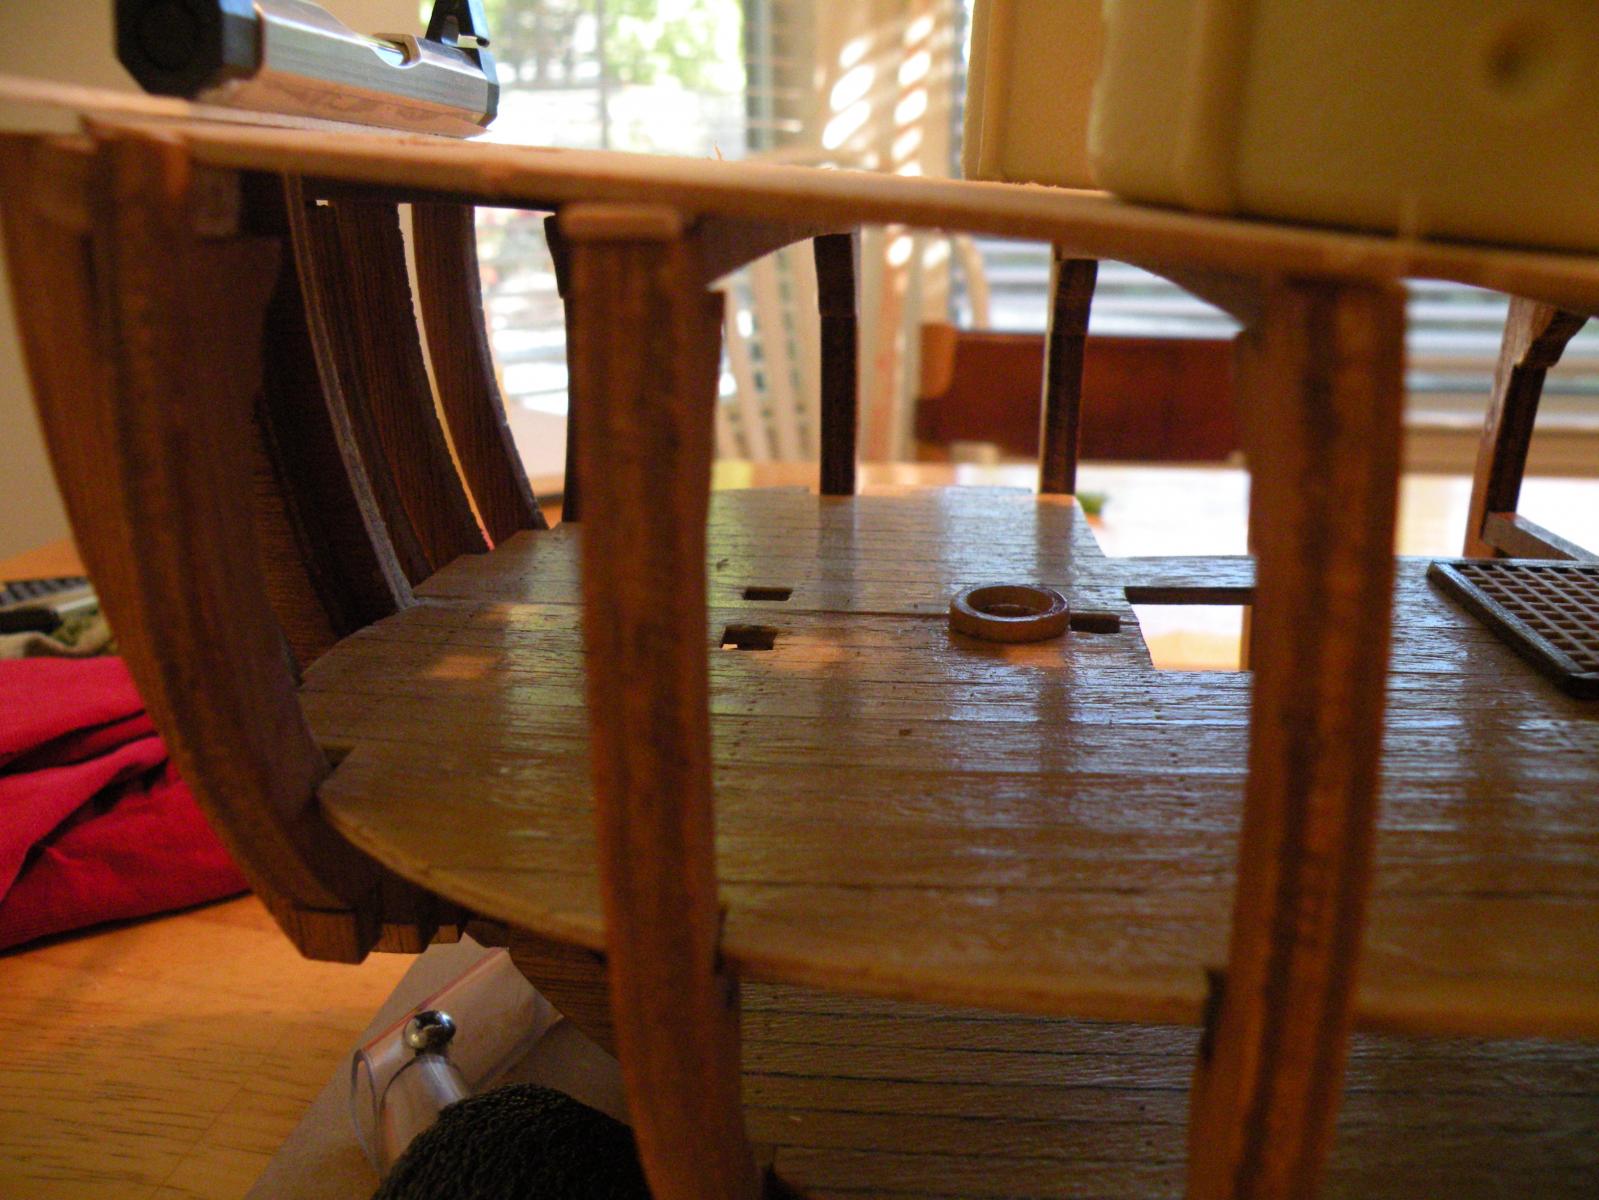
You got the knitting machine weights right, Mike. Relics of my wife's avocation. The deck does rise significantly from mid ship to the stern, so the frame on the left should be lower. I think also the photo exaggerates the height difference somewhat. There is a modest bevel to the tops of all the frames. In fact, its a tricky compound bevel -- it bevels down from the inside to the outside of the frame to accommodate the slope of the deck mid point to side, and each one bevels a bit upwards toward the bow or stern. The picture doesn't clearly show that either. If I were to put any more bevel into either of these frames, the deck would be even further from making contact. This morning, after closer inspection, I think I am going to shim those frames like I have others, just making sure I shim them so the deck sits on them slightly higher to the stern. Then the clamping won't need to be so radical and still the sheer will be fine. It may not look like it in the photo, but in person its laying nicely except for the gaps.
-
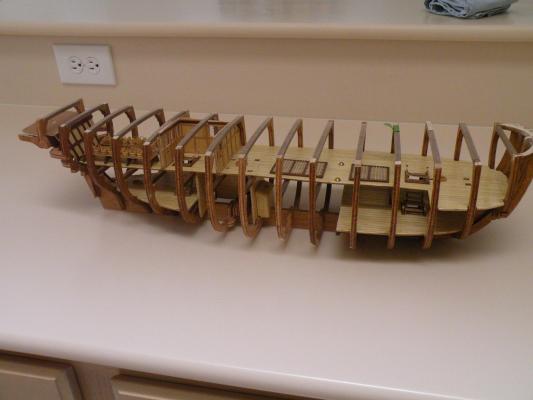
Well I'm moving along with my solution to the frame issue. After innumerable and painstaking measurements, finding that the tops of some frames didn't conform precisely to the plans and weren't level from starboard to port, I decided not to try to achieve perfection. I decided the best way to proceed would be to just make sure the sheer of the deck line (ie the tops of the frames) was nice and smooth, not radical and not bumpy, and looked much like it should. If I could achieve this I wouldn't worry that at various points the deck sat a few millimeters to high or low compared to the plans. After viewing both sides of the ship I decided I would take the starboard side as my starting point, and the center frame would be the low point as it should be. I was surprised to see that of the 14 other frames, only 3 or 4 needed shims or a bit of sanding to give them the proper (or a good) sweep. I think the tops of the frames needed to be slightly beveled anyway to account for the upward curve of the deck from its midpoint to fore and aft. After making these adjustments on the starboard side, I then needed to level them to the port side. I thought this would require cutting or shimming almost all of them but found only about five needed it. And they were all the aft frames. So I have proceeded to shim those on the port side. I've put on the beams and deck without gluing or pinning, and I think its pretty good. There are two frames that still need some radical shims which I'll quickly apply today. Then I'm going to just take a deep breath and nail down that sucker of a deck.
I'm looking for advice on the best way to hold down the deck while gluing. And what type of glue is best to use in this operation. Instructions say to work from bow to stern. If I use PVA glue and put it on all beams and frames at once, then start pressing down the deck from bow to stern, I think it will take so long the glue will be too dry when I reach the stern. But there will be no way to reach into the ship to apply glue to the beams when the deck is on (ie working progressively). I'll be able to reach the frames to glue the tips, but not very far into the beams. The weights you can see in the pictures below work pretty well. Using those I could probably work quickly enough to glue all the frames and beams and position the deck and then place the weights on, giving me time to pin it in "springy" spots. Any suggestions? Do most of you apply glue across the beams?


Santa Maria 1492 by Dominic - Artesania Latina - 1:65 Scale
in - Kit subjects built Up to and including 1500 AD
Posted
Another question for you Dom. This goes back to an earlier discussion on someone's build log. Did you plank up to the companionway holes or cut them out after planking over them?