

Mike 41
-
Posts
439 -
Joined
-
Last visited
Reputation Activity
-

 Mike 41 got a reaction from uncarina in HMS Beagle 1820 by Mike 41 - 1:48 scale - Cherokee-class brig-sloop
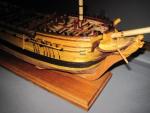
I have been working on the main deck items and added several hatches, pumps and the main jeer bits with attached winch. The main mast, mizzen mast and ensign staff are set in place. I will be working on the gun port covers and pin rails next.
-
Mike 41 got a reaction from uncarina in HMS Beagle 1820 by Mike 41 - 1:48 scale - Cherokee-class brig-sloop
The Horn davits and false quarter galleries have been added to the model.
I started to make the quarter galleries out of solid blocks of wood but wasn’t having much luck squaring up the windows and went to using 14 individual pieces for each gallery. I used boxwood and walnut and like the way they turned out.
-
Mike 41 got a reaction from uncarina in HMS Beagle 1820 by Mike 41 - 1:48 scale - Cherokee-class brig-sloop
This set of photos shows the main deck planking and lining with the gun ports in place. The port side is left open to show some of the framing.
-
Mike 41 got a reaction from uncarina in HMS Beagle 1820 by Mike 41 - 1:48 scale - Cherokee-class brig-sloop
The upper deck framing is about half done. This set of photos shows the progress on the deck and some misc. deck items. The framing is European Beachwood and the forward hatch is bloodwood.
-
Mike 41 got a reaction from uncarina in HMS Beagle 1820 by Mike 41 - 1:48 scale - Cherokee-class brig-sloop
All the frames and the keelson went together without any problems.
I will be adding the breast hooks and deck hook next. The only place they are shown in the drawings is an elevation view of the keel and stem assembly so the patterns will be fun to make.
This is a few photos of the frames and keelson being installed.
-
Mike 41 got a reaction from uncarina in HMS Beagle 1820 by Mike 41 - 1:48 scale - Cherokee-class brig-sloop
Hi Mark,
I actually did draw a set of plans for the Beagle in the English framing style but didn’t think I would live long enough to build her.
Mike
-
Mike 41 got a reaction from uncarina in HMS Beagle 1820 by Mike 41 - 1:48 scale - Cherokee-class brig-sloop
The bow framing started with the installation of the most forward frame ‘O’. I generated patterns for the Hawse pieces from the existing drawings after the pieces were cut out I glued them to the frame bread and butter style. I trimmed the timbers to the proper height and sanded the interior and exterior smooth. The last step was to drill the hawse holes.
I will be adding the rest of the frames and Keelson next. Thanks for the likes and comments.
-
 Mike 41 got a reaction from Siegfried in HMS Beagle 1820 by Mike 41 - 1:48 scale - Cherokee-class brig-sloop
After spending three months in Myrtle Beach SC visiting my daughter and grandchildren it is good to get back home to do a little work on the Beagle.
The lower deck has a series of floor hatches to access the hold and items below the deck. I used walnut for the covers. The deck planking will be basswood and installed next.
-
 Mike 41 got a reaction from mcpwilk in HMS Beagle 1820 by Mike 41 - 1:48 scale - Cherokee-class brig-sloop
The mast steps, limber strakes and limber boards are shown in this set of photos.
-
Mike 41 got a reaction from Siegfried in HMS Beagle 1820 by Mike 41 - 1:48 scale - Cherokee-class brig-sloop
The bow framing started with the installation of the most forward frame ‘O’. I generated patterns for the Hawse pieces from the existing drawings after the pieces were cut out I glued them to the frame bread and butter style. I trimmed the timbers to the proper height and sanded the interior and exterior smooth. The last step was to drill the hawse holes.
I will be adding the rest of the frames and Keelson next. Thanks for the likes and comments.
-
 Mike 41 got a reaction from CiscoH in HMS Beagle 1820 by Mike 41 - 1:48 scale - Cherokee-class brig-sloop
This is a few photos of the hammocks as installed on the model.
-
 Mike 41 got a reaction from Saburo in Washington 1776 by Mike 41 - FINISHED - 1:48 - row galley
This is a few photos of the keel assembly. The keel is made from European Beachwood and the false keel is rosewood.
-
Mike 41 got a reaction from Saburo in Washington 1776 by niwotwill - scale 1:48 - Row Galley - NRG plans #121
Hi Will, your frames are looking particularly good. Using the bolt holes to align the frames works well. The frames seem to go a little faster when you see the hull taking shape.
Mike
-
 Mike 41 reacted to niwotwill in Washington 1776 by niwotwill - scale 1:48 - Row Galley - NRG plans #121
I finally took some time out from other models to work on the Washington. Patterns for frames 0, A, B, C, D, E, F have been cut and frame 0 was glued to a piece of timber. Cut all the pieces and fit them together with just the junction points finish sanded. Using a modified Ed Tosti pinning method to assemble the frames. First take the glued patterns and drill a hole in each spot where the pattern had a dot. I drilled a .026 hole the created a snug fit to a #9 silk sewing straight pin. Then dry fitting the parts with the pins as alignment registration. When all fit you take the parts apart and glue them with the previously darkened Titebond glue. The darkened glue makes a very nice line at the joints simulating the tar substance used in 1776. (To darken the glue I use raw umber artist pigment power mixed into the glue. Empty an 8 fl oz bottle of titebond and mix in 2 teaspoons of pigment stirring until completely mixed and the color of chocolate milk. It'll darken as it drys) All the done and the first frame has been raised. Yippee. Now on the the next six.
Drilling alignment holes will have copper wire placed after assembled
Dry fitting parts after drilling and scroll saw
First frame raised yipee
Now back to the scroll saw for more sawdust and parts to assemble. I hope making frames gets quicker as I progress.
I'll get back to the Syren for awhile and then make more frames when I get tired of the Syren.
Stay Well and Safe
Will
-
Mike 41 reacted to niwotwill in Washington 1776 by niwotwill - scale 1:48 - Row Galley - NRG plans #121
I have finally made a keel, stem and stern post correctly. Yesterday I glued them together making the assemblies that match the drawing. I forgot to mention the copies of sheets 1 thru 10 were not to scale. Dumb me I never measured them. The total length of the keel was .135 shorter than the original and you can guess what happened. Note to self always measure and measure again always. So I measured the scale on the original and it is within 1/64" of the dimensions noted. I took the original to an engineering copy center (Mesa Blueprint, Mesa, AZ great people and made 3 copies while I waited) and had perfect copies made so I could work from. More wood to the hungry scrap box.
Finished it up and Saturday I assembled the pieces after checking the fit with dry fitting. Glued the stem and stern pieces together and set aside to dry.
I decided to add copper bolts to the keel scarf joints after doing the the stems bolts that looked so nice. So I drilled a pattern of .018 diameter holes thru the keel in the scarfs and pushed .019 diameter copper wire into the holes after dipping the wire in CA glue. I then snipped off the wire with side cutters and filed them flush to the keel surface. I then used a razor blade to scrape the CA residue and will blacken the copper with liver of sulfur after everything dries.
You see the small clamp on vice that I modifies by filing the top of the jaws flat and parallel to use in paring scarf joints or any flat surface. I put tape on the jaw faces so parts won't get damaged.
With all this done it was time to drill the holes for the .093 brass rod to locate the keel assembly to the building board. I have been obsessing about drilling the hole in both the keel and building board since I don't have a drill press the would handle items as large as a building board. But with a little ingenuity and measuring measuring and more measuring it got done and low and behold the keel fits.
So this is where I stopped next on the frames.
I have to rip some wood and mill it to .125 for the frames, not very exciting but must be done.
Stay Safe and Well
Will
-
Mike 41 reacted to GDM67 in HMS Naiad 1797 by GDM67 - 1:60 - using Ed Tosti Books
Hi All,
Its been a solid 7-8 months since I have posted and almost a year and a half since I worked on Naiad. Funny how these things go.
590 hours into the voyage and I have successfully tackled the Stern Transom. This was an extremely challenging area of the ship to model. One of my greatest takeaways was that no matter how precise you are, you should always leave a little meat on the bone when it comes to making parts from patterns. For some reason I cant help myself, I tend to cut the parts too close to the pattern lines. I have learned to love the scroll saw on a build like this and am amazed at how quickly my skills have developed with it. That being said, leave atleast a 32nd of an inch or so of extra room on the parts. Doing so will allow you some margin of error when fitting the puzzle together.
In addition to the Transom, I am doing a final detail of the lower hull. This includes inserting copper and iron bolts. I will also add the ribbands and other copper features. One other lesson that I am trying to learn is - know when to stop sanding! I have been sanding this hull off and on for two years. There is only so much material to work with, so resist the temptation to make it to perfect to early. I'm going to finish it and walk away.
Thanks for following along!
Gary
-
Mike 41 reacted to mtaylor in Washington 1776 by niwotwill - scale 1:48 - Row Galley - NRG plans #121
Lovely work on the keel. As for re-making parts.... the scrap bin is always hungry and constantly needs feeding.
-
Mike 41 reacted to niwotwill in Washington 1776 by niwotwill - scale 1:48 - Row Galley - NRG plans #121
Well oops!!!! while dry fitting part #8 to the keel I discovered that i'd made an error with the keel and had to make another keel. Actually I made two errors one I cut the stem scarf end incorrectly and the other was I cut the rabbit as a 45 degree "V".
some photos of my boo-boo's
This one shows how I missed cutting the first frame relief
This one shows an end view of the rabbit (Kind of blurry but you get the idea)
Now to making new parts a keel and stem #7 & #8
I made the keel in three pieces as per the monograph and cut the rabbit on each section before making the scarfs. I made the scarf by cutting the rabbit and keel shapes on the back edge of an old backsaw blade.
scrapping the rabbit
before scraping the rabbit shape I checked it against the drawing trying to prevent more boo-boo's. So when the pattern was correct a lightly scraped the keel piece to the required depth.
When all three pieces had rabbits it was time to make scarfs to join them together. (wonder of wonders the rabbits aligned) Now on to setting up the mill to cut the frame reliefs, always a tedious error procedure. To keep the reliefs correctly in place I made a spreadsheet that incremented .406 (1/4" frame width and 9/64" space to create the room and space)
Next I cut the stem and stern post parts. No excitement here.
When dry fitting the stem parts I realized that #7 and #8 scarf was not correct, so on the alcohol to get them apart. I spent 3 hours filing the joints until they align with drawing. I'm going to let it set aside for awhile and then check that I've actually got the scarf correct. Scarf joints on curved parts is the most challenging joint i've made to date. Note to self and all very small adjustments make a substantial difference.
Thanks to all for the likes and comments it helps to keep me motivated.
Thats it for the post
Stay well and safe
Will
-
Mike 41 reacted to niwotwill in Washington 1776 by niwotwill - scale 1:48 - Row Galley - NRG plans #121
I took time out from the Syren to cut and mill new keel timber so I think I'll start cutting the scarfs tomorrow. Also cut out the patterns for the stem and stern deadwood pieces. Cut the shapes and sanded them down to the lines. Cut the scarfs in the cut water and stem. Glued the part 10 & 11
and 7 & 8 together. Felt really good to actually be assembling something. YeeHaw
Stern pieces ready to sand
Stem pieces ready to sand
Sanding curves on drum sander (finger is not as close as it appears)
f
Thats all for today, maybe more tomorrow.
Stay Well
Will
-
Mike 41 reacted to niwotwill in Washington 1776 by niwotwill - scale 1:48 - Row Galley - NRG plans #121
Thanks Mike I was leaning towards bolts and copper wire is easy to straighten and I had planned to use liver of sulfur to blacken the bolts.
Will
-
Mike 41 got a reaction from Saburo in Washington 1776 by niwotwill - scale 1:48 - Row Galley - NRG plans #121
-
Mike 41 reacted to goetzi73 in Hanseatic Ship c. 1500 by goetzi73 - 1:50 - first scratch build
After a few month of silence, here's another update.
Finished the rails on the forecastle. Next were the two ladders. I did not take pictures of the work in progress, sorry.
Small parts will be next.
-
Mike 41 reacted to Jeronimo in ROYAL CAROLINE 1749 by Jeronimo - FINISHED -1/48 scale
Completion of the model.
During the construction report, I did without explanation / working methods etc. ,
because I thing the photos say more than a lot of words.
All pictures during the construction phase can also be seen on my hompage.
Many thanks to Mike for helping with the construction of the frames.
Thanks again to everyone for the kind comments and likes.
Karl
Part 26 / Finish
-
Mike 41 reacted to Jeronimo in ROYAL CAROLINE 1749 by Jeronimo - FINISHED -1/48 scale
The mirror, as well as on both sides window bay window
with its carvings I have already finished,
with the oriels still missing carvings / figures attached later.
I have decided not or color this model, or only black/brown
wood stain for the moldings and golg color for the numeros crowns.
The model will look a bit different from really beautiful and colorful
models of Maarten or Doris, etc.
First off all, I will start with the interior design of the model.
Karl
Part 11
-
Mike 41 reacted to Jeronimo in ROYAL CAROLINE 1749 by Jeronimo - FINISHED -1/48 scale
Carving-Set ROYAL CAROLINE 1749
Karl
Part 10