DONATION DRIVE - SUPPORT MSW - DO YOUR PART TO KEEP THIS GREAT FORUM GOING!
×

Navis Factorem
-
Posts
240 -
Joined
-
Last visited
Content Type
Profiles
Forums
Gallery
Events
Everything posted by Navis Factorem
-
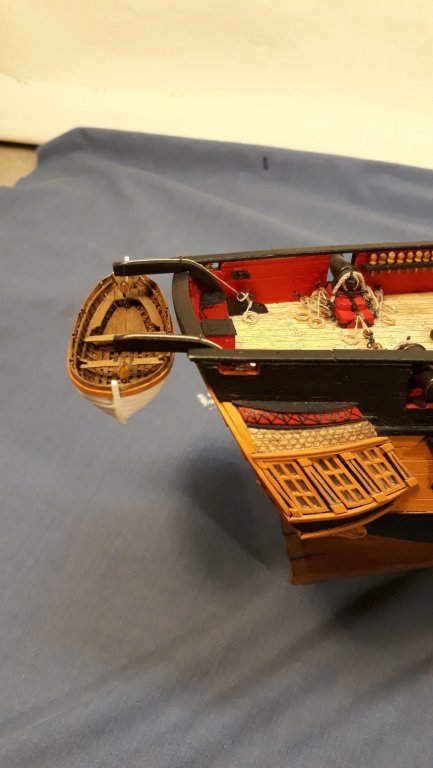
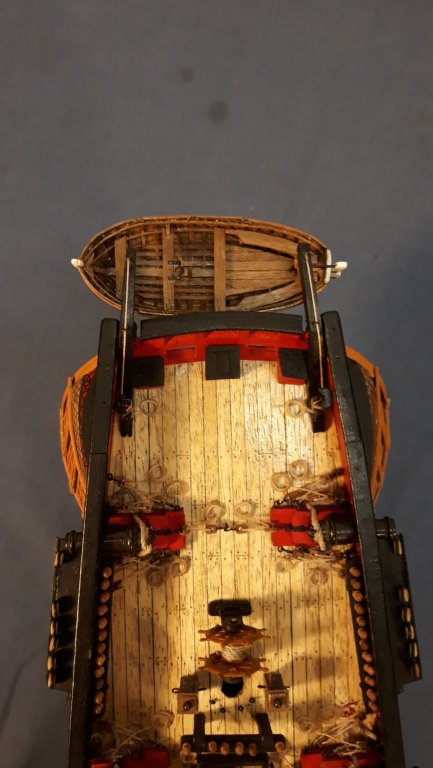
I have been working my way around the deck fitting the many rings and other bits and pieces required for rigging connection. Quite a bit of time and not really much to see. So I decided to complete something that has a bit of visual impact, davits and tackle for the jolly boat at the stern.
- 256 replies
-
- 11
-

-
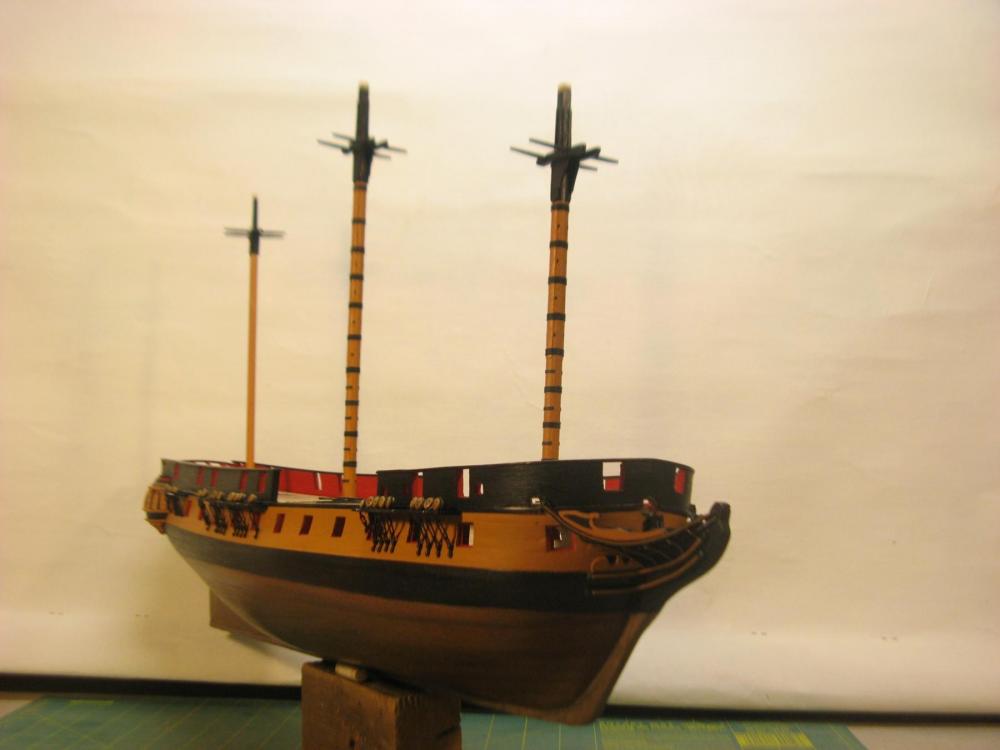
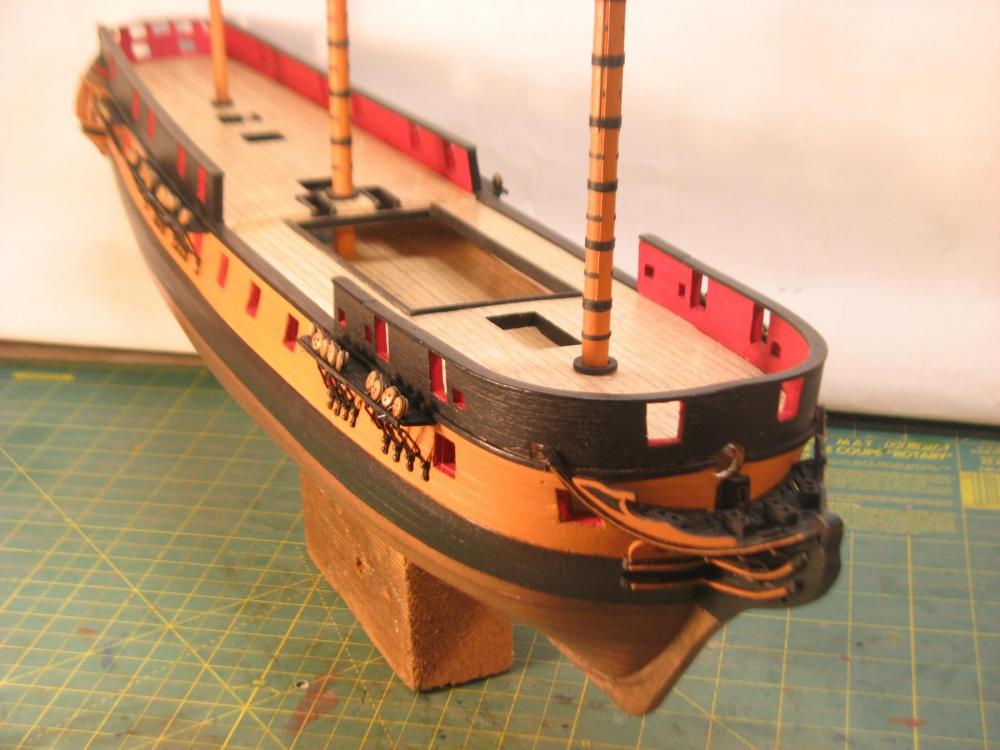
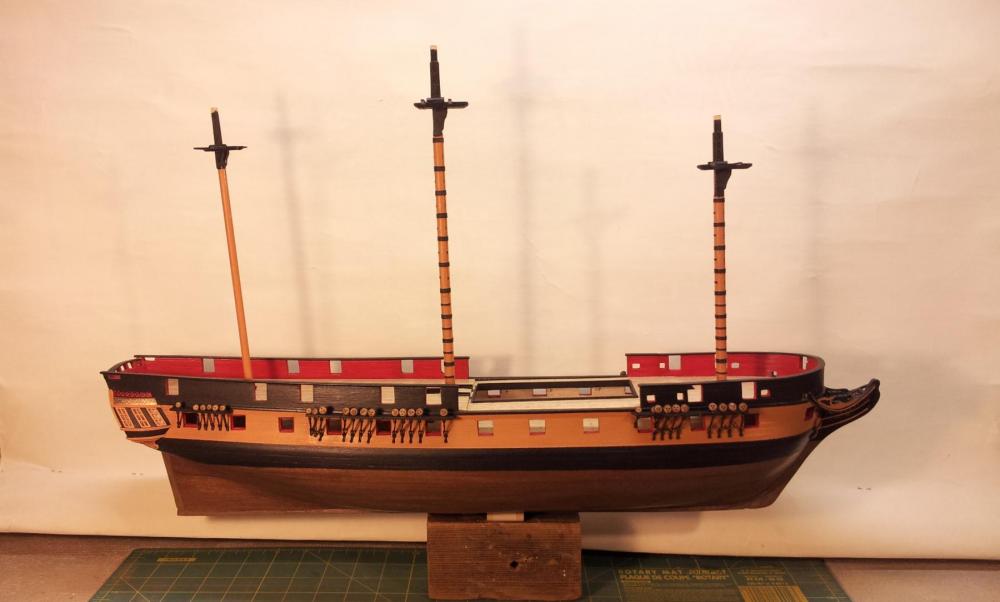
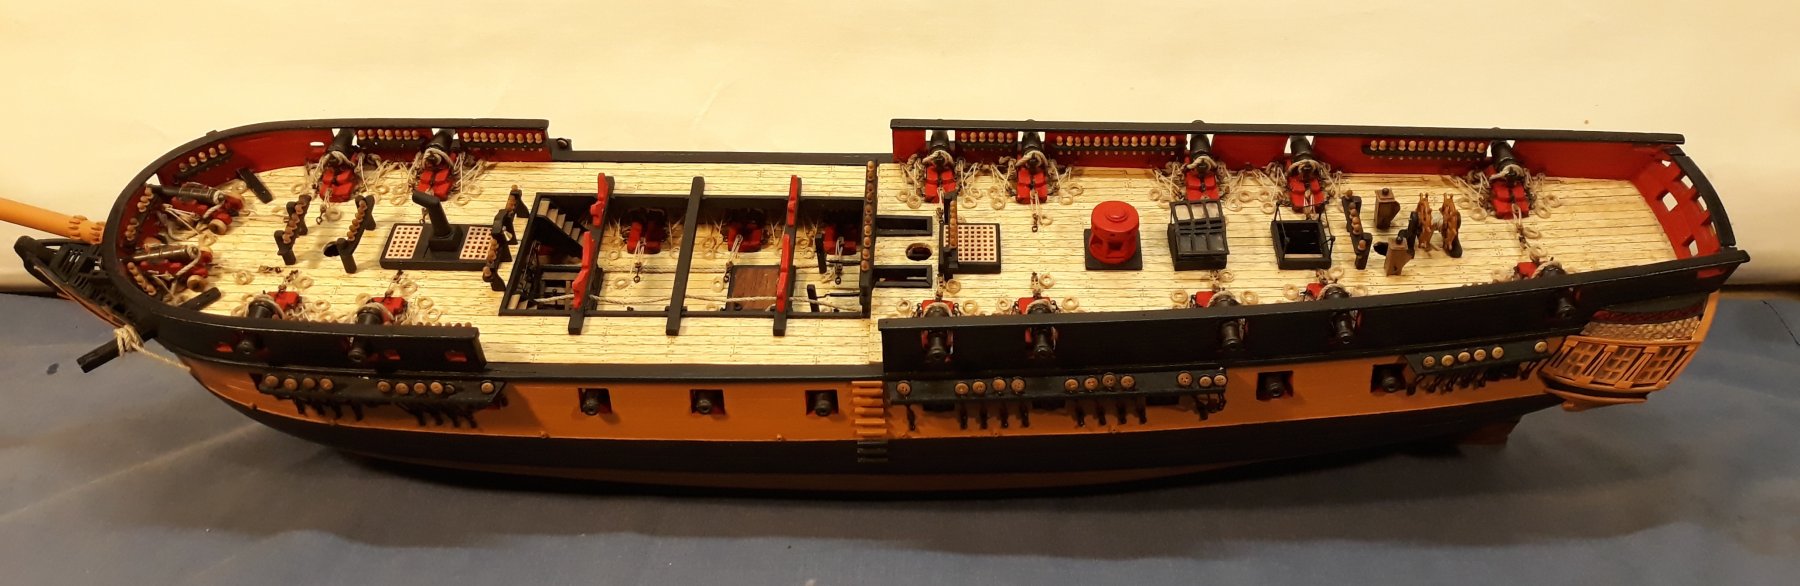
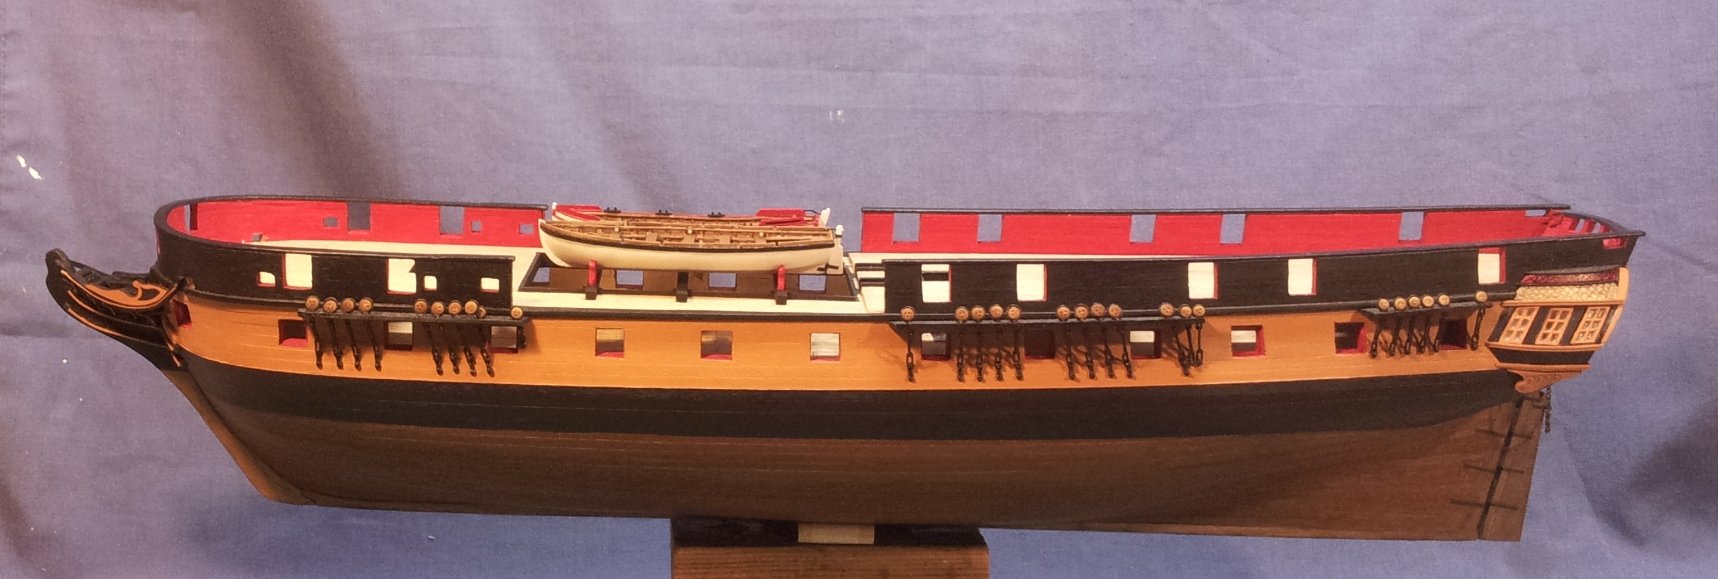
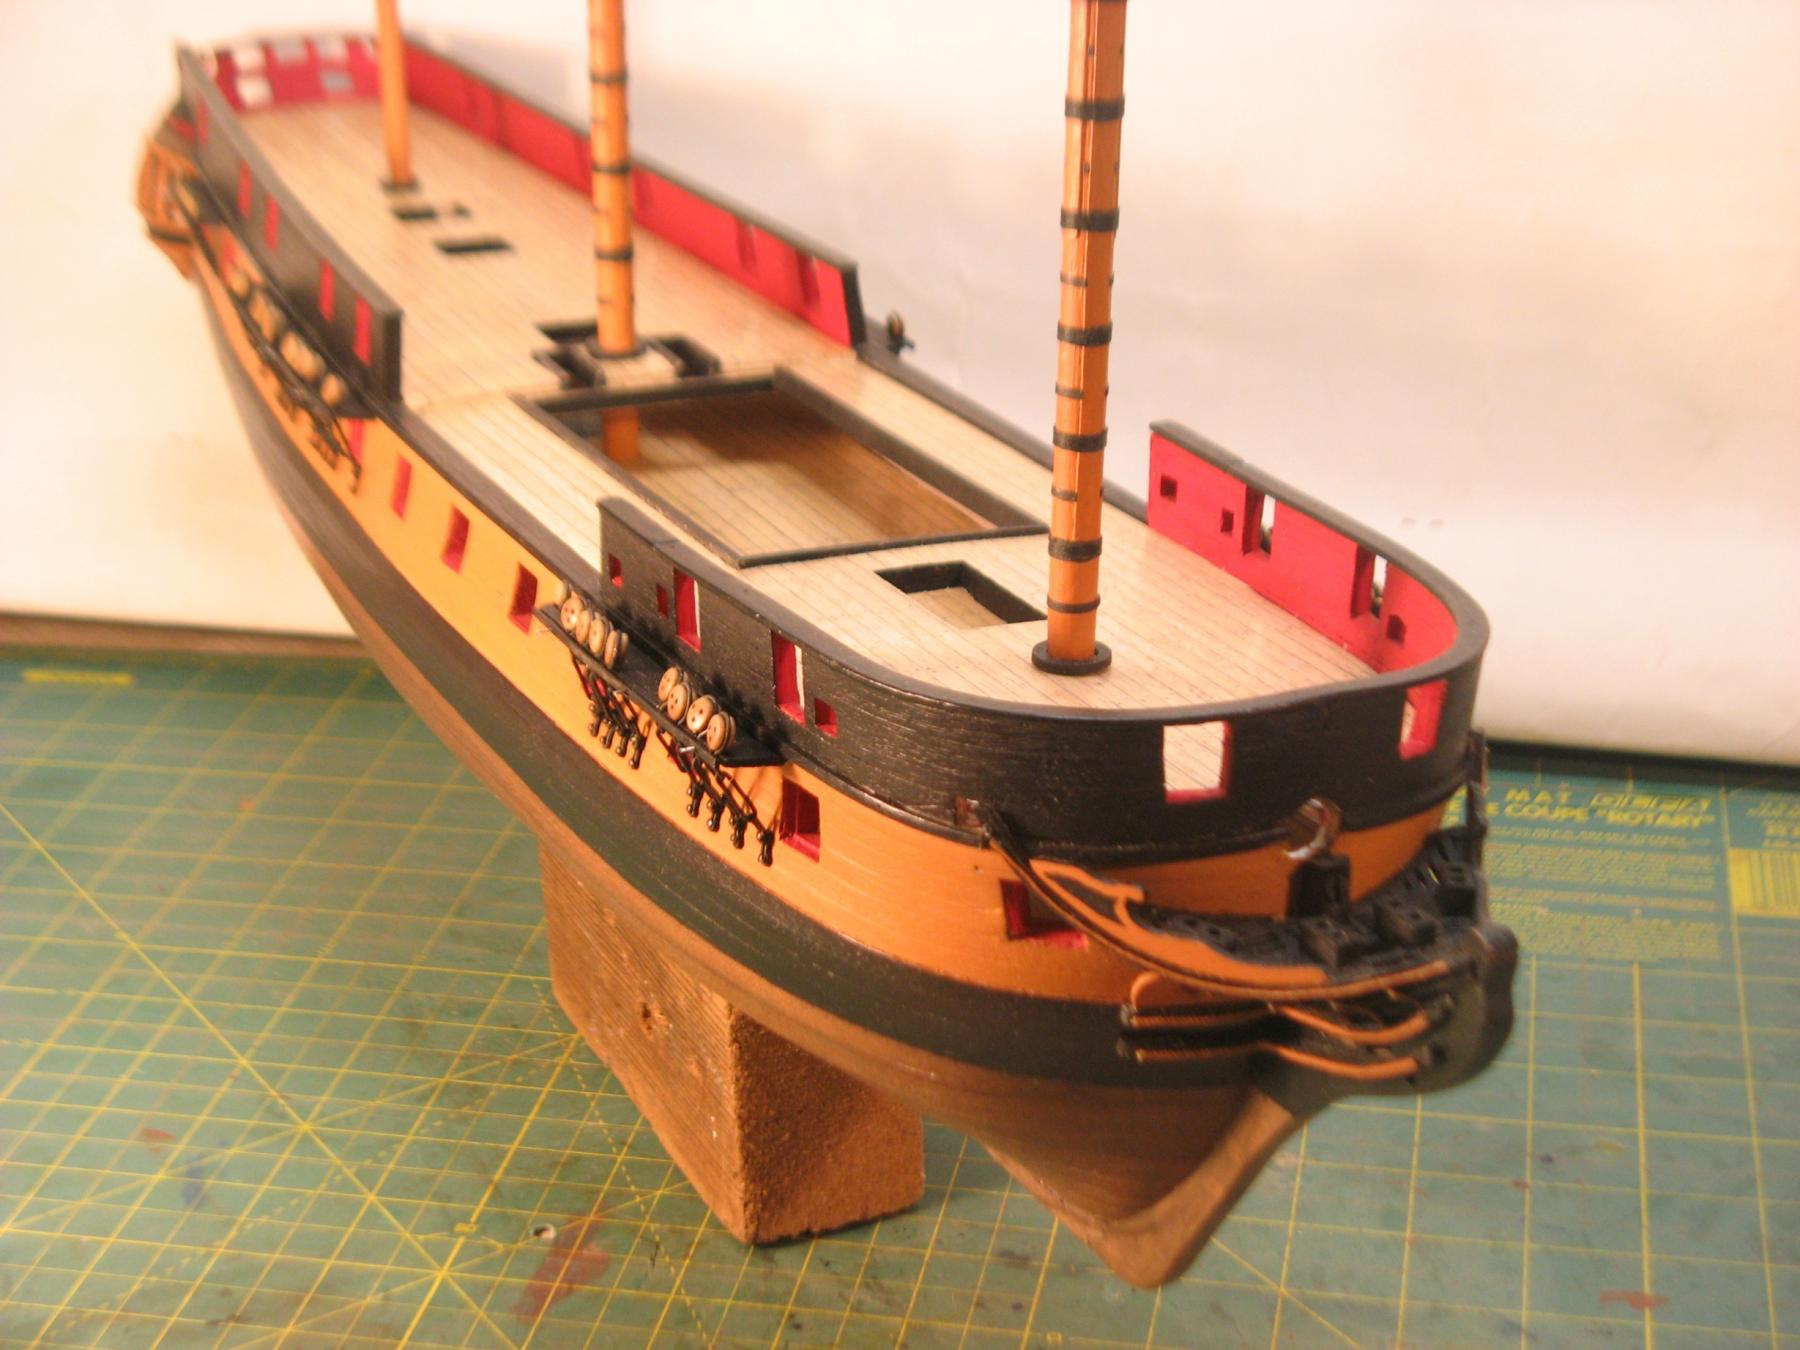
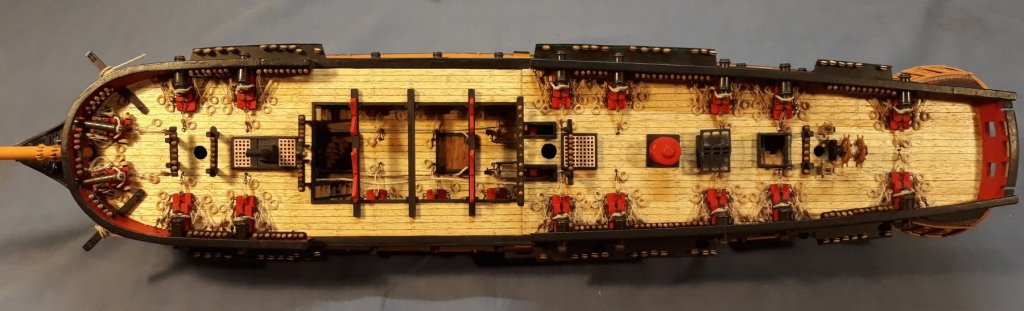
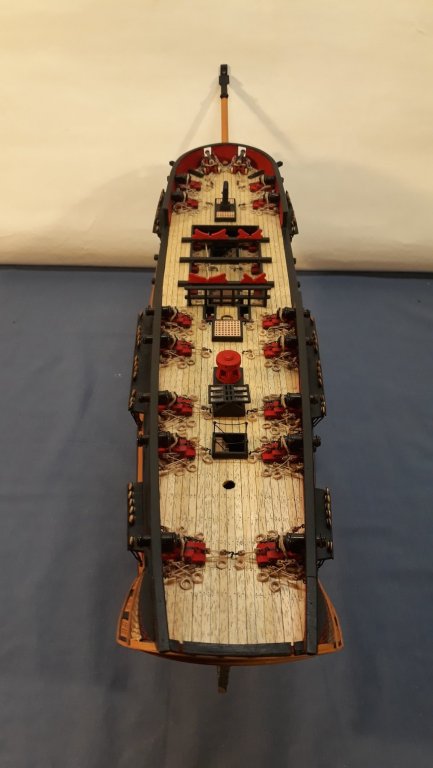
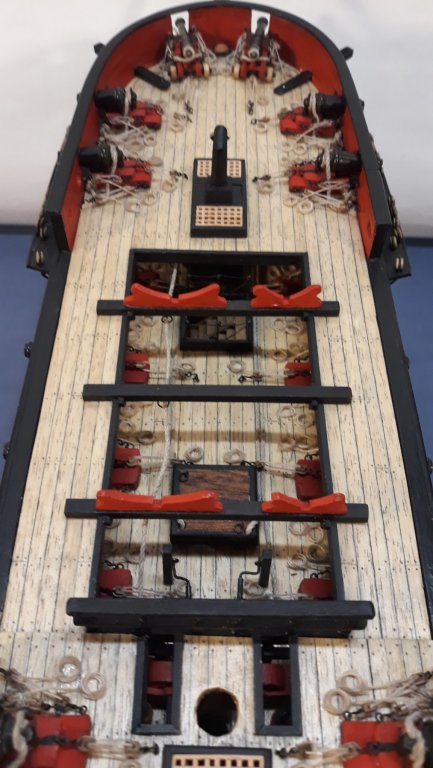
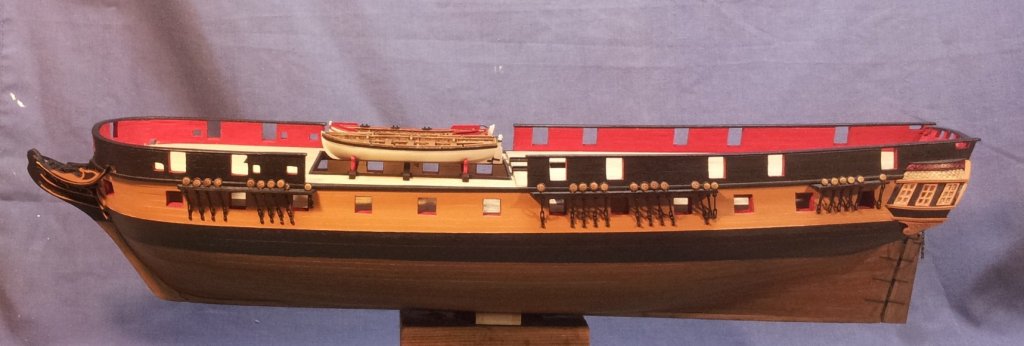
Deck fittings. The deck fittings are now pretty much complete and stepping of the masts and commencement of the rig is getting closer. Before this major step I need to do a deck rig layout to ensure that I fit any rings, blocks etc that are required where lines run down to the deck before belaying. On my Bounty build I omitted this step and had to drill holes and fit blocks and rings once the masts were in place, not easy. Cheers, David.


- 256 replies
-
- 14
-
-
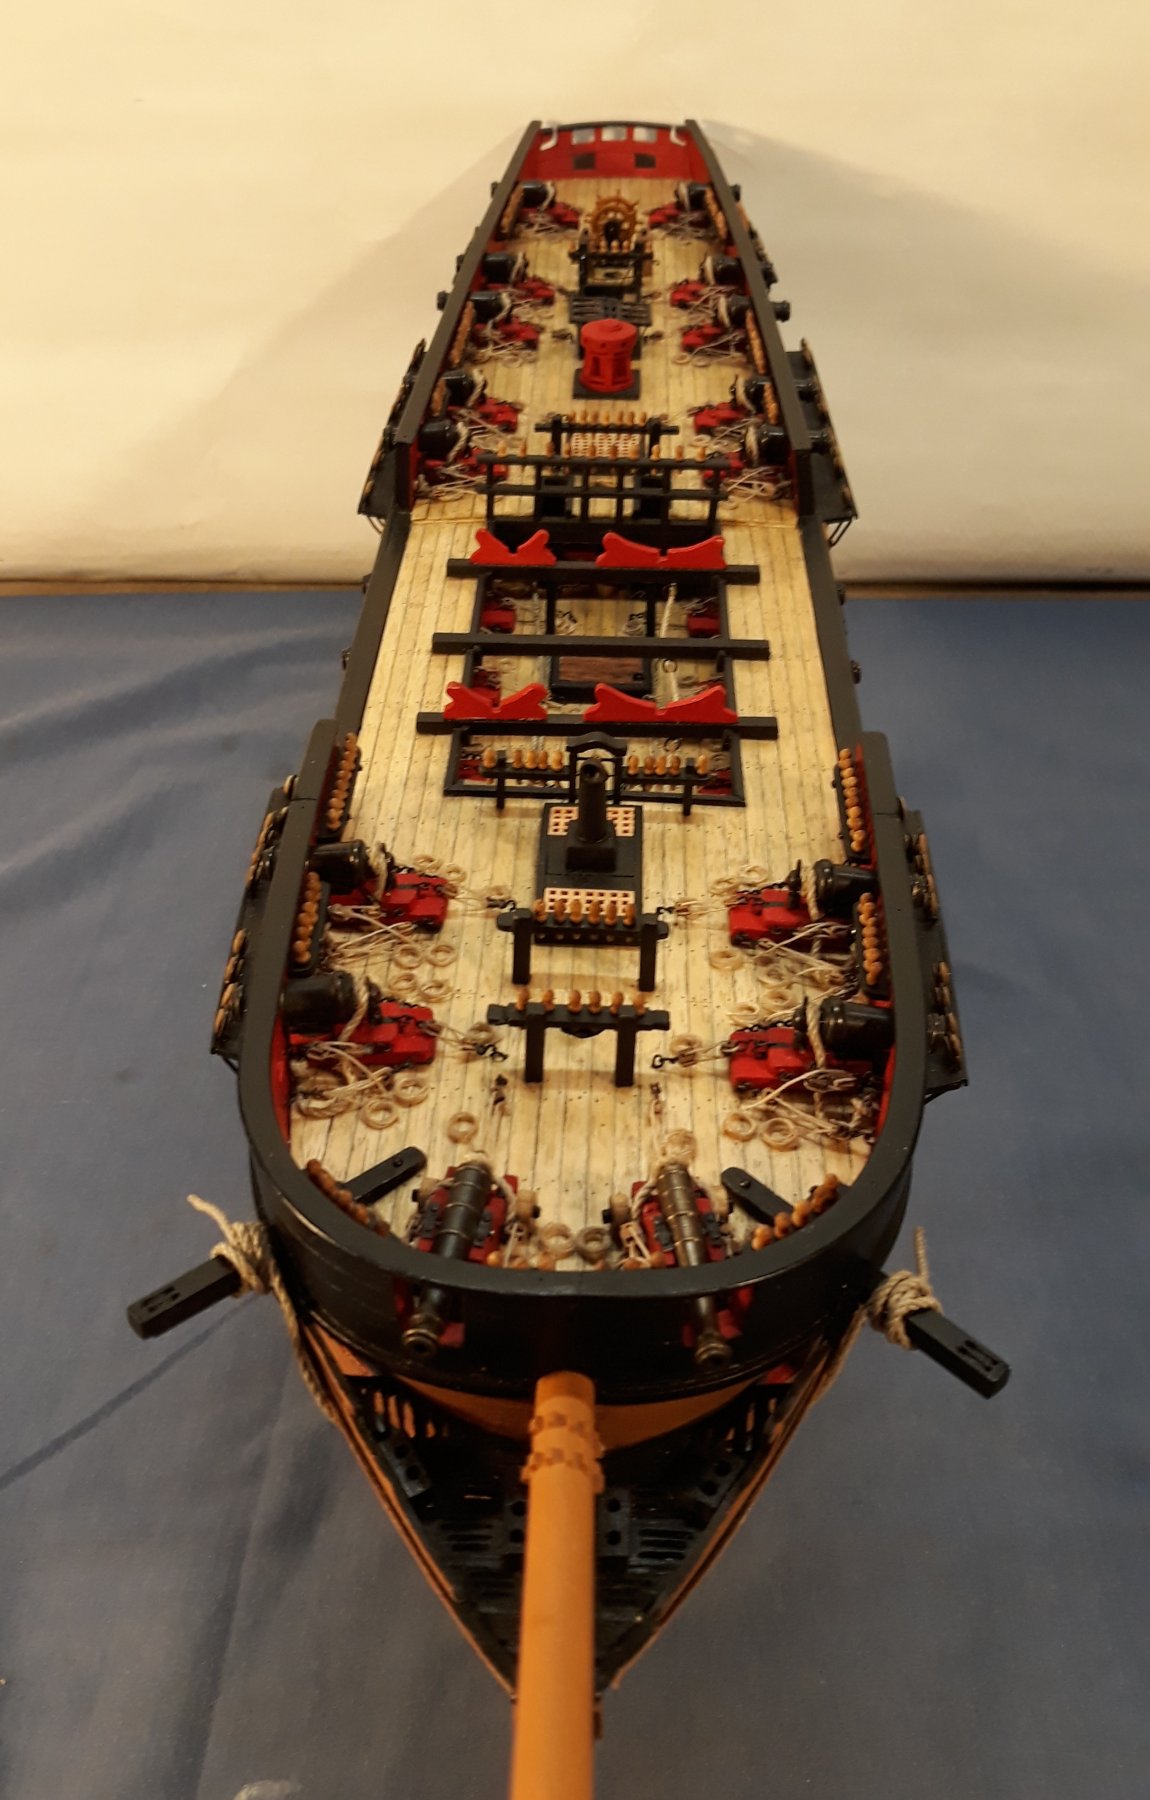
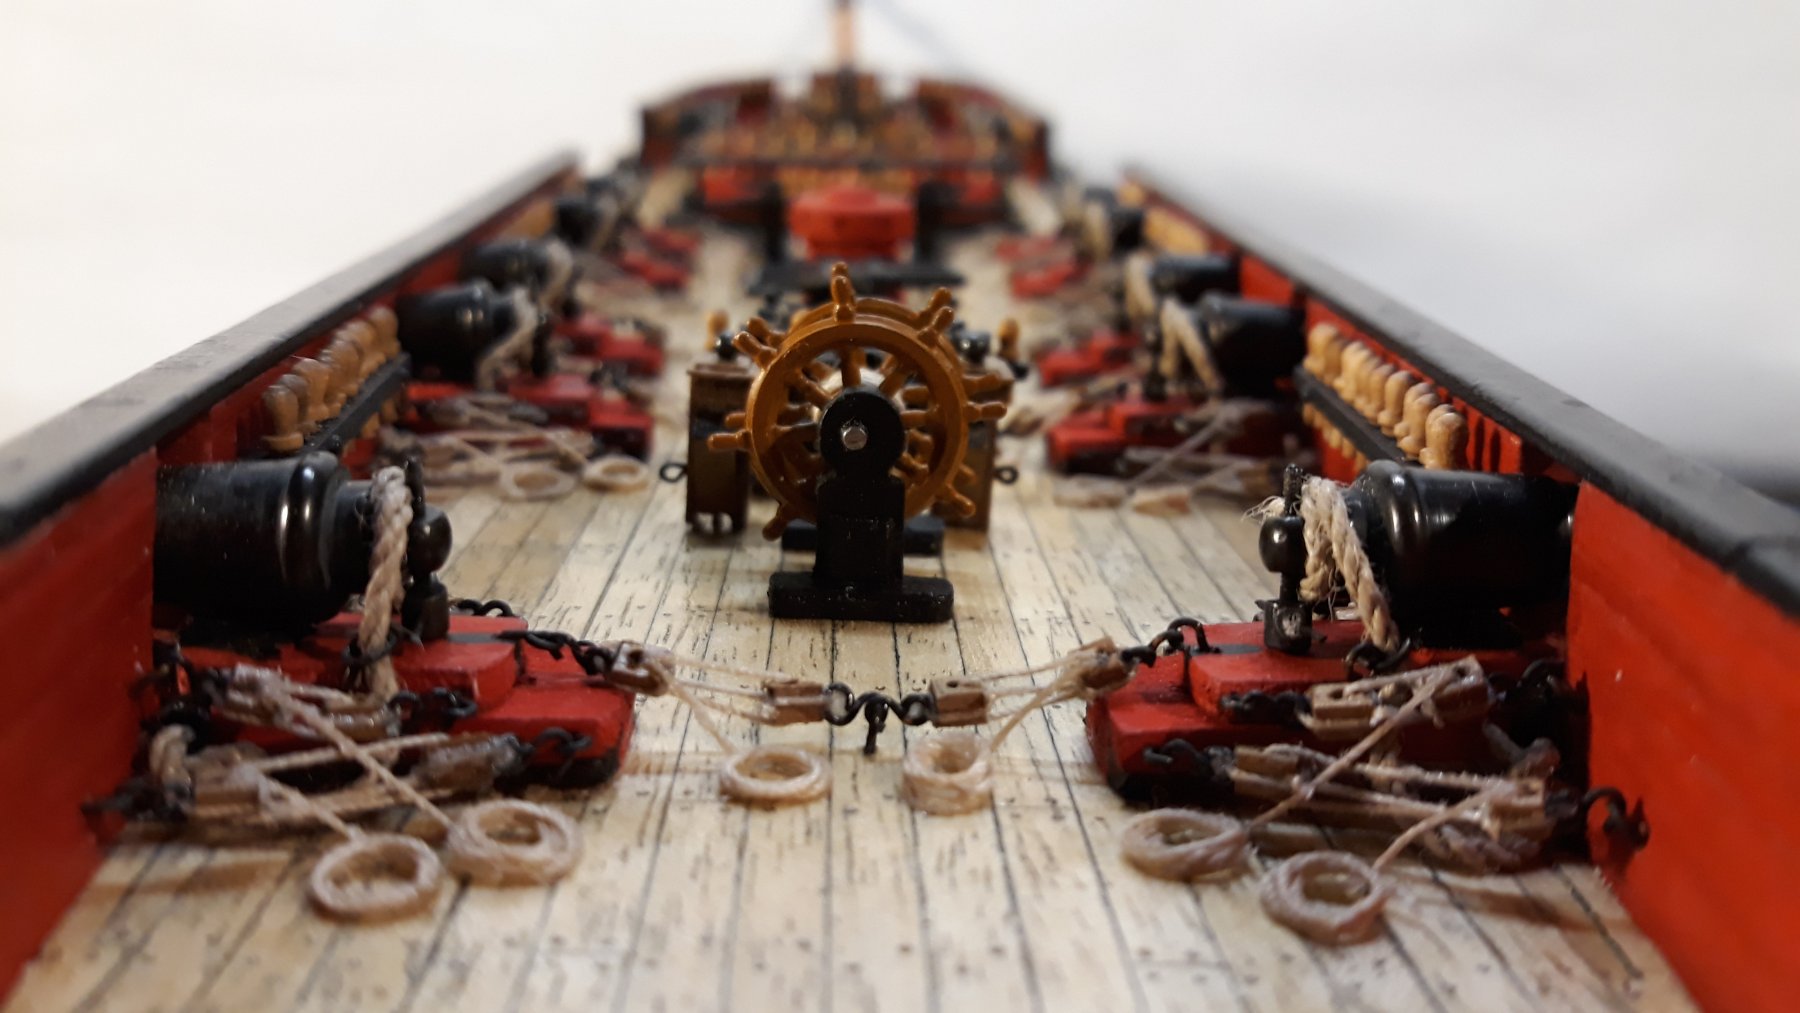
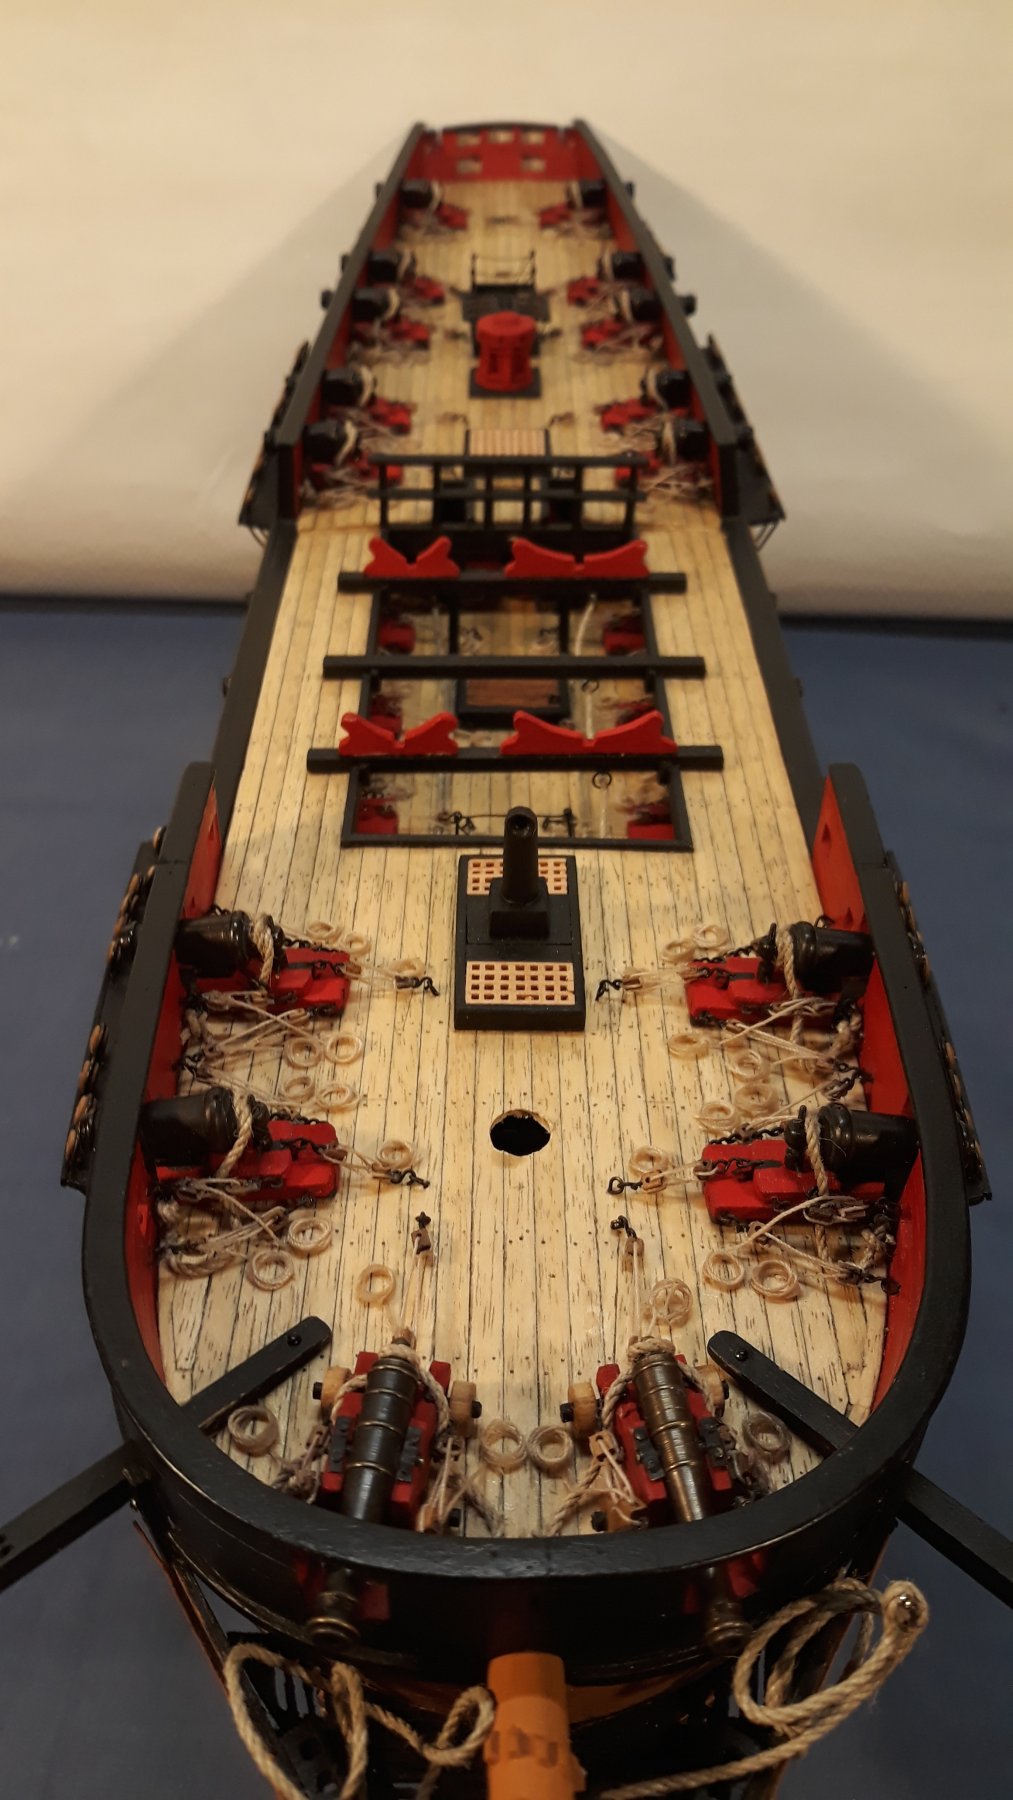
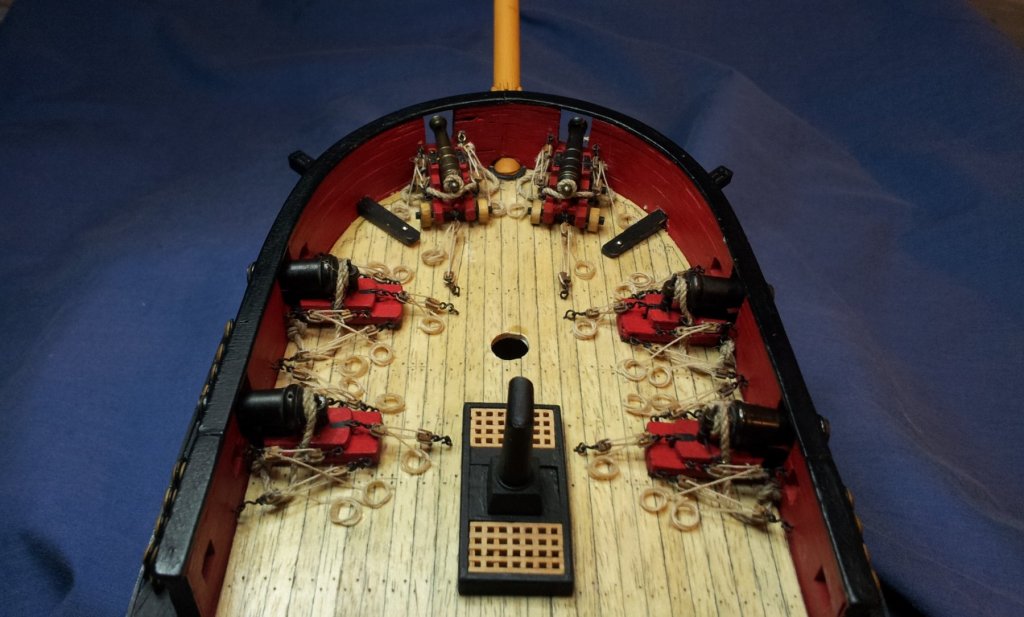
The tackle for the forecastle and quarterdeck guns has now been completed. Next is the rest of the fittings for these upper decks, belaying pin racks, ships wheel etc. Cheers, David.


- 256 replies
-
- 14
-
-
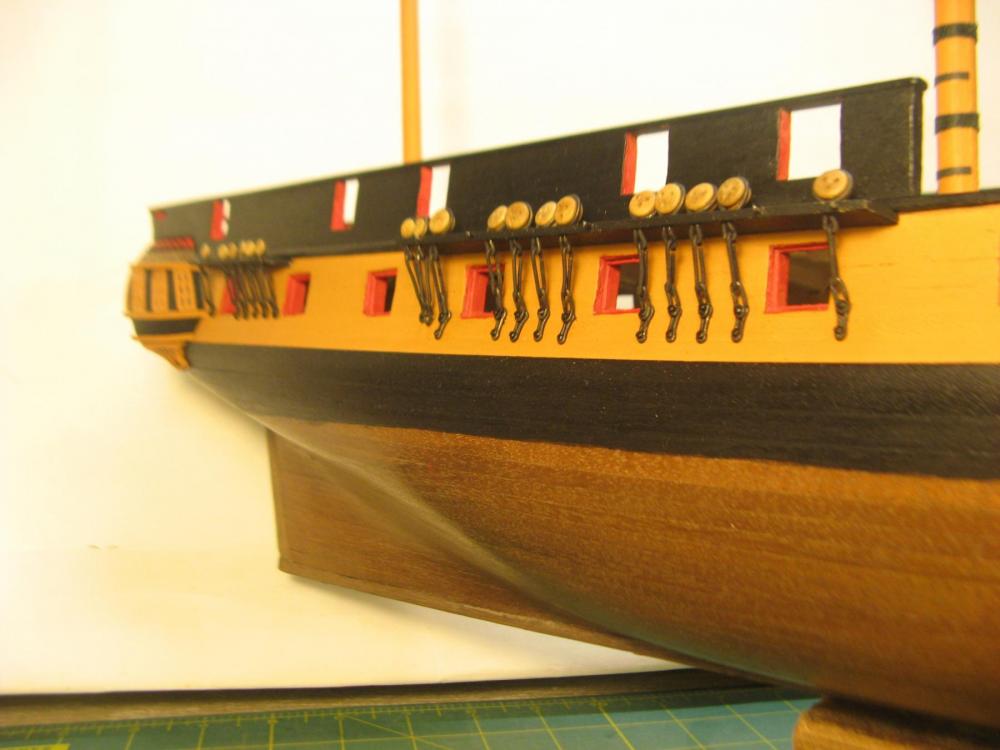
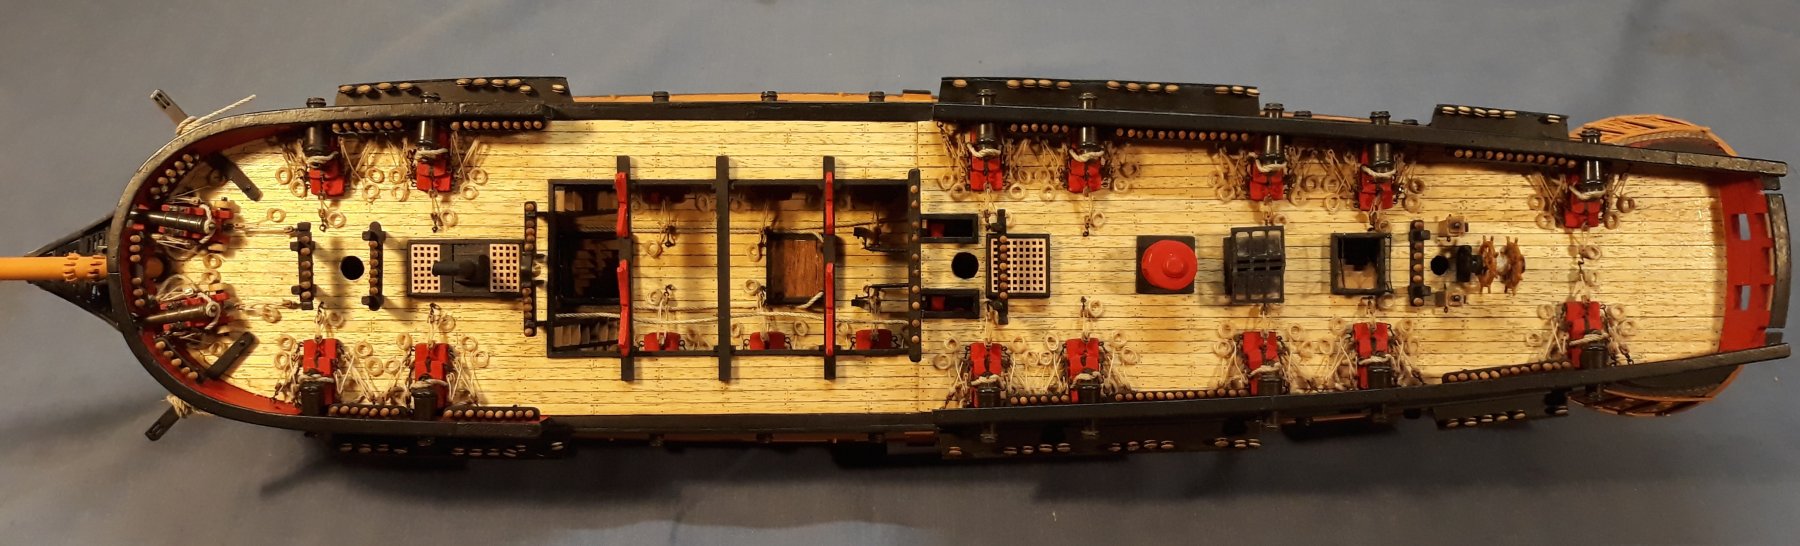
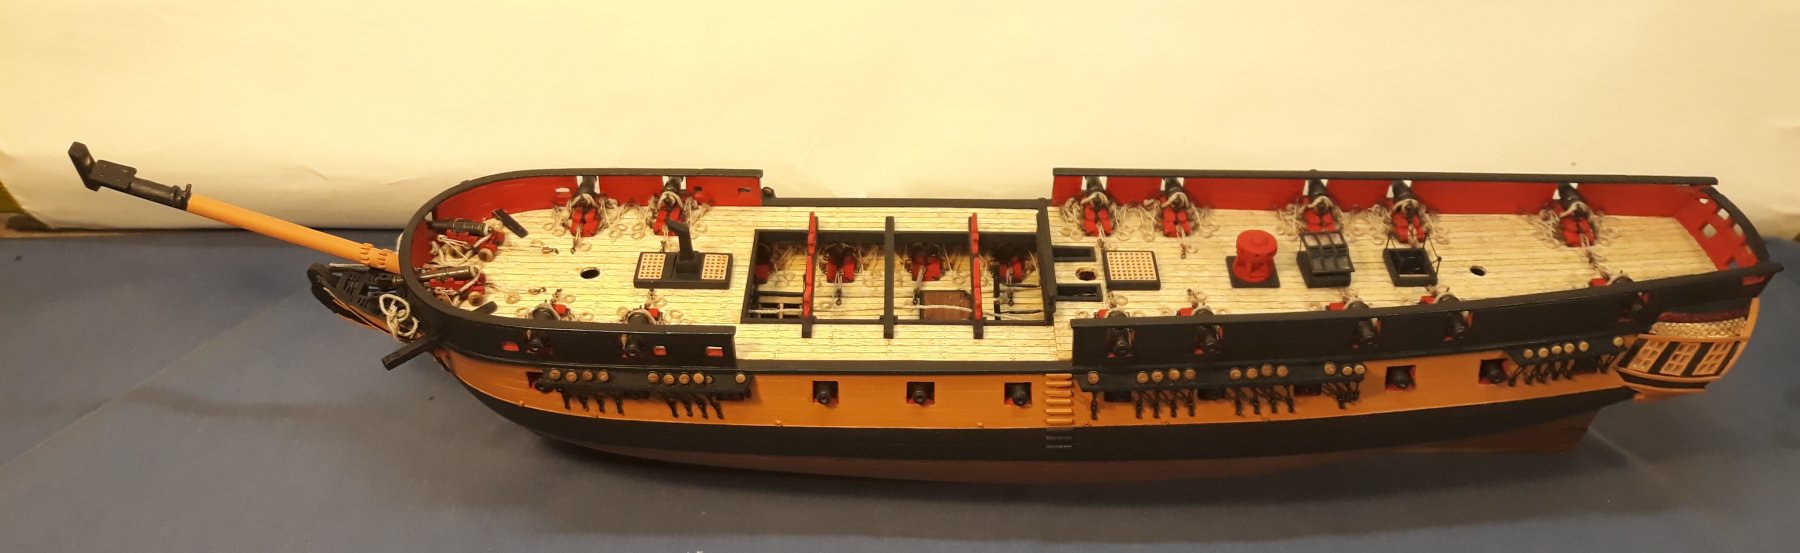
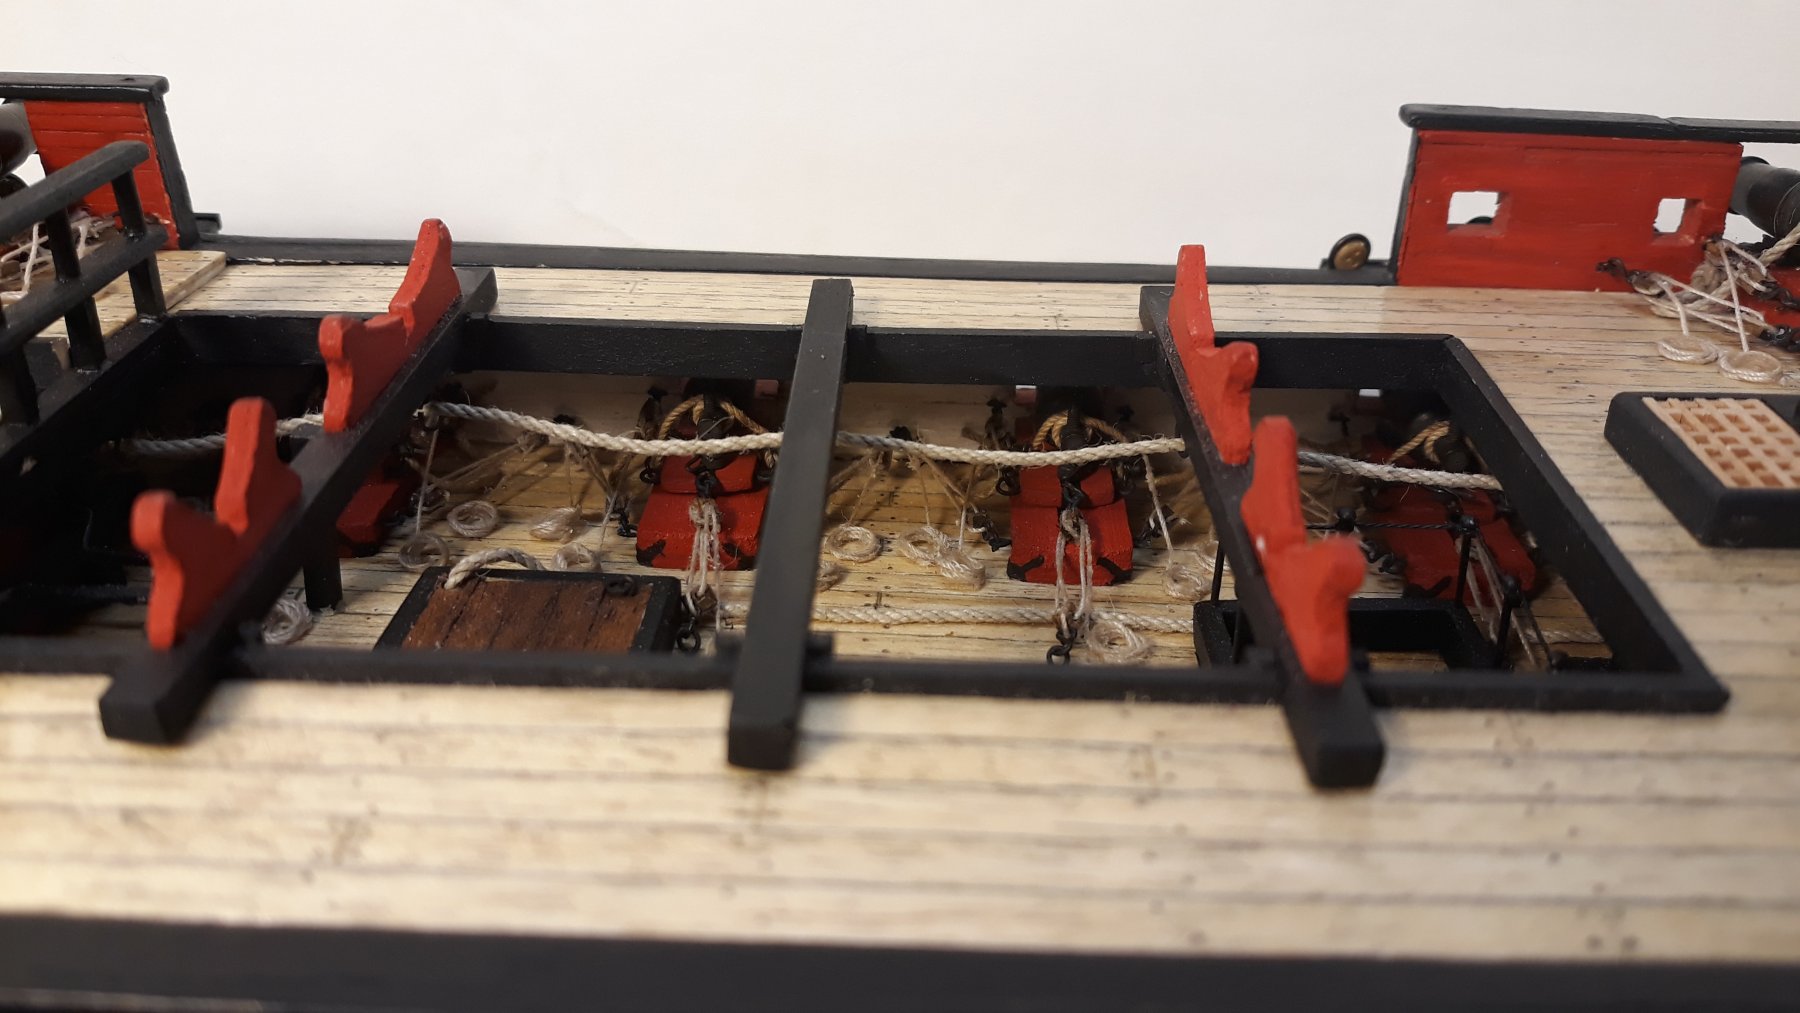
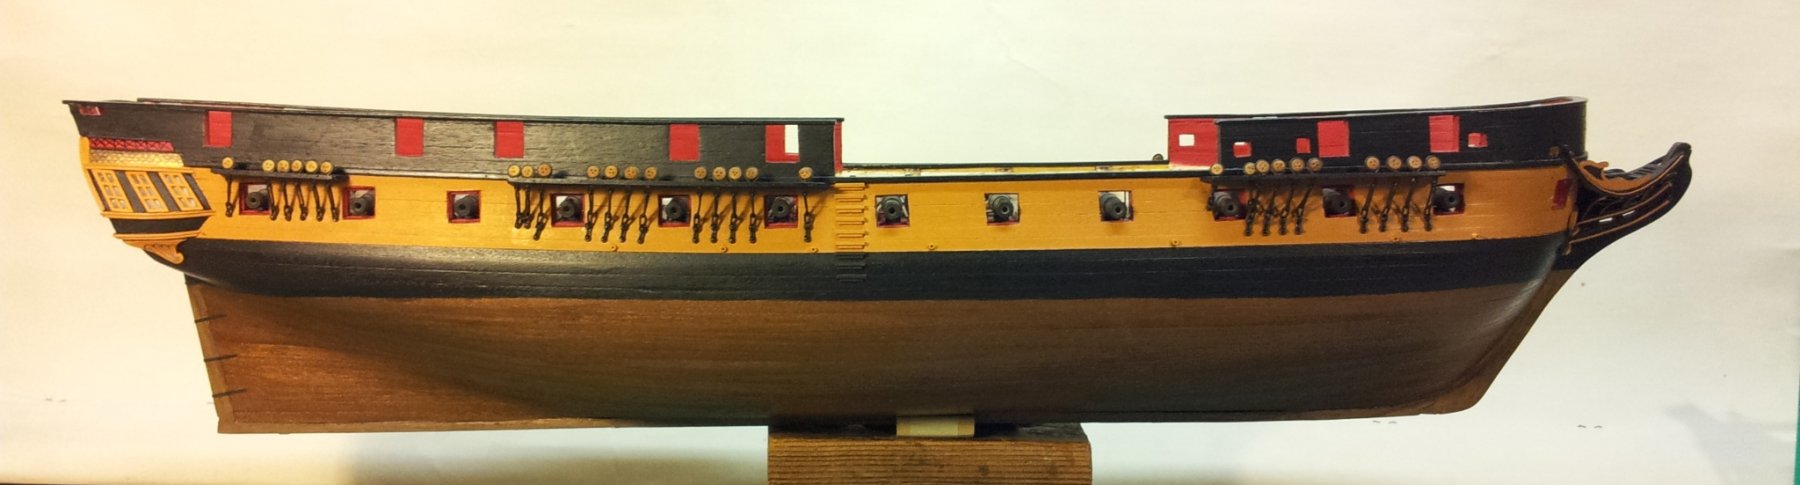
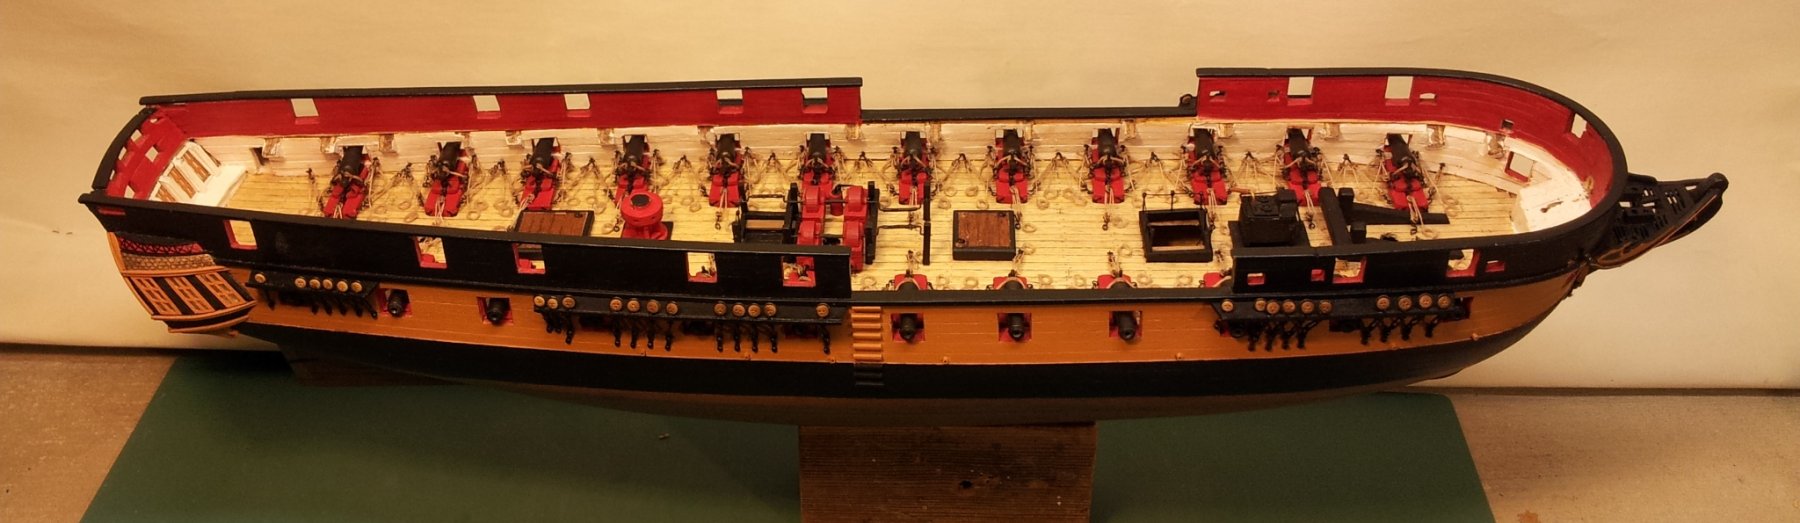
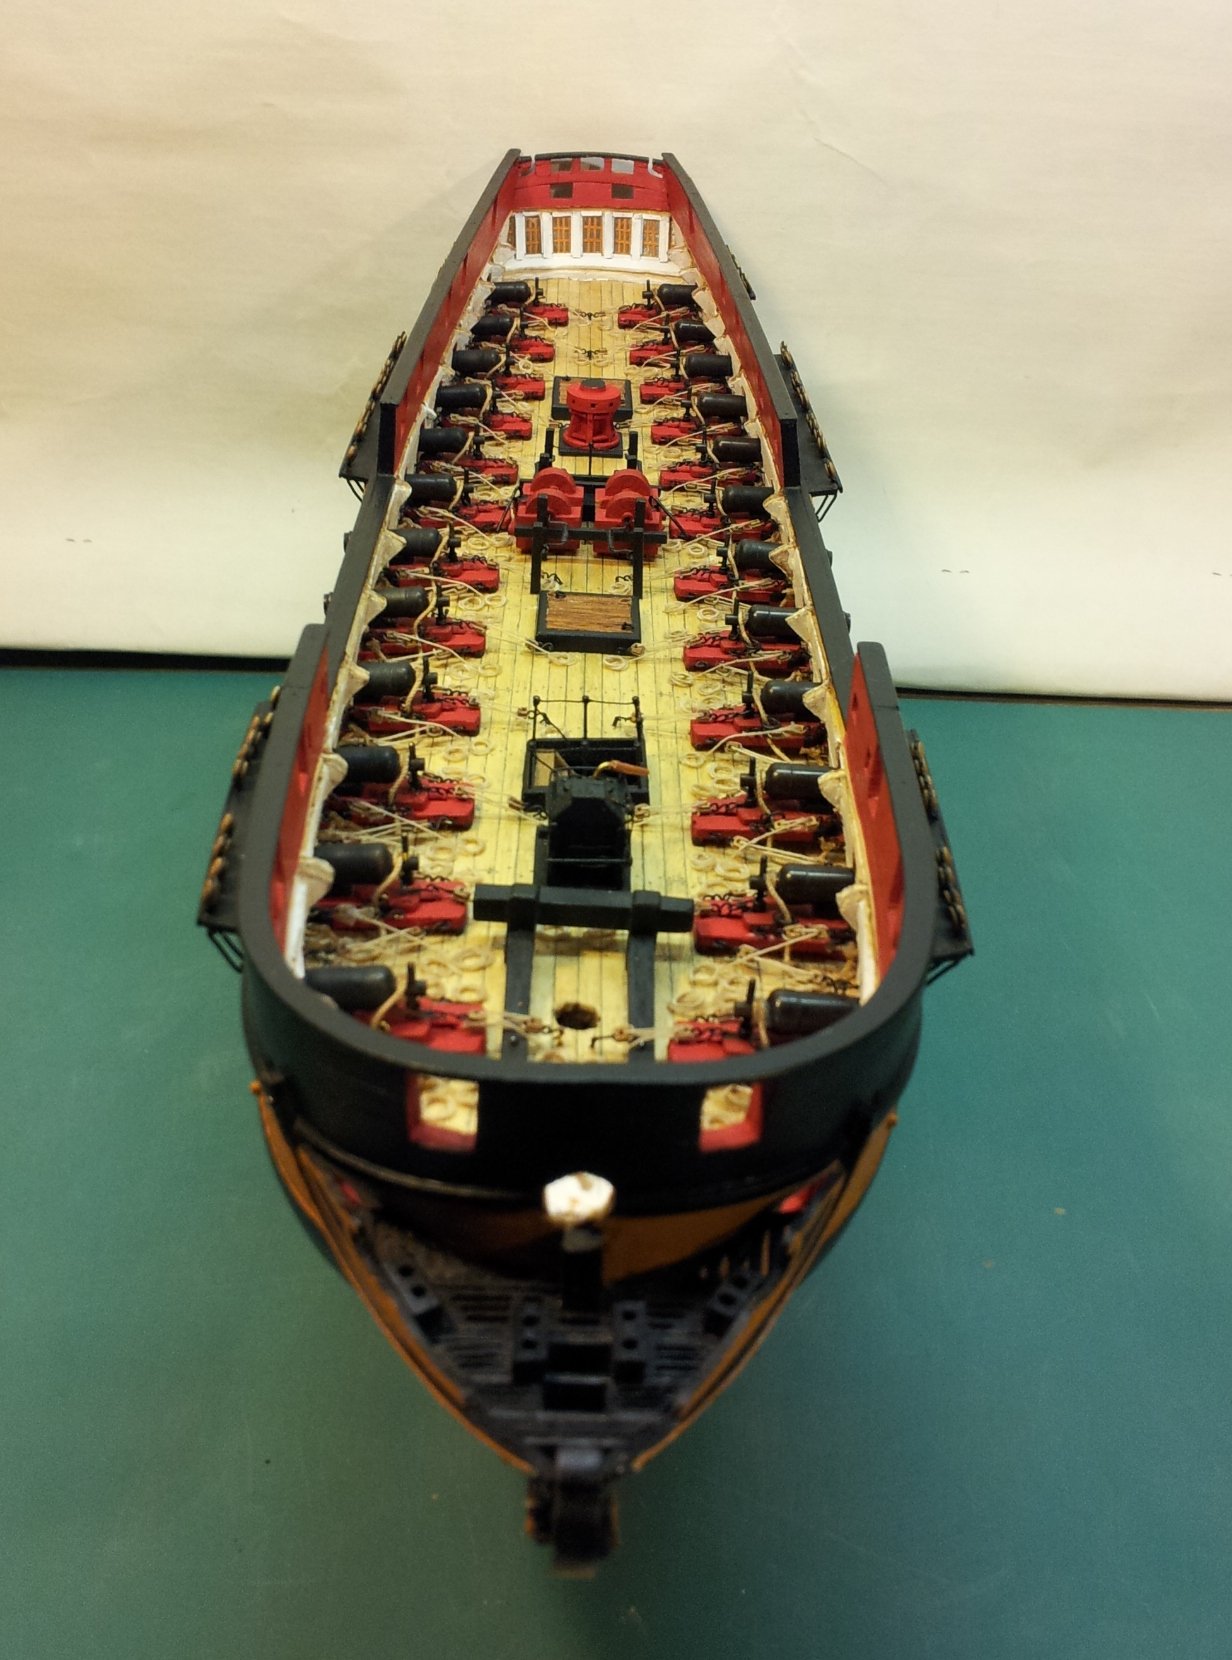
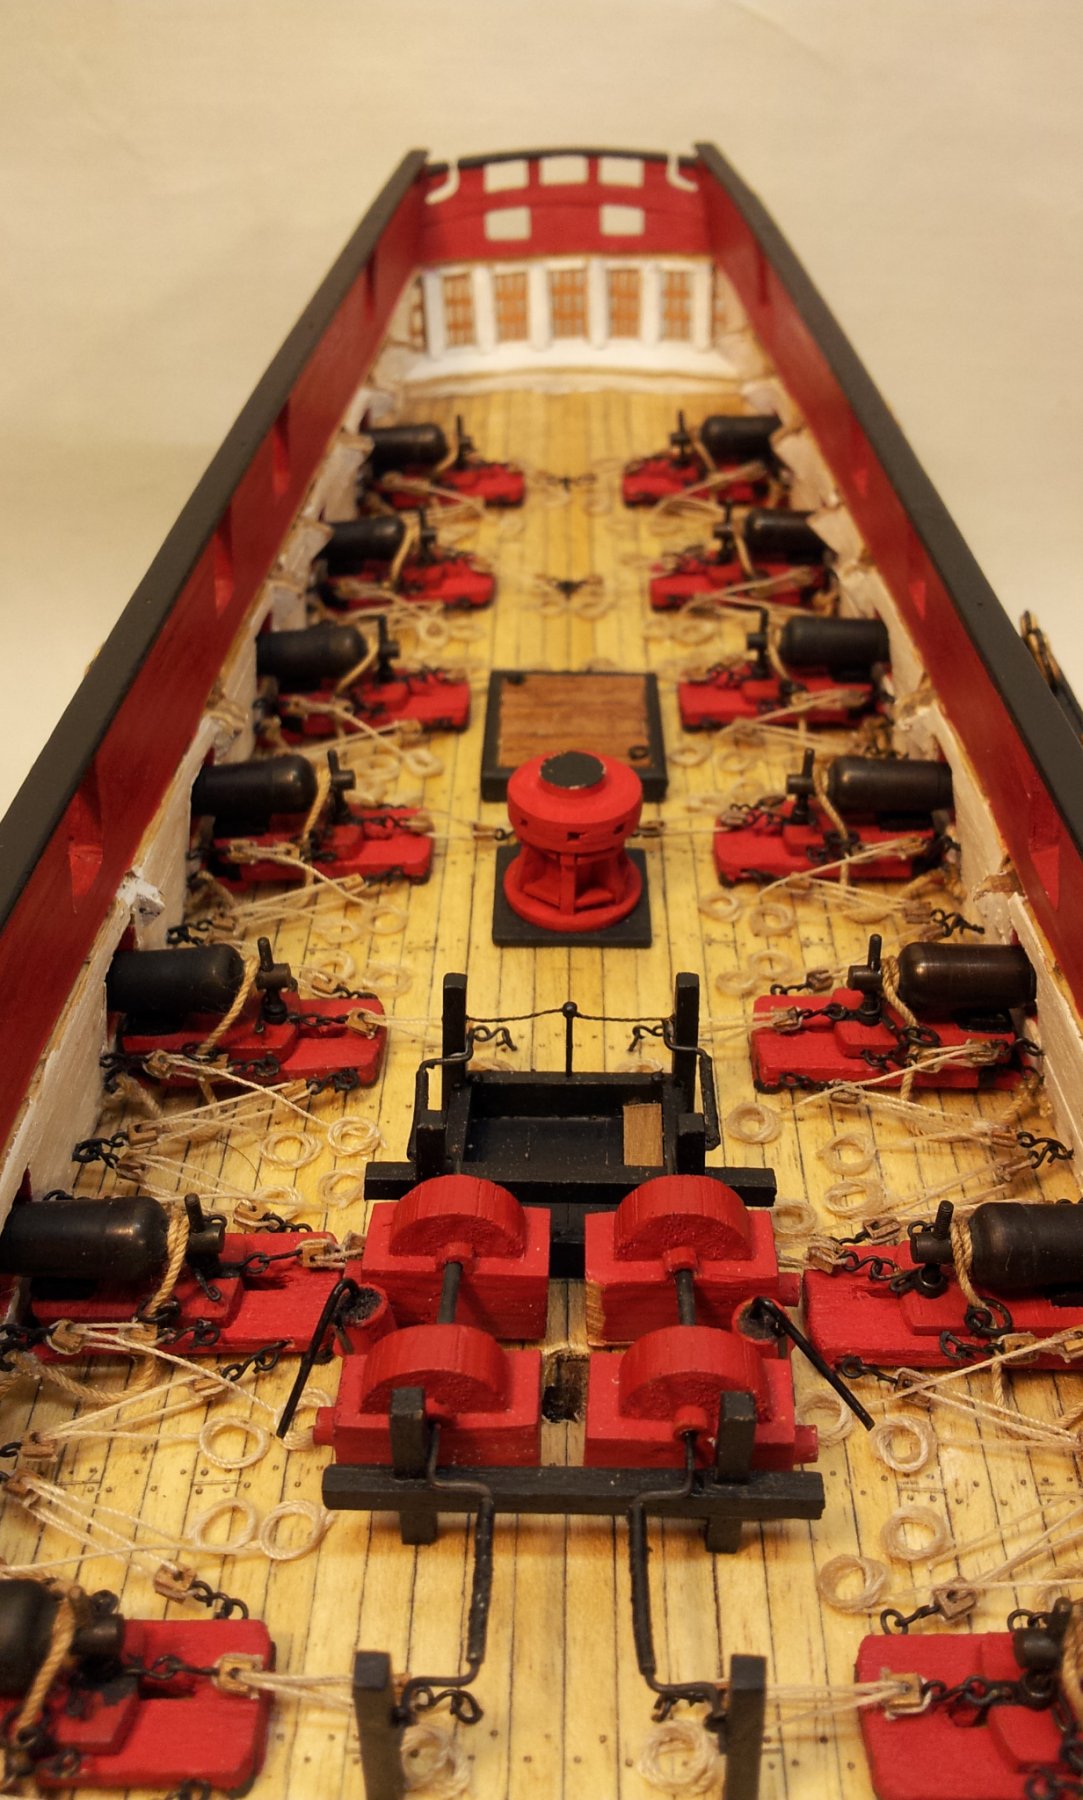
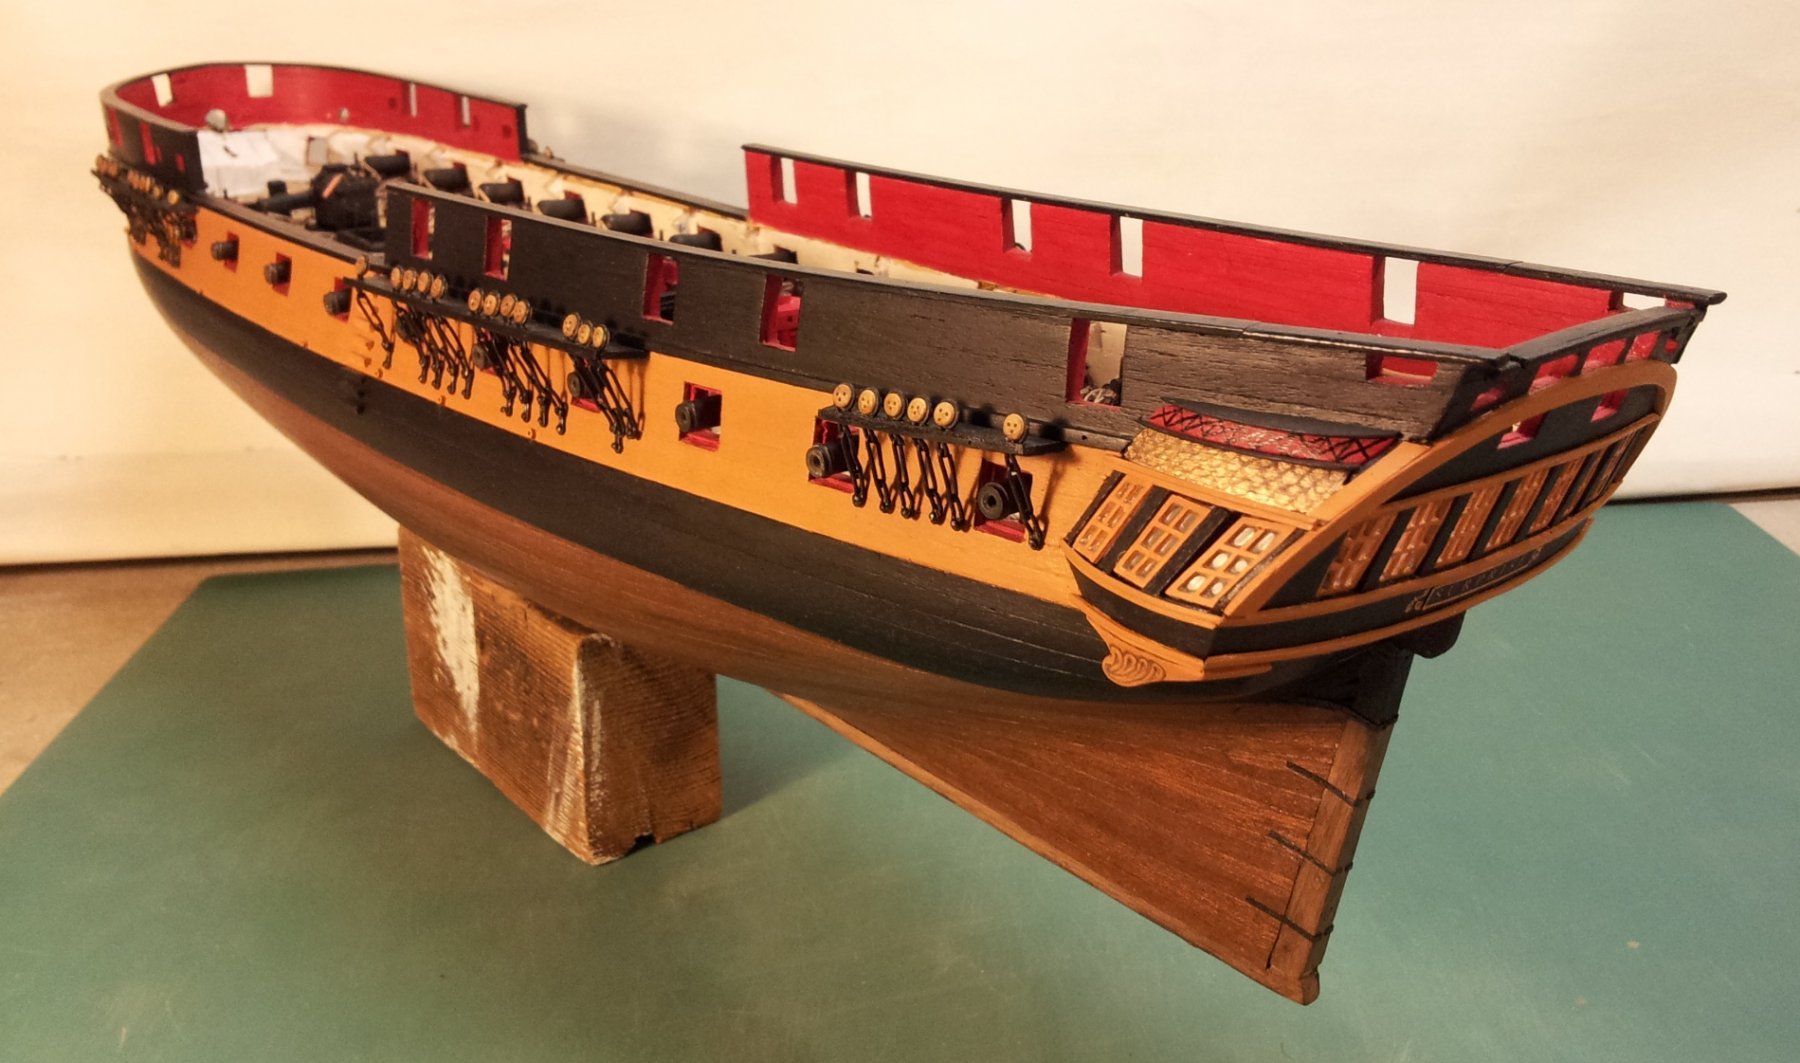
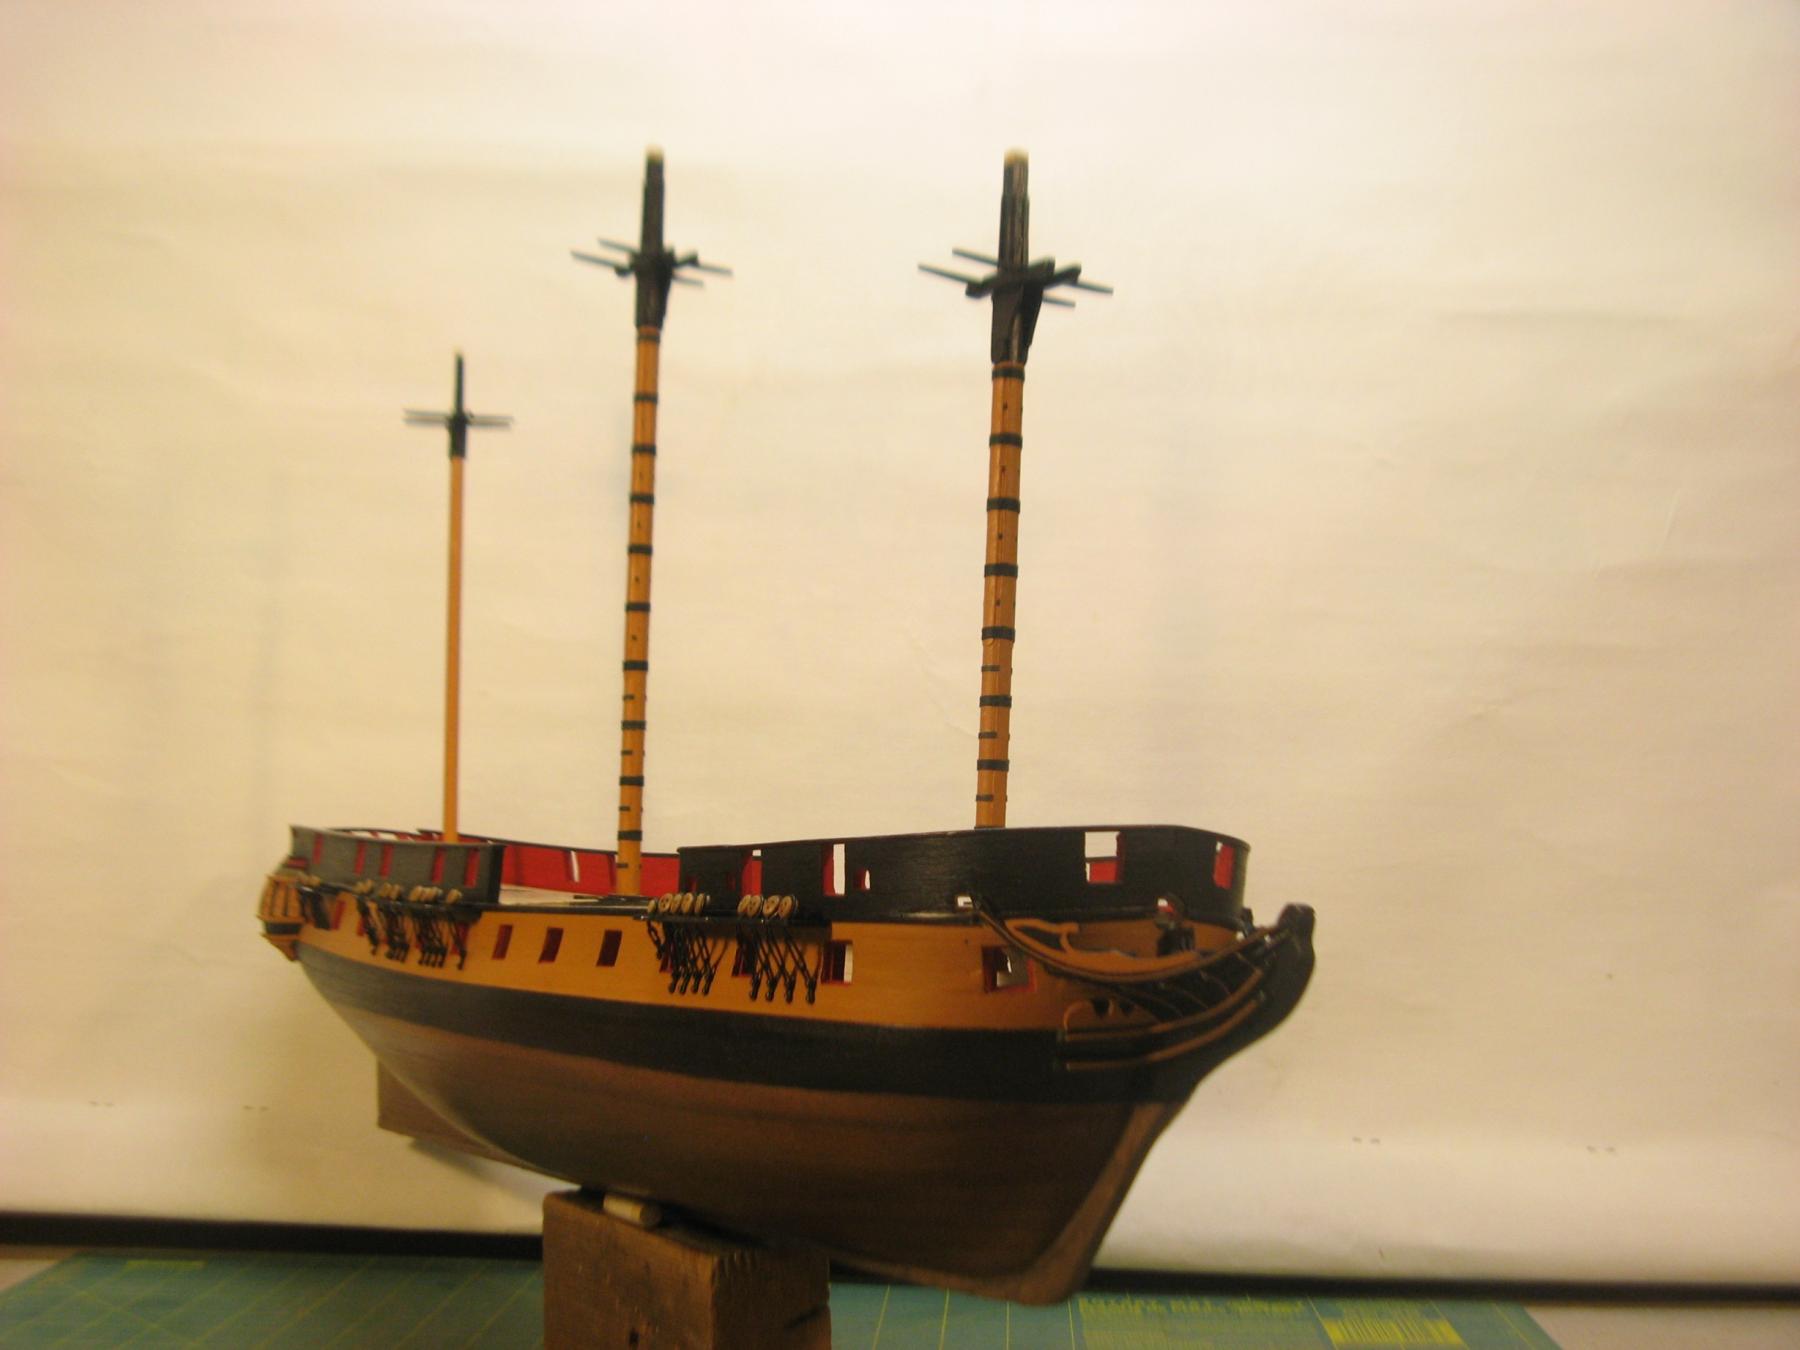
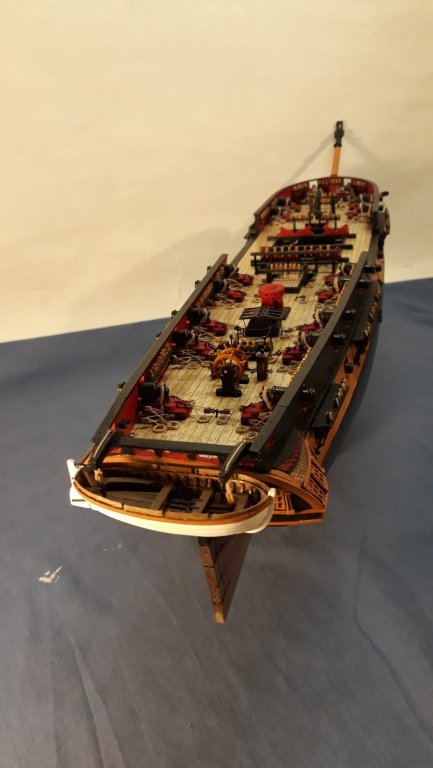
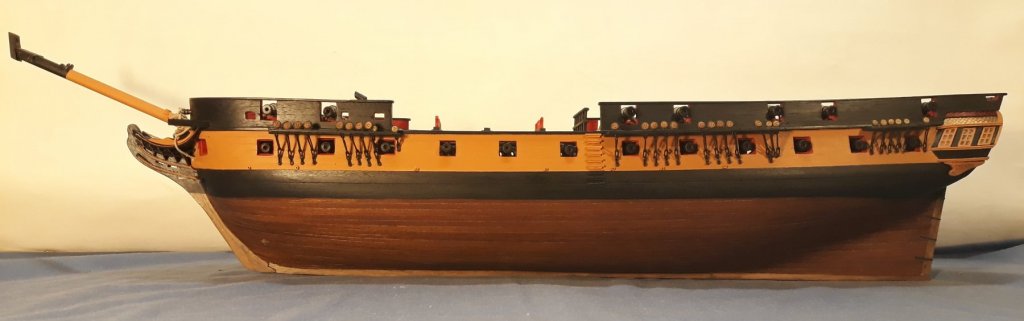
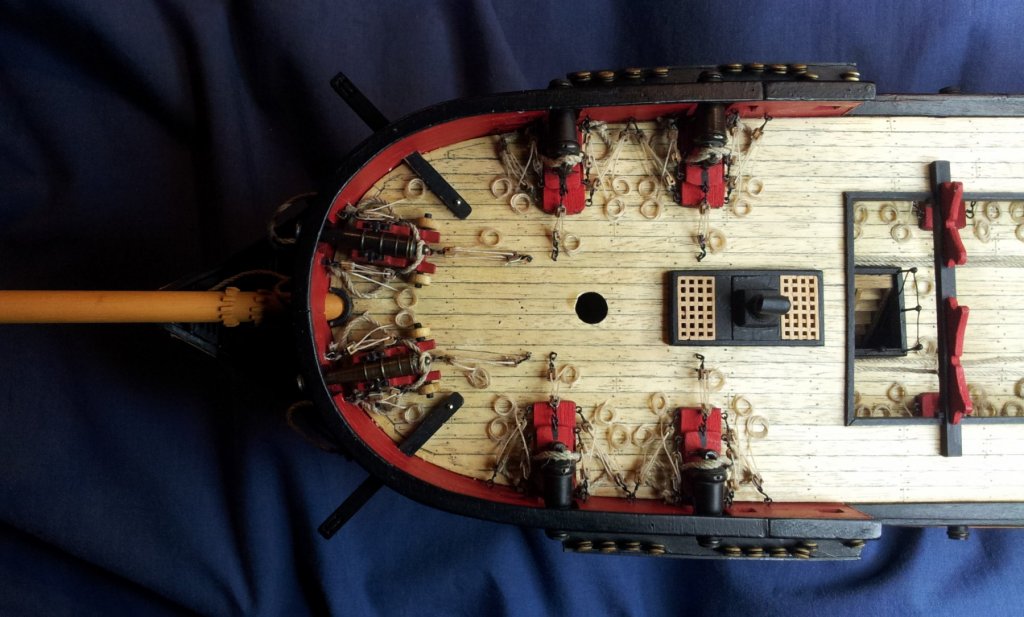
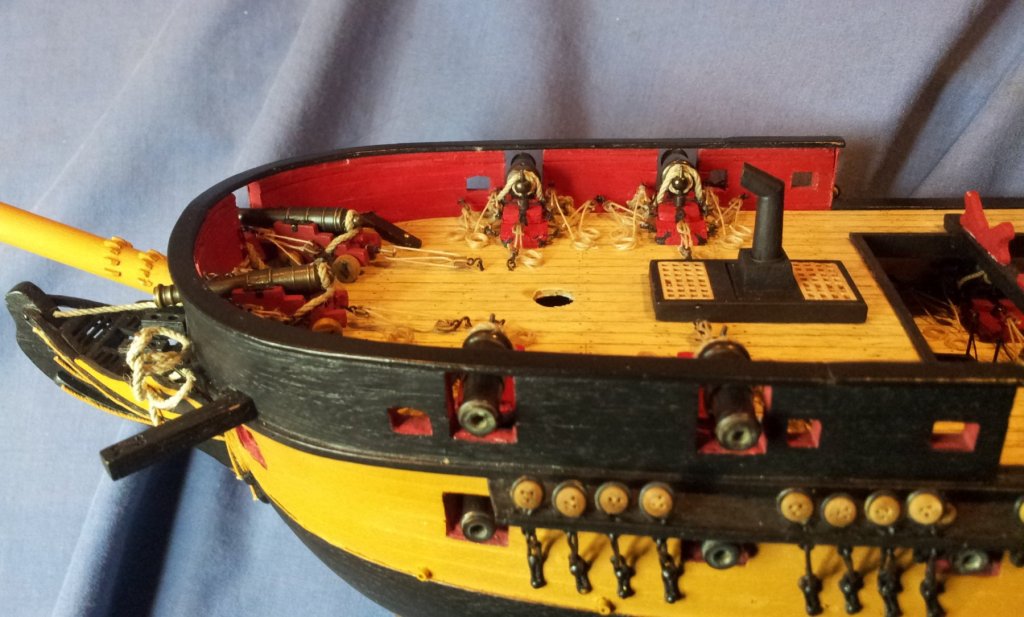
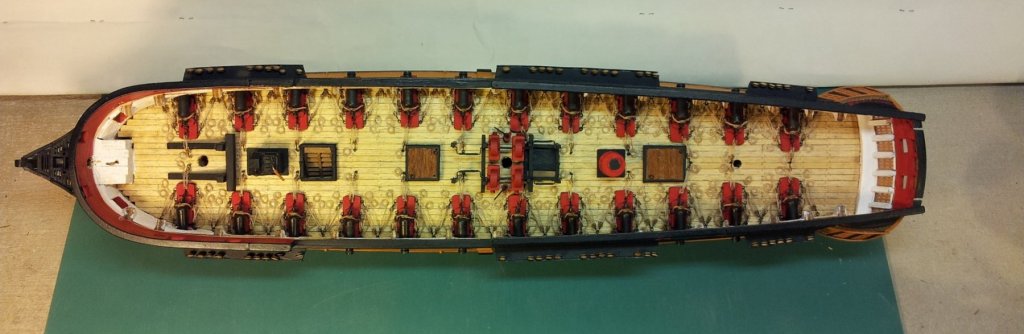
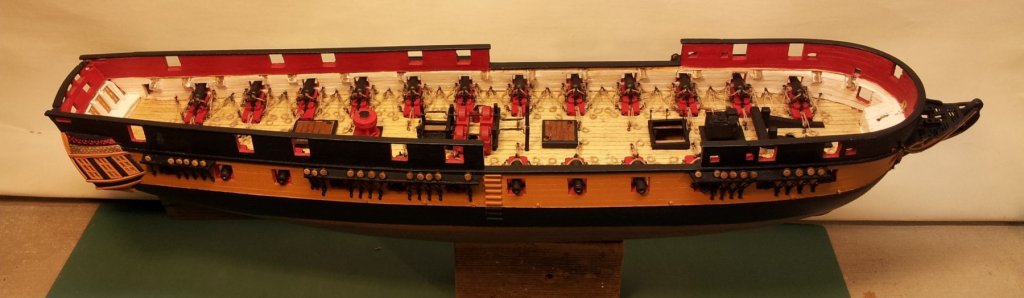
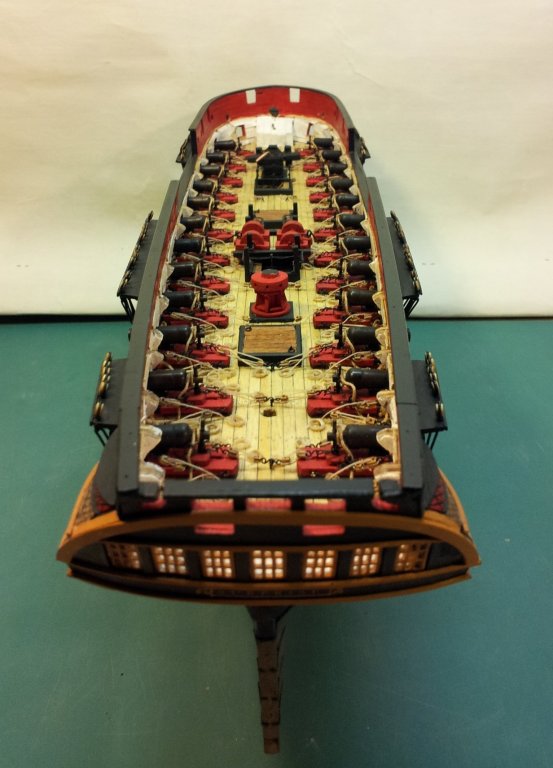
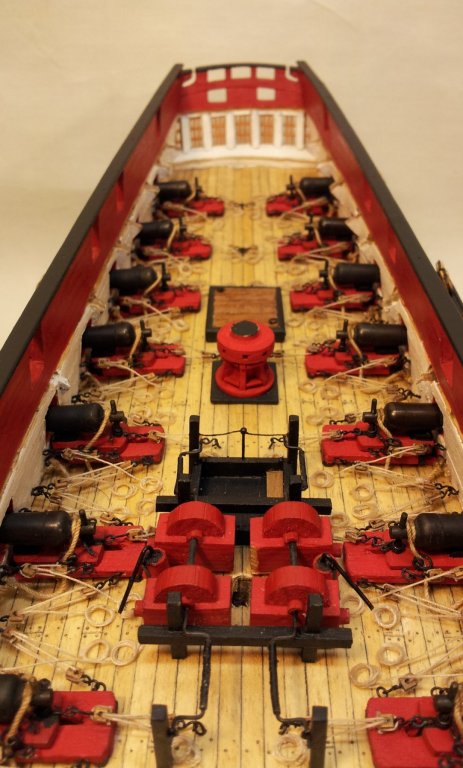
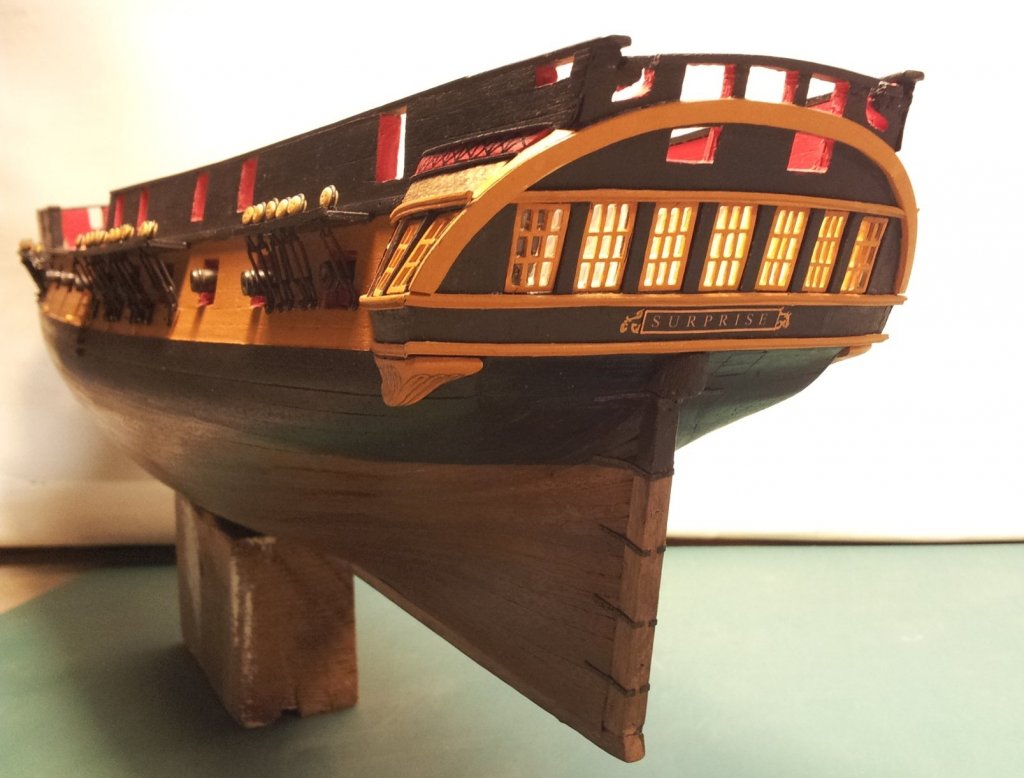
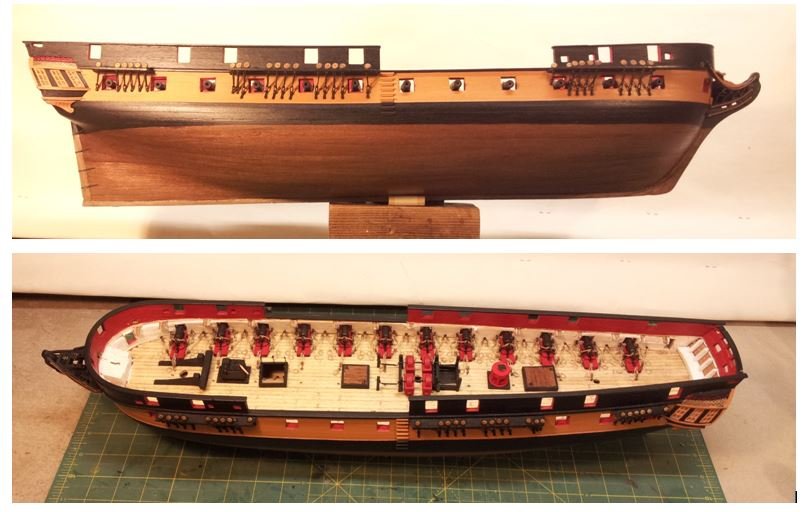
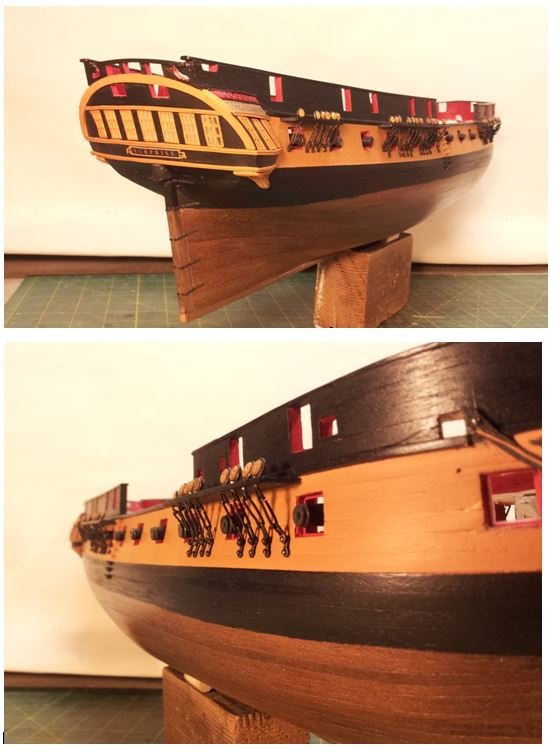
More gun tackle. The fitting of the 32 pdr carronades and all the other bits and pieces to the main deck have been completed and the forecastle, gangways and quarterdeck have been permanently fixed. The installation of the guns on the upper deck has now started and the 2 x 8 pdr long guns and 4 x 18 pdr carronades to the forecastle have been completed. 10 x 18 pdr carronades on the quarterdeck to go. Cheers, David.
- 256 replies
-
- 10
-
-
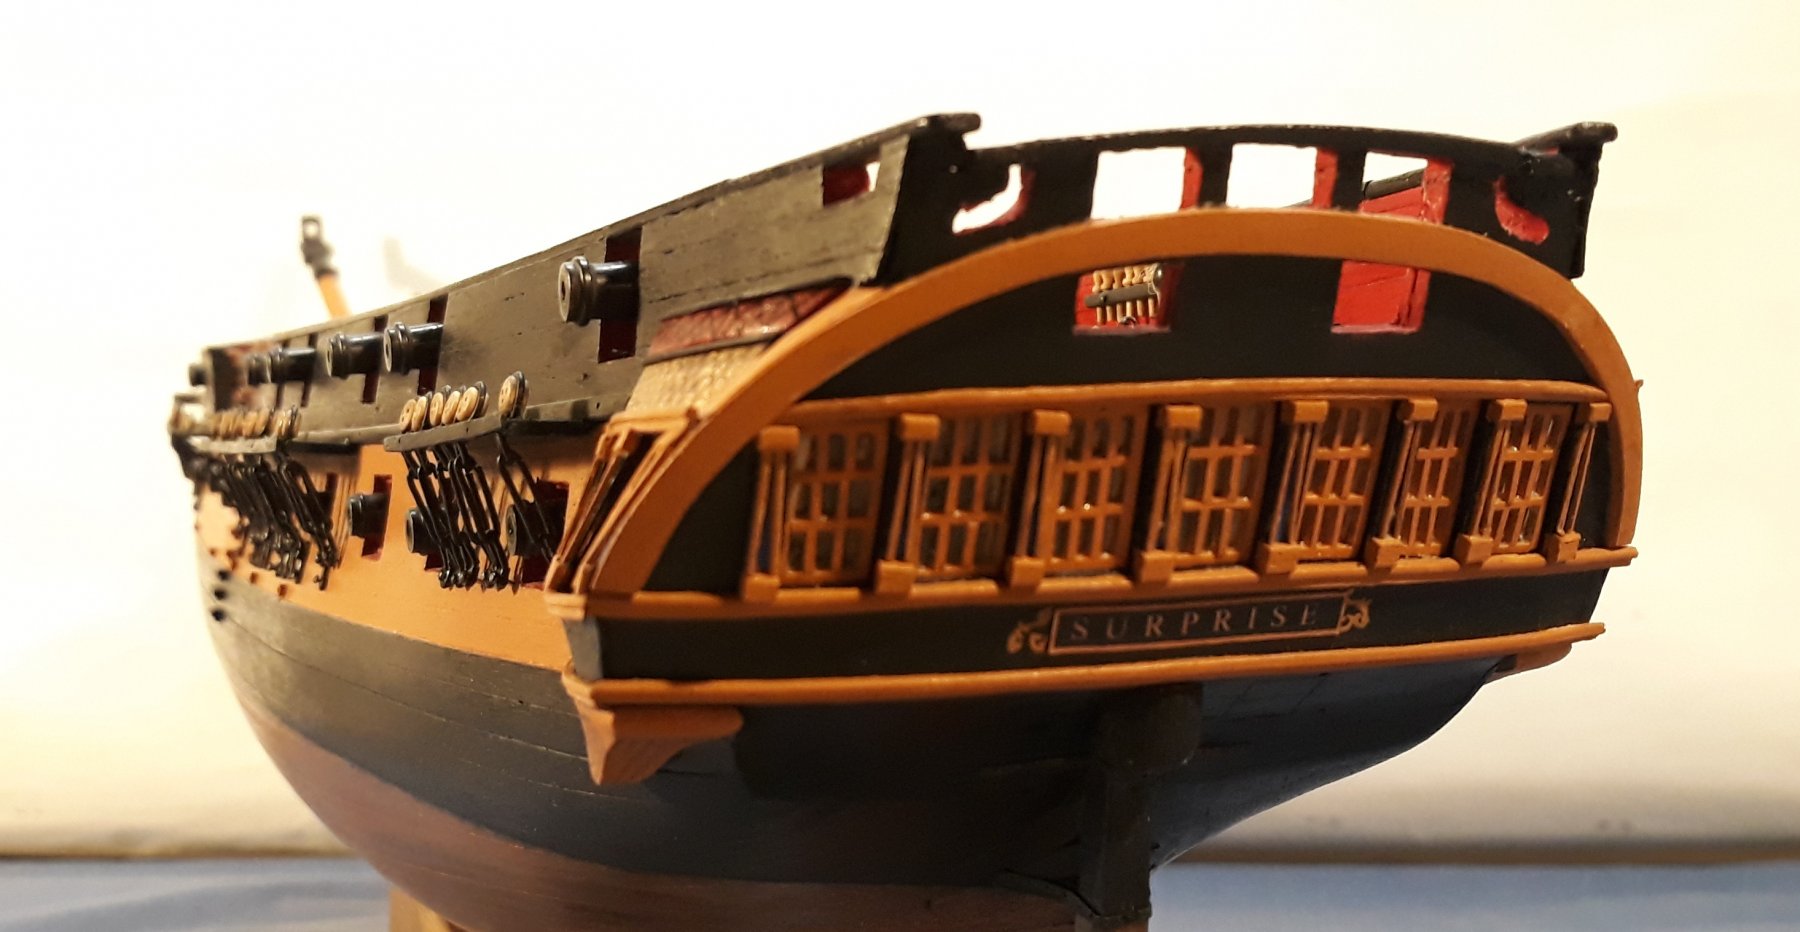
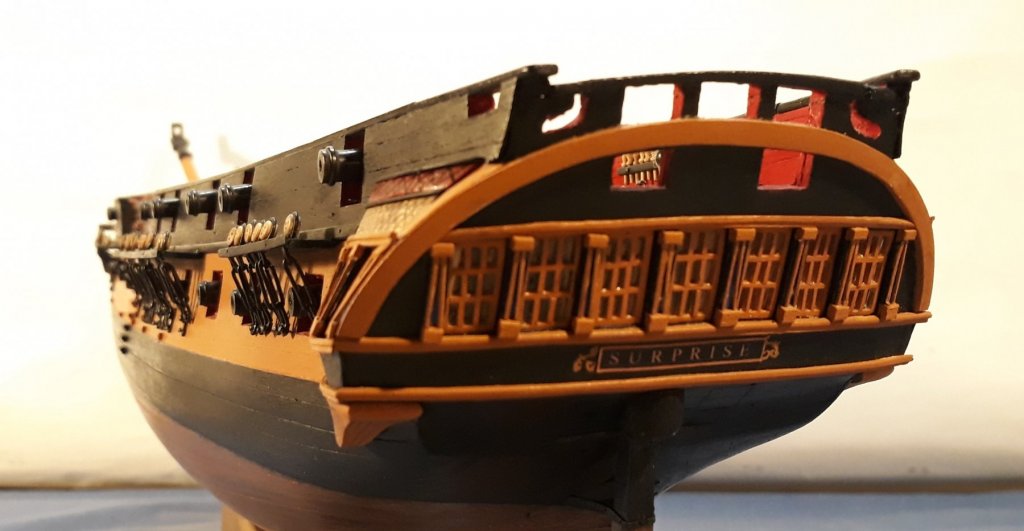
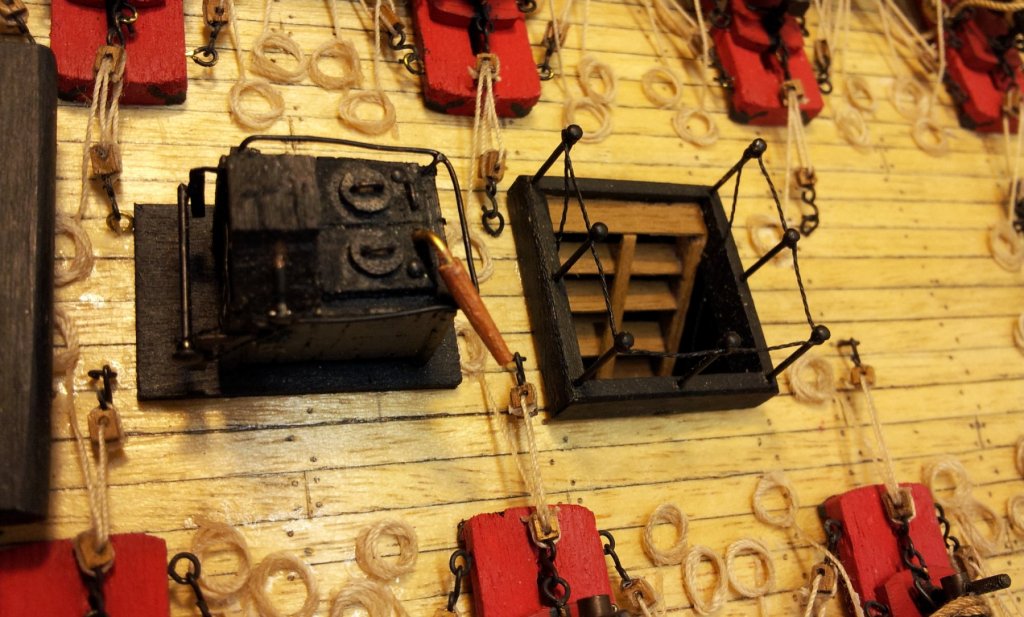
All the tackle for the 24 main deck 32 pdr carronades now completed and all the other main deck fittings have been fixed in place. Before the forecastle and quarterdeck are permanently fitted only the anchor tackle remains to be done. The hawsers and and the lower part of the messenger can be fitted before the upper deck is fixed with the upper part of the messenger fixed to the underside of the upper deck. A fairly significant hull element is the scuppers. All the water that ends up on the main deck through gun ports and the waist has to go somewhere. I couldn't find any information for Surprise but the AoTS book for HMS Diana shows scupper positions and sizes. Both ships being about the same size I figured that the Surprise scuppers would be in about the same place. Next was finding small tubes the right size. Scouring the odds and ends that I have acquired, and it is amazing how much you do collect over the years of modelling, I found some 2mm diameter by about 3mm long brass tubes that came as part of the carronade kits. I didn't use much of the parts for these kits as most of the carronade carriages were fabricated from scratch so these were left over. Actually I have no idea what part of the carronade assembly they were meant to be. They are pretty much the right size so these have been fitted. So next will be fitting of the forecastle, gangways and quarterdeck and the various parts that go on these. Cheers, David.


- 256 replies
-
- 11
-
-
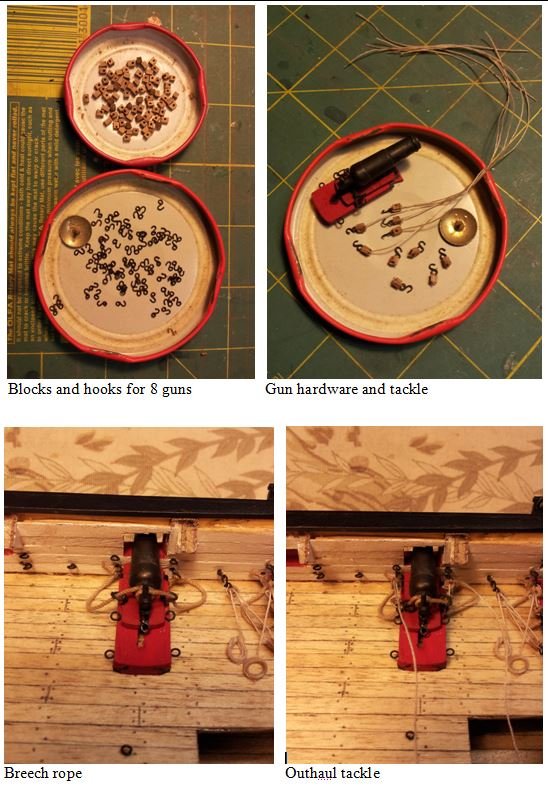
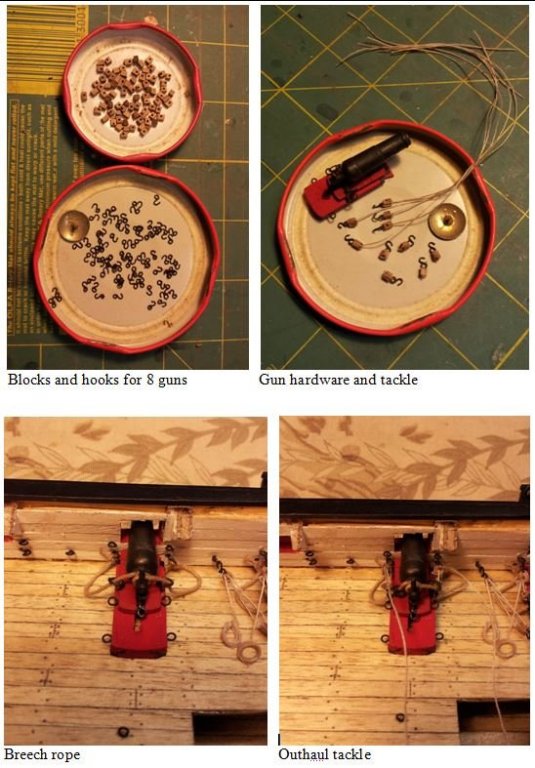
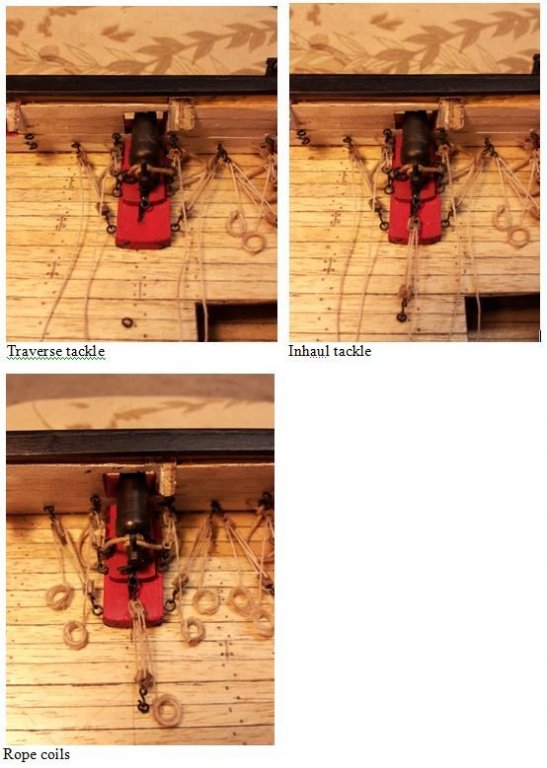
I decided against getting distracted from completing the gun tackle for the main deck carronades so I have started on the port side 12 guns. Why stop when you're on a roll! The pictures explain the tackle installation for one of the 32 pounder carronades. 8 to go.
- 256 replies
-
- 12
-
-
New member from North Sydney Australia
Navis Factorem replied to Fernando E's topic in New member Introductions
Hi Fernando, Welcome to MSW from another ship builder from the same part of the world. My build history is similar to yours although I started on the Port Jackson Schooner from Modellers Central, a bit challenging for a first build but it turned out OK. That was close to 10 years ago and a substantially modified kit of the Bounty followed, a 4 year build, and I am currently working on a scratch built HMS Surprise. This site has been of huge assistance to me and i would strongly suggest you start up a build log and join the crew. Cheers, David. -
Starboard gun tackle complete. I might do something else for a while, perhaps start on some spars, there's only so much time I can spend on making tiny blocks and hooks and tying tiny knots before I need a rest. Cheers, David.

- 256 replies
-
- 15
-
-
Gun tackle. I have started installing the gun tackle for the main deck 32 pd carronades. So far guns 1 and 2 on the starboard side have been completed. If I had realised how much tackle is attached to each carronade I think I may have built a different version of the Surprise with long guns only! Each gun has 5 block and tackle units, 2 for the slide outhaul, 2 for the carriage traverse and a slide inhaul, along with the breech rope. Each block and tackle has 2 blocks and 2 hooks, and where they attach to the gun and the hull there are another 2 ring bolts each. And the breech rope has 2 ring bolts on the slide along with another 2 rings. That adds up to a lot of copper wire shaping. 36 to go. Cheers, David.

-
Hi and thanks, I looked up the link, exactly the information I was after. Cheers, David.
-
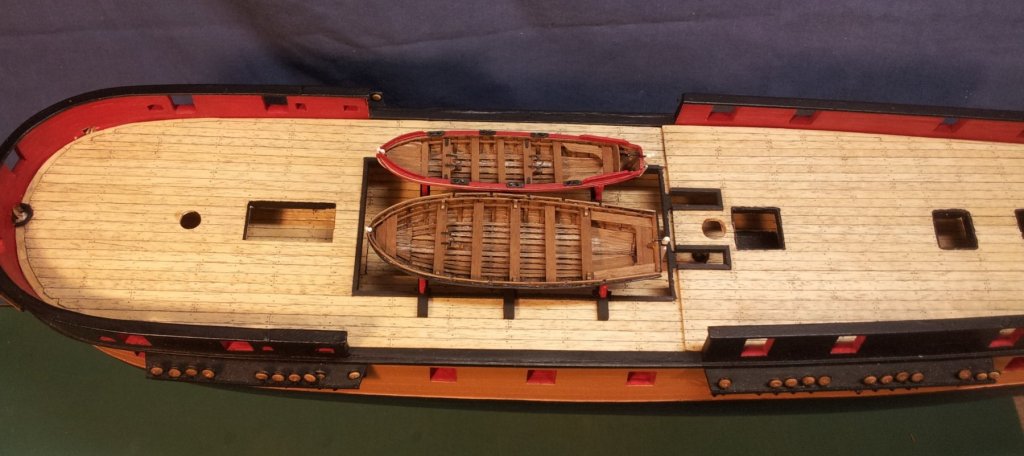
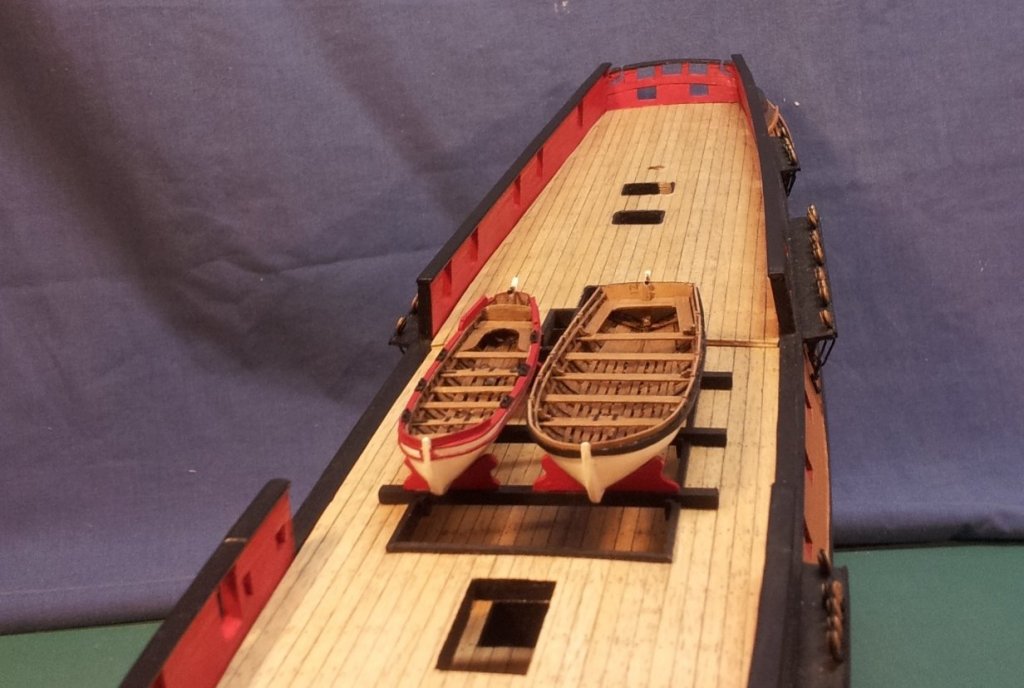
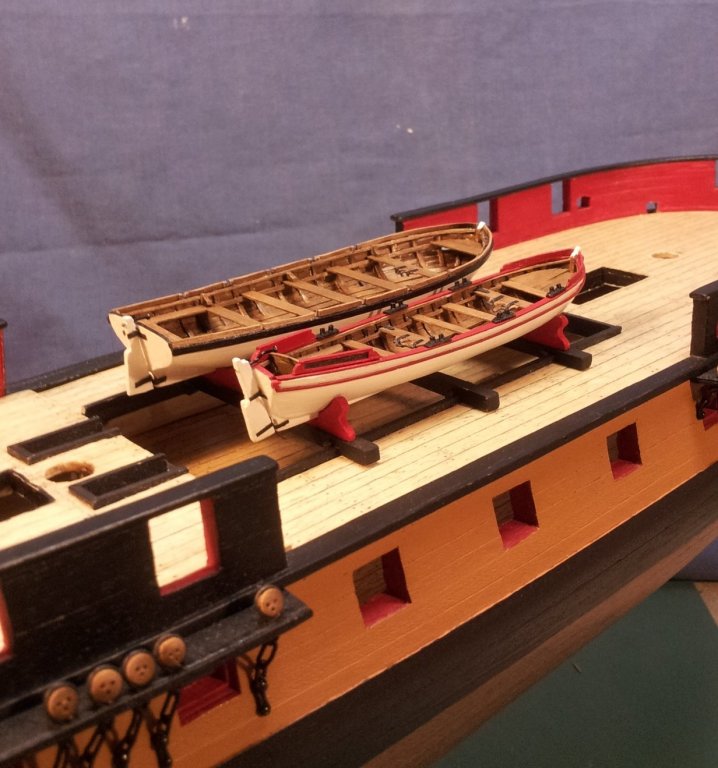
Having finishing building the ship's boats I thought it would be good to see how 2 of them mounted on the hull. For final fit the rudders will be removed and stored in the boats. These 2 boats substantially cover the waist making it hard to see down to the upper deck so I am thinking of showing the launch hoisted above the deck. I am not sure how this was done, I assume lifting tackle was connected to the burton pendants for the fore and main masts with other tackle on the main and fore yard to enable sideways movement. Advice on how this was handled would be appreciated. Cheers, David.

-
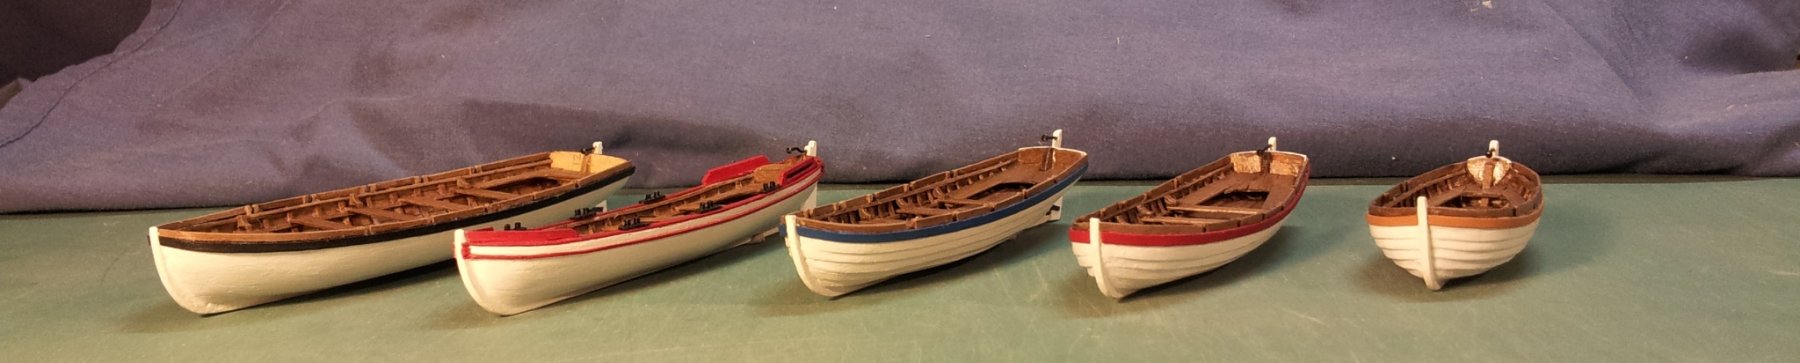
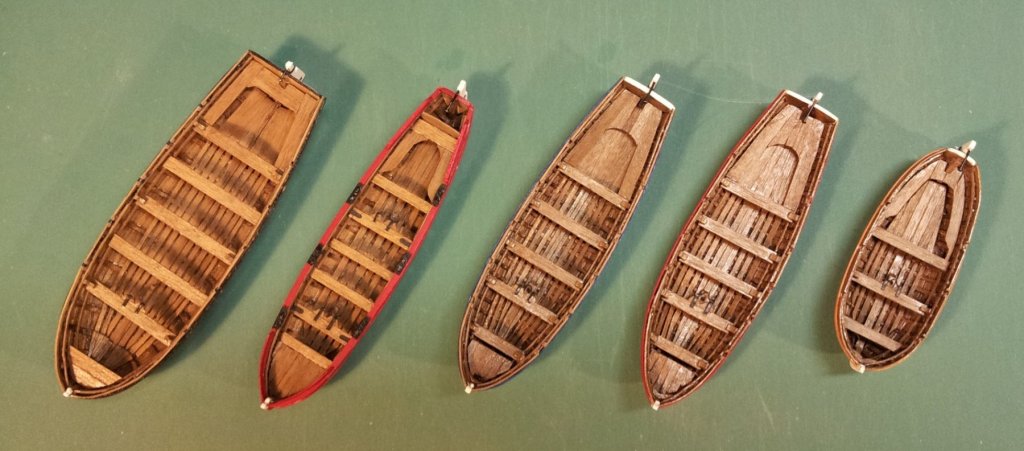
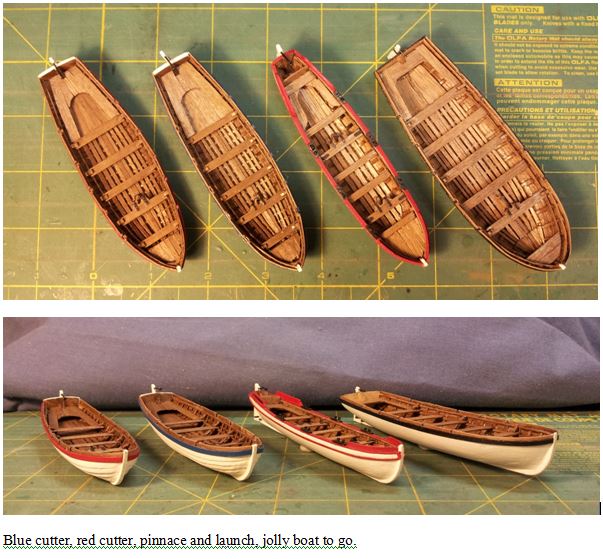
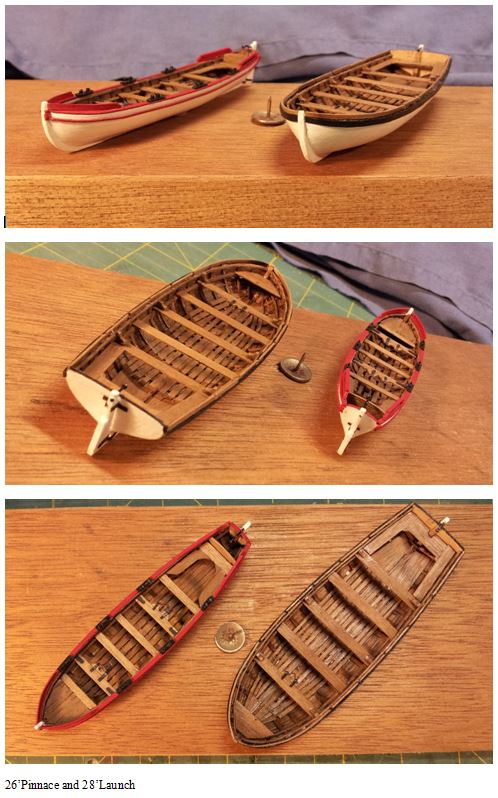
Ship's boats complete. The 5 boats have now been completed. Up to this point I hadn't really appreciated just how different the boats are, from the heavy duty 28' launch to the sleek fast pinnace and the short jolly boat. So after about a 4 month break from the main build I will now get back to work on the hull. Cheers, David.


- 256 replies
-
- 14
-
-
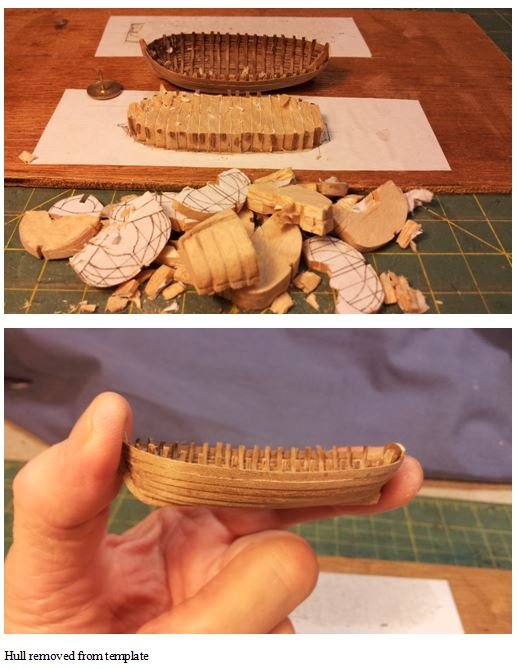
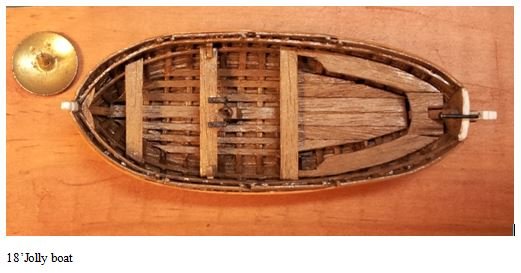
18' Jolly boat I have finished this build and I am glad I left this until last. The shortness, relatively bluff bow and tight narrow stern meant that this was certainly the most difficult and fiddly to build. I think the final product looks OK so now all 5 ship's boats have been completed. Like all these things the process changed as I went along, learning from each build, I think I am relatively proficient now. Pity I've finished, I will probably forget by the time comes to build boats for the next project, whenever that is!

-
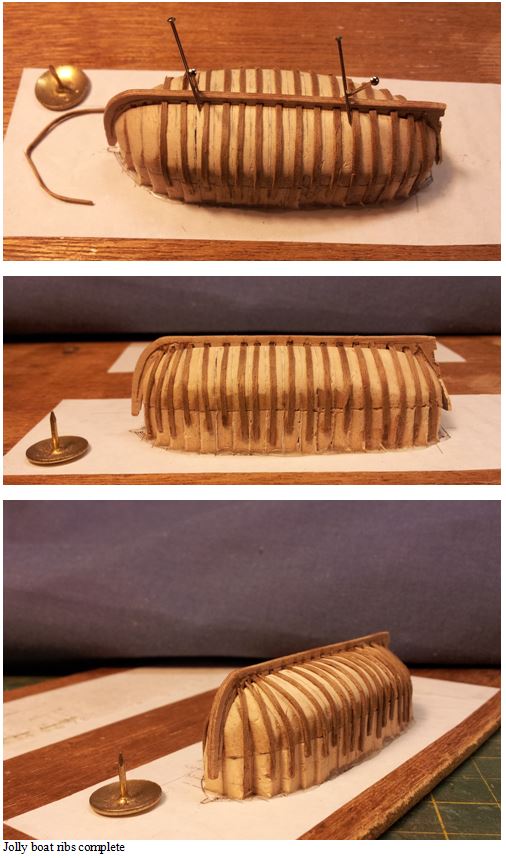
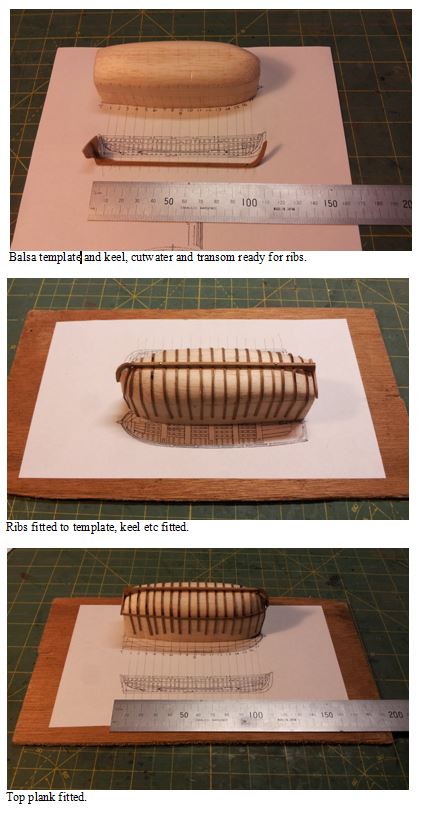
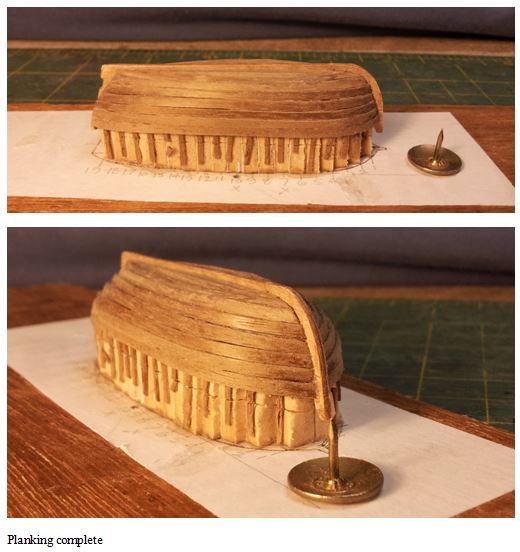
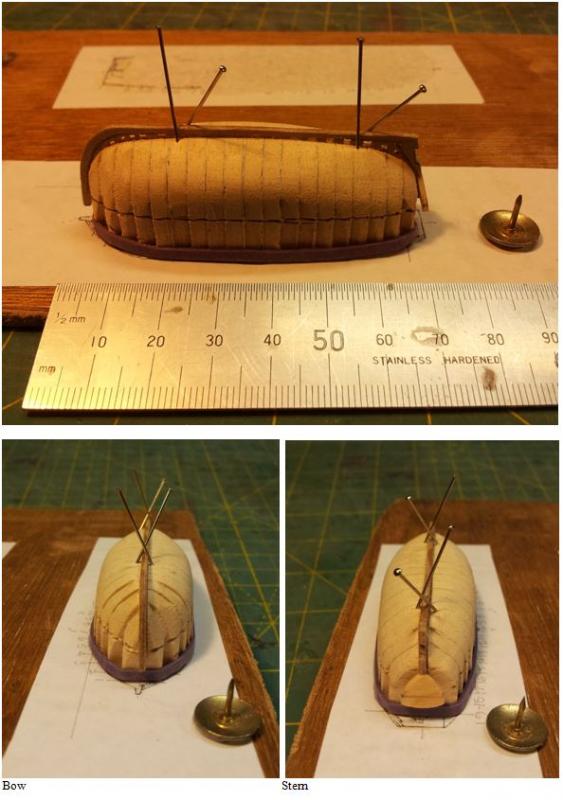
18' Jolly boat I am using the same method to build the jolly boat, hull profiles scanned then printed and pasted to balsa to create the template. Getting the template right for this boat took a bit more time than the others, probably because of the relative shortness and the fairly bluff bow and the narrow tuck stern. The transom is tiny. All the ribs are heat shaped to fit before threading through the keel and gluing to the template outside of the hull line. To get the 18 ribs done took about 25 lengths. At 0.5mm x 1.0mm they snap very easily. Now for the planking. Again this is a clinker hull so the planks will be 2 piece, the basic 2mm wide visible plank and a 0.5mm square strip glued to the bottom edge to create the clinker "stepped" look. Cheers, David.

-
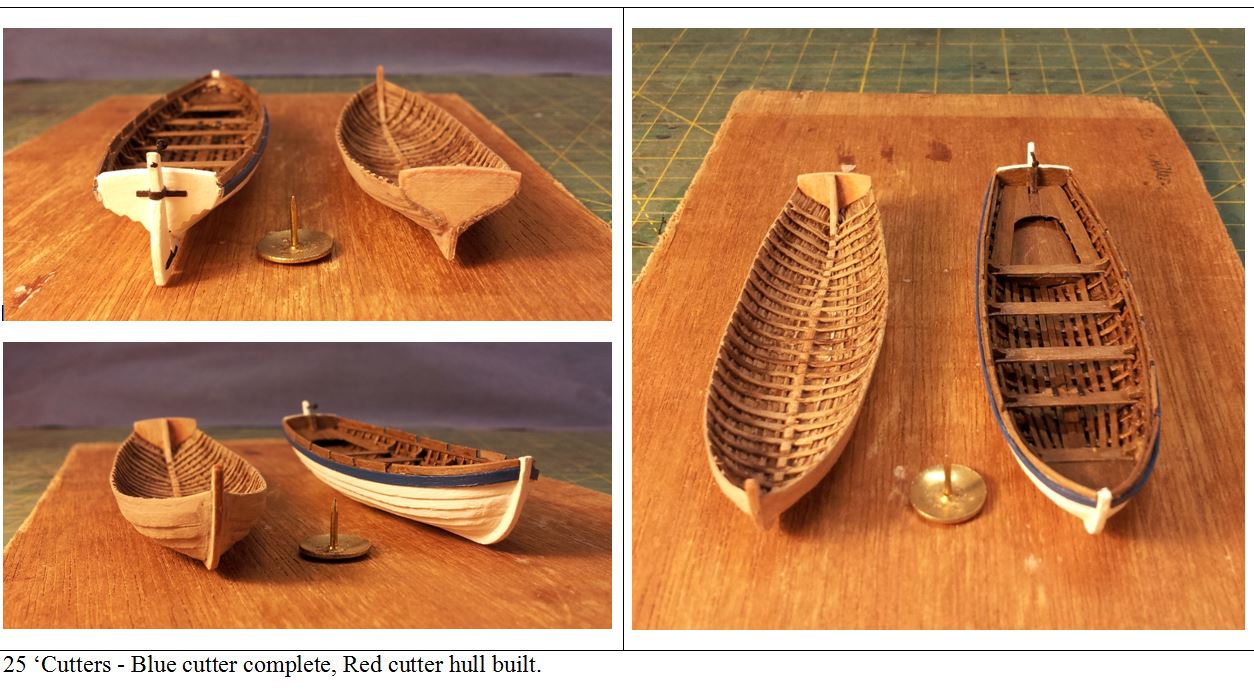
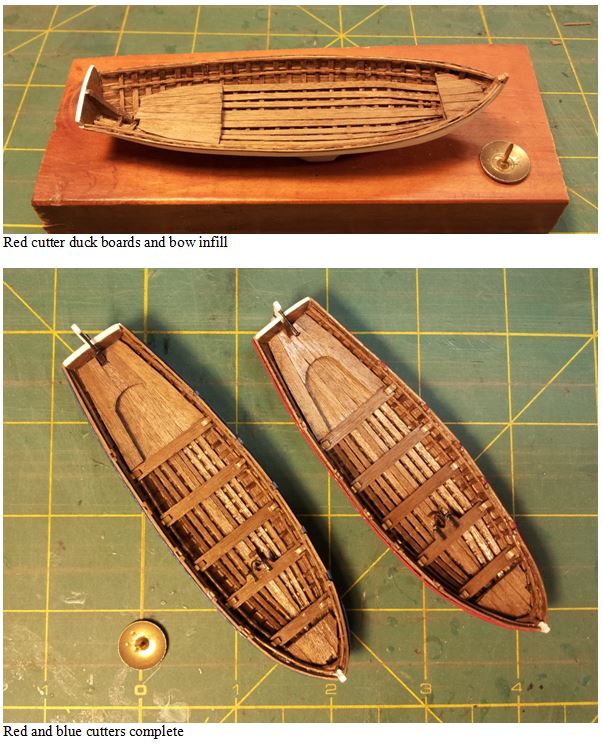
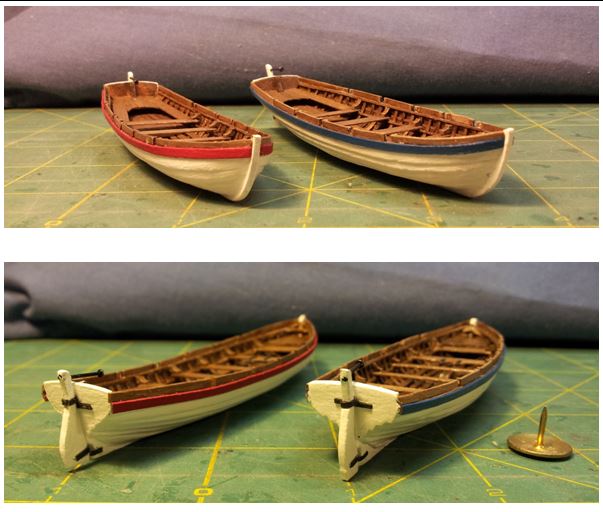
25' Cutters The red cutter is now complete. It is reasonably similar to the blue cutter but I am glad that they will be hanging on different sides of the stern and not viewed close together. Being able to re-use the template from the blue cutter for the red one was a great help but I find that working at this scale it is easy for inaccuracies to creep in. I won't say where I went a bit wrong, consider it one of those "spot the differences" puzzles. 4 boats done 1 to go. Now for the jolly boat and a short stumpy little item this is, at 18' only 3/4 the length of the cutters. Cheers, David.
-
25' Cutters The "Blue" cutter has been completed and the hull for the "Red" cutter built. I was quite pleased to have been able to preserve the blank from the first cutter so I have a reasonable chance of ending up with 2 boats which should look reasonably similar. Cheers, David.

- 256 replies
-
- 10
-
-
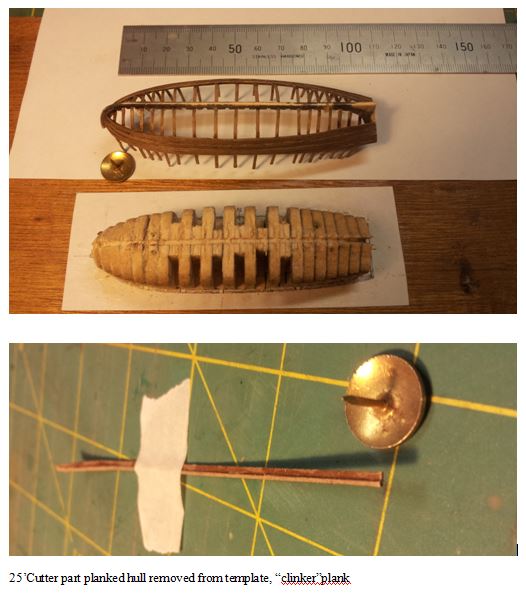
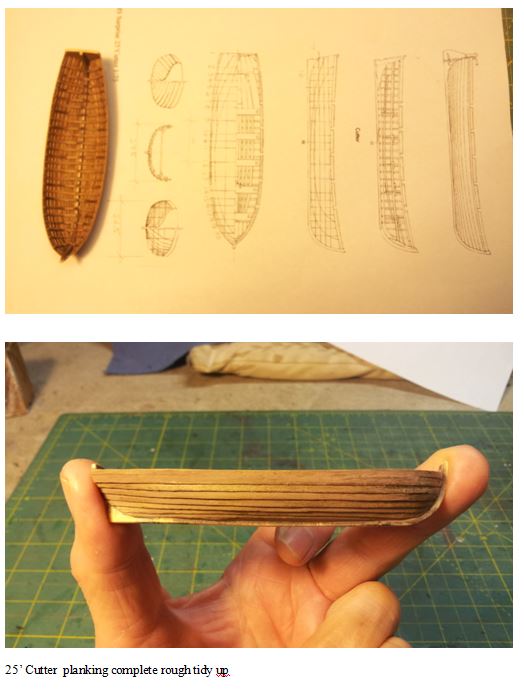
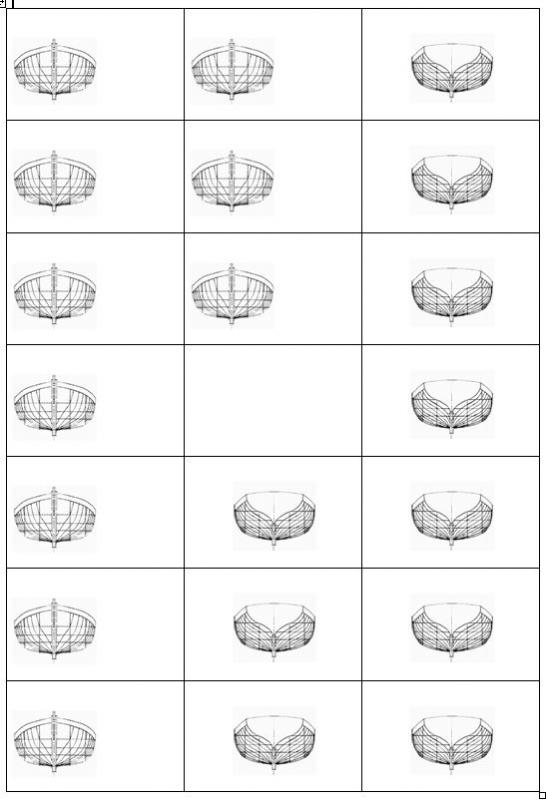
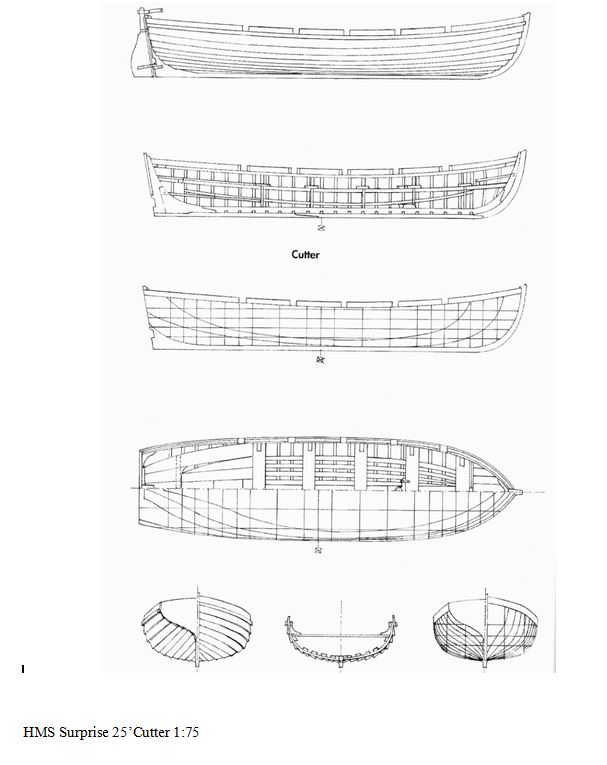
25' Cutter progress. The outer shell of the hull of the first of the 2 x 25' cutters is complete. The template made from individual profiles worked fine, for me, definitely easier than trying to shape a template out of a solid block. As Surprise carried a pair of these cutters it would be easier for me if I could preserve the template instead of extracting it from the inside of the hull in small pieces as I have done previously. To make the balsa template a bit more robust I painted it with the PVA glue that I had used to fix the individual profiles to the base board and to each other. As I was fitting the ribs to the template this caused some difficulty as the CA that I was using wouldn't fix to the PVA. I ended up stretching an elastic band around the template and tucking the rib ends underneath it. This worked OK. The unseen advantage of this was that when I came to lift the hull off the template once I had fixed enough planks to make it stable this process was comparatively easy as the CA used to fix the ribs to the keel and the planks to the ribs didn't stick to the template. As I didn't feel confident doing the clinker planking from the keel up so as to achieve the overlap another method was needed to let me plank from the gunwale down. I decided to try thickening the individual planks at the bottom edge so I could butt joint them and still get the clinker look. Gluing a 0.5mm square timber strip to the inside bottom edge of each plank was a bit fiddly but i think it worked OK. Now for the internal fitout of the hull. Cheers, David.

- 256 replies
-
- 12
-
-
Dave, Thanks for the feedback, I am really enjoying building the ship's boats. More walnut planking arrived so I can have a try at the clinker built 25' cutter. The accompanying pics are based on scans from the Lavery & Hunt book "The Frigate Surprise" which has been a great source of information. I have also sourced much information from the web including lots of images of the movie version of the ship at San Diego. Unfortunately the L & H book doesn't show the rig so I will need additional sources of information. My main source will be Lennarth Petersson's book "Rigging Period Ship Models" which is based on a 36 gun frigate model from the period very similar to Surprise. If you haven't come across this book it consists of drawings of each individual rig line including the belaying layout. I'm not too sure how much of the rig I will end up including on the model. If I experience problems that I need additional information to resolve I will certainly be in touch. Thanks and cheers, David. Drawing scanned from L & H book and resized to 1:75 Base drawing for hull profiles to be glued to balsa as rib guides.
-
Rudder. While waiting for more timber to continue construction of the ship's boats some more hull detailing has been completed. Cheers, David.

-
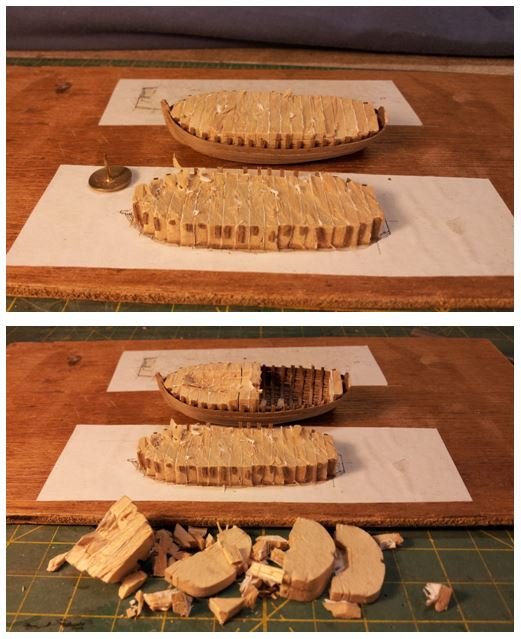
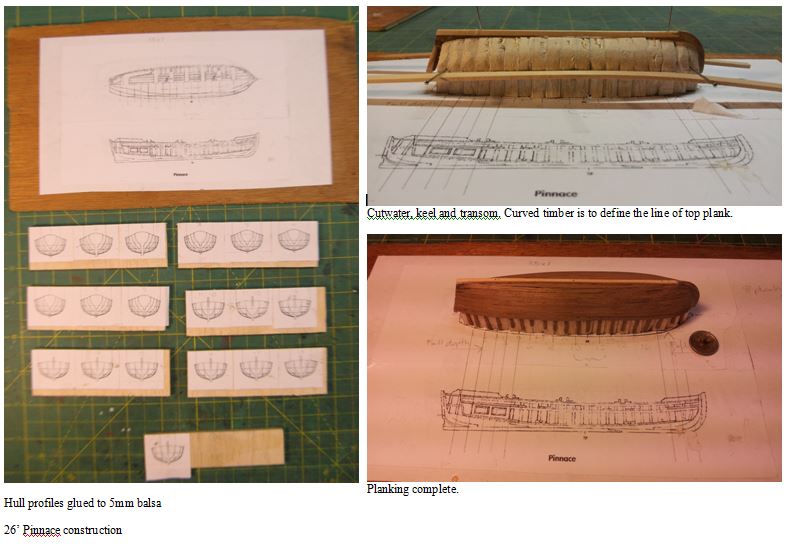
Boat 2, 26' pinnace This boat has now been completed, only 3 to go, 2 x 25' cutters and the 18' jolly boat. I think the pinnace and the launch have been the easiest to make as they are carvall construction. Planking of these 2 was started at the gunwale and proceeded down to the keel. With a small amount of filler the smooth hull was OK to build. The other 3 are clinker built. On the real things I assume that the planks would be laid from the keel up to achieve the overlaps. I'm not sure how to do this on the 1:75 versions, some thought required. I used 2 different methods for the construction of the sacrificial balsa templates for the launch and the pinnace. The launch was a solid block shaped using cut out negative profiles to achieve the overall shape. The pinnace template was made from individual 5mm thick sections cut out using the profiles and then faired to get the right shape. I think the second method resulted in a better template and I will use this again for the other 3 boats. The launch and the pinnace are probably the most different of the 5 ship's boats. The launch is big and beamy and capable of heavy duty tasks such as anchor transportation for warping and carrying of stores. My understanding is that the the pinnace is basically for transporting officers between ships or to shore and other light duties so is more built for speed as evidenced by it's comparatively narrow design and the small compartment at the stern for the boatswain. Additional gunwale height at the stern also makes for dryer ride. It wouldn't do to get Captain Jack wet! Building the ship's boats has been a nice change from the main construction. Unfortunately I have run out of the 4 x 0.5mm planking used for construction and will need to source more before the other 3 boats can be built. I might do some more work on the main hull. Cheers, David.

- 256 replies
-
- 19
-
-
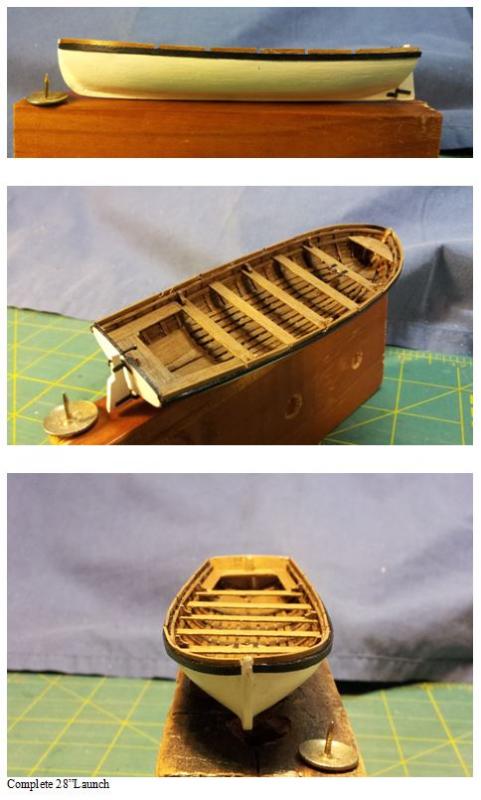
Ship's Boats. After a bit of a break I have got back into construction and have completed the first of the 5 ship's boats, the 28'launch. I shaped a solid balsa block template rather than the previous method i had used for the Bounty boats when I made up the template from individual balsa strips spaced to the rib pattern. Cheers, David.

- 256 replies
-
- 24
-
-
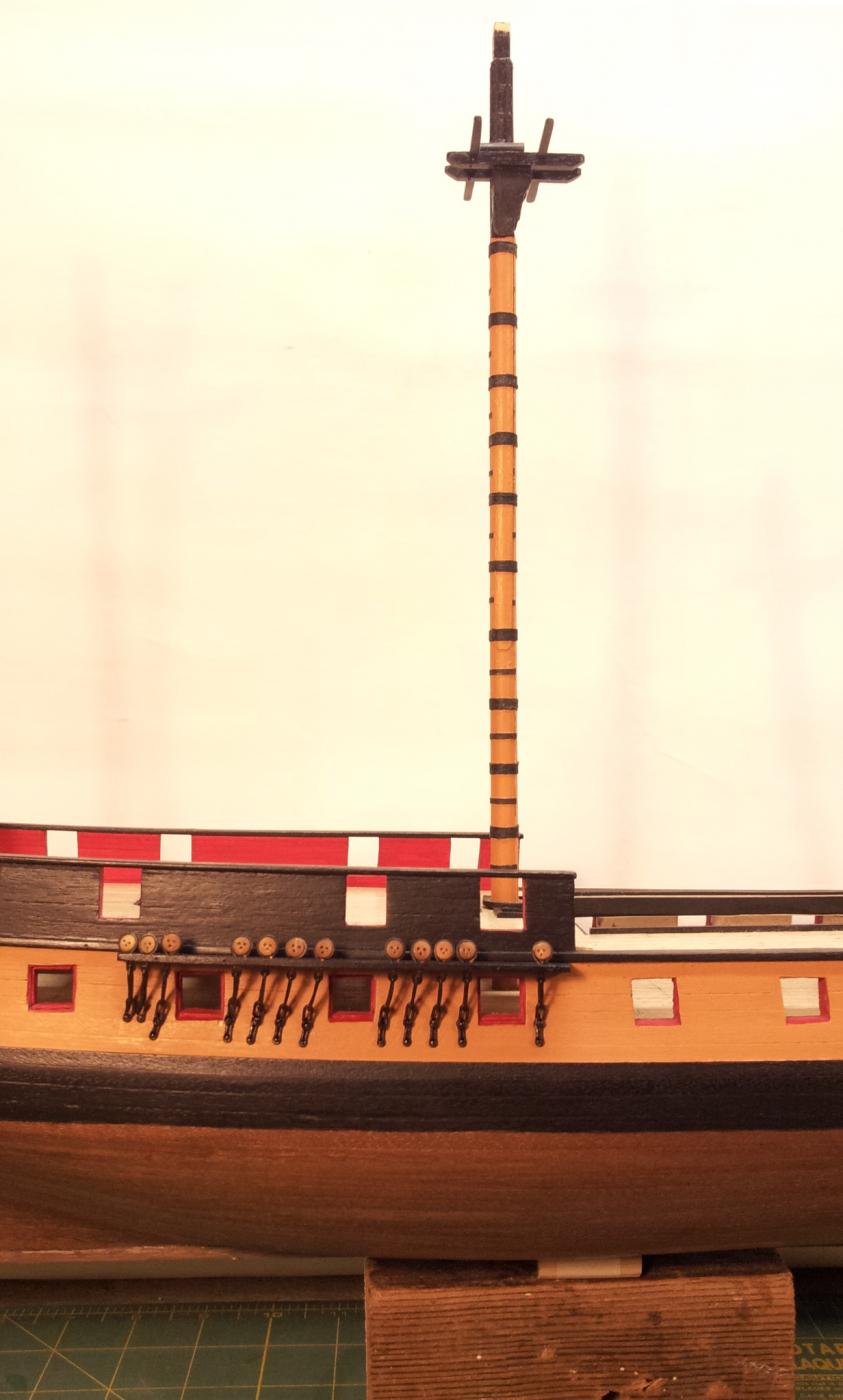
Deadeyes take 2. I visited an interesting exhibition of model ships a couple of weekends ago. Some of the models are outstanding, they remind me that I am a relative newcomer to the hobby. Looking at some of the models of ships from the same period as Surprise, and more carefully checking out the drawings and some images online, I realised that the deadeyes that I have used are too big. So some more work was needed on chains and deadeyes. The next size down that I could source from my friendly supplier was 4mm diameter instead of the 5mm used initially. All the chains were removed, the old deadeyes popped out and the top part of the chains reshaped to take the 4mm items. Fortunately the process didn't take too long and I am much happier with the result. Live and learn! Cheers, David.

- 256 replies
-
- 15
-
-
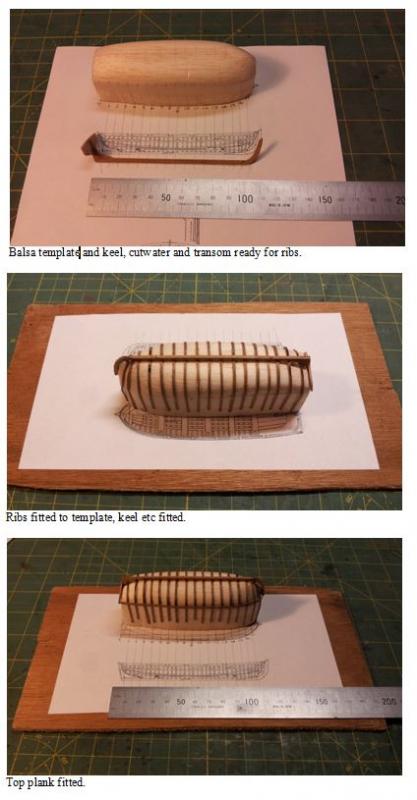
Time for some boat building. The first that I will attempt will be the 28' launch. I have scanned the page out of L & H and upscaled to 1:75 then cropped, copied, flipped and butt joined the hull profiles to create full width rib shapes. The plan and long section views will be glued to a sheet of ply as a base. The blank will be shaped out of balsa and glued to the plan view on the ply for attachment of cutwater, keel, transom ,ribs and planking. Hopefully I will then be able to remove the hull from the blank and complete internal details. I'll see how it goes and hope luck is still with me! Cheers, David. L & H drawings

-
Hi Lawrence, Just before I opened the MSW site I had again scoured L&H and the internet generally looking for Surprise boat information. This time I was particularly trying to work out the boat colours. It appears that the boats are generally painted white with a coloured stripe at gunwale level and possibly across the stern. This would make sense so that they could be identified from behind. As previously described there are various versions of the boats that Surprise carried and their numbers. My decision on what to build is mainly decided on the boat plans available in L&H so there will be: 1 x 26' pinnace with a red stripe, stored at the stbd waist, 2 x 25' cutters, one with a blue stripe, the other looks like an orange stripe but I can't be sure, stored on the quarter davits, blue stbd side, 1 x 18' jolly boat which definitely has a yellow stripe, stern davits 1 x 28' launch, the only colour I can find looks like brown but I think this unlikely, waist port side. Any more colour advice from members would be greatly appreciated. For the boats I made for the Bounty the cutwater, keel and transom are made from spare bits of 2 mm thick walnut and the ribs and planks are from 0.6 x 4 mm mm mahogany deck planking cut down to 2 mm wide for planks and about 1 and a bit mm for ribs. Bounty is 1:60 scale and although Surprise is 1:75 scale I will use the same size materials for the Surprise boats, going any smaller would drive me crazy(ier!) I glued the entire boat assemblies with CA to be able to work without long PVA setting delays. The jig was made from balsa, a fair amount of which stuck to the inside of the hull when I chopped it out, first slicing as close the the hull as I could then pulling out the rest with needle nose pliers. I was amazed the hull didn't disintegrate in the process. I was careful to only glue the ribs to the jig outside the finished hull shape. when fitting the planking I tried to avoid getting glue on the jig but I think it all worked because the balsa is very soft and any glued surface just pulls away and bits stayed attached to the hull and were fairly easy to tidy up. I think luck had a lot to do with it. I hope this helps. Cheers, David.
-
Starboard chains now also fitted. This process was a lot easier than the port side and much less blood was spilt! There will be some fine tuning and probably some dead eye changes when I get to fitting the shrouds so that I have matching dead eye pairs and the lanyards are consistent. Cheers, David.