alde
-
Posts
1,028 -
Joined
-
Last visited
Content Type
Profiles
Forums
Gallery
Events
Everything posted by alde
-
 All planks did overhang the transom. I guess they could have gone further aft but I probably didn't take enough care in bending the planks to the correct shape. They have to make a pretty tight twist at the bow so the edges all line up. I know it's not a problem with the kit as it looks like other people did not have this trouble. I did get buy without a stealer though. I have learned a lot to carry over to my next build. The best thing is I am looking forward to the next one after this one if done. I am having a blast with it and look forward to the time at the workbench.
 -
Thanks for the tips. I think having a bit of primer on will help me just take down the high spots. I will also make a bunch of sawdust from my scrap to use as filler. It looks a lot better with the primer on. I think where I got into trouble was the first bulkhead didn't quite touch the planking in some cases. This made the planks want to curl under a bit. It looks ok on the inside so if I get outside looking good with filling and sanding all will be good. Keep an eye on that CaptainSteve. You might have to add some material to the first bulkhead for the planks to flow. Al D.
-
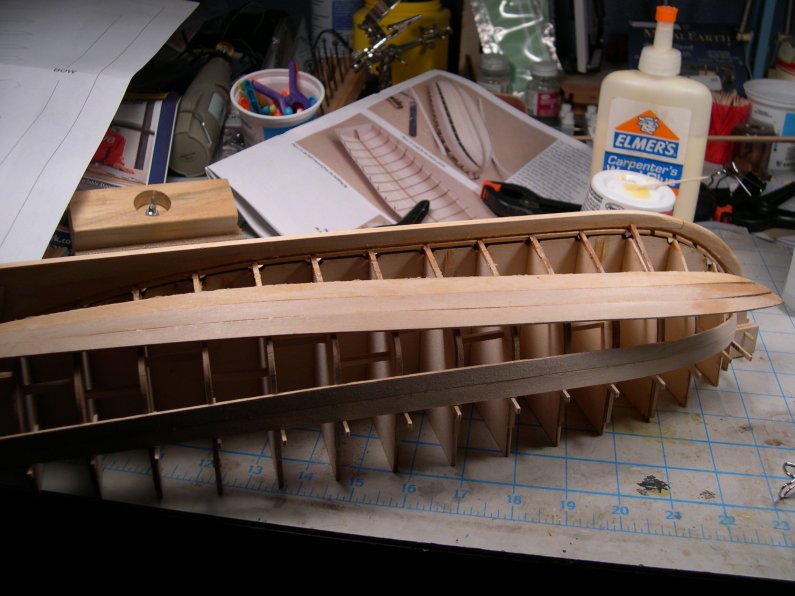
You need to use the tabs to align the sheer plank too. Keep them on until you get the planks on and then they get in the way of sanding and more sanding.
-
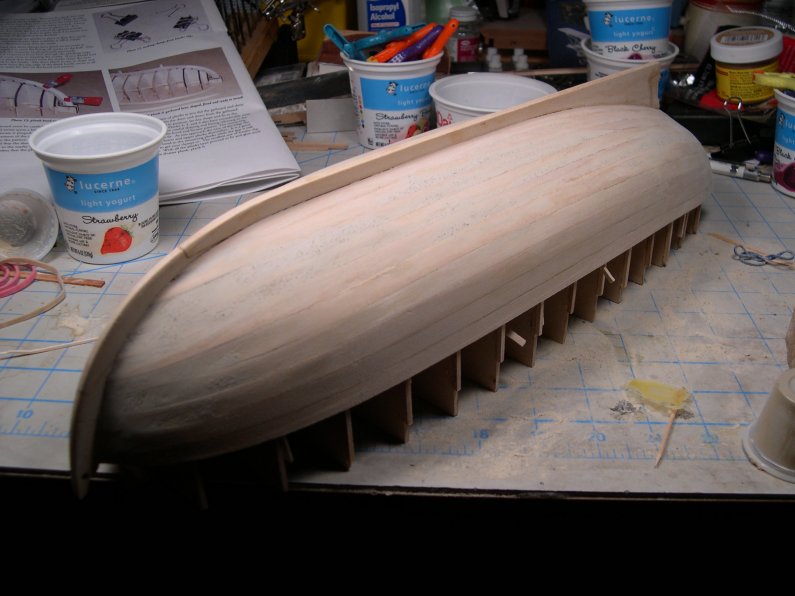
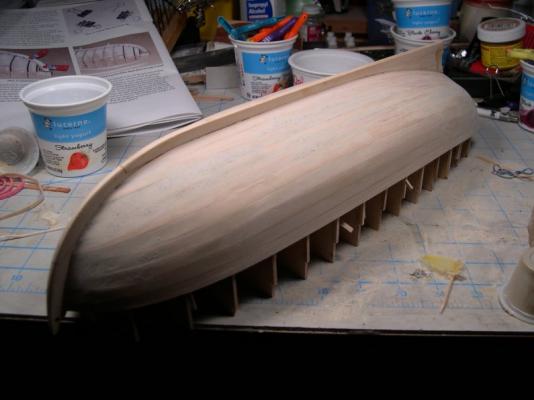
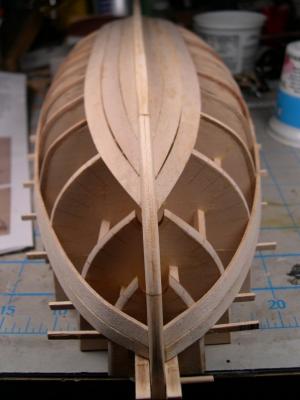
I wish I could say I was totally happy with this but here is my fully planked hull, warts, bumps and all. As you can see I have done some filling and sanding but it's still not very smooth. I have since given it a quick shot of grey primer and it looks a little better. Any suggestions on smoothing it up better? I do like the fact that the plank seams show.
-
Heck, we will take pictures of sawdust.
-
When you glue those tabs back on don't spare the glue. You will need them in the later stages of planking to secure rubber bands to under a good amount of stress. They sure come in handy.
- 625 replies
-
- 1
-

-
- bounty launch
- model shipways
- (and 1 more)
-
I will be watching this one with great interest. I love the lines of this boat.
-
When I was a draftsman my old boss used to tell me "don't draw more in one day than you can erase the next". Seems like it applies to model ship building.
- 625 replies
-
- 3
-
-
- bounty launch
- model shipways
- (and 1 more)
-
A minor setback. I can't see where it would really make all that much difference anyway. Just pop those puppies off and stick em to the other side and all will be right in the world.
-
Tim, I have that Pinky kit on the shelf right now. I think it may be next after the Bounty Launch. These Model Shipways kits with the laser cut parts and great instructions sure do make it nice for us beginners. Of course having the fine folks on this forum helps a lot too.
- 60 replies
-
- 1
-
-
- muscongus bay lobster smack
- first build
- (and 2 more)
-
I would go for a smaller drill. As small as will allow your line to go through. Or you could just seize the line to the spar.
-
Ah yes, the old 19 men in a small open boat in tropical heat for a long period of time effect. Point taken. The whale blubber would only add to the foul stench. It's obvious that you have this well thought out my friend.
- 625 replies
-
- 1
-
-
- bounty launch
- model shipways
- (and 1 more)
-
Very nice work. It looks great. I have always liked the lines of these boats and your is building into a beauty.
-
Sure did. It made all the difference and looks ship shape now.
-
The removed planks are back on and it's a world of difference. Just mounting the garboard planks a fraction of an inch too far forward threw the whole thing off. The big lesson here for me is to not be afraid to take something apart to do it right. I was going to patch it up with filler and move on but it would have just compiled. There are a couple of gaps from trying to fit the planks in the wrong place but they are minor.
-
First let me say what an honor it is to have a minute vile of sawdust named after we your thread followers. There are no words to describe the gratitude I feel deep within my heart. Your progress is commendable but I do have to question your use of scented candle wax. What would old Bligh have though of that. Being the stout and ship shape sailor he was he would have used whale blubber or some other such masculine scent. Even the wax of the bee shows risk of life and limb to acquire it. I do like that Tasmanian Blackwood. Such an exotic wood may be out of place in what was essentially a work boat though.
- 625 replies
-
- 1
-
-
- bounty launch
- model shipways
- (and 1 more)
-
I got the second side off with no issues and soaked the first side apart and cleaned it all up. It went much easier then I expected. No to clean the glue off the old glue and get it back together. I tried dry fitting the planks further aft and the go much better. I don't think I was using the templates from sheet 2 of the plans corectly. It all lines up now. It's good to know that a mistake like this can be corrected without too much problem, Thanks again for all the help. Al D.
-
Ah yes, the pounding headache and aversion to noise and bright light. It doesn't make for very productive modeling.
-
OK, I gave the glue joints a good soak with 99% pure isopropyl alcohol and let it set during the hockey game. I came back and gave it another squirt and slowly started peeling and it came off pretty easy with no damage. I will just soak the 3 planks together in warm water to get them apart and clean off the glue on the rib lines. Thanks all for the help and encouragement to do it the right way.

-
OK, I have started with the alcohol application with a fine point syringe. I will let it work in for a while then re-apply. Now I will open a bottle of consumable alcohol in the for of a beer while I have pizza and watch the Boston Bruins hockey game. Life is good.
-
A question for those with more experience. When I remove the planks can I just remove the 6 planks closest to the keel or do I have to remove the sheer planks and their mates even though they laid in fine? I don't think the form will warp but wanted a second opinion. Thanks, Al D.
-
Steve, That's why I don't mind posting close up photos of my mistakes. It not only helps me but maybe somebody else down the line. As frustrating as it gets at times it's still fun to work through problems.
-
Thanks for the tip Tom. I will give it a shot.
-
OK, I have thought about it a bit and surgery it is. I will try removing the planks with water. Does it take a few applications to get it to work free? I should be able to work out the dent on the one garboard plank without any problems. You guys should see some de-construction pictures in a couple of days. Amfibious, After looking closely at your photos it looks like your garboard plank is in fact a bit further aft. I can see where it flows better with the shapes of the planks that follow. CaptainSteve, I think what Amfibious did by bending all of his planks before gluing any was a great idea. The instructions have us bending and gluing one at a time but the can be dry fitted better if you have them all bent first.
-
Remove the planks? Sounds like major surgery. It might be the best option and then it will be right. I will give that some thought. I am using Elmer's Interior Carpenter's Wood Glue so it should loosen up with some water.