Jump to content

Recommended Posts

Posted

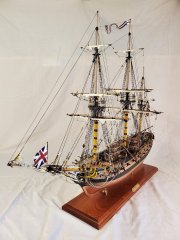
I just finished my first build, the OcCre Beagle (build log).


Now I'm questioning myself as to the way I have rigged several of the running rigging lines coming from the upper sails. It's too late for this build, but I'd like some clarification for future builds.


I've run these lines in the way that produces the least obstruction from the masts between the top of the line and the belaying pin that the instructions indicate it should attach to. So for the lines to the upper sails that the instructions indicate to belay to the pins on the inside of the bulwark, I've rigged around the outside of the mastop and then back in through the shrouds/ratlines. This is almost line of sight so would put very little strain or friction on the line in real life. You can see this here:


20210530_230558.thumb.jpg.513cfdfb4c789c71c6f080b41c1c53f7.jpg

There's more pics of the finished ship here that may also help show what I mean.


Now that I've finished, I've looked more at other ship builds and see that, on most, lines like these are run down through the topmast lubber hole and then splay out to the belaying pin on the inside of the bulwark. This creates more of a bend in the line, and in the real ship, I would think would cause more friction and fraying of the rope at the point it touches the inside of the masttop. On the other hand I can see that the way I have it rigged would make it more difficult for crew to climb the ratlines.


So my question is which is the correct path to use for these kind of lines to match real rigging?


Or in the real ship would they belay these lines to pins further astern so that they don't interfere with either the masttop or the ratlines?


Posted

TechT

Lots of things, but the first thing that looks odd is that there is a shoulder block coming off the yard arm with a pendant and the line appears to run aft.  Shoulder blocks were used at the end of the yard arms for the lifts which ran inboard and up to a block at the cap then down, not aft and there was no pendant   Actually shoulder blocks were not used after 1805 (Lees, page 69)  


I would strongly urge you to compare actual rigging practice with what the kits suggest as the kits are not always correct.  Lees' Masting and Rigging is probably the best book (IMHO) to get as it covers 1625-1860 in great detail.  There are others that are quite good, but if you were to only have one book and want to cover a wide range of years, this book is the go-to for many model builders for British ships of war.


 You might want to also consider getting some information on making sails that are to-scale.  Sewn cloth sails are impossible to make to scale with sewing at scales smaller than about 1:12 or maybe 1:24.   David Antscherl's booklet on making sails is a great source as are some very good videos on making model ship sales on You Tube  The booklet is still available from Seawatch Books for $8.


Hope this will be of some help to you on future projects.


Allan


PLEASE take 30 SECONDS and sign up for the epic Nelson/Trafalgar project if you would like to see it made into a TV series.   Click on http://trafalgar.tv   There is no cost other than the 30 seconds of your time.  THANK YOU


Posted

I believe most of the lines should go through the lubbers hole. In fact, later era full rigged ships had fairlead holes in the top for all of those lines. The problem arises from the position of the blocks. A lot of these lines would have leading blocks at the yard that were near the mast or attached to the trestle trees that would make them come down directly adjacent to the mast and so properly lead through the lubbers hole


Some lines did indeed come down outside of the top. Particularly those that belay to pins at the rail. Then they would often have fairlead thimbles or blocks attached to the shrouds or backstays to make them run parallel to the shrouds.


That being said, all ships were uniquely rigged at the whim of the captain and the bo's'n.


Regards,

Henry


Laissez le bon temps rouler ! 


Current Build:  Le Soleil Royal

Completed Build Amerigo Vespucci

Posted
  On 6/2/2021 at 11:11 AM, allanyed said:

TechT

Lots of things, but the first thing that looks odd is that there is a shoulder block coming off the yard arm with a pendant and the line appears to run aft.  Shoulder blocks were used at the end of the yard arms for the lifts which ran inboard and up to a block at the cap then down, not aft and there was no pendant   Actually shoulder blocks were not used after 1805 (Lees, page 69)  


I would strongly urge you to compare actual rigging practice with what the kits suggest as the kits are not always correct.  Lees' Masting and Rigging is probably the best book (IMHO) to get as it covers 1625-1860 in great detail.  There are others that are quite good, but if you were to only have one book and want to cover a wide range of years, this book is the go-to for many model builders for British ships of war.


 You might want to also consider getting some information on making sails that are to-scale.  Sewn cloth sails are impossible to make to scale with sewing at scales smaller than about 1:12 or maybe 1:24.   David Antscherl's booklet on making sails is a great source as are some very good videos on making model ship sales on You Tube  The booklet is still available from Seawatch Books for $8.


Hope this will be of some help to you on future projects.


Allan


Expand  


Thanks for the reply Allan.

"first thing that looks odd is that there is a shoulder block coming off the yard arm with a pendant and the line appears to run aft."

That's definitely how they show it in the instructions - both the paper and video - here's the part of the video where they rig it.

You'll see the yard lift blocks are there, just on short tan lines, while the braces are I think what you are referring to, and are on thicker brown lines about an inch long. It is entirely possible (or even probable) that OcCre rigged it wrong.


For the sails, I had read in several places about the issue of scale so I knew they were not going to look entirely realistic. But since this was my first ship I thought I'd stick with the supplied sails as there were already enough challenges. Definitely something to consider for the next build though now that I have more experience.

Posted

  Ahoy!  You started Johnny thinking about making sails, and some likely ideas came to mind ... and I thought (versus said) to myself, THIS time I've got to try one of my own ideas before suggesting them on the forum.  Except for the full sized sail I made for my 12' Viking dinghy years ago (and sailed her too!), I have not made a model sail before.  The idea was to use fine natural muslin, and that can be had in a fabric store (the Admiral got some at JoAnn's) - and it is at least 100 threads to the inch.


  So I fooled around with the Admirals sewing machine (a mid-grade Baby Lock with touch panel) and a scrap of muslin.  She had burgundy thread in the machine, so I used that at the default 2.5mm stick length and sewed parallel lines by eye ... the presser foot was a handy guide.  Johnny sews piecework of various re-enactor supplies, but he's got an old manual Kenmore thats been through the wars, and is otherwise a 'hack' sewer.


  This exercise is intended as a 'proof of concept', since I felt that I could do a lot better than the stock OcCre sail in my Endurance kit.  Not that they are all that bad - and certainly a convenience for anyone without a decent (like the Admiral's) sewing machine or even knows how to sew.  BTW I like thevbBeagle build you did, and want to get the kit for my stash.


  OK,  once the vertical lines were sewn I realized that I could change the stitch length way down.  'Tried some at 0.2mm - but it turned out to be more 'theoretical' than practical.  The setting of 1.0mm actually produced 33 stitches to the inch (0.75mm) , which I used around the perimeter with 'natural' thread.  WOW, that actually looks nice and works out to a 'scale' (at 1:50) of about 1 1/2" long stitches on a full sized vessel.  That is still a little large, but looks just fine to my eyes.  If the vertical stitches were done in natural thread, it would be perfect.  Compare the following photographs to the 'stock' sails in the kit.


DSC03703.thumb.JPG.d9a5b1fd1212c926a4332d3815a811f4.JPG


  Now I didn't want the edges to fray, so I used a product called 'Fraycheck' - also found in a sewing store (or on line).  It dries totally transparent.  You can see the dark lines of stitches (again, just for this sample) which are 2.5mm (still too large, but I didn't know what I was doing at first), and compare them to the 0.75mm stitches around the edges.  After the fray check dried, I pressed the edges one and clipped the corners, before sewing them down.


DSC03704.thumb.JPG.94fa31a7e9908b6b42ba0b0b32f89b9c.JPG


  Now then I took some 24 gauge brass beading wire from the Admirals supply and fed it through the pocket - making loops at the corners as I went. (I made one loop first to serve as a clew, fed the wire through one straight section, then made a clew by winding the wire around the narrow part of a dental tool.)  In the above photo, the stitches started at 2.5mm, then I reduced to 0.75mm - and you can see how fine the smaller stitches look.  The stitches on the left are 0.75mm.


DSC03705.thumb.JPG.df41a2afc97ede3aa2470c49e4f728cf.JPG


  It is a trick not to 'kink' the wire when feeding through the next pocket along the edge.  When the wire ended at the home position, it was just wrapped once around the clew and cut off with flush cutters.  Note that bead working tools like fine, tapered round needle-nosed pliers (and the like) are very useful.   (Thanks Admiral.)  She  'caught' me at her machine, but was amused at the title sail I'd made.  You can see that with the wire in place, one can gently bent it to simulate 'wind in the sail'.  This is only a test piece, as mentioned above, and beading wire is available in many colors ... including shades of brown, so one would use brown colored beading wire (24 gauge) to made the clews - which I could have done a little finer with practice.  But hey, this is a Johnny idea that has actually been tried!


Below is the sample sail seen from the front at a corner.

DSC03706.thumb.JPG.937c5589be85b4745a3e8b9b396bbedf.JPG


  In the above photo the fine stitching is preferable to the coarse, and the Admiral says that if I pick a finer blond thread that what I used, I could probably make the 0.4mm setting work. - that would probably yield 0.3mm, which at 1:50 scale would be 15mm - or .6" stitches ... with approach real-life size range. (Don't know if I want to go that far, but she says that there are finer muslins approaching 200 threads to the inch!)


Below is a corner from the back.  Now the Admiral says that if I'm careful to press the edge over a little once, THEN press it over again before sewing the channel that runs along the edge (to feed the wire through), there will be no 'raw edge' - which is more like the real thing.  Fray check is still a good precaution either way.

DSC03707.thumb.JPG.33389f189ce0ffdf18f4d21279d5cf49.JPG


  I'm curious to hear what fellow builders think of this approach.  Fair winds!


Johnny


Completed builds:  Khufu Solar Barge - 1:72 Woody Joe

Current project(s): Gorch Fock restoration 1:100, Billing Wasa (bust) - 1:100 Billings, Great Harry (bust) 1:88 ex. Sergal 1:65


Posted
  On 6/2/2021 at 4:47 PM, popeye2sea said:

I believe most of the lines should go through the lubbers hole. In fact, later era full rigged ships had fairlead holes in the top for all of those lines. The problem arises from the position of the blocks. A lot of these lines would have leading blocks at the yard that were near the mast or attached to the trestle trees that would make them come down directly adjacent to the mast and so properly lead through the lubbers hole


Some lines did indeed come down outside of the top. Particularly those that belay to pins at the rail. Then they would often have fairlead thimbles or blocks attached to the shrouds or backstays to make them run parallel to the shrouds.


That being said, all ships were uniquely rigged at the whim of the captain and the bo's'n.


Regards,

Expand  

Thanks for the useful info Henry.


The blocks at the top of each line are all fairly close to the mast. If they were belayed at the foremast pin rail then they could run straight down mostly parallel to the mast. But I think the problem may be that the foremast pin rail on this model only has 6 pins in it in total. The instructions already have you belay 12 lines to these 6 pins - so doubling up on each pin. This is done for the foresail rigging and the sheets for the fore-lower topsail. But all the lines that originate from higher up are belayed out to pins on the bulwark.


My feeling is that in the real ship there would have been more pins on the foremast pin rail allowing most of the upper rigging lines to be belayed closer to the mast. But in the model this is not possible due to physical accessibility issues.


I did notice on the main mast that most of these upper lines get belayed further aft of the mast so don't interfere with the ratlines. I think with my learned experience of "don't always trust the instructions to be correct", if I was to do it again I would do similar with the foremast. There are pins further aft of the foremast but the instructions use most of those for belaying the foremast gaff sail rigging. I think I would swap these with where the the upper rigging is currently belayed to.


Posted (edited)

Johnny

The thread count of the full sized material itself would be about 28 to 30 per inch full scale depending on the weight of the cloth.  For a scale of 1:48, that would be about 1,400 per inch.  I don't think there is any cloth that  has an actual count that high which is why cloth sails never look right on scales smaller than 1:12.   Also, the panels were about 2 feet wide, (1/2" at 1:48) with a 2" overlap so it is not possible to have sewn seams that look realistic at our most often used scales.  The following shows details for various weights of doek (duck) cloth.  Linen (flax) duck was the most likely sail material until cotton replaced it in the 19th century so the various charts should be apropos in most cases even though it was written in 1924.

    https://nvlpubs.nist.gov/nistpubs/nbstechnologic/nbstechnologicpaperT264.pdf  


TT, do give the use of nonwoven material like silk span a try on your next project.   You will be pleased with how good they look compared cloth.     When it comes to rigging, kits vary and there are sometimes errors such as the example we used concerning shoulder blocks in the wrong place even though, in your model, there would be no shoulder blocks on the lifts  by the time Beagle was built.   Braces never had shoulder blocks so maybe you can sand off the shoulder rather than re-rig the entire line with the correct style block 🙃


Allan

Edited by allanyed

PLEASE take 30 SECONDS and sign up for the epic Nelson/Trafalgar project if you would like to see it made into a TV series.   Click on http://trafalgar.tv   There is no cost other than the 30 seconds of your time.  THANK YOU


Create an account or sign in to comment

You need to be a member in order to leave a comment

Create an account

Sign up for a new account in our community. It's easy!

Register a new account

Sign in

Already have an account? Sign in here.

Sign In Now
  • Recently Browsing   0 members

    • No registered users viewing this page.
×
×
  • Create New...