Johnnyreg
-
Posts
178 -
Joined
-
Last visited
Content Type
Profiles
Forums
Gallery
Events
Everything posted by Johnnyreg
-
 Thanks for the kind words Martin & BE. I’ve studied in detail both your amazing Fly/Pegasus builds which have been an inspiration for my Fly build so thank you. I have to to apologise for the slump in my progress but I assure you it’s only temporary. This is the summer home for my Fly 😭 We’ve had a cracking summer here in the UK and the Admiral and I can’t bear to be stuck inside. Normal service will be resumed when it get colder and wetter, which it will.
-
Amazing progress Denis and looking good. Love the portholes and how you made them.
- 171 replies
-
- 4
-

-
- krabbenkutter
- authentic models
- (and 1 more)
-
That was funny Denis . We have a program over here called “You’ve been Framed” where you would have got £250 for the video of that. In future just keep the camera rolling just in case . Good work by the way.
- 171 replies
-
- 5
-
-
- krabbenkutter
- authentic models
- (and 1 more)
-
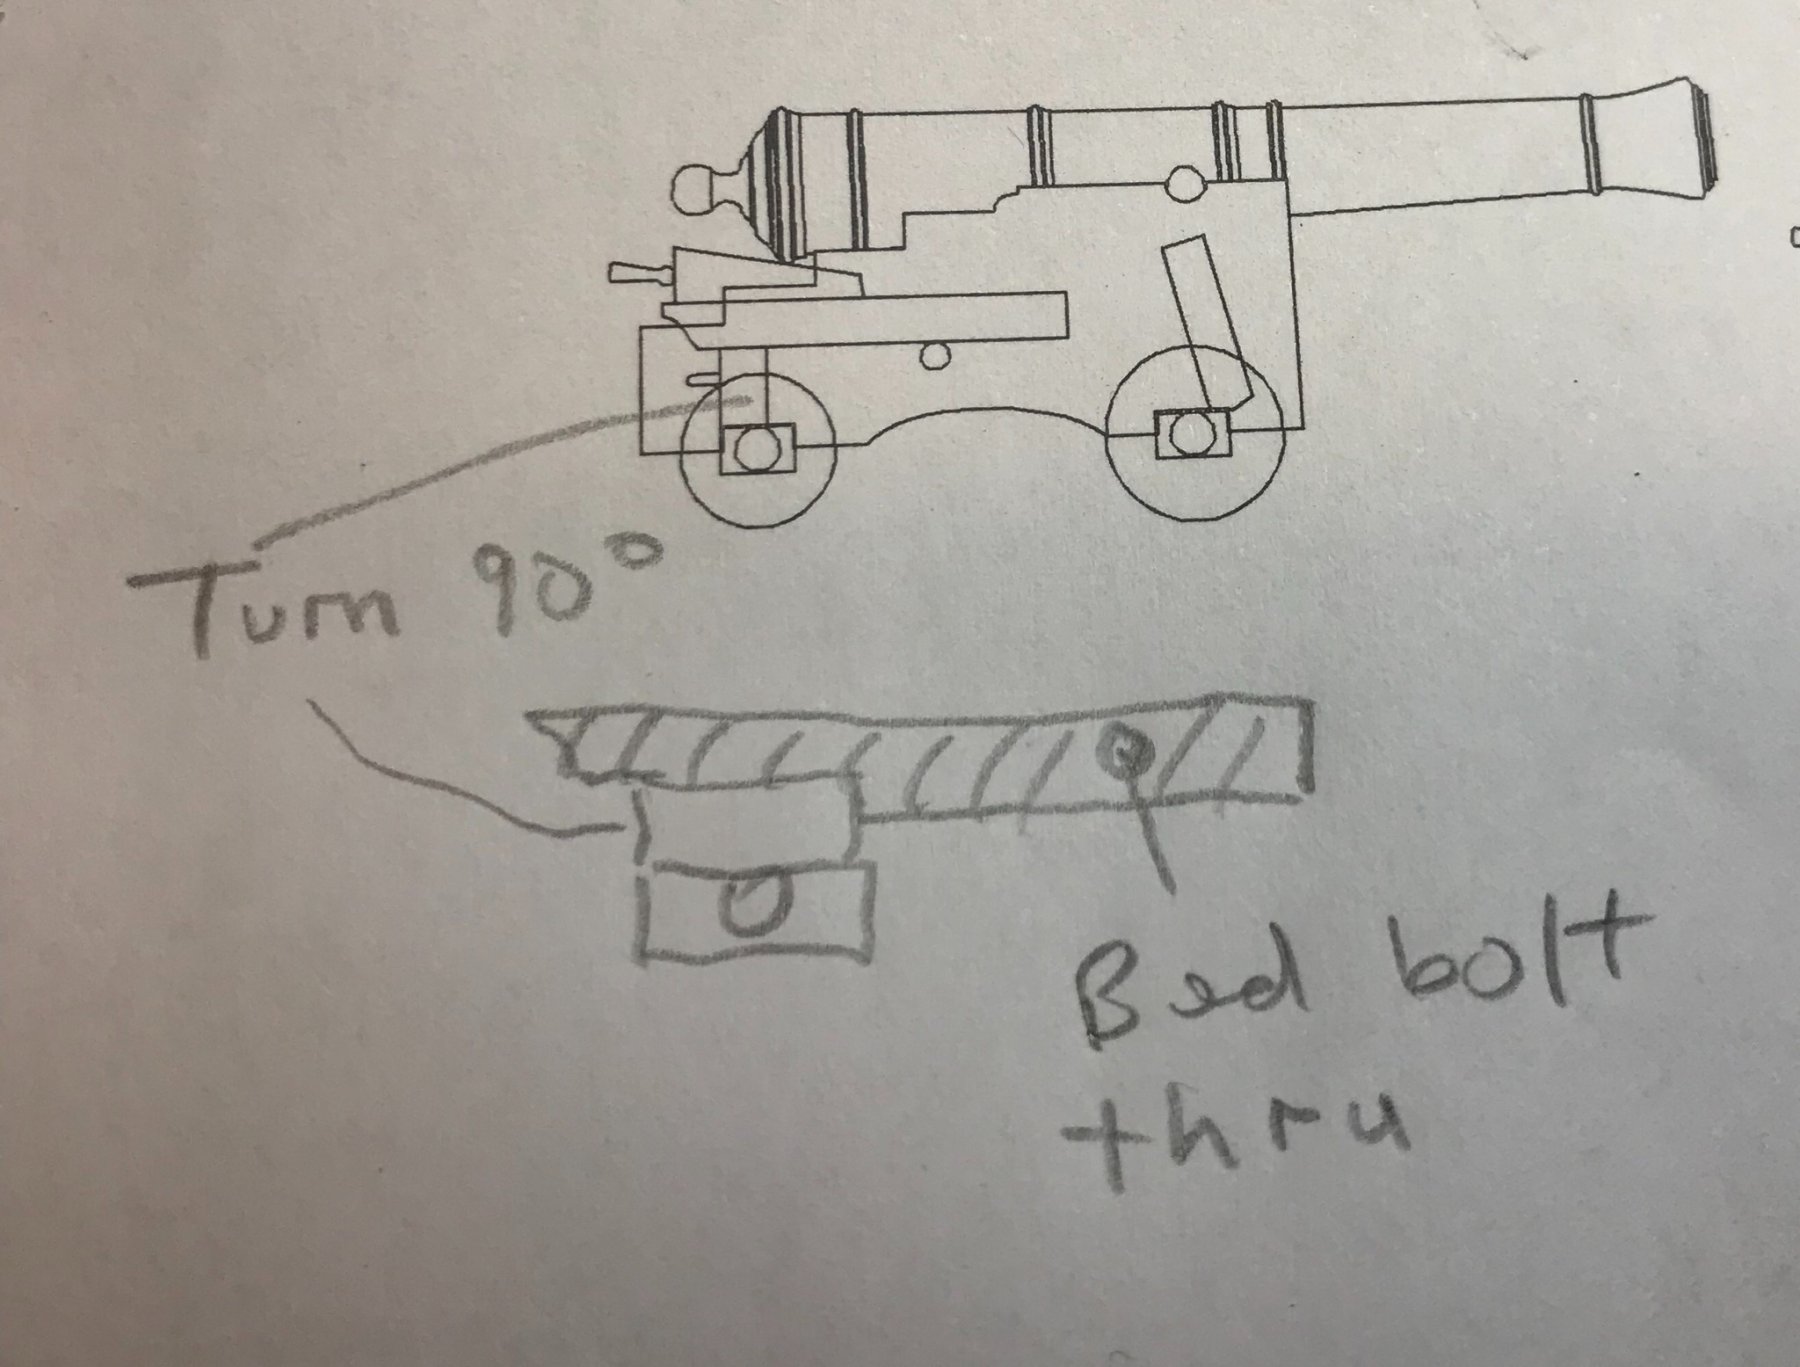
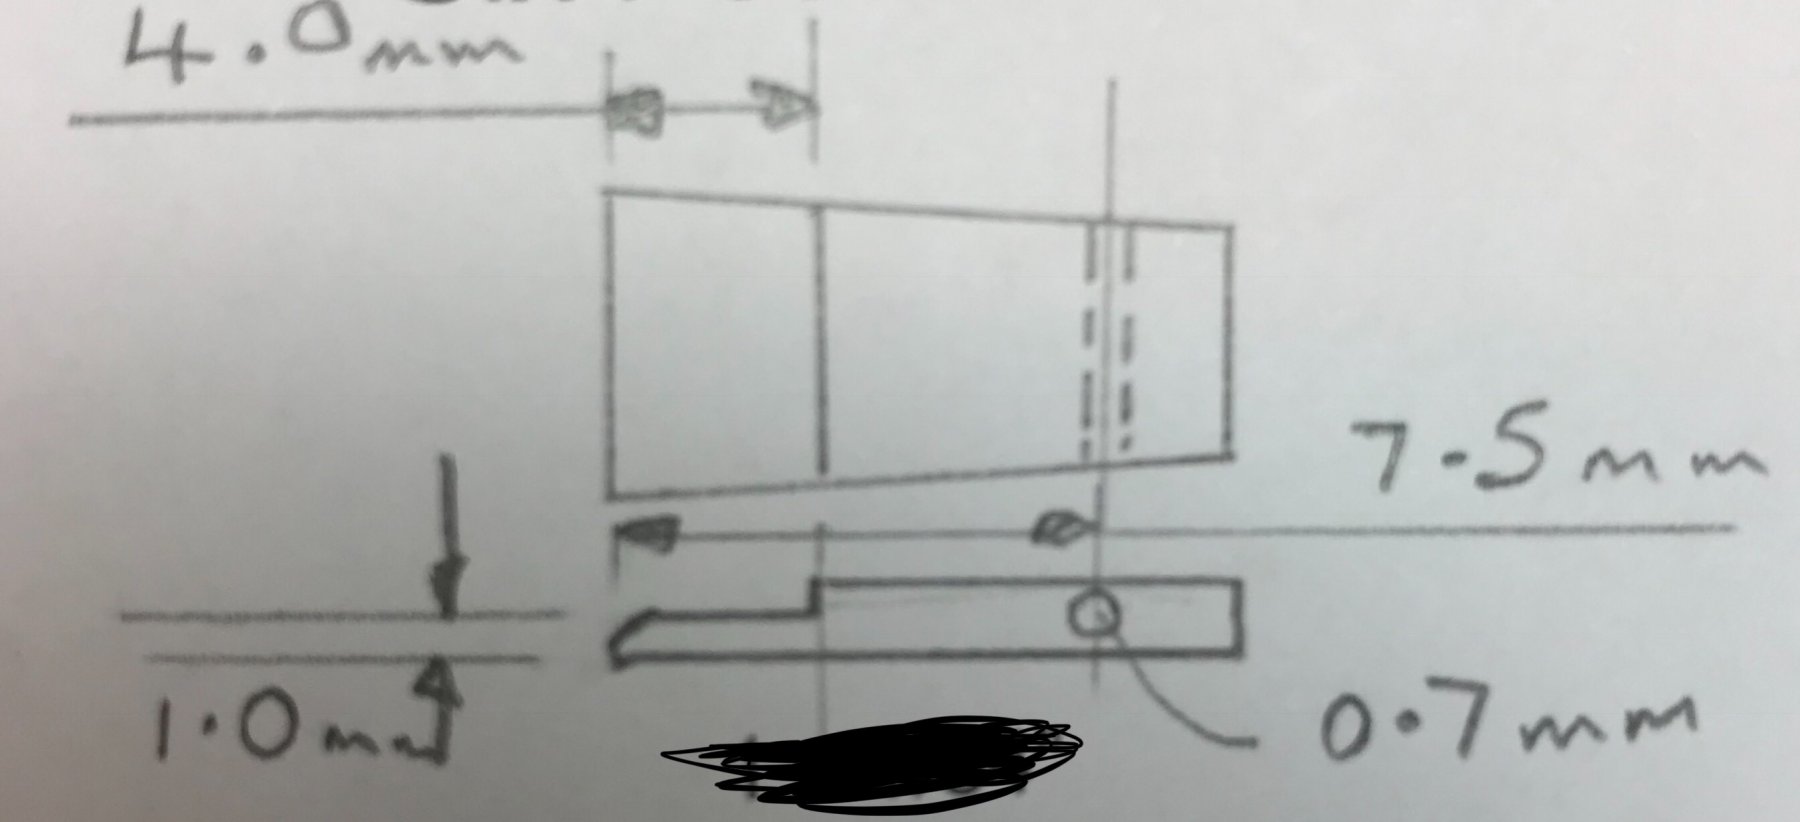
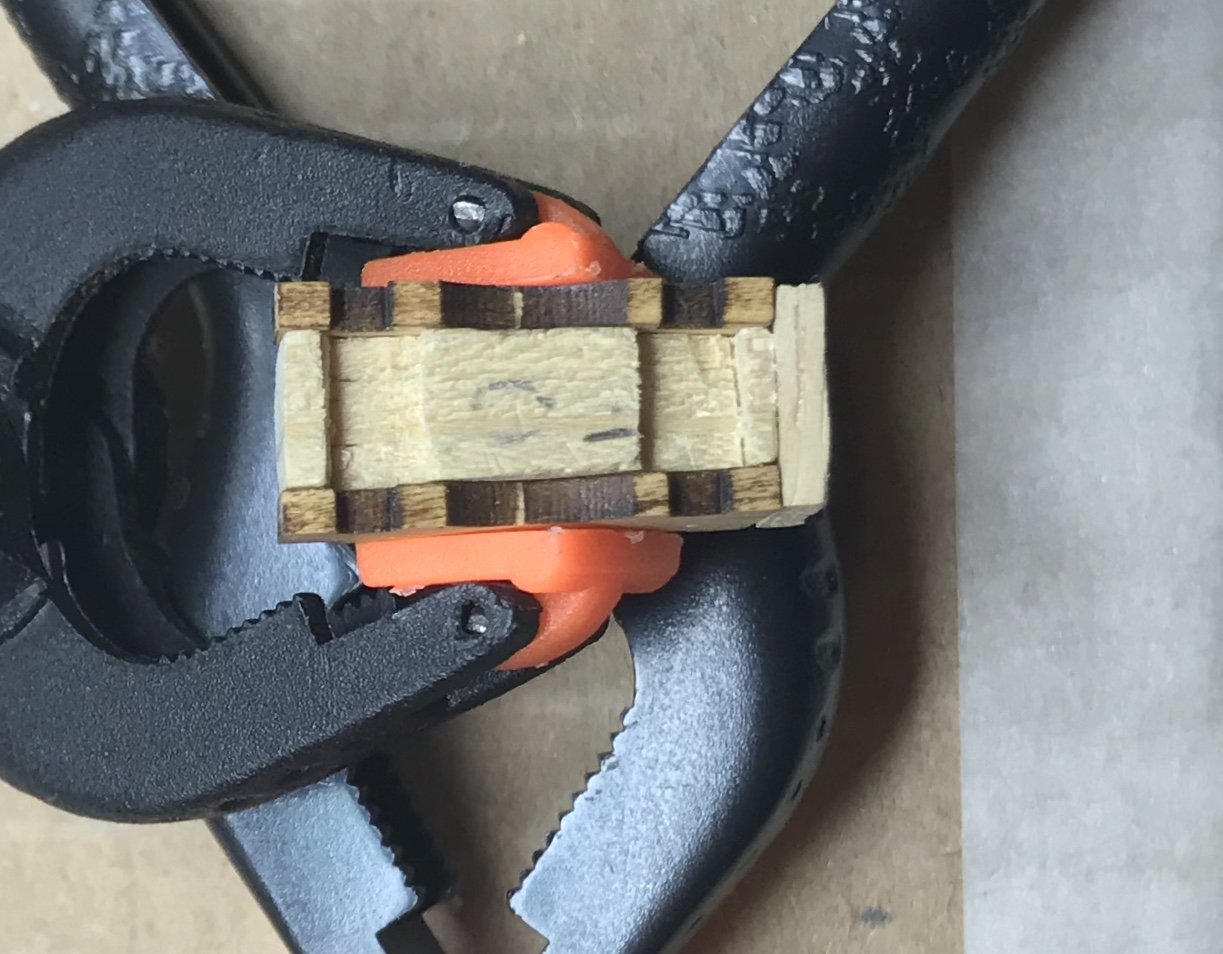
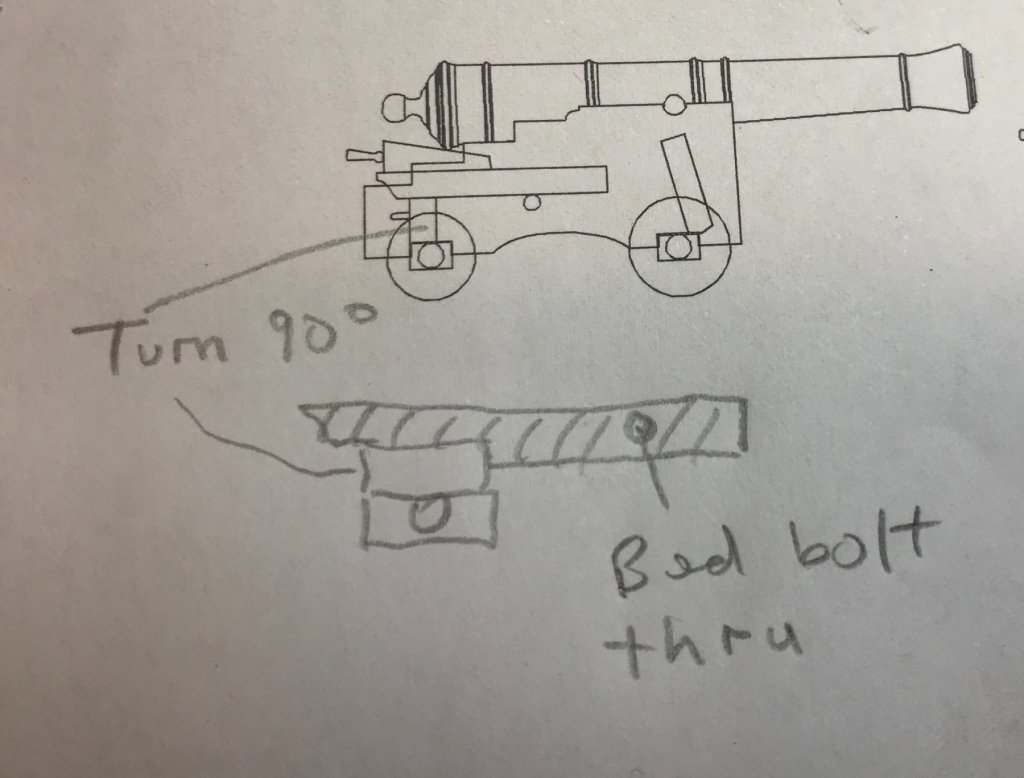
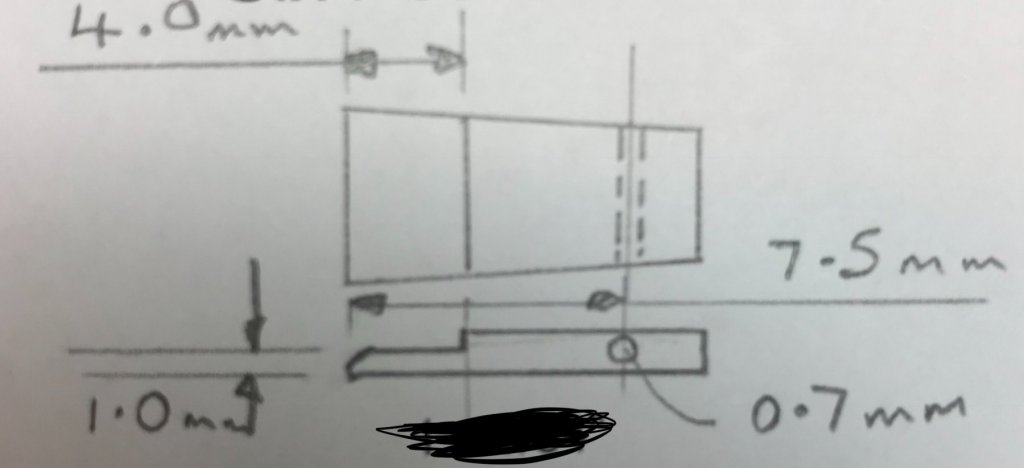
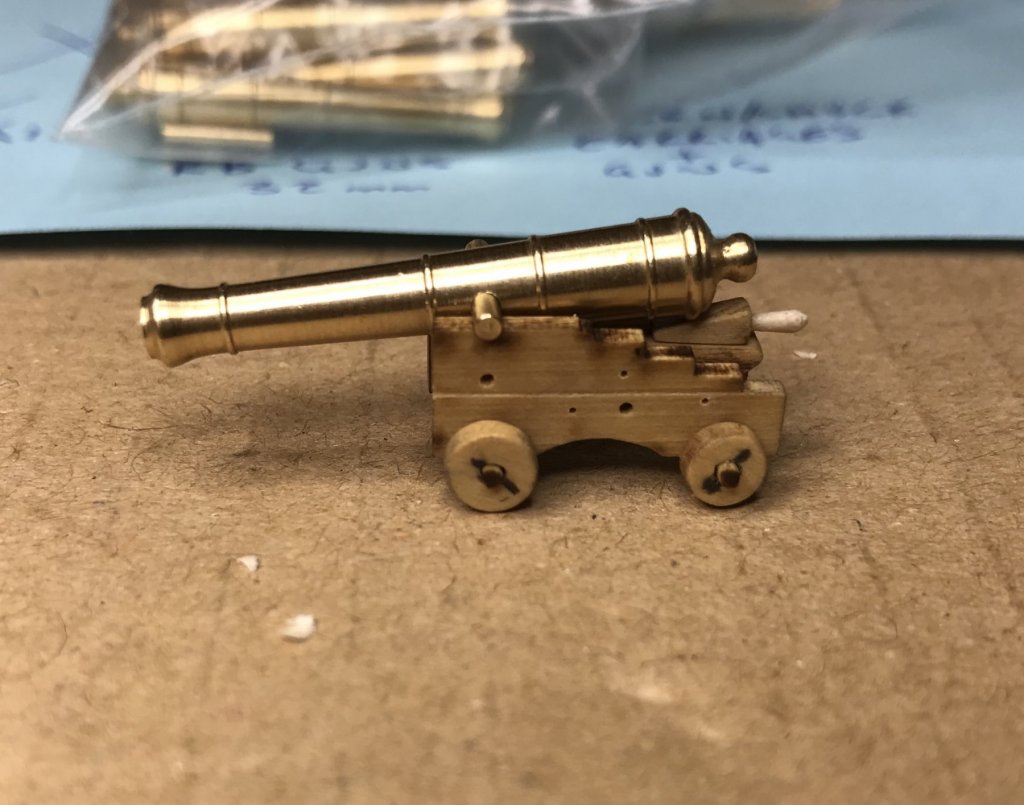
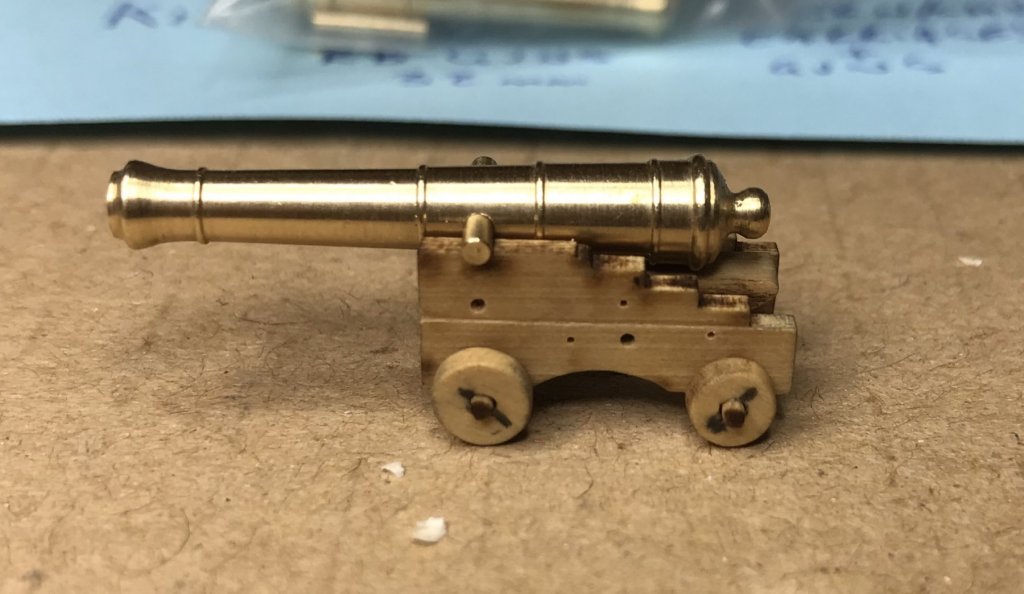
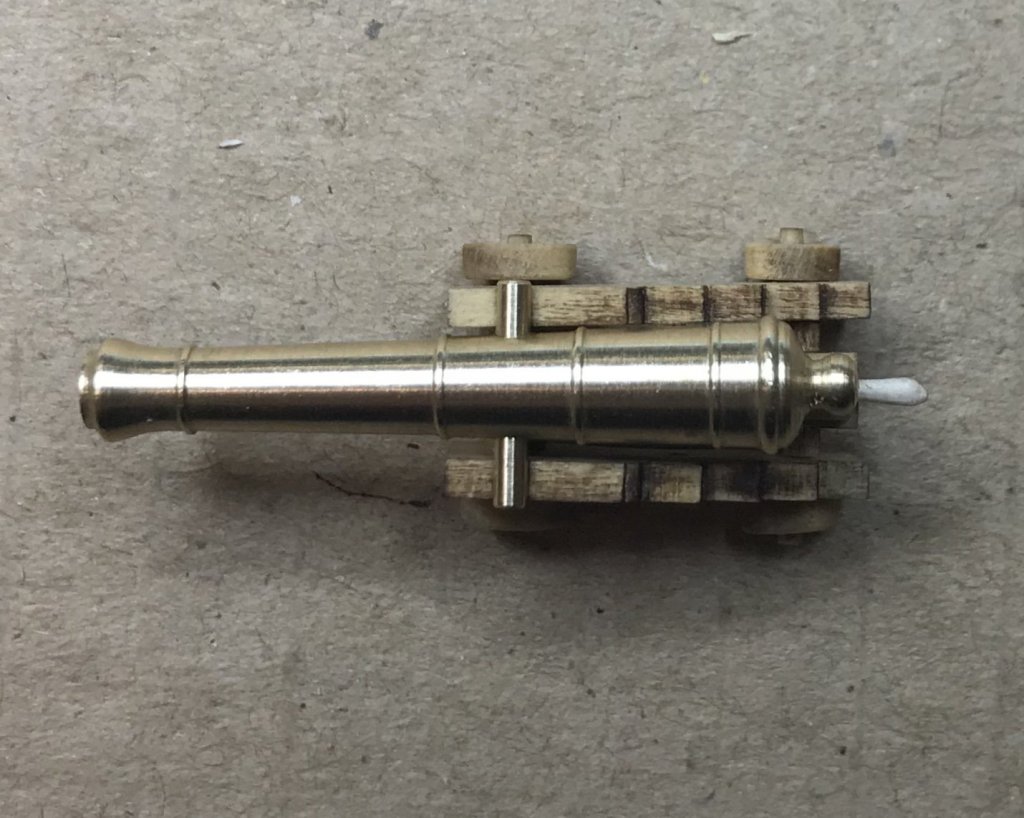
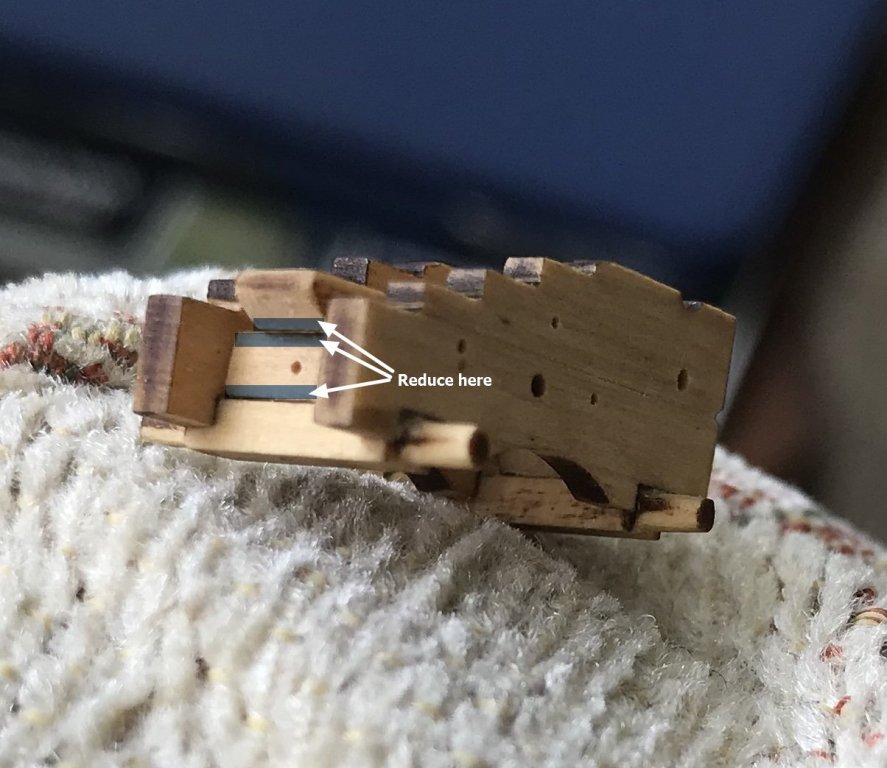
Thanks Jason & Denis for your good words. Jason - my approach to reduce the gun angle isn’t much different to what you did. This is what I ended up doing. * Turn the bolster through 90deg. Bolster was 2.2 high x 1.7mm wide so after turning 90 deg becomes 1.7 high x 2.2 wide. This drops things down by 0.5mm * At the end of the stool bed that sits on the bolster, reduce the thickness from 1.7mm to 1.0mm. This drops things down by a further 0.7mm * Because the top surface of the stool bed is now 1.2mm lower it can no longer sit on top of the bed bolt so I drilled a 0.7mm hole through the centre of the stool bed. Hopefully these pictures will explain Stool bed mods Denis - looking at real life cannons definitely helped me with getting the detail something like so my recent trip was very much worthwhile. I noticed you haven’t come up for air after your terrific Norden build and you’re straight into another one. I will be following with interest but please catch your breath first
-
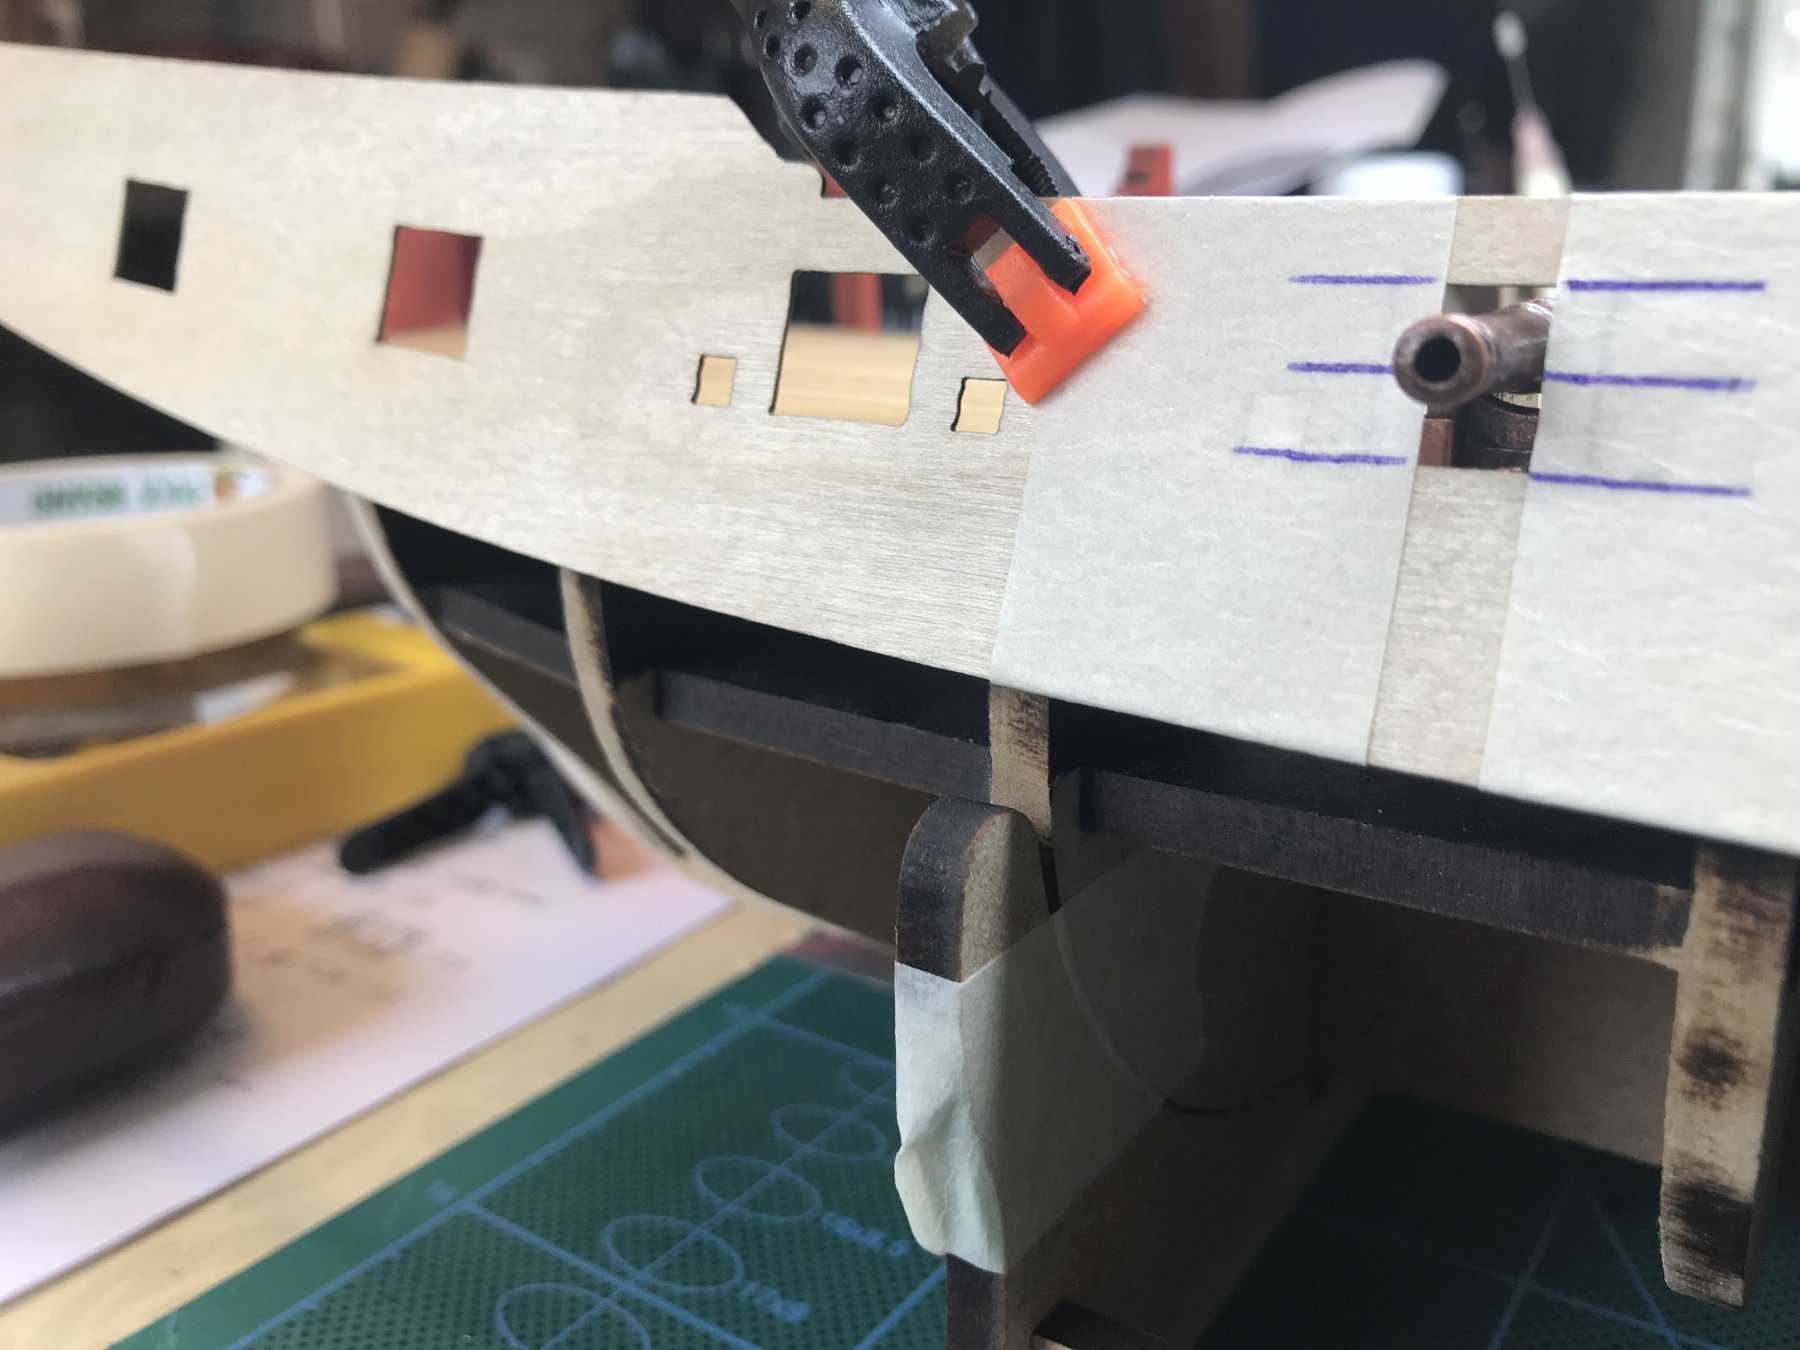
Thanks OC & SpyGlass for your kind words. Yes the thing that surprised me most about the Victory was how low the beams are. I’m not tall at 5’ 9” but managed to bang my head quite a few times (I’m now 5’ 11” with all the bumps on my head ). Lord Nelson was 5’ 4” so he would have been ok I think. I’m still doing a bit, mainly de-charring the laser cut gun carriage parts, scribing and drilling the brackets for the ironmongery. Very time consuming but I’m really enjoying this part of the build. Picture update soon when I have some visible progress to show.
-
Black wire for eye bolts/rings
Johnnyreg replied to Johnnyreg's topic in Metal Work, Soldering and Metal Fittings
I was trying to be humorous but still handy to know for the future, thank you. -
Wow that’s a big gap. I’m sure it isn’t but it almost look like the wrong bulkhead. If that is a kit error then that is inexcusable.
-
Black wire for eye bolts/rings
Johnnyreg replied to Johnnyreg's topic in Metal Work, Soldering and Metal Fittings
Thanks aviaamator. Neat looking eyes and rings. I’m using same method for creating rings but I’m committing to using bare copper now then blacked after. Thanks Greg. All good advice. I think your right about the silver soldering of the rings being a bit overkill but it’s a new skill I need to master so will do a few more that way until I get confident or bored, whichever happens sooner. Hmmm... where can I get some 2mm cannon balls Anyway thanks to all of you for your great comments. I’ve put it all into practice now and here is what I came up with. My Blackening routine was: 1 Clean in hot soapy water with an old toothbrush and rinse in water 2 Soak in White Vinegar for 10 minutes and rinse in water 3 Soak in neat Birchwood Casey Brass Black (BCBB) for about 30 secs and rinse in water 4 Clean any CA residue patches (not blacked) with Acetone 5 Polish with paper towel 6 repeat previous steps from 3 until satisfied (3 or 4 times I found for me) I didn’t get a true black finish but I’m reasonable happy with the dark grey that I got. Also I only handled the items with tweezers during the blacking process. Thanks all again.
-
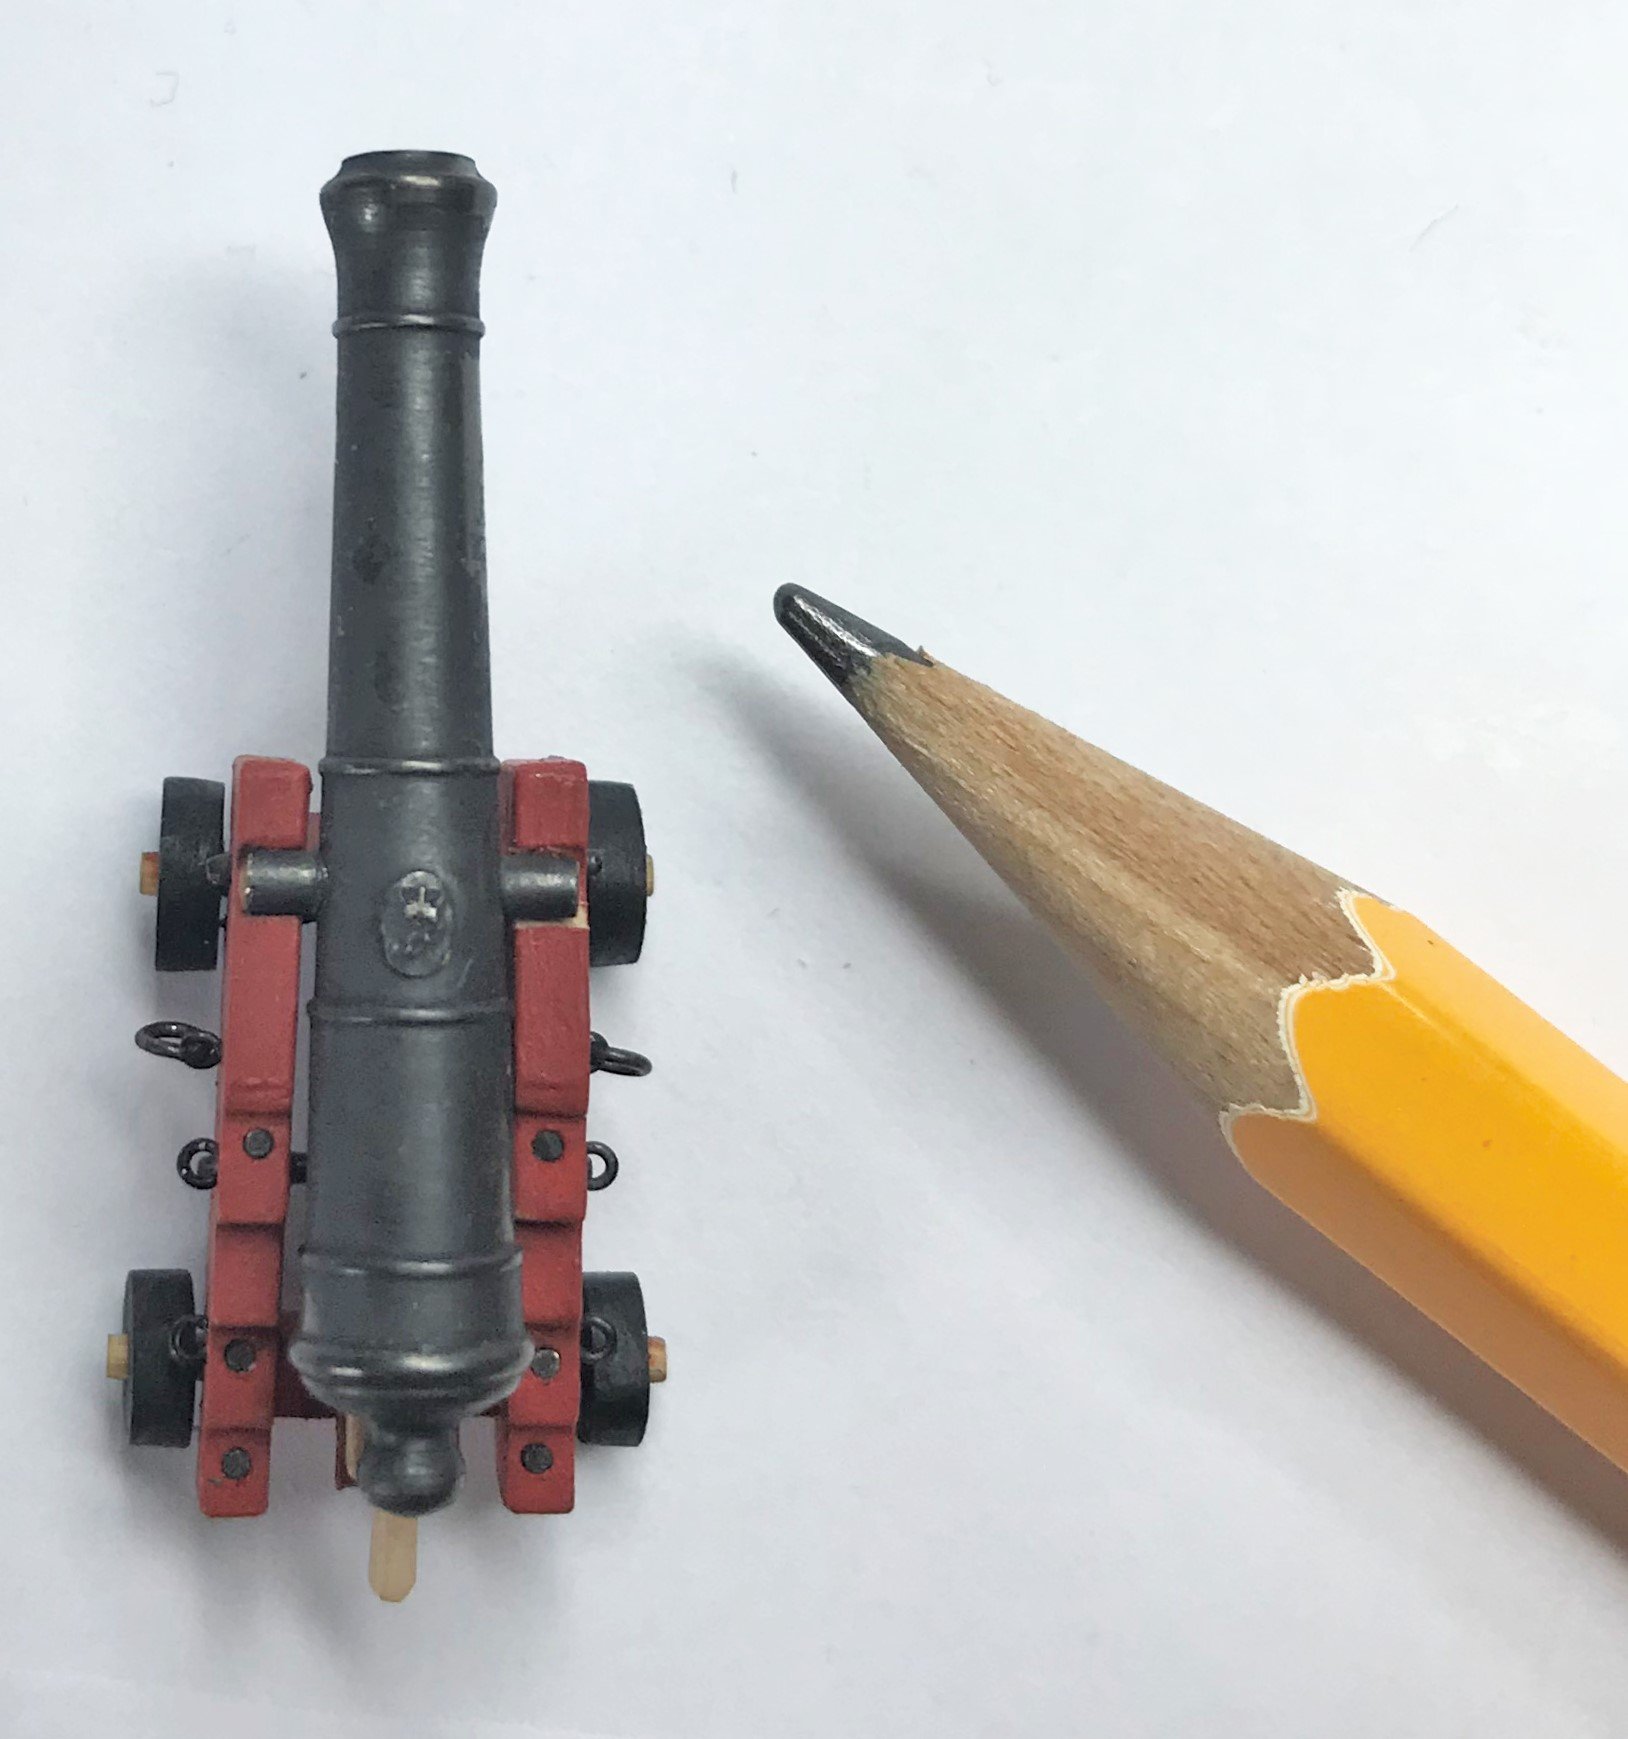
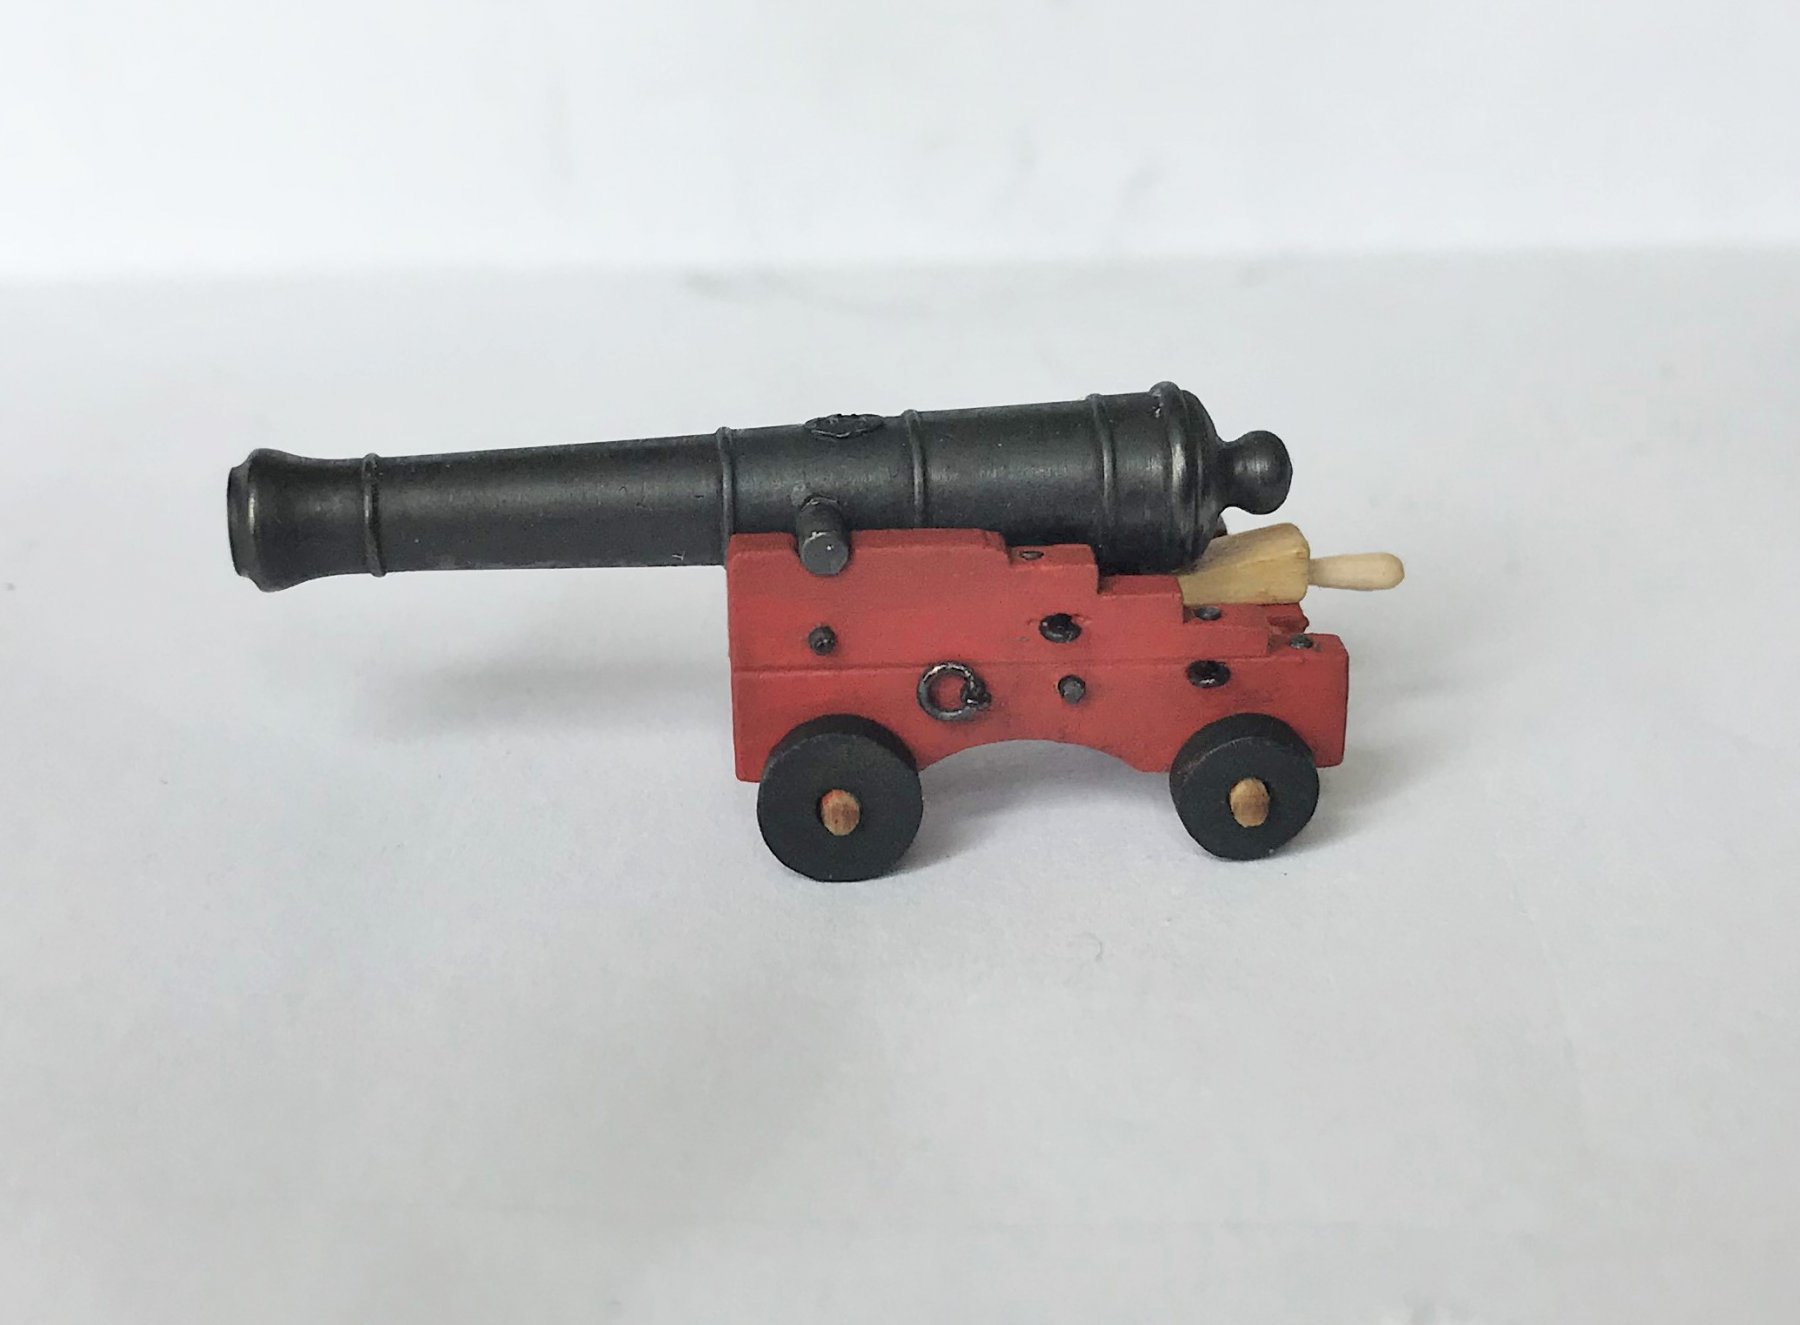
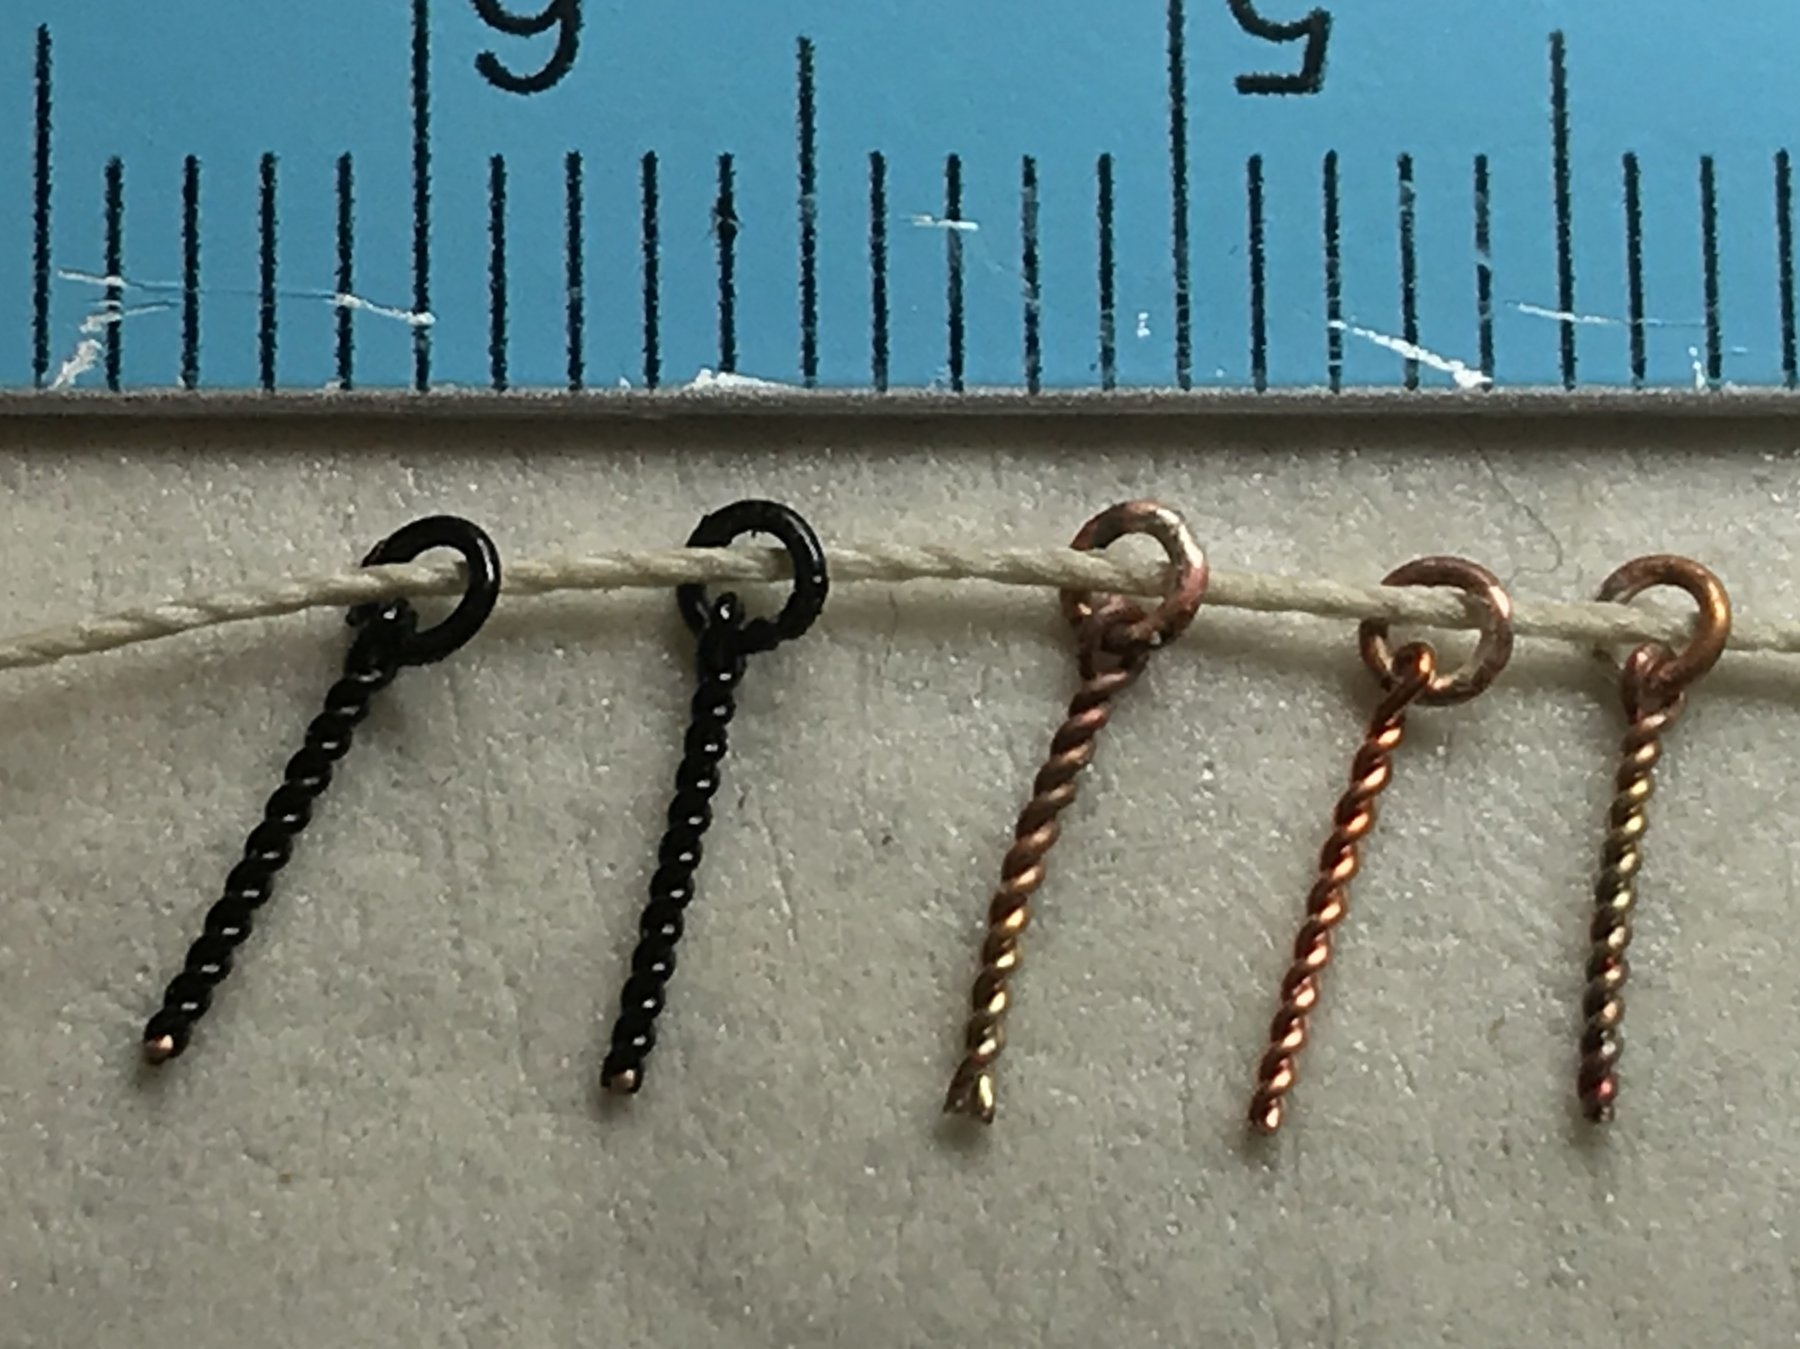
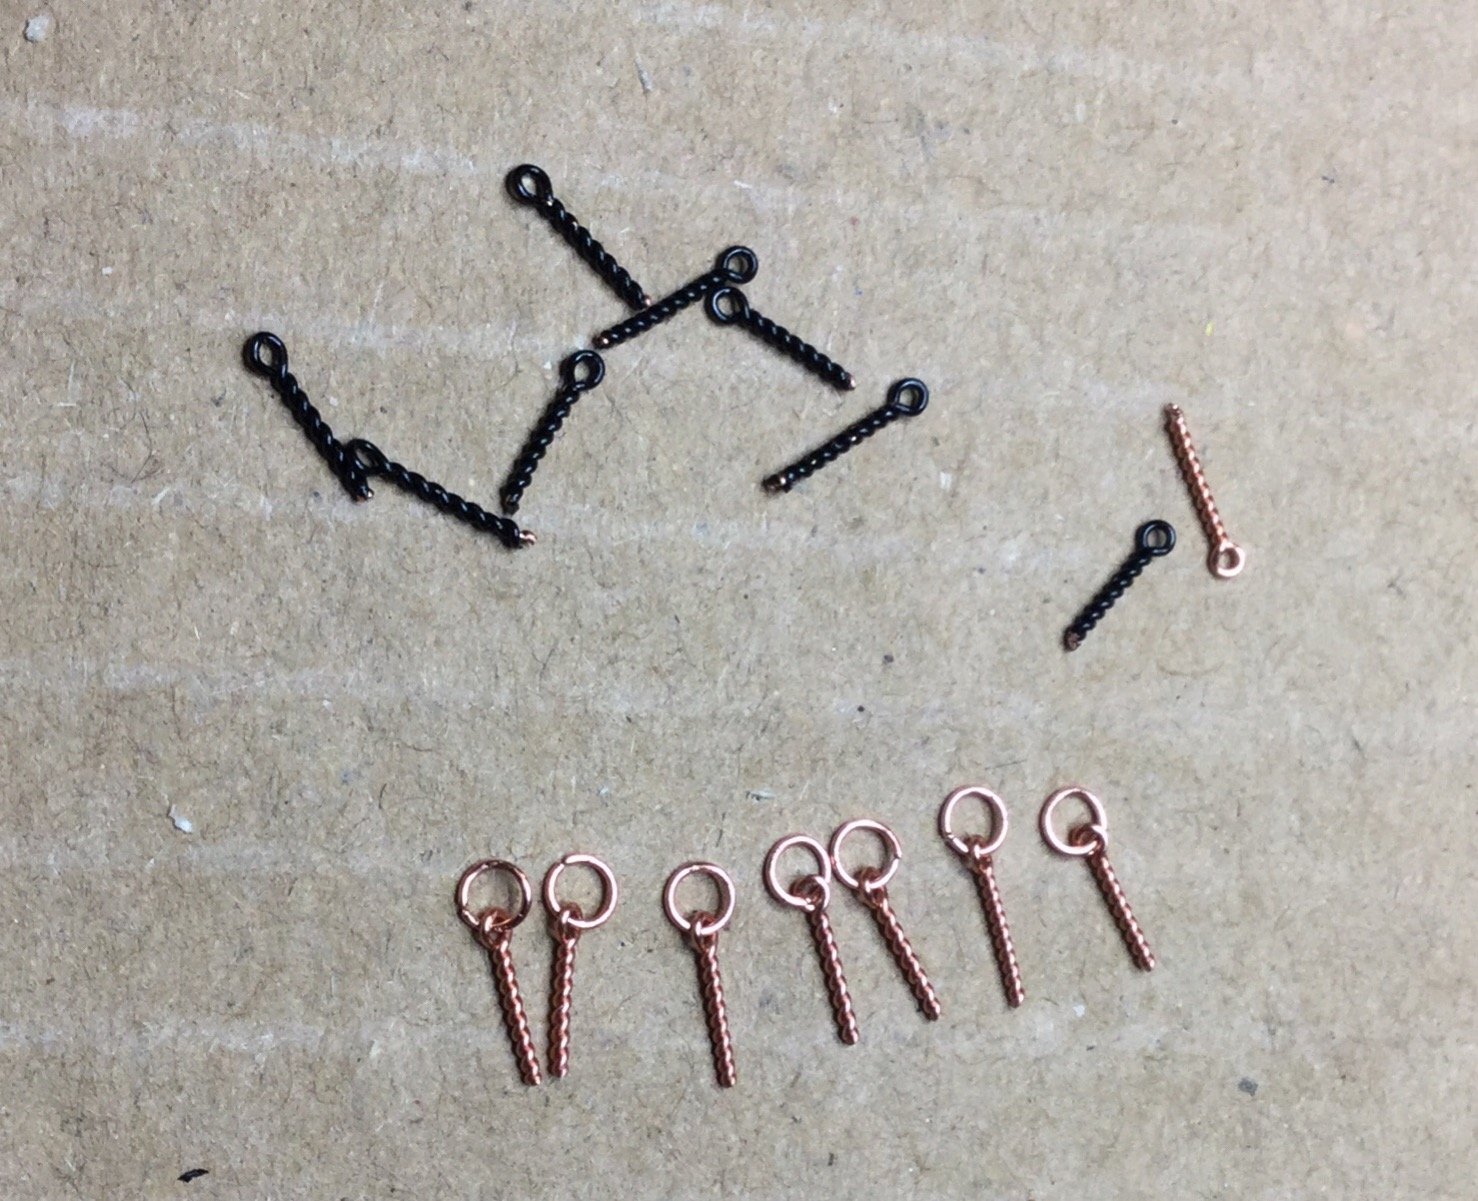
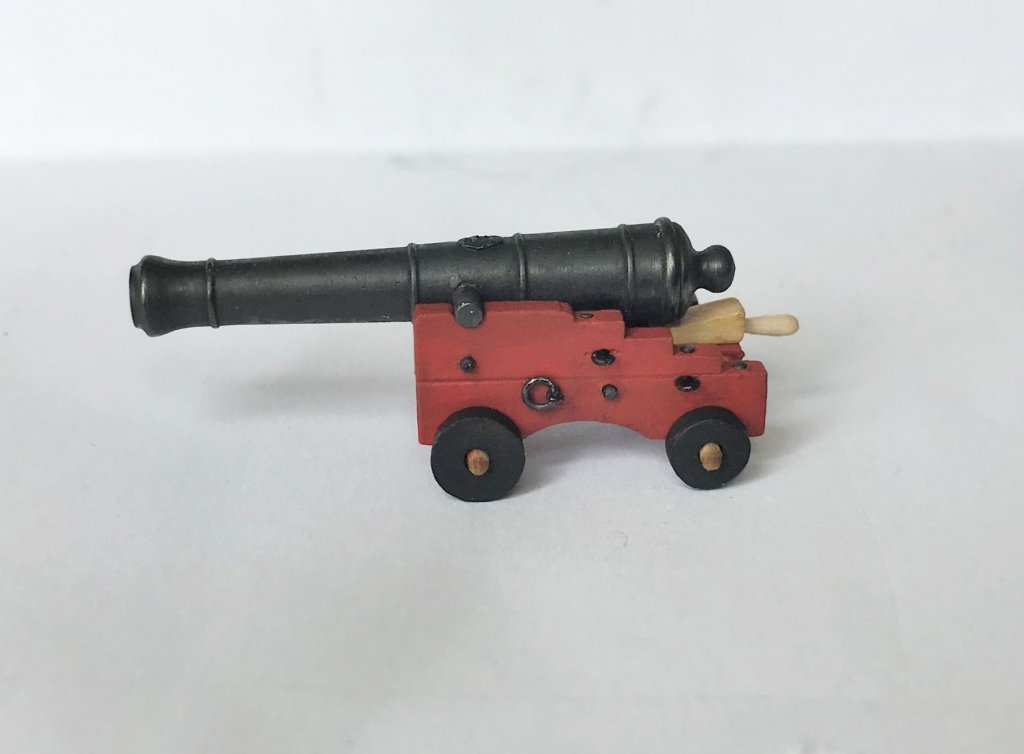
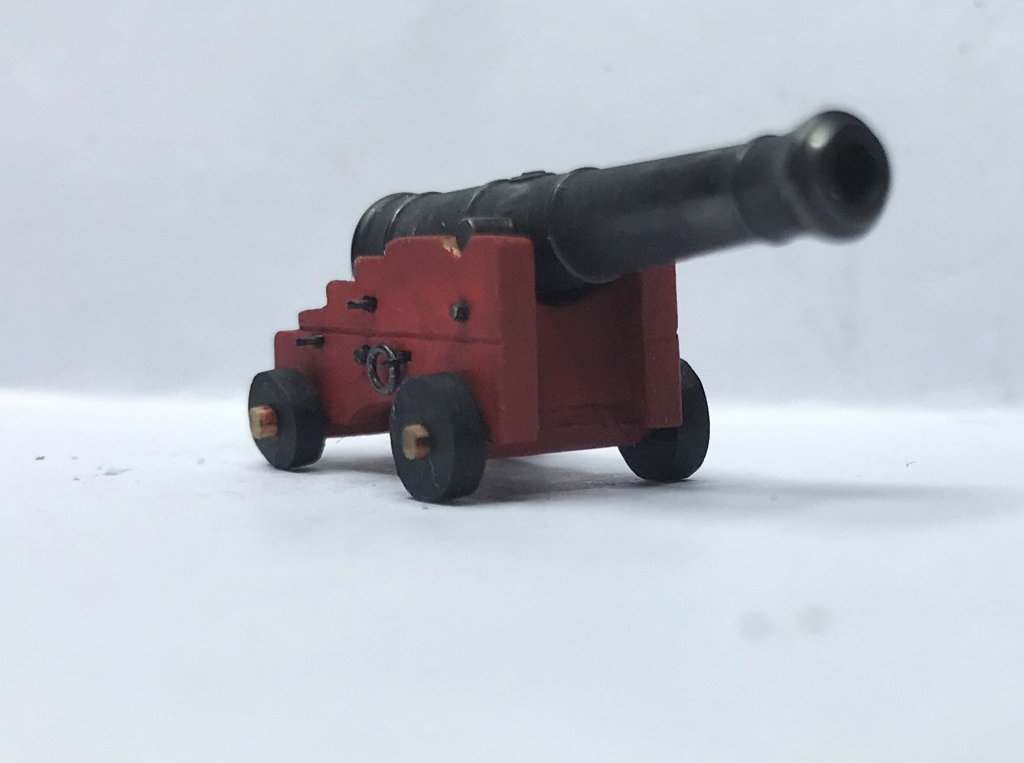
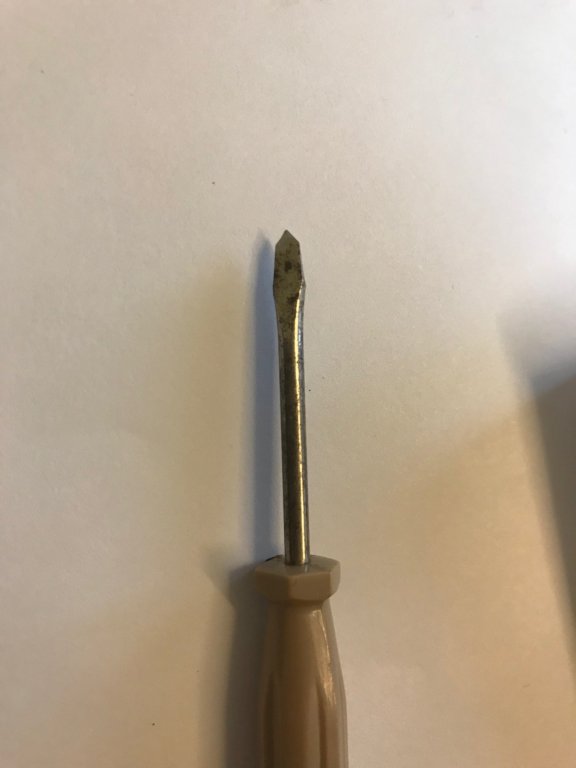
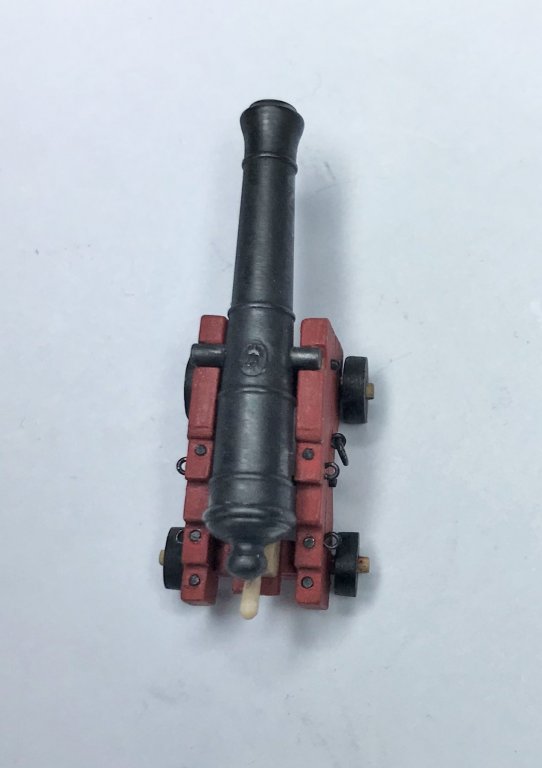
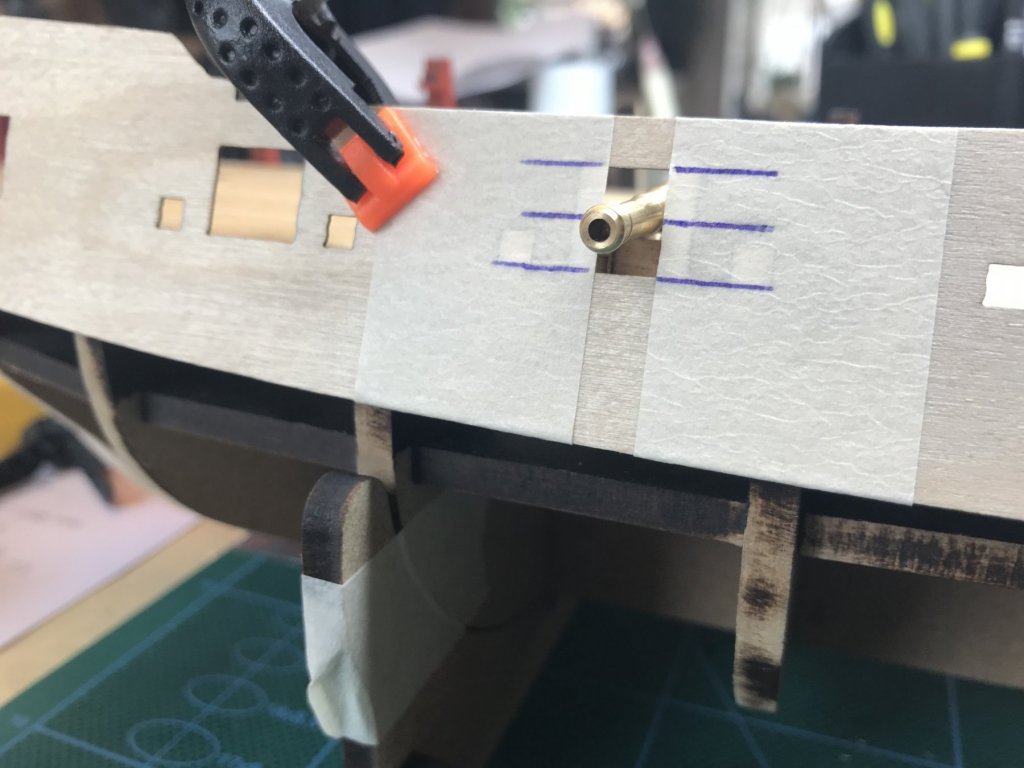
It’s been a while but as you know, if you’ve been following, we spent a week in Portsmouth which was very exciting, for me anyway. I learnt so much. If you get chance it’s well worth a visit and there is so much to see at the Historic Dockyard there, where we spent 3 days looking at all the attractions. We went on the HMS Victory twice and really got a feel of what it must have been like to sail and work on her back in the day. Elsewhere at the Dockyard, I particularly liked Boathouse 4 where you can have a guided tour and see experienced and student boat builders at work building new boats and restoring old ones. They nearly roped me in as a volunteer, which I was very tempted by as full training would have been given, but I live just 270 miles too far away. For anyone that’s interested in visiting take a look here http://www.historicdockyard.co.uk/index.php Anyway back to my build… I’ve been concentrating my labours on building one gun and carriage set to determine height and also the method of building the others. I have been playing around with different ways of doing the gun tackle eyes and rings. I’ve tried with pre-blacked enamel coated copper wire and bare copper wire which was blacked afterwards and to cut a long story short (full story here), here are my findings. The breaching tackle eyes/loops & rings done to scale at 1:64 & (full size) would be * eye loops - 0.2 wire & 0.6mm hole (1/2” & 1-1/2”) * breeching ring - 0.35 wire & 1.2mm hole (7/8” & 3”) * breaching rope - 0.5mm (1-1/4”) Here are my attempts at the Breeching rings in both black Jewellery wire and Bare Copper. The divisions are mm by the way. Everything is almost to scale but I have made changes as shown below. I rounded the 0.35mm up to 0.4mm because that’s all I have and the 0.2mm up to 0.3mm because I found the 0.2 wire too thin and a pig to work with. * eye loops - 0.2 0.3 wire & 0.6mm hole (1/2” & 1-1/2”) * breeching ring - 0.35 0.4 wire & 1.2mm hole (7/8” & 3”) * breaching rope - 0.5mm (1-1/4”) Here is the almost finished gun and carriage set Note the scribed line to simulate the two halves of the side piece (bracket) Note the GR/Crown monogram super glued onto the gun Just in case you think it’s a full size canon I’ve photographed (it could be a really MASSIVE pencil though ) Just to recap what we have here: * Carriage is from Chuck/Syren * Gun is 32mm from RB Models * Eyes/loops are twisted bare copper (blacked) - 0.3 wire & 0.6mm hole * Breeching rings are silver soldered bare copper (blacked) - 0.4 wire & 1.2mm hole * Carriage bolts (6 vertical bracket bolts, Bed bolt and Transom bolt) blacked brass - 0.7mm * GR/Crown monograms are etched brass parts supplied in the Fly Upgrade set (curved to match curve of gun) My Blackening routine was: 1 Clean in hot soapy water with an old toothbrush and rinse in water 2 Soak in White Vinegar for 10 minutes and rinse in water 3 Soak in neat Birchwood Casey Brass Black (BCBB) for about 30 secs and rinse in water 4 Clean any CA residue patches (not blacked) with Acetone 5 Polish with paper towel 6 repeat previous steps from 3 until satisfied (3 or 4 times I found for me) I didn’t get a true black finish but I’m reasonable happy with the dark grey that I got. The gun tackle eyes/loops were inset into the Brackets by creating a horizontal groove across the hole with the help of this screwdriver I modified Work still to do on this one are the Truck keys and the cap squares and bolts and then it’s only another 15 to do
.JPG.21842bfe376b103a0fbc40d75f29e560.JPG)

- 110 replies
-
- 12
-
-
Your too kind. Not sure I want the competition though . Seriously though I would be honoured and thank you for giving me loads of ideas to shamelessly nick on my next fishing boat build.
- 378 replies
-
- 4
-
-
- t78 norden
- billing boats
- (and 1 more)
-
Excellent job Denis. Lots of innovation and detail. A model to be proud of.
- 378 replies
-
- 4
-
-
- t78 norden
- billing boats
- (and 1 more)
-
Black wire for eye bolts/rings
Johnnyreg replied to Johnnyreg's topic in Metal Work, Soldering and Metal Fittings
Thanks again. All much needed good advice. -
Black wire for eye bolts/rings
Johnnyreg replied to Johnnyreg's topic in Metal Work, Soldering and Metal Fittings
Thanks Steve. Interesting, I’ll see how easy it is to blacken when the darn solution arrives. Seller say I should have had it by now so is re-sending. If it’s a pain to do I may reach the same conclusion and decide silver soldering the rings are a bit overkill too. We are going away on Sunday for 5 days to Portsmouth to see HMS Victory so I won’t get chance to do any blackening. Hopefully the solution will be waiting for me when I get back -
Black wire for eye bolts/rings
Johnnyreg replied to Johnnyreg's topic in Metal Work, Soldering and Metal Fittings
Thanks Steve. Just to clarify I’m not silver soldering the eyes but I am silver soldering the Breeching ring ends to close the ring after threading through the eye. I wrongly or rightly assumed every one did this. What do others do?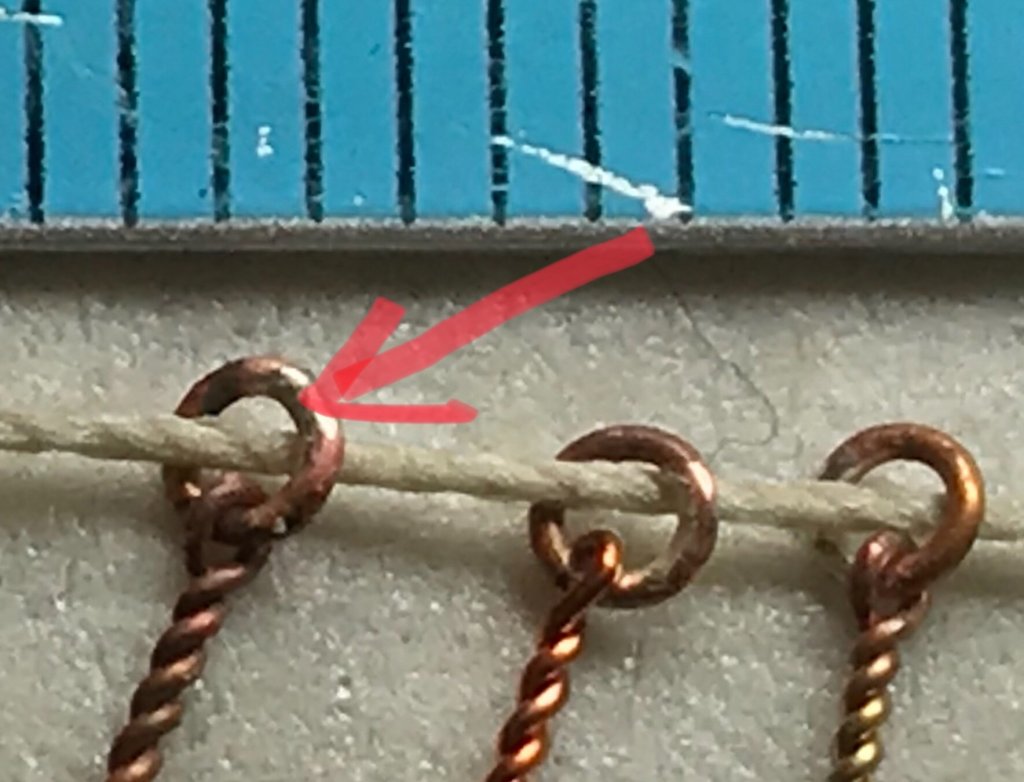
-
Black wire for eye bolts/rings
Johnnyreg replied to Johnnyreg's topic in Metal Work, Soldering and Metal Fittings
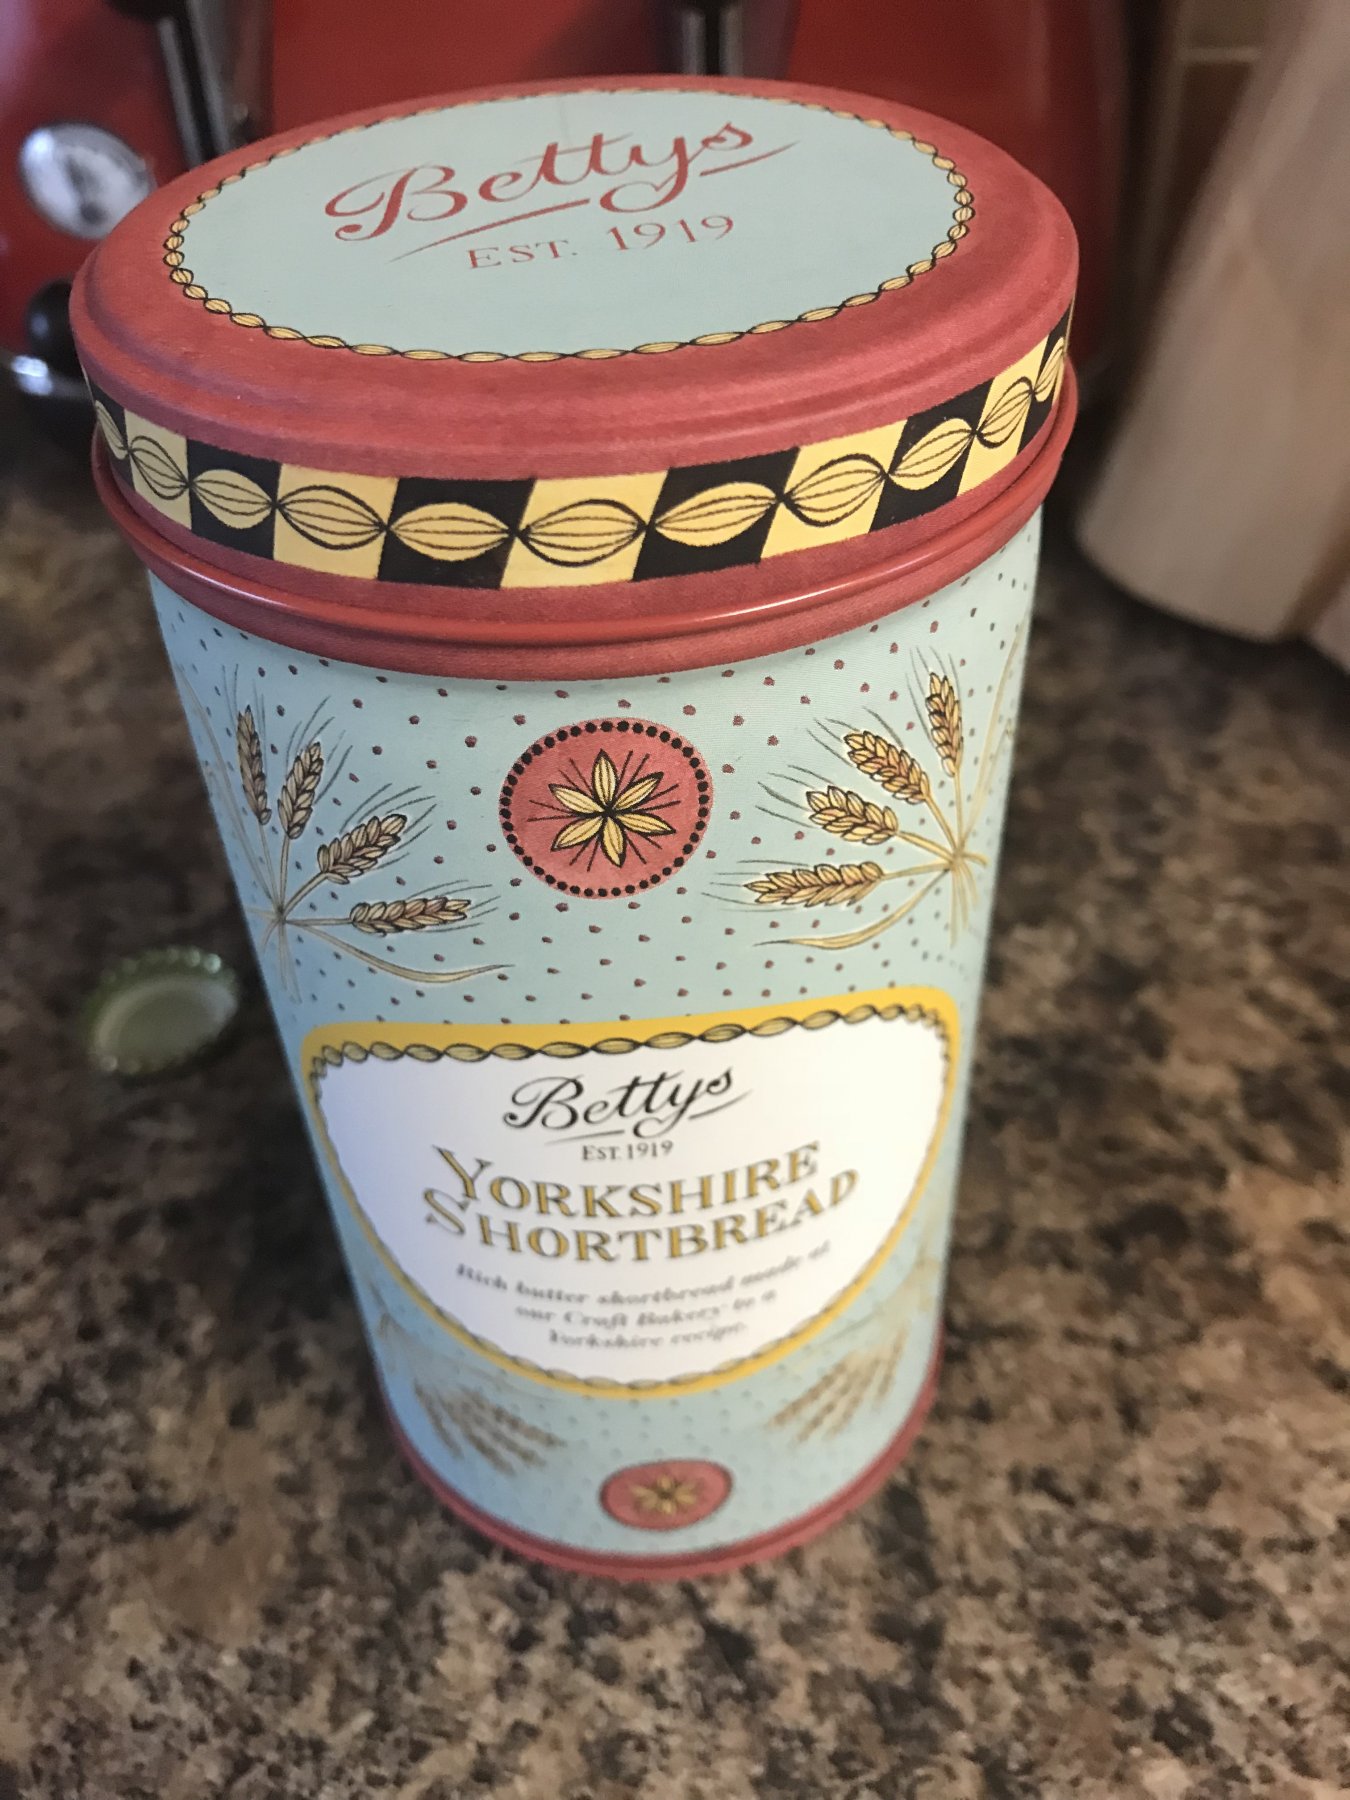
Hi Dave. Thanks for your tips. I’ve committed to Birchwood Casey Brass Black now (as recommended by Hornet) so will have to experiment with that. Not sure if you can brush this on locally. Still waiting for delivery but it’s 2 days late now so will have to chase the seller. Yes Betty’s tearoom is still there. We don’t go in often as there is usually a queue full of tourists from Switzerland . They do nice biscuits too which come in nice handy tins.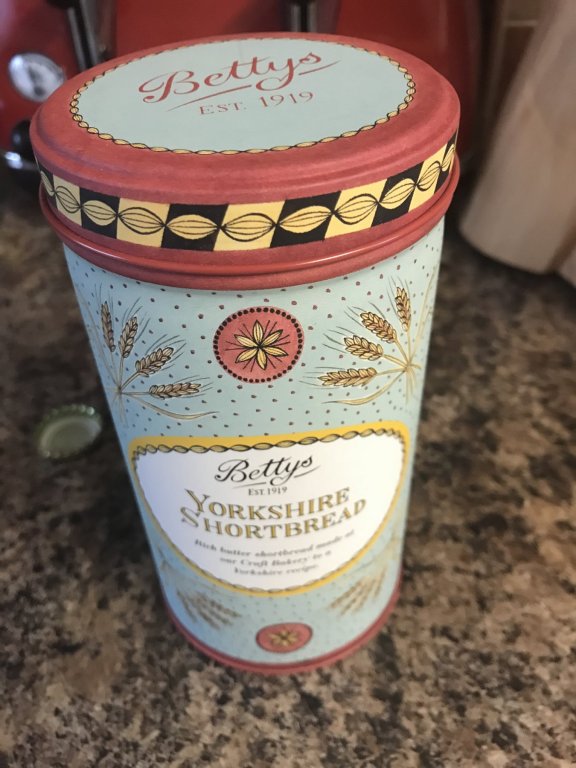

-
Black wire for eye bolts/rings
Johnnyreg replied to Johnnyreg's topic in Metal Work, Soldering and Metal Fittings
Thanks Steve. That makes a lot of sense I will try that. I will have to re-blacken after silver soldering the rings though, is that a problem? -
Black wire for eye bolts/rings
Johnnyreg replied to Johnnyreg's topic in Metal Work, Soldering and Metal Fittings
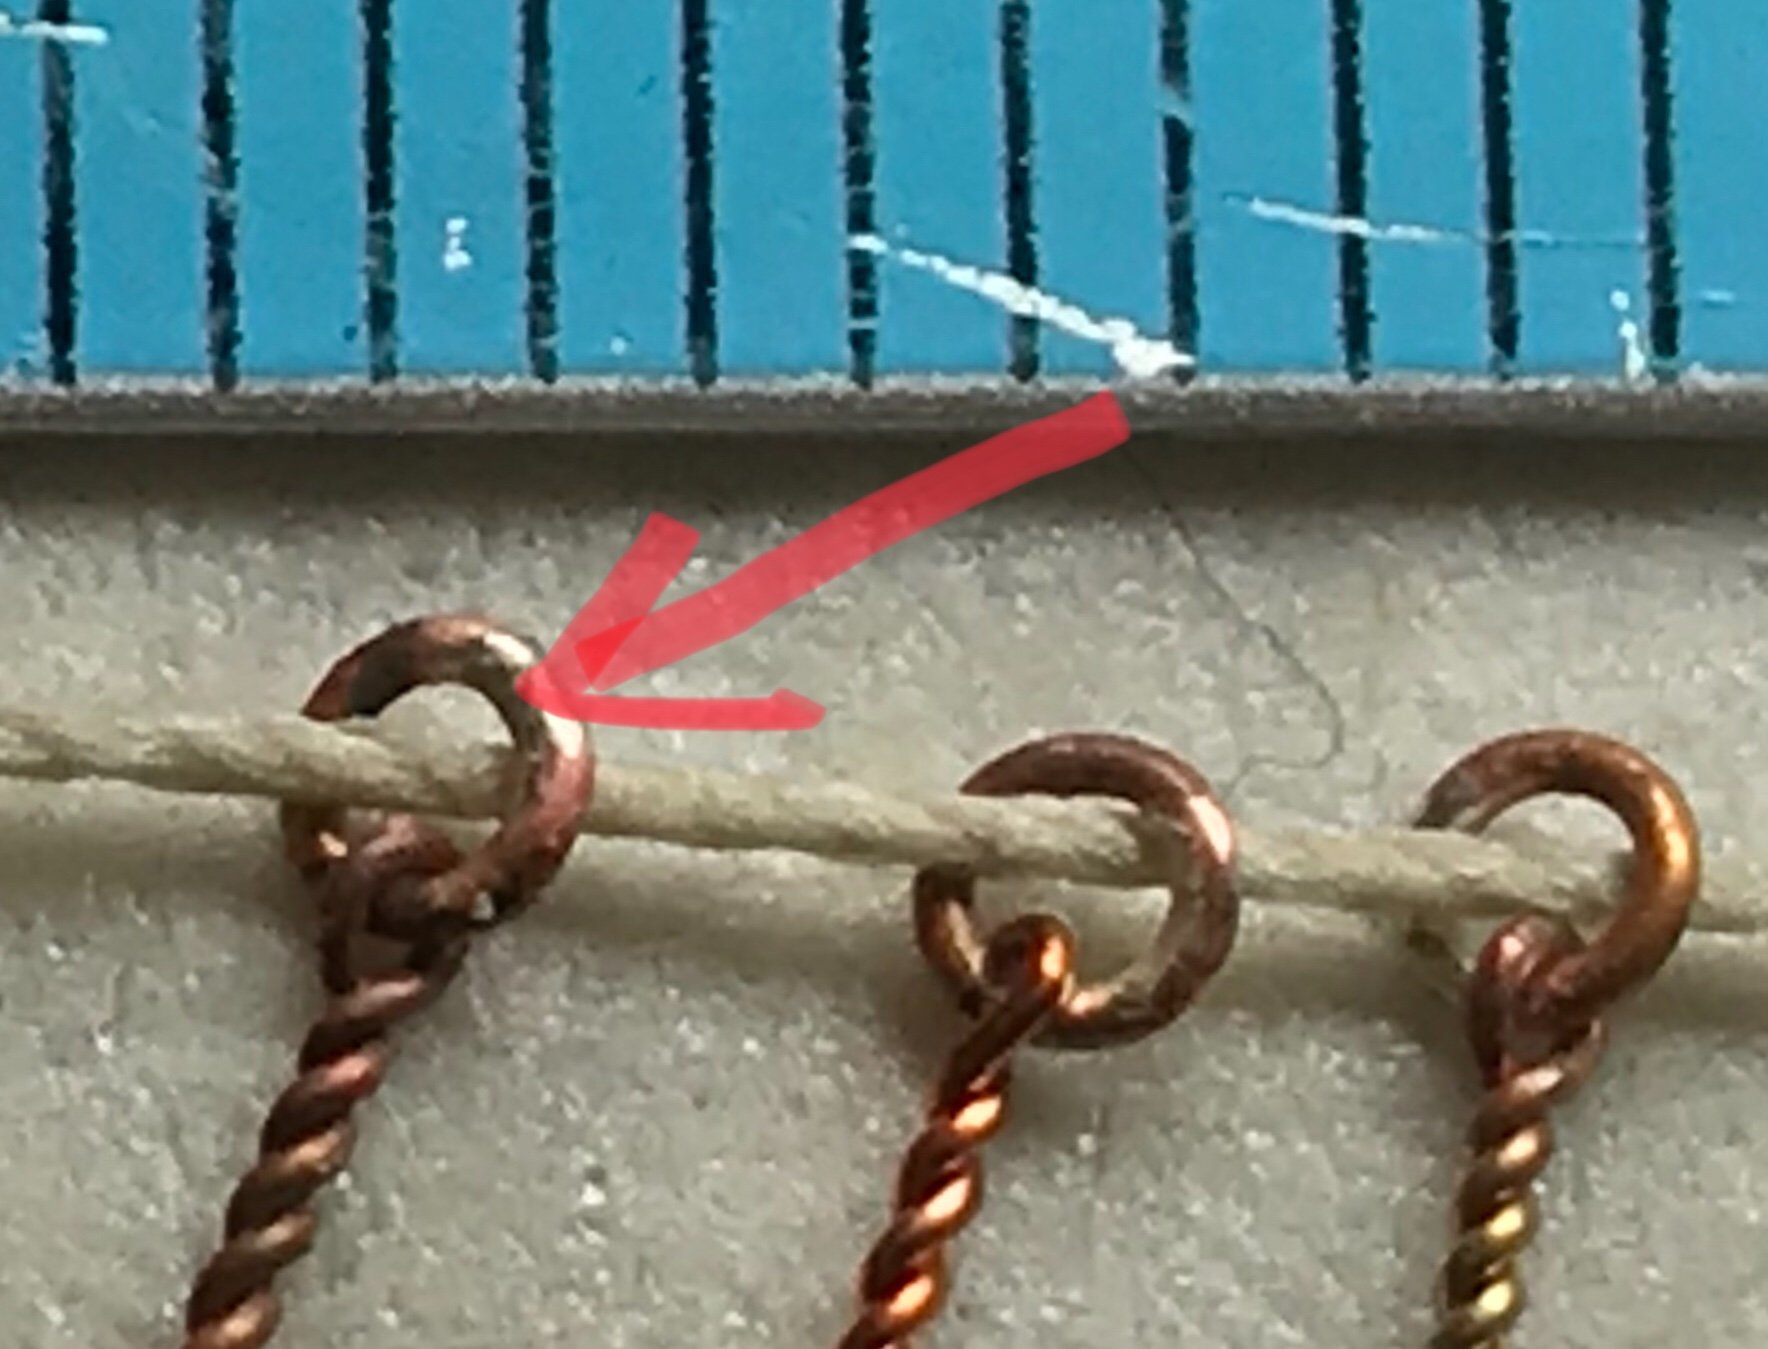
Here are my attempts at the Breeching rings in both black Jewellery wire and Bare Copper. The divisions are mm by the way. Everything is almost to scale but I have made changes as shown below. I rounded the 0.35mm up to 0.4mm because that’s all I have and the 0.2mm up to 0.3mm because I found the 0.2 wire a pig to work with. Does anyone else use 0.2mm successfully and is it strong enough? The 2 rings on the left were joined with CA and touched up with a permanent marker. The three on the right were silver soldered but they aren’t the first three I made as the previous ones have all been DESTROYED Through trial and error I found that, the join had to have no gap, and that just a tiny bit of silver solder paste applied with a pin was enough and the butane torch was best set at the lowest setting with the work piece heated slowly by flicking the flame on and off until the solder ran into the joint. I think it’s a case of you have to learn how to do it wrong before you learn how to do it right. Still waiting for the blackening solution to be delivered but I will show them finished when it arrives. I didn’t appreciate just at how tiny and fiddly these bits are because I’ve seen that many zoomed in pictures here on this site.
-
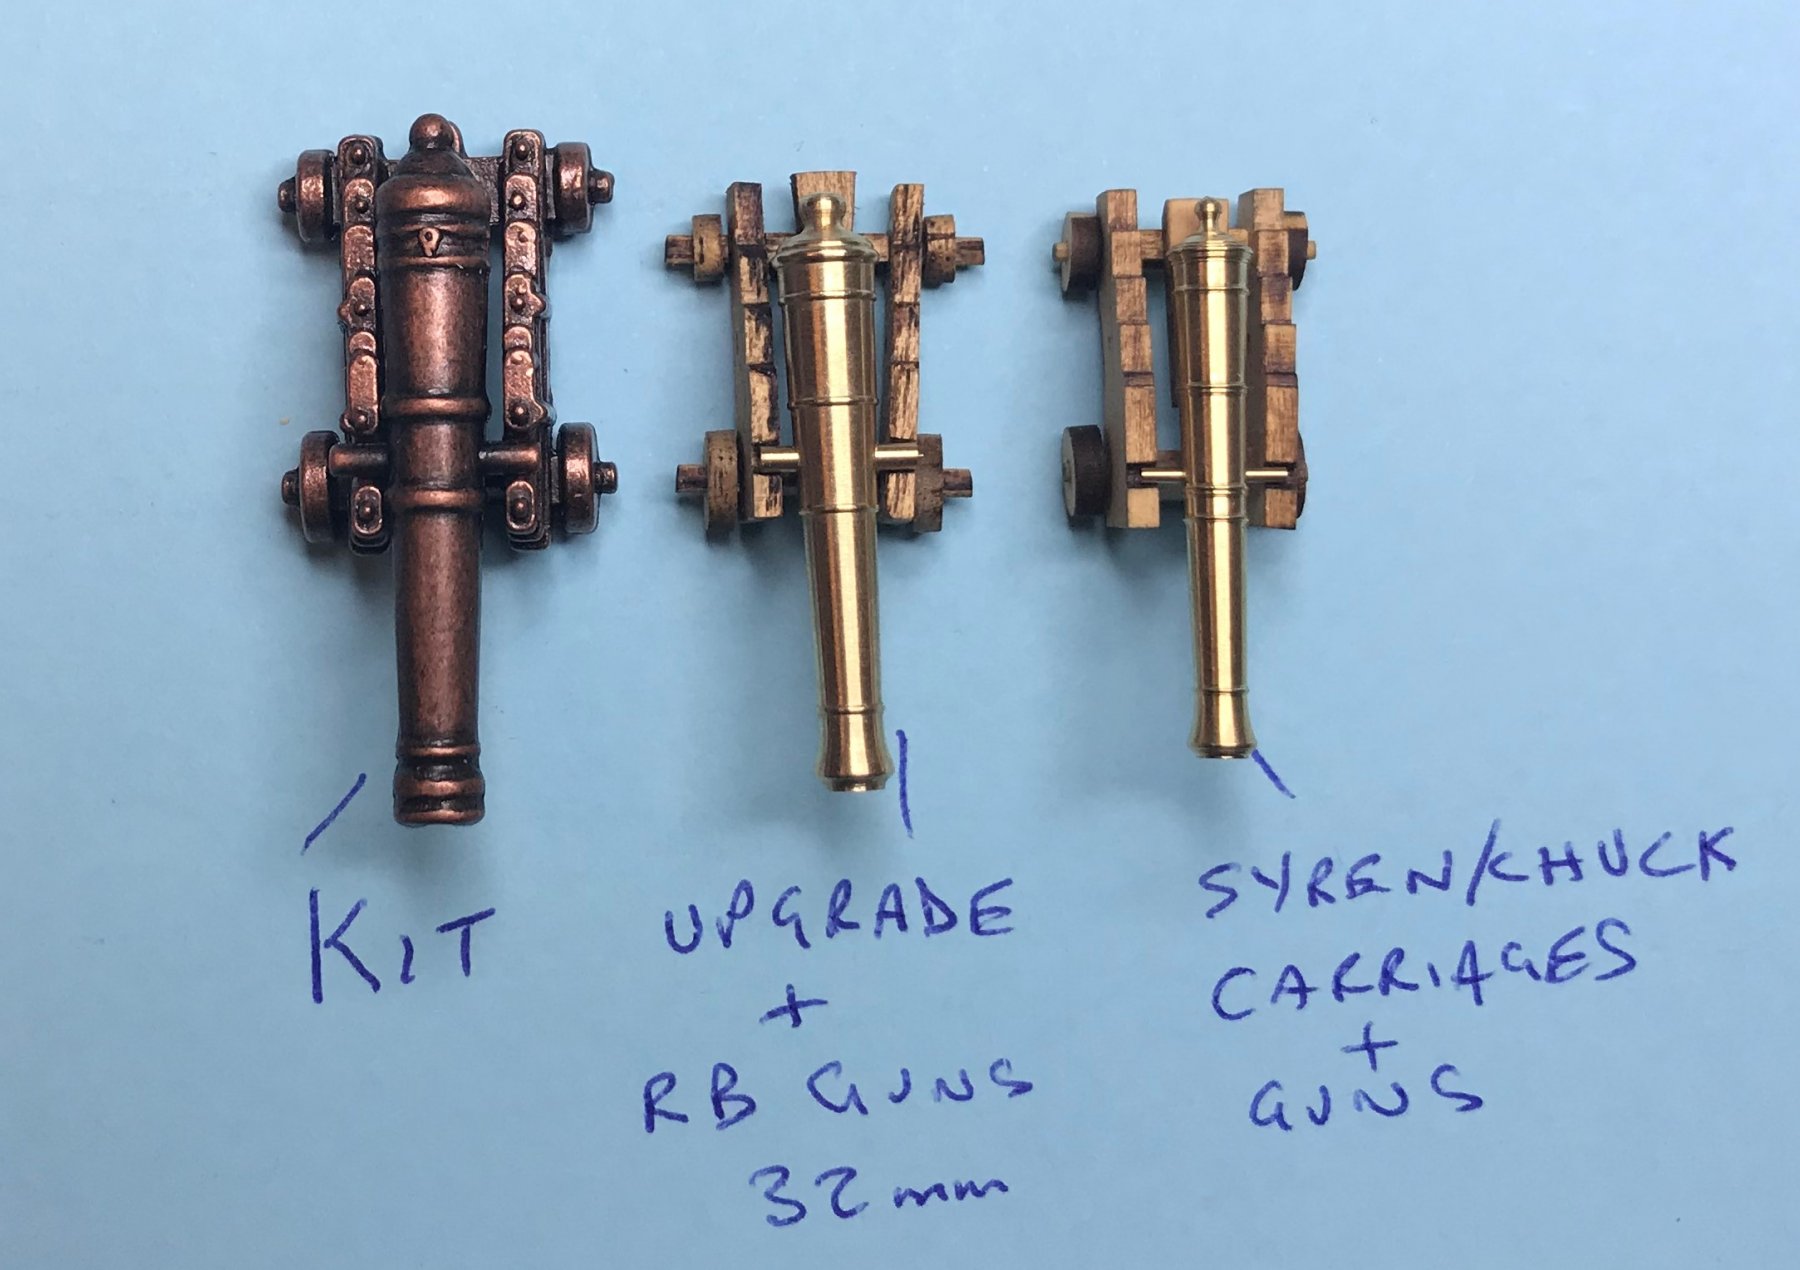
Thanks SpyGlass, Mike & Denis. SpyGlass - It was a surprise to me how oversize the kit guns sets are too. I suppose that is why the Fly upgrade (Pegasus) carriages were offered to go some way to rectify but the guns are still 6mm (1.25ft) too big. The Fly Upgrade/Pegasus carriages are close to scale put the quality isn’t too good, especially the wheels and fragile axles. The Syren/Chuck carriages are top notch. Mike - I think it was your use of the RB guns that prompted me to look at them so thanks for that. Denis - yes I agree. If I file the carriages to seat the trunnion better I will lower by about 0.5mm. I’ve done this and the other mods I mentioned and can now use the quoin at mid point and the gun is level. I’ll show a picture in my next update. Update on our Portsmouth trip - were going this next Sunday for 5 nights. The Admiral is so excited
-
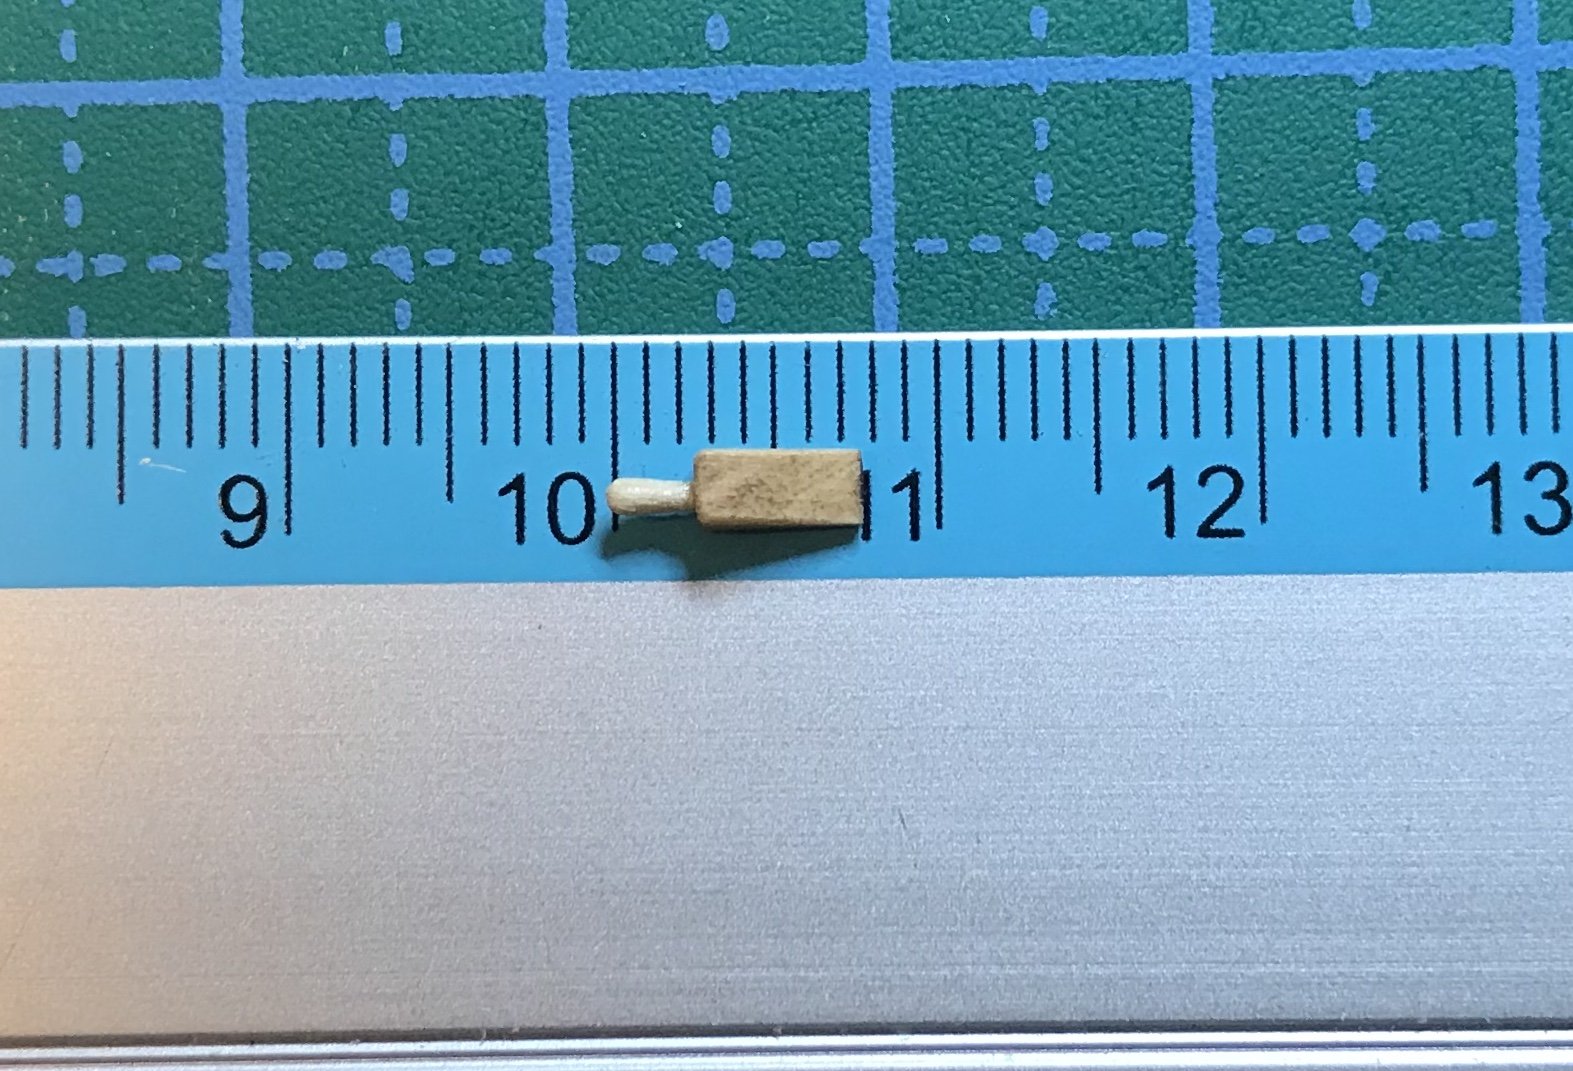
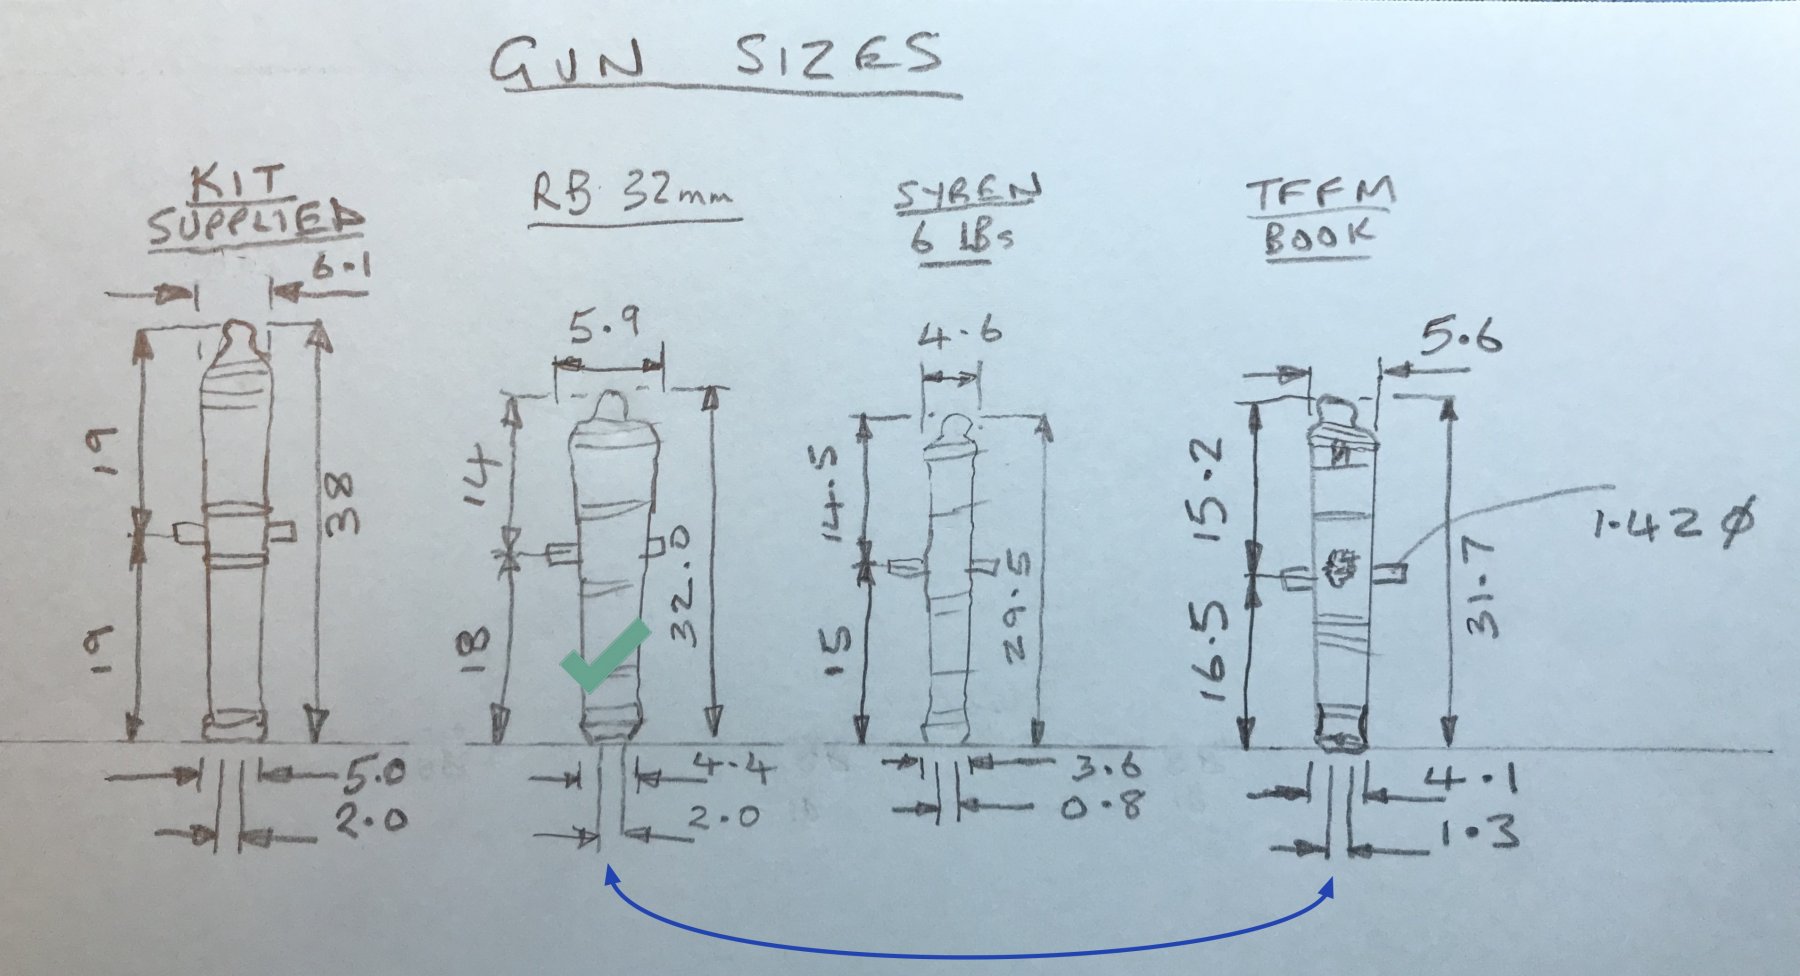
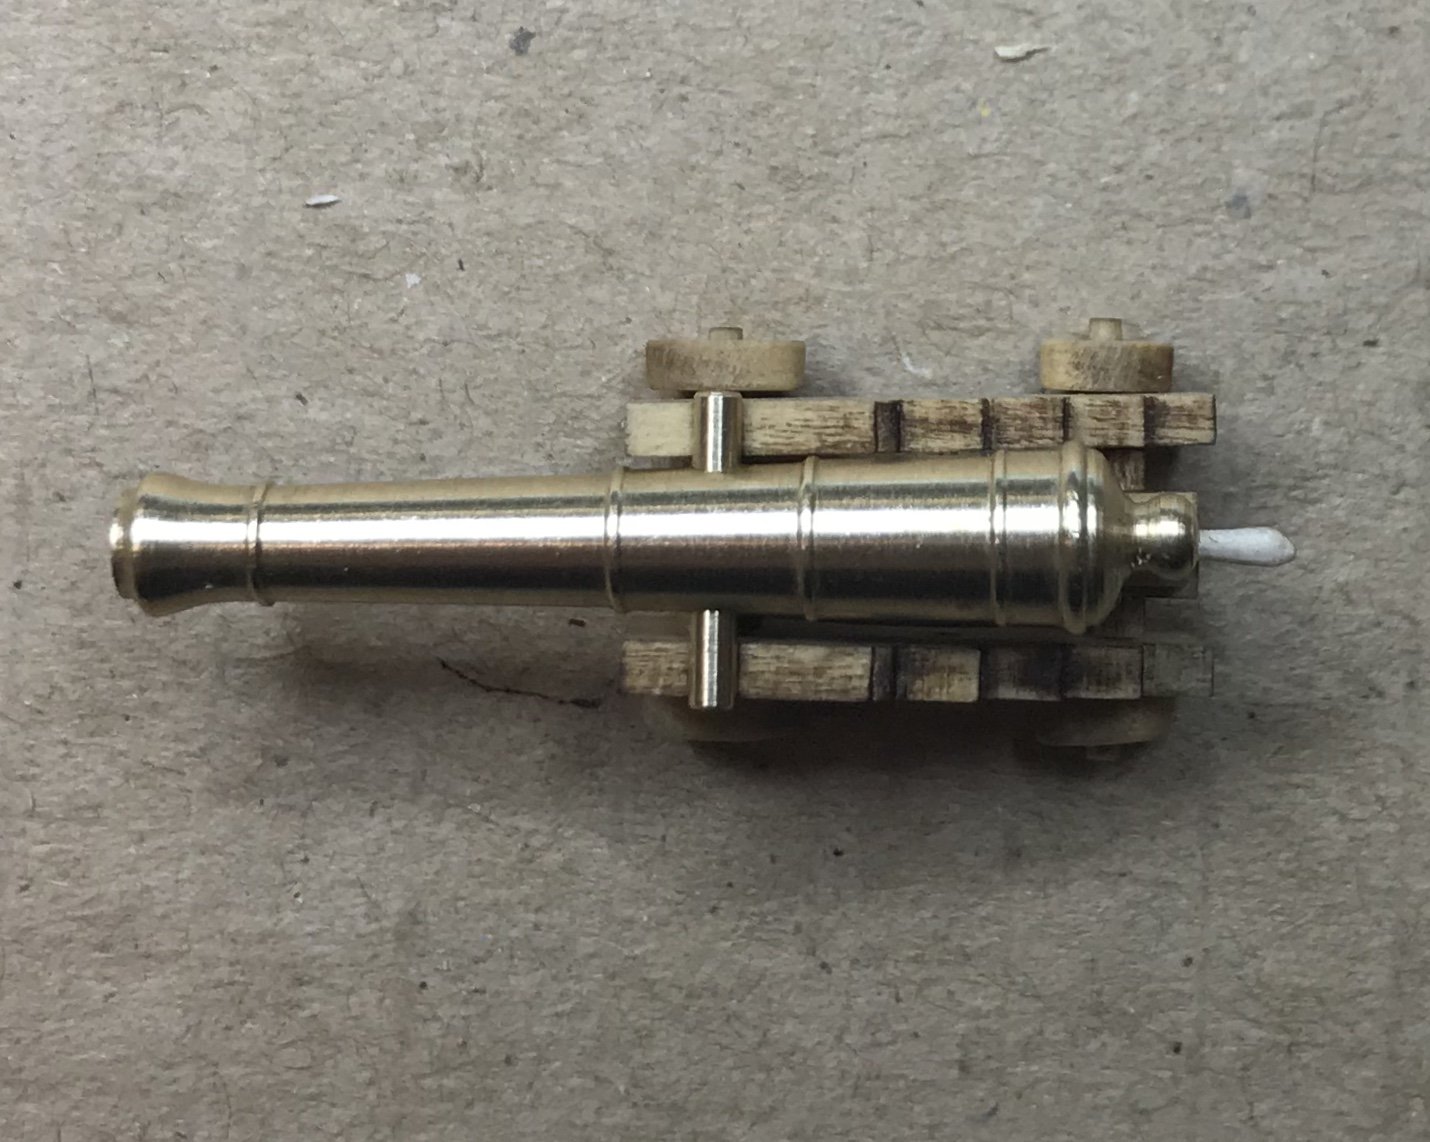
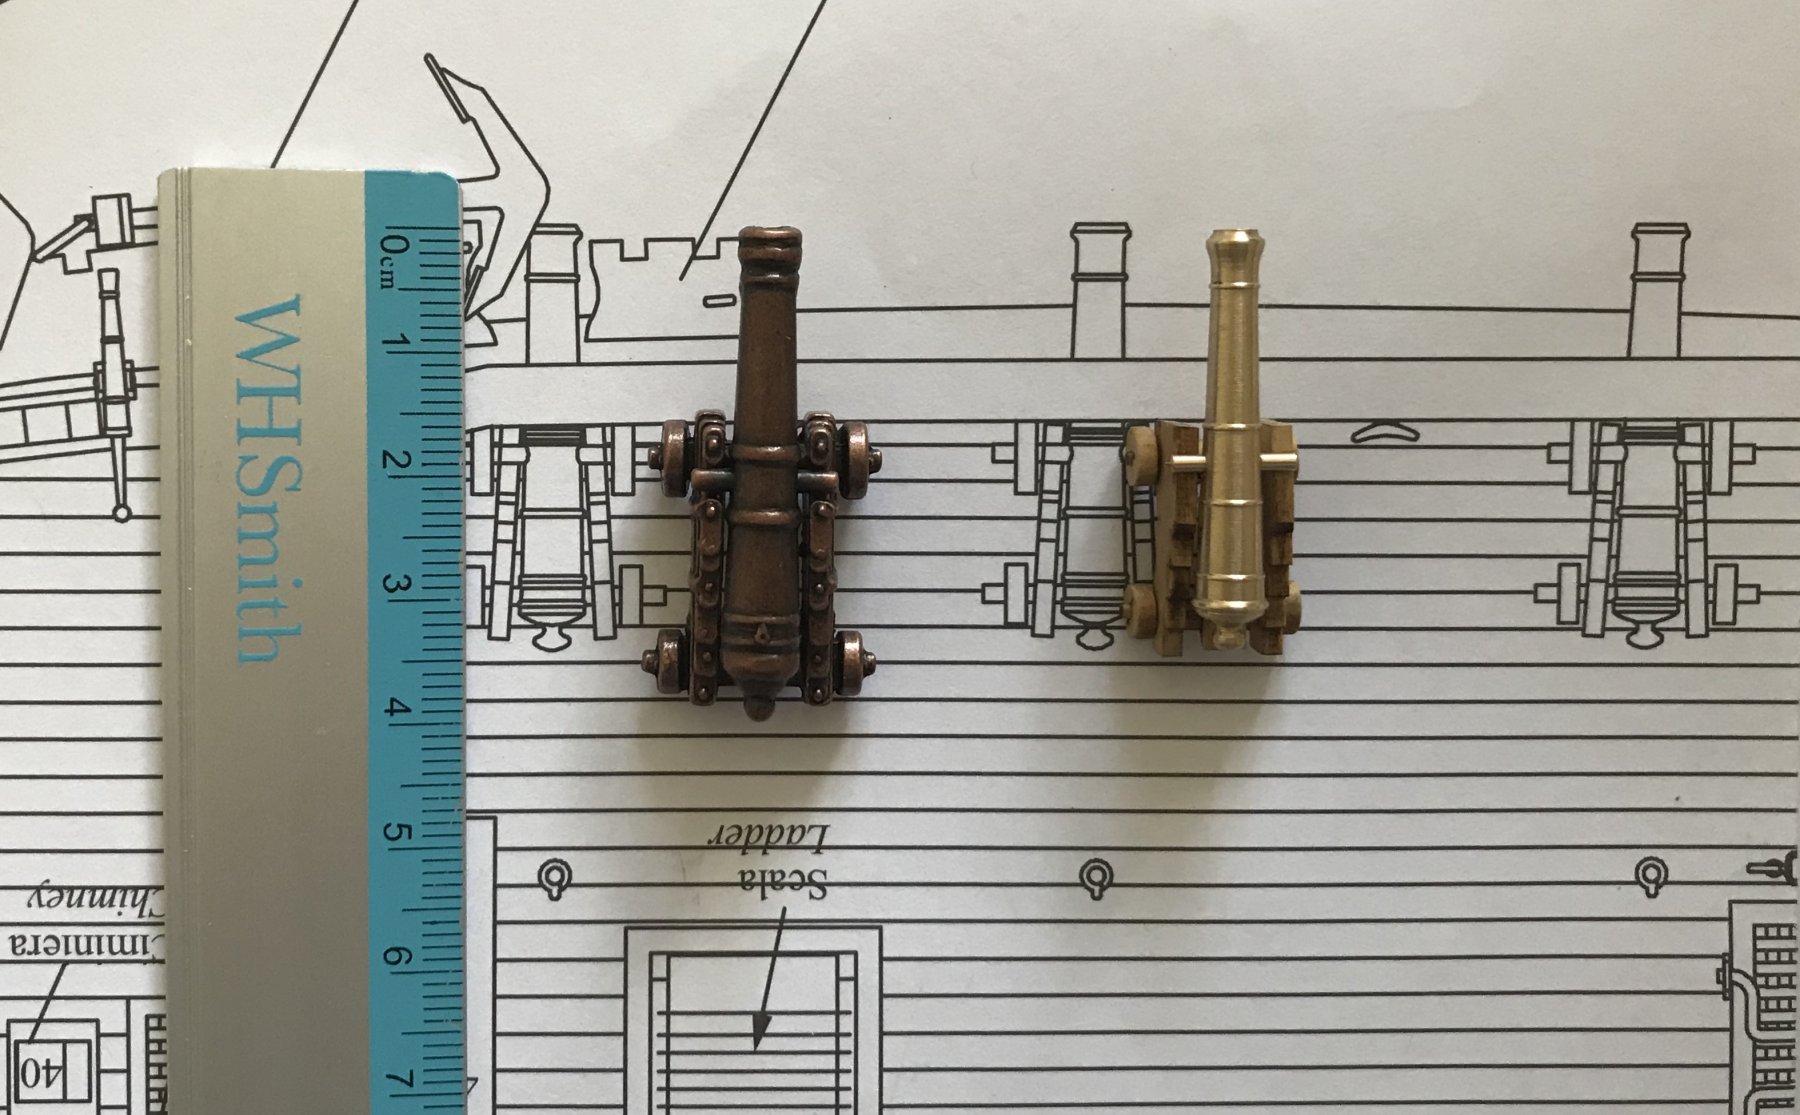
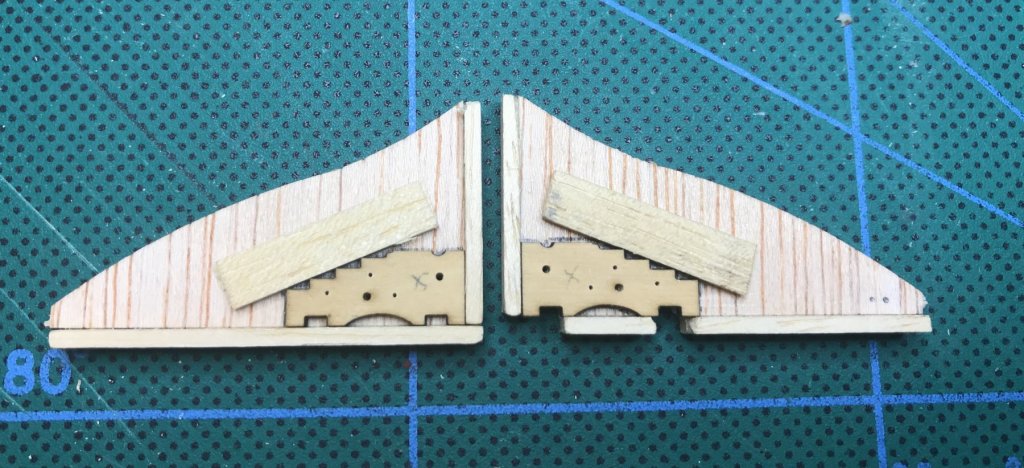
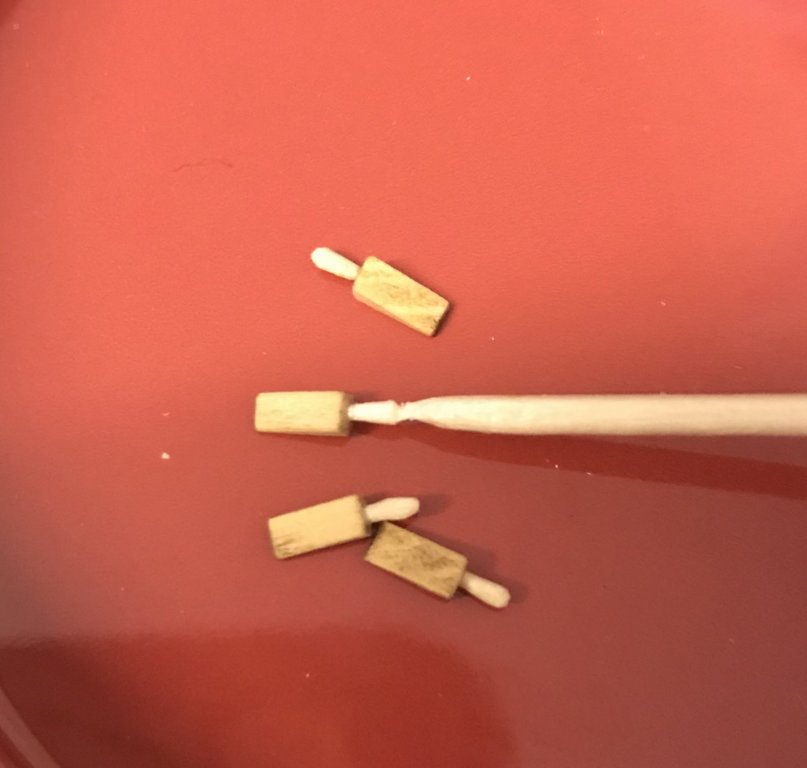
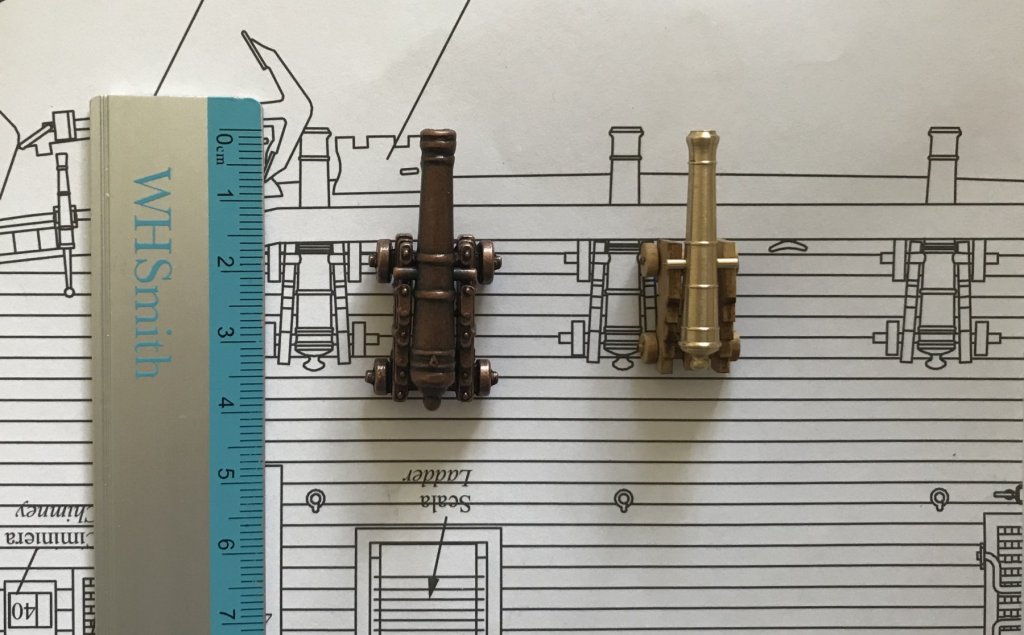
Forgot to say my RB guns arrived a while ago so I can now decide on which carriage and gun combination I’m going for. First I built one of the Syren/Chuck carriages using a simple jig to get the slight taper of the frames correct to the axles. I made some more jigs for drilling the holes for gun tackle loops and rings. I made a left and right hand as I drilled the holes by hand so they might not have been square enough to drill from the inside to outside without errors (I think that makes sense). I was up for a challenge so thought I would make the quoin handles. Instead of turning the supplied matchsticks I opted for using cocktail sticks glued into a 0.7mm hole and very carefully whittled and sanded by hand once the glue was well set. Here are the three sets side by side for comparison Kit supplied seems a bit high Two views of the RB Gun on Syren carriage (without quoin) appears spot on I’ve discounted the kit supplied set altogether. From the other 2 sets I prefer the Syren/Chuck carriage to the Fly upgrade ones but I prefer the RB 32mm gun as it is closer to scale than the other two, as you can see here. The only thing I’m not happy about the RB gun is the pivot point which is about 2mm too far back which exaggerates the following problem with the quoin fitted half way. Without the quoin it looks ok Viewed from above the RB gun also looks better than the Syren/Chuck one RB gun on Syren/Chuck carriage Syren/Chuck gun on Syren/Chuck carriage. Gun is too slim, to my eye I’ve finally decided on the RB 32mm gun together with the Syren/Chuck carriage but I need to fix the problem of the severe downward angle with quoin fitted, which I will come too shortly. First I thought I would check the assembly drawing and it appears as though Chris Watton has drawn the guns at the correct scale, according to the FFM books, but Amati have just thrown in some generic oversize ones as you can see here. My chosen combination is shown on the right, which looks spot on. I think I can fix the problem of the severe downward angle with quoin fitted by reducing the thickness of a few parts as shown by the shading here Not sure yet by how much exactly but my best guess is about 2mm in total . Up next are some attempts at gun tackle eye and ring making, silver soldering and blacking which are all new skills for me to master (or not ) .


-
Black wire for eye bolts/rings
Johnnyreg replied to Johnnyreg's topic in Metal Work, Soldering and Metal Fittings
Thanks SpyGlass. I coiled them round a 2mm drill bit and snipped but they are over scale. I hope to do some to scale so I have since ordered some finer wire at 0.2 & 0.3mm in both black Jewellery & bare copper. The breaching tackle eyes/loops & rings done to scale at 1:64 & (full size) would be * eye loops - 0.2 wire & 0.6mm hole (1/2” & 1-1/2”) * breeching ring - 0.35 wire & 1.2mm hole (7/8” & 3”) * breaching rope - 0.5mm (1-1/4”) Not sure how the silver soldering will go at these sizes but will report back with the results (scrap copper maybe) -
Black wire for eye bolts/rings
Johnnyreg replied to Johnnyreg's topic in Metal Work, Soldering and Metal Fittings
Thanks Derek, Frankie, Darell & SpyGlass I did order some Jewellery Round nosed pliers when I ordered the black wire as it happens and they look the business. The shine on the black Jewellery wire is something I could live with or fix as SpyGlass suggests. I have been playing around with both the black wire and the bare wire I have received but can’t compare until I get the blackening stuff which hasn’t arrived yet. Im happy with my technique of making the eyes and rings These are all with 0.4mm wire. I’ve also ordered some silver soldering bits and pieces (butane torch, silver solder paste, etc) for the bare brass ones. Silver soldering is a skill I learnt during my apprenticeship over 45 years ago but I’ve never done it since and not on anything this small, what could possibly go wrong I presume that with the black Jewellery wire you CA glue the rings ends together and touch up with paint or permanent pen?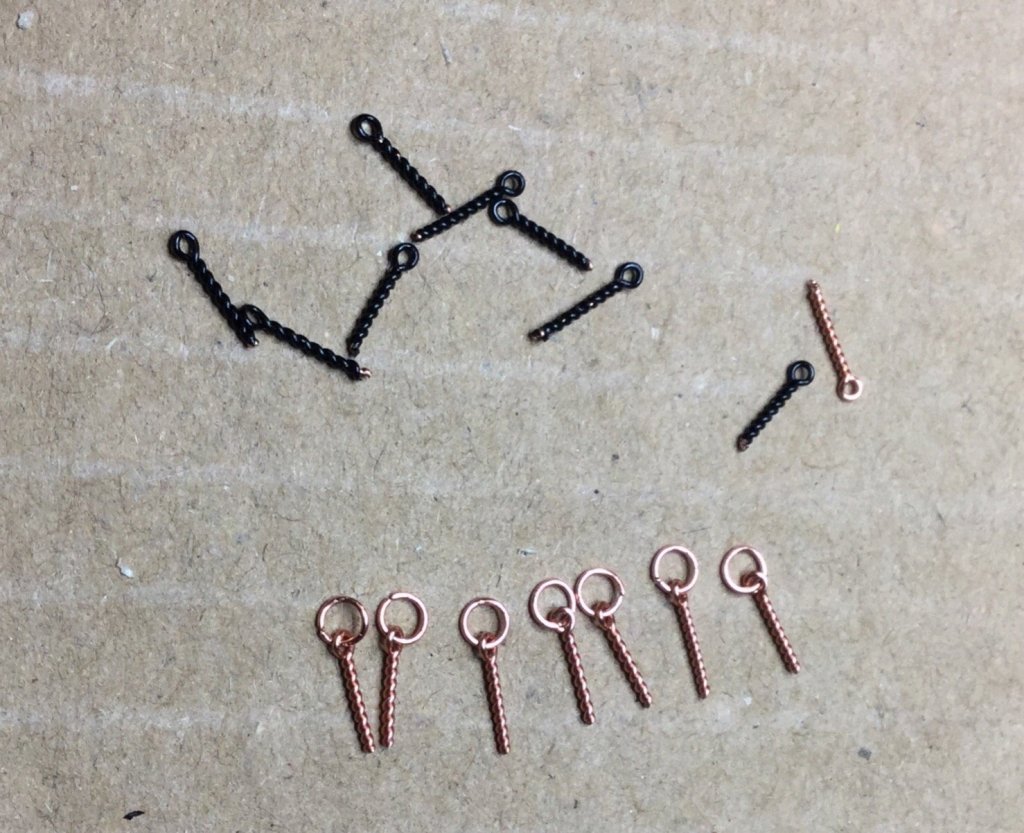
-
Tantalisingly close Denis. Inspiring work indeed.
- 378 replies
-
- 3
-
-
- t78 norden
- billing boats
- (and 1 more)
-
Thanks Denis I thought I’d better cos I know your watching I’m living and breathing it at the moment. Learning lots of new skills and getting lots of inspiration from all you guys. I haven’t made much progress to look at over the last few days as I have been mainly researching and sourcing materials. I’m currently building a Syren/Chuck gun carriage (and jigs for the others) and these are looking favourites up to now.
-
Black wire for eye bolts/rings
Johnnyreg replied to Johnnyreg's topic in Metal Work, Soldering and Metal Fittings
Thanks Maury. Apologies as I might not have made myself clear in the original post but I was after sourcing the pre-coated black copper wire because I was looking for a short cut (I’m lazy) to save me making the eyes/rings from bare copper and blacking afterwards. In my last post you can see I’ve left my options open with my purchases so I can do some tests and decide which gives the best results for me, either bare copper and blacken OR pre-coated black Artistic wire.