TBlack
-
Posts
1,311 -
Joined
-
Last visited
Content Type
Profiles
Forums
Gallery
Events
Everything posted by TBlack
-

SS Vinal Haven by TBlack - FINISHED
TBlack replied to TBlack's topic in - Build logs for subjects built 1851 - 1900
John, Thanks for the encouragement. Here's the final product: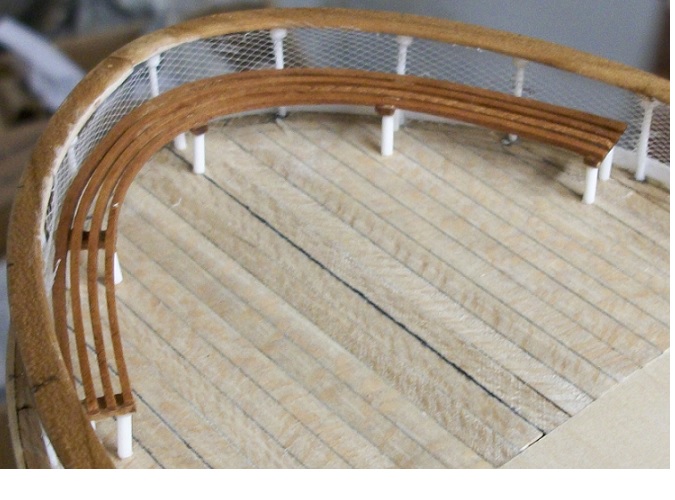
- 326 replies
-
- 3
-

-
- vinal haven
- steam ship
- (and 1 more)
-
SS Vinal Haven by TBlack - FINISHED
TBlack replied to TBlack's topic in - Build logs for subjects built 1851 - 1900
The bench at the aft end of the 01 level looks pretty straightforward from the photo. There is no back to it and the legs look straight, and white. I decided to make it out of apple, just because I have a lot of it and it finishes to a nice golden hue. What I did was to make a "mould" that replicates the curve around the stern; slice up some slats; and make some spacers out of basswood. I tried assembling the whole thing all at one time. Too complicated; pieces flew in all directions. I realized there were too many moving parts. To minimize that I'm tackling one section at a time. So, I put the spacers in at the end and glue the first cross piece; let the glue dry and move the spacers around to the next cross piece and so on around the curve (I hope!).
- 326 replies
-
- 1
-
-
- vinal haven
- steam ship
- (and 1 more)
-
Snowmans (does this refer to winter weather or is this about women?), A lot of this bending stuff depends on the wood you're using and how thick it is. But to your question, I've found that if you soak a wood like cherry for too long it will change the color of the wood (it gets lighter and grayer). I can't imagine that it would take a whole day for the water to do its thing. You might try shortening the soak time and see how pliable the wood is. Tom
-
Popeye, It has to be like that to keep the traplines from fouling as the traps go back over the side off the stern. Notice also that there are no cleats on deck aft for the same reason. Tom
- 552 replies
-
- 1
-
-
- maine lobster boat
- Midwest Products
- (and 1 more)
-
SS Vinal Haven by TBlack - FINISHED
TBlack replied to TBlack's topic in - Build logs for subjects built 1851 - 1900
Thanks, John. I appreciate the comment. Next up is a U shaped bench at the back end of the 01 level. It should be more fun to build. Tom -
SS Vinal Haven by TBlack - FINISHED
TBlack replied to TBlack's topic in - Build logs for subjects built 1851 - 1900
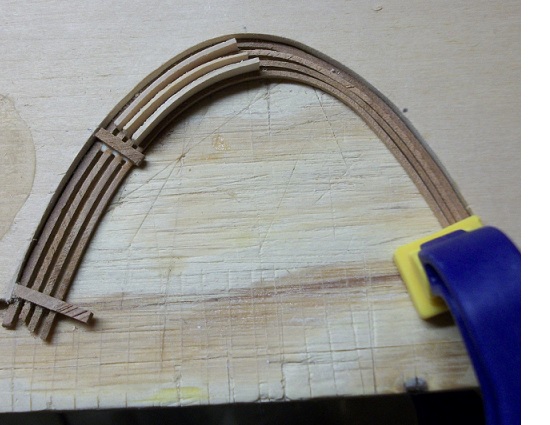
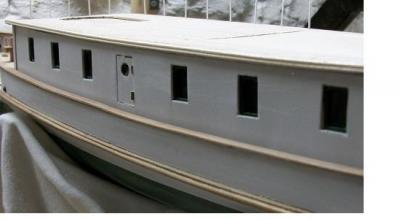
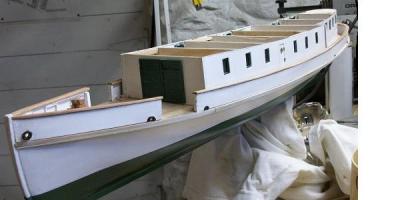
For better or for worse, I finished the railing around the 01 level. I laid out the railing on the 01 deck to get the joints and curves properly aligned. Next I put stanchions in place around the deck. The next step took some education on my part, but it turned out that the best way to install the railing onto the stanchions was to take one of the sections of the railing (there are 7 sections all the way around), attach stanchions only at the end points and let the ones in between fall where they may. That process insures that the stanchions will be vertical and parallel. The railing is cherry, the stanchions are Evergreen styrene rod (.040), and the nipples are Evergreen tubing. That hole in the decking at the forward end of the 01 level is where the pilot house goes. Tom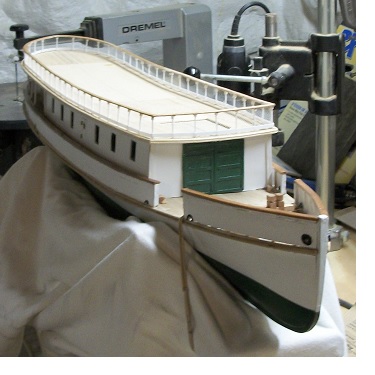
- 326 replies
-
- 4
-
-
- vinal haven
- steam ship
- (and 1 more)
-
Jim, I know that you don't have the opportunity to add to your log, and good luck with your move and the relocation of the boatyard. I just went through the process (downsizing) which, for us, took a whole year. Anyway, I hope you monitor this site regularly, because, as you know, today is your day...happy birthday! Tom
-
SS Vinal Haven by TBlack - FINISHED
TBlack replied to TBlack's topic in - Build logs for subjects built 1851 - 1900
I haven't made an entry here in a couple of weeks. I'm struggling with the railing that goes around the 01 level and I'm not ready to show you any results yet, but rest assured it's been a process. I'll share with you later. In the meantime, I thought I'd show you how I came to decide on dimensions for the layout of the superstructure. I have been working off the profile picture which is back on page one of this log and is actually 10'X14", so shows some detail. There's a man standing up by the pilot house and I gave him a 6 foot height. Also, from the hull plan that I do have, I know the height of the bulwark. Using those two dimensions I've been able to determine relative sizes of cabins, doors and windows. It's not been 100% perfect, but it has been 95%. By that I mean I can draw in windows and doors and copare the result to the photograph. All I've had to do is tweek the plan a bit to look like the photo. My 01 layout, which is basically the passenger salon, the pilot house and the stack I've drawn as shown in the accompanying photo. I'm not sure you can see the detail very well, but I've just laid tracing paper over the hull plan and drawn in the cabin layout, leaving room for the stack in between. Then I compare that to the profile photo of the boat for accuracy. Tom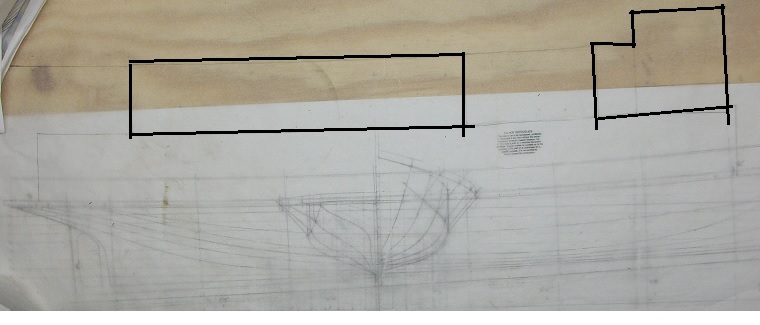
- 326 replies
-
- 1
-
-
- vinal haven
- steam ship
- (and 1 more)
-
I think this is another example of: Are we building history or are we creating art? There is no wrong answer. Andy said it best," It's your build; do it as you see best." TB
-
Jay, Thanks for the additional information. I can see where with a more complicated molding the aluminum bar as guide would be necessary. What I did with my simple double bead was to file a slot the width and depth of the molding piece into the edge of the razor and at the bottom of that slot put in the two half-rounds. The blade then fits over the wooden strip and is prevented from moving sideways. BTW, great website; looks like you have a lot of fun! Tom
-
You see what I mean? The lathe idea is a great one and didn't cost me anything! Damn, this is a good place to be! I'll try that. Also, Brian was asking about pre-made moldings. In the US, actually not far from my house, we have Northeast Scale Models (www.nesm.com); take a look. Tom
-
Dear Philo, Your question implies that you're planking a hull, so I'm assuming a certain size of your wood. With respect to Fish's comment, I don't bother to boil the water with basswood. But like Fish, I find that with basswood about 20 minutes does the trick. If you're using hardwood, a longer soak is necessaryand perhaps the application of heat to assist in bending. In any event I've found, just as you suggest, that to place the water-logged plank in place and let it dry and then glue in place works great. And actually, if you are using CA, it benefits if the wood is a little wet. Tom
-
Dave, It was, in fact, Alex's build log where I saw the technique first. And Mark has included a link to Colin's post in the "wooden tips and tricks" section. Both gentlemen use the same technique and are obviously quite adept at using a dremel in tight spaces. And that's the key; that and making sure the slot in the razor blade is the exact width of the scraped plank. The scraping part is actually duck soup. Dave and Mark, thanks for the "heads up". Tom
-
Popeye, I think somebody pointed this out in the previous log, but the picture of the trap with the lobsters in it shows the lobsters already cooked....Maine's version of fast food? TB
- 552 replies
-
- 1
-
-
- maine lobster boat
- Midwest Products
- (and 1 more)
-
I'm just envious of your talent, thanks. TB
-
I did my best, but I'm not yet able to figure out how to get a more intricate shape to the molding than a basic double bead. The photo of the blade shows a cut that is 3/32" wide and the result is along the cabin top in the other photo.

-
Steve, Thanks for that explanation. Your foredeck is mahogany, so does that mean that you will use a filler up there? TB
-
Steve, Nice work on this which prompts two questions. The cord caulking turned out great, but I didn't quite understand why the limewood approach didn't work for you. Some years ago I was faced with the same issue and used the limewood approach and I don't recall that I had any problems (see photo). The other question that I had is how do you get such a beautiful glass-like finish to the wood? Tom
-
SS Vinal Haven by TBlack - FINISHED
TBlack replied to TBlack's topic in - Build logs for subjects built 1851 - 1900
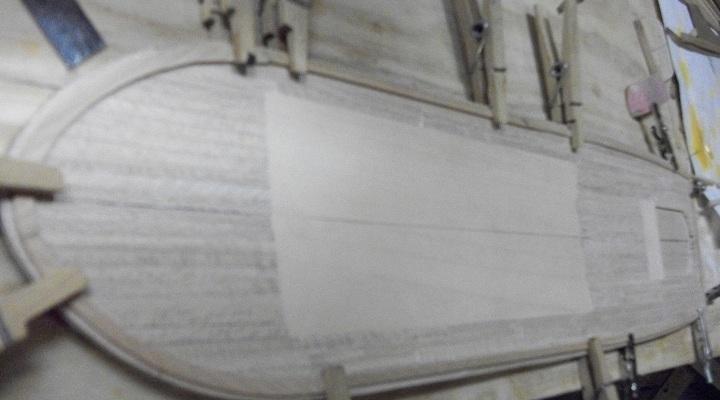
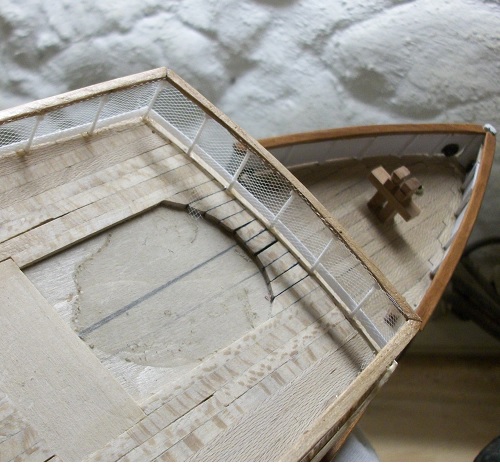
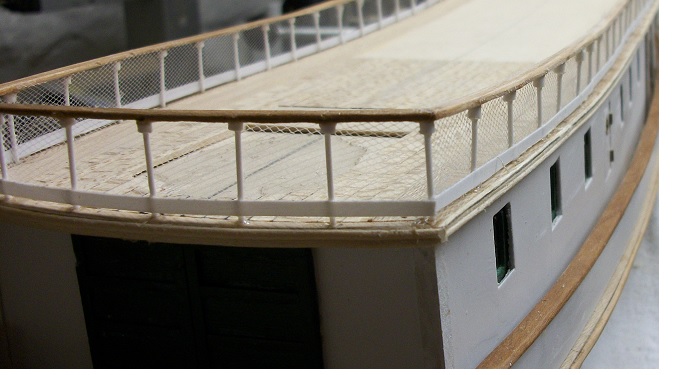
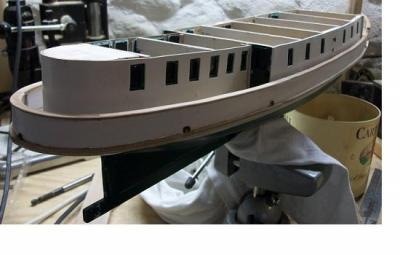
So now on to the 01 level. The subdeck is the same as the main deck, 1/32" plywood under 1/32" sycamore strips. As on the main deck, there's not a lot of decking to do given that the pilot house and salon and stack take up most of the area.. My biggest challenge here was to insure that the stanchions for the railing would all be vertical and in line. It took me a while to figure it out, and what I did was to make the deck off the boat; fashion the railing around the deck (last photo below); turn the whole assembly over and drill through the deck at the stanchion locations, making a mark at the underside of the railing. That process insures that the stanchions will all be lined up properly. I then attached the deck to the model and did a test of the railing at the forward end (first two photo below).

- 326 replies
-
- 1
-
-
- vinal haven
- steam ship
- (and 1 more)
-
SS Vinal Haven by TBlack - FINISHED
TBlack replied to TBlack's topic in - Build logs for subjects built 1851 - 1900
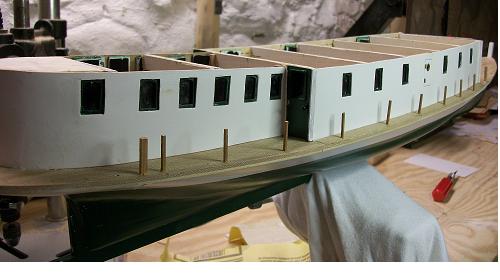
I built the rest of the bulkhead in 3 pieces: 2 long ones to go down either side and one curved one at the stern. If you look back at the previous pictures you can see a stanchion that is thicker than the others. That's where the joints occurred. At first I thought I could do the long sections off the boat, paint and install. That didn't work out so well due to the sheer curve that the bulkhead planks had to follow. I ended up doing the curved section off the boat and the long sections constructed in place and painted. The bitt at the bow is a bit of a guess. The only picture I had showed just the top of it peeking over the bulkhead. The pictures below show the cap rail in place. I made it up out of cherry.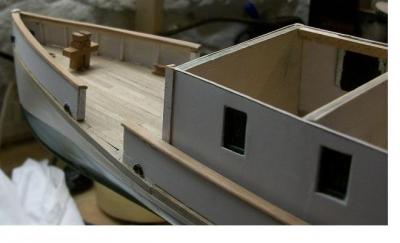

- 326 replies
-
- 1
-
-
- vinal haven
- steam ship
- (and 1 more)
-
Mark & others, Thanks for your suggestions, but the information was on this site. Forgive me, but I'm a tight-fisted yankee and reluctant to pay good money to someone who may or may not have a productive suggestion for me. I used to be able to get all the information and help I needed right here for free because the membership here is very generous and entirely knowledgeable. I'm hoping that the membership will come together and rebuild this wonderful site. TB
-
About a month ago, in a build log, one of us displayed some rather intricate molding detail on his model. Another one of us questioned how he was able to create such detail and, in response, the modeller produced a short vidio clip of his scraping technique. Does anyone remember who it was that created those moldings, or how to contact him? Tom
-
SS Vinal Haven by TBlack - FINISHED
TBlack replied to TBlack's topic in - Build logs for subjects built 1851 - 1900
At the bow, the bulkheads were built off the boat because I didn't see how I could easily paint the inboard side once installed. Also, you'll see in the photos a hawse hole...plastic! Works great. Two separate ovals, filed to shape and glued to either side of the opening in the bulwark. The two cleats are wooden, probably not historically correct, but I enjoy turning out small wooden items, so there they are!
-
SS Vinal Haven by TBlack - FINISHED
TBlack replied to TBlack's topic in - Build logs for subjects built 1851 - 1900
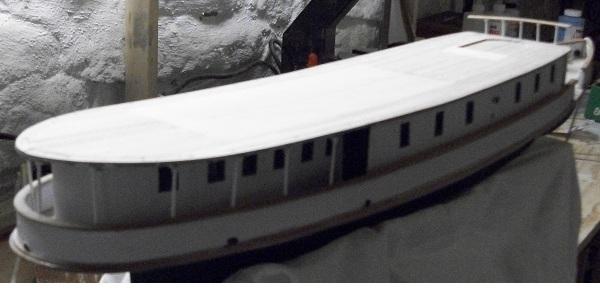
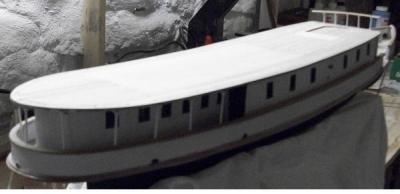
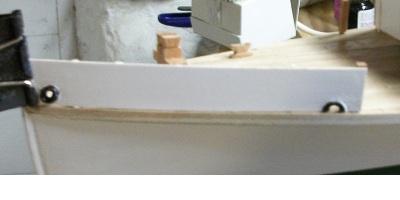
Main deck cabins having been constructed and installed, next comes the bulwark. Prelimary photo: I don't exactly remember how I decided what the spacing of those stanchions should be. If I had it to do over again, I'd halve the space between them.
-
SS Vinal Haven by TBlack - FINISHED
TBlack replied to TBlack's topic in - Build logs for subjects built 1851 - 1900
Michael, Thanks for your encouragement. Tough situation re the website, but we must carry on. The benefit of redoing a log is that you have the opportunity to cut out the extraneous stuff!