
HOLIDAY DONATION DRIVE - SUPPORT MSW - DO YOUR PART TO KEEP THIS GREAT FORUM GOING! (89 donations so far out of 49,000 members - C'mon guys!)
×


TBlack
-
Posts
1,309 -
Joined
-
Last visited
Content Type
Profiles
Forums
Gallery
Events
Everything posted by TBlack
-
 I don’t want to hijack my brother’s log, but thanks Keith and Keith. I’ll send pictures of the Xmas festivities
 -
Keith, bro, I’ve been having some medical issues, but I’ve got 4 doctors pouring over me. They’ll get it figured out.
-
I love your patience in soliciting ideas and your polite responses. Mom would be proud of you! And your final result looks just fine; don’t agonize over it.
-
Also, please see Dava Sobel’s book Longitude for more on Harrison
-
These "T's" were altered many times over their lifespan, so the model will represent a particular time period in its life. The box that you are calling an armored conning station was the captain's sea cabin on our ship (1123) with the conning station above that. I was going to add, "nice work so far", but we've seen the finished product and the delighted recipient. Tom
-
My Navy service was aboard LST 1123, a slightly later version of your model, but still of the 542 class. Naturally I’ll be following along. Tom
-
OK, OK, this thread has caught my imagination, not to mention that it’s another Keith Black original. I’m in! Tom
-
Hank, you might ask Dave Lester how he did it on his model. Tom
-
Surface sonar? I thought sonar was underwater. Perhaps my ignorance, I’m amphibs. Tom
-
Jack, As everyone else on this forum by now knows, mom loved Keith best, he being the baby of the family. And all you have to do is look at our respective build logs to see Keith’s marvelous accomplishments
-
Jack, My brother, Keith, is the hippie. And the better modeler. I'm a little more buttoned down, being the older. But I'm also a Navy vet (engineering & navigation). Petty officer? love to know which dept. Tom Black
-
Phil, Your memory of who did what with what, plus where various equipment was attached and their model numbers is quite remarkable. You must have been an excellent junior officer. I imagine that your DD214 is festooned with compliments. Tom
- 465 replies
-
- 2
-

-
- minesweeper
- Cape
- (and 1 more)
-
If the vessel had been altered post launch, frammed, I guess, would that show up?
- 465 replies
-
- 2
-
-
- minesweeper
- Cape
- (and 1 more)
-
Those plans you have must be very detailed, if they tell you how wide the grout is and the precise shade of paint.
- 465 replies
-
- 1
-
-
- minesweeper
- Cape
- (and 1 more)
-
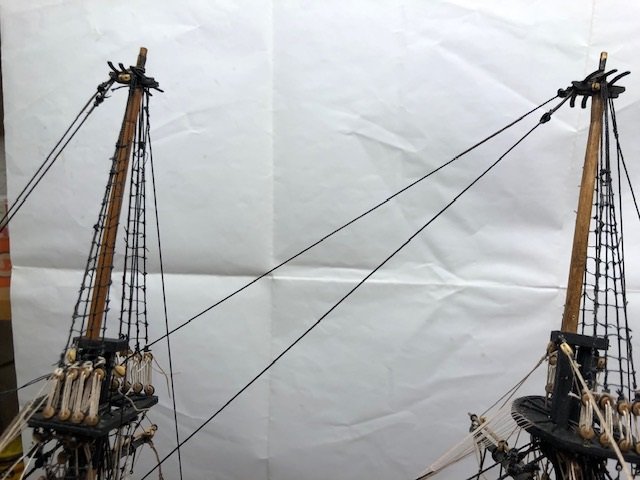
Main top stays in place. Couple of observations here: Making a mouse is an art beyond me. others have tried and they come out a little large. I decided to save time and just use the beads included in the kit: I was correct that the main top stay can be assembled off the model and installed. No problem there. Can't be done with the preventer stay as it has to pass down through the fore top and won't fit if the fiddle block is on the end of the stay. Found that out the hard way. Anyway, they are both ultimately secured to hooks and eyes at the foot of the foremast. Try and find them in this forest!
- 341 replies
-
- 10
-
-
- Sophie
- Vanguard Models
- (and 1 more)
-
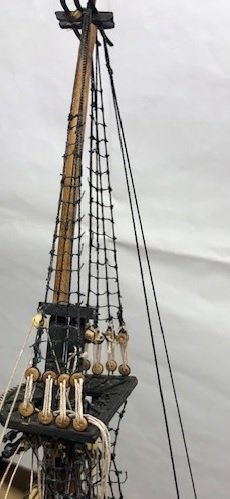
As to the main topmast stay and preventer, I'm going to try something different. The plan calls for a double block at the end of the stay where in goes to the deck. My muse (Delf), has substituted that fixture with a fiddle block. I don't know why, but I have about 15 fiddle blocks that I got from Chris way back when, so I don't remember why I bought them. Un any event I thought i would follow Delf's example and use a fiddle block there at the end as well. Also, I think I can assemble the main top stay off the boat and then attach. Maybe a little easier? Main top stay goes first because it runs through a block attached to the foremast below the hounds whereas the preventer stay goes through a block attached above at the doubling. Notice the block with the hook in the upper left. Its lanyard needs rigging through the fiddle block and then the whole assembly can be mounted on the ship.

- 341 replies
-
- 8
-
-
- Sophie
- Vanguard Models
- (and 1 more)
-
I'm sure Chris will be able to fill in the blanks. If not, let me know by PM. This can be remedied. Tblack
-
Nicely done. With your talent, it would have been a shame not to finish the model.
- 32 replies
-
- 1
-
-
- Model Shipways
- Miss Adventure
- (and 2 more)
-
Steve, I love your attempt to save money, but I find that if you go to a shop in CA that deals in trophies, you will find that they can engrave a wonderful plaque for your model for not too much money. Tom
-
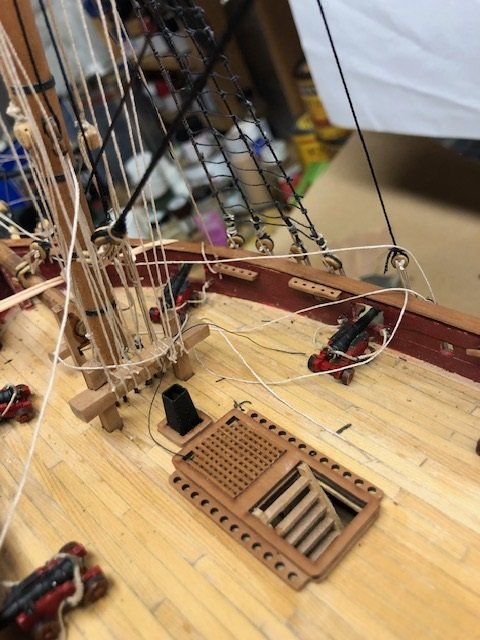
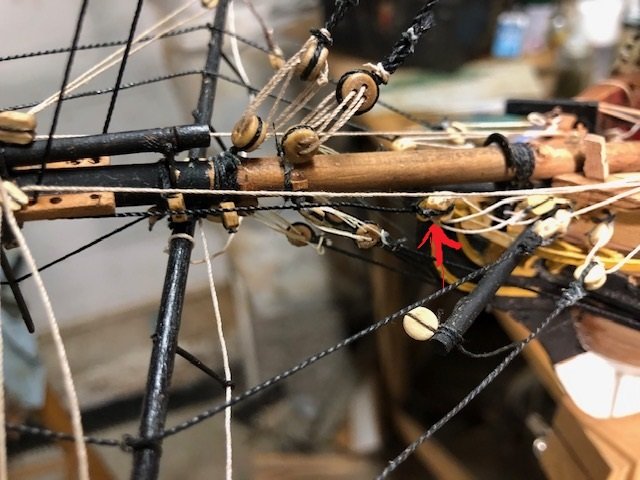
Thanks for the "likes" and attention. Trying not to bore you! There are many Speedy logs far better than mine. As I mentioned previously, my big challenge was in reconfiguring the hull to accommodate the aft cabin and quarter deck. I think I've done that, and the rest of this is just building out Speedy. Except that in the book there are references to royal sails. Gotta do that too. Anyway, one of my mentors (muses) is Delf from his log back in 2020-2021. One of his concerns is how to load the serving machine without wasting line. He splices extra line onto the end of the stay/shroud he is serving to cut down on the waste. I sympathize, and do it this way: Just grab the end of the line with an alligator clip, no need to wrap line around the nails! Maybe Chuck designed it that way to sell more line? Next up, I've gotten the foretop stay and preventer in place: We're looking at the preventer stay side. It comes down through the bees and ends aft in a double block (see crude arrow!). Then the fun part starts. There's a single block in that forest that has to hook on an eye in the hull. Took a bunch of tries, but I got it. On both sides!

- 341 replies
-
- 10
-
-

-
- Sophie
- Vanguard Models
- (and 1 more)
-
Thanks, Keith. I'm having the prostate problems that most of us old guys get. I believe that we're on top of it; it hasn't spread. I'm my college class secretary, and I do a monthly newsletter that, this month, included a poll: "how many doctors do you have?". Seems like, at our age (80+) 6-7 is about right.
- 341 replies
-
- 4
-
-

-
- Sophie
- Vanguard Models
- (and 1 more)
-
One other thing. My picture of me and my grandson is out of date. He's now 15 years old and doesn't need me to read to him. So I'm going to up-date from this: T to this:


- 341 replies
-
- 9
-
-
- Sophie
- Vanguard Models
- (and 1 more)
-
Been awhile since I've written anything. I think I mentioned that I hate doing ratlines. It's tedious and they never come out looking ship shape. But I finally ran out of excuses to putting them off and finally finished their installation. Also, put in the top mast backstays, and I'm now letting the glue dry on the serving for the forestay.
- 341 replies
-
- 5
-
-
- Sophie
- Vanguard Models
- (and 1 more)
-
Phil, Looks like you've got some pretty good plans as a starting point. Tom
- 465 replies
-
- 2
-
-
- minesweeper
- Cape
- (and 1 more)