


usedtosail
-
Posts
2,421 -
Joined
-
Last visited
Content Type
Profiles
Forums
Gallery
Events
Everything posted by usedtosail
-
 This will be the second Beagle model that I will build. I built the Mamoli Beagle model many years ago and gave it to my son. Since the OcCre kit is fairly new and is supposed to be a better representation of the real ship I was intrigued enough to buy it and build it. I am a retired engineer and scientist so besides the fact that this ship was so important because of Charles Darwin, it was also a survey and hydrographer ship which I think is really cool. I have the Anatomy of the Ship (AOS) book for the Beagle, which I used for the previous build and will use for this one too. I opened the box today and at first glance the contents look OK. After building a few modern kits from companies like Vanguard, I realize how these kits from older European companies are really lacking in the realism of some of the smaller details. I will try to improve them as I go along. This kit comes with sails that are way too thick but I haven't ruled out using them yet. Maybe I'll use them as patterns for more appropriate sails. I may be starting this model this week, but don't expect to really get into it until after the holidays.
 -
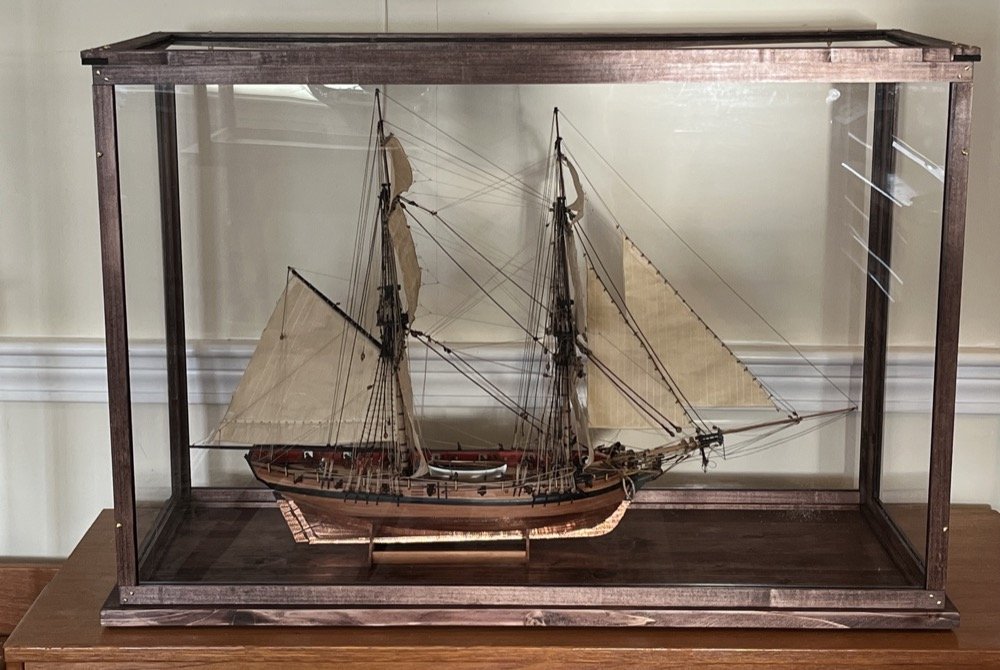
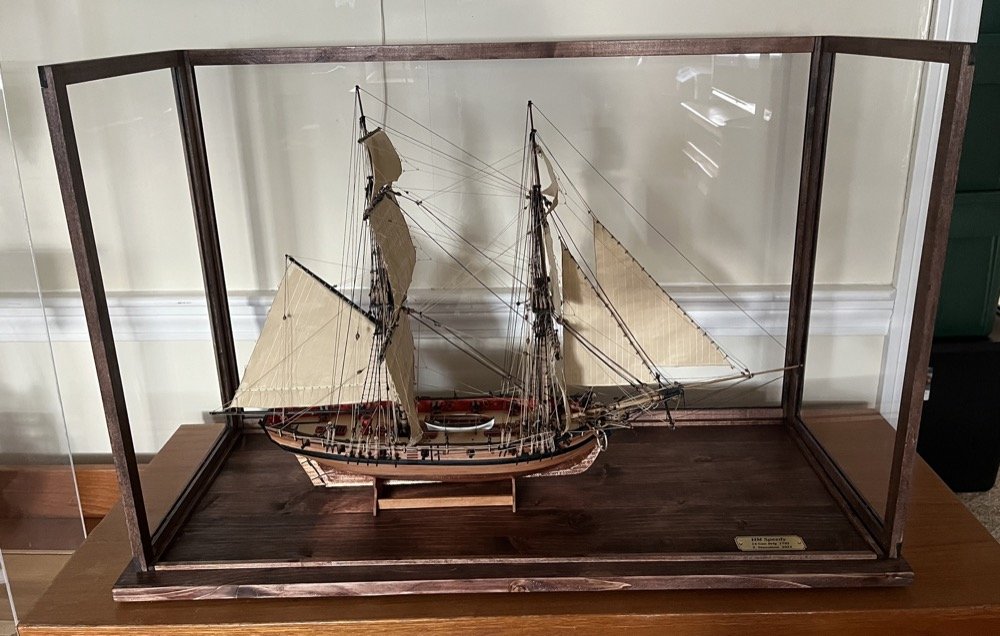
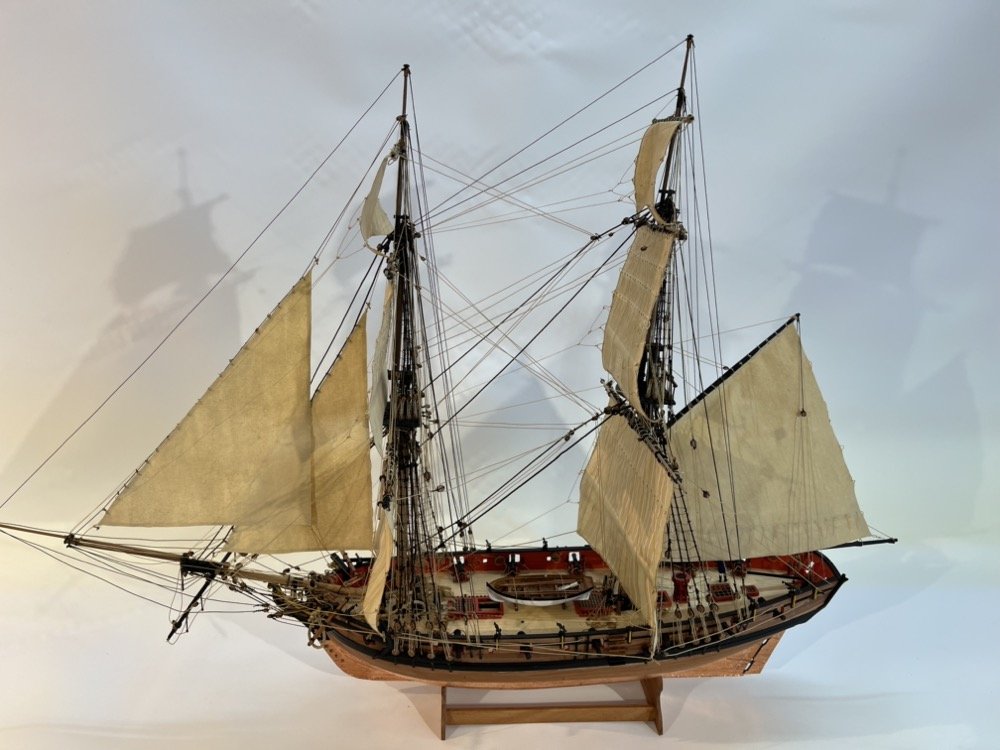
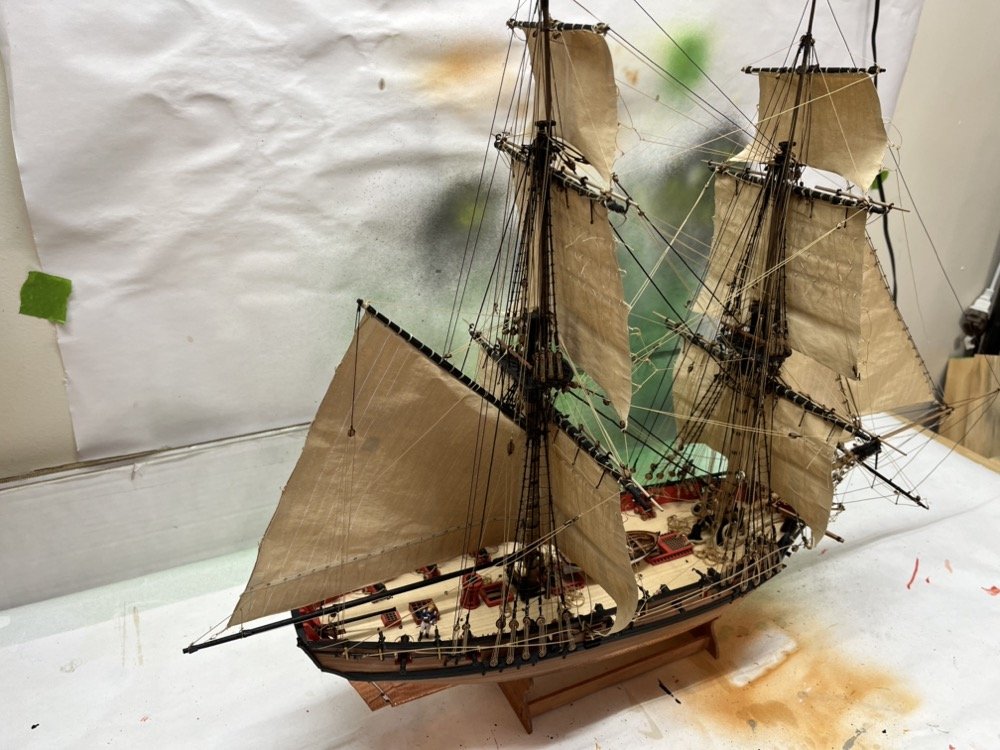
Just a couple of last photos of the model going into its case and the final result. I will hold onto it for a few years until my grandson is old enough to care for it and then move it into his room at his house.
- 144 replies
-
- 16
-

-

-
- HMS Speedy
- Vanguard Models
- (and 1 more)
-
Help with depicting extra line on bitts
usedtosail replied to usedtosail's topic in Masting, rigging and sails
TBlack - I couldn't agree with you more. Chris? Gregg - If you haven't figured it out yet, that is one of the magnetic arms removed from the yellow base and stuck to a 123 block as a base. -
Here are pictures of the completed model. I will set up a gallery with more photos in it.
- 144 replies
-
- 17
-
-
-
- HMS Speedy
- Vanguard Models
- (and 1 more)
-
Help with depicting extra line on bitts
usedtosail replied to usedtosail's topic in Masting, rigging and sails
Welfalck my model is finished. I could do all the research I want now but I can't change it without undoing almost all the running rigging and I am not going to do that. SO future builders of the Vanguard Speedy kit, don't do what I show, but completely redo the belaying plan that comes with the kit and build new a whole new fore bitt with lots of belaying pins or add a lot more pin rails along the sides or put many lines on each belaying pin that is there now. Or just cut the lines at the bitts and be done with it. Your choice. -
Help with depicting extra line on bitts
usedtosail replied to usedtosail's topic in Masting, rigging and sails
Gregory - these bowlines are from the main sail so they go forward to blocks on deck before the fore mast then back to the fore bitts on this model. -
Help with depicting extra line on bitts
usedtosail replied to usedtosail's topic in Masting, rigging and sails
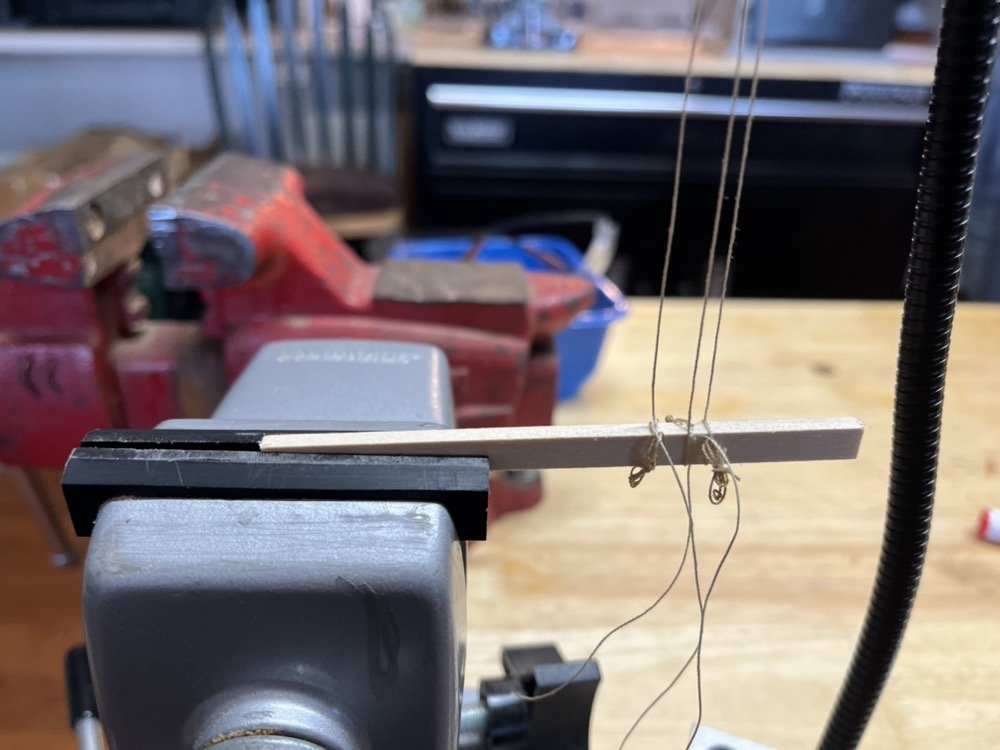
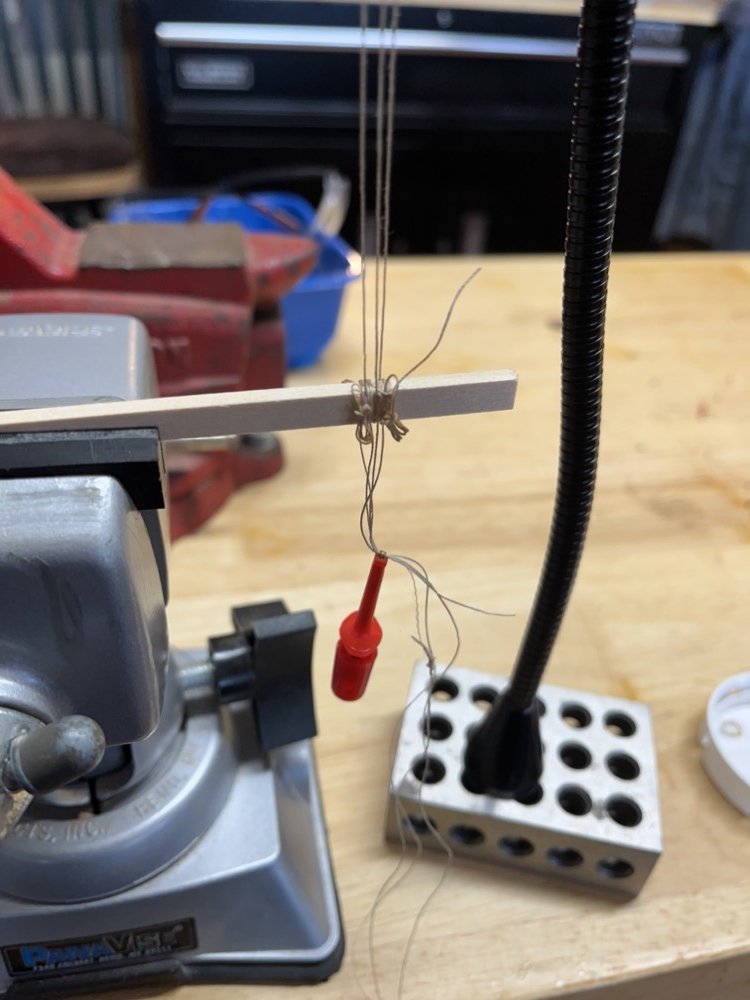
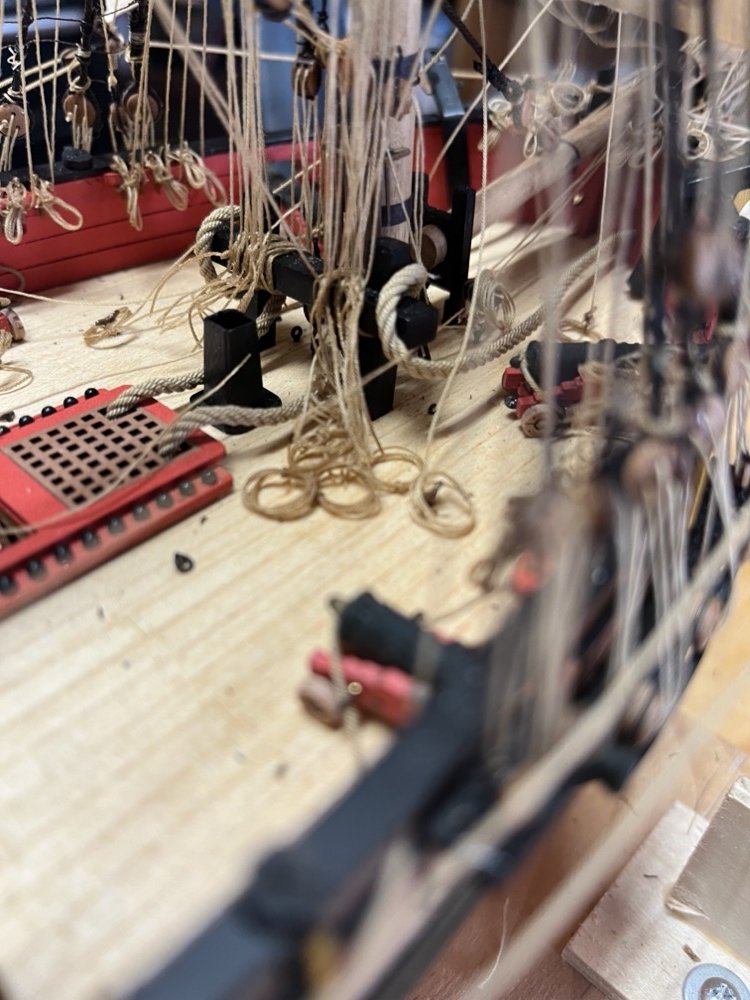
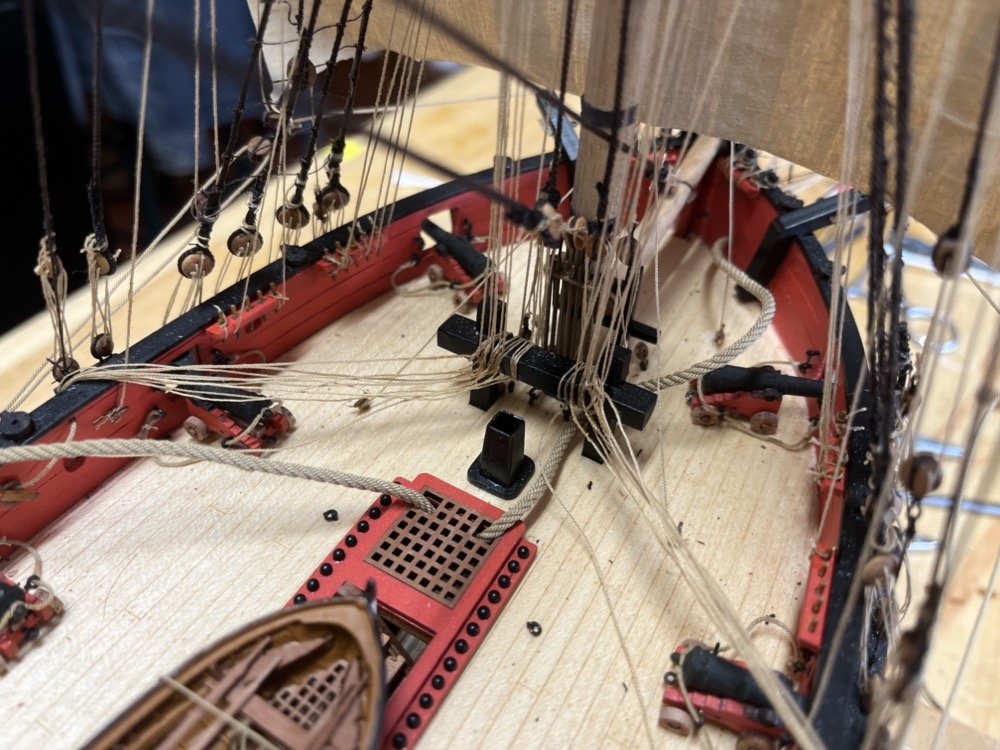
Thanks for all the great responses here. First of all, I agree that this whole arrangement of lines on the bitts is not historically accurate. BUT if one follows the plans as they are shown, can we still come up with a more realistic representation of the lines on the bitts. I set up a simple test rig and tried some different ways to add rope coils. Here is the test rig. I first added rope coils like you would put on a belaying pin to each line before tying the line to the bitts. I alternated the sides that the lines were tied so the rope coils on adjacent lines were on opposite sides of the bitts, providing room for more coils. You can see this on the two right lines of this picture. My rope coils suck so don't judge me on them, but I think this looks pretty good. It does require that the coils are added as the lines are tied, not after like with belaying pins, so some planning is needed before rigging is started. Then I tried adding a rope coil to a line that was already tied to the bitts, which is the line on the left in the above photo. I just ran the excess line through the rope coil and tied another knot. This worked OK too but would probably have to be done before fixing the first knot so the line is still flexible. I then looked for a way to add rope coils after the lines are all tied on the bitts and maybe even cut off flush with the bitts. I tied a single line to one end of the row of lines, then wrapped it around the bitts between each line. For each wrap I slid a rope coil onto the line. Then when the wrap was tightened, I adjusted the coil to one of the sides of the bitts, again alternating sides with each wrap. I tied off the last wrap back to itself. Again I think this looks OK but could be pretty tricky depend on how accessible the bitts are. I am not going to try these on my Speedy at this point but I hope this whole discussion helps future modelers.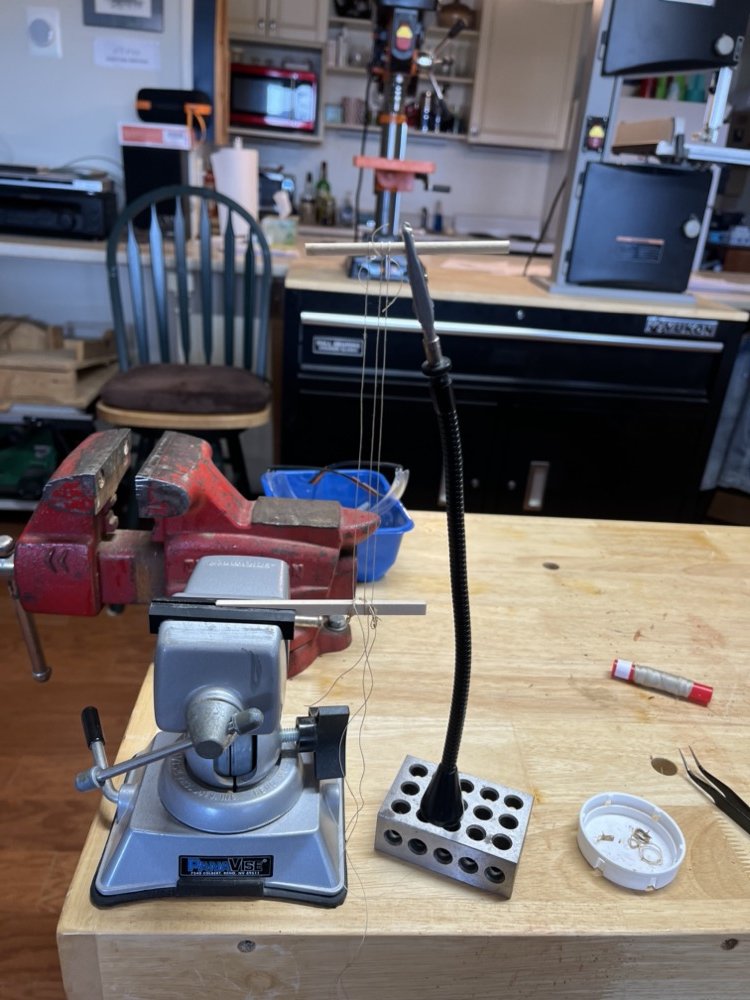

-
Help with depicting extra line on bitts
usedtosail replied to usedtosail's topic in Masting, rigging and sails
In the rigging plan for this model, which is spread out over 4 different plan sheets, there are 23 individual lines attached to the fore bitts. I'd have to go back to the plans to identify all these lines, but for sure they include all the sail lines - buntlines, clewlines, some of the bowlines, sheets for the topsails and topG sails, and braces. There are no belaying pins associated with any of the bitts and there would not be enough room for 23 pins on them anyway. So I'll break this down into a couple of questions. If, as many models do, there were just 2 lines tied to the bitts, with no belaying pins, how would the working end of the line be shown? Maybe a coil that hangs on the ends of the bitts? The other question is what to do when the instructions for the model show many lines on the bitts like this one? What is more incorrect, showing the lines cut off at the bitts or showing rope coils on the deck? Both seem wrong to me. If the model tried to include enough belaying pins along the rails for all these lines there would not be enough room by a lot. Would having multiple lines on individual belaying pins be acceptable? There would have to be three or four on each pin for this model to fit them all. Getting philosophical here, I guess it all comes down to resolution and fidelity of the modeling process. We can only show a depiction of the real ship at whatever scale we are working on and have to make choices about what to show and how to show it. The model designer gives us a starting point, but it is up to us to work out the best depiction at the modelers skill level and comfort zone. -
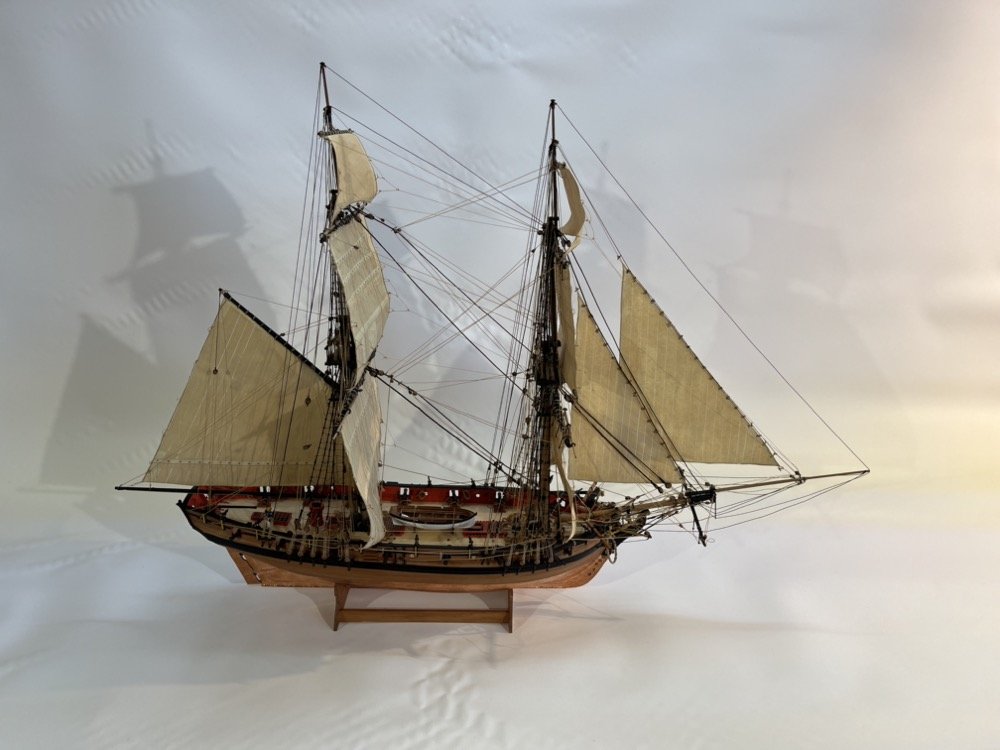
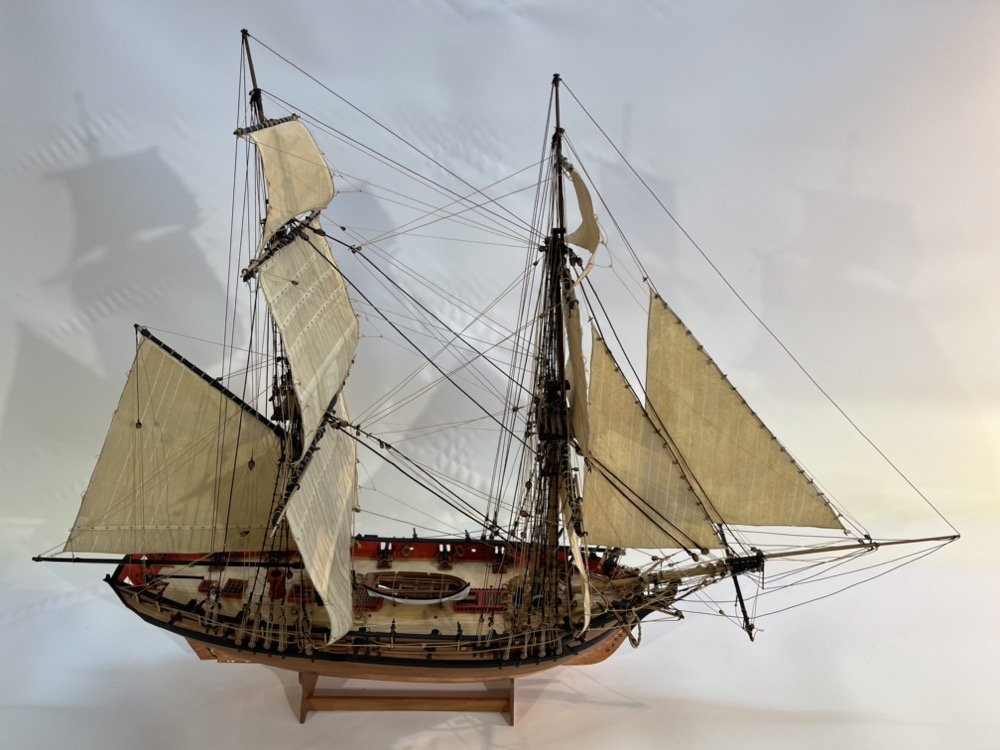
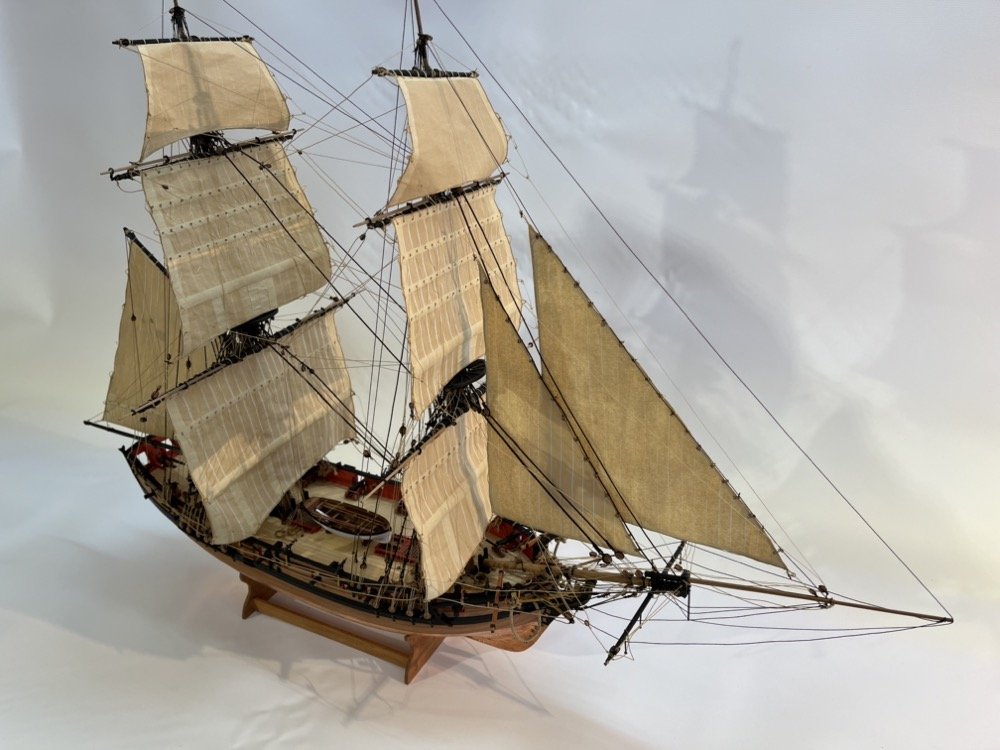
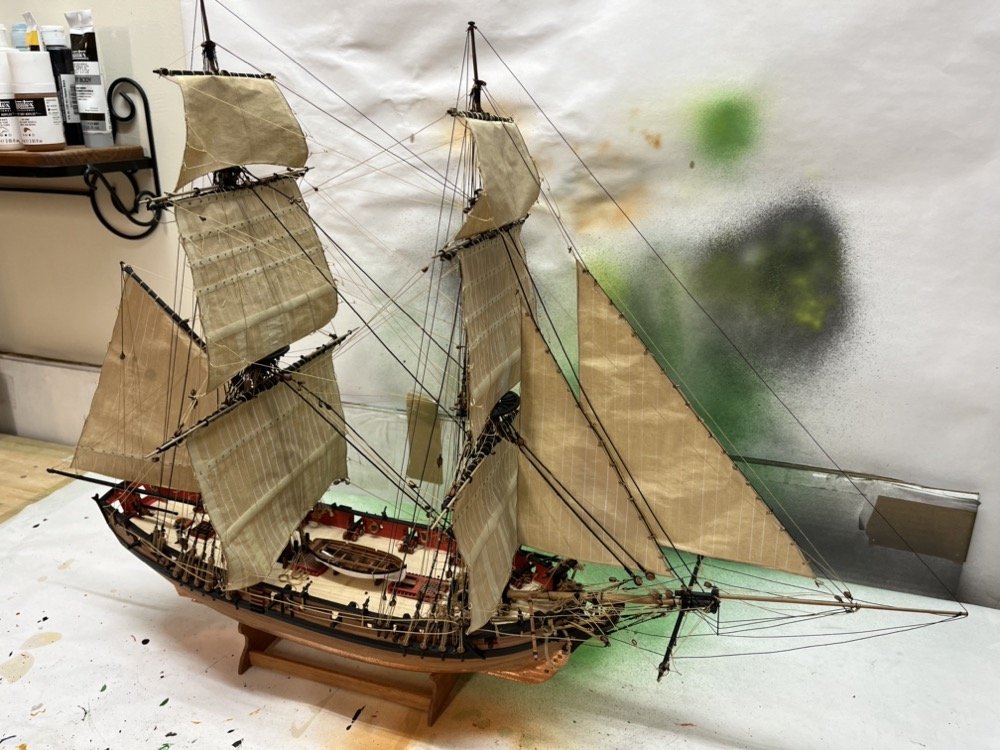
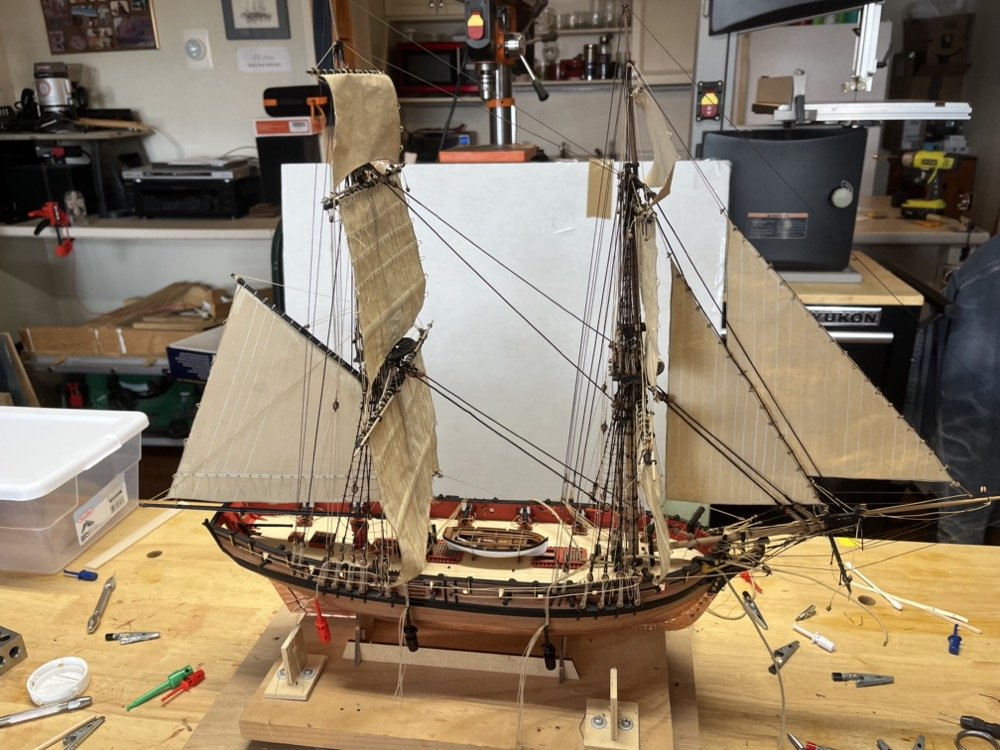
Captain Cochran has joined the party so this model is now finished. I finished up the anchors and added the swivel guns too. I used a straw and gently blew the dust and other crude from the deck. Here are some quick photos but I will take some decent photos soon. Thanks for taking an interest in this build.
- 144 replies
-
- 13
-
-
-
- HMS Speedy
- Vanguard Models
- (and 1 more)
-
Help with depicting extra line on bitts
usedtosail replied to usedtosail's topic in Masting, rigging and sails
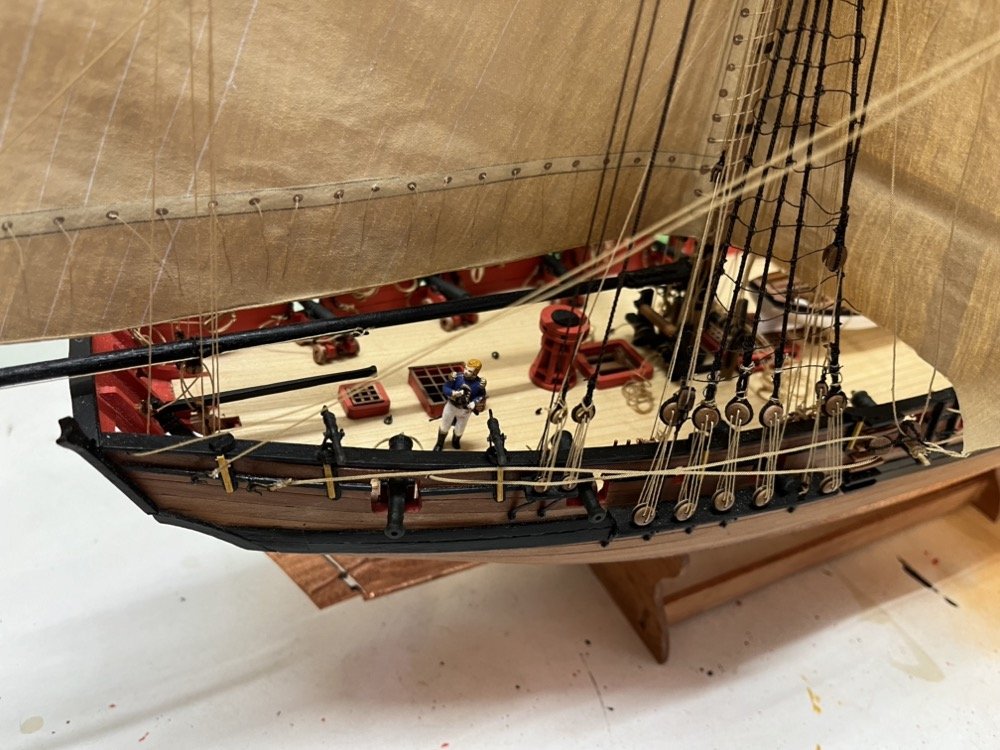
Here is a photo of how David Lester finished these lines on his beautiful Speedy. I must say it looks much cleaner than mine by not showing the extra line for the lines on the bitts. This is the only photo I could find of this area of a completed Speedy build. -
Help with depicting extra line on bitts
usedtosail replied to usedtosail's topic in Masting, rigging and sails
Thanks guys. Henry - I just followed the plans that came with the model for these lines. There are belaying pins with other lines on them but not enough for the lines shown on the bitts. -
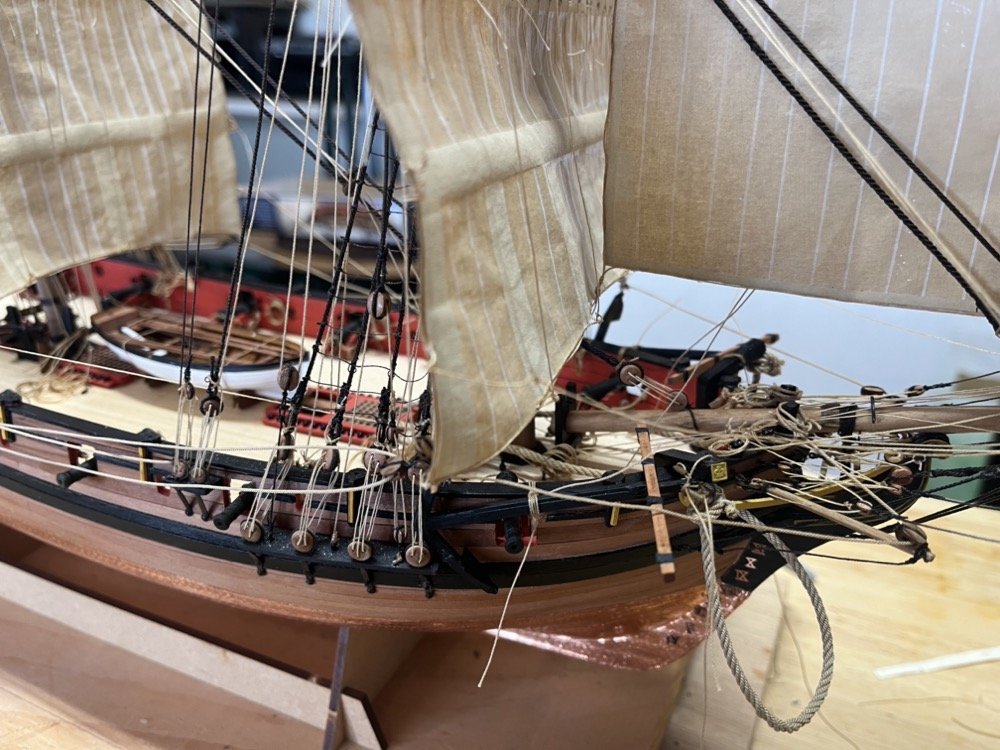
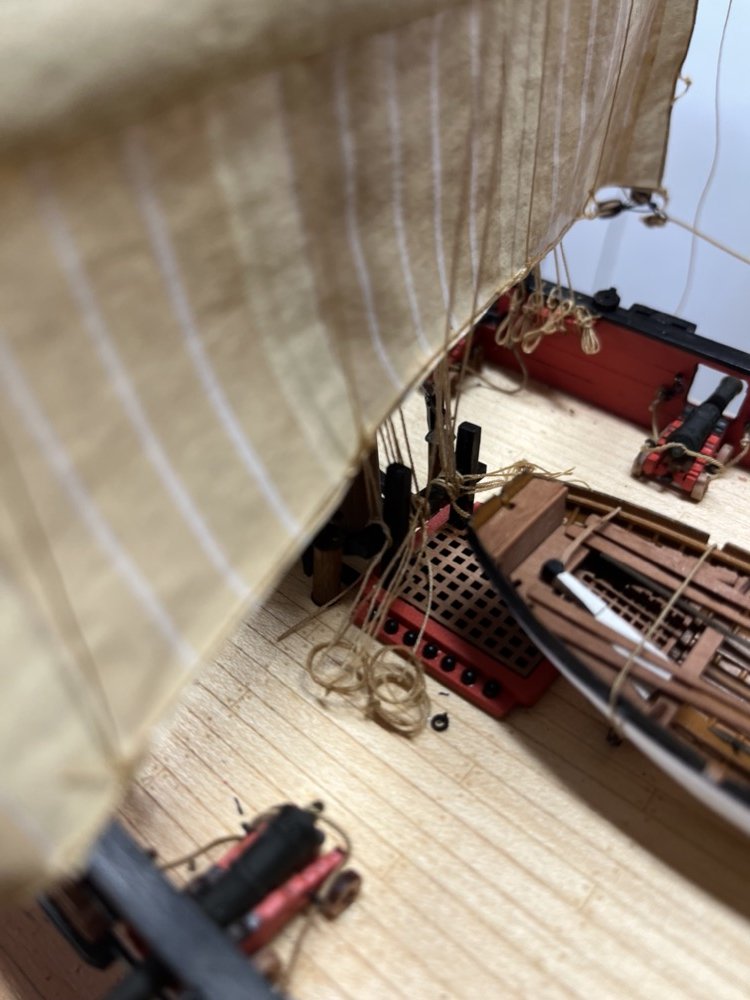
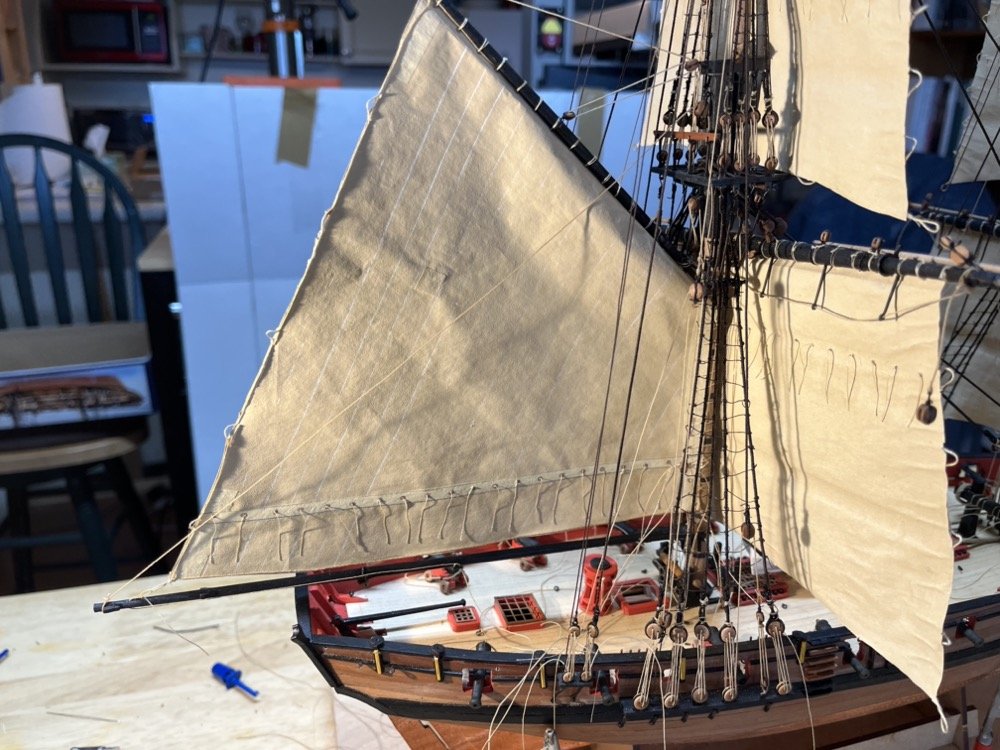
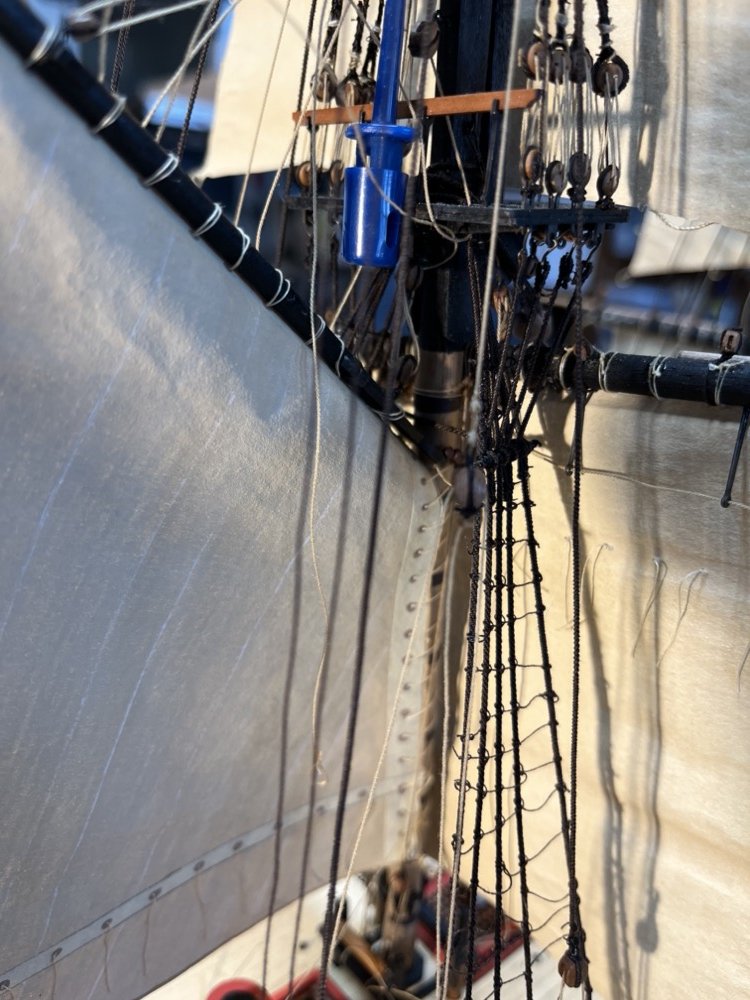
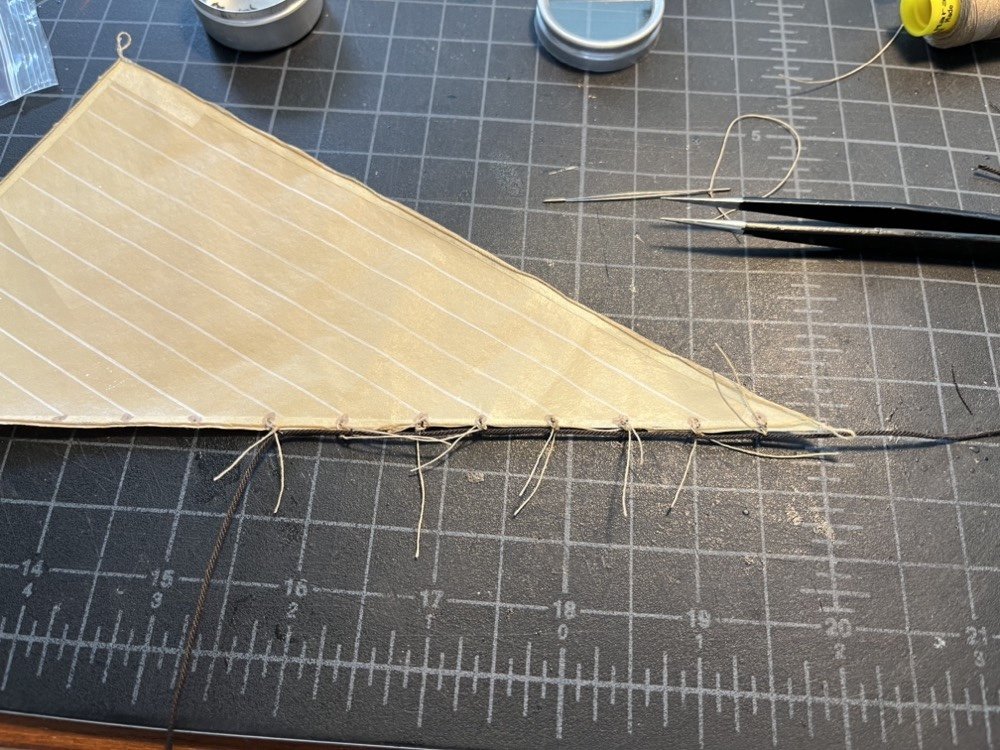
So the problem I have yet to find a solution for is how to show excess line for lines that are tied to bitts? On lines on belaying pins a rope coil is used but what do you do when a line is tied around a bitt? On the Vanguard Speedy model there are many lines tied to the fore bitts as you can see here. In the photos in the Instruction book they show the lines just cut off at the bitts so no excess line is shown, which to me is not realistic. I tried running a rope coil down each line but there are too many of them to have that many rope coils hanging off the bitts. What I settled on was to run the individual lines down to the deck and put rope coils over the ends. There are less coils than there are lines but I think it depicts things OK. I doubt that on a real ship there would be piles of rope laying around on deck so I am really curious how you other modelers have dealt with this issue. Thanks.


-
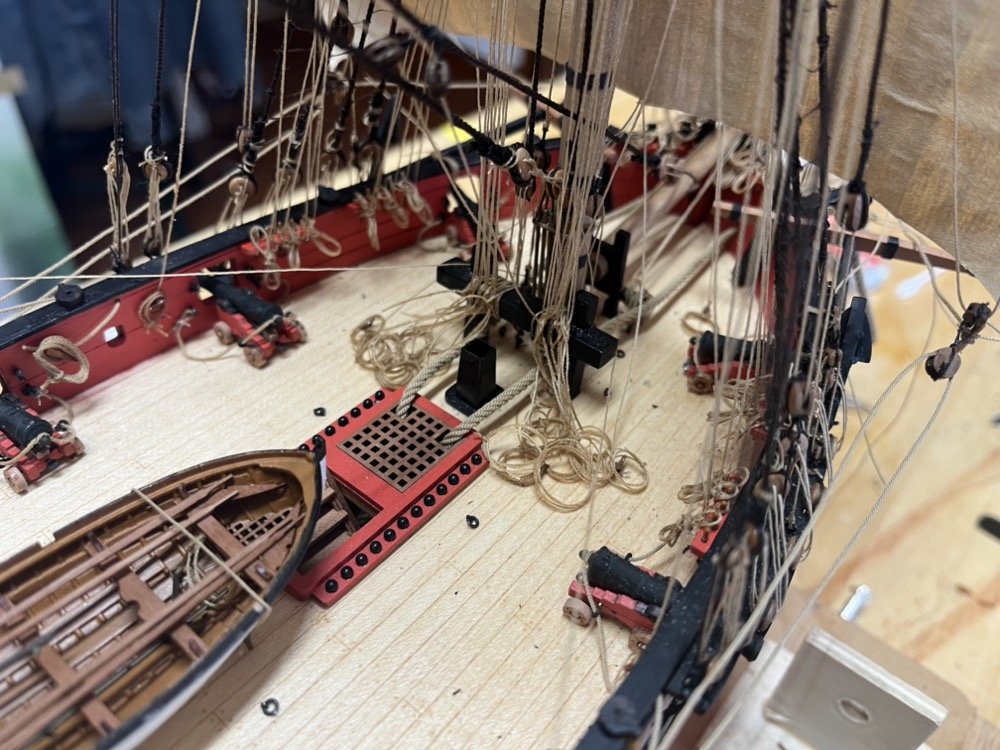
I am getting close to the end now. I finished making rope coils and have added them to the deck areas and belaying pins that have rope on them. I secured a few loose cannons that I bumped during the rigging process. I have tied the anchors to the anchor lines and then lashed them to the hull, both through the first gun port and the cat heads. I need to clean up the excess lines and drape the anchor lines around the fore bitts. Here is the deck area I showed in the previous post with more rope coils added. I doubt in a real ship that there would be piles of rope lying on the deck but I have no idea how else to show the excess lines that should be there. The photos in the instruction book show the lines just cut off at the bitts with no excess shown at all, which is not realistic to me. I did a search for rope coils on bitts but found nothing, so I am going to start a thread in the rigging section to see how others have dealt with this. Here is the starboard anchor lashed to the model. I am only putting one anchor on each side. Once the model is complete I will be making a case for it which should take another couple of months.
- 144 replies
-
- 7
-
-
- HMS Speedy
- Vanguard Models
- (and 1 more)
-
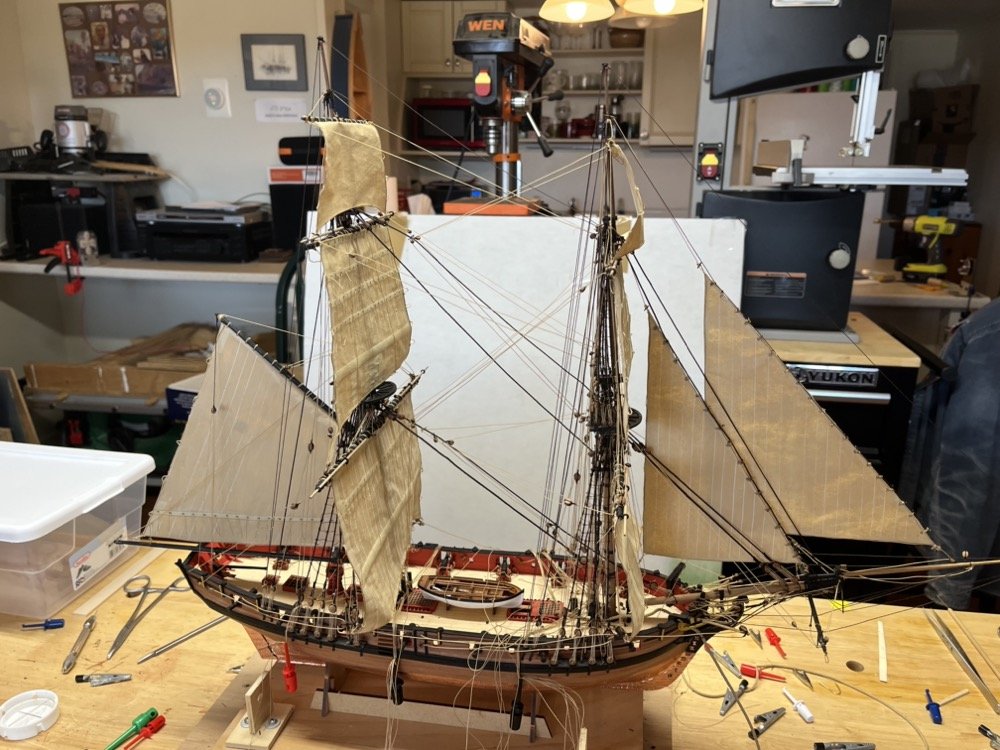
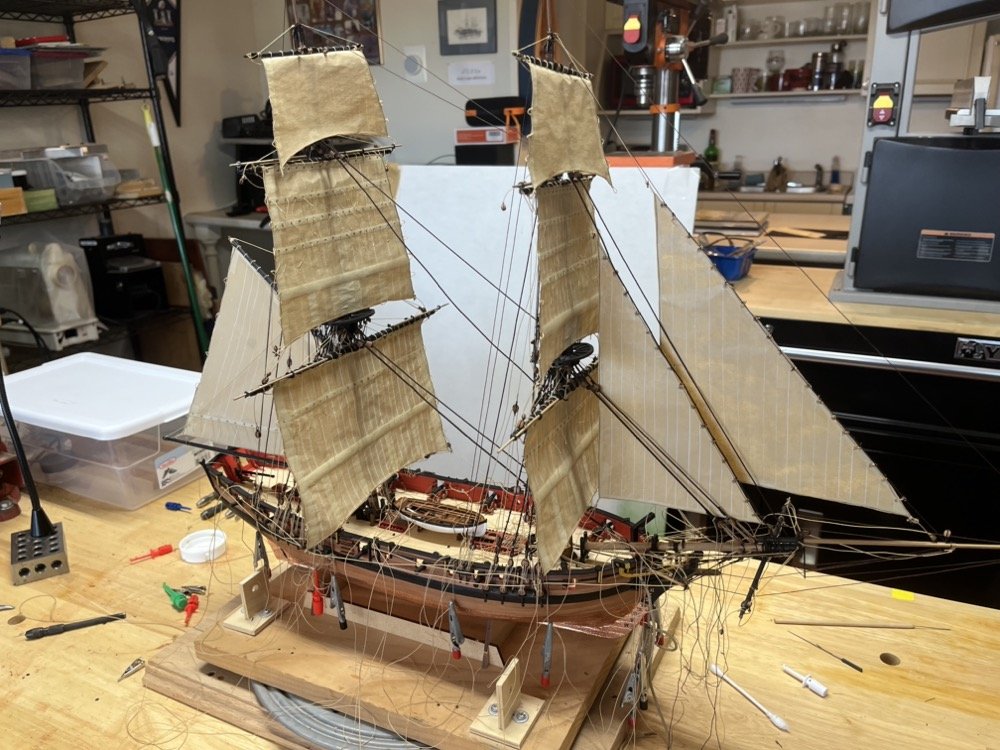
All the bowlines are installed and tied off. I have started adding the rope coils to the belaying pins and cleats, with only a few left to add. I have been playing around with the many lines on the bitts and how to add rope coils to them. What I came up with was to cut the excess line a little longer so the lines tied to the bitts can reach the deck, then glue rope coils on top of the lines. Here is the first layer of rope coils on the fore and main bitts. After these dry I will add more, but not as many as there are lines, as I think that would not look good. I am still making rope coils and will add them as I make them. I also need to re-glue a few cannons to the deck, and add the anchors, swivel guns, and Capt. Cochrane.
- 144 replies
-
- 11
-
-
- HMS Speedy
- Vanguard Models
- (and 1 more)
-
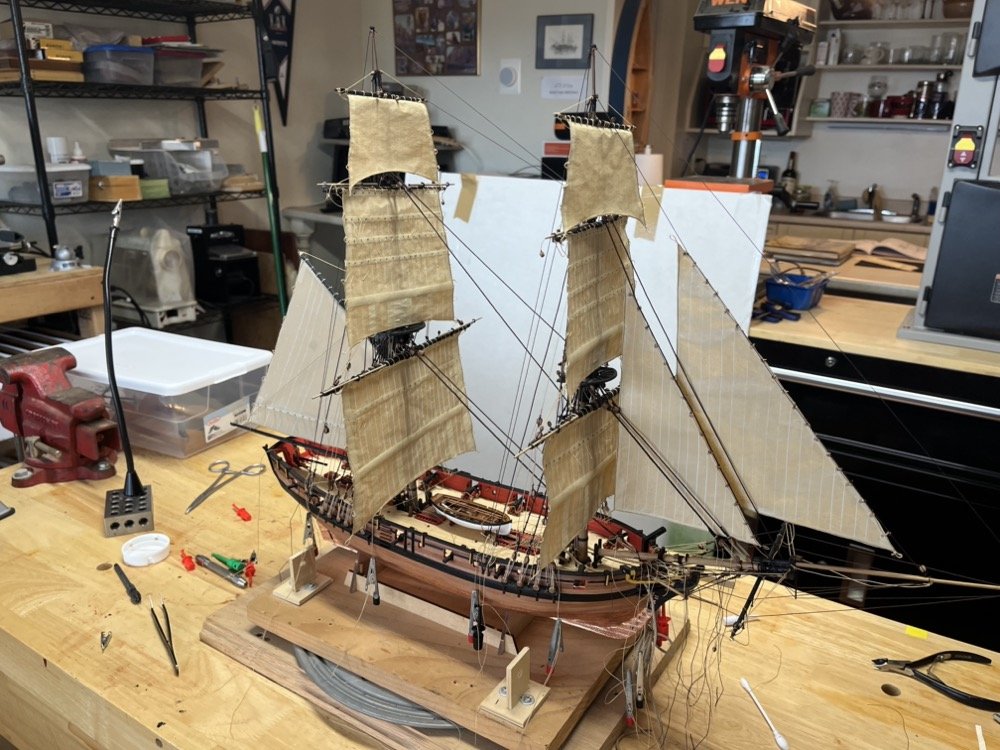
After almost 2 weeks away, I am back onto this model. I added the fore sail bowlines and tied them off to the fore bitts. I am now working on the main sail bowlines and still making rope coils.

- 144 replies
-
- 10
-
-
- HMS Speedy
- Vanguard Models
- (and 1 more)
-
Braces are all installed and tightened. I also added the vangs to the gaff. Next up are the bowlines. I have also been making a lot of rope coils, both to go on belaying pins and others to go on cleats and layer on the deck. I am waiting to add them until all the lines are installed.
- 144 replies
-
- 12
-
-
- HMS Speedy
- Vanguard Models
- (and 1 more)
-
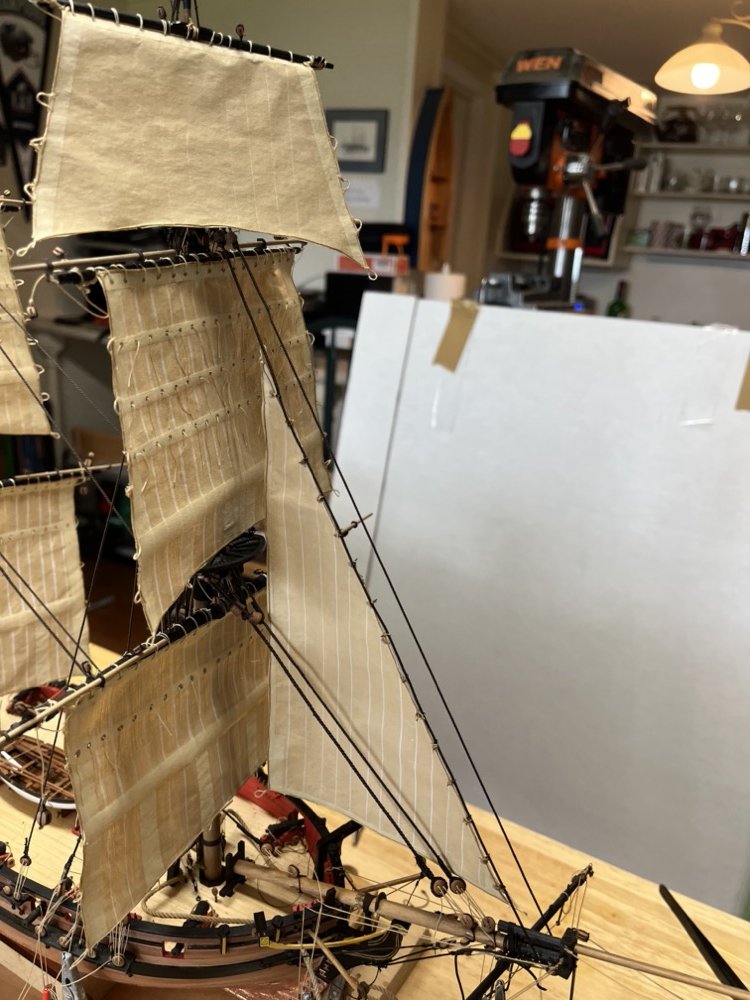
I finished adding the sheets, clew lines, tacks, leech lines and bunt lines to all of the sails. I tied off the ends of all the lines so far and fixed them in place. I trimmed the lines that ended at cleats or belaying pins but not those that are tied to the fore or main bitts. There are so many lines tied to the fore bitts, as per the belaying plans on each rigging sheet, that I am not sure how to finish these off. Do I lead each line down to the deck and add a rope coil for each one, but they would have to be stacked on one another. I thought about making some bigger rope coils and draping them over the bitts but haven't tried it yet. Any ideas you guys have would be appreciated. Some of the braces are also tied to the bitts so I won't add anything until all the lines are on the bitts. I am now starting the braces and then will finish off with the bowlines. I still have the lines that go down from the ends of the gaff to add and the anchor lines to wrap around the fore bitts also. Plus adding rope coils to the lines on the belaying pins and cleats, but it is getting close.
- 144 replies
-
- 11
-
-
- HMS Speedy
- Vanguard Models
- (and 1 more)
-
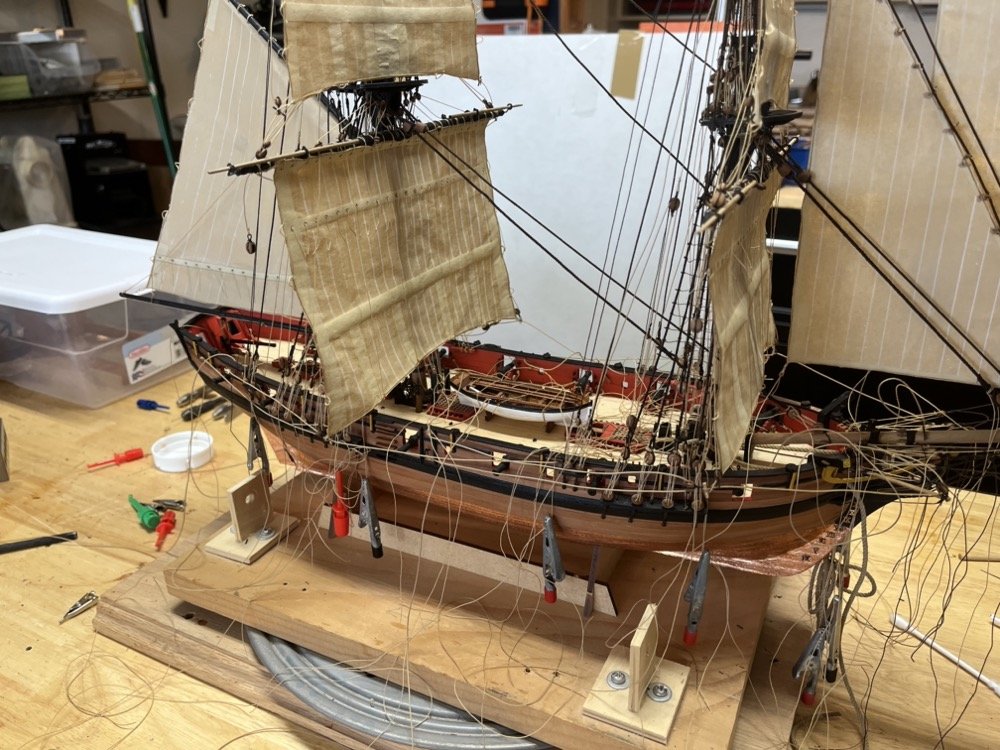
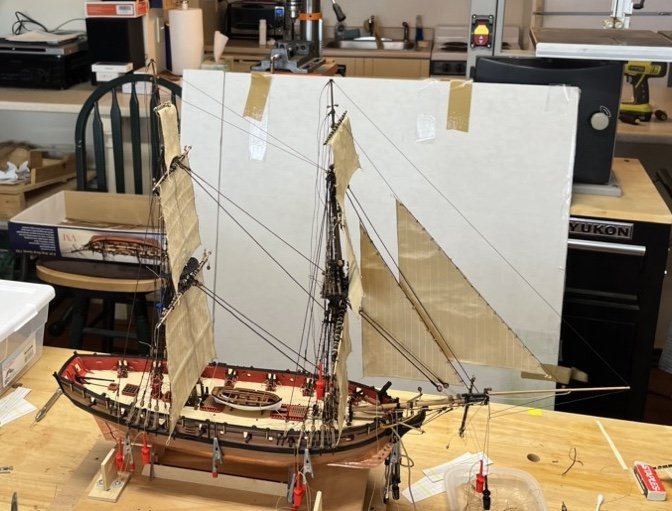
I have added the sheets, tacks, and clew lines for the courses but have not tied them off yet. I used a thinner line than suggested on the plans as those lines just looked too thick. I also added the leech lines and buntlines to the courses and added the sail control lines to the jib and topmast staysail. I am currently adding the sheets and clew lines to the topsails and topG sails, and the leech lines to the topsails.
- 144 replies
-
- 14
-
-
- HMS Speedy
- Vanguard Models
- (and 1 more)
-
Thanks Andrew. I will be addressing the rat lines as they are now to see what I can do to make them look better. I may be able to replace the few worst ones and clean up the rest.
- 144 replies
-
- 1
-
-
- HMS Speedy
- Vanguard Models
- (and 1 more)
-
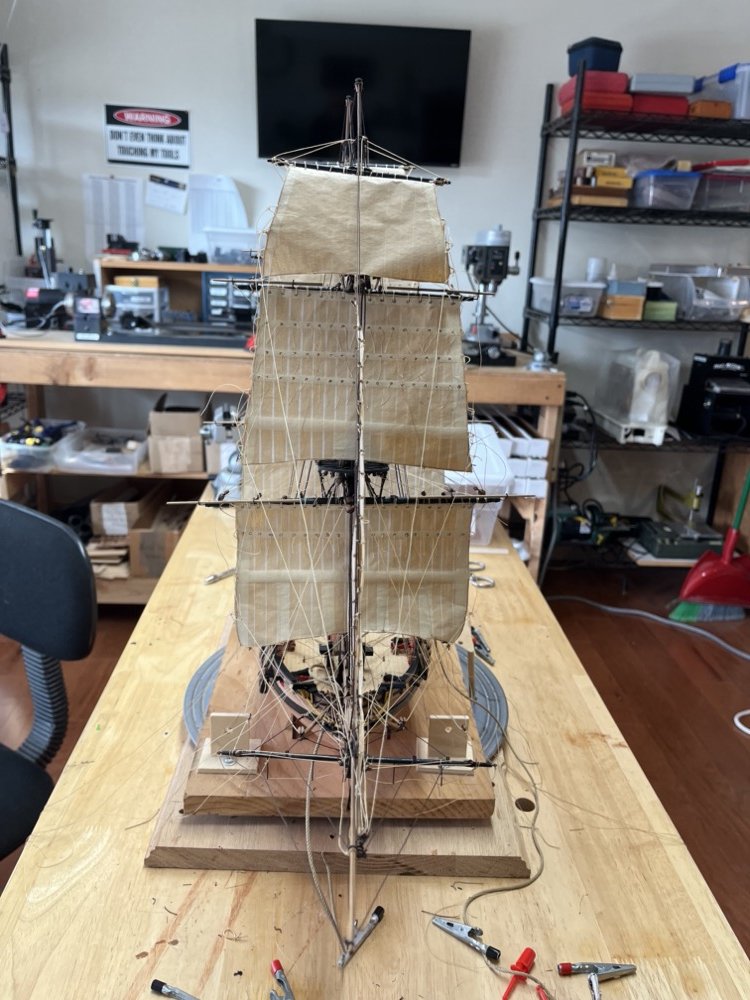
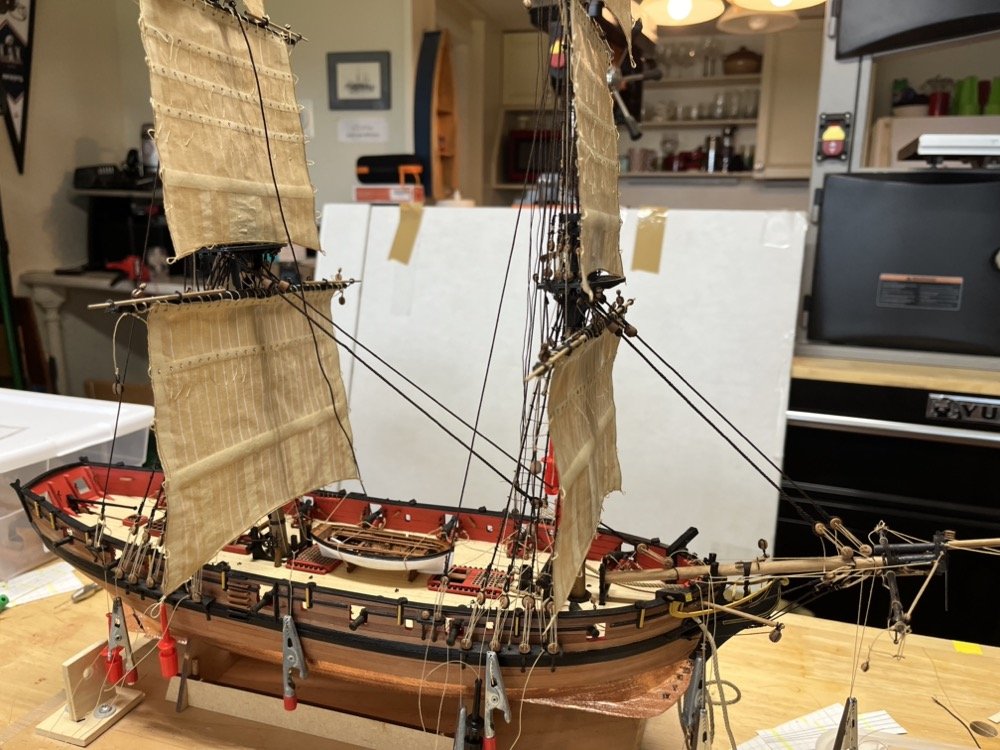
I finished up the rigging on the driver boom and moved on to the adding the lift lines to the yards. I started with the lower yards and worked my way up to the topG yard lifts. I think the hardest part of adding these was threading the lines down through the mast tops to the deck without having them foul other lines. I also added the jib boom guys to the bowsprit, which go through eye bolts on the sport sail yard and end with tackles hooked to eye bolts in the hull. These were pretty straight forward. I am now to the point of adding the sheets, tacks and other sail control lines. I have also been going back and replacing lines that I didn't like the look of, mostly because I had already tied them off and trimmed them but they have gone slack. I am really not happy with the ratlines. As you can see in the close up picture in the previous post, the knots have not stayed tight and many off the end knots have come loose. I may go drastic and remove them all and redo them, even though I have to work around other lines now. I have not have this problem to this degree on past builds, but I used a polyester thread on this model where I usually use nylon thread. In any case here how the model looks at this point.
- 144 replies
-
- 6
-
-
- HMS Speedy
- Vanguard Models
- (and 1 more)
-
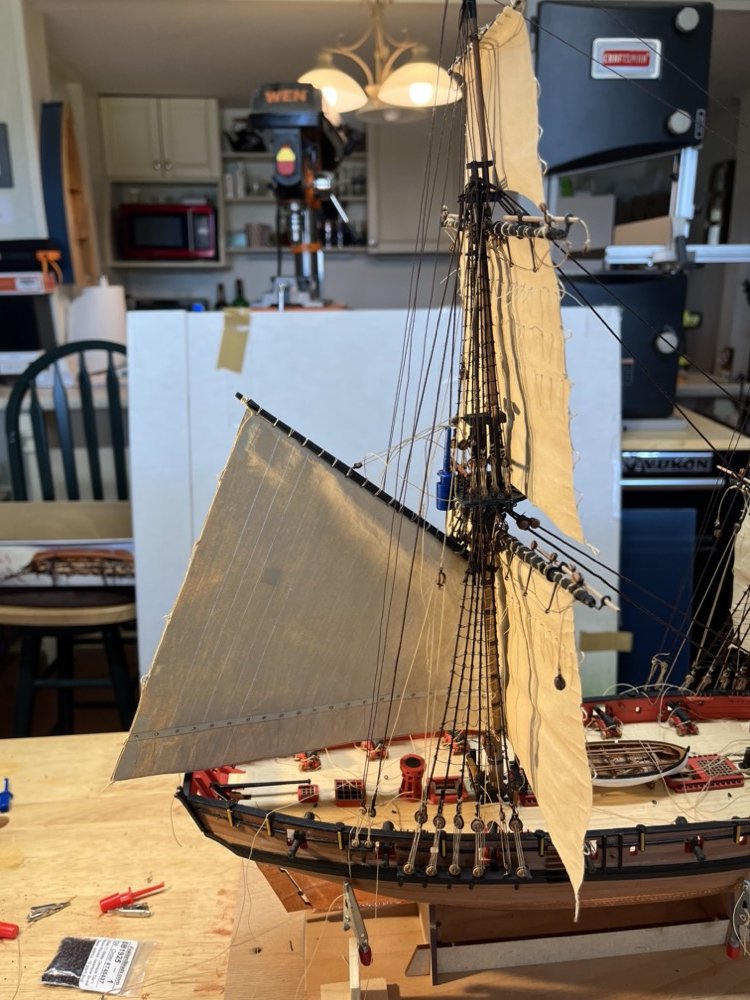
Thank you Mustafa and the likes. All the stays and back stays are now in place and secured. I had already added the yards to the masts except for the gaff and drive boom, so those went on next. I started with the gaff which already had the driver sail bent on. I threaded the parrel line around the mast, after partially rigging the topping lift and gaff tie to hold the gaff up, and tied there parrel line off to the other side of the gaff. I then ran a line around the front of the driver sail and wrapped it around the main mast to hold the sail to the mast. At this point I finished rigging the gaff lines in preparation for adding the driver boom. I made the driver sail to be loose footed so it is only attached to the boom at the front and back. For the front attachment I added an eyebolt to the top of the boom and for the back I drilled a hole through the boom. I added the parrel line around the main mast and tied it off, then added the topping lift and tackle. I tied lines to the front and back of the sail. I threaded the back line through the hole in the boom and tied it off to the cleat on the side of the boom. I have yet to thread the front line through the eyebolt or add the sheet tackle, but here is how it looks so far. Once I finish here I'll start on the yard lifts.

- 144 replies
-
- 7
-
-
- HMS Speedy
- Vanguard Models
- (and 1 more)
-
Yes those look nice but mine won't look like that. I am going with David Antscherl's advise in the sail making supplement to the Fully Framed Model that unless you have the ship in a diorama not to have it look like it has wind in the sails. I have the main topG and royal stays in place and have bent the flying jib to the fore topG stay. I had to remove the stay from the hanks (don't ask) and replace it on this sail but I found it was pretty easy to do. The fore royal stay is also in place, but I still need to finish threading these through the blocks on the bowsprit and add the tackle lines. The fore royal stay just goes over the end of the flying jib boom, so I used a small file to file a groove into the end to help hold it in place better as it kept sliding off the end. After I get all the stays installed I am going to go through and tie off many of the lines before finishing the rigging of the yards.
- 144 replies
-
- 10
-
-
- HMS Speedy
- Vanguard Models
- (and 1 more)
-
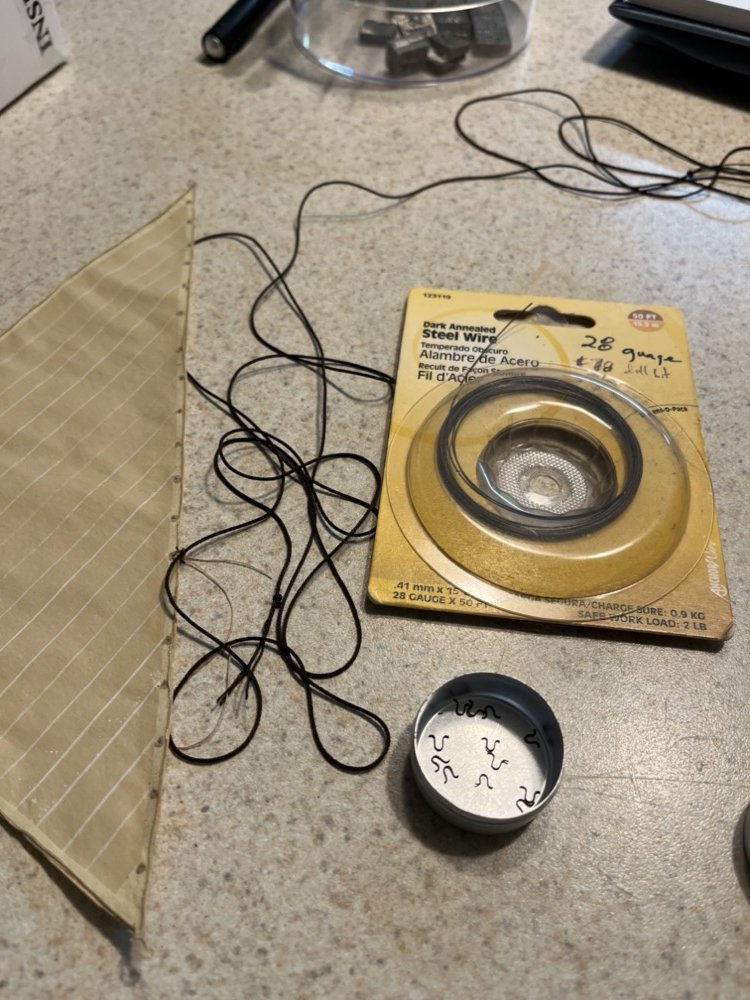
I added the fore and main stays and preventer stays. I left the lanyards loose in the deadeyes in case I need to adjust them after the other stays are added. I then started on the topmast stays. The fore topmast stay is where the jib sail is bent so first I needed to figure out how I was going to attach the sail to the stay, since I wanted to do this on the bench and not on the model. I decided to use metal hanks so I bent a bunch from 28 gauge black steel wire. I also experimented with tying them to the sail. This is what I came up with. I started by sliding one of the hanks around the stay and pinching it closed, then looping a length of line around the two "horns". I ran the line through one of the eyelets on the sail and looped it a couple of times, then put those loops over the horns and pulled the line tight. As a final step I looped the line over the horns one more time and added a half hitch to hold it all together. After doing this for all the eyelets, I positioned the sail along the stay and fixed the knots with shellac. I looped the stay with the sail around the mast and around itself, then seized the loop into place so the sail was at the right height and fixed the position of the mouse. I then threaded the other end of the stay through the bees and seized the tackle to the stay. The other topmast stays were more straight forward because they didn't have a sail on them. Next up are the topG and royal stays.
- 144 replies
-
- 10
-
-
-
- HMS Speedy
- Vanguard Models
- (and 1 more)
-
They will get a little more shape once the sheets, tacks and bowlines are added but I don't plan to shape them like they are full of wind.
- 144 replies
-
- 1
-
-
- HMS Speedy
- Vanguard Models
- (and 1 more)

