

Usgecko
-
Posts
73 -
Joined
-
Last visited
Reputation Activity
-

 Usgecko got a reaction from Knocklouder in US Brig Niagara by Usgecko - Model Shipways
Good day!
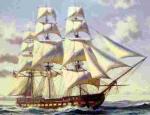
This build log will cover the second wooden model ship I am tackling, after the Drakkar Amati.
Unlike the Drakkar I decided to do a build log of this.
Why the Niagara - two reasons:
My wife is from Erie PA where the reconstructed Niagara can be found, and thought that this should be my next build - who am I to disagree especially as she purchased the kit! I like the lines of the ship and it is simpler than other multi deck models out there
Pictures of in progress build to follow - I have been working on it for a few weeks now making steady progress as work and other things allow - happy for all comments/suggestions
Stuart
-
 Usgecko got a reaction from abelson in US Brig Niagara by Usgecko - Model Shipways
On to attaching the bulkheads. All were shaped, according to the plans, before attaching. Following someone else;s suggestion I had some L shaped aluminum extrusions laying around and I sawed those up to provide a right angle to try to keep the bulkheads square.
I also marked the center line of each of the bulkheads to try and get them aligned correctly. Had one misstep which required used of vinegar to soften the wood glue before re-attaching it more precisely.
-
Usgecko got a reaction from abelson in US Brig Niagara by Usgecko - Model Shipways
On to the hull. Following a lot of advice/suggestions/good ideas I have seen on other builds - thanks to all those that have provided logs on the Niagara!
Decided to cut the rabbet before gluing the keel parts together
A little filler over the joins. The rabbet may be made a little deeper after I have attached the bulkheads
-
 Usgecko got a reaction from Mr Whippy in US Brig Niagara by Usgecko - Model Shipways
First I decided to work on the stern boat:
Found some great Dremel attachments to hollow out the bread and butter kit parts - held them up against a light frequently to make sure I didn't go too far in removing material.
Used Bondo car filler to smooth out the hull
Decided to use plastic strip for the ribs etc on the inside
Instructions indicated that the hull of the stern boat was of lapstrake plank and I elected to use thin plastic strip for that - below is painted
And the completed stern boat (aside from oars that I will build later)
-
 Usgecko got a reaction from Tom E in US Brig Niagara by Usgecko - Model Shipways
First I decided to work on the stern boat:
Found some great Dremel attachments to hollow out the bread and butter kit parts - held them up against a light frequently to make sure I didn't go too far in removing material.
Used Bondo car filler to smooth out the hull
Decided to use plastic strip for the ribs etc on the inside
Instructions indicated that the hull of the stern boat was of lapstrake plank and I elected to use thin plastic strip for that - below is painted
And the completed stern boat (aside from oars that I will build later)
-
 Usgecko got a reaction from CiscoH in US Brig Niagara by Usgecko - Model Shipways
First I decided to work on the stern boat:
Found some great Dremel attachments to hollow out the bread and butter kit parts - held them up against a light frequently to make sure I didn't go too far in removing material.
Used Bondo car filler to smooth out the hull
Decided to use plastic strip for the ribs etc on the inside
Instructions indicated that the hull of the stern boat was of lapstrake plank and I elected to use thin plastic strip for that - below is painted
And the completed stern boat (aside from oars that I will build later)
-
Usgecko got a reaction from abelson in US Brig Niagara by Usgecko - Model Shipways
First I decided to work on the stern boat:
Found some great Dremel attachments to hollow out the bread and butter kit parts - held them up against a light frequently to make sure I didn't go too far in removing material.
Used Bondo car filler to smooth out the hull
Decided to use plastic strip for the ribs etc on the inside
Instructions indicated that the hull of the stern boat was of lapstrake plank and I elected to use thin plastic strip for that - below is painted
And the completed stern boat (aside from oars that I will build later)
-
 Usgecko got a reaction from ccoyle in US Brig Niagara by Usgecko - Model Shipways
First I decided to work on the stern boat:
Found some great Dremel attachments to hollow out the bread and butter kit parts - held them up against a light frequently to make sure I didn't go too far in removing material.
Used Bondo car filler to smooth out the hull
Decided to use plastic strip for the ribs etc on the inside
Instructions indicated that the hull of the stern boat was of lapstrake plank and I elected to use thin plastic strip for that - below is painted
And the completed stern boat (aside from oars that I will build later)
-
Usgecko got a reaction from Mr Whippy in US Brig Niagara by Usgecko - Model Shipways
Good day!
This build log will cover the second wooden model ship I am tackling, after the Drakkar Amati.
Unlike the Drakkar I decided to do a build log of this.
Why the Niagara - two reasons:
My wife is from Erie PA where the reconstructed Niagara can be found, and thought that this should be my next build - who am I to disagree especially as she purchased the kit! I like the lines of the ship and it is simpler than other multi deck models out there
Pictures of in progress build to follow - I have been working on it for a few weeks now making steady progress as work and other things allow - happy for all comments/suggestions
Stuart
-
 Usgecko got a reaction from Cathead in US Brig Niagara by Usgecko - Model Shipways
First I decided to work on the stern boat:
Found some great Dremel attachments to hollow out the bread and butter kit parts - held them up against a light frequently to make sure I didn't go too far in removing material.
Used Bondo car filler to smooth out the hull
Decided to use plastic strip for the ribs etc on the inside
Instructions indicated that the hull of the stern boat was of lapstrake plank and I elected to use thin plastic strip for that - below is painted
And the completed stern boat (aside from oars that I will build later)
-
 Usgecko got a reaction from SigEp Ziggy in USS Constitution by Usgecko - Revell - 1/96 - PLASTIC
Well, after something of a break, and with colder weather I have resurrected my building efforts.
Wanted to get my head back into it by working on something fairly small so I decided to scratch build the Brodie stove. Somewhat pointless maybe because I will never really see it when it's installed!
-

 Usgecko got a reaction from Marcus.K. in USS Constitution by Usgecko - Revell - 1/96 - PLASTIC
As I am building the Constitution as depicted in Corné's painting I had to do something about the Revell kits window panes. The model has simple 2 * 4 panes in each window frame, Corné clearly shows 3 *2. To remedy this I cut out the horizontal bars in the kit widows leaving only the vertical bar in the window. I then gently open up the height of each window frame at the top and bottom, while avoiding damaging the vertical bar. Two thin plastic strips were then glued across the back of each window frame, and to give more depth to the newly added bars 4 pieces of the same size of strip were cut and glued to the outside of the added bars. Pictures below of inside view (partial only to show haw the added bars are glued to the inside), and outside view.
-
Usgecko got a reaction from Marcus.K. in USS Constitution by Usgecko - Revell - 1/96 - PLASTIC
Well, after something of a break, and with colder weather I have resurrected my building efforts.
Wanted to get my head back into it by working on something fairly small so I decided to scratch build the Brodie stove. Somewhat pointless maybe because I will never really see it when it's installed!
-
Usgecko got a reaction from Marcus.K. in USS Constitution by Usgecko - Revell - 1/96 - PLASTIC
Completed thickening the bulwarks on the starboard side
And the gun deck will sit snugly under that - will be closer fit once glued
-
Usgecko got a reaction from Marcus.K. in USS Constitution by Usgecko - Revell - 1/96 - PLASTIC
Thank you Lukas
Started work on the hull.
Closed off the gun port at the bow (will be modelling the Connie at the time of it's victory over HMS Guerriere, as depicted in the Corne paintings)
Work on thickening the bulwarks, starting first with framing in the gun ports. Next step will be add a layer of plastic on the inside over this framing.
The horizontal lengths of plastic are to provide additional support for placing the gun deck.
Thanks for looking,
Stuart
-
Usgecko got a reaction from Marcus.K. in USS Constitution by Usgecko - Revell - 1/96 - PLASTIC
Finished the scratch built 34 foot launch. Not exactly as I had wanted - the hull is deeper than I had intended - it I'm happy enough with it.
Also finished off the Commodore's barge - this was the one I had lengthened from the Revel supplied launch.
[/url]
That's the two cutters, the Commodore's barge, and the 34 ft launch completed now.
After spending this time on these I guess I had better get started to the hull of the Constitution itself!
Thanks for looking - all comments welcome.
Stuart
-
Usgecko got a reaction from Marcus.K. in USS Constitution by Usgecko - Revell - 1/96 - PLASTIC
Small update.
After procrastinating for a while on how to do the decking I decided to scribe it rather than add plastic or wood veneer planks.
Part of the reason was the fact that I thought Force9 build looked great with scribed deck and partly because I didn't see the value of buying the veneer or plastic strips for decking. Will not be painting for a while but here is the nekkid scribed plastic. Ignore the white lines - those are scribed lines with filler - some my mistakes, and some because of the method I used and the need to try and represent the interlocking planks that were on the gun deck.
The tools I used for the scribing are in the picture below. The method I used was to very carefully mark one line from bow to stern uninterrupted by gratings etc. I then scribed that line as a pilot line for the rest of the fore and aft lines. I then used the small pin vise on the left of the picture into which I had placed the tips of two sewing needles. The pilot line was used to one needle tip down, with the second creating a scribed line parallel to the first. This process was continued until the deck was scribed all over. After that I gently deepened each line using the scribing took and the back of a #11 blade where the tip had been broken off. The bumps either side of each line were then carefully removed with the chisel blade. I went for a repeating pattern every 5 lines of planks. The interlocking planks I basically made up - no idea if that is what they actually would have looked like but they are interlocking!
Tools used:
Here's the end result:
This last picture shows the way I have attempted to represent the interlocked planks.
Thanks for looking!
-
Usgecko got a reaction from Marcus.K. in USS Constitution by Usgecko - Revell - 1/96 - PLASTIC
Having been working on the commodore's barge I was thinking of trying to get another Revell 30 foot barge and using that as a basis and extending it for the 34 foot launch. Not having any success I decided to start work on building it from scratch. Here's the progress so far. I started with cutting the shapes of the keel, gunwale, and transom out of sheet plastic and assembling them together as a frame to start attaching the planking and framing to.
Here's a work in progress so far:
Thanks for looking
-
 Usgecko got a reaction from T. Alex in USS Constitution by Usgecko - Revell - 1/96 - PLASTIC
Small update.
After procrastinating for a while on how to do the decking I decided to scribe it rather than add plastic or wood veneer planks.
Part of the reason was the fact that I thought Force9 build looked great with scribed deck and partly because I didn't see the value of buying the veneer or plastic strips for decking. Will not be painting for a while but here is the nekkid scribed plastic. Ignore the white lines - those are scribed lines with filler - some my mistakes, and some because of the method I used and the need to try and represent the interlocking planks that were on the gun deck.
The tools I used for the scribing are in the picture below. The method I used was to very carefully mark one line from bow to stern uninterrupted by gratings etc. I then scribed that line as a pilot line for the rest of the fore and aft lines. I then used the small pin vise on the left of the picture into which I had placed the tips of two sewing needles. The pilot line was used to one needle tip down, with the second creating a scribed line parallel to the first. This process was continued until the deck was scribed all over. After that I gently deepened each line using the scribing took and the back of a #11 blade where the tip had been broken off. The bumps either side of each line were then carefully removed with the chisel blade. I went for a repeating pattern every 5 lines of planks. The interlocking planks I basically made up - no idea if that is what they actually would have looked like but they are interlocking!
Tools used:
Here's the end result:
This last picture shows the way I have attempted to represent the interlocked planks.
Thanks for looking!
-
Usgecko got a reaction from T. Alex in USS Constitution by Usgecko - Revell - 1/96 - PLASTIC
An update on progress so far.
Looking at the gun carriages for the gun deck I think I need to make a further adjustment to the shape of them. From looking at photographs there seems to be an arc shape cut out betwwen the wheels of the gun carriage.
On to progress. I decided that the smaller ships boats were not to great in terms of detail so I decided to attempt to improve them. I started with the 28 ft cutter (as it is described in Revell's instructions). I found a couple of sources on the internet with plans and scratch built wood versions which is what I have attempted to replicate.
Here are the work in progress pictures as I tackled the work:
And here are some shots of the finished article:
I'm happy with the end result but I have created a lot of extra work for myself to do the other boats in a similar way.
I'm also not sure what to do at this stage about the pinnace (long boat) and the lack of it in the Revell kit. I may have a go at scratch building it out of plastic.
All comments welcome!
Stuart
-
Usgecko got a reaction from T. Alex in USS Constitution by Usgecko - Revell - 1/96 - PLASTIC
As I am building the Constitution as depicted in Corné's painting I had to do something about the Revell kits window panes. The model has simple 2 * 4 panes in each window frame, Corné clearly shows 3 *2. To remedy this I cut out the horizontal bars in the kit widows leaving only the vertical bar in the window. I then gently open up the height of each window frame at the top and bottom, while avoiding damaging the vertical bar. Two thin plastic strips were then glued across the back of each window frame, and to give more depth to the newly added bars 4 pieces of the same size of strip were cut and glued to the outside of the added bars. Pictures below of inside view (partial only to show haw the added bars are glued to the inside), and outside view.
-
 Usgecko got a reaction from dafi in USS Constitution by Usgecko - Revell - 1/96 - PLASTIC
In the process of trying to tidy up a couple of areas at the bow where the molds on each side of the hull were a little mismatched. The white areas are plastic tubing I had inserted where the original molding holes were. Then drilled to get better alignment between the molding on both sides.
-
Usgecko got a reaction from dafi in USS Constitution by Usgecko - Revell - 1/96 - PLASTIC
As I am building the Constitution as depicted in Corné's painting I had to do something about the Revell kits window panes. The model has simple 2 * 4 panes in each window frame, Corné clearly shows 3 *2. To remedy this I cut out the horizontal bars in the kit widows leaving only the vertical bar in the window. I then gently open up the height of each window frame at the top and bottom, while avoiding damaging the vertical bar. Two thin plastic strips were then glued across the back of each window frame, and to give more depth to the newly added bars 4 pieces of the same size of strip were cut and glued to the outside of the added bars. Pictures below of inside view (partial only to show haw the added bars are glued to the inside), and outside view.
-
Usgecko got a reaction from dafi in USS Constitution by Usgecko - Revell - 1/96 - PLASTIC
Well, after something of a break, and with colder weather I have resurrected my building efforts.
Wanted to get my head back into it by working on something fairly small so I decided to scratch build the Brodie stove. Somewhat pointless maybe because I will never really see it when it's installed!
-
Usgecko got a reaction from dafi in USS Constitution by Usgecko - Revell - 1/96 - PLASTIC
Small update.
After procrastinating for a while on how to do the decking I decided to scribe it rather than add plastic or wood veneer planks.
Part of the reason was the fact that I thought Force9 build looked great with scribed deck and partly because I didn't see the value of buying the veneer or plastic strips for decking. Will not be painting for a while but here is the nekkid scribed plastic. Ignore the white lines - those are scribed lines with filler - some my mistakes, and some because of the method I used and the need to try and represent the interlocking planks that were on the gun deck.
The tools I used for the scribing are in the picture below. The method I used was to very carefully mark one line from bow to stern uninterrupted by gratings etc. I then scribed that line as a pilot line for the rest of the fore and aft lines. I then used the small pin vise on the left of the picture into which I had placed the tips of two sewing needles. The pilot line was used to one needle tip down, with the second creating a scribed line parallel to the first. This process was continued until the deck was scribed all over. After that I gently deepened each line using the scribing took and the back of a #11 blade where the tip had been broken off. The bumps either side of each line were then carefully removed with the chisel blade. I went for a repeating pattern every 5 lines of planks. The interlocking planks I basically made up - no idea if that is what they actually would have looked like but they are interlocking!
Tools used:
Here's the end result:
This last picture shows the way I have attempted to represent the interlocked planks.
Thanks for looking!