


Chuck Seiler
-
Posts
1,867 -
Joined
-
Last visited
Content Type
Profiles
Forums
Gallery
Events
Posts posted by Chuck Seiler
-
-
Bob,
Looks great. Did you drill a hole in the keel for the brass tubes or did you slot the tubes?
CHuck
-
-
Thanks Robert. I will look at the Skil (I think I said SkilCraft before) and Craftsman with that flaw in mind. I was told that vibration may be an issue-more so with the low end ones than the higher end.
-
The only other option I can see is to run a trunnel or two through the length of the stem piece. I like to use bamboo because it can be real strong even in small diameters. However, once broken off you might as well wait.
-
Any thoughts on the lower end saws? The scroll saw I used to have access to is no longer available, so I am looking at geting one of my own. I would not use it much, only to cut out frames/bulkheads and the like, and I don;t have much room in condo. Most work is done in the garage on a folding table, although a more robust table is availabe on the back porch.
I have seen some discussion involving Ryobi. I have also been looking at Skilcraft and Craftsman. Has anybody had any experience with these?
-
Has anyody used spiral blades? It seems that they would cut the tight angles better.
-
Mike,
I like the 'sanding mallet' for the interior of the frames. I look forward to trying the concept.
-
Bob,
Progress looks great. Where do you get your Badger paint, locally or online?
-
Mike,
Welcome back! Looks great.
-
Bob,
Welcome back. Conny is looking good as well.
-
Jason,
Welcome to the build and welcome to woodmodeling. You will find that wood has it's challenges and it's rewards. The rewards far outway the challenges. ...plus, when you REALLY get frustrated and throw the whole danged thing into the fireplace, it burns cleaner.
Great work so far and great progress. You might be new to wood models, but it is obvious you are a skilled modeler.
-
Chuck,
This is great!!! I see that it appears to follow the kit instructions but this way I can expand a particular picture and get a better look. This is a big help.
-
Before attaching the stempiece and keel, I cut the rabbet. There are probably alot of ways to do this but if it involves hand measuring and marking, count me out. Instead, I set the fence on my mini table saw so that I could cut the appropriate size notch on either side of the false keel.
Rabbet
Be careful when handling the model at this point. The top of the stem is very fragile and can break of easily. I ended up breaking it off twice before I decided to hold off fixing it until later. My intent is to run a few holes down the length of the stem and reinforce it with a bamboo treenail/dowel. I will cover this later. If yours pops off, just set it aside someplace where you won't lose it.
The next thing I did was make a jig to allow me to square the bulkheads/frames along three different axes, axises, dimensions...whatever.
A note on terminology. During this part of the build, I will refer to the athwartship structural pieces as "bulkheads". Once the centerpiece is removed, I will refer to them as "frames".
At this point, I put the centerpiece in the buildboard and started inserting the bulkheads. As I said before, precision is important. In addition to using the jig, I marked the top dead center of each bulkhead as another reference. I then dry fitted eachbulkhead to see how the whole thing looked. That's my story and I'm ticking to it....
Buildboard with assembly jig
-
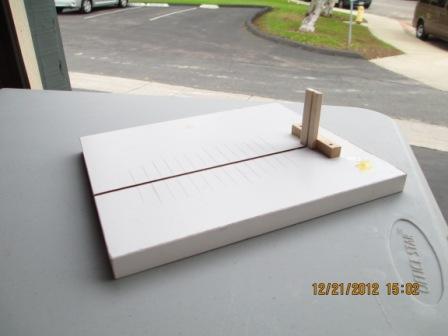
Buildboard with stem support.
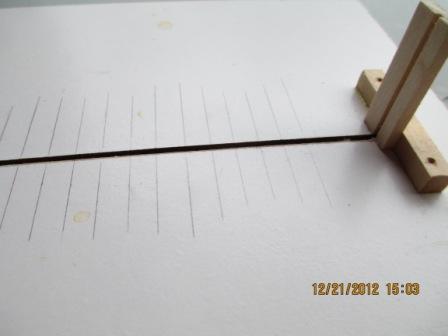
Lines were drawn perpendicular to the keel forward of each bulkhead slot in order to help true up the
bulkheads. I am getting ahead of myself, however, and will discuss this later.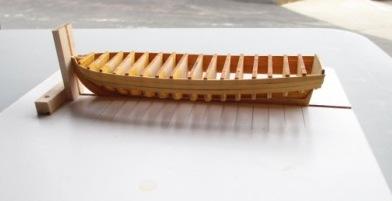
This photo shows how the model sits on the board.
-
Let me start off by saying this is an extremely flimsey and fragile structure until the top strakes are in place. At that point it becomes just
kind-of flimsey. It is important that care be taken to assemble the basic structure, to ensure it is ‘true’. Precision is important here.(Note: One of the other builders had a different concept. Blocks of wood were placed between the bulkheads to support the structure and the boat was planked completely from the garboard strake up to the gunwales. That eliminated that awkward ‘last plank between the top down and the bottom up which looks like a snake that swallowed a duck, a pig and 2 chickens. Hopfully that will be reposted.)
My first step was to produce a “build board” in order to provide stability for future steps. The groove in the board and the stem support hold center-piece, keel and stem assembly perpendicular to the surface. I would have liked to support the stern, but in this case I was unable. (As it turns out, it is not really necessary except to keep the model from sliding out of the cradle as you turn corners at 60 MPH while transporting the model.)
-
I originally started my build log on 21 December 2012. I know this because I started it with “Thankfully
the world did not end today, so I can proceed. I would hate to get halfway into it only to go “POOF”” Well, apparently
it took a little longer but ‘the world’ ended and we now get to put it back together. Thank heaven for notes!!!! If
anybody is taking a gander here before taking on this project I hope to provide
some helpful thoughts and observations.This project involves the Model Shipways ‘18th Century Longboat”. It’s a great project. It appears to be simple and somewhat straight forward but the planking makes it a challenge. This is a single layer planking with both interior and exterior exposed to view. The planking is quite thin, leaving very little room for error. This is an excellent model to hone your planking skills. Plans are excellent.
Once your ‘basic shell’ (more on that later) is set up I find that I can easily remove a plank/strake that does not work out and try again. (I have done a bit of work on the model since I originally wrote this. I DID have to remove a strake or two and try again. It is very forgiving.) Here goes!!
-
-
Hello all! I am back. I jusat found out yesterday that the site went down completely, so I have spent some time getting back onboard and navigating the site. I will go thru my notes and attempt to re-create my build log. Comments welcome.
- Ryland Craze and BRiddoch
-
 2
2
18th Century Longboat by Bob Riddoch - FINISHED
in - Kit build logs for subjects built from 1751 - 1800
Posted
Thanks Bob. I have not decided if I want to mount it on posts like you did or go with the traditional pedestals.
How far did you get in the discussion regarding cases during the last meeting? I think that would be good info for this group as well.