

Snoepert
-
Posts
288 -
Joined
-
Last visited
Reputation Activity
-

 Snoepert got a reaction from dziadek4444 in VASA by dziadek4444 - DeAgostini - 1:65
Fantastic work done here.I t has given me geat inspiration in finishing mine as well.
Snoepert
-
 Snoepert got a reaction from J11 in Vasa by Snoepert - FINISHED - De Agostini
My Ratline did not come out to well so I have decided to do it as the instructions by de Agustina manual.
-
 Snoepert got a reaction from JeffT in Vasa by Snoepert - FINISHED - De Agostini
My Ratline did not come out to well so I have decided to do it as the instructions by de Agustina manual.
-
 Snoepert got a reaction from GrandpaPhil in Vasa by Snoepert - FINISHED - De Agostini
My Ratline did not come out to well so I have decided to do it as the instructions by de Agustina manual.
-
 Snoepert got a reaction from BLACK VIKING in Vasa by Snoepert - FINISHED - De Agostini
My Ratline did not come out to well so I have decided to do it as the instructions by de Agustina manual.
-
 Snoepert got a reaction from popeye the sailor in VASA by dziadek4444 - DeAgostini - 1:65
Fantastic work done here.I t has given me geat inspiration in finishing mine as well.
Snoepert
-
 Snoepert got a reaction from fmodajr in VASA by dziadek4444 - DeAgostini - 1:65
Fantastic work done here.I t has given me geat inspiration in finishing mine as well.
Snoepert
-
Snoepert got a reaction from JeffT in VASA by dziadek4444 - DeAgostini - 1:65
Fantastic work done here.I t has given me geat inspiration in finishing mine as well.
Snoepert
-
Snoepert got a reaction from J11 in VASA by dziadek4444 - DeAgostini - 1:65
Fantastic work done here.I t has given me geat inspiration in finishing mine as well.
Snoepert
-
-
-
-
-
-
-
Snoepert got a reaction from GrandpaPhil in Vasa by Snoepert - FINISHED - De Agostini
It’s been a month since I have been able to do some more work.
I am getting into the next interesting stage of rigging.
can anyone advise where I might get plans for the full rigging for the Vasa
-
Snoepert got a reaction from J11 in Vasa by Snoepert - FINISHED - De Agostini
It’s been a month since I have been able to do some more work.
I am getting into the next interesting stage of rigging.
can anyone advise where I might get plans for the full rigging for the Vasa
-
-
Snoepert got a reaction from BLACK VIKING in Vasa by Snoepert - FINISHED - De Agostini
It’s been a month since I have been able to do some more work.
I am getting into the next interesting stage of rigging.
can anyone advise where I might get plans for the full rigging for the Vasa
-
 Snoepert got a reaction from Old Collingwood in Vasa by Snoepert - FINISHED - De Agostini
It’s been a month since I have been able to do some more work.
I am getting into the next interesting stage of rigging.
can anyone advise where I might get plans for the full rigging for the Vasa
-
Snoepert reacted to Matt H in Sovereign of the Seas by Matt H - DeAgostini - Scale 1:84
This is the 12 month subscription model by DeAgostini from Model Space. It arrives in 12 separate packages spread over a year and each arrives with a color magazine with historical information about the ship and instructions. The packaging isn't anything special, just a normal cardboard box with various small bags and plastic packages of parts.
At this point in time I have received the first two months. The first picture is the first month's supplies and the second is the second month deeper down in the same box for consolidation.
Here is the cover and inside of the first months magazine. You can find these digitally on their website as well.
I have to say I like the instructions and pictures, very well detailed and it might just make it possible for me to be successful with this ship at this stage of my experience. I will be bouncing back and forth between this and my Syren build, which also has great instructions. I just ordered some basswood blocks off Amazon and will get working on cutting them to size for my Syren when they get here.
Here I have begun attaching various bow former supports and the first part of the false keel to the forward bulkhead.
Here are the next two bulkheads assembled, but not yet attached. There is a step coming up that the instructions warn about a temporary jig setup to help hold the entire false keel and bulkheads upright and where these two bulkheads go is where that temporary jig sits.
Each month comes with various small projects to break up the monotony of doing nothing but planking or making 100 cannons. Some projects are a longboat or cannons. This month includes the start of a longboat and 2 cannons. Here are the parts of the cannon assembly and the final assembly. Please let me know what you think of the bronze and red coloring.
Some rope supplied this month.
That's it for now. I am waiting on some paint to dry on the second cannon you see there. I will keep updating as I go along. So far I am very pleased with this kit and this 12 month program. It comes out to $20 more if you buy it monthly plus an additional $10 per month for shipping, so the price difference isn't much. It makes these $1000+ ships more affordable for some, and I don't mind the extra in shipping.
-
-
Snoepert reacted to BLACK VIKING in Vasa by BLACK VIKING - De Agostini - 1/64 scale
Hi all.
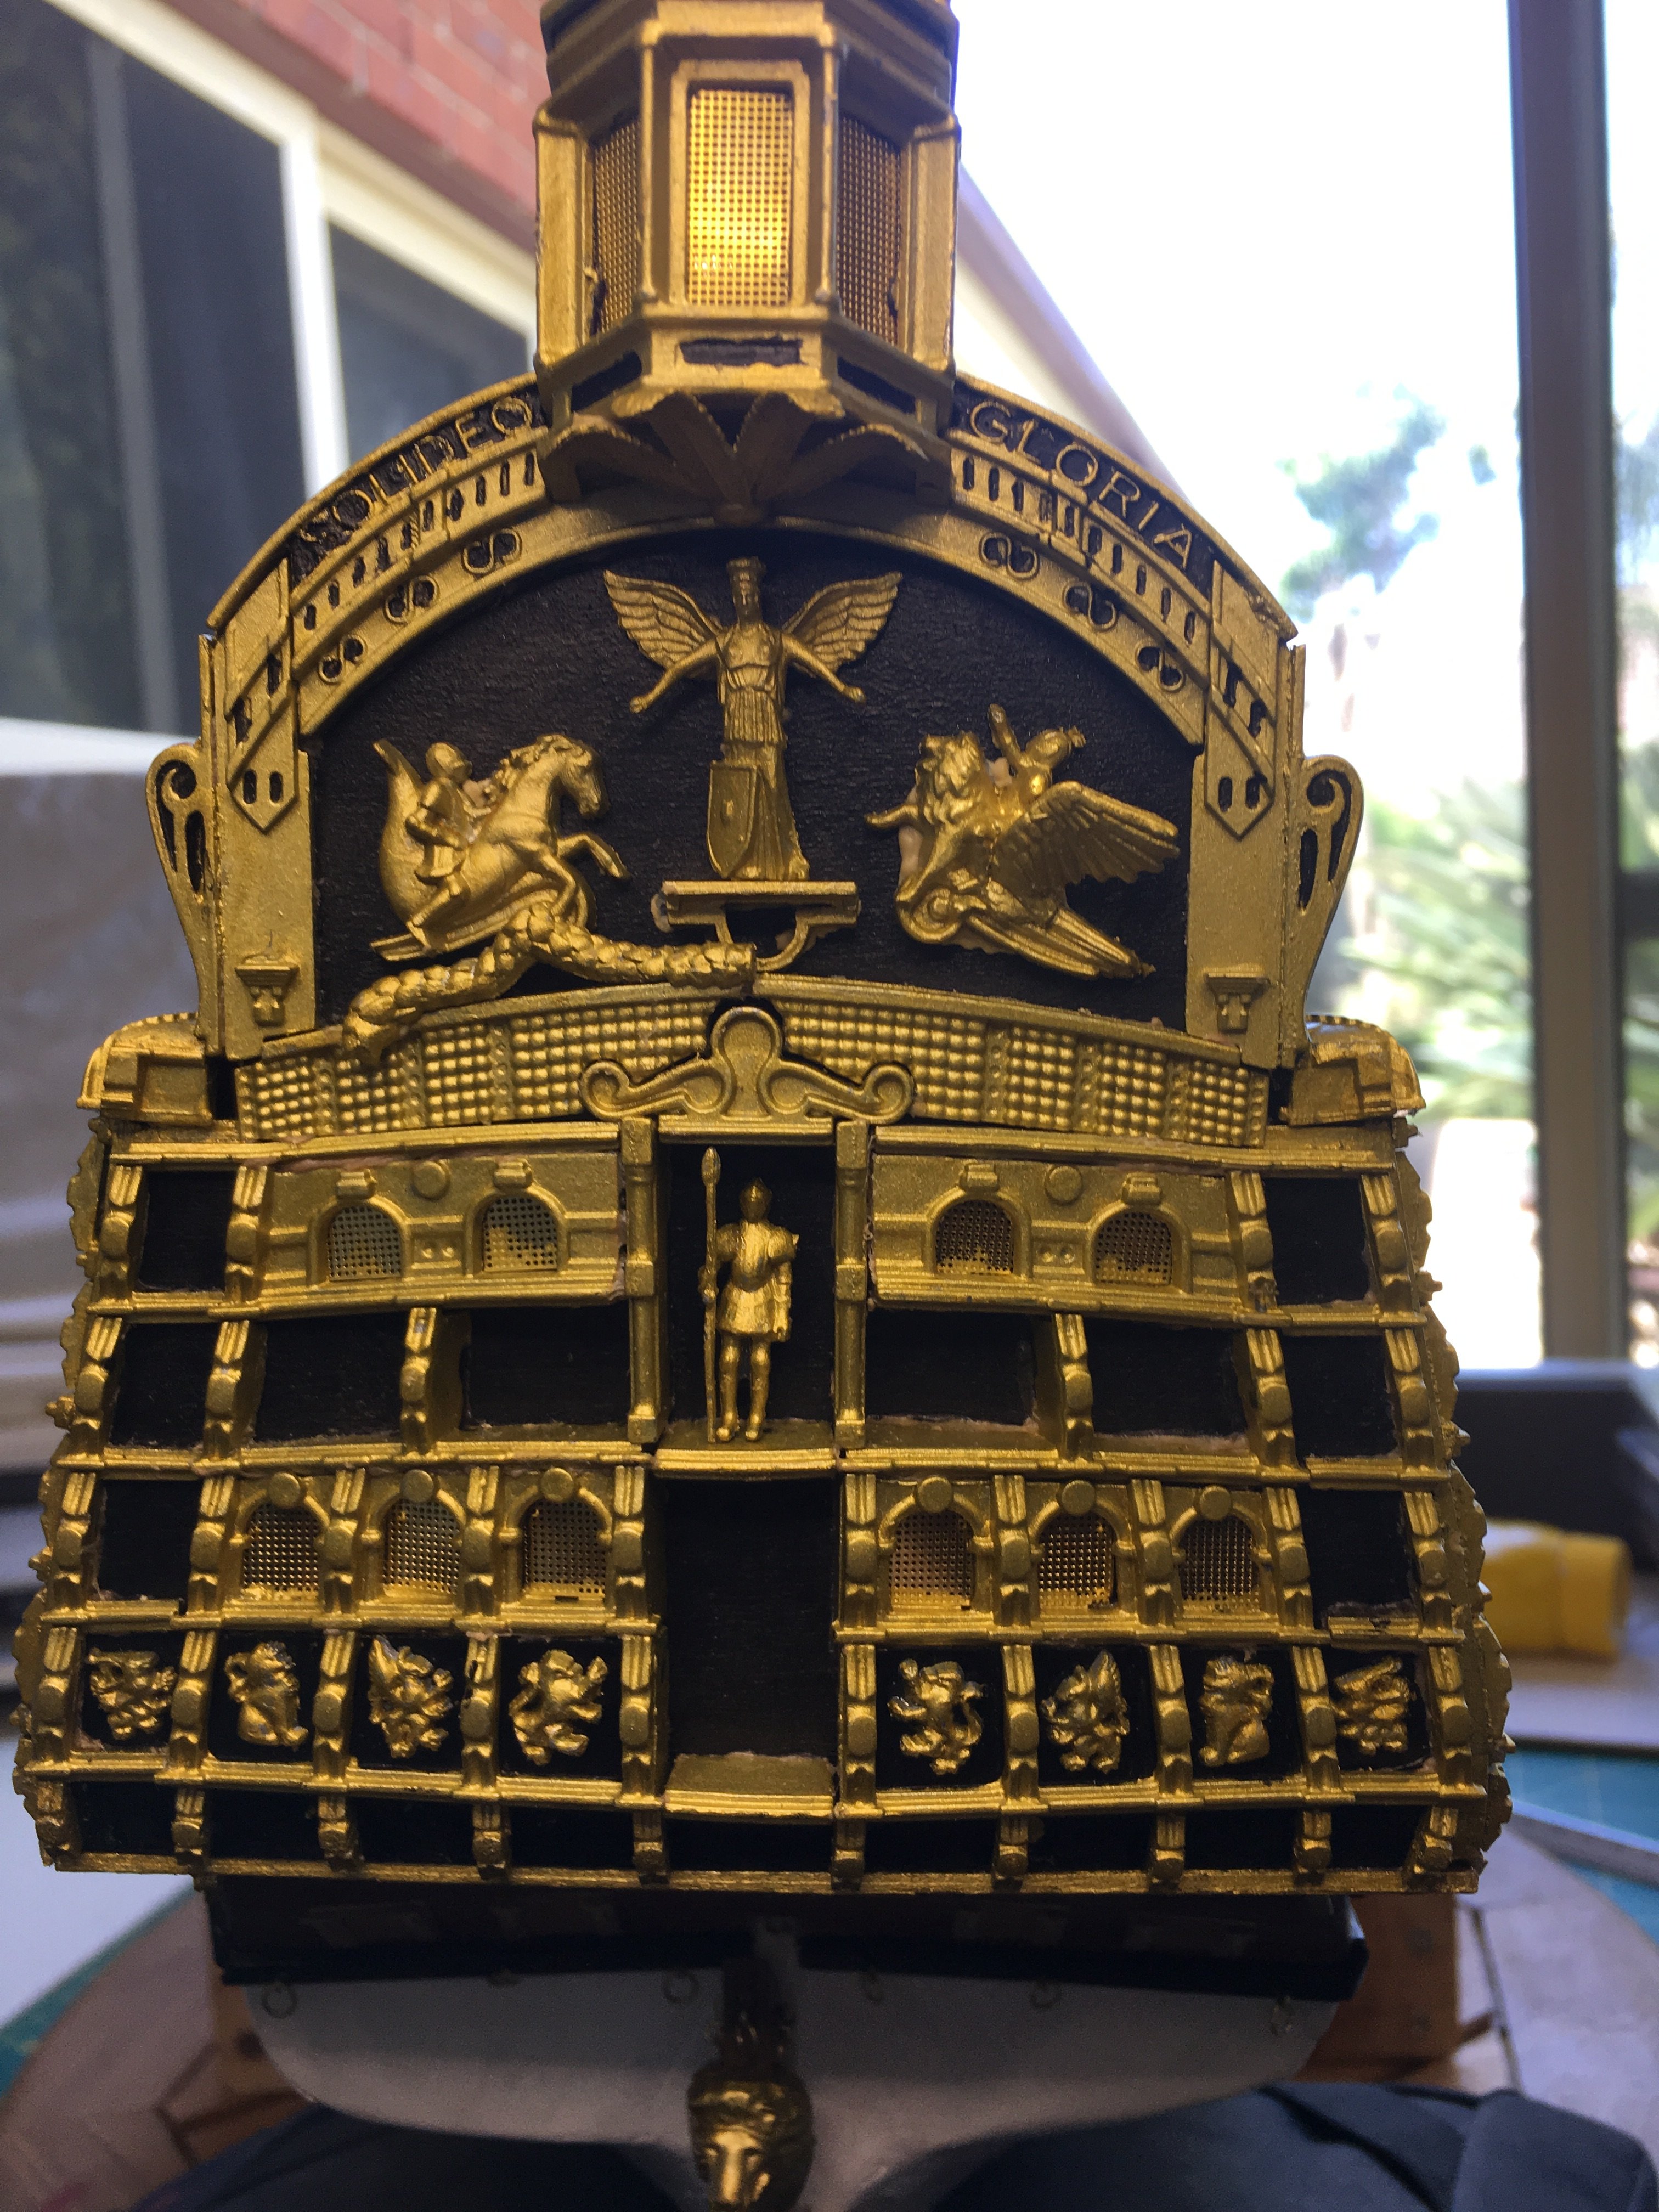
Some more work on the Vasa . The rigging has been started and have completed the formast. The mainmast yard with the sail has been rigged before the shrouds where put on as the rake of the shrouds would make it hard to get to the hallards so decided to do them first. I had to make the ramshead block as instructions for the rigging is totally different from what's on the real ship . To break up the ratline tying I painted some more carvings and placed them in their positions. Looking at the Vasa book I noticed a fixed block on top of the mizzen chainwhale that takes the bottom sheet from the mainsail so made some up from some wood stock . The forebrace and mainbrace have been rigged so it's back to ratlining.
Thanks for following
Martyn
-
Snoepert reacted to Peter G in Vasa by Peter G - Billing Boats - Scale 1/75 - BB490
I have developed a workshop specifically for building the Vasa (much to my wife's amusement) with a small power bench saw, lathe and various vices. I find a good stereo music system also a must as background. In the pictures posted, you will also notice a flat piece of timber on which the framework sits. This 'dockyard' I have designed with two things in mind:
1. The support for the growing ship can be rotated along a horizontal axis, even supported upside down, using soft plastic rubber (as used by swimming pool flotation). This will enable me to place the hull into the best position to plank, add fixtures, scupltures etc.
2. Another innovation is that the base board is mounted on a large circular, metal ring with ball bearings (online they are referred to as 'lazy susans platter or bearings'). These are cheap and easily fitted to a base. This allows complete 360 degree rotation simply and effectively. I have found this to be a wonderful means of accessing the ship all around, quickly and with care, safely. A note of caution with this however. Sometimes the rotation is so free, that a part of the ship may extend over the work bench. When this is the case (as for example the bow extension), it can easily be caught by a moving arm or clothing. After one disaster where I caught the bow, I soon became aware of this shortcoming. The ease of access to the overall ship however makes this innovation well worth it.
Following the bulkhead placement and the deck base, I commenced with the decking. For this and after some research, I noted that there was no geometric or logical layout to the placement of deck planks on the actual ship. They were seemingly random, and so I adopted this for my model. The planking I used was of mahogany but of a size scaled to be between 10 and 12 inches width (254 to 305 mm). I laid these using caulking simulated by PVA gluing one side of each deck plank with black crepe paper. When dry, I trimmed the paper and sanded the plank flat before laying it down on the deck base. I commenced from the centre and worked outwards to the hull flanks.
Allowances had to be made for the hatchs and stained timber edging was added to get the dimensions correct. The hatches themselves, with the Billing kitcame as a series of laser cut plywood cutouts. These with some work to weather and scribe the individual vertical/horizontal hatch timers looked and fitted quite satisfactorily.
Final treatment of the decking was by using a 'burnishing' organic oil. This finish is quite hard and durable when dry and leaves a lovely patina on the mahogany. The caulking with the black crepe paper stands out and looks about in scale. In the picture above too, I have shaped the edges of the bulkheads to the required angles to maximise contact with the hull planking around the curves of the hull. This Billing model requires a SINGLE planking only and so the glued and fixed contact must be strong and capable of maintaining the timber curves required with minimal splitting or gaps between planks.
The doors fitted above the beak area for seamen's access I have simply scribed the laser cut plywood and run black ink into the lines using a Rotring drafting pen. My Rotring pen set got a working out on this model as I discuss later.
-