HOLIDAY DONATION DRIVE - SUPPORT MSW - DO YOUR PART TO KEEP THIS GREAT FORUM GOING! (Only 13 donations so far - C'mon guys!)
×


etsinko
-
Posts
94 -
Joined
-
Last visited
Content Type
Profiles
Forums
Gallery
Events
Everything posted by etsinko
-
 Peta, maybe this comment is too late since your hull has already been completely planked, but I found that it is a lot easier to glue these thin planks using PVA glue and hot iron (really makes it super easy + you can unlgue and reglue planks if needed). Here is my description of the procedure: Hope this helps!
- 315 replies
-
- 3
-

-
- master korabel
- avos
- (and 1 more)
-
Really great build! Very inspiring. Can't wait to start mine..
- 315 replies
-
- 1
-
-
- master korabel
- avos
- (and 1 more)
-
This is correct. Similarly to other kits this kit includes 11x17 English drawings and tables along with complete English manual.
-
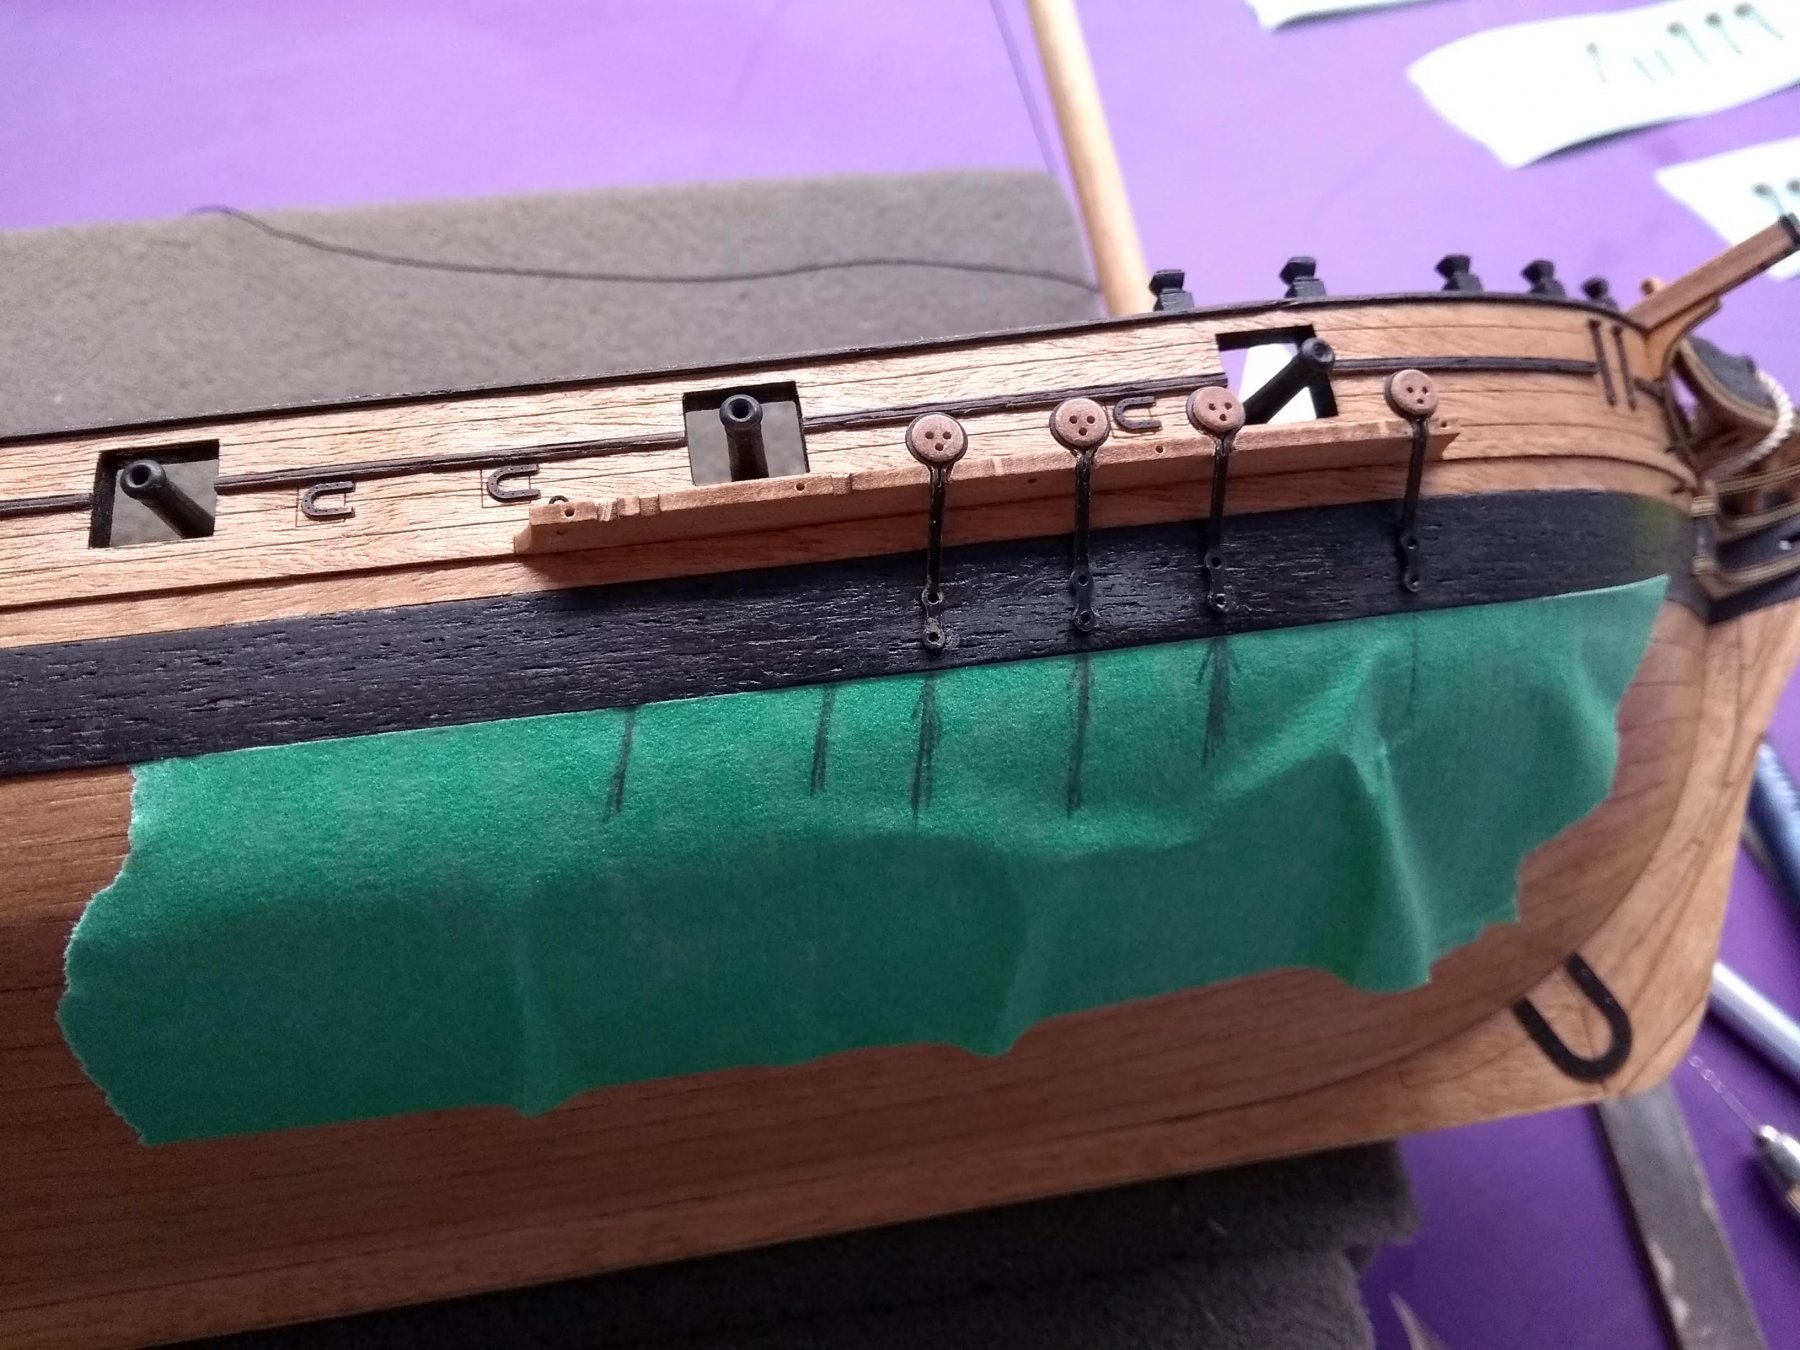
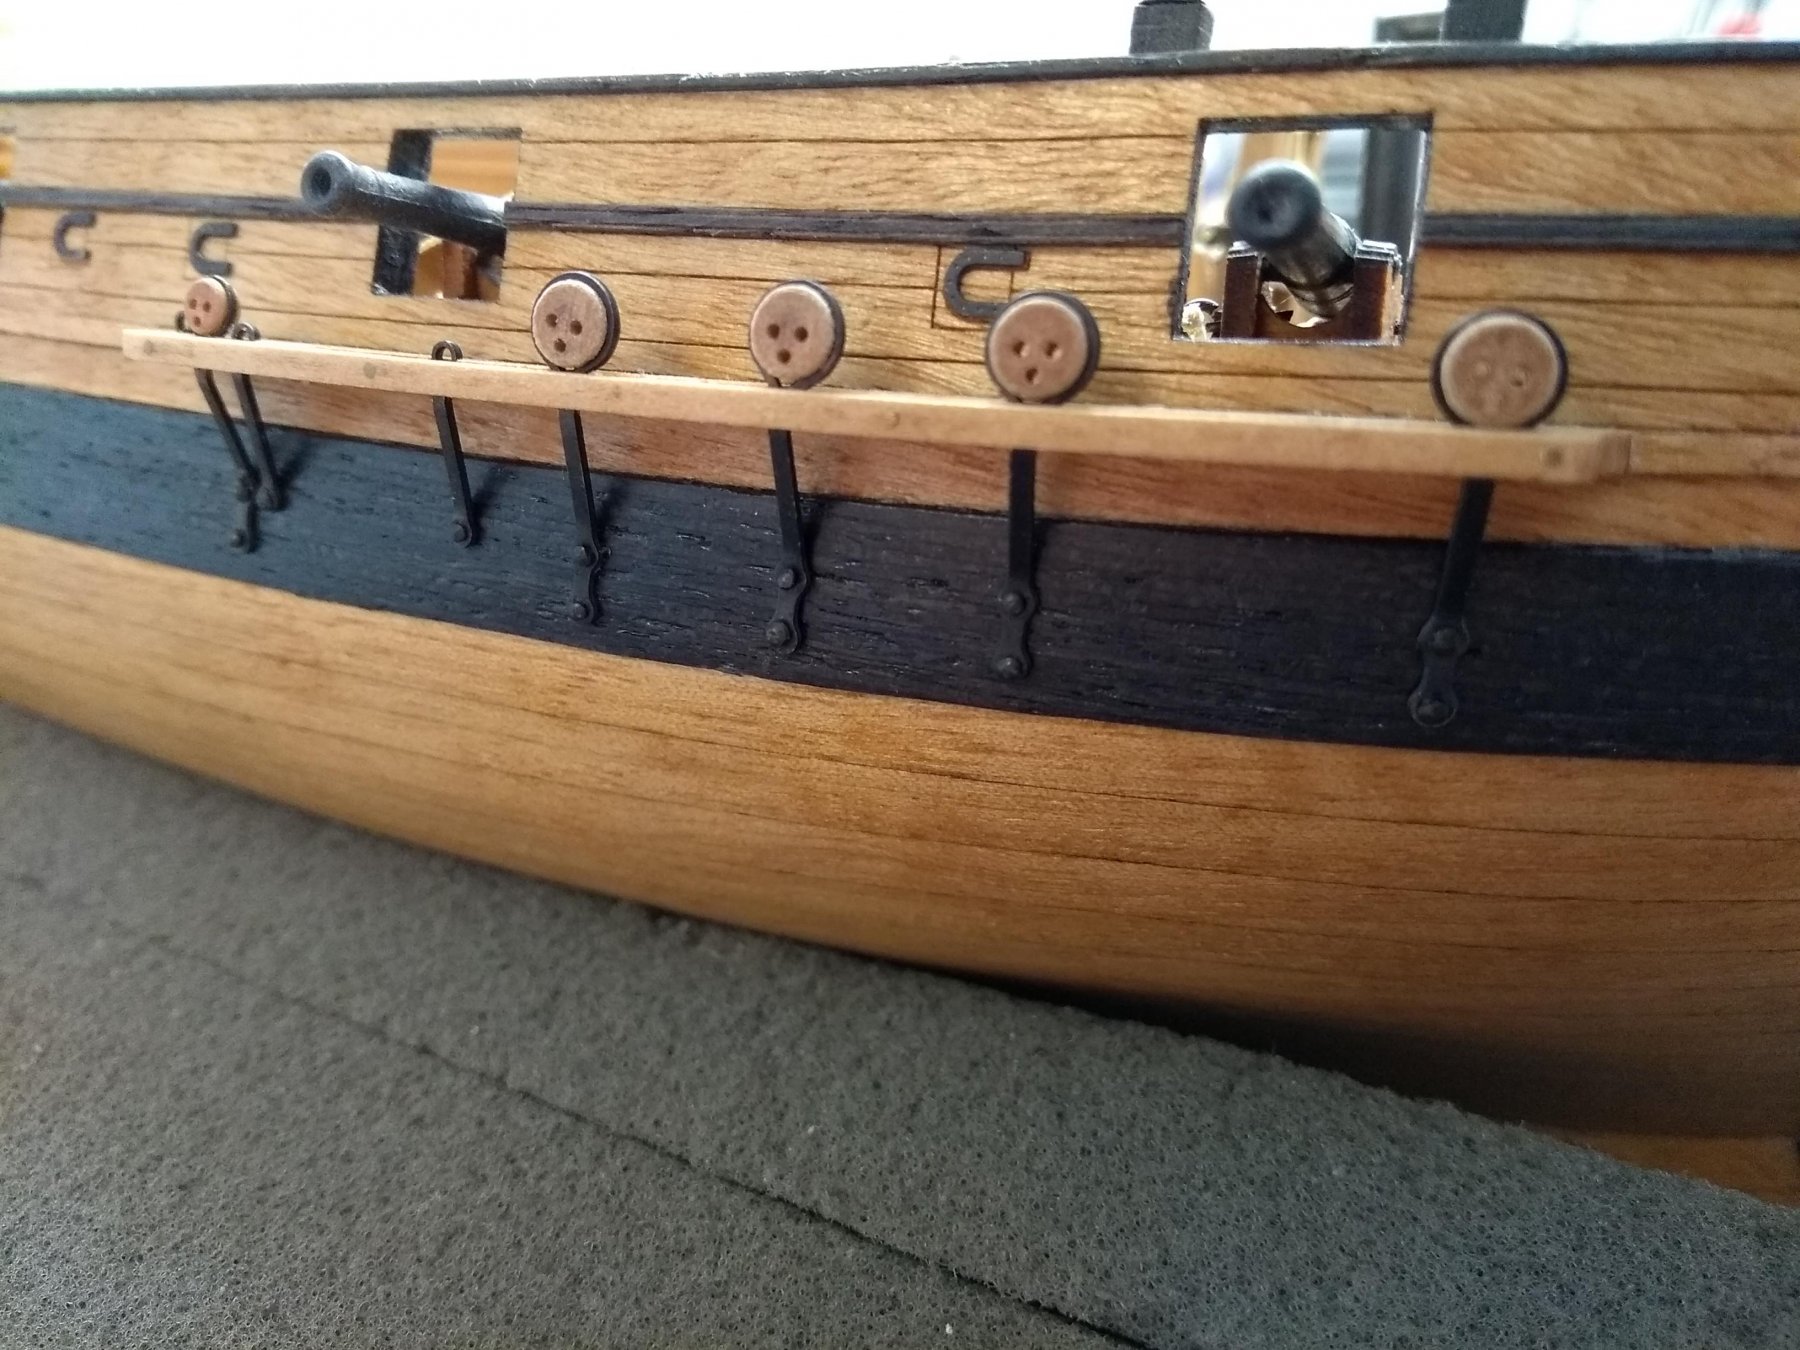
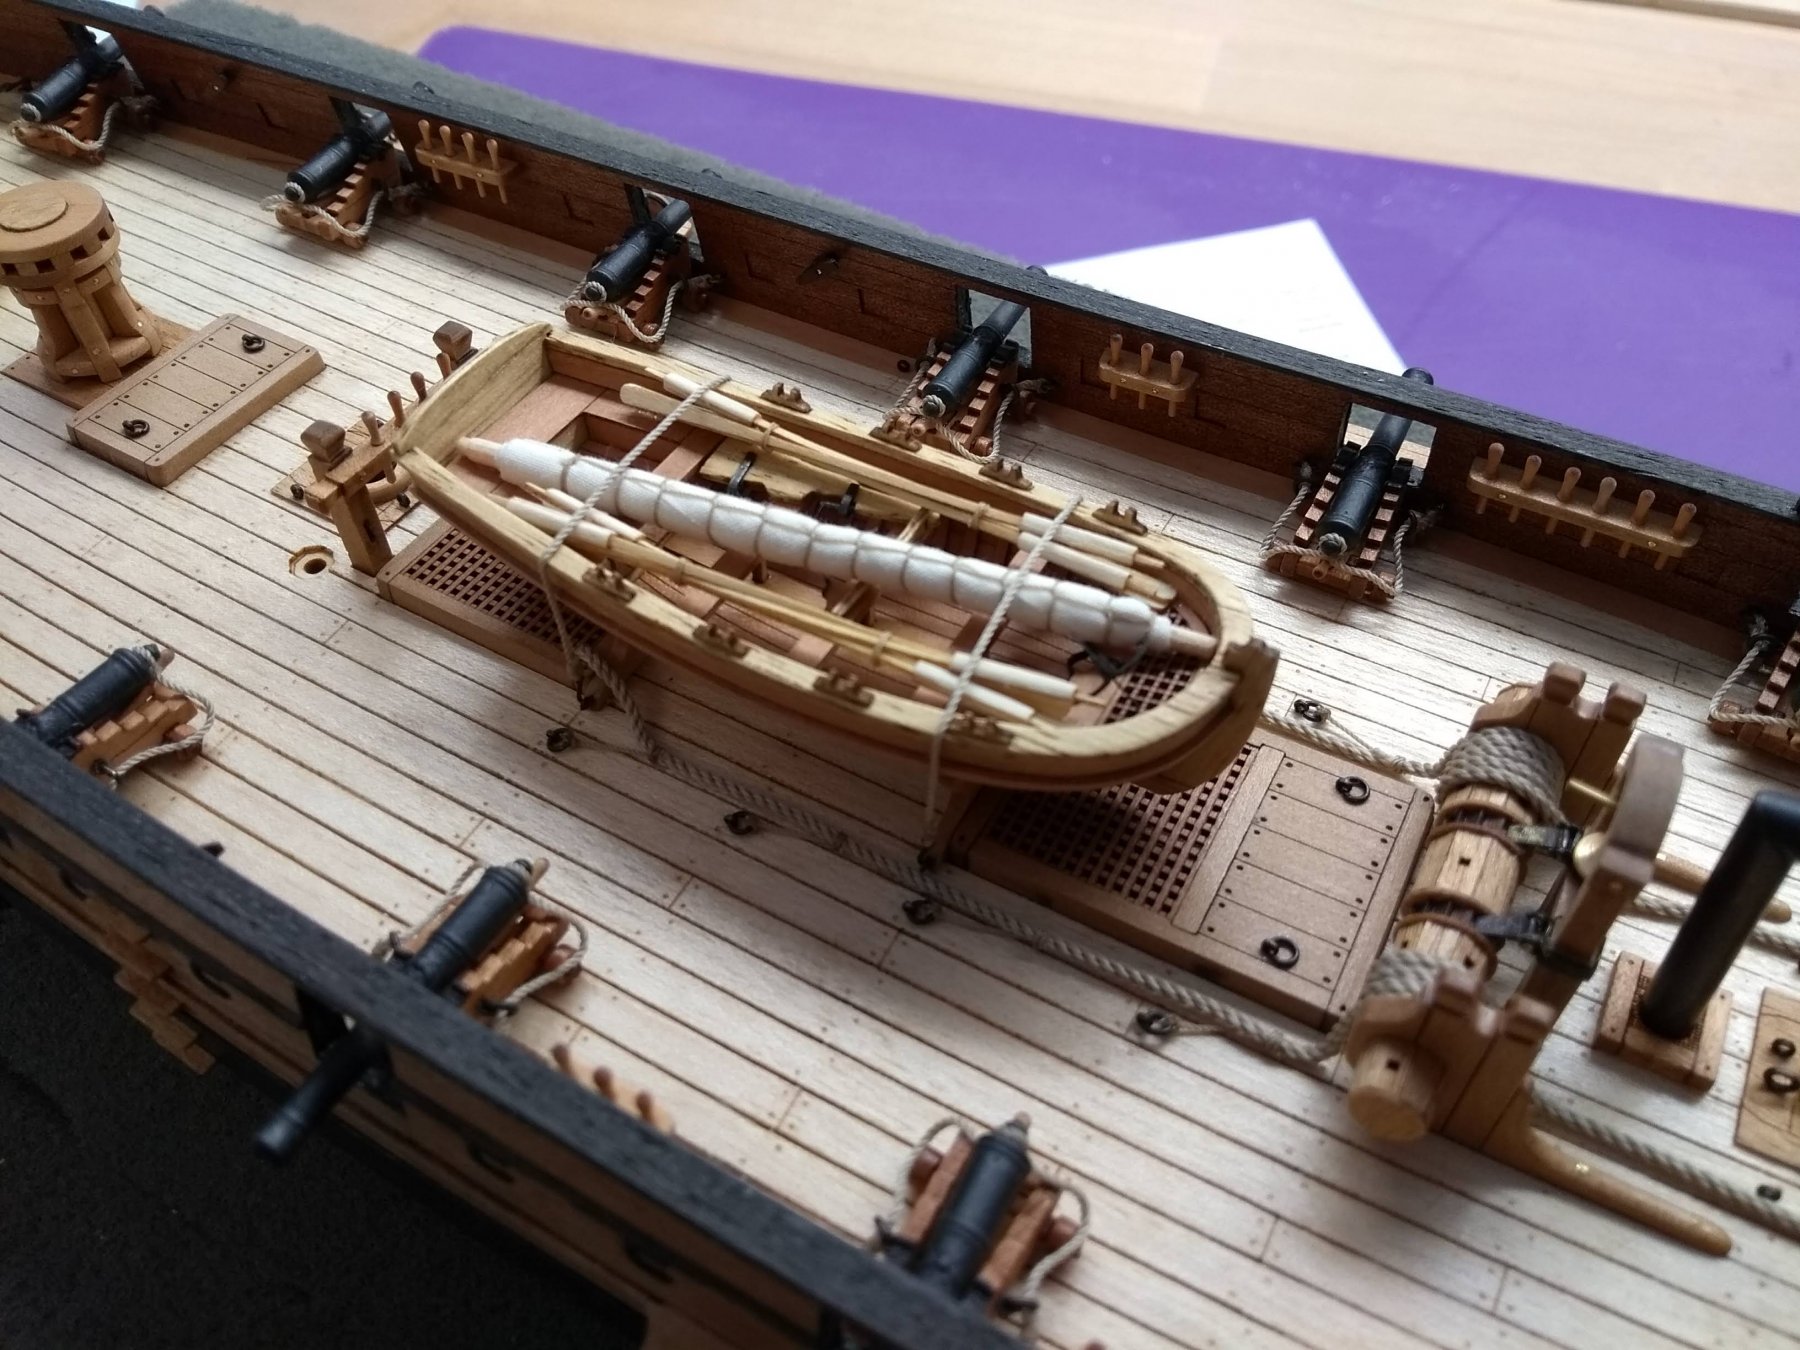
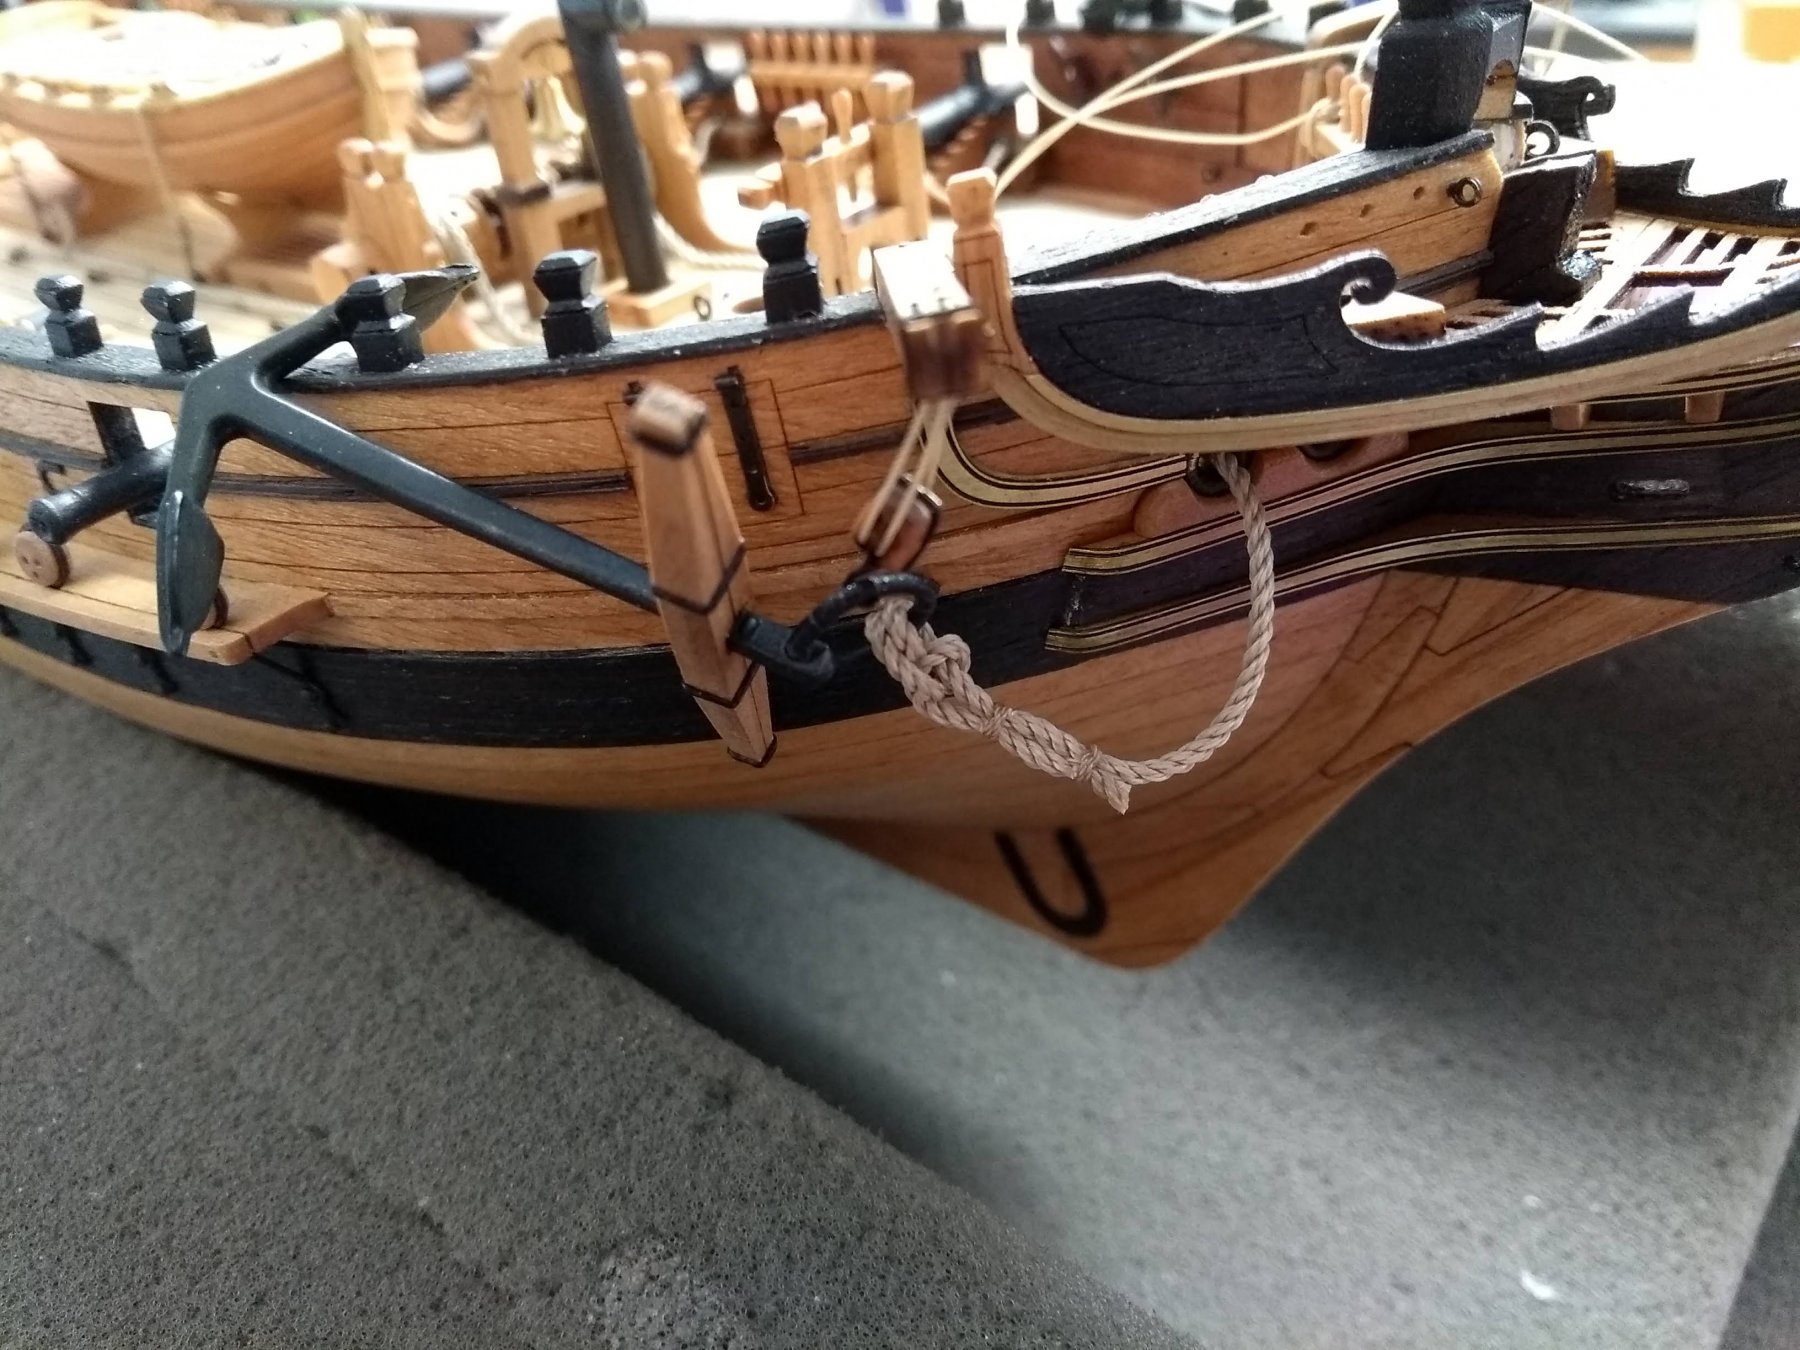
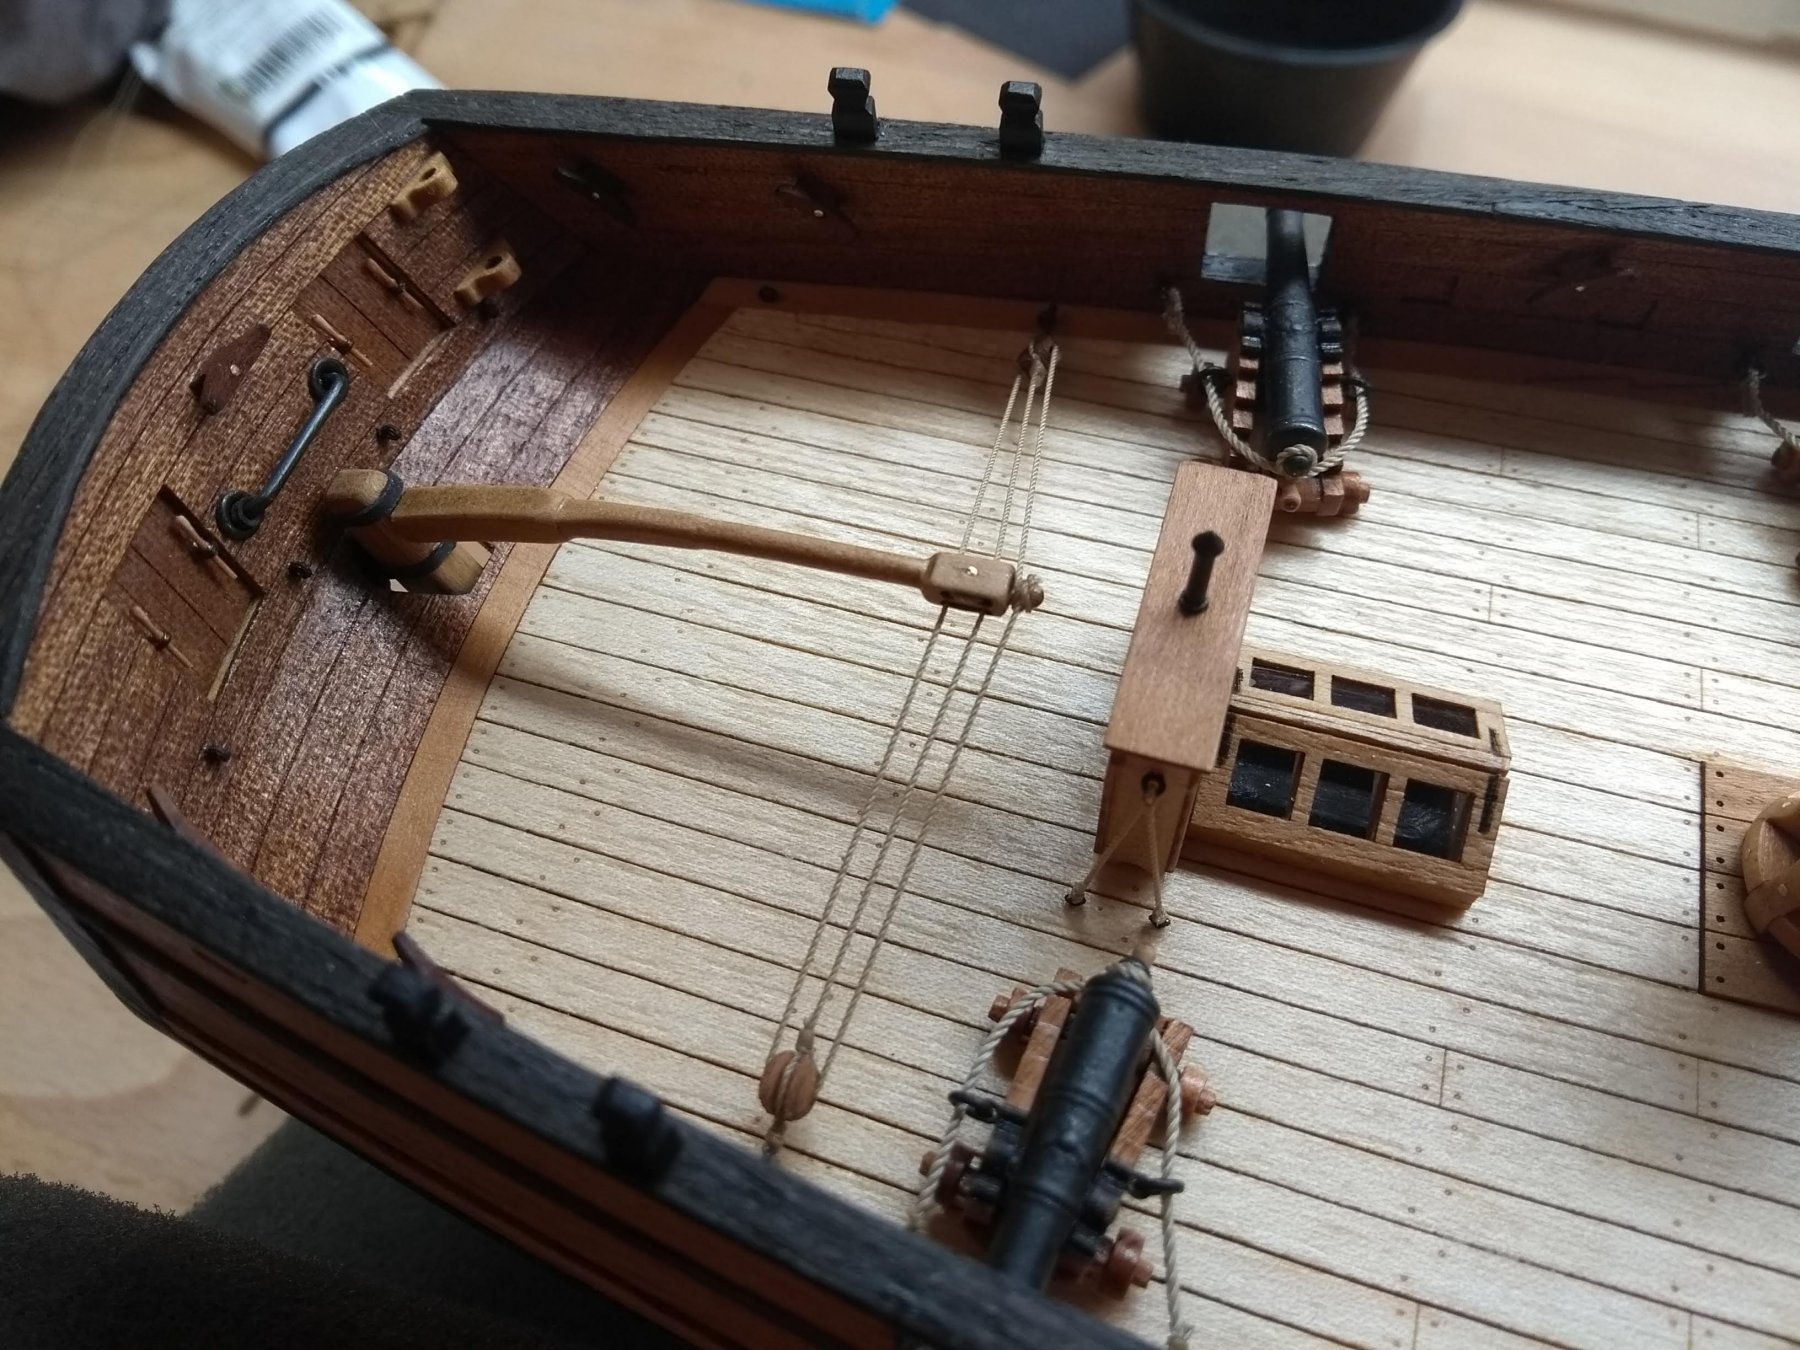
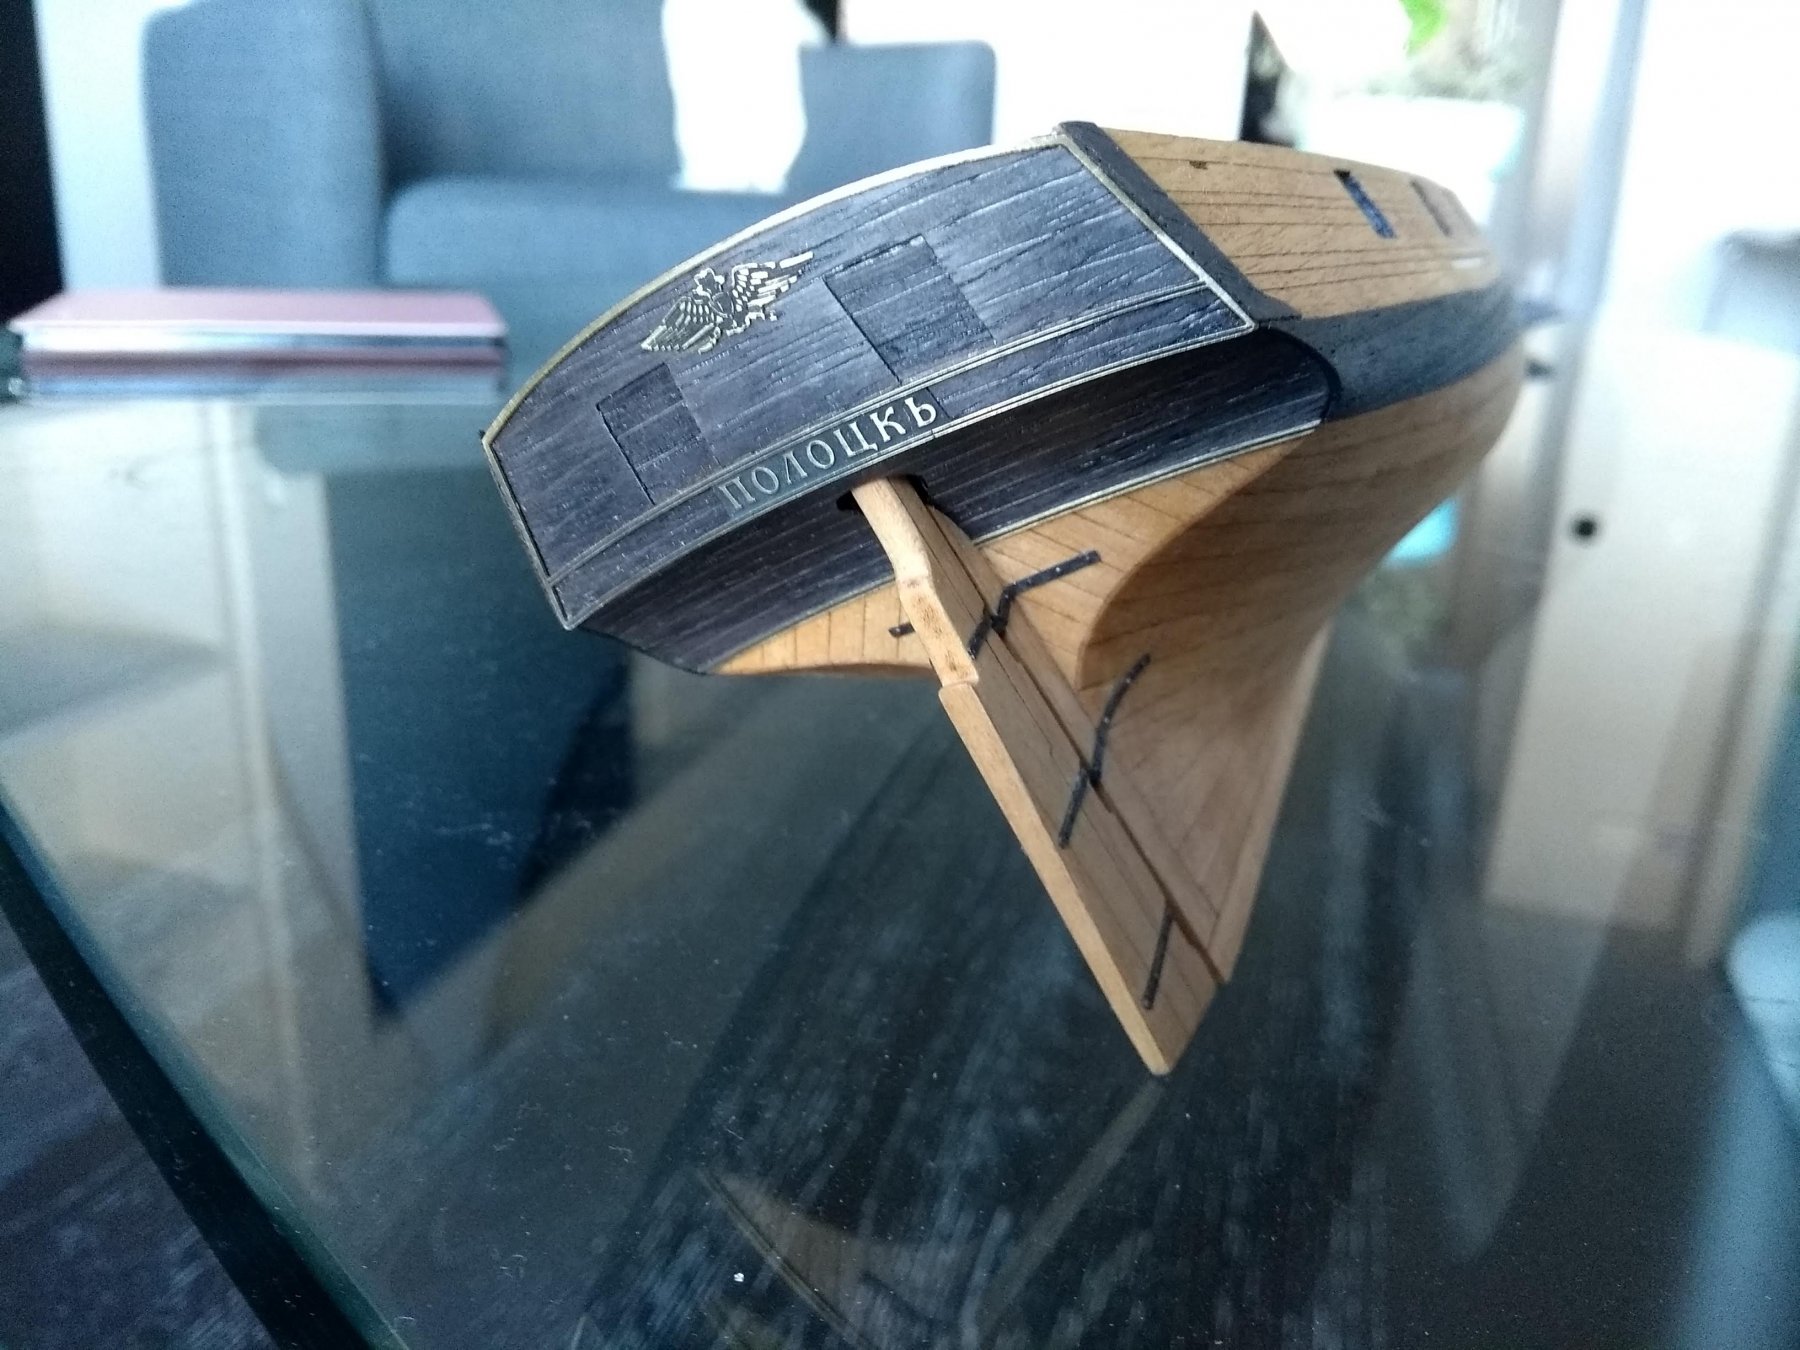
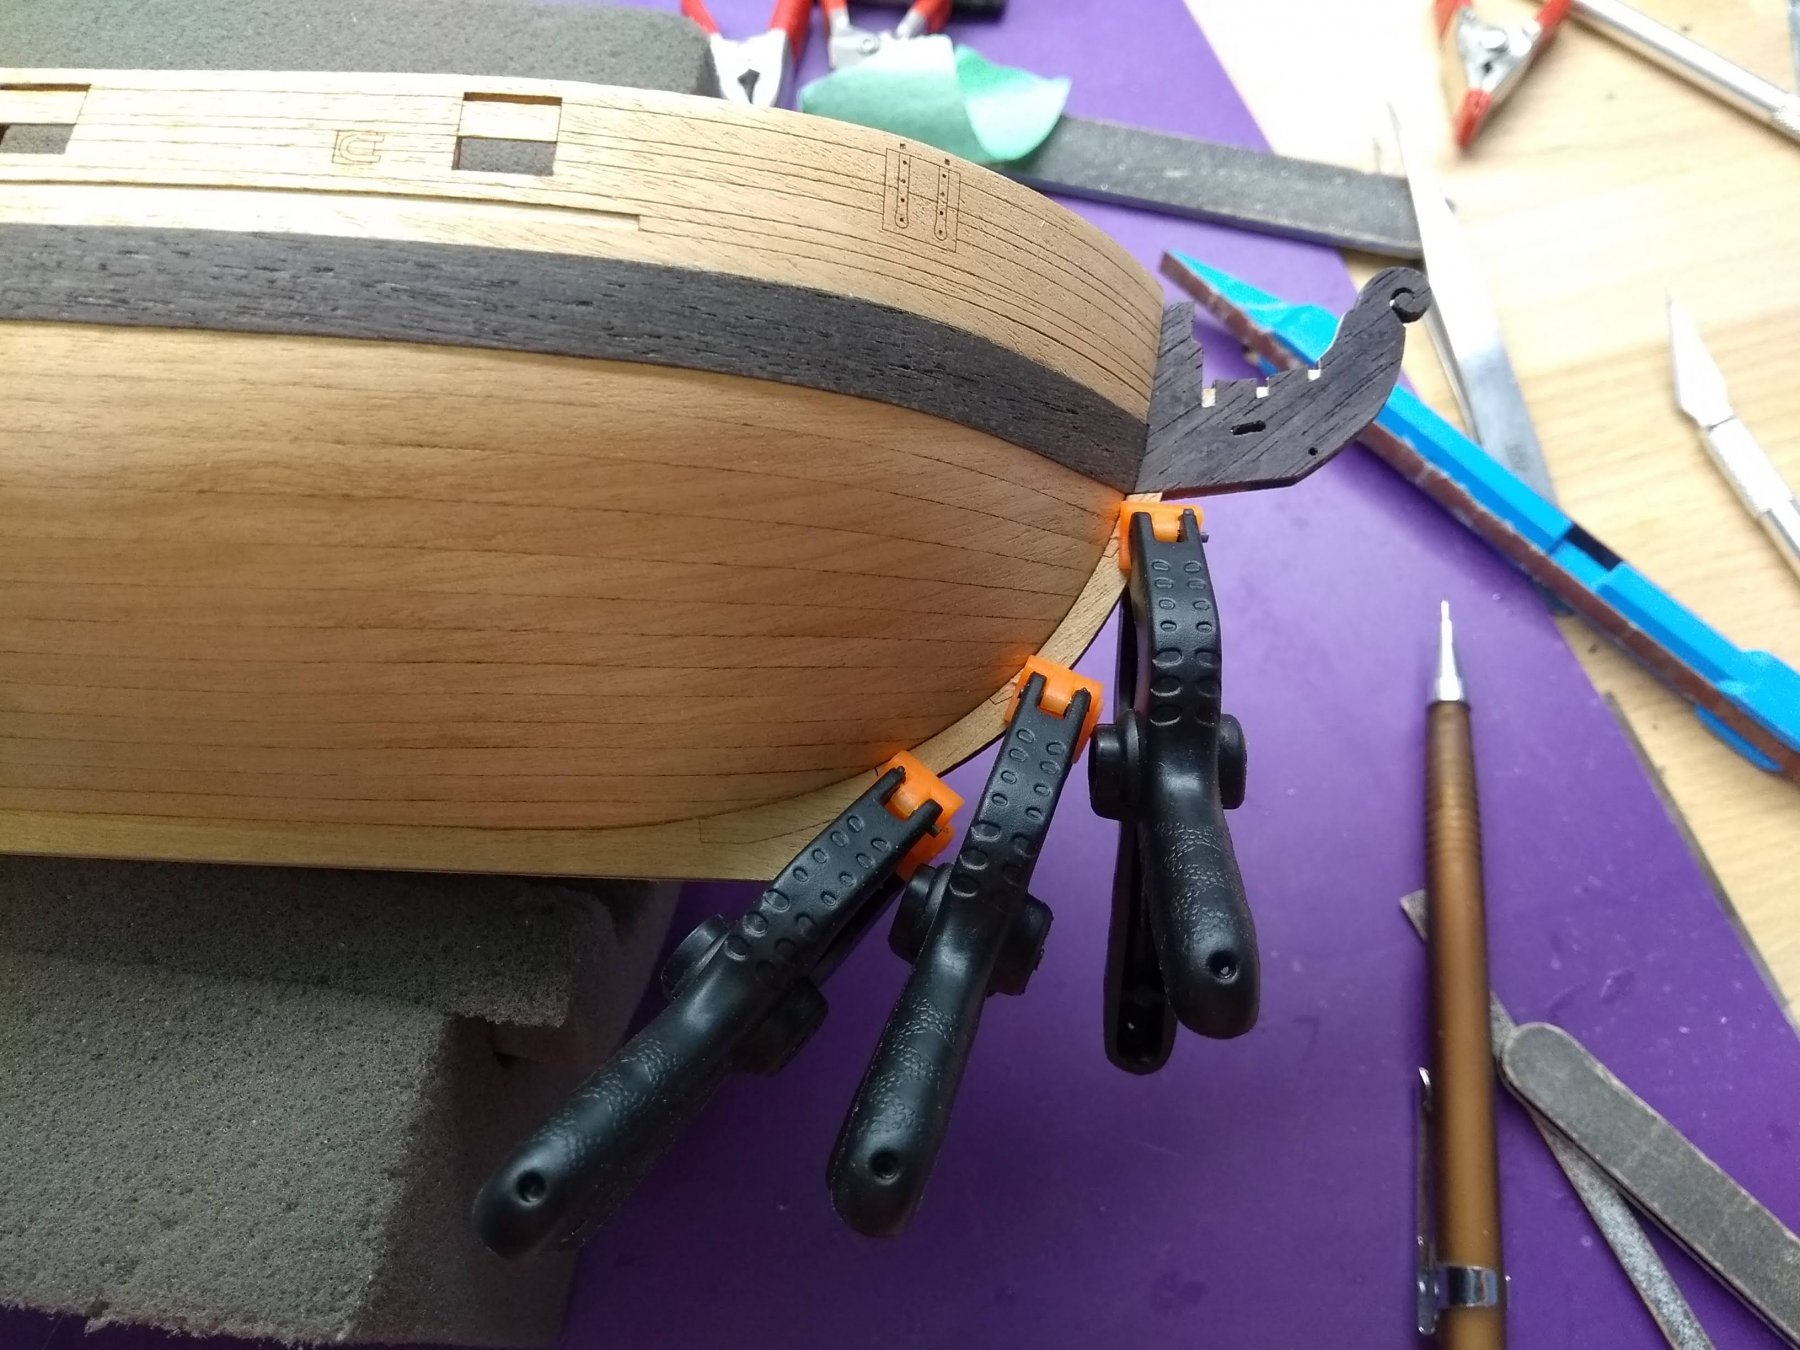
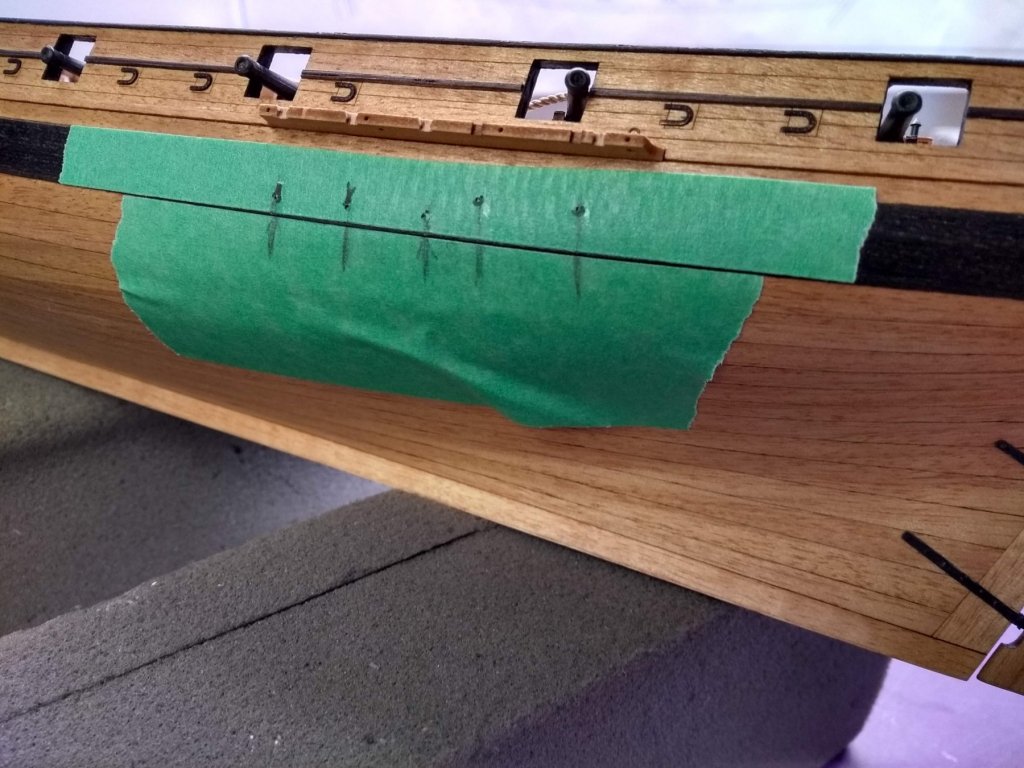
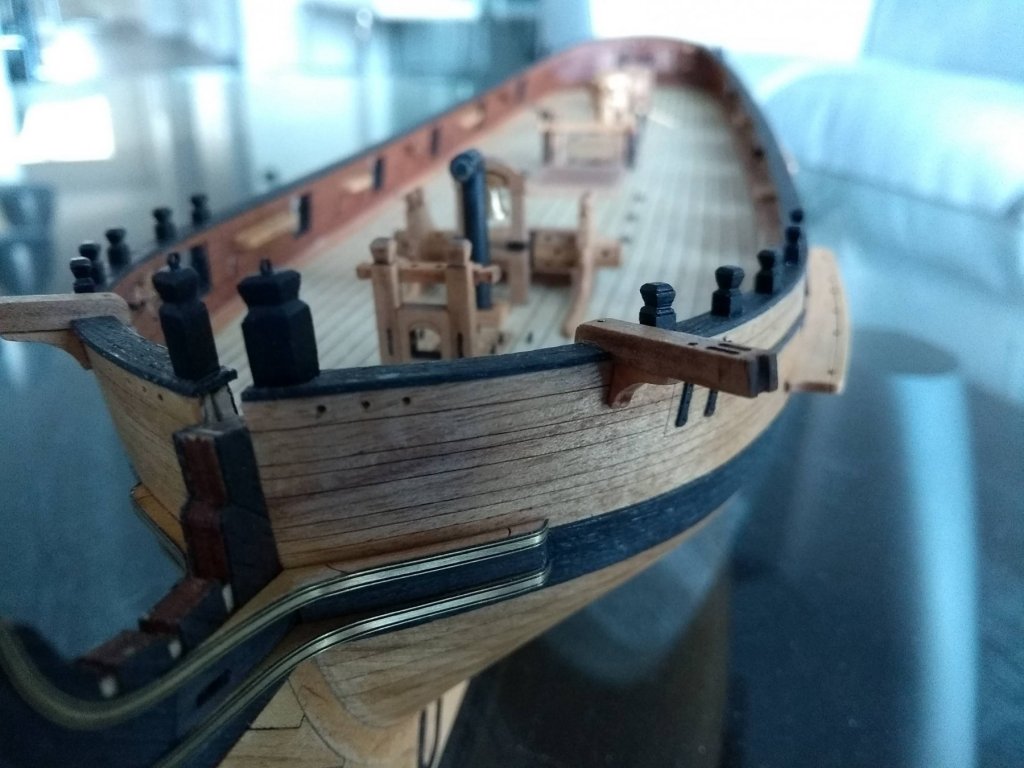
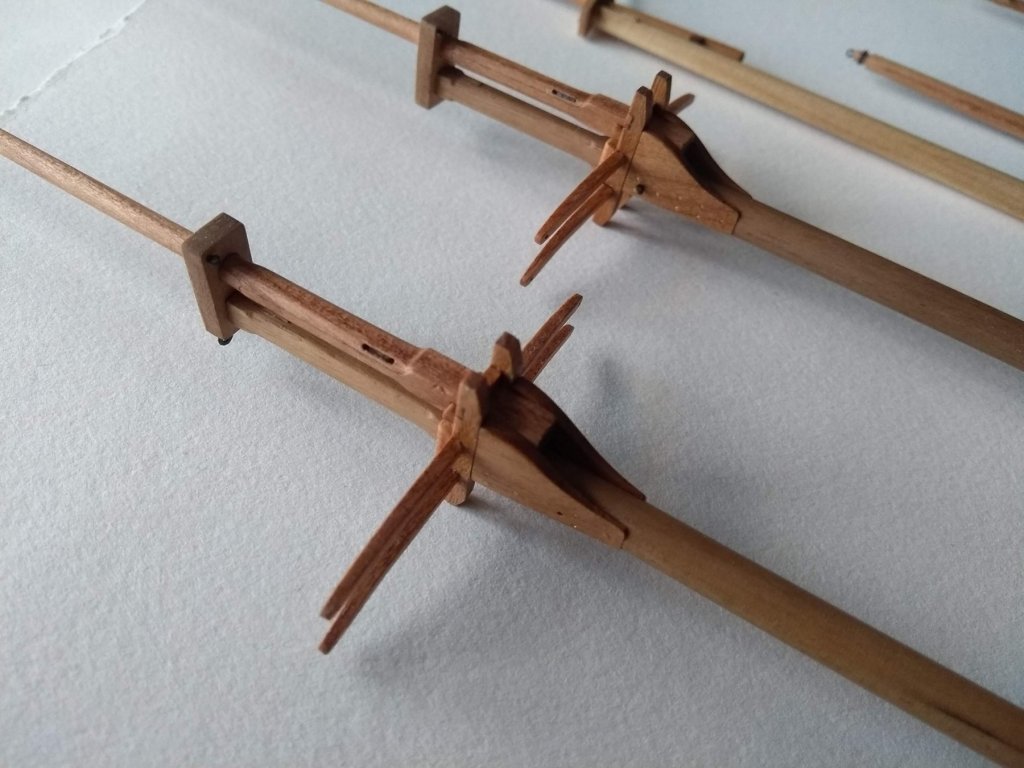
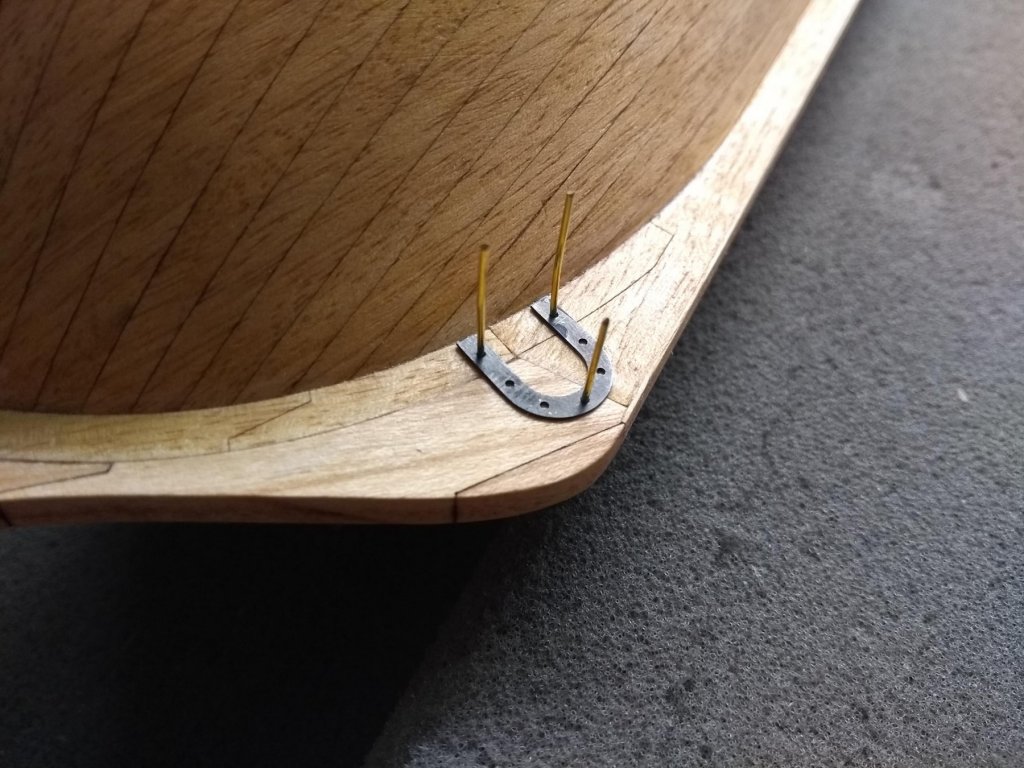
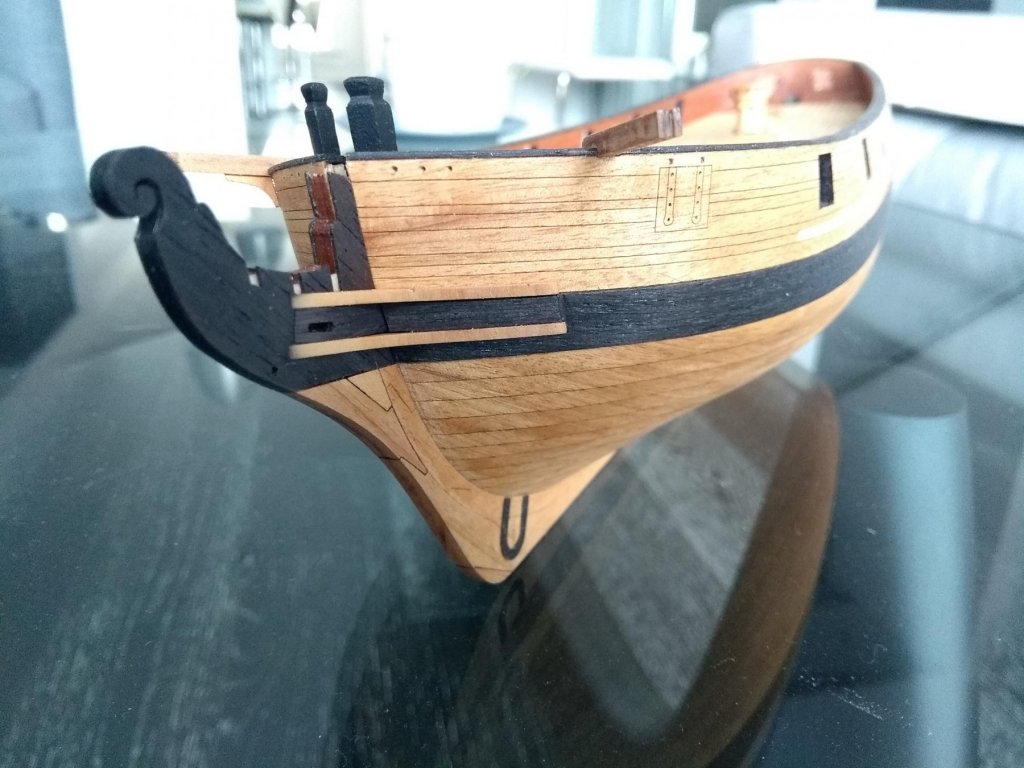
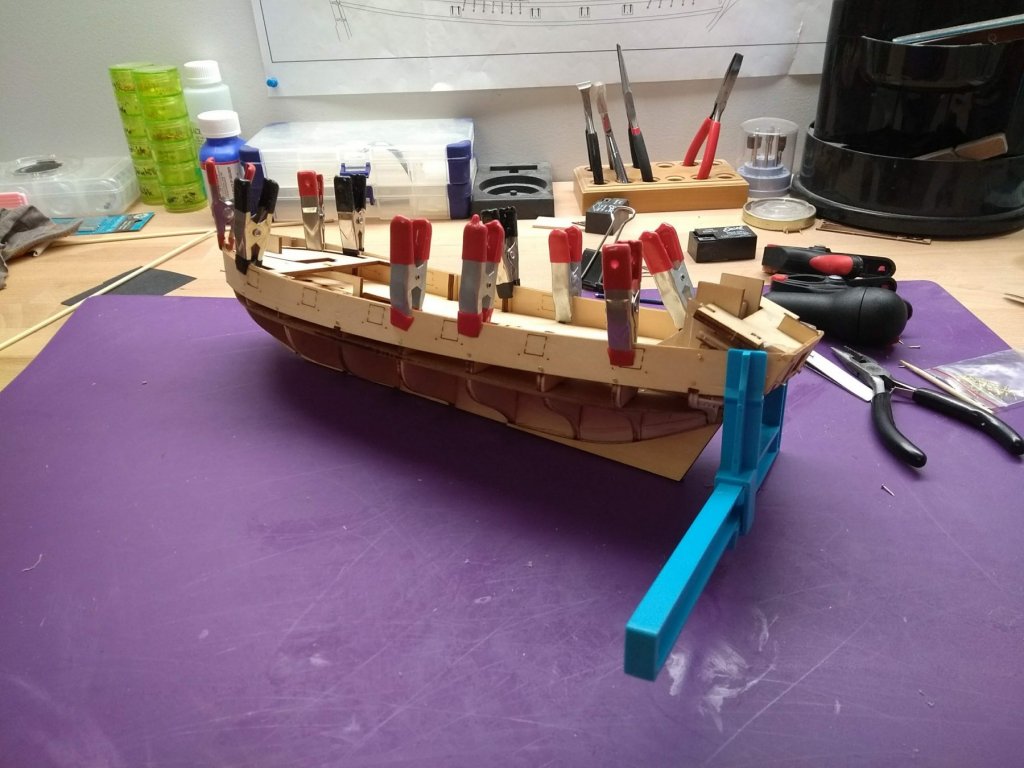
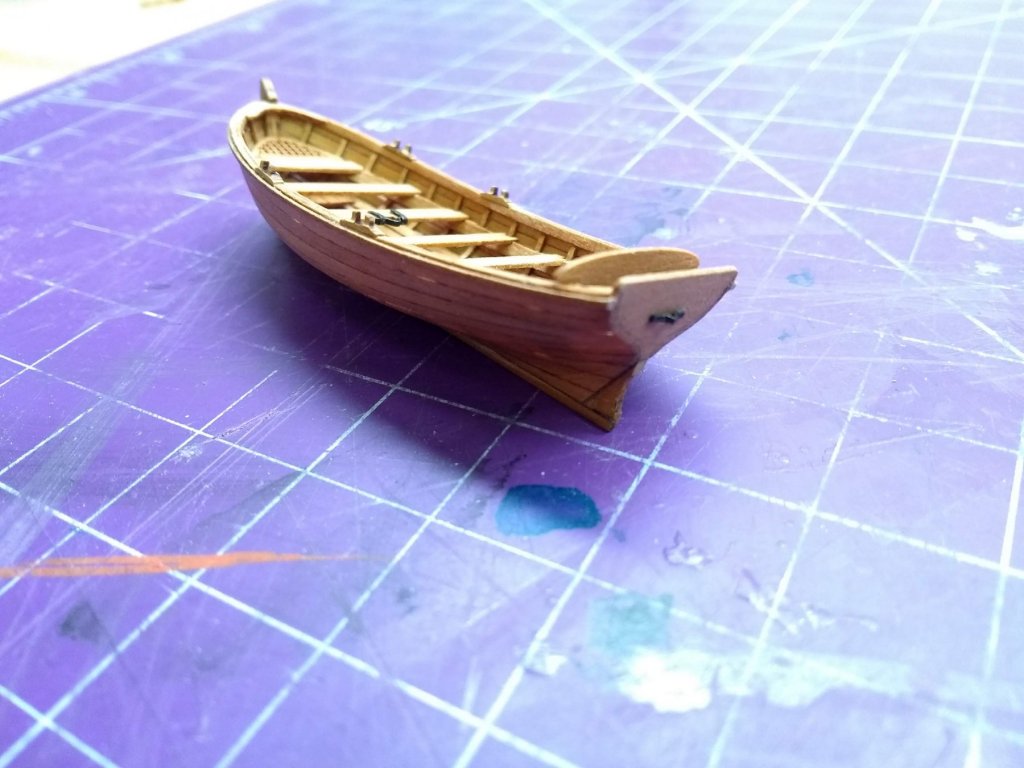
23. Finally I moved to installing the chainplates. First, I installed all deadeyes into the chainplates and carefully positioned them in the channels. I used green painter's tape to mark their angles: Then I spent quite a lot of time adjusting the chainplates on each side to make them symmetrical: When I was finally satisfied with their positions, I drilled the holes and inserted nails: 24. Next I installed the ship's boat on the keelblocks. I used some sailcloth to simulate a furled sail: 25. Then anchors were installed (I haven't lashed them to the knightheads just yet, will do it once bowsprit is rigged). I used heatshrink to simulate bands on the anchor stock:


- 40 replies
-
- 9
-
-
- finished
- master korabel
- (and 2 more)
-
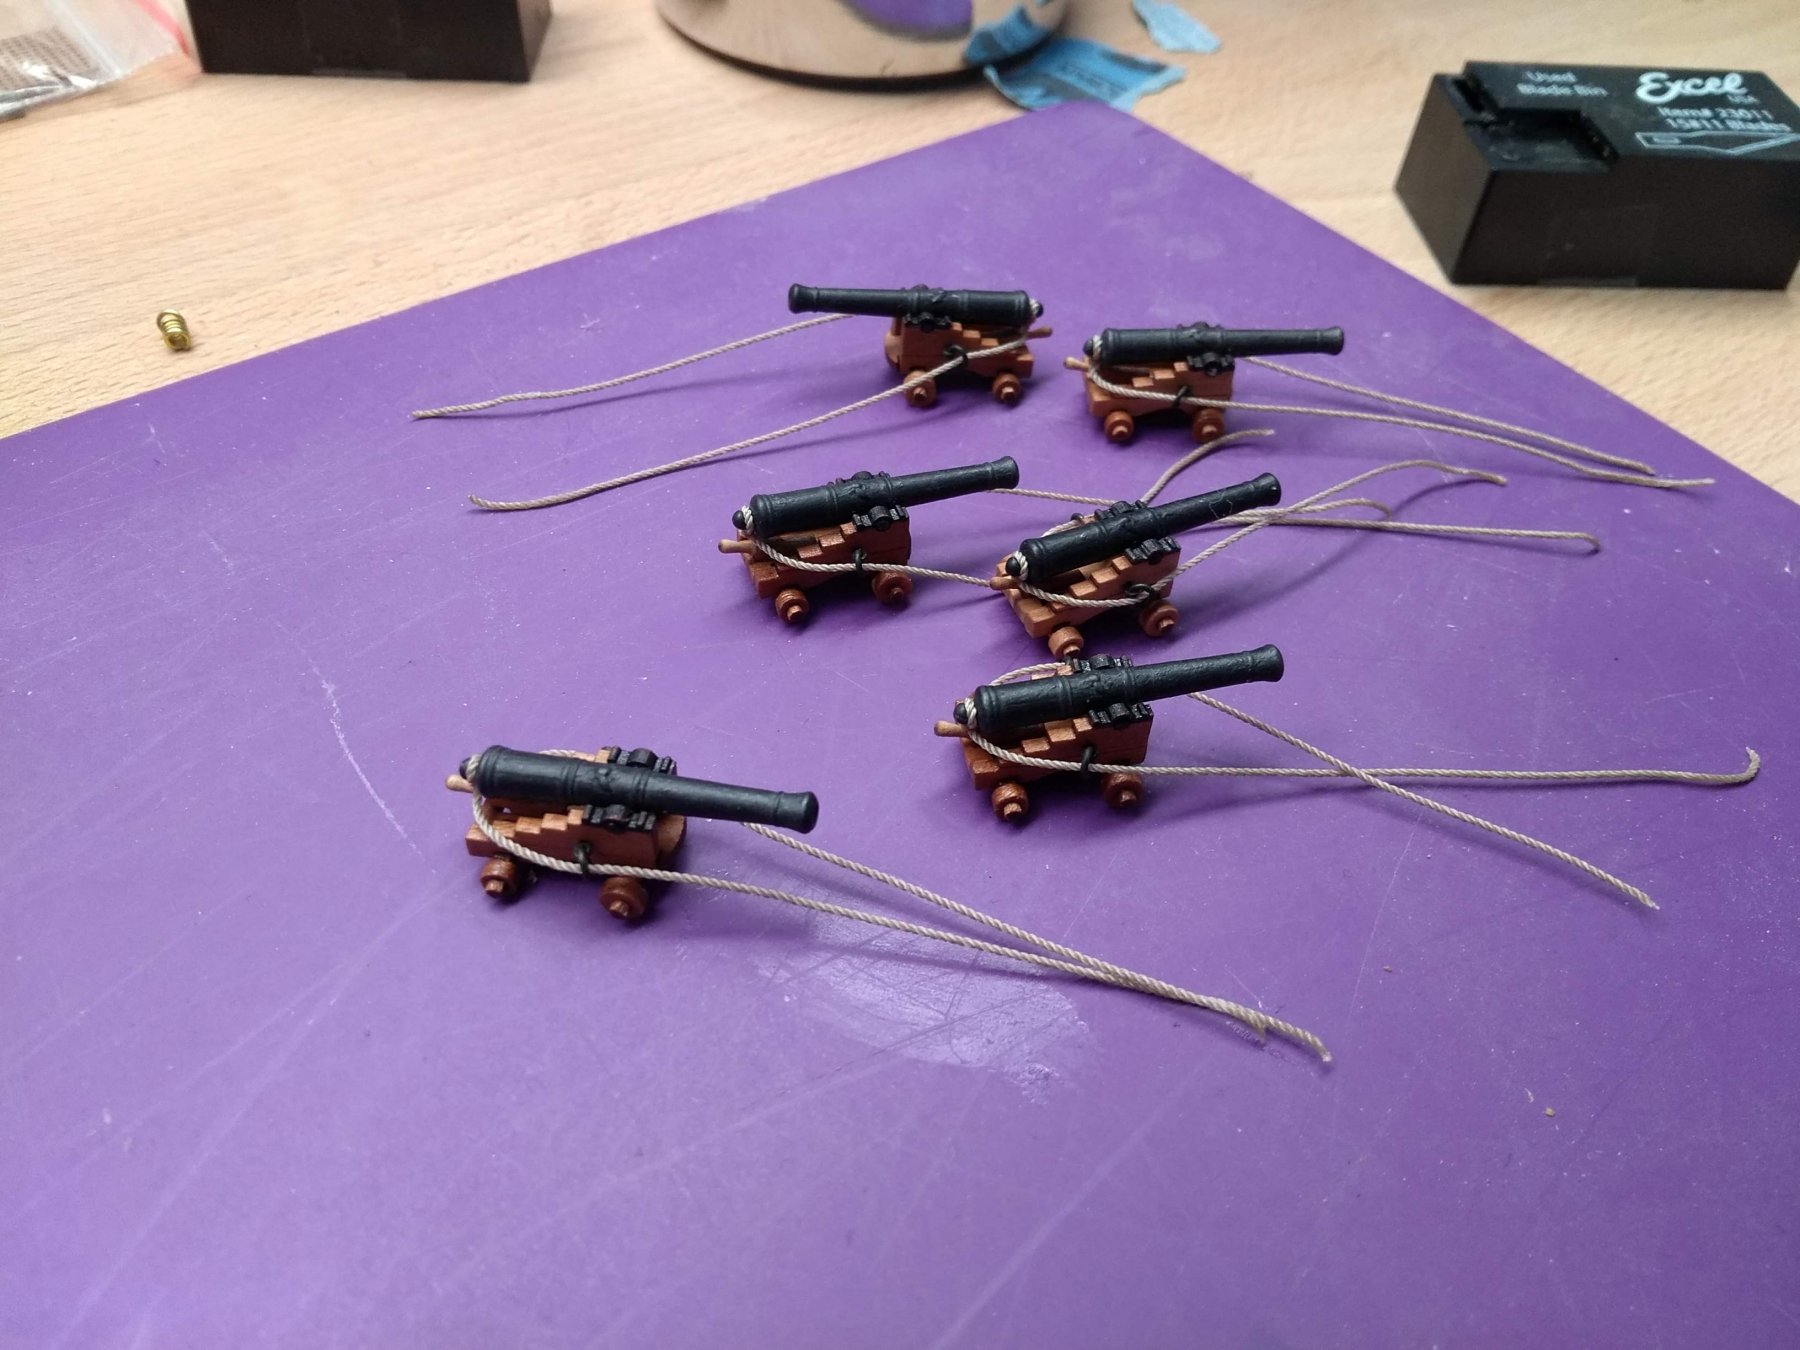
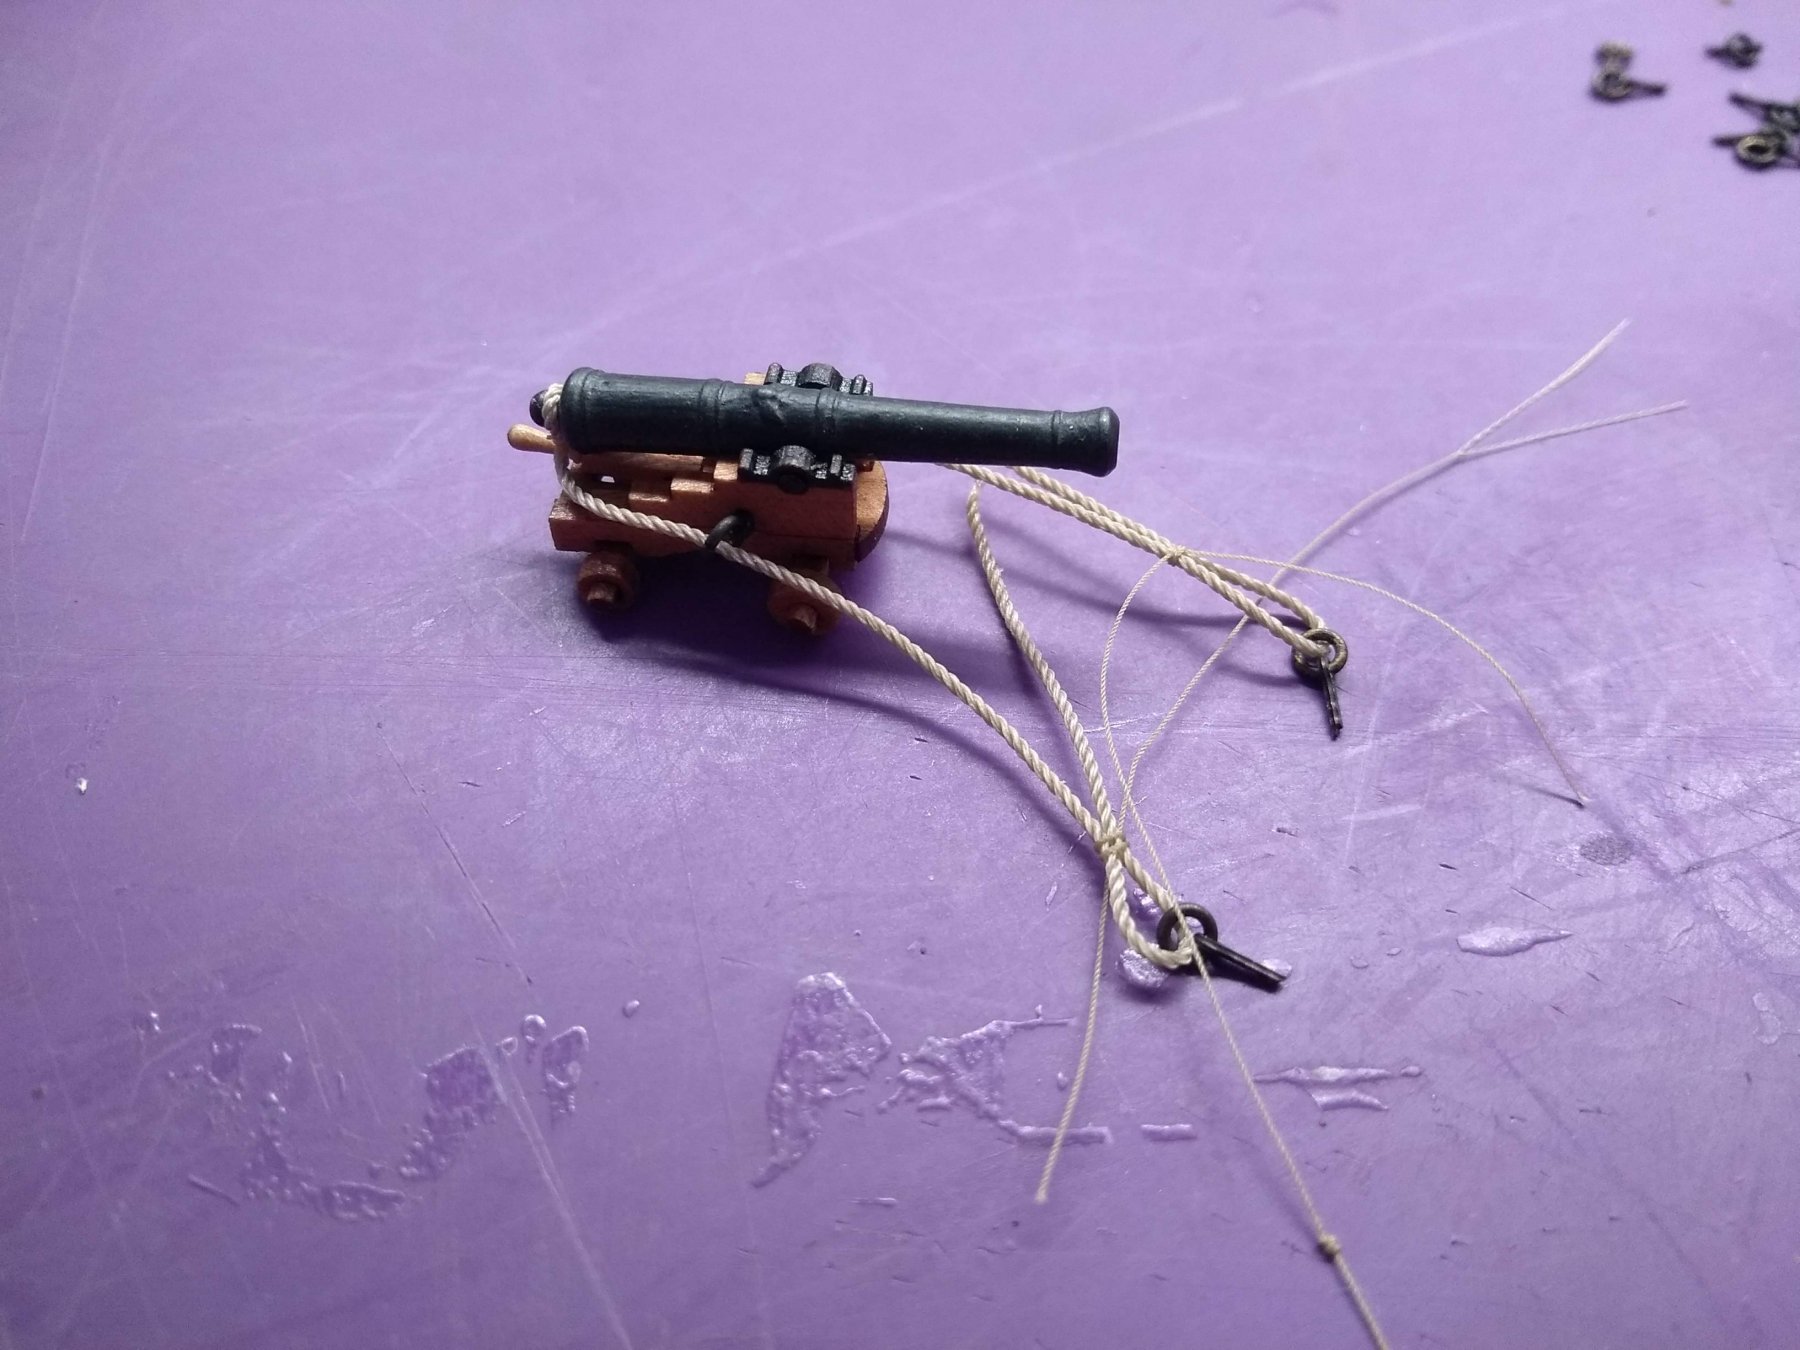
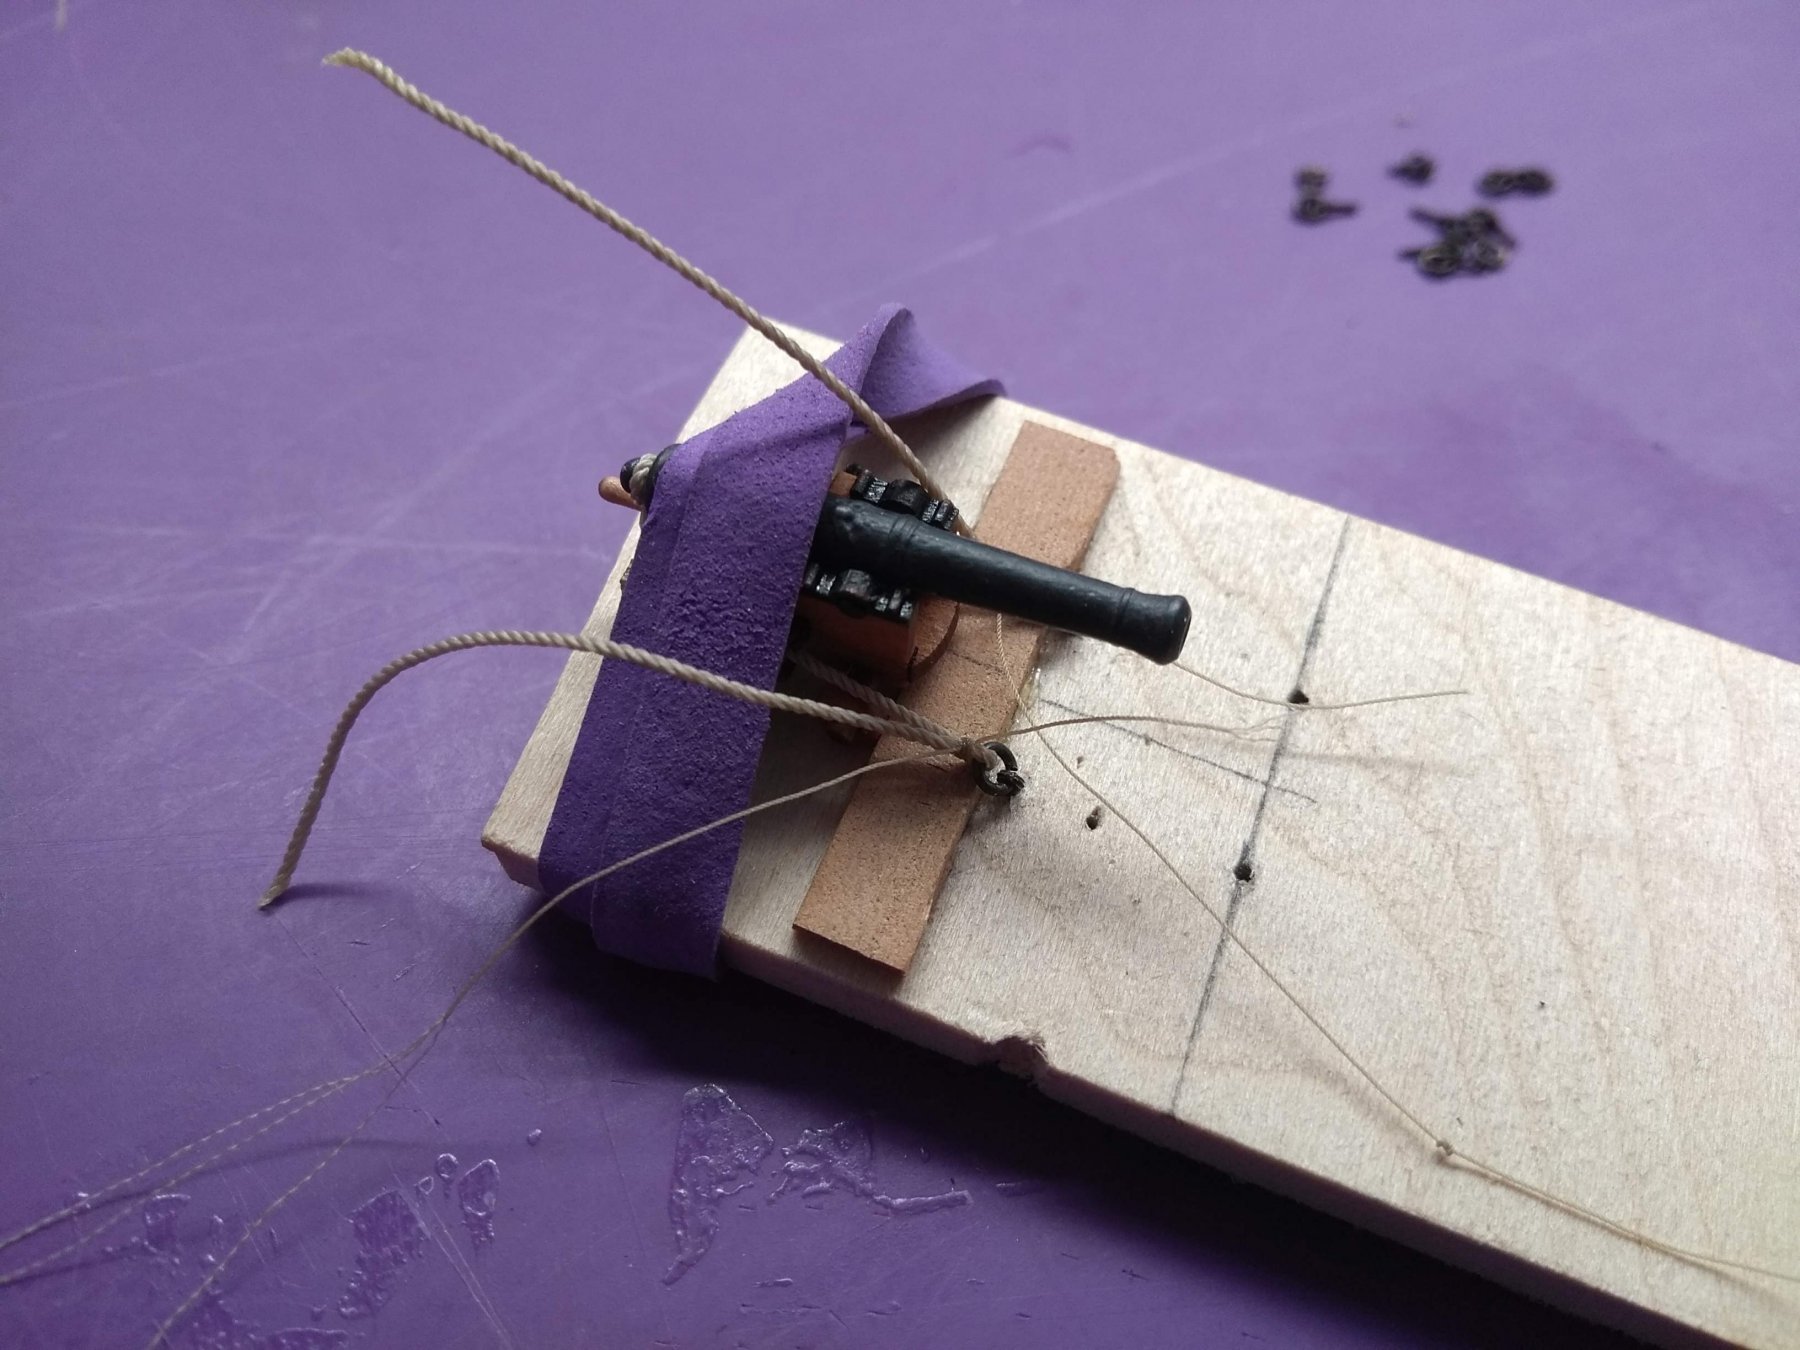
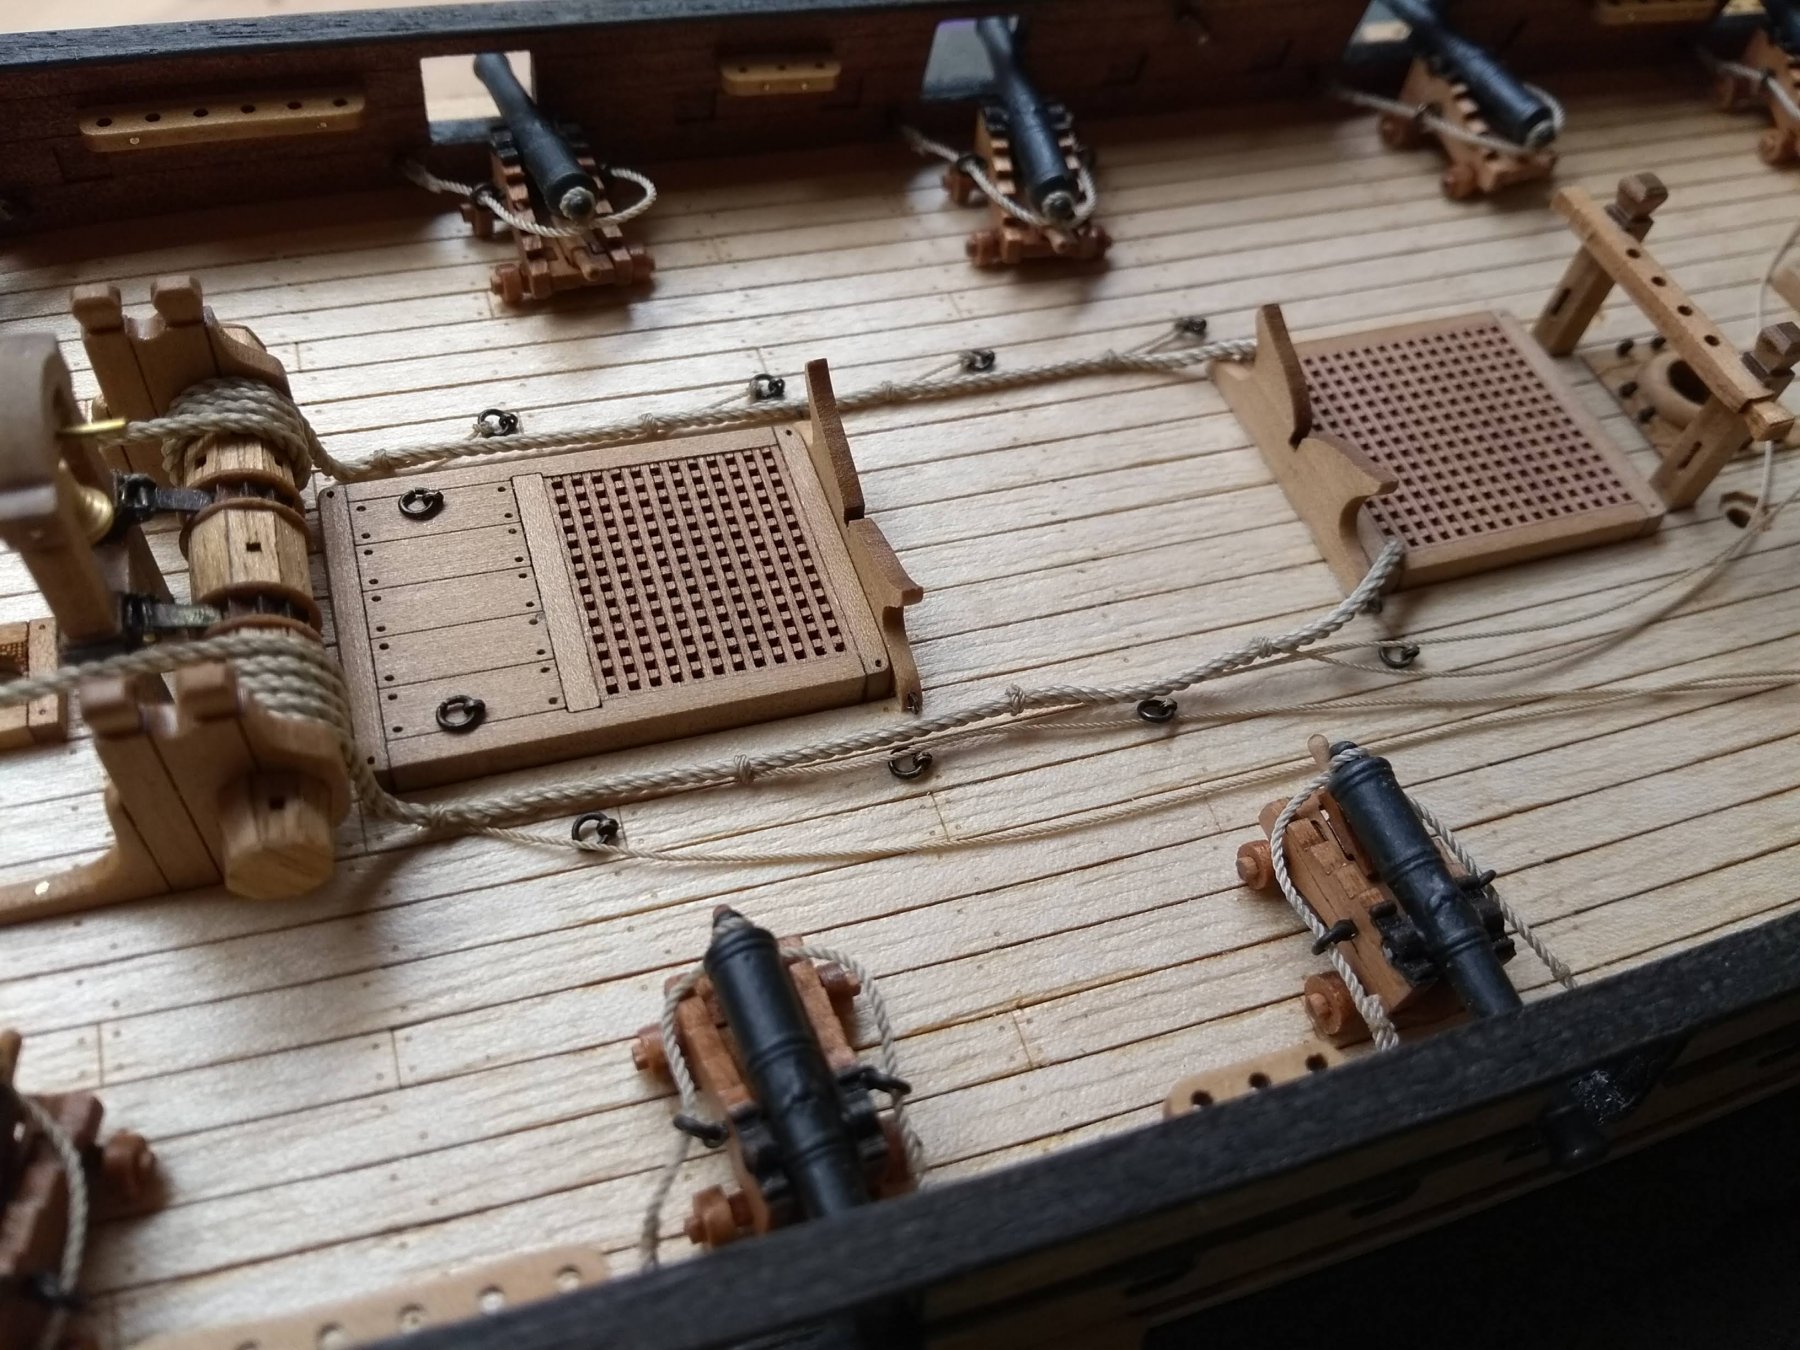
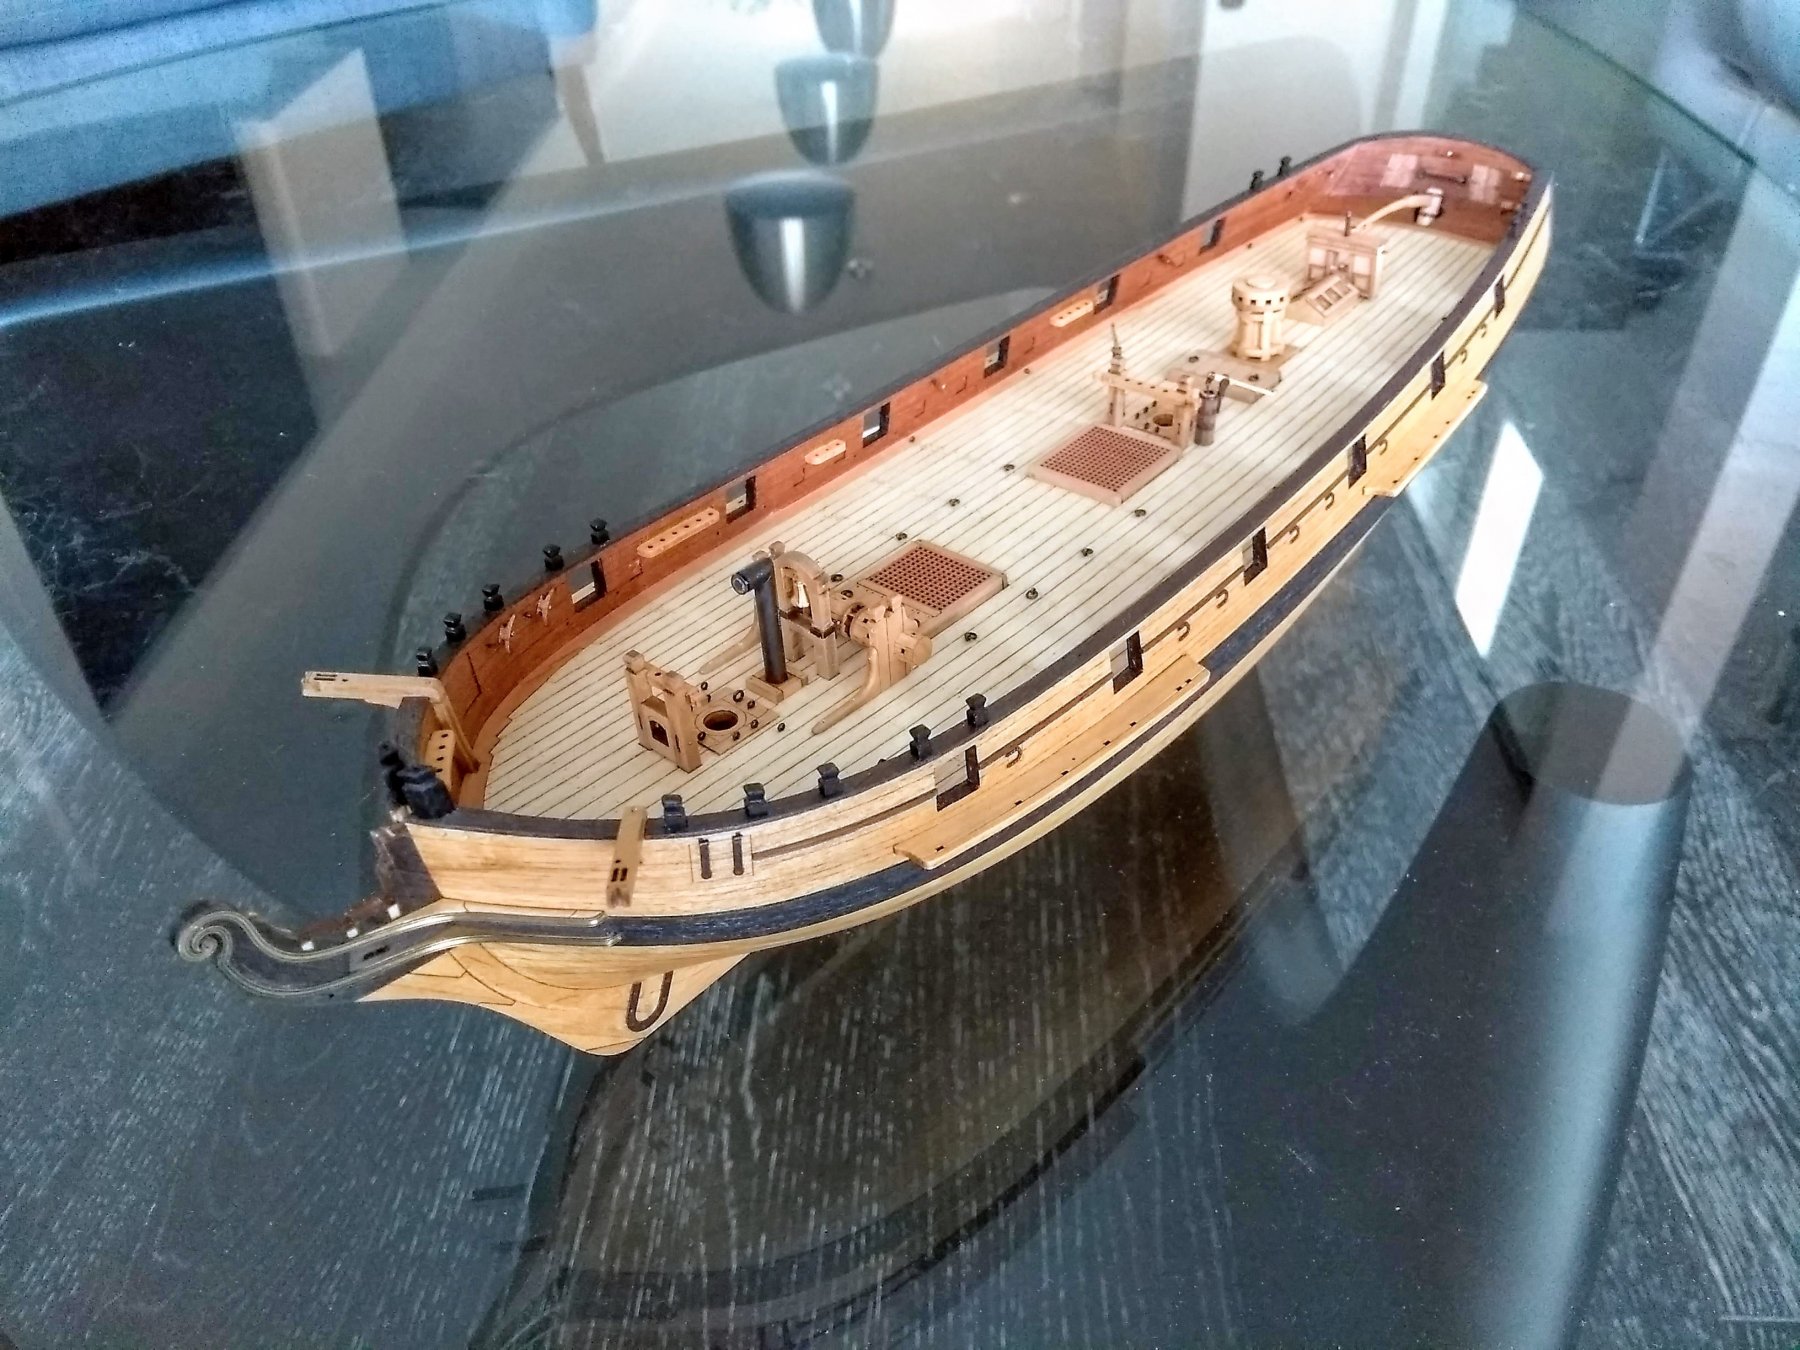
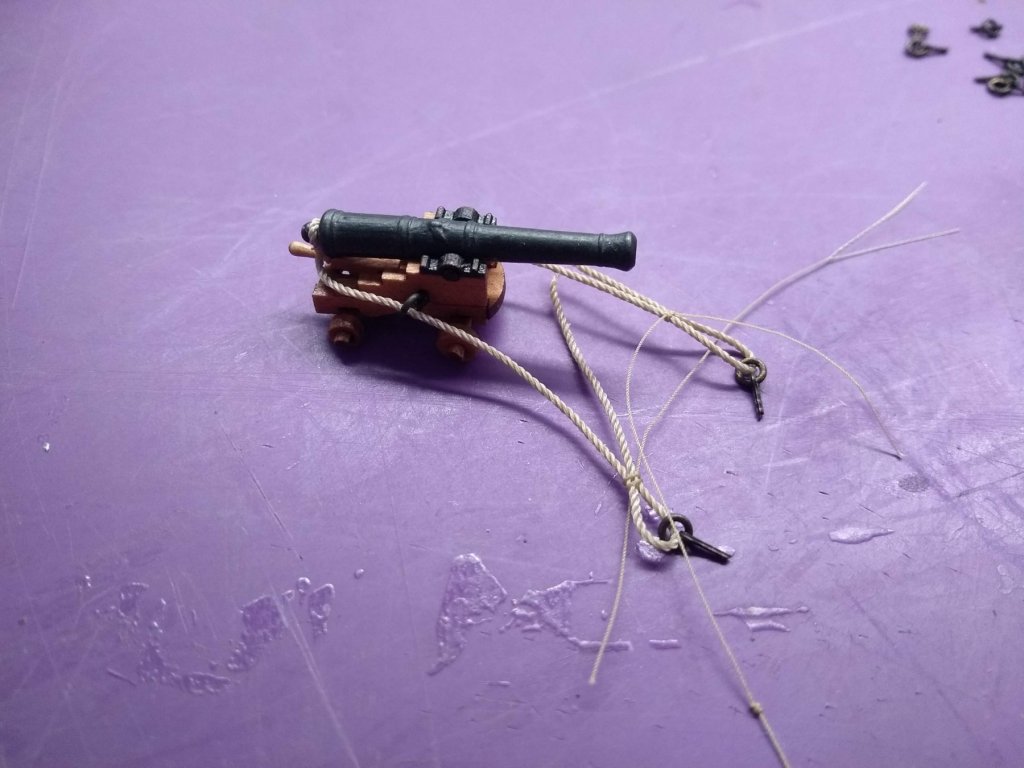
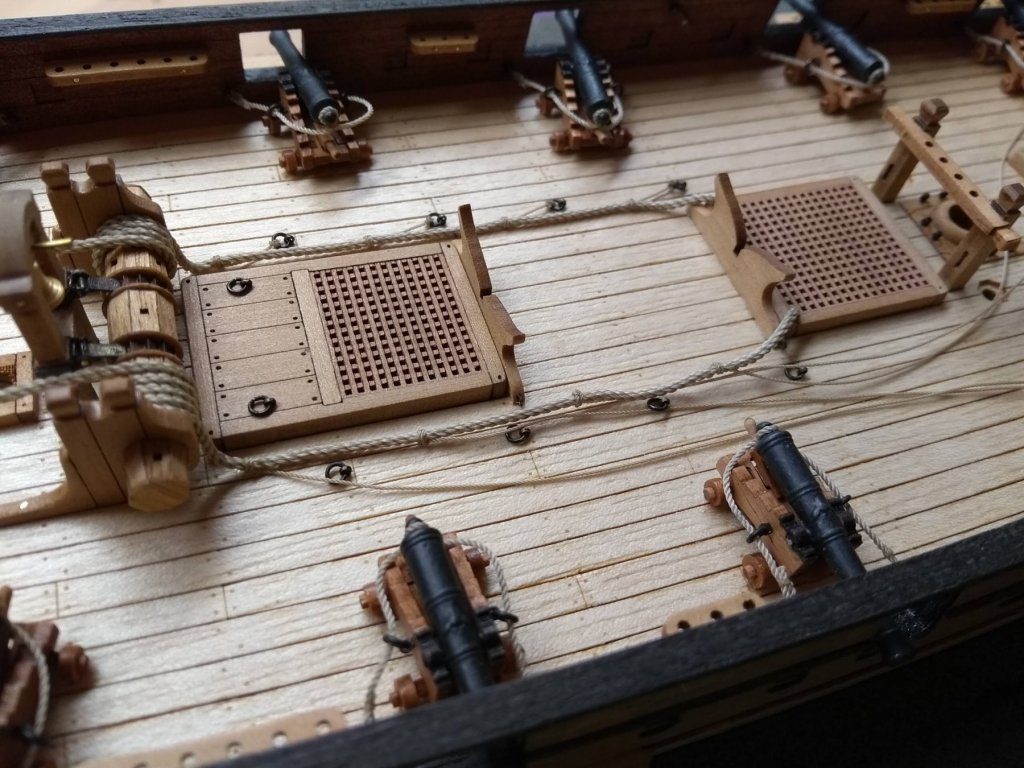
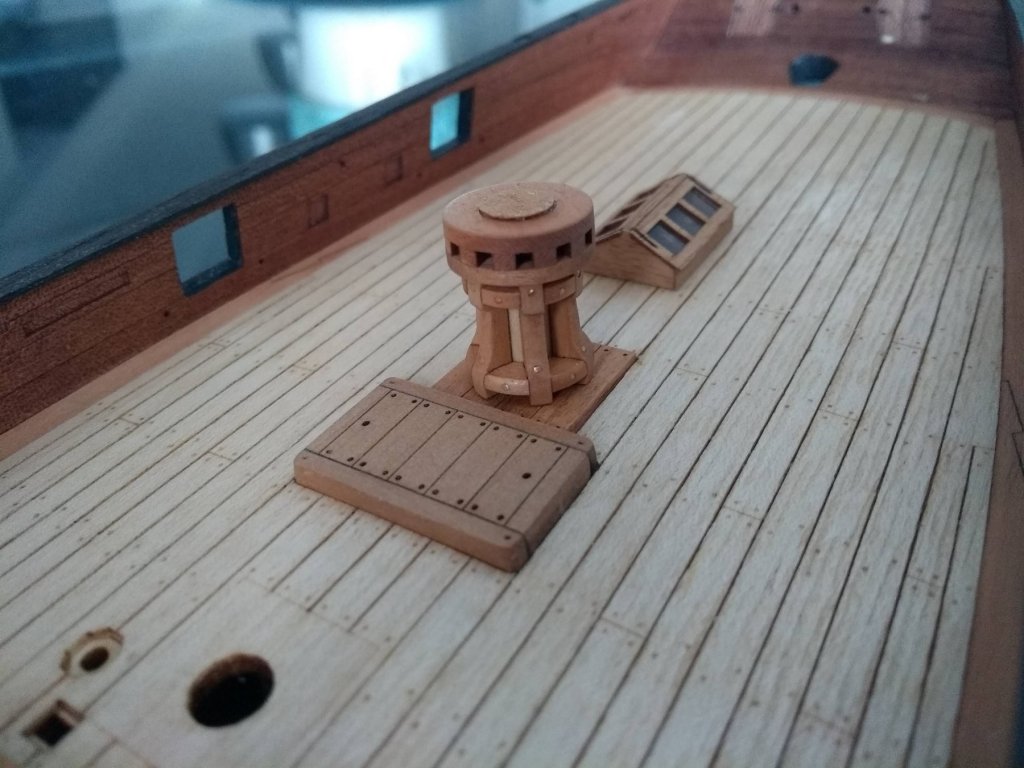
I'm finally back from my long break and begin to continue working on my model of Polotsk. I'm getting back into it slowly hence there is not too much progress so far. All that is left before rigging and masting can begin is to assemble and install the cannons, install and rig the tiller, the binnacle, the anchors, the boat, the chainplates and some other little things on the deck. 21. Getting cannons assembled was very easy but super boring. There are 12 of them altogether and it was very repetitive. I needed to make and install 48 jump rings into 48 eyebolts. First I built carriages and tied breeching ropes to cascables: Then I seized two eyebolts into the breeching ropes: And using a simple jig tightened and adjusted seizings so they are all of the same length: No other cannon tackles were used on this model, so the cannons finally could be installed on the model. Here, I only glued the eyebolts into the bulwark without attaching the cannons to the deck, I will glue them to the deck once the chainplates are installed. Also, in this picture you can see anchor cable being laid down: 22. Then I rigged the tiller and installed the binnacle and the skylight:


- 40 replies
-
- 7
-
-
- finished
- master korabel
- (and 2 more)
-
For sure, he is a talented presenter and his videos are very educational and inspiring. I'm happy to help him extend his audience
-
The first 13 Phoenix videos now have English subtitles (actually, first 3 don't have any, because there is no voiceover in them). The rest of them are coming soon.
-
The second Avos video now also has subtitles. I'm wondering if there are any other Vikulaev's videos that people want subtitles for.
-
Tender Avos review video now has proper English subtitles without funny nonsense like "I do not hesitate can not be". Eventually more Vikulaev's videos will have subtitles.
-
I believe there are plans to add subtitles to these videos.
-
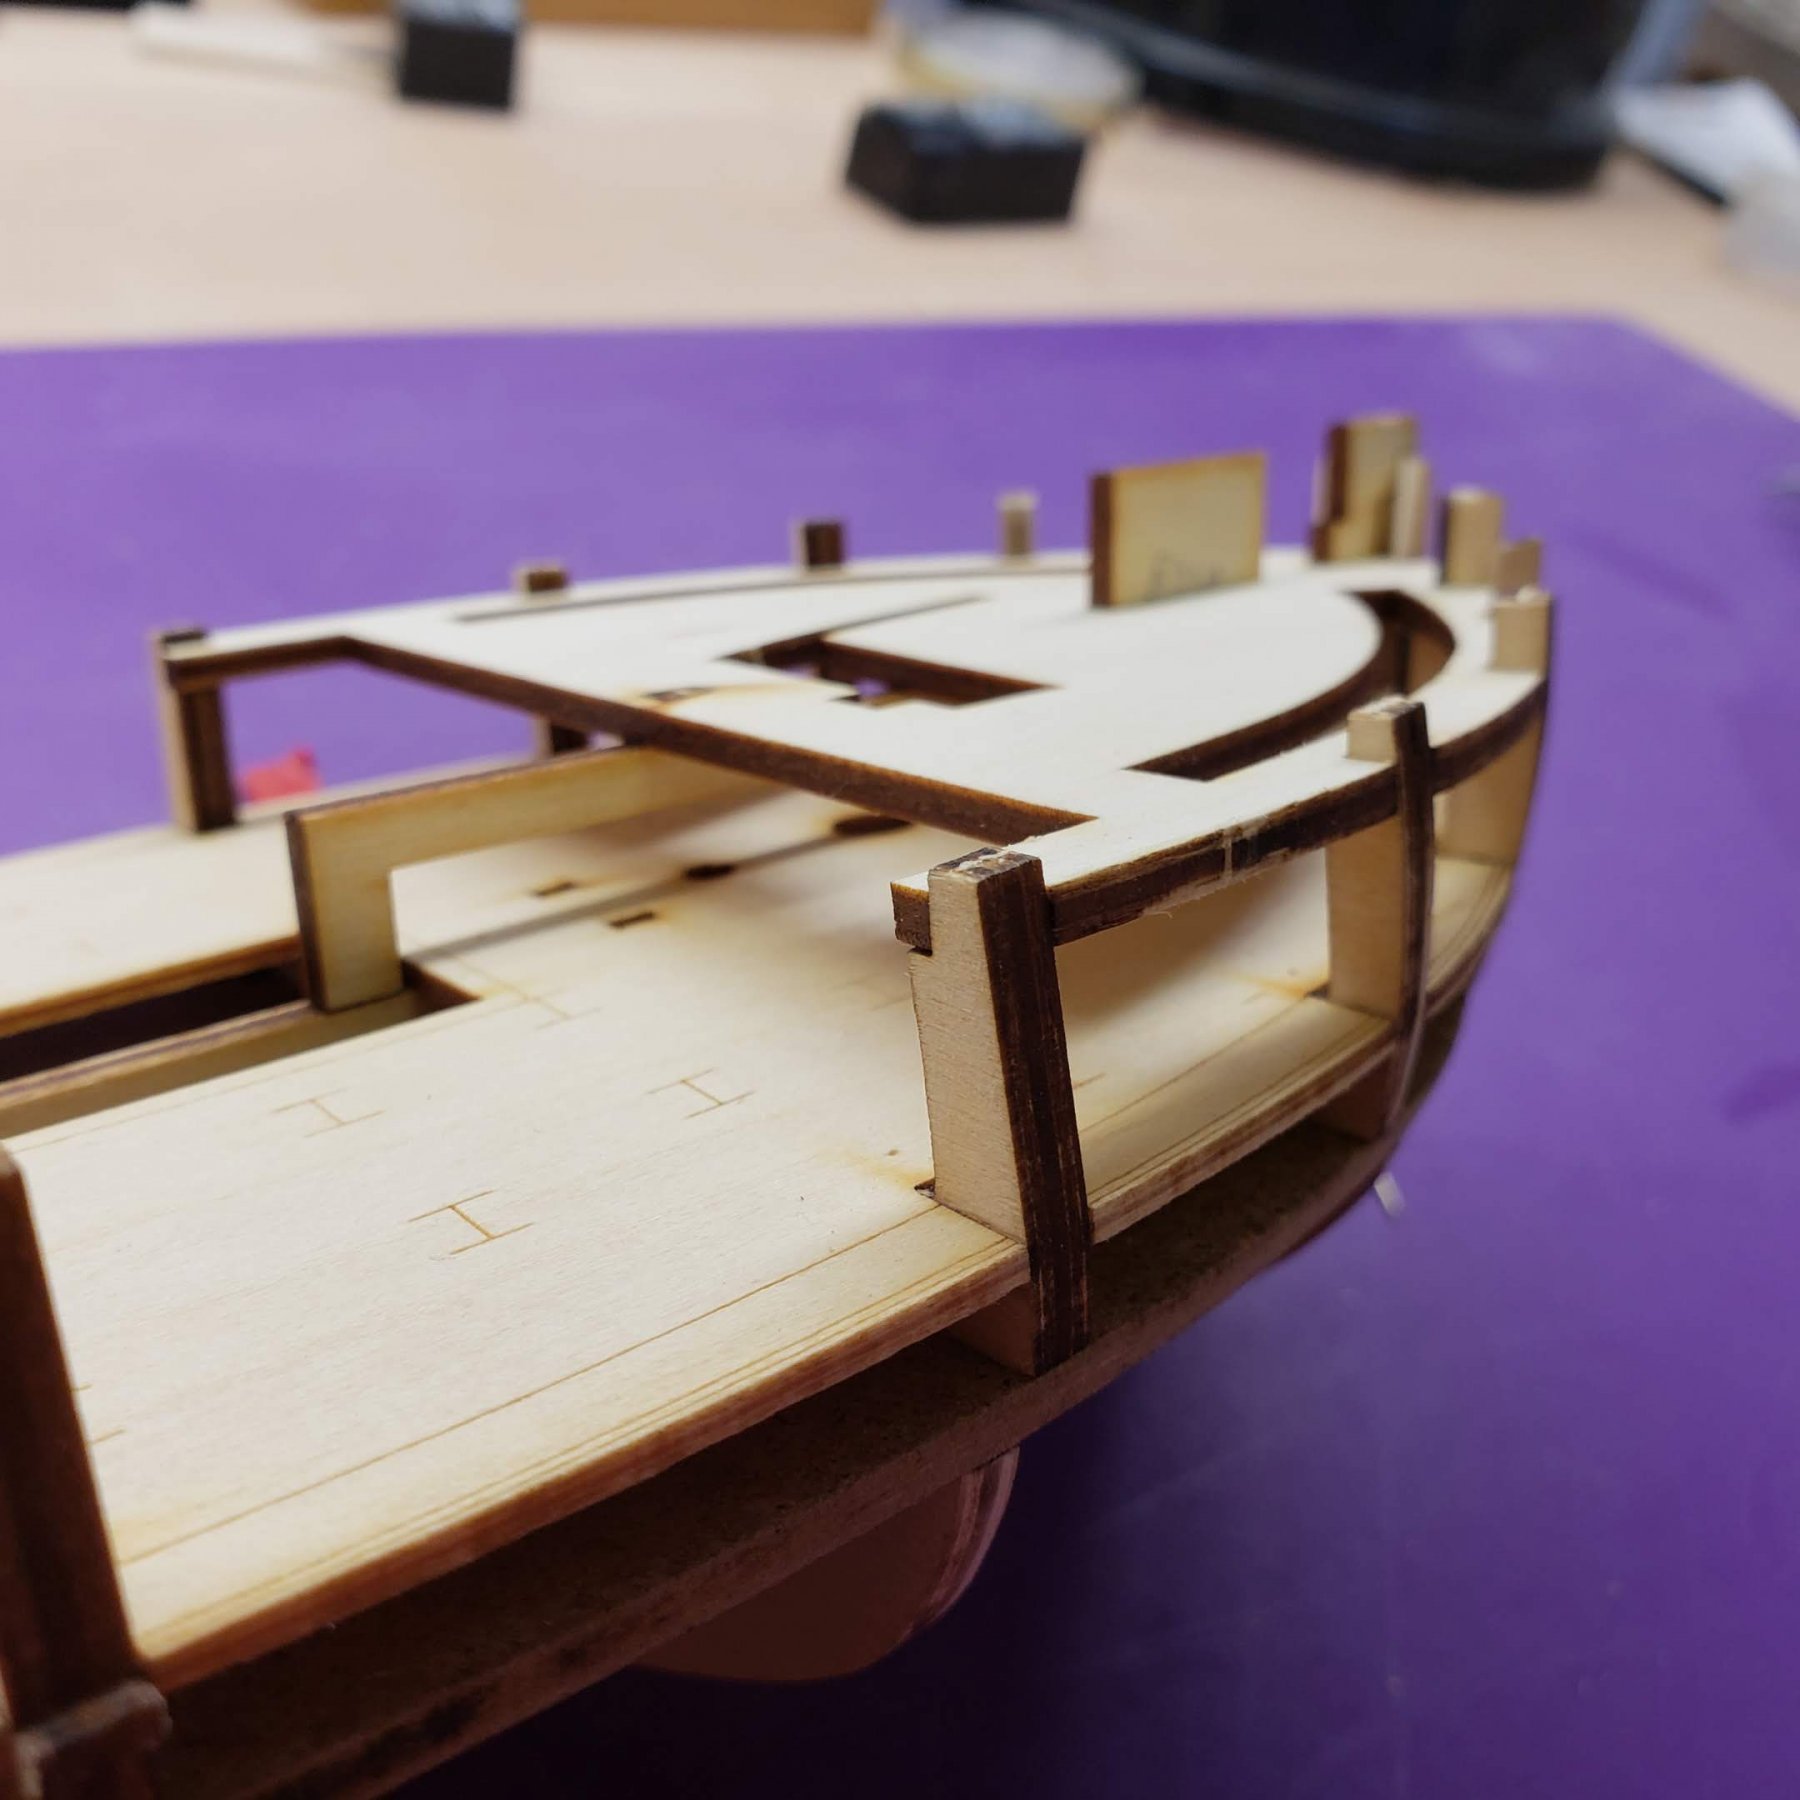
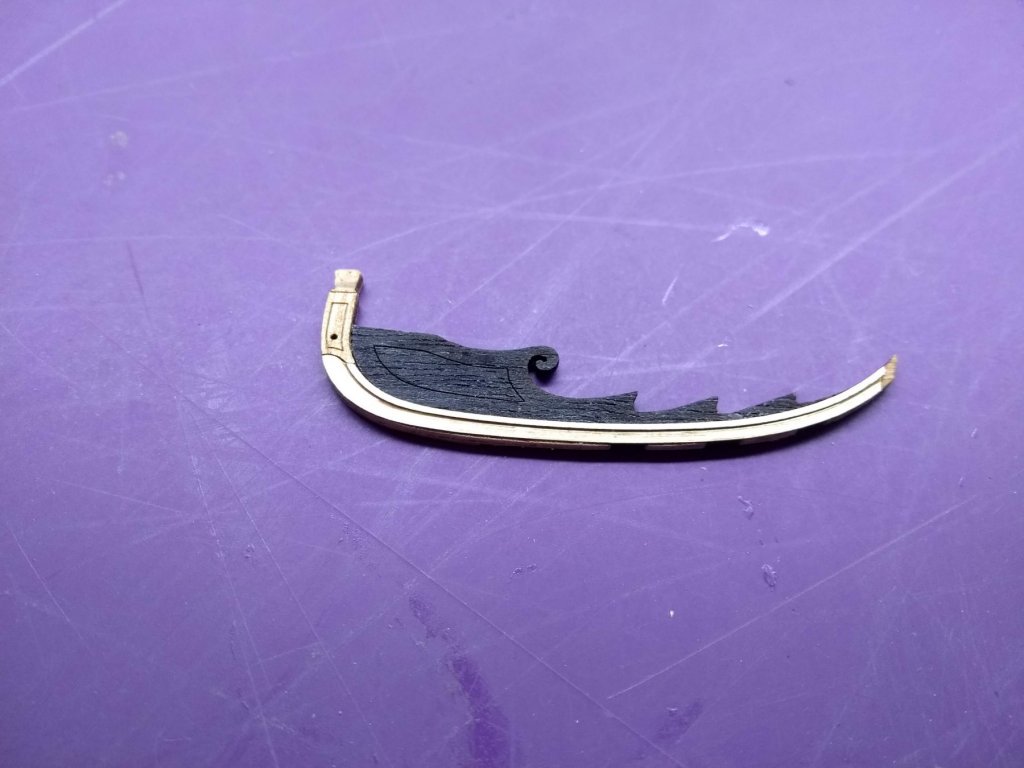
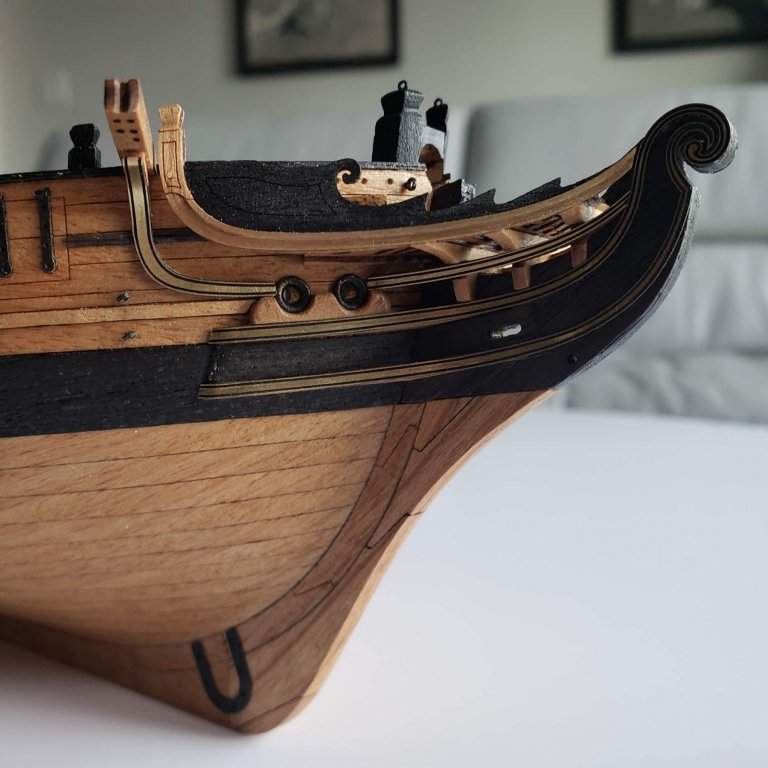
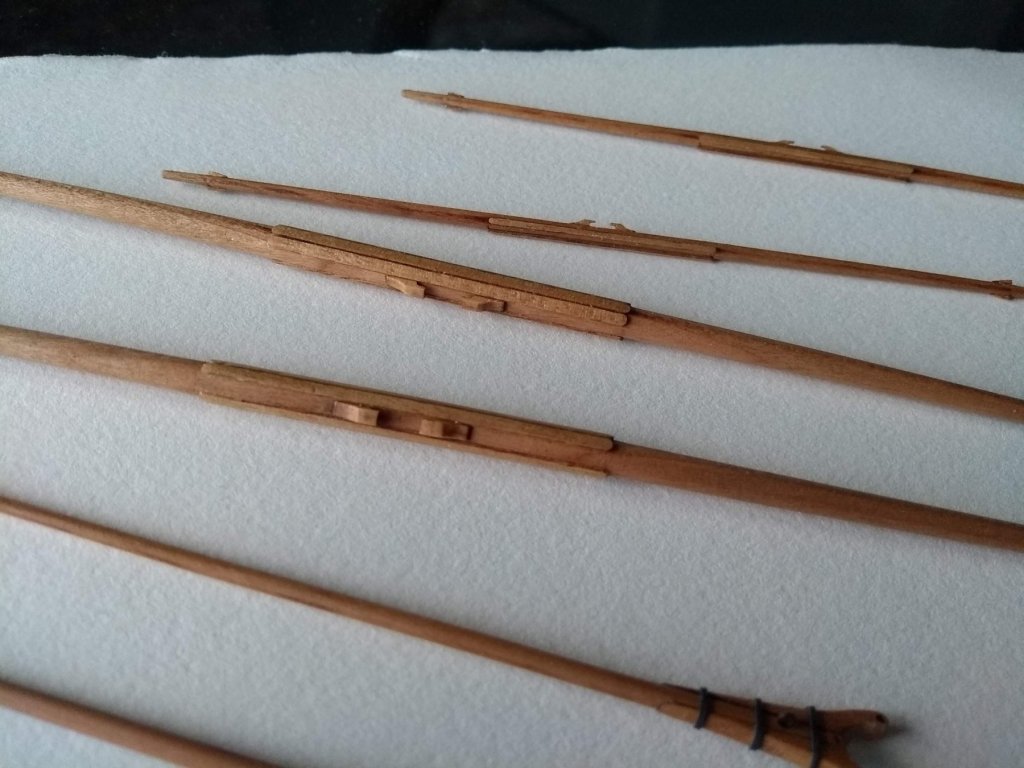
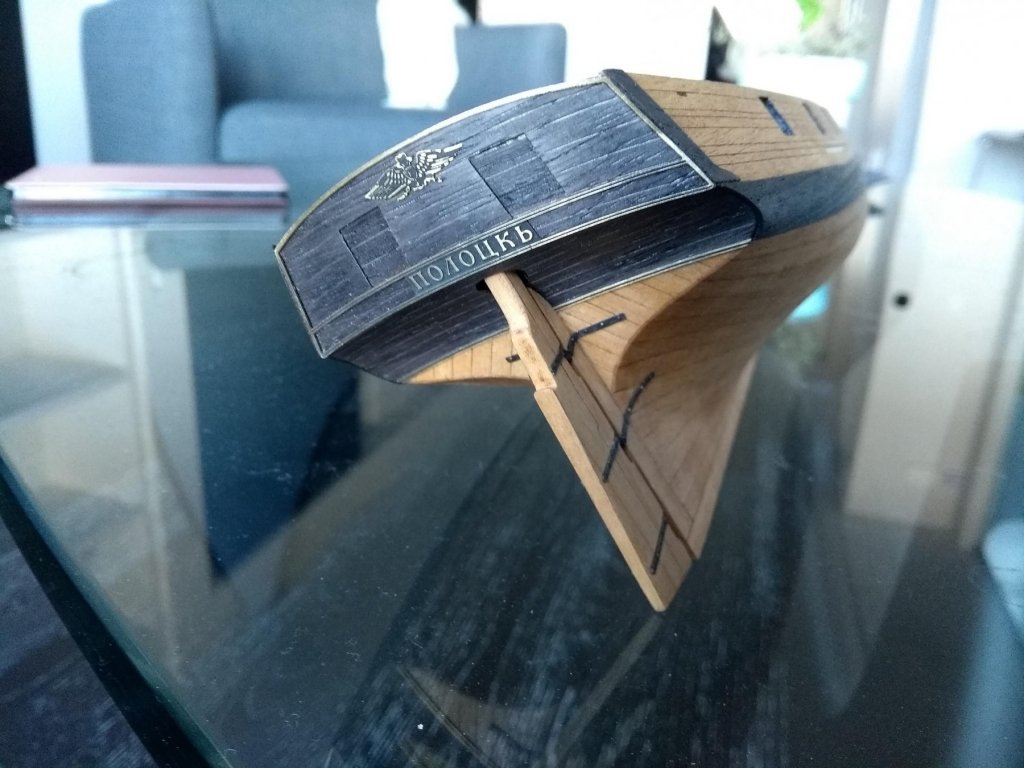
18. I patiently continued chugging along and adding more and more details... The mast bitts, the windass, the smokestack, the channels, the belaying pin racks. I also carved and installed 16 knight heads. Thankfully those came laser cut and minimal carving required to finish them: 19. I really liked working on the head decorations. The kit included a lot of details including two "sailors' thrones"! All parts were laser cut and were pretty easy to install and minimal sanding was required. All decorations were made of photoetched brass: 20. Finally all hull details were complete and I switched to spars. Altogether there were 15 spars including a couple of flagpoles - reasonable amount. Most of the spars came as laser cut parts and required rounding. I used a mini plane to make them octogonal and then sanded them further down. Some spars had pretty complex shapes: Yards were pretty detailed for such scale: Each crosstree consisted of 6 lasercut parts: And this is where I stand right now. All that is left is to assemble 12 cannons, rig and install them and then rig the ship. I will continue posting my progress here as it comes along.


- 40 replies
-
- 8
-
-
- finished
- master korabel
- (and 2 more)
-
SpyGlass, this technique works for veneer (less than 1mm thick). With thicker planks there is not enough time for heat to get glue boiling before the other side of the plank begins to smoke. Yes, try with scrap first. That is how I learned it. It is a great technique and you'll find it handy!
-
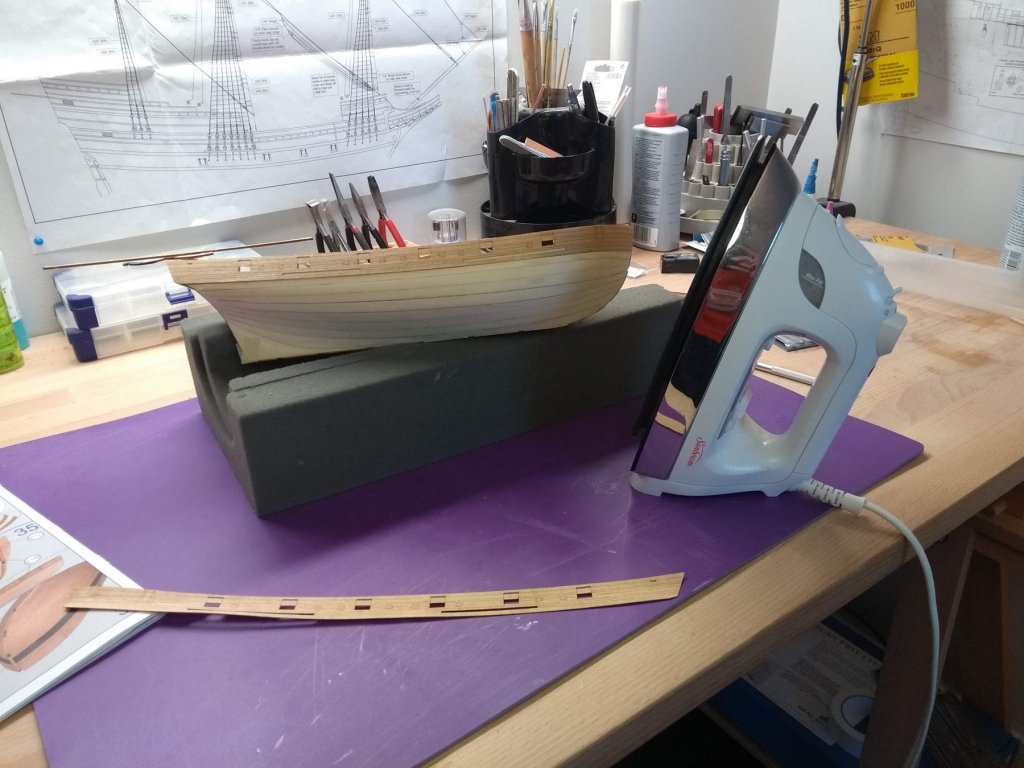
SpyGlass, The idea behind gluing with hot iron is that when you heat up PVA glue it melts and as soon as you stop applying heat it solidifies very quickly (~ 5 - 10 seconds). The benefit of this is that this can be repeated multiple times. 1. I dryfit the plank, make sure that it fits nicely where it supposed to go 2. I apply PVA glue (I'm using Weldbond white PVA glue) on the back side of plank and make sure to spread it with a toothpick so it covers the whole plank consistently Really, the beauty of this method is that there is no rush, glue can dry but it won't stop it from melting and gluing. So you can take your time here and make sure that everything is covered. This is how it looks like when covered whith glue (actually this is a bit too much): 3. I usually wait until the glue is tacky and then begin to put the plank on the hull. I start from the bow and put the plank as close as possible to the stem and to the previous strake. Just lay it out along the hull trying fit it properly (its ok if it is not a perfect fit) 4. Then I apply the tip of the hot iron to the plank where it touches the bow. I move it back and forth a little and press it slightly. Really like ironing linens. The goal here is to get the plank glued to the bow section so you have starting point. 5. After a few seconds (depends on how hot your iron is) the glue will melt and you can start pushing the plank with your fingers. I try to get it as close as possible to the stem and to the previous strake. You'll have about 5 seconds to do that. If glue dries before you finished you can apply heat again 6. Once I'm happy with how fore section turned out, I continue to work in ~ 2" sections: heat up, push the plank towards the previous strake and wait till it's dry 7. After the plank has been glued, I check the whole strake for gaps. If I see them, I apply the tip of hot iron and push the plank again 8. Finally, I look at the open end of the plank (the side that is opposite from the previous strake) and if I see any gaps, I just heat them up and push down with fingers And that's it! Another good thing about this method is that you can use an iron to remove a plank as well! Just start from the stern and move in short sections heating the plank up and lifting it with a tip of a knife. As for the temperature. I crank my iron to the max, but it is probably an overkill. You can practice on scrap veneer and see what works for you Hope this helps!
- 40 replies
-
- 6
-
-
- finished
- master korabel
- (and 2 more)
-
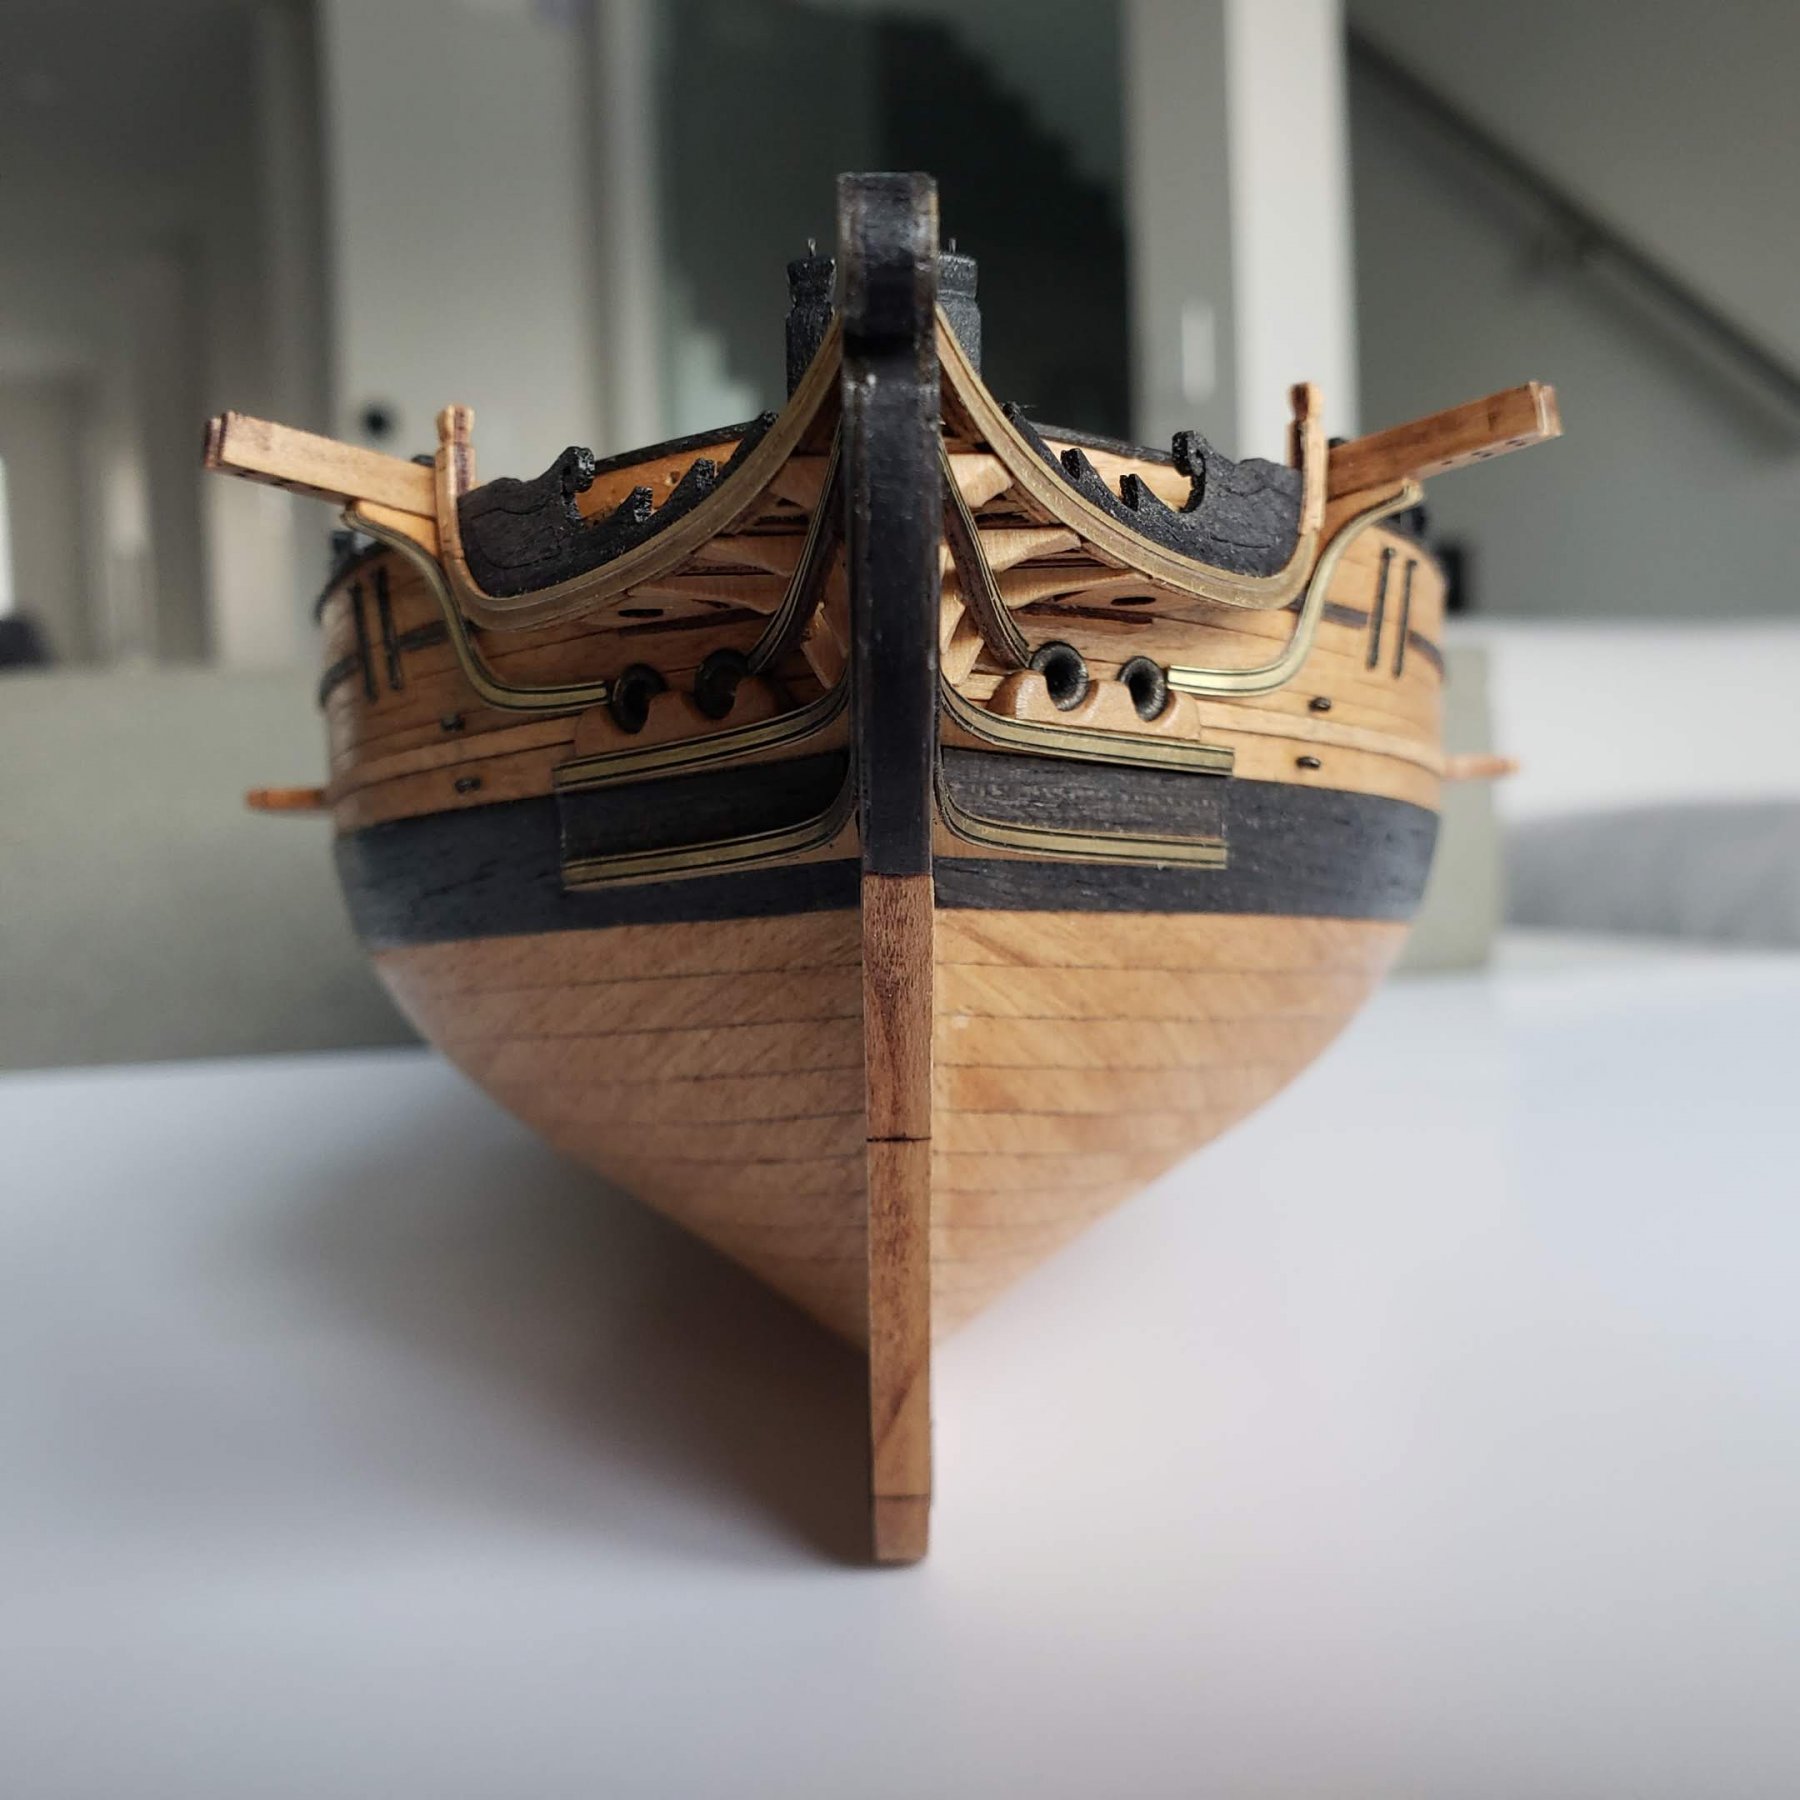
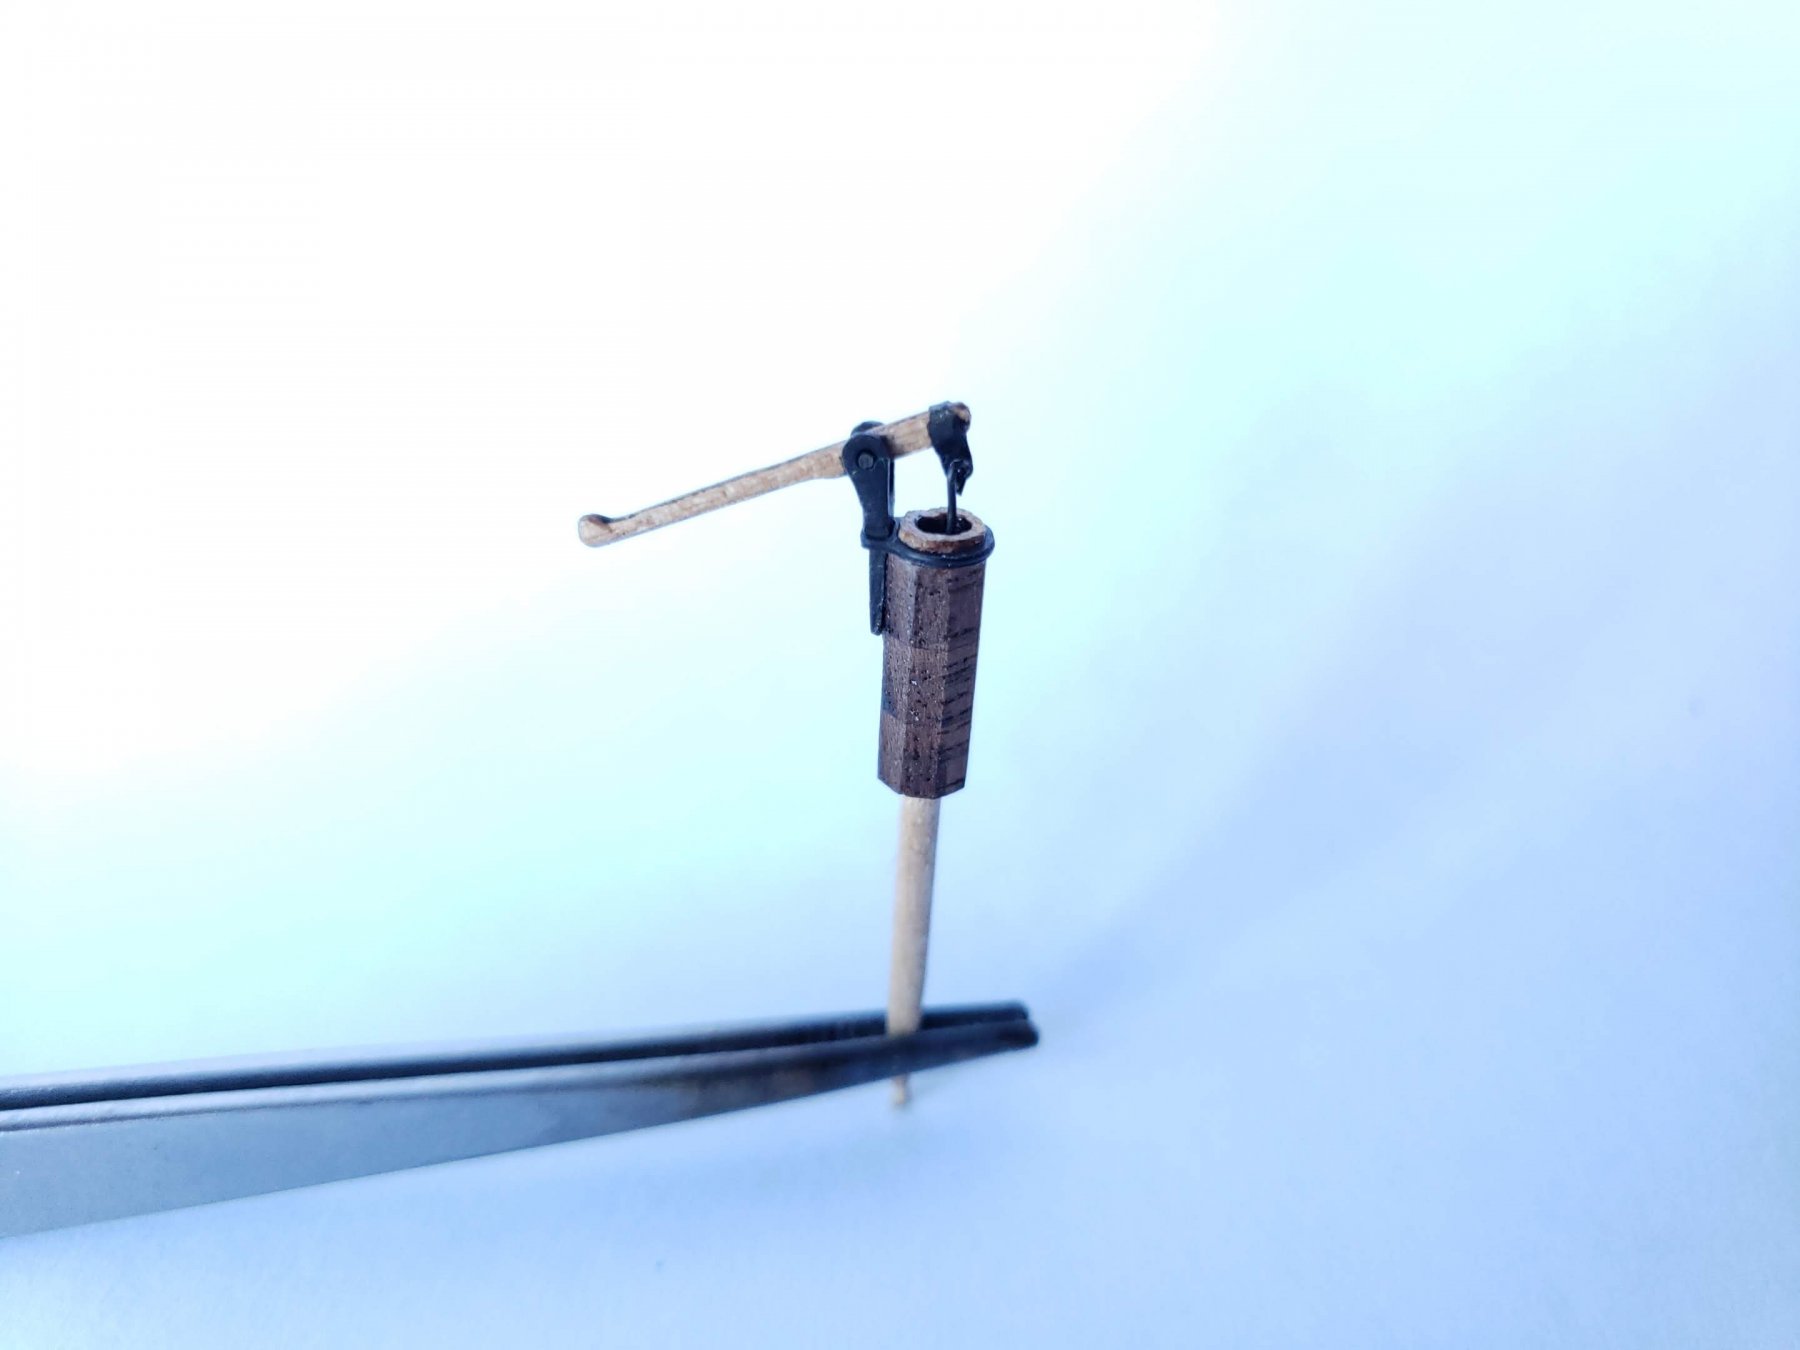
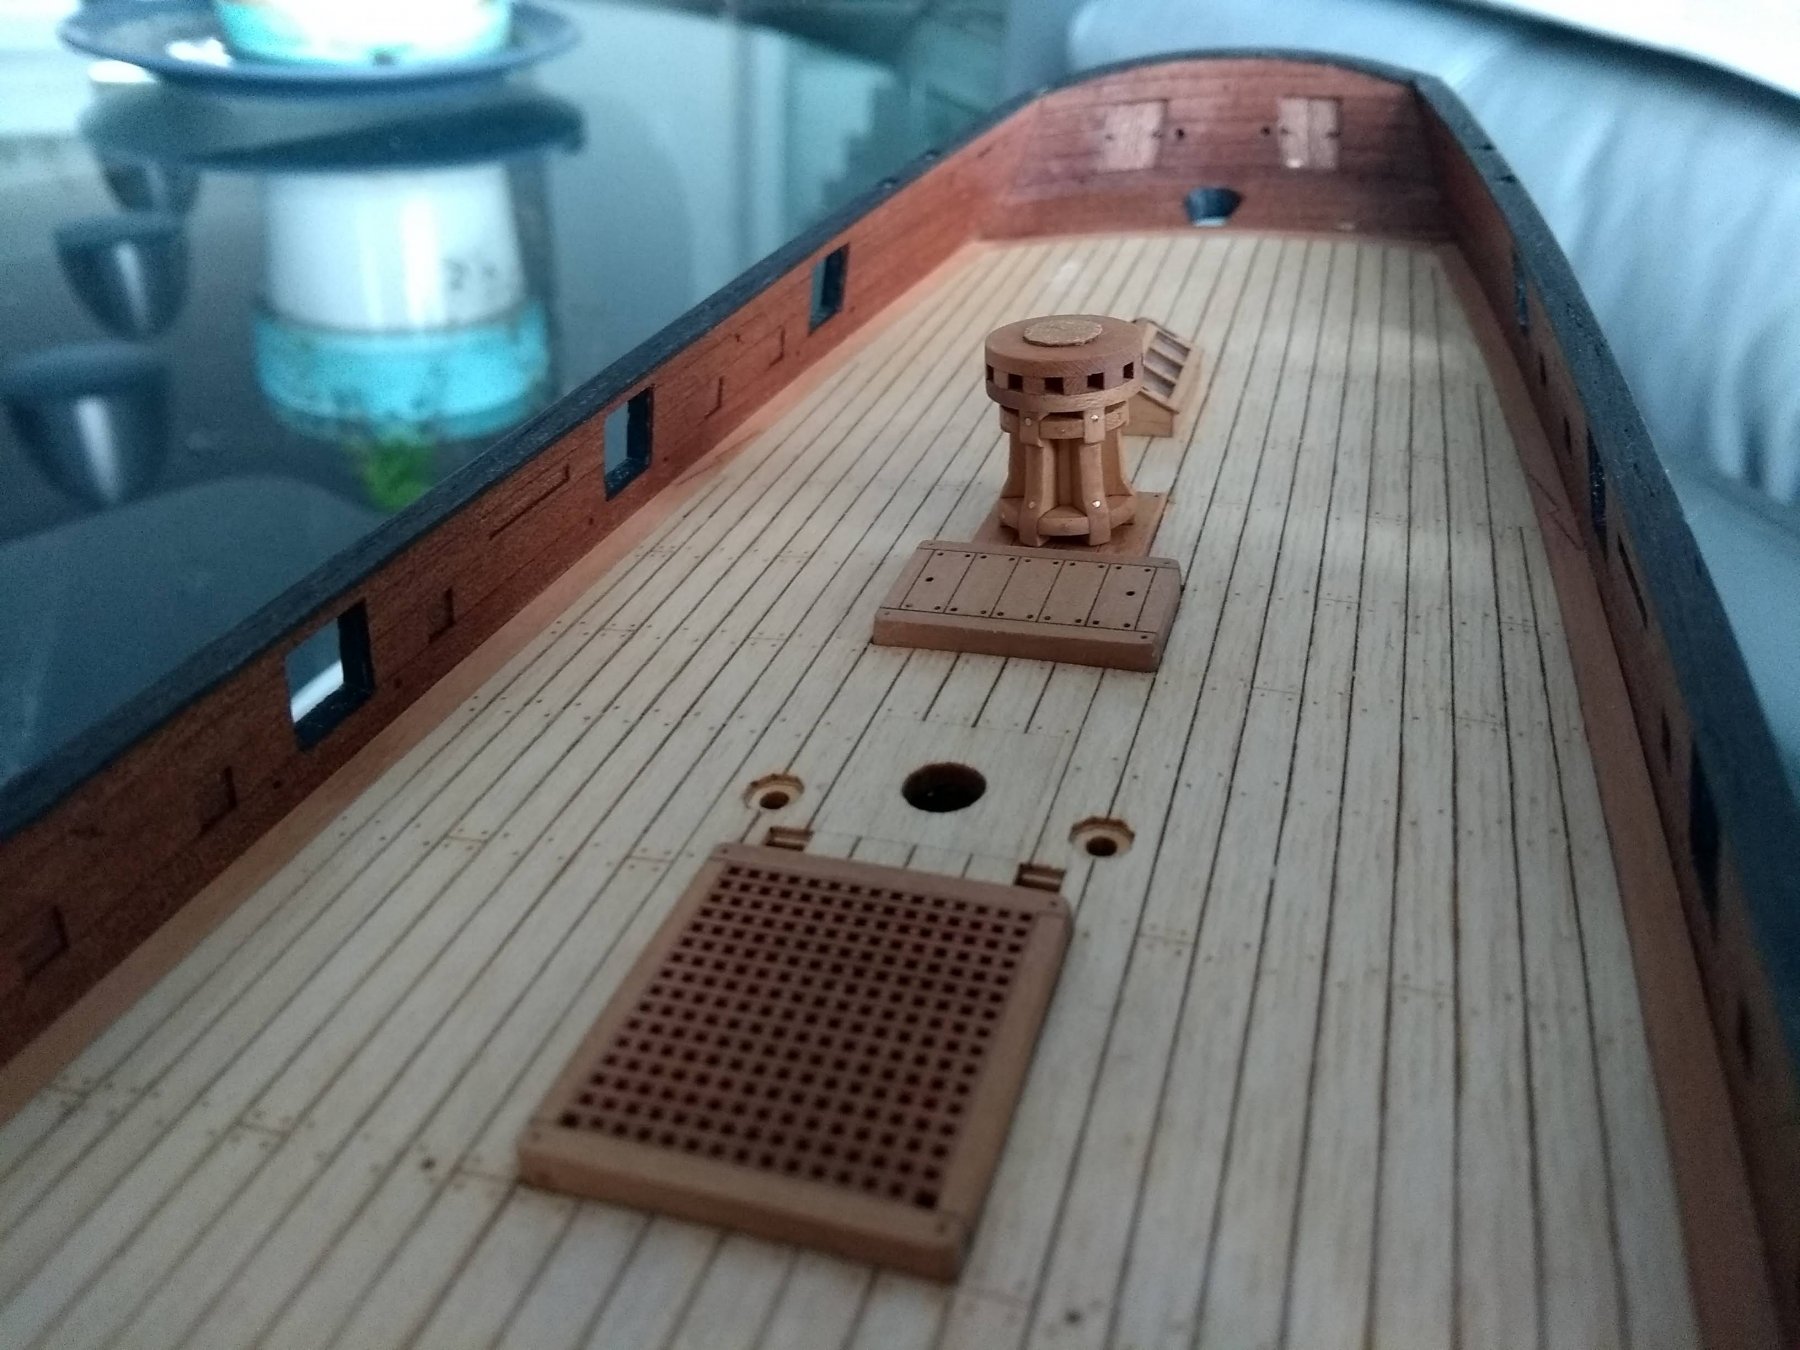
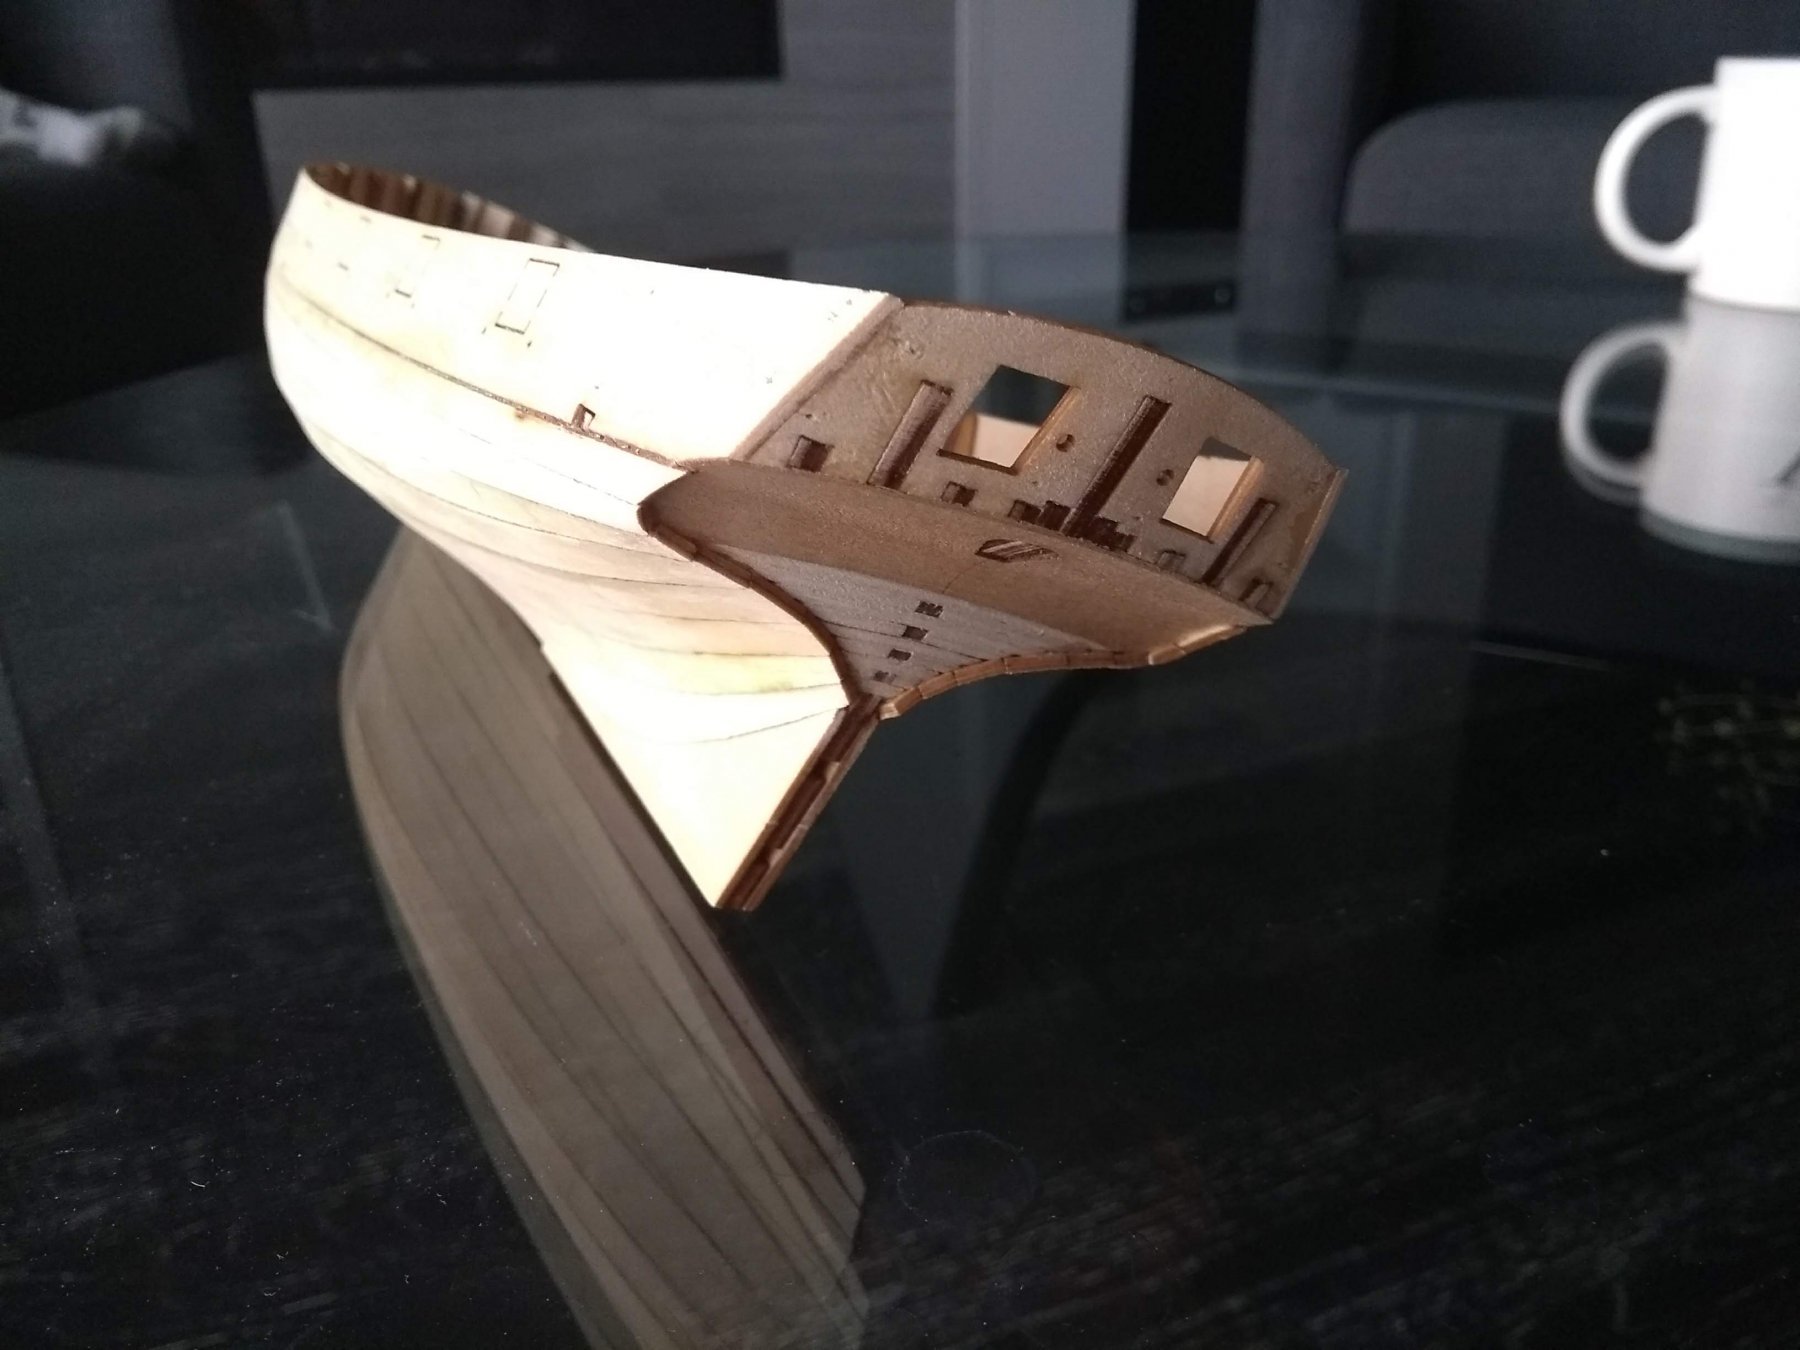
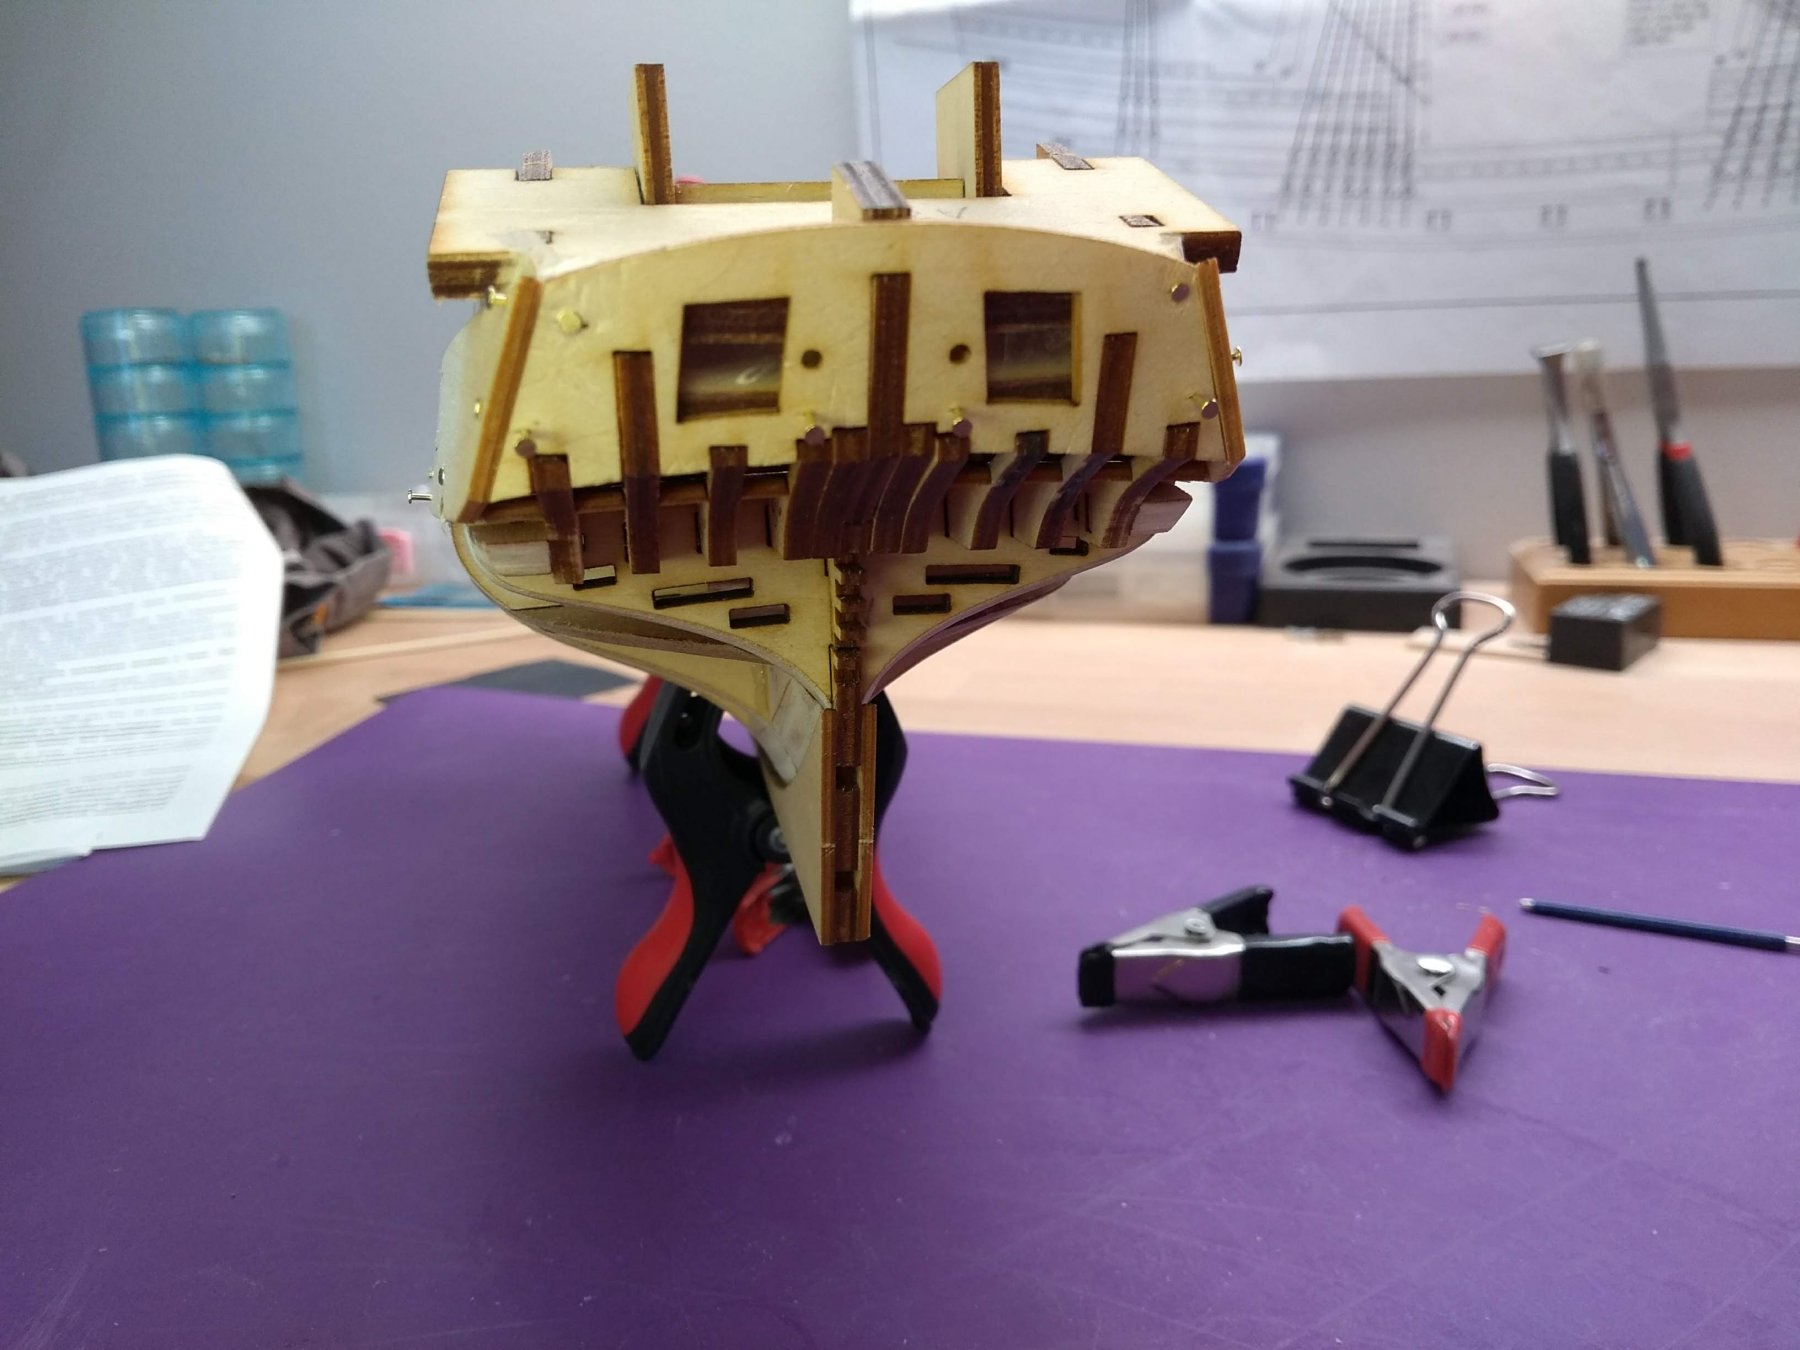
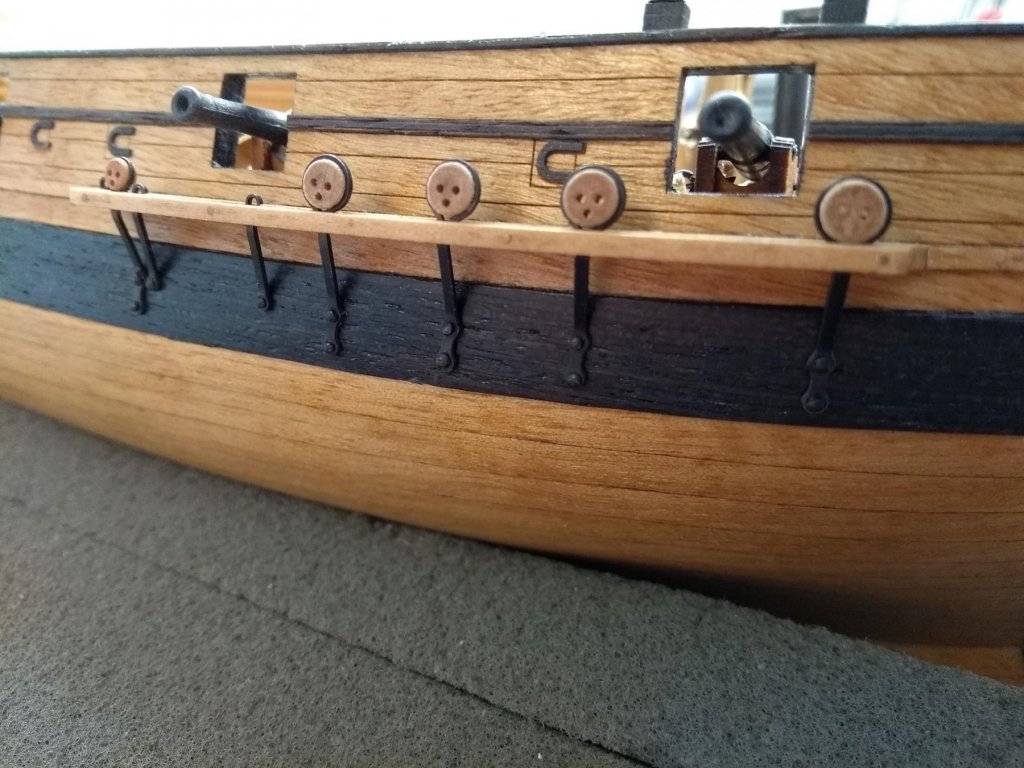
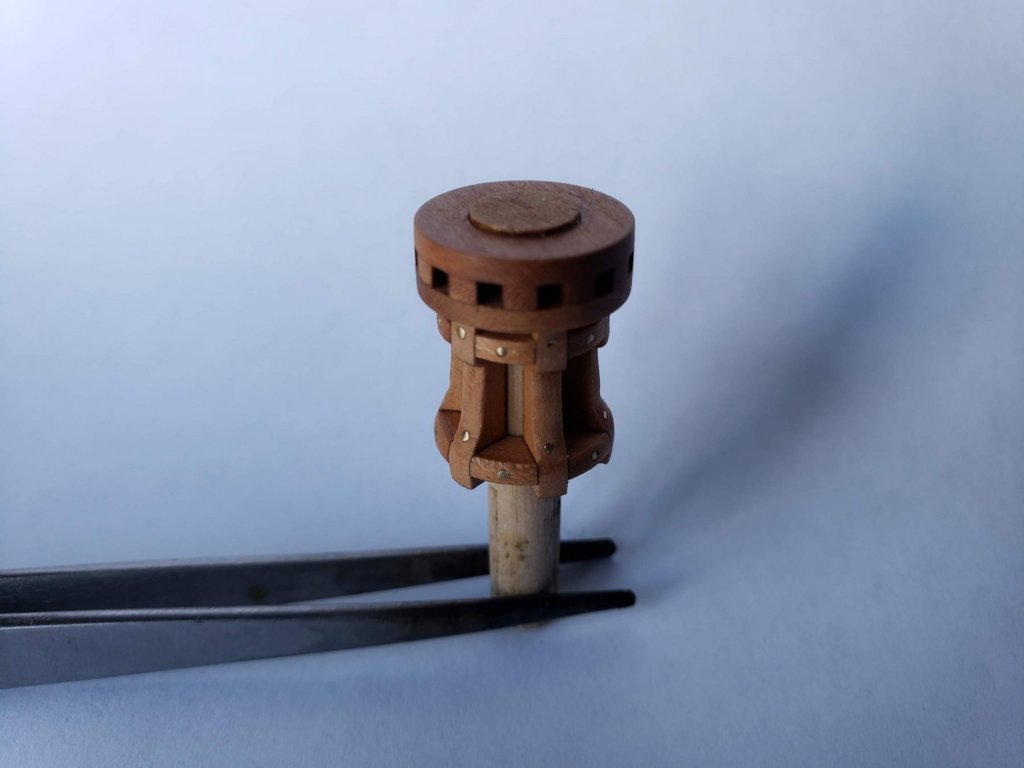
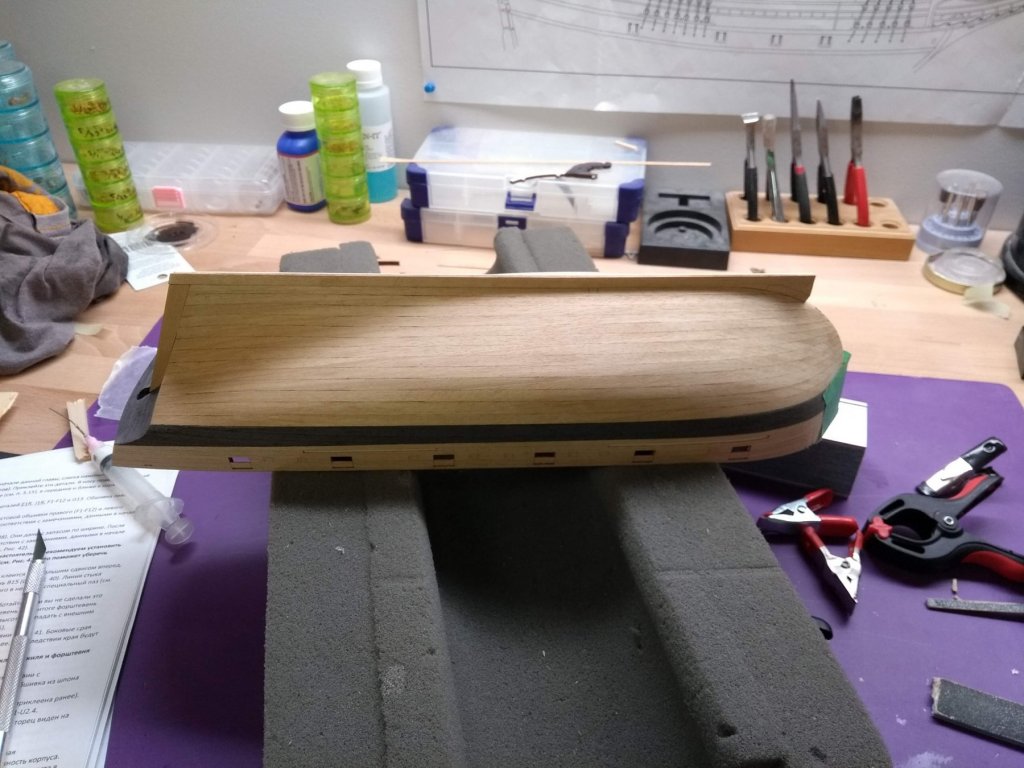
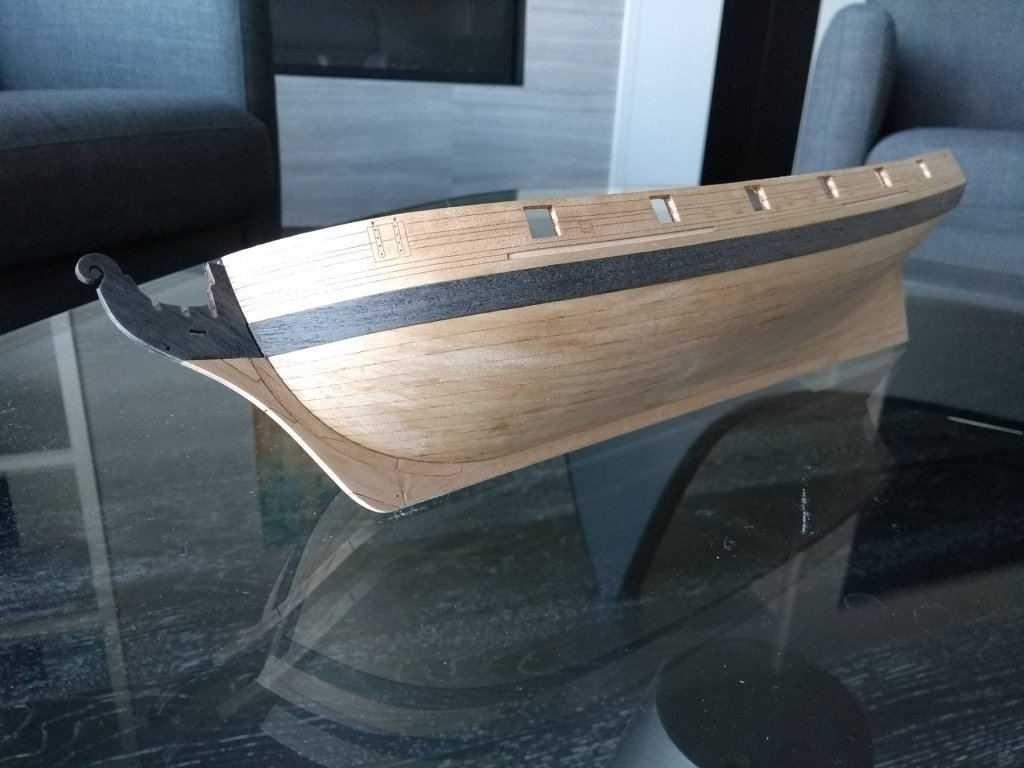
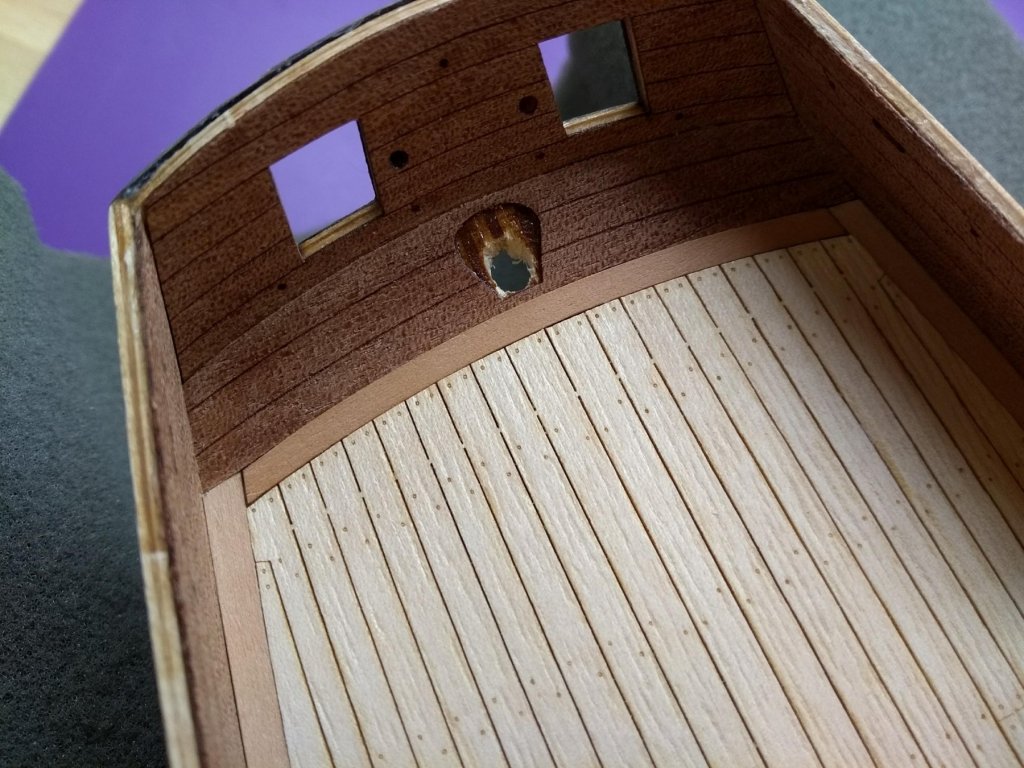
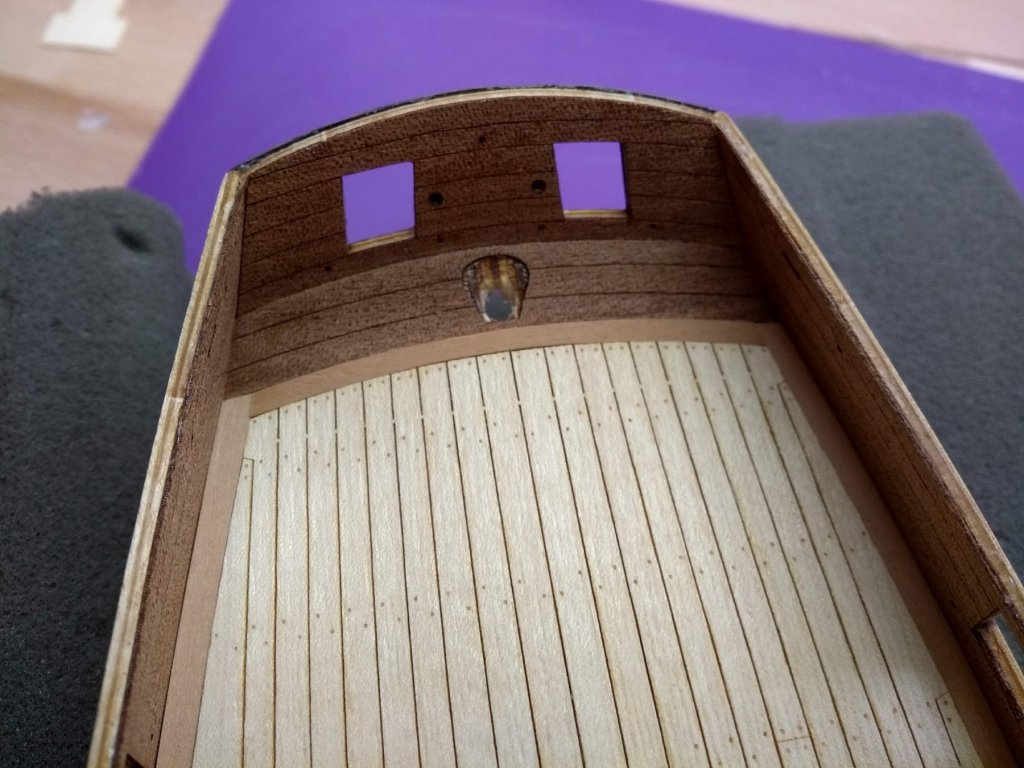
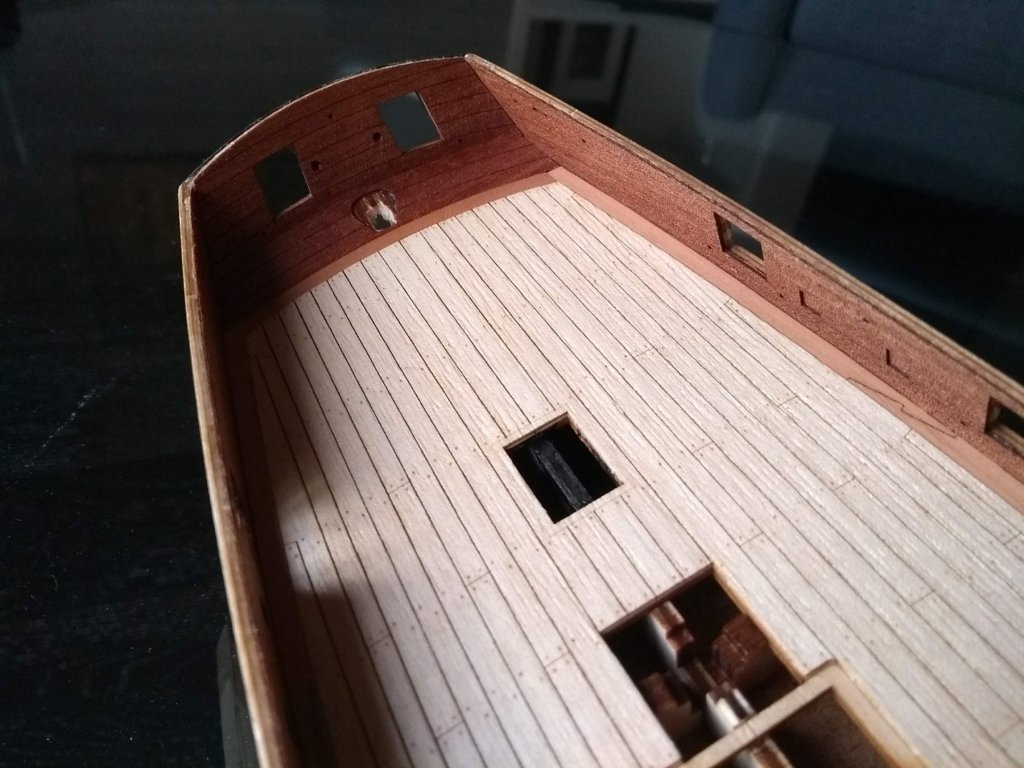
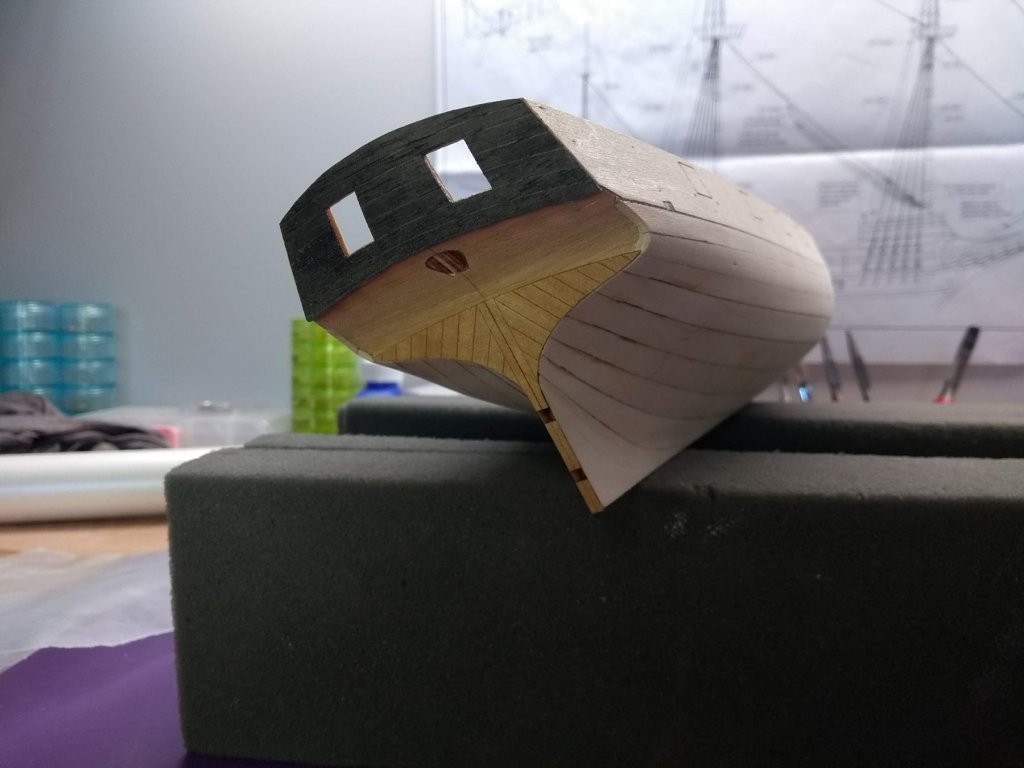
15. Next I assembled the rudder and the pintles: Glued the horseshoe to the keel: 16. After applying a layer of wipe-on-poly to the hull I glued brass decorative details to the taffrail and installed the rudder: 17. Next I decided to spend some time assembling all the deck details. They are done as a small kits included with the ship and were easy to assemble. The capstan: The pumps. The manual suggests gluing the metal handles with some BF-2 glue. I couldn't finds this glue in Canada. I think this is some special glue that can only be bought in Russia. I tried gluing them with CA glue but it doesn't hold brass. In the end I decided to solder them and the result was phenomenal. I highly recommend soldering brass parts instead of gluing them! The binnacle: Finally I assembled the hatches and the grates. I used aftermarket lasercut grates which have 0.6mm square openings. I think these are much better for this scale: 18. Then I installed catheads and some decorative elements in the ship's head:


- 40 replies
-
- 10
-
-
- finished
- master korabel
- (and 2 more)
-
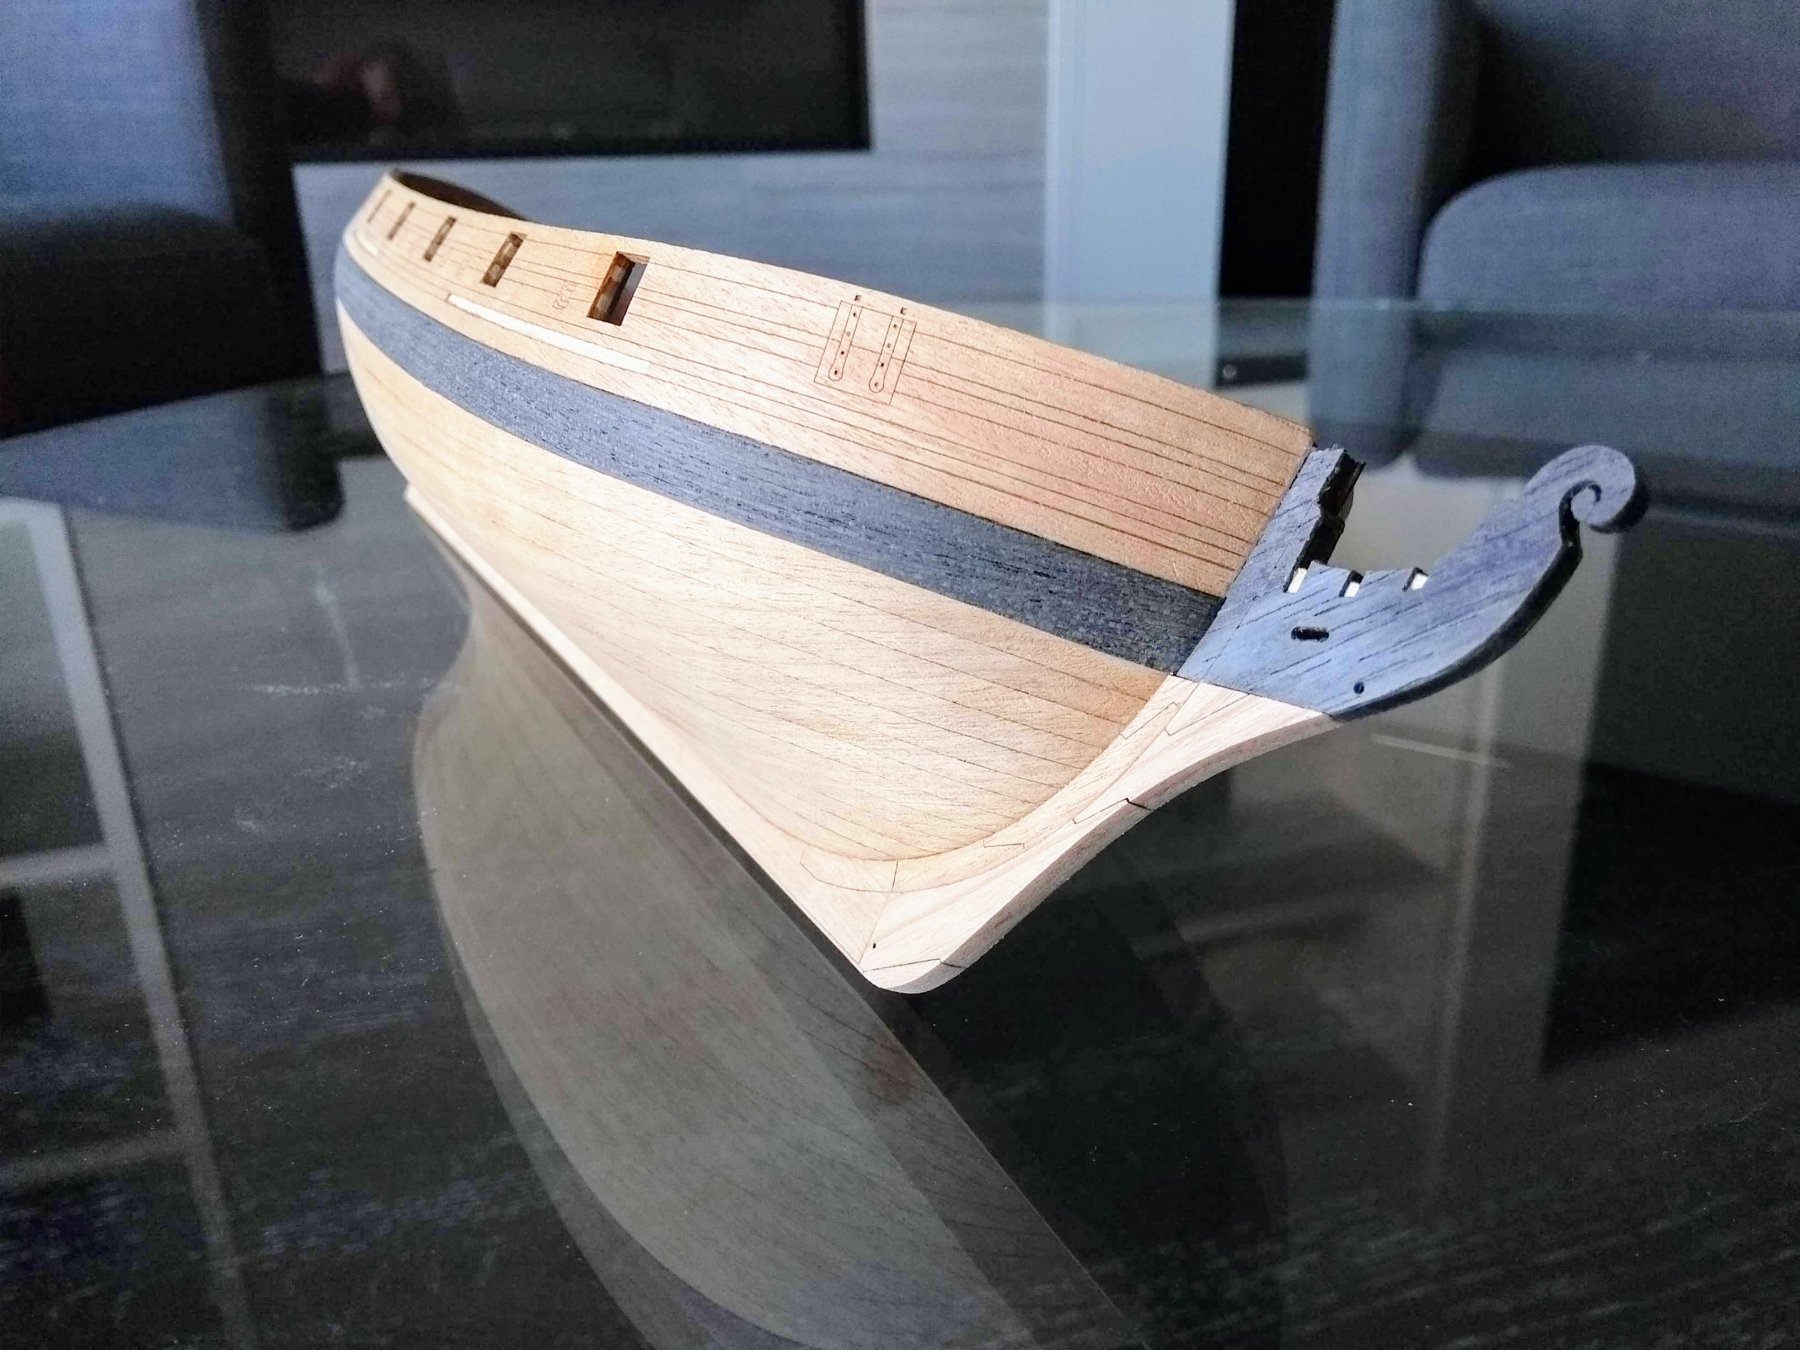
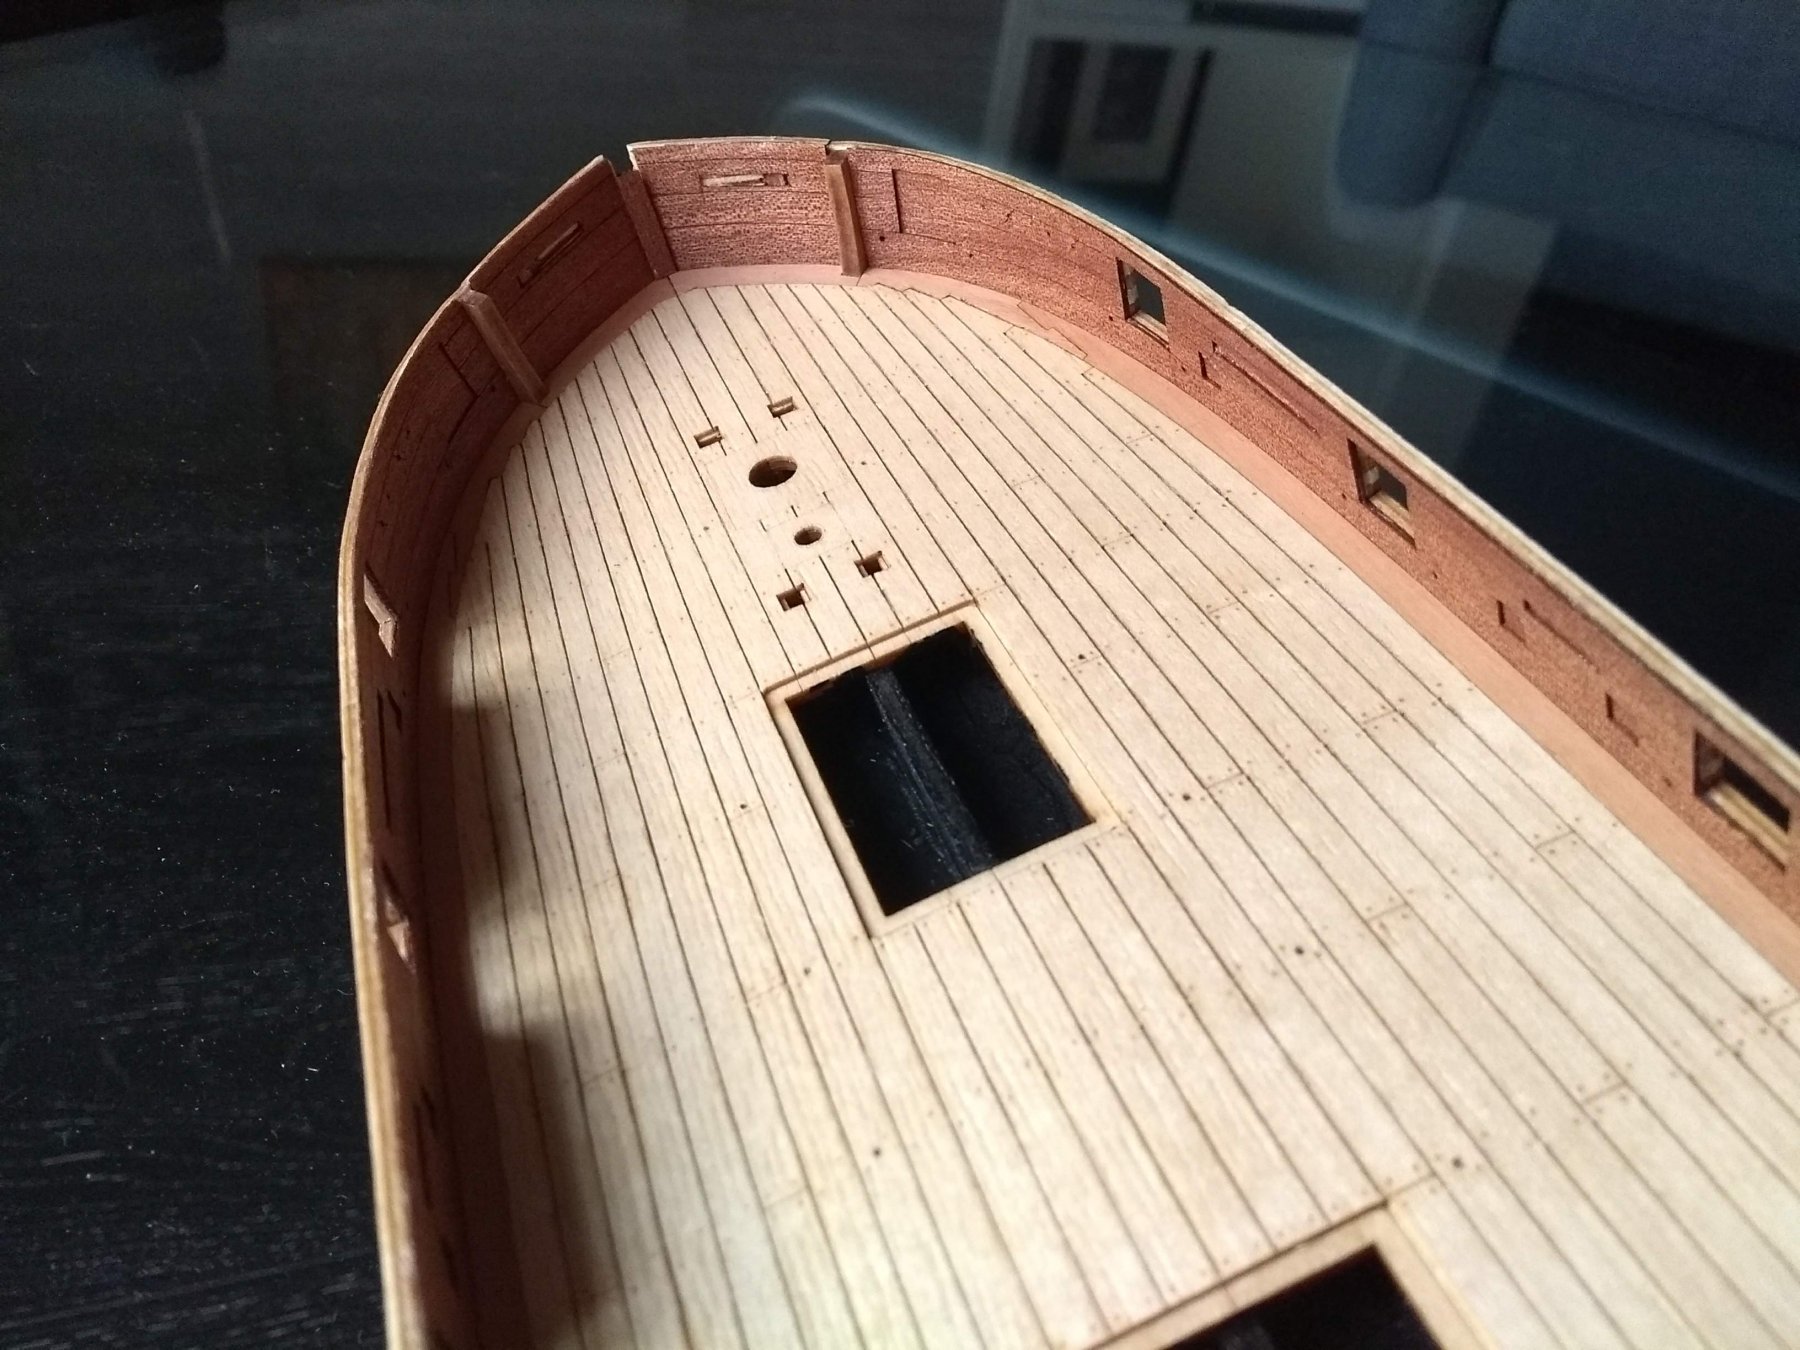
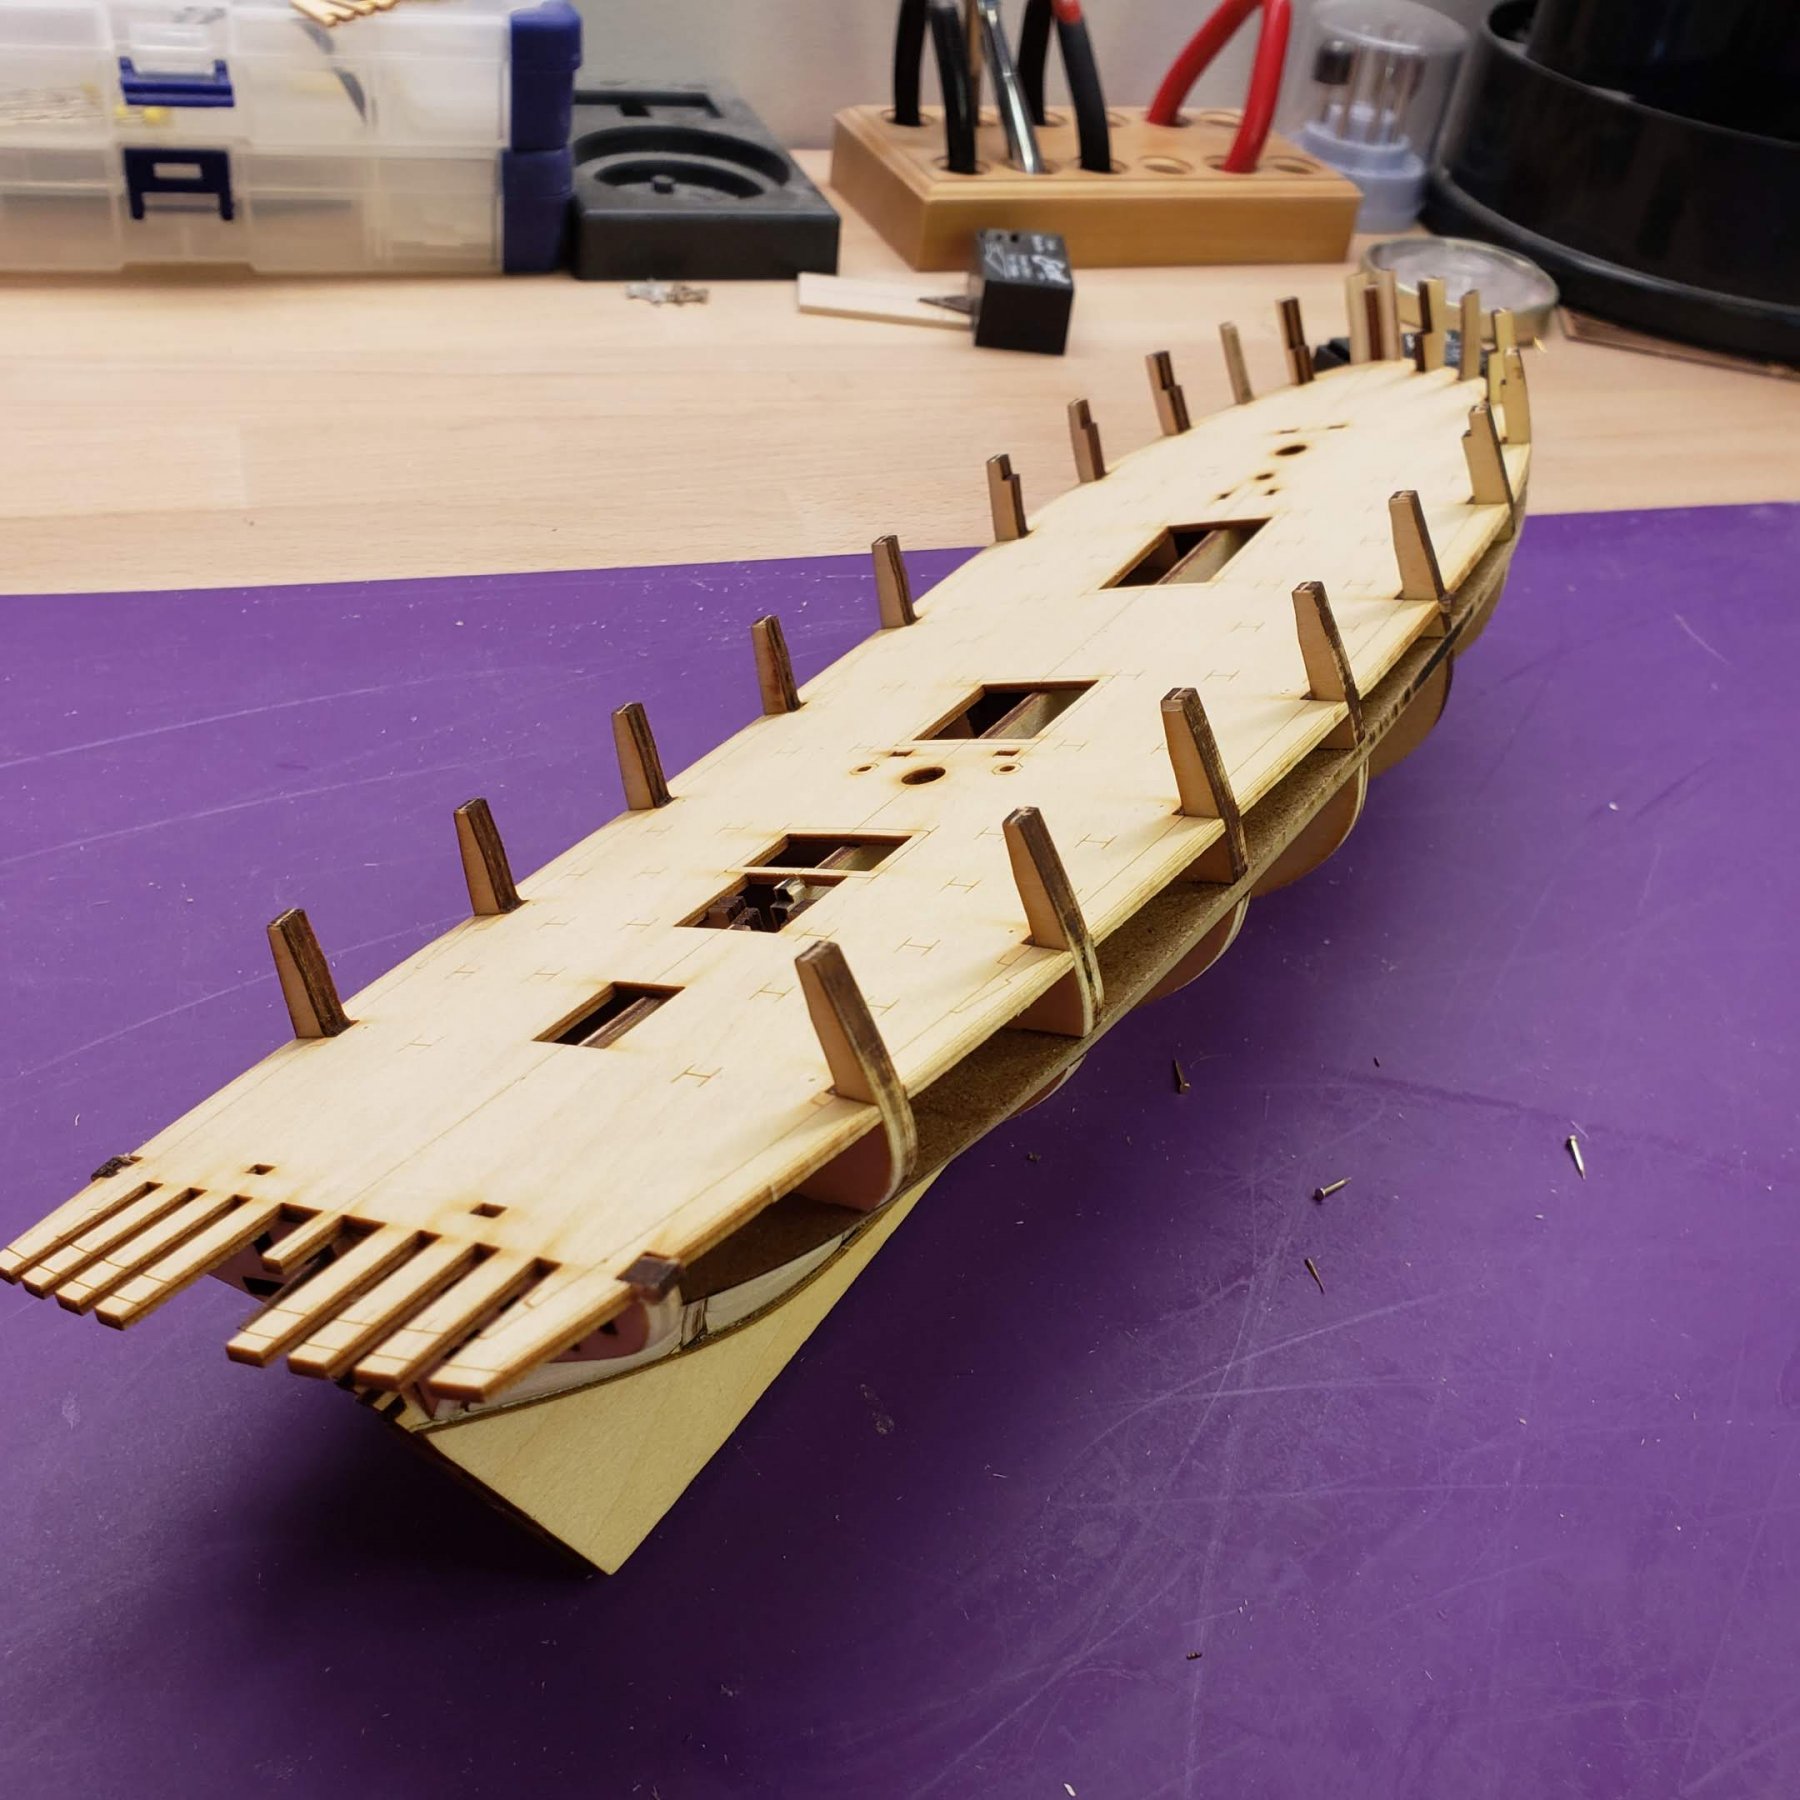
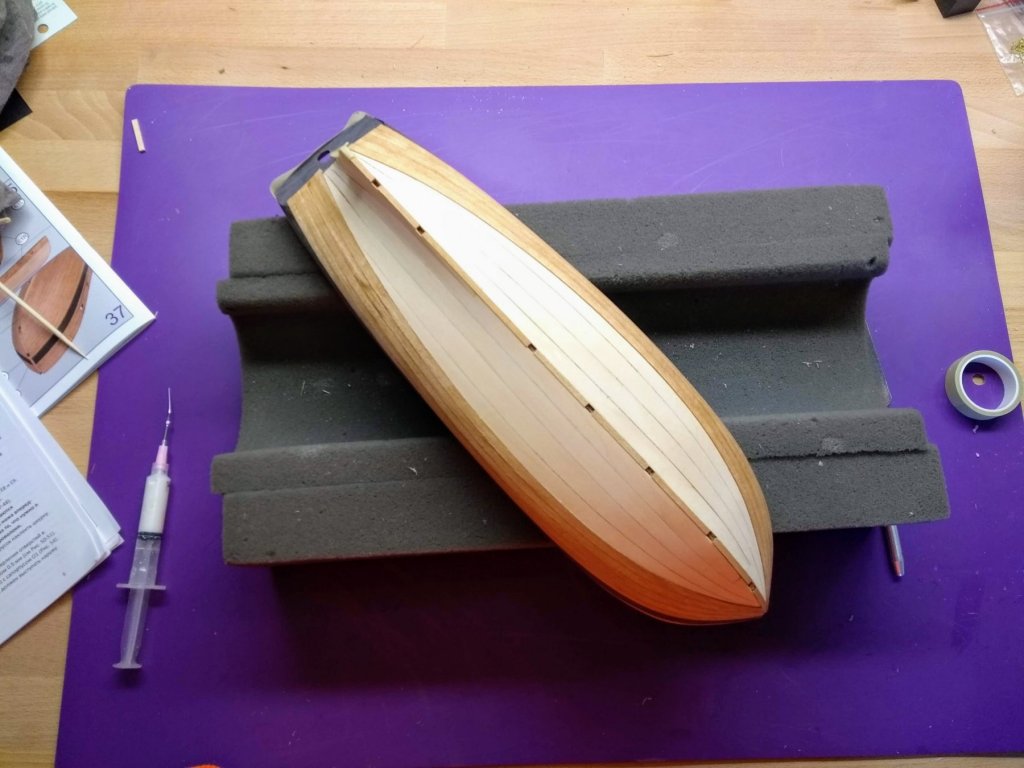
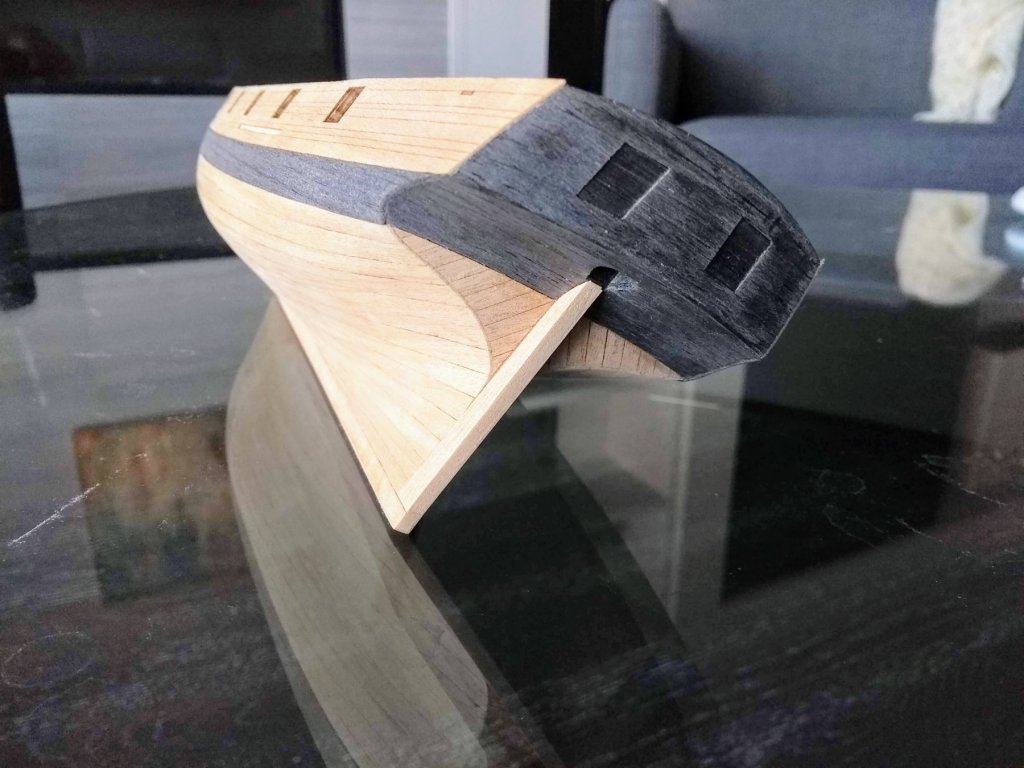
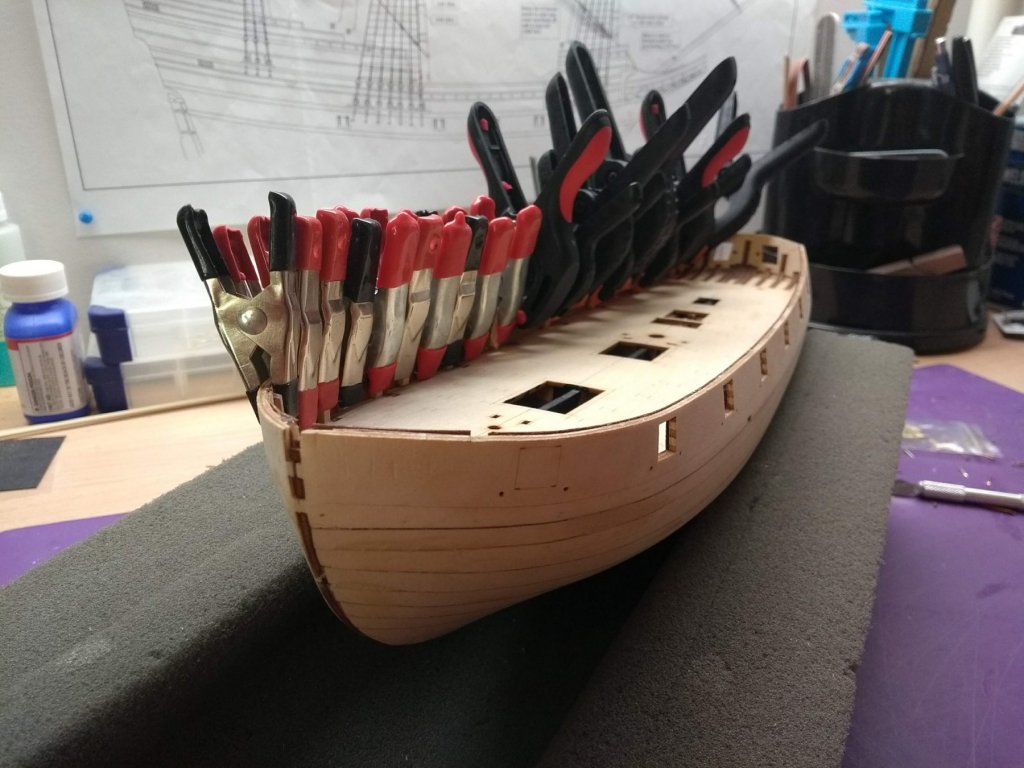
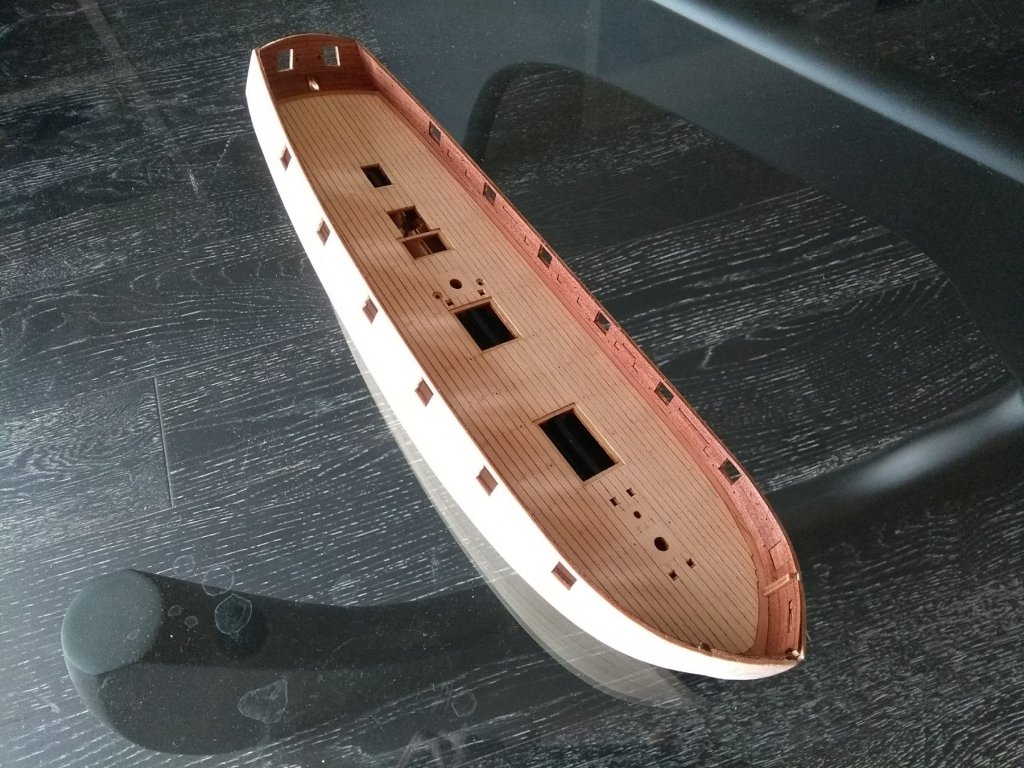
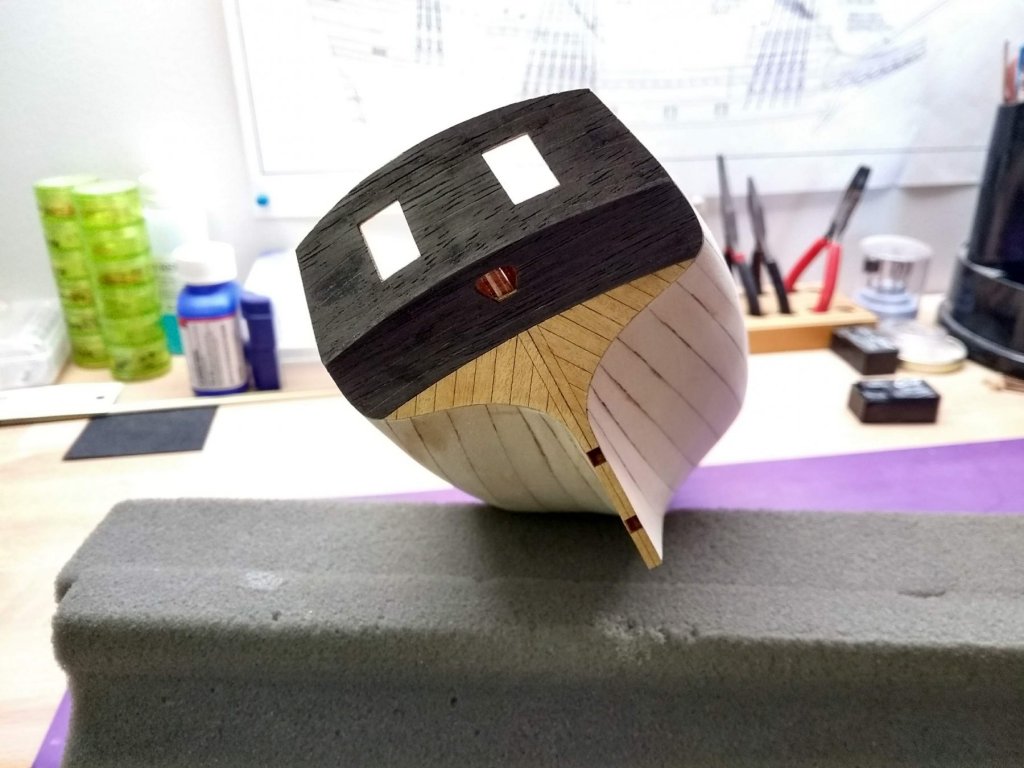
14. Once glue was dry I proceeded to glue the final layer of planks. All planks came precut in this kit and the first strake needed to be installed was the bulwark. It had to be carefully aligned with the port openings because all other strakes depended on this one. I used my favourite way of gluing veneer - PVA + hot iron: Then I continued gluing the strakes alternating port and starboard sides: Eventually the whole hull was planked and the central keel and the sternpost were installed: 14. The design of the stem piece was very interesting. It was made from one solid piece of plywood and a few veneer pieces were needed to be glued on to it to simulate a composite stem: 15. Finally I installed gun port covers in the stern: And this is how she looked after planking stage:


- 40 replies
-
- 16
-
-
- finished
- master korabel
- (and 2 more)
-
Yes, it will be with english text instruction, photo instruction and drawing Yes, the instructions will be available, but not just yet. End of January, that is when it is going to be available.
- 40 replies
-
- 2
-
-
- finished
- master korabel
- (and 2 more)
-
Yes, but those are models for Russian market sold by individuals, they don't have a manual in English. Master Korabel is still in process of translating it.
- 40 replies
-
- 2
-
-
- finished
- master korabel
- (and 2 more)
-
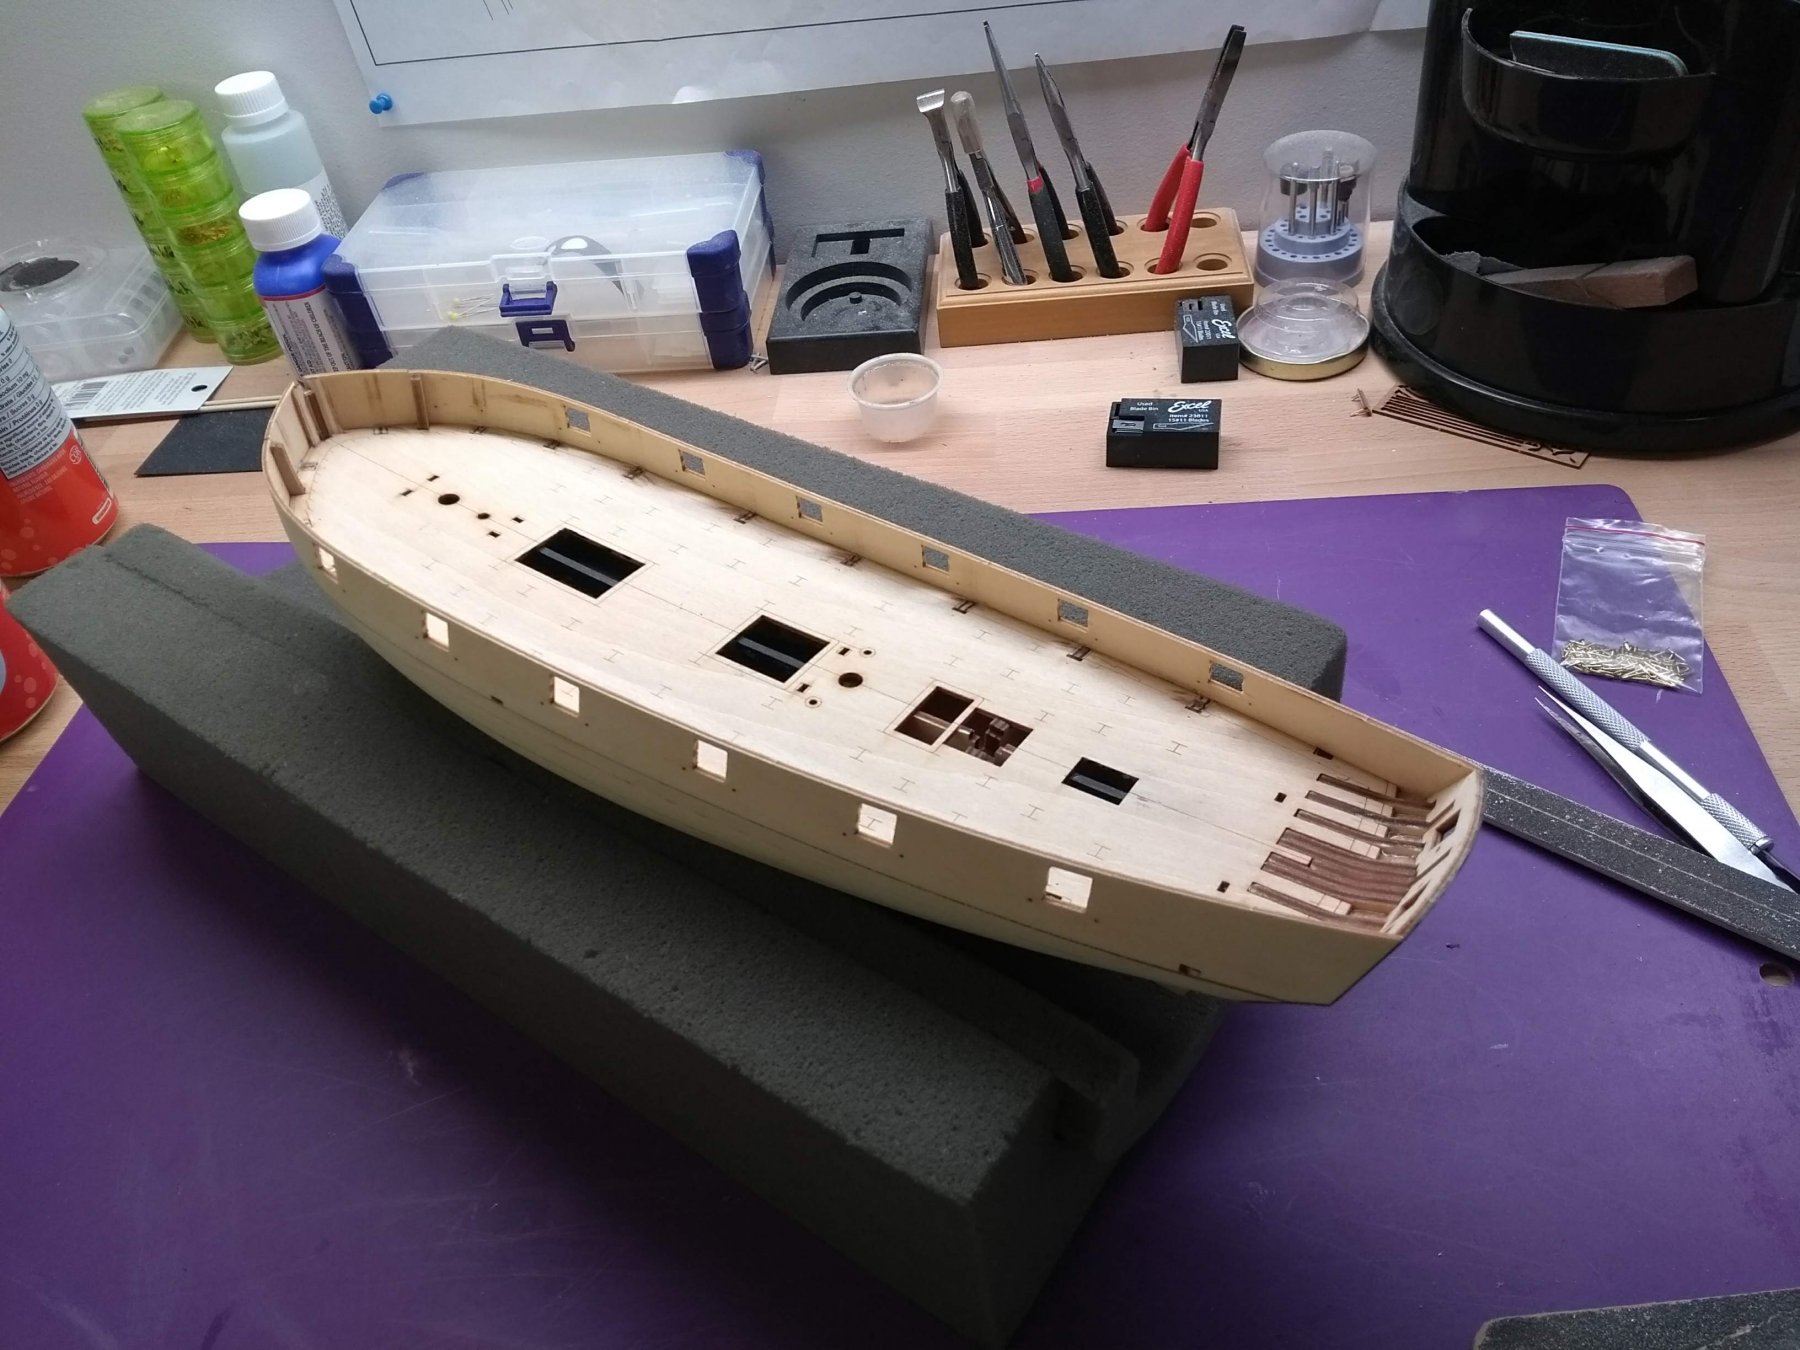
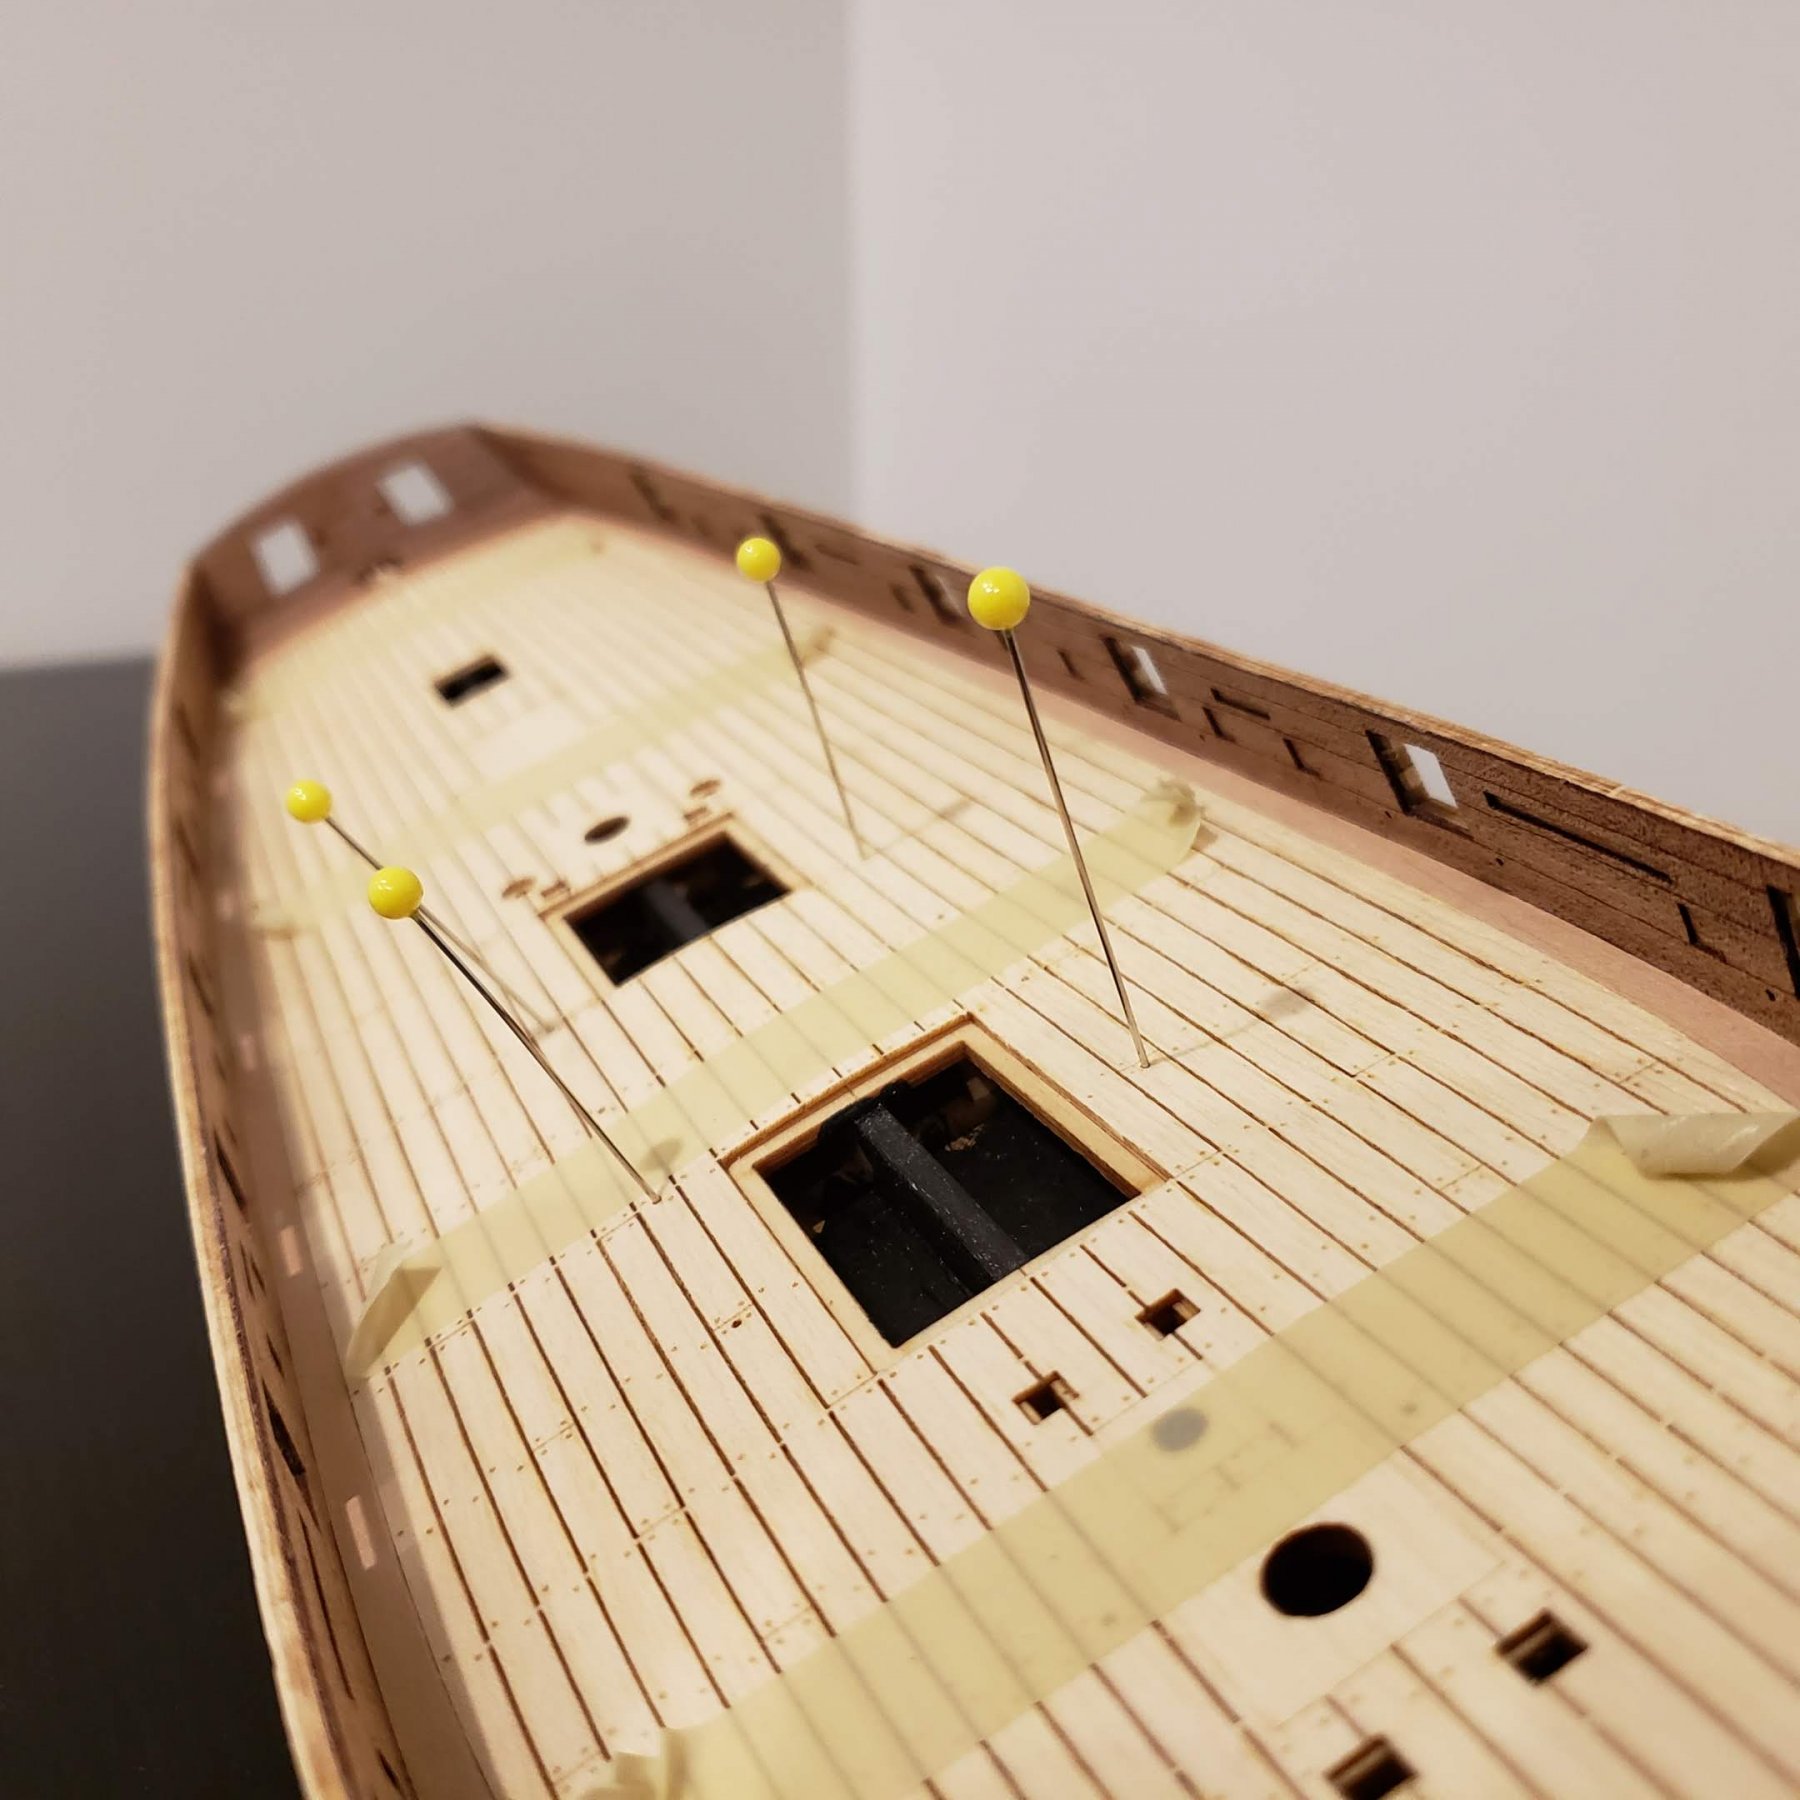
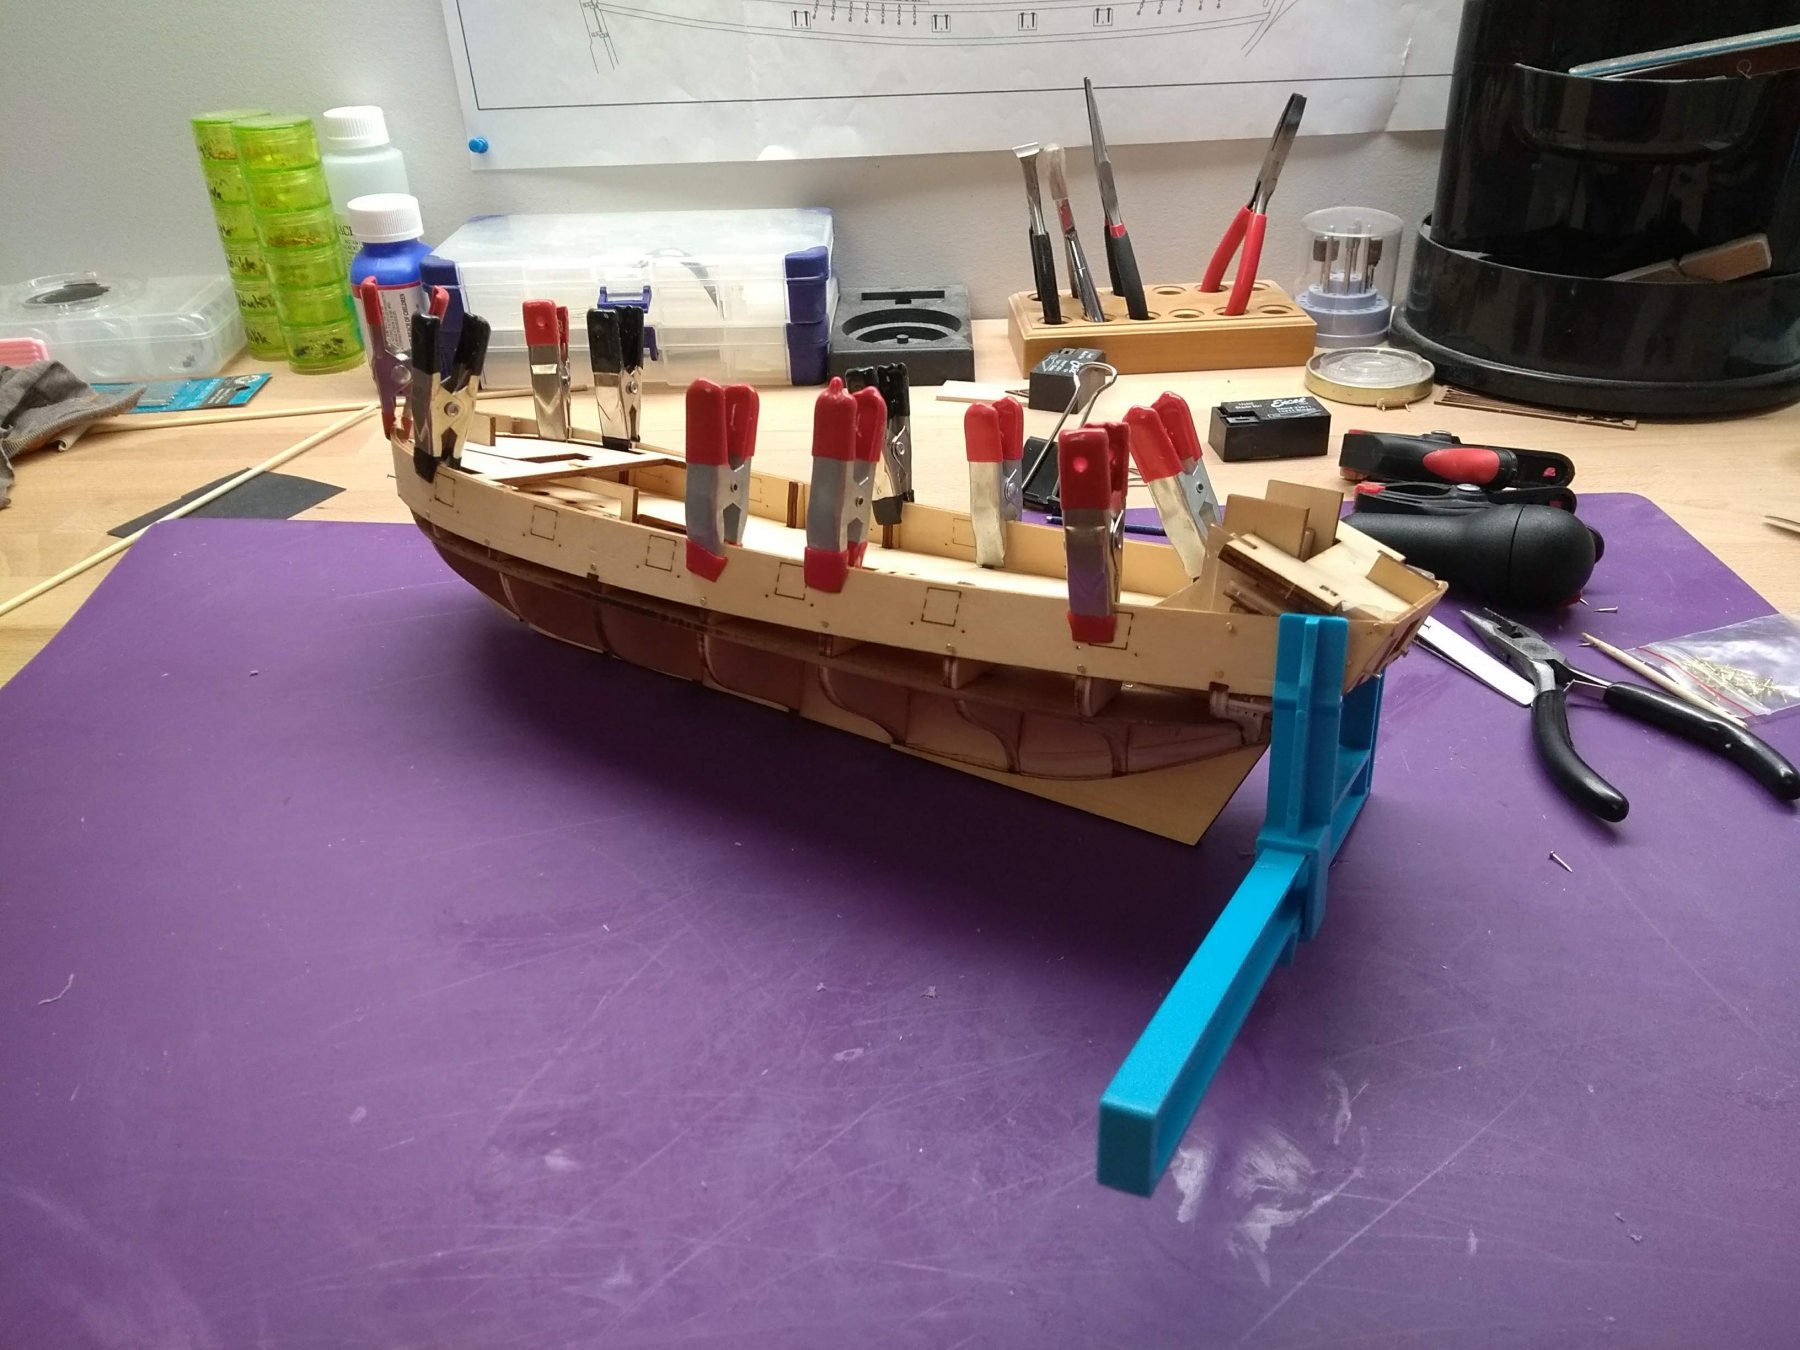
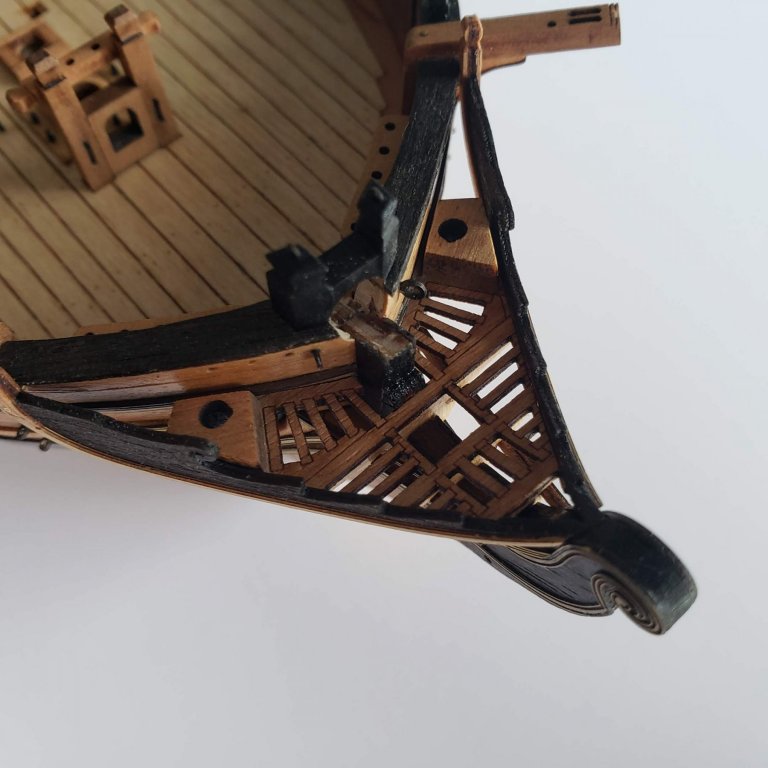
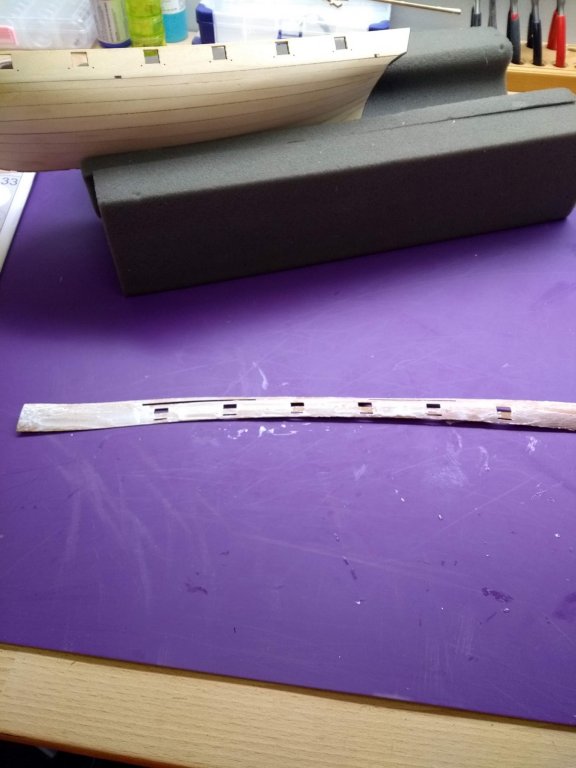
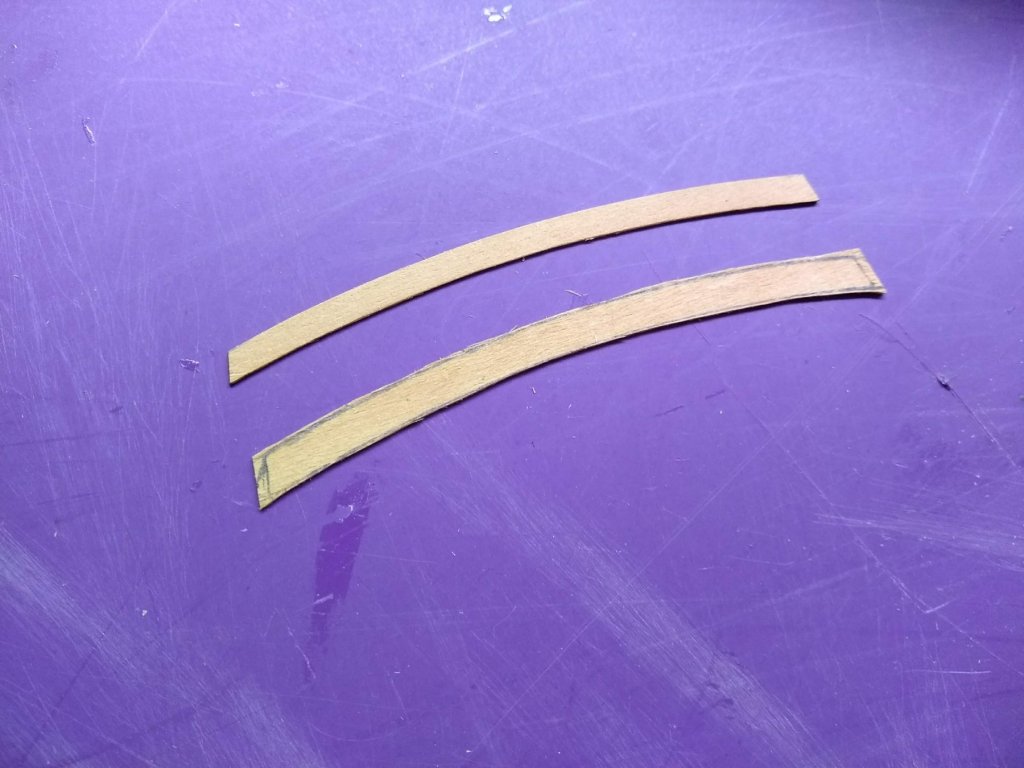
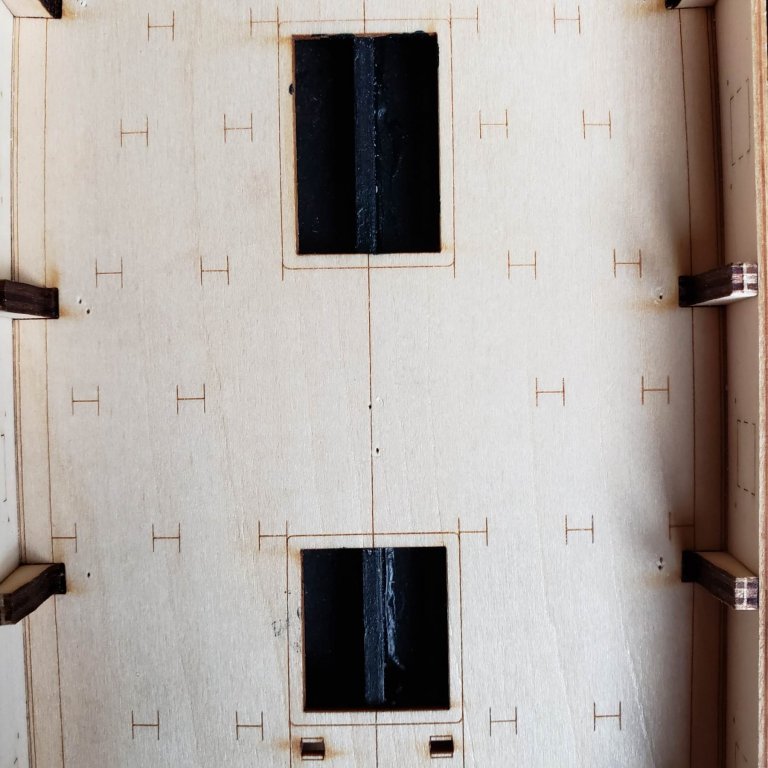
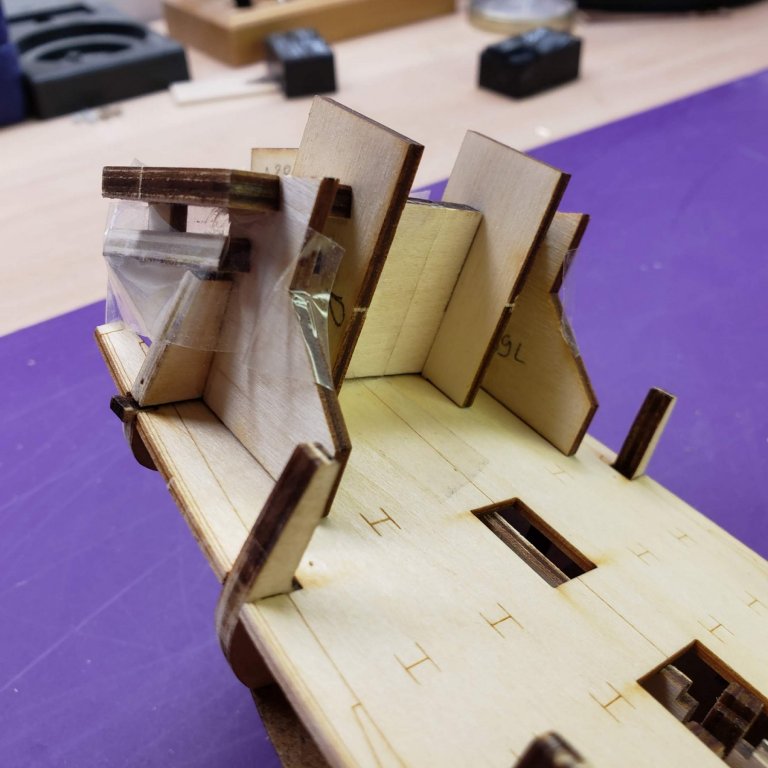
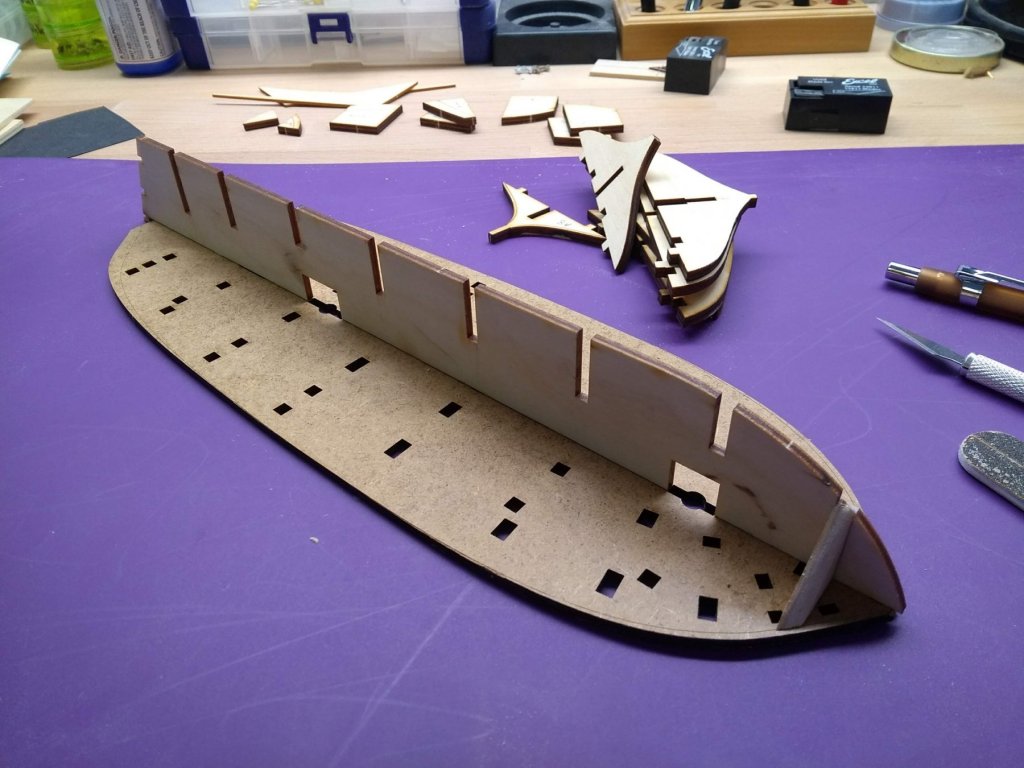
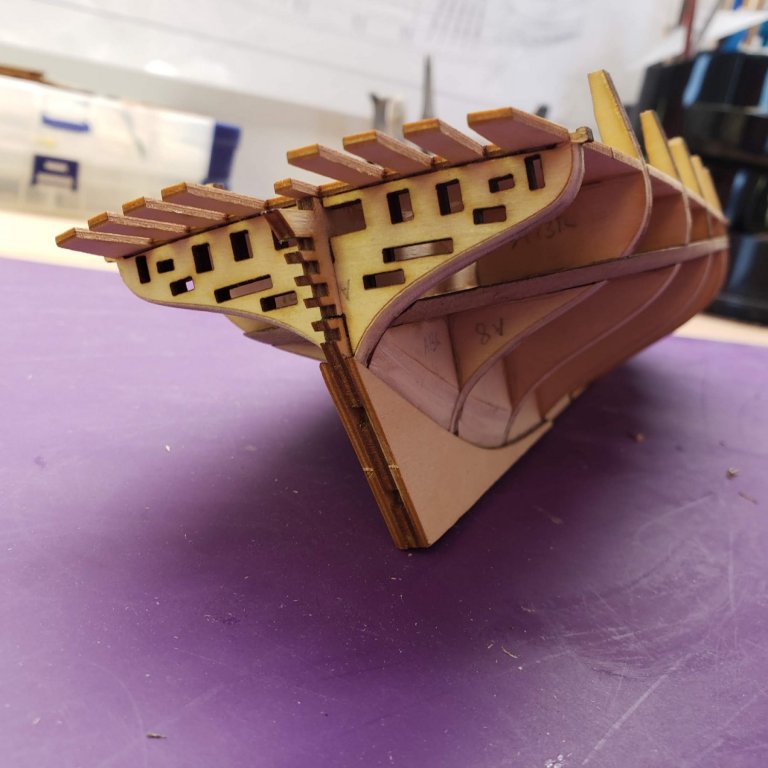
12. Next I cut off all timbers (except cathead's timber) supporting the bulwark. I was lucky the bulwark hadn't glued to them: The inner bulwark consisted of two layers on this model. First layer has only opening for gun ports, while the second layer had additional openings for oar ports. This created an illusion of real oarports. Gluing first layer wasn't too hard. All I had to do was to make sure that all gunport openings align correctly: I was worried about gluing the second layer. Not only everything had to be aligned, but I also had to work very fast so that PVA glue didn't dry before everything was aligned and clamped together: 13. Next were the deck and the waterways. In this kit the deck came as one piece with all plank lines cut with laser. I spent a lot of time sanding and adjusting the deck and the waterways so they fit nicely. After I was confident that everything fitted nicely I glued waterways first and then the deck. For gluing the deck I used thick CA glue. The deck had a saddle shape and I was afraid I wouldn't be able to clamp it well enough if I used PVA glue. I used pins to align the deck with the openings (you can also see oar ports in this picture) : The kit supplied final waterways piece in the stern was a little bit short for my taste: So I spent a few more minutes and made a new one from scratch: In the end, this is how the hull looked like:


- 40 replies
-
- 15
-
-
- finished
- master korabel
- (and 2 more)
-
I'm waiting for tender "Avos" as well. It is my next build after this one.
- 40 replies
-
- 2
-
-
- finished
- master korabel
- (and 2 more)
-
I totally agree. This is my second kit by Master Korabel and I'm loving it! As far as I know they are planning to release some 1:48 scale bigger boats some time this year. I assume the quality is going to be at the same level.
- 40 replies
-
- 2
-
-
- finished
- master korabel
- (and 2 more)
-
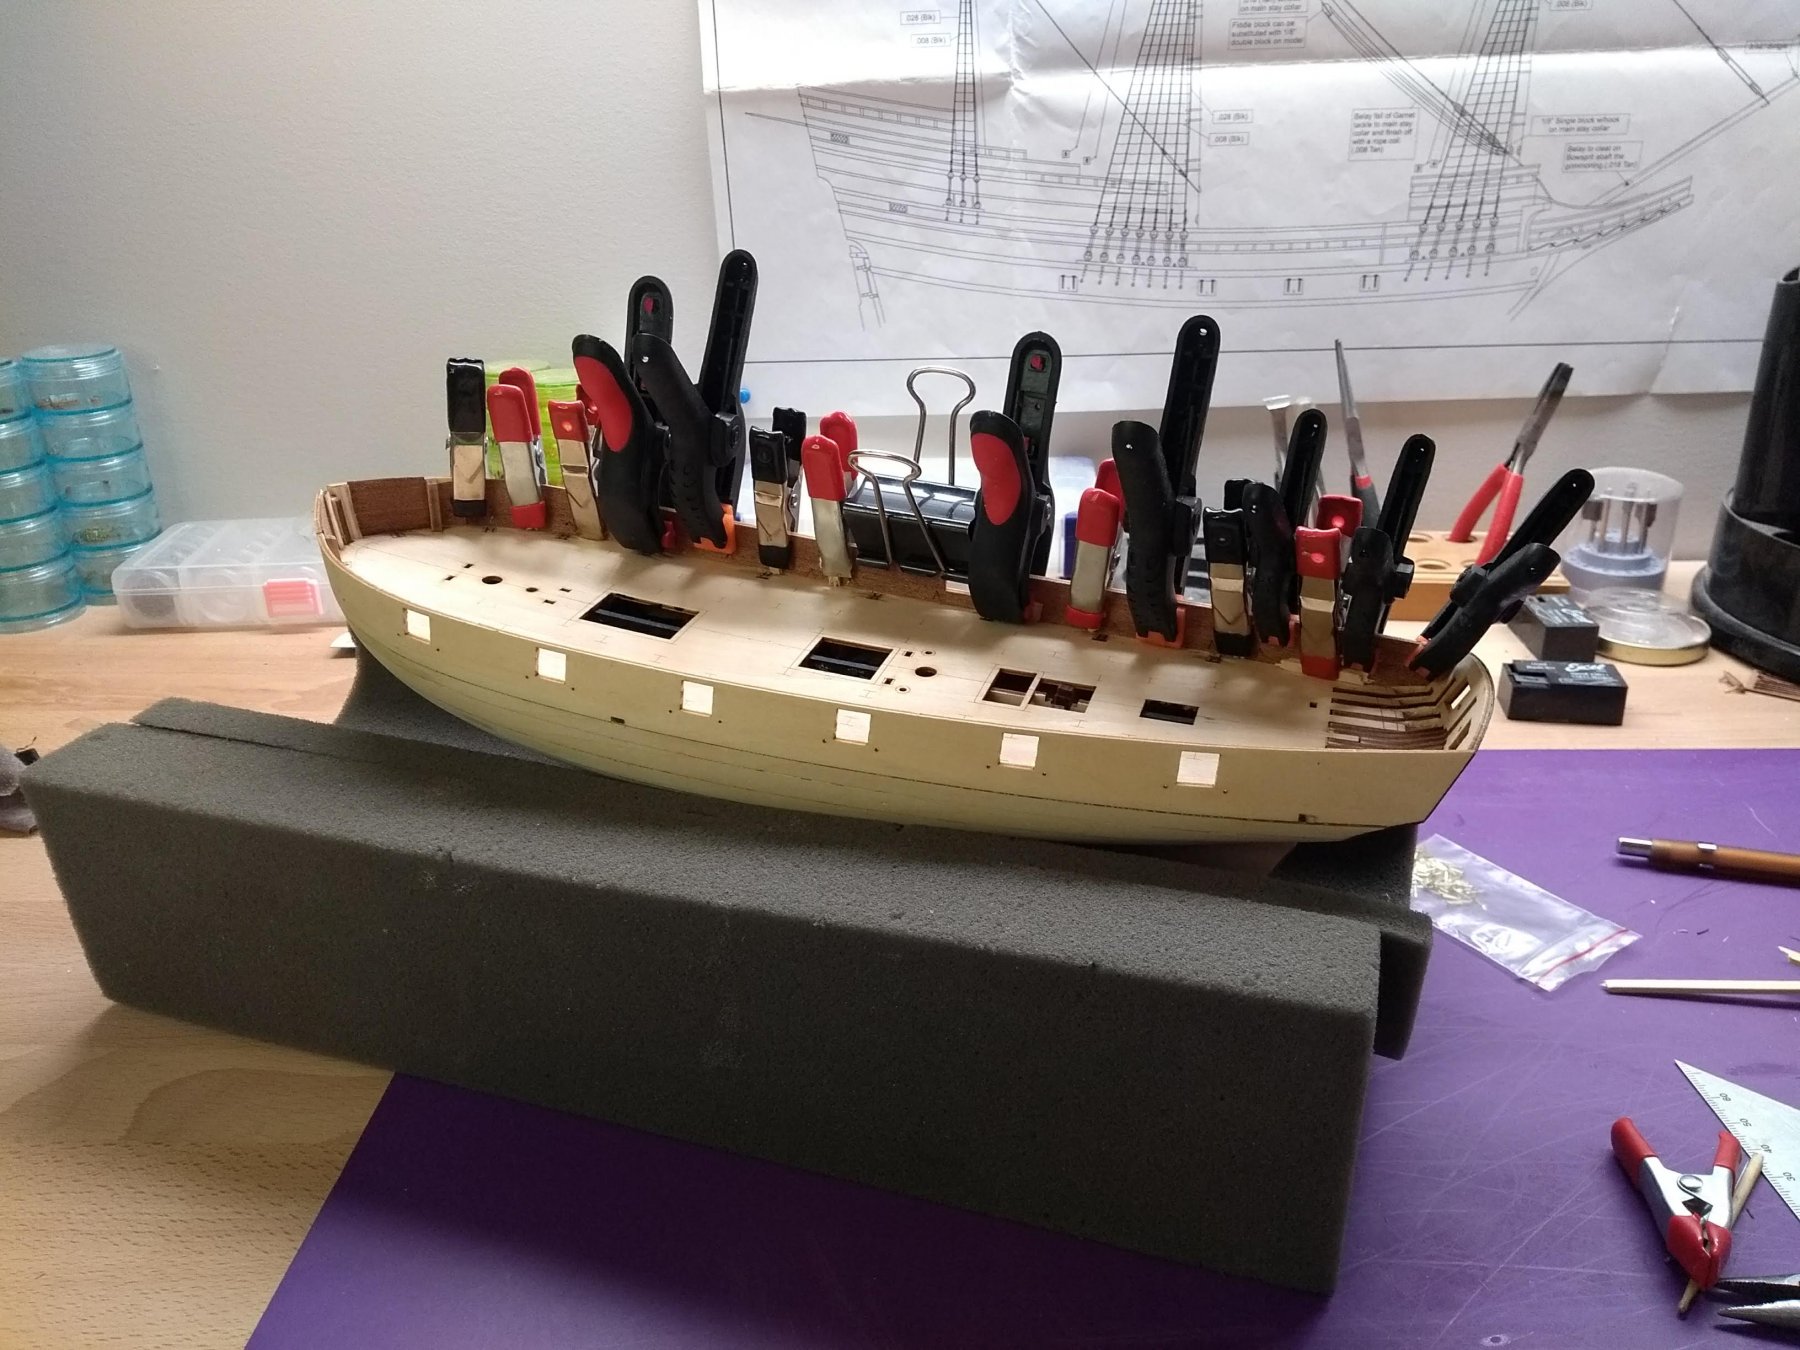
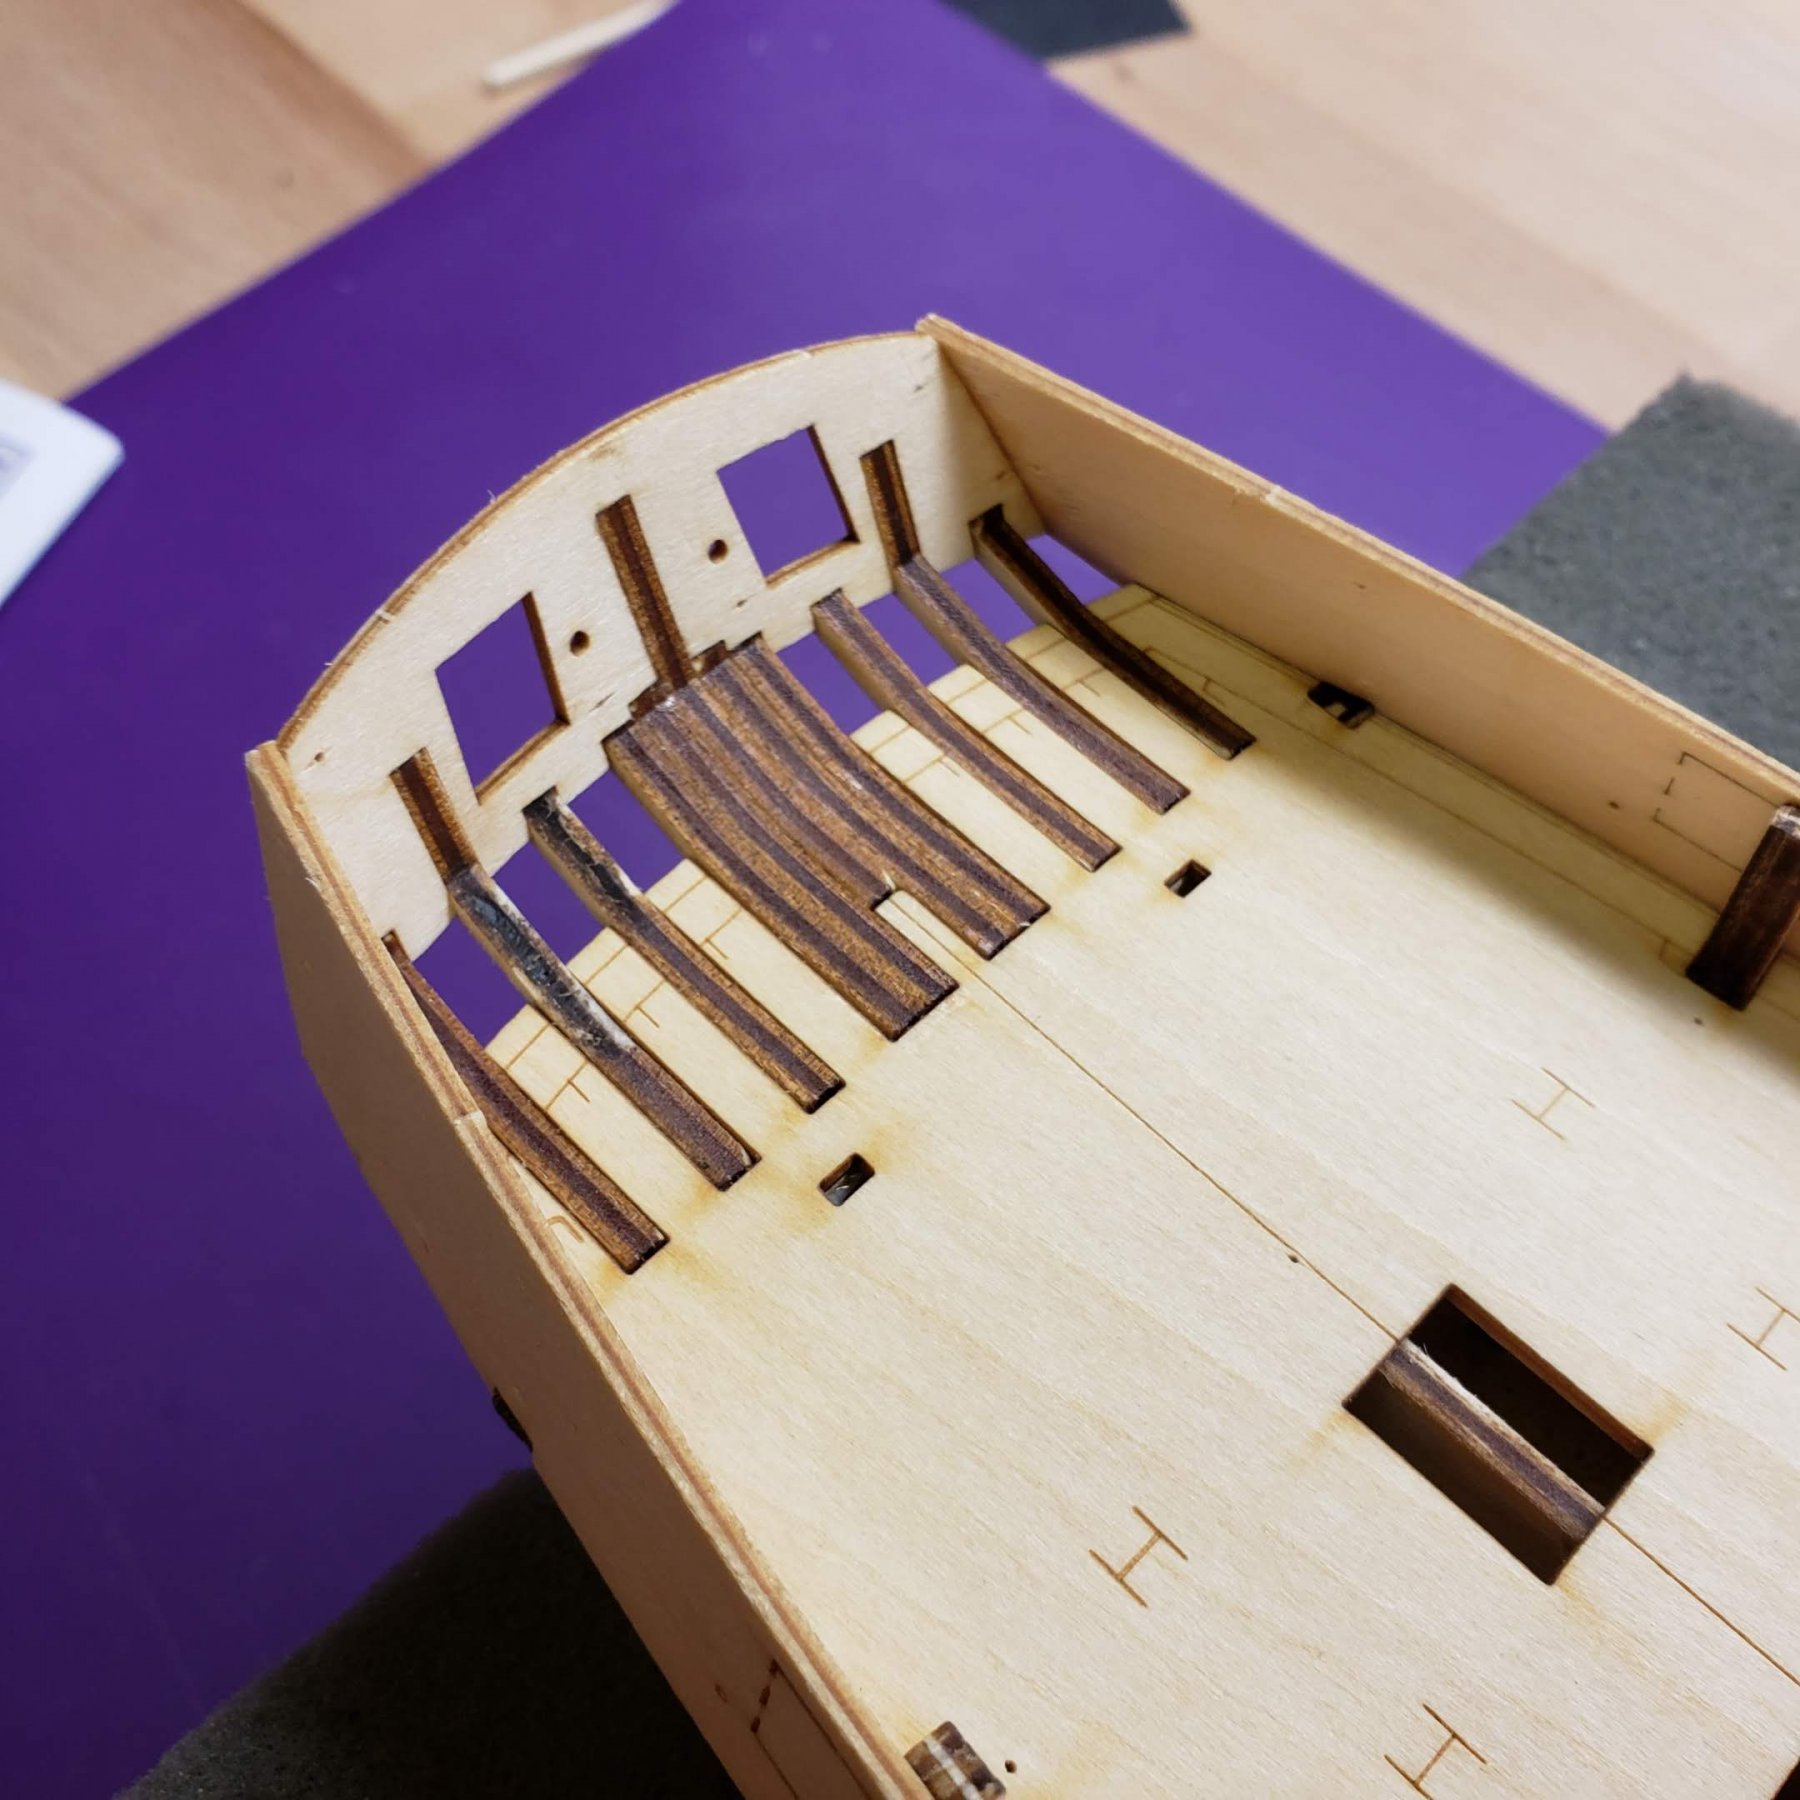
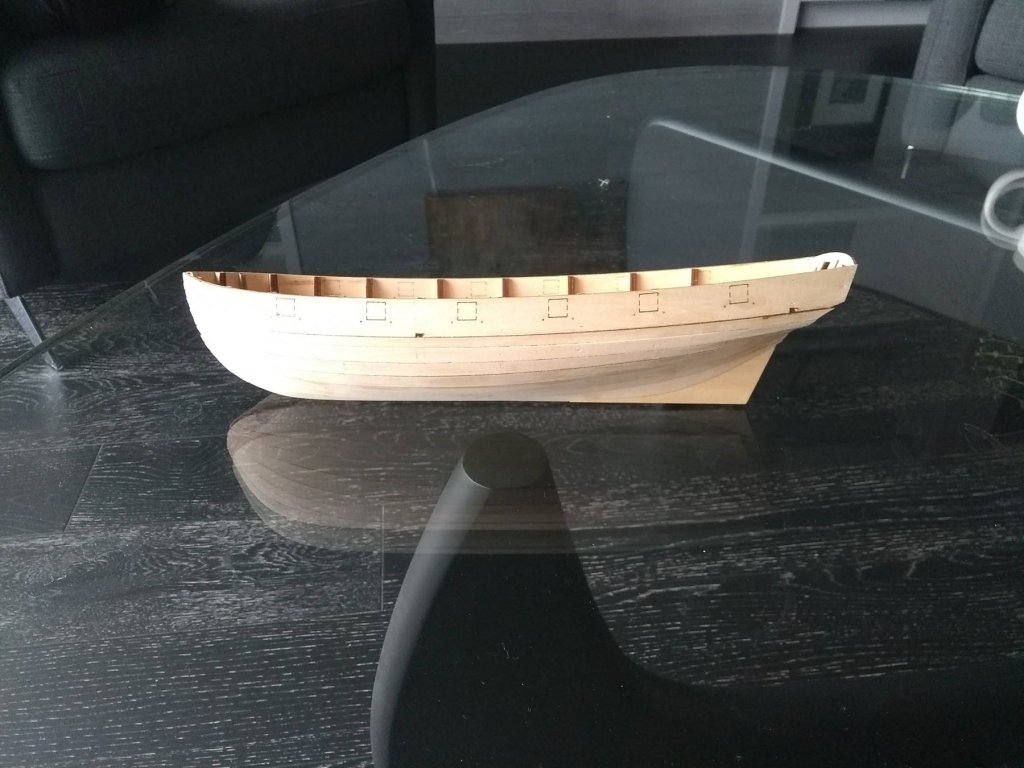
9. Next, the stern needed to be shaped using a bunch of filler blocks. I glued them in and carefully shaped them using a sanding block: 10. First layer of planking was a breeze thanks to all planks being pre-cut with laser. All of them fit each other perfectly and it was such an smooth sailing that I forgot to take any pictures of the process. Here is the end result: I also painted all openings and hatches in the deck black: 11. The final layer of planking started with the taffrail. Everything was straightforward and all parts fit each other perfectly:


- 40 replies
-
- 12
-
-
- finished
- master korabel
- (and 2 more)
-
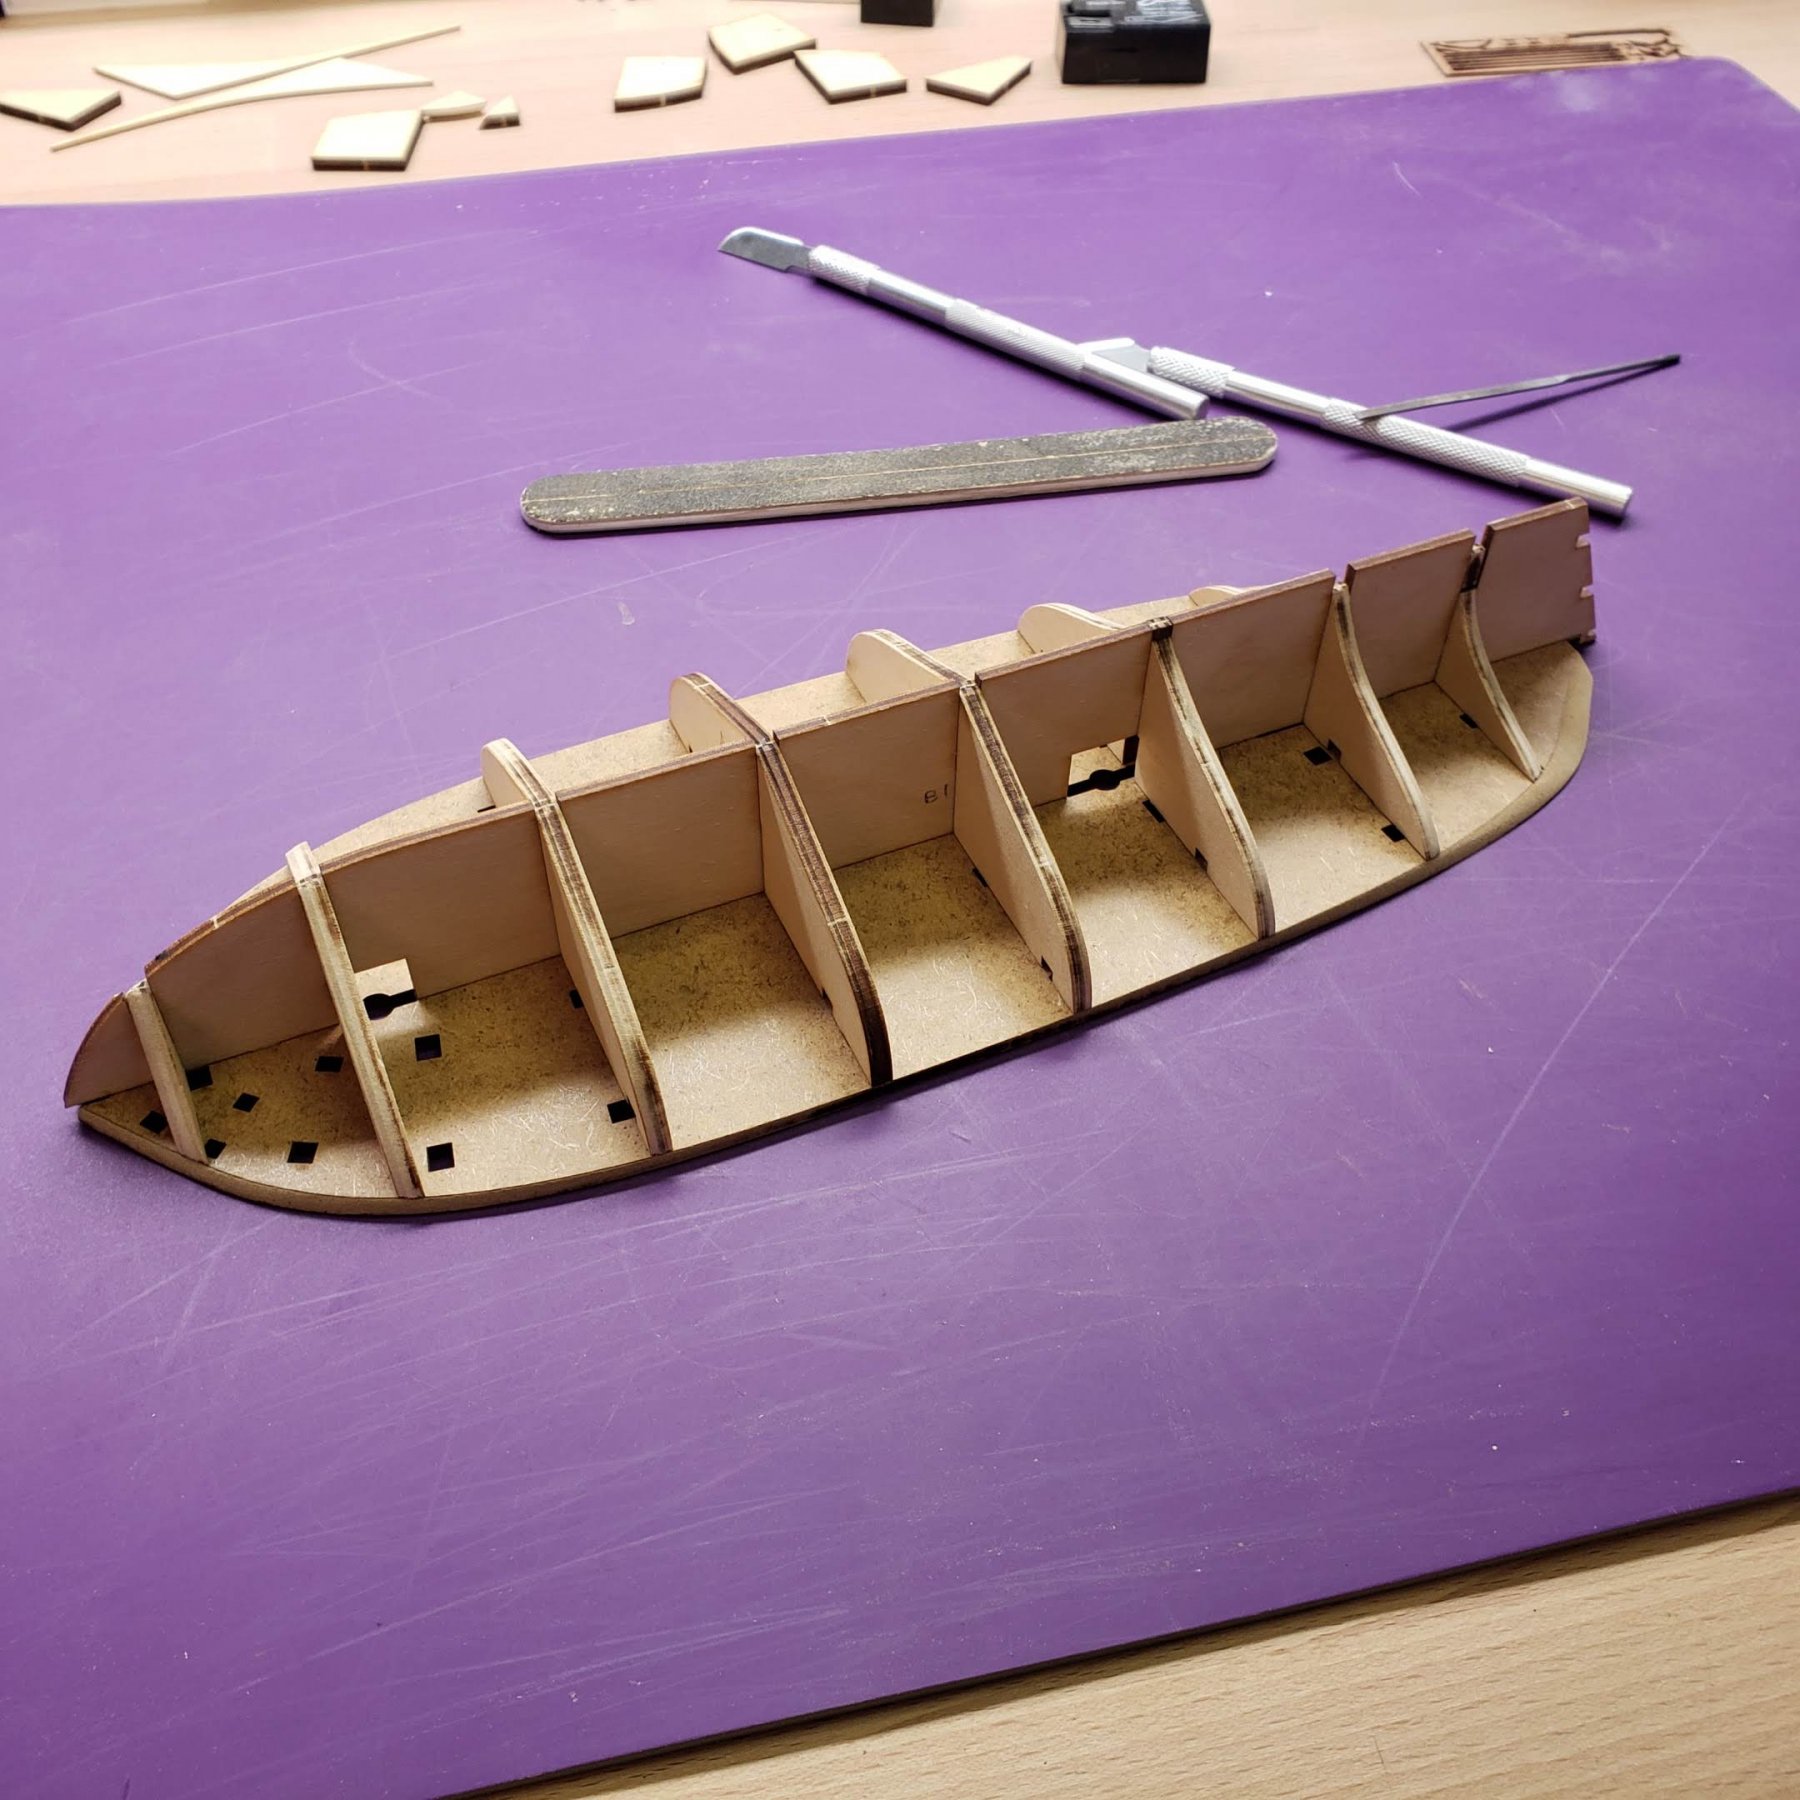
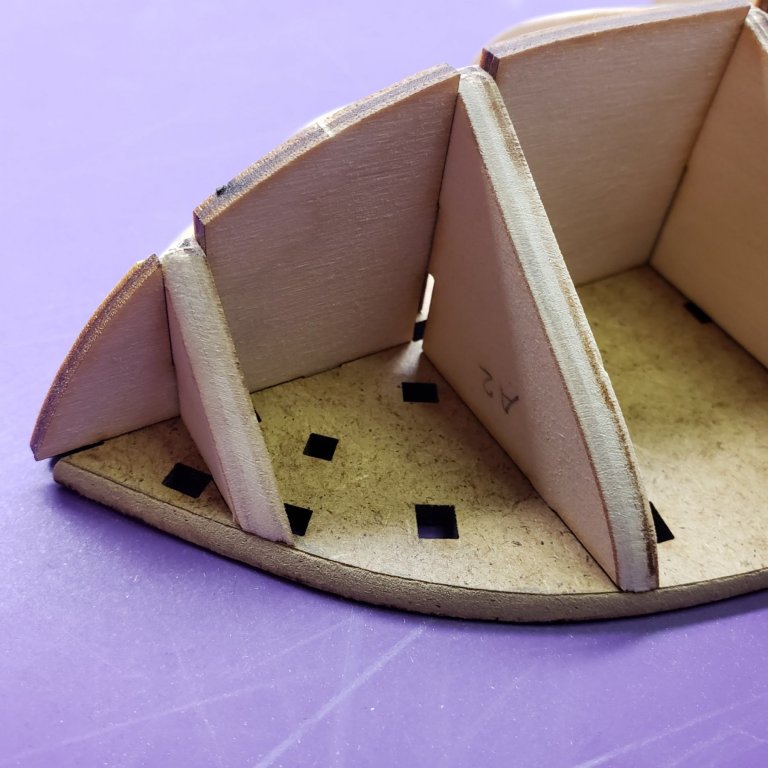
5. Next come the bulwark and the taffrail. In order to simplify this step the kit supplies two jigs. One for the bow and another one for the taffrail in the stern. These jigs are inserted into the holes in the deck and support both the bulwark and the taffrail (I wrapped one of them in scotch tape to prevent the taffrail accidentaly gluing to it): 6. After that I soaked the bulwark and the taffrail in water, carefully bent them and put them on the model without gluing anything. Then I let them dry completely: 7. Once dry they maintained their shape and could be easily adjusted on the model without too much stress. Finally I glued them to the hull (it was really important to make sure that the bulwark is not glued to the timbers!): 8. After glue was dry the jigs could be removed:


- 40 replies
-
- 8
-
-
- finished
- master korabel
- (and 2 more)
-
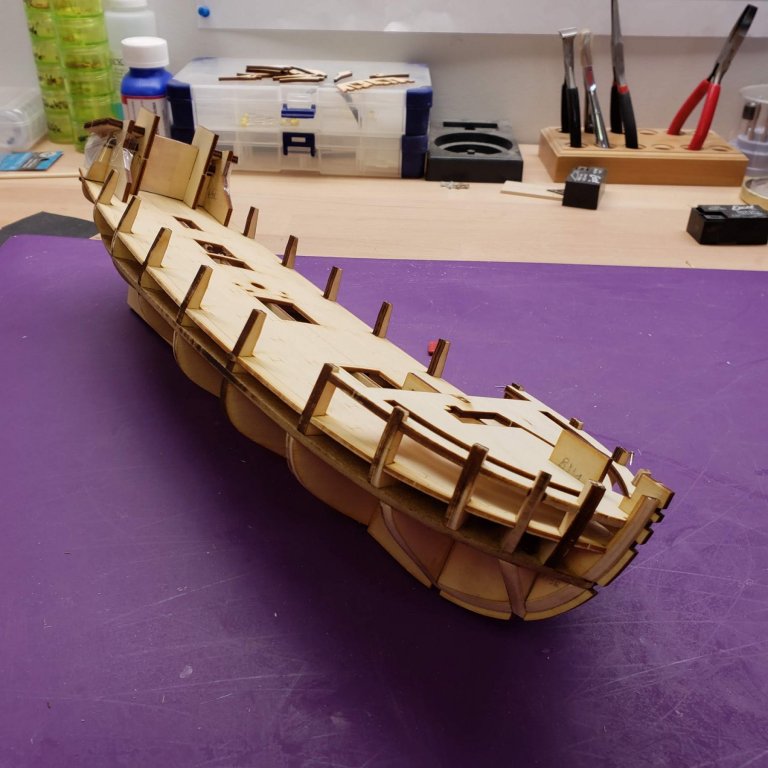
Hello everybody, Some time ago I started building Master Korabel Schooner Polotsk kit but I was too lazy/busy to start a build log here. Finally I decided to go ahead and do it. I'll be posting more often until this build log catches up with the build's current state. I have been precisely following the instructions during the process so far and it has been a smooth ride. 1. I started with assembly of the ship's frame. The desing of this kit's frame is very interesting, it has a HDF plate that splits the frame horizontally. This ensures that all bulkheads and the center keel are perfectly straight and perpendicular to each other: 2. All parts have laser cut notches so it was really easy to bevel them: 3. This is how the frame looks like with all lower bulkheads installed: 4. Finally upper bulkheads and the false deck are installed. Note how the deck overhangs in the stern and how thick the timbers are (these will be cut off later):


- 40 replies
-
- 7
-
-
- finished
- master korabel
- (and 2 more)
-
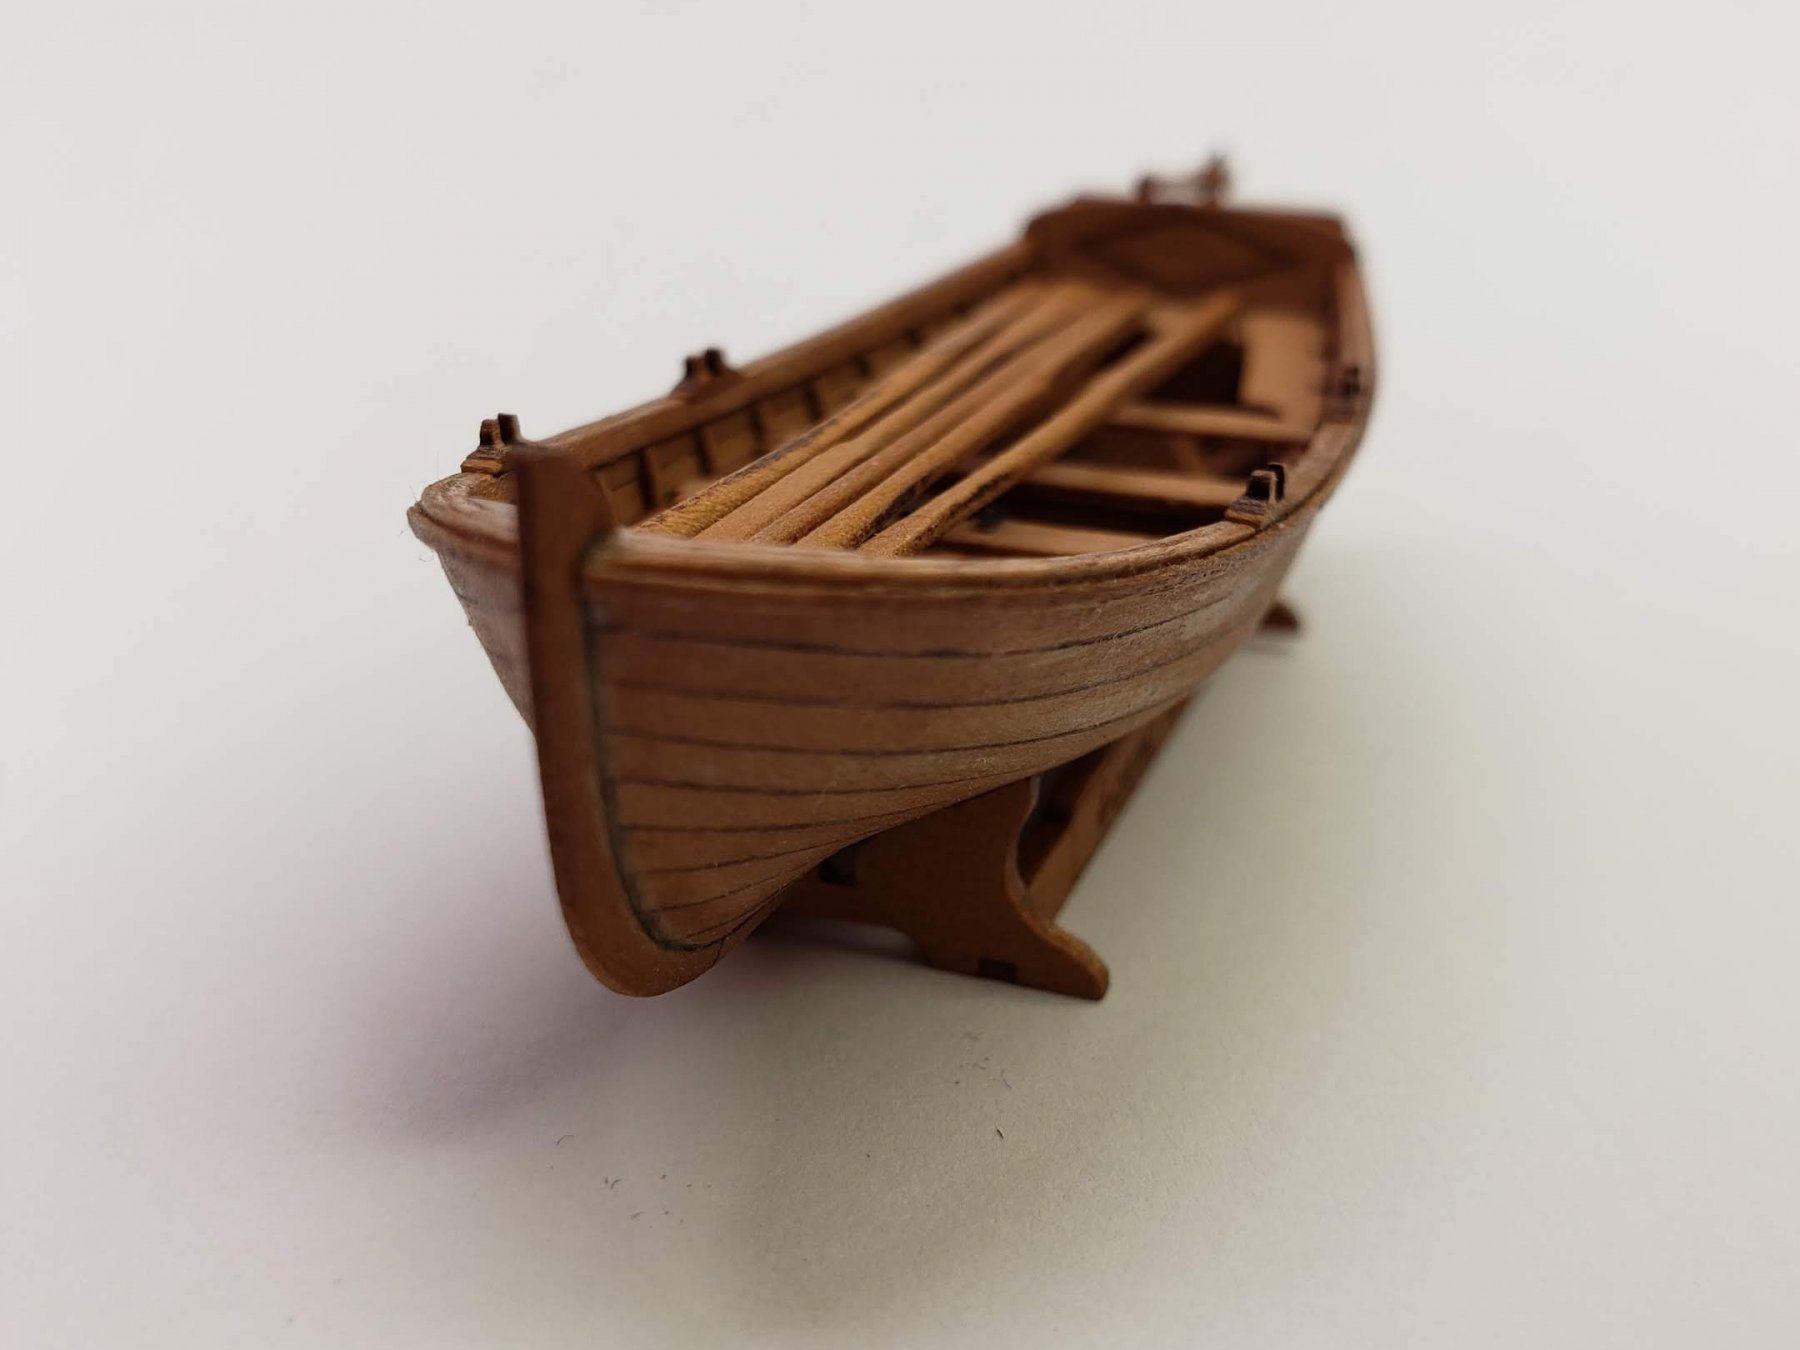
Thank you guys! Surprisingly, they were much easier to assemble at such scale than I had initialy thought.
- 7 replies
-
- 2
-
-
- lifeboat
- master korabel
- (and 1 more)
-
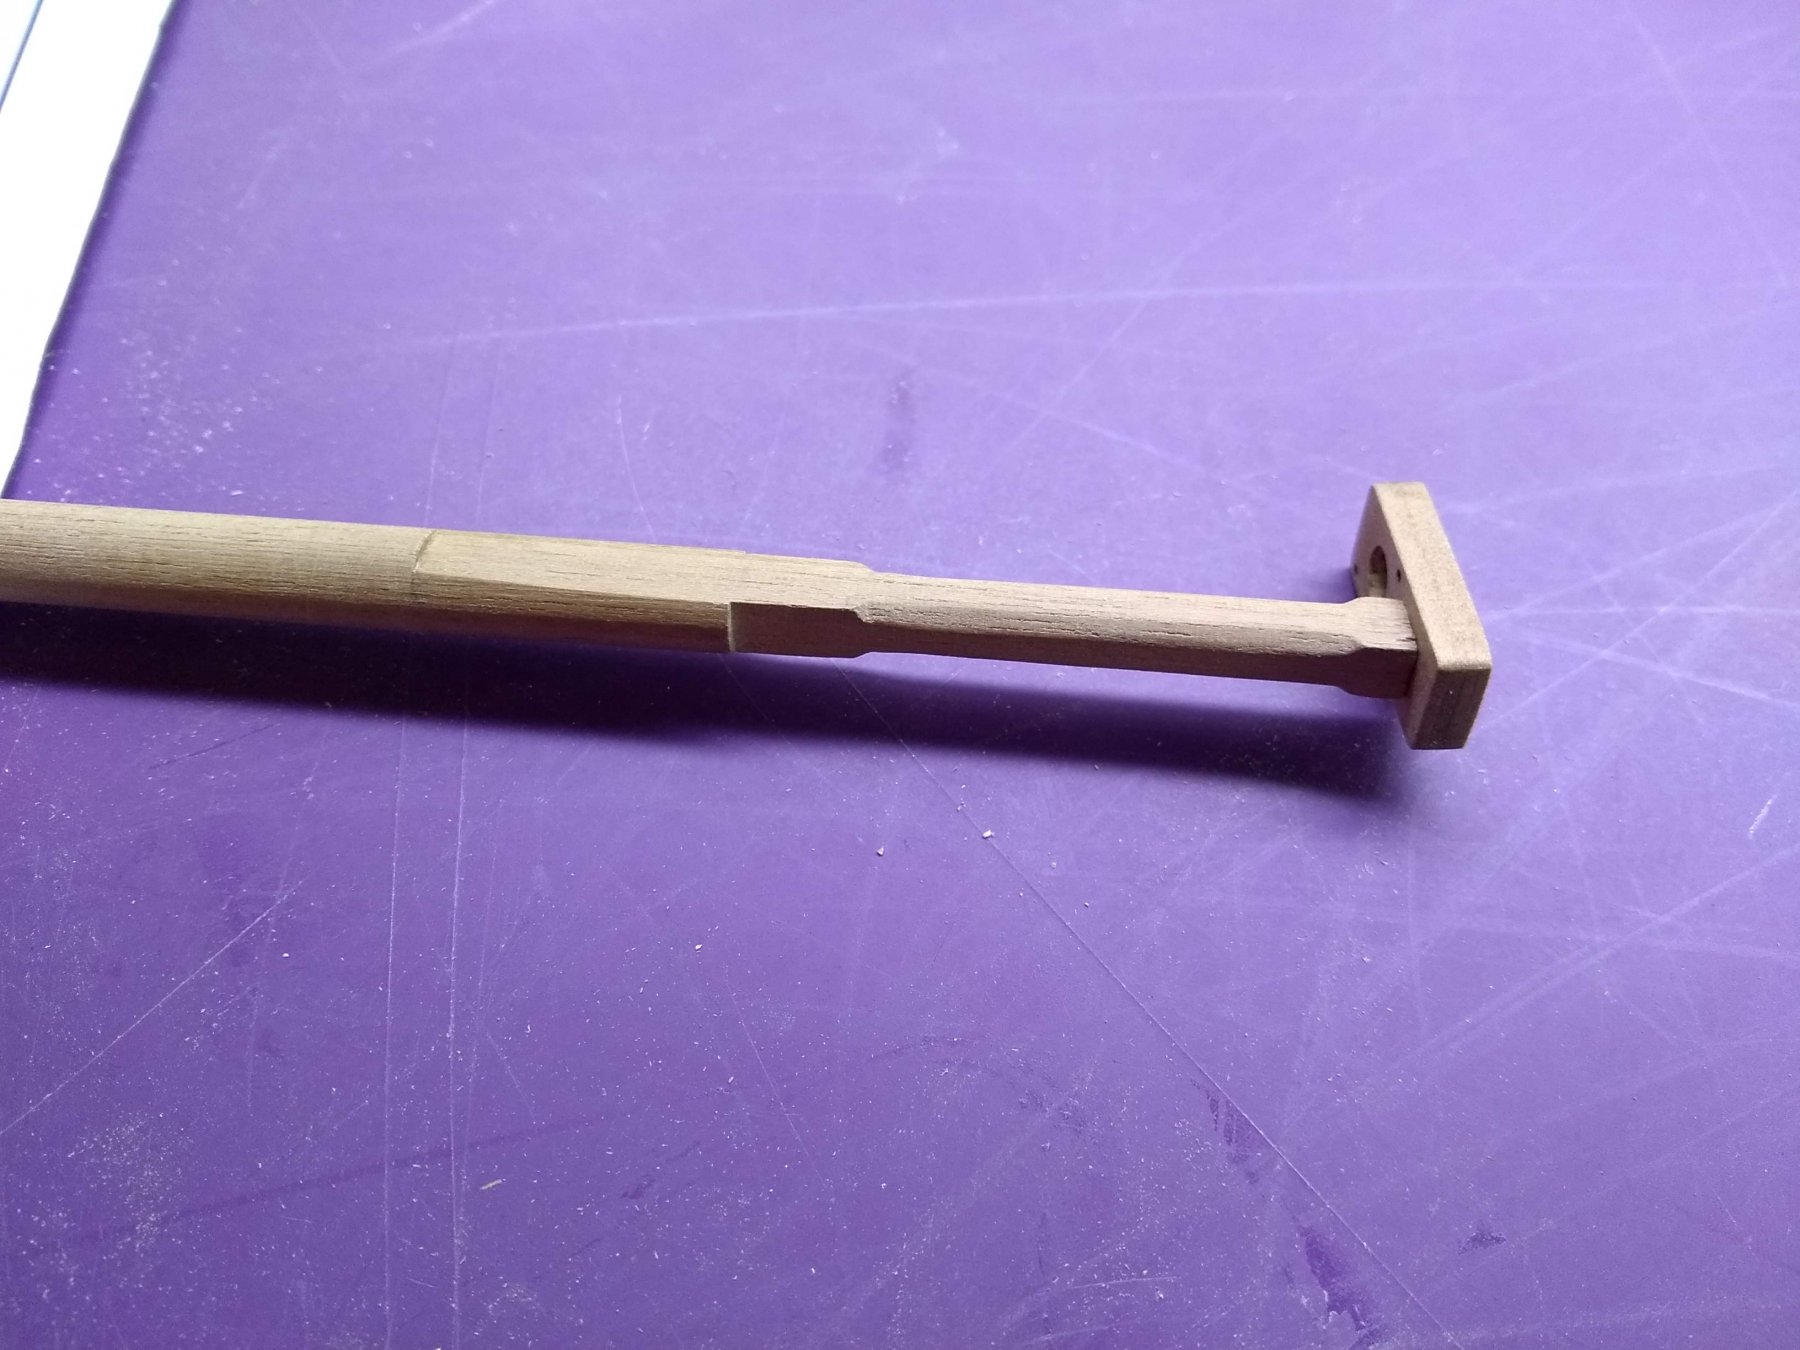
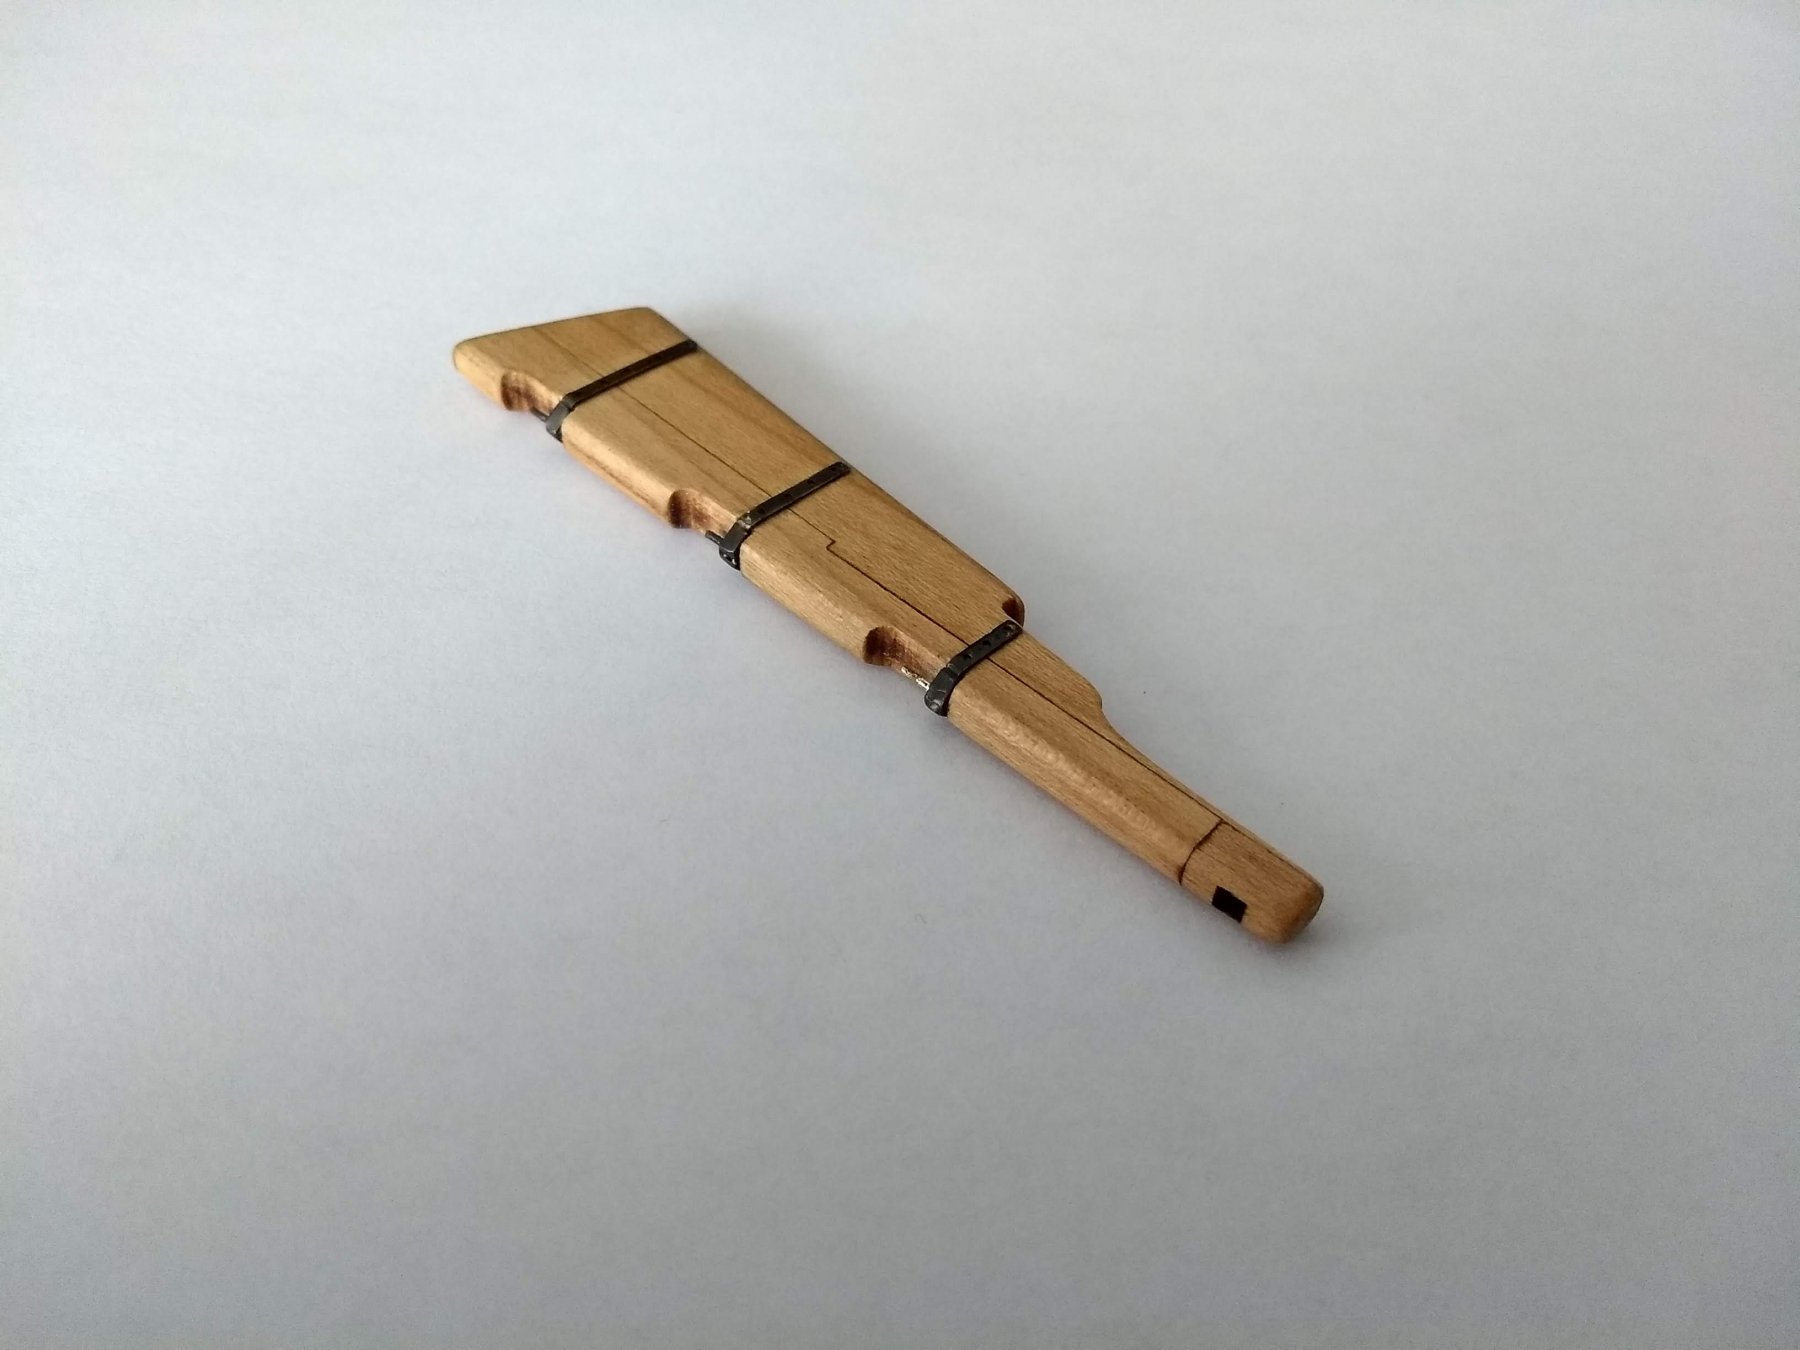
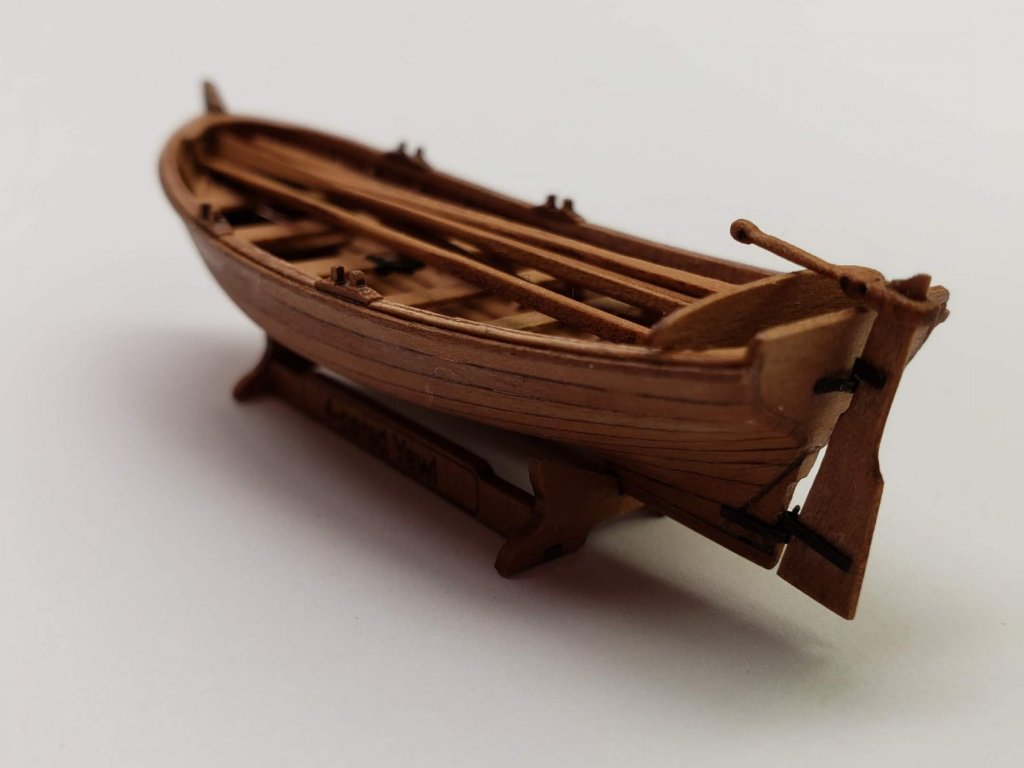
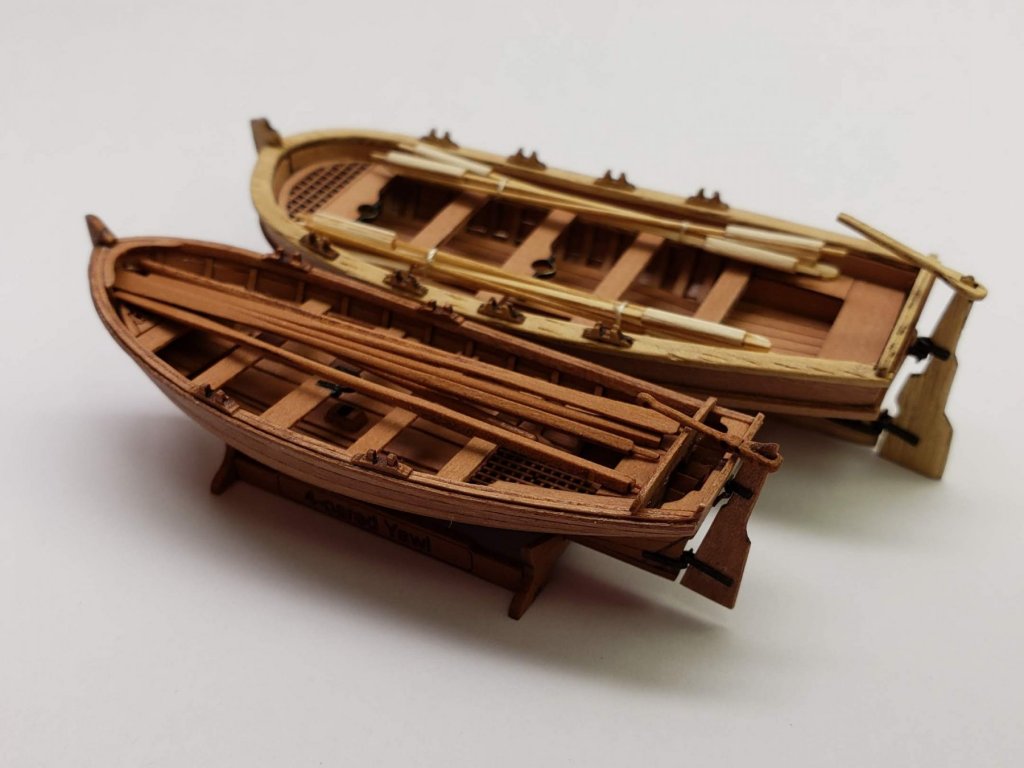
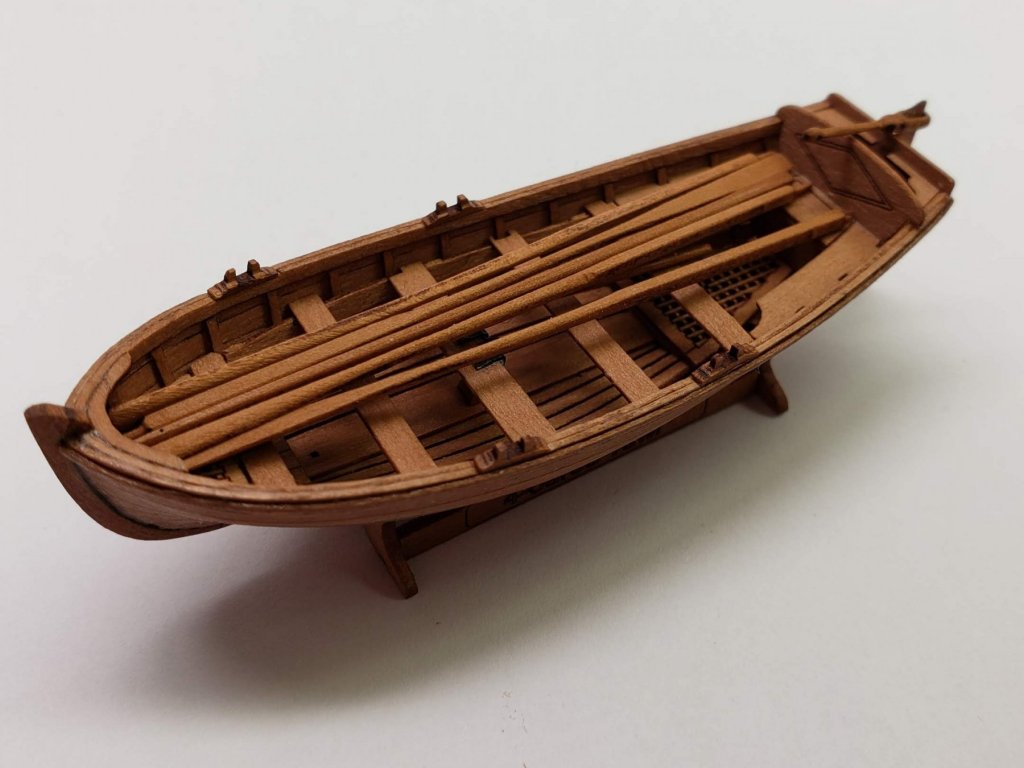
10. The rest was straightforward - I made the mast clamps and the pintles out of a brass strip provided with the kit, blackened them and attached them to the model, then I installed the oarlocks and the shoulders: 11. Then I made oars and masts, and finally the boat was done! This is the smallest working rudder I've ever built: Here it is along with the 75mm boat from Master Korabel that I built recently:

- 7 replies
-
- 11
-
-
- lifeboat
- master korabel
- (and 1 more)