

j21896
-
Posts
287 -
Joined
-
Last visited
Content Type
Profiles
Forums
Gallery
Events
Posts posted by j21896
-
-
-
Very nicely done Bob! Congrats on completing a fine model.
Cheers,
Robert
-
-
That is one beautiful ship Augie!
Cheers,
Robert
-
Hi B.E.
Gorgeous work! Those sails are amazing! And your sea looks so real!
Congrats,
Robert
-
-
Beautifully done Jason!
Cheers,
Robert
-
Say it ain't so Hakan! I'm not ready to let go of this build

Of course, if you post lots of really good photos in the completed ship Gallery, that would probably help my withdrawl

Cheers and Congrats,
Robert
-
Nice work Patrick! The rigging looks great. And she certainly is a tall old gal isn't she!
What size case will you need to put her on display?
Robert
-
Very nicely done! What plans did you use for your build?
BTW, I spent a winter up in Thurso, Scotland back in the 70's. Not many daylight hours way up there in winter!
Cheers,
Robert
-
Hi Rusty,
This is a beautiful build!
Could you tell me what type of wire you used for the hatch cover ring bolts? Is it black wire, painted, blackened?
Also, what is the inside diameter of the rings? I've seen documentation for the size of ring bolts used on gun carriages, but never for hatch covers.
Thanks,
Robert
-
-
Thanks Jay! That's a much more effective modification than simply making a shim to fit under the plastic insert. Kills a couple of birds with one stone -- provides a uniformly flush table, and zero tolerance opening!
Cheers,
Robert
-
Excellent! Thanks Jay.
Robert
-
I recently got the very affordable Ryobi scroll saw, but have only used it a couple of times so far. One annoyance is that the plastic insert around the blade does not sit flush to the table. I made a plastic shim ring to eliminate that.
However, it sounds like Jay may have a better solution that also solves other issues with it. Jay -- could you expand on your modifications to the saw?
Thanks,
Robert
-
Hi Elia,
Very clean and precise work! Looking good.
And by the way, in looking back through your whole log, worthy of mention is your Smuggler build. She's a real beauty!
Cheers,
Robert
-
You must be doing a good hiding job Hakan, because she does look good. Just curious, what thickness of planks did not work? And what thickness did you finally go with?
Cheers,
Robert
-
Clean Man! Real clean!
Oh yuh, she's going to display well

Cheers,
Robert
-
Very nice Patrick! Keep those pictures coming. You're really nearing the finish line there.
Also some fine looking reading material!
Cheers,
Robert
-
Thanks Jay, I'll check that out.
Robert
-
Looks like 1:1 scale work Bob! Very nice.
Robert
-
I imagine they never could have dreamed how captivating their work would be for so many people -- and for so long! Just amazing stuff.
-
Interesting. Thanks Greg!
-
Recent postings of Rogers Ship Model Collection photos got me wondering if much is known about the builders who created those masterpiece model ships -- two hundred and more years ago – as well as those in the NMM and other museums throughout the world. Their creations remarkably live on today, but what history of the builders themselves has been left behind? Did they keep any type of “build logs” or records of their work processes? What were their workshops like, etc.?
The craftsmanship is astounding; I can’t imagine how they did it! No modern conveniences, power tools, etc. How long could it have taken them to build their models?
Cheers,
Robert

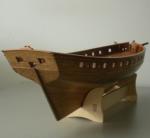
HMS Mars by j21896 - Caldercraft - 1:64 - modified kit
in - Kit build logs for subjects built from 1751 - 1800
Posted · Edited by j21896
Capping Rail
A very brief update: after a few weeks of indecisiveness coupled with a small case of “builder’s block”, I finally began to fabricate the capping rail.
I taped in a short piece of dowel as a placeholder for the bowsprit, and after scrolling out the approximate shapes of the rail sections from cherry sheet , I've started test fitting and sanding them to about 90% of their final shape and dimensions. With them temporarily taped in place, I can work on fit between the sections.
Using hooked scarphs for the joinery.
In addition to holding things in place with tape, I’ve drilled a few holes where some of the treenails will eventually go, and temporarily inserted short pieces of copper wire to ensure proper alignment, and consistent positioning after removal for shaping and replacement.
The deck furniture waits patiently in the foreground (atop some sections of old test planking) to be returned to their homes.
Now back to cutting scarph joints!
Cheers,
Robert