Rich_engr
-
Posts
322 -
Joined
-
Last visited
Content Type
Profiles
Forums
Gallery
Events
Everything posted by Rich_engr
-
 Larry, That seems like a reasonable approach. Since I already painted the upper half, I might try painting the waterline a little wider than needed, then mask over that with tape that's the correct width. This was my first hull painting job, so naturally I am trying to be careful since any misalignment will show up... But before I dive into the actual waterline, I need to figure out what color to use- the box shows a sort of teal, but I may have seen white or even a faded yellow on some models... (ooh- just had a weird idea, that may/may not work: instead of messing with super flexible masking tape, how about use a plank that's the width of the waterline, that runs the whole length of the ship, with some steam bending to fit the hull, and pin it in place? I may look into this, but I'm not sure as to the practicality of it...)
 -
Ok. FINALLY got the upper part of the hull painted after 3hrs of trying to get the +#*?!;** waterline straight and even!! So the black is done, now gotta do the line then the lower green. Regarding the waterline, I tried a few things: pencil in block, supported by my vice, along with trying to shim my stand to get the correct angle; freehand sketching, using some reference tick marks taken from the plans; and a weird sliding-pencil-rail-thingy jig (which did one side perfectly, but the other was all weird). Finally did a combination of freehand + tick marks + masking tape. Getting the waterline done has definitely been the weirdest and trickiest part thus far. But now it's done, and maybe I'll get the lower half painted. I'll get some pics up once I have the hull completely painted.
-
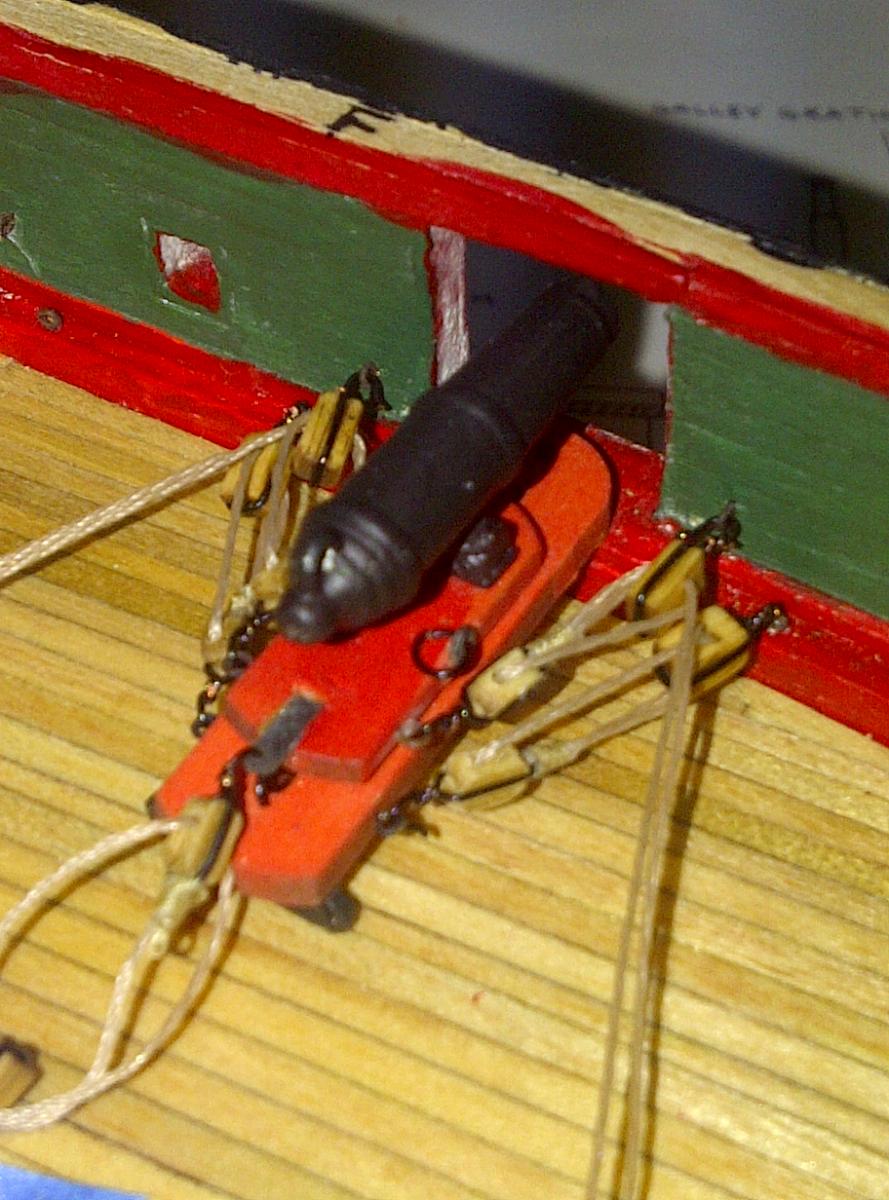
Back to the build (after having 2 recruiters and a good resource call today!): Yesterday I installed the eyebolts & rings for the guns' inhaul tackle on the deck, and now I'm marking the waterline so I can paint the hull (before getting too far ahead with the deck fixtures to avoid damage). I also realized I still need to drill out the hawse pipes and install the chafing blocks... (gotta refer to the plans more often at this stage) So it seems like the job hunt is more active than my build, which is a good thing!
-
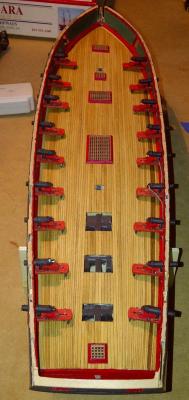
Here's some pics of what I've done. After job hunting all morning and mowing the lawn this afternoon, I installed all of the cleats on the bulwarks, and test-fitted the gun tackle. Also, here's some (bad) pics of the carriage pins I made with the leftover chicken wire.


-
Quick update: I installed the eyebolts in the bulwarks for the guns, blackened the carriage pins, and painted the cleats. So in between cleaning the house and job hunting I'm drilling and installing the cleats and other deck/bulwark hardware. I'll try to get some pics up tomorrow or so.
-
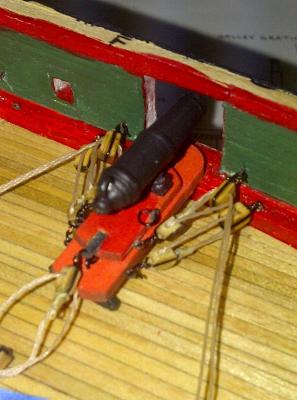
Tonight I found another use for the chicken wire (besides using it as makeshift barbed wire to keep my dog from jumping a 6 foot picket fence): pins for the gun carriages!!! I didn't want to use wooden dowels (seemed too "soft" for me), and brass nails or pins were too thin. Therefore, I snipped some short pieces of maybe #18 gage galvanized wire from the fence leftovers, and they're a perfect fit in the holes. They hold the guns VERY steady and solid, with no slack or slop, and they allow them to pivot very smoothly. So maybe tomorrow I'll dunk them in the B-I while perusing the job postings. That may be all for tomorrow since I need to take my car in to get looked at (yeah, I'm an engineer yet I know NOTHING about cars. I know more about ships & modeling than the inner workings of the modern internal combustion engine.) lol!
-
Roger, welcome! I was born in Erie, and got to visit the ship during a summer vacation once. $200 is a pretty good deal, and the kit has plenty of stock in it. The Niagara is my first ever wooden kit, so I'm learning as I go. Don't be afraid of the bearding line (or anything on this build), but realize that you have people here to help and learn from. Seriously, if I could have steadily worked on the kit when I got it 4 years ago, I would already be onto my 2nd build by now. Once you start the kit, begin a build log and we fellow Niagara builders (and others) will follow along. Good luck!!! (start a log for your Santa Maria while you're at it!!) -Rich
-
Hey Joseph- thank you and welcome aboard! Now, in addition to seizing the rest of the tackle, I'm going to install the eyebolts on the deck & bulkheads. This morning I made another 8ft of rope while the coffee was brewing. On the job hunting front- had a mini phone interview today & looks very promising!!! Hopefully I'll land an interview soon, followed by a schweet offer!!
-
Slowing down the Dremel Rotary tool
Rich_engr replied to JPett's topic in Modeling tools and Workshop Equipment
J.P, Which model of Dremel do you have? If it's a variable-speed tool (such as the 395 like I have), the slowest they'll go is around 1000 rpm. You could try putting a rheostat in there, but the addition of the electrical components could make the device not as hand-held (duct/electrical tape, small box to house, etc.). If you'd like to get something that's in the 100rpm or so, try a slow single-speed, then rheostat for control. Btw, where I DFW? I'm in Tyler. -Rich -
Larry- nice work! Yeah, the framing takes some time and isn't the prettiest job- that's why they're planked over! . A nice file should clean up the ports once ready. Also, remember to check the height of the gun ports versus the drawings and the bulkheads- I think mine were originally too short, so I added a strip of square stock on top to get me the height I needed (and provide some real structural support). Unfortunately I don't have any pics (was pre-MSW 1.0 for me). But keep it coming- you're moving along great! (Framing stage is check, check, measure, check, check, then glue, check, check and sand/file, check!!).
-
Friday Update: Managed to turn about 12ft of rope for the gun tackle (two 6ft runs on the ropewalk). According to my calculations, I will need to make a grand total of about 60ft of rope for all of the guns (and another 10ft or so for the breech lines). I've been gobbling up the 008" tan line for the tackle (3 strands per)- may need more for the rest of the ship! For the tackle & train lines, I've been using 3 strands of the 008 tan line (each SB + DB gets about 7in worth for seizing, reeving, and coiling/wrapping). I've made about half of the total rope needed thus far. For the breech lines, I make those using 3 strands of the 020 tan line (about 6-8in or so for seizing around the rings and slack in the lines when guns are stowed). All of the breech line rope has been made. My goal is to seize & reeve a set of tackle for 2 guns a day (10 lines), which is about another 10days of work there...
-
I'll have to agree- I think the level of difficulty has more to do with the level of detail and especially the time required. I dove in with an intermediate for my first build, but with the help here and my slow, patient dedication it's coming along rather nicely. So be patient, ask questions, research, and most importantly HAVE FUN with whatever kit you choose! -Rich
-
Brian, Yeah, since I've been doing the guns for a while now (and still some to go), I don't think I could handle a 1st rate right now... lol!!! And thanks for the support- at least I've been getting some hits and 2 replies!
-
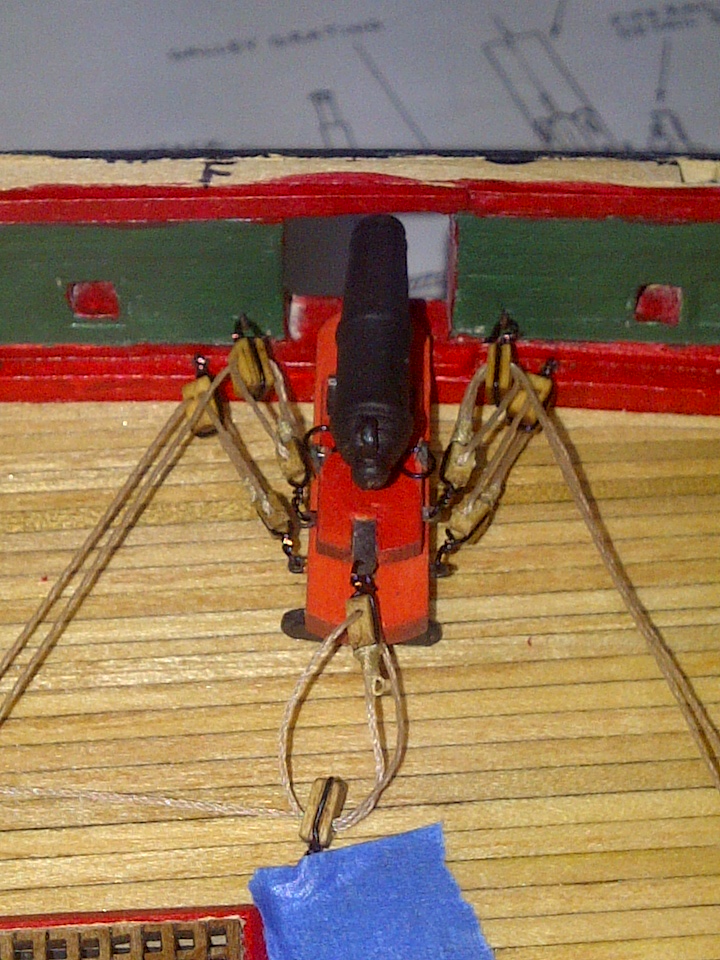
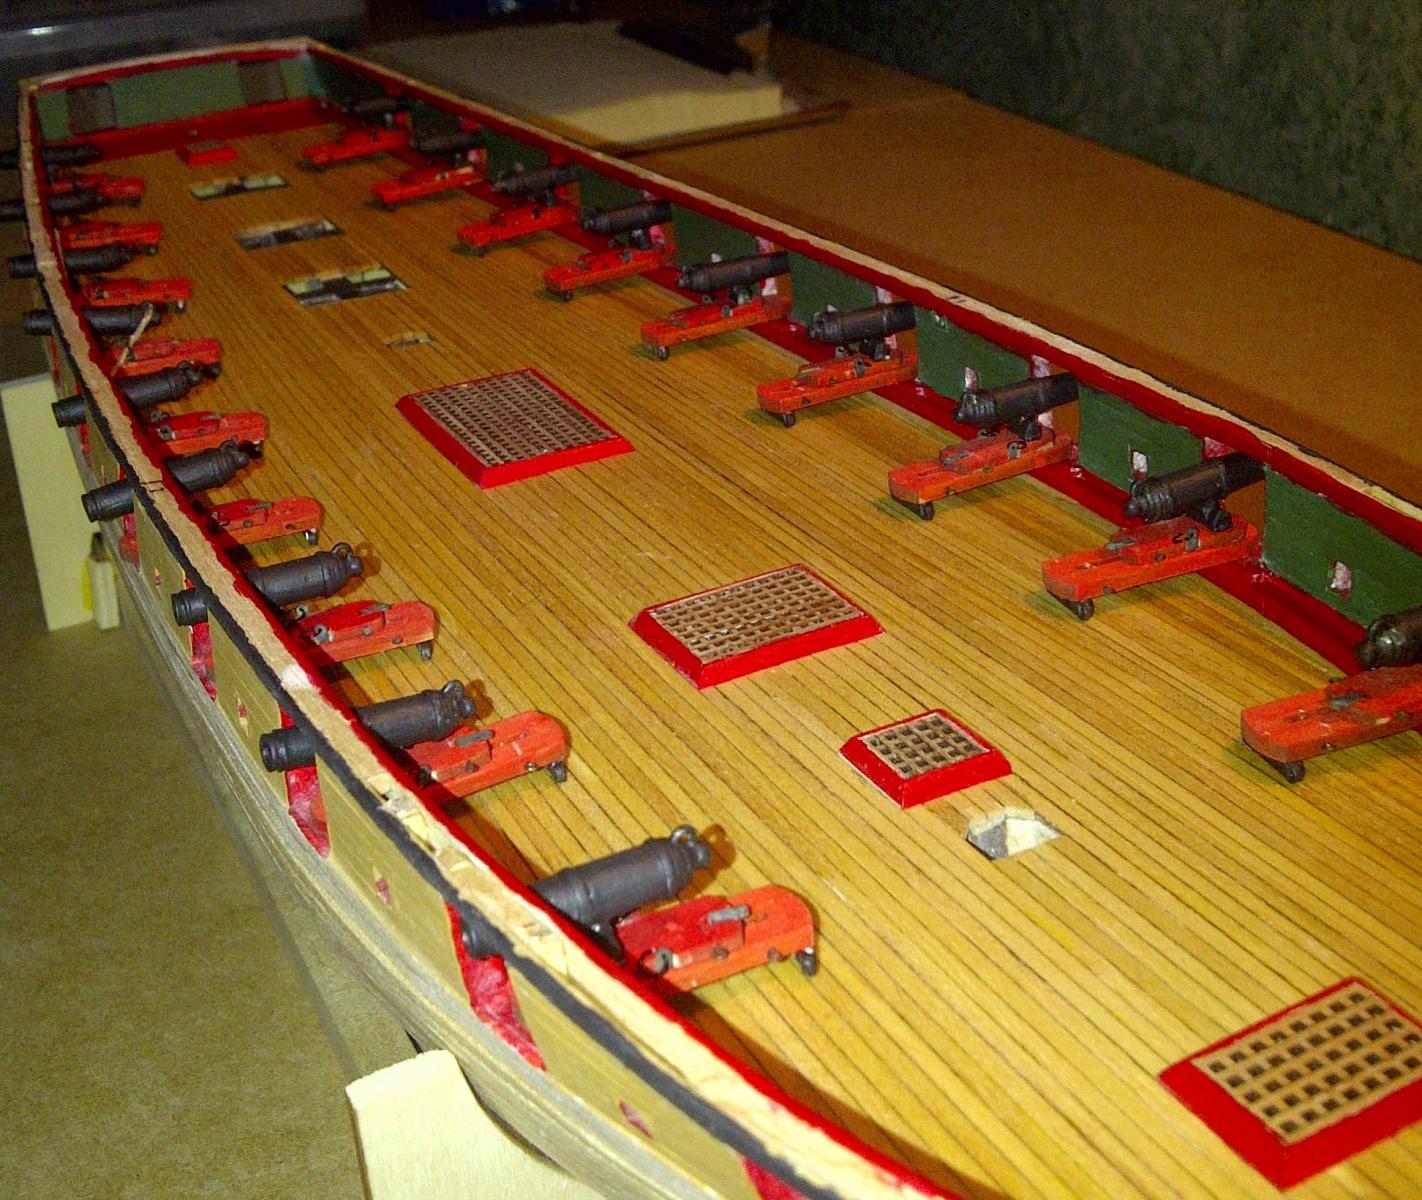
Mark, per your request, here are the guns (with breech plates, side plates and rings) placed on deck: Some touchup paint is still needed, and now I'm seizing the tackle lines. Good news is that I applied to 2 jobs today, and an HR guy called me back 15mins later!!! <fingers crossed>

-
Dead Eyes (avant premiere) - moved by moderator
Rich_engr replied to stelios's topic in Masting, rigging and sails
Very nice and clean work- were they soldered?? Can't wait to see more! -
Couple questions regarding Chainplates
Rich_engr replied to BareHook's topic in Masting, rigging and sails
Ken, I haven't gotten to the chainplates yet, but from what I've read, it's best to strop the lower deadeyes, then attach the chainplates to the hull/channels. Once masts are stepped and shrouds attached, then do the reeving on the deadeyes. As far as rusting, it might make a neat "weathered" look for the model, but depending on the look you're going for, you could just use blackened brass instead. (Check the paint & finishing section for some blackening topics. I also have a few pics in my build log that show the blackened brass breech plates for my carronades- I think the finish would come out similarly for the wire strops- mine came out sort of dark brown/black rust looking, which is ok by me.) But always do test pieces first, and before using the blacken-it, clean the brass really well & don't touch with your fingers. After blackening, wipe the excess soot off (nasty stuff) before handling and attaching to the model. Hope this helps & good luck!!! -Rich -
Ahh... finally heard back from one company in the hunt- hopefully land an interview soon!! After searching for about 9hrs today, I managed to paint the last two guns and the remaining wheel castings. Maybe if I take a break I'll finish attaching the rings for the breechlines. Seizing & reeving will have to wait another day or two.... As we used to say in music (yes, I was a band geek... "this one time at bandcamp..."), "Poco-e-poco, meno moso" (My Italian is rusty since I haven't picked up an instrument in over ten years.) One thing to note: the quantity of eyebolts in the kit seems rather light- I might need to whip out some homemade ones (still have my drill bit & arrow nock for twisting eyebolts).
-
I know I'm probably getting waaay ahead of myself here (don't we all regarding this subject), but does anyone have any good suggestions for a 2nd kit to build? I'm working on MS Niagara, 1:64, which is an "intermediate" level... For my next build, I'm toying with these possibilities: Quick and easy sloop or something similar (MS Bluenose in 1:64 or maybe AVS, etc.) Another brig (Lexington, Swift, etc.) Way More advanced (Syren, MS Constitution, Amati's Fly, or Mamoli's Surprise) I'd like to kind of stick with 1:64 scale if possible, and wouldn't want to go too much smaller (Conny would be a challenge) (Personally, I've had my eyes on the Fly, Surprise, and Syren, and even the Bluenose. I feel the Constitution is out of my league right now.) Any thoughts on these, or others??
-
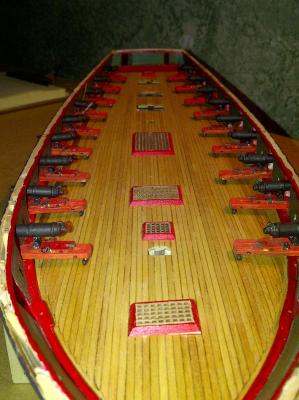
Larry, Thank you for your support. Yeah, the hunt is tiring and exhausting, but I do see it as an opportunity for something much, much better. As for the carronades, maybe I'll paint the missing two and tackle some tackle. It's nice to be able to see 18 of them at the same stage and ready to go- it's been a loooong trip with them, and hope to finish that stage soon and move onto deck hardware and structures.
-
Here's what I was able to do before bed last night (2 guns and most of the wheels still need paint):

-
Niagara from Model Shipways - move by moderator
Rich_engr replied to rogerpf's topic in Wood ship model kits
The MS Niagara is my 1st ever wooden build- great kit and you'll definitely learn a LOT! If you can get it for $200 or less, jump on it. It's made for intermediate level builders, but there's a bunch you can pick up along the way to get you there if you take your time and read up on a few things here and there. Plus, you have lots of us here to help (I know I wouldn't have made anywhere near as good progress as I have without MSW and the folks offering their assistance). So go buy the kit, clear off your desk, and grab your tools. It'll be a fun yet challenging kit!!!! Check out the Niagara build logs to see what it's like. -
Today I was able to attach the breech & side plates for the rest of the carronades (while waiting for computer to reboot since it's slooooow from job hunting 10+hrs a day). Now I just need to seize a few more pigtails & reeve the remaining sets of tackle. I'll try to get a pic or two of what I have done thus far.
-
Brian, Thank you for the support!!! Yeah, being forced into this position isn't what I had in mind, but I am staying positive and thankfully I do have the support of family and friends (and MSW'ers)! I've already been hitting the hunt pretty steadily, and got a new suit today so I'm ready if called! I've been mass-producing all of the gun hardware and tackle, so once all parts are ready, it'll be a gun-build-a-thon. After that, it's on to the deck hardware & structures. The build is a nice break and helps to keep the mind fresh in between searching and applying (plus keeps the creativity alive too, which is definitely needed).
-
Sarah, Thanks. The layoff was a shock (like getting sideswiped by a semi truck), but I'm positive about the hunt. As for my build, it gets the usual attention, but not as much as one would think I have time for, since my #1 priority is finding a new job. But I do take an hour or so here and there to do a few little things, which makes for slooooow progress...
-
Weathered decking
Rich_engr replied to MD11pilot's topic in Building, Framing, Planking and plating a ships hull and deck
Try Weathered Oak by Minwax- it comes out sort of greyish. Lightly wipe on, or let a bit sit in an area for a varied appearance.