JSGerson
-
Posts
2,633 -
Joined
-
Last visited
Content Type
Profiles
Forums
Gallery
Events
Everything posted by JSGerson
-

USS Constitution by mtbediz - 1:76
JSGerson replied to mtbediz's topic in - Build logs for subjects built 1751 - 1800
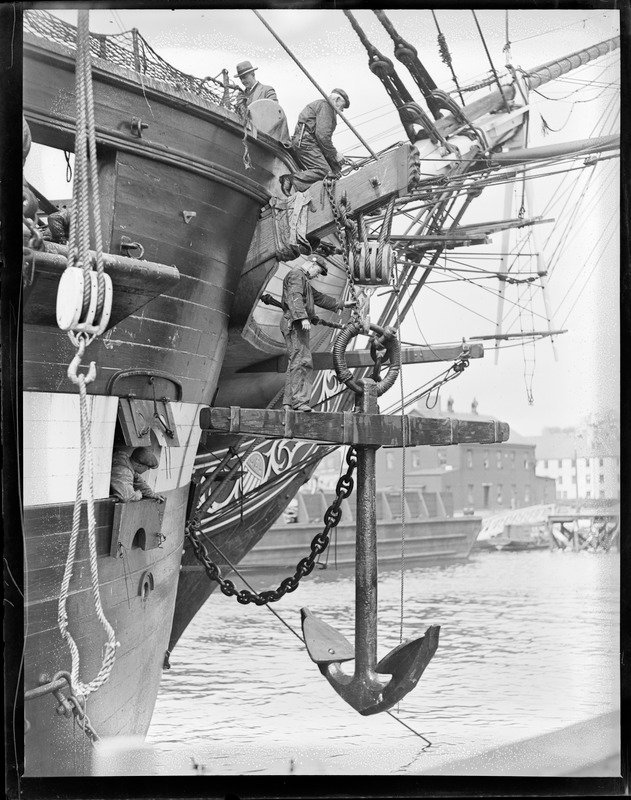
GGibson - I have been saving pictures of the USS Constitution from multiple sources ever since I decided to build her. I started my kit in 2017 but my photo library started a year or two earlier and I have not stopped collecting. I do not remember from which source or sources these photos came from (National Archives, or US Navy archives?), but they were taken in 1931. I found that if you try to Google a detail like "USS Constitution Anchor Chain," you may or may not get what you are looking for, but you may get a great reference photo of something else entirely. I retain those images (because I don't know if I could find them again), and categorize them for easy retrieval later. I have thousands of images. Should you (or anyone else) need a USS Constitution image of something, I may have what you are looking for. Jon -
USS Constitution by mtbediz - 1:76
JSGerson replied to mtbediz's topic in - Build logs for subjects built 1751 - 1800
The chain that is provided in the kit, is single link. According to the pictures I've found showing the anchors on the ship, they used chain links with cross studs. At least one anchor used rope. Hope you find this useful.

-
USS Constitution by mtbediz - 1:76
JSGerson replied to mtbediz's topic in - Build logs for subjects built 1751 - 1800
As I have said all along; beautiful work. Just be careful that you don't lockout your access to the gun deck before you install the anchor rope(s)/chain(s) and maybe the traveler. Jon -
USS Constitution by mtbediz - 1:76
JSGerson replied to mtbediz's topic in - Build logs for subjects built 1751 - 1800
Beautiful work. At your pace, I'll be following your foot steps very soon. Jon -
Coming along nicely Jon
-
USS Constitution by mtbediz - 1:76
JSGerson replied to mtbediz's topic in - Build logs for subjects built 1751 - 1800
It's going to be a shame if you deck over all that lovely bow work. Those supportive beams between the main beams really cut down the view of the gun deck, I've been thinking of making those beams look "broken away" so that the gun deck will be more visible, or maybe leave them off altogether. What are your plans? Jon -
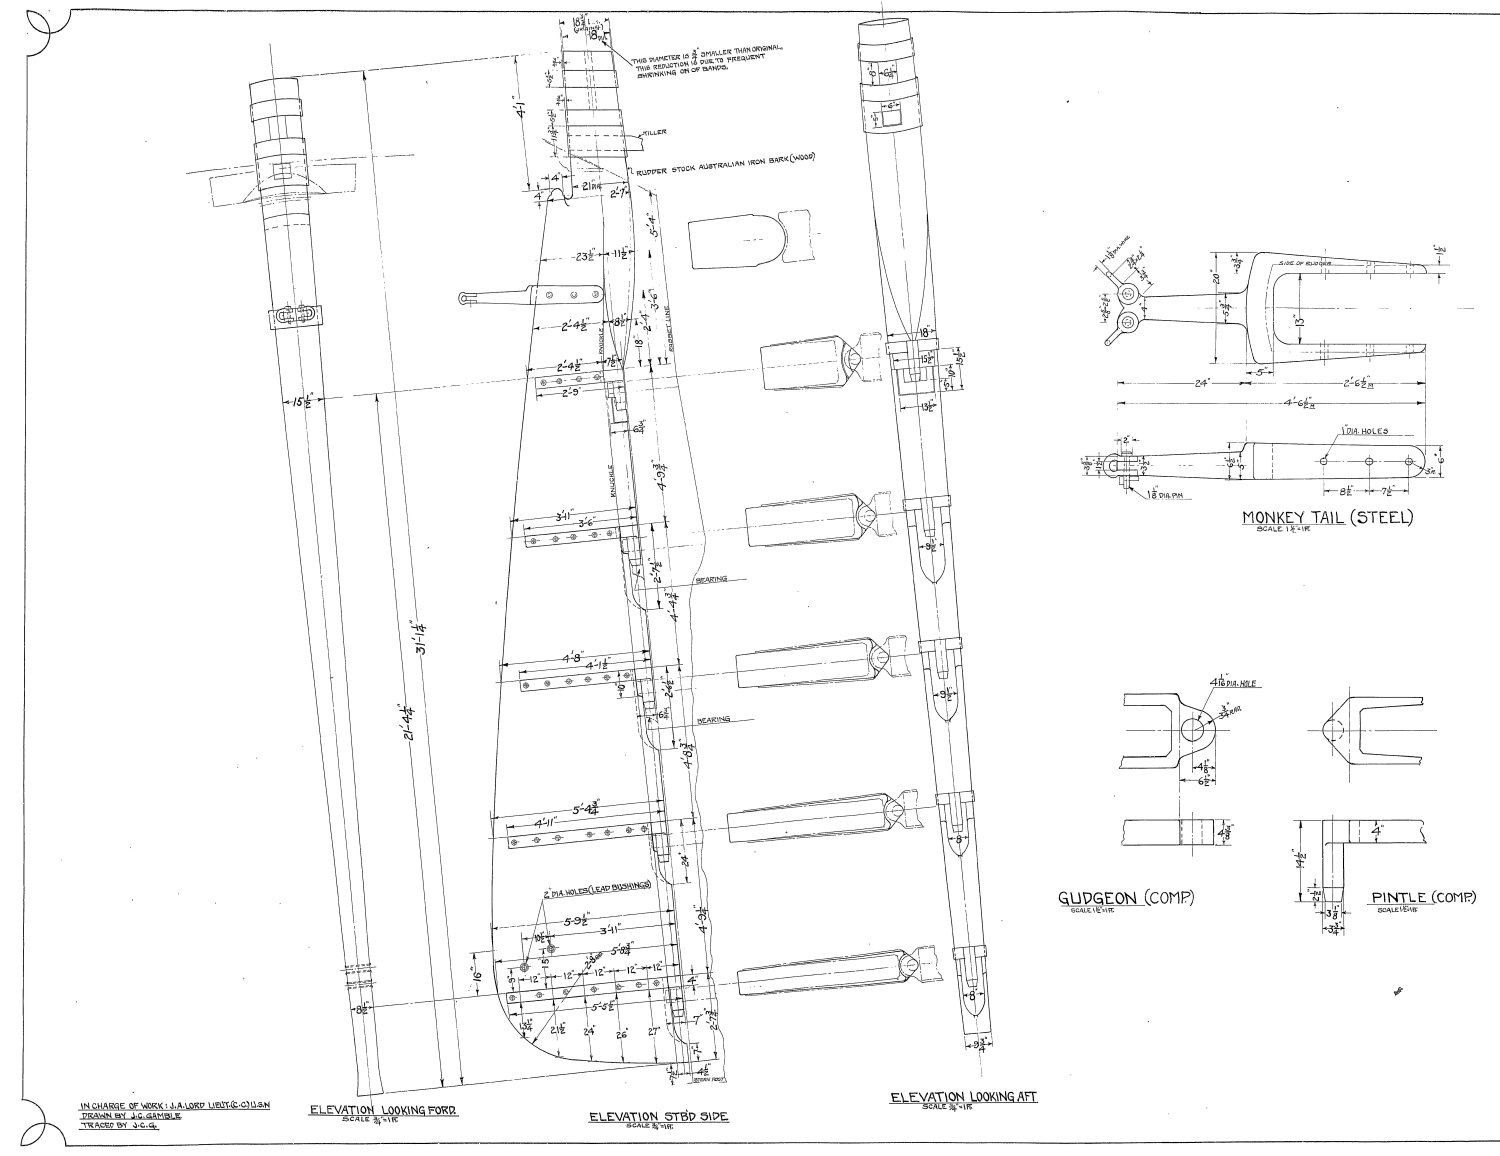
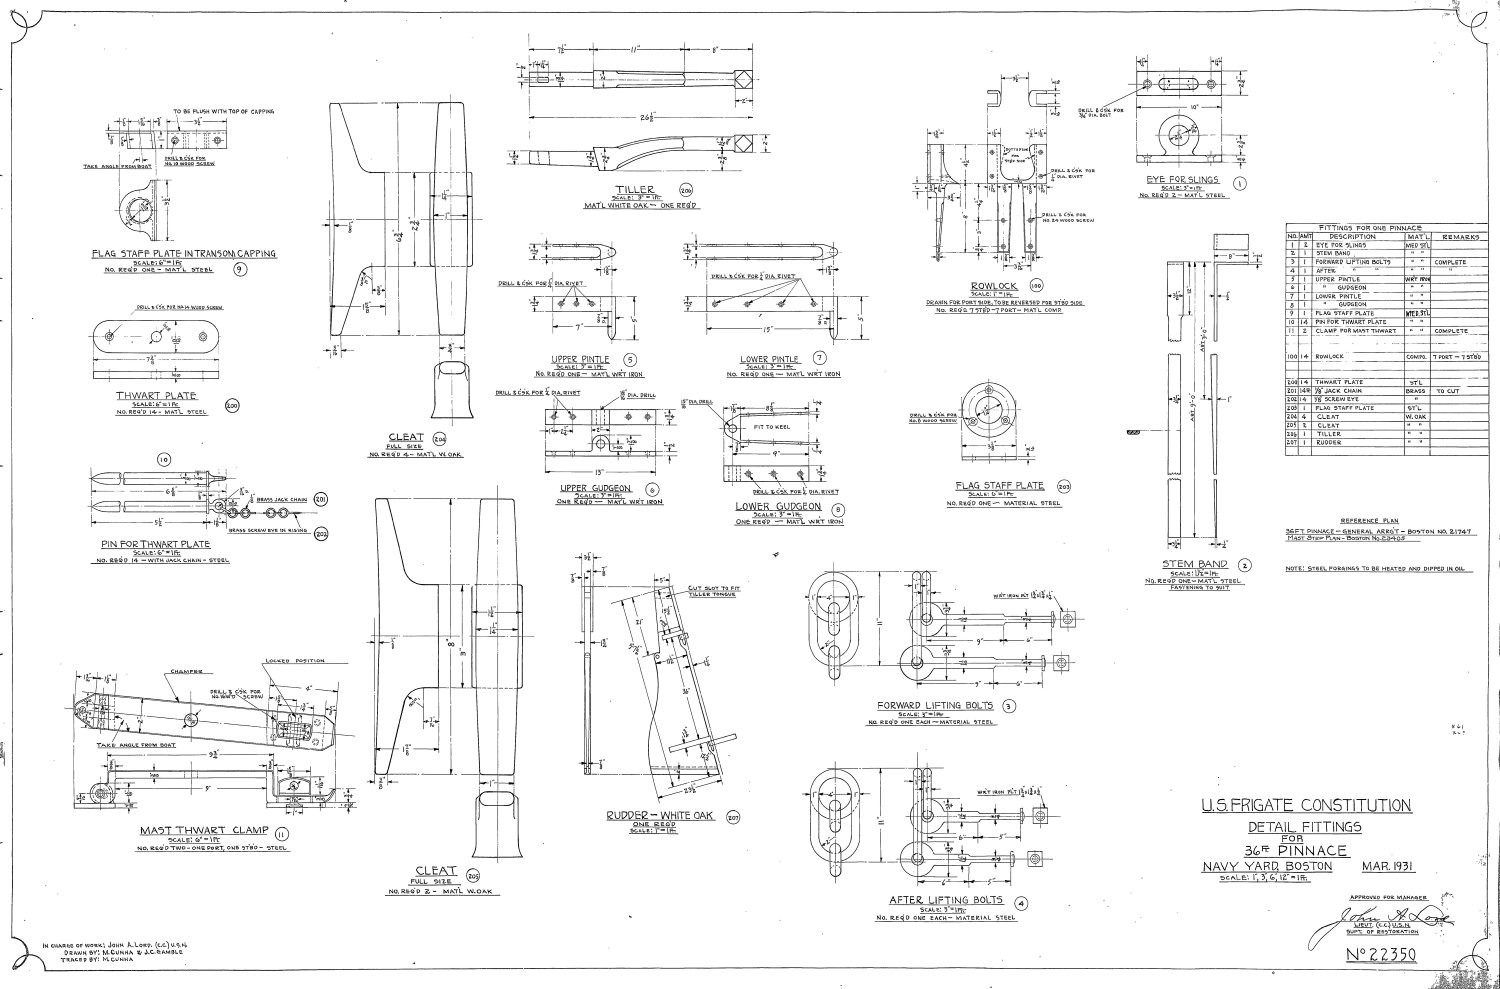
Rudder plan from the US Navy

-
If you look at Khauptfuehrer's Bluejacket build log, he states: "There is a pitfall concerning the rudder installation. The rudder is made from 5/32" stock. If your kit is like mine, you will have gudgeons and pintles whose interior dimension is 1/8". The folks at Bluejacket swear up and down that the dimension is 5/32" but, trust me, it is 1/8". Bending these to suit is difficult and yields less than satisfactory results. Bluejacket also sells gudgeons and pintles with a 1/4" inner measurement. These are easy to adapt and work well. Drops of glue are used to simulate bolt heads I recommend that you buy 1/4" gudgeons and pintles. They will bend easily to suit, and you will be fine." This might be a solution to your problem. Jon
-
Have you thought about the color you're going to paint them. Like ER Rich, mine are copper color. His is painted, mine are made of actual copper. If you look at the ship in dry dock (see my log), the gudgeons and pintles are the same color as the rudder underneath them. Some builders have made them all black. the choice is yours. Jon
-
As you know from reading my blog, I'm not the speediest builder, so take this with a handful of salt. I started my planking in April 2020 and didn't finish until July 2021. Of course, my planking was interrupted by working on the the gun deck and its furniture. So cumulatively, it only took about 9 months to plank my hull and prepare it for copper plating. This is not including the planking around the gun ports which was done earlier. So a month or two to plank your hull, that's nothing.😁 Looking good so far! Remember, it's not a race; take your time and enjoy the journey. Jon
-
USS Constitution by mtbediz - 1:76
JSGerson replied to mtbediz's topic in - Build logs for subjects built 1751 - 1800
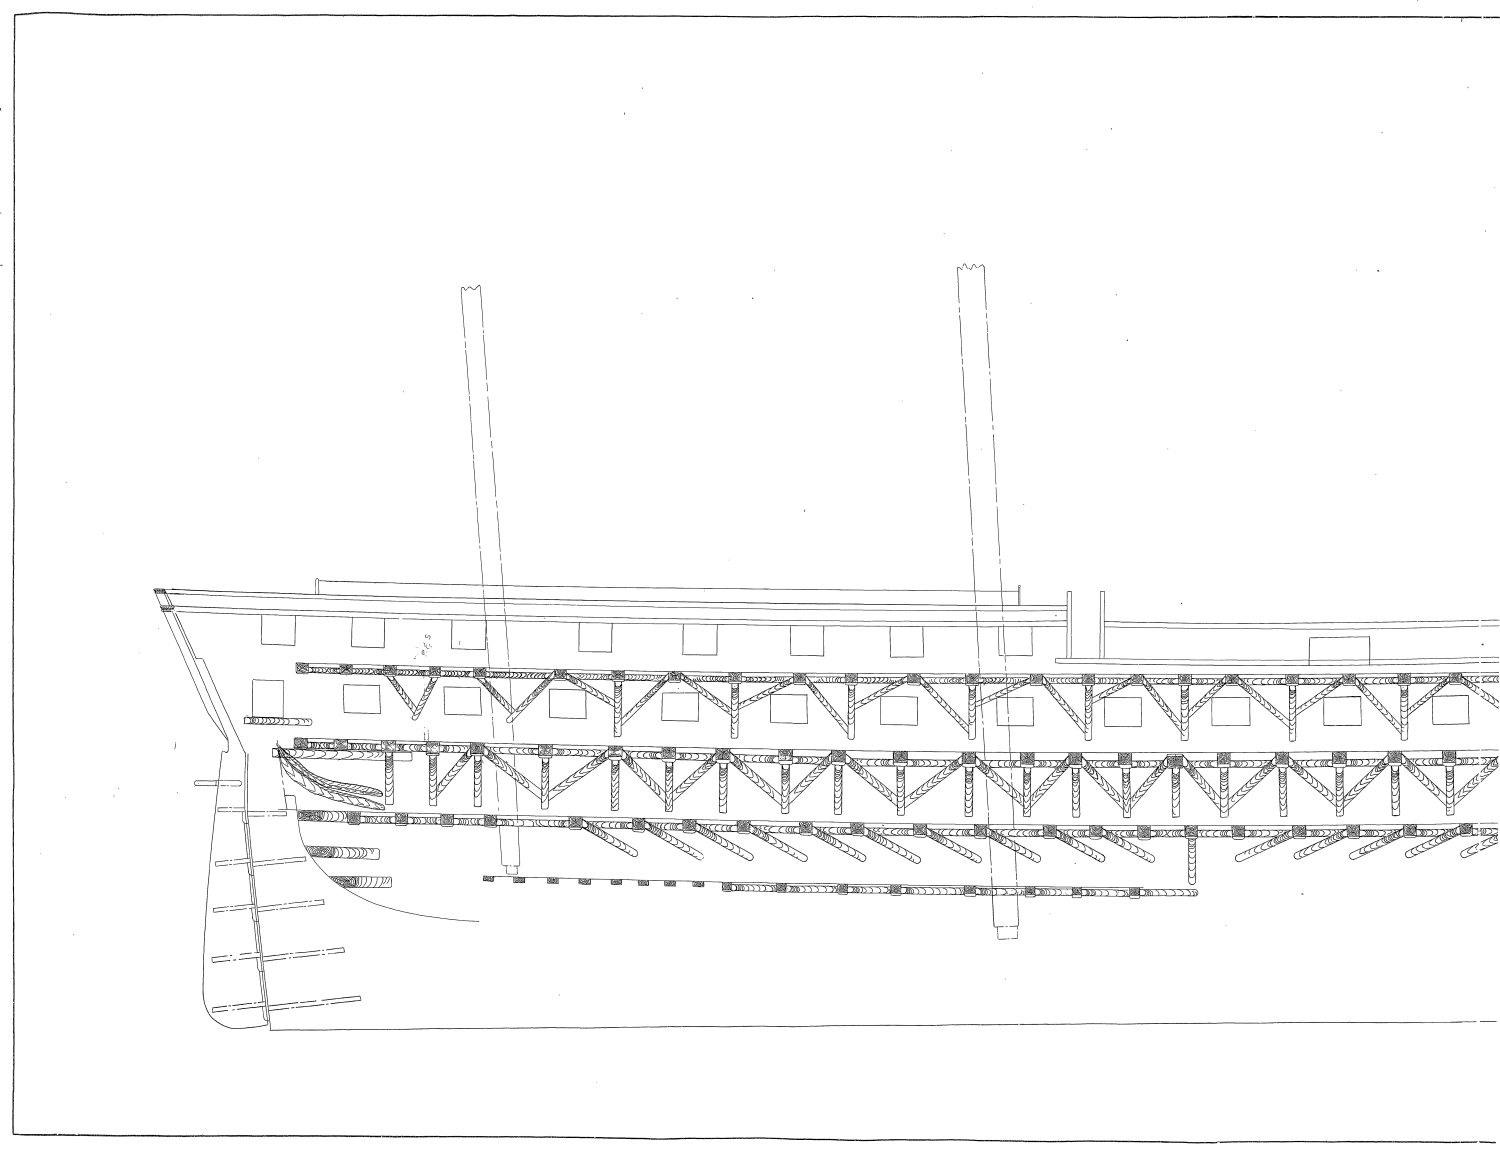
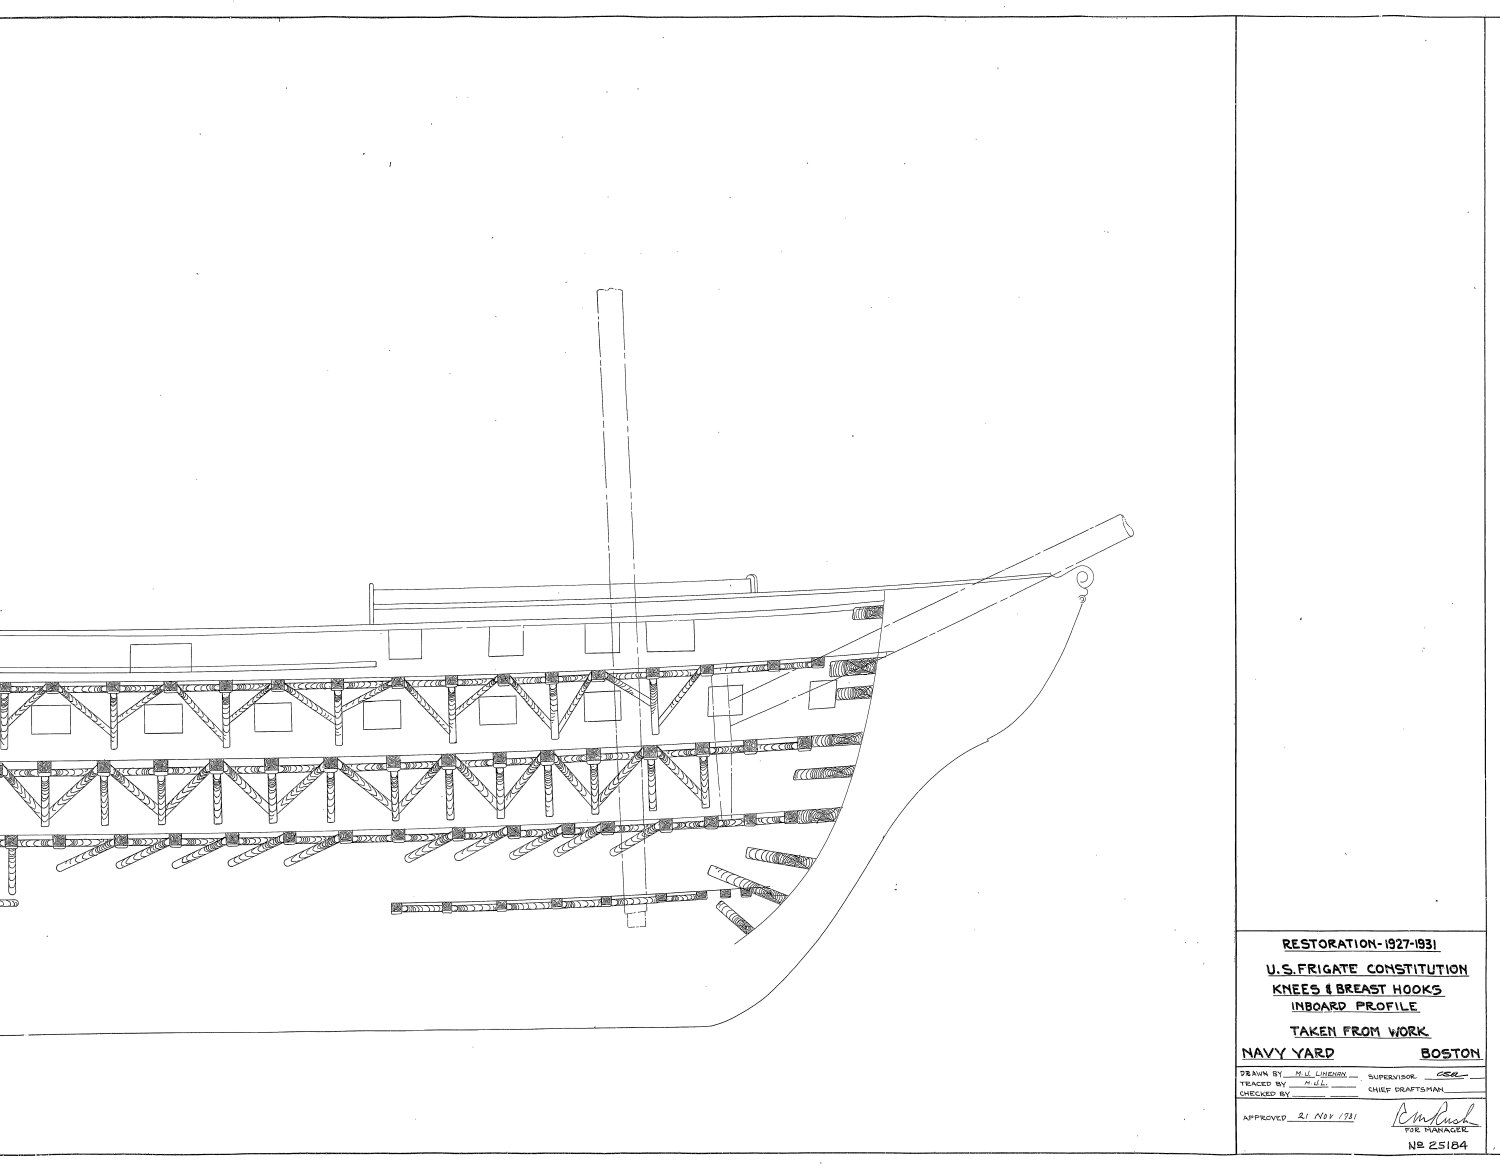
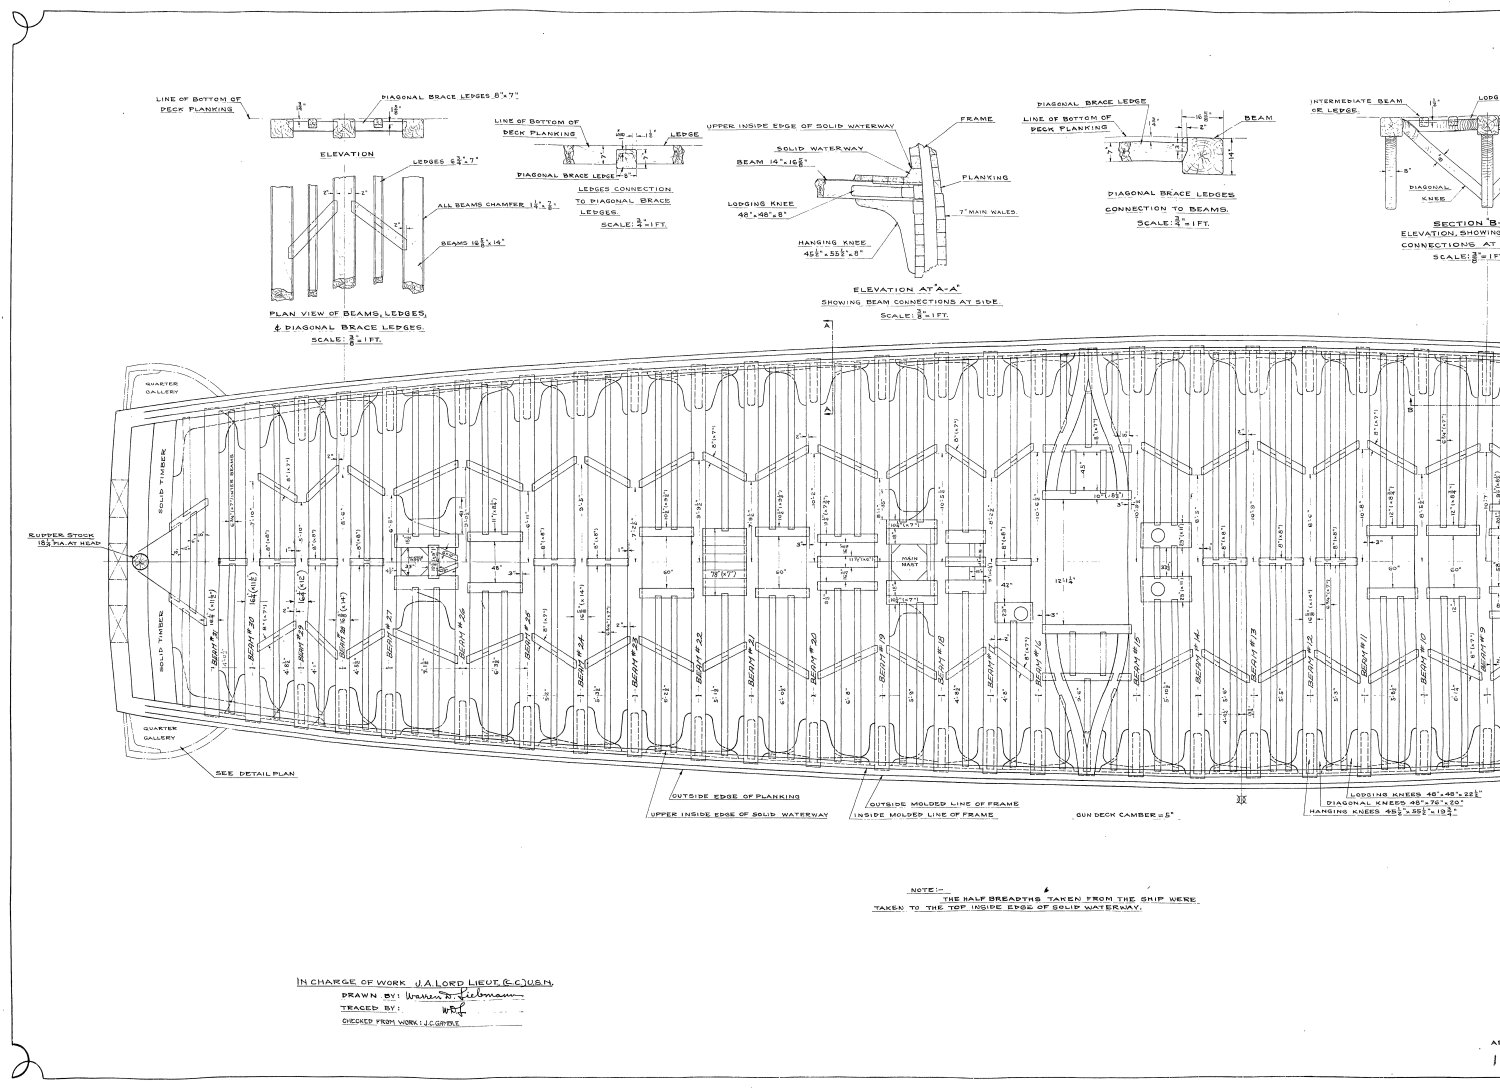
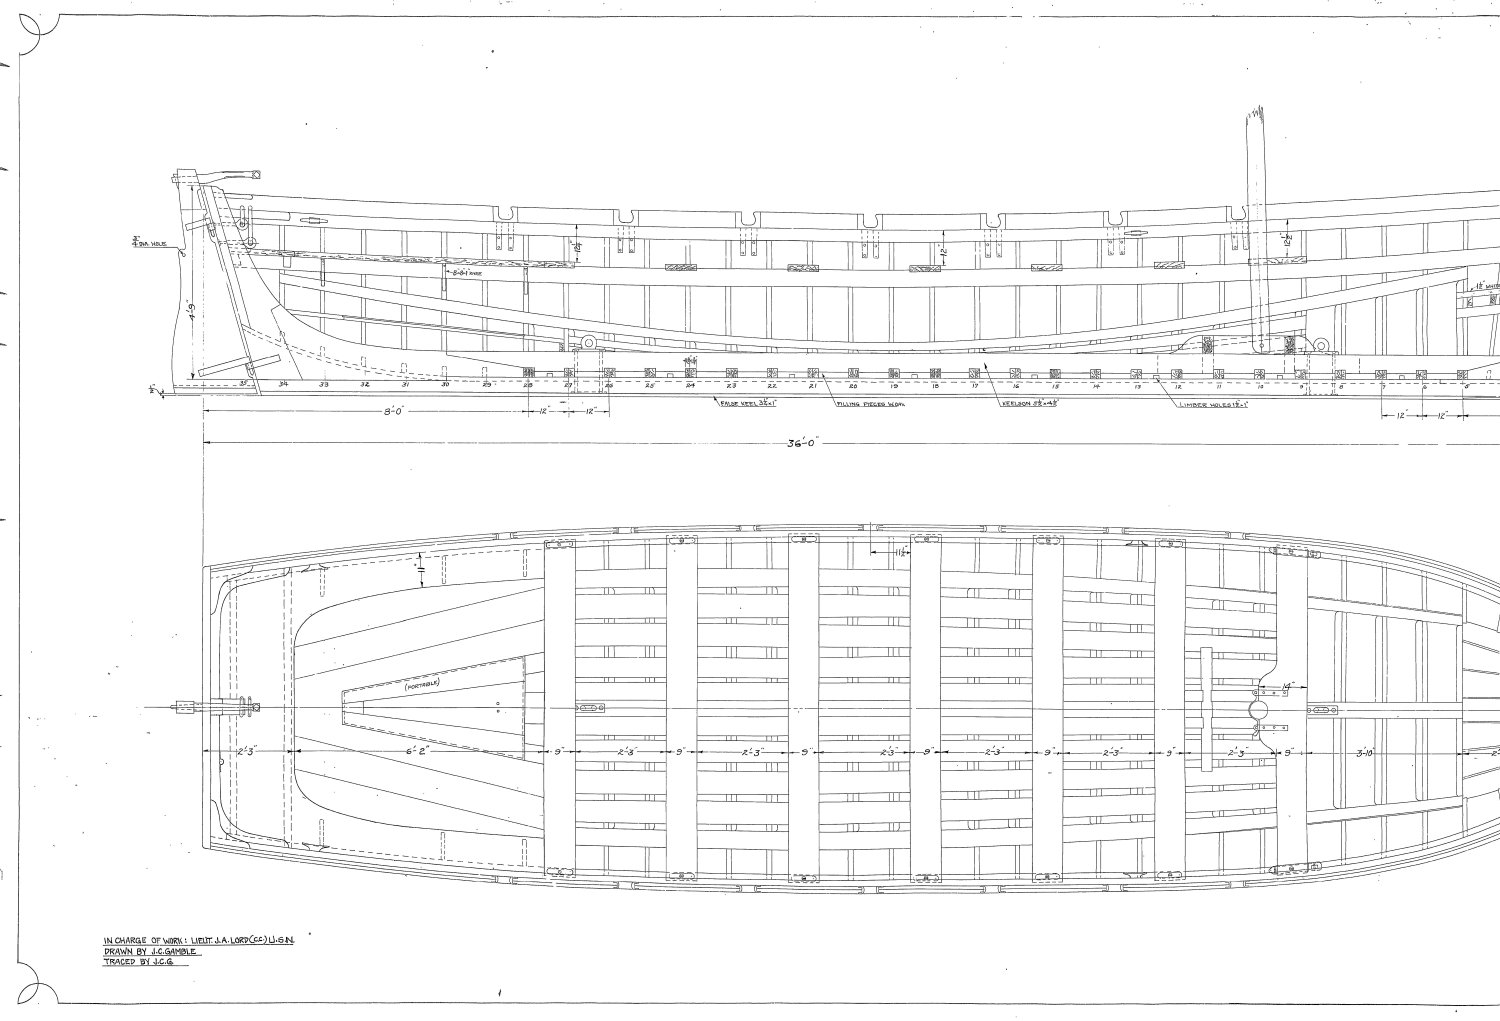
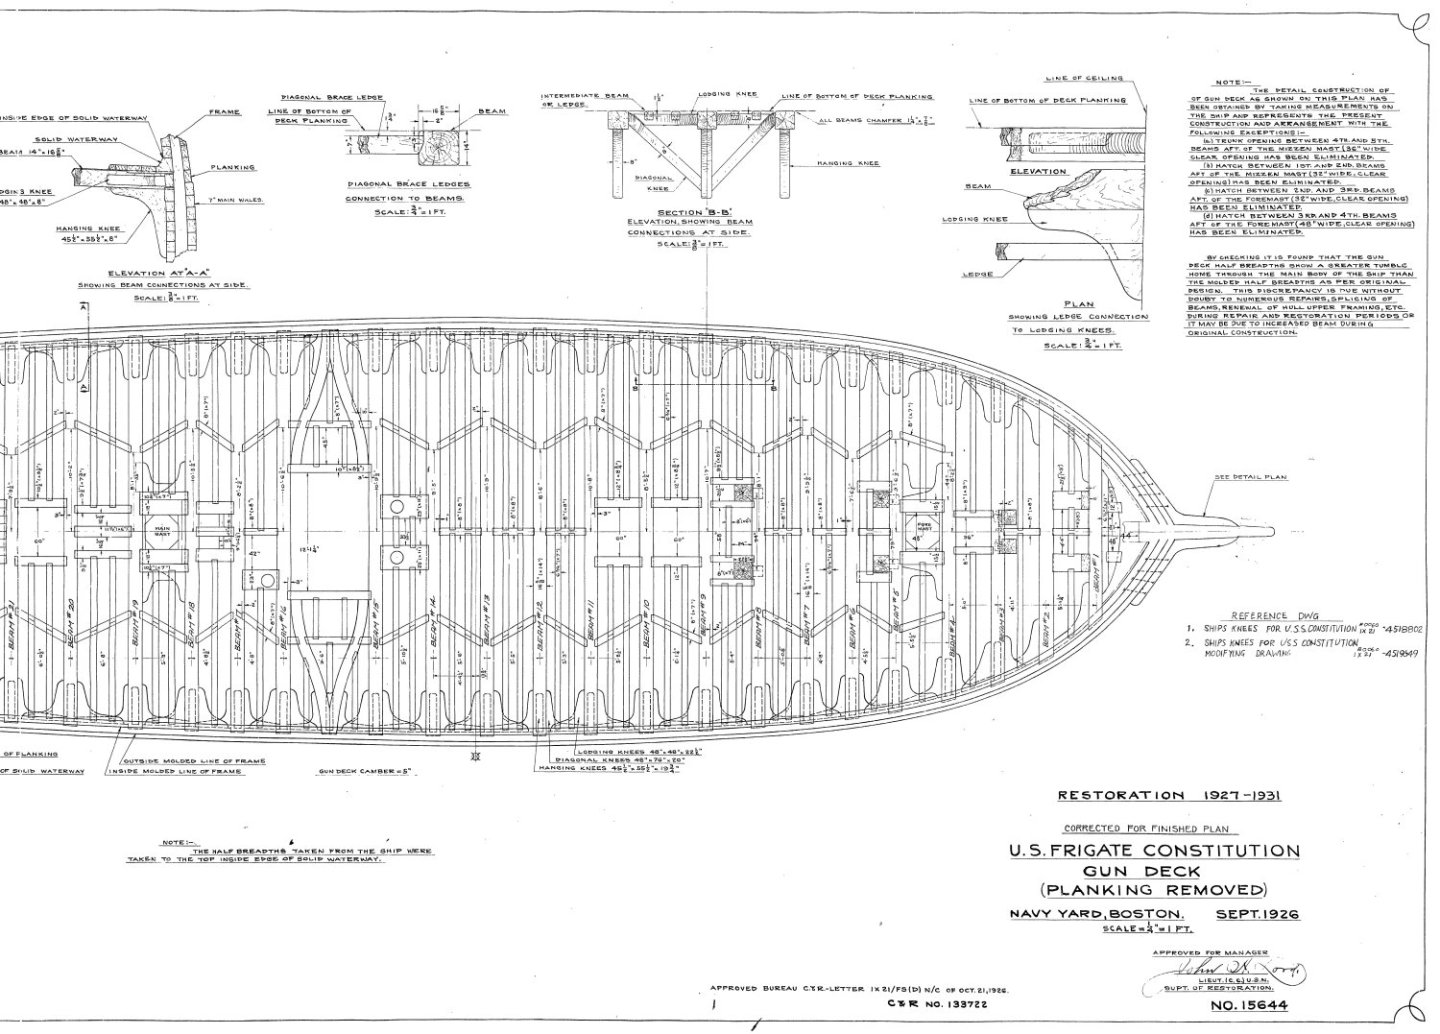
These US Navy plans may help you. Jon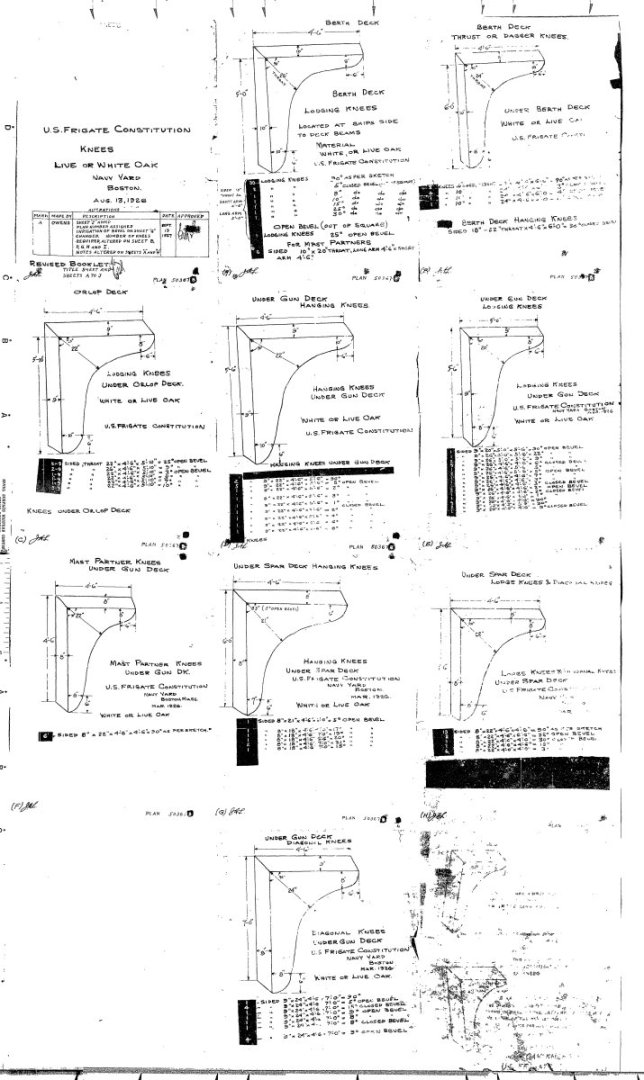


-
It looks like your planking is coming along very nicely. I did a variation of your method of planking. Instead of putting tick marks on the bulkheads, I marking the planks with the bulkhead position, and calculated the proper width the plank should be at that point. Then using a micrometer, shaped the plank ensuring that at each bulkhead mark, the plank was the correct width for each bulkhead position, for each zone. I just couldn't trust my tick marks on the bulkhead. At these scales, the width of a pencil mark can have big consequences. Jon
-
USS Constitution by mtbediz - 1:76
JSGerson replied to mtbediz's topic in - Build logs for subjects built 1751 - 1800
Beautifully done chain stoppers. Too bad nobody but you and God will know they exist on the finished model. We, of course on this build log, get to enjoy them now. Jon -
SUBaron - I had a lot of fun building those boats. Jon
-
I can't tell you how many times I shaped and refined those filler blocks, and shaped and refined, etc., till I thought I was done. I think I didn't I stop until I had planked the hull! Well done BTY. Jon
-
USS Constitution by mtbediz - 1:76
JSGerson replied to mtbediz's topic in - Build logs for subjects built 1751 - 1800
According to US Navy Plan No.: BNS 50976, the larger pump has a 16.25" diameter sphere or 0.212" (5.38mm) at scale and the smaller pump sphere is 14.5 " or 0.188" (4.78mm). As indicated in my log, For both size pumps, I used a 5mm diameter “memory wire end cap” which I still don’t know exactly what their original intended purpose was, from the DIY jewelry section of a crafts store. At this scale you can't tell the difference. Your pumps are looking great. Jon -
USS Constitution by mtbediz - 1:76
JSGerson replied to mtbediz's topic in - Build logs for subjects built 1751 - 1800
Your bilge pumps' rocker arms and frames are much simpler and neater than mine and they give the same viewer effect. Well done! -
I've been collecting the US Navy plans ever since I decided to build the Conny back in 2014 or so.. Why these particular plans are not available from the Museum makes no sense. When the US Navy plans were first added to their website, I know these were there. I checked every plan they offered against what I purchased on their second version CD. The first version CD I got from a fellow builder, had a different file format and others plans that are not relevant to the historic ship (fire prevention, electrical, etc.) as well as the main bulk of what available to the public today. I've also found some plans in the National Archives. I know there must be a bunch more plans in the hands of the many subcontractors who have work on the ship over the decades, but why those aren't available, I don't know. Jon
-
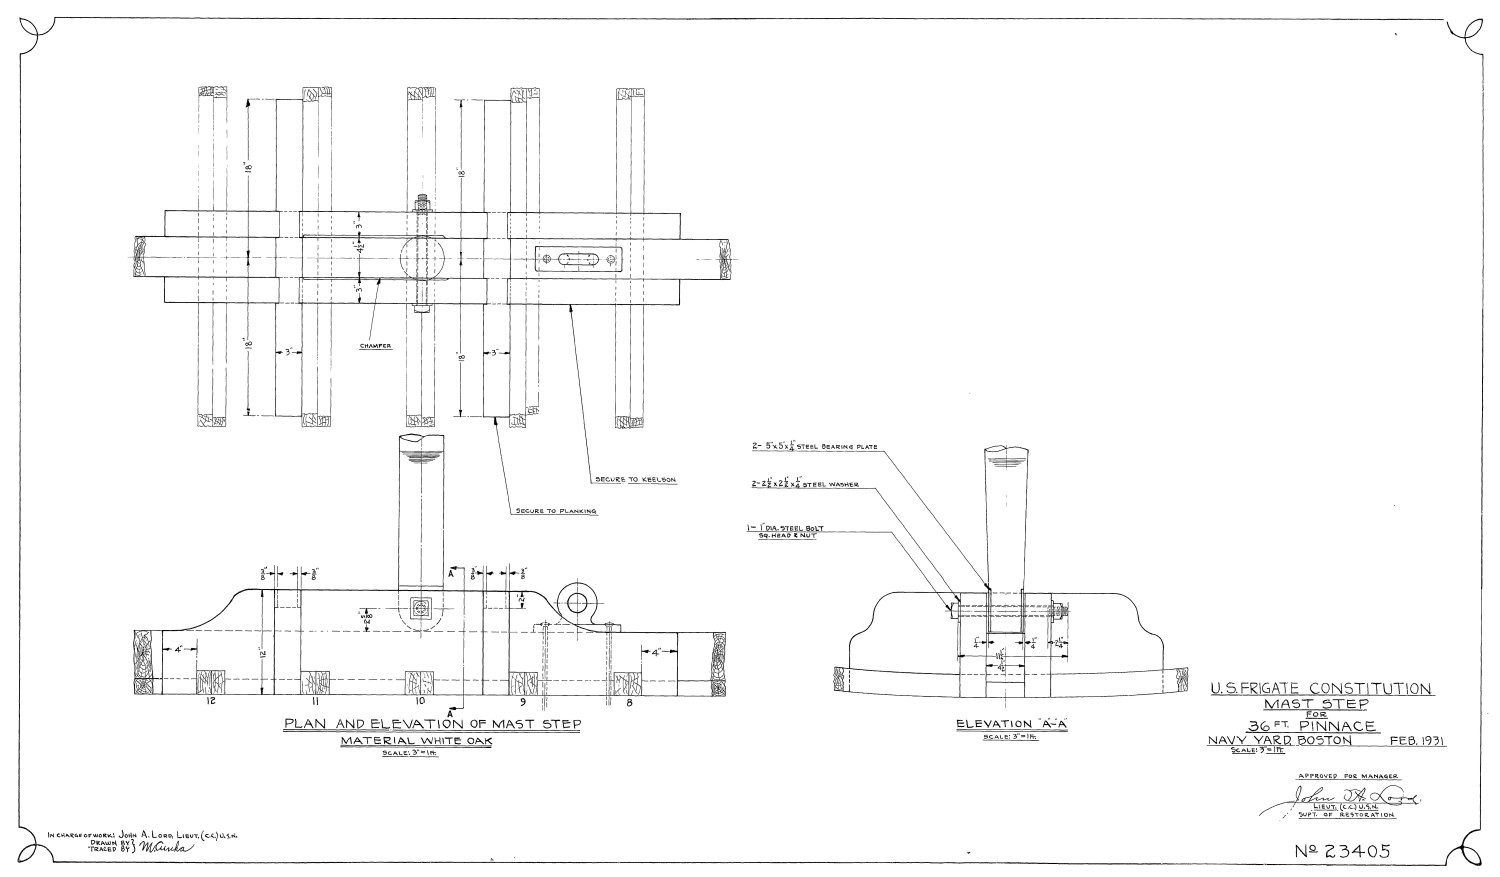
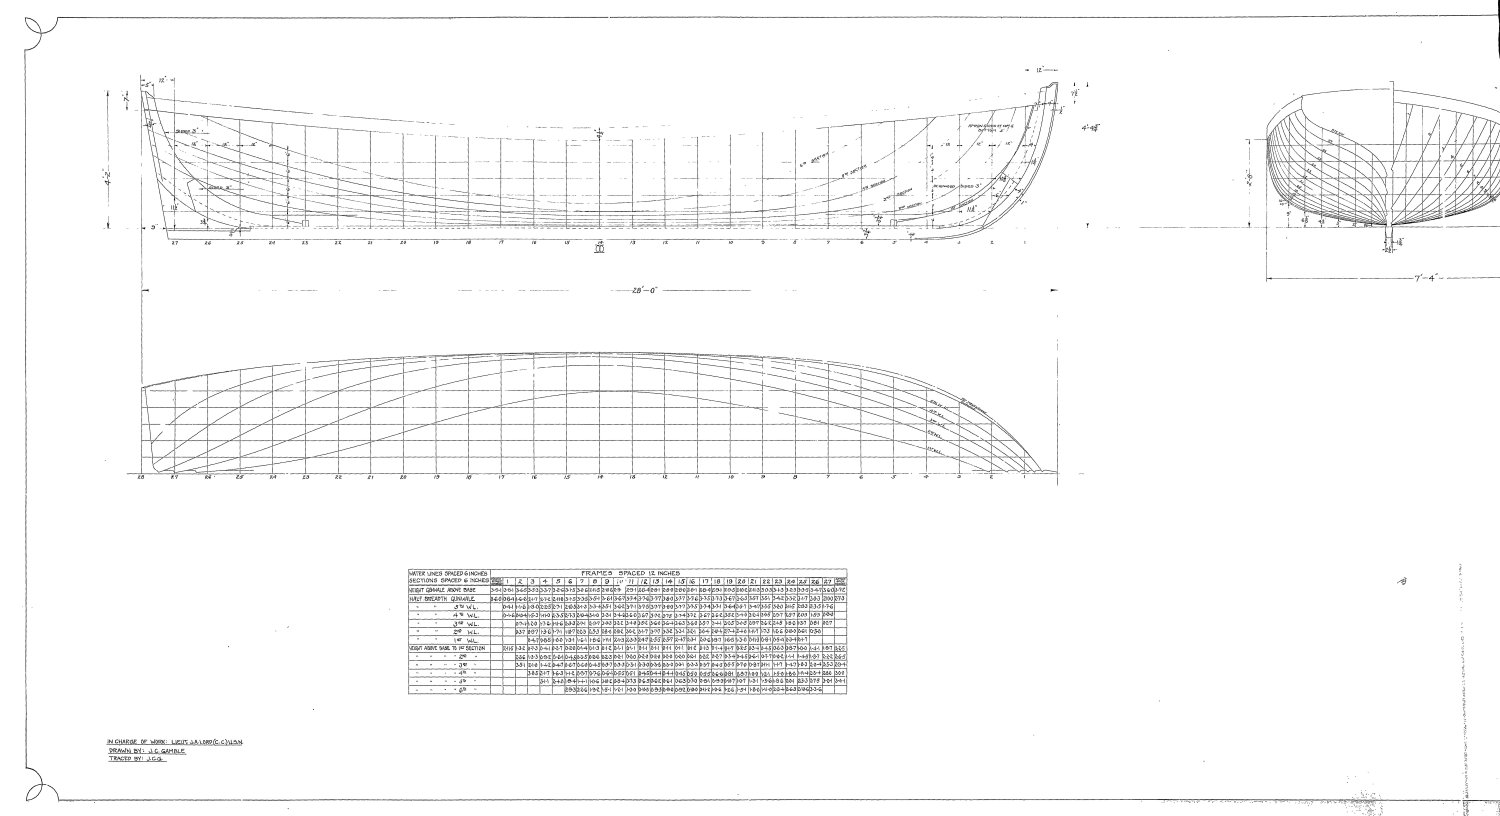
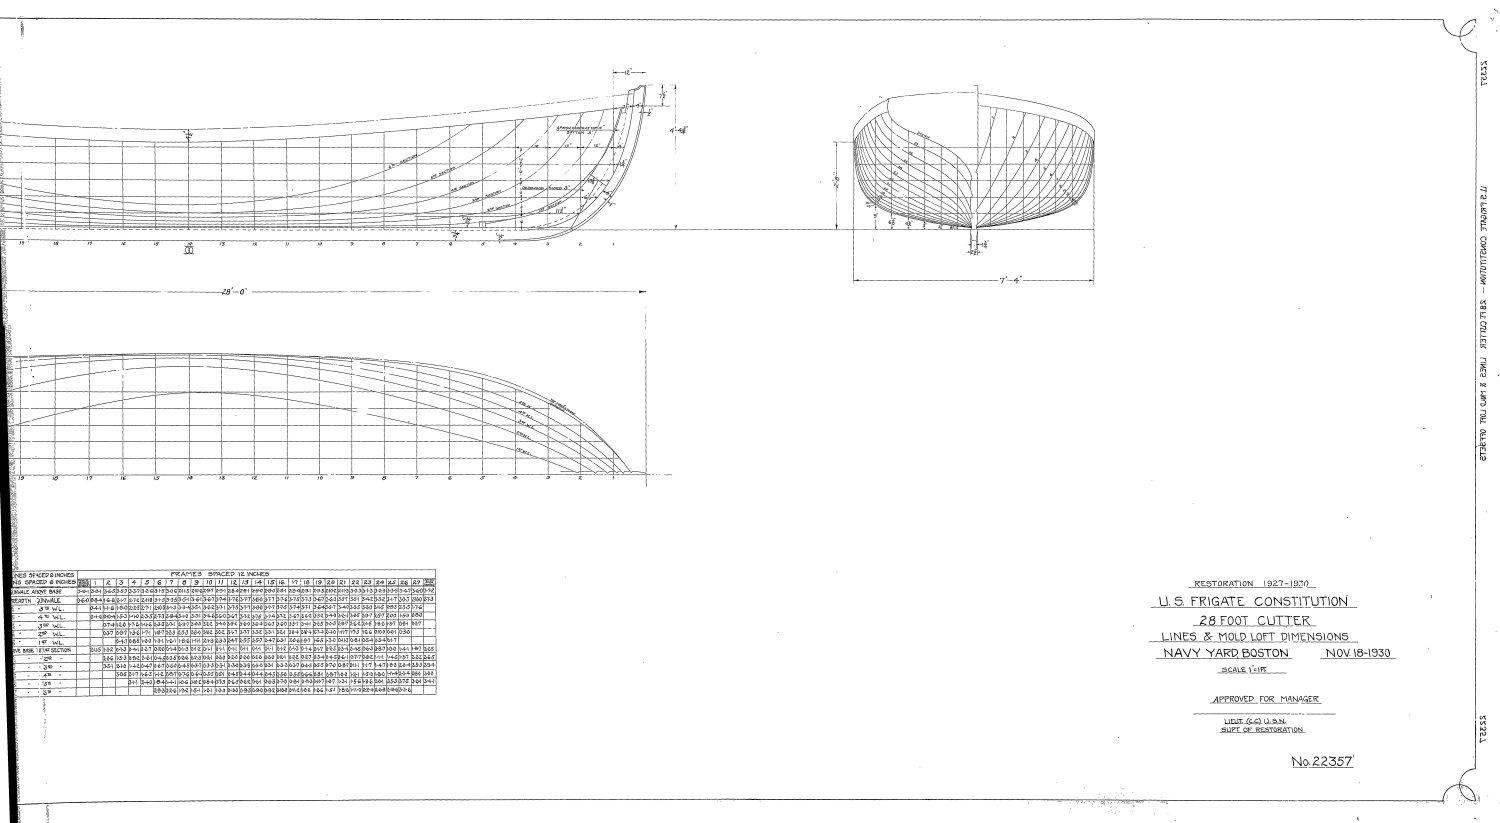
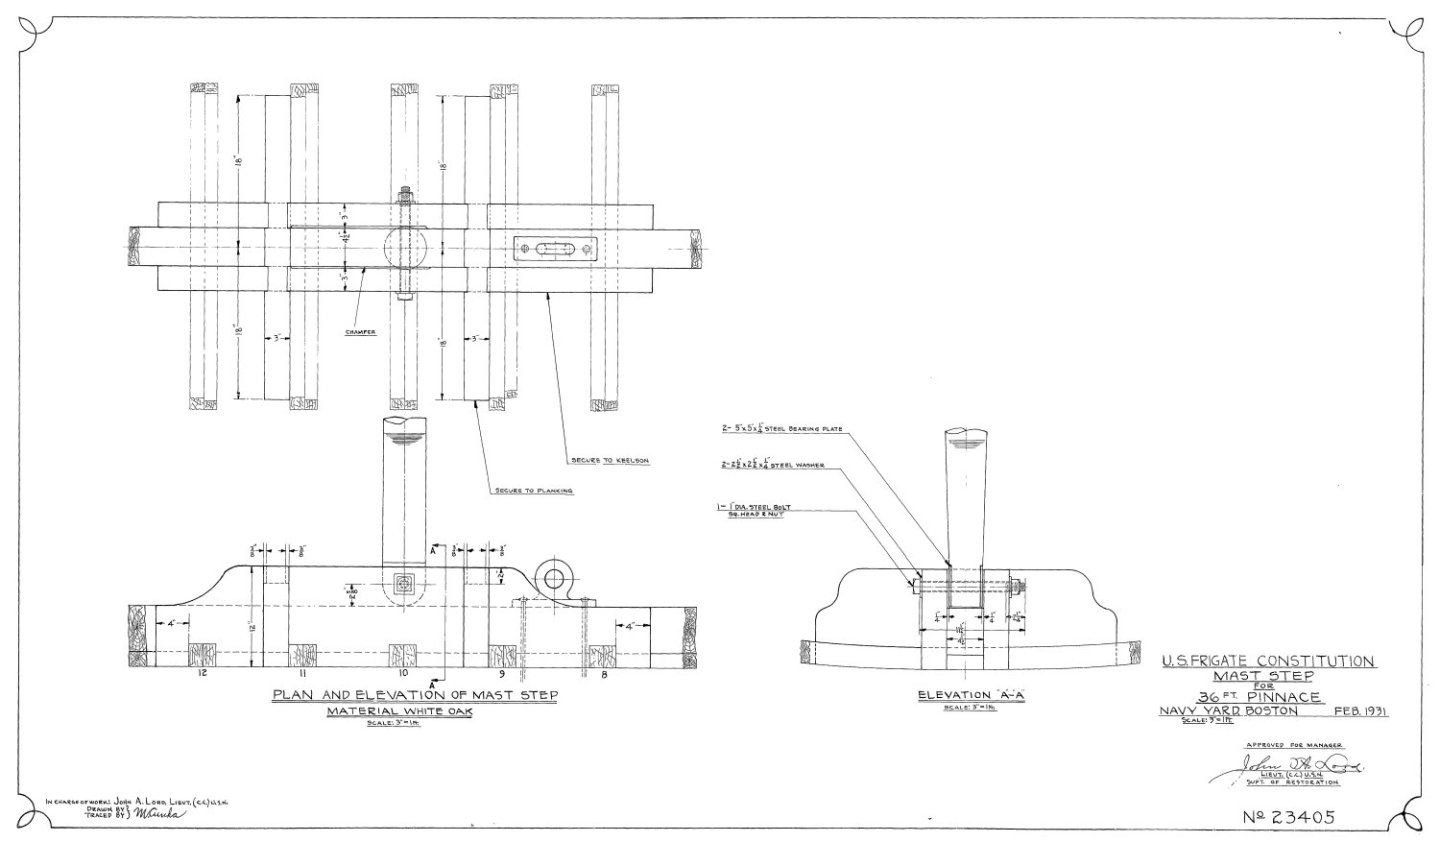
And one more correction, 22357 is the 28 footer. The plan number should be 23405 attach to this post
-
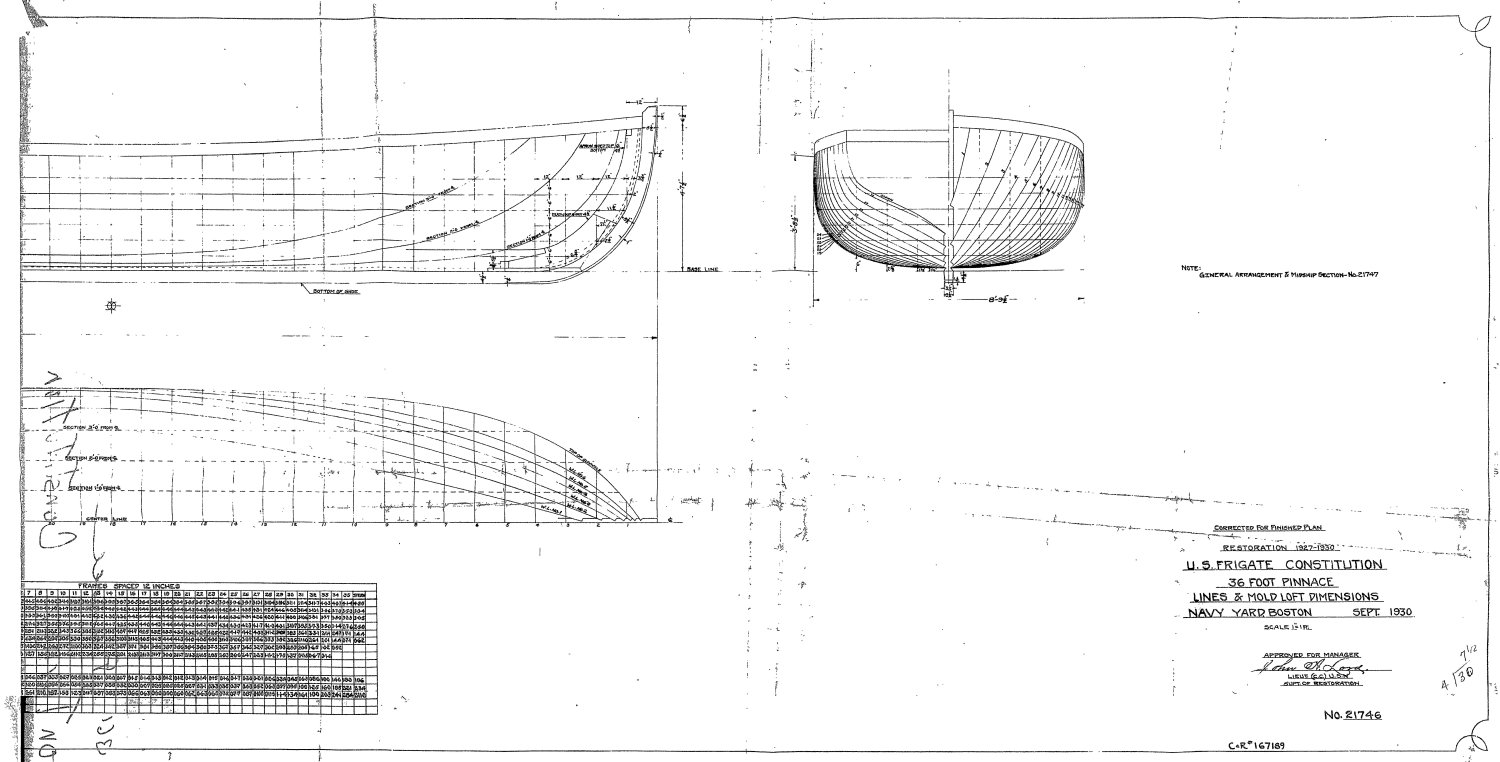
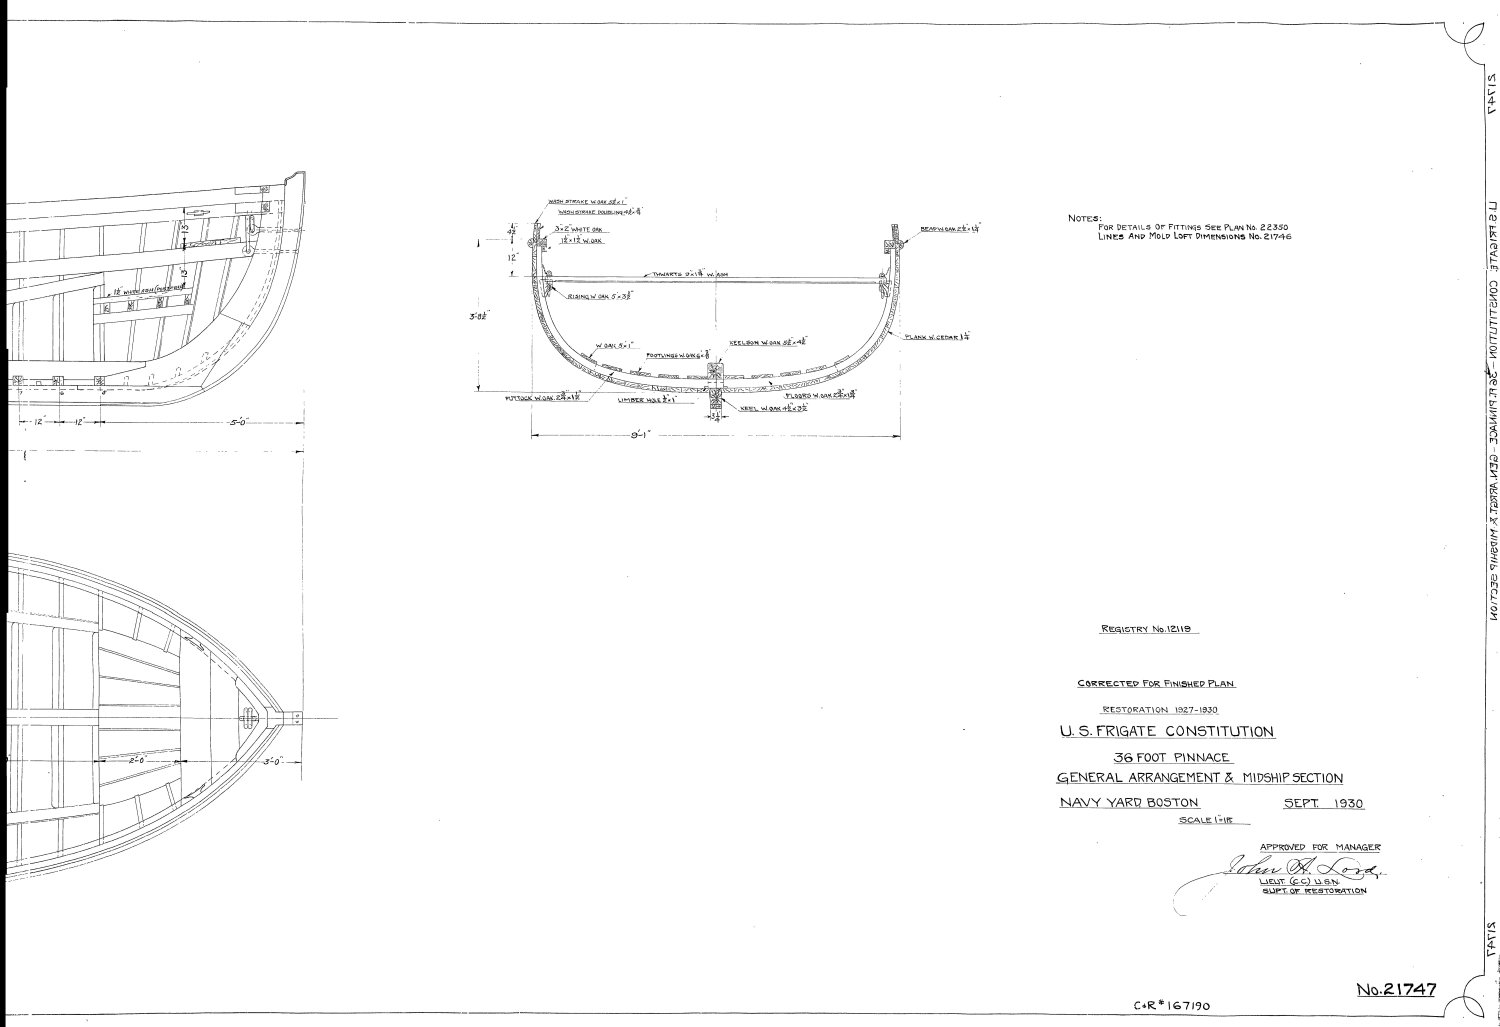
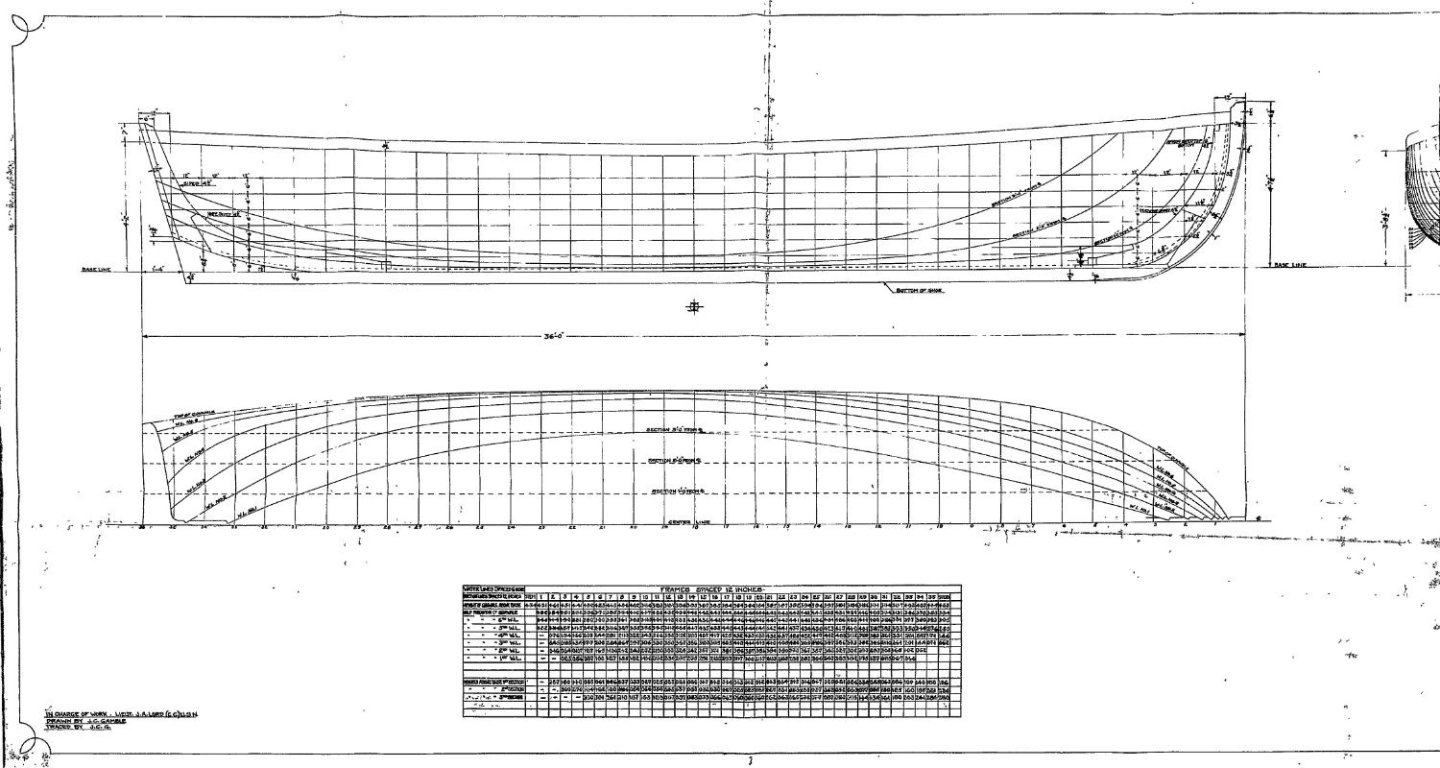
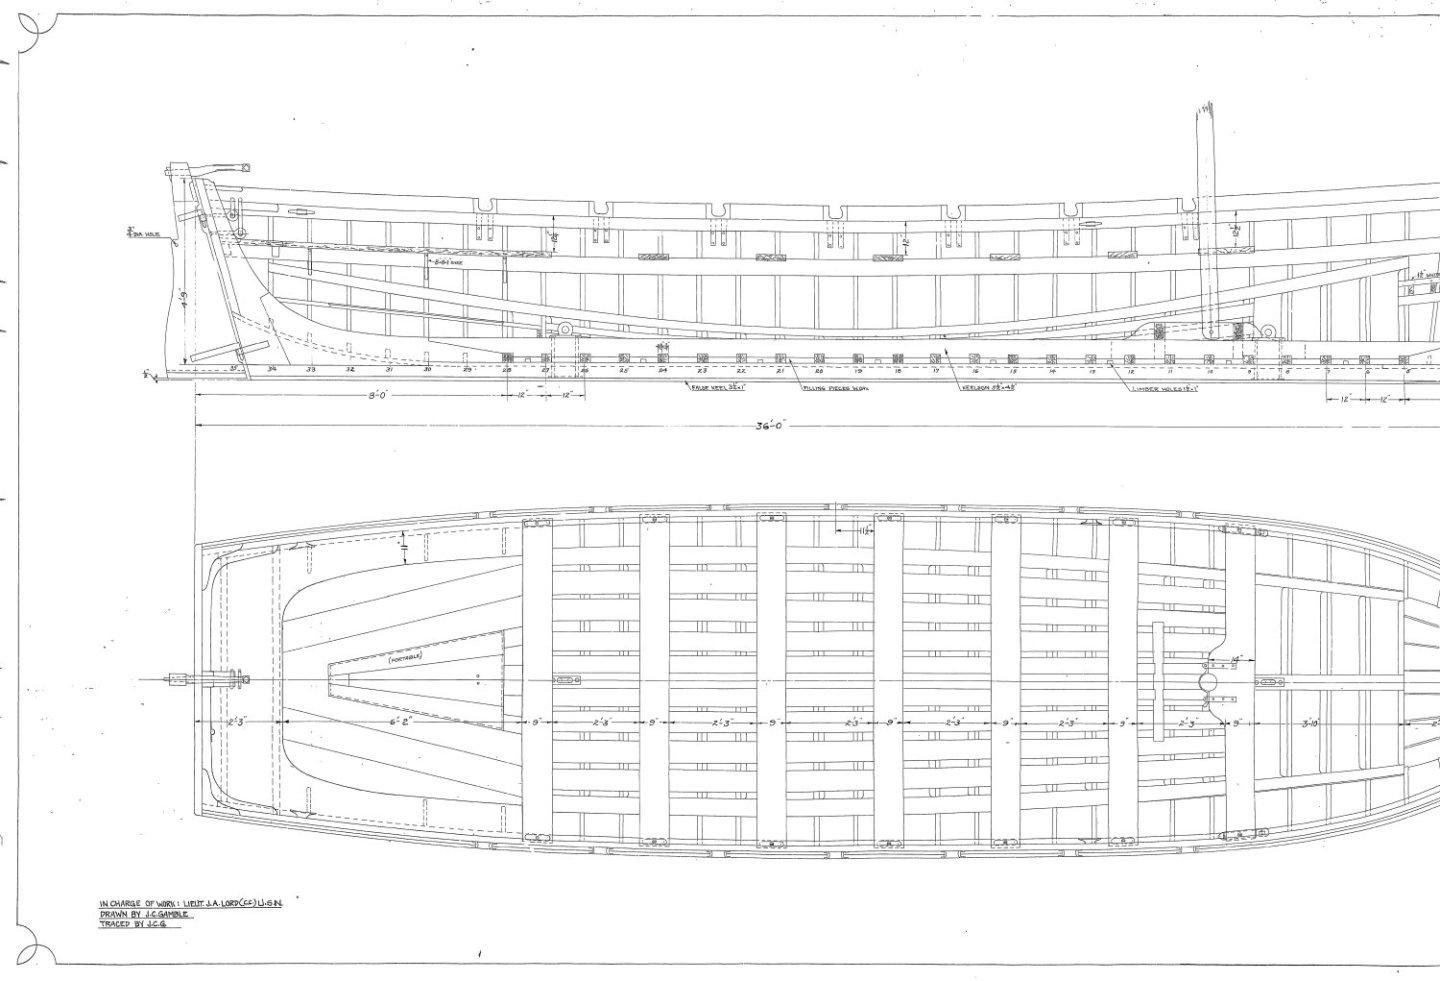
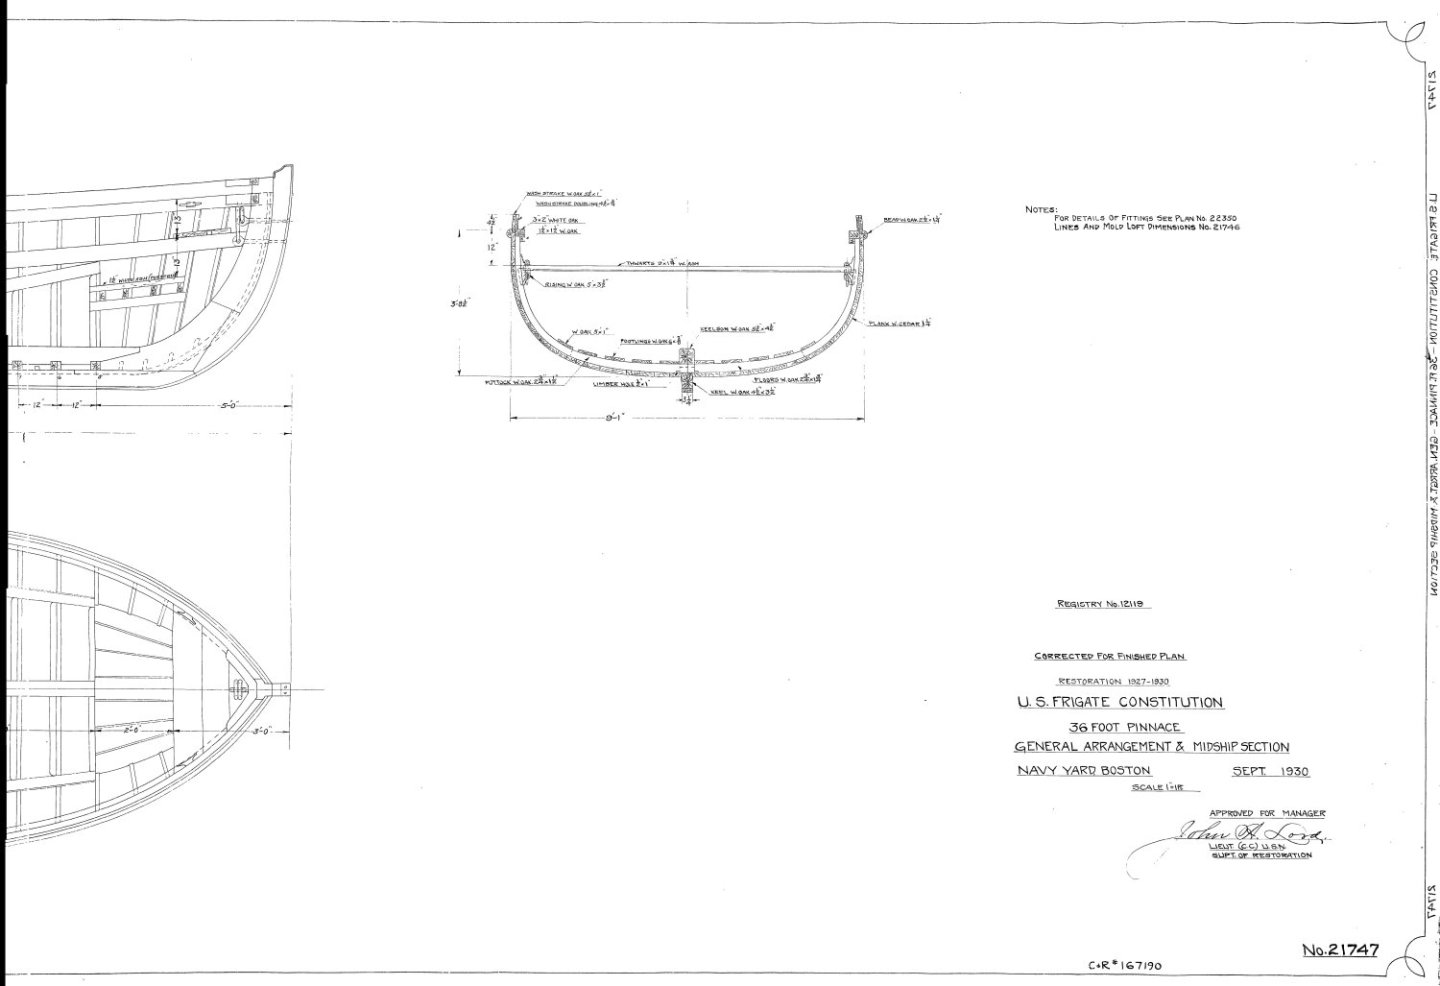
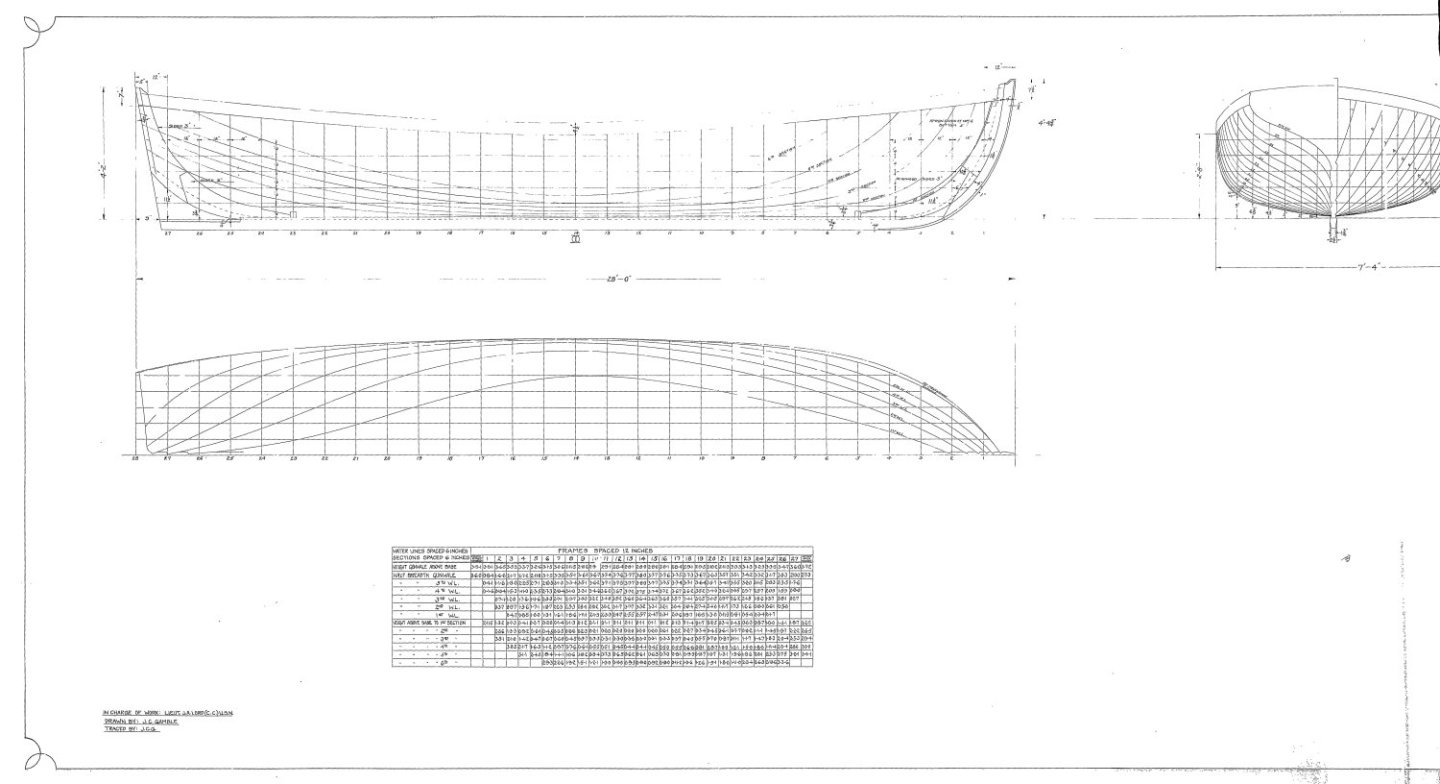
Unegawahya, finding the USS Constitution plans is an effort on the Museum's site, because it's not obvious; why, I don't know. So here is the link: https://ussconstitutionmuseum.org/discover-learn/modeler-resources/ For the 36' Pinnace you need plans: 21746, 21747, 22350, 22357 edit: I just made a liar out of myself, when I checked the museum's site, they don't have these plans. So, I've attached them to this post. The location of the plans has moved over the years. I originally I down loaded them for free from a US Navy site, now gone. Then the museum sold them on a CD (at least 2 versions that I know about) and finally provided the free download on the link above. If there is any US Navy plan I referenced in my build log that you can't find, let me know, because the plans available to the public has also varied on the years. Jon


-
USS Constitution by mtbediz - 1:76
JSGerson replied to mtbediz's topic in - Build logs for subjects built 1751 - 1800
At the time I fabricated my gun deck capstan, I made the square holes with my Byrnes Saw because it never occurred to me to use my Dremel drill on my Dremel drill press to make the cuts. I don't have a dedicated drill press. You just proved there is always more ways to do the same job with equal results. You do what ever is more comfortable for you. As always, nice job. Jon -
In the practicum section 1.4.1, 3rd paragraph Mr. Hunt states: "After cutting the block to length, You will need to reduce it’s thickness to 11/32”." In your first two images of post #12, you drew a line on the counter then it appears your carved down to that line. Were you not reducing the block's thickness? I failed to do that by oversight so I ran into a problem on the gun deck. Jon Oops, I just realized I was responding to a SU Baron comment and not to you Peter.
-
USS Constitution by mtbediz - 1:76
JSGerson replied to mtbediz's topic in - Build logs for subjects built 1751 - 1800
As always, beautiful, neat, and clean workmanship. Wonderful stuff. Jon -
I don't know why you had a problem with drilling the hole in the counter, your set up looks solid. You correctly drilled the hole before carving the counter's final shape. Also I noticed you did NOT make the same mistake I made which was not reducing the counter's thickness by 11/32". So you did good. Just be aware that just about everyone has had some sort of problems with the transom so don't be surprised if you join that club. Mr. Hunt's practicum is a great guide for the novice and intermediate modeler, but his words are not gospel. I always check what other's have done in addition to Mr. Hunt's instructions. And, where I deviated from his lead, my build log usually indicates why. My build is a kit bash. I have added the gun deck interior and based my model primarily on the 2015-17 restoration. The kit (and therefore Mr. Hunt's practicum) is based on the 1927 restoration. so there are visual differences, specifically the removal of the top gallant rail and the addition the the open waist as seen today. As a result, I use the practicum as a guide and bounce around the chapters as I need them and supplement them with the plethora of build logs available for reference. This kit is chock full of sub-models, so enjoy and take your time. Jon
-
USS Constitution by mtbediz - 1:76
JSGerson replied to mtbediz's topic in - Build logs for subjects built 1751 - 1800
You call that slow? You're not slow. I'M slow. You started after me and you're almost surpassing me! I've working on this model since 2017, now that's SLOW!😁😅🤣