palmerit
-
Posts
1,116 -
Joined
-
Last visited
Content Type
Profiles
Forums
Gallery
Events
Everything posted by palmerit
-
Planking the first model, it can be a bit panic-inducing. Planking the second model, you feel like you learned something from the first one, even if you still screw up. Planking the third, you kind of know what you're screwing up and how to fix it and how to get better on the next model. My first one, I thought maybe this hobby was not for me - and in fact I did the Model Shipways Shipwright models and the NRG Half Hull in the middle of building the Sherbourne because I felt like I was completely clueless about planking and working with small wood pieces. I've seen only a handful of build logs where someone did a great job planking the first time (I bet some of them were artists or wood workers or had other transferrable skills - or they have a superpower).
- 35 replies
-
- 4
-

-

-
- Sherbourne
- Vanguard Models
- (and 1 more)
-
Looks good - especially for a first attempt - definitely better than my first on the Sherbourne. Yeah, the bow and parts of the stern can be tricky to fare correctly - I've seen other ships like the Adder that look even more challenging at the bow. What's particularly challenging is that it is really hard to get the pins to "bite" without pre-drilling some holes because you push the pin and it hits the main frame of the ship, which is not lime wood, but something much harder. And you don't really have a bulkhead there to use clips. I've sometimes use a piece of wood along the keel that I clamp into position to help hold the piece there. And the bow and stern are good places to use CA glue, even if you decide you want to use PVA along the rest, just to get that piece to stay in position since the pins do not help as much as they do elsewhere. On my most recent (Zulu) I would get the bow end of the plank to get perfectly into place with some CA and let it sit for a while, then glue the rest of the plank into position (waiting to add glue to the rest until the bow end was secured).
- 35 replies
-
- 3
-
-
-
- Sherbourne
- Vanguard Models
- (and 1 more)
-
Looks great - certainly way better than my first planking on the Sherbourne. Definitely good to spend some time after the first planking filling in divots and sanding down high spots so that the second planking lies flat. A divot on the first planking will show up as a divot on the second. And if the high and low spots are big enough, there will be gaps in the second planking. Of course you can also rinse and repeat and fill and sand after the second planking. If you're painting over, it should be fine. But even when painting, it looks better to paint over planks than paint over sanded filler.
-
I tried to find a clear photo but couldn't (quickly). This one shows a way of using push pins on edge and somewhat blurry a use of the modified binder clips. I use blinder clips, pins, push pins of various sorts, clamps, rubber bands, even tape in various combinations to hold first and second plankings in place.

-
I'm completely digital in my working life, but I like using the analog planking fan from Chuck Passaro's tutorial: https://thenrg.org/resource/articles "Lining Off Your Hull Planking, Tutorial and Fan" I estimate how many planks I'll need (e.g., from the widest portion of the hull - not accounting for stealers and dropped planks needed on more challenging hulls), measure the space left for planks at each bulkhead location with calipers or just a piece of masking tape, put x's on (printouts of) the planking fan given the number of planks I need (e.g., 12 x's if I need 12 planks), then slide the masking tape with the extent of the open (unplanked) space along the planking fan until I get (in this case) 12 of planks fitting, mark the plank ends for each plank from the fan, then put the masking tape back on the hull at the bulkhead location and mark the locations of width of each plank. I'm sure this isn't rocket science for anyone who has used an analog planking fan. But it oddly took me a year to figure out what all the discussion of a planking fan was for. And I think this would be way easier than using a spreadsheet that tells you that each plank is supposed to be 3.542mm here and 3.145mm there. I know on large hulls - which I haven't done - people mark out regions (say 1/4s of the hull) at a time. Even for a small hull like I've done, I'll redo the planking locations a few times - though I'm still not that good at it and made mistakes on my most recent Zulu hull. Practice.
- 18 replies
-
- 2
-
-
- cutter
- Sherbourne
- (and 1 more)
-
I've slowly gotten a sense of the combination of edge bending and tapering (and regular plank bending) needed to get the plank to lie flat. On the second planking, you might also try a bit of beveling of the edges where two planks meet together edge to edge. Especially if there's a good bit of curve, you can end up with a visible gap between the planks even though they're meeting together where they lay on the first layer of planking. This definitely looks better than the first pass.
- 18 replies
-
- 2
-
-
- cutter
- Sherbourne
- (and 1 more)
-
Yup. Those work far better than the other kind in my experience.
-
It's very easy to post photos directly from a smartphone to the modelshipworld.com site. I never copy photos to my computer first. Unnecessary.
-
You don't need to use nails. You can use clamps. And on the first planking, you can make some useful "clamps" from binder clips: I tried two different "pin pushers" and they were both garbage. This "Pin Insertion Plier" works a lot better: https://www.amazon.com/dp/B09GZH7D7K?ref=ppx_yo2ov_dt_b_fed_asin_title&fbclid=IwY2xjawPk9yZleHRuA2FlbQIxMABicmlkETFzejNFNjBSMFRsak8wM1hIc3J0YwZhcHBfaWQQMjIyMDM5MTc4ODIwMDg5MgABHkfMepYplOOlkAcqMtTmUezQlbYnL7bWYMLmkvdbd3-vcuurCb--EA7STOxL_aem_PVV07KTpTeEh3lhU63YOZQ
-
The Vanguard kits have some etched markers on the bulkheads indicating the beveling that needs to be done to achieve the right faring - and the instructions say to do that faring before assembling the frame. I do a bit of the sanding (with my Dremel) on the pieces bulkhead pieces on Vanguard kits before putting the frame together - not quite up to the line indicated so I have some to sand off after assembled. Definitely not square. Take a piece of the pear wood planking (since it's far more flexible that the lime wood) and place it against the frames all over the hull, looking that the plank sits flat, sanding down parts of the bulkhead that bulge, or adding back with filler or scrap wood if there's a divot from overly aggressive sanding.
- 35 replies
-
- 2
-
-
- Sherbourne
- Vanguard Models
- (and 1 more)
-
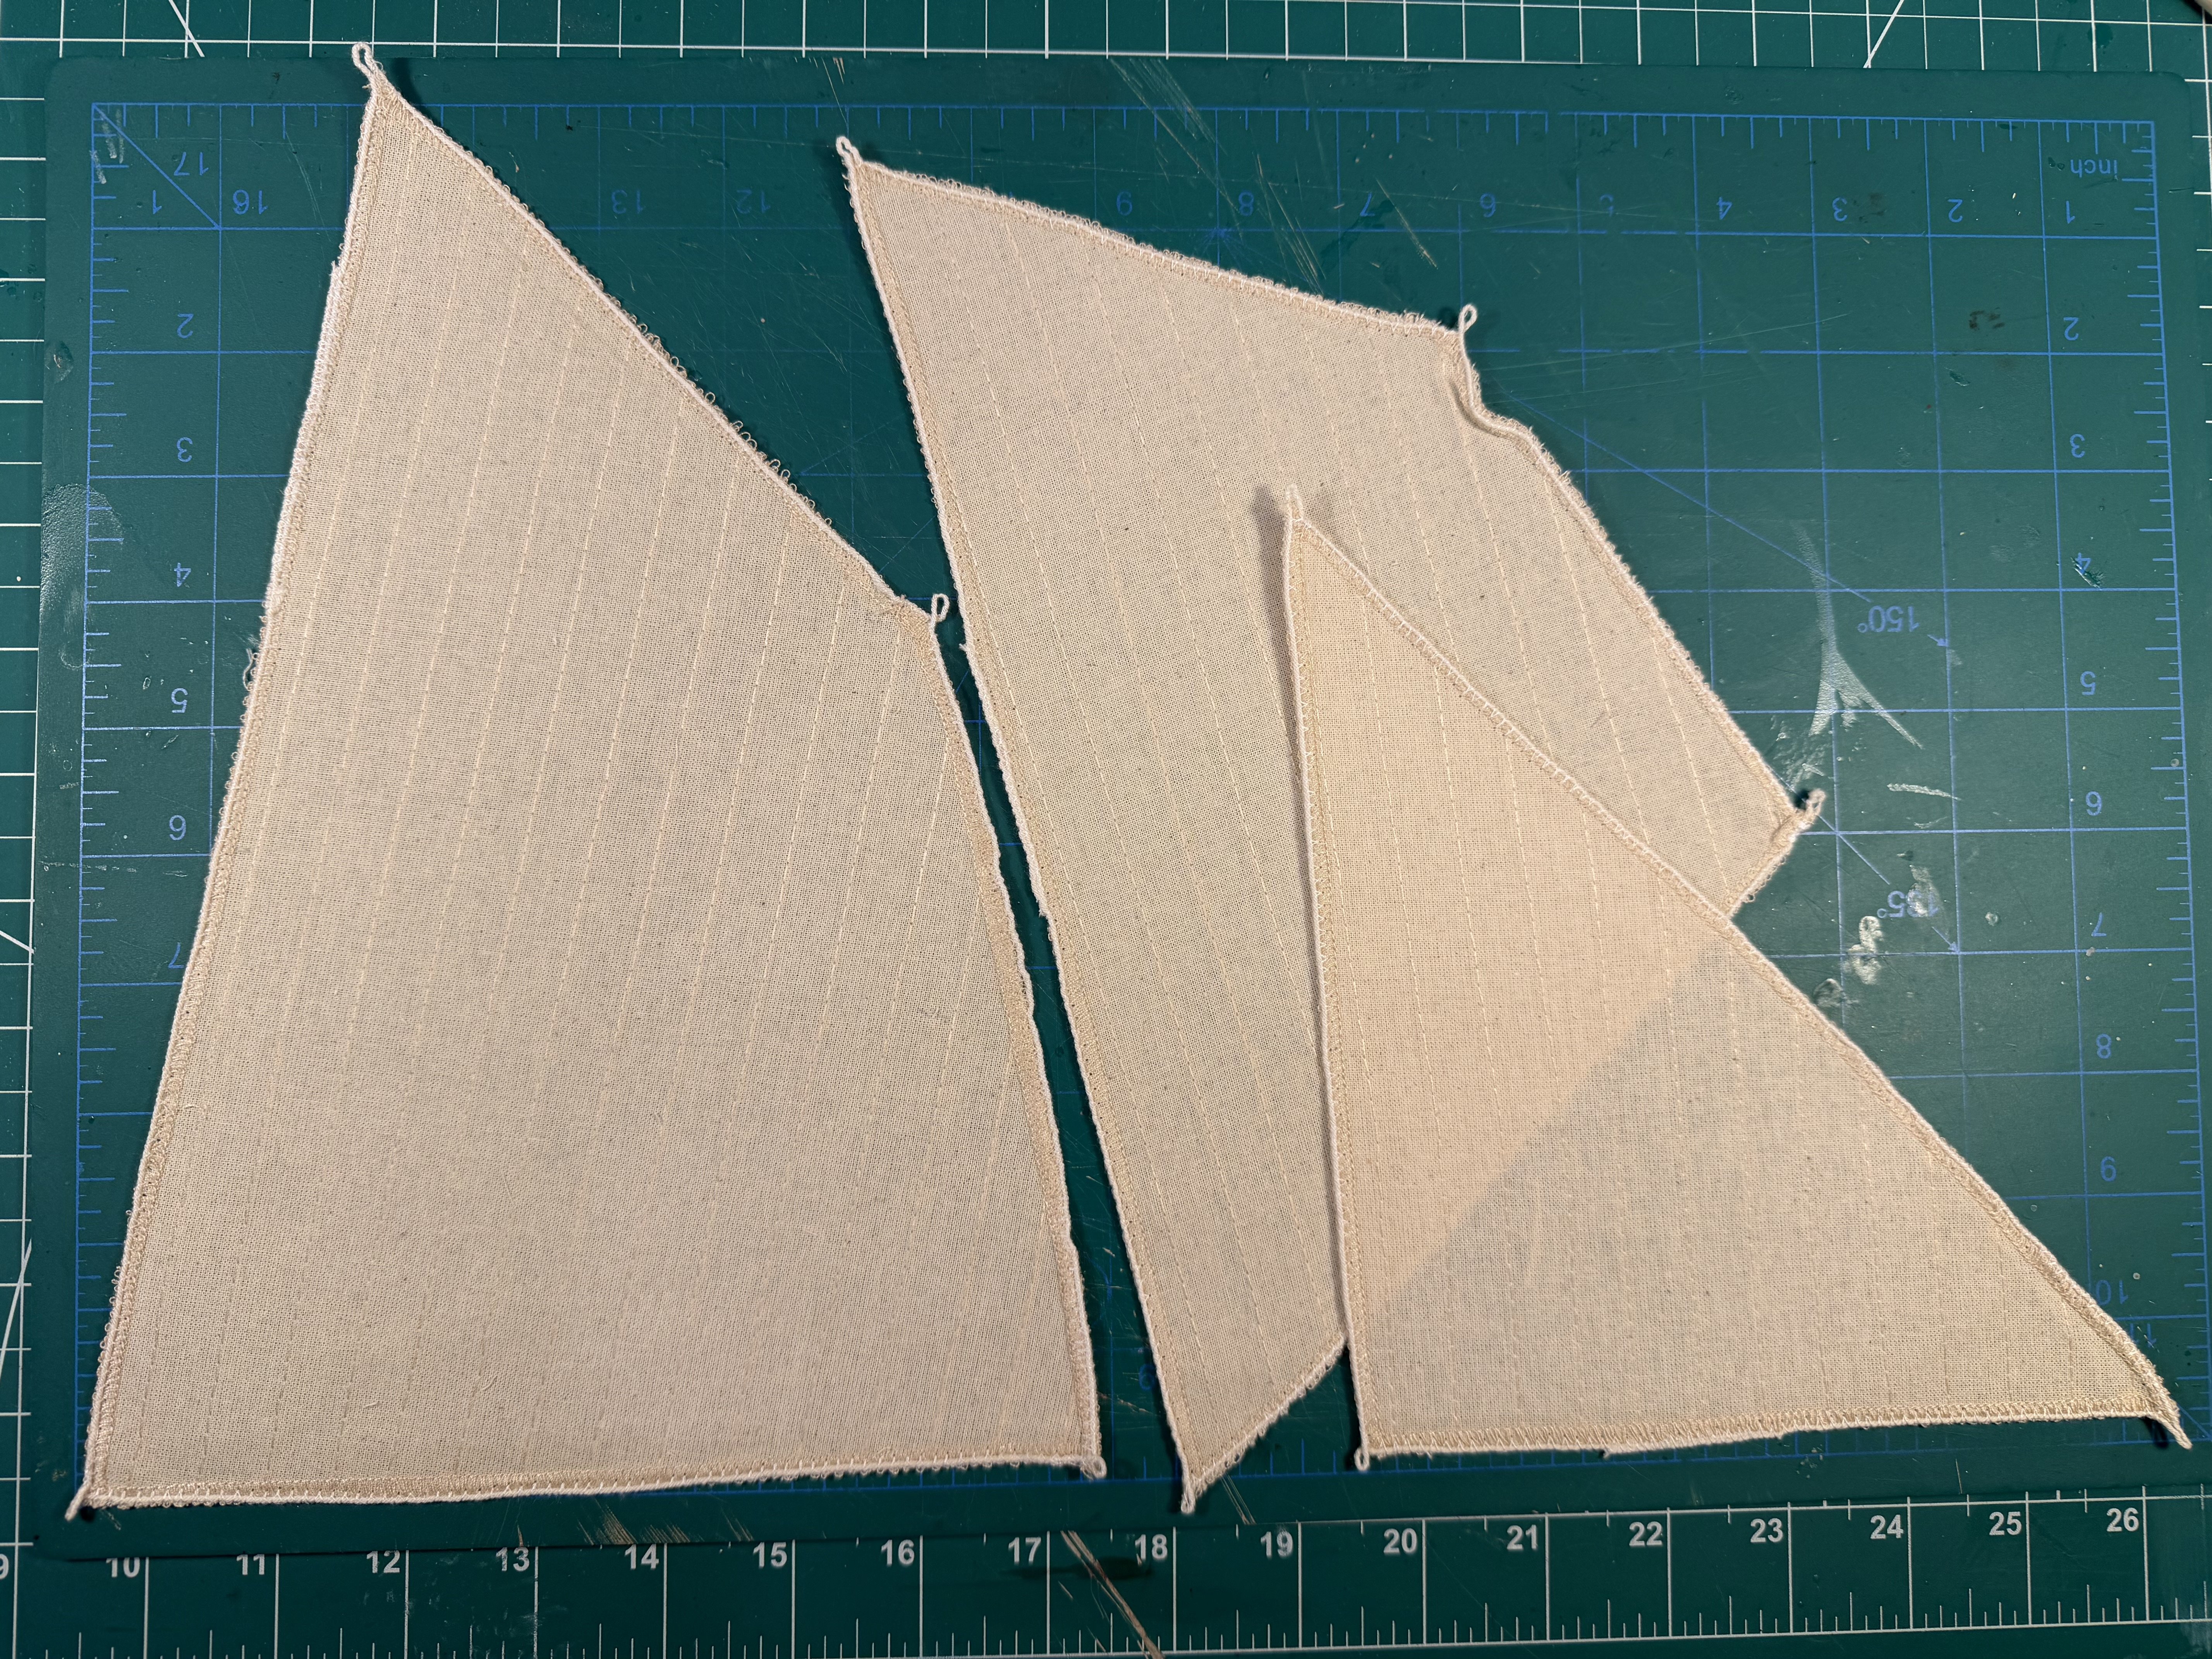
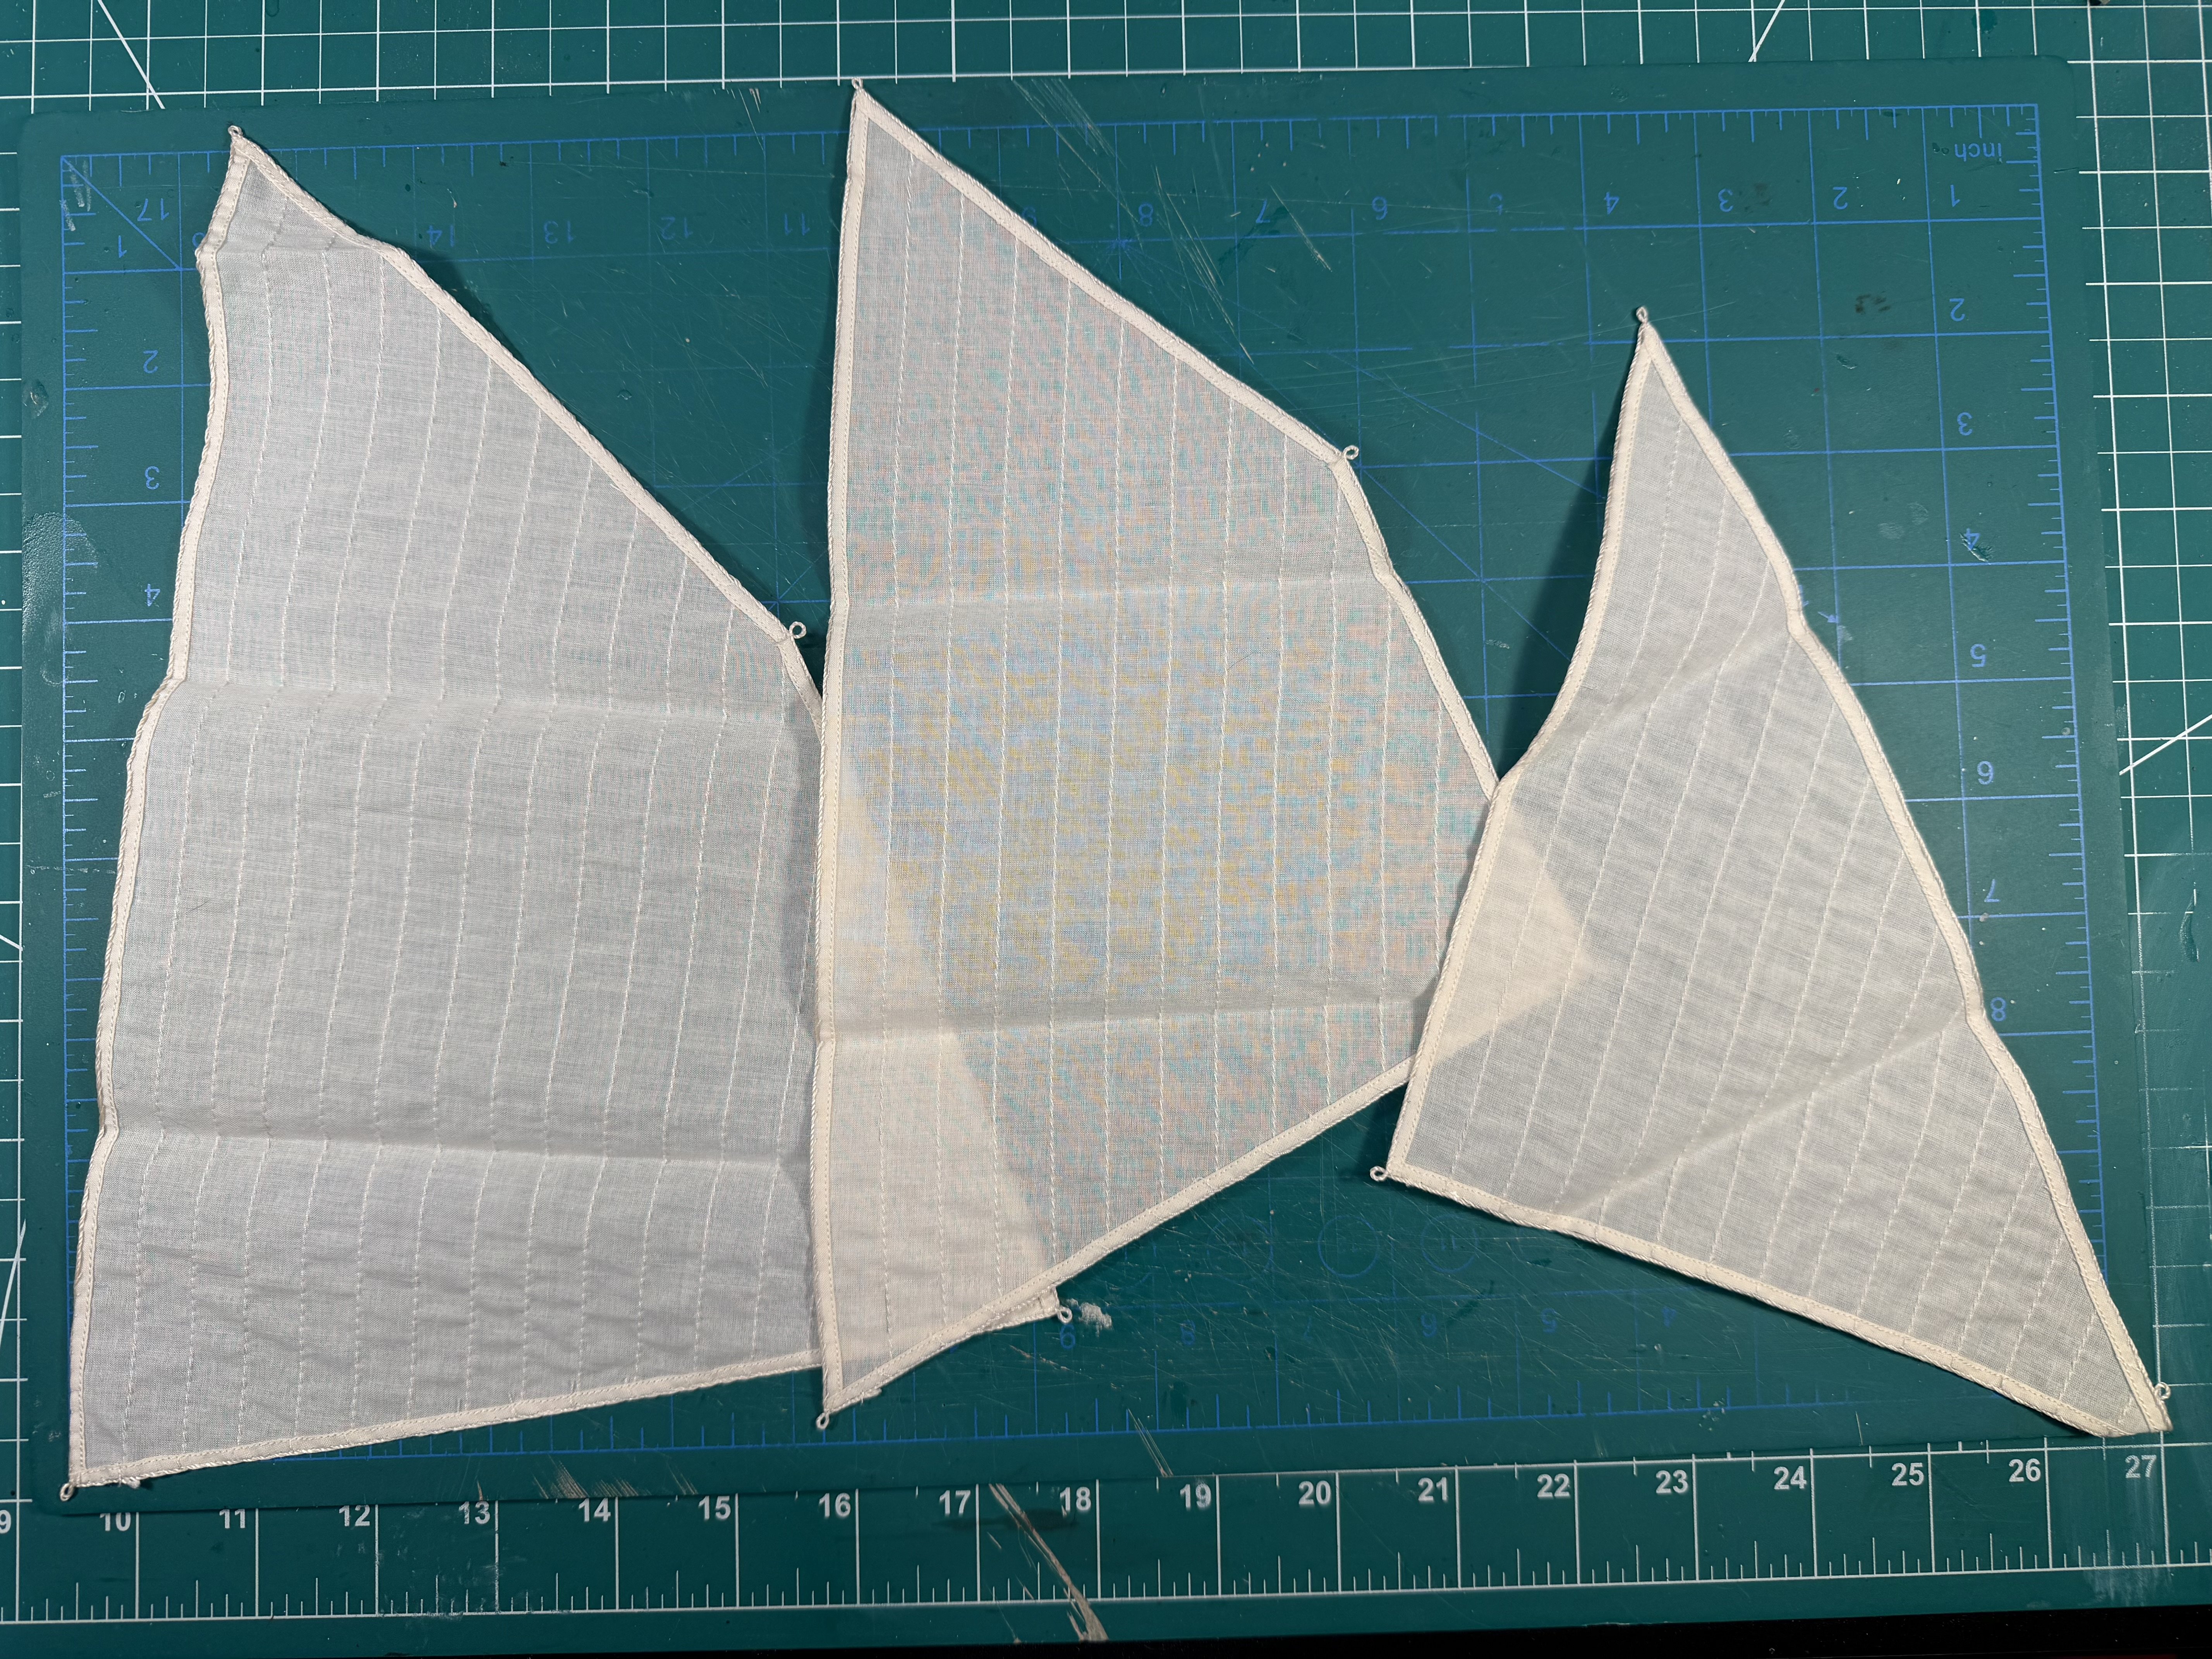
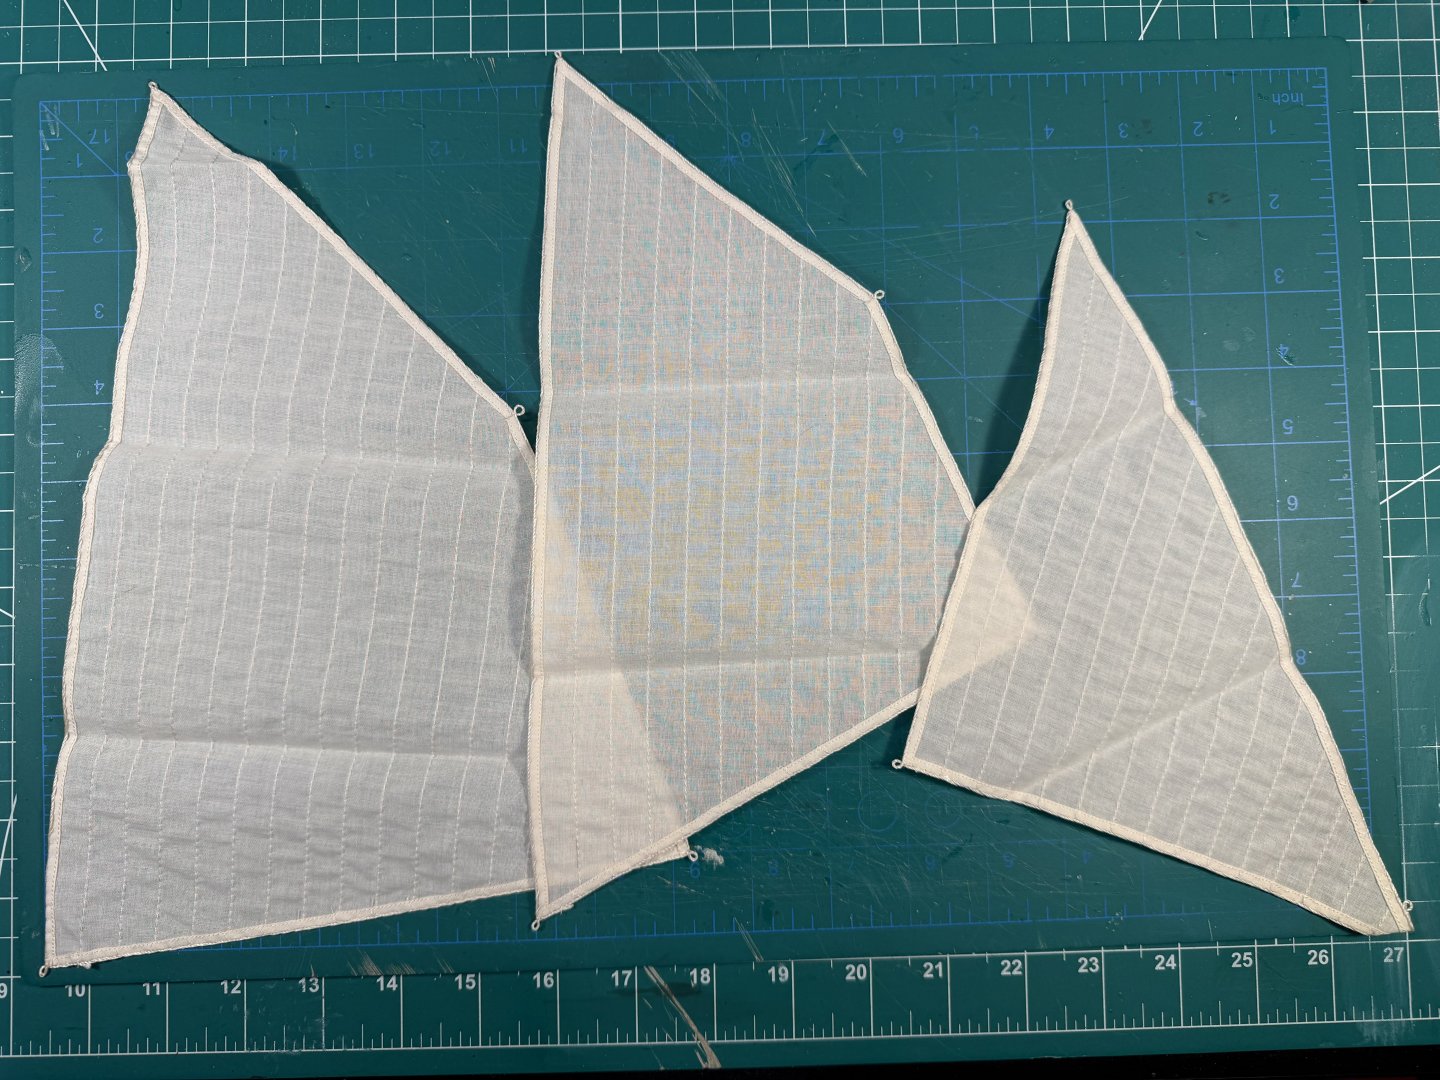
I ordered the high quality sails that are available as add-ons from the Vanguard Models web site. I think Chris said that they’re no longer going to be including the lower quality sails with their kits. The higher quality sails seem to be thinner and have better stitching all around. The top photo are the ones that came with the kit. The bottom photo are the ones I ordered. I will be dyeing the sails and then will iron them.

- 50 replies
-
- 1
-
-
- Lady Isabella
- zulu
- (and 1 more)
-
One thing you might do - a "free" version of the NRG half hull kit - it to take a piece of wide masking tape, place it over the part of the hull where there is a sharp bend (for example the front 1/3 of the hull) and use a thin marker to trace out what the plank when resting flat would look like. Then take the piece of tape off and lay it flat. You know you need edge bending if that image of the plank bends (usually a slight arch with the tip of the arch towards the top of the hull, at least for a hull like the Sherbourne). In the middle of the hull, if you did the same thing, the image on the masking tape would end up being fairly straight. It was really that exercise - which is required for the half hull because you cut out planks from wide sheets of basswood - that made it click for me how the 2D geometry of a flat plank needed to be bent to a 3D hull. It's also useful to use a planking fan (spreadsheet or a printout) to get a sense of how much you should taper the planks. The Sherbourne instructions do use a short-hand of just seeing when the plank rubs against the one above. It can be useful to also plan out the thickness of planks at each bulkhead. That way you also won't end up - or be less likely to end up - with having to add in extra small bits of plank or have some planks that come to a point. You never want a plank to be less than half of its regular width; it you need to, you need to use more advanced planking techniques.
- 18 replies
-
- 1
-
-
- cutter
- Sherbourne
- (and 1 more)
-
While edge bending is perhaps not necessary on the Sherbourne - like it is on other ships - it really can help. I know with the Ranger I built (and the Lady Zulu I am building now) the instructions explicitly said that edge bending is not necessary, but it surely does help some of the planks to lay flat. The lime wood strips on the first planking are pretty thick. And the Sherbourne is intended to be painted all over. So you can get by with lots of gaps and stairstepping in the planks and fill it with filler and do a ton of standing. Look at my Sherboune. It was an absolute mess but it turned out looking okay. On the Lady Zulu, I did some edge bending (in addition to regular bending) in places and the planks lay much neater - which is useful for sure on the second planking. If you look at my progression from Sherbourne to Ranger to Lady Zulu you can see quite a bit of improvement. I was happy enough - despite the myriad of mistakes - to leave the top part of the planking on my Lady Zulu bare wood just with some shellac and varnish. If you treat the planks on models that you intend to paint as if they were ones you intended to leave unpainted - meaning doing a bit of work on getting them to lay flat - it will serve you later when doing more complicated hulls (where that edge bending and shaping is a must) and when and if you want to try to leave a hull fully or partially unpainted (without using filler). It may take more time, but there is no rush.
- 18 replies
-
- 3
-
-
- cutter
- Sherbourne
- (and 1 more)
-
Are you edge pending?
-
HMS Victory: Caldercraft or Artesania Latina
palmerit replied to darkening's topic in Wood ship model kits
Any time I see people ask about which Victory kit - at least assuming Chris Watton's Amati kit is never released - I've seen people say that the Caldercraft is the best one. No direct experience though. -
Have you seen this YouTube build of the Bluenose?
-
On the question of venting an airbrush booth, you can vent outside or you can vent to a large pail inside (with some water in it, cutting holes in the top, with some filters - see the video below). Here's the video I followed. Ironically, my modeling area is right near a window, but we live in 100 year old house and lots of the windows don't open.
-
To be clear, I do look forward to someday working on a kit (like the Model Shipways - Chuck Passaro - Syren in my stash) that requires a lot more scratch building. For example, on many Vanguard kits, you get a beautiful etched deck with plankings and tree nails and you get bulwarks with gun ports cut out that is etched showing the planking and tree nails. On a kit like the Syren, you need to scratch build for yourself all of these parts (you need to do the planking, do tree nails if you wish, create the structure around the gun ports, plank around the gun ports). That's part of the reason why a Vanguard kit in the hands of a novice like me can look so nice. You can always chose to do all this scratch building on a Vanguard kit of course - and some do - but you don't have a choice on other kits. That's also why a relative novice can build something like a Vanguard Sherbourne, which would be a far more difficult kit if you needed to do all the constituent steps from scratch.
-
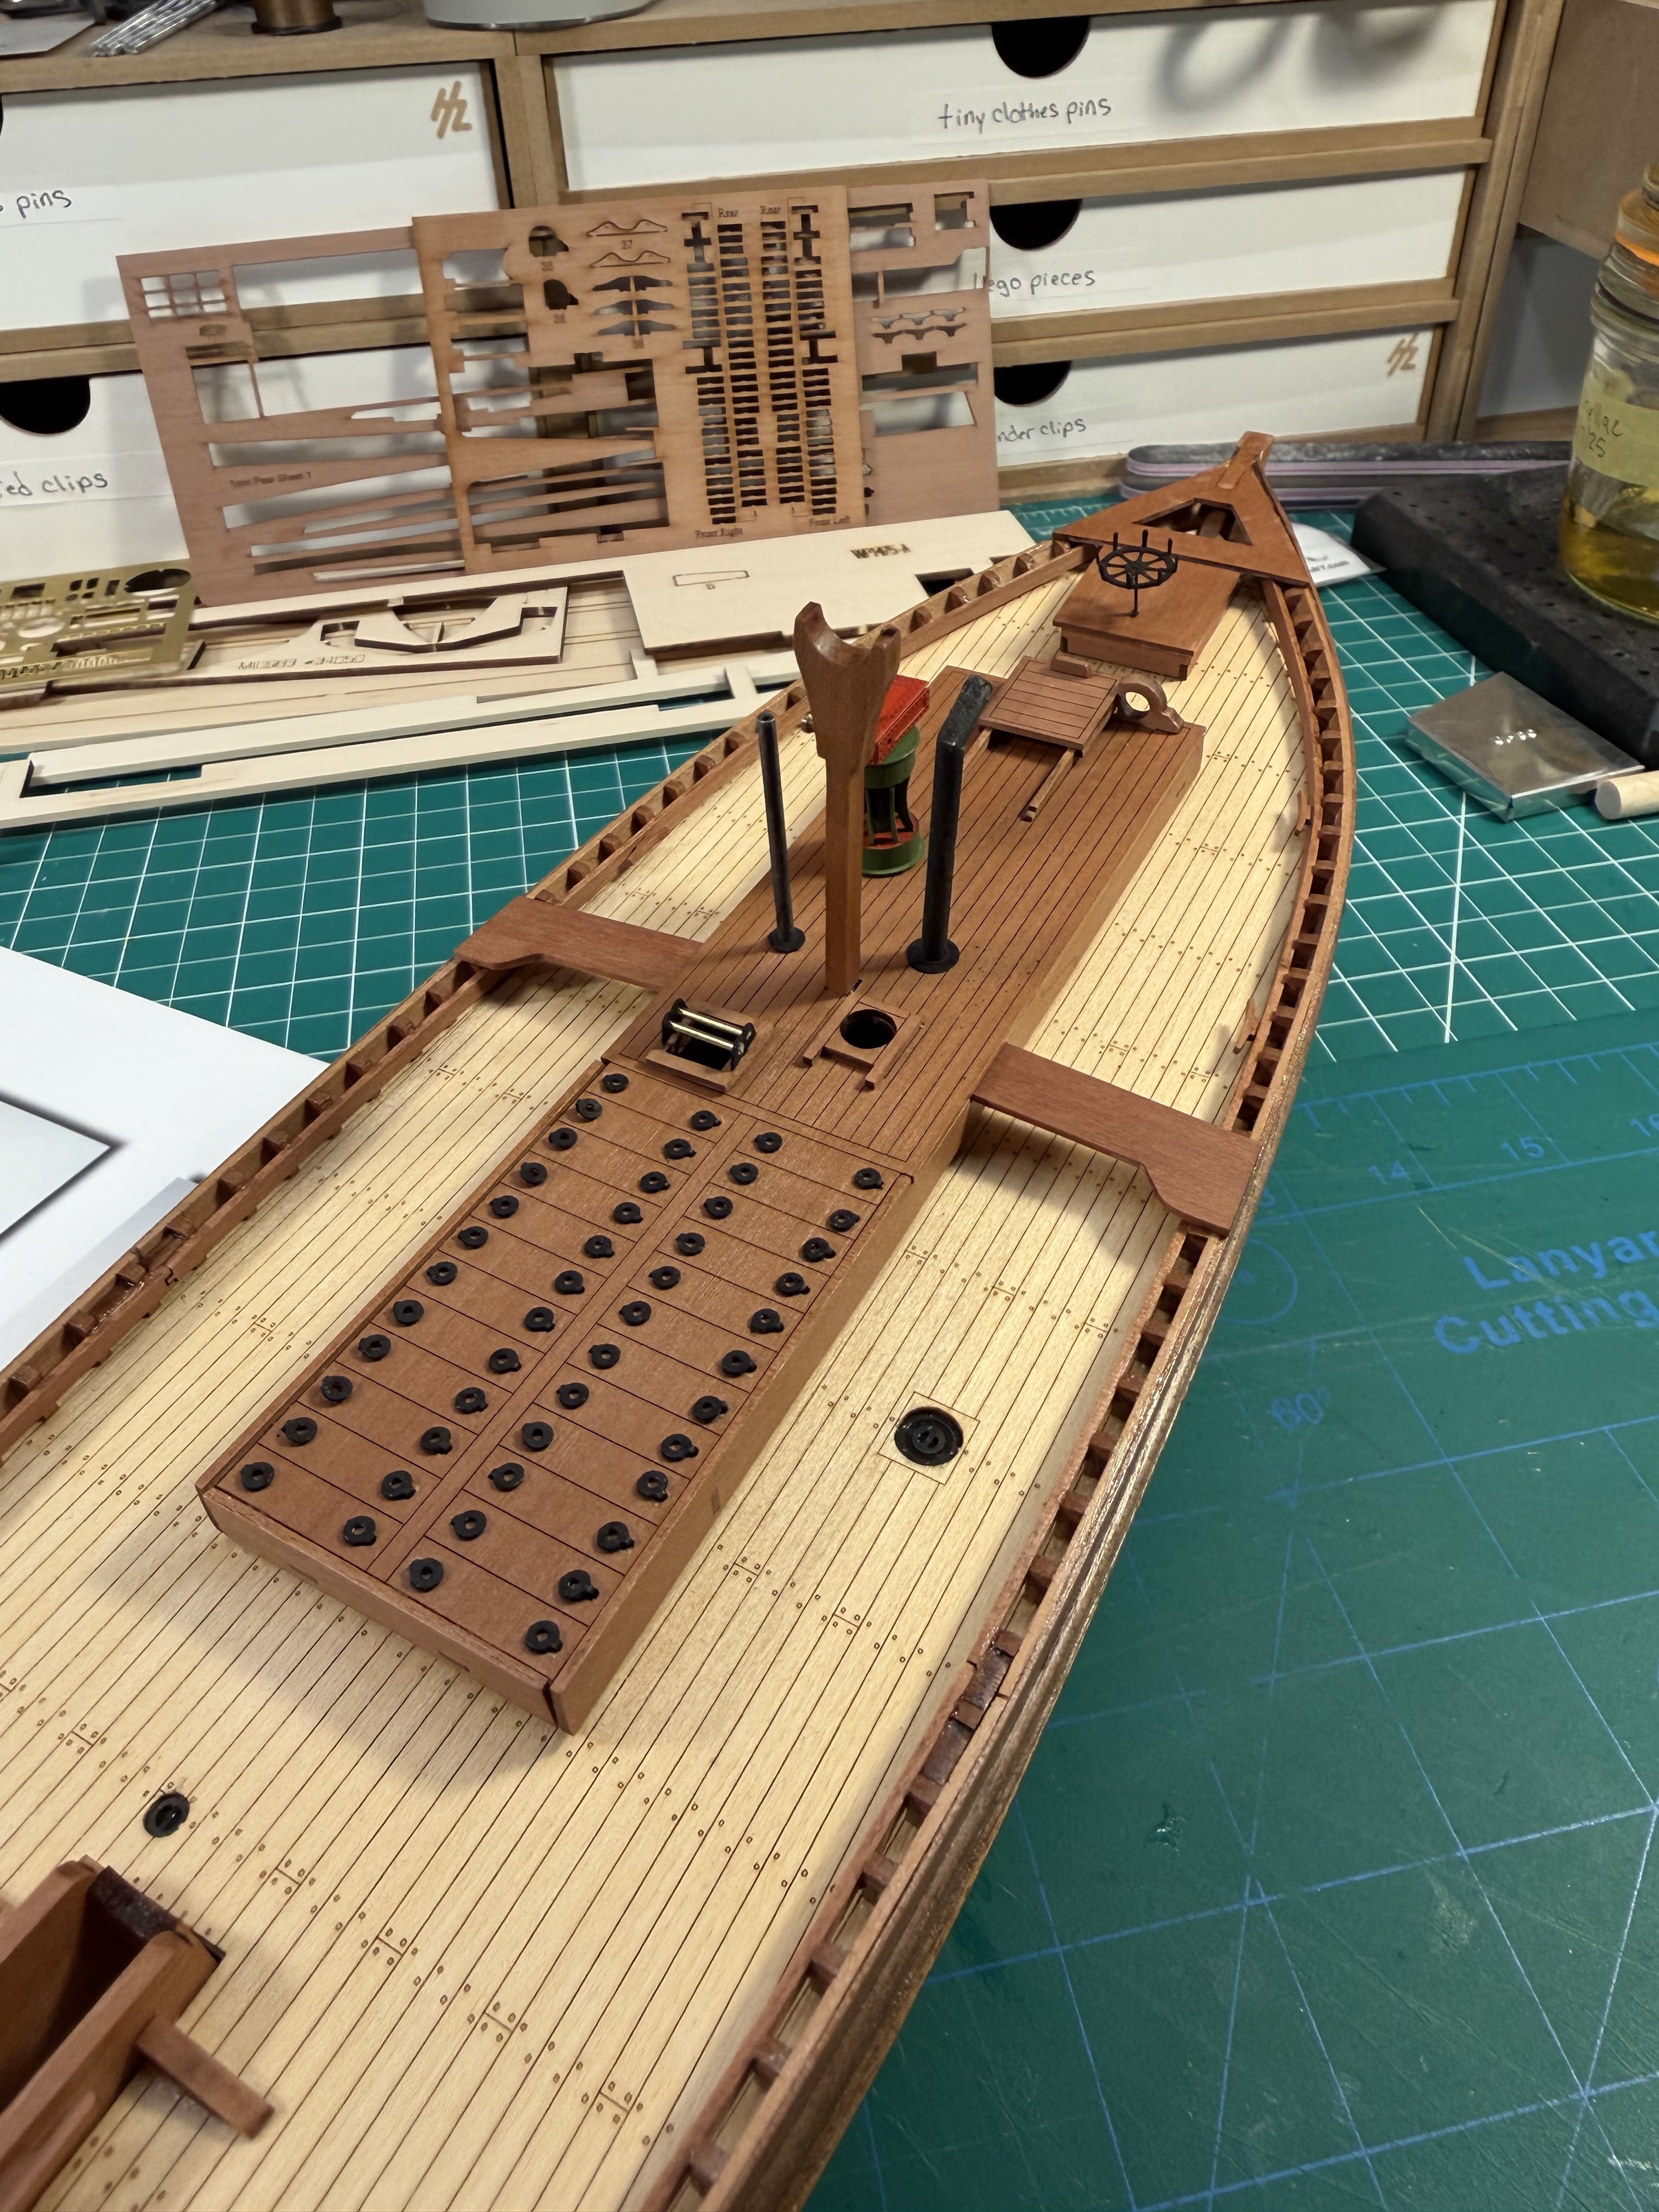
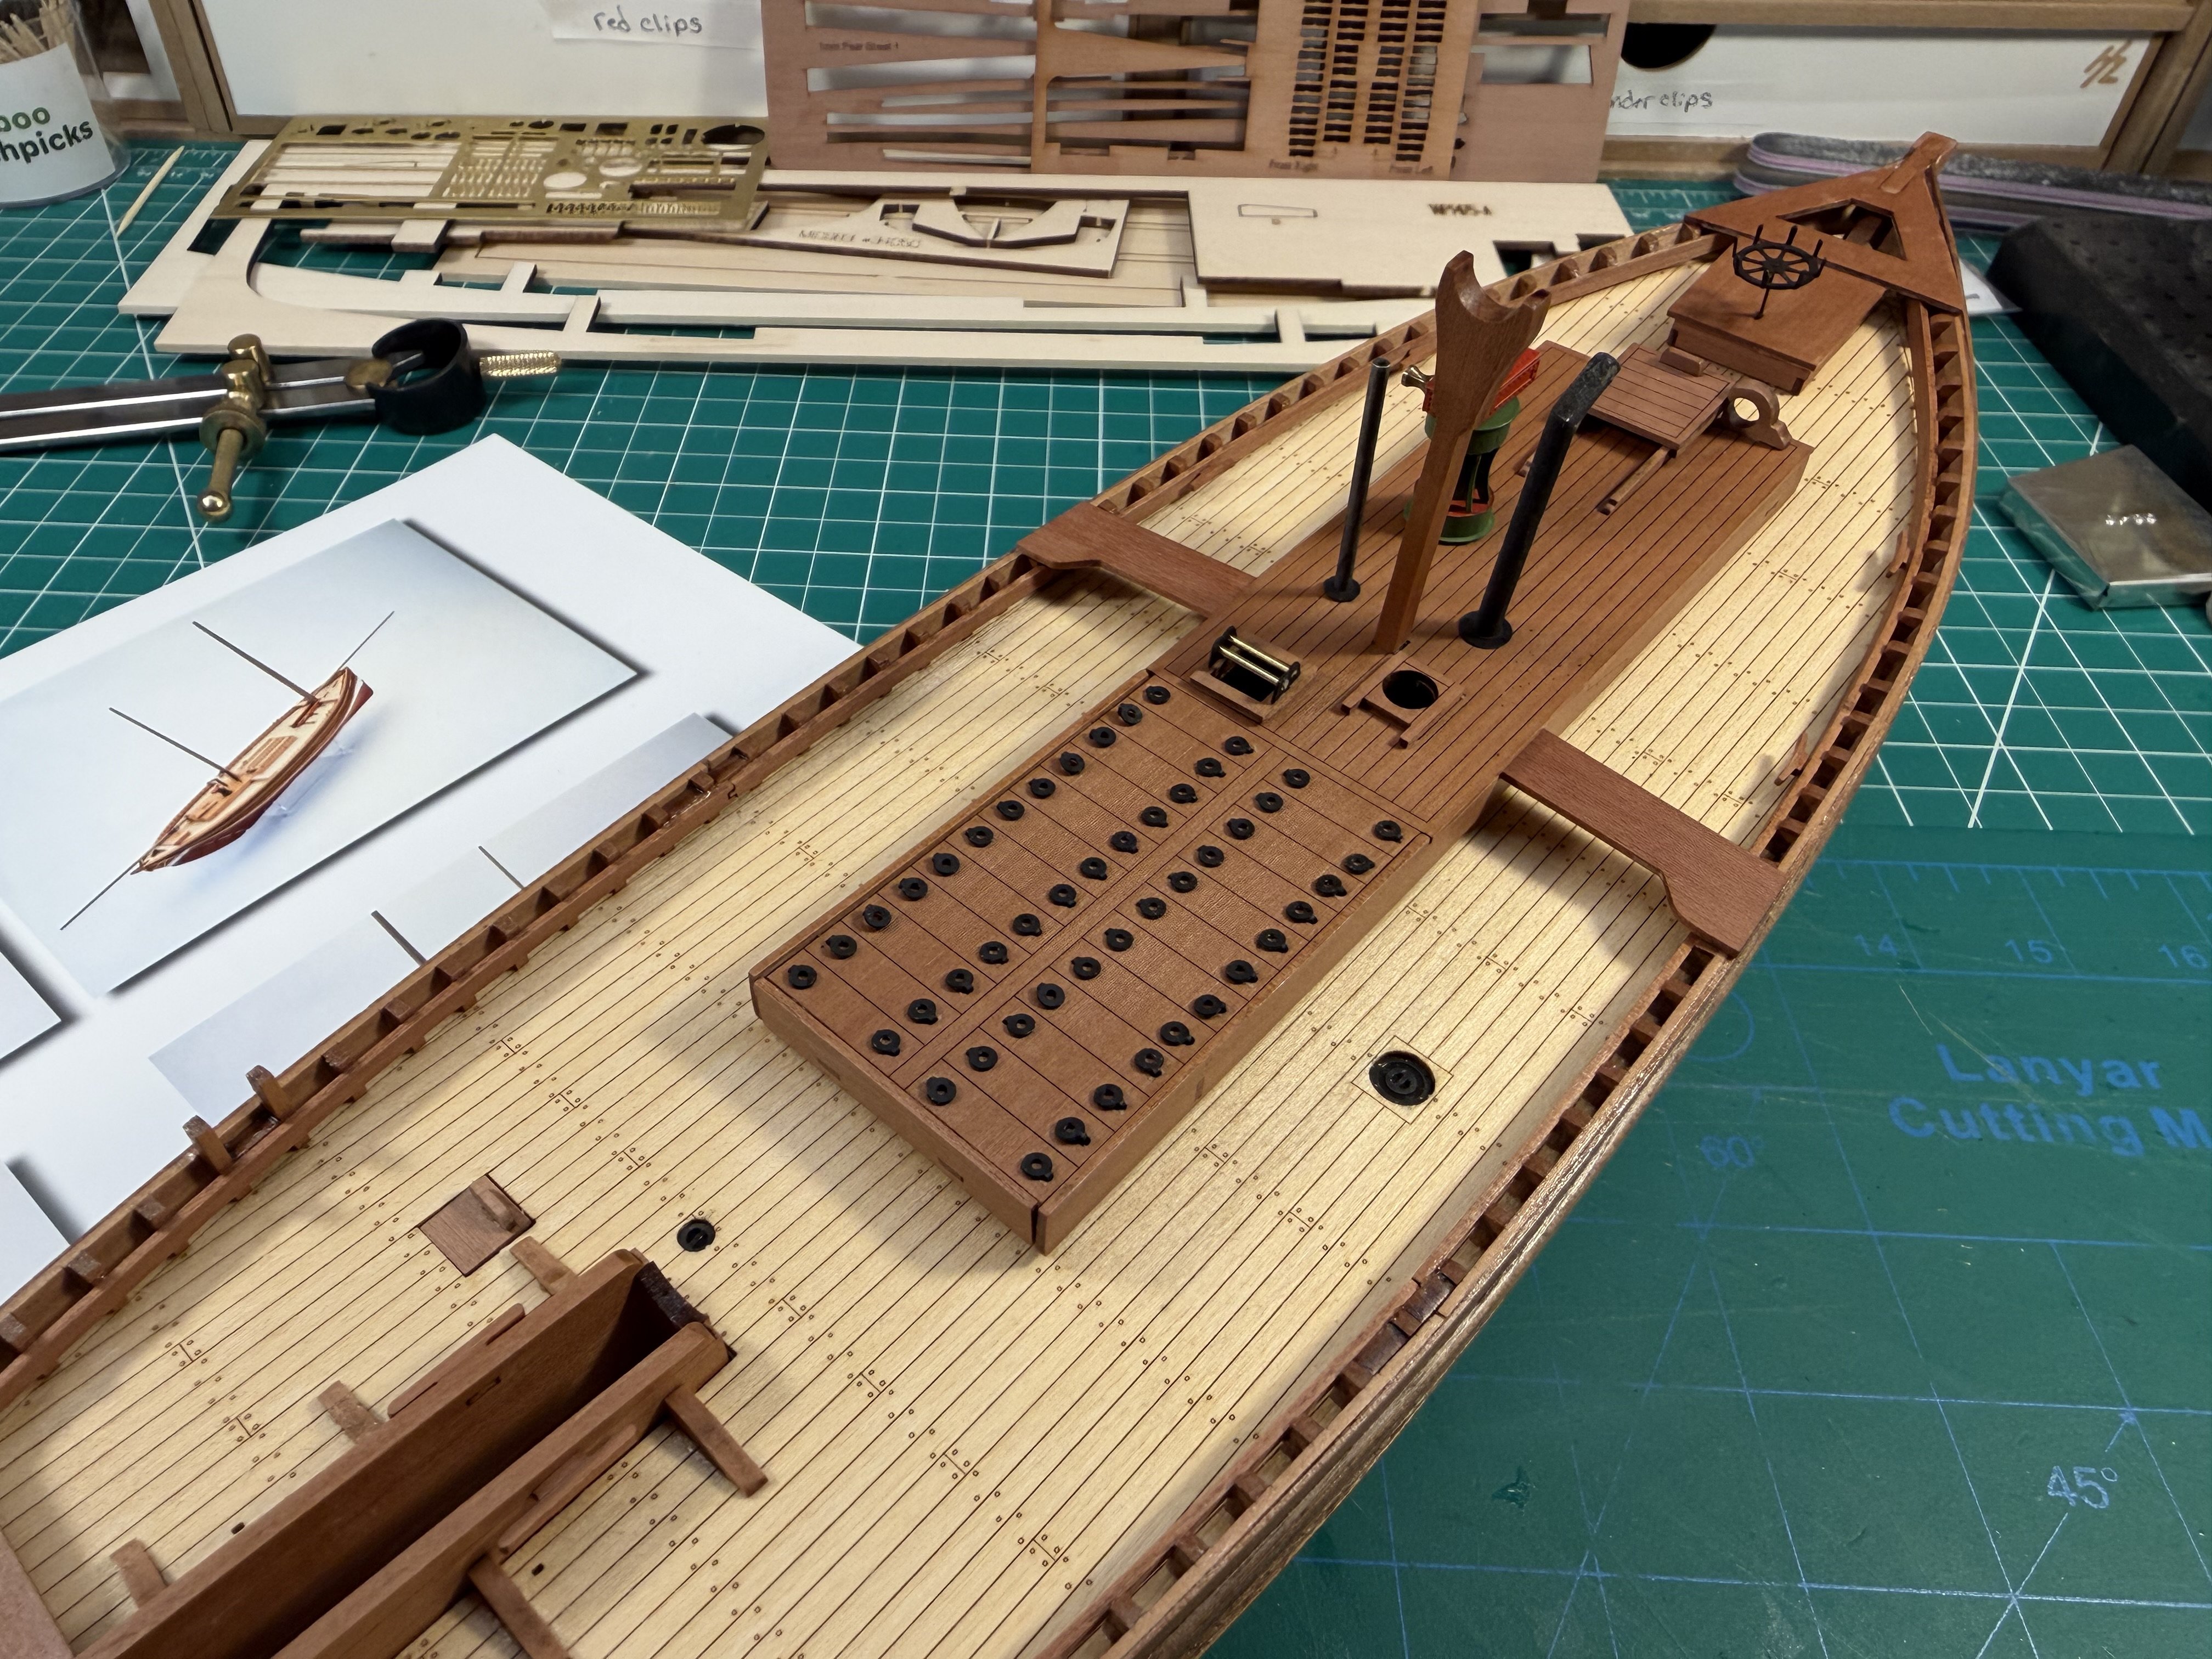
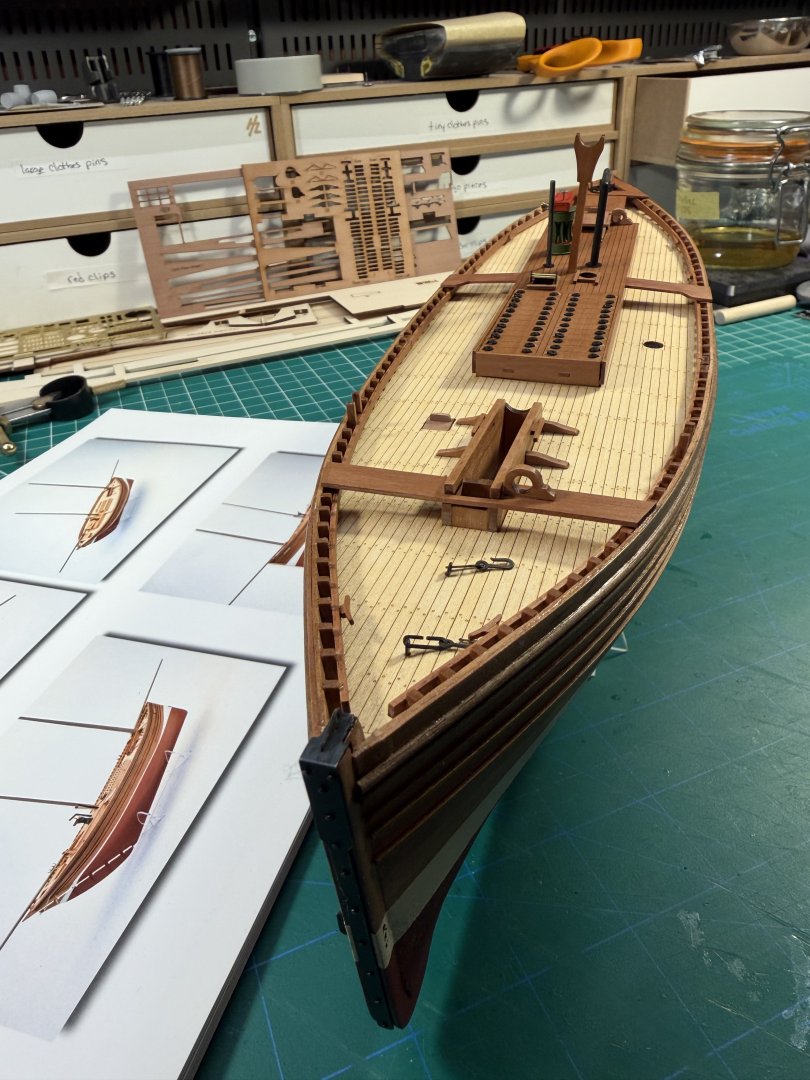
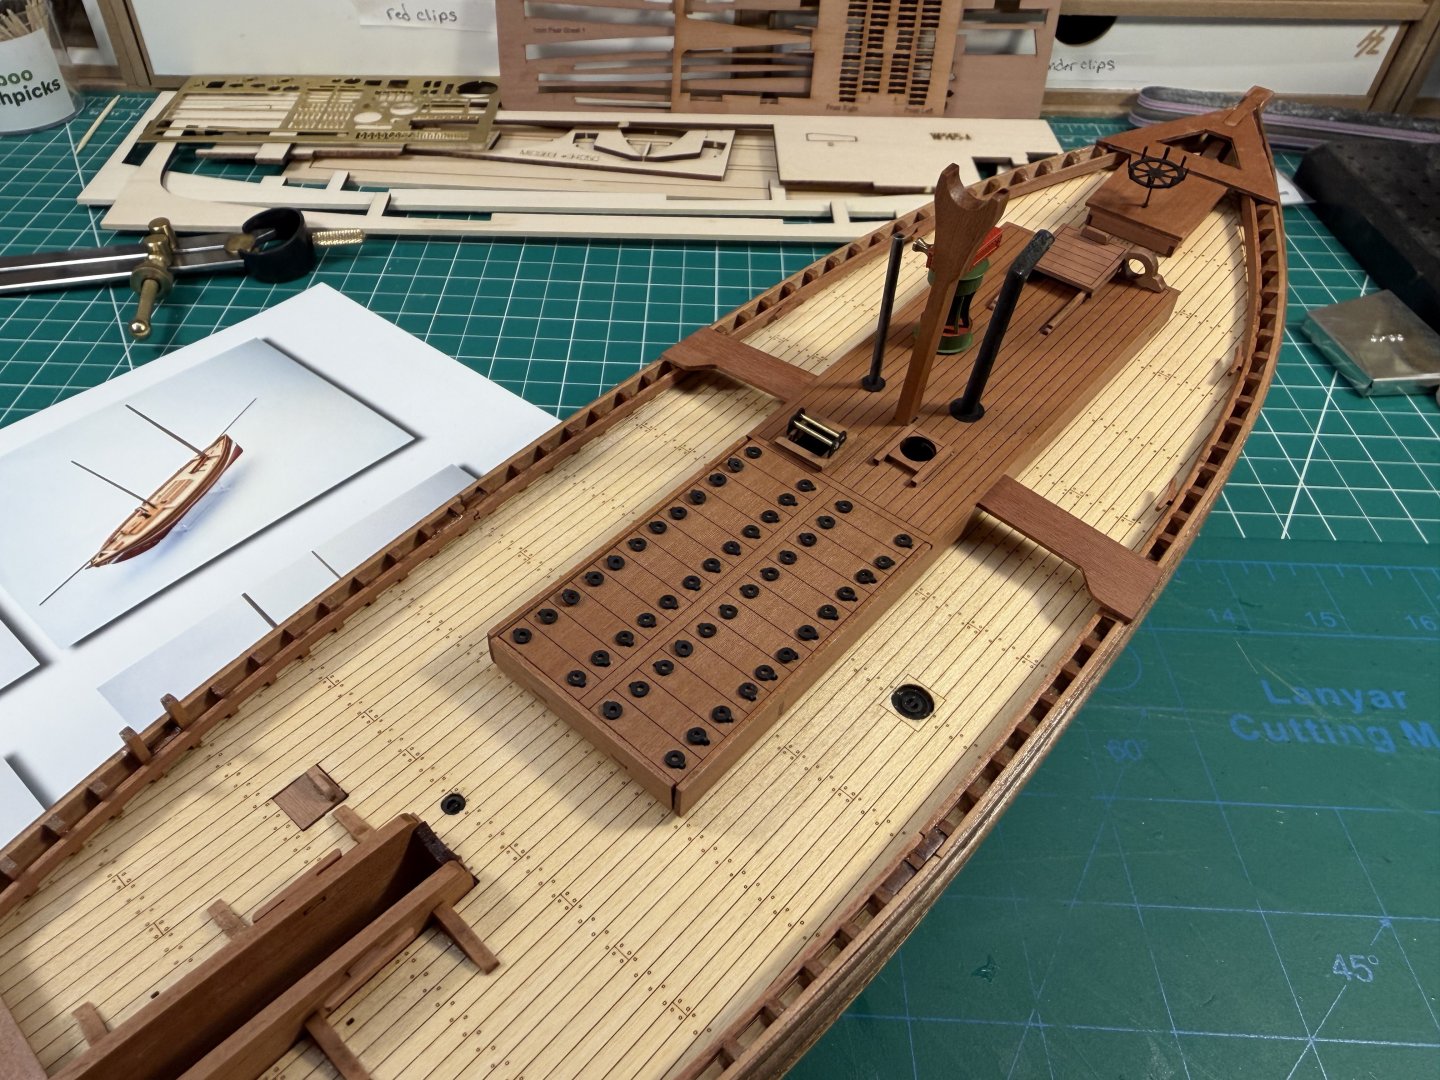
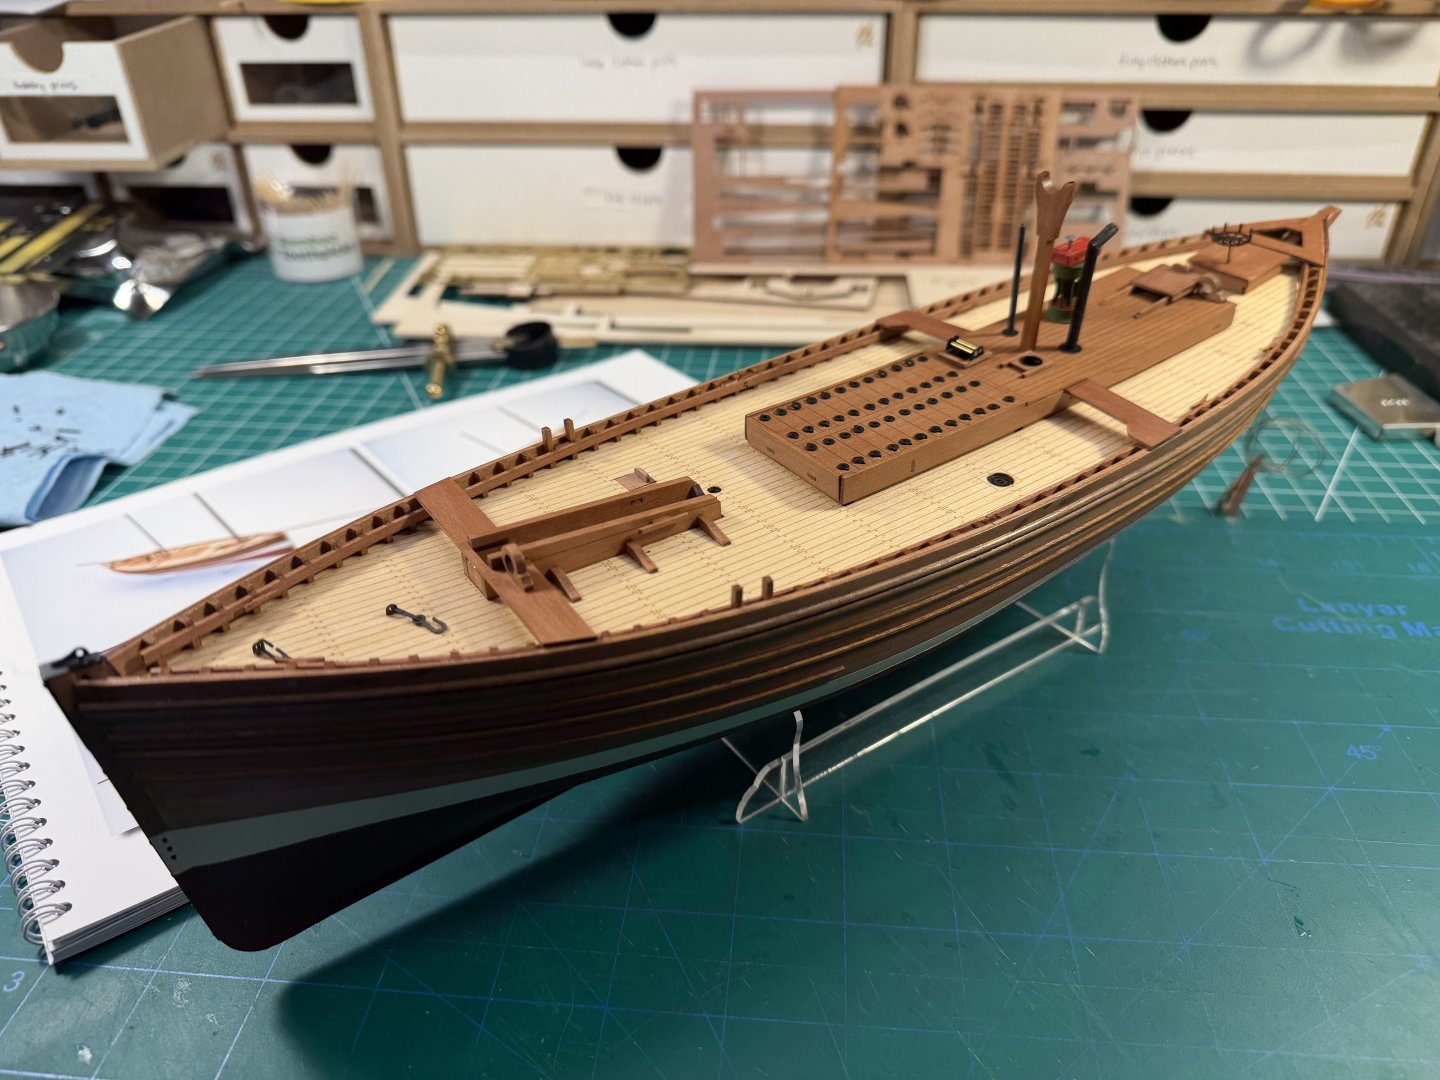
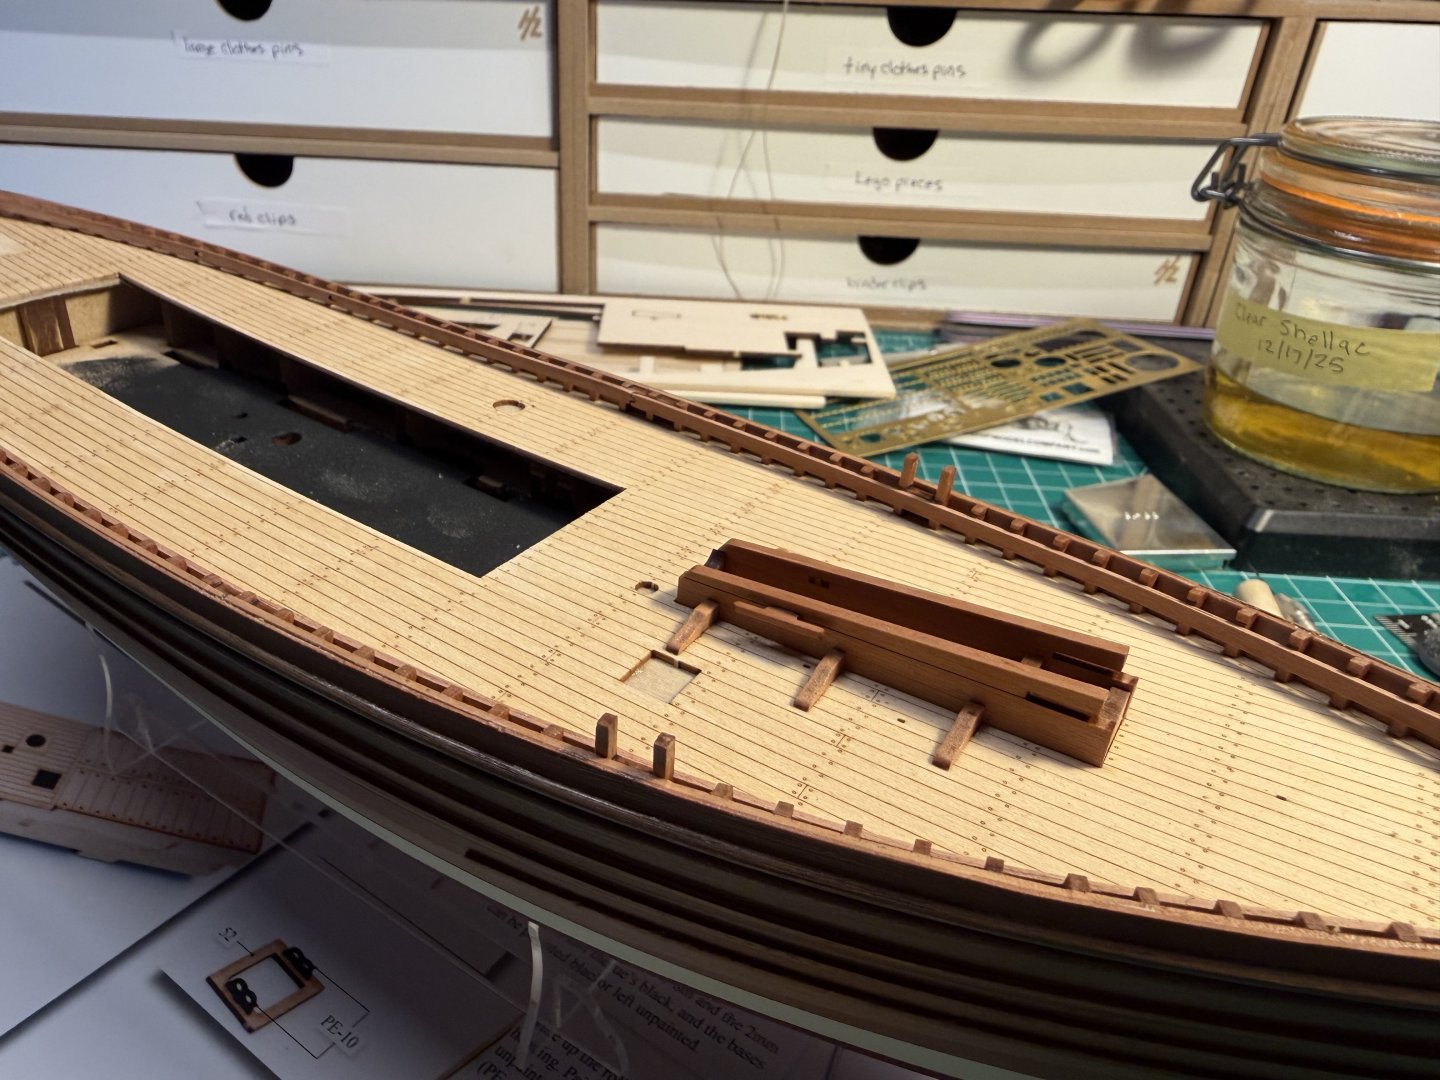
Finished the deck for the most part. Just a few last pieces to add. Then it’s on to the masts, yards, and rigging - and sails.

- 50 replies
-
- 4
-
-
- Lady Isabella
- zulu
- (and 1 more)
-
I'd recommend a Vanguard model 100%. Great materials, great instructions, great design, great finished product. I did the Model Shipways three model (Shipwright Series) kits and they're a great experience. Building something like the Vanguard Sherbourne will be completely different. For example, the Dory, Pram, and Smack do not have the kind of strip planking that larger ships have - that's a whole other skill. The rigging on the Sherbourne is "novice" but way more complex than the Pram or Smack (Dory has no rigging). I've also built the Vanguard Ranger and am currently building the Vanguard Zulu, both of which are also "novice" kits. Still challenging. I haven't built an Occre (have one in my stash) or AL. I think Vanguard's engineering (design) is much better. I saw a YouTube video of someone building an Occre kit and the frame rattled like castanets. The frame on a Vanguard hull is like a tank. The Vanguard instructions are also the best. Not just arguably. They're the best. Another great thing about Vanguard kits is that you have a great YouTube build series by Jason on Modelkit Stuff. He did the Sherbourne. He's currently doing another "novice" Vangard kits that's the somewhat smaller little sister to the Ranger and Zulu (all "fishing" boats - but larger boats, almost ships, compared to the Model Shipwright small boats you built). I originally bought - in my stash - the Vanguard Duchess of Kingston to be my second kit (my first was the Sherbourne but built the Model Shipwright boats and the NRG half hull in parallel). I now realize while I could have built it (after the Sherbourne and the Model Shipwright boats) it was a far better decision to build some additional novice Vanguard models. After the Zulu, I have the Erycina in my stash (an "amateur" kit). From what I've seen of a current build of the Erycina, it's a more challenging hull from the novice kits. I'm probably going to do the Grecian and maybe the Adder (also "amateur" kits). With each of these, I've tried to hone some skills. Like on the Zulu, I worked harder to get the planking right. So I've been able to leave the top part of the planking bare (shellaced and varnished) wood rather than painting it. I'm also going to be using Syren rope and blocks rather than the kit-supplied ones (which are very good in Vanguard kits - much better than anything in a Model Expo kit - just not as high end as the Syren products). I have the Model Shipworld Syren in my stash (my sons bought it for me). It was designed by Chuck Passaro and has great instructions - I'll probably replace a ton of the wood and all of the rope and blocks. I'm not ready for that kit because it requires a ton of scratch building. I think the Rattlesnake is the same. I like working on kits right now that might take months to build so I can try things and hone my skills and some of my models have turned out better than others. I think something like the Rattlesnake or Syren or other large models (Constitution or Victory) are multi-year endeavors that I'm going to wait to tackle until maybe retirement.
-
It took a few models before I didn't regularly put my hand or my head through some rigging. Especially problematic when wearing magnifiers on your eyes since they completely screw up your depth and peripheral vision. Just know that if you ruin some rigging you won't be alone there either.
-
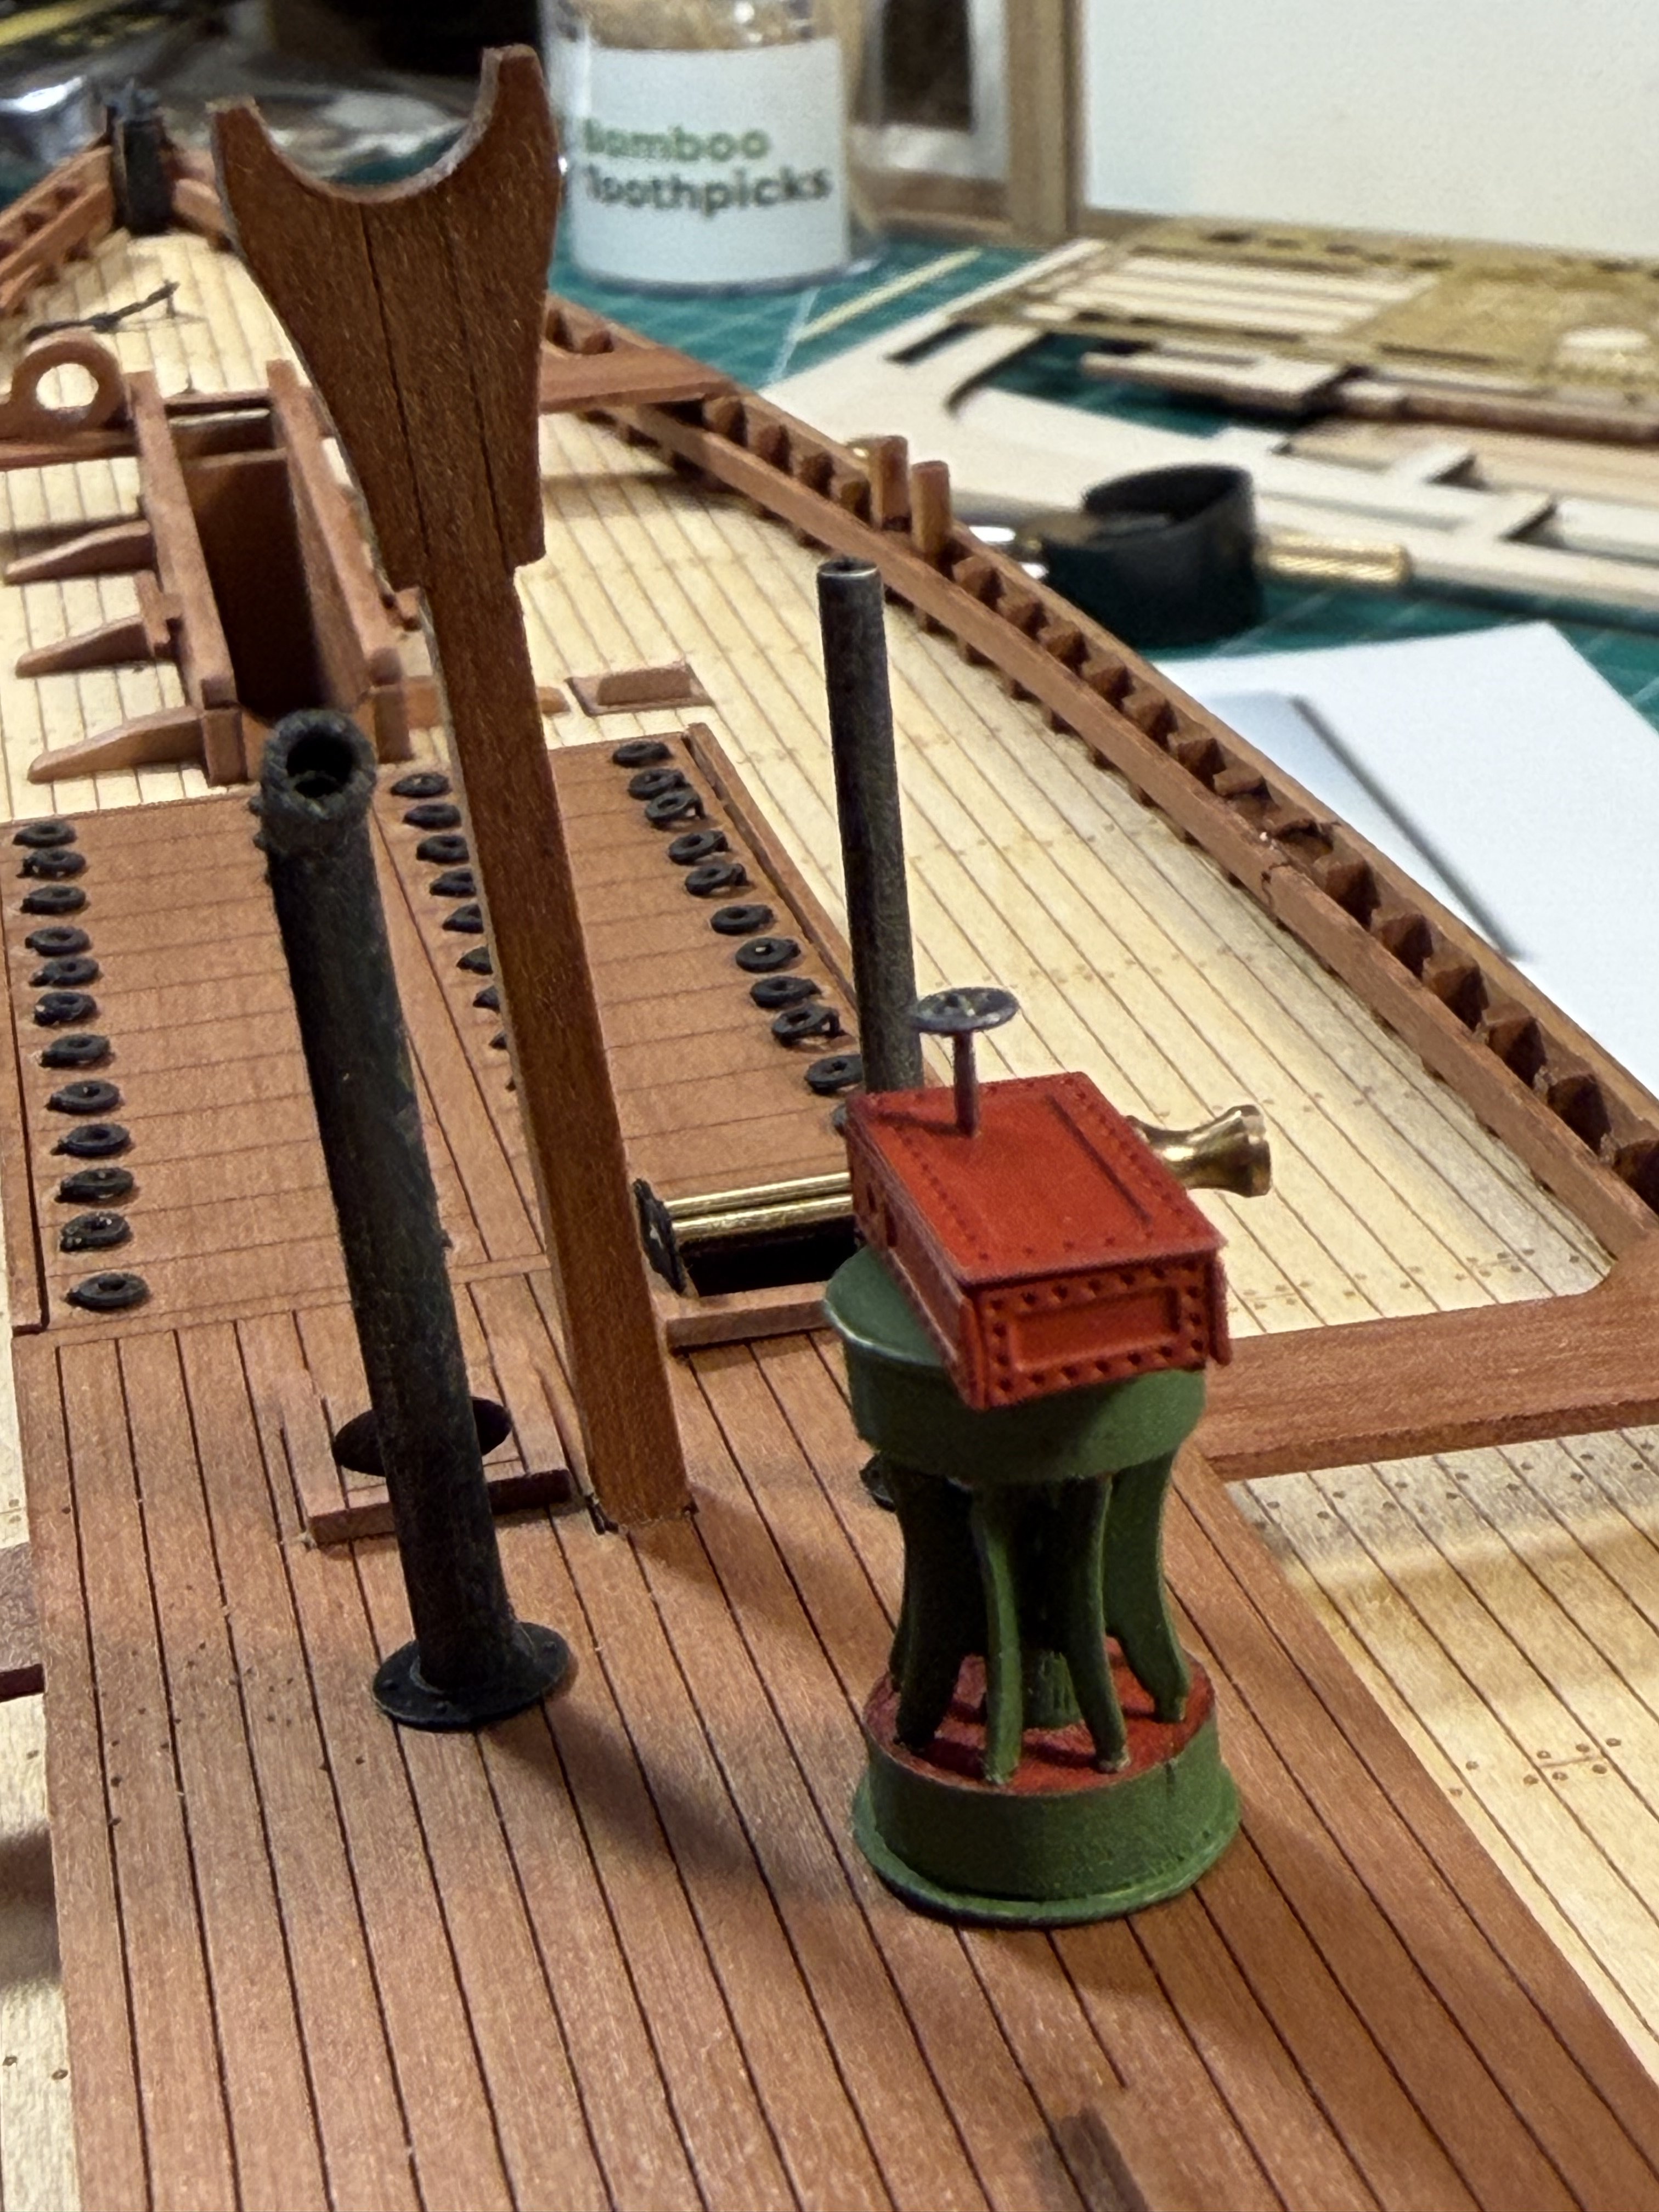
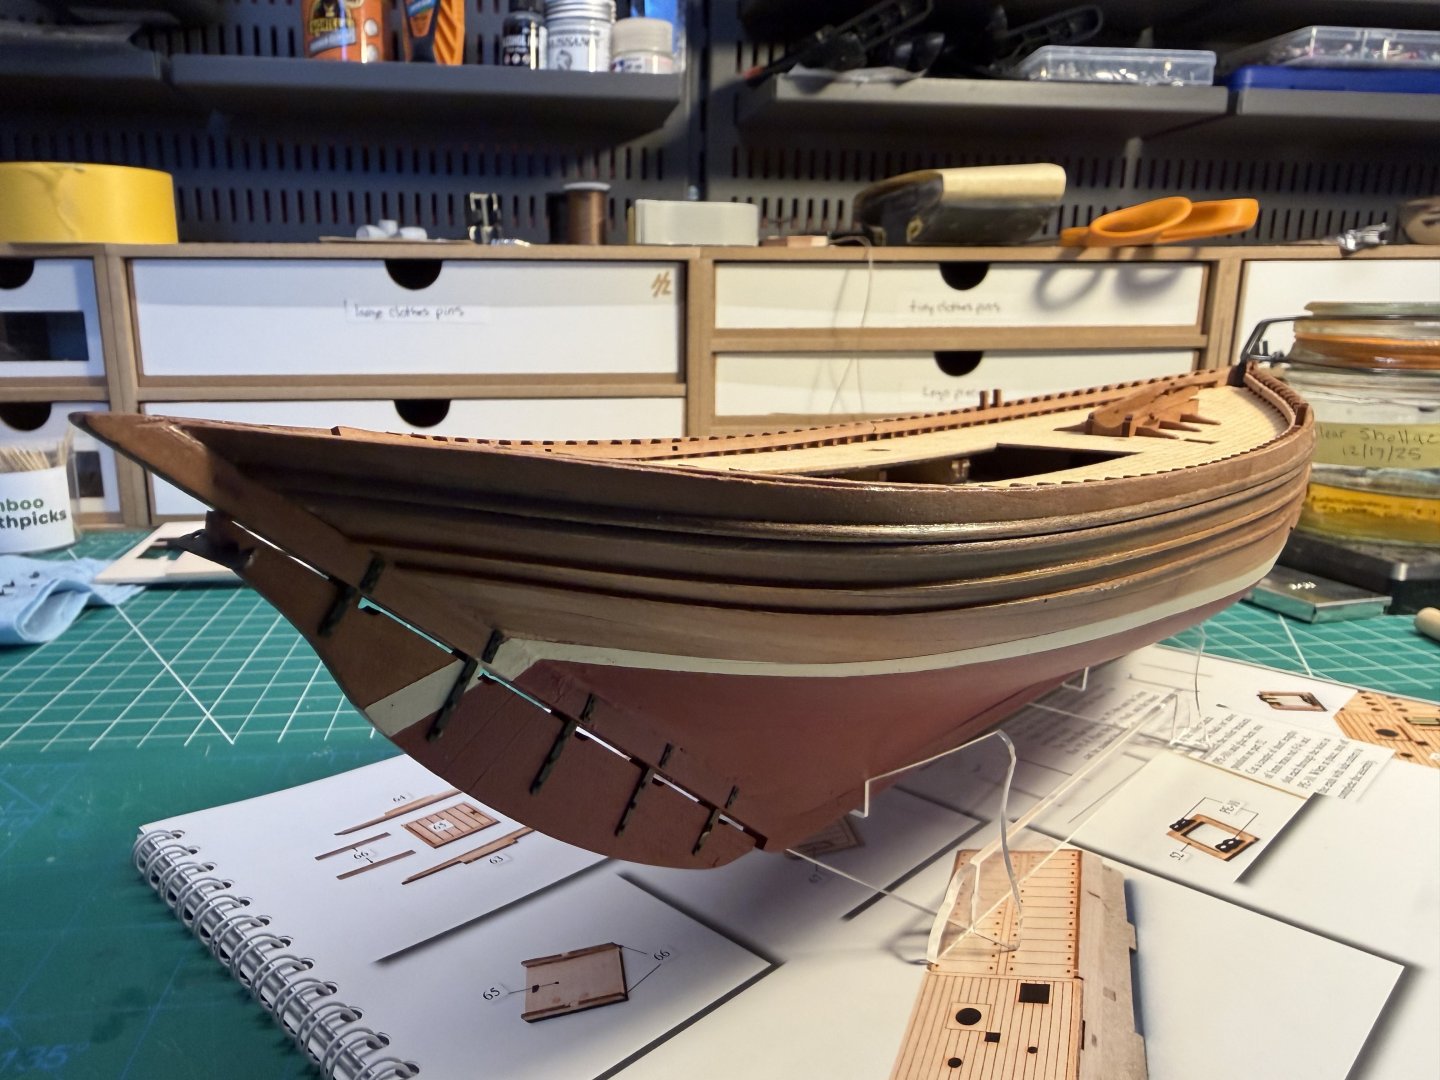
Added the metal work to the rudder and started to add the deck fittings. To add the rudder hinge (which for aesthetics I decided to keep brass blacked rather that paint over with hull color) I used a Tamiya clear acrylic paint as the “glue” and then added a couple of layers of airbrushed matt varnish on top. I learned that trick on a Finescale Modeler YouTube channel. The clear paint works like glue with flat pieces and gives you a lot more time to carefully position a piece and less mess than using CA.

- 50 replies
-
- 4
-
-
- Lady Isabella
- zulu
- (and 1 more)
-
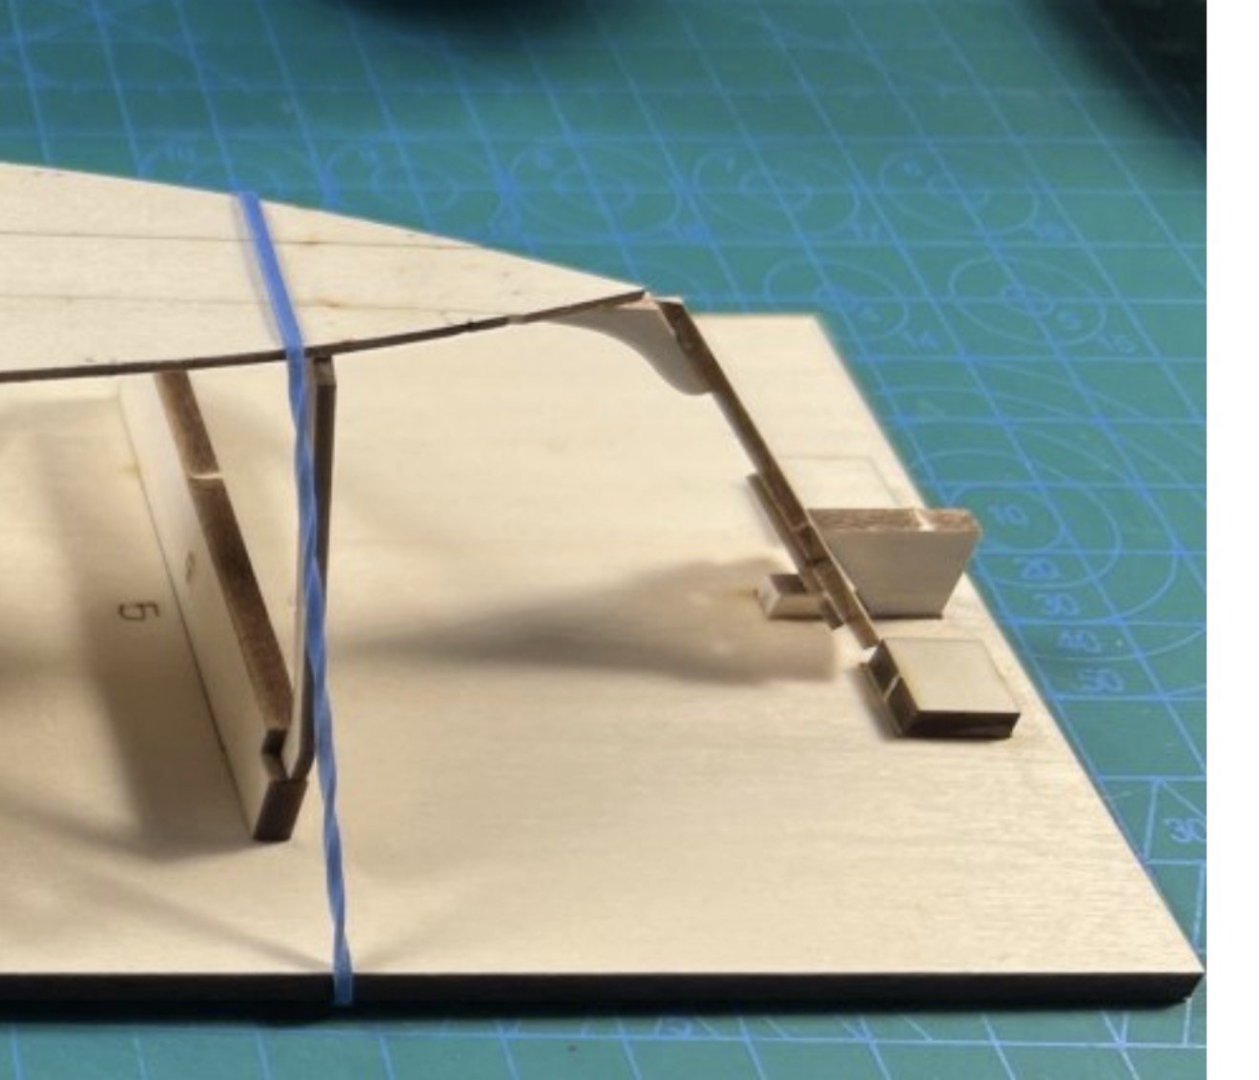
I think it depends on the model. Vanguard Models have two layers of planking and two layers of the keel. The first keel is added, then the first layer of planking, then the second layer of the keel. The second layer of the keel means that you don’t need to chisel a rabbet. Then the second layer of planking.
-
This is how I did mine (the middle option). From what I recall, there’s a fair amount of sanding (faring) to get the planks to lay flush. I don’t remember if there are later instruction steps that might help make it clearer.
- 29 replies
-
- 1
-
-
- Lowell Grand Banks Dory
- Model Shipways
- (and 1 more)
-
I'm no expert by any stretch. The quality of the wood certainly makes a big differences - basswood (from Model Shipways / Midwest) kits does not produce the same finish as higher quality pear (from Vanguard kits). In terms of planking and decking, it's the quality of the wood work that seems to determine the quality of the final product - if you're painting, it doesn't much matter how much wood filler you use, but that won't cut it if you're planning to keep the wood unpainted. I've recently discovered making my own shellac from flakes and alcohol, which ends up with a much better product than using pre-made canned shellac. On a current model I used shellac on the bare wood at the top of the hull, with the bottom painted, and after it was all done and dried I applied a couple layers of a Vallejo matte varnish on top. I'm sure others have more sophisticated approaches and answers.