Leo-zd
-
Posts
201 -
Joined
-
Last visited
Content Type
Profiles
Forums
Gallery
Events
Everything posted by Leo-zd
-

Lady Nelson by Leo-zd - 1:119 - SMALL
Leo-zd replied to Leo-zd's topic in - Build logs for subjects built 1751 - 1800
So another small very small work. And this time I am not guilty the problem is the provocation from this site: so I have no choice than to made it


-
Lady Nelson by Leo-zd - 1:119 - SMALL
Leo-zd replied to Leo-zd's topic in - Build logs for subjects built 1751 - 1800
Thk *56 times -
Lady Nelson by Leo-zd - 1:119 - SMALL
Leo-zd replied to Leo-zd's topic in - Build logs for subjects built 1751 - 1800
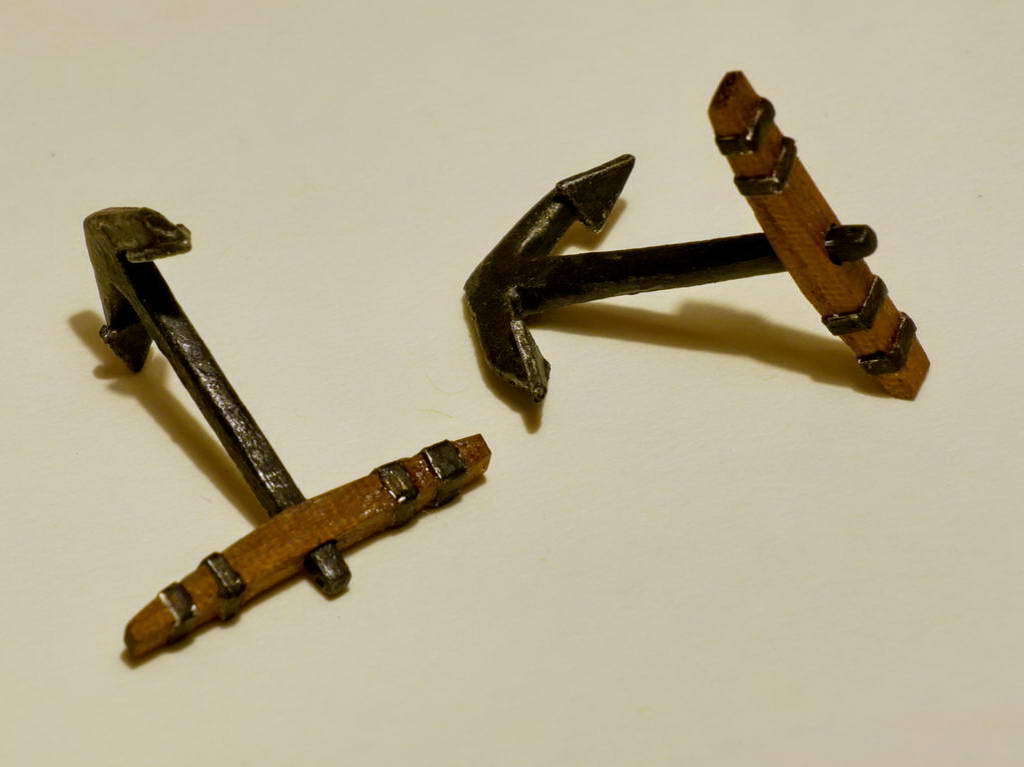
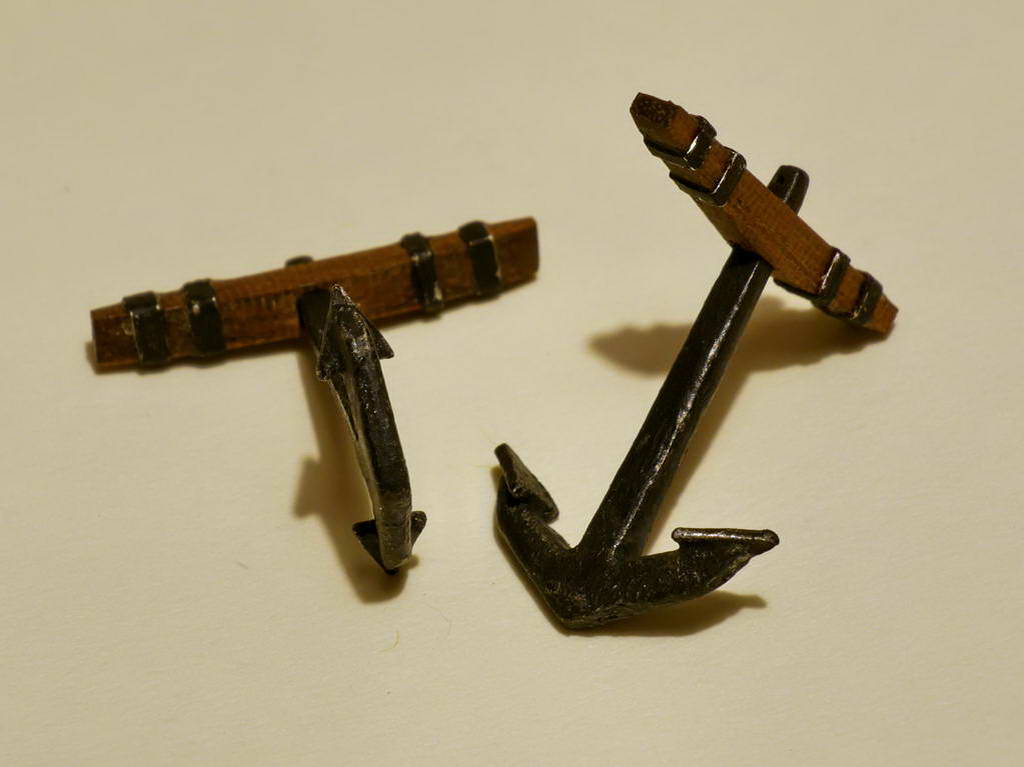
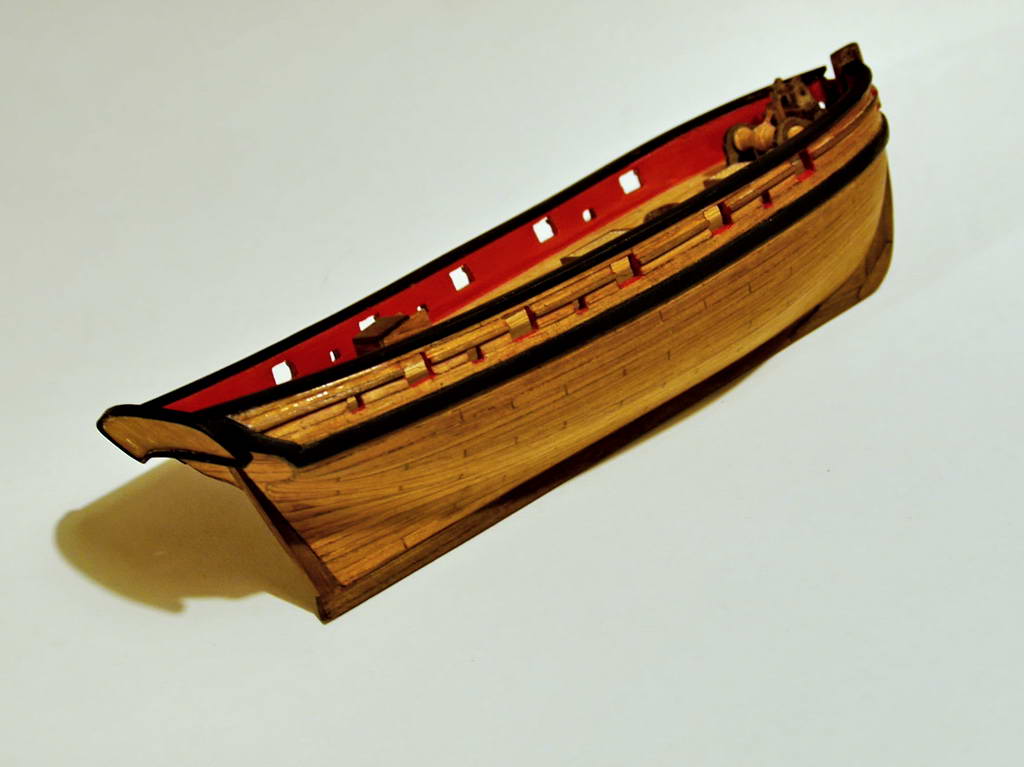
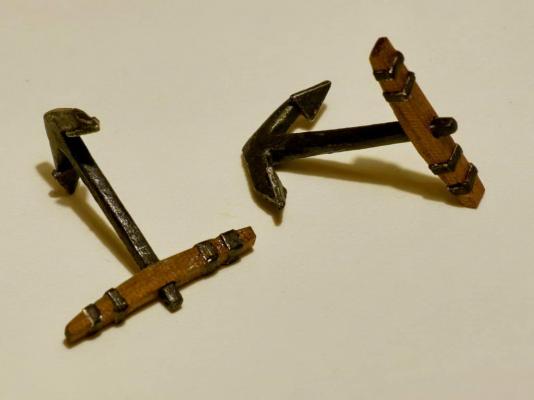
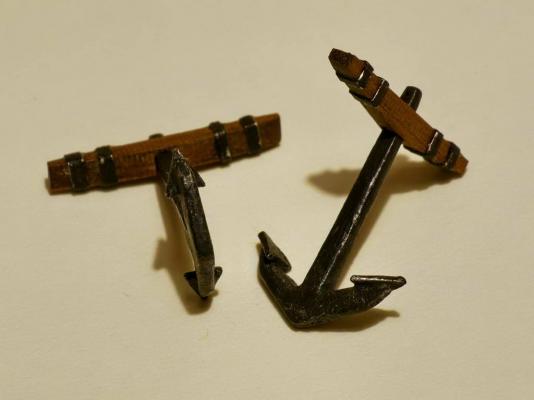
Anchors the anchor's drawing attached on styrene sheet, cut, attached two more layers (with Tamya extra thin liquid cement, it transform two pieces of styrene in one) modeled , created the triangular ends, painted with mat black and dry brushed with graphite pencil. Wooden part from walnut 2*2mm with metallic reinforcements.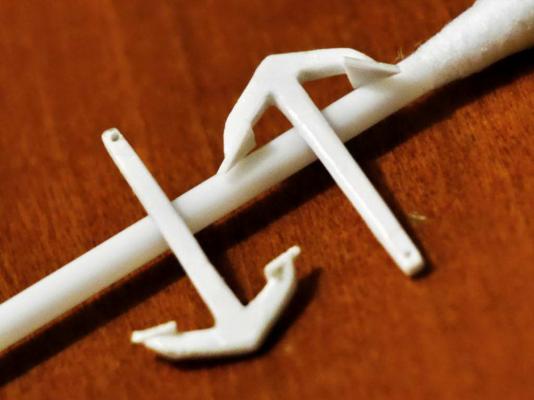
-
Lady Nelson by Leo-zd - 1:119 - SMALL
Leo-zd replied to Leo-zd's topic in - Build logs for subjects built 1751 - 1800
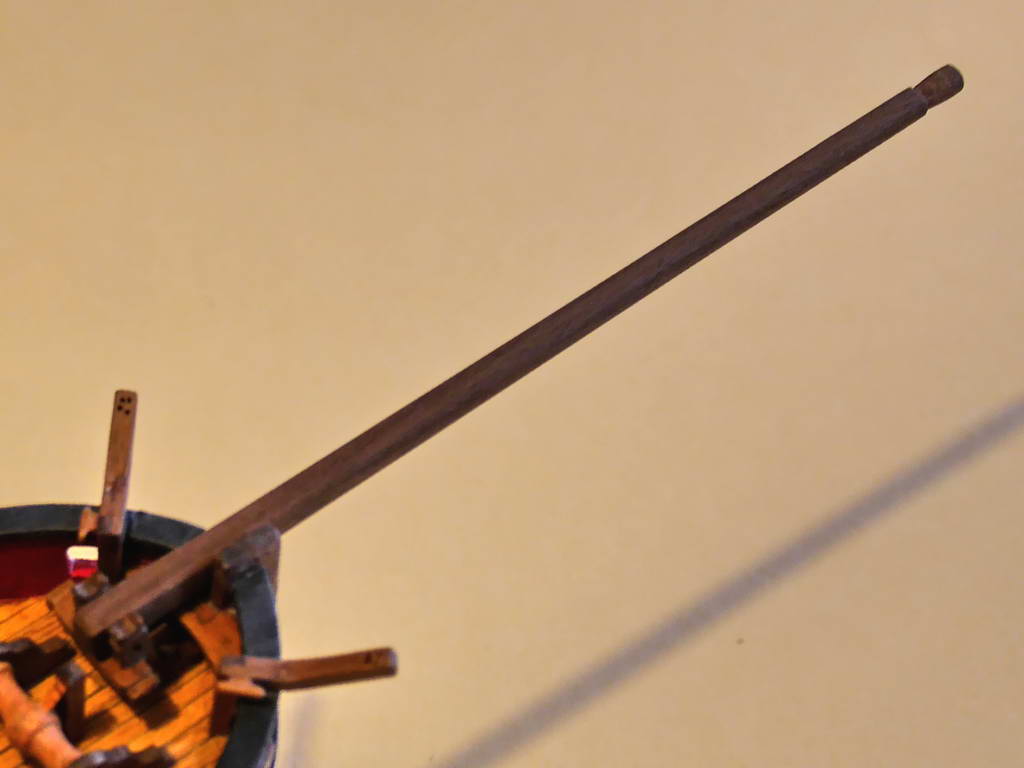
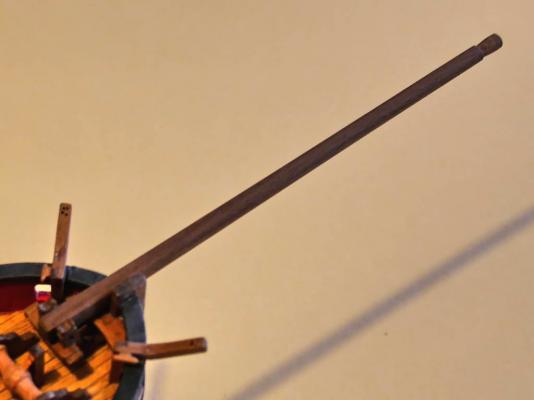
bowsprit is made and the first try to fabricate blocks for cannon rig As the smallest wooden blocks is about 2mm and that is too big for my cannons I tried to produce blocks. I used the iron wire, diameter 0,5mm, and the very thin paper (used in packages of shirts) rounded around the wire and glued. Later sanded to reduce to squared section of about 1,2mm*1,2mm. The next goal will be to cut the slices of 1-1,2mm. As the dimensios are so small the photos are poor.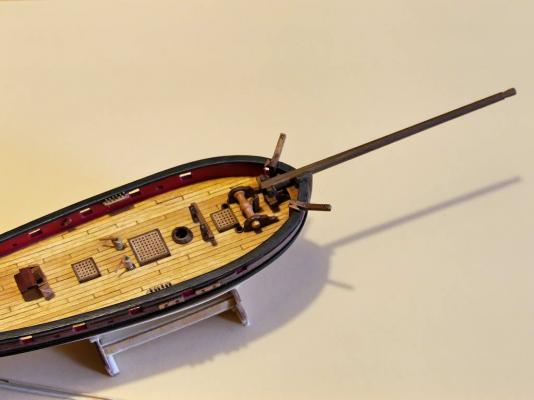

-
Lady Nelson by Leo-zd - 1:119 - SMALL
Leo-zd replied to Leo-zd's topic in - Build logs for subjects built 1751 - 1800
Thk But after painting I feel very sad so to bring me up I returned to one I really love, wood, and made a bowsprit , that is life , workstation/bathroom, sandpaper, wood dust (as I haven't any type or place for working room, the gently works I do on the kitchen table but dusty and rumors works like sanding I do in bathroom ) and you could immediately see the results of work, That was real working therapy , the photos soon. -
Lady Nelson by Leo-zd - 1:119 - SMALL
Leo-zd replied to Leo-zd's topic in - Build logs for subjects built 1751 - 1800
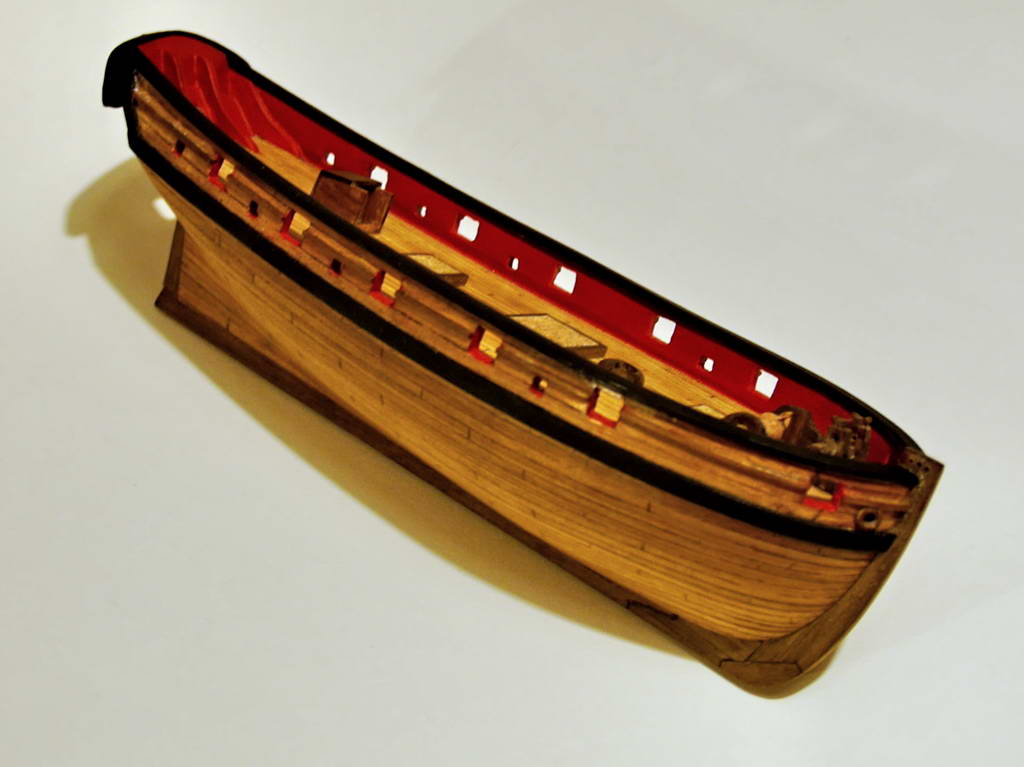
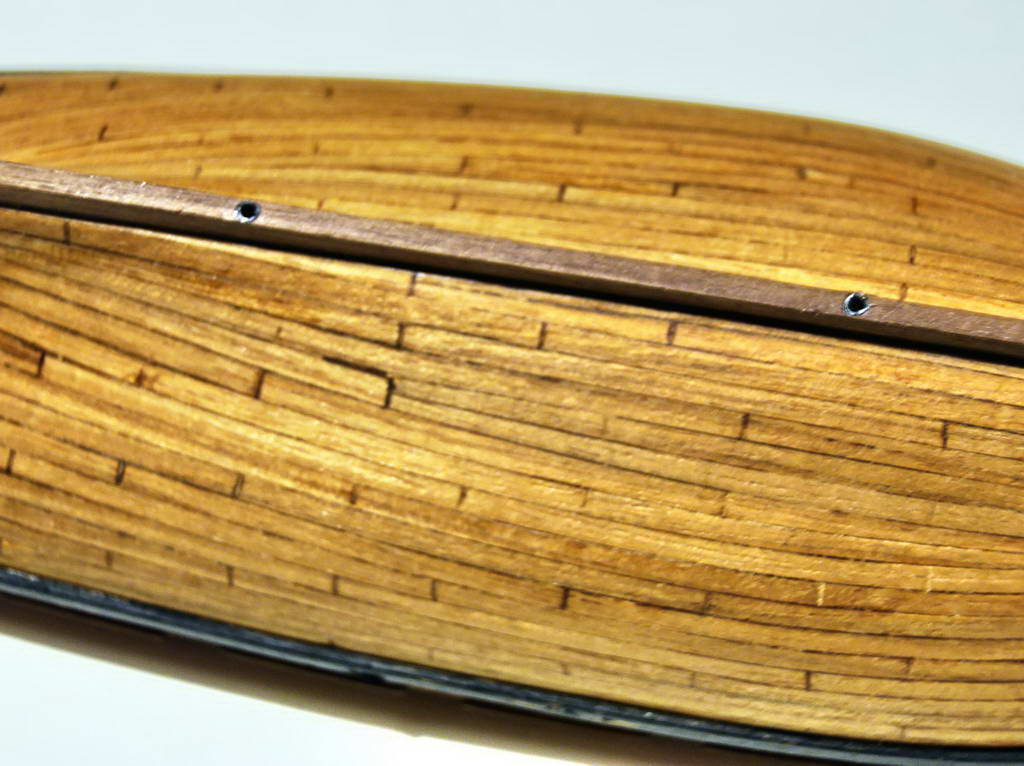
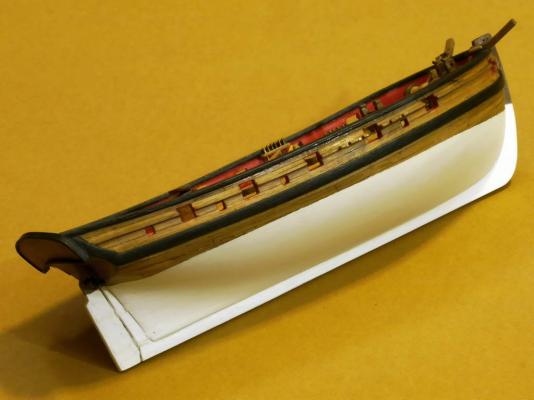
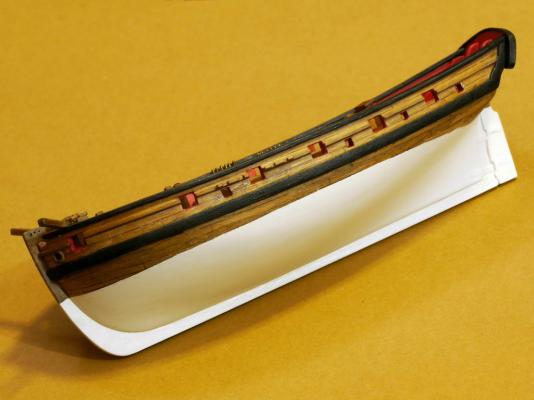
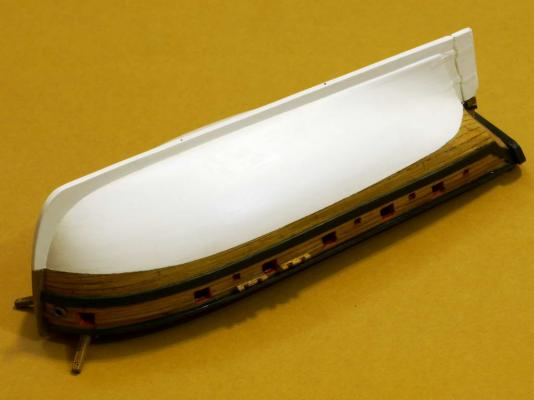
The story continues I made some small parts, practically nothing to see but much to do.. Painting of the underwater part.. At the end the result isn't the one I planed.. :/ My intention was to apply a very tiny color layer, and as the white never cover too much, so the structure and the distribution of hull will be partially visible. but.. but when I applied the first layer of white it was terrible, all surface structure was out of scale and the imperfections were magnified. I decided for new solution, two hands of liquid putty (Mr surfacer 1000) and sanding with used sand paper 1000. When the surface was satisfactory I applied the white... but the problems newer goes alone.. I used the acrylic white with brush, the one from Revell cube.. The result wasn't satisfactory. I applied two layers and gently with previously mentioned sandpaper removed al imperfections, this operation repeated for three times. This procedure created a small problem with masking tape. I used normal masking tape Tessa pink (gently, for sensible surfaces) and it works well but the thickness of all that layers of putty and color was to high so when I removed the tape I noticed some small cracking . At the end the border of color reduced with mentioned sandpaper. The result isn't the best but from other side I hope that at the end, as it is so small, it won't be so visible.

-
Lady Nelson by Leo-zd - 1:119 - SMALL
Leo-zd replied to Leo-zd's topic in - Build logs for subjects built 1751 - 1800
This are the examples from two different cutters (Shenandoah and Alert) especially Alert seems to bee similar to Lady Nelson

-
Lady Nelson by Leo-zd - 1:119 - SMALL
Leo-zd replied to Leo-zd's topic in - Build logs for subjects built 1751 - 1800
I need help or better to say different opinion As this isn't a project on real existed boat (Lady Nelson is in fact imaginary or better to say generic ship from that period) and as I decided to give it the name of one of similar HM cutters from the list of lost boats I am thinking about some modifications. I noticed that in the biggest part of ships the masts and bowsprits are a bit different of the ones from LN drawings, I think that is easiest and simply interpretation of that parts. In fact I refer to the terminal parts of mast (excuse me for my terminology) where the lover part is connected to the upper part and the part of the bowsprit inside the boat. I noticed that in other models this parts aren't with circular section but squared and I have intention to do it in that mode. -
Lady Nelson by Leo-zd - 1:119 - SMALL
Leo-zd replied to Leo-zd's topic in - Build logs for subjects built 1751 - 1800
New small update

-
Lady Nelson by Leo-zd - 1:119 - SMALL
Leo-zd replied to Leo-zd's topic in - Build logs for subjects built 1751 - 1800
Thk, I like small models (and as I could see, You too ) It's my opinion, I appreciate also big scale super detailed models, but my preferred are small scales (ship 1:700; 1:350, small boats 1:72, 1:144, military planes 1:72 for smaller and 1:144 for bigger... military vehicles 1:72) First because I like to hold the model on my palm and second more pragmatically reason is that I haven't space to work but on the kitchen's table And the last reason, more oportunistic , because of costs -
Lady Nelson by Leo-zd - 1:119 - SMALL
Leo-zd replied to Leo-zd's topic in - Build logs for subjects built 1751 - 1800
another small step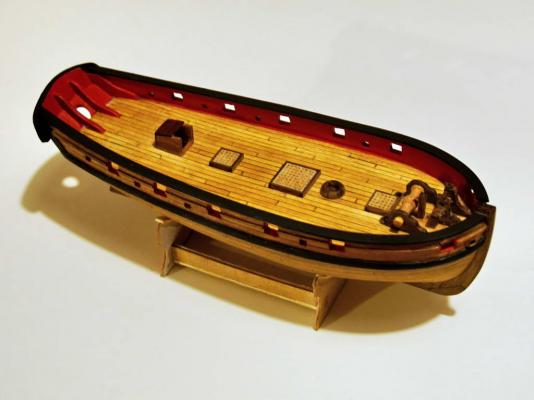


-
Lady Nelson by Leo-zd - 1:119 - SMALL
Leo-zd replied to Leo-zd's topic in - Build logs for subjects built 1751 - 1800
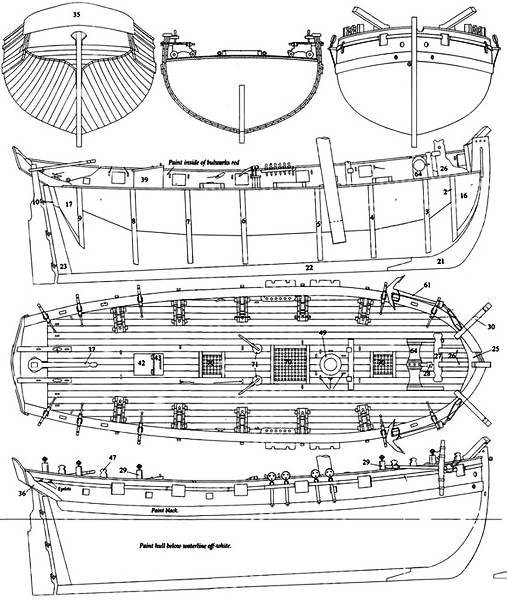
Opss.. I deleted my previous post Here is reduced drawings of LN, for only purpose of comparison (in respect of copyrights and in my personal respect of Cris Watton's works)
-
Lady Nelson by Leo-zd - 1:119 - SMALL
Leo-zd replied to Leo-zd's topic in - Build logs for subjects built 1751 - 1800
Thk Now with shorter days and longer nights (and less real sailing ) I hope I shall made progress -
THk
-
finally finished

-
Lady Nelson by Leo-zd - 1:119 - SMALL
Leo-zd replied to Leo-zd's topic in - Build logs for subjects built 1751 - 1800
Another small step..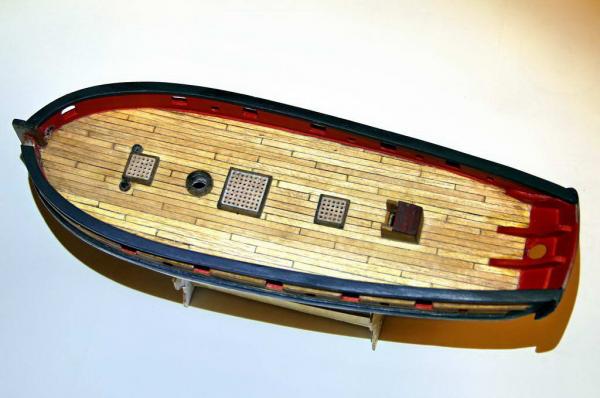
-
Lady Nelson by Leo-zd - 1:119 - SMALL
Leo-zd replied to Leo-zd's topic in - Build logs for subjects built 1751 - 1800
Thk Patrick About the choice of the woods... as now I am distant from any model store and I use only handy tools I use the profiles and woods I bought time ago.. generaly walnut and some light woods , and the red one (the roof ) I think is a mahogany. The deck was passed with teak warmish, after short time removed with soft textile so remained only a light toning. about the speed... unfortunately or simply the life is not only this but this is rather the way of short escape. -
Lady Nelson by Leo-zd - 1:119 - SMALL
Leo-zd replied to Leo-zd's topic in - Build logs for subjects built 1751 - 1800
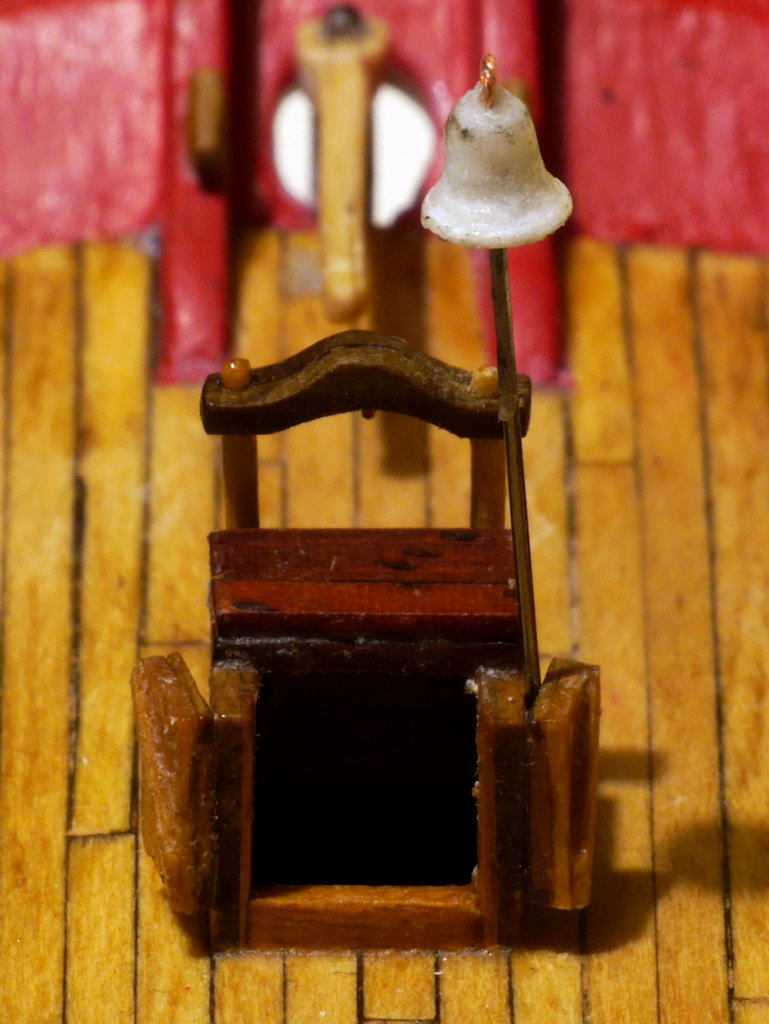
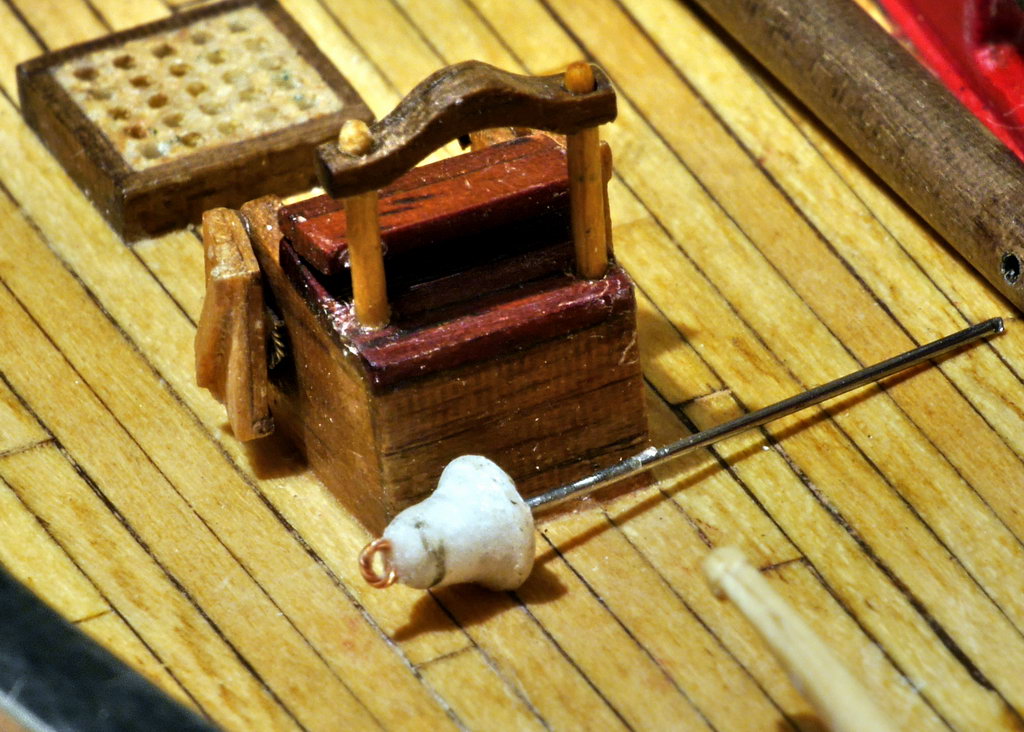
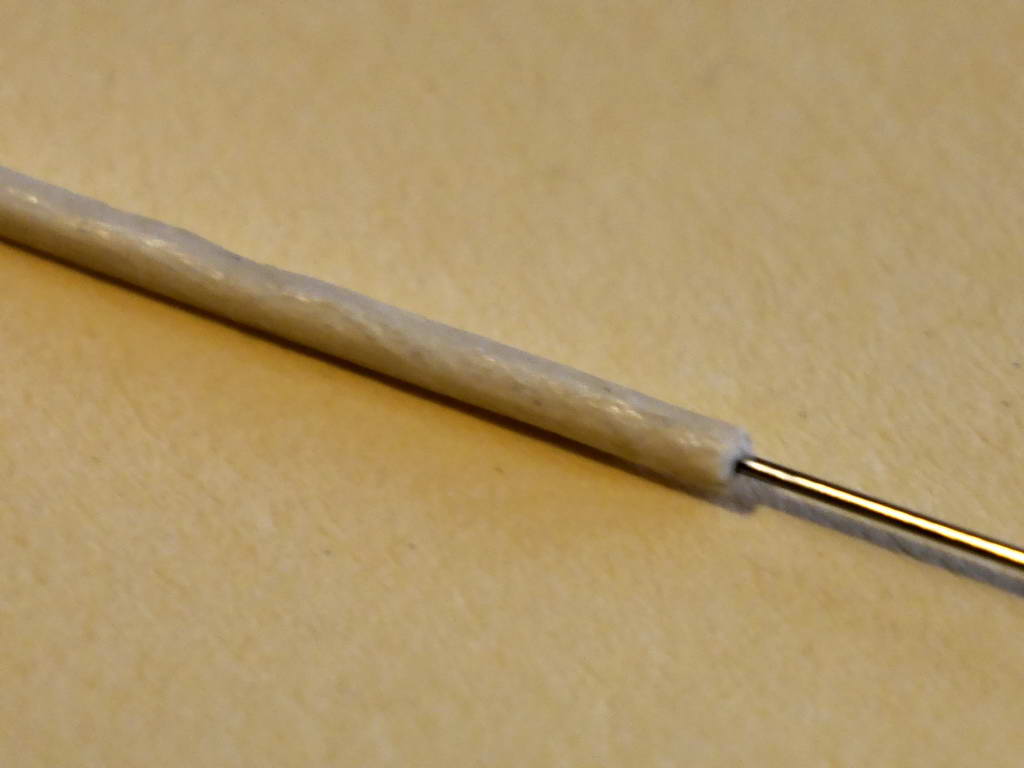
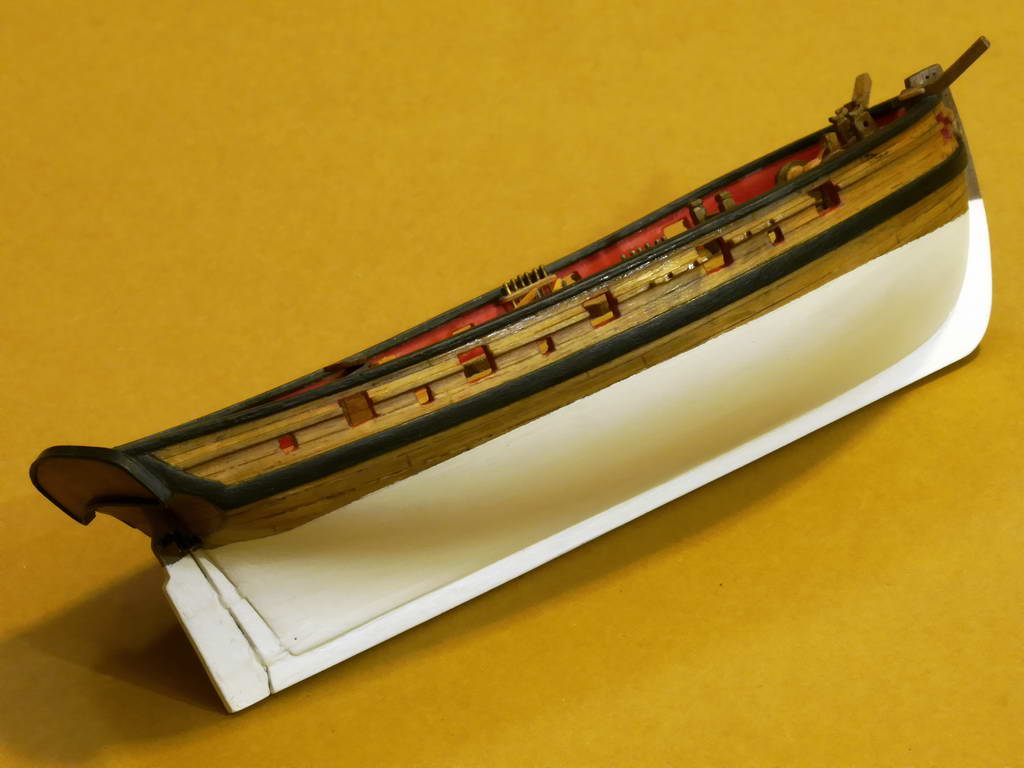
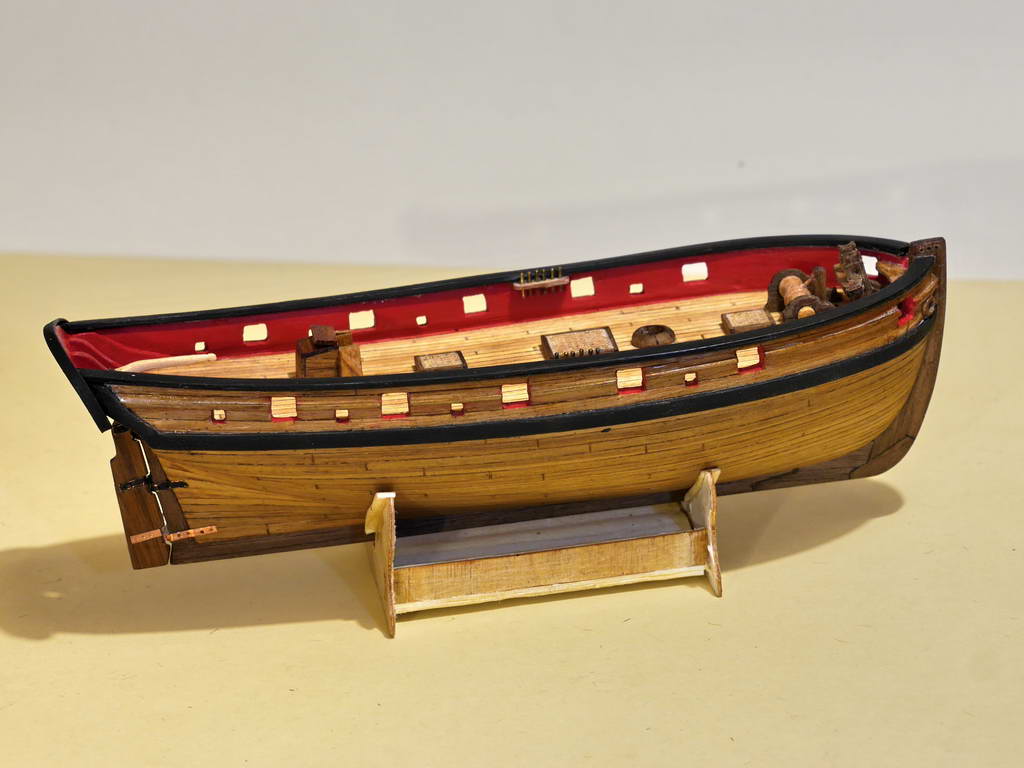
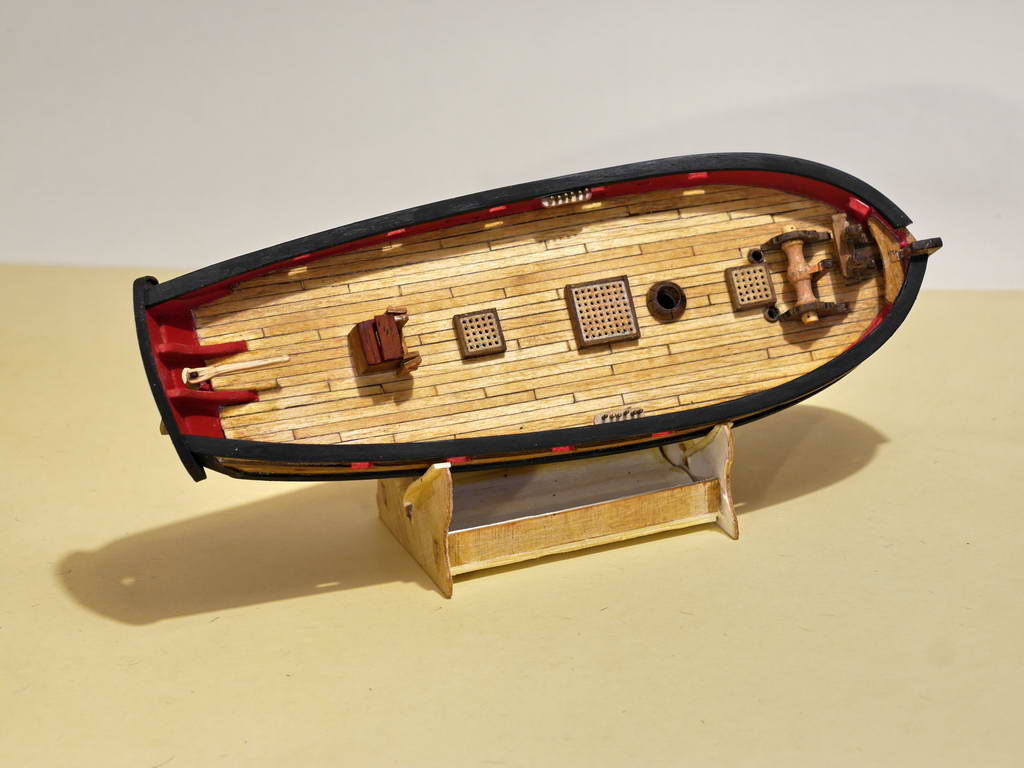
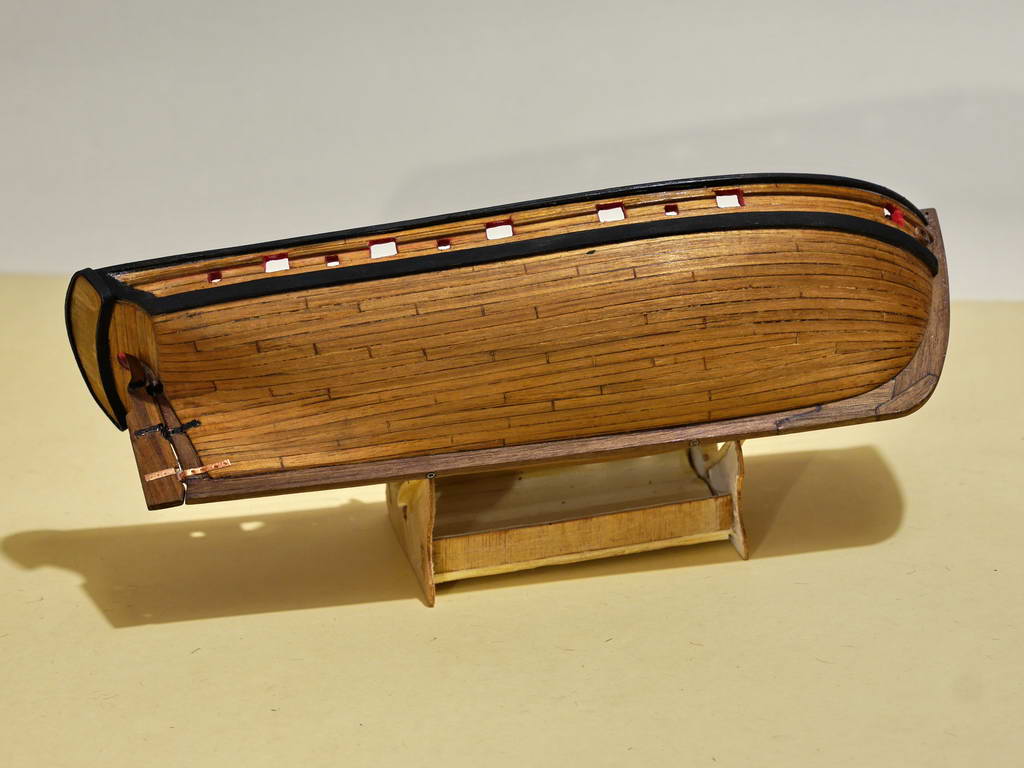
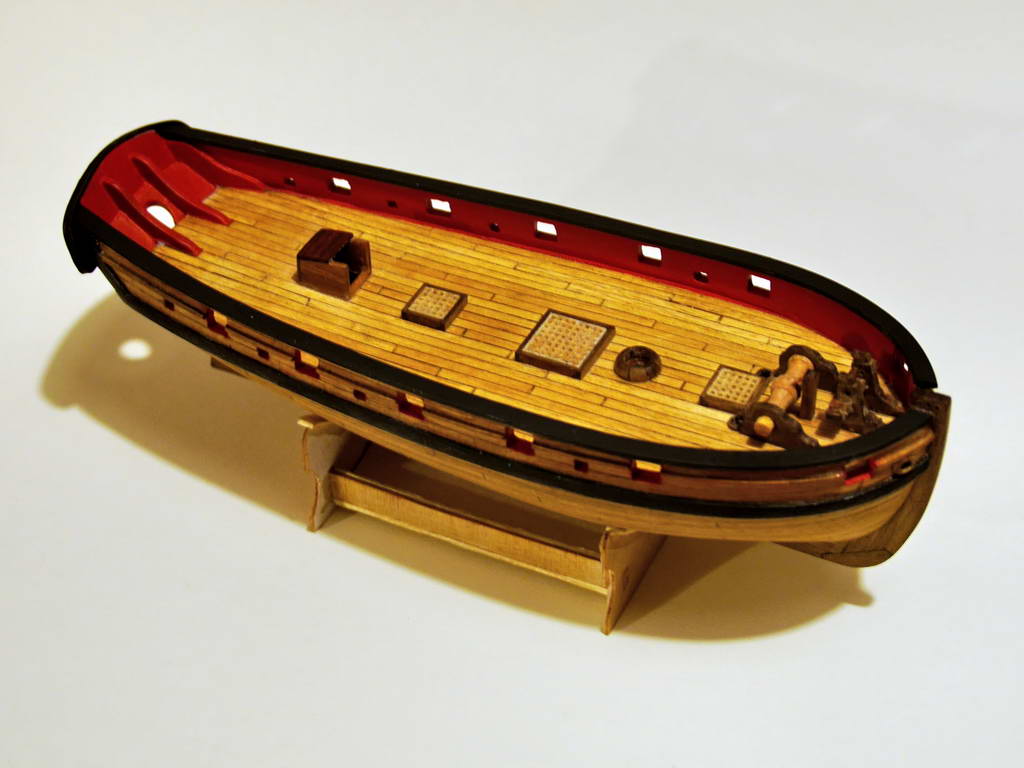
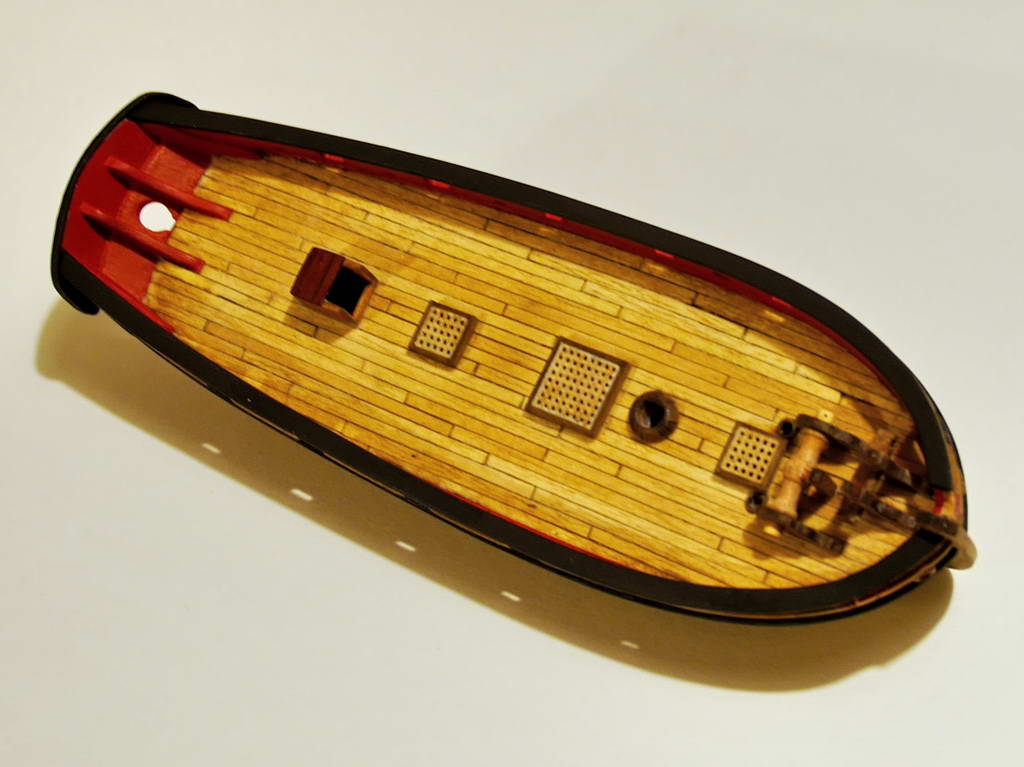
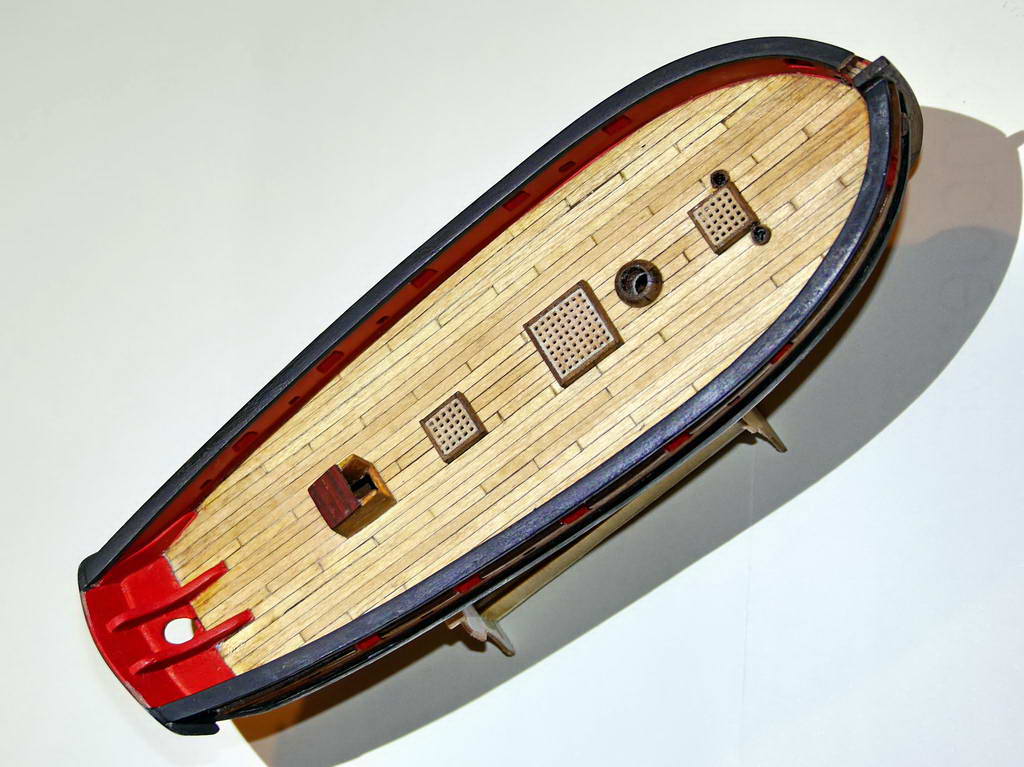
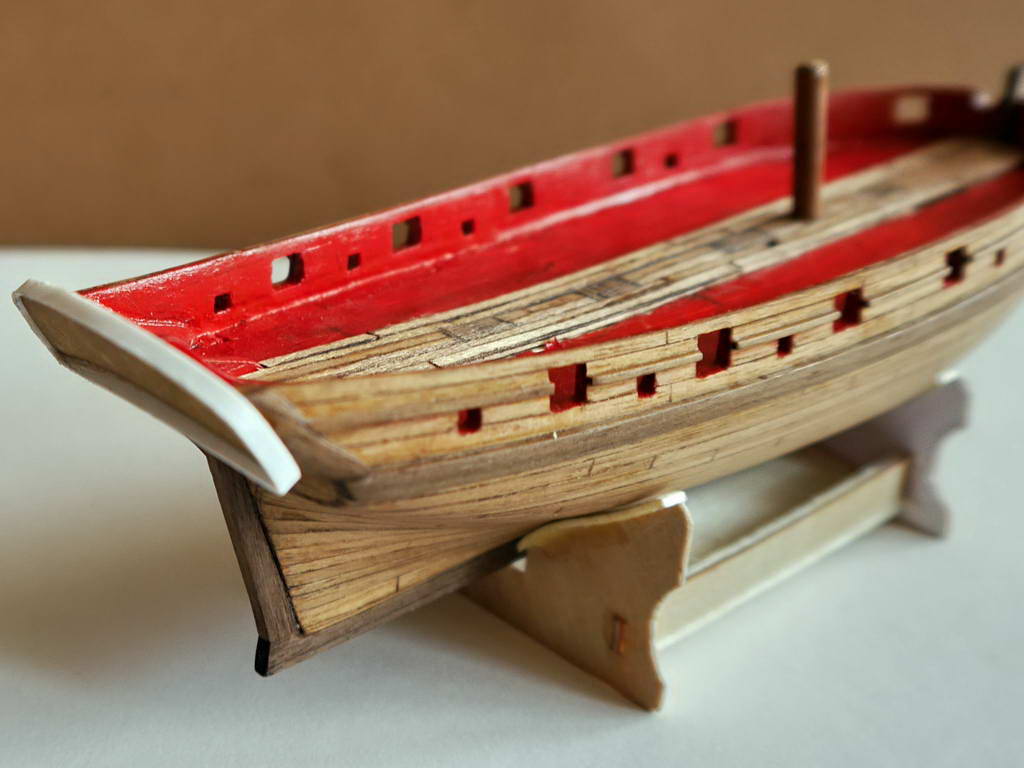
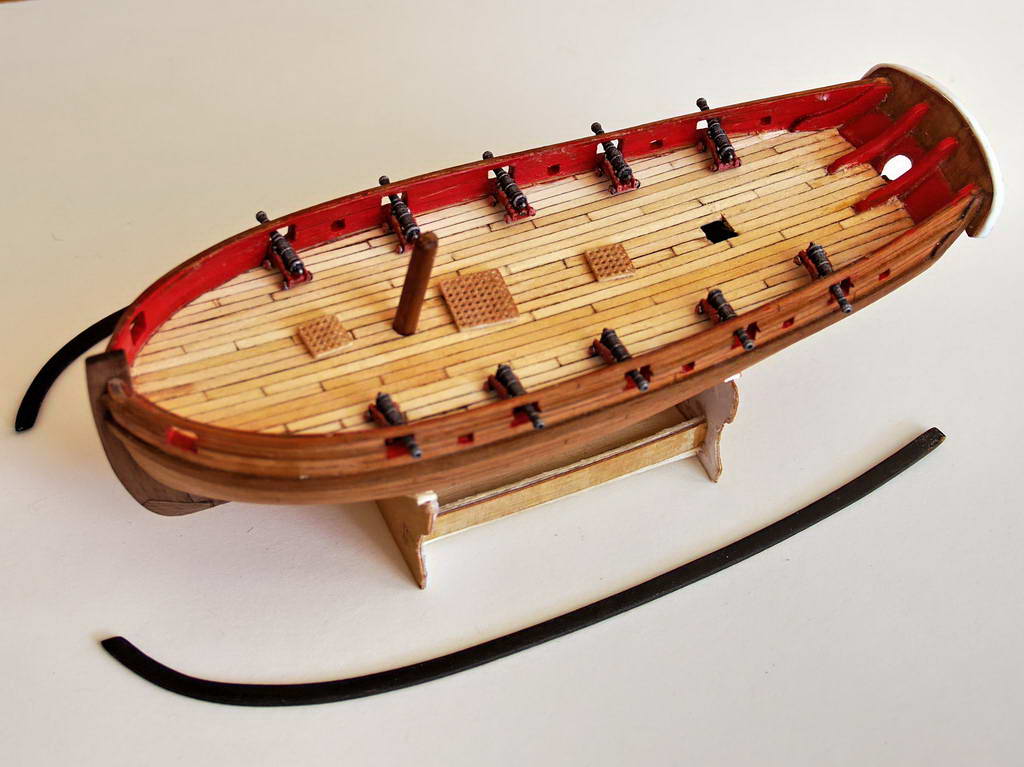
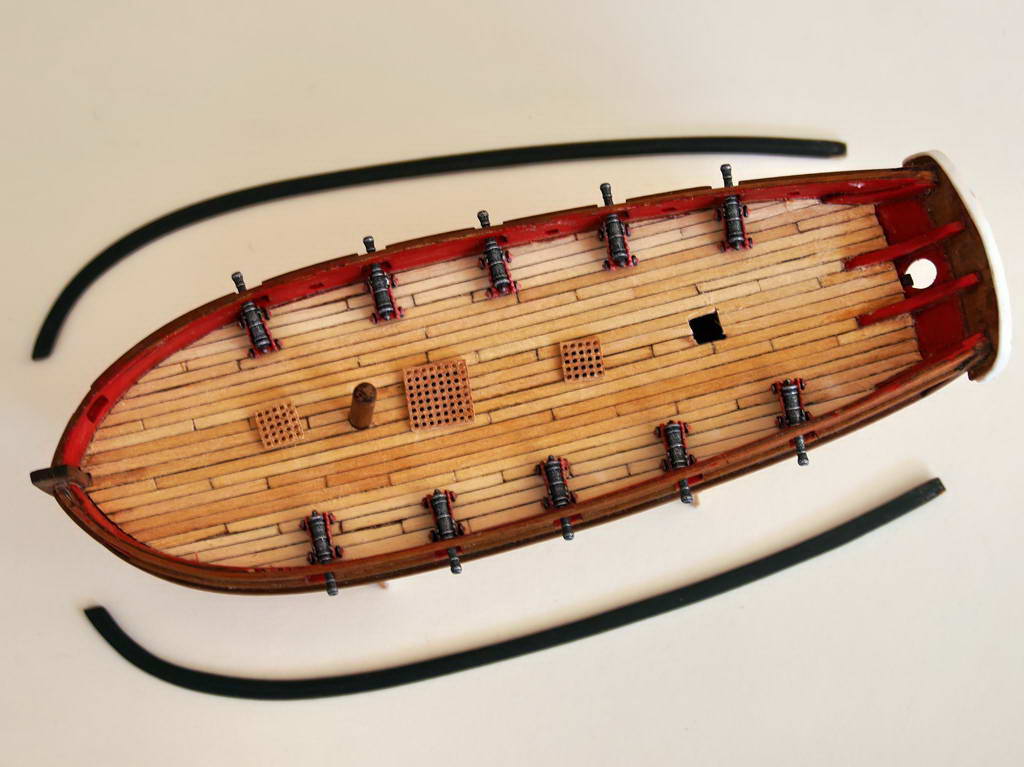
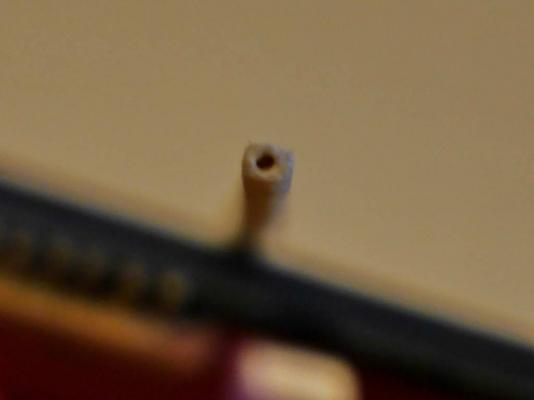
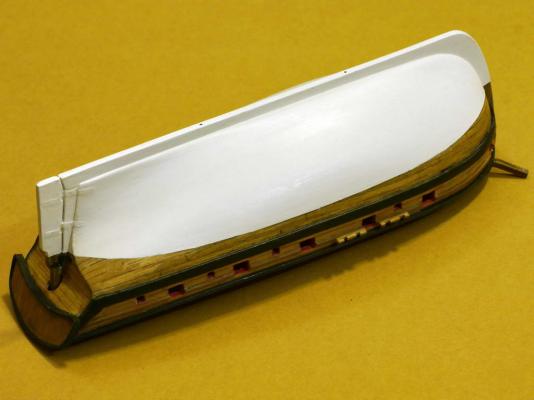
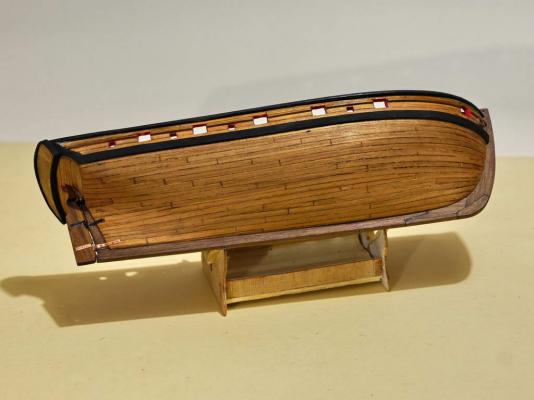
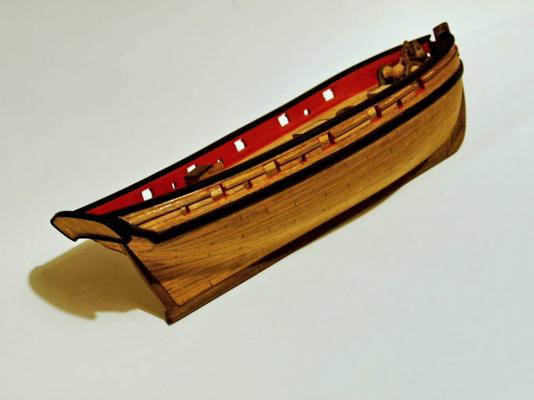
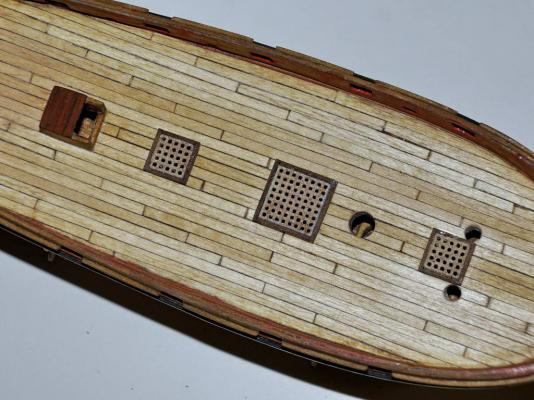
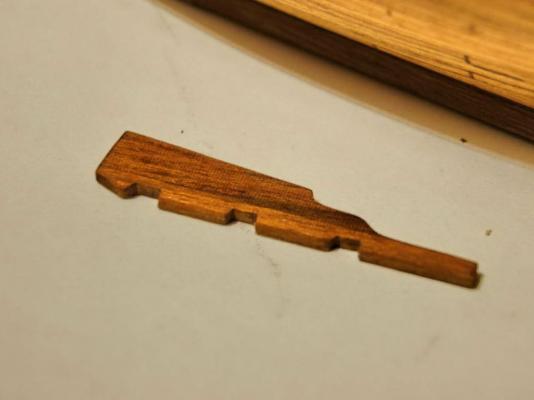
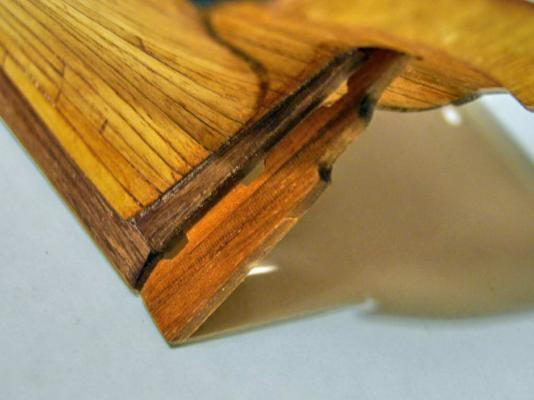
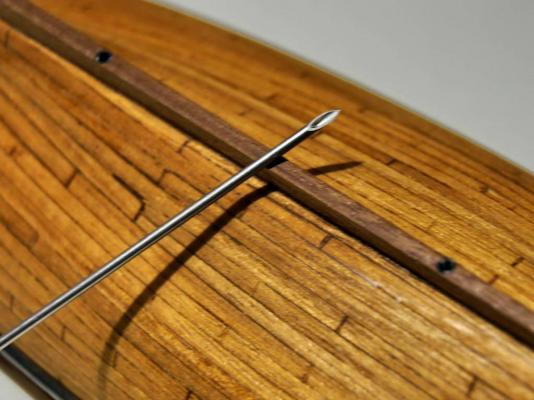
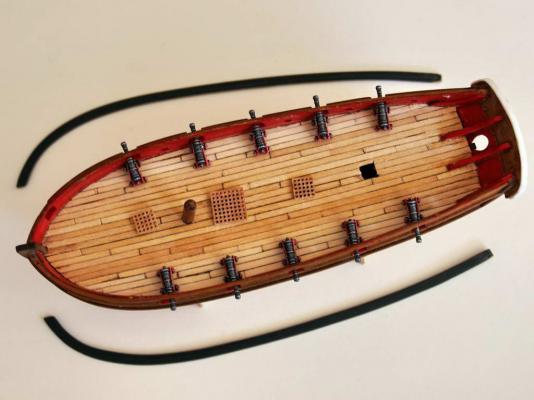
Another microscopic step.. I made the companionway, and naturally I decided to made it open the sides and the roof are glued in position, now I have to make the doors and the hatch. The gratings received frames and also were glued in position. I wont to put the chain or the rope on anchors but there wasn't any hole on the deck for it so, near the first grating I placed two, one on each side. Initially I wonted to create holes in that grating but it's so small. The rudder is made from four pieces of 3*3mm glued walnut. And the creating base for support. I drilled two 1,5mm diameter holes into the keel (keel is 2,3 mm ) than i take an medicine needle (this is the one for infusion with plastic over needle) cut at the requested length. Into the holes on the keel put some CA glue, put inside the pieces of needle, all sanded. So now I have a good and strong support for wire of 1mm diameter.

-
Lady Nelson by Leo-zd - 1:119 - SMALL
Leo-zd replied to Leo-zd's topic in - Build logs for subjects built 1751 - 1800
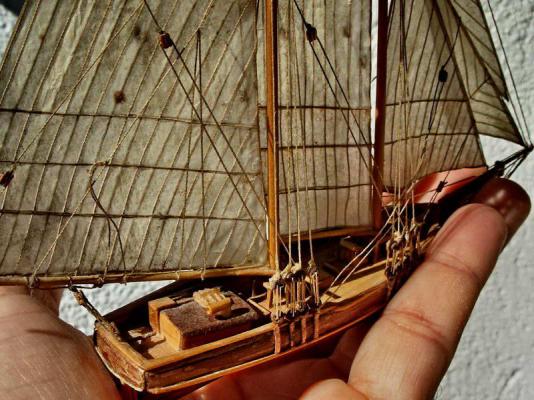
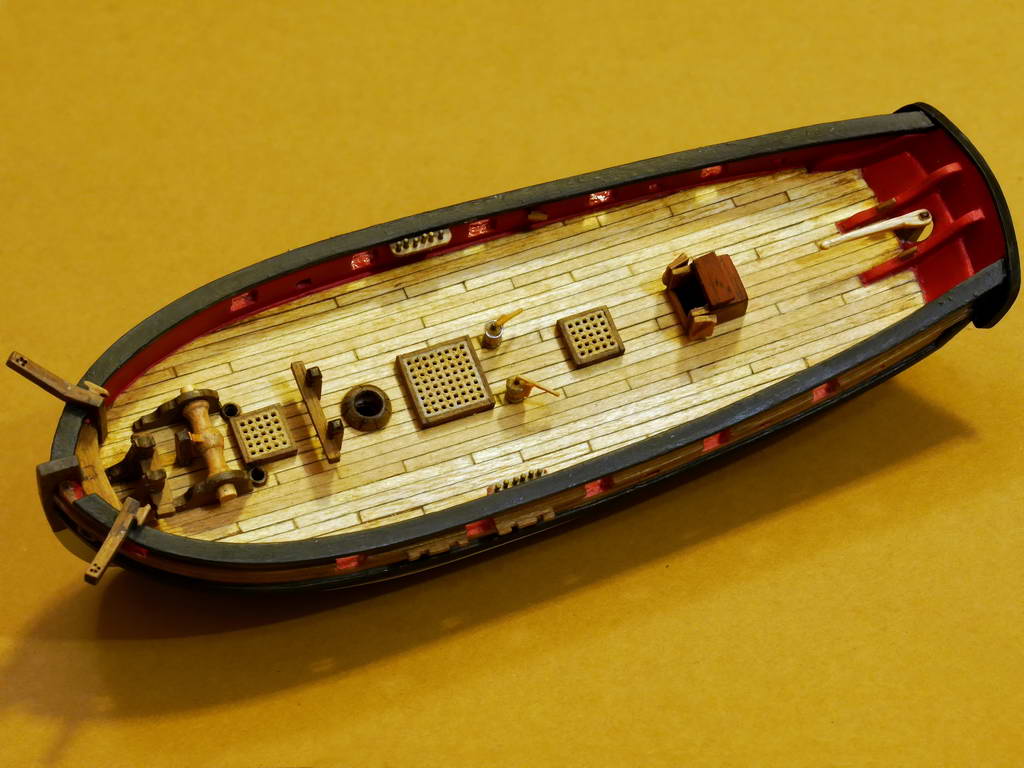
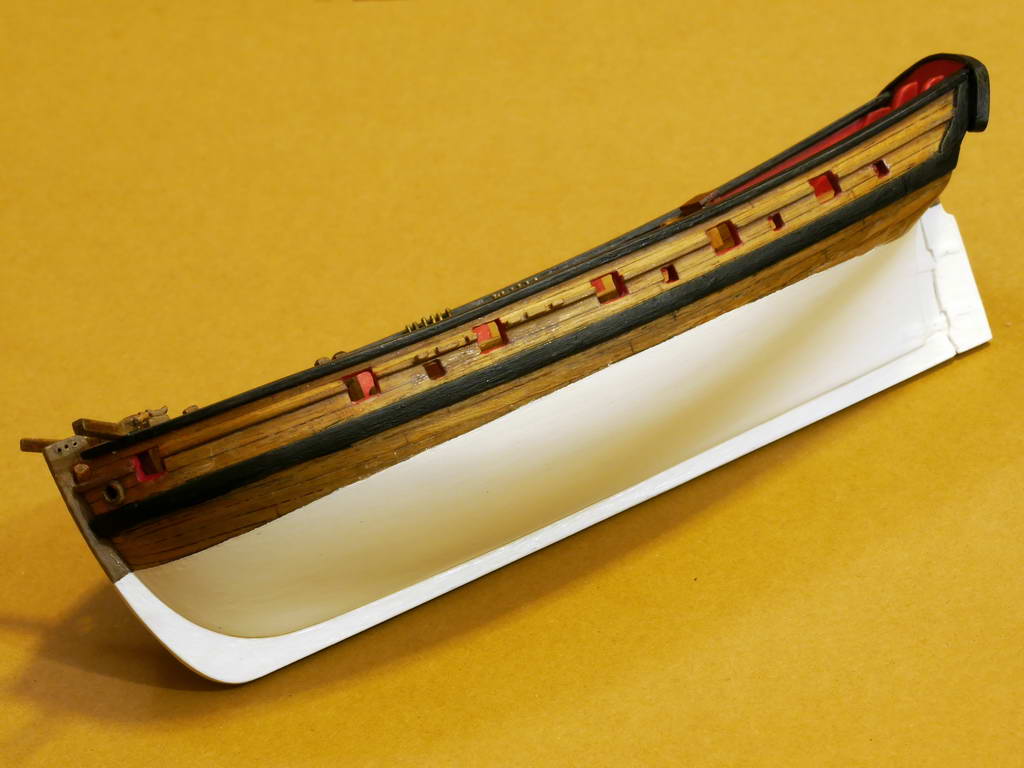
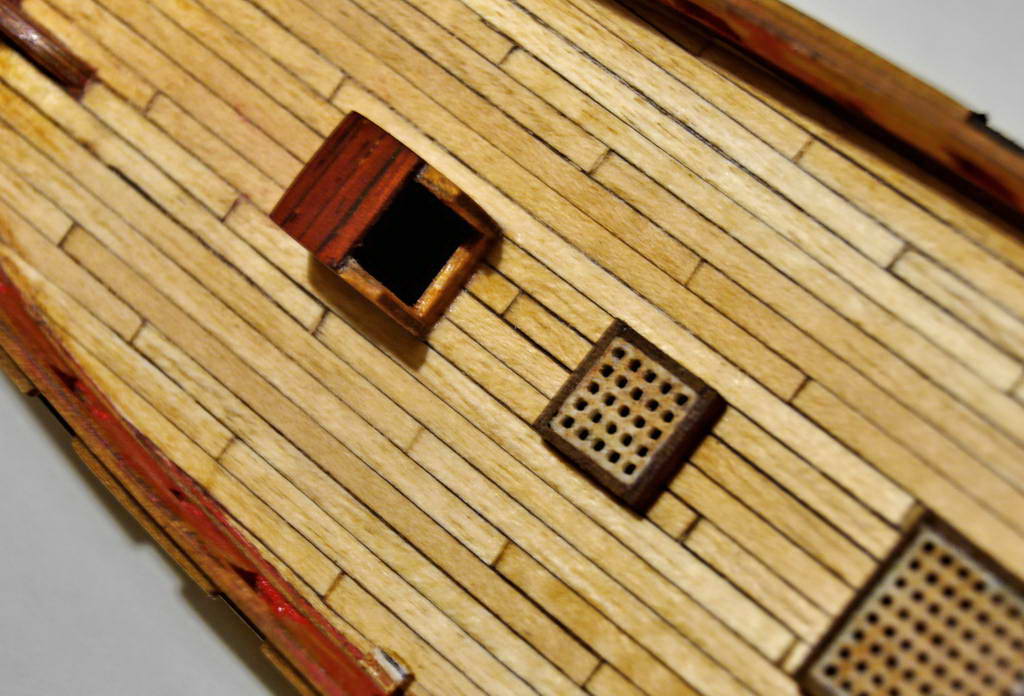
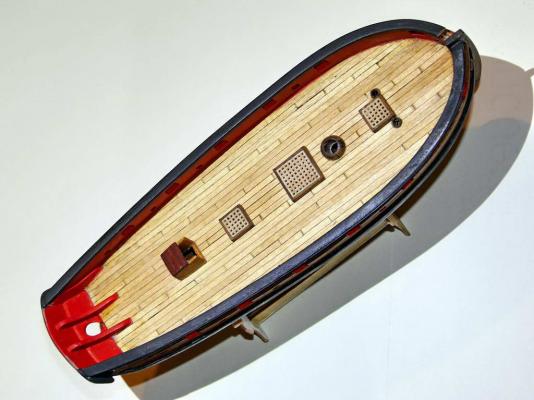
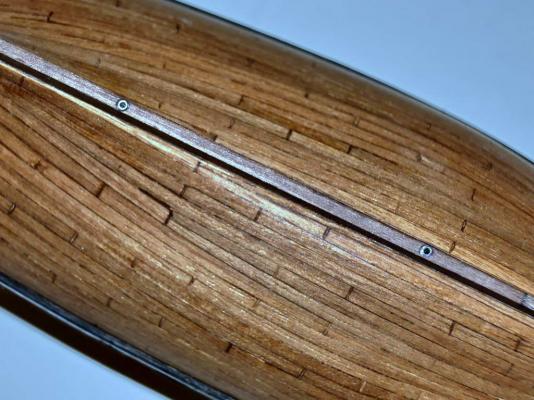
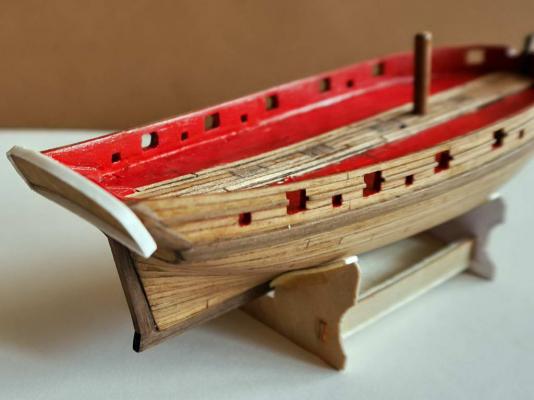
Here we are.. Another small step The deck is finished... not completely. I was convinced that I used the same wood but it seems that was different essences. To reduce the difference I will pass some light "filters", diluted color and sanding. The grids were made with 3d print as I couldn't made it from wood, the beams are 0,4 mm and the openings are 0,75mm Cannons... a little big problem.. the cannons are too high for openings.. although I lowered maximally the deck in that zone. Probably I have to reduce the anterior wheels of carriage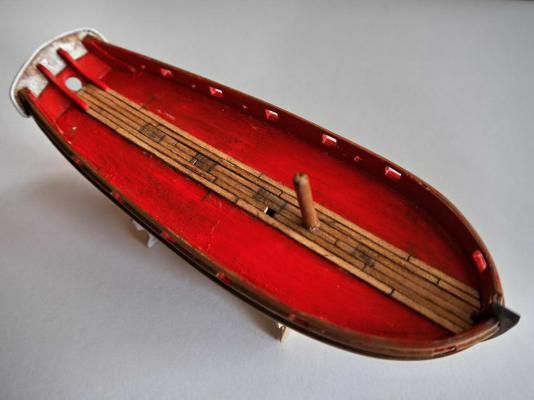

-
just e x c e l l e n t !!! I suppose that you calibrated all instruments and that all indicators are in function (wind direction, true wind speed, apparent wind sped, VMG...)
-
Me again For lines, look in artistic shops but also in comercial centers the artistic colour pencils (I hope I wrote and explain right) thid pencils are a bit different of normal colour pencil that is in use at school, it's a bit bigger and the color substance is a bit greasy, it's perfect for that works but also for something that plastic modellers call "dry brush" especially as this colors came in tonality of gold, bras, chrome, silver, gunmetal and similar, and in usually tonalities
-
I think so, on the simple junctions only draw the line and on the angles and on the boards attach one or more peaces in dimension of reinforcements. You can use a paper glue in stick.
-
Yep... if the sail is too small I use to put just a half of seams on one side (for ex. the 1,3,5...) and the other half on the other side (2,4,6..) as the paper is partially transparent it's ok.
-
Hi Patrick Another my solution If you have a problem with sail's material you can try with the paper which can find in cloth or shoe boxes, not the exclusive ones with monograms, but simply ones without anything. That paper is thin but strong and perfectly imitate sail material in small scales. Just for indication here is my Fly fish 1/200