Leo-zd
-
Posts
201 -
Joined
-
Last visited
Content Type
Profiles
Forums
Gallery
Events
Everything posted by Leo-zd
-
 Yes, but I think that less then a drop of black will remove the shining of the Humbroll aluminum leaving at the color the metallic aspect. If you could try to polish it with cotton, as you probably knew, between the "normal" enamels that is the best aluminum .. Of course that the Alcads is another story..., some comparison as between cotton sails and composite sails...
 -
The Jan's model is fantastic In reference for the mast and boom color is also important the consideration of the scale, the difference is approximately 15 times! And the plastic modelers have the rule that take in consideration the scale, as the scale is smaller the object is at bigger distance so the colors must be lighter or the same color as on the bigger scale seems darker. Take also the consideration that the Patrick's mast is so small that I don't knew if he uses airbrush or classic painting. My opinion is that will be enough the used color, maybe with drop of black just to "kill" the shining of used color and maybe gently polished to bring the "metallic" aspect (not shining but metallic) I hope that is understandable what I wrote.
-
Lady Nelson by Leo-zd - 1:119 - SMALL
Leo-zd replied to Leo-zd's topic in - Build logs for subjects built 1751 - 1800
Thk Patrick, But now I want to finish the hull and the inside of the deck. Fortunately there aren't many things before the mounting the guns. I have some problems with rigging for guns. -
Lady Nelson by Leo-zd - 1:119 - SMALL
Leo-zd replied to Leo-zd's topic in - Build logs for subjects built 1751 - 1800
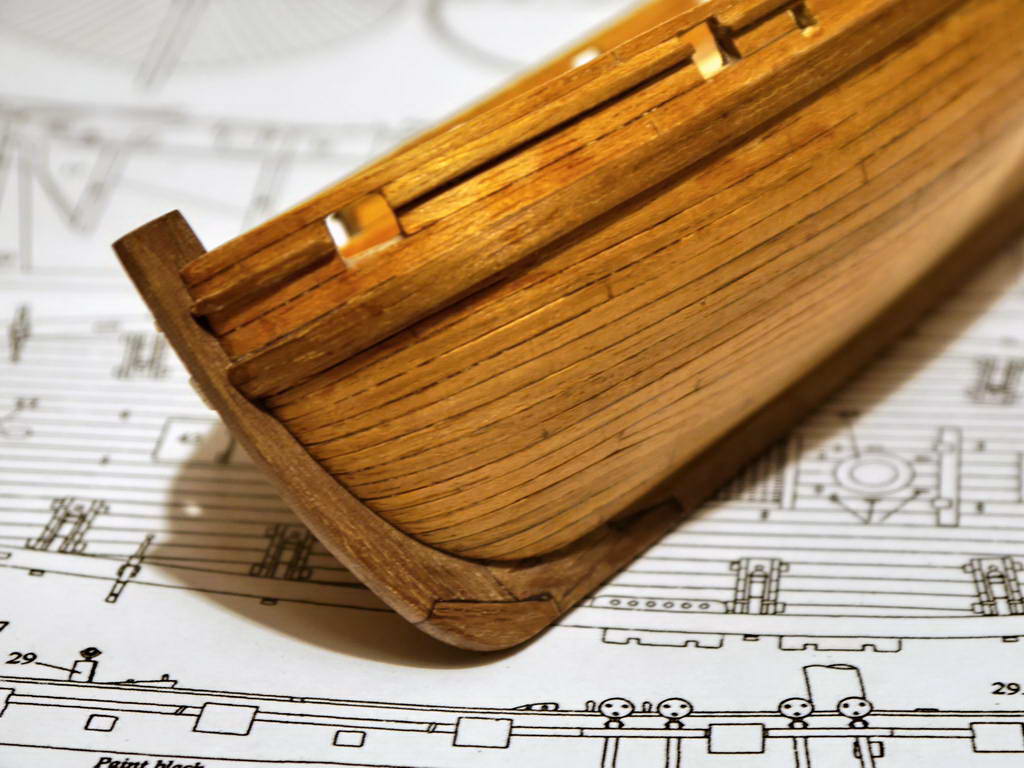
Another small, microscopic step for the model but big for me I finished the stem, made it from two 4*4mm pieces, boiled and curved, and sanded to 2mm (my fingers was happy when the part (3rd. attempt) was finally glued, no more sanding ) I knew that the connections are too rough and that the parts are approximate but that part will be painted and it is so small that this will partially disappear.

-
Noo it's OK nobody in model's universe uses to say styrene...it's normally called plasticard or as the best known producer "Evergreen" I only wanted to indicated that exists usable plasticard in our everyday life
-
Hi... excuse me for intrusion but small tip. Plasticard is in fact styrene, suppose that all know, but its also the part of many different cups and boxes in "normal" commerce and its marked (in Europe but I think also in other ) as triangle with symbol PS 06 thin polystirene you can find in cups for yogurt and similar (so when we buys yogurts, my wife looks at the upper part; ingredients, price, date... and I look at the lover part "PS 06 OK, otherwise NO it's not good"), often is (transparent or white) the single use glass in coffee/drink automates... also the packaging boxes for frozen meals, cakes ... are from that material.. (not to confuse with expanded poystirene, softer, with visible structure and not so thin) I wrote all this because sometimes you don't need too much of material and the dealer is distant, close (My glue, paint, spare parts finish twenty minutes after the shops closed).. and also sound good.. you are recycling One more an I promise that I will stop..(don't shoot me ..) In comerce you have many types of glues but some types are better because in fact it dissolve and weld two parts of styrene in one body, for example the Tamya green cap liquid glue.. or ..if is difficult to found you can use small quantity of acetone
-
Lady Nelson by Leo-zd - 1:119 - SMALL
Leo-zd replied to Leo-zd's topic in - Build logs for subjects built 1751 - 1800
Yep, you are right, garywatt, unfortunately my knowledge of English is smaller than my models -
Lady Nelson by Leo-zd - 1:119 - SMALL
Leo-zd replied to Leo-zd's topic in - Build logs for subjects built 1751 - 1800
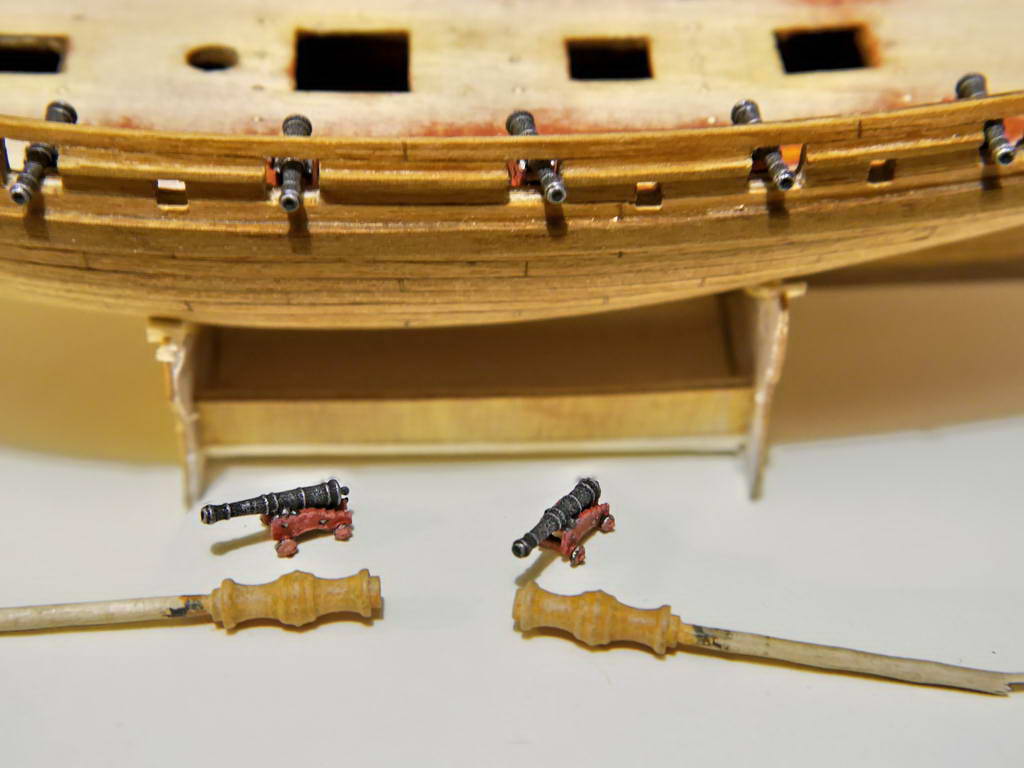
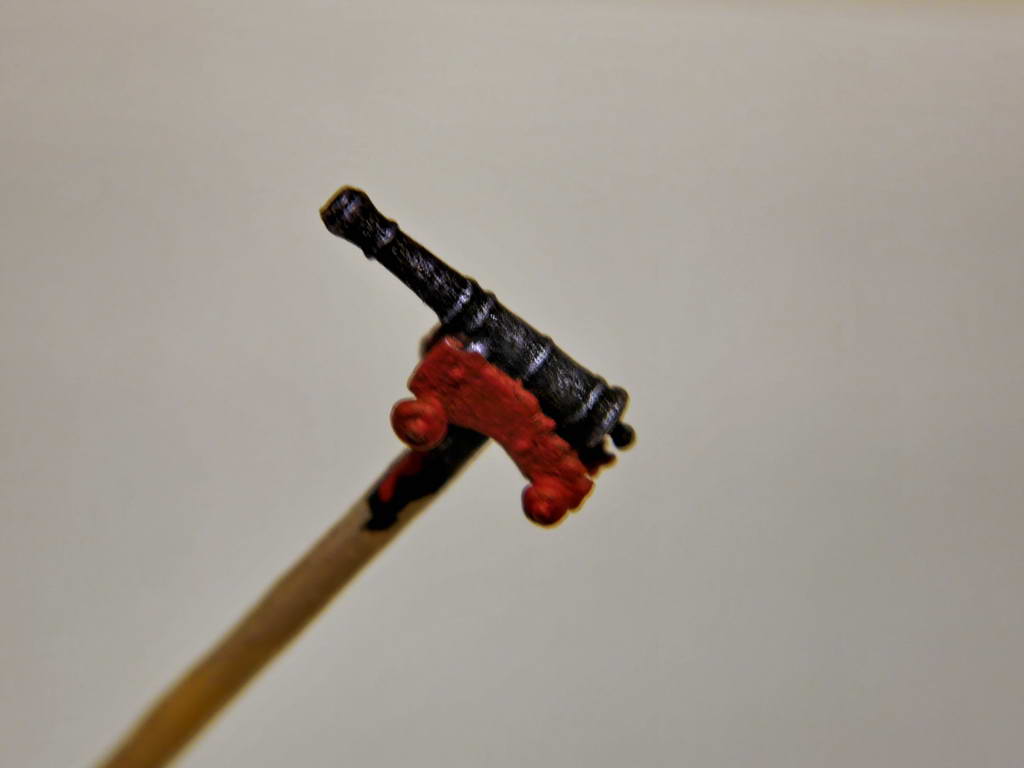
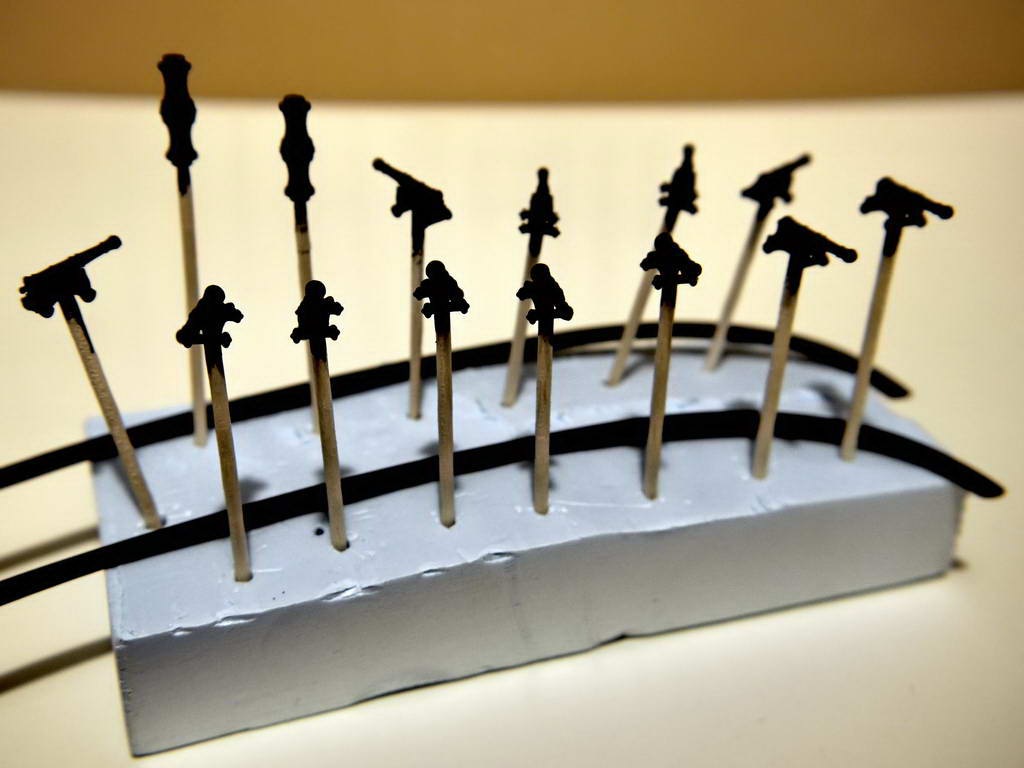
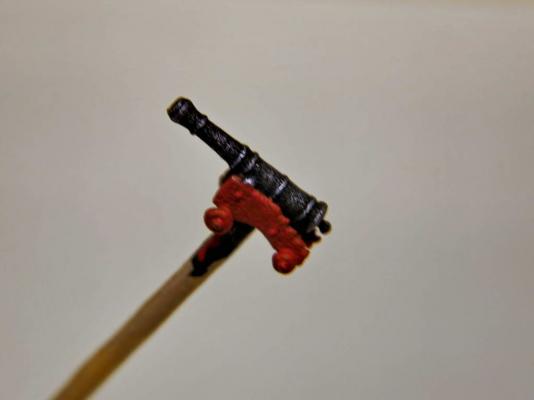
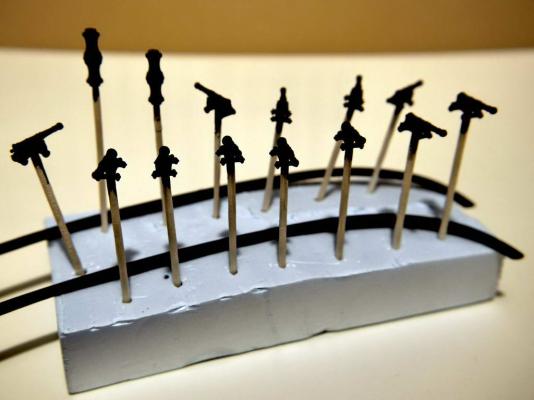
Thk The potato on the picture is my finger and the beam which is the support for the cannon is a toothpick Yess I know that I have big fingers and teethes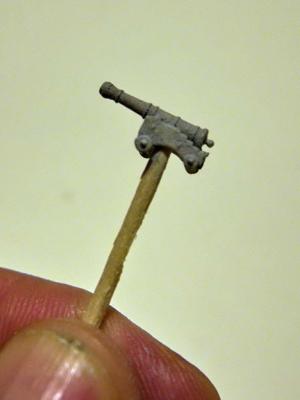
-
Lady Nelson by Leo-zd - 1:119 - SMALL
Leo-zd replied to Leo-zd's topic in - Build logs for subjects built 1751 - 1800
Thk Patrick, it's nice to hear this form the Master of small fantasies I had now to find the tin, very tin rope, eyebolts and blocks. I think that I must produce because Ihadn't seen soo small. -
Lady Nelson by Leo-zd - 1:119 - SMALL
Leo-zd replied to Leo-zd's topic in - Build logs for subjects built 1751 - 1800
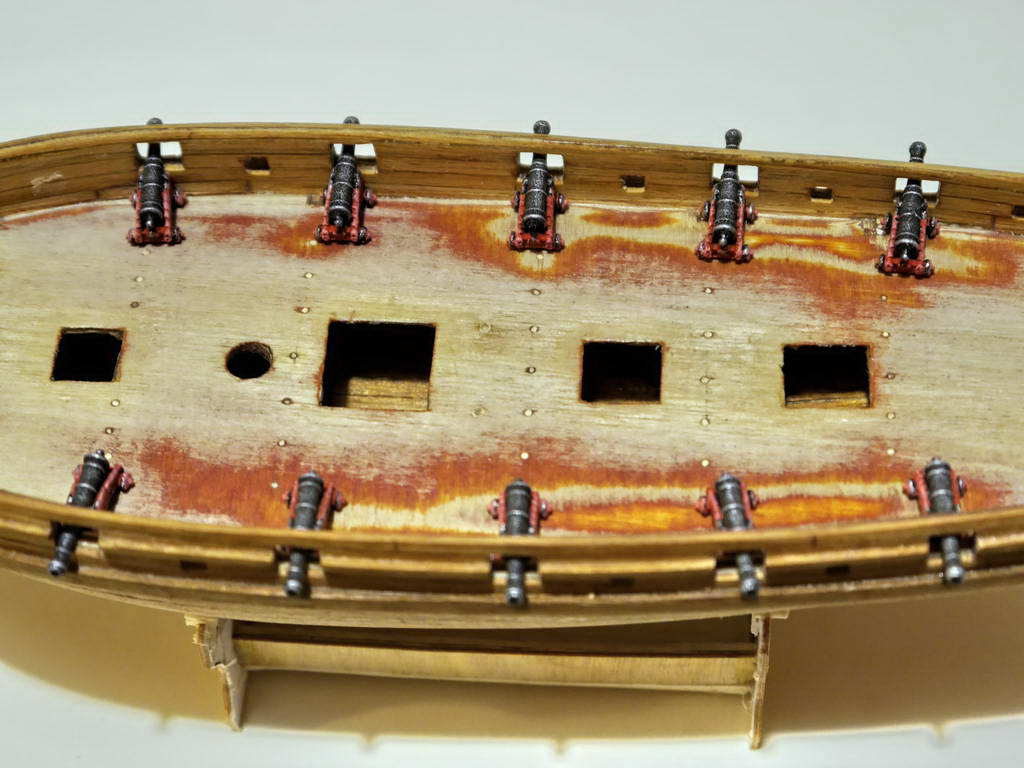
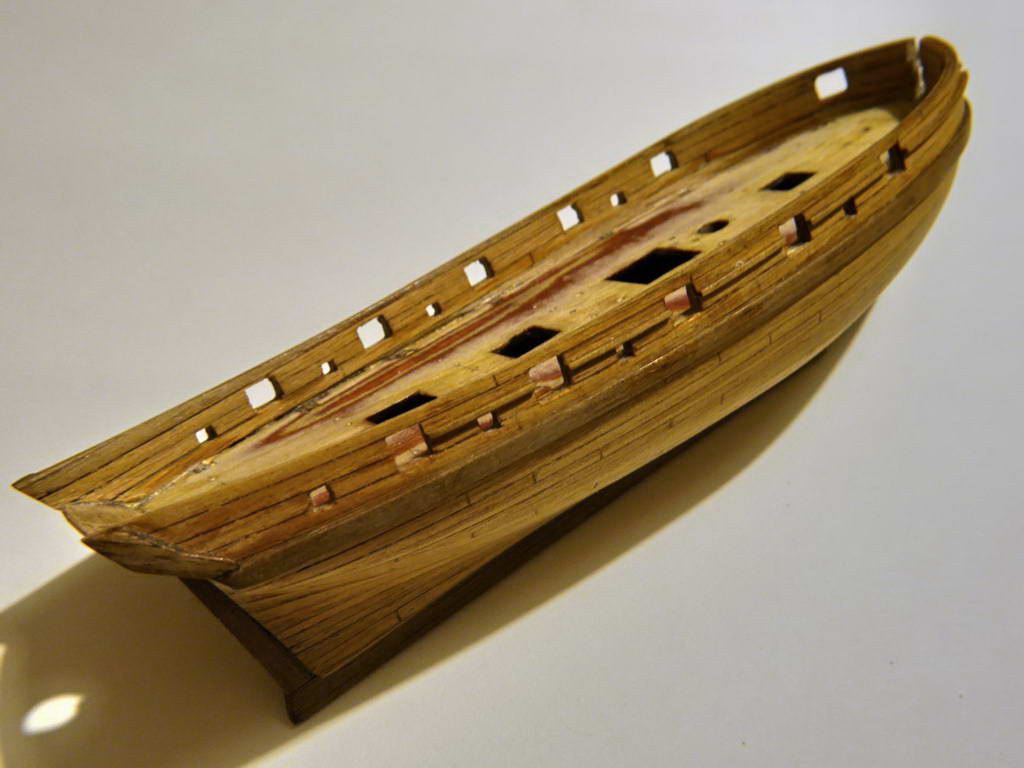
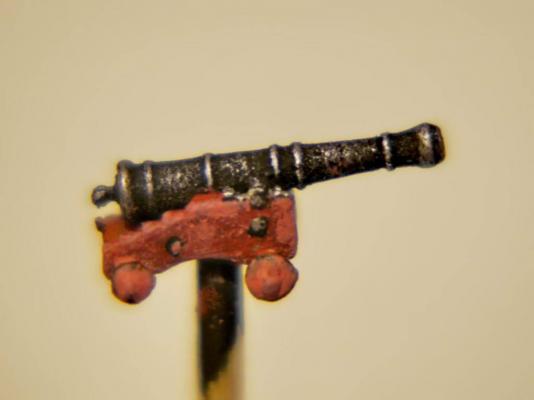
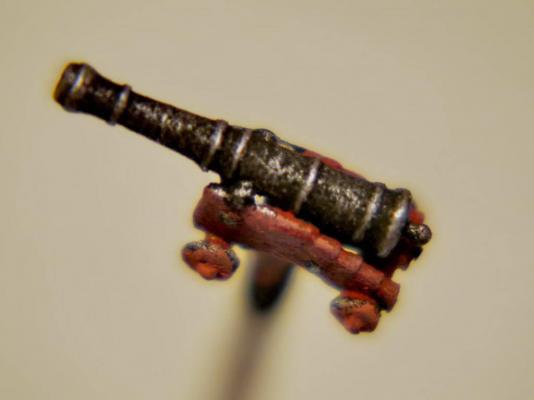
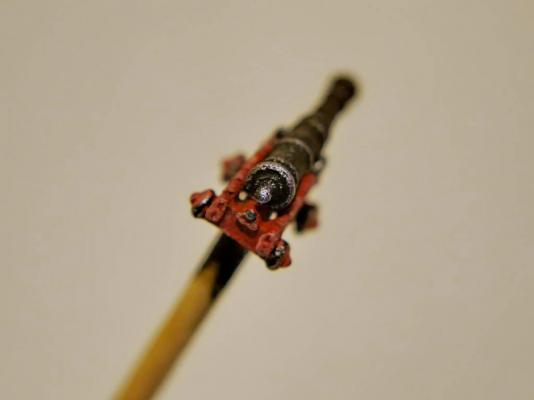
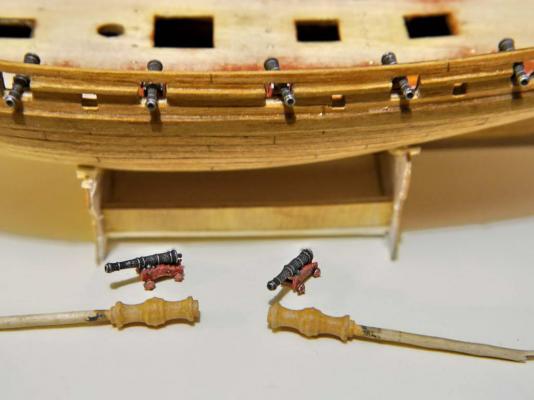
Here we are The guns are done (except the rigging, and that will be fun) the coloring may be looks aproximativ and less precise but in the great part it's invisible at normal looking, without magnifier.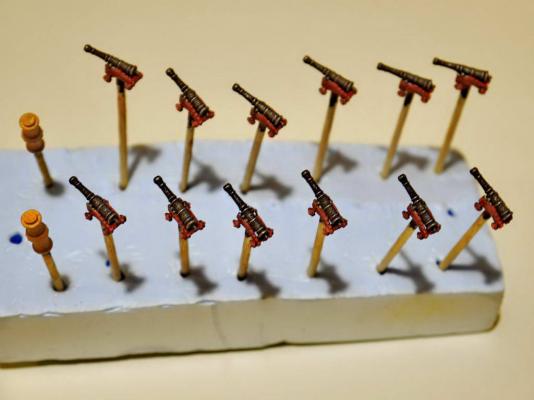

-
3D Printing - Not Just Yet!
Leo-zd replied to dvm27's topic in CAD and 3D Modelling/Drafting Plans with Software
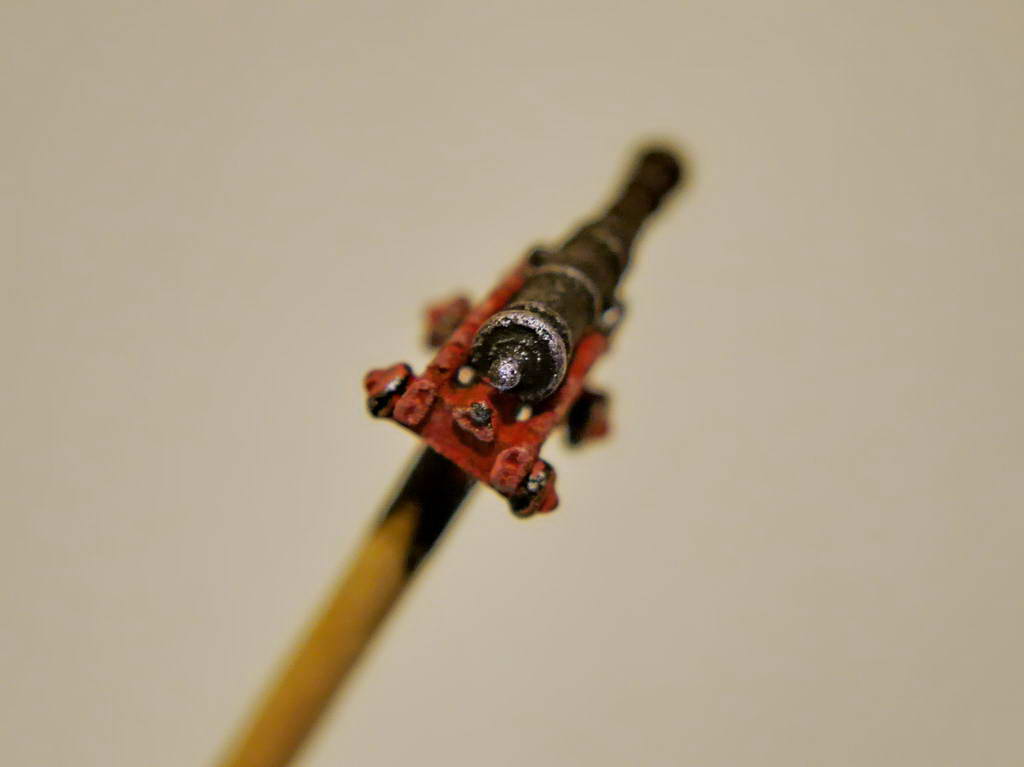
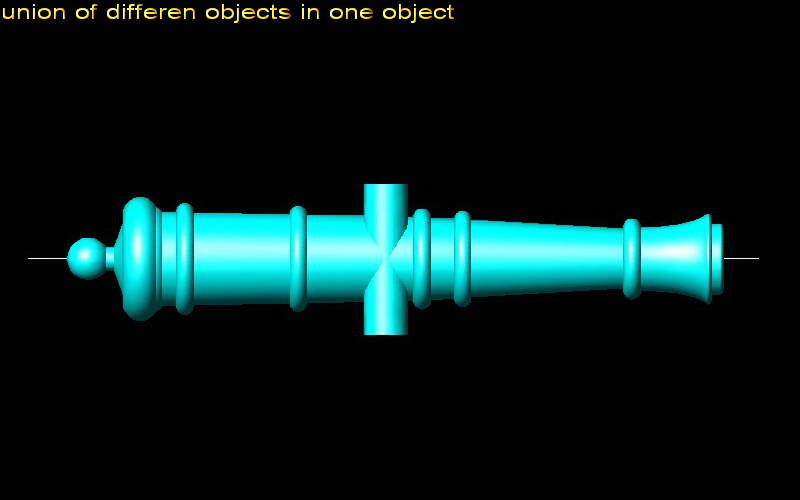
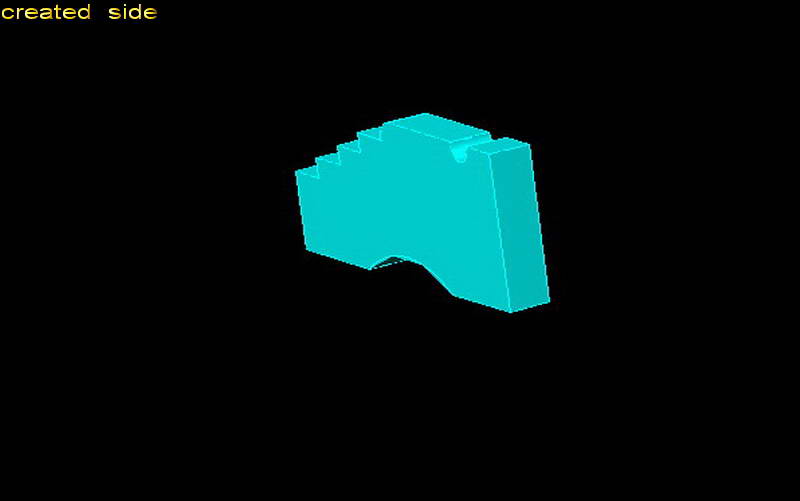
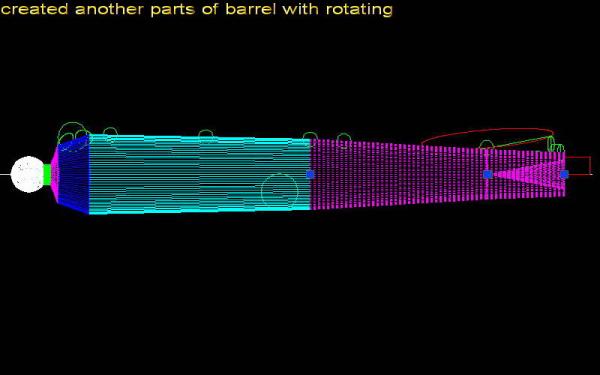
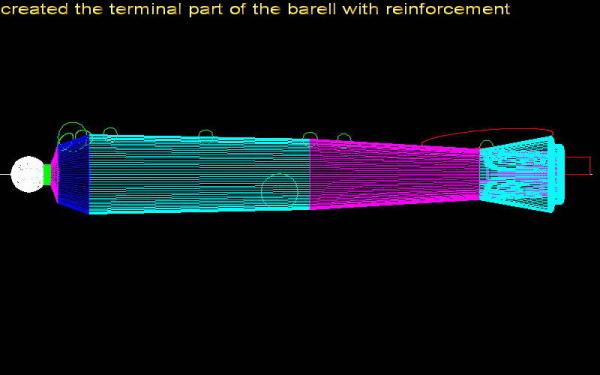
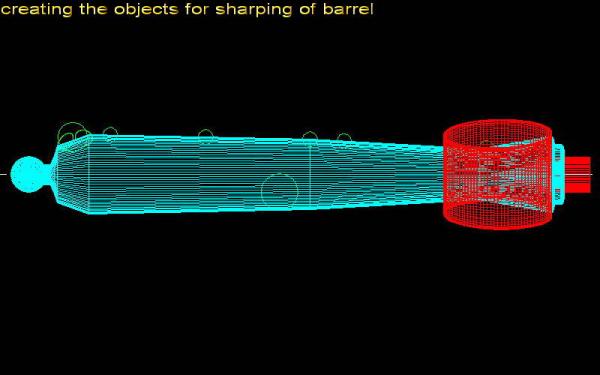
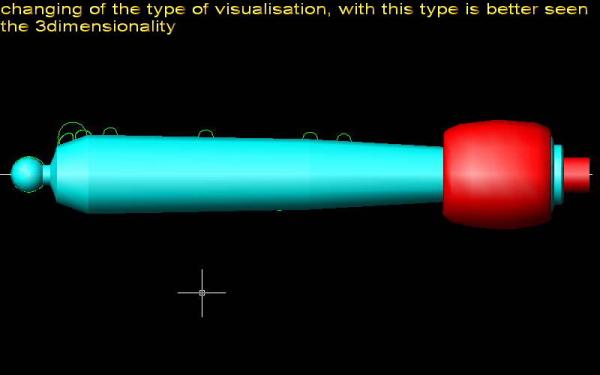
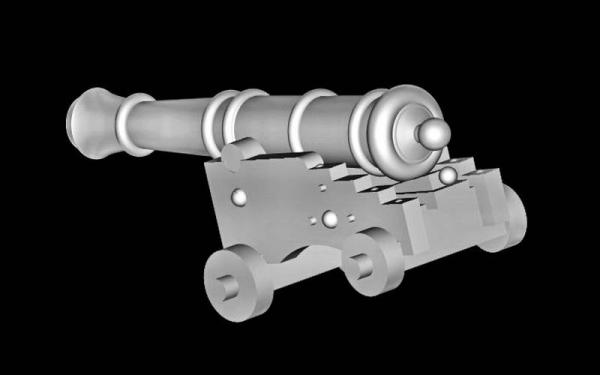
Here is my first attempt, 3pounder gun based on Armstrong 3pounder drawings in download section. In fact this is the second drawing, as the scale is aprox 1:120 and the first model was exactly based on drawing so the bigger part of details, printed with that proportions would disappeared. So as the printing company warned me about it, I drown new model with less details and over sized. This is the result of laser printing with resolution of 0,1 mm The part of photos show the cannons in phase of painting with previous applying of liquid putty to reduce the porosity of surface. The last two picks are the rapresentation of the model, drown in dwg and converted in stl format.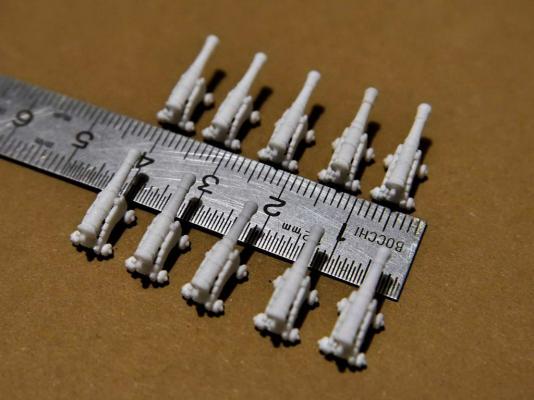


-
Lady Nelson by Leo-zd - 1:119 - SMALL
Leo-zd replied to Leo-zd's topic in - Build logs for subjects built 1751 - 1800
Thk Tadeus. I hope I arrive at the end -
Lady Nelson by Leo-zd - 1:119 - SMALL
Leo-zd replied to Leo-zd's topic in - Build logs for subjects built 1751 - 1800
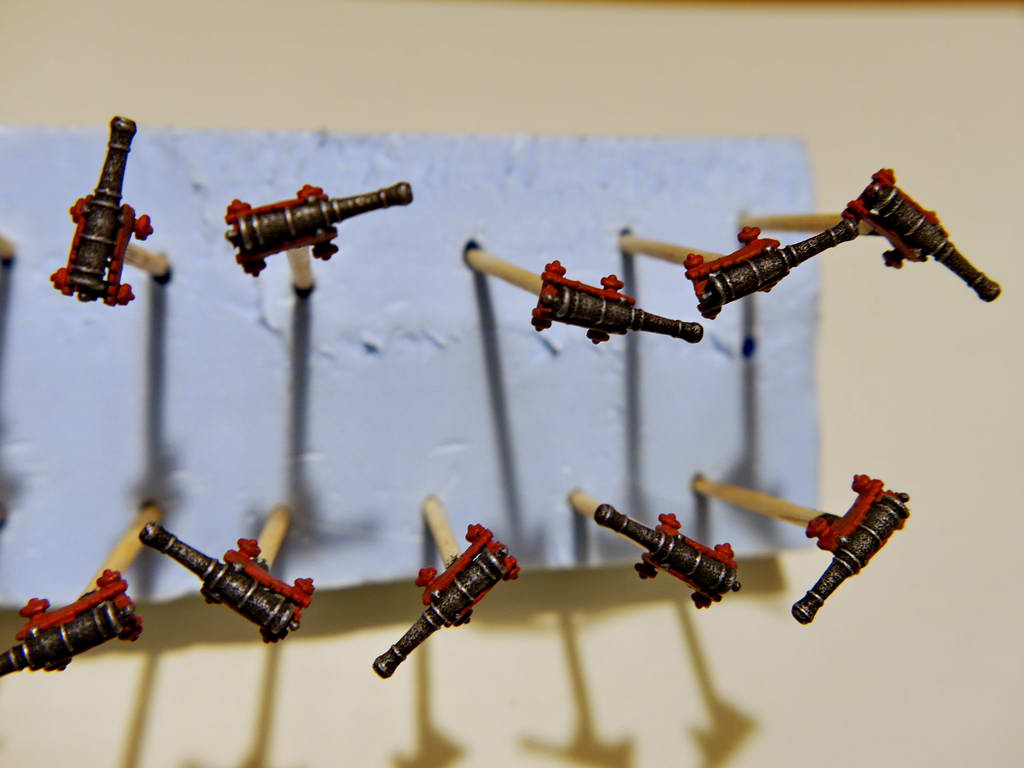
Today many work but small result or better to say not too much to show. I used the silver enamel paint with a part of gloss dark blue for dry brush of the barrels to give them the metallic aspect. Maybe seems too bright , but the scale is small and anyway I will pass the wash with black. The carriages are painted with first hand of red (in fact is the red with small part of ocra)after another hand of slightly lighter color will be done the dry brush with light red for emphasizing angles and borders and the metallic parts (bolts and similar) will be treated as the barrels. The photos are of poor quality :/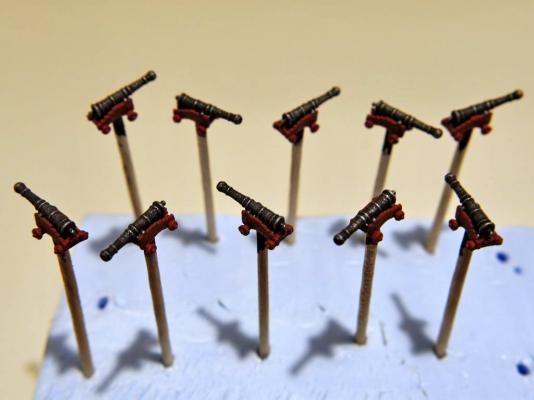

-
Lady Nelson by Leo-zd - 1:119 - SMALL
Leo-zd replied to Leo-zd's topic in - Build logs for subjects built 1751 - 1800
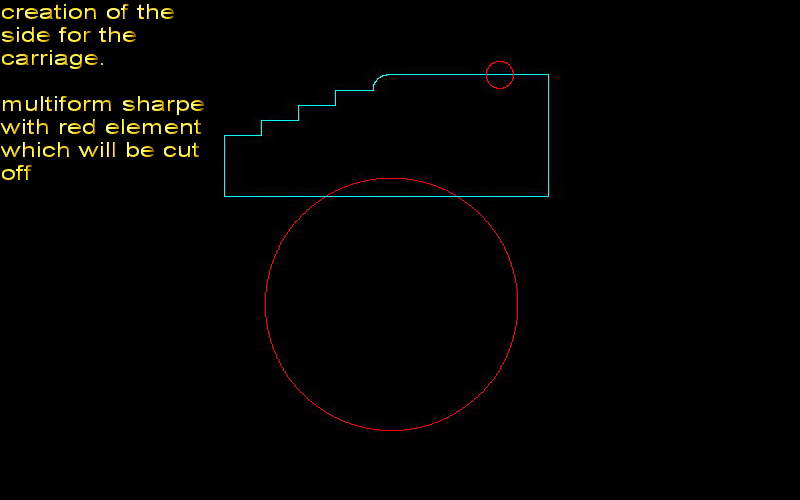
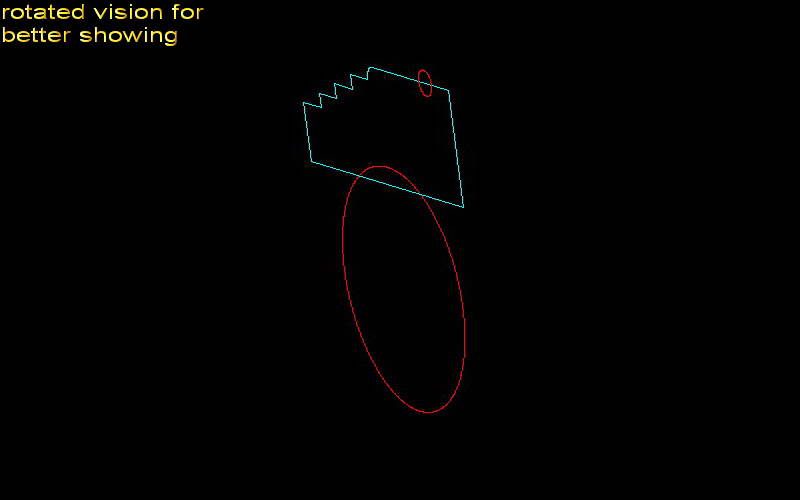
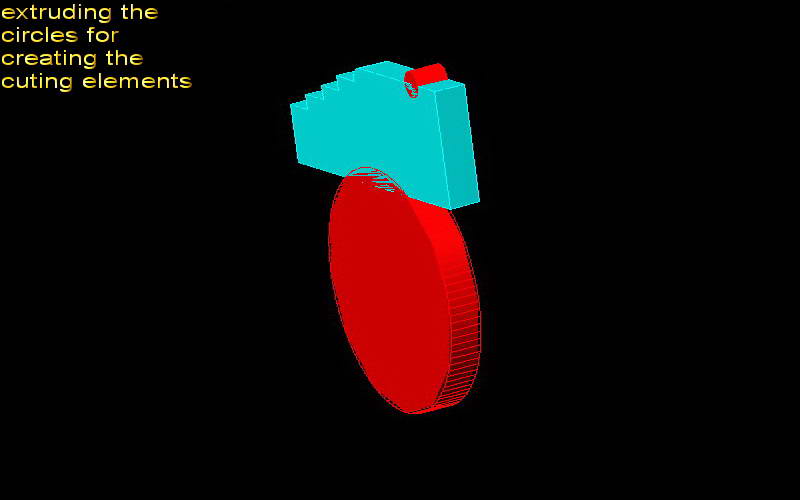
Here is the indication how I did the 3d model. Although my English is poor I hope that is understandable , anyway You ask and I will try to explain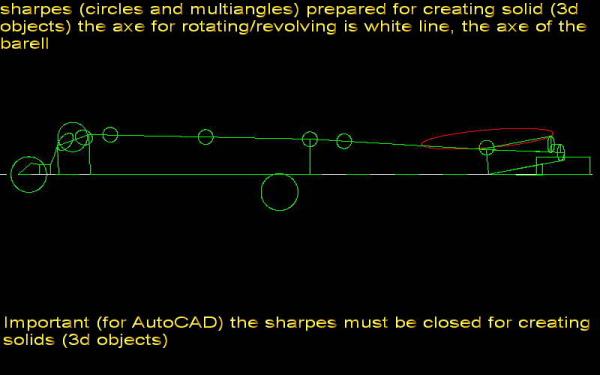


-
Lady Nelson by Leo-zd - 1:119 - SMALL
Leo-zd replied to Leo-zd's topic in - Build logs for subjects built 1751 - 1800
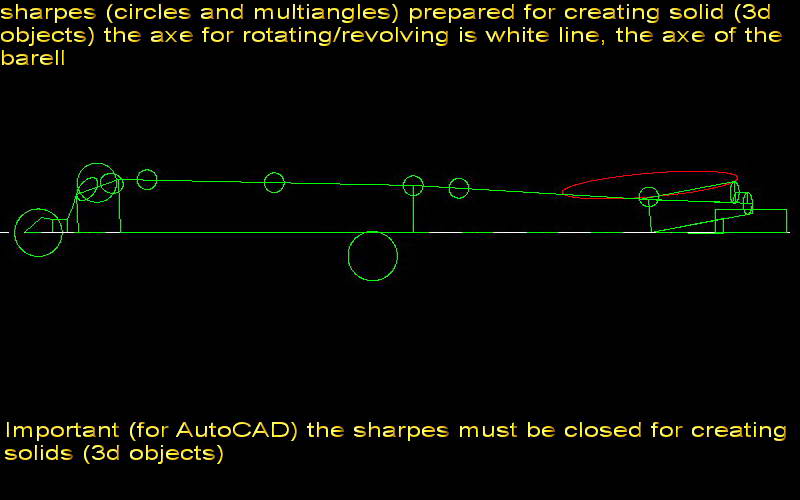
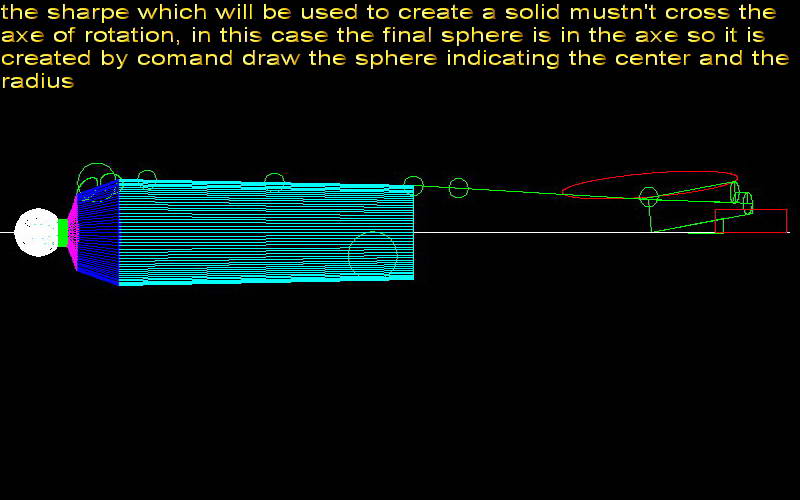
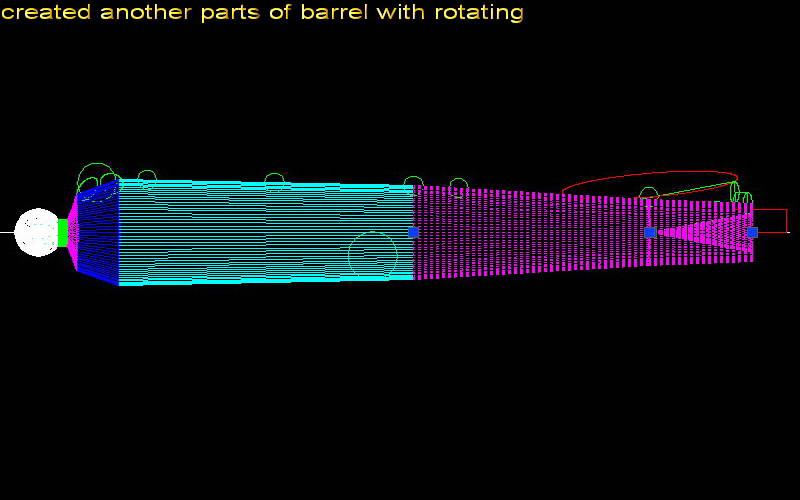
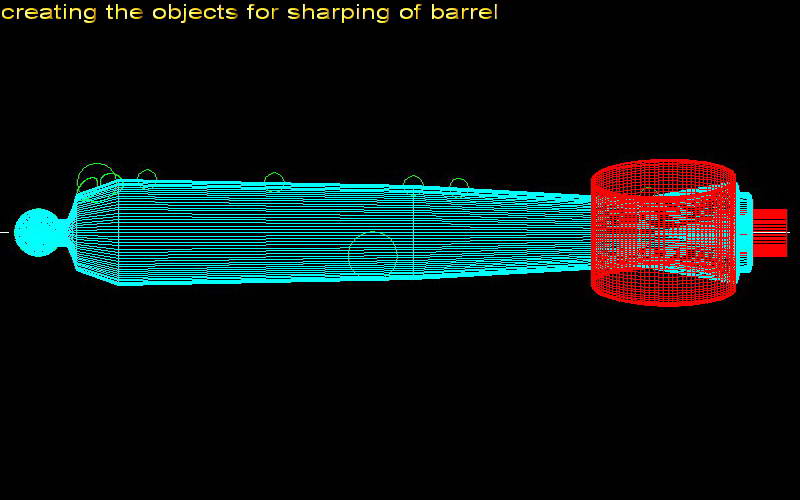
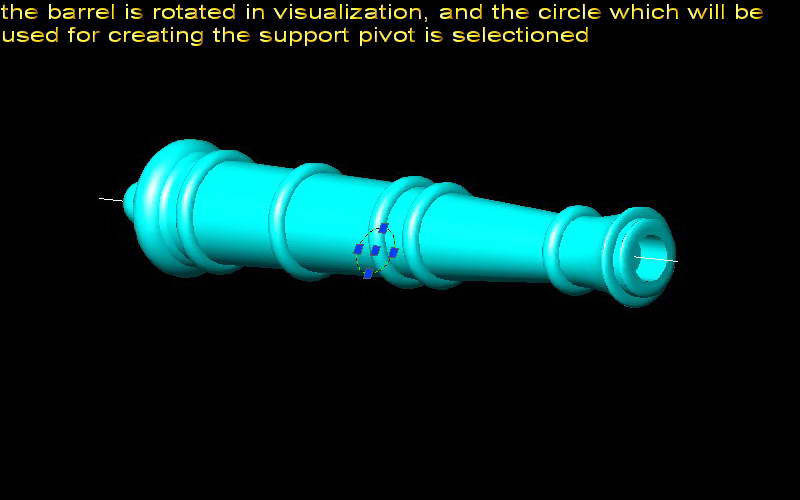
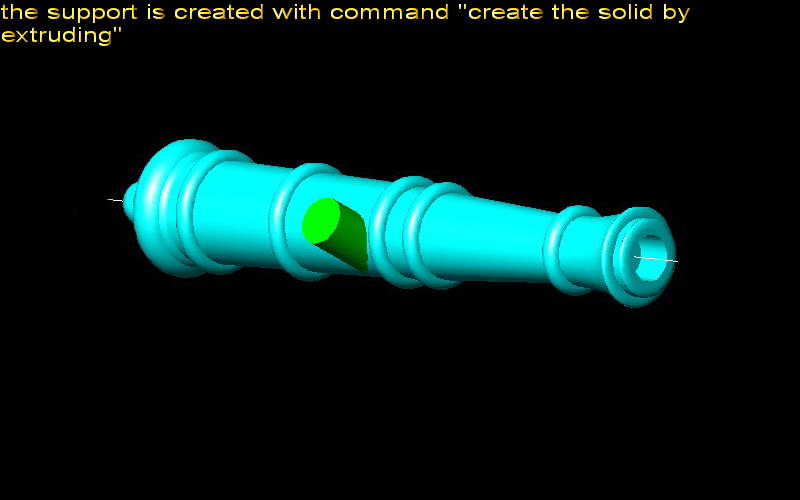
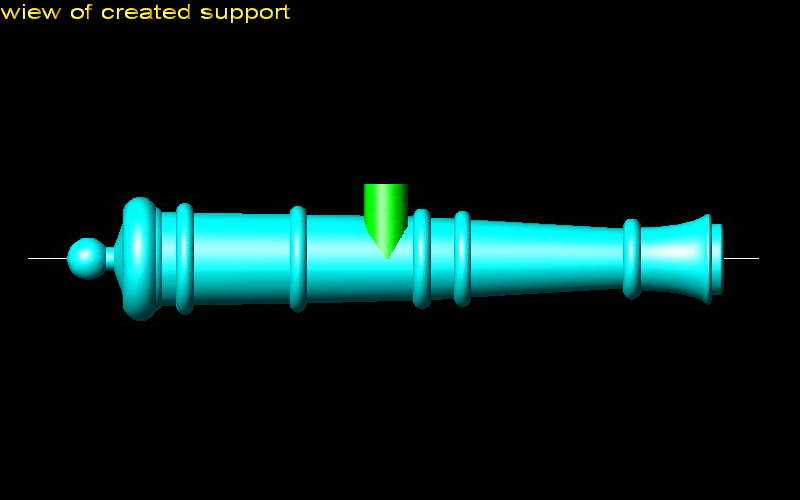
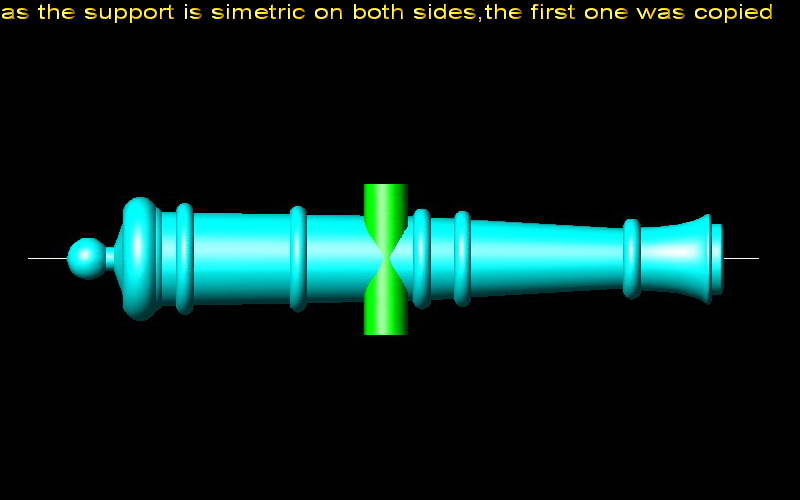
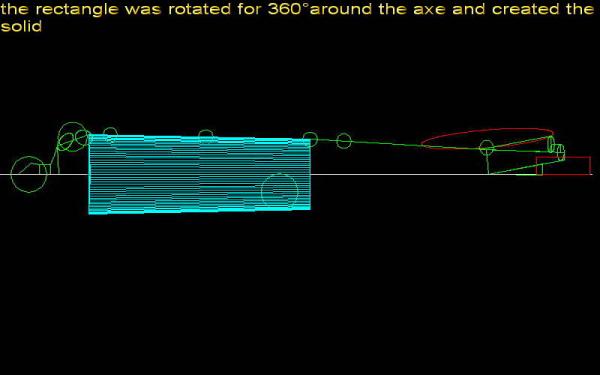
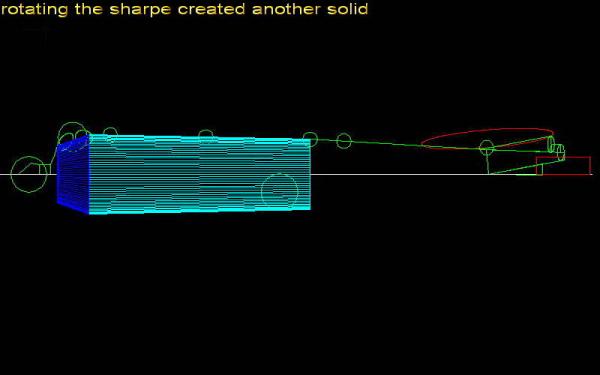
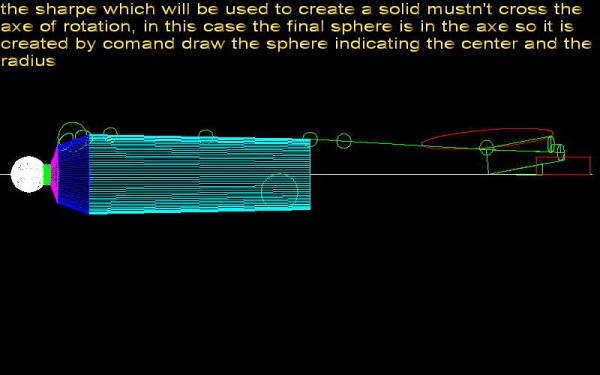
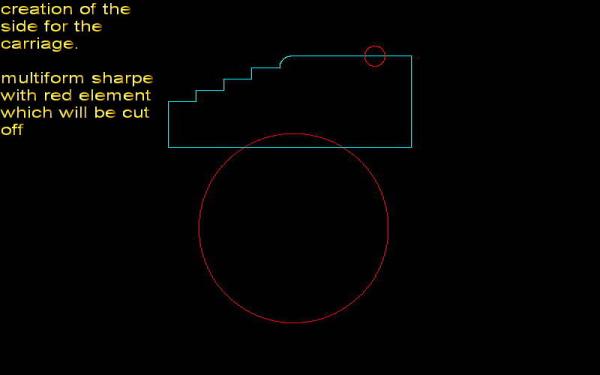
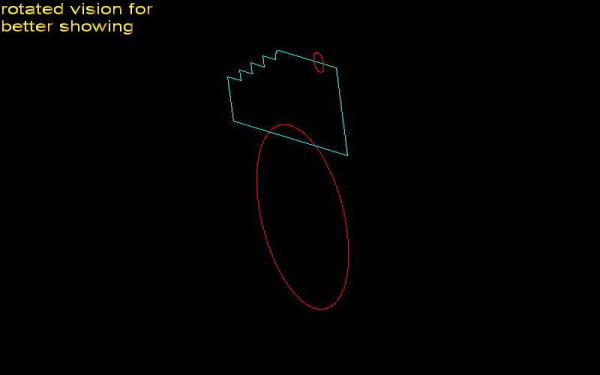
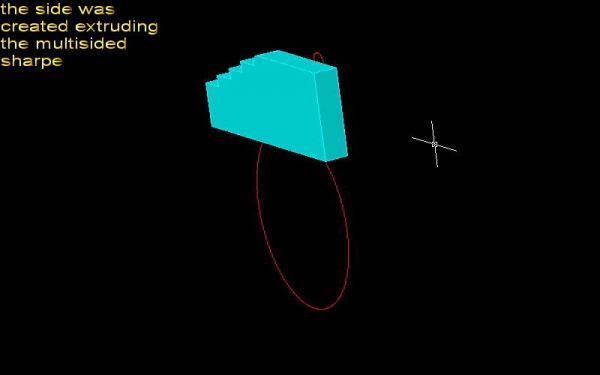
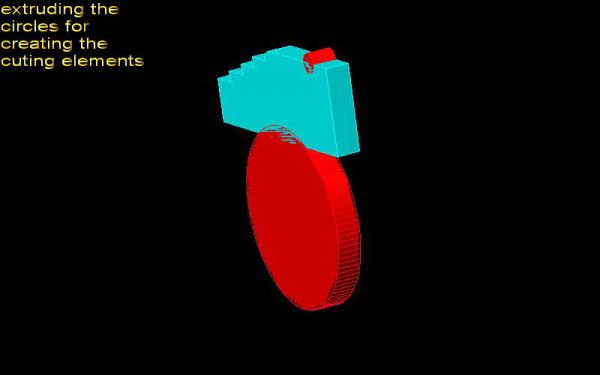
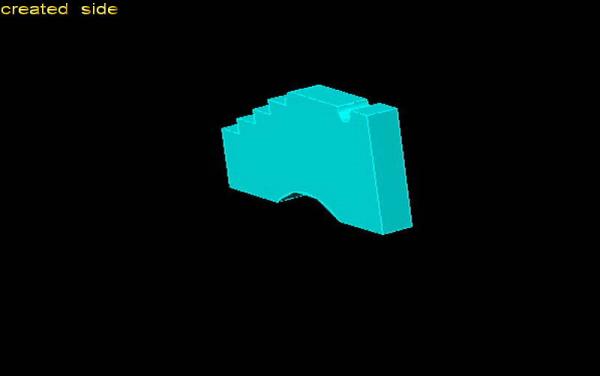
Ok I take the drawing of Armstrong 3pounder from download section ( thanks a lot at the poster of it) and draw the shape of cannon in AutoCAD . It's relatively simply to do, draw forms in 2D circles, rectangular; regular or deformed which define the shape then create the 3d image with rotating/revolution (for barrel and similar) or extruding for the 3rd dimension (thickness sides of carriage) , the wheels for example could be created drawing the circle and extruding for the it's thickness or drawing the rectangle with one dimension the radius of wheel and the other the thickness and then rotating it for 360 degree. Complex shapes and forms can be done with operations between forms, adding, intersection, difference.... when you got the final shape the DWG file (or other native file in 3D programs Rino, 3DMax and similar) had to bee exported in "object" type of file which in fact id a lot of coordinates that describe this object. For 3d printers this is "stl" extension files. These 3d printers in fact do the same think that do normal 2d printers but work on layers in altitude (in my case the high of any layer is approx 0,03 mm ) creating the series of prints one over the other , grooving in the high. Basically are two types, with more precision the ones which use dust of some plastic materials (simmilar to lasser printers, but here the dust are not fixed on paper but together , "in the air" , and with tin plastic rod , simmilar to ink jet , cheaper and faster but with less precision. Late will post some drawings so maybe explain better model's creation -
Lady Nelson by Leo-zd - 1:119 - SMALL
Leo-zd replied to Leo-zd's topic in - Build logs for subjects built 1751 - 1800
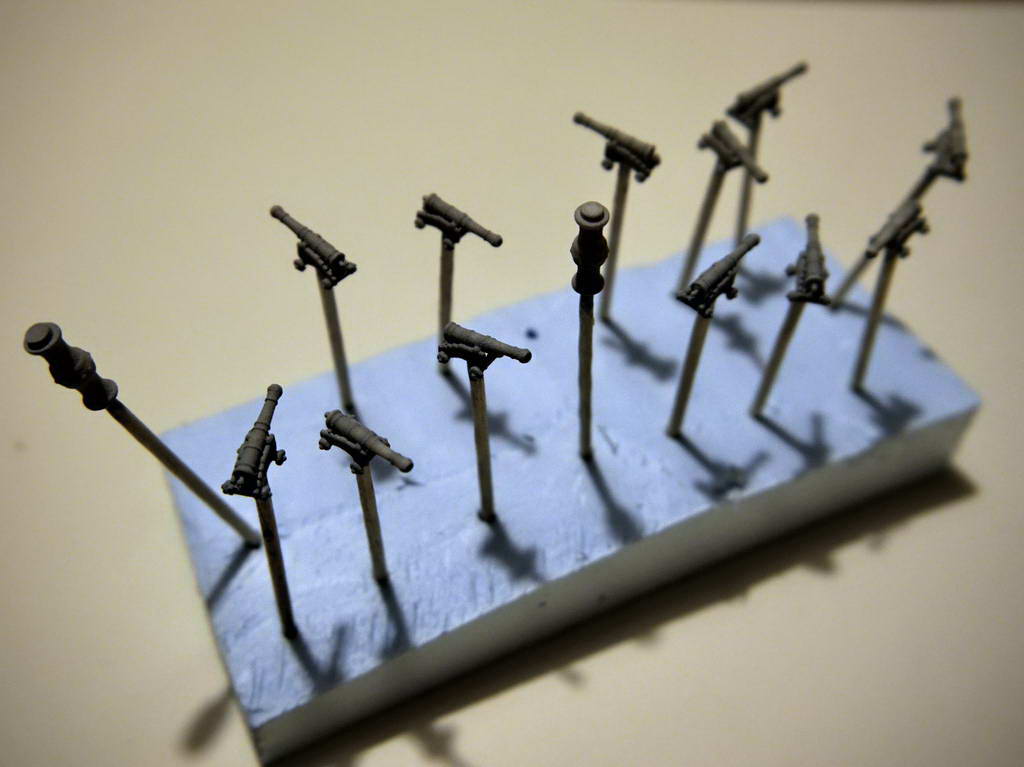
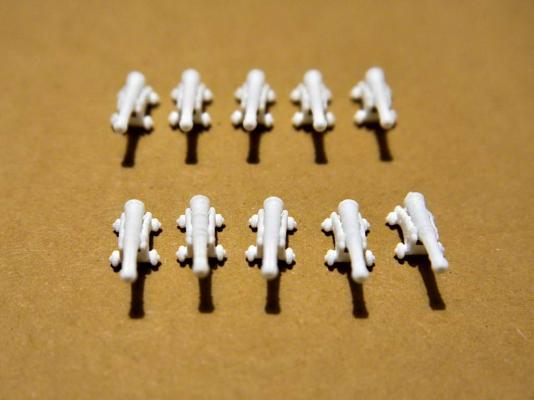
Here we are The cannons were attached on toothpicks for easier managing. First I put one hand of liquid putty which later treated with Tamiya tin licquid glue for fine surface. Then I painted with acrilic flat black, the barrels and carriages, although this will be red but I ned that the distant and shadows points became dark. Sorry for the bad quality of photos, but I have to learn about the new cammera.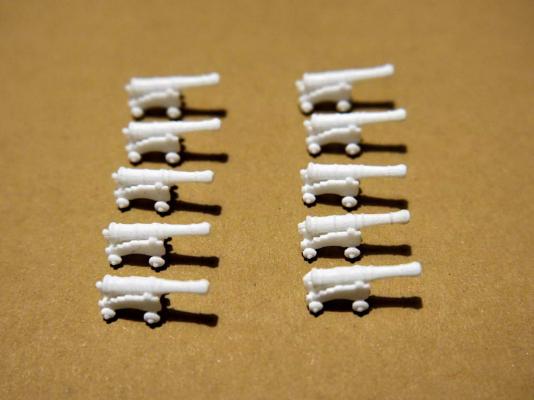


-
Pen Duick 1898 by Mfelinger - 1:20
Leo-zd replied to Mfelinger's topic in - Build logs for subjects built 1851 - 1900
Fantastic work, this gives at the model great aspect , it seems to bee at scale 1:1 -
Lady Nelson by Leo-zd - 1:119 - SMALL
Leo-zd replied to Leo-zd's topic in - Build logs for subjects built 1751 - 1800
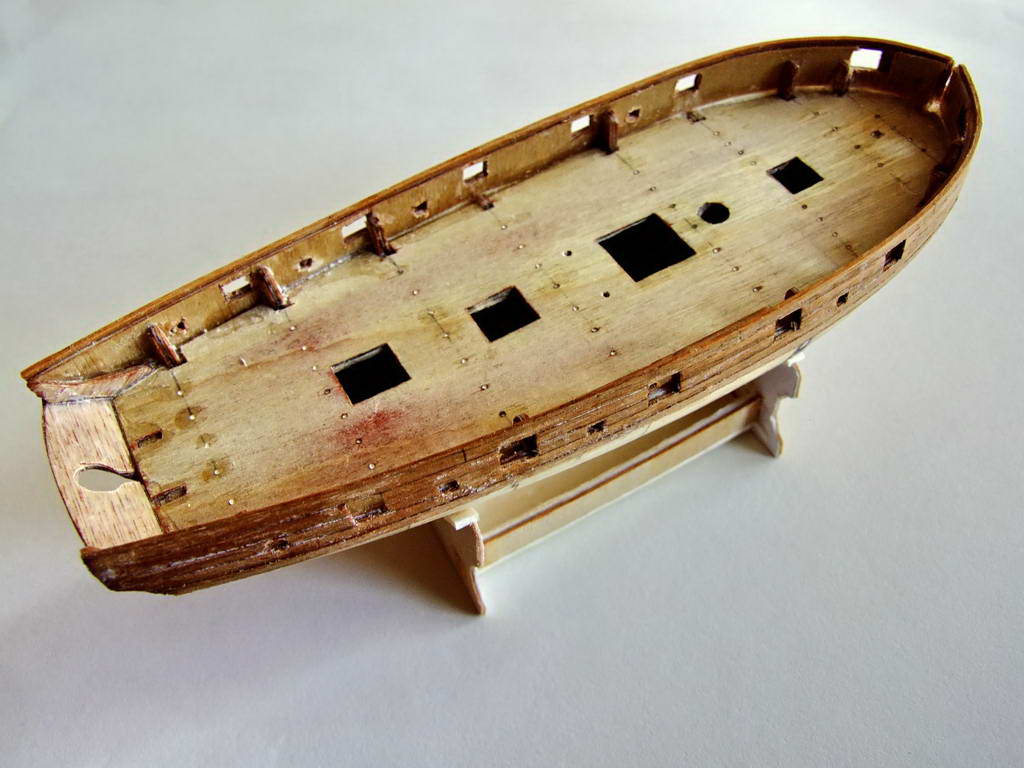
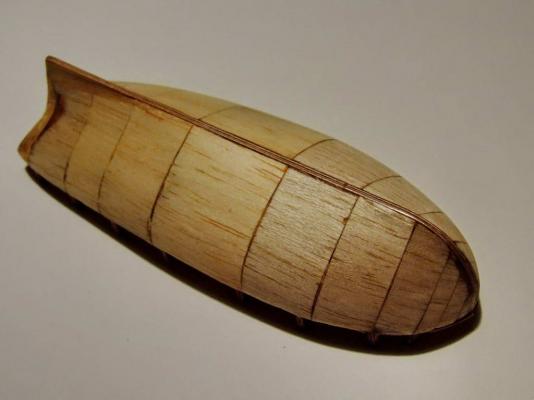
Thk Patrick Yes, I realized that , for small hulls, is speedy and fast way to obtain strong hull, I forgot to mention that, after fine sanding, covered the balsa with CA glue, in fact small quantity but I suggest to take care and dot bi with face over it because isn't to healthy. When the CA is straightened I sand with fine paper and that is it. I think that I'm not the only whom happened that after sanded the normal done firs planking at the end discover in the worst position very very tin (paper tick) section and useless for 2nd planking. PS. maybe is well known maybe not, but when the CA (cyanoacrilate) glue is used, if the quantity of glue is bigger , in holes, as a filler or similar, it need too long time for hardening, than is useful the fact that the catalizator for CA is humidity/water SO for fastening can be used two methods. to buy special spray or .. take one used spray bottle of nose spray or similar, fill it with water as the both are the same Spray/nebulize a very little quantity, not directly but in air, near the glue.. If you spray directly on glue it became milky white, with grooved volume and porous. (useful for imitating fog, smoke, or bubbled water) -
Lady Nelson by Leo-zd - 1:119 - SMALL
Leo-zd replied to Leo-zd's topic in - Build logs for subjects built 1751 - 1800
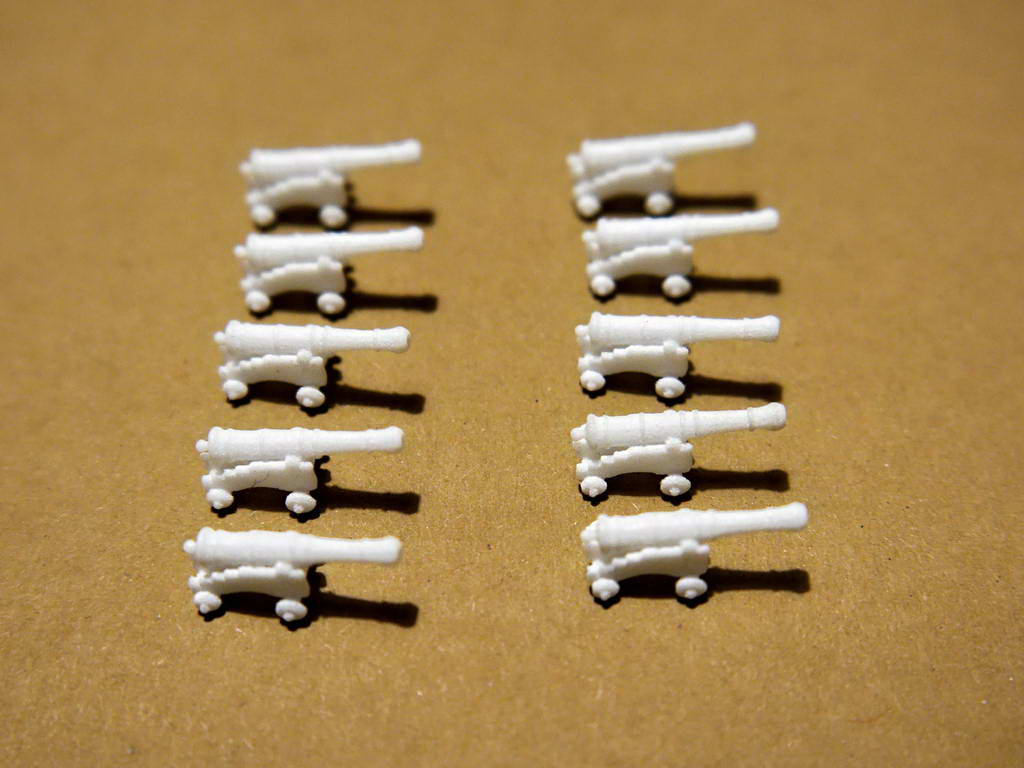
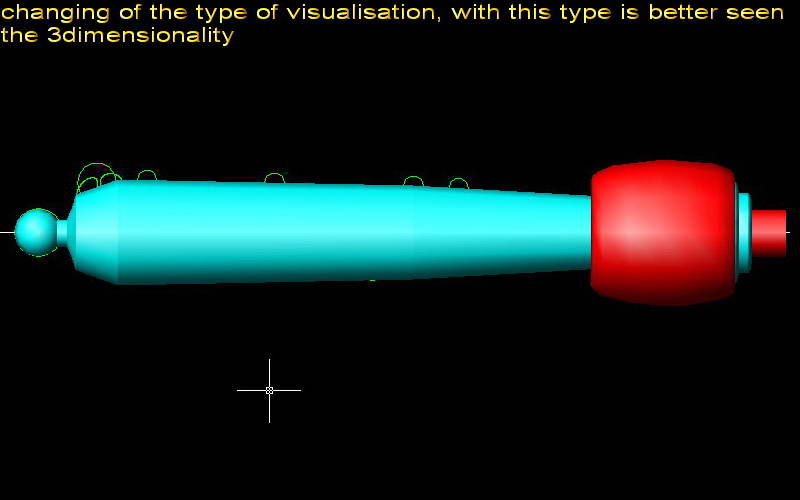
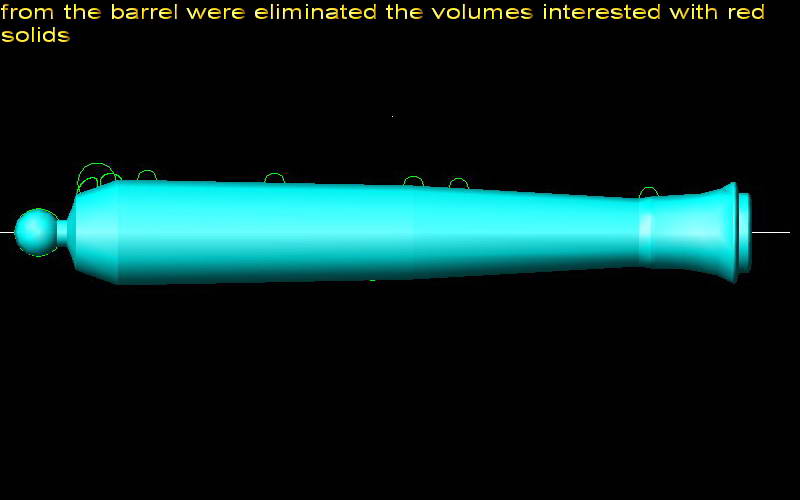
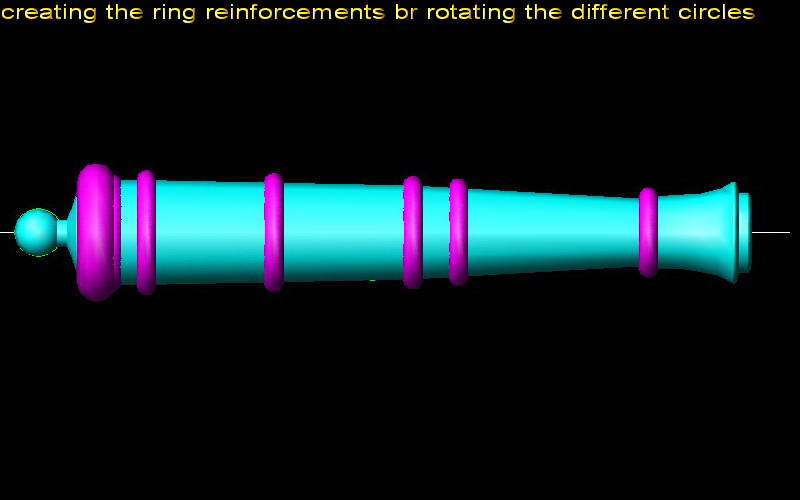
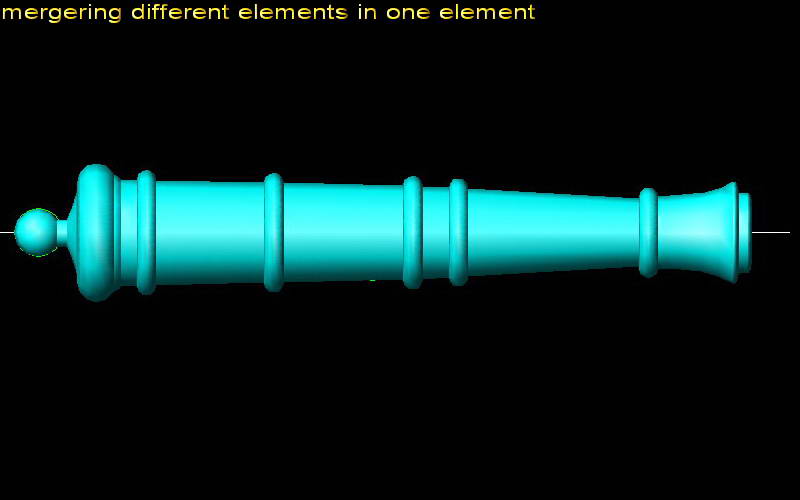
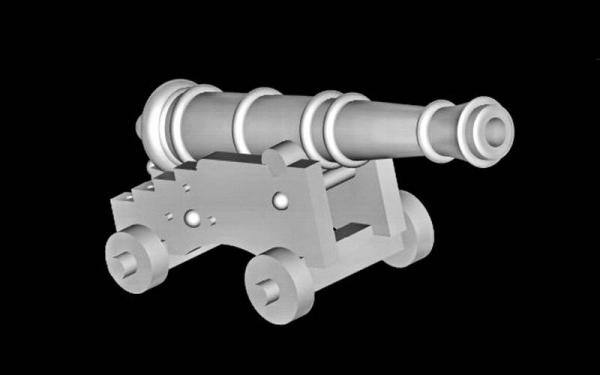
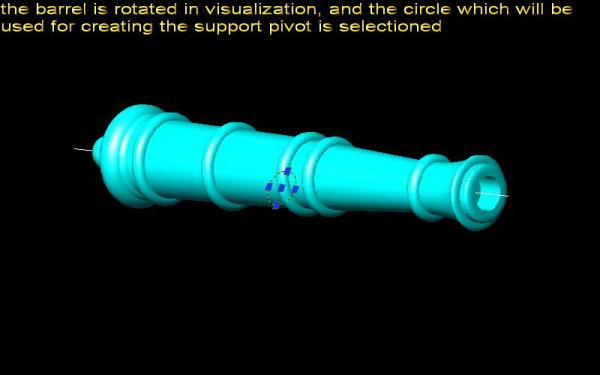
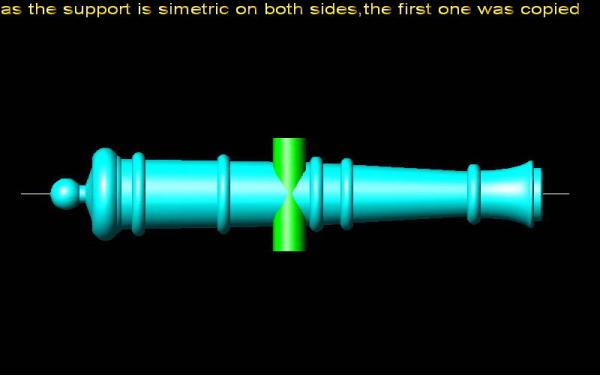
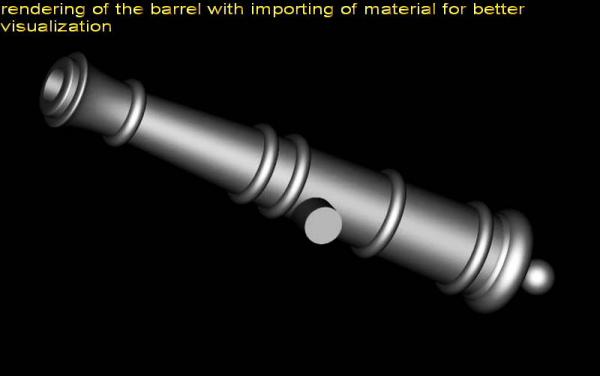
This model has 10 3pounder but in scale 1:119 the that is about 15mm long *_+ Initially I had the idea to made sepatly the gun and the carriage but it was too small. I used the drawings in download section and in made the DWG 3d drawing of the canon. With created stl file I ordered the 3d print. Fortunately that the company warned me about the problem of the resolution, as their minimum resolution is about 0,1 mm. On the cannon in perfect scale all the rings of reinforcement, crown, and in fact all details disappeared :/ , they made a test and that was useless So I redraw all, and on the visualization seems that the rings and the terminal part of barrel is oversized too much but you will see on printed models that the aspect change. Here is the the visualization and soon I will post also the pictures of printed cannons. Unfortunately in the meantime my photo camera died so the pictures are slightly late
-
I think that is correct admit own mistakes, and this was my mistake. After I had controlled other dimensions and for last also the cannons (3 ponders) I realized that the scale of Lady Nelson is 1:64 The reason for all this is that I started the scratc build of the model, I was convinced that the scale is 1:100 but in fact I am working in 1:119 .
-
Lady Nelson by Leo-zd - 1:119 - SMALL
Leo-zd replied to Leo-zd's topic in - Build logs for subjects built 1751 - 1800
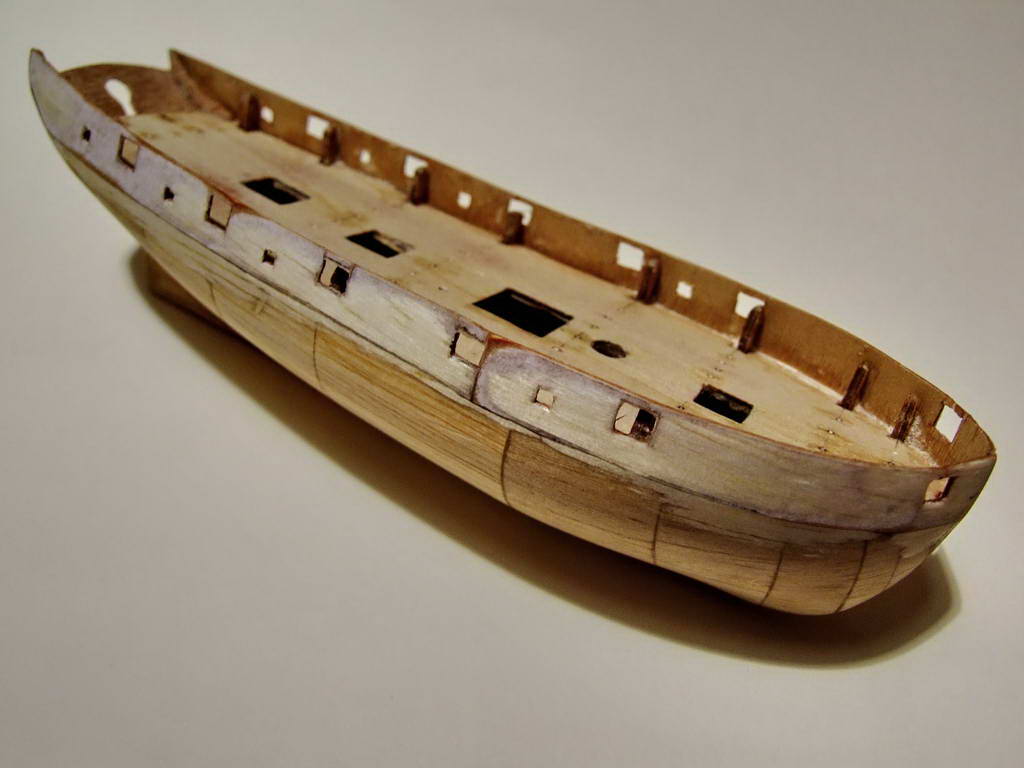
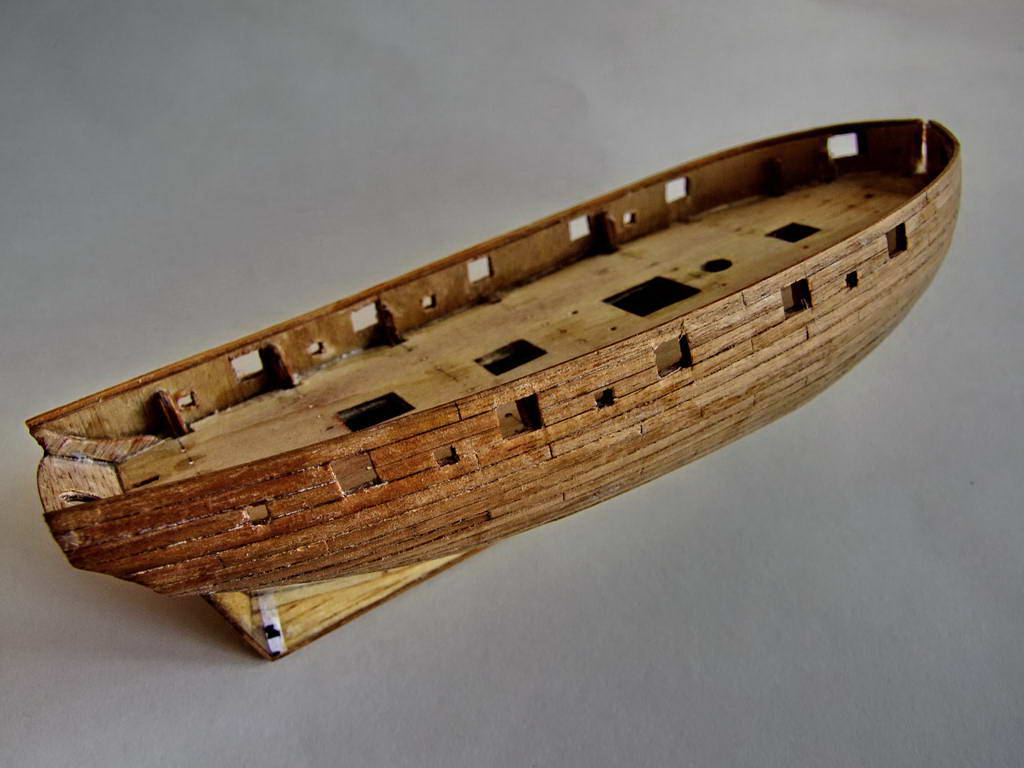
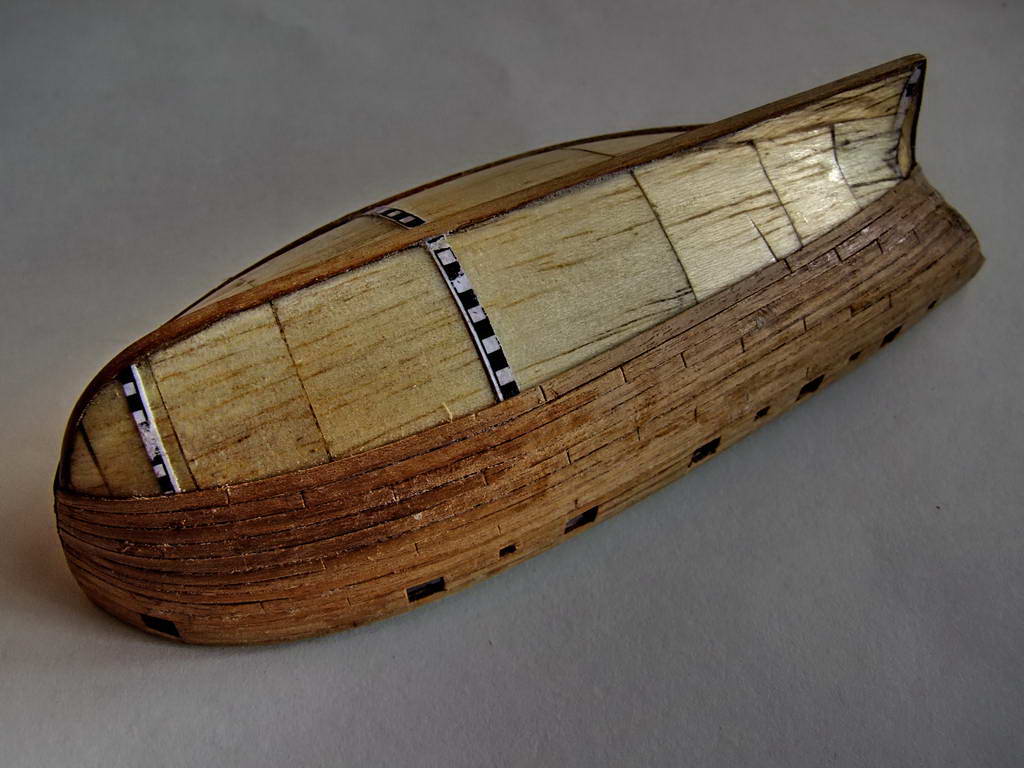
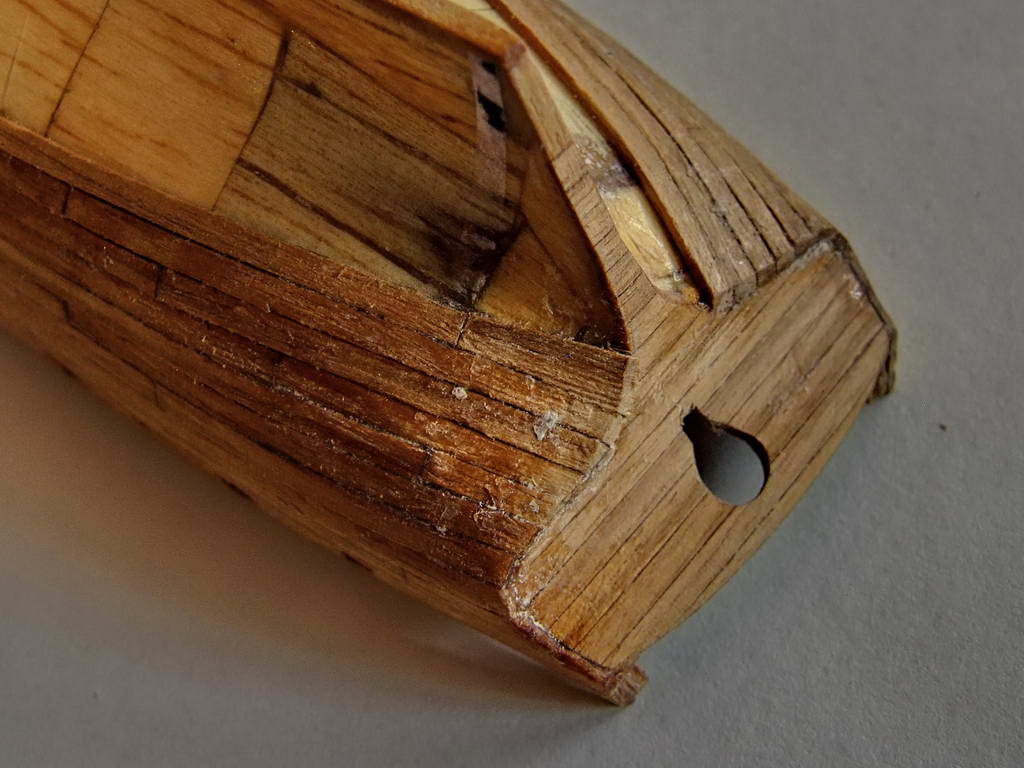
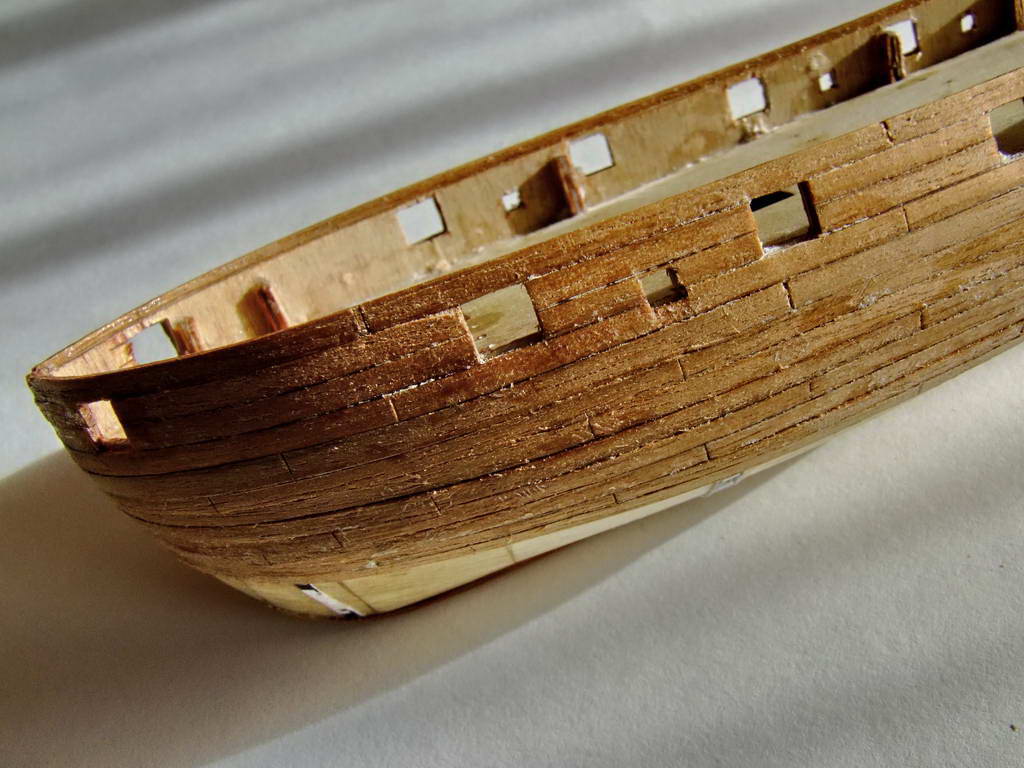
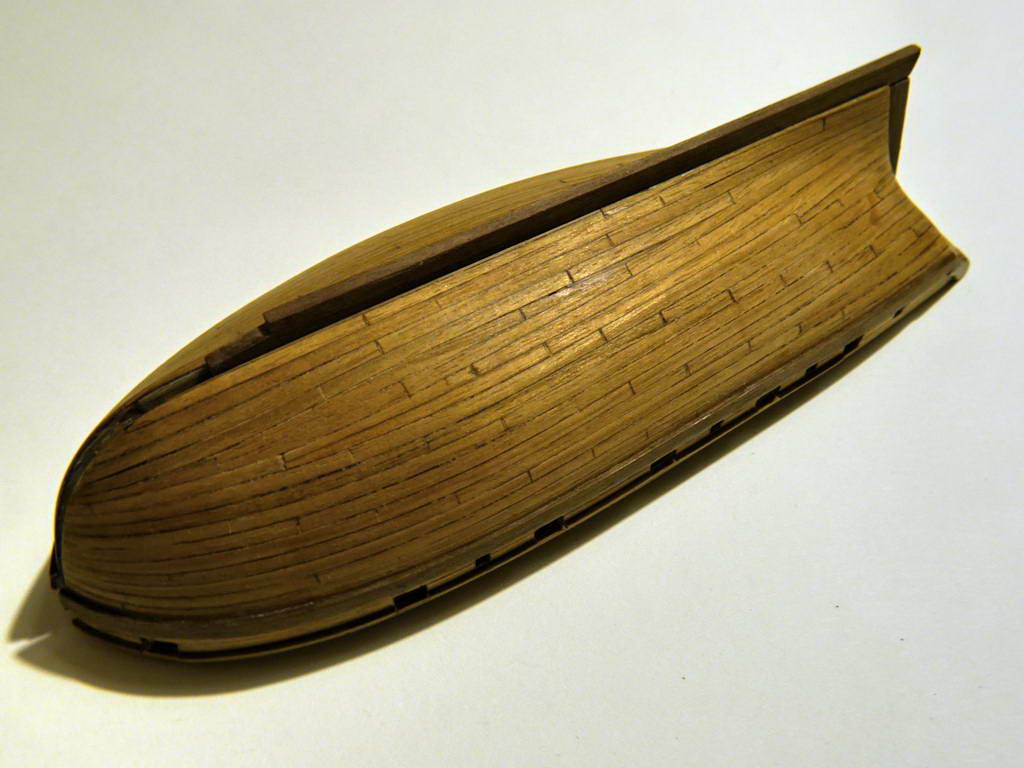
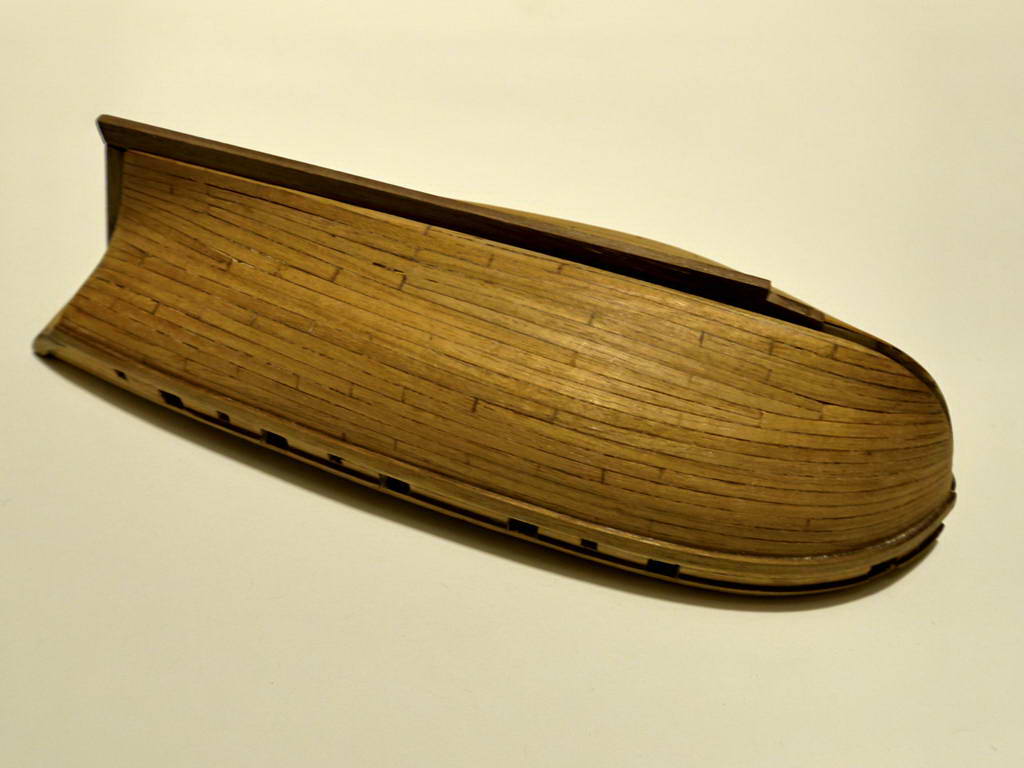
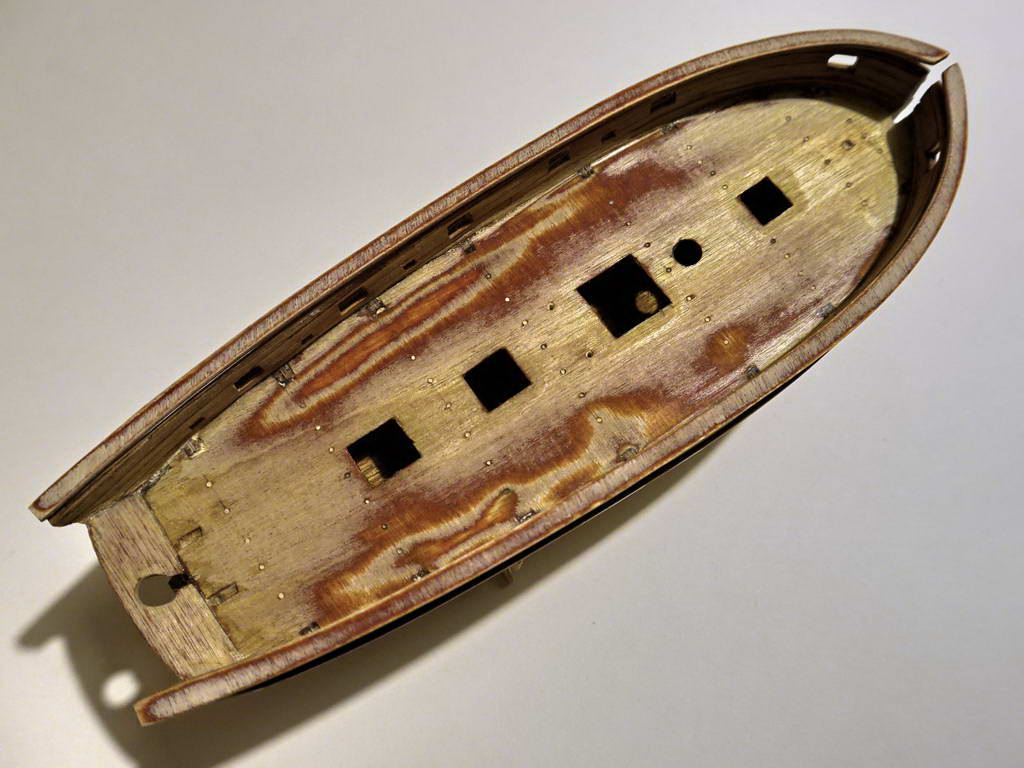
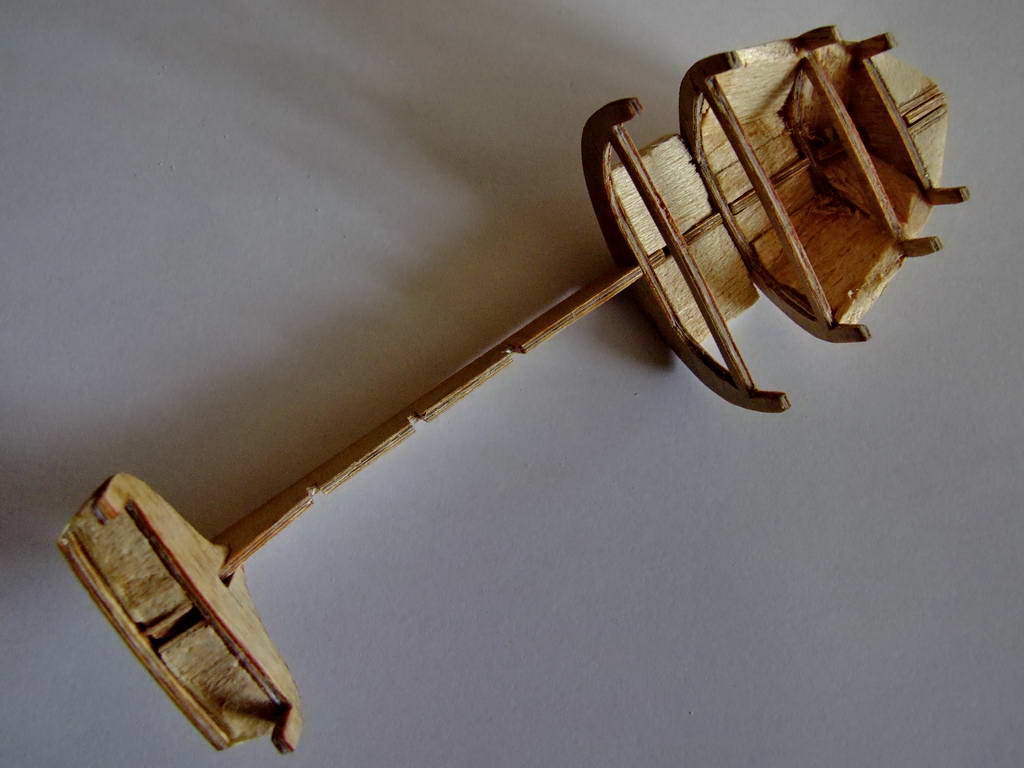
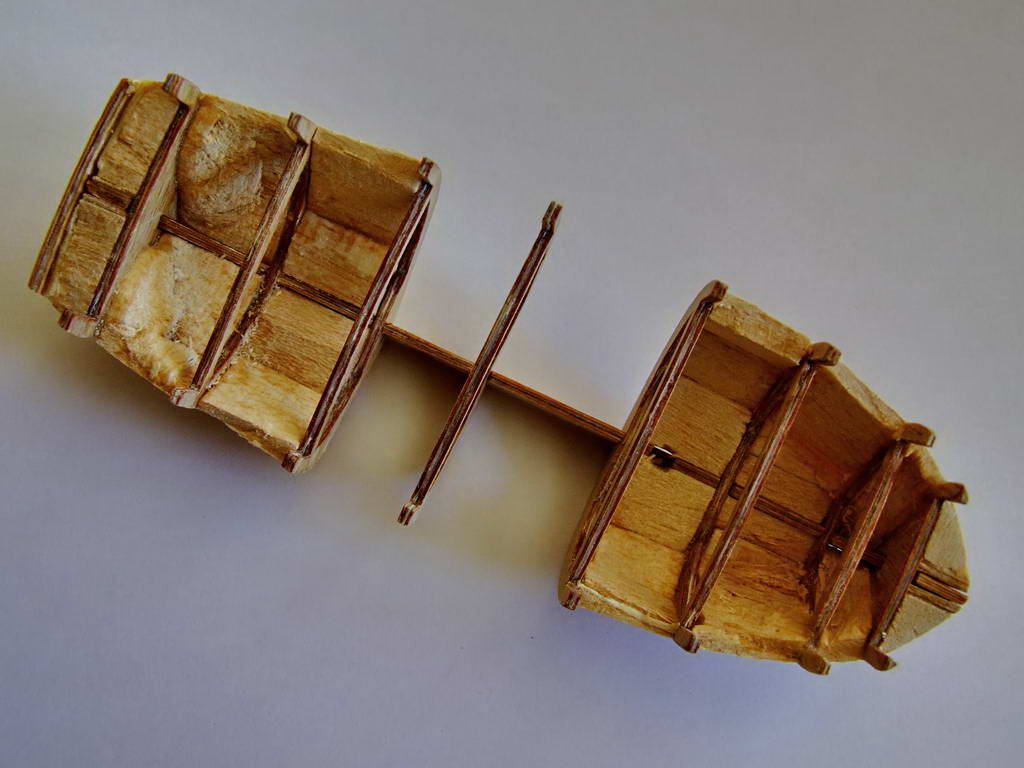
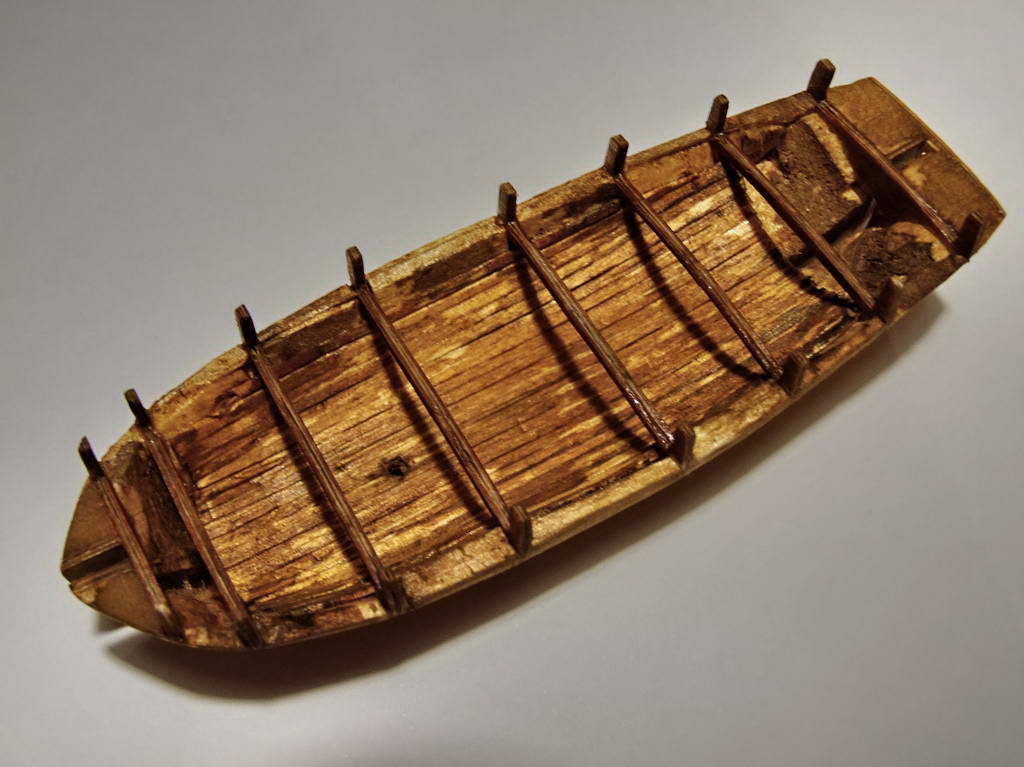
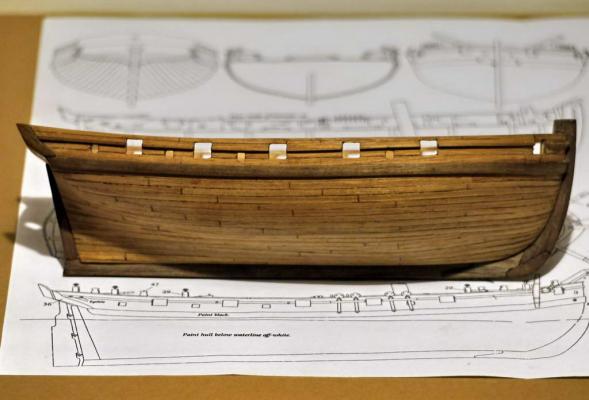
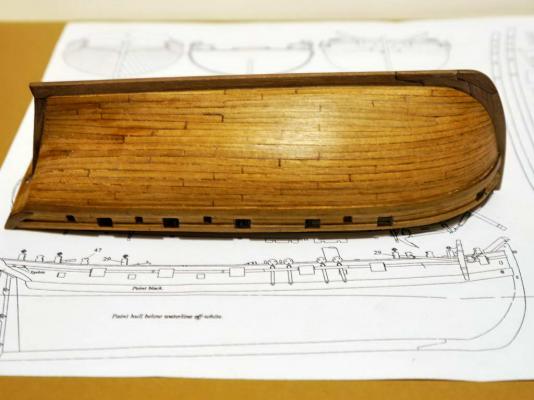
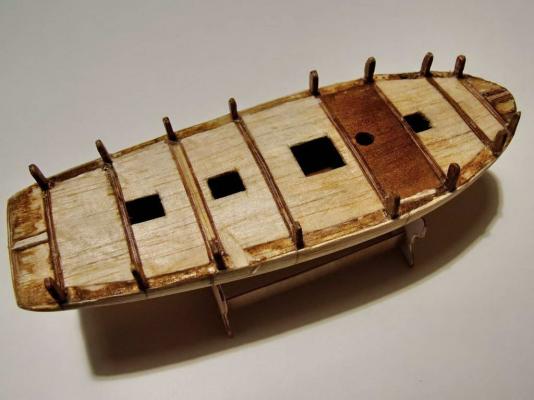
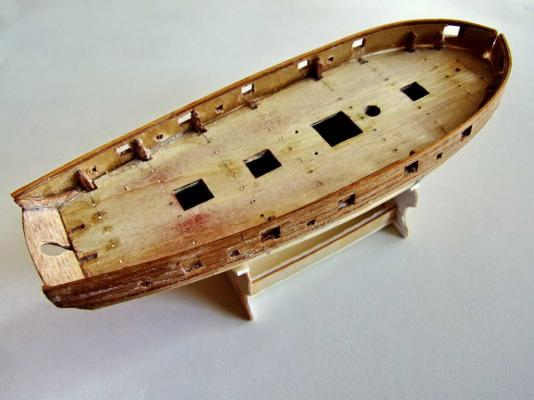
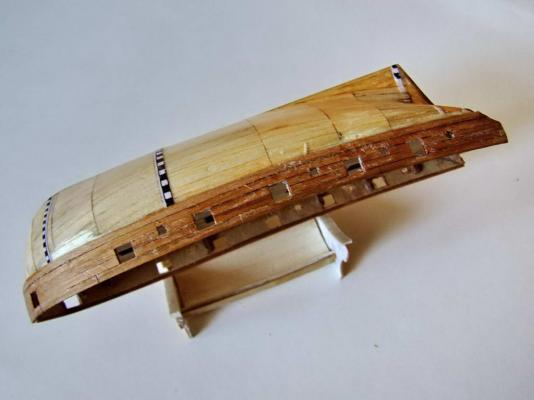
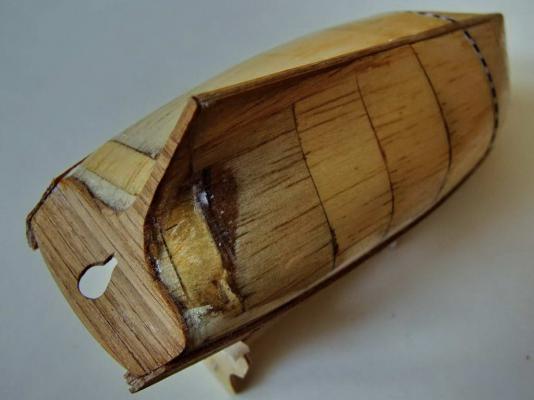
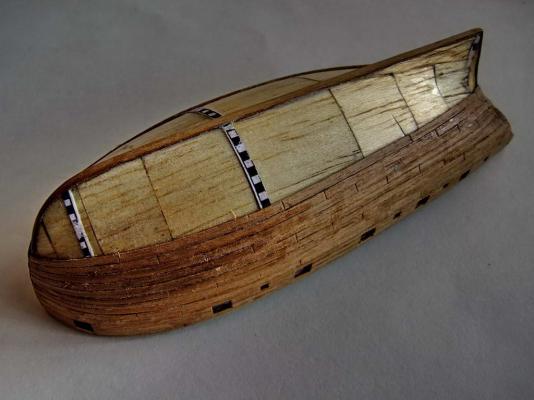
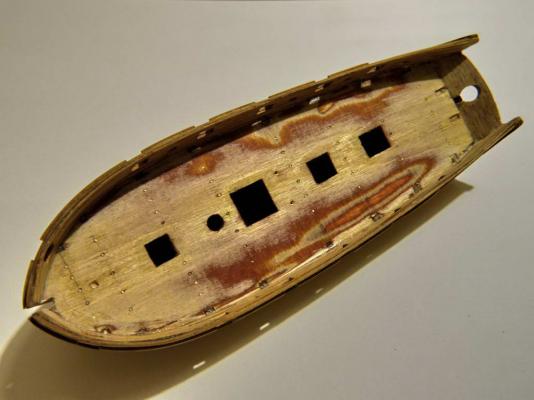
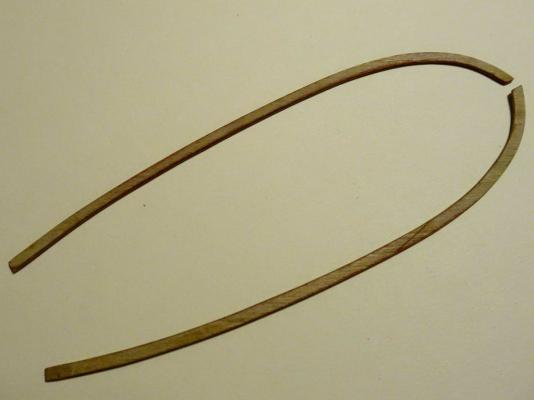
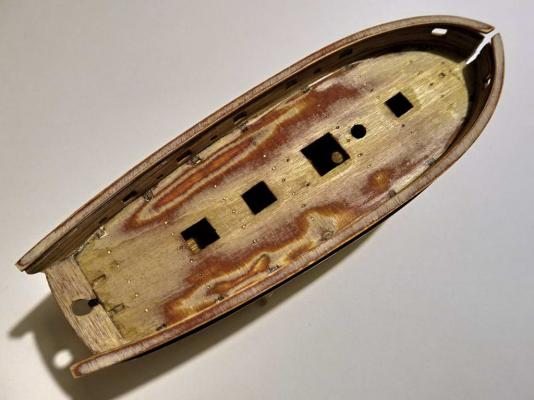
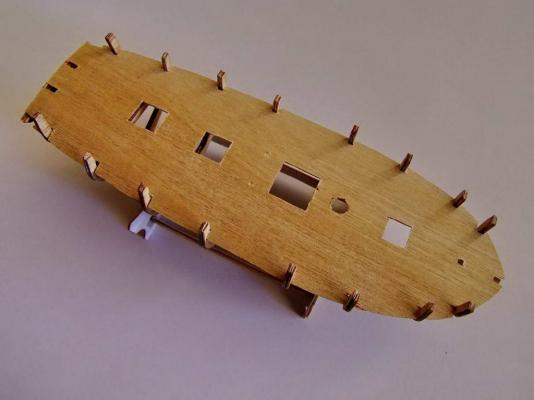
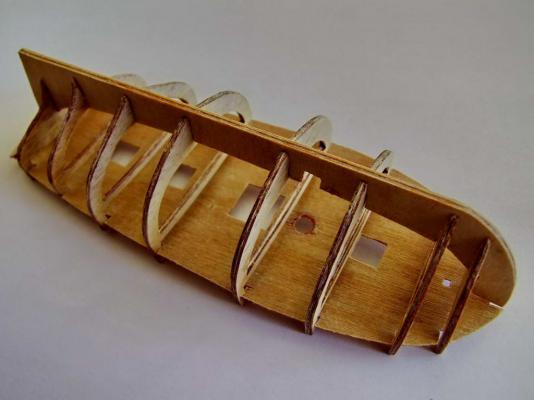
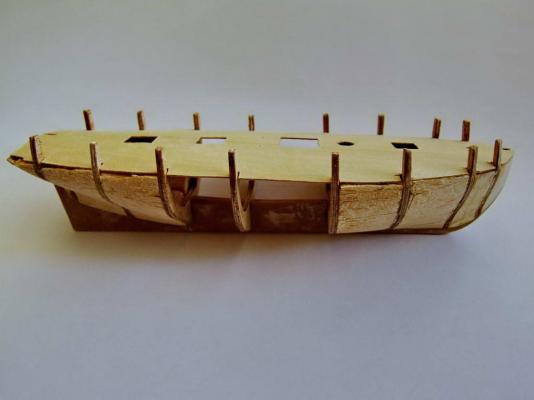
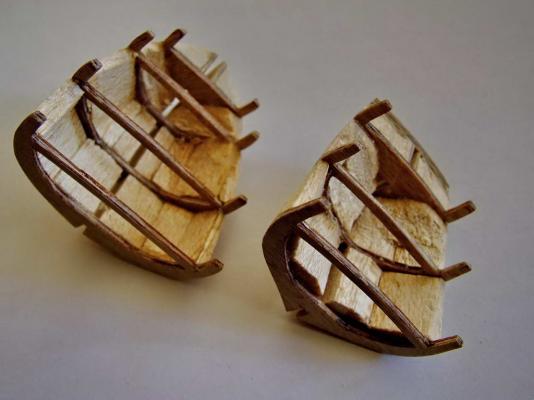
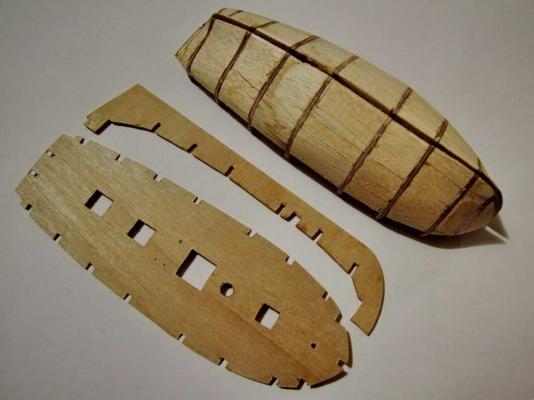
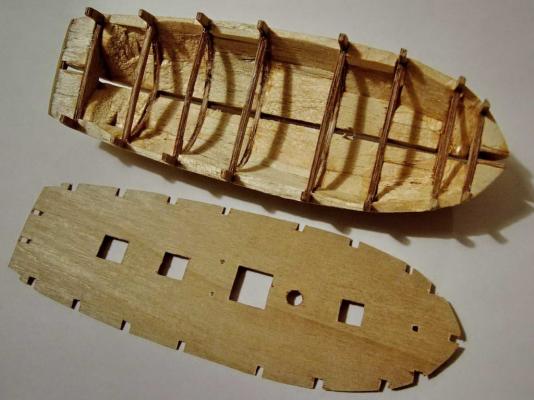
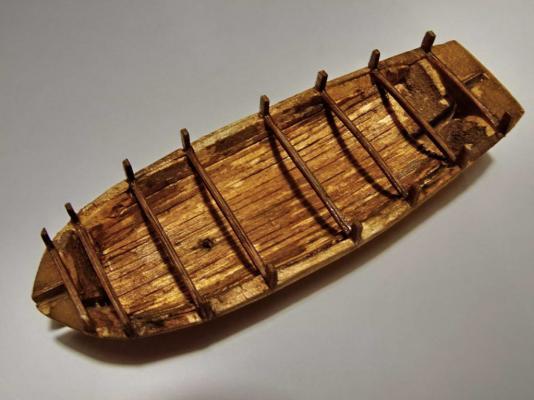
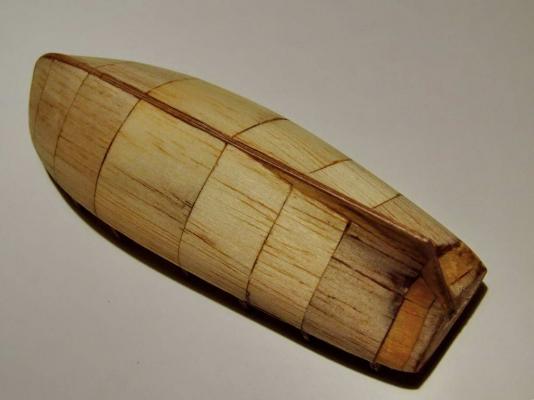
As the deck is from very tin plywood (0,4 mm) downside created the reinforcement with balsa and at the position of the mast with other piece of plywood, then on that was glued the deck. The second planking is done with walnut strips (2*1mm) . I have always the big problems when trim and sand the planking because I always damage the keel, so I usually make a hull without the keel and ad it at the last moment. For better positioning of the visible part of the keel I made a channel with saw so the junction is hidden. Now I am in war with the curved part of keel ..


-
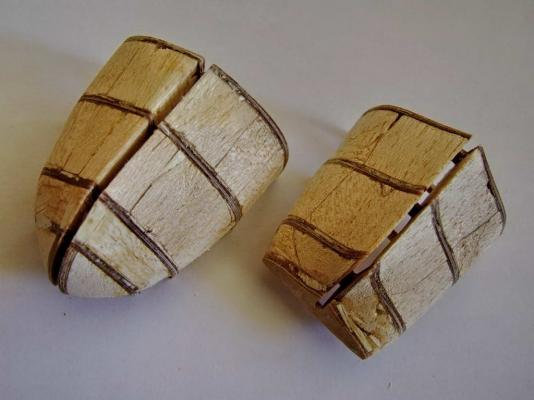
Another model, the last one, but probably will be the first to be finished. The model is based on the Cris Watton's (Victory models) drawings. I reduced the drawings, and .. I was convinced that the right scale is the one indicated on the model (1:64) but I was convinced that was 1:54 so instead the planed 1:100 i realized 1:119 I started in the usual mode, copied and reduced the drawings of the structure, glued it on tin plywood (aero 0,6 mm) cut it with scissors and with normal cutter, glued on another sheet of same plywood and cut again. The keel is made from 0,8 mm ply, double layers. For the first planking decided to substitute the classic wooden strips with blocks of balsa, and made some arrangement inside of the hull, so I slightly modified the structure creating the open spaces. In this way maybe I will leave open the hatch with the ladder and the litle portion of interior will be visible. (maybe) One little appoint, as this is in fact a generic cutter, not the real one, decided to change the name , I found few similar cutters on lists of Admiralty and probably I will make some small modifications on the deck arrangement, on base of other cutters. Ok, with balsa created the filling, after sanding added a strip of tin balsa for fine adjustement of hull sharpes.


-
OK, the first (Stupid) coment will ne: "how big watch" The second..... No second.. I will change im my topics SMALL with big and rough or better is anybody interested im postcard colectioning GREAT !!!!!
- 120 replies
-
- 1
-

-
- mystic
- motor yacht
- (and 2 more)
-
simply F A N T A S T I C !!! :im Not Worthy: