Hank
-
Posts
632 -
Joined
-
Last visited
Content Type
Profiles
Forums
Gallery
Events
Everything posted by Hank
-
Richard said: I think any of these so-called computer groups or clubs, etc. can turn out to be a waste of time - I went to one of these "social group meetings" way back in the early '80s in order to enhance my MS-DOS operating system skills etc. and it turned into a 2 hour session of old geezers trying to sell everyone one of us "newbies" on their favorite software program at the time. Yeah, believe it - in 1984 there were actually computer geezers (old dudes in their 50s - LOL!!!) - and I'm now 74, go figure, right?? And, no one learned anything!! Perhaps finding another local individual with like interests might be a better and easier learning solution, etc. Your comment re. night school - not a bad idea - a lot of local tech schools/colleges, etc. offer evening CAD classes for beginning students and this might be helpful. My suggestion is (before spending any $$ on a CAD program) - determine what your use of it will be (drawing up model parts, house plans, nuclear weapons development - you know, the usual stuff!) and then look around online for a FREEWARE CAD program that fits your needs. This will allow you time to see how "it feels" and perhaps download something different, etc. Back several months ago an online modeling acquaintance of mine proposed us both learning a 3D program to design & print parts to replace items he had handmade and wanted something a bit more refined. This way we could help each other in the learning curve (oh, YES!!! There is a learning curve!). So, I found the freeware Spark DSM and we both downloaded it and began learning it. Well, he did, I'm still struggling. Anyhow, it is a mechanical 3D design program that is oriented towards small parts, etc. - you wouldn't want to learn a CAD house design program for designing model parts, right? Once you know what the CAD program will be used for, decide whether you are going to build the parts from scratch or 3D print. I use a 2D CAD program for creating actual drawings to take out to my shop for making the wood or plastic scratch made parts. Now, when I want to make these as 3D printed parts I design them (or "visualize me designing them ) in the 3D program which will eventually produce the files the 3D printer can understand. Oh, and that brings up another subject - the intermediate printer program you have to install to make a further printing file that the printer understands. Isn't this great???? Usually though, these programs are also available as freeware. As far as board drafting tools, instruments, etc. goes - if that's your interest then by all means pursue it - once in a while a good deal hits Ebay or Etsy for old, used drafting stuff but sometimes the prices can be steep. I know that if I were selling any of my old drafting stuff I would be asking top dollar as those tools are in 1st class condition! And, a lot of those instruments/tools being from well known brands at the time are no longer in production and hard to find. Lastly, having a drafting table and all of its attributes on hand has other advantages also. For example, when The Admiral is on the rampage, off her Quarterdeck with Cat in hand, having a modeling retreat complete with adjustable full size drafting table can provide 1) adequate shelter in case she catches up with you, and 2) when the board is adjusted to 0° (flat) it and a sleeping bag can provide a welcome place to retire until the Quarterdeck resumes "normal operations" and it's safe to come out. You'll just need to sneak out back behind in order to take a leak😁! Hope this has provided sufficient inspiration and so forth, Hank
-
Tim, You're not alone!! I too, took mech. drafting in 10th grade (1962) and would have pursued an industrial arts path but my parents wanted me to go the "college prep" route instead. After a short college stint, 4 years USN, and back to college to finish, where did I end up??? Western-Electric doing board tech. illustrating prior to learning a pre-CAD computer based graphics program while working on the Safeguard Anti-Ballistic Missile Program. I then took a contract at one of the NC DuPont facilities doing board drafting until 1983 when they brought in IGDS Intergraph CAD - and I've been doing CAD (and a bit of board drafting along the way) ever since. I retired in 2019 but have a full size drafting table in my shop, along with a stand-alone CPU and single monitor for viewing the photos/drawings, etc. for my ship modeling. I have my same Samsonite Briefcase full of drafting equipment (circa. 1970's) and some of it is actually NIB (New In Box)!! A lot of those instruments can't be found anywhere and if you do they're usually of 3rd world mfgr. I actually suppliment my CAD drawings with small board drafted sketches when I need to refine something without going back to the house where my CAD software resides. I've worked in various industries (Petro-Chem, Electronics, Facilities, Chemical, Food & Drug, Pharma, Bio-tech, etc.) and have also spent an unemployed year doing house plans for an overworked residential house designer. My program of choice (45 years experience) is Bentley MicroStation 2D CAD and I still keep an active license - actually was working today on a stanchion/handrail layout for the pilot house overhead on a FLETCHER class DD that I am building. Another modeler/vet/acquaintance of mine in Fairbanks, AK and I began a self-taught 3D program called Design Spark Mechanical - a free download and it leads to making your own 3D printed resin parts. He's W-A-Y ahead of me at this point and I'll admit that when you use a Cadillac CAD program for 40 odd years and then try to learn a free CAD program - well.....it's not apples to apples. However, I am regularly using metric measurements now so that's some progress on my part. I now make sure I double dimension all my CAD drawings. I also kept my light table (18x24) as well as a small 18x24 table top drafting board w/parallel bar - the light table occupies the right hand side of my large drafting board and is proving its value all over again. I can honestly say that most CAD people are NOT draftsmen and either don't have the education/experience of board drafting to understand what a drawing is (or should be) about. Layout and composition (which back in the day was expected!!!) are basically unheard of today and I'll admit that CAD drawings lack the "artistic" originality that the old pen & ink and pencil/vellum drawings had. I spent a week at NARA II in 2016 doing research with some other ship modelers & researchers and found a set of full size (60" wide) drawings of USS PENNSYLVANIA drawn in 1932 after her modernization. I had them scanned and will refer to them when I get to building my 1940s era BB-38 (1:200 scale) - the craftsmanship & artistic beauty of those old drawing is alone worth having a copy of them. I knew one of the Long Beach Nav. Shipyard managers who oversaw modernizations of BB-62 (in 1968 when I was aboard and later in 1981), BB-63 in his many years of shipyard service - and his CAD drawings, while accurate, lacked any sense of artistic ability at all. They were drawn to serve a purpose, not to be enjoyed. Such is 20....whatever. But, CAD is here and I embrace it - as long as the drawing shows what's to be represented and the drawing as a whole is professionally created and rendered. Sigh...asking a lot😪 these days....! The 3D end of things is where it's all headed (unfortunately) - because $$$ rules everywhere, it's as simple as that. However, it doesn't rule in MY shop and I do things MY way!!! While my cohort in Alaska is designing 3D parts and printing them (some for me, as well!!) my efforts so far are not getting that far - so, I fall back on my old school handmade model parts, drawn up either on the board, from blueprints, or my 2D CAD drawings. I will pursue this because I have a brand new 3D printer sitting looking at me saying "Choose Me!!, Choose Me!!!" And also because in many cases, there simply aren't vendors selling all the various items we modelers need to build a scratchbuilt model. While tall ships, etc. are IMHO done best by old school methods, the steel ship is sort of hand in hand with more up to date techniques and abilities. A lot of my current model's parts will be 3D designed & printed in conjuction with the kit I started with and my scratchbuilt superstructure add-ons. So, "YES, VIRGINIA - THERE ARE OLD SCHOOL DRAFTSMEN Still out here" - hope this gives you moral courage to continue your craft!
-
Tim, Well, looks like both of us have separated ourselves (albeit only a short distance) from The Admiral and the ever-searching, ever-reaching Cat!!! Kudos on Your Shop - it looks like it will serve you well. I think your compact size & layout looks great and should provide a suitable space for model construction. However, you may want to invest in a home RADAR unit, in case The Admiral's pottery project goes belly-up and things start flying thru the air - LOL!!! Hank
-

Converting a Backyard Shed into a Model Workshop
Hank replied to Hank's topic in Modeling tools and Workshop Equipment
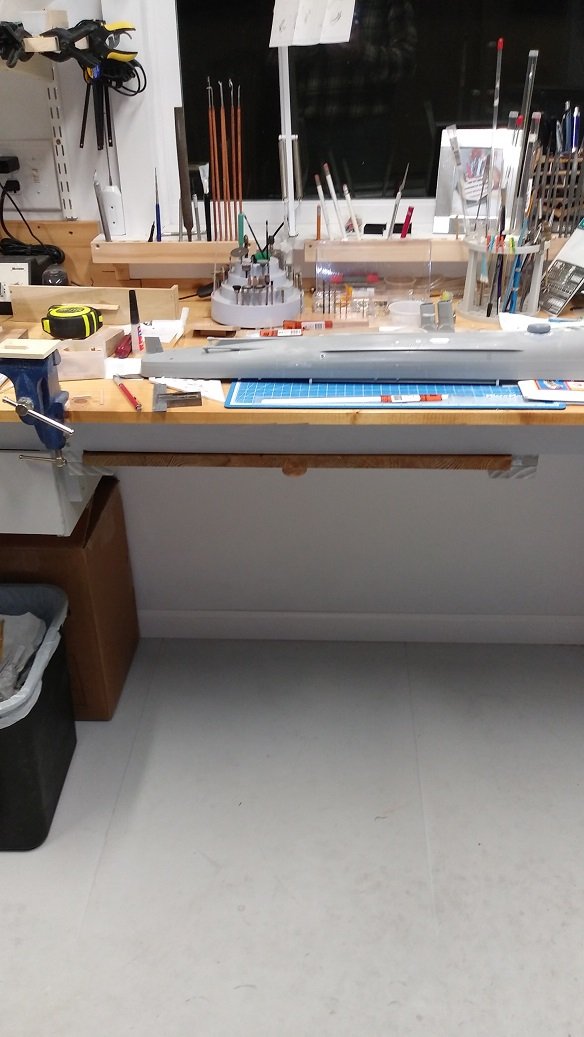
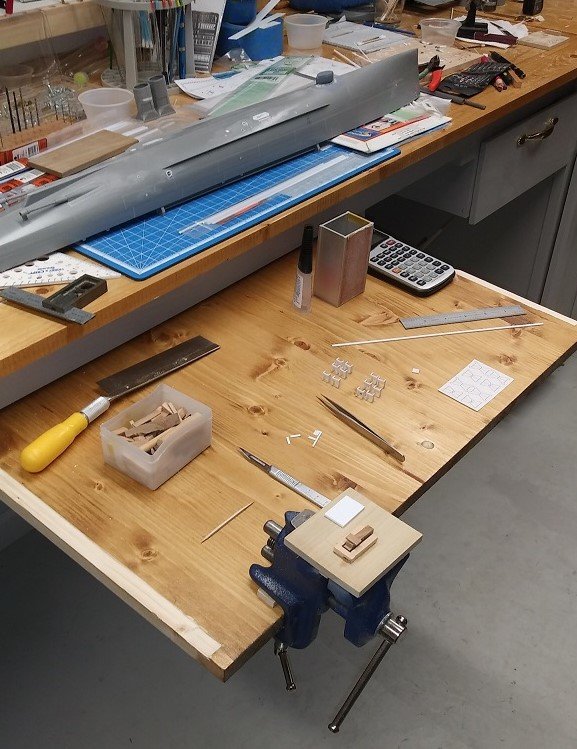
OK, so here's a post-election/pre-Turkey Day Update: Needing additional work space (I mean we all realize that 2 sides of the shop utilizing a work bench isn't REALLY enough, is it???) I've added a slide in/out work tray under the back work surface under the window. I used left-overs and a piece of glued-up pine board (24"Wx15"D) that was a remainder, so have no extra cost involved. Well, since I don't pay myself.....yeah, that's right!!! So, here is the open/shut case photos on this little project: And finally, here is the board in use - I'm making small part assemblies for the 3"/50 Dual R.F. gun mounts on my 1/144 scale USS STODDARD project: Oh, did I mention (no, I didn't ) that I'm now in the long learning curve of a 3D mechanical modeling program (Design Spark - Mechanical) - free version, of course!! Hope to sometime in the near future begin printing my own parts!! Hank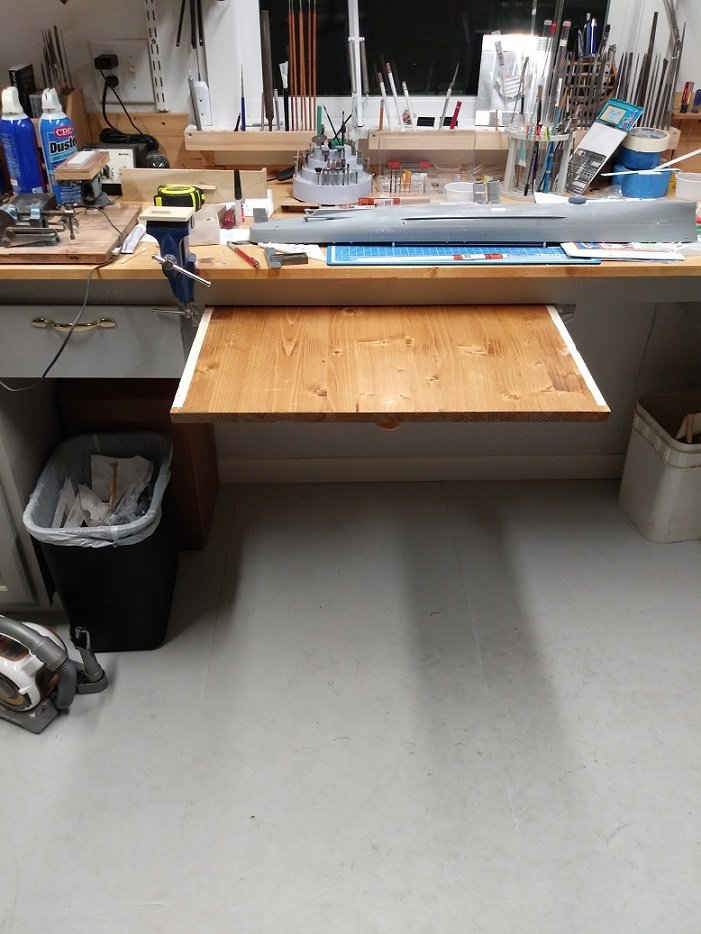
- 341 replies
-
- 13
-

-
Well, all the above is well and good....however, the question asked by SailingAnthony1812 is regarding frigate CONSTELLATION's spar dimensions, not a discussion as to whether the ship in Baltimore's Inner Harbor is or isn't the original frigate CONSTELLATION. Many of you weren't members of the NRG when this article was published (myself included), but back in the very early days of the N.R. Journal, when it was still a black & white, stapled newsletter, there was a beautiful model of CONSTELLATION (1797) described in photos, plans, drawings, and so forth by Thomas A. Todd - the article was USF CONSTELLATION As She May Have Appeared In the Period 1797 to 1800. This is the lead article in the NRJ Volume 31, June 1985, Number 2 - and I'm looking at it as I type. The second page of the article gives the sheer plan and hull lines as well as the Spars, 1801 - I believe this draft of CONSTELLATION is the one most of us are familiar with, and is also one of the pull-out plans in the volume Register of Officer Personnel....and Ship's Data 1801-1807, USGPO, Washington, 1945. This article by T. Todd is quite complete for a modeler to glean very useful information in not only building CONSTELLATION (or for that matter, USF CONGRESS) but most any other early U.S. Navy sailing warship of the period. He gives in addition, correspondence regarding his model's construction and a complete bibliography of his sources. So, S.A.1812 - if possible, you should try to locate a copy of this article, as it would be extremely useful as I've stated above. Perhaps, in everyone's interest, NRG could reprint this particular article in full as many members today probably aren't aware of its existence. [edit] I might add that these spar dimensions are also given in the Appendix to H. I. Chapelle's HASN (pg. 483). Hank Strub
-
Having bought the Byrne's Saw many years ago, I read thru this whole thread with interest. There is a lot of good information here. While my use of the saw has tended to be in a rather simple and straightforward application - nothing exotic or requiring angled cuts as in ripping, I find it quite useful in the ways other modelers have chosen to address the issue of angled rip cuts. I've also toyed with purchasing Jim's angled table accessory and may still do so - if the need becomes a reality. I especially like the idea of mounting the saw on a permanently angled base of sorts, using the piano hinge and thumbscrew method as suggested by Jaager. In fact, this basic idea could lead to a number of small additions for convenience in setting up the correct angle for cutting, etc. Hank
-
Converting a Backyard Shed into a Model Workshop
Hank replied to Hank's topic in Modeling tools and Workshop Equipment
-
Converting a Backyard Shed into a Model Workshop
Hank replied to Hank's topic in Modeling tools and Workshop Equipment
Dave, Thanks so much - I've also enjoyed posting the progress and also "messing witch people" along the way. I hope my humor played into this trip!!! Hank -
Converting a Backyard Shed into a Model Workshop
Hank replied to Hank's topic in Modeling tools and Workshop Equipment
Bob, Thanks for the links. I'll have to look into that - always something else to do, right? Hank -
Converting a Backyard Shed into a Model Workshop
Hank replied to Hank's topic in Modeling tools and Workshop Equipment
Bob, No - I haven't had it appraised; you are right, however, I should do that. You don't know the schedule for Antinque's Roadshow, do you???? I've had a day of cool and did run the a/c on heat for a short while - seems to work OK on the AUTO mode with the thermostat set about 8° warmer than the room temp. So, I'm giving the unit a "passing" grade at this point. -
Converting a Backyard Shed into a Model Workshop
Hank replied to Hank's topic in Modeling tools and Workshop Equipment
Roger, This was 1977 and I think that was a CVA (Connecticut Valley Arms) kit, a 36 cal. percussion cap Plains Carbine w/octagonal barrel. Answer - No! I've never fired that weapon. I also have 2 of the CVA pistol kits that are yet to be built - 1 a flintlock and the other a percussion cap model. Both, 36 cal. I got rid of all my priming & loading powder many years ago (all DuPont Black Powder - the REAL stuff!!!!). I may get the carbine out of my safe and hang it on a rack in the shop. That would be appropriate. With an actual powder horn/leather ball & shot bag my dad had that I think is somewhere in the 1850's vintage. Needs a lot of leather oil and rubbing, not in good condition. I did have a .36 cal Navy Arms (Italian) Colt revolver that I nearly wore out shooting off the deck of my house (into the woods behind) back in the early '80s - that was fun!!!! Hank -
Converting a Backyard Shed into a Model Workshop
Hank replied to Hank's topic in Modeling tools and Workshop Equipment
Ian, back in the '70s I lived in a studio apartment and had no space for anything. I built a Kentucky percussion cap carbine kit on my lap during that time. It can be done!!! FYI - the kit came out great - I still have that muzzle loader!! Thanks for the comments!!! Hank -
Converting a Backyard Shed into a Model Workshop
Hank replied to Hank's topic in Modeling tools and Workshop Equipment
Thanks, Roger - yeah, been long and expensive!!! But, more space than I've had dedicated to a hobby - I feel quite lucky to have gotten this far with all this. Hank -
Converting a Backyard Shed into a Model Workshop
Hank replied to Hank's topic in Modeling tools and Workshop Equipment
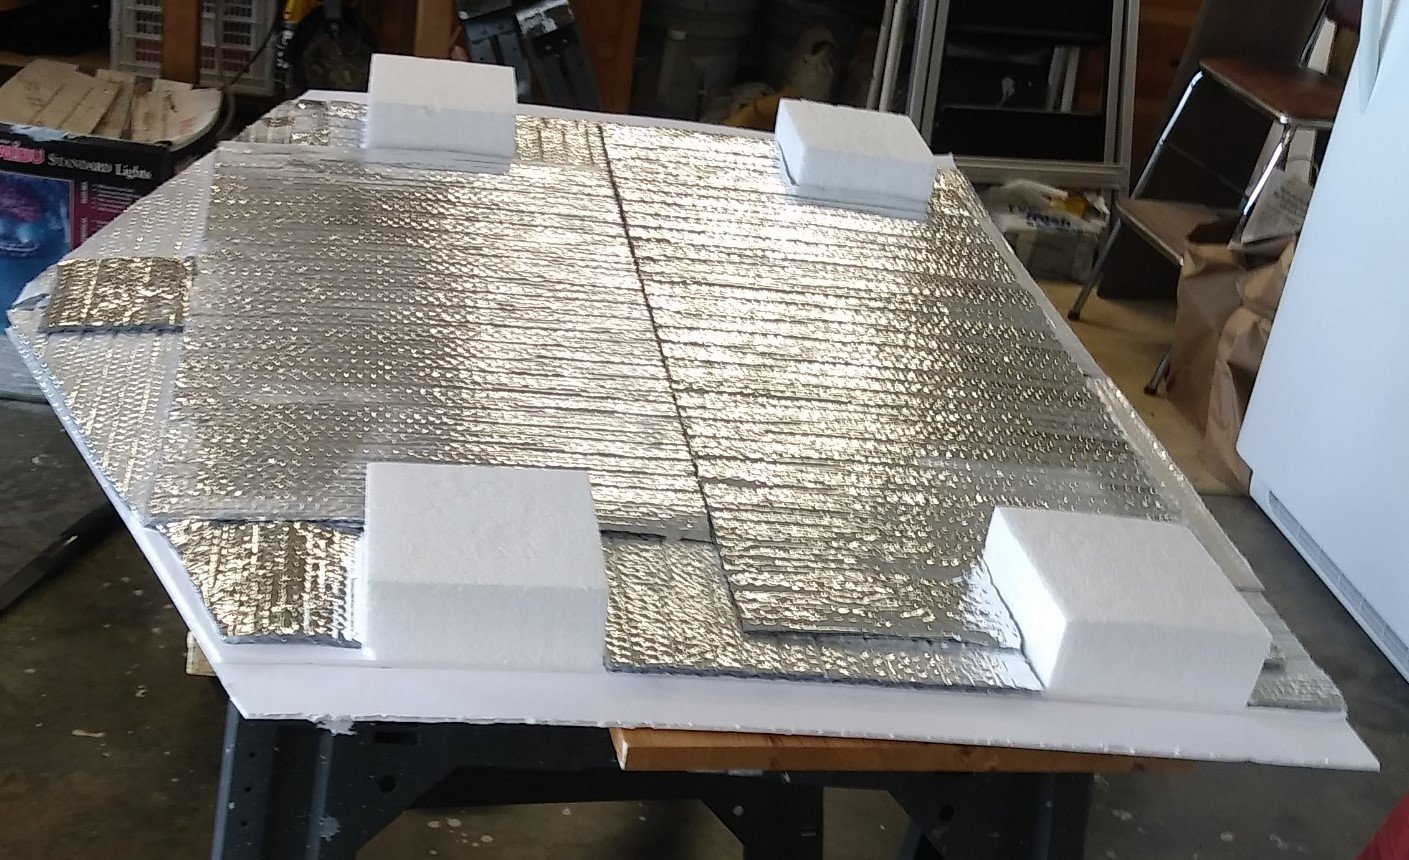
I successfully made a run to OfficeMax, Lowe's, etc. in the big city and returned to begin the final assault on finishing the shop; well, sort of....! Anyhow, I'm a bit short of caulking but will remedy that today. Other than that, the access door is completed and in place. Yesterday, I turned on the a/c and while not really needing it, i left it on for about 30 minutes while I taped up some parts on my B-2 bomber model. I noticed that the room temp actually DROPPED 1° during that time which indicated the attic closure was working. The access door was not in place, but I had the a/c pointed to the sitting room, away from the loft area. So, anyhow, the door glue holding the styrofoam blocks is now dry and the door is in place: So, now I only need to do a small amount of trim filler work along the center ridge, caulk the joints, and paint. The door is lightweight, made of 3/16" thk foamboard with a couple layers of bubble insulation and the 4 styrofoam blocks to hold it in place. I may try to find a long piece of foam to cut for an upper lip on the outside of the angled sides of the door just to seal up that visible crack. For all intents and purposes, the shop is now "in limited operations, pending Commissioning" - Further exterior painting, re-roofing, etc. will occur as time/money permits and I will update as necessary when those activities dictate. Thanks for the participation!! Hank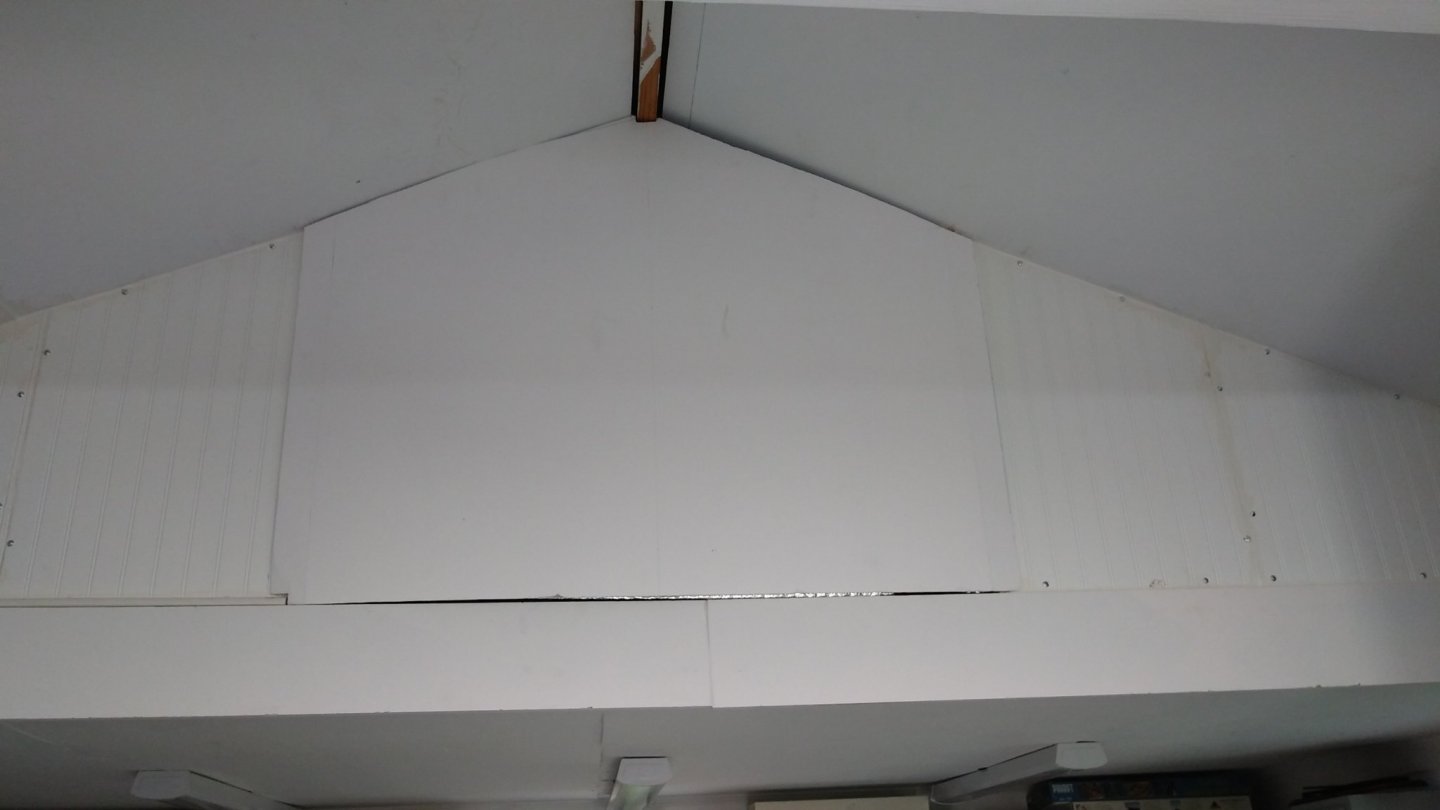
-
Converting a Backyard Shed into a Model Workshop
Hank replied to Hank's topic in Modeling tools and Workshop Equipment
Roger, The roof does have a short, centered ridge vent, I think about either 3 or 4 feet long. Also, I put 2 small metal vents on the back upper wall and one in the front wall, although larger ones would probably have been better (not enough room). Always something to learn and do better, right? Hank -
Converting a Backyard Shed into a Model Workshop
Hank replied to Hank's topic in Modeling tools and Workshop Equipment
Craig, Yep, so it's underway. I just cut out the bead board panels for the front attic opening and tomorrow a.m. (after I prepare spaghetti sauce - don't want to incur the Wrath of The Admiral), I'll be measuring the inside where the insulation will be adhered to it prior to installation. I anticipate that this end will be rather simple compared to the back panels which need an access area in the center. That will be a bit more involved, BUT...I can decide the opening width and then cut side panels to fit and get them insulated and in place (the simple parts first!). Thanks again for your interest, ideas, and input!!! Hank -
Converting a Backyard Shed into a Model Workshop
Hank replied to Hank's topic in Modeling tools and Workshop Equipment
Jaager, Gotcha!!! I knew there was some satire going on here, just wanted to make sure. We have a similar problem here in NC with certain linguistic challenges - esp. at Walmart... I want to get the front attic area closed first, so will get that done hopefully this weekend. The bead board w/foam insulation behind should do the trick. Once that is in place I'll concentrate on closing off the loft area. My above response to IMBC should give you an idea of my thinking along those lines. Actually, with today's rain & cooldown, it's a good opportunity to take measurements, go to Lowe's, and then get started on all this. Also, won't have to crank up the a/c today as it's in the low 70s and should stay there all day. Hank -
Converting a Backyard Shed into a Model Workshop
Hank replied to Hank's topic in Modeling tools and Workshop Equipment
IMBC, Thanks - you are correct with one exception - I insulated between the loft floor and workshop ceiling (below). The loft area is uninsulated. With Jaager's ideas regarding the unsulation boards, I am going to make insulated panels for both the front attic area (close it off, etc.) and something similar for closing the loft area so that I still have access. Actually, I may be able to glue foam insulation board to a thin hardboard shaped to fit the central part of that opening (for access) with two small insulated side panels permanently framed in on either side. However it turns out, this will get done fairly quickly. I appreciate your comments!!! Hank -
Converting a Backyard Shed into a Model Workshop
Hank replied to Hank's topic in Modeling tools and Workshop Equipment
Jaager, Thanks - did you mean "styrofoam ESKY" insulation?? I'm not finding a "Starfoam E.KY" insulation. I can get a 4x8 sheet of styrofoam insul. at Lowe's really easily and glue it to the back of the beadboard, thus insulating that ceiling partition once it's cut to shape. The hinge you're talking about, etc. - I'm guessing you mean for the access panel to the loft on the other end of the bldg. I think I see what you're getting at - doesn't seem too difficult. That might be the easiest and most efficient material to use. Hank -
Converting a Backyard Shed into a Model Workshop
Hank replied to Hank's topic in Modeling tools and Workshop Equipment
Dr. Per or Nirvana (which do YOU prefer?) - That's good news!!! It shows that your Admiral has a high degree of trust in you - be careful not to abuse that or take advantage of the positive gesture on her part. Remember, when dealing with Admiralty, The Cat is never, NEVER far from reach - almost like a DEWLINE of RADAR stations tuned in to take you down!!! However, on the prospects of a dedicated shop - 23'x10' is a nice size to be sure. That's 230 sq. ft. and should be fairly moderate in cost to cool/heat, etc. One thing that I've read in the operating manual about the unit I bought is that their ratings of output are not exactly as described in product advertising/data sheets due to newer calculation formulas used by the gov't. & industry - but, you don't find out about this until you've already read the online/printed comparisons and decided on a particular model. Those information columns don't always show the TRUE figures. This admission of sorts is included in the manual that came with my unit - so, I'm not sure that buying an oversized a/c unit in order to compensate for the attic situation will prove positive or negative at this point. What I based my decision on was the figures published online in their product data columns - as this is the only stuff you have to go on. Time, I guess will tell!! As you say, you've got to mess around with these things before it all becomes murky! I do have enough new beadboard on hand to fashion a permanent upper end to the front attic area. I hope to get that made this weekend. The loft area will still take some thinking on how to close it off, yet leave it accessible. I hope once you begin your shop construction you will inundate us all with pix, blarney, and coupons for free "adult" refreshments, etc. !!! Hank -
Converting a Backyard Shed into a Model Workshop
Hank replied to Hank's topic in Modeling tools and Workshop Equipment
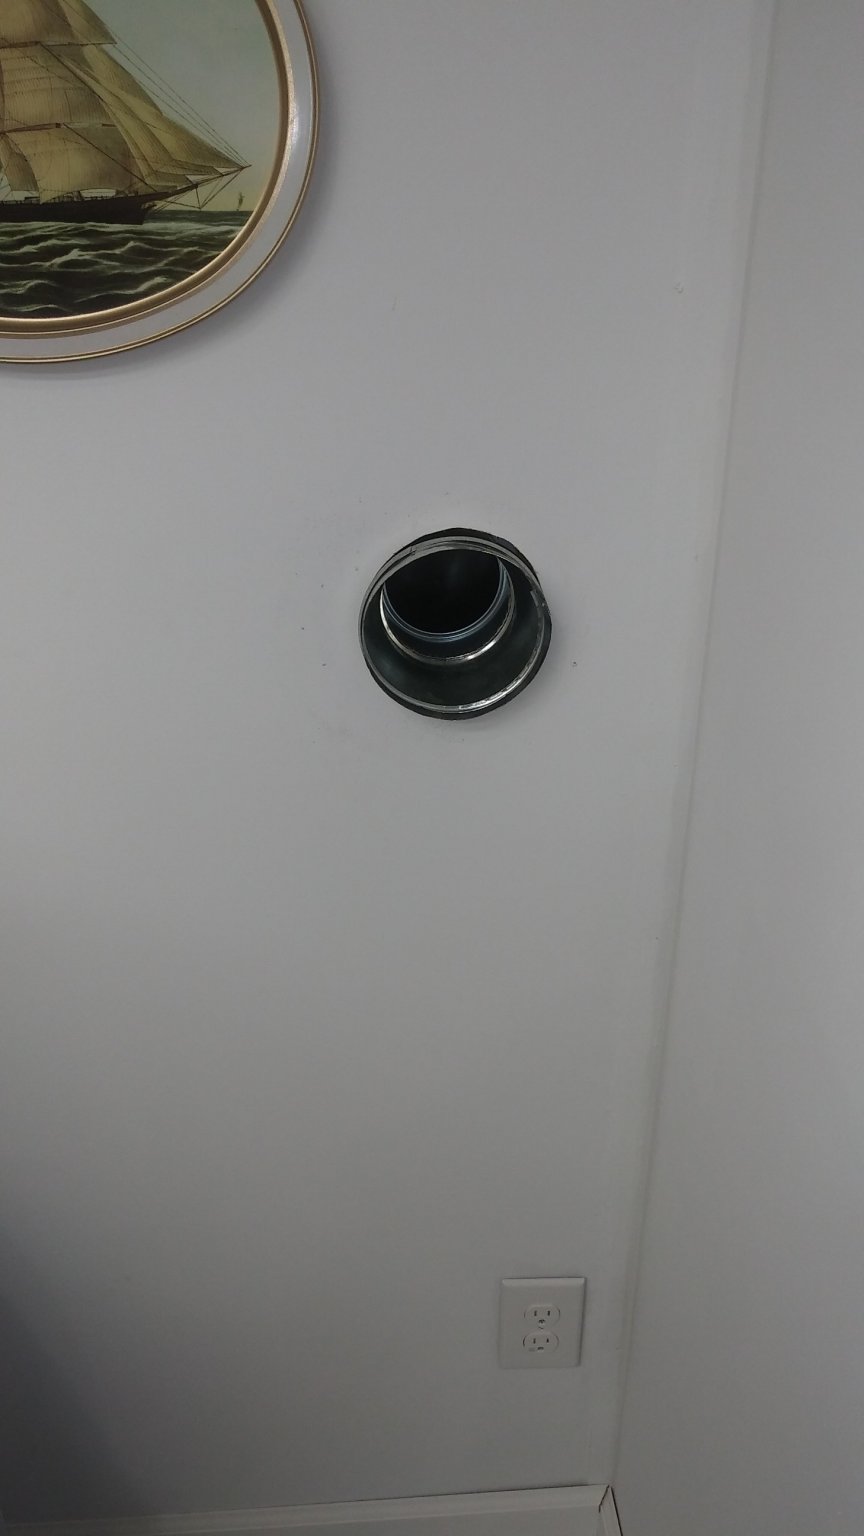
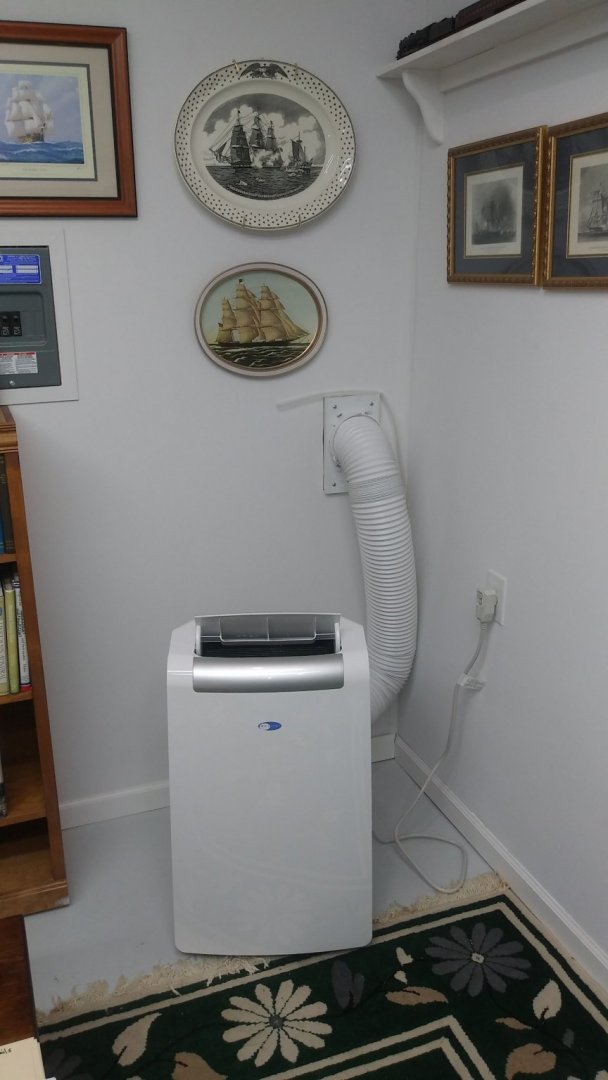
Well, my a/c was delivered yesterday so I let it sit for a day (per directions) and then trucked it out to the shop and got it installed this morning. I had to alter the exhaust opening in the wall (did so with a metal 5"x4" reducer somewhat modified): and Then, modified the provided window panel slide piece to be used on the wall instead. This hose is 5 1/4" dia. which is somewhat larger than the original B & D exhaust hose. Anyway, once the panel was mounted on the wall, I inserted the hose into both the wall opening and the unit, moved the unit into place (sort of), and plugged it in. Started right up. The ambient temp. inside was 74°F and outside somewhere around 77 or 78. I messed around a bit with the remote and left it set on Cool with the fan on high, setting the temp. for 71. Well, as the day progressed, it got quite hotter outside and inside. When I shut it off and came inside late in the afternoon, the outside temp was around 89-90 and inside 84-86 depending on where you were. So, while everything seems to work ok, I'm not seeing any cooling of the space. NOTE: I do still need to close off the attic area over the sitting area in front as there is no need to leave it open. This will obviously affect the a/c ability of the unit. The same area in the back of the bldg. (over the workshop area) needs to remain accessible as it is a storage loft. So, this may present a problem not easily solved. I'm thinking about some type of curtain that could at least be closed (snaps?) when the loft is not being accessed. At least then those two areas would be closed off from the rest of the cooled interior space. Probably sleep on that for a while....! Anyhow, here is the modified exhaust hose wall mount and the a/c unit itself: I did manage to get in a few hours on my Williams Bros. WASP engine kit that I started 2 years ago. I need to get it finished and clear the decks for a full time STODDARD build. One other note - the unit is on castors and can easily be moved around (which I did) about 5' from either wall. I am planning on adding a permanent angled drain line thru the wall for connection to the provide drain tube. Just a matter of getting to it, etc. Hank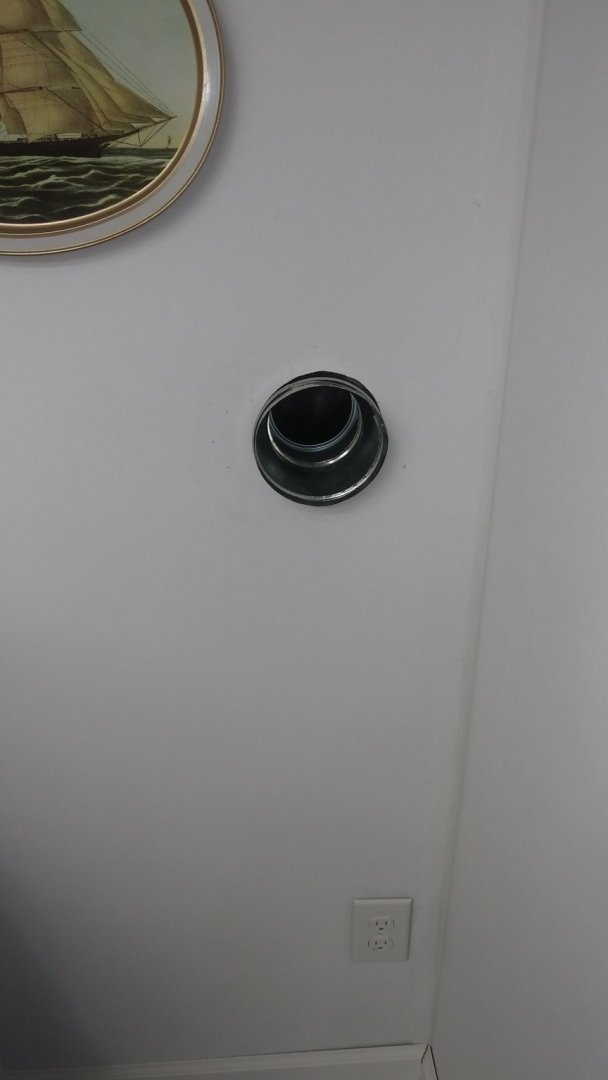

-
Keith, Well, sadly those are the facts, but not the emotional ties that develop, etc. - she had a twin (pure white/blue eyes (Casper) - we adapted both as kittens. Casper passed early also, but for other reasons. I adapted "Smokey" our current cat when he was 6 weeks old as a companion to CJ but they never completely clicked - perhaps age difference. Anyhow, Smokey is the King of the Roost around here, almost as demanding as The Admiral can be!!!!! Cats are certainly their own bosses, we're just here to make sure THEY are happy!!!! Hank
-
Keith, Here is a shot of CJ I took in 2010 - she was sitting in my vintage Gibson Banjo case like she owned it!!! Sadly, CJ developed a tumor resulting from a vaccination and after the 1st tumor was removed, developed a 2nd - this one simply couldn't be operated on and she was put to sleep in Aug 2014 - she was 13 years old at the time. This, BTW is not uncommon in felines according to our vet. We currently have a Japanese Bobtail that is 10 years old now - he grew up with CJ as his "adapted" mom. I should rephrase that - HE allows us to take care of him!!!!! Hank

-
Converting a Backyard Shed into a Model Workshop
Hank replied to Hank's topic in Modeling tools and Workshop Equipment
Grant, Well, The Admiral has placed restrictions on the use of all elec. devices during all this, however - she did allow for a sketch artist to capture the event just before it began: