Hank
-
Posts
632 -
Joined
-
Last visited
Content Type
Profiles
Forums
Gallery
Events
Everything posted by Hank
-

Converting a Backyard Shed into a Model Workshop
Hank replied to Hank's topic in Modeling tools and Workshop Equipment
I don't know about this question, but....a couple years ago I did replace the circular fluorescent bulb in my magnifier lamp with a new one. So, from that standpoint they are still available. -
Converting a Backyard Shed into a Model Workshop
Hank replied to Hank's topic in Modeling tools and Workshop Equipment
Dr. Per - Well, YES!!! I'm actually making this paint shelf box IN the workshop, so there is a bit of dust being created, however not model dust at this point!🙄 -
Converting a Backyard Shed into a Model Workshop
Hank replied to Hank's topic in Modeling tools and Workshop Equipment
Jaager, You know, you're right about the poplar being both pretty & ugly on the same piece of wood. However, for it's intended use, I don't care at this point - a lot more cost effective than the same size red oak (despite the looks!). I'll have to see what a walnut stain does on it - I've got that on hand. I may just put conditioner and a coat of poly and let it go at that! -
Converting a Backyard Shed into a Model Workshop
Hank replied to Hank's topic in Modeling tools and Workshop Equipment
Thanks Wefalk, Dave, & Jaager for the lighting suggestions, etc.! When I had everything going down east prior to retirement, I had an assortment of clamp-on, adjustable lamps, both circular, u-tube, and linear flourescents and incandescent bulbed lamps. All those are in the loft, piled up on each other - they will be resurrected and brought out of mothballs for Ship-check and evaluation ! It was actually a sunny day and I was able to get the ladder up and put caulking & new flashing on where I think the leak was located. We did get an evening shower and more is on the way, but so far not enough to count. We'll see if my repairs worked or we go to Plan J . I also picked up some nice 3" wide x 1/4" thk poplar at Lowe's and have begun work on a 4'x4' shelf box for all the bottled & cans of model paints, etc. Nice for once to have everything in one place! No pix tonight, but hopefully in a day or so. We'll see what the weekend brings in the way of further progress.... Hank -
Converting a Backyard Shed into a Model Workshop
Hank replied to Hank's topic in Modeling tools and Workshop Equipment
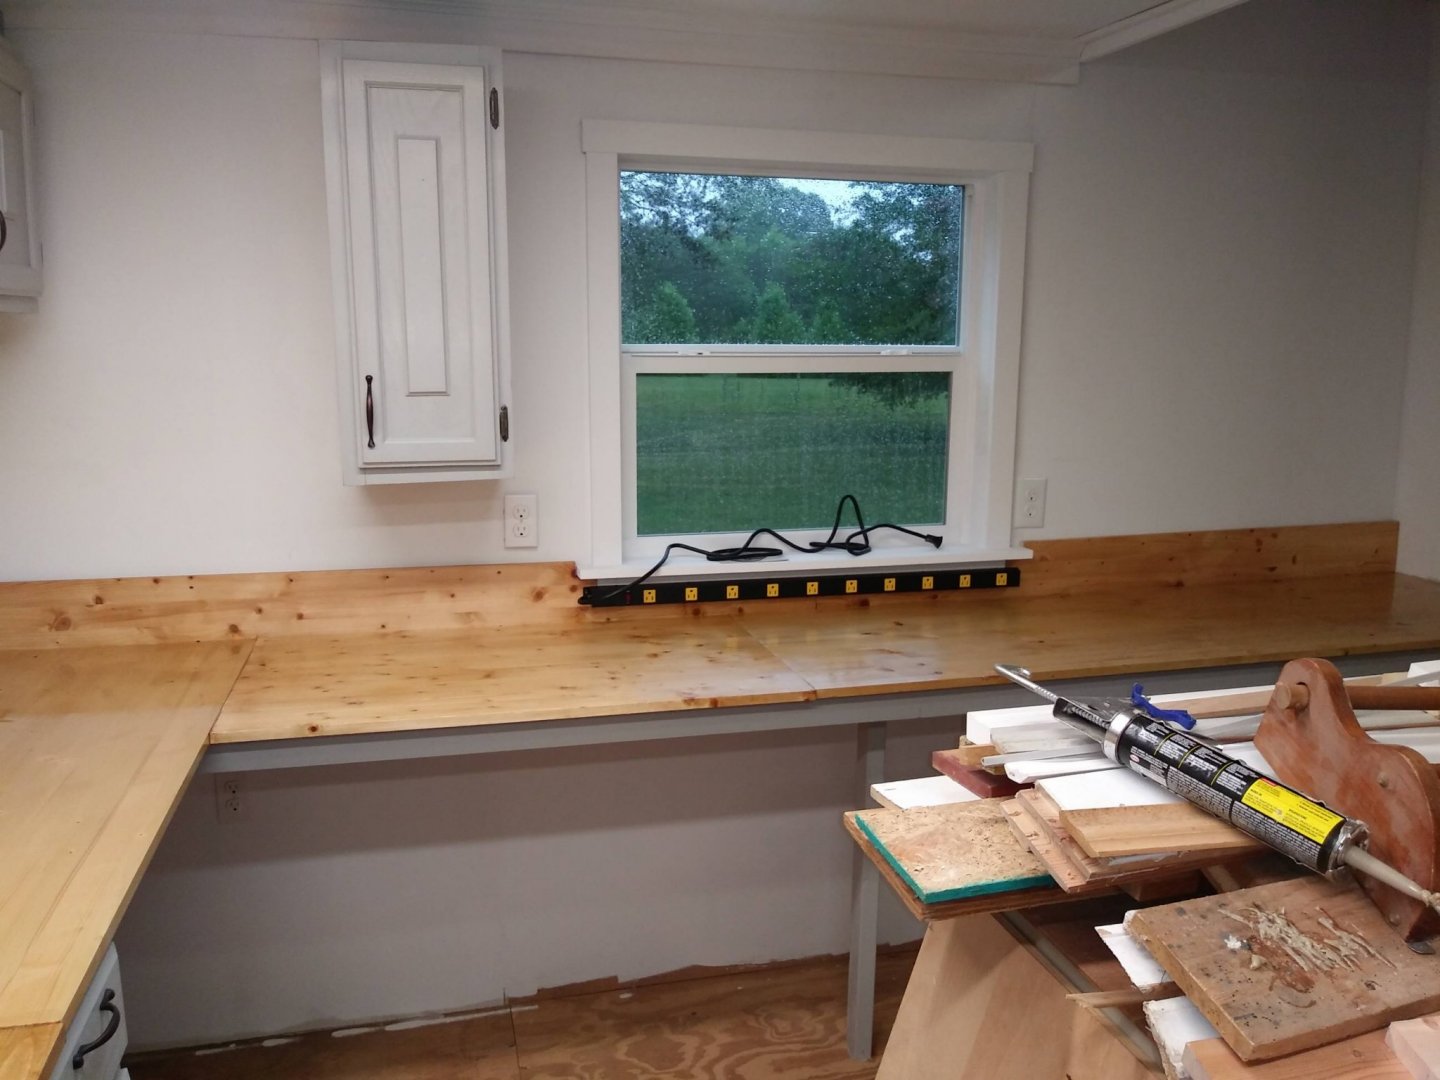
Roger, Thanks so much - it's always nice to know I'm making progress - esp. in others' eyes! Dr. Per, Henry - Thanks - I think the Sig. Other is probably correct. OK, I reversed course with the 1 lamp LED fixture I had purchased yesterday - took most of the morning, but it's assembled and wired with an on/off switch under the cabinet. I also added an extension of the cabinet face to cover the fixture. Here it is prior to painting to match the cabinet: Thanks to Jaager for the great suggestion. I'm mulling over whether or not to add one on the left side also (under the bottom shelf - I may sleep on it while thinking about the shelf height and whether or not to adjust it before proceeding with a light fixture. _After lunch I then sanded the entire worksurface and put on another coat of polyurethane. It's been "dry" for the last hour or so (well, not really raining, mainly light mist) so I may try to get the ladder put up and see if I can put some temp. cover over where I think the leak is occurring until it's dry enough to effect a permanent repair. Besides, I didn't want to disturb the wet poly as it sets.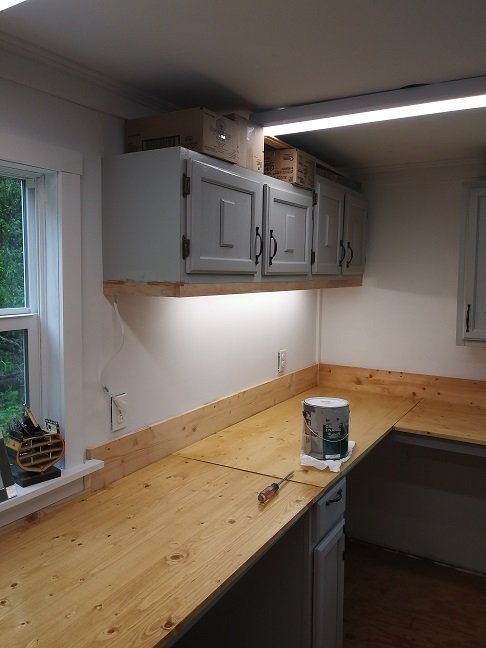
-
Converting a Backyard Shed into a Model Workshop
Hank replied to Hank's topic in Modeling tools and Workshop Equipment
Julie, Thanks for the nice comments! This is a 20+ year old shed that has typical shed features - it has 4 skid beams with joists @ 90°, 16" OC. Then either 1/2" or 3/4" exterior plywood flooring (don't know the variety). That's it - it is what it is!! The shed sits too low to the ground to get under to do anything in the way of repairs. I guess the time to have thought about replacing or insulating would have been prior to any renovations when it was basically empty. Didn't give much thought to it then. The plan (if you want to call it a "plan") was to use the old laminate floor out of the house as a finished shop floor - but, as my recent posts have indicated, that just at this point probably won't work out. I'm leaning towards 16" (or 24") square black/white vinyl tile in the shop (back) and using the salvaged Berber carpeting in the front. I did a CAD layout of the floor using 12" squares and as I noted, it was just way too busy for this size area. For the most part, the existing plywood is fairly flat - only a couple places where nails will have to be hammered down. The floor is not 100% level all around, but "acceptable" - most of the joints are fairly even between the sheets of plywood. The other factor is cost - I'm trying to do this with available materials and not spend a fortune on this building; hence, buying tiles, etc. is not fitting into this plan very well. What does "SO" mean? Not familiar with that abbreviation. Hank -
Converting a Backyard Shed into a Model Workshop
Hank replied to Hank's topic in Modeling tools and Workshop Equipment
Mark, Dr. Per, & Jack12477 - Thanks All for the nice remarks!!! The back half of the bldg. (the shop area) is a lot further along than the front half (sitting/books/etc.) - but, all in good time, I guess! If I don't find this damn leak, I may be having a Titanic moment!!!!🥵 Still raining here and forecast for tomorrow, again. So, this things really messing things up. I hope to get out today and maybe put a tarp over the front porch roof where it joins the front of the shop and see if that doesn't at least divert the water leaking in until I can make permanent repairs. That is, if what I think is causing this leak is the correct answer. Was out a little while ago just to check on things. Today's work inside would be to sand and re-poly the worksurfaces again. Three good coats ought to do it. -
Converting a Backyard Shed into a Model Workshop
Hank replied to Hank's topic in Modeling tools and Workshop Equipment
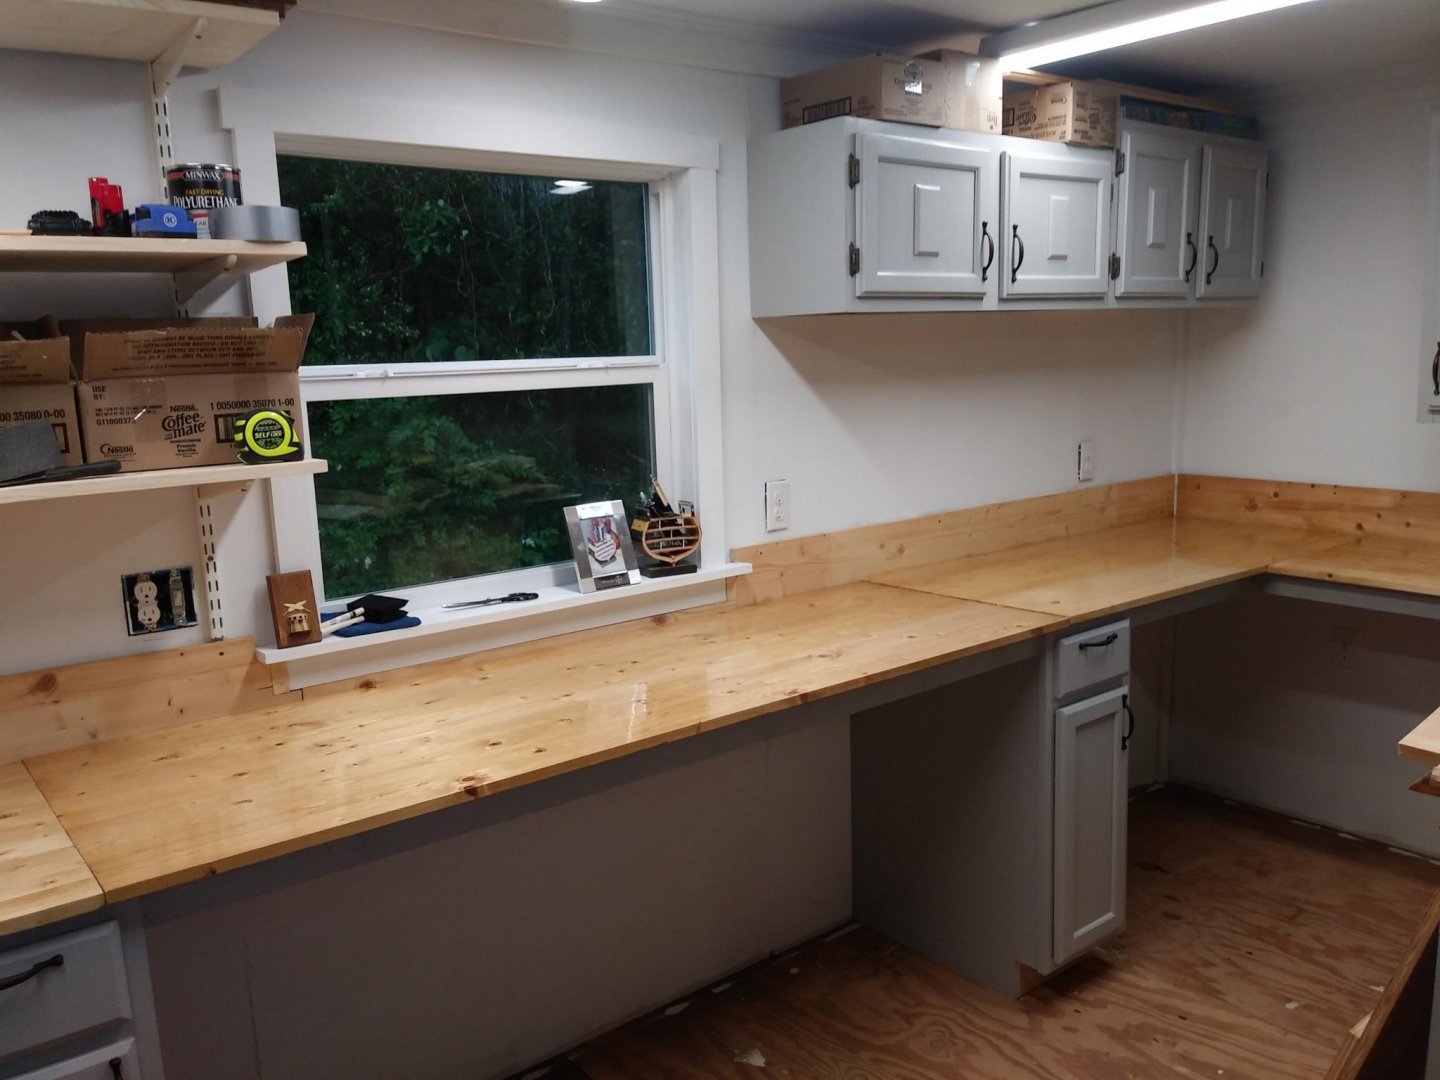
OK, so tonight I got all the worksurface pieces cut to size, fitted, and installed. Then, did a complete coat of polyurethane. Will sand tomorrow, and repeat. Also, installed one 36" receptacle strip below the side window and bought a 4' LED under counter fixture at Lowe's but that's going back - no installed wiring (110v AC w/plug) - not that I can't, but I would rather purchase a unit that's all there (plug & play, if you will!). Looked into the vinyl floor tiles - 12x12 would be extremely busy - I laid out a pattern of black/white diamonds 12x12 and that's just too extreme. But, 16x16 might work better and even 24x24 might work, as well. I know I can get the 16x16, but haven't researched the larger ones yet. So, here's where I'm at: With all the rain we've gotten in the last 2 days, I now have a leak somewhere up front and that will be tomorrow's Job #1 - finding and sealing it up. I think I know where there may be a problem, but day light will tell. Rain expected again tomorrow, but if I get a chance to explore, I need to correct this ASAP.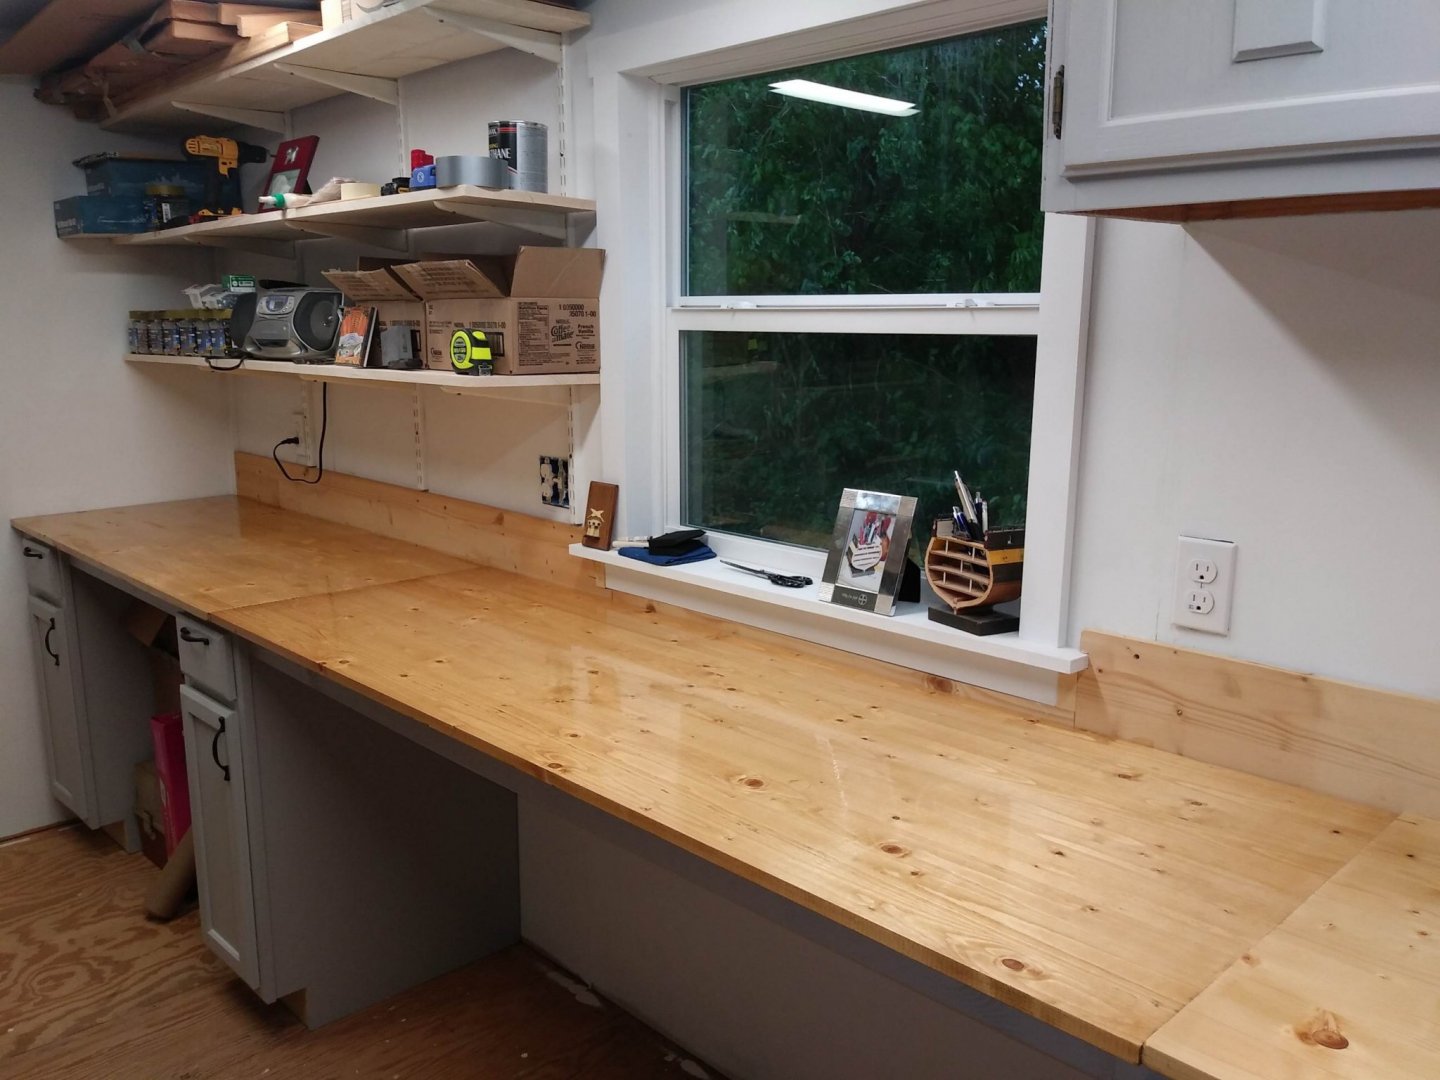
- 341 replies
-
- 10
-

-
Converting a Backyard Shed into a Model Workshop
Hank replied to Hank's topic in Modeling tools and Workshop Equipment
Jaager, The spacing on the floor joists is satisfactory; and, with a couple very small exceptions, the plywood shed floor doesn't need any attention (in front at the doors I intend to fill some pitted areas with Durham's Hard as Rock wood filler and then sanding smooth prior to putting down the final flooring. I intend to go thru and make sure all the original nails are pounded down as flat as possible. The LED under cabinet lights are a good suggestion - right now, the workbench gets fairly good light at night and in the sunny daytime it's really quite good. I may add some additional lighting on the right where bench top tools will be located. We'll see - once I've actually started using things and see how the present lighting works or doesn't work. And - I have one of those Atomic Powered Clocks which will be moved from garage to shop - I've noticed the lack of a wall clock! Thanks for the great suggestions!! Hank -
Converting a Backyard Shed into a Model Workshop
Hank replied to Hank's topic in Modeling tools and Workshop Equipment
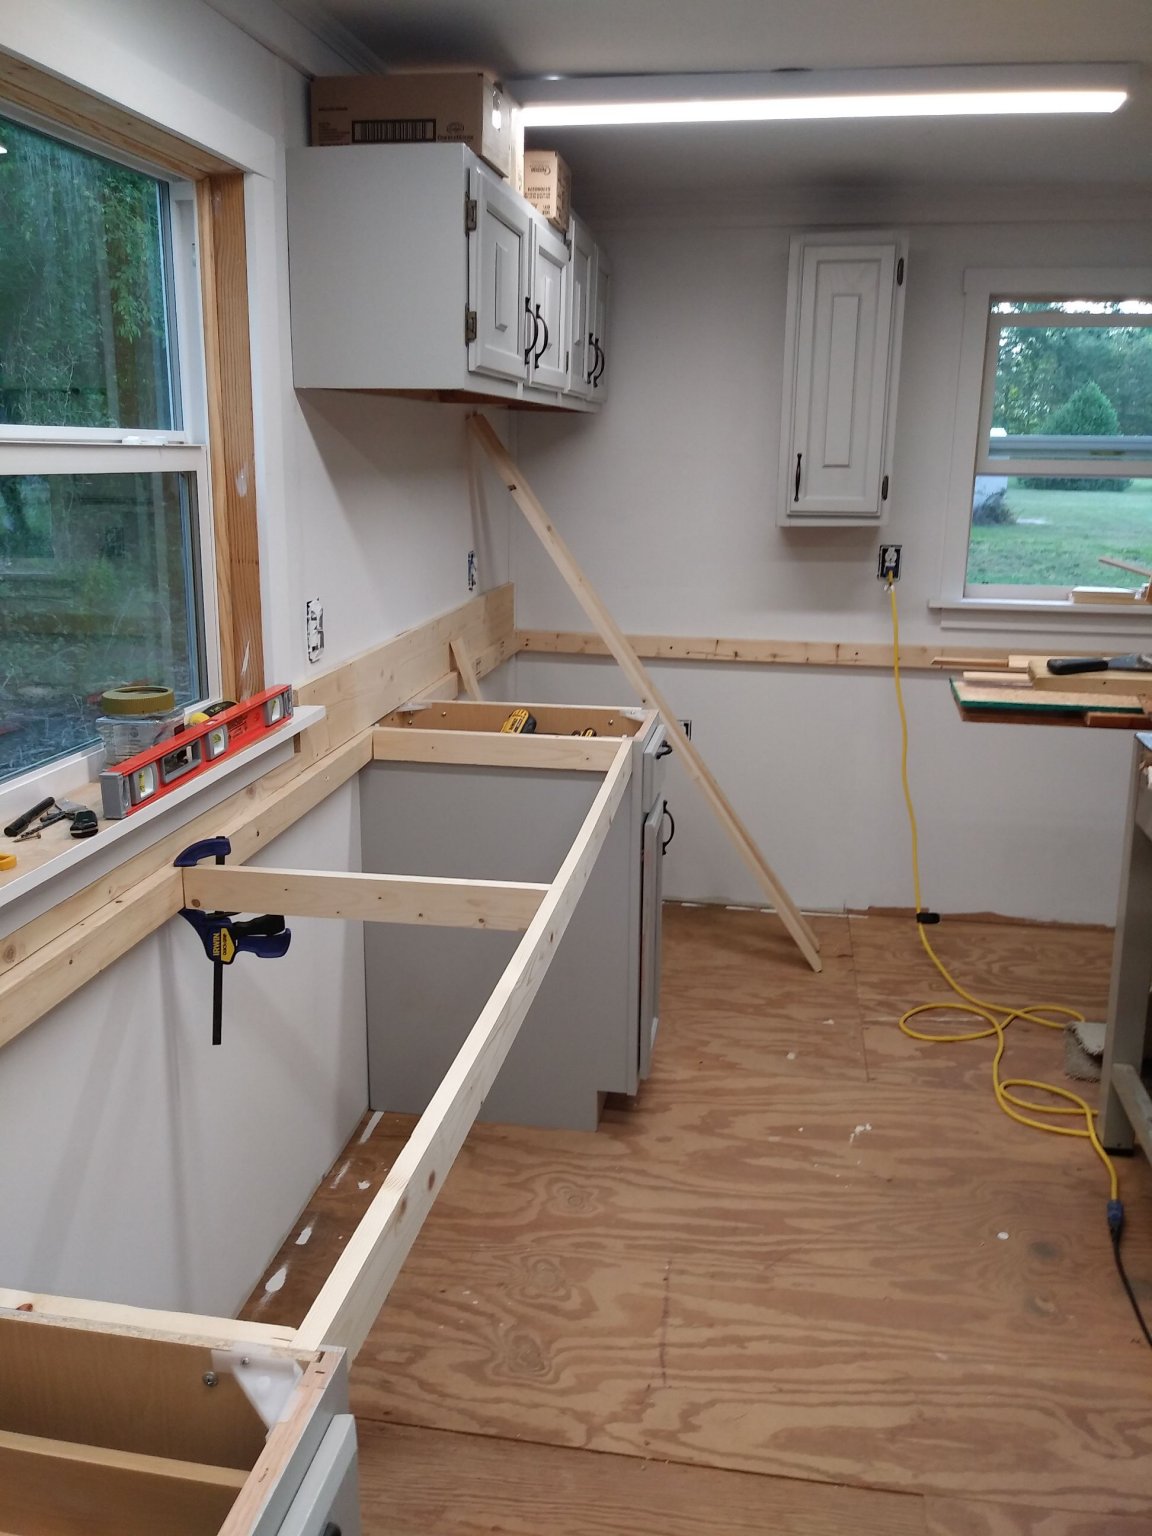
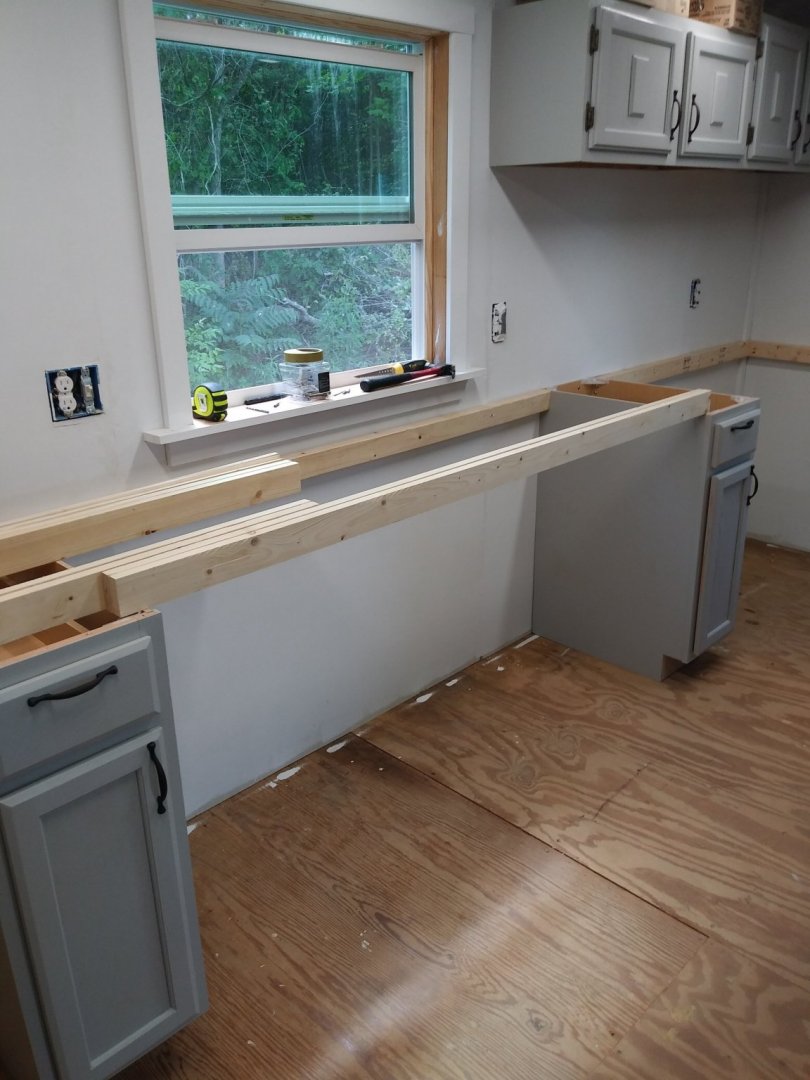
Did get some work done today/tonight - one small surface board to go and then I'll be finished installing the workbench. I've been polyurethaning as I go, and will sand and then put a final coat on once all the pieces are in place. Also, did a bit more touch up on the wall/trim primer. So, here's where we stand: After some conversation with another forum modeler re. the flooring and my stated plans, I'm doing a re-think on this - haven't come to a conclusion yet but looking at various options at this point.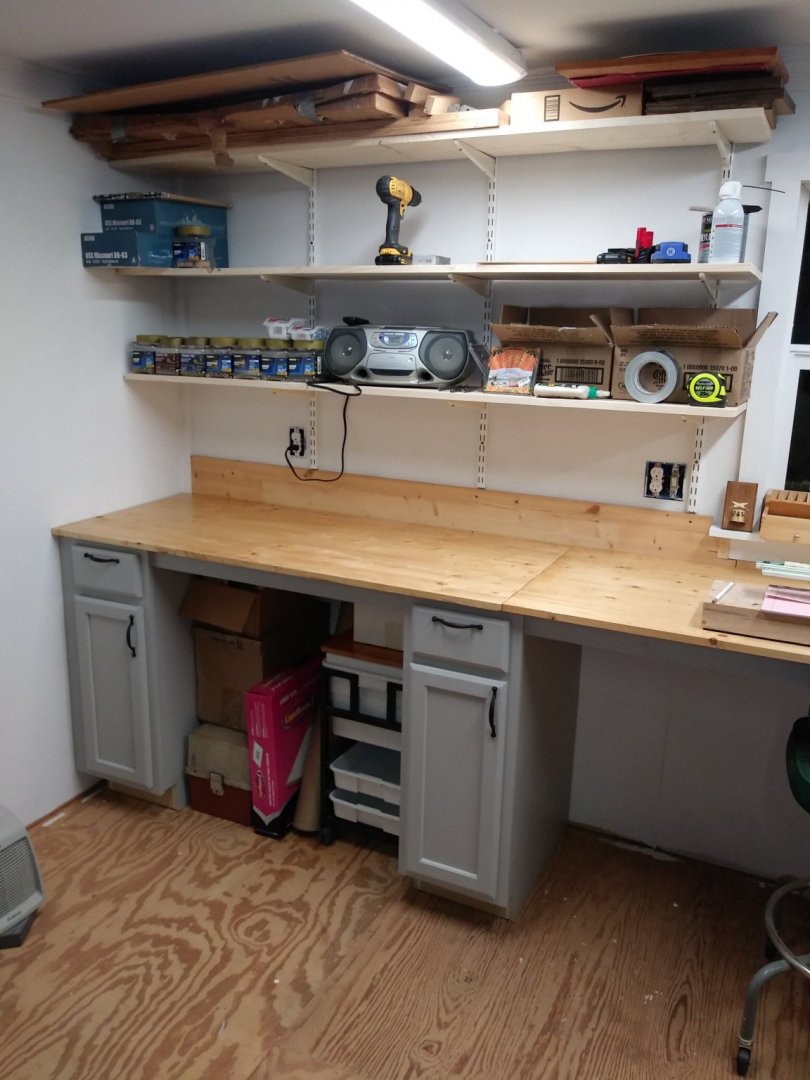
-
Converting a Backyard Shed into a Model Workshop
Hank replied to Hank's topic in Modeling tools and Workshop Equipment
Dr. Per, Dean (Jaager): Flooring - well, when we had our house renovated in 2018, I had the existing dk. bwn. laminate flooring removed and stored in the shed by the contractors. My plan was to re-use it in the shop - at least in the back or shop area (behind the partition). I also had them roll up & stow the best of the existing Berber carpeting for use in the front of the shop. I also planned to make a small entrance area in front of the dbl doors using alternate black/white 12" vinyl tiles (as Jaager suggested) - sort of a throw back to Nelson's flooring in his cabin, etc. So, that's the plan - we'll see how things progress!! Hank -
Converting a Backyard Shed into a Model Workshop
Hank replied to Hank's topic in Modeling tools and Workshop Equipment
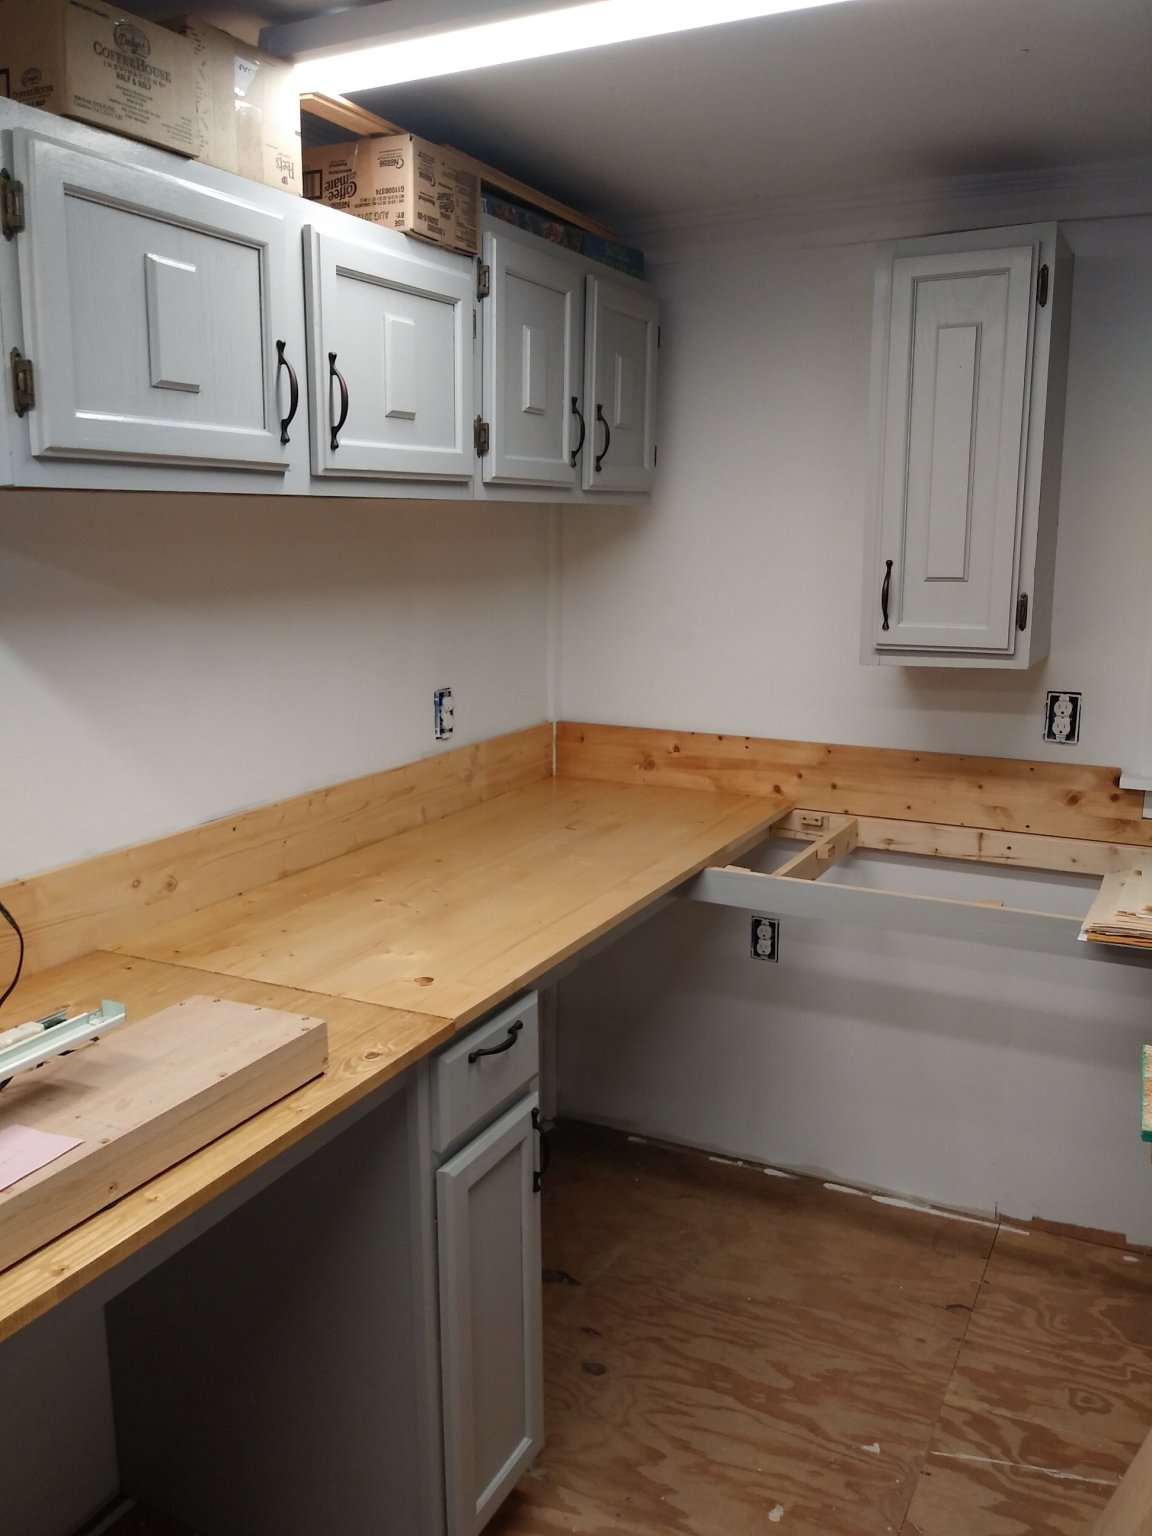
Mark, I appreciate the advice. The only thing about Lowe's is that you end of paying shipping if they ship it to your house. And right now I'm not sure about how long it would take to order the lumber vs going to another store near by and getting it myself. I did make a local run and picked up one of the 4 edge-glued boards I'll need - the short, 4' long board which will be shortened by about 5" or so. Tonight I got the backsplashes stained, cut to fit, and installed. During the Lowe's trip I also picked up (3) 12" W. Pine boards (they were cheaper than the shelves that were for sale!) - sanded, and installed them along the back, left wall. Then, finished the primer on the windows and touch up all around. Lastly, I brought the center work surface out from the garage and positioned it for install tomorrow. So, here's where we're at: Somewhere I have a bag of new receptacle covers and I can't find them in all this "stuff"!!!!🥵 I'd hate to have to go spend money on items I know are around somewhere!!! IT'S KILLIN' ME!!!!!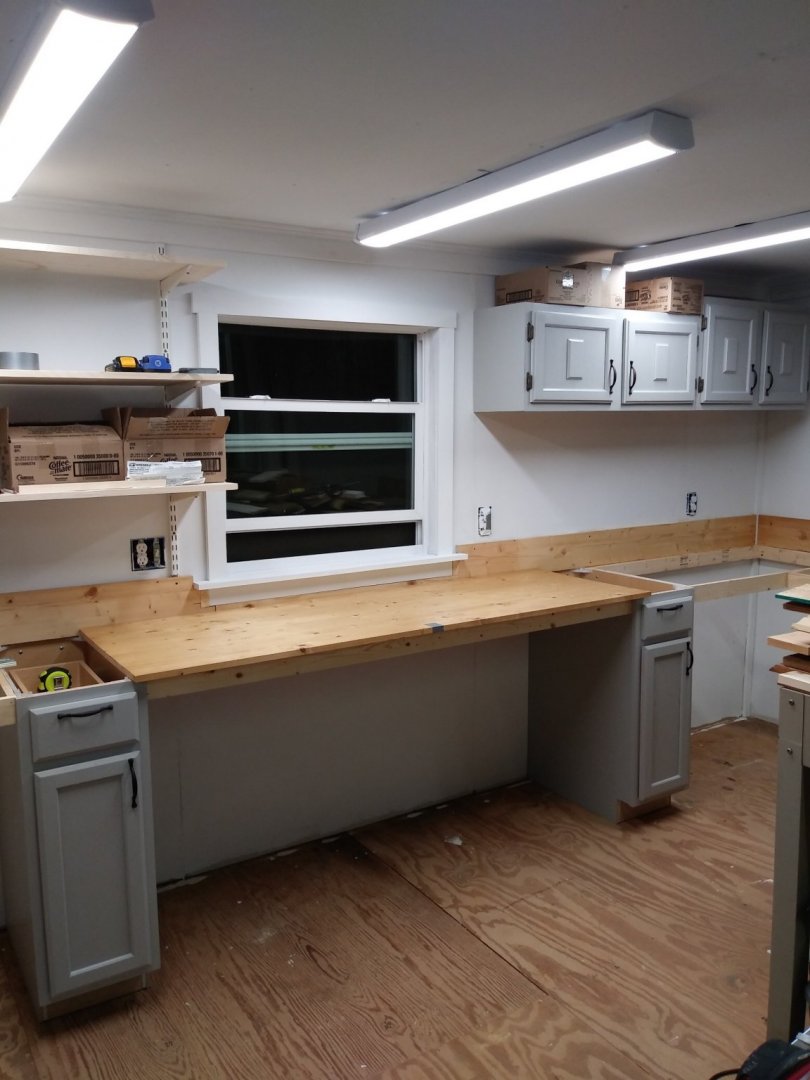

- 341 replies
-
- 10
-
-
Converting a Backyard Shed into a Model Workshop
Hank replied to Hank's topic in Modeling tools and Workshop Equipment
Ron, Yes, they are particle board sides. However, when I screwed the 1x3 frames along each side, I used construction adhesive and 1 1/4" sharp point lathe screws. The worksurface will be glued to the frame - I had thought about using screws, but this construction adhesive won't come apart, so with clamps in place, I think this will be sufficient to tie the worksurface down. The frame is mainly to give horizontal strength - the surface actually sits on each of the cabinets so they really carry the "load", so to speak. But....I understand what you are saying about the particle board sides. FYI - The 2x3 along the wall is screwed into the wall studs and only had a couple lathe screws on the ends to hold the cabinets in place - I also glued the backs of the cabinets to the wall in addition to lathe screws. Thanks for the advice, always welcomed!!! Hank -
Converting a Backyard Shed into a Model Workshop
Hank replied to Hank's topic in Modeling tools and Workshop Equipment
Dr. Per, So sorry, but just to ease the pain - it was my 1st smoked brisket attempt and I give myself a "C" on the effort. Feel better now???? No apologies on the shop, however!!! -
Converting a Backyard Shed into a Model Workshop
Hank replied to Hank's topic in Modeling tools and Workshop Equipment
Back in the shop after Brisket-a-go-go and got a bit more completed on the worksurface framing. The local Lowe's is out of the 24" edge glued boards, so I may have to make a Viking Raid on the other local stores and see what I can come up with. The center workbench top is drying in the garage - tomorrow I'll sand and then re-apply poly for a nice smooth surface. Probably point the Caddy-wagon east while things dry out. Tonight's photos: So, that's my story and I'm sticking to it!!!

-
Converting a Backyard Shed into a Model Workshop
Hank replied to Hank's topic in Modeling tools and Workshop Equipment
Well, it came out "ok" - a bit overdone, but....was the 1st one I've smoked so beginner's luck, right??? Taste was good, however. Next time, I'll do the rub overnight, and try to keep the grill temp at a steady rate, not up/down, etc. The Admiral wasn't all that impressed, so I self-keel-hauled after supper to her mirth and delight -
Converting a Backyard Shed into a Model Workshop
Hank replied to Hank's topic in Modeling tools and Workshop Equipment
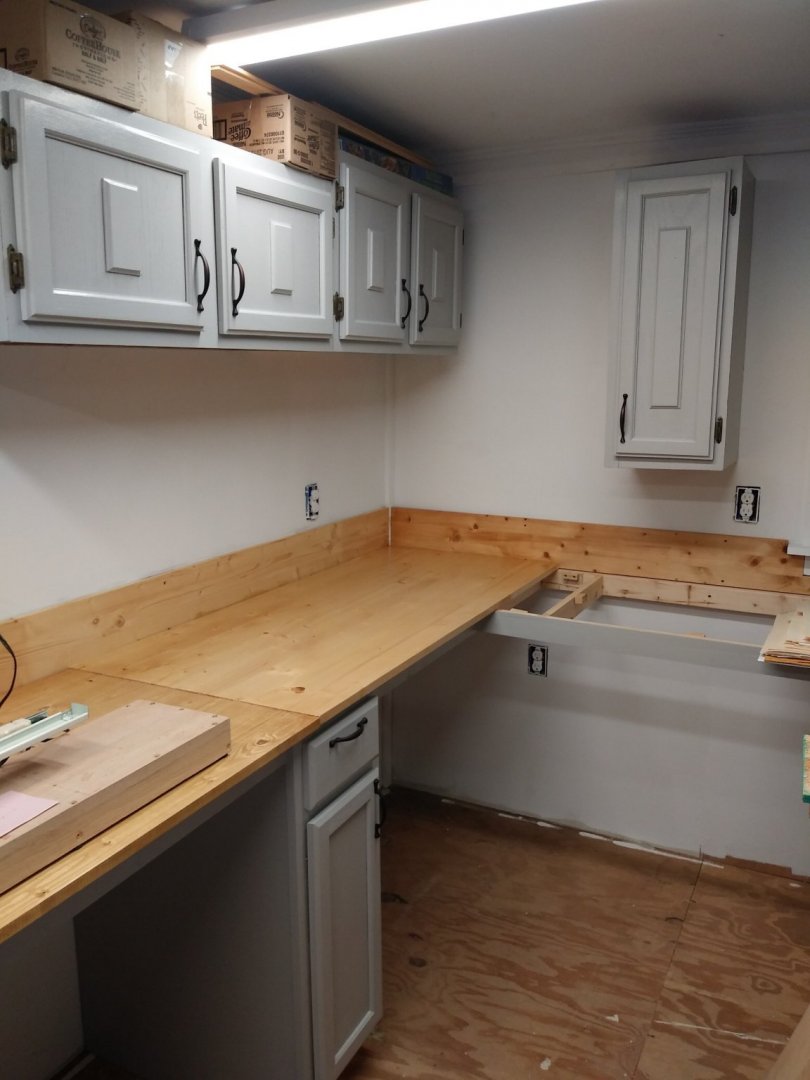
4pm or so....you know, just before they pipe down chow! - Cabinets in place and some framework for the work surface. Will probably continue after chow, but right now a smoked brisket has Uncle Hank written all over it!!! Once we've secured from Mess Call, I'll probably be back out for an hour or so and will make an evening post. FYI - the level of the cabinets required almost no shims and I couldn't be happier about that aspect of this work!
-
Converting a Backyard Shed into a Model Workshop
Hank replied to Hank's topic in Modeling tools and Workshop Equipment
Sat. - lots going on today - yard work, shop work, smoking a brisket (and...much tastier than smoking dope!!!). So, I got the end base cabinets finished, leveled and secured in place. Am about to go out to locate & secure the two back wall cabinets and in the meantime began polyurethaning the center work surface. It's an edge glued pine board 24"Wx6'Lg. and will be centered under the back window. Light sanding all around, a coat of wood conditioner, Minwax Golden Oak Stain, and various spray coats of Minwax clear gloss poly and this should look fairly nice. Here's it about 2pm today - I have a couple more doses of spray poly to apply: I hope to get this in place with backsplash today and will post results later.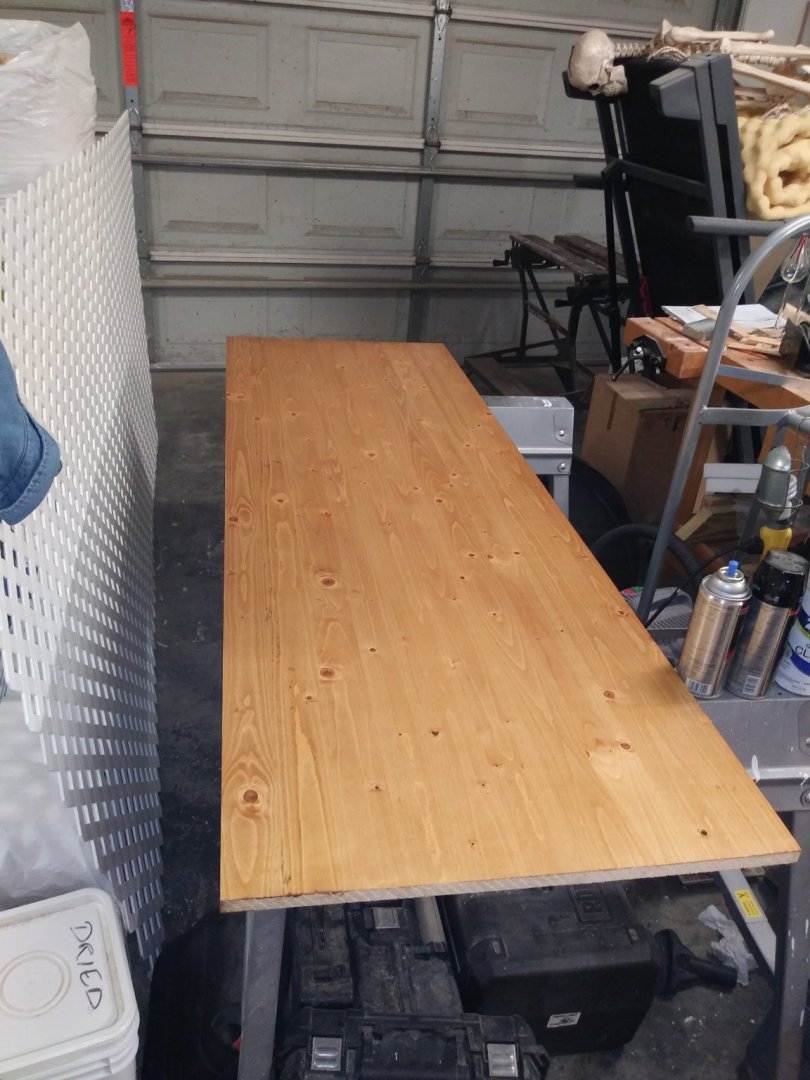
-
Frigate Boston by overdale - FINISHED
Hank replied to overdale's topic in - Build logs for subjects built 1751 - 1800
Dan, I just discovered your BOSTON! Fantastic work and a beautiful end result - kudos!! I've entertained thoughts and did research on BOSTON a few years back - your interpretation is very well founded. My ideas were almost parallel in how I would have attempted to build a BOSTON. Hank -
Converting a Backyard Shed into a Model Workshop
Hank replied to Hank's topic in Modeling tools and Workshop Equipment
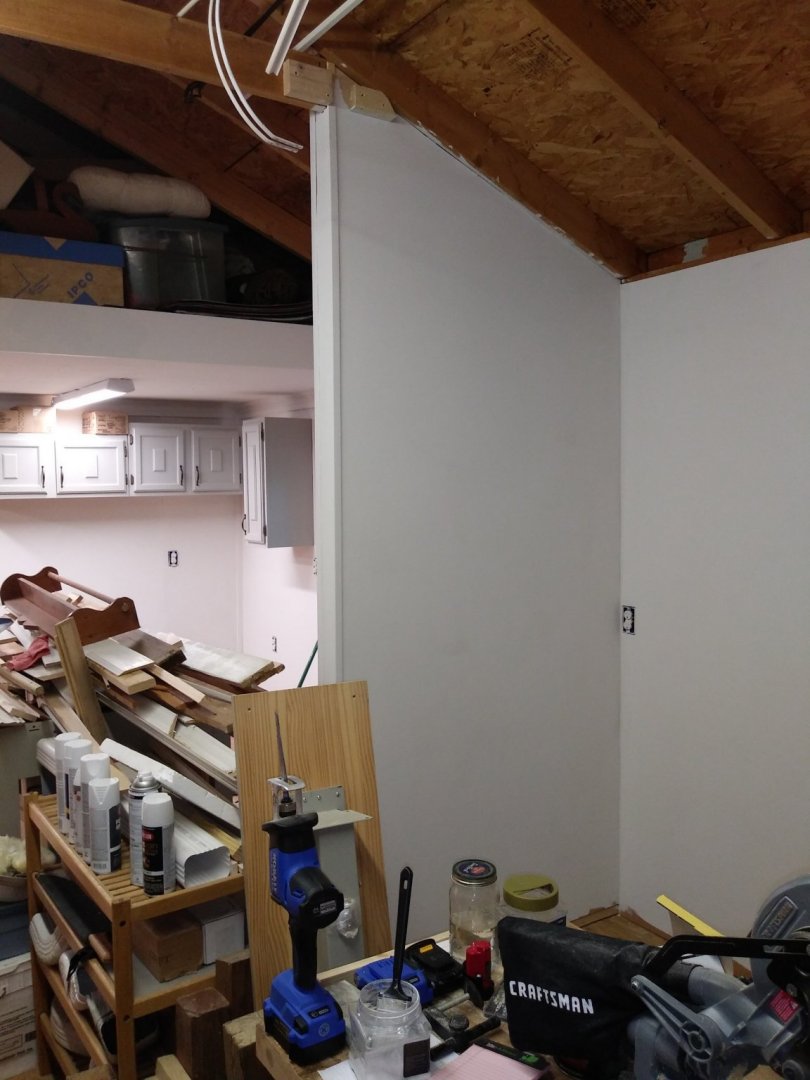
OK, today's work & tonight's painting is moving things one step closer. I've got the back of the interior painted as far as I'm going to at this point. Tonight I started painting the 4 base cabinets but not before adding build outs to the end cabinets where they will meet the wall. This offsets them an inch or so and looks a bit nicer. I also today purchased a 24"x6' long edge glued pine countertop which will be the center work area along the back wall. I've got all the needed framing materials, etc. and so once the cabinets are finished in being painted, the first two units will be located and put into place and the framework for the center work surface added. Then the two end cabinets and corner posts on the right side where the "L" worksurface bends. Once these are in place, I can begin to layout the laminate flooring and then baseboards. Step by step it's taking shape. Here is the back area as of this evening: With a nice weekend ahead, I expect (of course, this is done without prior consultation with Admiralty staff and we all know who loses when this type of behavior is afoot!) to get a good start on the back wall worksurface & cabinets. May also get the shelf hangers located on the back wall, as well - we'll see!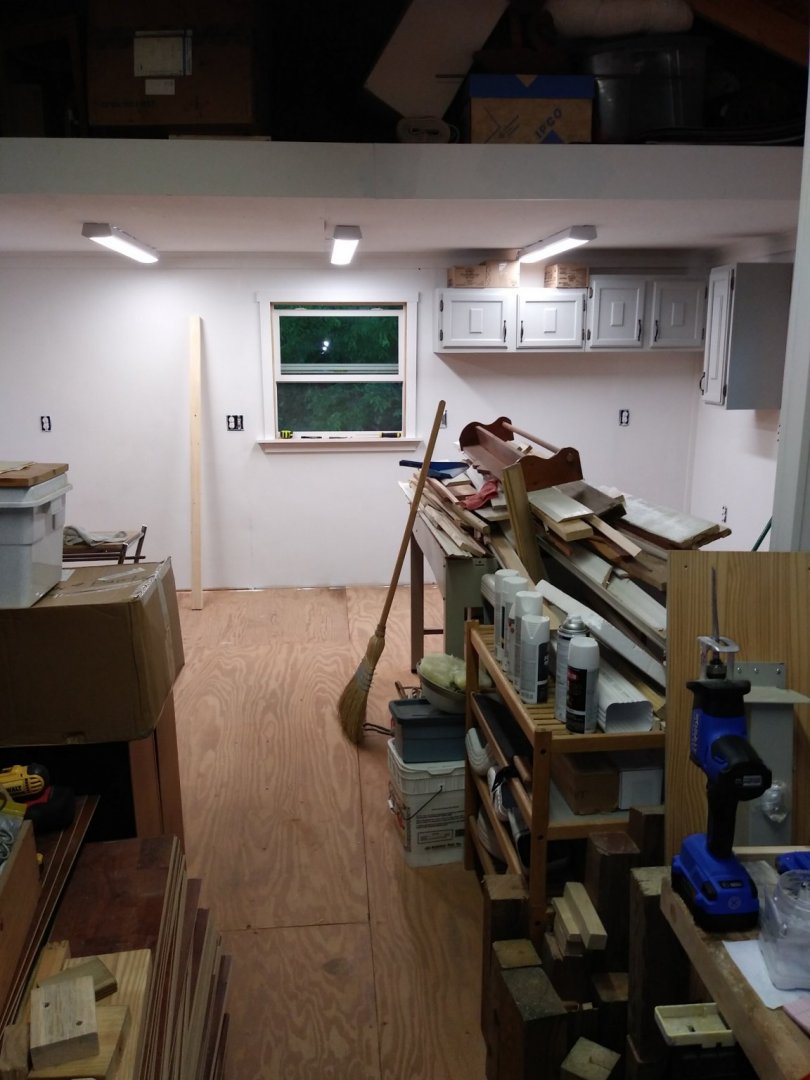
-
Converting a Backyard Shed into a Model Workshop
Hank replied to Hank's topic in Modeling tools and Workshop Equipment
W2M, Thanks for the link to Overdale's BOSTON. I had no idea there was another out there. Well, his thinking was almost exactly along the same lines as mine as to how the ship may have appeared. His stern is a bit different and I actually like what he did to his - I may have to revise my CAD representation to reflect his thinking. I'll have to consult with The Frollicky One as to his input on all of this. I knew there had to be a "Link"!!!! His method of hull construction he could have been reading my mind - although I'd be interested in seeing how his pre-planked hull actually looked; my ideas may be close but not exact. One thing I can share is that my belief is that the early American warship builders/designers/etc. all interacted with each other when a ship was authorized or subscribed to by a city for construction. Our country was not as prolific and wealthy as either England or France and didn't have the history or naval construction expertise to simply do things individually - therefore collaboration was the word of the day and I think the proximity of Salem & Boston as shipyards indicates there was quite a bit of shared "info" regarding the designs of both frigates. I think any further discussion should be on a BOSTON dedicated forum topic so I'll leave this where it's at! Hank -
Converting a Backyard Shed into a Model Workshop
Hank replied to Hank's topic in Modeling tools and Workshop Equipment
Aha!!! I see what's going on here...., trying to get me to open the vault....... A short answer would be - as there are no deck plans of BOSTON that I've found, this would have to be done; the question being - how and what sources are researched in order to feel that your efforts are fairly accurate. So, elaborate on where you stand on this, if you please..... -
Converting a Backyard Shed into a Model Workshop
Hank replied to Hank's topic in Modeling tools and Workshop Equipment
I agree, however....the flat paint has already been purchased. It's actually left-over from our interior house renovations a year ago. But thanks for the comment/interest!! Hank -
Converting a Backyard Shed into a Model Workshop
Hank replied to Hank's topic in Modeling tools and Workshop Equipment
Question: So when is a CaddyWagon fully loaded?????????????? Answer: When it has 1 Admiral & 4 Base Cabinets aboard (plus the pilot ) So, they are now stowed in the workshop area of my garage awaiting a light sanding and painting. No refurb work on these. We drove to Statesville, NC to the Lowe's and bought what I'll need for the construction of the workbench along the back & side walls. About the same distance/time to drive to Winston-Salem but with less issues to deal with re. Corona Corona. I hope to get out to the shop later today/evening to get the painting underway. Always something, right? 9:25 pm - (edit) - got all the edges, corners, dings, dents, etc. all primed and cut in tonight. Tomorrow it should be a simple job to roll out the white primer on the walls and then a bit later to do a coat of ultra flat white. I'm saving the trim for last as it's going to be semi-gloss or satin and is more for cosmetic than need.

-
Converting a Backyard Shed into a Model Workshop
Hank replied to Hank's topic in Modeling tools and Workshop Equipment
I'll be looking into this! I'm in the midst of redrawing my shop layout (needed to revise the orig. plan anyway!) and will include an under benchtop vacuum removal pipe and drops to exit thru the back wall. Maybe even add a blanked-off drop for a flex hose connection to use in the open area of the floor space. The remote controller seems to be the trick - it could be on the back wall with the vacuum loc'd in the caboose. Much appreciate the information!!! Hank