


NMBROOK
-
Posts
2,305 -
Joined
-
Last visited
Reputation Activity
-

 NMBROOK reacted to Daniel Dusek in Dusek Ship Kits-news+info
Hello all,
Just only last week of Christmas sale. Get 30% off on all goods in stock.
Discount code: CHRISTMAS SALE 2015
The discount code is valid only to the end of Sunday 6th December.
Best regards
Daniel Dusek
-
 NMBROOK got a reaction from mort stoll in HMS Victory by Heinz746 - Caldercraft
Truly wonderful work Heinz Your Elderberry plywood is a nice bit of thinking 'out of the box'.The results speak volumes.Those windows blew my mind .They look spectacular,not easy to do in any scale,let alone 1/72!!!!!!!!!!!.
Kind Regards
Nigel
-
 NMBROOK got a reaction from Seventynet in HMS Victory by Heinz746 - Caldercraft
Truly wonderful work Heinz Your Elderberry plywood is a nice bit of thinking 'out of the box'.The results speak volumes.Those windows blew my mind .They look spectacular,not easy to do in any scale,let alone 1/72!!!!!!!!!!!.
Kind Regards
Nigel
-
 NMBROOK got a reaction from Heinz6672 in HMS Victory by Heinz746 - Caldercraft
Truly wonderful work Heinz Your Elderberry plywood is a nice bit of thinking 'out of the box'.The results speak volumes.Those windows blew my mind .They look spectacular,not easy to do in any scale,let alone 1/72!!!!!!!!!!!.
Kind Regards
Nigel
-
NMBROOK reacted to Dimitris71 in Amerigo Vespucci by Dimitris71 - Mantua - 1:100 scale
Hello Nigel, nice to hear from you. Thank you for your encouragement words.. Much appreciated.. I almost go crazy with the masts , something was not right from the start.... As I said before at least in my eyes look more in scale.
Cheers
Dimitris
-
 NMBROOK got a reaction from Dimitris71 in HMS Victory by Heinz746 - Caldercraft
Truly wonderful work Heinz Your Elderberry plywood is a nice bit of thinking 'out of the box'.The results speak volumes.Those windows blew my mind .They look spectacular,not easy to do in any scale,let alone 1/72!!!!!!!!!!!.
Kind Regards
Nigel
-
NMBROOK reacted to Heinz6672 in HMS Victory by Heinz746 - Caldercraft
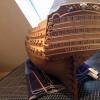
Hello friends!
I finished the windows. Oh God, these little parts... But now it´s done :-)
As I told you before, I was not really happy with the ornaments. The color of the new wood is a brighter than all the other strips of my elderberry wood. And it always breaks when I tried to build little details. NMBROOK gave me some advices how to resolve this problem. (Thanks again, Nigel :-) ). But I had another idea to try it with my old and small elderberry strips.
First I glue some strips parallel to get a smooth surface, for example 3 x 4 cm. In the second step I glue a second ply on the back in a 90 degree angel. The wood fibers run transversely to each other. This gives the piece of wood much more hardness to work out small details.
Look at the last 2 pictures. I have made the new ornaments on the right side in this way. There are no color differences and no broken and repaired places anymore. The ornaments look much more like the original ones. Don´t you think so?
I hope I can manage the left side in the same way...
Have a nice weekend
and greetings to all of you
- Heinz -
-
NMBROOK got a reaction from Dimitris71 in Amerigo Vespucci by Dimitris71 - Mantua - 1:100 scale
My admiration for taking the bold step to alter your masts to the correct height Dimitris Your build is looking fantastic
Kind Regards
Nigel
-
 NMBROOK got a reaction from Omega1234 in Amerigo Vespucci by Dimitris71 - Mantua - 1:100 scale
My admiration for taking the bold step to alter your masts to the correct height Dimitris Your build is looking fantastic
Kind Regards
Nigel
-
NMBROOK reacted to Dimitris71 in Amerigo Vespucci by Dimitris71 - Mantua - 1:100 scale
Hello all , Nils - Don- Jt Lombard - Greg i do thank you also for your time to comment and also for your likes!!! Many thanks to all of you for stopping by and hit the L button... :)
The work continues, all the pin racks and eyelets are in place on stern and main deck!!
Kind Regards
Dimitris
-
NMBROOK reacted to Dimitris71 in Amerigo Vespucci by Dimitris71 - Mantua - 1:100 scale
And three more....
Dimitris
-
NMBROOK reacted to Dimitris71 in Amerigo Vespucci by Dimitris71 - Mantua - 1:100 scale
Thank you Nils for your nice words and also for the likes. I' m thinking of proceeding with the masting and rigging so as to ensure that i will have more space for my big clumsy hands!! :)
So after 1 year i managed to get back my olympus from my young brother, and finally manage to take some decent photos as requested...
Kind Regards
Dimitris
-
NMBROOK reacted to Dimitris71 in Amerigo Vespucci by Dimitris71 - Mantua - 1:100 scale
Hello shipmates, many thanks for your encouragement words and also for the likes... Much appreciated!!
The work on Amerigo's masts continues .. I decide to rebuild the masts in appropriate length.. So Patrick if you read this.. the hull's length without the bowsprit is 81,7 cm ,with the bowsprit 99,7. I missed 1,3 cm from the real ship and 0.3cm from the kit .. lol (kit specs reports, length 100 cm) .Sorry for my measurement the other day but i was in a hurry... the real ship is 101 meters with the bowsprit. So it was a little odd the tallest mast (by the manual of the kit ) be 540mm from the keel, since the real ship had 54 meters from the waterline. So i rebuild the mast with the 540mm(538,7 mm to be accurate) from the waterline and from the keel about 61 cm. (real ship 62 meters). Here are some photos... Sorry for the poor quality!!
At least this time seems to my eyes more in scale.
Kind Regards
Dimitris
-
NMBROOK reacted to Dimitris71 in Amerigo Vespucci by Dimitris71 - Mantua - 1:100 scale
Hello shipmates, I don't want to make you bored regarding the masts (this is the last post about the difficulty to say if this was my mistake or the plans)? So I will post a photo to show you how i read the plans for the masts. Like Greg said ... Brain Freeze.... :) Some fellow modellers on Greece , had the same issues , that the masts against the ship looks small.
Kind regards
Dimitris
-
NMBROOK reacted to Dimitris71 in Amerigo Vespucci by Dimitris71 - Mantua - 1:100 scale
So i made an effort to do what Jeff and mtdoramike suggest. I am pleased to announce that the surgery was very successful without damaging a thing!! It was much easier than i thought . The only think kept me from forcing the masts a little bit harder on my earlier effort, is the fear to break the middle and the upper rings... Now I will replace only the 3 lower sections of the masts and they will be as new!!! Thank you guys!!
Cheers
Dimitris
-
NMBROOK reacted to Dimitris71 in Amerigo Vespucci by Dimitris71 - Mantua - 1:100 scale
The idea to extend the masts, is to make a strong bind with epoxy glue and a strip of metal around the masts...I think that will work...I spoke with some other modellers on a Greek site and found that the masts of their ships (Amerigo Vespucci) had the same issues.
Kind Regards
Dimitris
-
NMBROOK reacted to Beef Wellington in HMS Jason by Beef Wellington - Caldercraft - 1:64 - Artois-class frigate modified from HMS Diana 1794
Mike - I know I'm looking enviously at your work, yup, we're in step (at least until you shoot past )
Ray - you're so right. What I actually really like about this kit is that it allows you to try things that maybe aren't necessary, but is a good proving ground for the future. One thing I know, I won't be spiling a full hull until I'm retired! The planking udner what will be copper will 'utilitarian' - i.e. something best covered by copper - which of course is as much work, if not more, than another layer of planking.
Here's how I dealt with the planking at the tricky plank at the counter. I'm planning to use strip for most of the planking where I can but the first one required a spiled one. Shaping planks with a steam iron is definitely something that helps.
Spiled planking at the bow pretty much done, walnut will be used below here. Without wishing to waste any boxwood, I'm going about 8-10mm below where the waterline will be just to be on safe side. This has had a quick surface sand to convince myself it will look OK in the end...
The tricky transition at the counter and the wale. Spiled plank next to a 4x1mm strip for comparison.
-
NMBROOK reacted to marktiedens in Royal William by marktiedens - FINISHED - Euromodel - scale 1:72
A little update - before starting on the planking I thought it would be a good time to make the hole for the bowsprit. Planked down from the main deck to just below the lower gun deck. After triple checking the gun port positions vertically & horizontally I drilled pilot holes for marking & cutting the gun ports out, I am trying to decide whether to cut out the gun ports now or finish planking down to the keel & sand the hull first. I`m thinking it may be easier to plank the lower part of the hull first so I don`t snag the sandpaper on all the holes.
Mark
-
NMBROOK reacted to Daniel Dusek in Dusek Ship Kits-news+info
Hello,
Kevin Omland from Oyster Bay, NY USA sent us photo of building stave church Gol in 1/87 scale with some notes from building.
Although its not ship model i think it is very nice work, if you are interested you can see it here:
http://dusekshipkits.com/stave-church-gol1
Best regards
Daniel Dusek
-
NMBROOK reacted to shihawk in How much detail is too much
Janet , I think you have summed up the conclusion i have come to , if you can,t do it to look right ,don,t do it .
-
NMBROOK reacted to janet bode in How much detail is too much
Janet B.
As regards the amount of detail,i think a small amount of neatly done detail is far better
than a model with a lot of detail badly done.
-
NMBROOK reacted to albert in HMS Naiad 1797 by albert - FINISHED - 1/48
Provisional laying the beams of the lower deck
-
NMBROOK reacted to albert in HMS Naiad 1797 by albert - FINISHED - 1/48
Hi, yesterday I visited my friend Aldo, you showed the photos of the model that has just finished
-
-