HOLIDAY DONATION DRIVE - SUPPORT MSW - DO YOUR PART TO KEEP THIS GREAT FORUM GOING! (89 donations so far out of 49,000 members - C'mon guys!)
×


monkeyman
-
Posts
96 -
Joined
-
Last visited
Content Type
Profiles
Forums
Gallery
Events
Everything posted by monkeyman
-
 I'm not super specialist in English shipbuilding terms since my native language is slightly different, but as far as I understood, carvel is single planking, but it's not the same as "double planking" despite it might look like at the end. In carvel you simply put one plank close to another without overlapping, but double planking is more like immitation of it.
 -
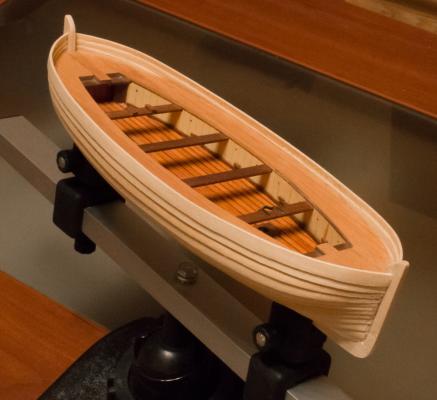
A little photoless update to my build. I almost finished with my second attempt of painting this beautly. Of couse, it's not perfect, but a bit better, than the first one. Here's what I did: Removed the previous paint using mostly sharp knife. Sanding paper appeared to be not that effective. Covered the surface with the 1st layer of the primer and let it dry. Polished the primer with 600 grain sand paper. Covered the surface with the 2nd layer of the primer and let ir dry. Using airbrush covered with white paint. Had to do about 5-6 passes on each board for clean white effect. It looks not bad in real life and, considering that I'm not a pro yet, might be left as is. Paint layer is so thin, that the whole hull should've been planked A LOT better for perfect results. But that's my first clinker, so I have to forgive myself for all the flaws, sorry :-) A couple thoughts about the whole process: Wood filler is not THAT good for clinker. I mean, you shouldn't cover all the hull with it, but only a flaws. Stepping makes it much harder to sand and clean the surface, so any extra stuff like fillers will make this job harder. I would TOTALY recommend to trash the original planks and use the ones with 1 mm gauge. Less sanding, easier to fit = less flaws at the edges. This is the worst looking part after painting, but using other planks could improve the picture. But the most part I love in this boat, is that it allows you to GREATLY improve your skills. Would absolutely recommend it to any first-timer of as a training ground. The original manual is stupid, you can trash it and use online pictures, blueprints and documentation. The more time you spend planning this model, the better it'll be. I did a couple mistakes in the process, but they were fixed more or less. Still, there're several things, that could be improved right now. If somebody will ever want to build this boat and have any questions, feel free to ask. I studied its pictures and all available blueprints so many times, that could make a replica of it in rel life. It might even save your life in the face of an iceberg! :-)
-
Thank you, Michael! It really drives me nuts. I've spent too much time on it already and only the main task to hone my skills keeps me alive :-) Seriously, all this planking and further painting made me hate this boat! But I'm a bit perfectionist, and looking to other blogs, especally Gil's HMS Victory furstrales (Wow! I love this word: FURstrates! Purr-purr!) me A LOT. But, as I said in my previous post, this is some kind of experiment, so I try to be less punishing to myself.
-
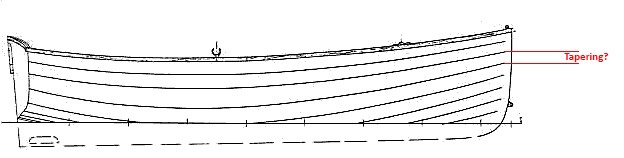
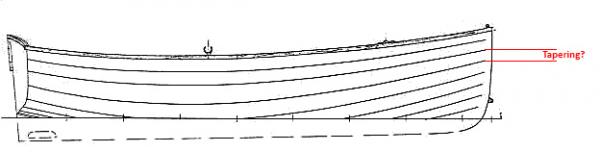
If you decide to build this boat and follow my steps, here's a little hint, that wil help you make it better: put the markes on the keel to make tapering even. There're 12 planks on each side. Maxmum height of the boardside is approximately 42 mm. So it'll be about 3.5 mm. I didn't put marks on the keel, so my tapering is not even right now. It's not THAT bad, but with marks it can be close to perfect. Also, I'd recomment to replace stock hull planks with more thinner ones. About 1 mm, not more. If you look at the original picture, you'll notice, that stepping was very small. But with 1.5 mm planks it looks a bit oversized. Plus 1mm planks are much easier to fix. I'd do it this way, if I started this model right now.
-
Yep, but it's single planking like clinker, as far as I know.
-
Thanx, mate! I've heard, that carvel is even harder, so you may try clinker someday, since you're experienced carvel planker already :-)
-
This stupid boat will kill me someday! I've started with painting, but before that I decided to use wood filler. My mistake was to cover the whole hull in it, hopiing to evenly sand it down after that. Unfortunately, it apppeared to be impossible to evenly sand filler down, so it was sanded down almost completely (about 80-90%). And I was covered in filler dust more, that the boat! Then I started to paint... I love my airbrush, but it covers the hull with so thin layer, that all the faults become totaly visible. It looked so good, so polished without paint, but after paining all flaws started to shine. Literally. There were a bunch of filler patches, not polished areas, even some stupid dust and hairs. Gosh, I hate hairs! So I'm currently removing paint and will sand down the hull again. I'll sand it SO good this time, that glass will look like sanding paper in comparison!
-
Just note, that it'll be a bit harder to plank with deck, because you won't have access to inner parts of the skeleton and won't be able to use clamps as usual. But that's not a big deal, because there're plenty other ways to fix. You can also use iron to fix/move planks or hair dryer to speed up the glueing process.
-
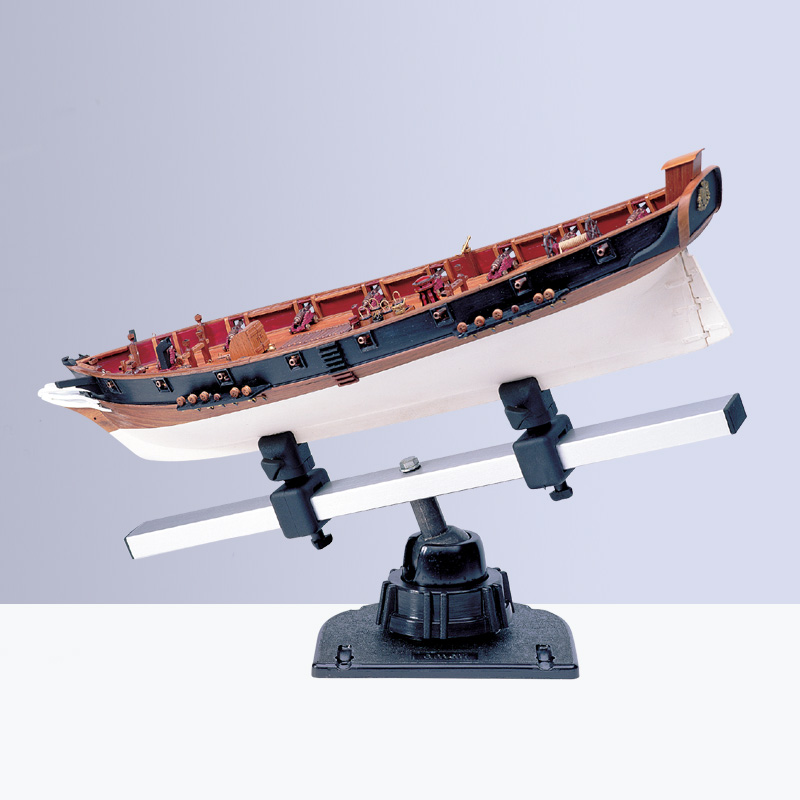
Yeah, good point. I've just never saw such solution and never thought, that it might be this way. This is why I wondered :-) I myself use Amati Keel Klamper to avoid breaking stuff:

-
Ah, so you will build everything right on the stand... that's interesting. Never thought of that, because I used to keep the hull in hands. A LOT! :-)
-
Go to your first post and hit Edit, then choose Full Editor and you'll see the title fields, where you can edit the title.
-
Yeah, I saw that blog too. The guy just forgot to soak planks in water before fitting them to the hull and they all broke. Looked funny :-) Sure, pal, I have time. Last 3 planks on each side were a bit of a pain. Had to be extra careful, because they needed to be sanded more thus becoming thinner, than the other planks, and could easily break. Here's how I did it: First of all, I planked the hull completely upto the deck. The original keel was used as a base, to which planked were glued. Removed the original keel, including parts above deck. Started to add last planks above deck, leaving a gap for a keel. Since there were no keel, I didn't glue the edges of the planks. You just have to be careful, when sanding the edges. Took a 3 x 4 plank and glued the bottom (horizontal) part of the keel. Then glued the aft part and straight fore part. Next I've made 2 small pieces of the keel and glued them to the deck and main keel (see the top parts on the pic). These 2 pieces are actually sligtly inclined to the main keel and their top is more thin, than the bottom. And finally I glued several pieces of the keel plank together and shaped a rounded fore part of the keel. Don't try to twist the plank - it'll break even, when soaked to death. It's much easier to restore it the way I described: glue 3 parts, carve and sand the inner side until it fits the hull shape, glue it, sand down the outer side, when dry, to meet the final keel shape. Easy-peasy. This is the final "blueprint" of the keel: One note. Like I already mentioned, the final planks of the hull should be thinner. I sanded them down good, leaving only a 0.5 - 0.7 mm at the top (from the original 1.5 mm gauge). If you look at the original picture of Titanic's lifeboats in one of my previous posts, you'll see, that planks above deck have very small stepping (not sure about the term). Also mind, that later you'll have to glue timbers to them, so the more flat your board, the easier to fit. Hope you'll understand, what I said :-) It's a bit harder for me to explain stuff, since I'm not much into ship building terms yet.
-
So you say clipper will be harder to build? Yes, it's 1:96, but the final model is not small. I also was thinking about HMS Jalouse from Jotika, but didn't like how parts were cut. Yes, I know, they make good kits, but in my opinion MSW kits are WAY better: great manuals, nice cuts and wood quality. And Jotika kits have a bunch of sawdust in the box :-)
-
Hey, Jim! How do you find Caldercraft kit? I compared Flying Fish from Model Shipways and Supply Brig / HMS Jalouse from Caldercraft and have some doubts in Caldercraft's manufacture. Totaly love what MSW does, but Caldercaft looks a bit... cranky to me. What's your opinion? How good's your kit? Is it easy to build? Do part fit well? Just want some on-the-fly opinion :-)
-
You might want to change your topic's title: it's "mantua", not "mantura" :-)
-
Hey, mate! I'm not a professional modeller either, but I think you did good with raw planking. I just want to say, that you shouldn't worry too much of the final result. It may look ugly when raw, but it'll look much, much better, when you do some finishing stuff like sanding, using wood fillers or paint. I did a couple kits myself (never finished tho) and it was always the same: "Oh, god, it sucks! How do they do it THAT perfect?!" turns into "Huh... looks good! I'm the king of the world!". Just be a bit patient, my friend :-)
-
Anybody built these kits - moved by moderator
monkeyman replied to latestarter's topic in Wood ship model kits
I've just checked both in the store and somehow liked them much less, than Model Shipways'. I was a bit confued, that all pre-manufactured parts are not laser cut. -
Thanx, guys, for your support! It's really encouraging. I'm currently preparint my boat for painting. I even bought an airbrush for that. Will try to finish with the hull tomorrow, if nothing goes wrong. Also thinking of my next project. Really love, what Model Shipways does. Have my eyes on Flying Fish, a Catty Sark's sister ship.
-
That's absolutely... stunning. Victory's one of my favorite ships and your model of it is just marvelous! Hope someday I'll be able to complete something like this :-)
- 755 replies
-
- 2
-

-
- finished
- caldercraft
- (and 1 more)
-
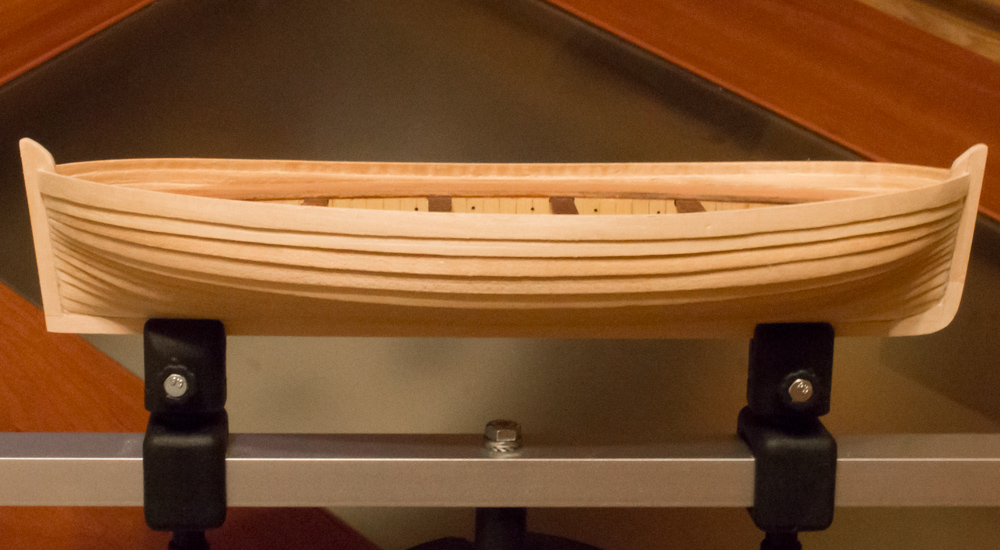
Today I've finally finished with planking. Yay! It of course not perfect and has a bunch of flaws, but this was my first clinker anyway. Here's how it looks right now, not covered with any filler or paint: More minor improvements After planking I completely removed and restored the keel (yes, for the third time!), made it much more close to the original. The previous version was sanded down and instead of it I've built a new one from 3 x 3 x 4 basswod plank, adding extra parts above the deck inside the boat. Also I've covered deck with planks as well. They make it look more authentic, but the main reason was to hide that stupid difference in direction of wood fibers on fore/aft and side deck parts: side - lengthwise, fore/aft - atwart. No idea, why Artisania Latina made them this way, but it looked bad even when woodstained. Next step is to cover the hull with white wood filler and varnish. Should look sexy :-)


-
Ah, good to know. I saw people mark this stuff on the keel, but I didn't do anything particular. Just narrow a bit to the end and for now it looks legit. Of course, without marking planks have different width, but I'll leave it this way for the first time. I needed to get used to clinker planking and find out, how hard it is and how to handle it properly. Right now, at the end of the planking process, I'm doing much better and learned a couple tricks. My next boat will be more accurate in this part.
-
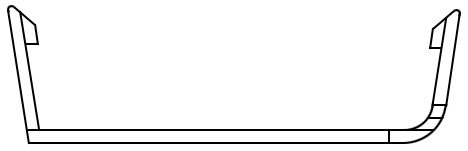
No, you didn't confuse me at all. Was nice to read some practical information as always. Just to sum this up: Is this tapering? This kind of narrowing at the edges?
-
What do you mean under tapering? The narrowing of the planks on edges? Sorry, I don't know all the terms yet, since English isn't my native. I wasn't able to find a step-by-step explanation myself. It's pretty hard to understand some things right away and without any help. Anyway, the more tutorials, the better :-)
-
You're welcome, pal. * * * OK, I've uploaded last 2 pictures of the clinker planking tutorial. Hope it'll help someone and save some time. It indeed not that hard and might be easier, than carvel, like was suggested in one of the previous replies. The only problem I see with clinker planking - you must put more efforts to make it as much accurate as possible. It's a bit more unforgiving, than carvel or double planking, because you can't use fillers and change shape, if your boat's skeleton wasn't perfect. I'll try to use white wood filler and varnish instead of painting, when done with planking. Will post results here.
-
It's Amati's Contour Sander. Here's a link: http://amatimodel.com/it/attrezzi/attrezzi-per-modellismo/pulitore-contour-sander Here're Amati's contacts in US, if you need them (I see, that you're from Arizona): http://amatimodelusa.com/contact.html