Cathead
-
Posts
3,558 -
Joined
-
Last visited
Content Type
Profiles
Forums
Gallery
Events
Everything posted by Cathead
-
 As another method, I'm quite fond of using cotton swabs (Q-tips) for applying gentle color using pastels. Rubbing the swab's head on the pastel and then gently on the model gives a really nice gentle wash of color. It won't necessarily create thin streaks, but it's great for applying tone in a variety of settings.
- 296 replies
-
- 4
-

-
- chaperon
- model shipways
- (and 1 more)
-
That's a big, complicated project, even if it seems cheaper. Why not build a small, open wooden boat? You can do that with a good kit for under $100 and you don't need any tools beyond really basic stuff like hobby knife, wood glue, and clamps (like clothespins). You'll learn and experience most of the essential skills to tackle a larger craft, too. If you're ultimately interested in learning about modelling in wood, building in plastic won't get you very far, the skill set is very different. It's worthwhile project on its own terms, but it won't get you much closer to learning whether you like wood projects.
-
Need advice for what to do with Dad's beautiful ship models
Cathead replied to Sarahbday's topic in New member Introductions
My condolences on your dad's passing; it is a difficult time to work through such decisions. Have you considered contacting various public entities, such as libraries or government offices, who might want to have something attractive on display? Placed in a nice case, a beautiful model can inspire and engage people passing by every day, even if the office isn't directly related to anything nautical. Perhaps even a retirement home or other care facility might have a corner where patients might enjoy the sight of such a visually interesting piece of artwork. In other words, I'd say cast a wide net for public facilities that might be "spruced up" by one of your dad's models. Even a local restaurant, law office, or other business might be willing to include one in their decor somewhere; it can't hurt to ask, especially as you are not looking to sell them. Best of luck to you. Models are tough, as most of their inherent value is to the builder and their immediate relations. I hope you can find a way to help your dad's work live on and inspire others.- 11 replies
-
- 10
-
-
Vossiewulf, are you British (or Australian)? I work in both British and American English; "notice" would be the more common construction in American English, while "note" would be preferred in British English. Let's not veer Mark's thread too far into the linguistic abyss, though (I know, I started it).
-
Mark, don't feel bad: I'm an editor and so tend to notice (and enjoy) quirks of language.
-
To the best of my knowledge, and others may chime in, American riverboats like this did not use anchors. They really didn't need them; to hold position at any given point in most Western rivers you just nudged the boat up against the bank, tied off to something on the bank, and/or used the paddle. Rarely would these craft have been in a situation in which anchors would be necessary or functional, given the river environment. However, as they routinely tied up at wharves or levees, they often needed to run lines forward. Often these were just passed over the bow, but others had a slotted hawsehole that allowed the line to be easily dropped in and kept out of the way. I've never seen round hawseholes as the AL kit has; more commonly they were slotted rectangles like the ones you can see in this image. The AL kit you describe has a lot of inaccuracies, however, so this isn't really surprising. So I'd say no anchors, and change the shape of the hawseholes if you care to. That's my opinion; there are others very knowledgeable about steamboats on here, including Kurt Van Dahm, Cap'n Bob, and Canute. If you don't get other answers here, look them up and message them to get their ideas, too. You could also try posting a similar question in the Steamboats and Other Rivercraft-General Discussion thread to see if you get more answers there.
-
You're welcome. I thought I had a comparable photo in my own collection from my last visit there, so the delay related to me hunting through photo archives, but none of mine showed that detail as clearly as the F&WS photo, so I used the latter instead. As a big fan of weathering models, I'm enjoying the approach you're taking and want to see how it all comes together.
- 296 replies
-
- 4
-
-
- chaperon
- model shipways
- (and 1 more)
-
Here's an example of a mudline, from the large-scale model at the Steamboat Bertrand museum near Omaha, Nebraska. The image is from the US Fish & Wildlife Service, which runs the museum. Good progress on Chaperon!
- 296 replies
-
- 6
-
-
- chaperon
- model shipways
- (and 1 more)
-
Erik, I've adopted the same approach on several builds including my current one. I like knowing that I can "practice" on one side. Everything looks great!
-
If you're going to weather her that heavily, you might consider adding a "mud stripe" such that the bottom 1/2-2/3 of the hull are consistently stained darker, to mimic the effects of river water. It would be a more realistic look than random weathered spots.Just a thought, you can certainly decide what looks best to you!
- 296 replies
-
- 6
-
-
- chaperon
- model shipways
- (and 1 more)
-
Hey, B, if that's your preferred name. Your build looks nice so far. I did this one as an early learning model and had many of the same issues, but it also taught me a lot about working around problems. I'd like to follow along and see where you take it.
- 66 replies
-
- 2
-
-
- bounty launch
- model shipways
- (and 1 more)
-
I tend to like models with a used feel; I think it helps trick the eye into perceiving the model as more realistic. Sometimes an "accurately" crisp and clean model can look too shiny to the eye even if it's right, whereas a slightly over-weathered model can end up looking right even if it isn't right. And as Ken says, do it the way you'll want to look at it!
- 296 replies
-
- 6
-
-
- chaperon
- model shipways
- (and 1 more)
-
Thanks, Glenn, and all the Likers. Matt, I've been taking lots of time to study the rigging diagrams and agree that they're better than they seem at first, once you learn how to use them. I agree that I don't want to follow their order of steps, but I'm leaning toward adding the sails/booms/yards first as that means a lot of work right up against the masts, where the standing rigging would get in the way. Then, once all that weight is on the masts, I'll add the standing rigging and get it all straight. Then add the rest of the running rigging. That's the idea right now, anyway. I'm making the rest of the sails now, which gives me more time to think about and plan all this.
- 96 replies
-
- 4
-
-
- topsail schooner
- revenue cutter
- (and 3 more)
-
Why is it that you want a display ship so badly, and why the Constitution? I'm not being sarcastic, it's a serious question to help you understand what you want. Do you live in an area with a significant nautical tradition and want to fit in? If so, cheap and low-quality models like that are just as likely to get you laughed at as respected. Anyone who knows anything about the Constitution will be horrified if you show them either of those models, and anyone who doesn't won't really care what ship is on your mantle. In all honesty, consider buying a nice painting instead. There are quite a few options for well-done nautical artwork that would look quite attractive on a mantle, be just as much of a conversation piece, and would support a real artist instead of whomever is producing those crappy knockoffs. Wouldn't need as much dusting, either. If you really, really want a model, buy the plastic kit for the Revell Constitution at 1:196. It's pretty manageable for just about anybody to turn out a decent looking model without taking too long at it, it'll inherently be more accurate than anything you linked to, and having built it yourself will make it a much more interesting conversation piece.
-
Yay! Wonderful collection of illustrations, thank you for that. Do you know anything more about the jackstaff design for the Yellowstone and Napoleon? I've never seen one like that, with the two-part structure first angled forward then aft? Seems much fussier than the standard vertical jackstaff, why would they do it that way? Which style are you using for Heroine? Also, how did you get the silk to sit so perfectly against and around all the various skylight corners, etc? Everything looks great, and I appreciate you continuing to put the work into keeping us updated.
-
I disagree that a kit is "just a bundle of wood". A good kit, at least, has had quite a bit of thought put into it by the designer and can save the builder quite a bit of mental energy. Having done both scratch and kit models, I enjoy the mental stimulation of designing and preparing everything myself in a scratchbuild, but also enjoy the relaxation of knowing that someone else has thought through the process for me in a kit. I think that dismissing kits as "just wood" does a disservice to the significant skill, art, and research that goes into kit design. Now, a bad kit like my current build is more trouble than it's really worth. I should have scratchbuilt this one, given the amount of mental and physical work I'm doing to make up for its shortcomings. But not all kits are the same. As for the original question, as I have a very limited disposable income (a few hundred US dollars a year for modelling), I keep things simple. No power tools, basic hand tools, try to re-use anything I can in future work, try to find workarounds for purchases (like making sails out of bond paper left over from Mrs. Cathead's graduate thesis over a decade ago rather than buy fine sailcloth). I would rather my models be enjoyable and cost-effective to build than perfect, and so allow myself a certain amount of leeway in the accuracy/perfection department to achieve the other goals.
-
Jerry, that's really useful, although I think at my 1:64 scale I can't replicate that; the boltrope is just too small and the edges of the sail too delicate. I tried, and felt that it was too likely to tear putting each stitch right at the sail, so moved the stitches inward a bit where they're more visible but also sturdier at that scale. As my sails are paper, they behave somewhat differently from cloth. Great info, though, thanks for sharing. Also, I'm curious, you say that boltropes should be on the forward side of a square sail, but I was going on this reference from The Rigging of Ships by R.C. Anderson, which says "the boltrop goes on the after side of square sails". Did practices change at some point in time, or between different countries?
-
What you do, is you take apart one binder clip, and slip the silver handle horizontally between the black arms of another clip. The regular clip goes over your frame; the "extra" horizontal part presses flat against your plank and holds it in place. In other words, it takes two clips to make each one of these, but the result is a 3D clip that can hold planks horizontally against a vertical frame. For example, see the second photo on my build log here, which shows how these are holding a flat plank onto a set of vertical frames. If that still doesn't make sense, I can try to take a few photos to demonstrate. Again, not taking credit for this method, I just know where the photos are in my own build logs!
- 296 replies
-
- 4
-
-
- chaperon
- model shipways
- (and 1 more)
-
Blighty, I suspect some of your spring-back is happening because you've reached the point where the planks start bending in several dimensions at once. The first few just wrap around a nice vertical curve, but as you go down they increasingly need to bend inward toward the keel, and that's the part that popped off; it's trying to maintain that nice, flat curve but the frames are sinking away beneath it. You may want to start tapering the planks more, or adding some horizontal bending to help them form that nice 3D curve. You might consider using some form of planking clamps instead of pins; I've never liked the way pins make the wood split, especially on curves where the wood is already under stress. I like the "modified binder clip" approach, which I discussed with a few photos in a build log here. I certainly didn't come up with this idea and wish I could credit whomever did, because it works really well and is easier on the wood. Apologies if you know all this; I don't mean to talk down to you. I'm an amateur too and appreciated all the help others have offered me as I've learned various skills in this fascinating hobby, and have an instinctive desire to want to return the favor. Please feel free to tell me to lay off!
- 296 replies
-
- 5
-
-
- chaperon
- model shipways
- (and 1 more)
-
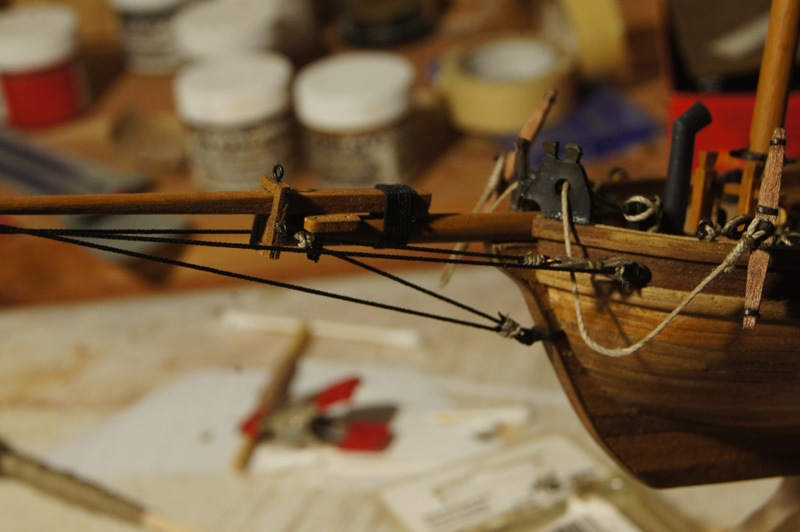
I've spent much of the last week experimenting with sail design, finishing a topsail last night that I'm pretty happy with: I posted details about the design approach to this sail over on this thread on realistic sail-making, so won't duplicate that content here. Quick version, the out-of-scale boltropes are intentional, choosing function and an artistic look over strict accuracy. The sail is made of bond paper, with individual panels following real sail-making practice. What do you all think? I've also slowly moved forward on rigging. I started with the bowsprit assembly, since it's an isolated area that I can complete while getting my head around certain skills and methods. Now I need to move forward on the regular rigging, and have been studying the plans and other references obsessively to try and assemble a sensible plan that will minimize the need to reach around rigging to do other rigging. Certainly one first step is to make the rest of the sails and bend them to their respective booms/yards. I find rigging both fascinating and infuriating, so this should be an interesting time coming up. Of course, I have lots of time this weekend as we're under threat of an ice storm here in Missouri, so I won't be distracted by outdoor activities. On the other hand, if the power goes out, I may be working on this by candlelight just like the old-timers. What could go wrong?

- 96 replies
-
- 7
-
-
- topsail schooner
- revenue cutter
- (and 3 more)
-
Here is my finished topsail, made from bond paper with individual panels. I think it came out quite nicely. Before some of you recoil in horror, I'm quite aware that the boltrope stitching is wildly out of scale. I did a lot of research on attaching boltropes, finding a number of approaches. Essentially there's no way to simulate boltrope stitching at scale, so if you don't want oversize stitching, you have to glue the ropes on. That might work for cloth sails, but I was sure that gluing ropes onto paper sails wouldn't end well and my tests proved this. And I wanted my clews to be really strong, meaning I couldn't just try to attach an isolated loop to the corners. So after some experimentation with different stitching methods, I decided to go with this one. It's hand-stitched with white thread, colored with pastels like the rest of the sail. Given that the model this sail is going on is essentially a representative "artistic" model rather than a strictly prototypical one, I like the idea of showing that boltropes were a part of the real sail even if they shouldn't be seen at this scale. And I just like the pattern and visual interest they provide to the sail. Also, one reference I found said that the boltrope should be slightly to the aft side of a square sail, so mine follow that practice as it's pretty hard to get them precisely on the edge of a paper sail anyway. I also researched different methods for bending the sail to the yard, and for attaching reef points. I chose to bend the sail with a single wrapping line, as various references show, because it was so much easier than tying lots of individual loops with oversize knots. I tried knotting the reefing points on both sides of the sail, but couldn't get the knots tight enough against the sail to look right. So I cut them to length and glued them loosely down in slightly curved configurations so they look like they're hanging down naturally. I also chose the one-point-at-the-seam pattern, as opposed to two points per sail cloth, based on the Tilley drawing of USRC Louisiana that I've used as a reference several times. The kit also calls for one vs. two reef points, though it puts the points in the middle of the sail. I like the points in the seam, an extra-strong place to anchor them. In any case, the final sail is strong and stiff, easily shaped into a nice curve to simulate some wind. I really like how the individual paneling creates a 3D effect in real life (it's hard to see in a photo), and the overlapping seams show up well when light is shining through the sail. I decided not to try and draw stitching on, because in all my tests I couldn't get a stitch small and regular enough to look right. I know that's in opposition to my logic for the bolt ropes, but I just didn't like the look of large stitching. I'm interested in what others think, good and bad.

-
Judging by that last image, I suspect you'll want to start tapering and/or bending those planks near the bow. It looks like your planks are starting to want to pull away from the frames a bit. It's definitely a lot of fun to feel a hull coming together.
- 296 replies
-
- 3
-
-
- chaperon
- model shipways
- (and 1 more)
-
Charlie, I just PM'ed you a couple photos of the Corel plans showing the carronade in detail. Hope they're helpful, although I wouldn't trust Corel very far on the accuracy front.
- 362 replies
-
- 3
-
-
- active
- revenue cutter
- (and 1 more)
-
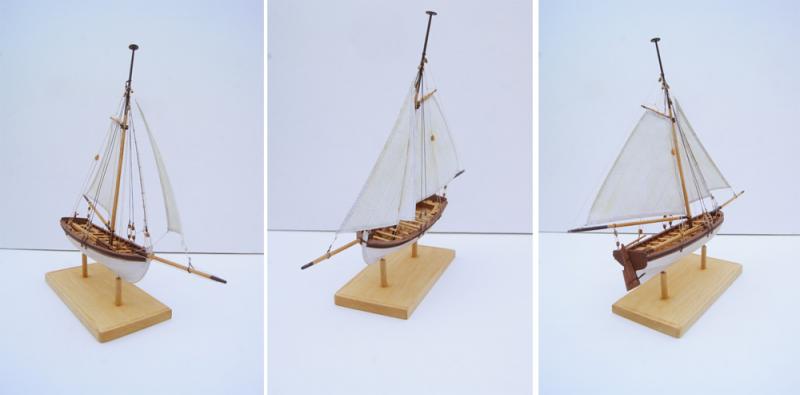
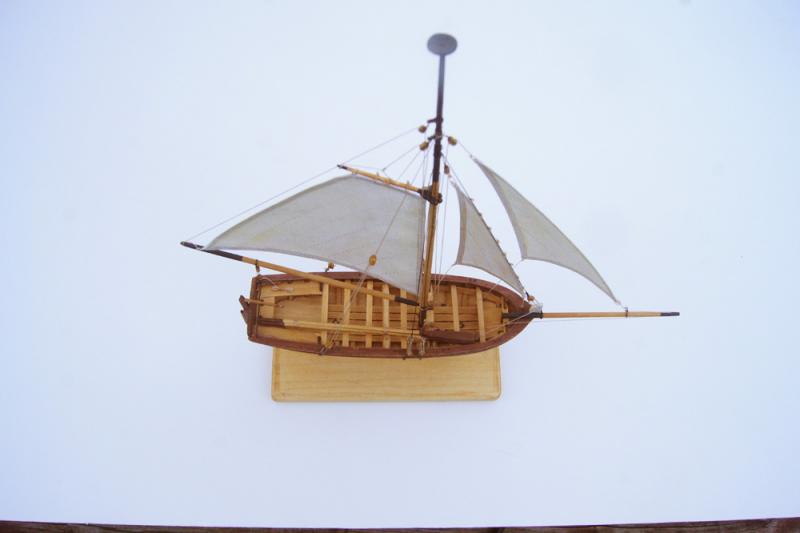
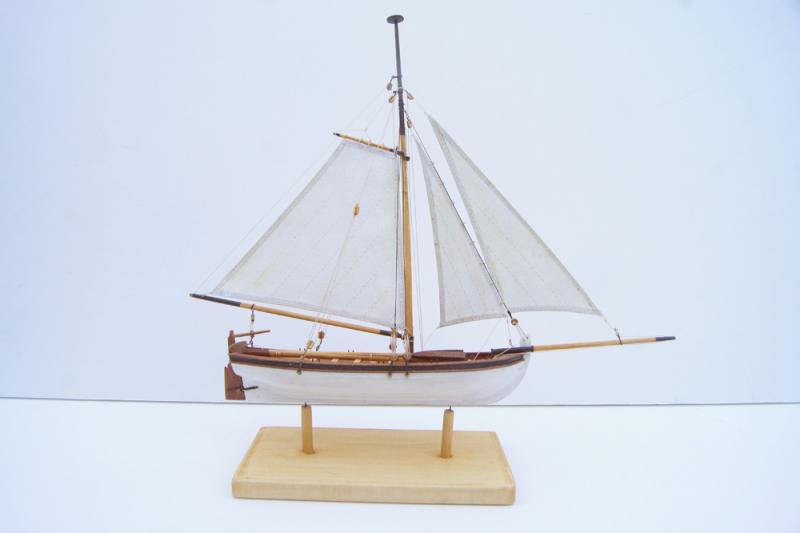
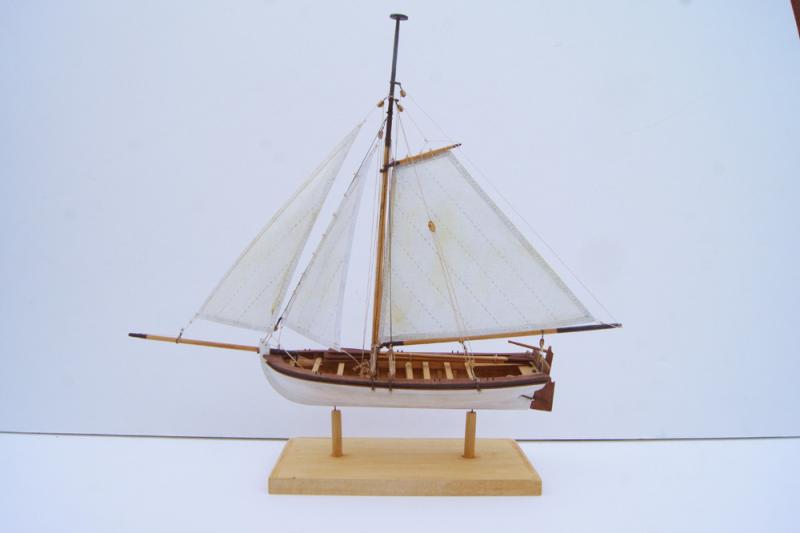
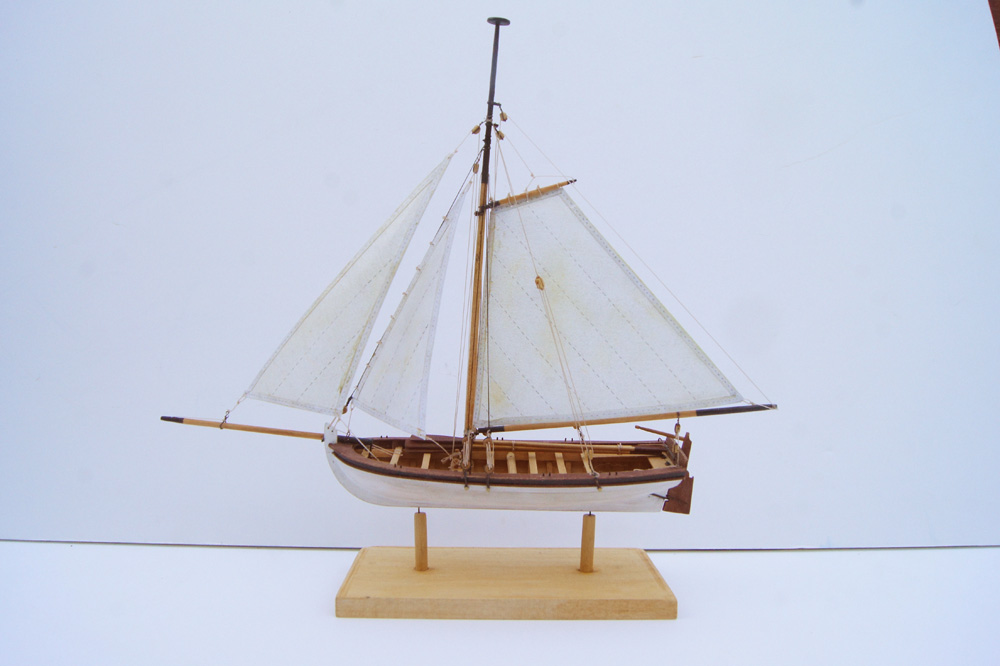
Sail design for 18th-century longboat?
Cathead replied to Cathead's topic in Masting, rigging and sails
After all that discussion, I never came back and shared how the sails turned out for this longboat. So here are four photos of the completed model; I think it turned out pretty well. Thanks to all who offered advice; hopefully this is useful for future builders who want to try adding sails.