
MORE HANDBOOKS ARE ON THEIR WAY! We will let you know when they get here.
×

PeteB
-
Posts
183 -
Joined
-
Last visited
Reputation Activity
-

 PeteB reacted to Jim Lad in Bismarck by Dan Vadas - FINISHED - GPM - 1:200 - CARD and PE
Danny, that's seriously insane!
John
-
PeteB reacted to Dan Vadas in Bismarck by Dan Vadas - FINISHED - GPM - 1:200 - CARD and PE
Thanks again Popeye .
There are two 20mm Guns on the aft funnel platform, so I thought I'd have a go at making them. These are the smallest guns on the ship, so if they came out OK the rest of them should (theoretically ) be easier. They are also the smallest guns I've ever made - the barrels are 9mm long, to give you some idea of the size. Here's the PE card of them all, there are 12 guns in total, and each has 34 parts :
I started by rolling the support base into a cone and CA gluing it to the base :
Next is a rack to hold four spare magazines. Each magazine is made from 3 pieces, and there is a triangular divider between each of them :
I didn't take any more pics of further sub-assemblies until I'd finished them. Some of the pieces were a bit tricky to get right, but they didn't turn out too bad. The Breech comes in 5 pieces to make up the thickness, the 3 middle ones have a scallop in them to accept the barrel. The barrel itself came with the set of CNC lathe-turned barrels. It's amazing how small and accurate they can make things like that these days :
Here's a pic to give a sense of scale. The Australian 5c coin is 19mm in diameter :
There is a spent cartridge collector basket which is supposed to be fitted to the side opposite the magazine. I found out I'd actually fitted the stock and barrel back-to-front, so I can't fit the basket to these two guns. Something to watch out for on the rest of them :
Here's one of the guns after painting - quite acceptable, and further ones should turn out even better as I've worked out a few tricks on how to work with the PE :
Danny
-
PeteB reacted to popeye the sailor in Bismarck by Dan Vadas - FINISHED - GPM - 1:200 - CARD and PE
cranes came out nice the 'D' effect will certainly be there......1D, 2D, 3D...the detail is so good on these paper models. your doing a superb job of bringing the detail out
-
PeteB reacted to Dan Vadas in Bismarck by Dan Vadas - FINISHED - GPM - 1:200 - CARD and PE
Surrounding the funnel are two Platforms. Straight-foward enough to make :
There are a number of gussets beneath the platforms :
A railing is fitted to the edge of the platform. The PE railing I have doesn't have a "kickboard" which saved me having to cut it off. I drilled 0.3mm holes for each stanchion using a tungsten drill by simply turning the drill bit by hand, which gives me more accuracy than trying to use one of my powered drills. I was a bit "sus" about these drills until I actually started using them - they are excellent . So far I've only managed to break ONE, and that was only due to not supporting the piece properly :
Beneath the aft platform is another, which also has two Cranes for moving the ship's boats at the aft end of the funnel. I drilled out the holes in the gussets, the smallest is 0.4mm :
Finally, the two cranes. The "U" shaped section is PE, I really don't know why the two trusses weren't also supplied with the PE set - they were fairly difficult to cut from double-thickness paper :
Danny
-
PeteB reacted to Dan Vadas in Bismarck by Dan Vadas - FINISHED - GPM - 1:200 - CARD and PE
Thanks guys .
Finishing off the top of the funnel involved scratch-building some Baffles, which weren't even mentioned in the kit , and also the "Grating" at the top. The grating took some very careful cutting. I re-inforced it with a wipe of CA on it's under side after I'd cut it out :
Danny
-
PeteB reacted to Old Collingwood in Bismarck by Dan Vadas - FINISHED - GPM - 1:200 - CARD and PE
Amazing work danny really really good, its just amazing that card can prove to be so sturdy for model making.
OC.
-
PeteB reacted to Dan Vadas in Bismarck by Dan Vadas - FINISHED - GPM - 1:200 - CARD and PE
Thank you Carl and John .
This doesn't look like much of an update, but these tiny pipes took me a full day to cut, roll and fit :
Danny
-
PeteB reacted to Dan Vadas in Bismarck by Dan Vadas - FINISHED - GPM - 1:200 - CARD and PE
The Funnel was a fun bit of work . All up it's taken me 3 days to get to this stage. The framework supplied in the kit needed a few extra pieces, but not many. I hadn't added any when I took the pic below :
The funnel is in two sections. I forgot to take any pics during construction of the top section .
A little bit of filler was needed on the joins. Here are a couple of pics before painting :
And after painting. The colour match was pretty good, no clear has been applied yet. The pics don't do it justice, as I couldn't stop the glare from the worklights making the "toe" look like it's too lightly coloured :
Danny
-
PeteB reacted to Dan Vadas in Bismarck by Dan Vadas - FINISHED - GPM - 1:200 - CARD and PE
Thanks all .
There are 25 Life Rings shown in the 3D Bismarck book. Only two are with the kit, so I printed up a heap more and glued them to 0.5mm card. There are two sizes, the smaller ones are fitted to some of the ship's boats. I used my punch set to make these, it only took about 15 minutes, and I'd hate to think how long it would have taken to cut them by hand :
The forward section of the 3rd deck has an angled edging on the bulwark, similar to the one I made earlier. This one was a bit more complex, but it turned out a lot better than the first one - no filler at all needed, and the only paint touchup will be on the edges :
Danny
-
PeteB reacted to Captain Slog in Bismarck by Dan Vadas - FINISHED - GPM - 1:200 - CARD and PE
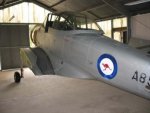
They would be the aircraft hangers.
Nice progress the boat supports have come out well.
Cheers
Slog
-
PeteB reacted to Dan Vadas in Bismarck by Dan Vadas - FINISHED - GPM - 1:200 - CARD and PE
Thanks again Carl, Greg and John .
There are two structures either side of the funnel, I have no idea what they are for. EDIT - Thanks to Slog for telling me they are the Hangars for Aircraft (must be broken down?) .
I added lots of card to the poorly designed framing for them. One wall on each is not vertical, rather on an angle, and the roofs of both also aren't symmetrical :
On these structures are three Racks for some of the ship's boats. Cutting and gluing these pieces has taken me the best part of two days. Virtually every piece is a different shape, so keeping track of what went where was tricky :
Some of the brackets had rounded internal corners, so I once again used my punch set for them :
The racks assembled and glued to the hangars. There is still some paint touch-up needed on the joins and folds :
Danny
-
PeteB reacted to Reg in Bismarck by Dan Vadas - FINISHED - GPM - 1:200 - CARD and PE
Everything looks great but the portholes and piping are superb!
Greg
-
PeteB reacted to Dan Vadas in Bismarck by Dan Vadas - FINISHED - GPM - 1:200 - CARD and PE
Thanks Rick and popeye.
That area's actually all Black, and it's the same on both sides. Now that I've painted it there's no longer a problem - it looks like a small step-in, and as if it's supposed to be like that . BTW - "Black" isn't just black. It's a mix of 40% white, 50% black and 10% yellow ochre.
A while ago I mixed up some Wood colour for a few small touch-ups on the main deck and it came out really well - you can't see them at all now. Instead of just attempting to do it with one colour I mixed it "as I went", starting off with the lightest coloured plank and adding a touch more Burnt Umber/Yellow Ochre for each following plank.
Danny
-
PeteB reacted to Dan Vadas in Bismarck by Dan Vadas - FINISHED - GPM - 1:200 - CARD and PE
I've built the Forward 3rd Deck. This went together well, though there is a slight mistake in one small area - it's going to be difficult to spot later on when other items are fitted, so I'll leave it :
I've glued the 3rd deck to the 2nd deck. The mistake referred to earlier can be seen below, where the two decks don't align properly in the black area. A bit of paint will fix it :
The balustrade at the forward end of the deck was difficult (I had to re-do it twice), mainly due to no instructions on how it went together. This is a recurring theme of this kit :
Danny
-
PeteB reacted to Dan Vadas in Bismarck by Dan Vadas - FINISHED - GPM - 1:200 - CARD and PE
Thanks John and Popeye.
After adding the previous details I decided I may as well do the rest of the deck sides. I've added the Piping, using 0.3mm nickel-silver wire. I'm thinking of leaving it as-is rather than painting it.
I'll also add hatch covers when I can get my printer to work, I've already copied all the covers from a scan of the parts sheet :
Danny
-
PeteB reacted to popeye the sailor in T78 Norden by popeye the Sailor - FINISHED - Billing Boats - 1:30
oh......Santa thought I was a REAL good boy I posted what I got in the 'what did you receive today' thread. Mak'in me wish I wasn't so bogged down with projects.
-
PeteB reacted to popeye the sailor in T78 Norden by popeye the Sailor - FINISHED - Billing Boats - 1:30
thanks Keith.......when I was looking for info on the winch, I happened onto a site that showed quite a few variants for this type of boat. I almost used one of them as the subject! did you add detail to the winches?
there is more progress on her......haven't had the chance to post it. I ended up making an adjustment to the starboard bulwark strip, at the stern. it wasn't right, so I pulled it back and did more sanding to the posts. I did the port side.....but I left the aft section free, in case I had to adjust it on that side as well.
the front wall was added to the pilot house. it was a lot easier setting it up, with the house attached to the base.
the rudder was assembled too.....
I got to work, making the margins......first I set up the deck template over two pieces of 1/32 flat stock.
then I traced it out. taking the parts panel {template} of the cap rail, it was laid over the deck and the outer edge was drawn.
I moved it a few times, so I could trace an even curved outline. I didn't make it too wide, boxing in along the bulwarks only. what I ended up with was this.
removing the two tracings from the board, the outer line was cut. trimming the bulwark side is going to be tricky. when in place on the deck, these should hide to majority of my Ca boo boo.
I likely won't get too much further with them, till after Christmas day. so have a great Christmas folks........I intend to I'll let you know if Santa left me anything good.....if I get a certain something....you might even hear me!
-
PeteB reacted to popeye the sailor in T78 Norden by popeye the Sailor - FINISHED - Billing Boats - 1:30
boy!........I must be out of touch or something.......I made another goof up! I'd better wake my butt up, or this build is gonna look terrible! I started to assemble the pilot house.......one of the bases is connected to it.
again....I saved all the punch outs for the windows and doors....I'll use them for something. I did some sanding to the bulwark posts, to get them ready to accept the thin plywood bulwark strips. one of the posts that got broken off by the CA debacle broke away again, so I'll have to put it back on when the strip is in place.
when the pilot house was dry, two spreaders were measured out and cemented in the front corners, completing the box. they were arranged, so they wouldn't need to be removed.......if anything, they will lend extra strength to the assembly as I work on it. the front wall is made up of three pieces that will give it a sort of hex shape. to do this, I thought it best to attach the pilot house to the base, so that an exact measurement can be made for their location.
this is when I found that I had cemented the top of the base on backwards......the square corners are to be towards the stern, and the rounded corners are to be towards the bow. so.......I had to remove the top and reposition it.
it wasn't a huge deal.......the top came off without too much bother. with a little sanding to clean it up, the top was cemented in the proper position. to insure that the pilot house and base are in sync with each other, it was set on the deck. the bottom surface is curved to match the curvature in the deck.....I didn't have to clamp it at all.
I will let the bulwark dry for a while....the strip is kinda stiff and has plenty of spring-back. I also need to trim it at the center stern post before the port side is cemented on. when the port side is in place, then I can work on making the margins for the bulwarks, and mark out where these structures are to be located.
-
PeteB reacted to popeye the sailor in T78 Norden by popeye the Sailor - FINISHED - Billing Boats - 1:30
I did a little tinkering with her this morning, adding the tops to the structure bases. I also managed to get a shot of the deck platform...mental note to self....lighten up on the CA!
totally out of character for me......I'm usually not this careless. that's what I get for doing something, and taking off in a rush. I still need to do more faring, but I needed to wait for the posts that I had to cement back on, to dry. it had the entire week end, so it should be alright to handle.
I want to see about making some waterways along the bulwarks......and I notice that the bulwark strips do not have scuppers, so I may add some. while I was scheming, I put the tops on the structure bases.
I have an errand to run today {getting some more paints too....hee....hee....hee}........I hope to make a little more progress
-
PeteB reacted to popeye the sailor in T78 Norden by popeye the Sailor - FINISHED - Billing Boats - 1:30
as mentioned, I'm not going to follow the instructions on the hull planking. I'll assemble the two halves together first, then plank it
this was a pain......assembling the winch body. I had assembled the reels, and then sandwiched them with the sides of the body, so I could cement the bottom of it in place.
while I was waiting for things to dry, I though to assemble the two main structure bases. I made a mistake on how the sides were located, so I had to take them apart and correct them.....good thing I saw this before they were completely assembled.
in the end, I got the pilot house base done. I added corner brackets to make it a bit stronger.
the forward structure is like a cabin, with the companionway to go below deck
I would say that this is a form of vent for the cabin structure
brackets were added to the cabin structure, to give it strength as well.......they both are set aside to dry.
meanwhile, the winch was dry fitted onto the base, and the two half moon parts were added to the body, on the larger end. I will be working on the supplied reels, to see what can be done. if they don't look right......I will have to experiment a little to find the look i'm looking for
I didn't get any pictures of my deck platform goof up.......I thought I had taken some. I'll show you in the next update. I'm not sure what upgrades the site underwent.......but it did not bode well for picture uploading. I had several failed uploads posting these updates. has anyone else experienced any problems?
-
PeteB reacted to popeye the sailor in T78 Norden by popeye the Sailor - FINISHED - Billing Boats - 1:30
the hull frame is in two halves.........I have already gone and pre-numbered the parts. as I've pointed out in other build logs.......I save everything......right down to the punch out cast off bits.
I might used them on something for the boat......if not....they might be used somewhere else.
Billing did their best to utilize the wood panel......I will need to put a frame around the panel, to preserve it.
they also supply that piece of board under the panel, to assemble the frame halves on. they instruct you to nail the frames to it......I prefer to clamp it to the table.
with the keel halves punched out and ready to go.....the board is set up with the first side.
there is a rabbit cemented to the bow and stern ends. once dry, the other half will be set up. the other side will be done as the starboard side {bow facing the opposite direction}.
as I was assembling this side, I did some faring to the port side. the instructions tell you to plank both sides separately......the AmericA reissue kit is done the same way, but I chose not to follow the method. I don't think I will on this one either.
-
 PeteB got a reaction from Omega1234 in JU-287 by Lucius Molchany - 1/48 - PLASTIC
Forward thinkers ??
-
 PeteB got a reaction from popeye the sailor in JU-287 by Lucius Molchany - 1/48 - PLASTIC
Forward thinkers ??
-
PeteB reacted to Chuck in Queen Anne Style Royal Barge by Chuck - FINISHED - Syren Ship Model Company - 1:24
Just an update....Hoping to have a bunch of barge kits available in about one week to ten days. In addition, the entire 3 part assembly guide is now complete and you can download it from my website.
https://www.syrenshipmodelcompany.com/royal-barge-kit.php
Unfortunately for the time being, the accessory sets for those NOT wishing to carve those seven decorations will not be in stock for few more weeks. I just need a bit more time to prepare and make the molds for these seven additional decorative carvings. and cast them So if you really want to order everything at the same time, you will need to wait until the accessory sets are ready. I am working overtime to get everything ready as soon as possible.
But while you wait, please do read through the instructions and dont hesitate to ask me any questions.....and Merry Christmas.....and have a very happy New Year.
-
PeteB reacted to Dan Vadas in The Syren Rope Rocket is now in Stock
Maybe you should only supply a link to the downloads to buyers of the ropewalk? At least the Chinese will have to actually buy one before they pirate it . It might slow them down a day or so .
Danny