HOLIDAY DONATION DRIVE - SUPPORT MSW - DO YOUR PART TO KEEP THIS GREAT FORUM GOING! (Only 20 donations so far - C'mon guys!)
×


mikiek
-
Posts
2,276 -
Joined
-
Last visited
Content Type
Profiles
Forums
Gallery
Events
Everything posted by mikiek
-
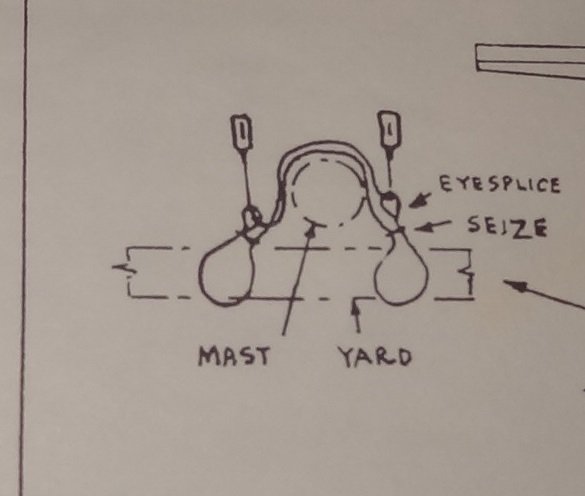
 Still haven't found the answer in the plans, but I did see something that showed the fore top stay & inner jib stay wrapped around the top mast head with eyesplice & mouse keeping it in place.Typical stay configuration. In the plans, the outer jib stay looks like it goes around the masthead also but still haven't found how it fastens.
- 648 replies
-
- 1
-

-
- niagara
- model shipways
- (and 1 more)
-
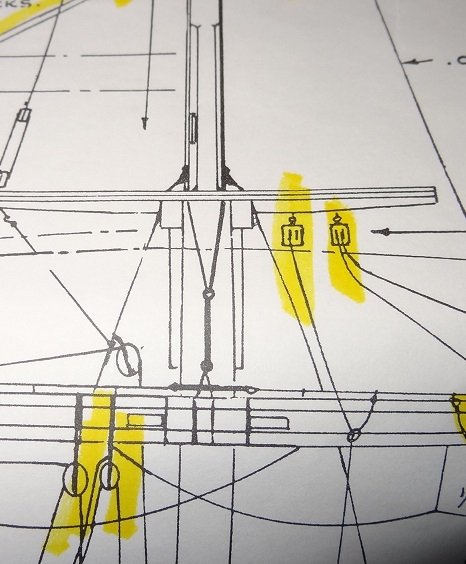
Amen to that Darrell, this will probably be another one of those 'I missed it' situations. Can't find how the fore top stay and inner & outer jib stay fasten to the mast. Is it an eyesplice with a mouse like the lower stays? The fore upper top doesn't have much room for ropes to pass thru it. Are all 3 of those stays supposed to pass thru that square opening?
- 648 replies
-
- 1
-
-
- niagara
- model shipways
- (and 1 more)
-
Have been trying to finish a RC speedboat this week - spent precious little time on rigging. Now I'm in the usual position, don't remember a dang thing about where I was or what I was doing. Took one look at that pile of string - do you remember Lurch from The Adams Family, Uhuhuhuhuhahahahahahaaaaaaaa.
- 843 replies
-
- 2
-
-
- niagara
- model shipways
- (and 2 more)
-
Steve - I like the idea. Braces I was planning on. I see halyards & sheets on the plans but they're all attached to sails. Not sure where they would fasten to if there were no sail.
- 843 replies
-
- 2
-
-
- niagara
- model shipways
- (and 2 more)
-
The neat freak in me REALLY wants to clean this up. So far this is the hardest part of rigging. Having the self control to leave it all alone until it's ready.

- 843 replies
-
- 3
-
-
- niagara
- model shipways
- (and 2 more)
-
Stumped again. And I believe I have put up a reasonable search of the plans. Where does the fore top stay fasten to on the bowsprit? The plans show it turning into a dashed line right before the bowsprit. If I am deciphering correctly, does it tie off on the bee? One of those holes? Which side or does it matter? Also, the royal stay runs down to the flying jib boom, then under and back into the dolphin striker. There it magically appears to turn into a backrope. This is the same rope, right? You out there Darrell?
- 843 replies
-
- 1
-
-
- niagara
- model shipways
- (and 2 more)
-
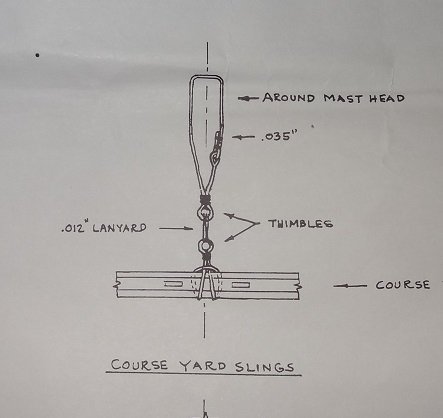
As usual I have not read the inset thoroughly. I see what you are saying. I was describing the truss and you the sling. I have done the sling although I forgot to serve it. And the inset for the truss has the terrible detail picture to the left. Below is the plan then Lever follows Sorry for my confusion.

- 843 replies
-
- 2
-
-
- niagara
- model shipways
- (and 2 more)
-
Darrell and Steve - thanks for stopping in. Sounds like glueless is the way to go with the masts - fine by me. I like even better doing some of the shrouds before stepping the lower spar. I'm a little confused by the pix. If we are talking about the same thing it looks like the course truss & sling is under the mast top not thru it - inset 6-G. That little drawing on the left is terrible. Lever has a much better look at it in page 36. I didn't even realize it was a single piece of rope until I saw that. I should post a few pix of how I did that. One of the cooler pieces of ropework. The other thing I have been avoiding like the plague - the bow sprit. Once that goes in there is almost no place to put the boat. Seems like those spars need to be mounted to the boat early on. In most cases one end of almost every rope fixes to the boat or a mast.
- 843 replies
-
- 2
-
-
- niagara
- model shipways
- (and 2 more)
-
Just saw your log. What a gorgeous kit! Great execution on your part Doug.
-
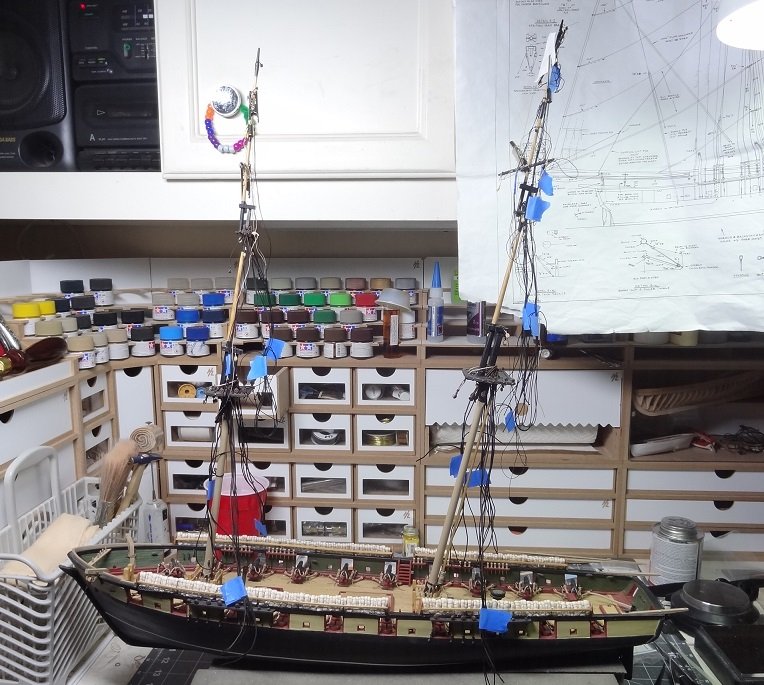
Hey Steve - you know it's getting really hard to resist popping a mast in and starting to 'clean up' all the lines hanging off spars. Sure as I do, there will be something that should have been rigged before the mast was stepped. I've no idea how to go back and review to make sure I have everything in place before the masts go in. Too many lines on the plans I guess one thing that could help with that. I'm leaning more and more towards not gluing the masts - just let the rigging hold them. So at least in theory I could go back and pull out a mast if necessary. But that is probably a lot easier said than done.
- 843 replies
-
- 2
-
-
- niagara
- model shipways
- (and 2 more)
-
Man, chalk one up to the 'how dumb can you get' column. I've been struggling with the plans. A lot of the lines shown don't show where the line ends up. Obviously belayed to somewhere, but where? Sometimes a pin number is shown by the rope, but just as often it is not. Plan page 6 has the belay pin layout - that I knew. There is also a legend immediately under that identifies pin number and the line that goes to it - that I never noticed. Yup that's me.
- 843 replies
-
- 2
-
-
- niagara
- model shipways
- (and 2 more)
-
I've often wondered if I need a vacation from the builds. I've taken several with family but I always bring plans, books, etc for reading material.
- 228 replies
-
- 5
-
-
- gunboat
- model shipways
- (and 1 more)
-
Looks like on the pin is the consensus. Some question as to whether a coil is looped over or if a hitch is pulled thru and over the coil and the hitch is what goes over the pin. The feeling seems to be that open coil over the pin was done in the merchant marine and the hitch was used by services. I haven't seen anything earth shattering in regards to making the coil with hitch. You really almost need to do it like it is done in real life. Most folks are claiming about 5 minutes per coil and we are going to have maybe 30-40 per side. Bringing back memories (or nightmares) of rigging guns. I don't think getting coils on pins is going to be much of a problem even with standing rigging installed. The worst part may be deciding how long the rope should be. For some coils, 3-4 loops might be sufficient. For others there could be many more. We'll have to follow each rope from it's source to the pin and then see if we can figure out how much extra should be in the coil. I don't mind taking the lead on that.
- 648 replies
-
- 1
-
-
- niagara
- model shipways
- (and 1 more)
-
I've seen 2 placements for coils. One is on the pin - over the actual belay which saves you from having to do those accurately. Just glue the line to the pin then put a coil on top. It also covers most of the pin which can be a good thing. The second - you belay the line on the pin but the coil goes on the deck beneath it. Those are not nice, neat coils like for the guns. Rather a wound up pile. I'm having questions as to how big the coils should be. Several have said 3-4 loops but in many cases that doesn't seem like enough. I've tried making a few with .008 rope and they are pretty wimpy looking.
- 648 replies
-
- 3
-
-
- niagara
- model shipways
- (and 1 more)
-
It's always a joy sharing something you like with others. Thanks for sharing that Darrell.
- 648 replies
-
- 2
-
-
- niagara
- model shipways
- (and 1 more)
-
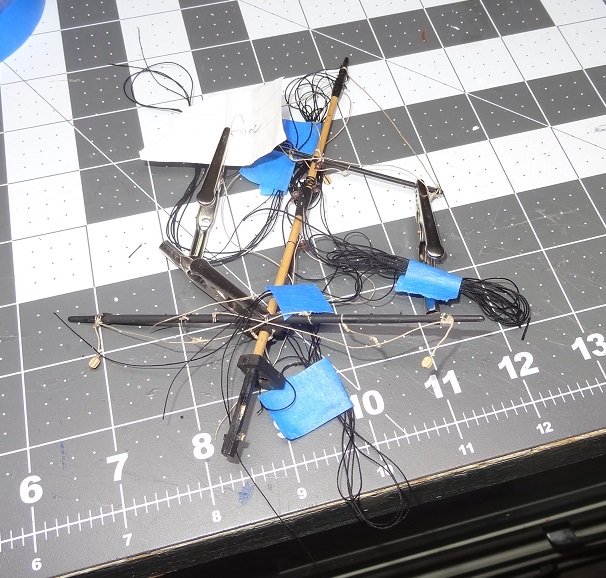
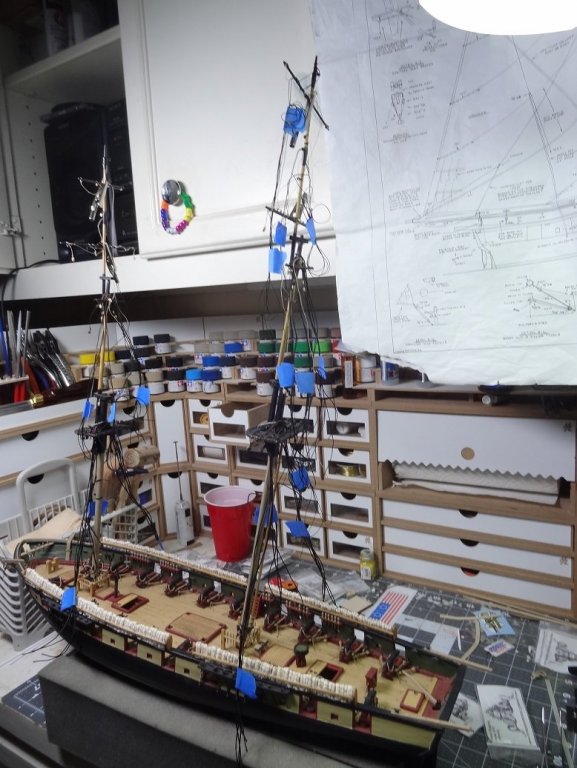
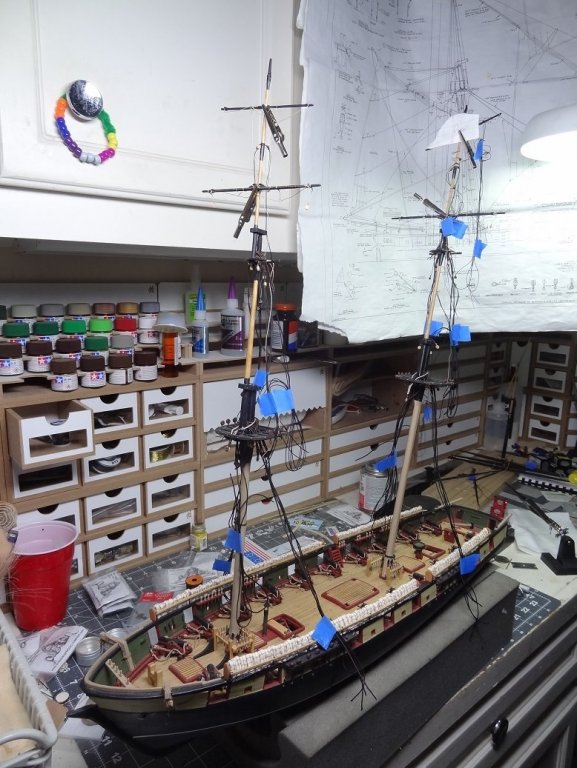
I've been having a debate with myself as to whether or not to show individual rigging components as I complete them. So far I have not and I suspect I'll regret not doing that. Could be a good reference in the future. Quite a lot has been done and quite a lot is left to finish. Thought I would at least post a few progress pix. Everything is show together but nothing is actually together yet. It was 101 degrees today. Same yesterday. The poor little portable AC in the garage is working its tail off and just barely making it tolerable. It's 82 out there a little after midnite. Well, here's proof I am getting things done: I'm wondering about all those lines at the masthead. They don't want to lay flat. Maybe it would be better to take them off and then rope by rope glue them back in a stack. Have not even looked at the bow spars yet
- 843 replies
-
- 3
-
-
- niagara
- model shipways
- (and 2 more)
-
Dang - this new format of the website seems to have done away with the post #. On page 12 dated Nov 16 you are showing your top gallant and royal yards. You have lifts on them. I can't find anywhere in the plans that describes how the lifts are hung and where they belay to. It barely even shows the lifts. I see it for the lower yards but not the upper 2.
- 648 replies
-
- 1
-
-
- niagara
- model shipways
- (and 1 more)
-
I was hoping there would be a tarp over it Then I could steal the idea for the Niagara boats. Looks great Don.
- 653 replies
-
- 4
-
-
- trabakul
- marisstella
- (and 1 more)
-
Those pix are actually very helpful right now. I'm fitting out the lower tops and I see a lot of what I am working on. Kinda cool!
- 843 replies
-
- 3
-
-
- niagara
- model shipways
- (and 2 more)
-
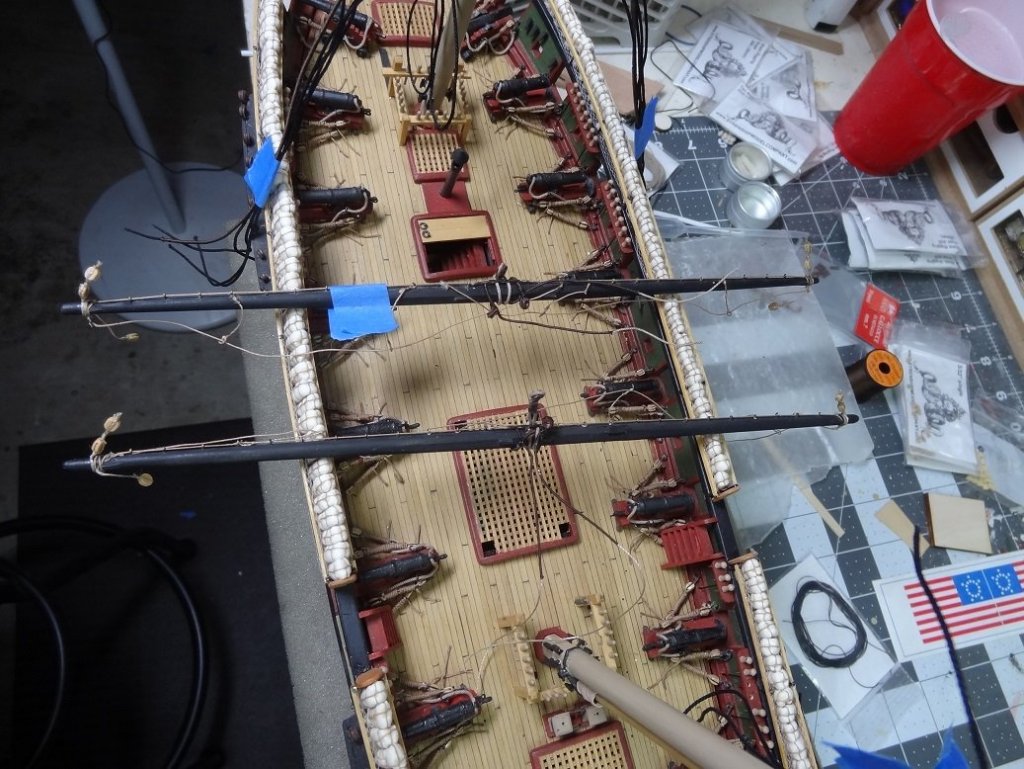
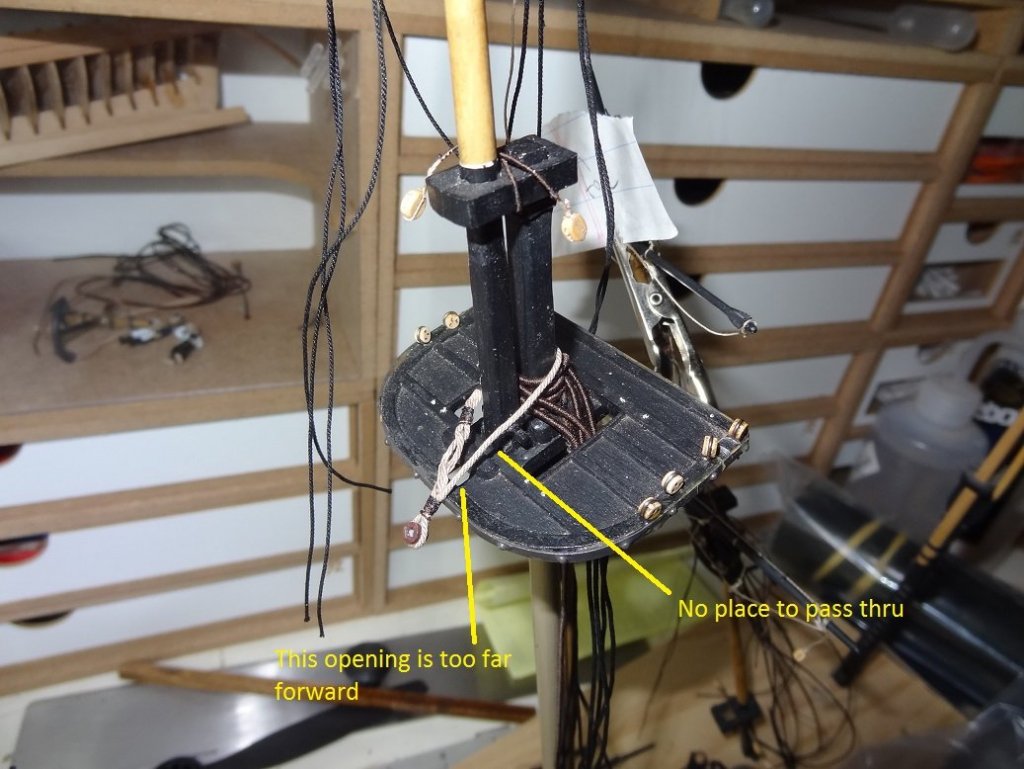
Two observations Frankie. 1. Using that forward opening the yard will be dangling almost an inch in front of the mast. According to the plans the course yard has no parrel or yoke. 2. In the pix it almost looks like the sling does not go around the mast head. OK - #1 is incorrect. The plan shows a truss that pulls the yard back to the mast. Problem is the added distance to the forward opening makes my sling a little short Do you suppose all that would have been served?
- 843 replies
-
- 2
-
-
- niagara
- model shipways
- (and 2 more)
-
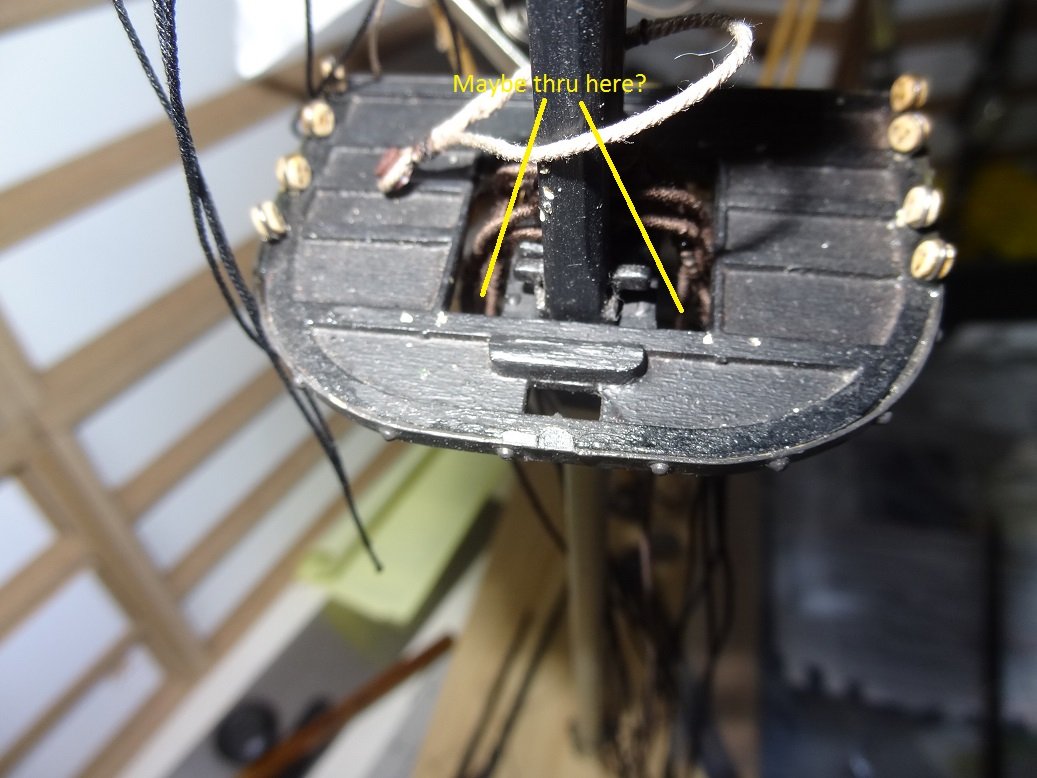
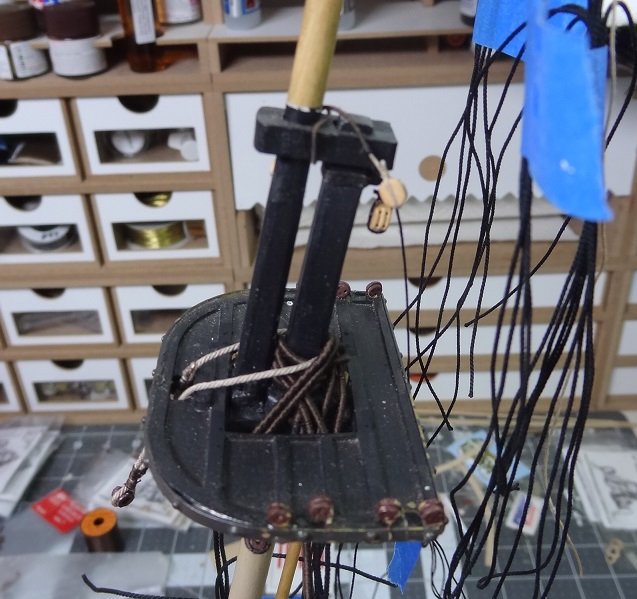
Here's one for the experts. This is easily drawn on the plans. Implementation is another story. The course yard sling is basically a loop of rope that goes around the mast head then somehow magically passes thru the top and down to a thimble to which it is lashed. There is no place for it to pass thru the top The right opening would be where the top mast foot sits, but when the top mast is stepped the hole is filled. The only option I see is thru the holes a little further out. This is not what the plans show. Any ideas?

- 843 replies
-
- 3
-
-
- niagara
- model shipways
- (and 2 more)
-
I am trucking along with rigging for Niagara. It's been tough trying to pick out what running rigging to include. The plan page for running rigging also includes the sail plan and much of the lines shown are tied off to a sail. I will not be doing sails. So at the moment I will include the braces, lifts and halliards. Clew and bunt lines will not be done. It seems like that should provide enough detail. Does that sound reasonable?
- 843 replies
-
- 2
-
-
- niagara
- model shipways
- (and 2 more)