HOLIDAY DONATION DRIVE - SUPPORT MSW - DO YOUR PART TO KEEP THIS GREAT FORUM GOING! (Only 24 donations so far out of 49,000 members - C'mon guys!)
×


mikiek
-
Posts
2,276 -
Joined
-
Last visited
Content Type
Profiles
Forums
Gallery
Events
Everything posted by mikiek
-
 Thank you Joel. I have a punch & die set that makes these pieces that look like the head of a carriage bolt. I've used them on some other parts. The smallest of those is actually so small it's not really of much use - your dot of glue would be larger than the bolt head. re: the catheads - I've been dying to put the anchors back on and lash them to the side. But I know they would get beat up down the road. I do have a question about the anchor cable. The plans don't really show where they run to once on deck. I'm looking at the Eagle practicum and they run the cable all the way to the main hatch and into some holes in the grating. I was thinking about dropping them into the first grating at the bow. But now I'm seeing that the bow area below deck would have been the crew area (the seamen at least) so I don't know that a cable running thru there would have been practical. And of course the cable I do have on the anchors is about 2" too short to reach the main hatch.
- 843 replies
-
- 2
-

-
- niagara
- model shipways
- (and 2 more)
-
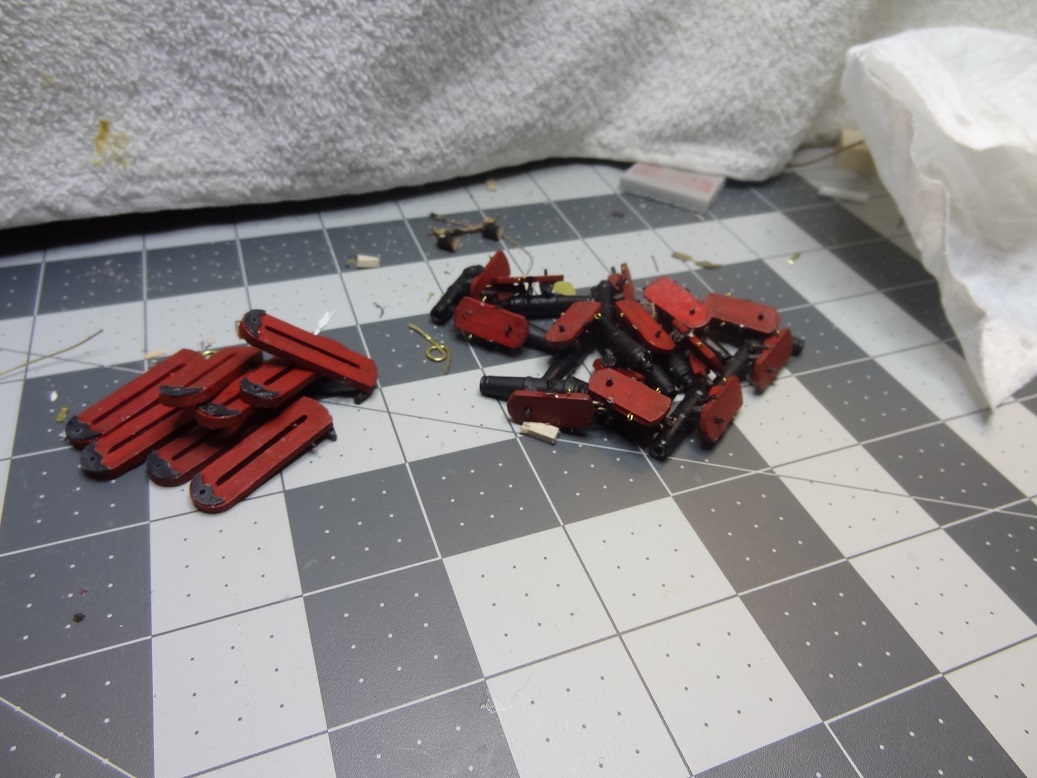
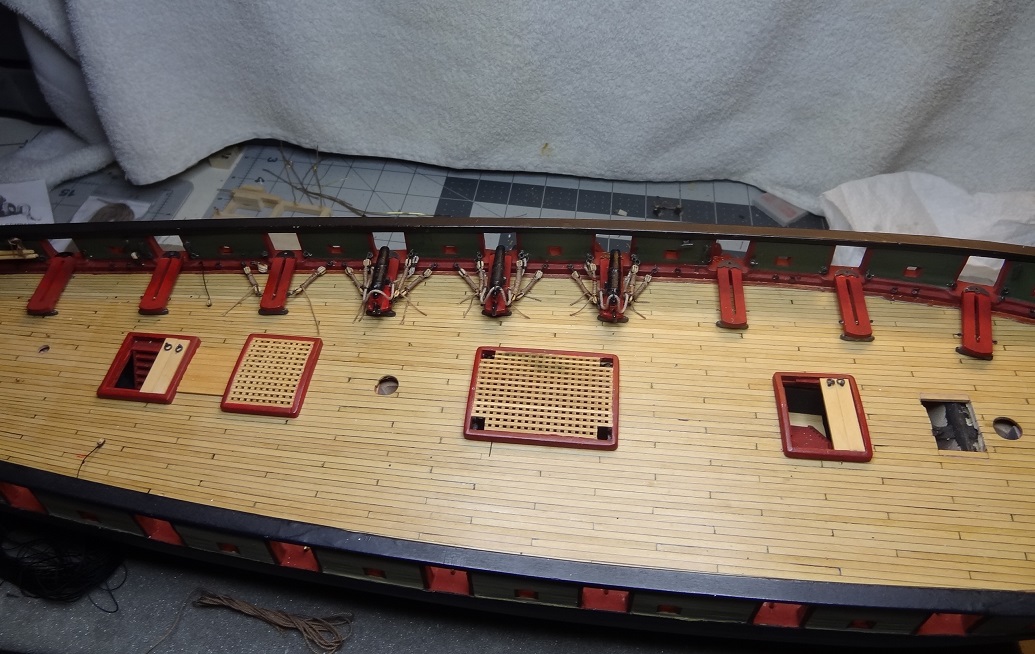
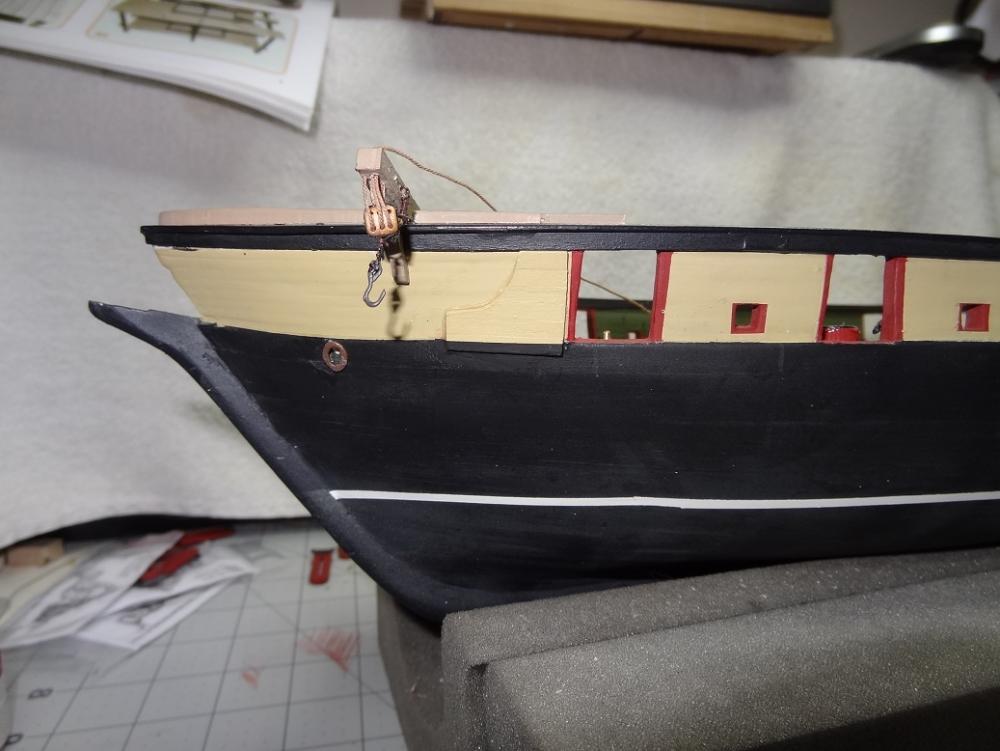
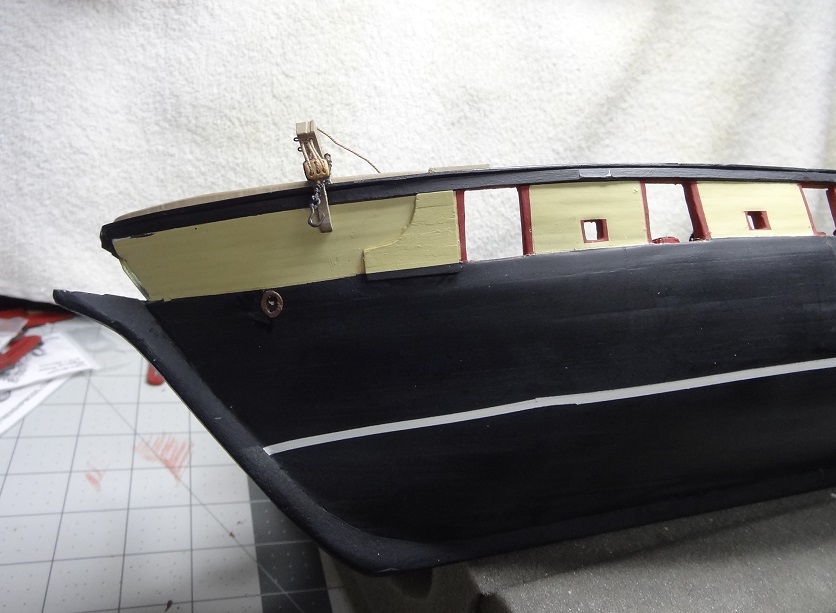
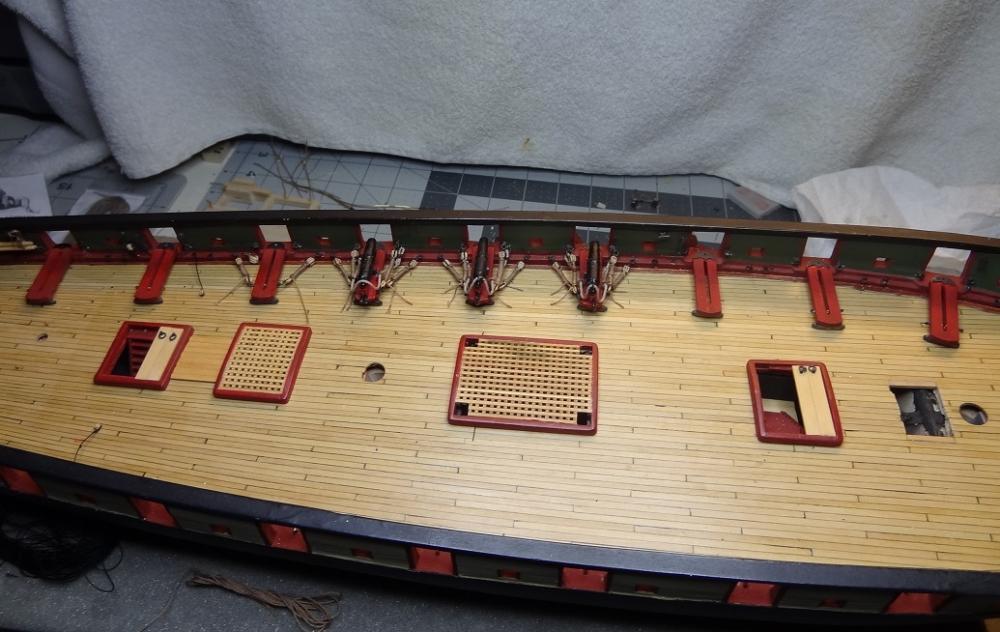
Hello everyone. It's been a week since I've posted, mainly because there has been a lot of grunt work going on and it's not overly exciting. I mentioned before I had only 4 completed carronades when I began to rig them. So I'm making all the pieces and assembling those. No wonder all his pieces keep falling off I did notice several of the cascables are broken. Not sure if I want to try to fix those - not sure how I would. I'm also trying to rig all the eyebolts in the waterway before going back to the guns. This afternoon it is raining, all day actually, so for once with the portable AC running the garage is actually cool. A welcome change. So back to the guns. I'm following Darrell's plan and gluing and rigging all the gun bases first. It just makes good sense. But I believe it's been 2 weeks or more since I frapped a tackle and I have almost forgotten my process. While doing some reading I came across a mention of frapping the gun tackles. Apparently it was a pretty common thing to do while at sea with no nearby threats. Nice to have a little validation on that. Sometime in this last week I backtracked a bit and built and installed some hull anchor linings. I just glued some thin strips edge to edge and when that dried, cut it to the shape I wanted. Seems as though the linings were bolted on to the hull , so I am debating whether to add some bolt looking things. Well at least I'm back on track with the gun rigging again.


- 843 replies
-
- 4
-
-
- niagara
- model shipways
- (and 2 more)
-
And ship-o-holics grab them all. Beware! Don't worry, there is help......
- 701 replies
-
- 3
-
-
- phantom
- model shipways
- (and 1 more)
-
Hey - No Planking? Like Don said - you now have one "on the shelf". Welcome to the madness
- 701 replies
-
- 4
-
-
- phantom
- model shipways
- (and 1 more)
-
Thank you Henry. Well said, particularly the variations. As you and Brian said, not sure I will serve all the strops on my build this way but I will experiment just to see what is possible. This has turned out to be a helpful thread!
-
Allan - I have to wonder whether it becomes a question of scale. Trying to make the strop look like 127 with .008 rope would be a challenge - at least for my fat fingers. Then again, maybe putting the .008 rope in my serving machine and wrapping it there might work. Then cutting that to length. A rookie's perspective....
-
OK - I will order. How does sizing work with monofilament? Is 3/0 thicker or thinner than 6/0?
-
Yeah - I was just looking at those today. Well said Henry, worth the price of admission right there. Now if I can find enough memory to put all that in. This afternoon, I did run into what I suppose is typical for smaller scales. I had .008" rope going thru an eyebolt. How in the world do you seize .008" rope? Do you even bother? If yes, then with what? Even sewing thread is almost that size. If no, then just tie a knot?
-
You are right on Henry. I get the feeling I am using the term stropped rather loosely. I would appreciate if you or someone could find a pic of what you are describing (eyebolt & block). I still don't have an image in my mind. Or maybe I do and just don't know it Keep it coming.
-
Brian - it all helps! Thanks. The third one in particular. I have one like that. Is the long rope a continuation of one side of the strop or a separate piece? Looks like you stropped the block, seized that, cut the rope on one side and ran the other side down to the eyebolt?
-
I do have sewing thread available but that's going to put me back on my color rant again. Seizing is tarred, yes? So brown to dark brown?
-
For that particular block I pulled out the bolt, seized it and put it back. The next 2 bolts (forward of that one) I left them and just did a couple of winds and a spot of glue. Lawrence would be good. Or I'll rename to Detroit and we can have an arms race. Don't want to go there. I did just get the Lees book. Opened it last nite for the first time. I'm sure the information is great but I really struggled with the language. Not sure if it's The Queen's English or what but I found it difficult to follow and stay with. I've found Darcy Lever's book Young Sea Officers Sheet Anchor to be the most helpful so far. The English there is a little difficult as well but the text describes an adjoining illustration so it ends up making better sense. And those illustrations are really good. I have several others but haven't dug into them as the need wasn't there. My general intention was to build up the masts based on descriptions of fitting out a new ship. Lever gives some of that. What I find confusing in the plans is it shows both standing and running on the same page. Since I am not going to do sails I don't know how much of the running I can skip. I do have several other unbuilt kits and a few of those have plans that separate running and standing. I was planning on referencing those too
-
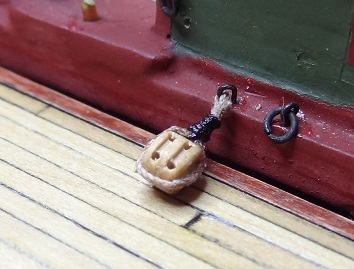
Like this I need to find some thinner seizing cord....
-
Don't forget the rings that go on the spanker mast. That seems to be a pretty common oversight. They've got to go on before you install that mast to the main.
- 648 replies
-
- 2
-
-
- niagara
- model shipways
- (and 1 more)
-
On second thought - if the seizing between the eyebolt and block is what is keeping the rope clinched to the block, then I understand. Although the plans don't show it, in Lever's book the vang pendants and fall are hooked to an eyebolt (the one closest to the stern). And frankly, I'm grateful that we are both thinking about the same issues. We are both asking questions that the other should be aware of. This arrangement has been tremendously beneficial for me and I hope for you.
-
Darrell - I'm thinking (and was about to do) what we both are thinking. The end result being (pardon the laymans terms) a block with a small loop at one end, an eyebolt reaved on the loop and then some seizing in between the eyebolt and the block. As suggested in photo 5 here. However that kinda goes against what Henry was saying - if one had to repair the block they would still have to cut the seizing AND the loop (strop) to remove the block. Of course since this is just a model it doesn't matter, but I would like to get it right.
-
Henry, what you are saying makes sense. I am having difficulty envisioning one thing you said - probably the most important - "The strop of a block should be seized to an eyebolt." Would you mind explaining or posting a pic?
-
Sorry, I wanted to get that other post to you asap. The hinges look good. Did you anneal the brass or use as is? Also which brass strip did you use? Had to do a double take on your pix. I have the same mat on my workbench.
- 648 replies
-
- 1
-
-
- niagara
- model shipways
- (and 1 more)
-
Hope I catcha in time, some of the masts are supposed to be buff and some natural!!
- 648 replies
-
- 2
-
-
- niagara
- model shipways
- (and 1 more)
-
Thanks Joel. I gotta learn how to read the rigging plans. I imagine if every single line, block, hook, etc had notation the page would be pretty busy. So looking for something similar makes sense. I'll crack open the Lees book tonite.
-
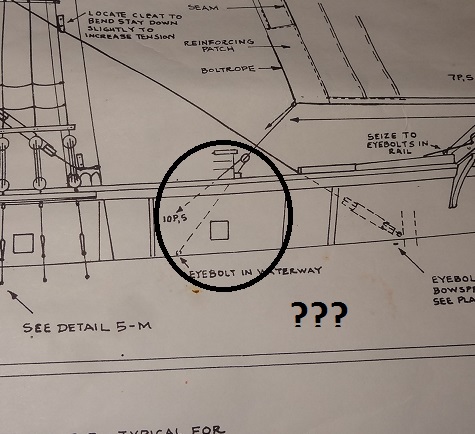
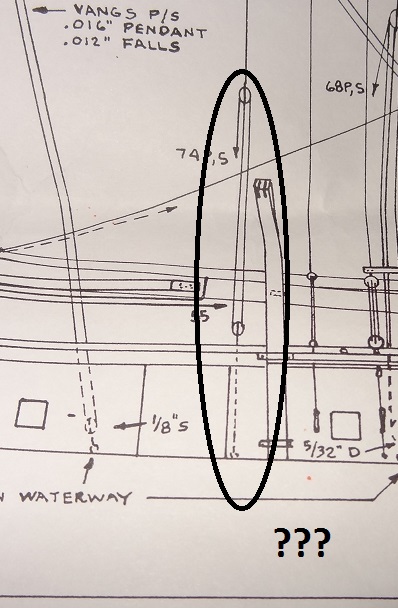
Good point on the books. I just haven't got into the rigging mindset yet, so I don't have my identification process down yet. I just got Lees' book recently but haven't gone thru it yet. I kinda figured either stropped or seized to the eyebolt, but neither pic shows the block size or rope size. On that same topic, is there any rule as to when to strop vs seize? I would guess pic 1 would be seized to the eyebolt. Pic 2 (the circled rig) is seized, but just to the left there is another that is stropped?
-
Don - I've always liked the varying color in different planks - whether it be the hull or the deck. I like where you're headed!
- 653 replies
-
- 5
-
-
- trabakul
- marisstella
- (and 1 more)
-
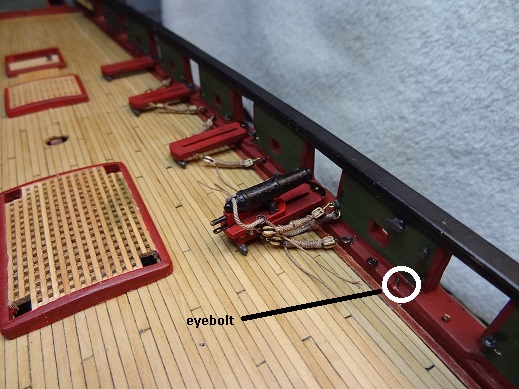
Joel - I can account for the waterway eyebolts on the plans - found them all. I'm having difficulty figuring out what the plans are telling me. Several don't specify the block size and most don't specify the line size. Jay - I've seen that tip before regarding reinforcing the pinrails and channels. Thanks for the reminder. I do feel like I need to get the guns in before the real rigging starts. But those eyebolts need to be addressed now as well.
-
Jay - I have the eyebolts for the gun tackle handled already. All blocks for that tackle have hooks stropped. The eyebolts have split rings attached and the hooks go to them. What I was asking about is some additional eyebolts in the waterway that appear to be used for general rigging - not sure if it's standing or running. The plans are not definitive on how the blocks are fastened to them. I want to go ahead and do that now while I can still get to them. Accessibility will be very limited after the guns go in.
-
I'm guessing that I need blocks stropped to eyebolts. The question now is can I get the existing ones out. I will definitely stop the gun rigging until I come up with a solution. The eyebolts are still accessible at the moment. Thinking ahead did help here. Several of the eyebolts are directly beneath the eyebolt/ring of the gun tackle. It would have been impossible to get to them later.