mikiek
-
Posts
2,276 -
Joined
-
Last visited
Content Type
Profiles
Forums
Gallery
Events
Everything posted by mikiek
-

Can't Find Thin Brass Strips
mikiek replied to mikiek's topic in Metal Work, Soldering and Metal Fittings
Thanks everyone - SpecialShapes has what I am looking for. I hope they don't mind a small order. What I need is under $10. -
Holding Small Items
mikiek replied to mikiek's topic in Painting, finishing and weathering products and techniques
I will probably get around to buying one of those fly holders when it gets time to rig. But for my current problem I don't think it is the answer. I usually paint a lot of parts at one time, so I don't see a single holder helping much. Plus I imagine a holder would cover some area of the part so I would still need to paint twice. Pins seem like they would work well for wood. Not so sure about the small brass parts. -
I recently bought one of those assorted brass strip packages - K&S. There was one 3/32x1/64 which I have mostly used up. I would like to get more but can not find it. There are a few .01x" thickness strips available but the narrowest is 1/4" wide - much wider then I want. I'm still pretty new to the metal working side of this hobby so I don't know all the options. Is it reasonable to think that I can find sheets with the thickness I want and then cut strips that narrow? I don't really want to grind down 1/4" strips to 3/32". I also would like to avoid buying another assortment package - there is a lot of pieces in there I will never use. Any other choices?
-
Holding Small Items
mikiek replied to mikiek's topic in Painting, finishing and weathering products and techniques
Duff - I was having the same idea about pins. They're cheap and I can deal with many parts in one painting session. Plus they leave almost no footprint on the piece. -
For painting small pieces (airbrush or by hand) I have been using the alligator clip on a skewer things. I'm getting less and less happy with them. They can literally crunch some pieces and at best they leave a spot where the paint didn't go meaning I have to sand and paint that spot after everything dries. I don't like double work. I'm wondering if you guys have any suggestions for an alternative
-
Thank you Elijah! That's good of you to say. Welcome aboard. There is still a LONG way to go....
- 843 replies
-
- 3
-

-
- niagara
- model shipways
- (and 2 more)
-
Once again, I procrastinate with my log. I HAVE been working on Niagara every night. I'm just getting frustrated and end up making it a short night. Decking is taking forever. I feel like I'm hitting a wall there. Hard to stay motivated. I am working on other items - masts, the port bulwark - just to stay busy. It's hard to judge whether I need a good kick in the rear to get moving again or I need to take a break for a while....... Man was that depressing or what?
- 843 replies
-
- 1
-
-
- niagara
- model shipways
- (and 2 more)
-
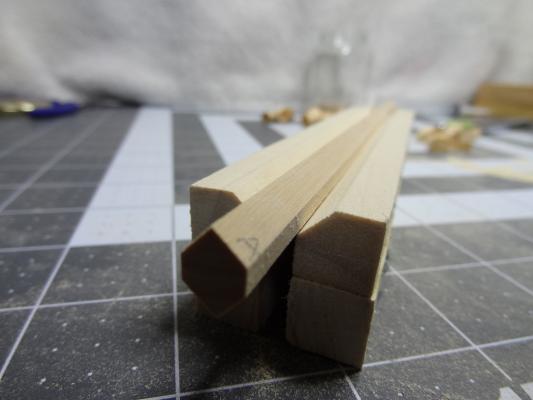
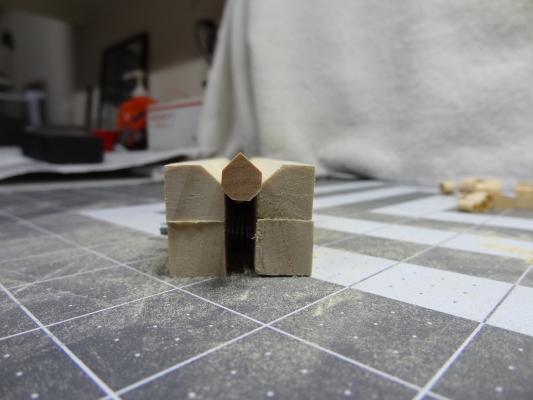
Jaager - Perfect! Thank you! jbshan - I think I'm doing the same thing. I plane the square stick down to proper size (still a square), taper that and then mark and sand the octagon. I was having problems sanding level, smooth surfaces. After a little adjustment, the jig allows me to sand away. The top surfaces of the jig stop me from sanding too far or getting crooked. I've tried sanding and filing completely by hand, but my "flat" surfaces always end up a little rounded or one edge is higher than the other. I probably just don't have the technique, so the jig keeps me under control.
-
For #1, I completely forgot about styrene. Easy to cut, shape, more durable than wood. One problem solved. Would still like to know what material was used back in the day.
-
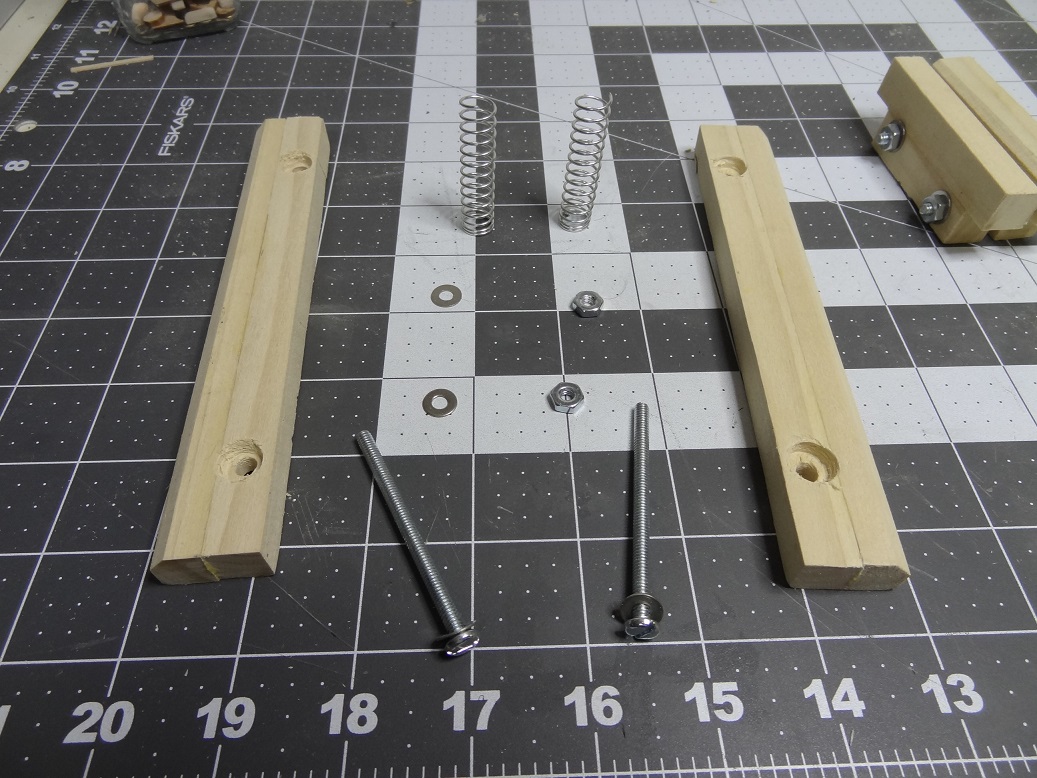
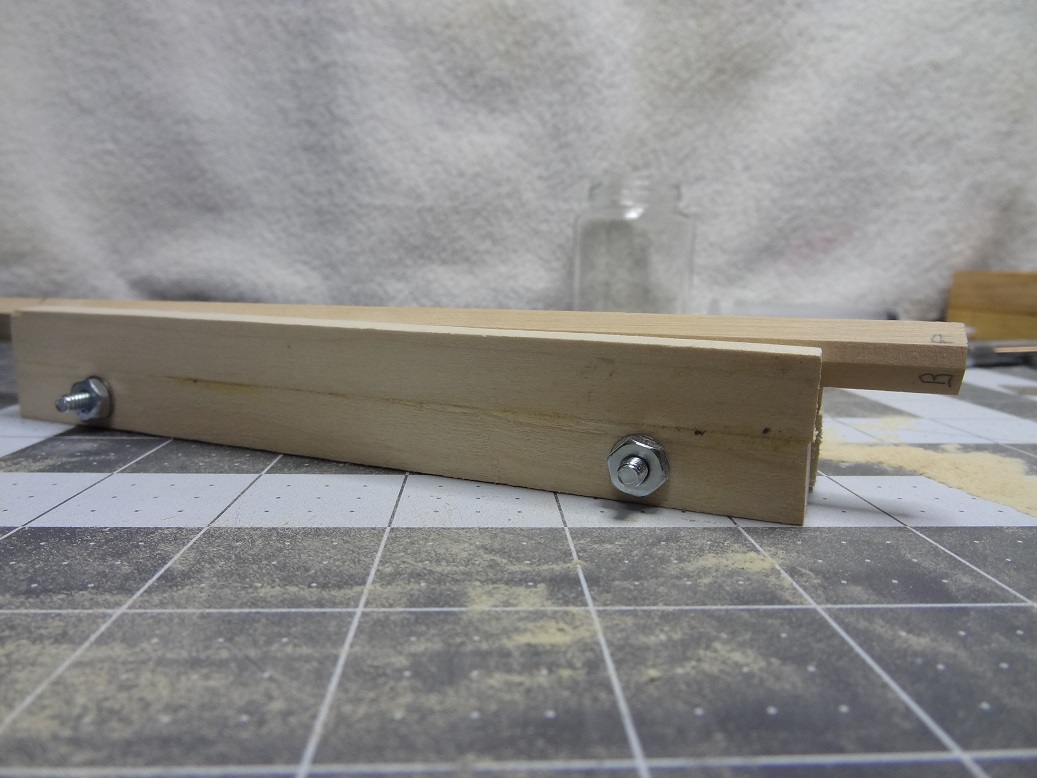
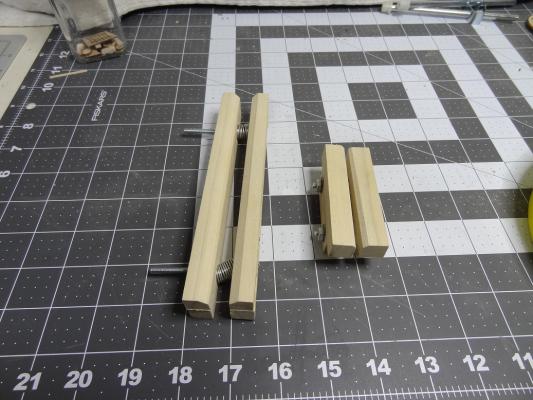
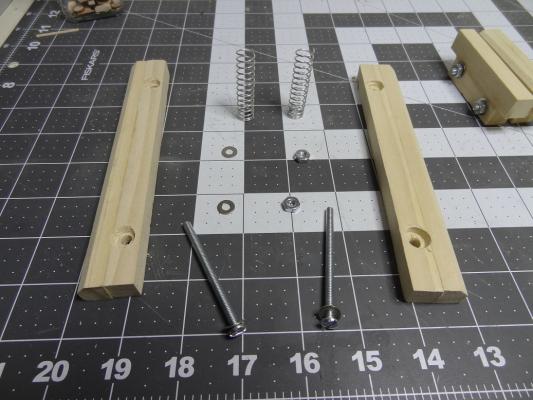
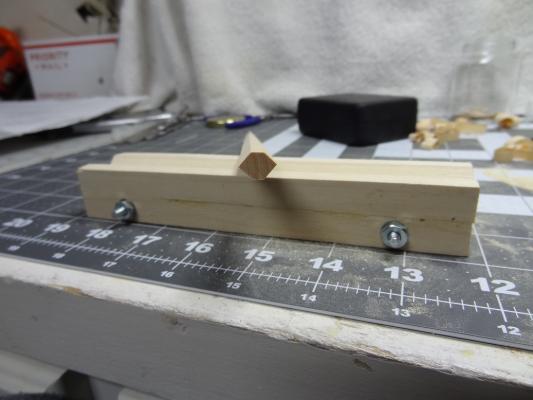
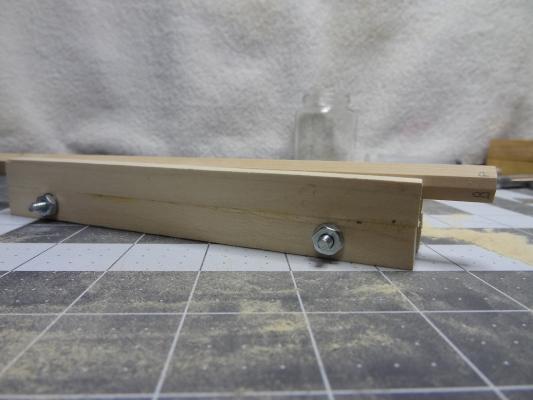
Hi Everyone - I'm working on the Niagara masts and have a few questions. This is really the first time I've looked at the mast plans closely. 1. Plans show quite a few chocks (masts & spars) most are less than 1/16" tall. I'm debating whether to use wood (easy but would damage easy) or brass cut from strip (would take longer but more durable) 2. Plans show sheaves in the masts - even one in the skinny end of the top gallant. At 1:64 scale trying to do something like that ain't gonna be easy. Suggestions? 3. I've got the main top assembled, cheeks on the main mast and was going to glue down the top. The main cheeks provide an 11* angle. The main is also tapered. How in the heck do you get the top horizontally squared with the mast? I was just going to "eyeball it" but I'm afraid even a slight variance will come back to bite me when I start the rigging. 4. The plans keep using "P/S" i.e. chock P/S, cleat P/S . What is P/S? I also made a jig that helped me with cutting octagonal sides on a tapered stick. There are plenty of pix showing a 90* notch taken out of a long piece of wood. You drop your square (maybe round too) stick in and file the side facing up. My problem with that is I would need quite a few different sized notches for the various sized masts and spars and a tapered stick presents some problems. Below are some pix of my solution. Maybe everyone does this but I SWEAR I didn't purposely steal it. It has helped a lot as I have all my masts shaped using just the 2 jigs - one small & one large. All you do is tighten or loosen the nuts on the ends so one end is a little wider than the other. You put the fat end of your tapered stick in the wide end of the jig. With a little adjustment, the side of the stick facing up will be parallel with the top of the jig. Then you can file or sand from one end to the other. The springs in between the wood pieces of the jig keep them from moving once they are adjusted. Not scientific or calibrated. You still must adjust by eye, but I do a lot of that anyway. You can see in a few of the pix, I get nice sharp edges.
- 19 replies
-
- 11
-
-
Tool for Shaping Brass Strip
mikiek replied to mikiek's topic in Metal Work, Soldering and Metal Fittings
Hey John - you mentioned scoring the pieces at the bend. What do you use for that? Mark - I'm working on some metal work for the mast. Took your advice and heated up the strips first. WOW! What a difference. The strip is amazingly pliable now. -
Taking a break from decking, I have begun cutting and shaping the masts for Niagara. I'm using square boxwood strips, trimming them down and shaping them per the plans. As a general rule, should I assemble the masts with fittings and metal work on the side and then install the completed mast to the boat? Also, just wondering about the order of assembly. I have 4 of the mast parts shaped and ready. It's been real tempting to do the metal work, fittings, etc. and installing it all. I would really appreciate hearing from you guys on things like order of assembly, things to do , things NOT to do. Anything that might help me get it right the first time.
- 1 reply
-
- 2
-
-
Stockholm tar - I'm still at the construction phase so dropping them on the spanker mast is easy. However, I do like your idea of metal loops instead of the laser cut wood ones in the kit. I have a mini torch and silver solder coming this week. I believe I will give that a go.
-
Great explanations from both of you. Thanks! I got to thinking about those loops and came to the same conclusion. As a kid I used to sail a Sunfish, and the boom and spar were attached to the mast via loops. As the MS kit has no sails and I don't intend on adding them, the loops will just lay at the base of the spanker mast.
-
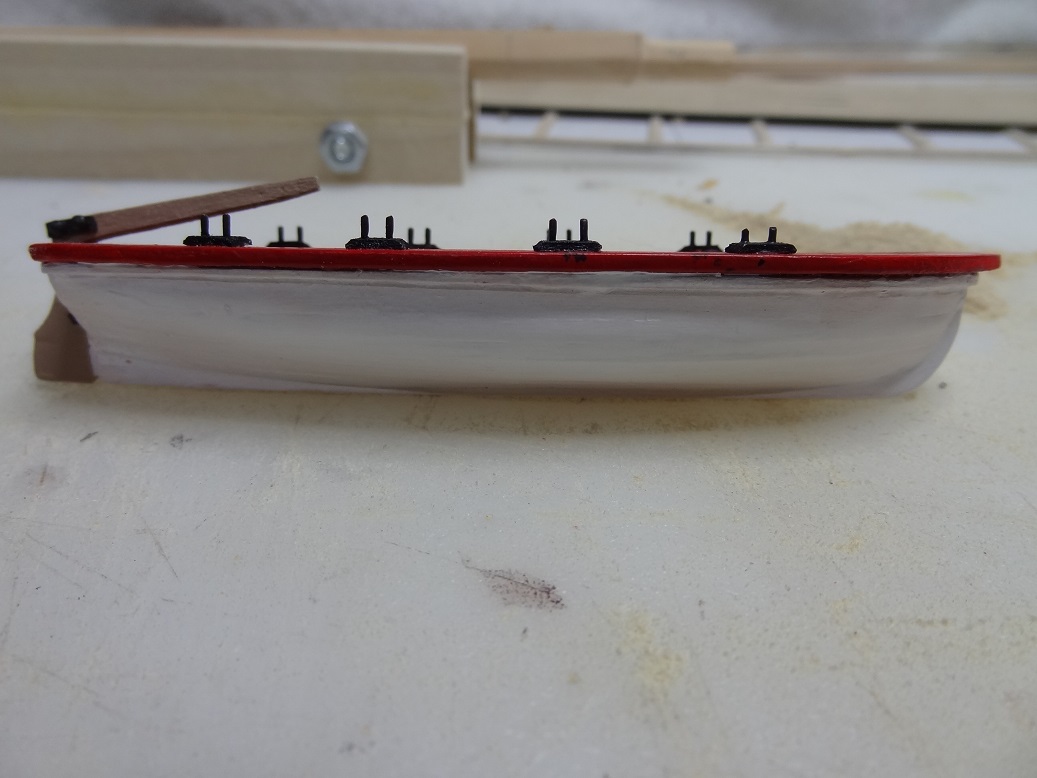
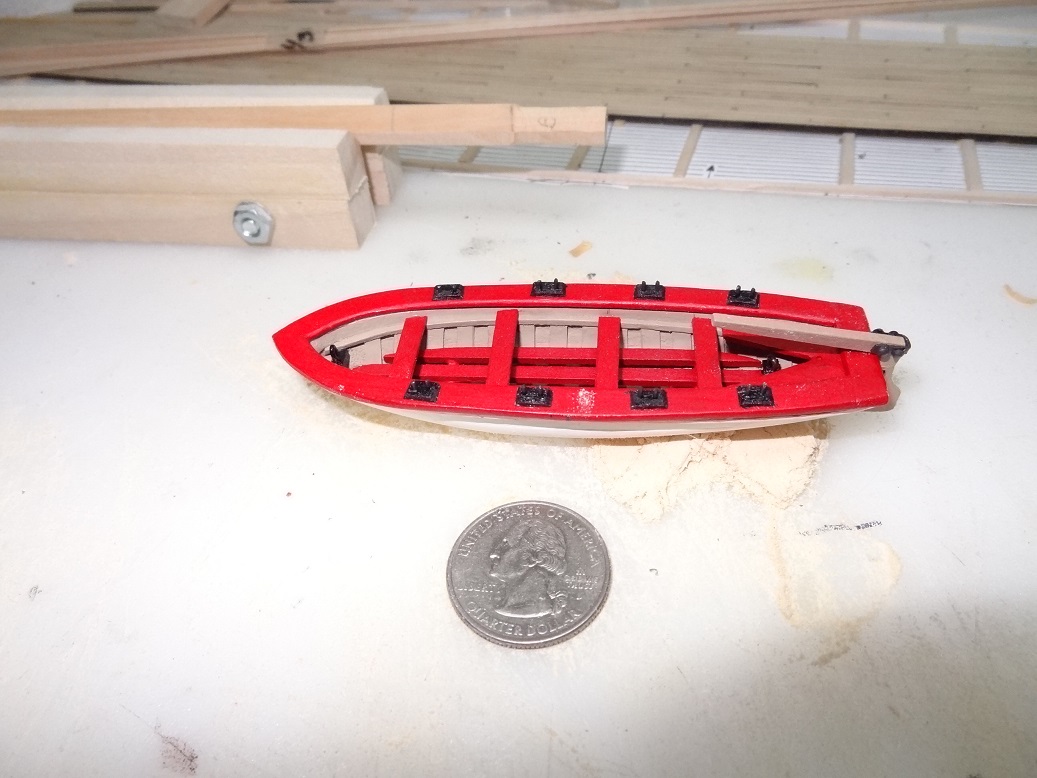
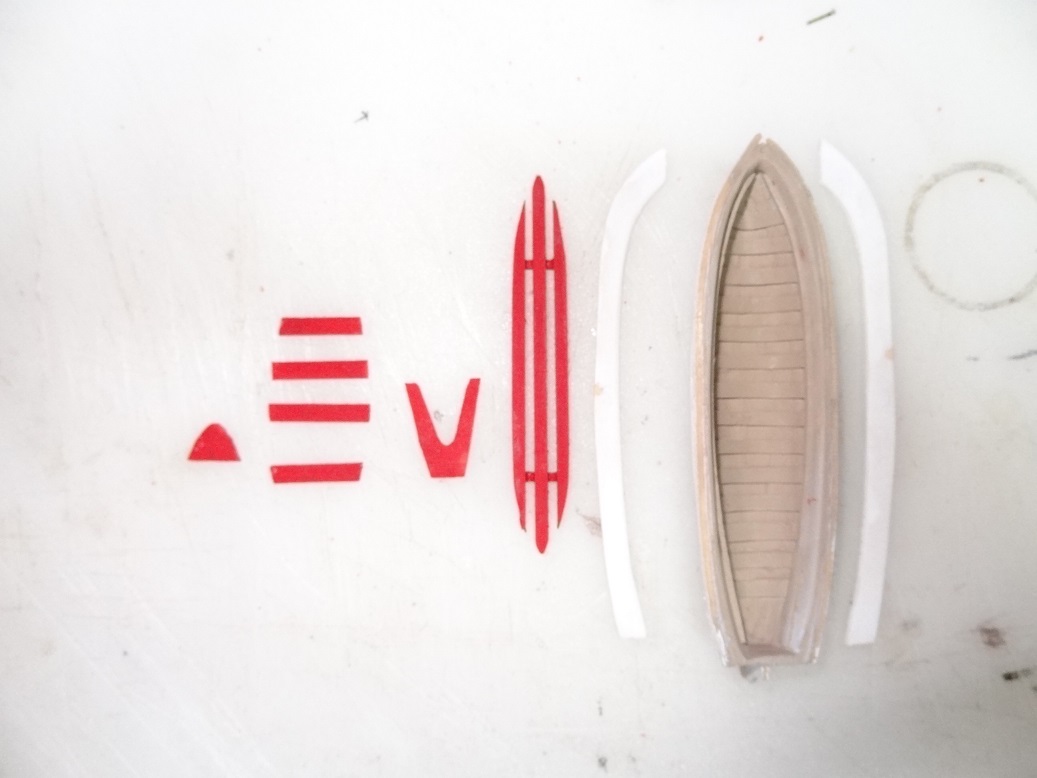
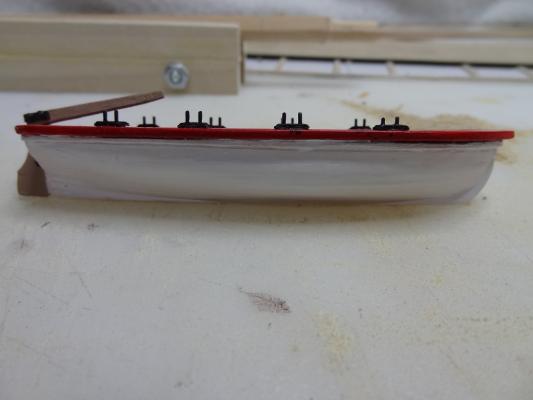
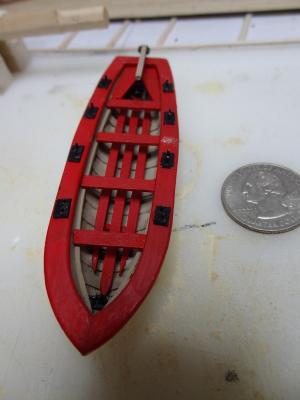
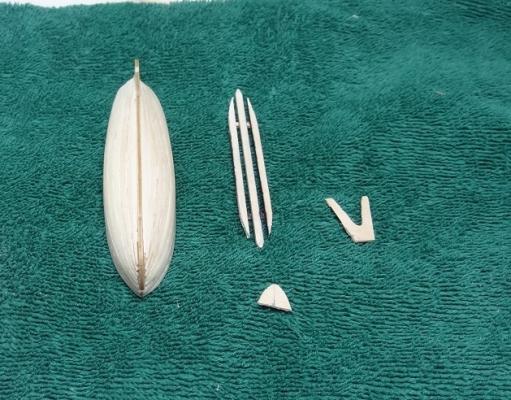
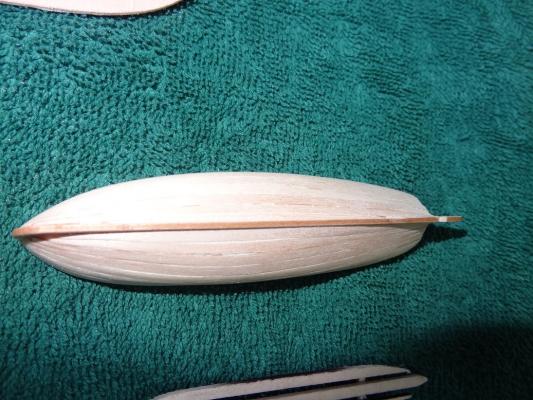
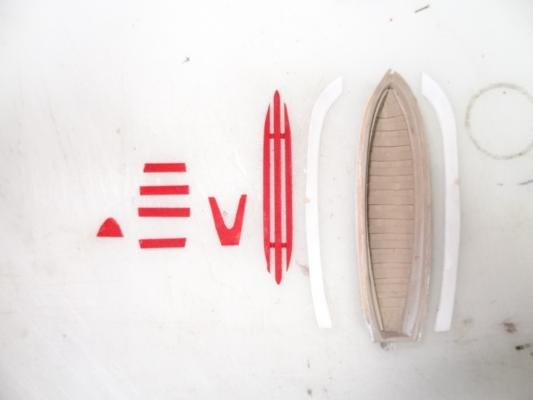
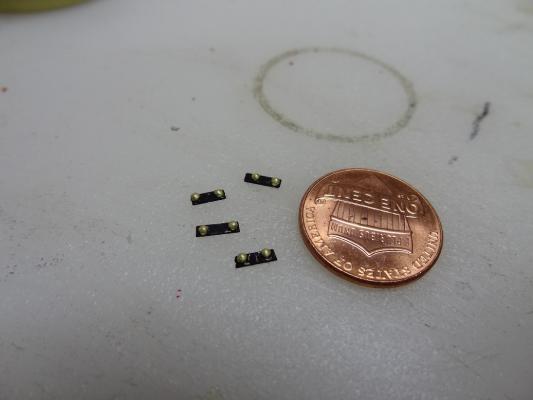
Hello folks - I hope everyone made it thru the holidays OK. Been hard at work on my kit - and I FINALLY have something completed. I have so many tasks going on right now, decking, building cannons, building masts (from squares), planking the other bulwark. Also several new tools were recently delivered - lathe, rivet head punch kit, drill press - so I have been trying to learn those as well. It's probably too much to be doing at one time, but it's the way I am. But I am excited to say I have actually completed a piece of work - the yawl. I have a few pix below. A few highlights: I did the inner frame pieces with styrene strips. I could never get wood strips to set flush to the bottom. I tried soaking them, heating them, using 2 pieces instead of one. Nothing worked for me. The styrene worked great and since I elected to paint the inside I think they look pretty good. I added a few metal parts that were not called for in the plans. I was dying to do something with the rivet heads so I added some metalwork to the transom & tiller. I like the overall appearance but I'm thinking they may be slightly out of scale - a bit too large. I do think the rivet heads have a lot of potential for other metal pieces. Let me know what you think. I have been struggling with getting small metal (brass) pieces colored. I love the blackening effect. I learned early on that the stuff rubs off so I began adding a coat of matte varnish on top. Still for small pieces it's tough. Any glue of the surface prevents blacking - you can see in my previous post. I finally broke down and painted them. Yesterday, some Tamiya acrylic paints were delivered, one called Dark Iron gives the brass a nice color. I have some updates on the masts I have made but no pix yet so I will hold off for now. Let me know what you think on the yawl - positive or negative.


- 843 replies
-
- 9
-
-
- niagara
- model shipways
- (and 2 more)
-
The MS Niagara plans show all the masts "looking to port". This killed me right off. I translate that to mean looking towards the port side from starboard. The problem was all the deck angles were backwards. So what that really means is looking towards the starboard side from port? Sort of a rhetorical question. The plans are showing me the port side of the masts. My real question also pertains to this side view - whatever side it is. Since there is only one view - and it is a side view - when I see cleats and other items mounted, is it a given that the same items are also on the other side? I see no notes to that effect in the plans. Just came up with another. The plans for the spanker mast show "12 laser cut hoops mounted". Mounted to what? I can slide them on the spanker but then what? Are they loose? Glued? More to come I'm sure. Seems like this portion of the plans are really lacking - at least for a newbie.
-
Tool for Shaping Brass Strip
mikiek replied to mikiek's topic in Metal Work, Soldering and Metal Fittings
Sounds like just the ticket John. Beautiful metalwork! Thanks for sharing. The other thing that has caught my eye is something they call a forming bezel. They come in various shapes - round, square, triangle. I've found both the pliers and the bezels on Amazon. -
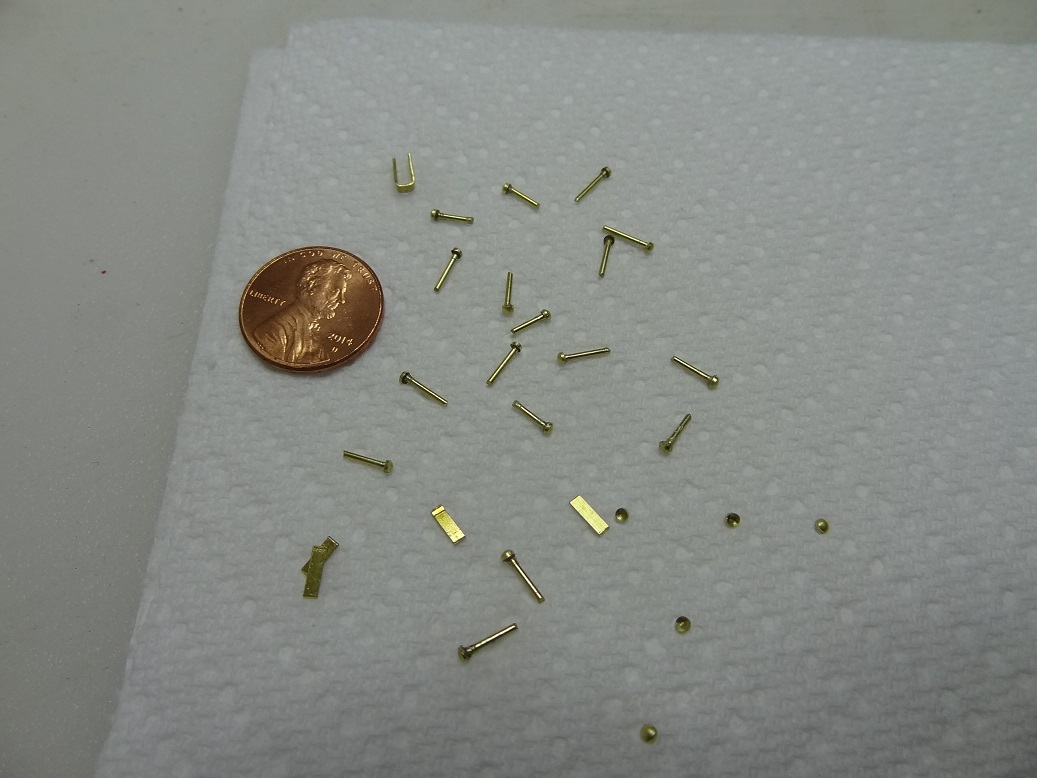
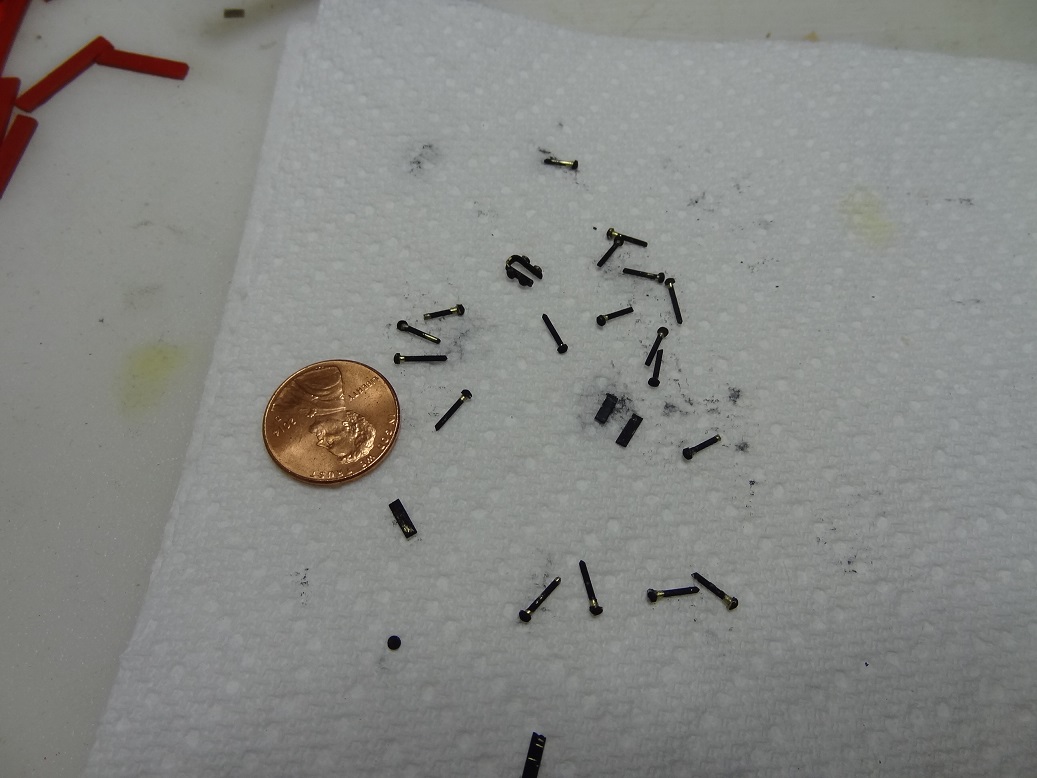
Gee - time sure flies by. I have been at it (the build) every day but slacking on logging my progress. Well, I am still decking, but that gets old and error prone after putting down too many strakes in one sitting. I will say I believe I have enough side tasks (maybe too many) to keep things rolling along. The ships boat - the yawl - is about ready for assembly. I decided to go with Carvel planking rather than lapstrakes. This was my first stab at any sort of planking so I decided not to get too complicated. What to use for the inner frames (or even to add frames) was a deliberation. I could not get wood strips to bend well so I ended up making some styrene strips that laid down pretty well. Since I had decided to paint the inside rather than stain this worked out pretty well. I recently picked up a punch & die set for making rivet heads. Have been doing some playing around with that. Actually I needed some pins to attach the carronades to the planksheer so I thought this might be an opportunity to get creative. I glued some of the rivet heads to some thin brass rods - no easy task. They came out looking pretty good. By chance yesterday I came across a post with a link to all the fittings on AgesOfSail.com . More pins there than you can shake a stick at. I feel a little foolish now. But it was fun anyway. As mentioned gluing the rivets to a rod was pretty tough. Setting them down perpendicular took some work. I used medium CA for glue. That ended up fouling up the blackening - it won't blacken where glue is on the material. Guess I'll end up painting those. You can see in the pix. That also got me wondering - how crazy is all this? I spent probably 2 hours to make 18 pins that NO ONE will see. Hmmm. Also in the works is the fore top mast. It's pretty well shaped. I am debating whether to sand it to round by hand or try my lathe. I just received a 4 jaw chuck so I am anxious to use it for something. I'll try to size that up tonite. If my hand work has made the mast too crooked I'll have to wait for the next mast. Below are a few pix.....


- 843 replies
-
- 8
-
-
- niagara
- model shipways
- (and 2 more)
-
This is just my sheer ignorance in the metal work world. I was bending some 1/16" brass strip into a U shape, or more accurately a 3 sided square. In this application each side was about 1/8". I was using a needlenose plier and a small hammer to try to get decent 90 degree bends. The result was fair but could have been better. So what I am wondering is if there are some type of shaping forms that I can use to hammer brass strips on. Some square rods, circular, and maybe even triangular - probably a set with various sizes. I have plenty of brass rods & tubes but I doubt beating brass on brass is going to work. I'm sure there is something out there but I don't know what to look for. Let me know how you guys do it.
-
That's perfect! It will give me a chance to use the new rivet punch set I got a few weeks ago.
-
That's a good read Spyglass. A little off topic for this forum but while we're talking about it - the kit does not supply any type of pin for fastening the carronade to the planksheer. I don't mind making something but it would be good to know what it looks like. Something fancy? Just a piece of wire? Happy Holidays everyone!
-
Cutting Boxwood
mikiek replied to mikiek's topic in Building, Framing, Planking and plating a ships hull and deck
That may have been the trick. I pieced together a few scraps until the height matched the saw platform and glued them together. I'm still using the 24T blade but the cut was a lot cleaner. Thinking about it, that was probably a bigger problem than the blade. If the sticks are flexing (not still) that would explain a lot. The 230T blade arrives Weds. Should get even better. Thanks everyone! -
Cutting Boxwood
mikiek replied to mikiek's topic in Building, Framing, Planking and plating a ships hull and deck
Michael - both good suggestions. I have a Proxxon chop/miter saw that came with a 24T blade. When I was cutting 6 sticks at a time it did pretty well. Now I am having to shape each stick so I am cutting just one at a time. I have had a few where the end got buggered up a bit. I have ordered the 230T blade but did not think about the support. The sticks are in a clamp and the blade comes down about 1/2" from that. But the area under the blade is concave so there is no support for about 2" until the sticks reach the edge of the recession. Something under those sticks would be helpful. Just not sure what would fit well. -
Build Deck Separately
mikiek replied to mikiek's topic in Building, Framing, Planking and plating a ships hull and deck
I have started work on the Niagara decking with this approach. So far it is going very well. As a beginner I have found it easy to work with. It also gives great access to the underside of the deck. I've posted more details in my build log. It is a real confidence builder for me allowing freedom to move around and experience the decking process. I am using 5-7 short planks per strake instead of 1 long one. And if I happen to hose up the whole thing I can just toss it and start again. In hindsight now, yes, I probably could have decked the boat. But I'm glad I went this route and will probably continue to use this method if the boat structure allows.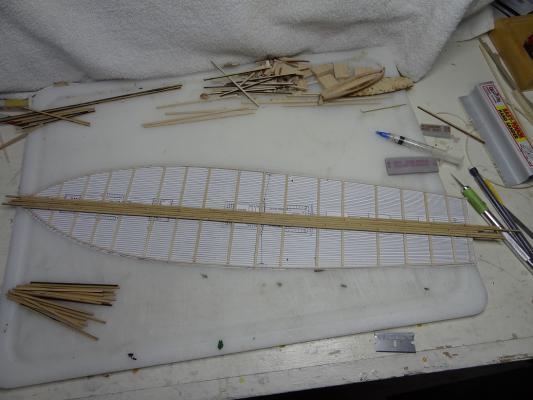
-
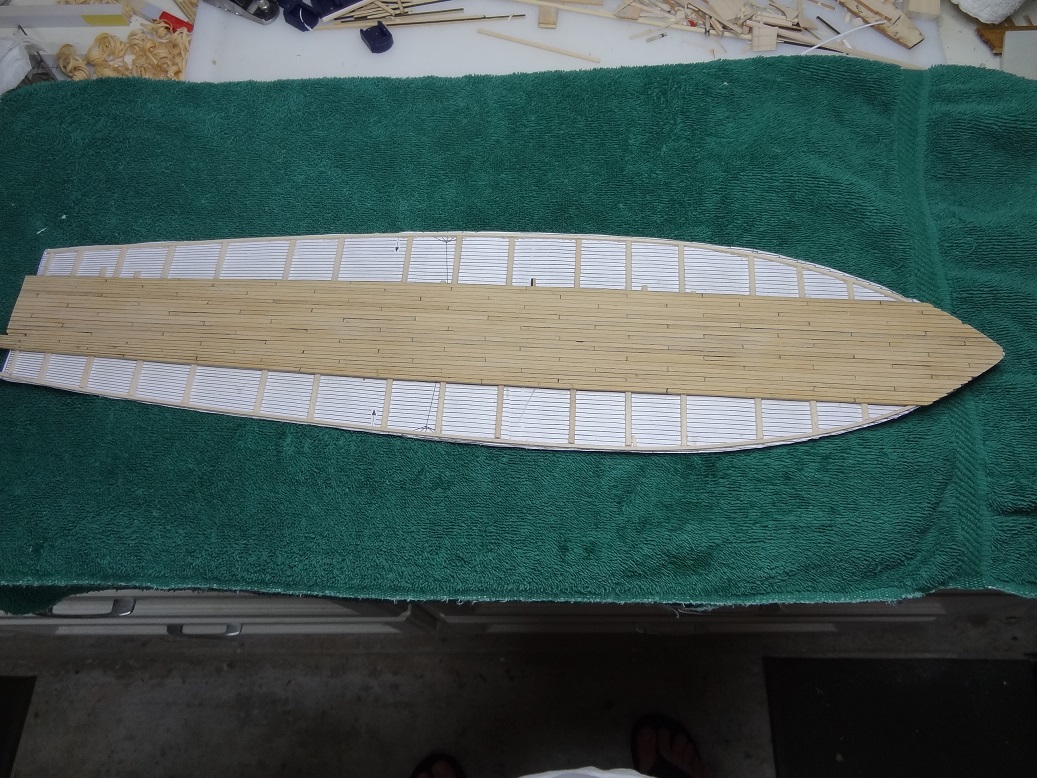
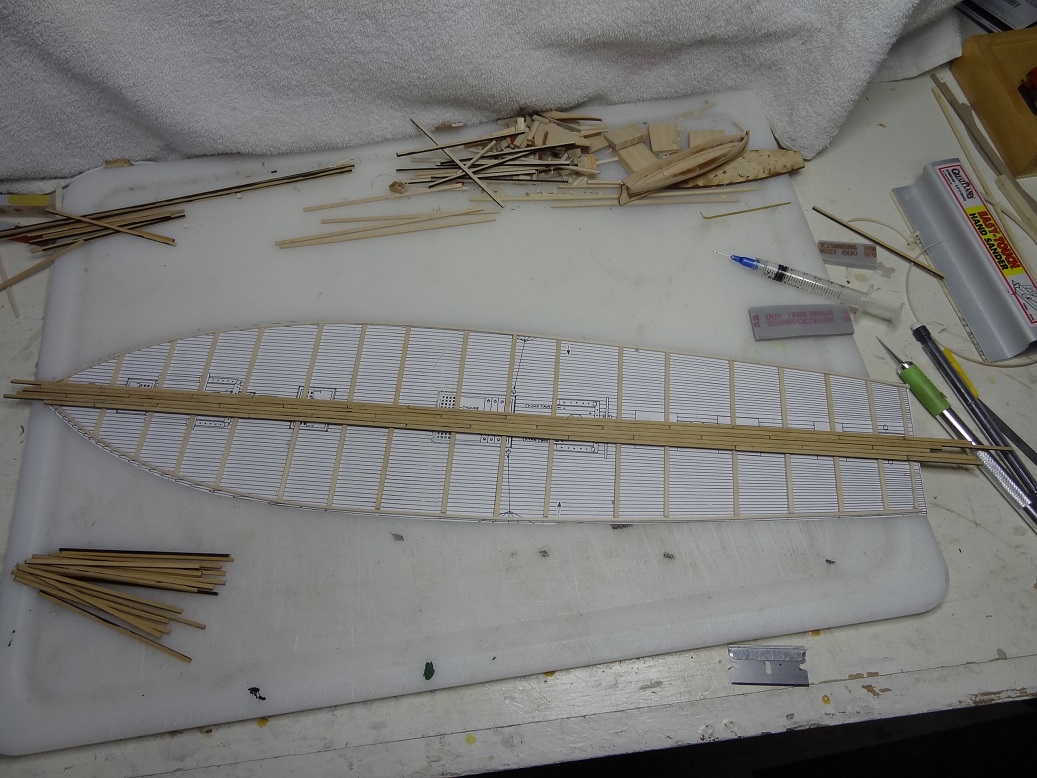
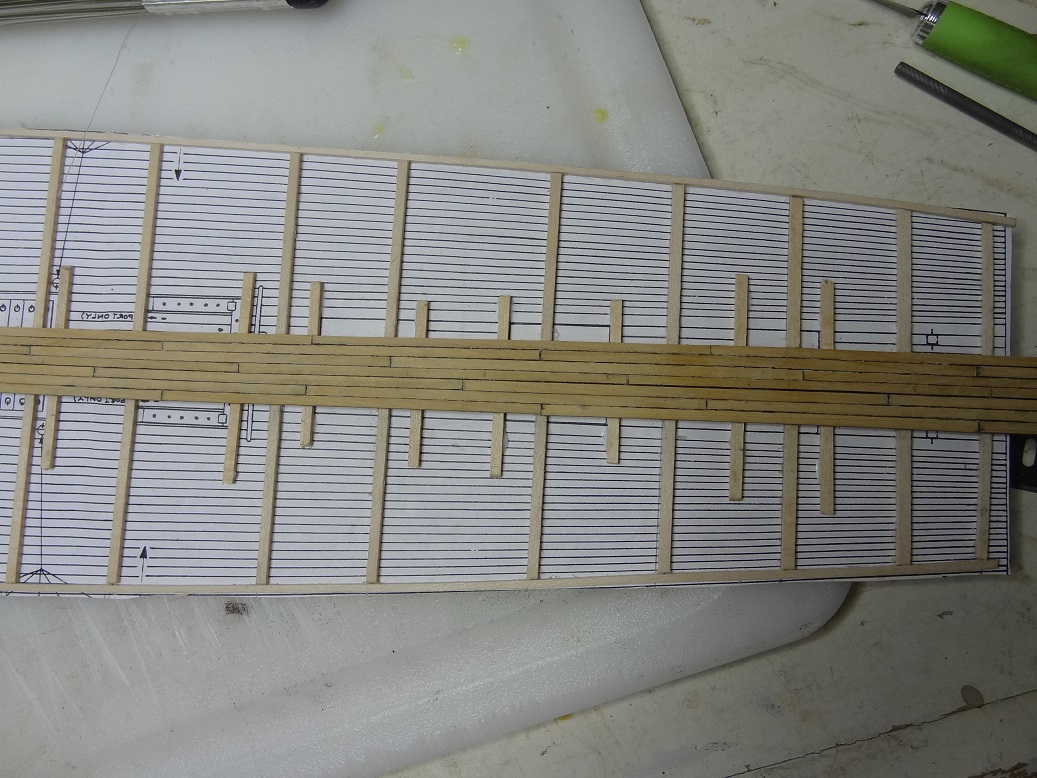
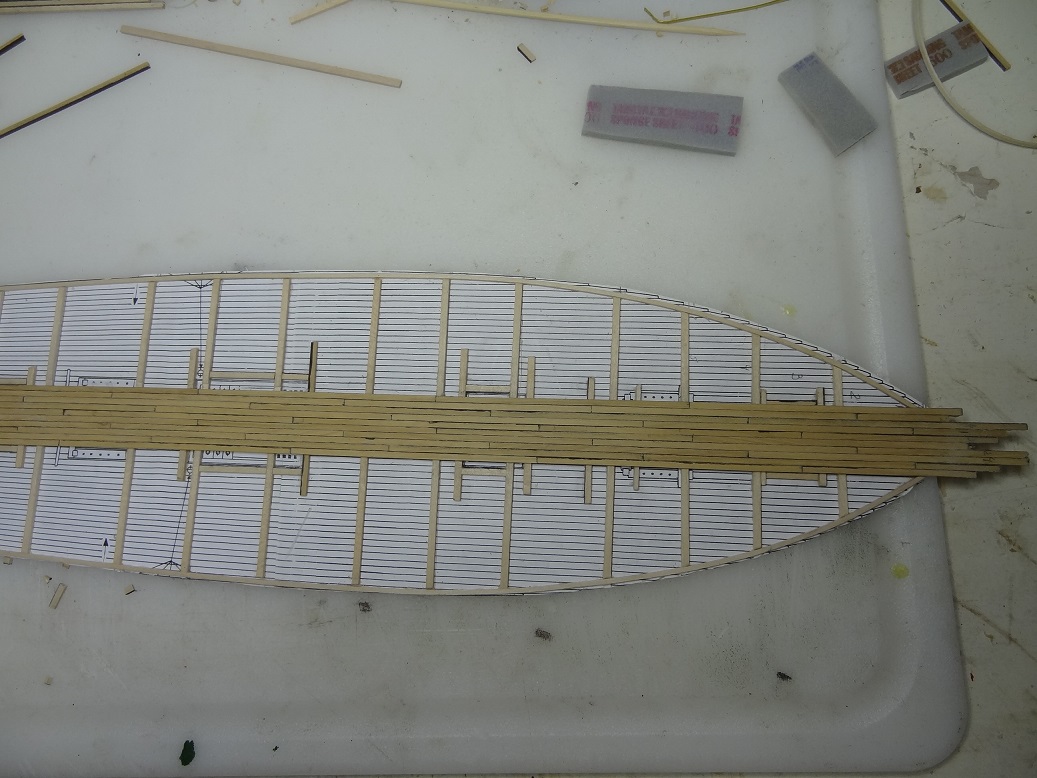
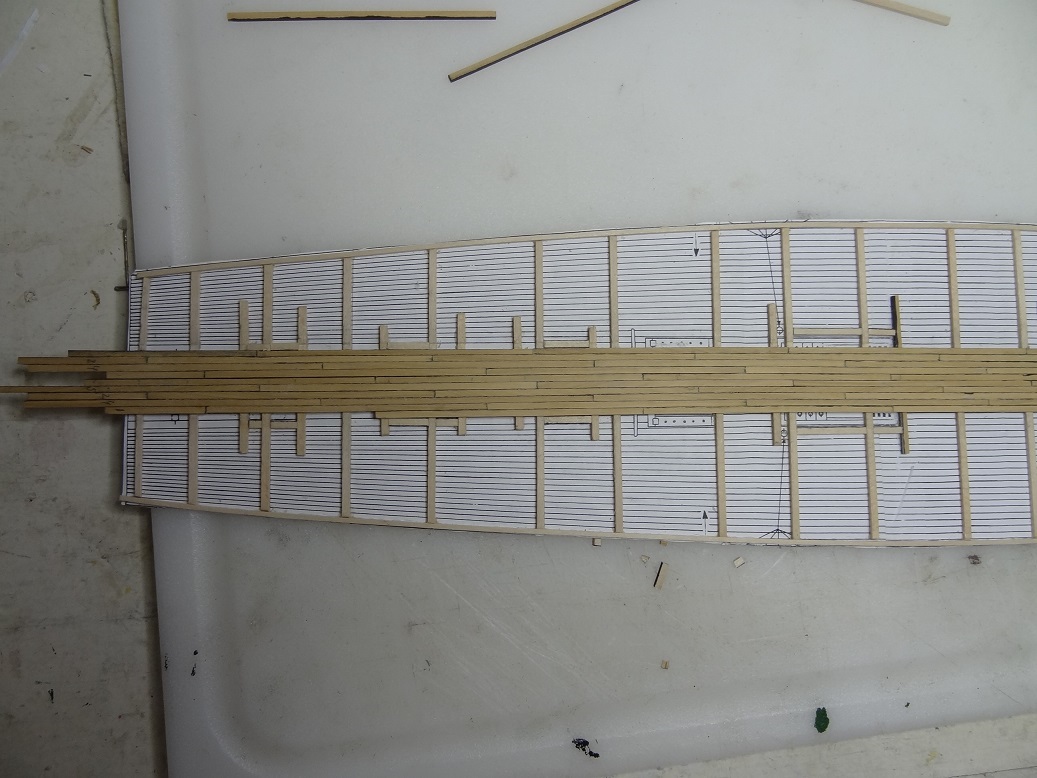
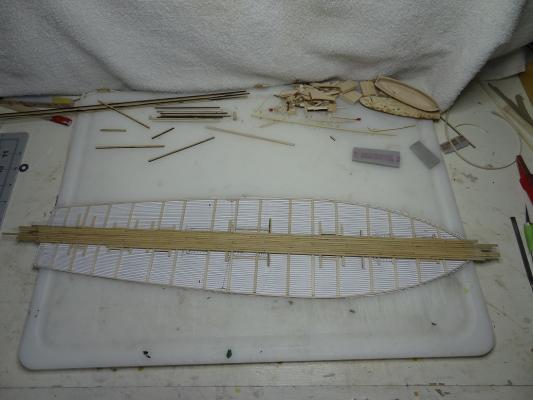
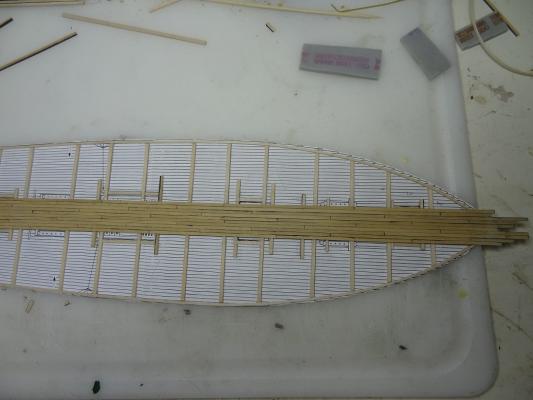
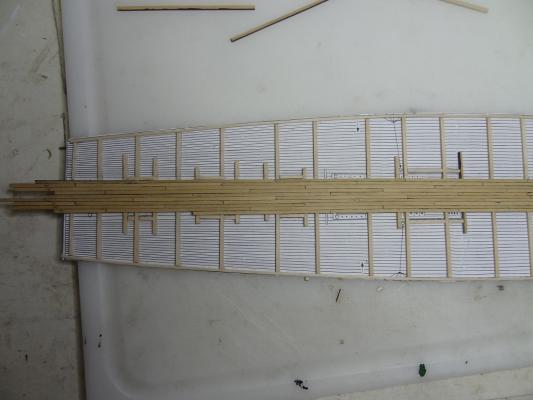
A few days ago I began putting together the decking. I may have mentioned before that I am building the deck as a separate unit and drop it in on top of the bulkheads when complete. From another post, it was mentioned to be sure there is clearance to do this - tumblehome I believe it is called. Niagara is very generous in this regard, there is plenty of room for the deck to be laid in. I really like this method, especially being my first build. As you will see from the pix, I made a full size copy of the deck plan. The problem is the plan only shows 1/2 of the planking. To get around this I had the copier also make a mirror copy which essentially reverses the image, so I get copies of the starboard half and the port half. After that I taped them together right at the centerline, and then trimmed around the edge of the image. When completed, I had a complete copy of the planked deck. From there I marked where the bulkheads were and then glued some strips across the image about 1/16" behind the bulkhead lines. I glued some more strips about 1/8" in from the edge of the deck. So the strips give me a frame to lay the planking on. My deck image also shows all the deck structures. I have not yet decided if I am going to cut out areas on the deck to insert the structures or just glue the structures on top. In the event I decide to cut out, I laid more strips around the edges of the structures so the planking would have some support. Then I got around to some planking. To be honest, and this is just a personal preference, I don't care for the models I have seen where the builder uses a single long strip for a deck strake and then scribes the butt joints. Please don't take that personal if that's how you do your decks, like I said it's just a preference on my part. At any rate, I am cutting 3 3/4" strips (20 footers) and laying those individually. I am running a MarksALot down 1 long edge and 1 short edge of the plank for the caulking look. Using the guide on plank spacing in the MSW library, I am laying planks in a 1-3-5-2-4 pattern. So far I am really pleased with the outcome. The planks are not laid down perfectly and lengths may vary by 1/16" - 1/32", but frankly I think that adds to the realism. None of that stuff would have been CNC cut back then There has only been 1 foul up so far. I am using some boxwood strips, replacing the basswood in the kit. I kind of assumed that these would be perfectly planed and cut with near zero variance, so I just went on happily laying planks and not really checking closely how things were coming out. By about the 5th or 6th strake I realized that the planks were beginning to not lay perfectly. I few were slightly crooked. Checking around I finally discovered some of the strips were a tad wider than others. Of course this would make planks not lay completely straight as I put down a new strake. So lesson learned, even when using premium timber I still need to check every plank before it is laid. I suppose this would not have been a problem if I was laying a single long strip instead of the 20 footers. To save time I had taken 15 strips and cut them all to length and then threw them in a pile so it was quite likely I was not laying all the planks from the same strip in one strake. I do have a question regarding gluing the deck planks. On a suggestion in another post, I am using TiteBond Trim & Molding glue. I really like the stuff - it sets very quickly so I don't have to leave planks clamped for very long. I am putting a spot on the cross beams I mentioned earlier and also along one long edge. This edge will be pushed against the previous strake - any glue that squishes out I wipe off. Impatient son of a gun that I am, I wanted to see my deck work cleaned up and sanded down so every 3 or 4 strakes I do just that. What I am noticing, is I am seeing spots of dried glue - not in top but in between planks as I sand off the top. In my eye it is noticeable, so I am wondering if there is any way to clean that up?? Well, I started on the centerline and am working outwards. The first 10 strakes were pretty easy, full width no trimming or shaping. I am now about 1/3 of the way out and am having to narrow the ends quite a bit so progress has slowed. Every strake is it's own adventure. Here's how it is shaping up:


- 843 replies
-
- 6
-
-
- niagara
- model shipways
- (and 2 more)