mikiek
-
Posts
2,276 -
Joined
-
Last visited
Content Type
Profiles
Forums
Gallery
Events
Everything posted by mikiek
-
 Thank goodness for this log! I got to sizing up the the port framing and didn't remember much of what I had done on the starboard. Memory just ain't what it used to be. I'll have to get the routine down again. It will be interesting to see how I do it this time - with a little more modeling under my belt. Was checking the leftover paint from the starboard bulwark. I had mixed a green for the inner bulwark and a yellow for the outer. What I didn't use I put in some of those 1oz paint jars. Looking at them tonight, both of the tops somehow loosened up. The paint is ruined. I'm willing to concede that I could have left one of them loose but not both! Not sure what happened. I'm going to make a post in the paint forum about long term storage but I'd like to hear from anyone here about that if you have a good method.
- 843 replies
-
- 2
-

-
- niagara
- model shipways
- (and 2 more)
-
Well, I've been working on the masts for a while. Got many questions answered in that forum thanks to all the good folks here. One big lesson learned - CHECK THE PLANS - then double check. I got burned several times by pieces that need to go on the stick before too much shaping happens - because later is too late! As much as I would like to see a fully assembled mast, I have been reluctant to do that yet. Same reason as mentioned above. I have not included any pix - I imagine most everyone has seen masts before. Taking a break there, I am moving back to the hull. I finished gouging out notches for the frame under the deck. The keel and bulkheads are a mess now but the deck does drop in nicely. I think I made the situation worse by adding framing for all the structures. All that required notches just like the frame cross pieces. I've begun to work the port side gun/oar ports and bulwark. First thing up was to get a square strip on top of the timberheads. They were fairly unlevel so I needed to add several shims on top. I was also reacquainted with the fragileness of the timberheads. I managed to break 2 before I got the top strip glued down. Hopefully, that will protect them a little. Adding the gunwale strakes was an eye opener. I have been dealing with boxwood (replacement) strips for the decking. Now it's back to basswood, at least for a while. I couldn't figure out why the strips were feathering so much when I sanded them. After using the boxwood for a while, the finished basswood strip is just downright ugly. When I get to the real hull planking I will go back to boxwood, but since the starboard bulwark is basswood I wanted to be consistent. Overall, I think the move I took to do the masts was a good break. Now it's actually nice to have the hull back in my hands again!
- 843 replies
-
- 3
-
-
- niagara
- model shipways
- (and 2 more)
-
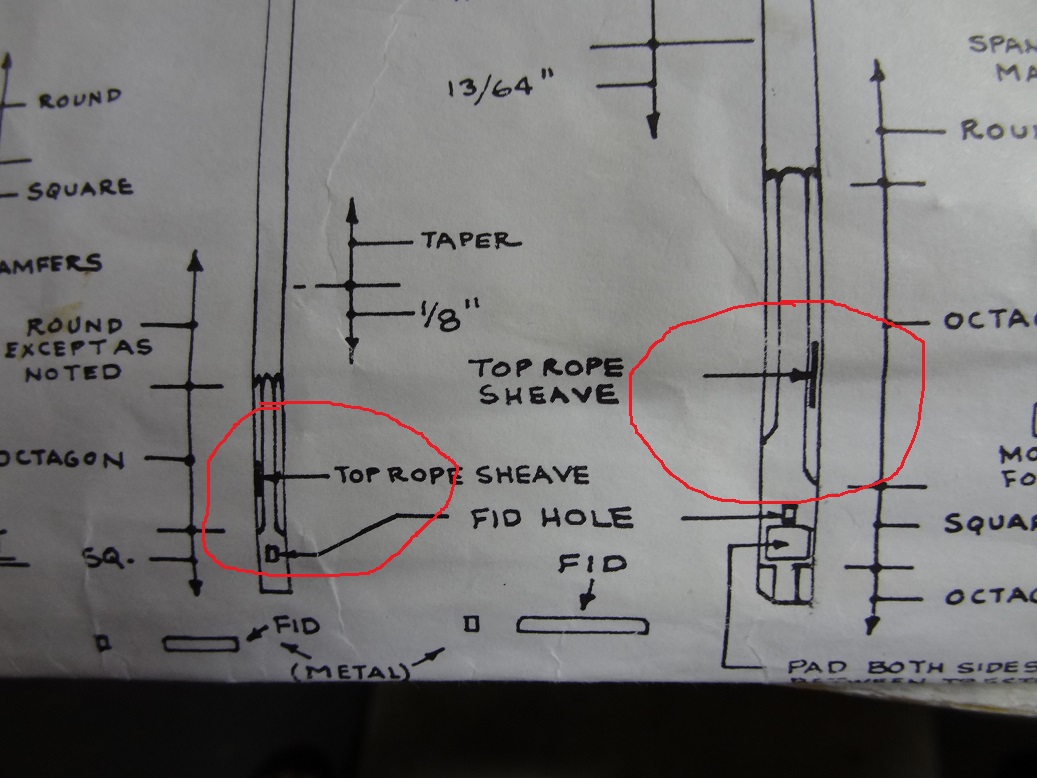
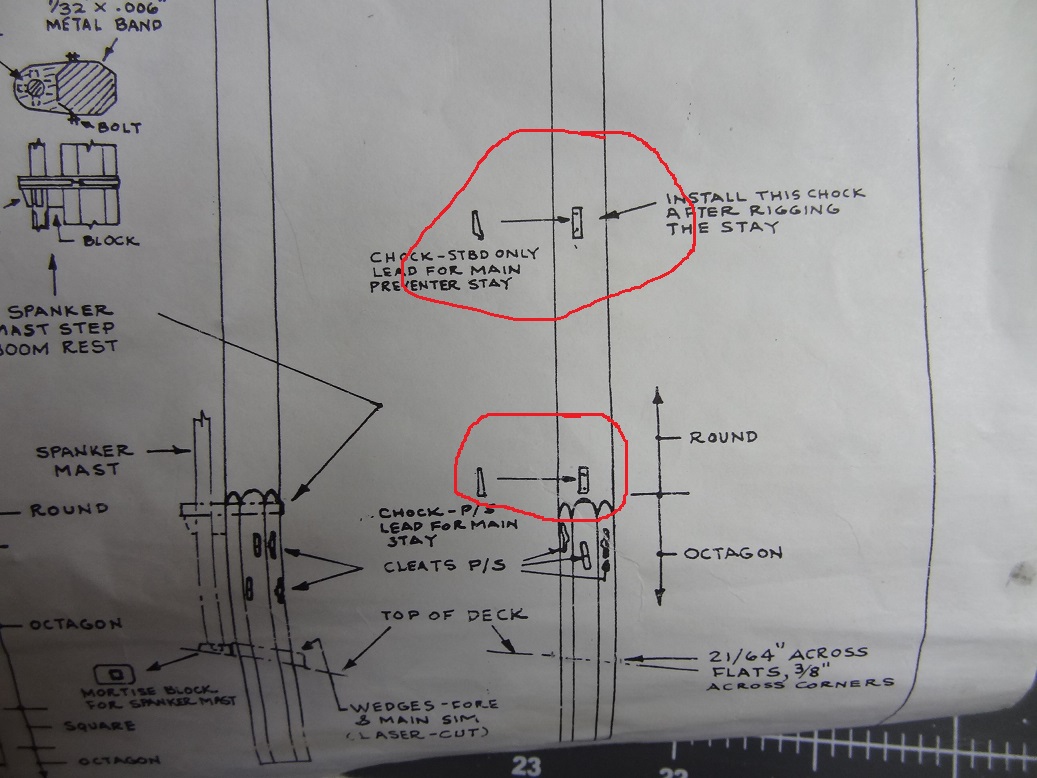
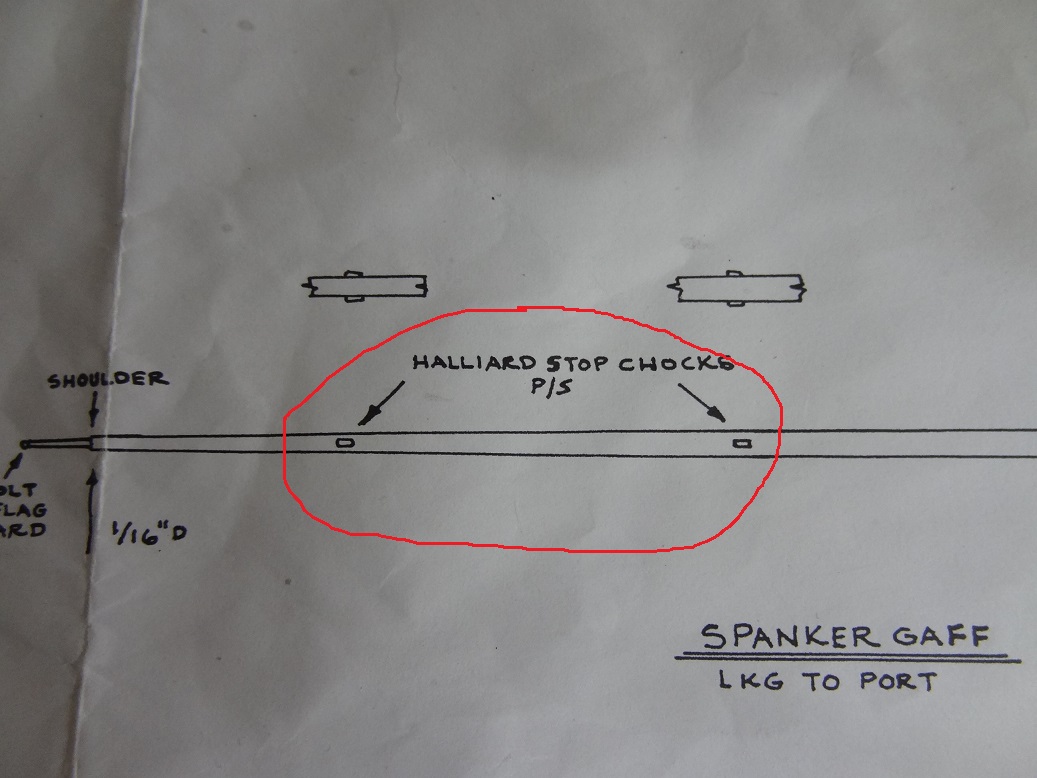
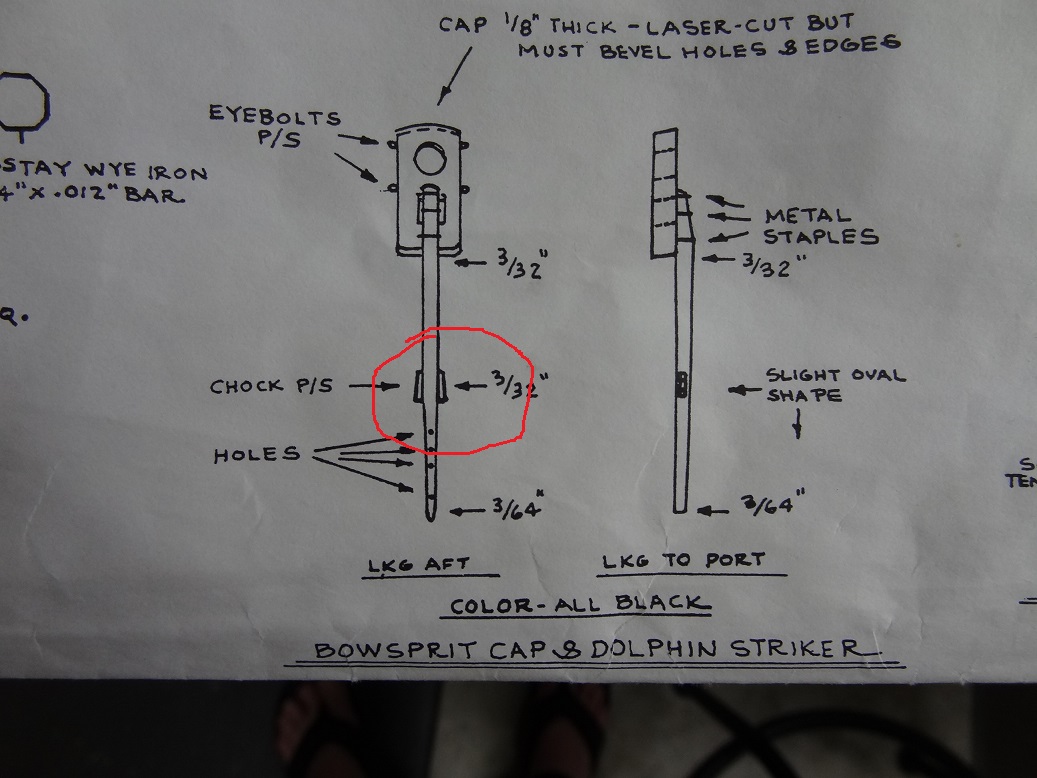
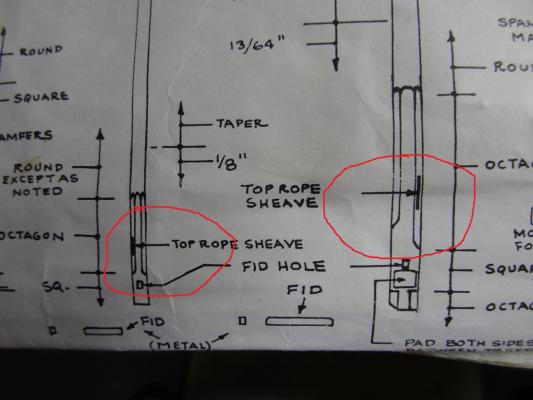
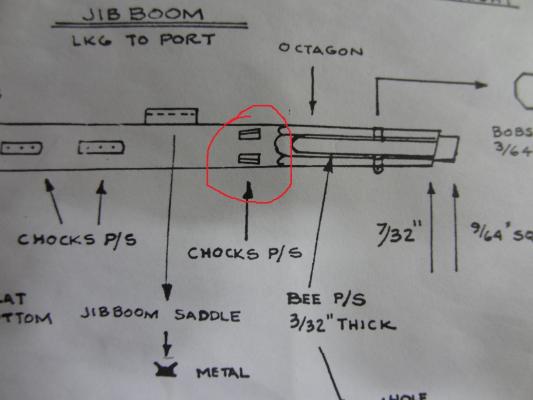
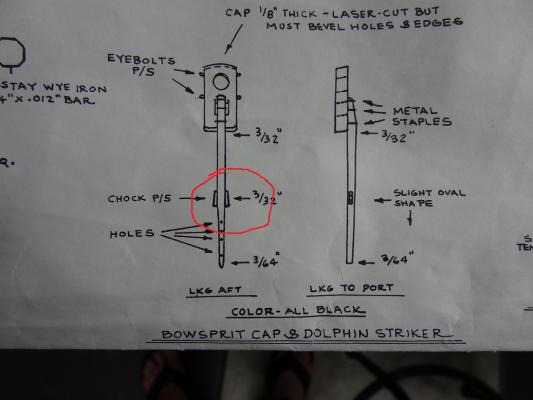
Goo information from all three of you. I did find something in Darcy Lever's book that looked similar and in about the same place. He called it a cleat. Yes they are on the masts, yards, bowsprit and probably other places I haven't gotten to yet. So just a wedge shaped piece of stick is a good enough representation? Just asking because some look a little different than others on the plans (see pix below) I also have a follow up question on the sheaves in the masts. The first pic below shows a sheave in the top and top gallant masts near the foot. Does the notch for these go straight through from the octagonal side shown to the opposing octagonal side. My first reaction to the plans was that I am looking at the notch head on and that it goes straight back, not through the mast. I would be pretty nervous trying to drill through the mast at that angle - even with a drill press. Thanks for all the feedback! This has been a helpful thread for me.
-
Bolt Heads on Brass Strips
mikiek replied to mikiek's topic in Metal Work, Soldering and Metal Fittings
I've all the mentioned bookmarked. My order from SpecialShapes arrived yesterday. I now have more brass strips than I will ever know what to do with. -
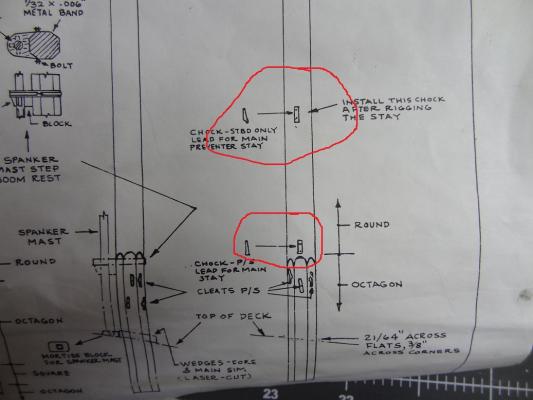
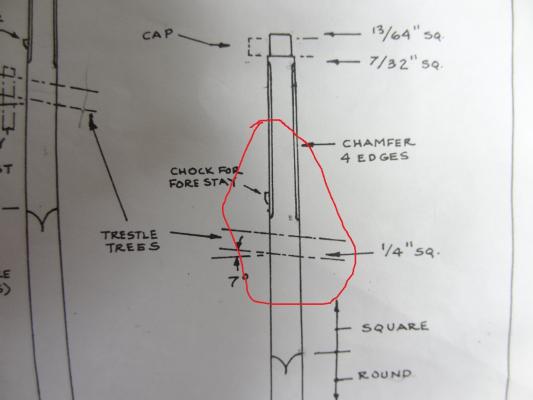
Henry - if you check Ken's Niagara build log Page 8, post #160, the 3rd picture from the top, right about the middle of the plan page you can see a chock called for on the mast. This is similar to chocks called for on other components. They all look like little bumps on whatever surface they are on. I suppose I should PM Ken and see what he did.
-
Bolt Heads on Brass Strips
mikiek replied to mikiek's topic in Metal Work, Soldering and Metal Fittings
The choices are getting fewer..... -
Henry - I believe it was 1812 - 1813
-
I've put the other books aside for a while and will focus on the Lever book. It's kind of a hard read. Some of the English needs to be "translated".
- 843 replies
-
- 2
-
-
- niagara
- model shipways
- (and 2 more)
-
I'll get pic of the plan sheet Henry. I just get a little nervous posting pics of copyrighted stuff. I guess just a small portion of a plan isn't going to hurt. The chocks I remember sailing small boats were 3-4 inch long strips mounted long ways on a surface. A grove was cut in the strip - wider than a rope at one end a tad narrower than the rope at the other. You could mash a taught rope into the grove and let go. The tension of the rope would jam it in the narrow end so the chock would hold the rope. That sounds sort of like what you are describing.
-
Can't Find Thin Brass Strips
mikiek replied to mikiek's topic in Metal Work, Soldering and Metal Fittings
Just an FYI - SpecialShapes does have a $25 minimum order, but I was able to order some other brass pieces that "I really needed" -
jbshan - "The Young Sea Officer's Sheet Anchor'" is fantastic!! When all the books arrived I should have opened that one first. I've never seen better illustrations! A must have for everyone. It does show mast caps just like what is supplied in the kit. The author describes it as a large block made of elm. Actually, I'm glad to see that. I was beginning to think the caps in the kit were just a cheap way out for the manufacturer. Also, I was having second thoughts about making the part described in Underhill's book. It was not just a connector for the two masts. It also had an extension in front to hold a yard - which is different than how the same yard is held in the kit plans. The piece also had some eyebolts for rigging - again, different than the kit. So while I still think it is a beautiful piece of metalwork, using it would open up a can of worms when it comes time for rigging.
- 843 replies
-
- 3
-
-
- niagara
- model shipways
- (and 2 more)
-
Bolt Heads on Brass Strips
mikiek replied to mikiek's topic in Metal Work, Soldering and Metal Fittings
Richard - I would love to use a blackener rather than paint. I am using the Blue Jacket product which works well (they also have a product for britannia) but it does come off. If I hold a blackened piece between thumb and finger they will pick up some of the black. I was under the impression that this was just a common issue with blackened parts. Maybe some products don't do this. That is the big reason I put a coat of lacquer on any blackened part. It helps seal up the black. I have not personally seen the decals, but I am in your camp on this. Whatever is used needs to have some dimension or relief. That is catches my eye when I look at a part with rivets. -
JC Frankie - the plans have cleats and chocks. A lot of times one of each is in the same area (masts, yards, etc) and it's not just 1 or 2. There are lots of them. As best I can see they are shown as some sort of parallelogram about 1/8" long and 1/16" tall. Too small to show any real detail of what it might look like. I've checked a few books but have not found anything helpful. Googling does pull up some info but the pix seem to show the modern day variety. It would be better to see what one looked like from that period. The kit supplies Britannia cleats that are supposed to be painted Buff, so I guess that's supposed to represent wood. Thanks for the details on the sheaves. That helps. Like you said, it just depends on how anal I want to get with them. I did go ahead and glue down the main top. You're right, with the mast rake the top would not be perpendicular to the mast when viewing from the side. However when viewing from the bow or stern the top would still look perpendicular. But you are right - I think parallel to the deck would be the right call.
-
Bob - Thanks for looking in. I agree with your concern and also that a deck can look fine with just sanding. I used a MarksAlot on plank edges for my "caulking" so filling for that purpose isn't required in my case. I also have to wonder whether filler does exactly what its name says and fills the grain in the deck planking. IMO If you're not careful with filler you can end up with your wood surface looking more like plastic after it's painted. Personally I kind of like all the imperfections.
- 843 replies
-
- 2
-
-
- niagara
- model shipways
- (and 2 more)
-
jbshan - You know I bought that book with about 7 others. They all arrived about a month ago and I have not even opened that one yet. I will do so this evening.
- 843 replies
-
- 3
-
-
- niagara
- model shipways
- (and 2 more)
-
Bolt Heads on Brass Strips
mikiek replied to mikiek's topic in Metal Work, Soldering and Metal Fittings
Richard - I wish I had a picture but the things are so darn small I can't get a good image. They don't come this big, but for the sake of this discussion, let's say a rivet was 1/4" tall when viewed directly from the side. What you would see is the side going up maybe 1/16" and then the dome starts. The dome is colored nicely on most pieces but that 1/16" (which goes all the way around) lost the color. Maybe most might not notice, but it does catch my eye. I also did some eyeballing of 2 pieces one with blackened/lacquered parts the other just painted with the Dark Iron paint. The painted one looks pretty good. That's coming from someone that really likes blackened pieces. I will keep trying. -
Bolt Heads on Brass Strips
mikiek replied to mikiek's topic in Metal Work, Soldering and Metal Fittings
Some not so great news regarding pre-coloring the rivet material and then punching them. It doesn't really help to pre-color. Looked at under magnification the actual shape of the punched rivet starts out a cylinder closely followed by the more visible half dome. When you punch the colored material the dome part goes thru the die first and it keeps the color. However the cylinder portion must be scraping the edge of the hole in the die because it was back to brass when the piece comes out the bottom of the die. I'm willing to try any other ideas, but it looks like I may be back to painting the assembled part. -
OK - first real foul up. I was hoping to make some progress on the masts. They're shaped, the tops are built and I'm about ready to paint. I wanted to temporarily "assemble" the main sticks - main, top, top gallant - so I dropped the the top mast into the slot on the main top. No problem there, until I started trying to figure out what else holds the top mast to the main? Of course, the cap which was still in the laser cut sheet. After punching the main caps out I started trying to figure out how it was going to fit onto the top mast. It won't. After reading another build log it seems like that is one of those parts that must be installed early on because you can't do it later. Frankly, I don't see how it would fit anyway. Given the mast taper, it looks like it would end up about 3" from the head and nowhere near the foot of the top mast. Bummer! One log mentioned splitting the cap longwise, fitting it around the mast and gluing back together. Another cool option is shown in Harold Underhill's POF Models V2. Page 23 shows a gorgeous piece of metalwork. Obviously a serious detour from the laser cut piece of wood. It would seriously test a complete newbie's patience and ability. Then there is the question if the piece is anywhere close to what was actually done during that period. And a follow up, Do I care? For me, parts like that add tremendous interest to a build. Of course that means I would need to follow suit for the other masts for the sake of consistency. Another month added to the project plan! Let me know what you guys think....
- 843 replies
-
- 3
-
-
- niagara
- model shipways
- (and 2 more)
-
I'd still like to hear your suggestions for the first 2 questions. Please chime in if you can!
-
Bolt Heads on Brass Strips
mikiek replied to mikiek's topic in Metal Work, Soldering and Metal Fittings
Richard - as much as I love the blackening effect I am considering giving it up for parts that will have the rivet heads. I don't know if it is the same for all blackening products, but when I blacken anything with the Blue Jacket products, the blackening easily rubs off. Even just sitting on a paper towel. When I pick up a part with tweezers ( a must for the rivet heads) metal to metal seems to always leave a scratch mark. That said I did have some success with painting a coat of matte lacquer on blackened parts immediately after they are removed from the blackening agent and cleaned. I will give the pre-blackening with lacquer one more try and report back to you. In one respect it is a good idea as I wouldn't have to worry about the glue messing up the darkening. FWIW - I have recently been painting brass with a Tamiya acrylic color called Dark Iron. It looks pretty good although I do miss the "crustiness" of the blackening process. Another Tamiya color called Black Rubber also looks good on brass. When I was doing some of the carronade barrels, I ended up blacking, then painting (all I had was Tamiya Regular Black at the time) then lacquering. That gave me the best of both worlds. A crusty surface with a more durable coloring. So what I will try is blackening the base parts and the brass strip I use to punch rivets. Painting the parts - probably with Dark Iron Lacquering the parts with a flat finish Punching the rivets Gluing the rivets to the base parts I am working on some metal pieces right now so I do have some parts to experiment with. I really like the look of the rivets on metalwork. So much so that I am adding more pieces than what the plan calls for. The latest addition I am working on is some metal straps with rivet heads to go around the fore and main top edges. The Niagara plan doesn't call for that, but I have seen some pix of other period brigs that do have it. I need to get the process worked out because IMO nice looking metal work adds a lot of interest to the model. I've had several comments regarding the Niagara yawl (pix in my build log) where people were amazed at the detail and I think most of that was in reference to the additional metal parts I used in that build. I can probably do this tonite so I will let everyone know the outcome. -
Thank you Frank and Elijah! Always nice to get a pat on the back from fellow compatriots. Well the deck is taking a little more work than planned. Besides the notches in the keel right behind each bulkhead I am also having to notch the outer portion of the bulkheads to make way for the deck outer frame. I should have seen that one. The Dremel is making short work of it though. I also did a bottom frame where each structure is located. That way when I cut holes to mount the structures the coamings have something to sit on. I think this was a good idea however some of those frames are running over the keel and/or bulkhead tops - more notches. I worked on color this afternoon.I wasn't crazy about my first attempt with the Golden Oak stain - too dark. On some faux decking I tried just matte lacquer and just Tamiya Clear paint. The clear was getting closer to what I want but not yet there. Then I found some Minwax Pre-Stain. I put down a coat of that and then later a light wipe of the Golden Oak. This is looking much better. Actually the pre-stain looked pretty good by itself. Still experimenting. I have forgone any pix as colors never look the same in a posted pic viewed on a computer. I"m also beginning to look at the plans for all the structures. I believe that's where I'm headed next.
- 843 replies
-
- 3
-
-
- niagara
- model shipways
- (and 2 more)
-
Bolt Heads on Brass Strips
mikiek replied to mikiek's topic in Metal Work, Soldering and Metal Fittings
I know this thread is a bit old now but I wanted to update on the hammer used with the punch set. The small metal one supplied with the set was beating up the end of the punches. I recently got a rawhide mallet for some metal working and it works great for the punches. It's longer and slightly heavier than the original so it take a few less whacks to punch thru brass. -
Question for you guys - I see that a lot of you spread a layer of filler on the deck and then sand it off. I'm questioning the need to do that. There are very few irregularities (high/low spots) and I believe sanding will take care of what there is. Is there some other reason for the filler?
- 843 replies
-
- 2
-
-
- niagara
- model shipways
- (and 2 more)
-
Thank you Don. I'm waiting too. However I think I am going to do as much as a can - structures, etc. - before I permanently install it.
- 843 replies
-
- 1
-
-
- niagara
- model shipways
- (and 2 more)
-
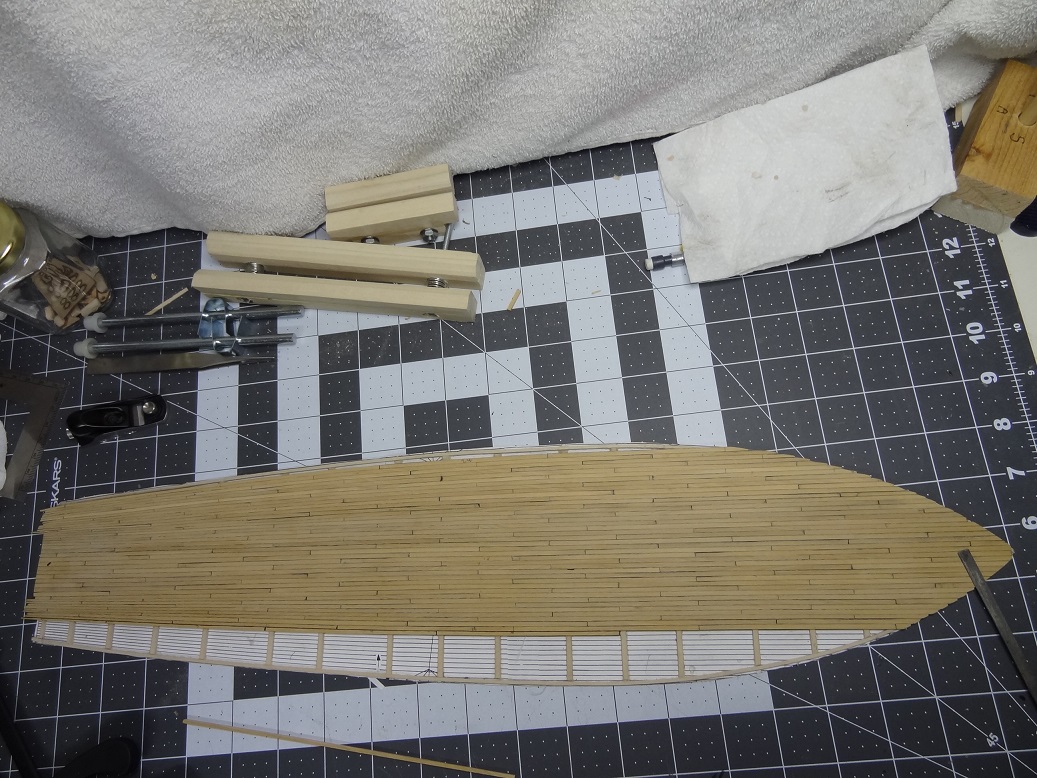
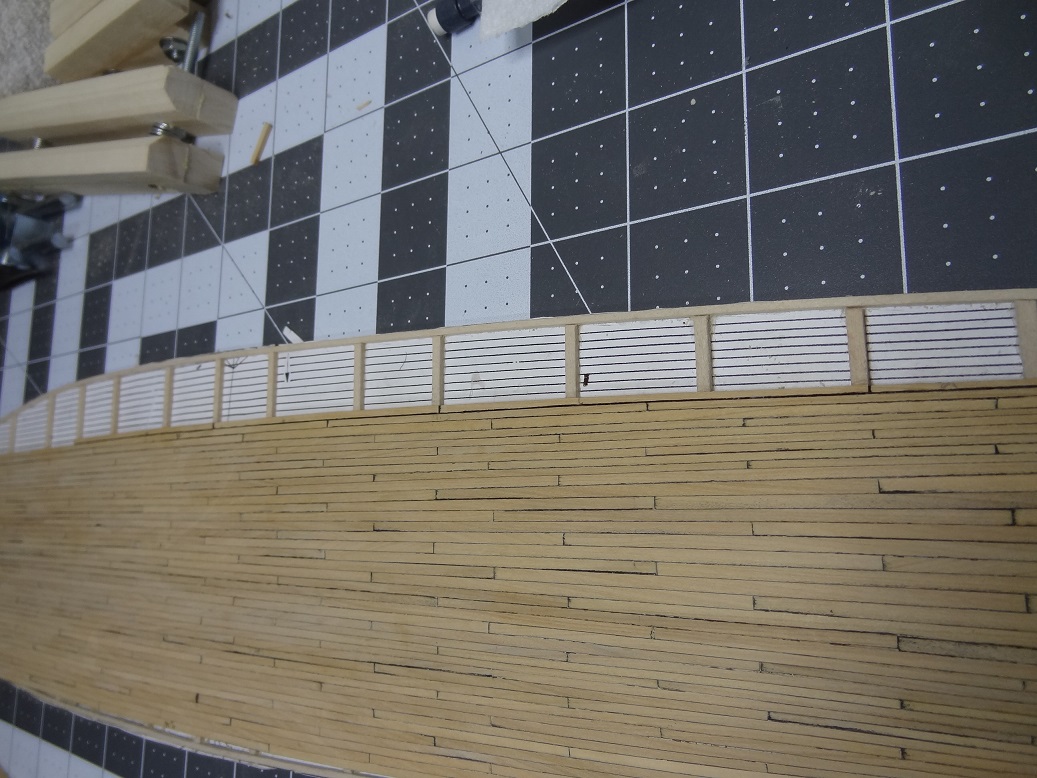
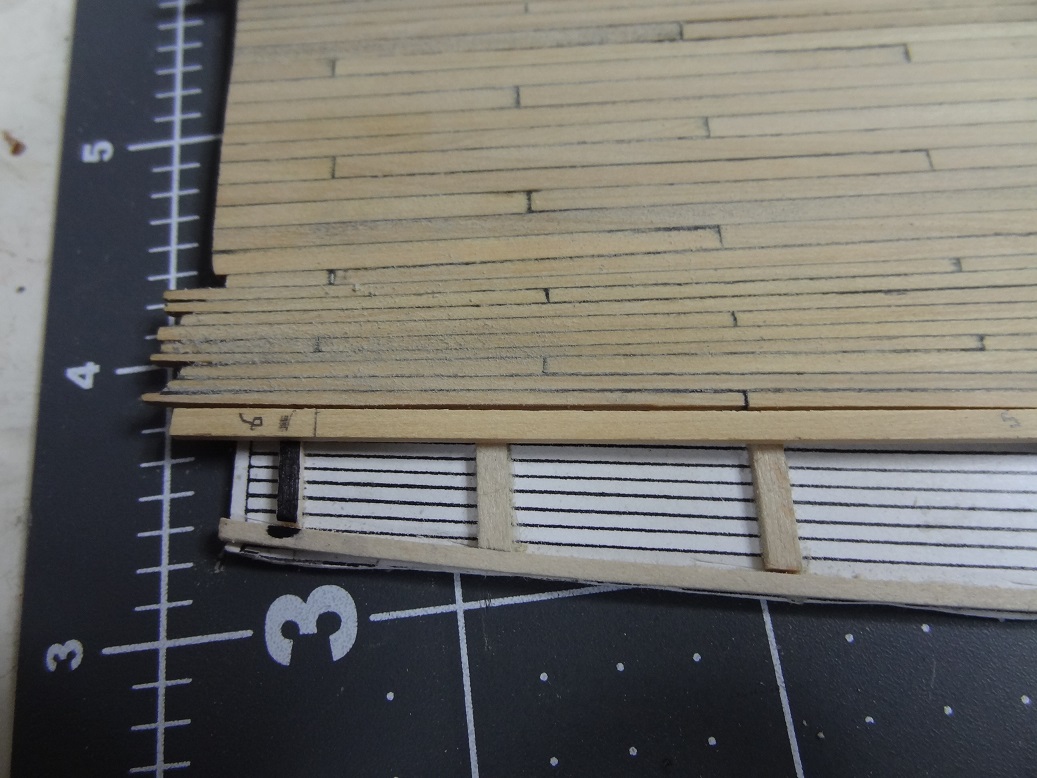
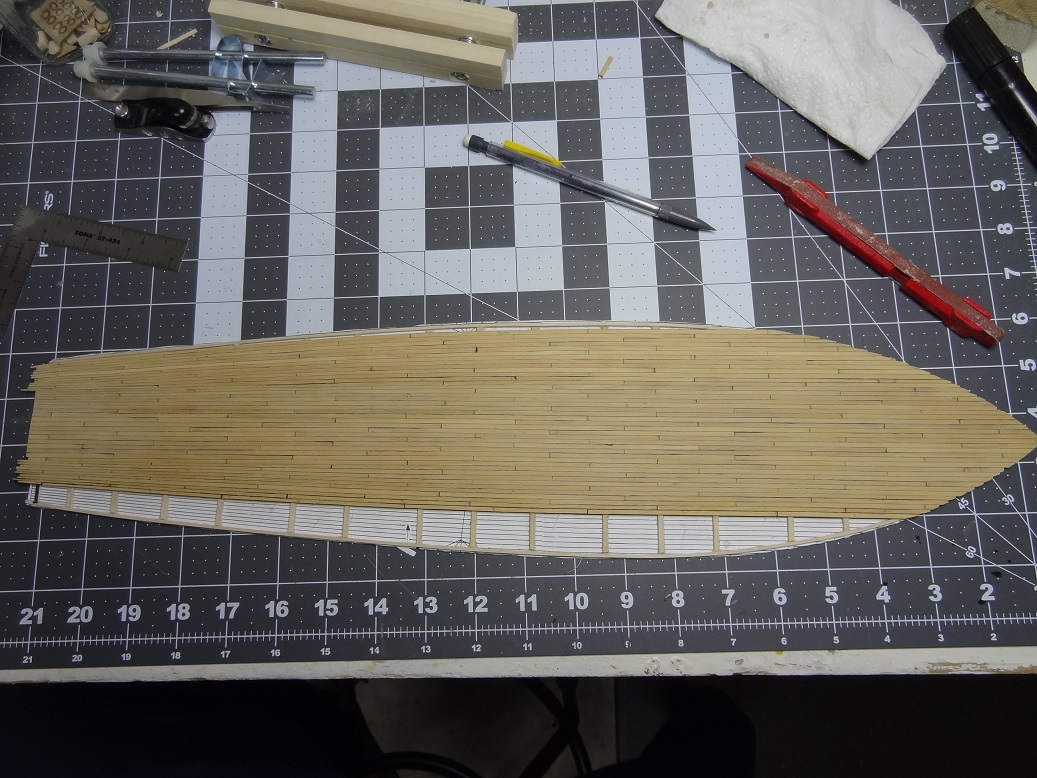
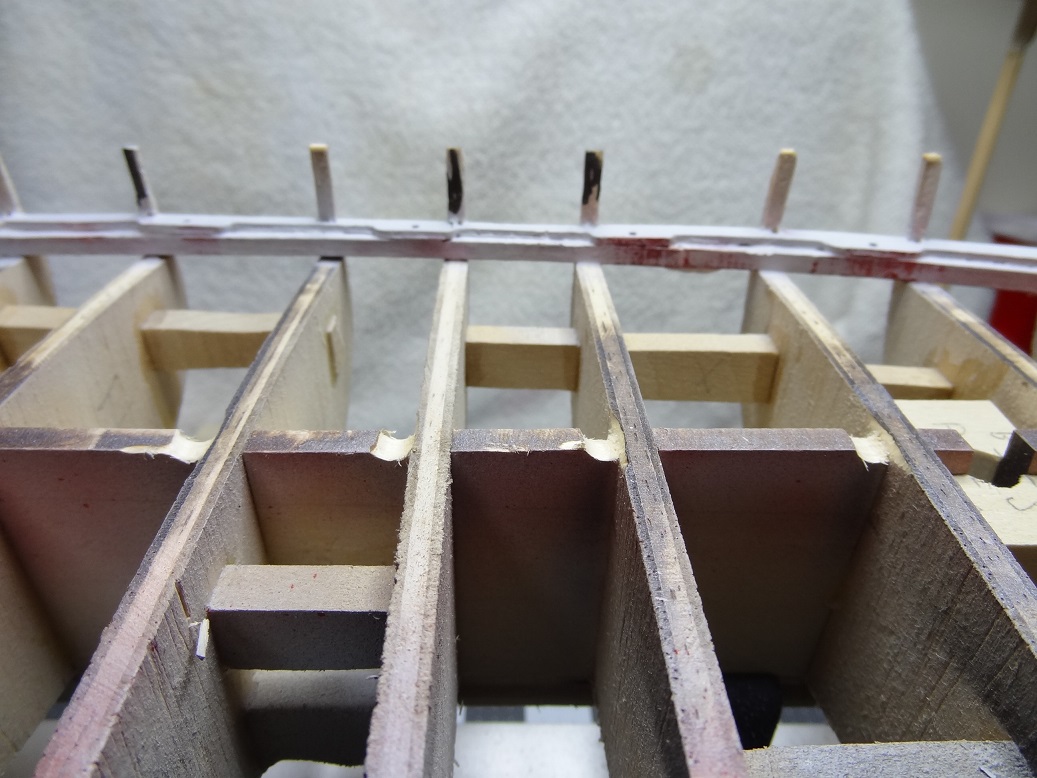
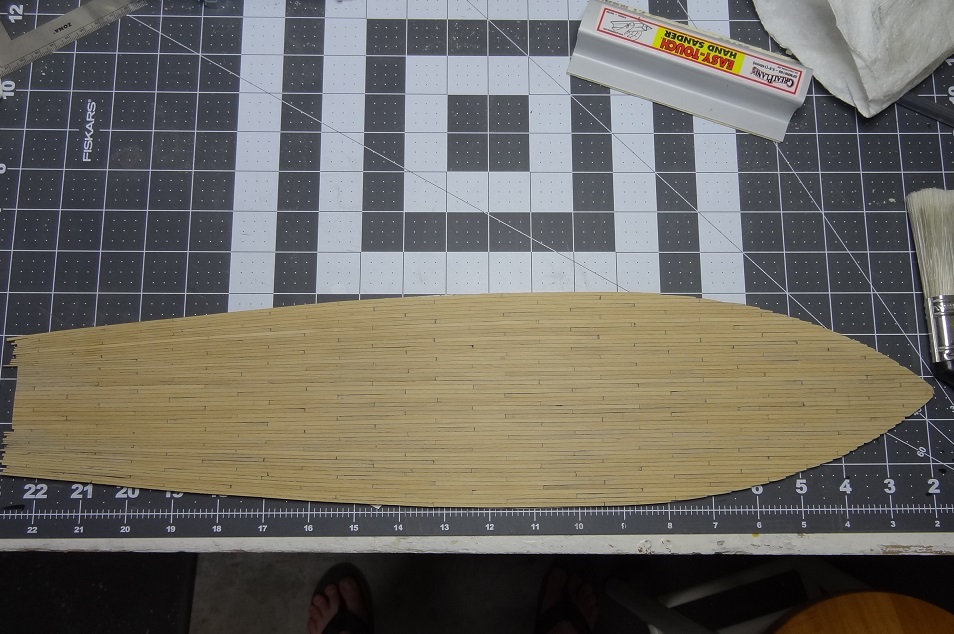
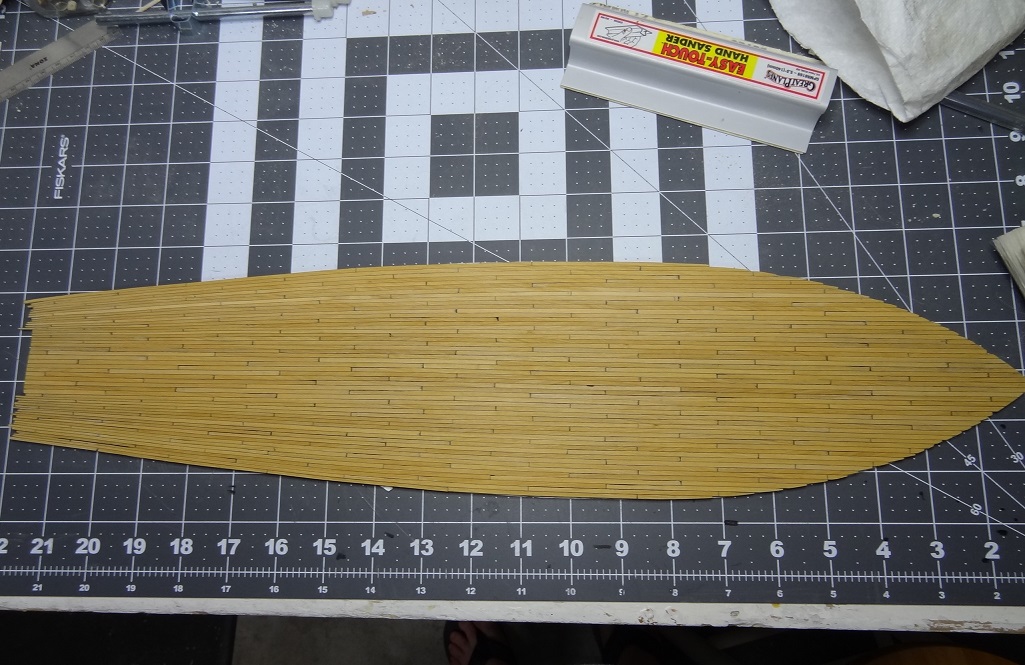
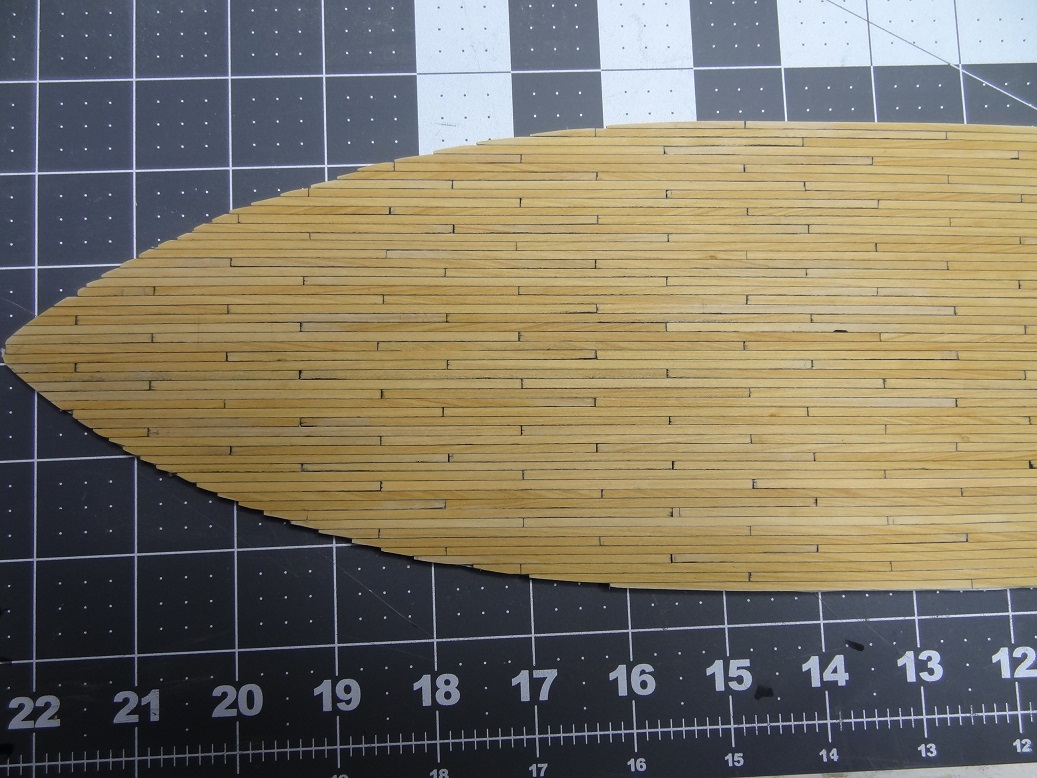
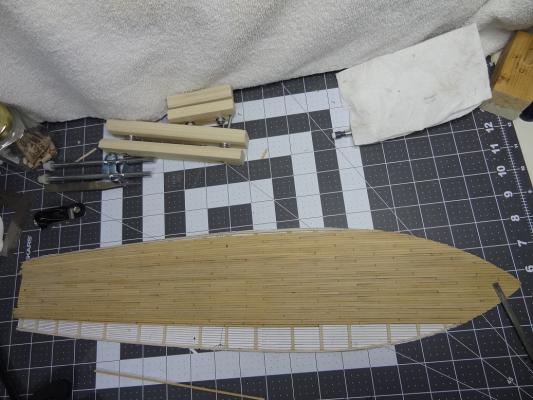
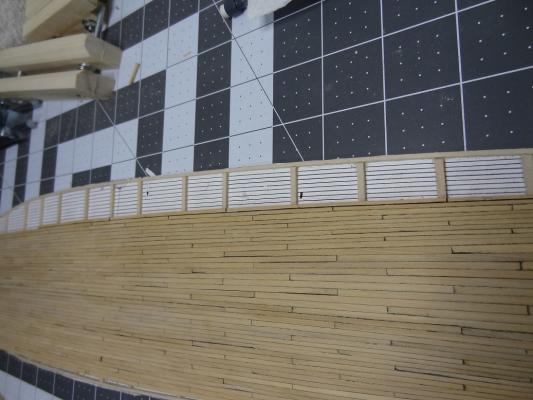
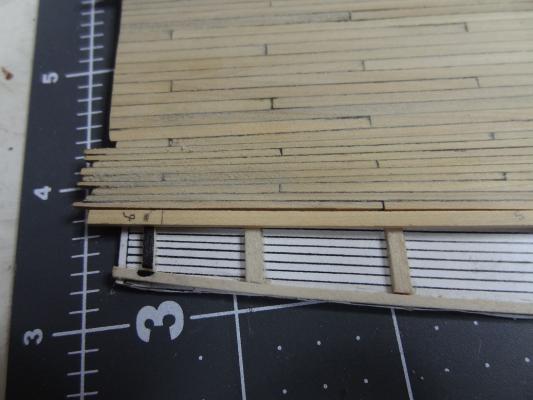
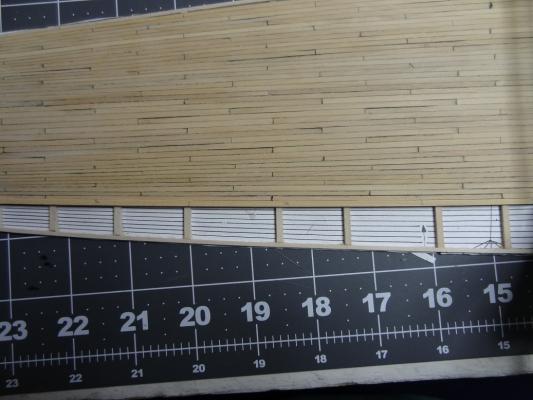
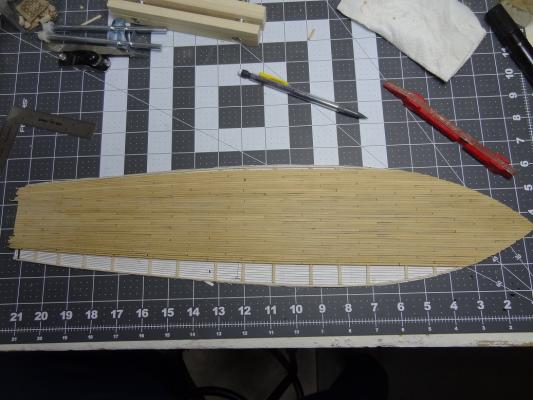
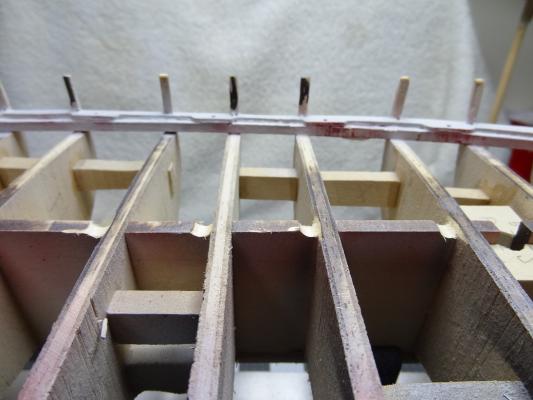
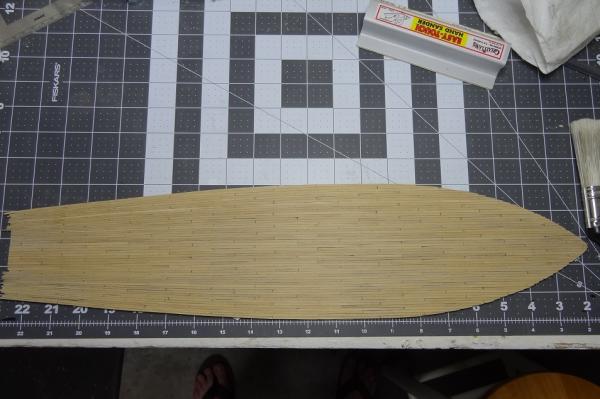
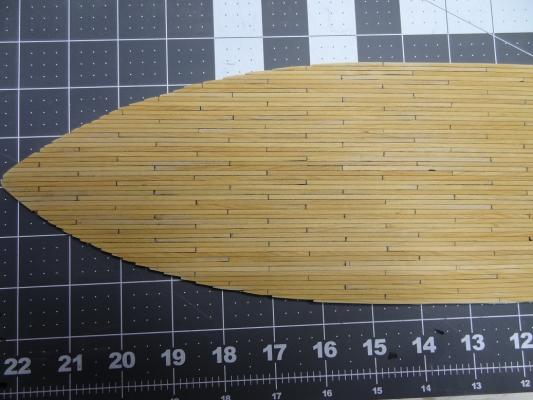
Drum roll please! After beginning nearly 2 months ago planking the deck is complete!!! I knew something big was about to happen when the 4" clamps would not reach from a newly laid plank to the other side of the deck. Kinda like when you see a seagull after days on the open water. Overall I am pleased - or maybe that's relieved. There's still some sanding to do but I think it looks good. Next I'll have to start working on the stain. I made a sample deck and tried some Golden Oak stain on it. That seems to be what a lot of folks use. I'm not crazy about it. On the boxwood it makes the planks look dirty - at least in my eye. I think the look I liked best was when I wiped the deck down with a damp rag. The boxwood darkened slightly but not as much as with the stain. I may play around with just using a matte or satin lacquer with no stain. All in all I am very happy with the approach I took - doing the decking separate from the boat. In full disclosure, this was not my idea. It came from the Niagara practicum on the shipmodeling.ca site. As a newbie, it just made me feel more comfortable doing it that way. I'm a lot more confident now and could go either way on the next build. Fortunately the Niagara design allows for this. I described the early steps in previous posts, but essentially you copy the deck plan (full size) and then glue a frame on it, including cross beams right behind where each bulkhead would be. Then you just start gluing planks to the frame. One nice thing about this method is you glue a plank right on top of the plan, so you can see exactly what shaping you have to do for each strake. You can see this in a few of the pix below. Somewhere along the way I picked up a Veritas miniature block planer and it was pure joy using that. Of course the frame and cross beams would sit on top of the bulkhead edges. Not really what you want as that would elevate the entire deck. So you make an indentation in the keel right behind each bulkhead. There's a pic of that. I used the 13524 butt-shift pattern - thank you Ulises for the great database article. As mentioned before I don't care for the butt scribing, so all planks were cut to scale 20' when possible. I marked the long and one short edge with a MarksAlot for the caulking. I didn't have any issues with the ink running. You can see on some of the pix, I nibbed the bow planks. I plan on trying to make a nibbing strake around the deck edge. So I suppose actually I'm not completely through with the deck. The practicum shows a way to do this. It looks like a lot of work, but I like the result. We'll see how that goes. Looking back, there were some trying times. Just the sheer monotony of it all. I am really glad to get this one over with! (Sorry, for some reason the Attach Files thing put the pix in reverse order)

- 843 replies
-
- 8
-
-
- niagara
- model shipways
- (and 2 more)