mikiek
-
Posts
2,276 -
Joined
-
Last visited
Content Type
Profiles
Forums
Gallery
Events
Everything posted by mikiek
-
 Nothing like a day of rework In addition to rebuilding the bowsprit I had to make the boom irons over as well. The rings are too far apart on the first one which sets the flying jib boom off in a crazy direction. The plans show a little bit of separation between the rings. I'm seeing that the rings need to be touching each other. It's a little weird because the fjb doesn't sit on the same plane as the other spars. A cool side note - a future build arrived today. Victory Brig Mercury. Very impressive! The materials look first rate. But that's another post in another forum. At any rate I am taking tonite to look it over and go over the plans. I need to get it out of my system before I end up with 2 hulls on the workbench. Can I just retire and do this from now on?
- 843 replies
-
- 2
-

-
- niagara
- model shipways
- (and 2 more)
-
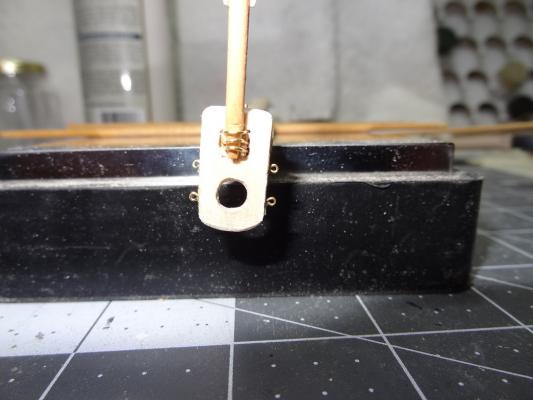
Well things turned out to be worse than I thought. I had most of the bowsprit upside down. The reason this matters is that the top of the bowsprit, while it takes on the octagon, square and round) is not tapered. The sides and the bottom are. You can see this in a couple of the pix. All the treads that are supposed to run along the top were on the bottom. The metal band under the bees had the eyehole on the top. The cap was upside down and in order to turn the band around I would have to remove the bees and the cap. And as I mentioned earlier that cap did not want to come off. The chocks and cleats on the sides were also OK. So I cut off all the treads, was able to cleanly remove the bees but I had to saw the cap off the end - tenon and all. I figured with a little structural help I could glue that back on. So with those pieces off I sanded all the glue off the bowsprit and cut new pieces to re-install. My biggest concern was the cap. I know this piece will take on a lot of stress once the rigging starts. I wasn't sure glue by itself would hold. So I made a couple of pins out of some .8 wire, drilled a couple of holes in the end of the bowsprit and a couple more in the cap where it would contact the bowsprit. Stuck the pins in the bowsprit added some glue, then put the cap on the end with the pins going into those holes. I've added the other pieces to the real top this time and everything is setting now. I'm still not sure if the cap will hold under stress. I guess I'll find out.

- 843 replies
-
- 2
-
-
- niagara
- model shipways
- (and 2 more)
-
Still struggling with the Russian site. Got some translation but still not much info. Either my browser or the site doesn't work very well.
-
That's why I love ya' Joel. Such a simple solution. Why do I always make things so difficult?
- 843 replies
-
- 2
-
-
- niagara
- model shipways
- (and 2 more)
-
You know it's funny Bob, it's the little stuff that really burns me up. Drop something on the floor, can't find the pencil I was holding 10 seconds ago, etc. A lot of screaming and yelling goes on over things like that. Big things like this, I just sat there shaking my head in disbelief, and finally broke out in a very sarcastic laugh. Like you I'm thinking option 2. The only possible problem is that the top side of the bowsprit doesn't taper. The other sides do. If I rotate the end I am moving the flat topside to the bottom where there is taper and the tapered bottom up to the flat top. It may not be that noticeable or if it is could be touched up with some sanding. I am about to find out.
- 843 replies
-
- 2
-
-
- niagara
- model shipways
- (and 2 more)
-
Tool for Shaping Brass Strip
mikiek replied to mikiek's topic in Metal Work, Soldering and Metal Fittings
Mark - when it is possible to do that I imagine you are right. As John mentioned earlier about scribing the line of the joint before bending. Anything to weaken that point should produce a better angle. The problem is a lot of what I have worked with lately is too thin to do much of anything to. -
Jolley Roger - Korabel looks interesting. I wish I read Russian.
-
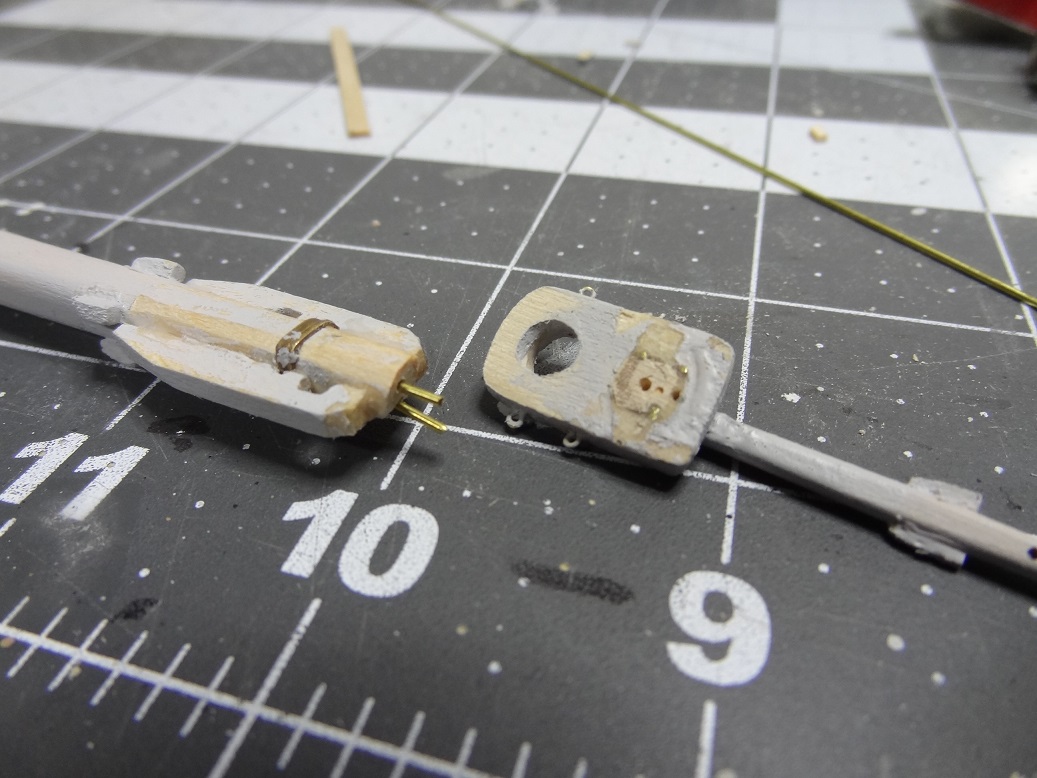
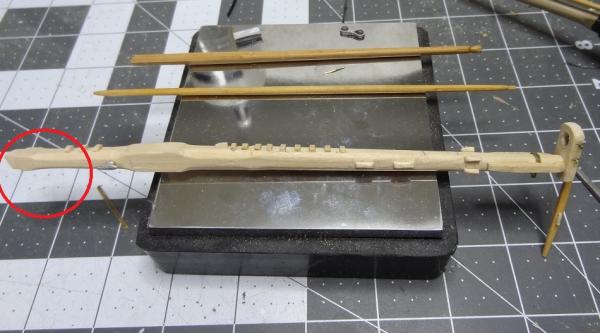
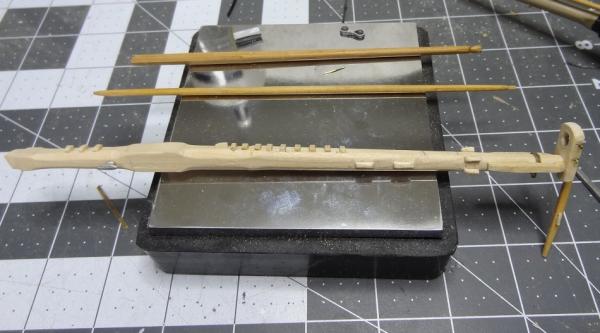
Sometimes I amaze myself - just shake my head and wonder. Tell me what's wrong with the pic below Don't see it? Here's some help. OK - times up. The tenon is angled the wrong way. It should extend longer at the bottom. It's bass ackwards. AHHHhhhhhhh! Lazy guy that I am I am not about to make another bowsprit. So options as I see them: 1. Break out the file and file the tenon to the correct angle. Downside - this will shorten the bowsprit and I don't know how that would affect rigging. 2. Make a perpendicular cut to the bowsprit either at the square part right behind the tenon or the square part behind the cleat. Then rotate the end 180 degrees and glue back together. Maybe adding some pins for strength. I'm open to any ideas you guys have......

- 843 replies
-
- 2
-
-
- niagara
- model shipways
- (and 2 more)
-
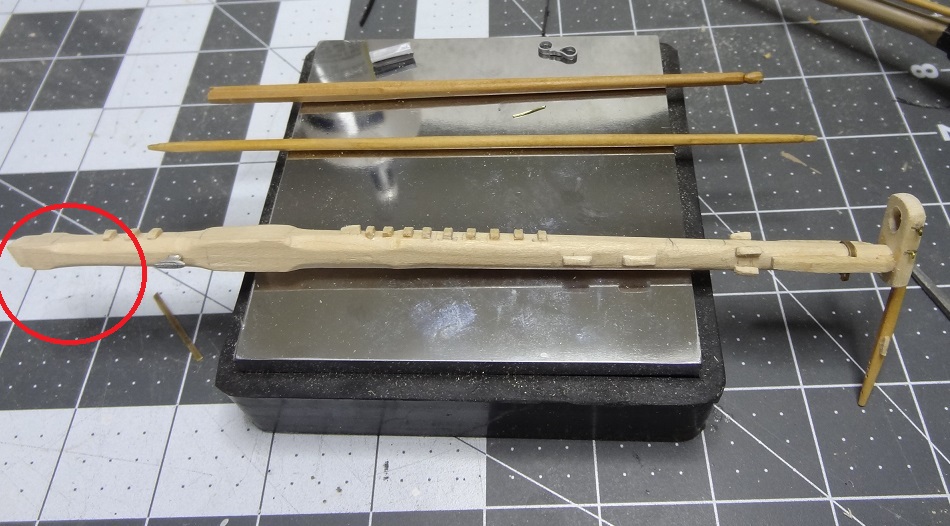
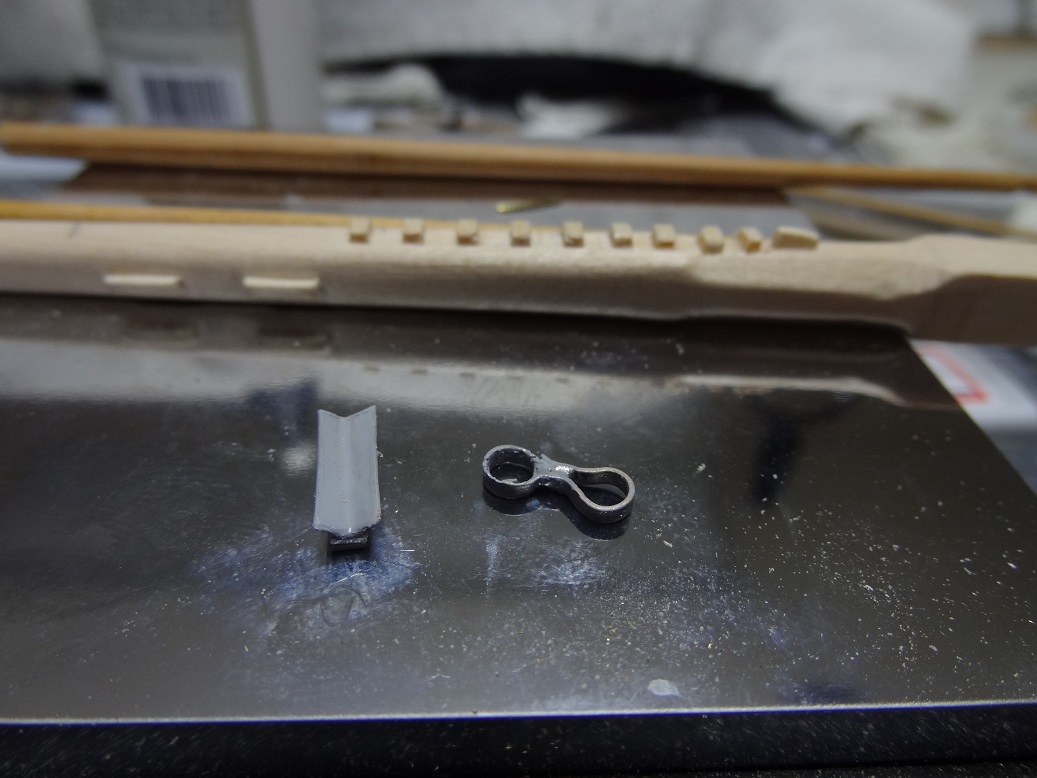
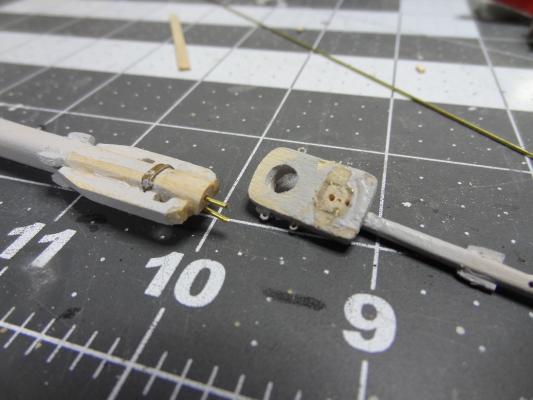
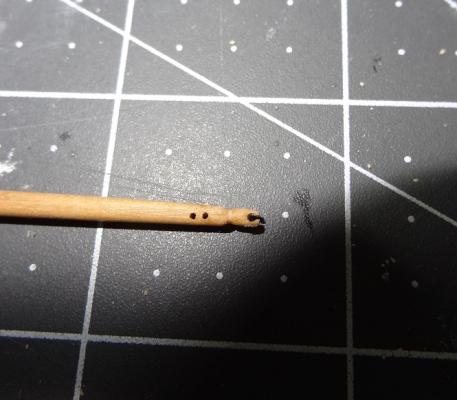
Just about to wrap up the bowsprit and boom - except for the actual assembly. I shaped all the spars from boxwood squares, but ended up using basswood for all the small pieces. Overall I happy with the outcome. I posted a few pix before I painted - It's kinda hard to see detail when everything is black. First problem during this was the cap for the bowsprit. Apparently I used it on one of the masts. The only two I still had on the laser cut sheets were way too small. So I had to make one. You can see it in the pix. Second problem, same part. Per the plans, I had to file a bevel in the holes in the cap so the jib boom will sit parallel with the bowsprit - the cap doesn't sit perpendicular on the bowsprit. Well sure enough, genius here glues the cap on backwards. I tried to get it off but the glue held and I didn't want to have to make another so - more filing. The metalwork came out OK. I got to use a resistance solderer for that. Very cool! No heating and waiting, just touch the electrodes to the part, press the foot switch, BAM, done. The plans call for metal staples (whatever that is) to help fasten the dolphin striker to the bowsprit cap. I ended up using some brass wire bent in U shapes. You can see those in the pic of the bowsprit cap. I must say they are mainly for looks. The striker is also glued to the cap. Cutting a few of the dumb sheaves was also a challenge. One of them was at the end of a stick that was about 1/32". I drilled as big a hole as I dared and then used an Exacto to scratch open the hole to the end of the stick. There's a pic on that. I really want to assemble all the spars but then I have to put it somewhere out of the way. Same reason I haven't assembled all the mast pieces yet. Back to the hull. When I was finishing up the transom I noticed that one of the gunwale strakes, where it terminates at the transom, is off (too high) on one side, almost 1/8". This is going to have to be fixed as I'm sure the offset would wreak havoc when I start planking the hull. Those 2 strakes are glued and painted so it's going to be tough to get them off cleanly. One good thing, as with all the timbers I am laying, the planks for the gunwales were cut as 20 footers rather than one long stick. So if I can get the ones next to the transom loose they should break free where they butt up to the adjacent plank. It least that's the theory. One general question. I almost overlooked the hawse pipes for the anchor line. The plans are a little vague. So you drill a hole thru the bulwark - then what? It seems like there would be some pipe or tubing to run thru the hole. Nothing supplied with the kit that looks like it would fit the bill. Let me know how you have done it.


- 843 replies
-
- 2
-
-
- niagara
- model shipways
- (and 2 more)
-
Right on Chris. There is so much of the same ole stuff. The MarisStella site was a breath of fresh air.
-
Actually, my bulwarks are done in basswood. That's just how I started out. I will use boxwood when I start the hull. Where the replacement planks really shine is on the deck. For Niagara, you have to lay strakes - don't recall whether Syren has that or a single deck sheet. I also used boxwood square strips for the masts. The only downside I have come across with boxwood is a lot of the stains that look good on basswood - Golden Oak for instance - look dreadful on boxwood. I haven't found a light colored stain that I like. Something with more yellow in it.
-
Don started a build on an interesting kit from a manufacturer called MarisStella. Granted I'm still a relative newbie to all this but I had never heard of this company before. Checking out their site - they have some interesting kits. Most are not your run of the mill Bounty or Constitution. It seems like there may be 10-15 of the "big players" in the kit business. We see them at all the major retail websites. I'm wondering about these smaller guys - the ones that hardly anyone has heard of. So 2 questions: 1. How do the small guys pop up and how do you hear about them? 2. Feel free to name any that you are aware of.
-
I hear ya' regarding the wood. I switched from kit supplied basswood to boxwood for my Niagara build. Will also be replacing the kit stock from Rattlesnake. For me the difference is huge. The wood is cut better, it is harder, it shapes better, sands better and just plain holds up better. Crown Timberyard actually has a Syren wood replacement package. I keep preaching that, then a reality check. Thousands of people have built thousands of drop dead gorgeous kits with basswood. So what is my problem?
-
Amati/Victory or maybe it's Victory/Amati. I picked the kit up from Cornwall Model Boats. It is much cheaper than anywhere in the states (even with shipping) and last weekend they had an additional %5 off.
-
Speaking of Mercury - it's on the way. Shipped yesterday from the UK. I don't have a lot to compare it to - I've not seen too many models. It will be interesting to see how it shakes out with the 2 kits I have on hand - Niagara and Rattlesnake.
-
Those ports can be hell. They look great one day, the next you notice something is off. Sometimes everything looks great until I snap a pic for posting. Then all sorts of evil shows up. Your hull is looking good too Jaggy. It looks really smooth.
-
Thanks for that reminder Ken. I 've heard that and meant to do it when I drilled the holes for the masts. For sure I will do it when I start cutting the structure footprints. I'm also hoping a real slow cut with a scroll saw will do better than the dull drill bit. Of course I do have to drill a hole to get the scroll saw started.
- 843 replies
-
- 2
-
-
- niagara
- model shipways
- (and 2 more)
-
Thanks John and Joel for that input. I'm still learning how to read plans. I am continuing on with the bow mast. Cutting those groves (dumb sheaves) was not easy. Was pretty nervous about splitting the small end of the jib boom. I am close to completing all the parts. Will post pix of my work when I get there. Joel, one thing I forgot to mention on that deck. For better or worse, the practicum said to paint a light coating of white glue on the underside. I did do that. Hopefully it will add a little strength.
- 843 replies
-
- 2
-
-
- niagara
- model shipways
- (and 2 more)
-
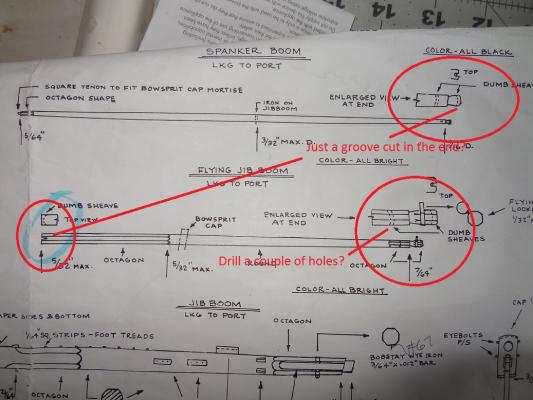
Last night and this morning I took a break from the hull to make the pieces for the bowsprit and jib boom. It's coming along well - I will post pix later - but I came up with a question from the plans regarding the dumb sheaves indicated at the ends of the boom pieces. They are are calling for a dumb sheave right at the end of several pieces. The plan shows a blown up top view and it looks like all I need to do is cut a groove into the end. Correct? Probably easier said than done. There is another dumb sheave about 1/2" from one end of the jib boom. Would that be just a couple of holes drilled?
- 843 replies
-
- 1
-
-
- niagara
- model shipways
- (and 2 more)
-
Joel - actually when I did the initial frame for the deck I did add strips for all the structures. That was really easy, and accurate because I was gluing directly to a full size copy of the plans. That's the reason the tops of the bulkheads are such a mess now. Every place one of the structure frames crosses a bulkhead I had to gouge out a spot on the bulkhead so the frame didn't elevate the deck. Eventually all that will get covered over so it is just a temporary eyesore. I'm hoping when it comes time to do the cutouts for the structures I can drill a SMALL hole and then use a scroll saw to slowly cut the rest of the footprint. I have to say after admiring the deck work for so long, it was painful to have to start cutting into it. And that adventure is just beginning.
- 843 replies
-
- 3
-
-
- niagara
- model shipways
- (and 2 more)
-
Nibbing Strake
mikiek replied to mikiek's topic in Building, Framing, Planking and plating a ships hull and deck
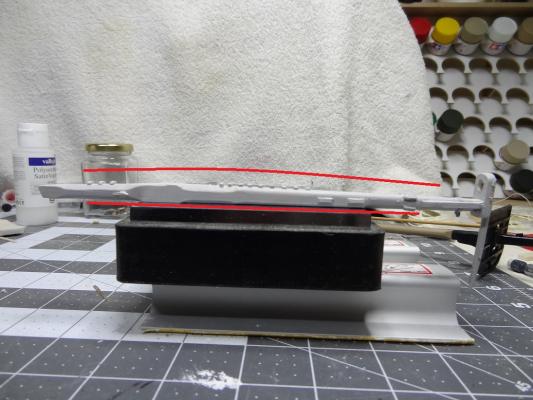
Mark - I agree completely. It would not be accurate to end up with a single piece. Recommendations from research are as you say. The gotcha is carving out the nibs on one side of the plank(s) and then having enough room for a decent scarf joint. The part of the joint that I would carve on the outside of the plank would probably be doable. But the part of the joint on the inside of the plank - I would have to cut that in addition to the nibs. The scarf joint would need to be placed strategically. Allen - the deck was built on a frame with crosspieces running parallel to the bulkheads and placed about 1/4" behind where the BH would contact the deck.So there is no issue there except that I ended up cutting those crosspieces at the deck centerline so that the deck will flex slightly and take on the crown caused by the BH pieces. The tougher part was the frame added around the edge of the deck. That will lay across the BH pieces and would raise the entire deck up by the width of the frame. To get around that, I cut grooves in the BH pieces where that frame would have come into contact. So when I lay the deck in, the frame really doesn't touch anywhere. This allows the deck to take on the normal shape that the tops of the BH provide. Even with a light coating of white glue on the deck underside, the entire structure has remained surprisingly flexible. I do wonder what a stain and a few coats of lacquer will do to the flexibility. -
Nibbing Strake
mikiek replied to mikiek's topic in Building, Framing, Planking and plating a ships hull and deck
Still thinking on this one. The space between the waterway, at it's widest, is maybe 3/16" wide. Trying to cut the nibs on one side of a strip would be most challenging. Also trying to do that with one piece of wood - even from sheet - is another obstacle. I've seen some pix where the builder used several shorter planks and joined those at the ends with scarf joints. Maybe a possibility. Although trying to add a scarf joint to a 3/16" wide plank with nibs cut in it is not an appealing thought. I'm also thinking maybe styrene. I lose my woodgrain but I gain some durability. -
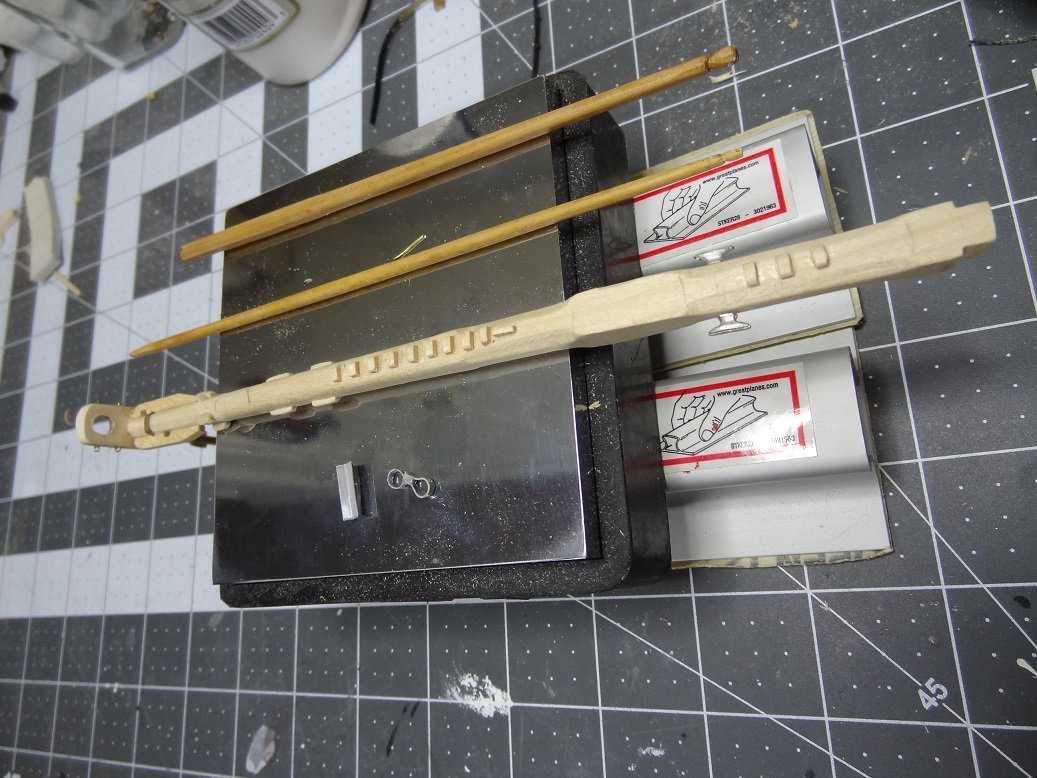
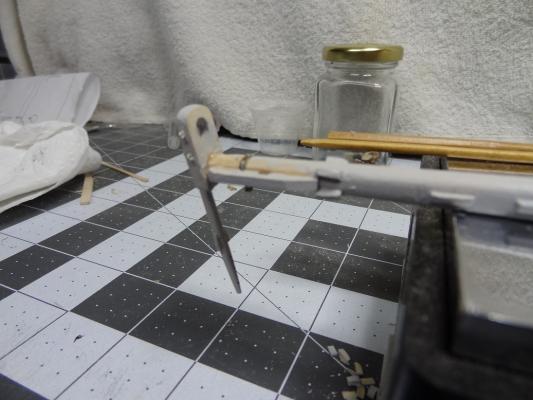
Don - just wondering is that your stand (the pieces on each end) or something that came with the kit?
- 653 replies
-
- 6
-
-
- trabakul
- marisstella
- (and 1 more)
-
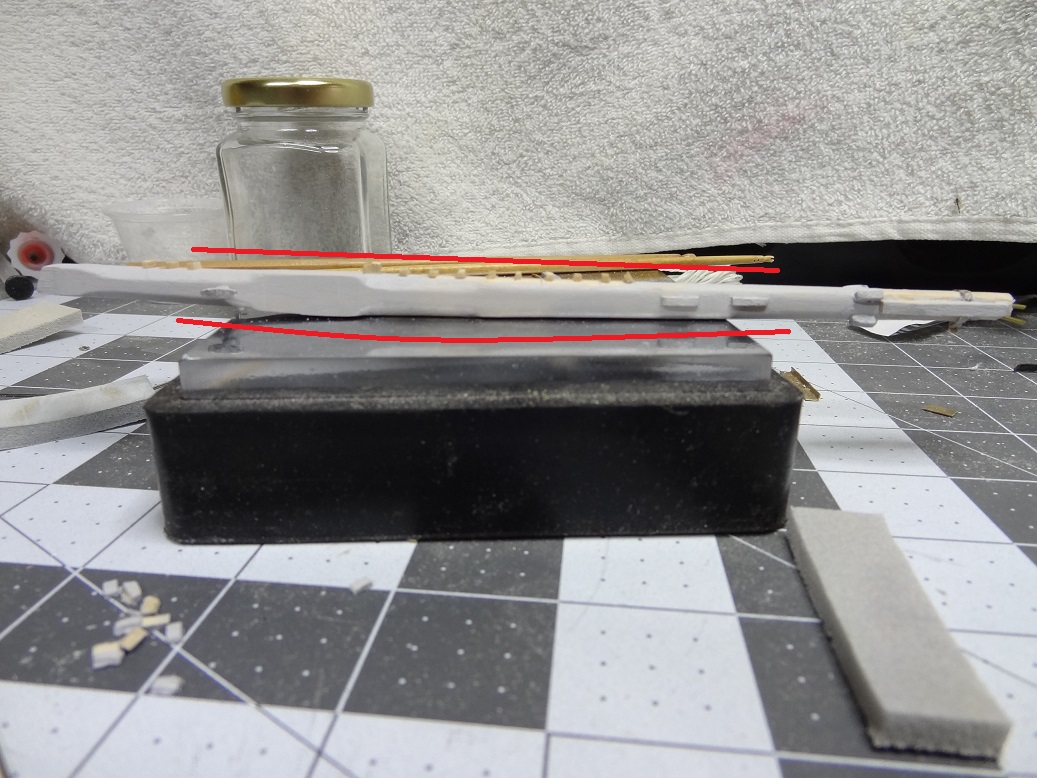
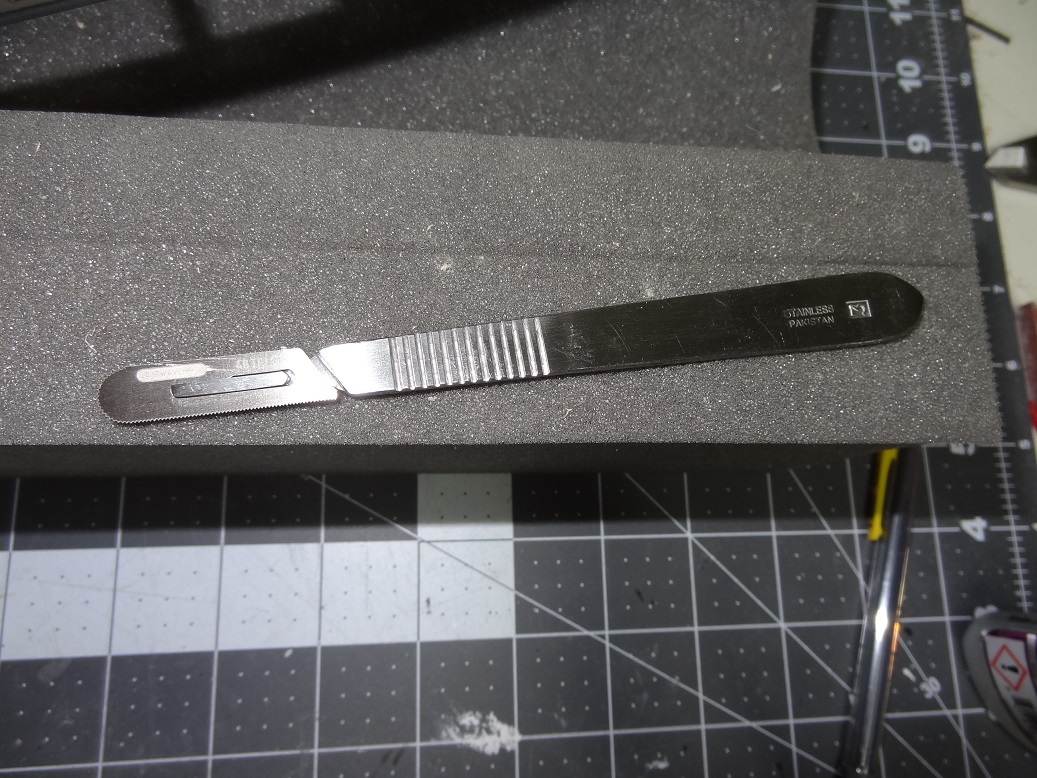
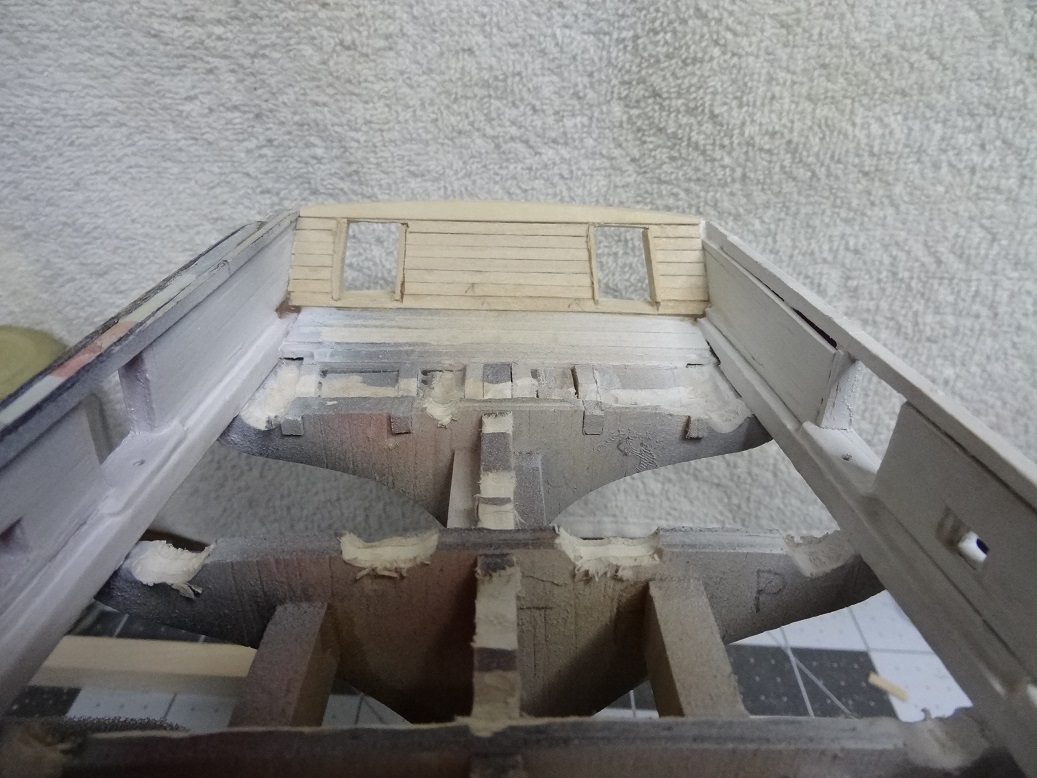
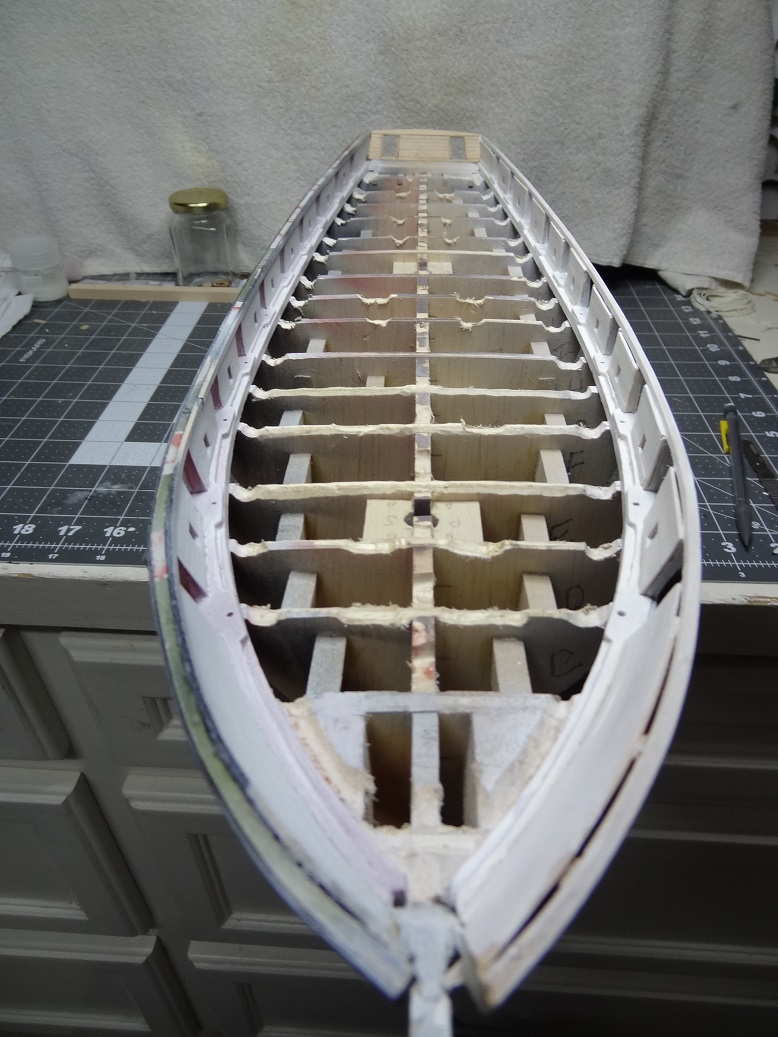
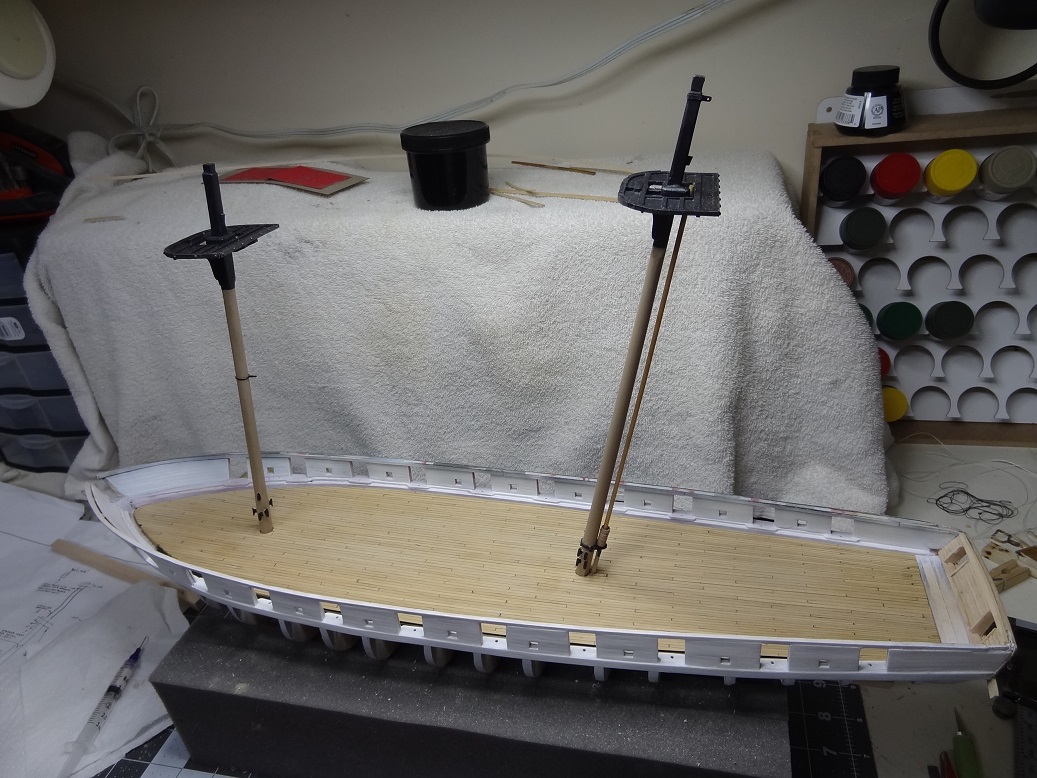
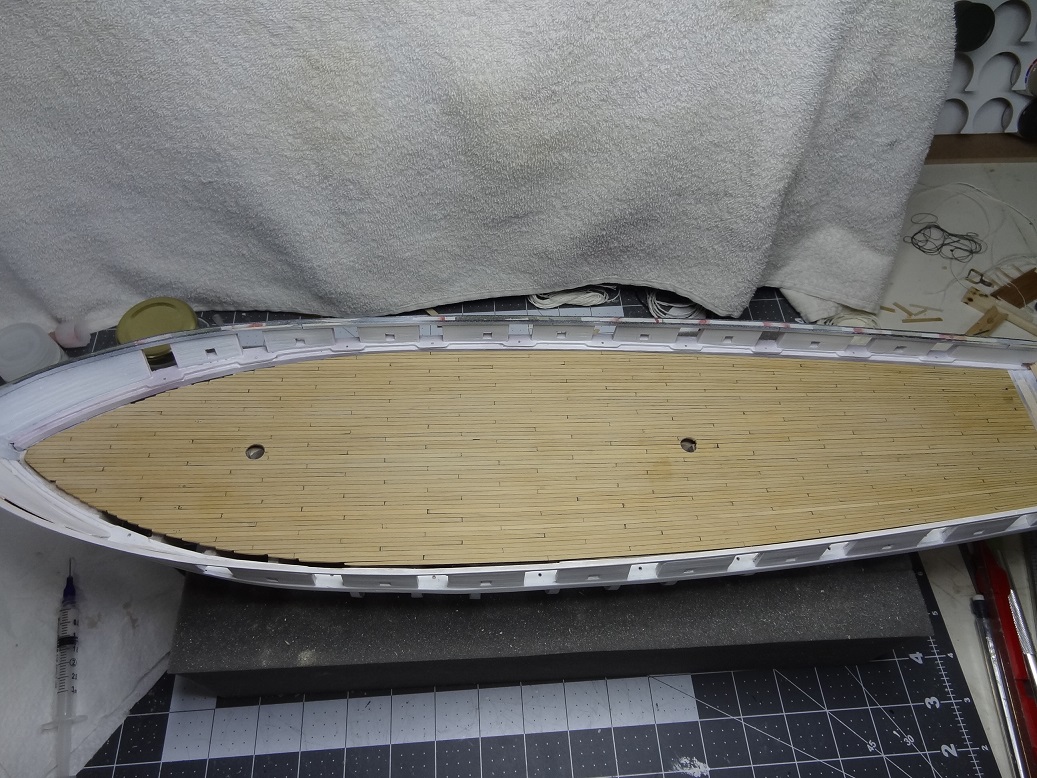
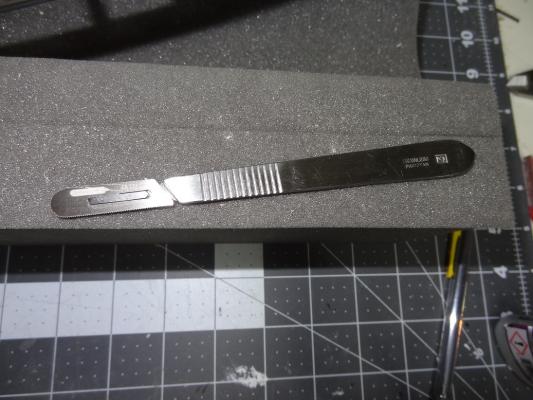
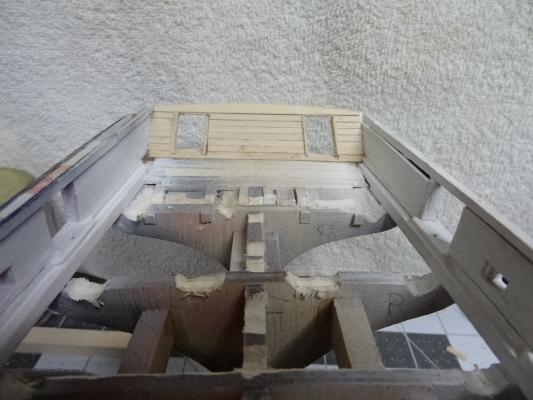
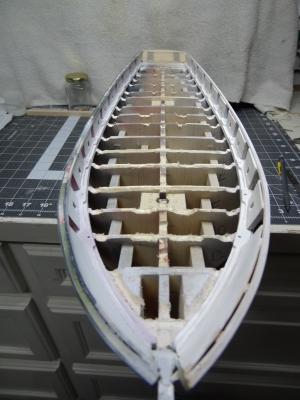
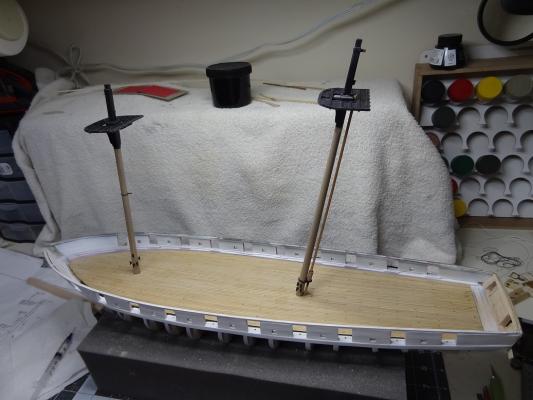
Niagara has a tail !!! The transom is now planked. I can't tell you the number of times I looked at that aft framing and just didn't want to go there. Getting those ports right was part of the issue. First off, I used a lot of literary license on this part of the build. The stern timberheads never lined up correctly - the 2 center ones protruding to the rear slightly more than the outer ones. This kept the archboard and subsequent planking from having the slight curve shown in the plans. Also I beleive the archboard is supposed to have a slight curve upward in the center. I had to get creative to add the curvature by spiling the first plank (right above the archboard) into a thin almost crescent shaped piece. My practicum has a scale print out (I think it comes from the plans) that shows the exterior transom planked, with ports. If you print it and then cut it out, it fits the aft end of the hull perfectly and shows exactly where the ports go and the angle that they lean in. Of course cutting a hole into the side of something is never easy. I finally found a use for a surgical tool that I had originally filed away in the junk box. It's a scalpel blade & holder. The blade has saw teeth that start at the bottom, go up and around the front and continue on top - I posted a pic. The teeth easily rip away at basswood and using the front end of the blade, cut the edges of the ports. The tool has been promoted to the toolbox now. OK, so the ports are open and filed to shape, but they need some trim around the edges and in between the inner and outer plank walls. I did this using some very thin scrap veneer I found. Anything thicker would have made the port openings smaller. Unfortunately, I installed these before I sanded and filled the planking so this task now becomes a bit more challenging. I had to do some more gouging on the keel and tops of bulkheads so that the deck would sit flush. I think I am done there although the keel and bulkheads look a mess. Speaking of the deck, I finally got the nerve to drill a couple of holes for the masts. I knew my hand wouldn't be steady enough so I pulled out the drill press. I did knock out one small piece of deck planking during this process but that was an easy fix. The holes were too small, but rather than drill again with a larger bit I used the Dremel to grind out the holes. Now that the holes are there I can lay the deck on the bulkheads and actually step the masts. Nothing permanent yet, but it is nice to see the build take shape even temporarily. I am still struggling with the nibbing strake. I have not had any answers to my post here at MSW, but I have found some pix. Most show the strake as several pieces joined by scarf joints. I think this is the route I will take. I'm considering do the strake in styrene. I think a wood piece would be seriously weakened by all the small cuts and difficult to handle. We'll see. Pix to follow:

- 843 replies
-
- 3
-
-
- niagara
- model shipways
- (and 2 more)
-
Good call Dave. That's what I ended up doing.