mikiek
-
Posts
2,276 -
Joined
-
Last visited
Content Type
Profiles
Forums
Gallery
Events
Everything posted by mikiek
-
 OK - I am going to order a few wider planks. Would twice the usual width be sufficient? Hull planks are 1/16"x3/32" so maybe I order 1/16"x3/16" ?
 -
Looks like they have some interesting kits! Way beyond the usual Victory and Constitution. Finishing out the interior will be most interesting. Enjoy!!
- 653 replies
-
- 6
-

-
- trabakul
- marisstella
- (and 1 more)
-
I don't mind doing the spiling. If that's how it was done then that's how I want to do it. My concern was really to make sure I had the proper materials on hand. It's a pet peeve of mine, getting motivated to work on something and then either running out of or not having the parts I need. I have another timber order to make. so I'll add a few wider planks and maybe a sheet as well.
-
I realize that the answer to my next question would depend on the hull, but on average what percentage of planks start out with wider material? Niagara has a narrow bow. And again, assuming one must start wider, is it more economical to use wider planks? Use a sheet? I'm thinking sheet as anything you trim from a plank ends up waste. I apologize if these are "duh" questions but I'm getting a little nervous over this. AHmmmmmmmmmmmmmm.
-
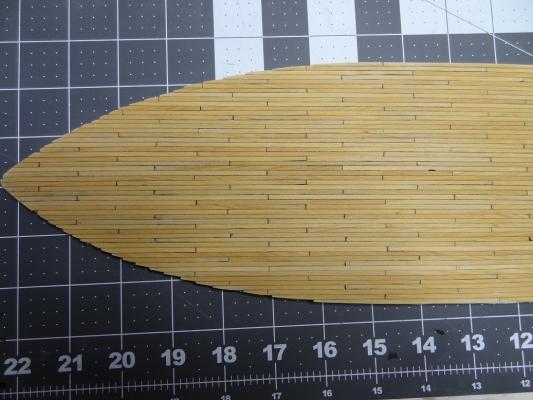
I'm not planking the hull yet, but have begun to plan for it. I came across some articles and pix about spiling. My Niagara build calls for 1/16"x3/32" sticks for hull planking. In some of the pix I saw, someone was really having to put a curve in the plank. Not bending but cutting an actual curve - spiling. So if/when I have to do that does it mean I may start out with material that is wider than 3/32" ??? If yes, is it better to get some slightly wider sticks? Cut from a sheet? I just ordered boxwood sticks for the hull, so if I need some additional material for spiling I want to get that ordered so it is on hand.
-
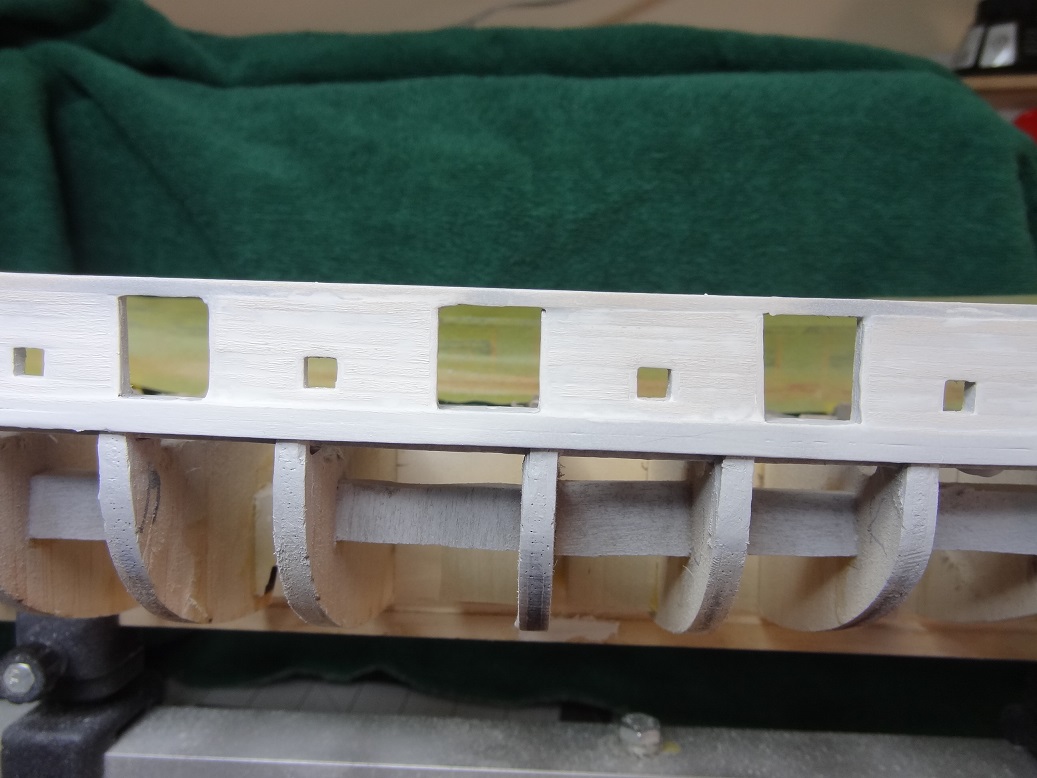
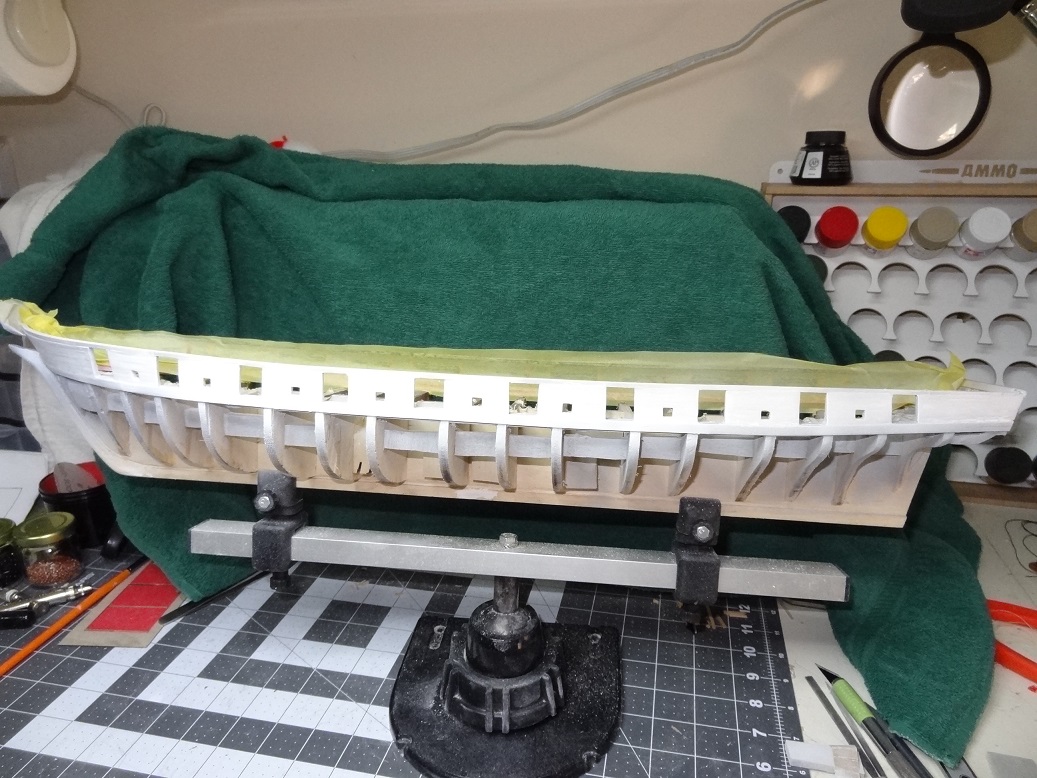
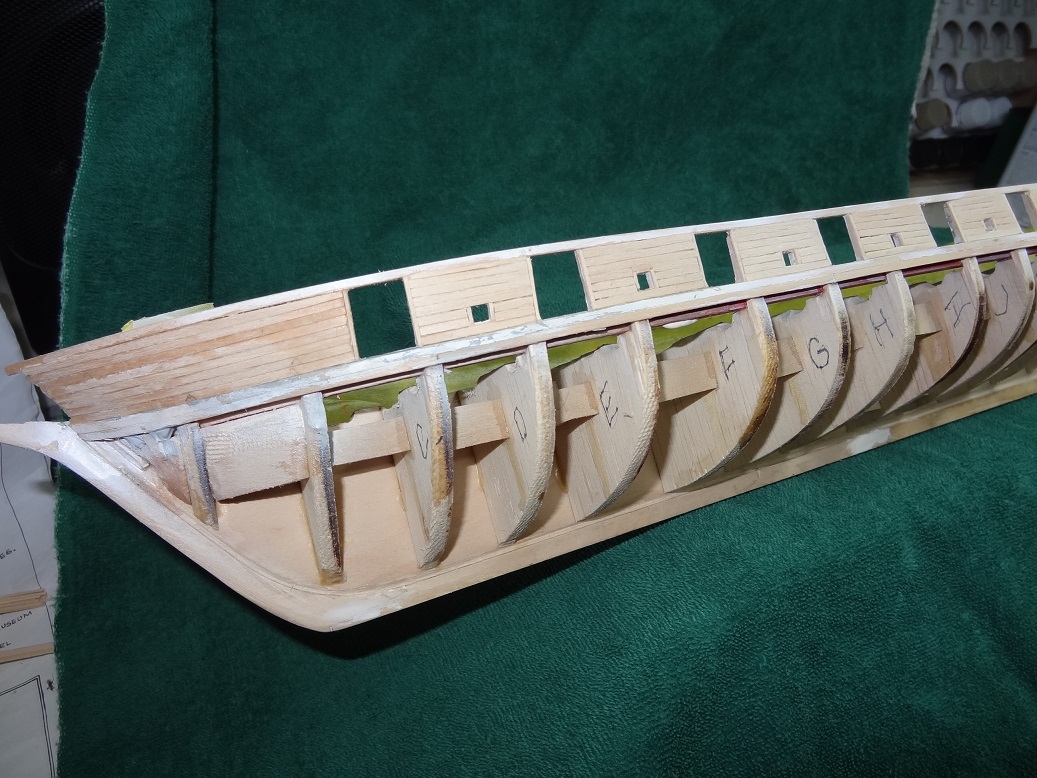
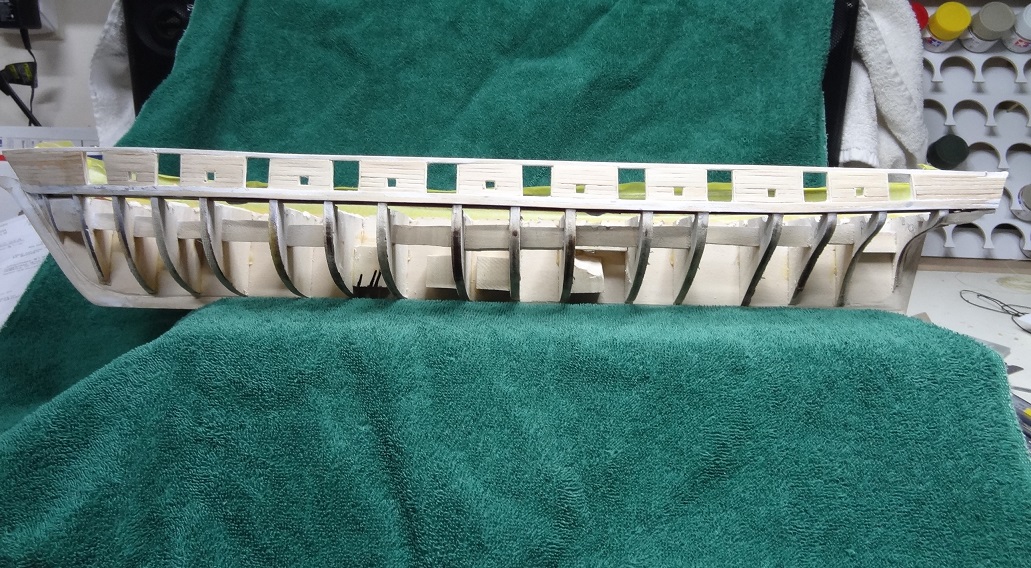
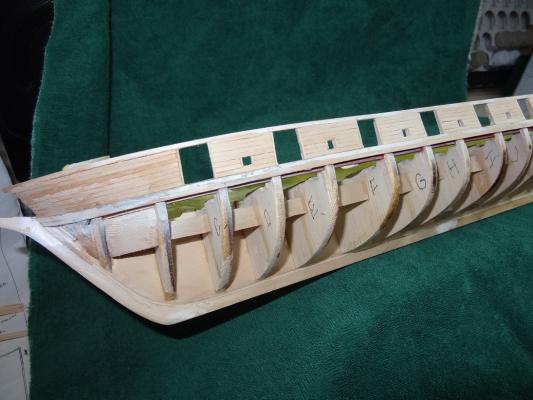
Niagara moves forward. The port bulwark is planked now - kit supplied 1/32"x3/32" basswood on the outside, custom cut 3/64"x3/32 boxwood on the inside. This was interesting jumping from one to the other in quick succession. The boxwood strips were easier to work with. They fit together - long edge to long edge - so well that I really considered not using any filler. Ultimately, I did apply a few dabs but it will be a one time task rather than 2-3 times. So the ease of work also turns into a time saver. I sprayed a coat of primer, but genius here forgot to mask the fully painted starboard side so I got some overspray there. After that, I made the decision to reprime the starboard side and will re-paint that. I hate to have to rework but in the end it should be better. Both the yellow (exterior) and green (interior) I had mixed had dried up due to lousy mixing bottle tops. So I would have had to mix more for the port and then try to match colors. That never works well. Plus hopefully I have learned a thing or two about painting so my edges - one color against another - should improve. If anyone is interested I have found mixing bottles from Tamiya. The tops are just like the paint bottles which, for me, have preserved open bottles for months. The mixing bottles are a little larger than the paint bottles. I have a question regarding decking. I built the deck on a frame outside the hull. I also followed the deck plans explicitly with the plank strakes narrowing radically towards the stern and leaving nibs on all the strakes at the bow. I'm thinking about the nibbing strake now, and how best to implement that. I want the nibbing strake to fit edge wise with the deck and nibs rather than on top of and cover up the nibs. The plans mention this as one option but give no details. My Niagara praticum shows the guy tracing the outline of the deck on something but doesn't tell what. The nibbing strake must fit between the deck edge and the waterway and run from bow to stern. The only thing I can think of is using some 1/16" sheet. Trace the deck edge on the sheet then leave about 1/4" outside of that. The outer edge would then have to be sanded to fit snug against the waterway. Does this sound reasonable??? Is there a better way to do this? I've also tried to make a few lengths of rope using the new linen thread I mentioned previously. I have to say, the results so far are disappointing. The thread strands are unraveling and twisting up before the thread ever gets to the point where it is twisted together. I've tried speeding up/down the rope walk, right lay, left lay but I have not yet come out with a good piece of rope. It's sad because the thread really has a good feel to it and it takes color very well. I haven't given up yet.
- 843 replies
-
- 2
-
-
- niagara
- model shipways
- (and 2 more)
-
Blackening brittiana fittings ?
mikiek replied to Senior ole salt's topic in Masting, rigging and sails
S.O.S. - One thing I do to parts after blackening is give them a layer of some matte lacquer. This helps keep the black where it belongs - on your piece, not on your hands. The flat finish hardly shows. -
My Niagara build plans call for a nibbing strake between the edge of the deck and the waterway. I realize there are a number of ways to do this. I actually built the deck outside the hull and will drop it in and glue it at the appropriate time. I did leave nibs on a lot of the strake ends, with the intention of making the nibbing strake fit into the nibs, rather than just glue something on top of the deck edge. The plans give no indication of what the nibbing strake should be made of or even what color it should be. I have some 1/16" boxwood sheet that I will probably use. However, rather than 1 piece from bow to stern I want to break it up into what would have been more accurate sized pieces for the time. I would appreciate some feedback from you guys.....
-
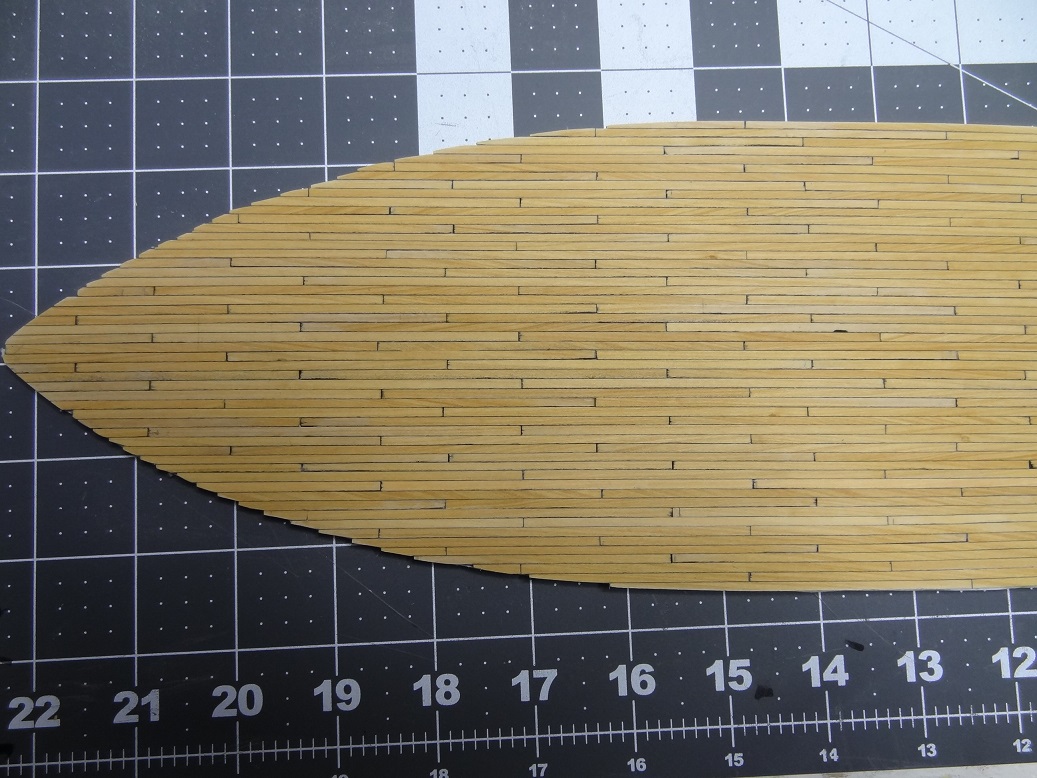
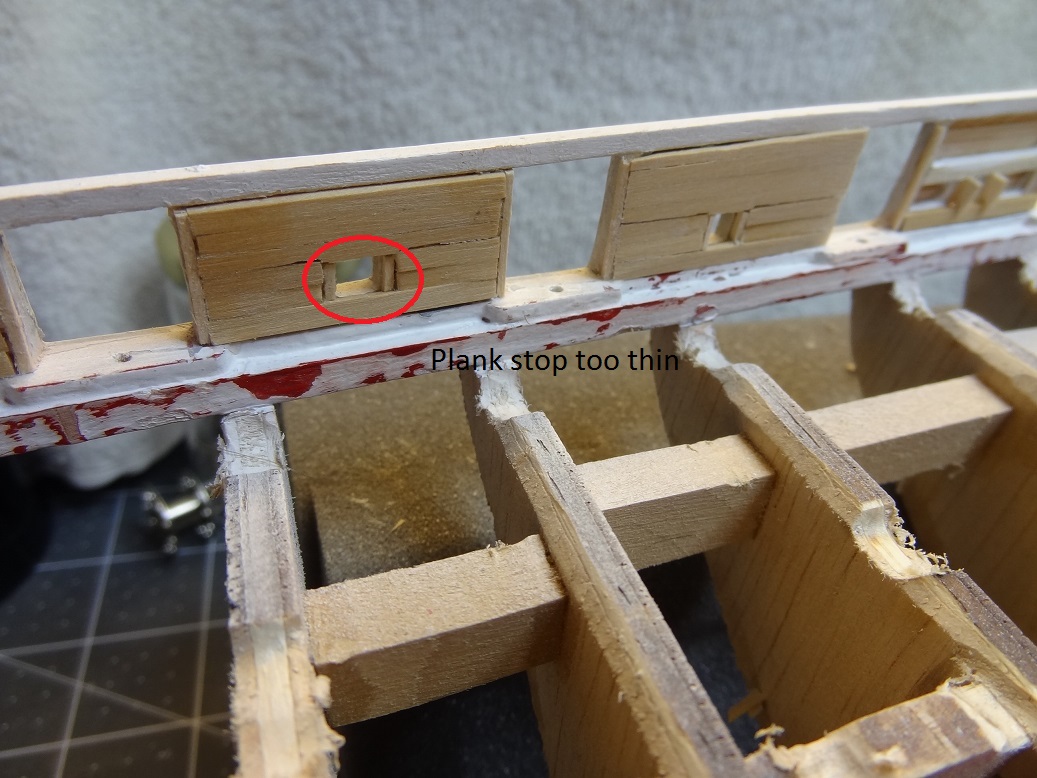
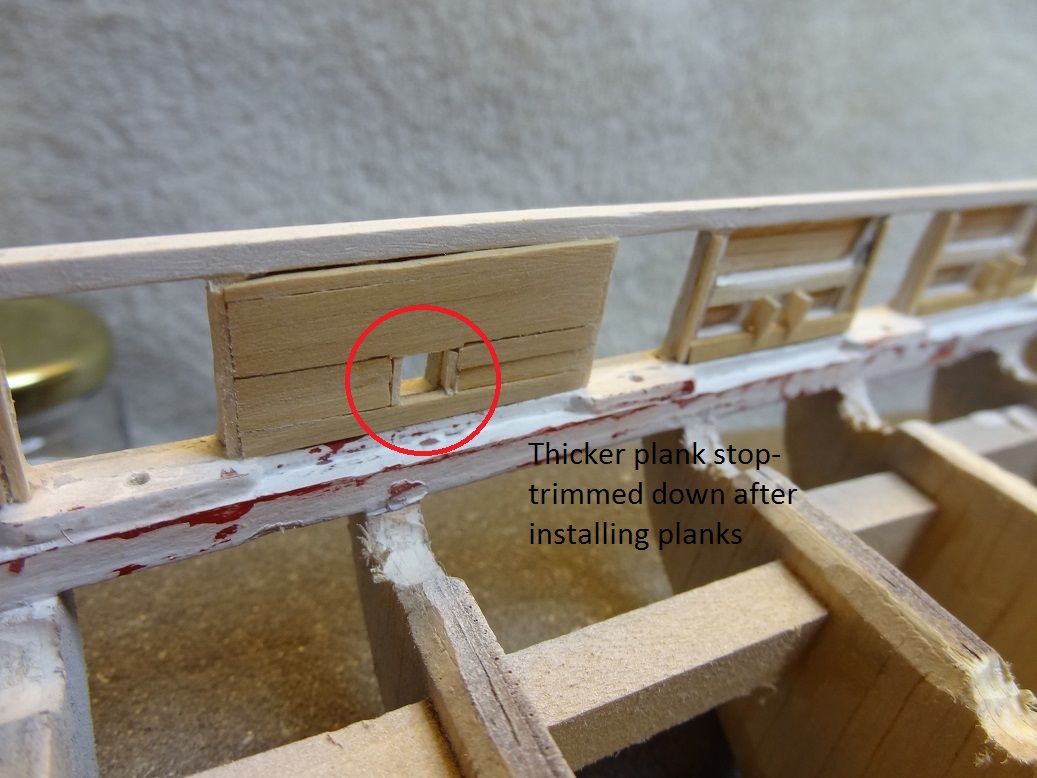
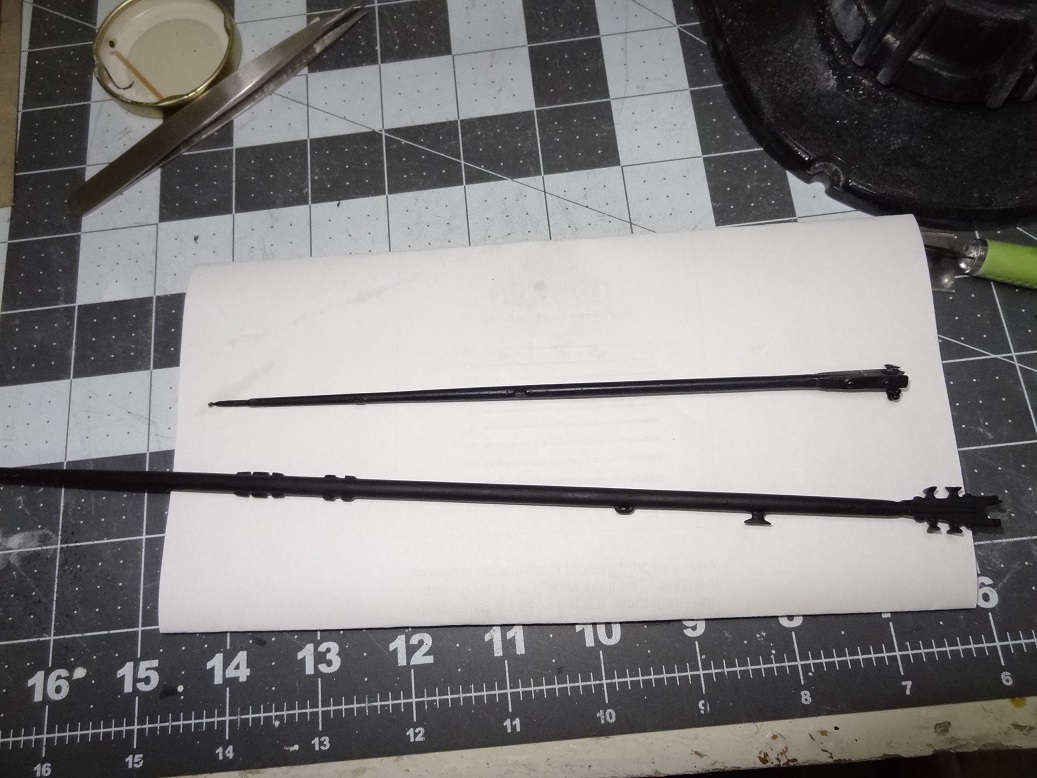
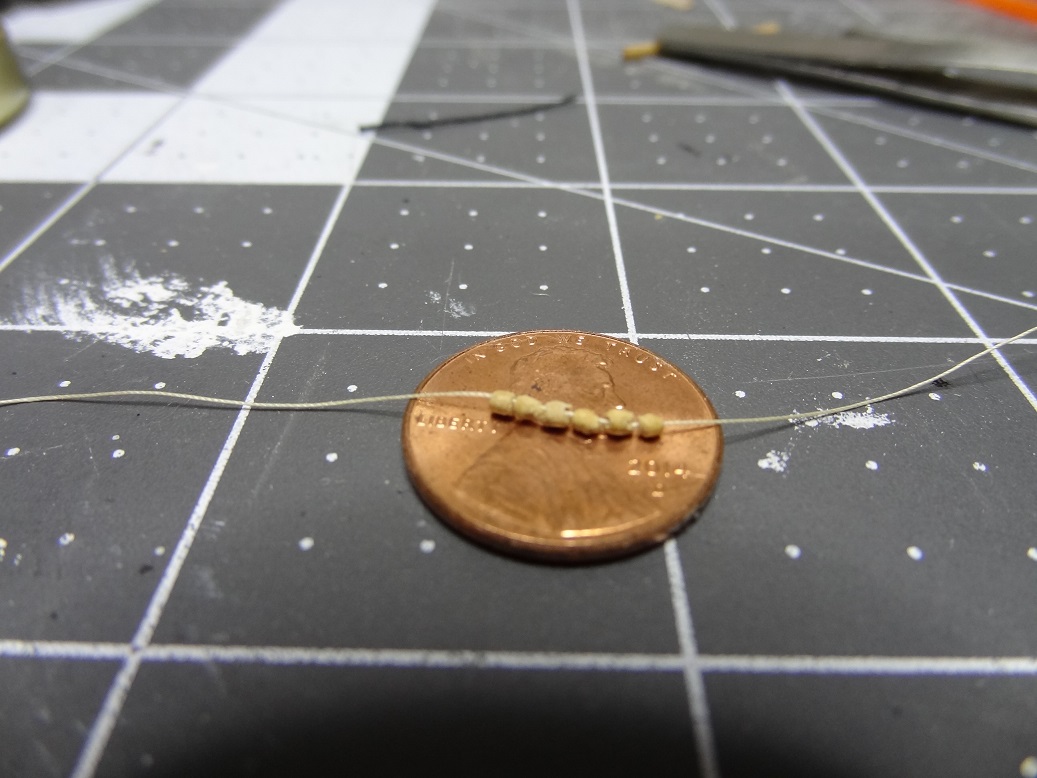
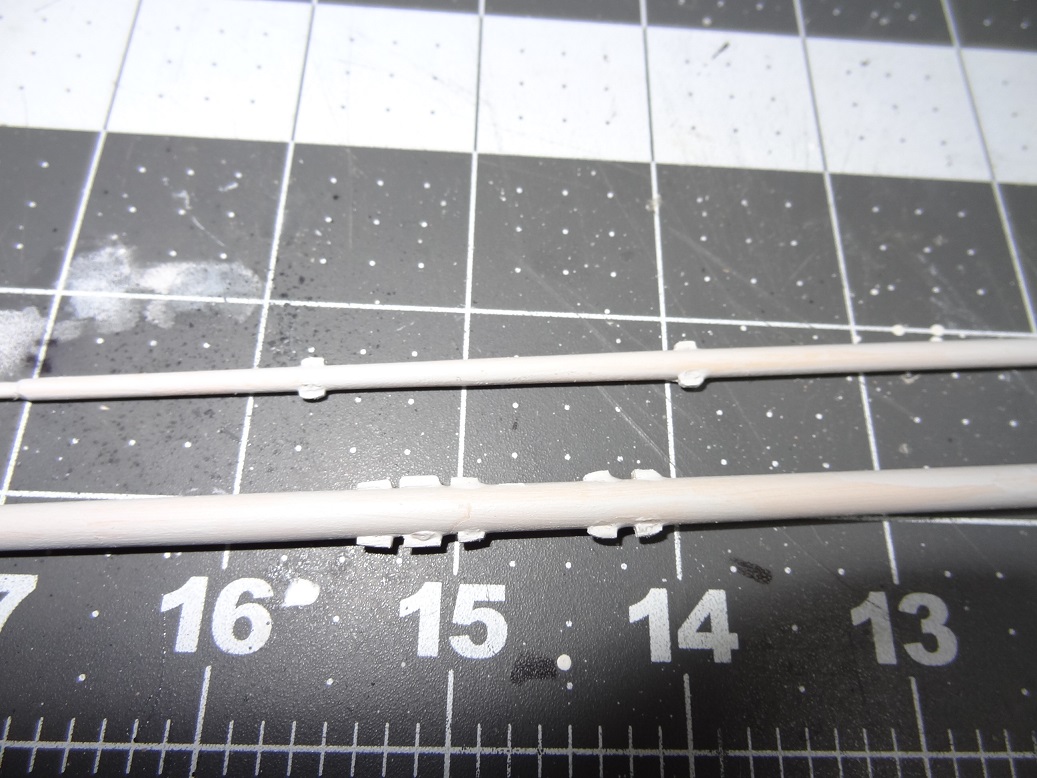
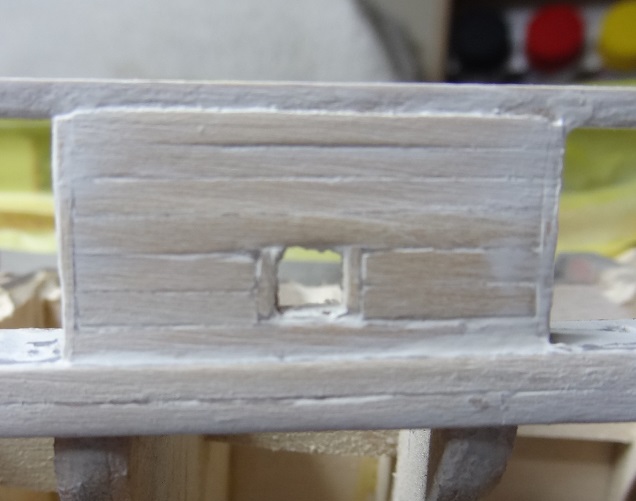
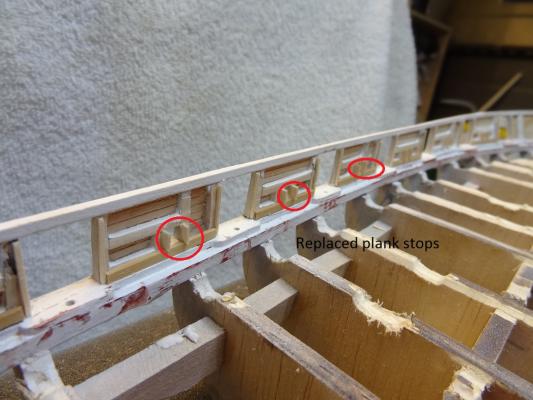
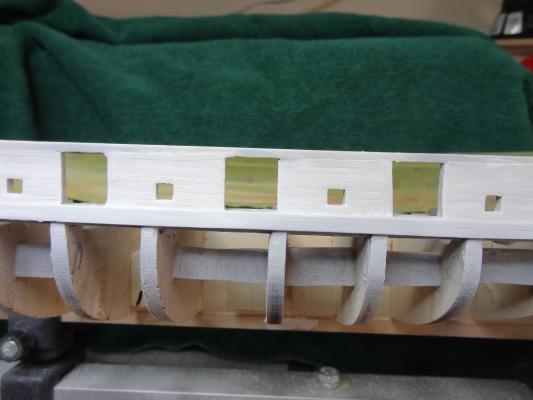
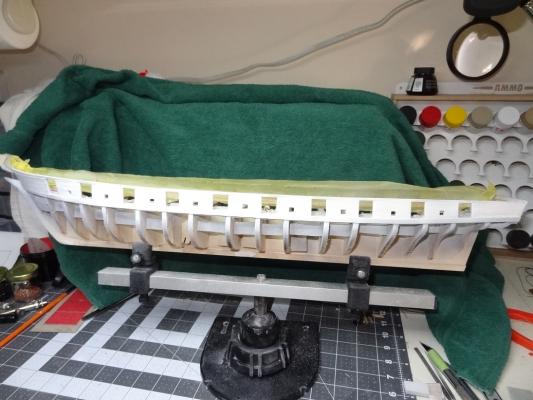
Hi Everyone - there's been a lot going on with the build this last week so I thought I would check in. When I left off last time I had fashioned some wood parral beads for the spanker gaff. Tiniest thing I have ever made or worked with. It was a good experience but I knew there were better options out there. As suggested, I found some beads at a hobby store and am using those instead. They are black glass and the bag had several sizes and shapes. What I used are the smallest round ones. I think it's a much better choice. So, I took a piece of my homemade rope, tied a knot at one end, reeved the other end thru one side of the jaw, strung up the beads, reeved thru the other side of the jaw and was ready ready to tie that off. What a nightmare! I was just trying to tie a thumb knot but I could not get it to tighten down right at the jaw. Every time I ended up with 1/32" - 1/16" of space between the jaw and the knot. Finally I ended up putting a dot of glue on the rope right at the hole. I cut the rope leaving about 1" and then tied my thumb knot around the rope end, slid that down to the jaw, put another dot of glue on that and then trimmed all the ends. More than one way to skin the proverbial cat. So the spanker boom and gaff are now complete. Which brings me to an observation. I know there are lots of good books on rigging out there - I have several. While the pix are good as are some of the write ups, I haven't really come across one that instructs on how to actually do it at scale. I mean using the small rigging tools and the like. If anyone has a suggestion there please speak up. One other quick rigging topic. I have begun to use the ropewalk and am making some samples. So far I prefer the Egyptian cotton thread. My gripe there is there is nothing to tell me what size thread it is. Just something off the rack. I've dyed some in India ink (for black) and walnut crystals for brown. Both look OK. But FINALLY the linen thread I ordered has arrived. It was so cool being able to order the exact size. I got some 18/3, 25/3 and 35/3. Wow - the stuff feels really good in my hands. Every thing I read says linen thread is the ultimate for rope making. We'll see. I got some spooled up but have not made any rope with it yet. Stay tuned. Back to the boat. I finished up the outer port bulwark using the kit planks - sanded and primed. Moving to the inside, I was excited to try the planking from Crown for that. Model Shipways uses a 3/64"x3/32" plank for the inside. I don't know how but I noticed it was all gone as I was planning out the bulwark. They don't give you that much and I guess I must have used some where I shouldn't have. And try finding that size plank online. Model Expo doesn't even have it. So, as I said I had Jason cut some for me - out of boxwood. This was a great comparison, planking the outside with not so great basswood and then switching to a much better quality cut of boxwood for the inside. For me at least the difference is night and day. I'm not having to bevel the long edges, what sanding I do is a real pleasure. No feathering or fraying. The planks fit together wonderfully! The one issue was having to replace the plank stop square strips with something larger as the strips really are 3/64". I can sand the planks down to the stops around the gun ports, but the stops around the oar ports had to be replaced. There's a few pix to show what I'm talking about. I feel like I am forgetting something, but if so I'll get it on the next post.


- 843 replies
-
- 2
-
-
- niagara
- model shipways
- (and 2 more)
-
White Paint Issues
mikiek replied to rynmss's topic in Painting, finishing and weathering products and techniques
I would just add - when you say primer, for paints like white, buff, even yellows use a white primer. Not light gray. Not that gray won't work but you may need to apply a couple of extra coats of paint to get rid if the dingy look of white over a darker color. -
Sounds like drilling yourself is a better way to go.
-
James - good idea using more or less stain on the planks. I like that look. Maybe I just don't see it in the pix, but does your keel have notches for the masts? That just brought back some bad memories with my build. I put the bulkhead filler blocks right up against the keel (and those notches). Then had to gouge out room for the mast heel as the mast diameter is wider than the keel width. Curiosity question, how would you rate the quality of the deck planks?
-
Good start jaggy - I have been considering Syren as an upcoming build so I'm interested in your take on the kit (parts, specs, etc.) as well as any gotcha's you run into. Syren does have a reputation as a great kit.
-
Joel - I will probably still go look for beads. I also found actual model parral beads in brass or wood on a few websites. I dug out my Model Expo Block Shaper device last night. I had ordered it but never opened/used it. Sadly, it must be assembled and there are no instructions whatsoever. I have a call in to ME. I'm thinking that might produce a more consistent shape. The ones I made were mostly just an exercise just to see if could do it. It was a worthwhile endeavor just for that. The things were so small I could barely focus on them. Maybe time to take out the reading glasses.
- 843 replies
-
- 2
-
-
- niagara
- model shipways
- (and 2 more)
-
Joel - I thought for sure you would suggest making them How are these? Of course I should paint them and use some black line. So I suppose I reeve one end of the line thru the jaws and knot that, wrap the line around the spanker mast and then reeve and knot the other end? Anyone know how tight the line is supposed to be? Tight? Loose? Never made ANYTHING that small before.
- 843 replies
-
- 3
-
-
- niagara
- model shipways
- (and 2 more)
-
Got it! I kept thinking maybe the beads were strung to a line that tied off on some eyebolts. Similar to the boom. So the line the beads are strung on is just reeved through a hole in the jaws and a knot tied at the top. Just curious - if you have done something like this before. I'm wondering if there is some small enough jewelry beads to use for this. As I mentioned at the moment I am going with 1/16" styrene rod drilled out and cut in very small pieces. The downside is they are not completely round. I could not make (and drill out) wood pieces.
- 843 replies
-
- 1
-
-
- niagara
- model shipways
- (and 2 more)
-
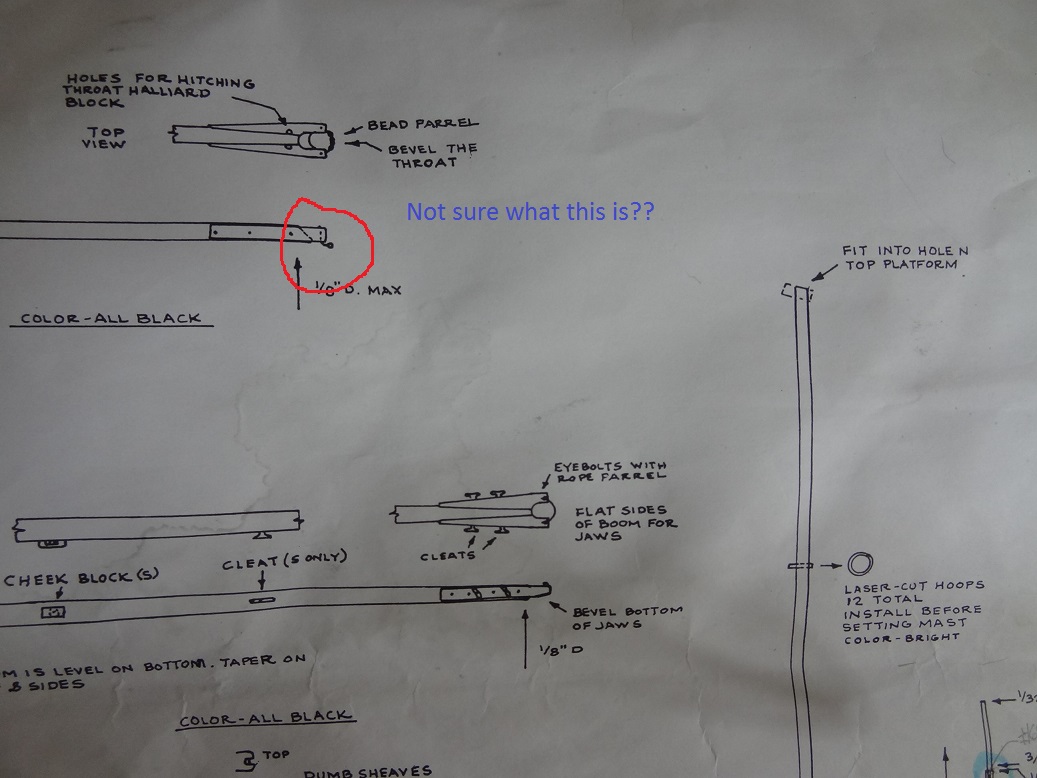
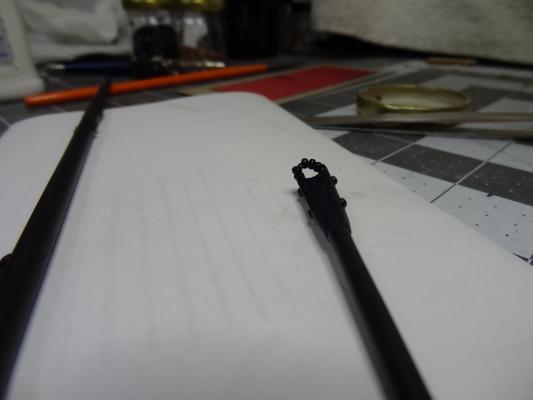
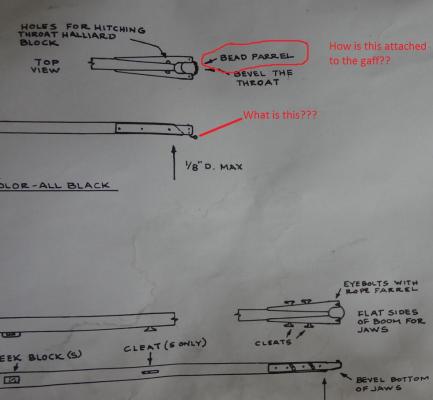
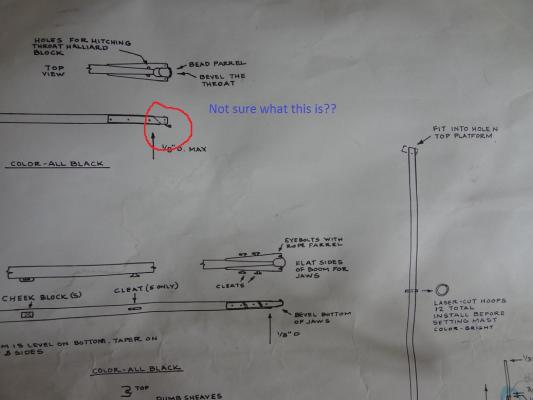
Joel - I'm afraid my first pic was too general. I have attached another. The object I am questioning appears to come out of the bottom of the gaff and then bend 90 degrees. Part of it is also a vertical dashed line that would make me think it is inside the gaff jaws. On another note - the boom parral is described as just rope. I've seen enough sample pix in books to get an idea of what it should look like. On the other hand, the gaff parral is described as beaded. But I am wondering what the "beads" are strung on and whatever that is how it connects to the gaff? I have sanded down the stops some more. They are actually very small on the plans. The pic showed them primed and I am planning on painting them today. I agree with you, the light color makes them appear larger.
- 843 replies
-
- 1
-
-
- niagara
- model shipways
- (and 2 more)
-
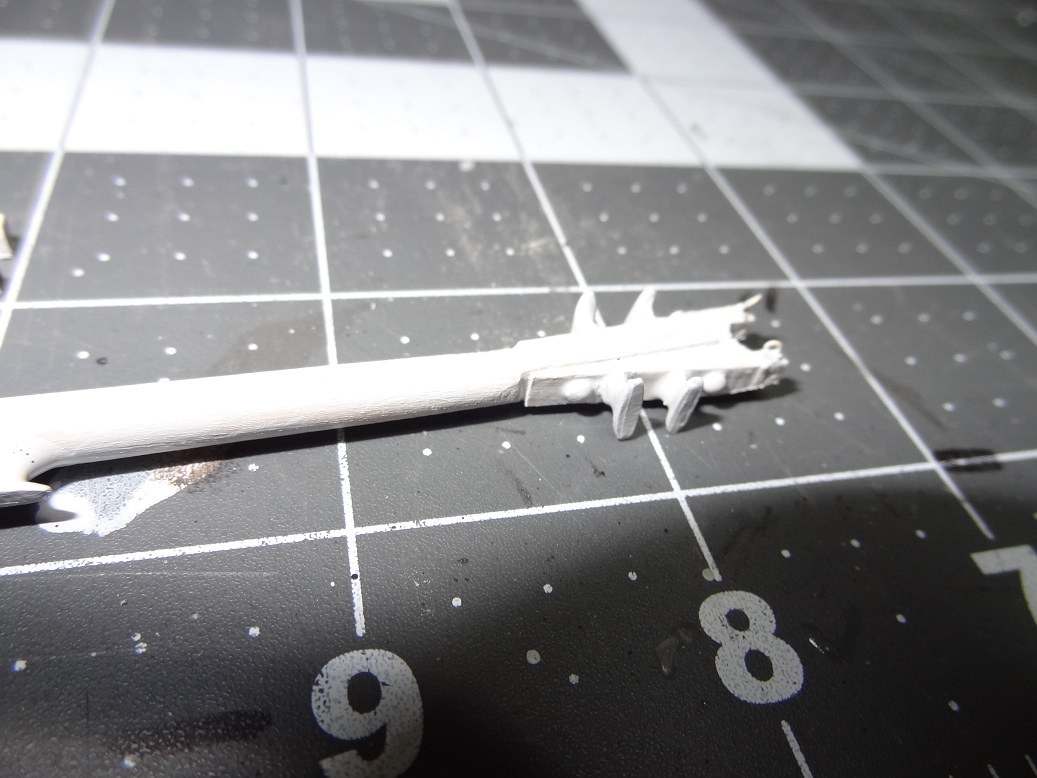
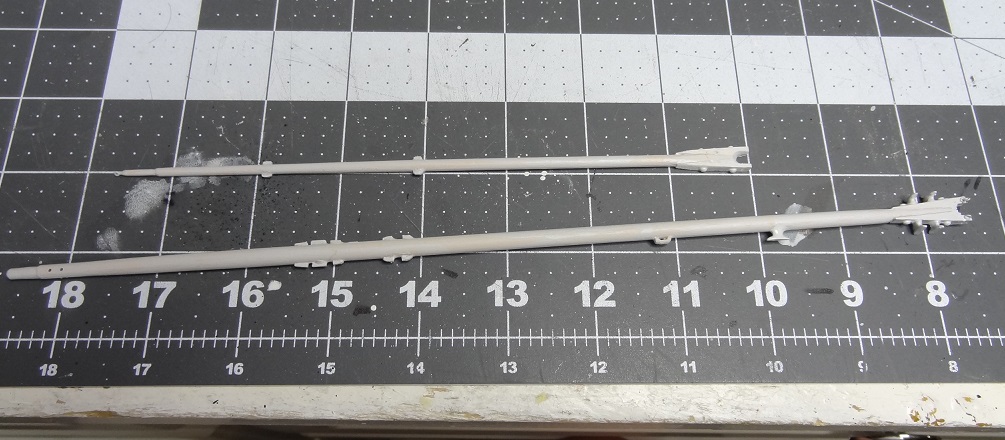
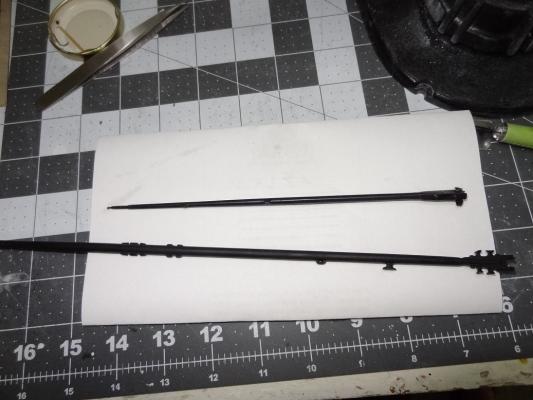
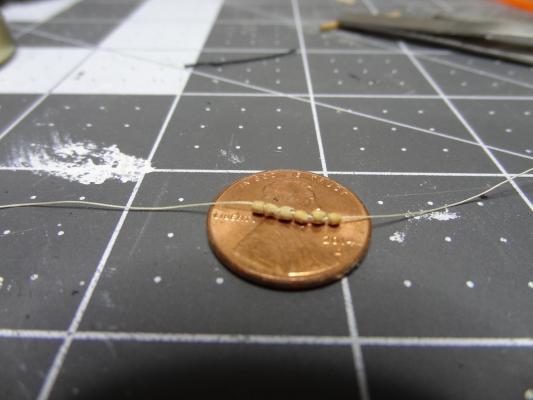
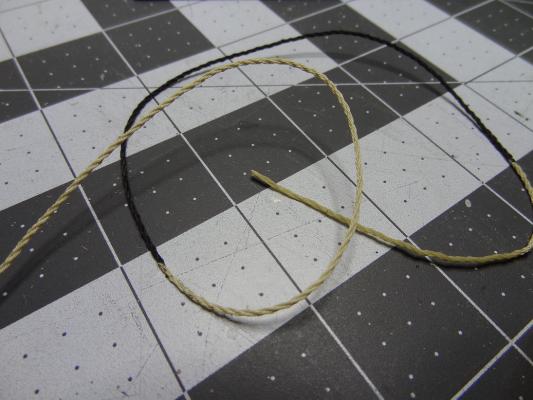
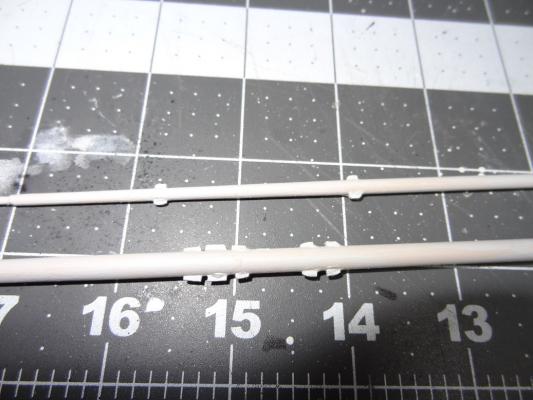
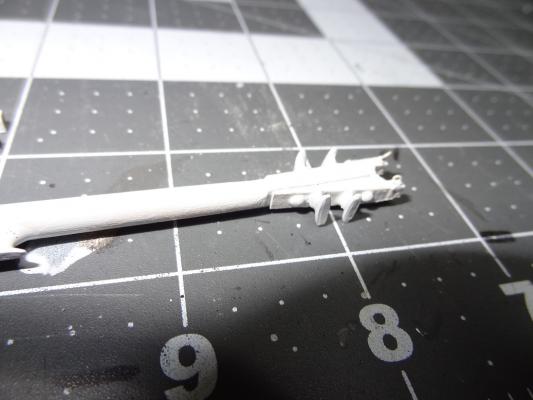
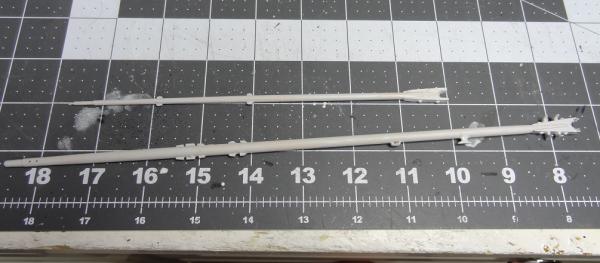
Finished the exterior bulwark planking on the port side today. Did some sanding, applied a first layer of putty and wiped that down. I believe I mentioned way back that rather than try to just fill in gaps I smeared putty over the the entire bulwark and then before it is completely dry, wipe it down with lacquer thinner until the wood comes back. I will most likely end up doing this twice more. Also on display is the spanker boom and gaff. Plans call for some very small stops/chocks on both. After trying to cut down several types of material to the proper size, I finally wised up. I cut larger pieces and glued them on and then shaped and sanded them in place. Much easier!!! They are shown in a pic, but after looking at them I think the need to be sanded smaller still. Both spars call for a parral to hold them on to the mast. The gaff calls for a beaded one. We're talking small. After several tests I finally settled on some 1/16" styrene rod - drilling out the center. I cut that into pieces about 1/32" long. They are not really rounded, but at that size I don't think it will be noticable. I am at a loss to figure out how this parral attaches to the gaff. There is a mystery piece (at least to me) on the plans that looks like it might be an eyebolt bent at 90 degrees. I included a pic of that below - please let me know what you think it might be. I'm kinda stuck on that. I made some larger rope yesterday. First 3 pieces of 4 thread rope using the Egyptian Cotton thread again. Then I took those 3 pieces and cable laid those. It doesn't look too bad for a first attempt, but I think it needs a few more twists in it. I also blackened a bit of it with India Ink to see what that looks like. I have some linen thread on order. Looking forward to working with that. It is supposed to be one of the best materials.


- 843 replies
-
- 1
-
-
- niagara
- model shipways
- (and 2 more)
-
Rope Making Basics
mikiek replied to mikiek's topic in Rope Making/Ropewalks's Discussions about Rope Making
Does anyone know about that last question? Thread must have a twist to it. So does thread with a right lay need to be used only for rope with a left lay? But then that begs the question - can you buy thread with a right or left lay? I'm wondering this because a few times I have seen the thread from one of the three bobbins unravel as it travels thru the feed to be twisted with the other two. Maybe the thread lay has nothing to do with that. Just my screw up? -
Hi everyone - just a quick check in. Seems like I have been avoiding getting back to the port bulwark planking. I'm finding any excuse not to go there. Experimenting with new rope maker, making a few more yards, drilling out sheave holes on masts. The list goes on. I did finally make progress last night. Come to discover I had to take a defensive driving course by Monday. So I did the online routine, which makes you wait a specific amount of time between pages. Took the laptop to my work area and did planking in between the pages. Started at 10PM last night and finished at 4:30AM this morning. The course is complete and the exterior planking is 3/4 finished. I'm wrapping up the rest of the exterior today. Not a bad 24 hours. With the ropewalk, I am just trying out various types of thread right now and also just learning the basics of the machine. A few of the ropes look OK, a few will end up in the trash. Threads I've used: Egyptian Cotton - not bad after wiping the rope down with white glue/water mixture. But this was my very first attempt so the lay of the rope is a little inconsistent. The color is a light tan so it has the look of new rope you might get at a hardware store. Not sure how accurate it would be on a build. Polyester - This seems to be the favorite of a lot of people, but I was a little underwhelmed. I wiped the glue mixture on some of this but it did not set well. Lots of spotting. Silk - my favorite so far. Very tightly wrapped and doesn't want to twist up on itself like the polyester did. I have some linen thread on order. This seems to be another popular choice so we'll see. Sorry for not having any pix, but the camera just will not zoom in on the rope. Maybe when I do some larger diameter cable laid it might cooperate more.
- 843 replies
-
- 2
-
-
- niagara
- model shipways
- (and 2 more)
-
Scott/John - I have ended replacing a lot of the sticks from the kit - including square strips for the dowels - with boxwood from Crown Timber. Much better to work with. That's not to say you couldn't get by with what comes in the kit, but I like the boxwood a lot. You know it's odd. I have a Niagara practicum I bought, and the guy says (mind you his opinion) that the MS 3/64x3/32 and 1/32x3/32 are notoriously poor quality. I have nothing to back that up, but can say the boxwood replacements are cut better and hold together better. I'm already looking into having CT replace the entire timber stock for my next build - Rattlesnake.
-
Hey Scott - welcome back. One thing I'm finding is that you can control where the lie of the top plank by sanding the long edges. I went as far as to bevel the long edge - outside on the top, inside on the bottom - it makes each strake fit together a little more snug, and you can make them wider or narrower as needed. Glad to have another Niagara builder posting again...
-
Hey folks - I just got around to breaking out the Planetary Ropewalk I ordered a few months back. The assembly instructions were good as were the "how to operate" instructions. I even got some good suggestions from Alexey on the types of thread to try. So I'm good with all that. Several of the books I have describe the different rope types - right lay, left lay, with cable, 3 strand, 4 strand, etc. While there are a lot of good descriptions, I'm not finding much on the "why" for these various types. Particularly when it comes to modeling a 1:64 build. I'm hoping someone can point me to a book, write-up, white paper or something that helps with the why's. Some of it I get - at least on a full size boat - but what really matters in a small modeling scale? For instance: I've seen posts saying dont' bother with 4 strand on a model - not enough difference with 3 strand. I can add a inner "cable" thread on the Planetary - do I care? I assume thread has a lay just like rope. Does this matter? If the thread is a left lay should I only make right lay rope with it? Again, what I would like is something that provides guidance about rope making as it pertains to our hobby.
-
Long Term Paint Storage
mikiek replied to mikiek's topic in Painting, finishing and weathering products and techniques
Received the Tamiya mixing jars I ordered. They are just like the paint jars - especially the tops - just a little bigger. My Tamiya paints have stayed good opened for months, so I am hoping for the same with these jars. -
Blackening brittiana fittings ?
mikiek replied to Senior ole salt's topic in Masting, rigging and sails
I use the BlueJacket products - both pewter and brass. They work well. They are still out on their website. You just have to drill down several menu levels. Just make sure your material is clean. BJ also sells a cleaning product which I use and there are numerous homemade concoctions.