PopJack
-
Posts
256 -
Joined
-
Last visited
Content Type
Profiles
Forums
Gallery
Events
Everything posted by PopJack
-
 Understanding there is only one set of sails to give away, is there any way you might be willing to lay the sails on a sewing/ cutting board or other grid and snap a photo so I can see the dimensions? It would be really appreciated.
 -
My son tells the story of a classmate who put one of the magnets in his nose. The idea was that he was going to use another one to pull it out in a kind of "surprise!" moment. As such things go, he ended up in the emergency room haivng it removed form his sinuses after using the wrong polarity on the removal magnet. Thanks for your input on the wood and other items.
-
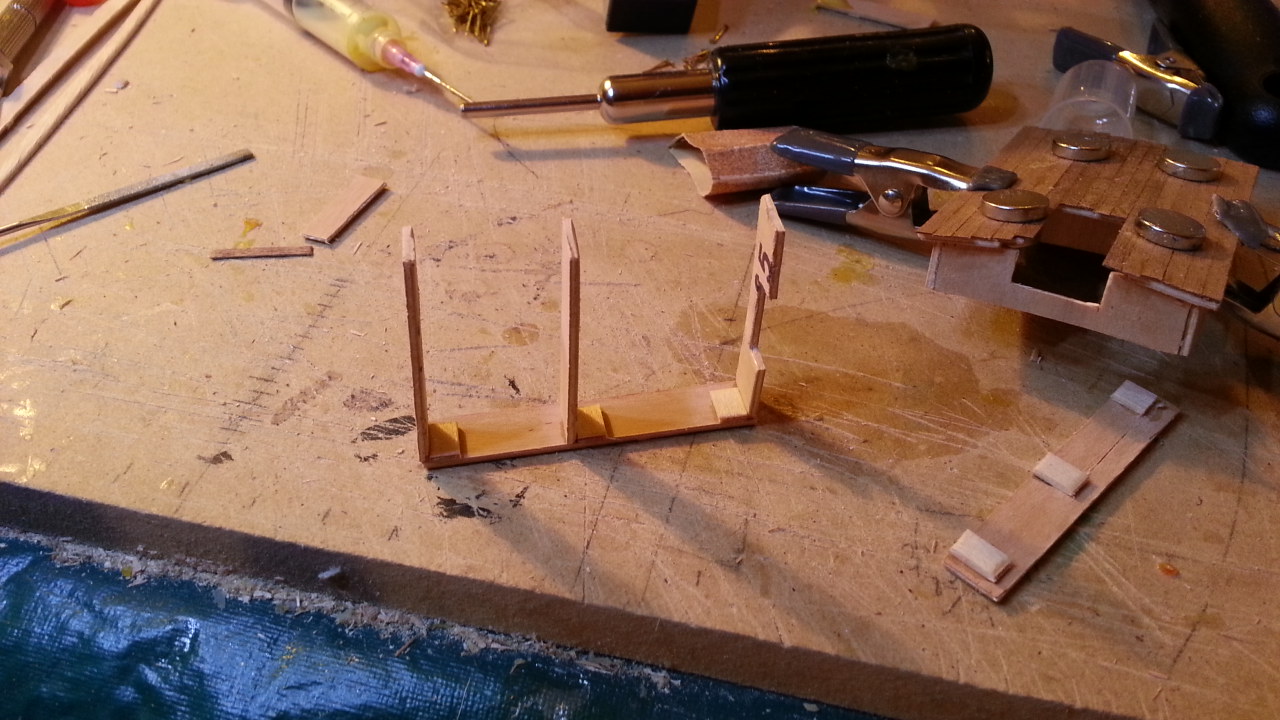
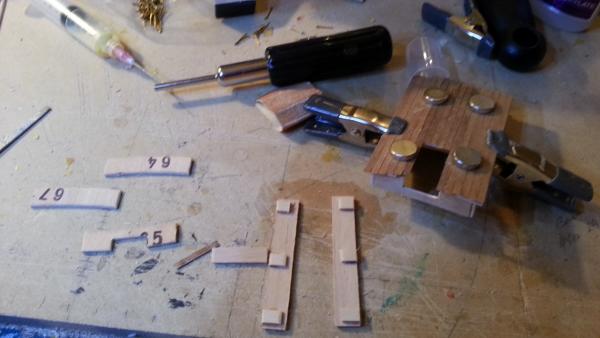
I considered soaking the deck, or even wetting an microwaving it. Probably would have been a good idea. The "clamps" are rare earth magnets I got from Amazon. (http://www.amazon.com/gp/product/B005HYCSLS/ref=oh_details_o00_s00_i00?ie=UTF8&psc=1) On one hand, they work really well. Any planking operation where you can get to both sides is really nice and flat. On the other hand they are TOO STRONG to deal with easily. They will grab a set of tweezers from a distance, and more than once, one sitting on my wood work surface has jumped up to join one on some fixture I was working on. This has actually broken a couple of things. They also react with wood glue and occasionally form a black stain that has to be sanded off. Again, on the positive side, I put one on top of my kitchen table with the stack hidden under the table in my hand and perform magic tricks for my grandson (4 years). I can make them jump and slide and all kids of things through the table top. The table top is 3/4" laminate covered pressboard to give you an idea of how strong these stupid things are. Someday I will try and find ones that are still strong, but not that strong. QUESTION: Do you (or anyone) know of a source where I can study how this boat might have actually been finished. I'd kind of like to try my hand a painting her- but I have no idea what she might have actually looked like. There has got to be a resource for small boats, but I haven't a clue where to start.
-
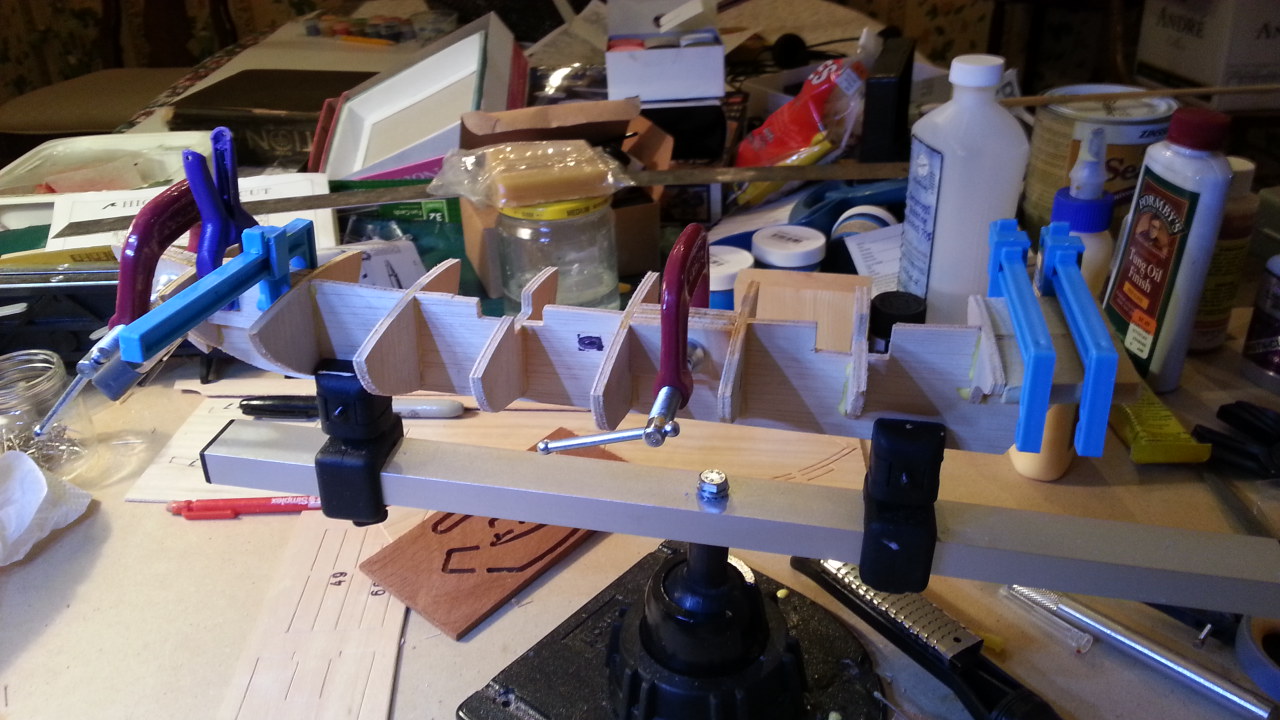
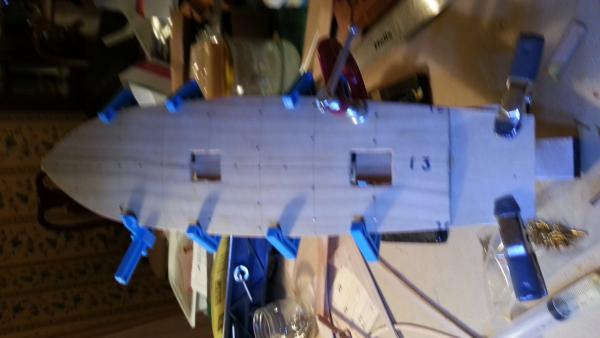
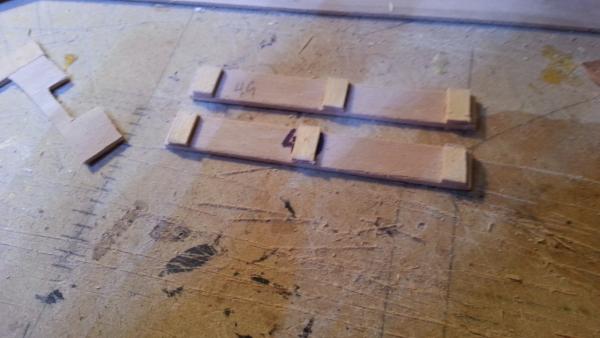
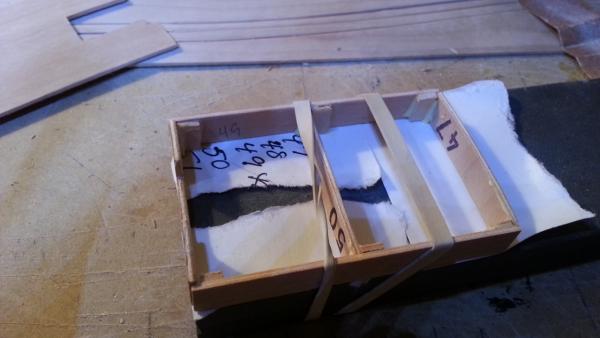
This afternoon I spent a few more minutes with the Swift. I have been following the directions as best I can, and doing things in the order suggested. The next step for hull construction was the gluing on of the false main and poop decks. The instructions suggested using wood glue and then nailing the deck down. The cross curvature of the deck is quite severe- this was one well drained boat! On my first build, I used CA glue and accelerator to help with this compound curve. This time I tried the nails as suggested in the kit's instructions. I discovered very quickly that the nails pulled out and with glue everywhere I started heading toward a mess. So I put a couple of nails in along the keel line and then used clamps to achieve the needed curvature. I went back to nails, but in the end gave up and used the CA glue. After everything was in place I outlined the seams with wood glue which should (according to my reading) work its way into the joint and seal things up forever. When I am making furniture, after all the dry fit and such, the glue goes on and the clamps come out. IT NEVER works the way it should - my kids and I call it the "cuss and fuss" stage. This is when bad things happen. True to form, when I tightened one of the clamps, the false deck BROKE! Using clamps and the magic supplied by a few choice words, I glued it back with a brace from the bottom. Everything looks good except that I think the nail heads are going to take a lot of work to get flush. What can I say? It seemed like a good idea at the time. I also worked a bit on the second deck structure. Again, I used my little scraps to help me get it together. This time I raised them a bit so that the framework of the hull should fit without being trimmed. You can see how with them in place, its very easy for even me to get the general form of the frame done quickly. I started planking the roof of one of the houses as well. All in all, the kit seems pretty sweet for the technology of its day. It is not percise and there isn't a sharp corner in it, but I'm enjoying the build so far.

-
Good catch Kevin- and excellent solution Keith. I'll make allowances in the frame for the supports to sit. Thanks for the tip on the extra brace. Yes, I'm certainly going with Dire Straights. Only issue is, I've got to figure out exactly how I want to put that on the boat. I like your idea of a transon detail. I also like the idea of an inlay on the deck or even one of the houses. If she had flags, it would be easiest to print something on them.... who knows? EDIT: The older version does not have anything to interfere with the corner post. The newer one might- as my other AL model did.
-
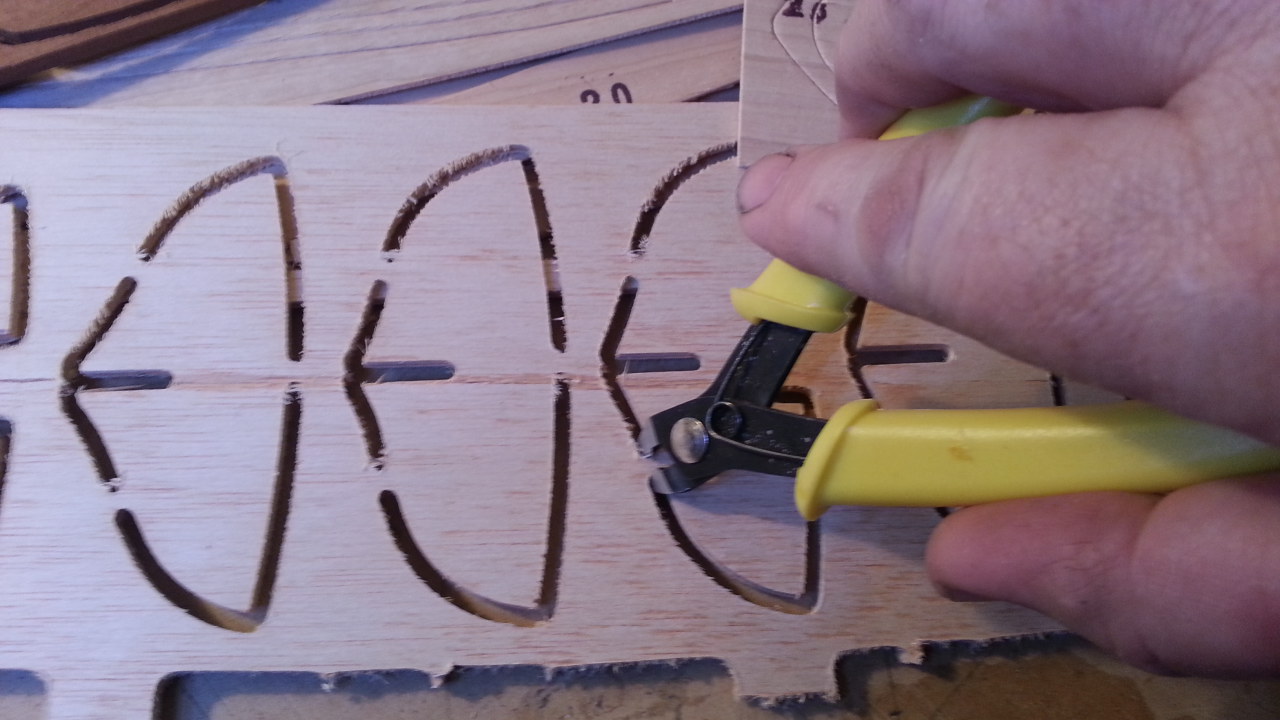
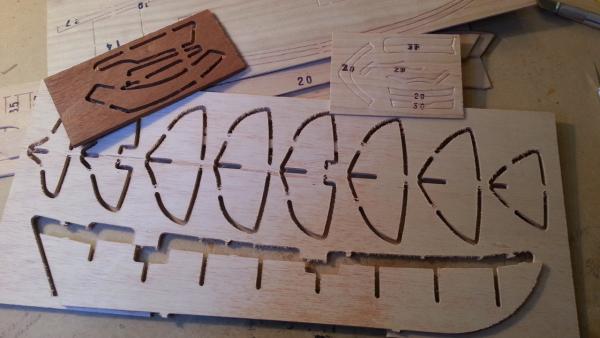
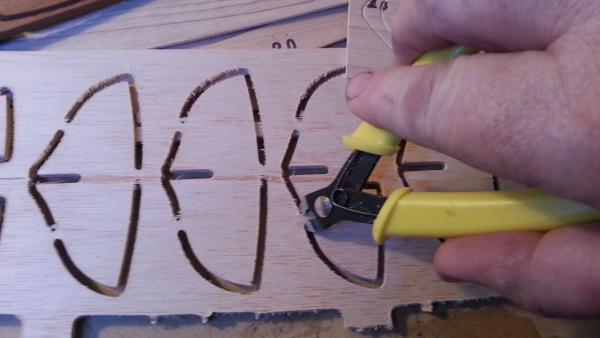
Like a couple of others I have a 1980's LA Swift Pilot Boat. I have completed only one boat- LA's Mare Nostrum. I am going to build a big ship, but decided that I needed more practice before destroying building such a expensive nice kit. So, while I don't plan on doing a BAD job, this one is really for planking practice. I've had this kit since the 1990's. I figure its time to do something with it. First of all, laser cutting is really nice. This kit was done with some kind of power router and a die cut- that more bruises than cuts. The pieces have to be cut out. I never appreciated lasers until I started this one. This is where the "old hands" can laugh at a newbie.... I just didn't know how good things are today. To cut them the pieces out, I tired a couple of different things. I ended up with my chip carving knife. It is razor sharp, but very sturdy and has a nice handle. For the largest pieces I snipped them with sharp side cutters and then file and sanded the edges. The false keel and bulkheads fit together amaizingly well. It only took a bit of sculpting to get them right. Others have written about the filler blocks. I followed the kits instructions and decided to glue them in place before shaping the stem and stern blocks. While things were drying, i started a deck house. Since the pieces were small and not terribly sturdy, I took some scrap wood and made little corner braces. I glued these in place and then the cross pieces to them using CA glue. After everything was glued, I strapped it to a square block to get the shape right and the used wood glue from a hypodermic along all the inside seams for strength. Since the roof is curved I think this thing is going to need to be pretty strong to sustain the bend. So, that's where it stands after one afternoon. And yes, she will be named after my favorite band, as soon as I can figure a cool nautical deviation of one of their songs.


-
I have the same model and would love to see what you do with the sails. I am thinking that she would look good with at least a partial compliment.
-
Great quality work. Like others, I'm learning from your innovative clamping techniques.
-
decals question
PopJack replied to PopJack's topic in Painting, finishing and weathering products and techniques
Thanks- everything makes a lot of sense. I'll make sure the wood is well sealed and smooth, and then apply the decal (transfer). Afterwards I'll give it a light spray coat of finish and see how she looks. -
Thanks for the advice and encouragement. I really appreciate is and have just recieved my acknowledgement of my order. I am SO looking forward to starting on this ship.
-
decals question
PopJack posted a topic in Painting, finishing and weathering products and techniques
This is my best guess as to where to post this beginner's question. I have been afraid to put the registration decals on my little boat for fear it would look, not like a painted ship registration, but like...well, not to put to fine a point to it, "like a decal." Is there some secret to blending in the decal so t doesn't stand out? (I have looked, if this was discussed elsewhere, a link would be most appreciated). Thanks PopJack -
HMS Surprise by Derik - Artesania
PopJack replied to derik's topic in - Kit build logs for subjects built from 1751 - 1800
Beautiful. I really like the .5mm pencil idea, it turned out great! -
I've finished one boat and really enjoyed it. I was looking at ModelExpo at the Rattlesnake and the Syren. The difficulty level on the Rattlesnake is medium and the Syren is advanced. I notice the Fair American is also medium, as is thier Bluenose. I like the look of the Syren better- but having only completed one ship, I'm a little afraid of the "advanced" level. I have a 1980's LA version of the Swift I could start on, but the ship does not appeal to me for some reason. I really enjoyed the small detail work (limited though it was) on the model I did. I started wondering what these lables mean. Is the advanced actually harder to do or it there just more of it? I will avoid asking the "what should I build" question directly, but really, maybe that's what I want to know.
-
Question on old kits - Moved by Moderator
PopJack replied to PopJack's topic in Wood ship model kits
Garym: I already have the kit- had it for years. It is not laser cut, and I guess I was worried about accuracy (like you indicated). I hadn't thought about "upgrades." I note the new version has sails- for example- and the one I have does not. It's a cheap kit- I think the new version is still under $100. No idea what it cost back in the 80's. I can't say I'm in love with the boat, but I was thinking about building it to keep learning. It would be my second build. This is the same boat being built as "Dock side of the Moon." -
For me, it was price and appearance. I did not know if I would like building mode boats and did not know if I had the technical proficiency. The kit was sufficient for my purposes, although it was missing wood (had to buy quite a bit) and such, but building has been a good experience. I thought the boat (Mare Nostrum) was pretty and interesting as well. The Sanson is also a interesting and - as far as this novice knows- fairly unique kit to learn on I have two kits "on the shelf." One is a Sanson and one is a 30 year old AL pilot boat kit, the "Swift." Assuming I can produce a good boat from one of these, I will probably invest in a top line kit next time. EDIT: I have now built another AL boat (the Swift) and purchased a Model Shipyards Bluenose (1:64) and started it. In comparison, I found the MS instructions harder to understand than AL's instructions. Additionally the units are in English, which is a pain compared to the simple metric units. The quality of the wood, etc I'm sure varies from kit to kit, but so far I've noticed very little difference. The plywood, for example in the Bluenose kit is thicker, but not well laminated and it frequently de-laminates when sanding or even trying to cut. All in all the Bluenose experience is making it plain I was too hard on AL.
-
First: Please excuse if this is posted incorrectly. I have a 1982 Artesania Latina Swift Pilot Boat 1805 kit. I have just completed my first boat kit- the Mare Nostrum and enjoyed the building a great deal- although I did not do a great job and am not happy with how it turned out. I actually own two kits (long story). The other is the Sanson steam tugboat, but I have been looking at this old kit for my second build. Question: Are there special considerations regarding this 31 year old kit that I ought to be thinking about? I'm not very good- is it something I should pass on to someone who is better or more experianced? I don't know if these kits develop "followings" or anything. Inside the kit, I see that the forms were cut with what appears to be a router. Should I expect even lower accuracy? I can see there will be a great deal more work making the pre-cut pieces work. Anything I'm not seeing? Thoughts and guidance appreciated.