PopJack
-
Posts
256 -
Joined
-
Last visited
Content Type
Profiles
Forums
Gallery
Events
Everything posted by PopJack
-
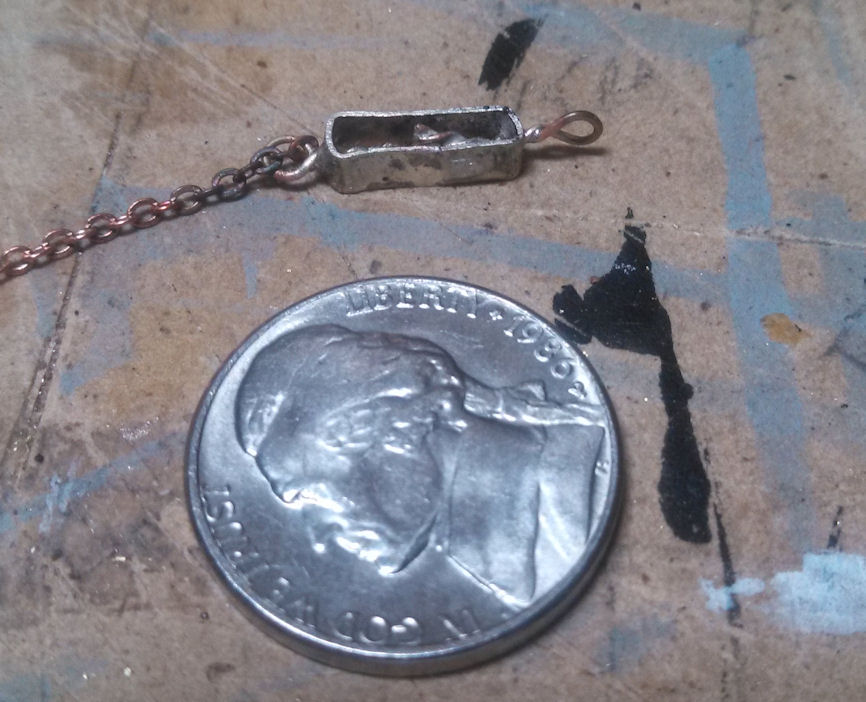
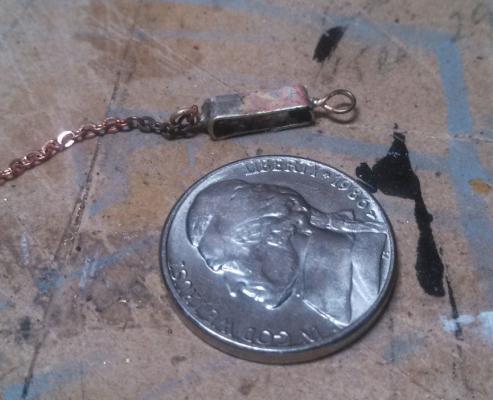
 My next adventure in metal- and I can't think of what you call it. The kit has the bow sprint held in place only by the knighthead and a metal strap. All of the boats in detailed paintings and photos show at least one chain from the tip of the bowsprint down to the cutwater. I decided to install a chain and "tensioner" for lack of a better word. This is my first ever attempt to make one, so any advice or constructive criticism is welcome. Here it is soldered to the ring in the ring around the bow sprint. Sorry about the focus. I tried to find brass chain, but only found copper. I'll darken it all before installation.
-
Wow- that is so lovely. I have to admit that I was having a bit of a problem visualizing how this was going to turn out. I need to learn to have faith in well controlled shaping and sanding!
-
HMS Surprise by Derik - Artesania
PopJack replied to derik's topic in - Kit build logs for subjects built from 1751 - 1800
Yep- Oak Ridge. The only town in Tennessee where you don't need to use headlights at night (it glows in the dark- ha ha). We moved here from West Texas years ago. I'm almost used to the trees, but not quite yet. This is definately Tennessee Football Country. Rule #1: Never comment on ANYTHING that is painted Orange! -
Thanks for the thoughts on what to do with the stack. I've got one mounted and am thinking about the other one. Well, I spent all evening on two soldered joints. The instructions say bend and glue, and I suppose that actually might make more sense, but this is a learning ship and I want to learn. Here it is mostly finished, but it needs to be blackened. I finished one stack and mounted it. I glued the other one back together but haven't tried to finish it yet. I started to work on an anchor and broke it too. I'm beginning to think this white metal stuff isn't as tough as I thought.

-
Excellent Points, all. I will go through photos in the book and see if I can find a photo on the knighthead. Despite the dozens of photos, its hard to believe what there isn't a photo of. Concerning the pipes, the instructions call them "ventilators." This makes no sense to me, since the cabins were small and the doors easy to open. I know from my reading that the boats were used 'year round,' and that on boats of this size it was not uncommon to carry a cook and couple of deck hands in addition to one or more pilots and their apprentices. In the winter the cabins were heated by wood or coal fired stoves, and of course any cooking was done on the same devices. Knowing this and looking at the shape, I figured they were chimneys for small iron bellied stoves. In the photos, I saw some of these also.
-
QUESTION: On the knights head that straddles the bow sprint, does the cross piece rest on top of the bow sprint? In other words, do I cut the legs on the bow sprint to fit the heights available when the angle of the bow sprint is correct? I read where the knights head "supports" the bow sprint, but I'm not sure how. Any links to photos appreciated.
-
I have no clue how to do a metal part that doesn't involve investing a lot of money in some kind of molding kit. I'm thinking this boat will only have one chimney. I'll put a vent or something on the other one.
-
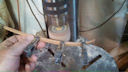
So... tonight I got the stove pipes out to see if I could make them pretty. I took a "before" picture to show what they looked like. Then I put the first one in a clamp to see if I could do anything with it. Turns out I can do something. It broke while I was scraping it with a dental tool. Poop. (and not the deck neither.) I'm trying to figure out what to do about this.


-
Request for Help- Soldering with Paste
PopJack replied to PopJack's topic in Metal Work, Soldering and Metal Fittings
Thank you. I can see how that technique would work and would result in clean bands- like the ones in your photo. I can't wait to try it. FYI only, after I posted the sketch, I found .an alternate technique in similar to what I was trying in "the Neophyte Shipmodeller's Jackstay" I don't think it will result in as clean results as you have though Over the next few days I make several in both techniques. If I have success, I will post what I tried. Thanks again for the response, it is really helpful and appreciated. -
Request for Help- Soldering with Paste
PopJack replied to PopJack's topic in Metal Work, Soldering and Metal Fittings
Here is a sketch of what I'm trying to make. It is not in the kit, not would there be a place for it if I followed the directions. That said, I have seen this kind of thing in photos of the real boats as well as on different models. I called it a yolk, I'm not aware of what to properly call it. I intend on mounting it on a spar, and then running chain of both sides. Thanks for any references of links to where I can see something like this being made.
-
Request for Help- Soldering with Paste
PopJack replied to PopJack's topic in Metal Work, Soldering and Metal Fittings
I'm making a yolk with a connection point on both sides. I am still having trouble, but now I can't find the tutorial I can't do it with butt joints. It's time to walk away for a while! -
I was making the upper spars for the fore and main mast. In the instructions, it reads "these are to be treated exactly the same." Basically, you start with the supplied 5cm dowel and taper them from 4 to 2 cm. They are the same dimensions in all regards, thus the instructions. I made the first one with no issues, but broke the second one while tapering it. At first I was going to run by somewhere and pick up a small walnut dowels, but decided that if Themadchemist could make parts out of firewood, I should be able to make a spar out of the wood in the shop. So, I went down, cut a corner off one of my walnut boards, put it in the lathe and then turned it down to roughly the right size before tapering by hand. It turned out quite well. In fact, this second dowel turned out so well, I decided to improve the shape of the first one- which, of course, I broke. Both are now complete and more or less ready to proceed. IN ANY REGARD, although I disregard many instructions, I certainly followed the one about treating these spars exactly the same way.
-
Request for Help- Soldering with Paste
PopJack replied to PopJack's topic in Metal Work, Soldering and Metal Fittings
Thanks for the response Russ. To anneal, I just heat it up and then quench it? -
I was hoping some expert would comment on this subject. Since no one has, allow me to venture that copper tape, unlike masking tape or so called duct tape- is intended to last forever. It is used in making stained glass constructions. You apply the tape to the edge of the glass, fit the pieces together and then solder over the joints. Although when looking at the glass you see the silver solder, it is actually the adhesive of the tape that holds it together. Duct tape is actually a very poor tape for most permanent repairs, and in fact using it in an A/C system is NOT recommended for the reasons you state. There is an aluminum foil tape that is made for permanent duct that any reputable contractor will use. You can spot it easily because it is very shiny and will cut you if handled improperly. Masking tape is, of course, intended for temporary "masking." I wish I knew enough about it to comment on the chemical or bond nature of the tapes, but I don't Perhaps someone can take a less anecdotal approach and answer your question properly.
-
Request for Help- Soldering with Paste
PopJack replied to PopJack's topic in Metal Work, Soldering and Metal Fittings
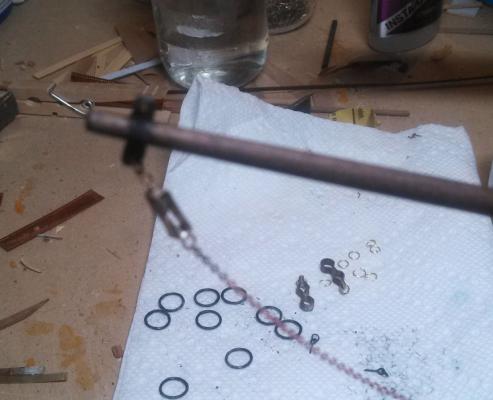
I continued to experiment after the last post. The paste works fine, it just takes quite a bit more than I thought. First, I made a couple of "easy" joints. This is 1/8" brass flat brass, btw Then I prepared to do what I couldn't do before. I started a bend and cleaned up the surfaces to be mated with a file. I then put as much paste as I could justify on it. I heated slowly with a torch and after most of the flux has evaporated, but while the remaining solder was still hot, I pinched the hot joint closed with a pair of hemostats. (No photos, I don't have that many hands) After it cooled, I had a reasonable joint. I still am not sure how to close up rings or how to avoid this "squeeze it while its hot" stage, but at least I can do some work.


-
Worked on the bilge pump today. The supplied part had rings, which after a lot of debate, I decided should be iron. I couldn't find any historical reason for this- most appeared to have been only wood, and even my pilot boat book doesn't seem to deam the lowly bilge pump as worthy of discussion. I also made my first ever metal fitting- I am rather proud of it, As fate would have it, I am fighting an eye infection that has temporarily affected my vision (actually the treatment has)... thus I can tell you these part feel good to my fingers. If this post dissapears in a few days, it means that they didn't look as good as I thought.


-
I watched the tutorial and several youtube videos on soldering with paste. It seems like it should be easy to do and give good results. I cannot get it to work! I've tried making two different fittings and both times they come apart. I am using Fusion Brand "Brazing Paste" Product stl-1205-655 I am wondering if I got the wrong stuff? I am using a nice micro torch and am cleaning everything up well. I apply heat, wait for the flux to bubble and then remove the heat. The surfaces to be mated pressed tightly together. After repeated failures, I went back and cleaned up everything and then soldered with plain lead free solder and it worked well. I want to solder the rings closed so that the riggings won't pull them open over time, but with regular solder and flux, this seems like it would be a bear, while with the paste, it appears pretty easy. On the positive side, I did make my VERY FIRST METAL FITTING! It was just harder than I thought it should be.
-
Thanks for the comments. The kit's rail was from the same sheet of plywood as the false deck. I was kind of surprised, being that they don't suggest painting- I kept wondering what it was going to look like. I'm guessing you got a rail, but probably looked at it long ago with a "are you kidding" kind of look. I'm not going to paint my rail (unless I'm too embarrassed by the joint). I think when I put oil on it, it should match the tops of my deck houses- which I also left unpainted. I've been watching your excellent build with great interest, BTW. It is quite a beauty- I'm suspecting that your mast will look great as well and that the rake will be perfect.
- 125 replies
-
- 1
-

-
- swift
- artesania latina
- (and 1 more)
-
Back in town tonight. Decided to make a new rail for my Swift. I had some mahogany that I think will look nice, so I used a bandsaw to cut it out and the my drill press with a sanding drum to shape things up a bit. I attached one side and ran out of clamps. After things had pretty well set, I found that my seam was terrible- and I don't use the word lightly. I'll do some kind of repair on it tomorrow if I have time. While using the drill press, I decided to go ahead and drill for the mast. These pilot boats had really raked mast- according to the book I am reading there are a couple of different theories why- including that it made sail handing easier (I guess it returned naturally to the boat's midline under gravity) which was important since they were often sailed with only one sailor on board. In any event, I prepared a paper guide from the plans and then used it to set my drill press table angle. I drilled both holes. Hope they are right. I also drilled for the bow sprint and anchor holes. I was going to lash my anchors to the outside of the gunnel, but the photos in the book show them universally just thrown on the deck. Finally, I found concrete evidence that at least some pilot boats did have copper bottoms. I wasn't going to remove my copper regardless, but it was nice to see.


-
Please don't think I'm trying to be contentious, but I find this remark curious. Although a novice at ships, I have a fair amount of experience with furniture and I have had no end of trouble with glue. Glue that is wiped off with a dry rag or finger is nearly always a disaster. I have found if I wipe excess glue (woodworkers glue, that is) with a damp rag it lessens the problems, but - at least with the woods I've worked with- glue spills if only wiped seal the grain and prevent the wood from taking a uniform stain coat. To get a proper stain or dye, I've had to either scrape or sand below the penetration level of the glue. I've built with various woods, cherry, oak, mahogany, poplar, and some exotics. Is there something I'm missing here?
-
Thank you for posting this build. Bluenose is my next build- sitting at home right now waiting patiently while I finish what I'm doing. You build is an inspiration. .FYI: They don't carry these any more. They suggested I search the web for scale figures.
-
For Father's Day, my sons gave me a copy of Tom Cunliffe's Pilots: The world of Pilotage under sail and oar, Volume 1: Pilot Schonners of North America and Great Britain. Soooo..... I hope I don't end up finding I did too much wrong!
-
Wow- I'v e never seen anything like this. Thanks for sharing your log- I'm learning a lot from it.
-
Jack or PopJack is fine. This is a name I use in many places- some where there are more young people. Some of them call me "Pop." (This is not to say everyone here is old ) Trivia: my name is actually Jack. (Most Americans who use the name "Jack" are actually named "John") Yes, that clears up my question. I understand how you solved the problem, thank you.
-
Well, I'm out of town for over a week. The only good thing I can say about my progress is that I've finished this little boat every night in dreams. If I can only make it work out as well as my mind's eye sees it.