PopJack
-
Posts
256 -
Joined
-
Last visited
Content Type
Profiles
Forums
Gallery
Events
Everything posted by PopJack
-
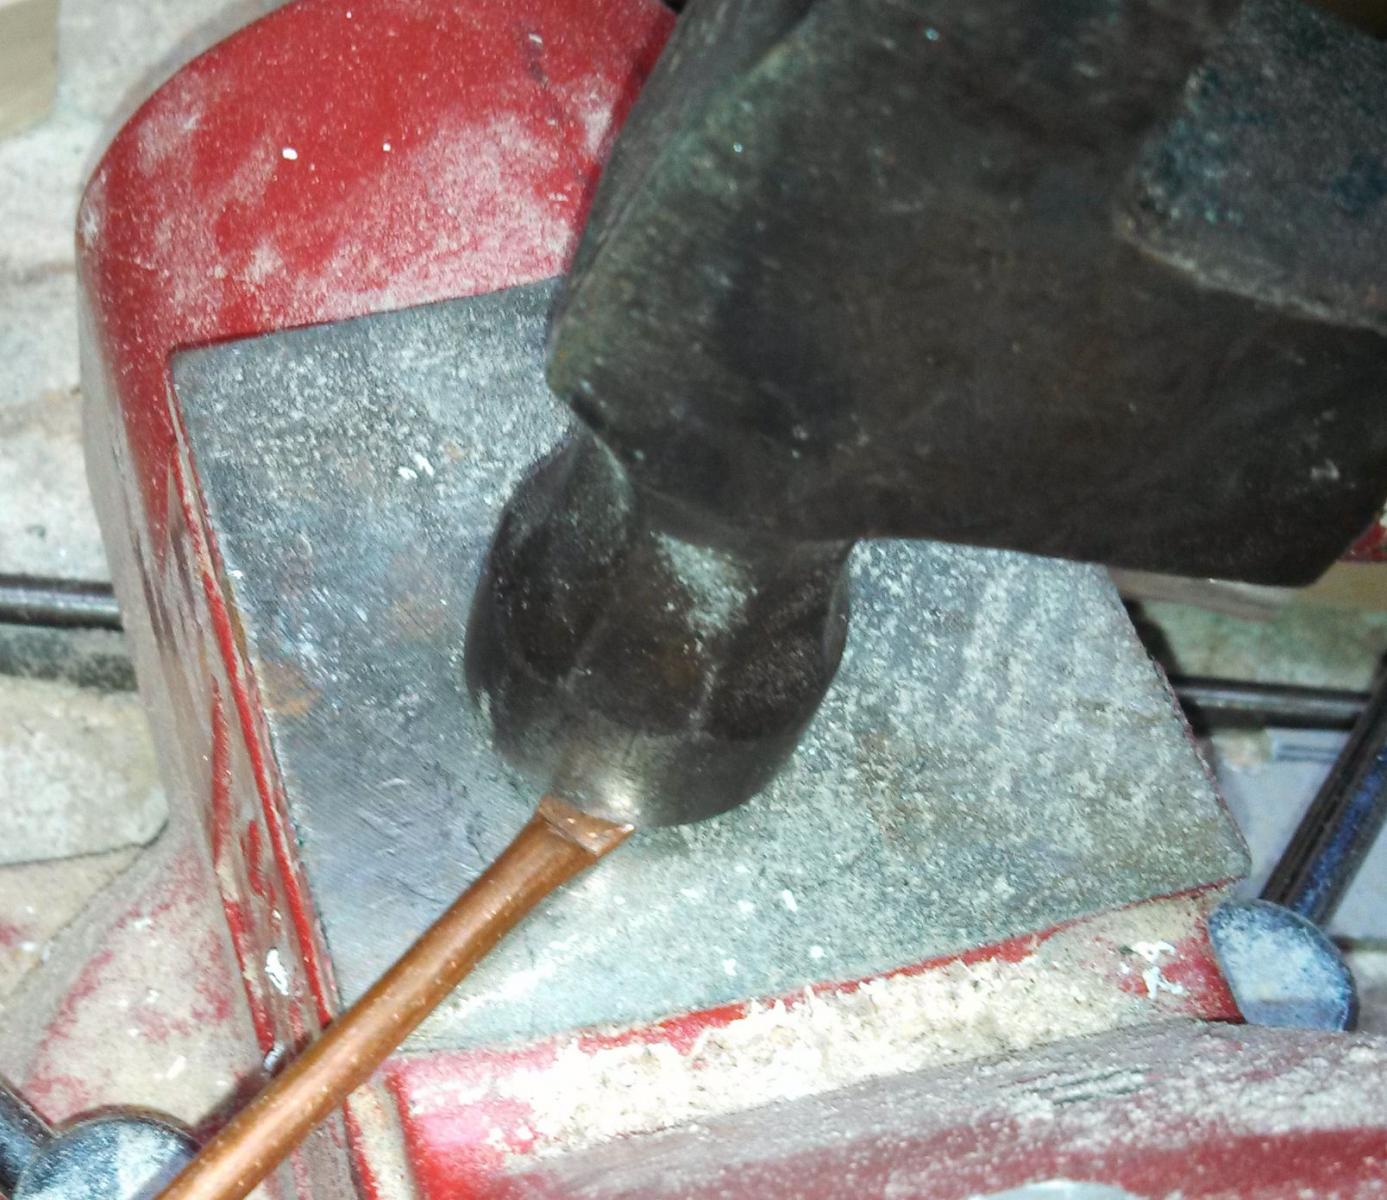
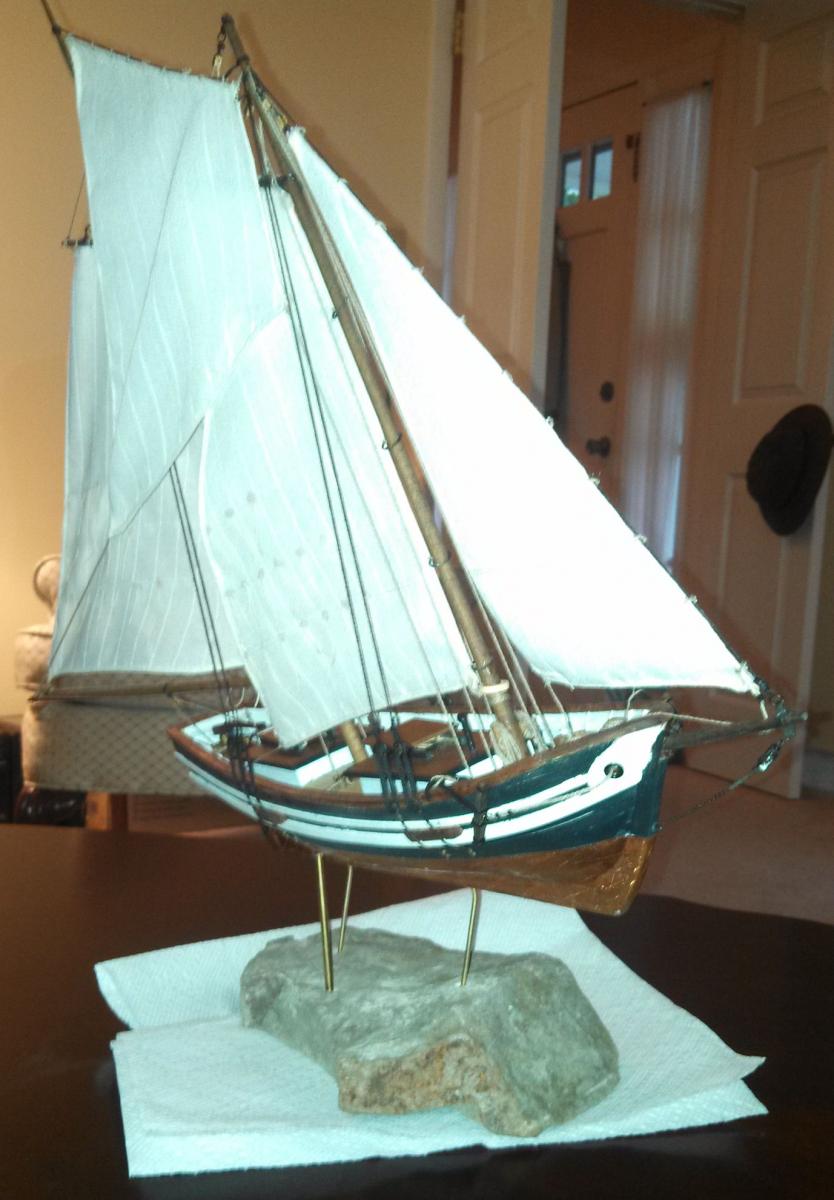
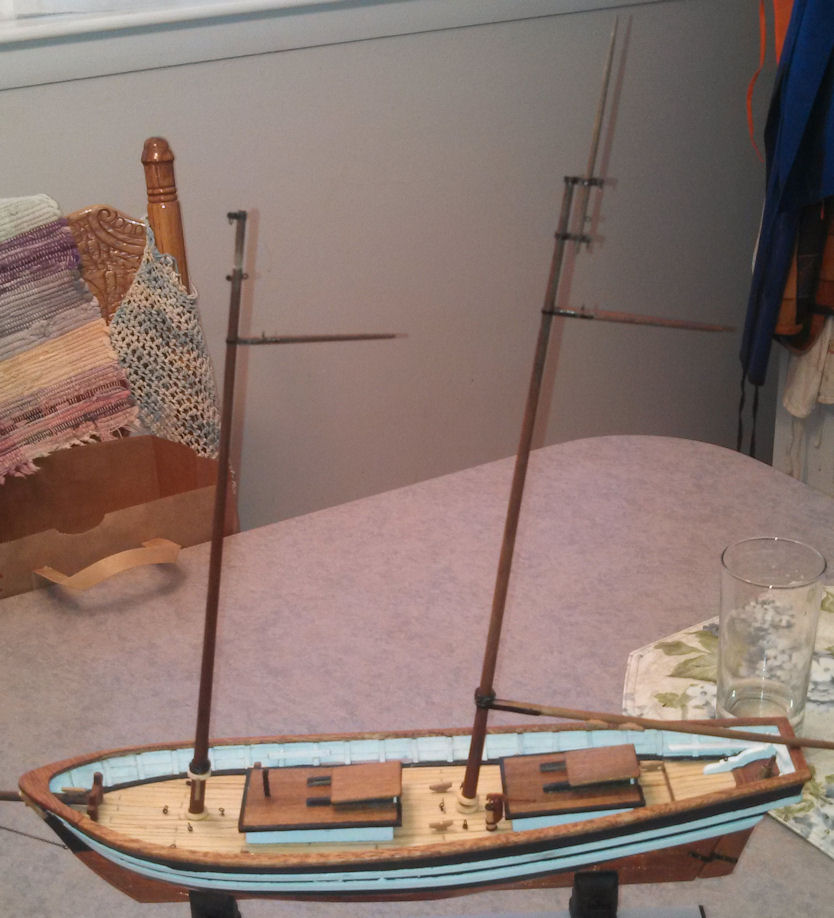
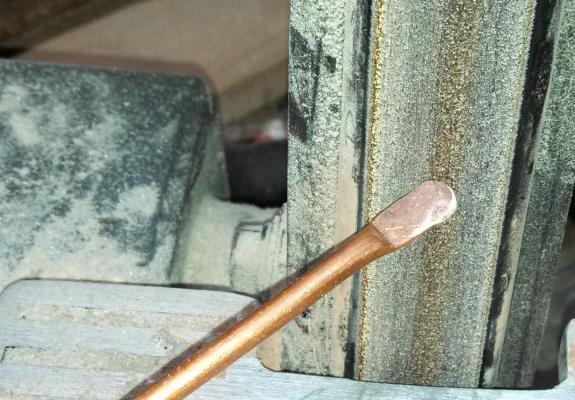
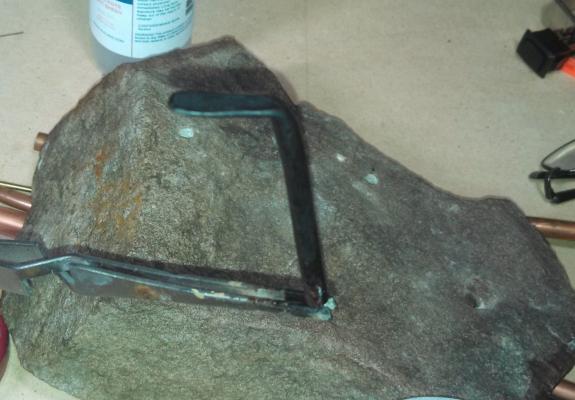
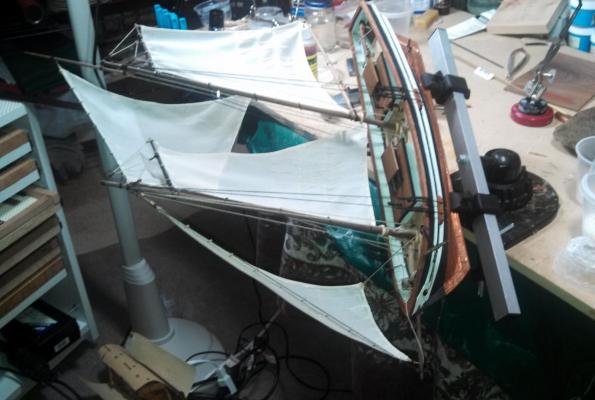
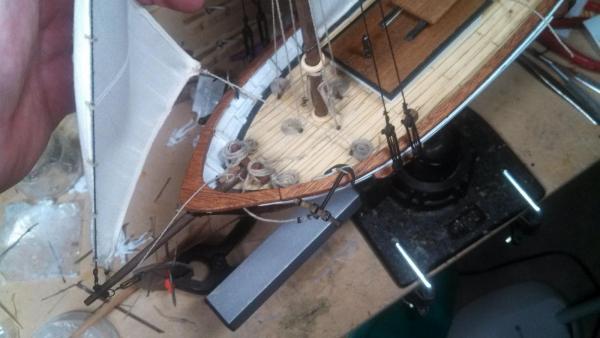
 Someone the other day said they hoped their post didn't get boring... well, me too. After considering the looks of the test mount, I decided to do two things, first shorten the mounting height relative to the rock and second increase the apparent strength of the mounting. I decided to use something black, so that if you saw it, it would appear strong, but it wouldn't stand out. In then end I decided on copper because its easy to work with and cheap at this scale. I found some copper pipe with an internal diameter that would slide nicely over my brass rod. I cut it to length and then for the back support hammered one piece closed. After a couple of test, I set the length and rounded the end with a sander. Following this, I pickled it and painted it black. On the boat, I use the mount to place it in a sideways, nose down position. Once there the sails billowed nicely. I mixed up 1 part white glue to 4 or 5 parts water and painted the sails. I also coated one rope that needs to stay stiff with CCA. If that isn't stiff enough, I'll add a wire later. Finally, I shot the rock with lacquer to bring out the colors a bit more (hope it wasn't too much- finding and drilling the rock wasn't all that fun). SO, I'm holding my breath waiting for everything to dry and hoping it all comes out Okay. We'll see.
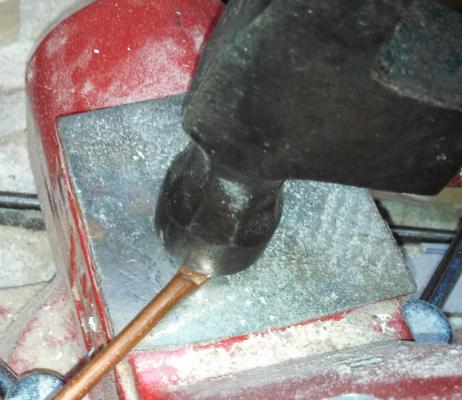

- 125 replies
-
- 2
-

-
- swift
- artesania latina
- (and 1 more)
-
Ah, I see- thanks. Everything will be epoxied in and so they will be very sturdy, but I will look it over again. I had been thinking that one one hand the metal rods made it look like it was "floating" but on the other hand that they made it look "fragile." I am definately going to shorten them (which will reduce what is sometimes called the "L/R Ratio") and will look at beefing them up with some kind of tubing as well. Thanks for the comment.
-
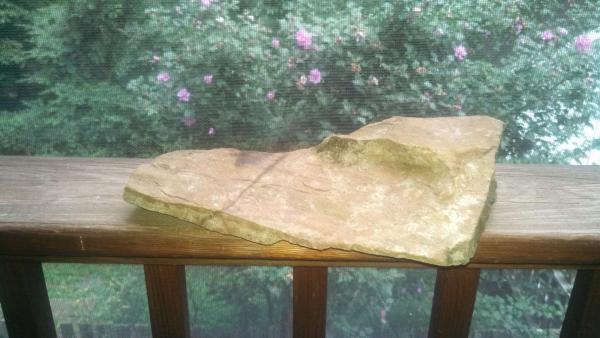
Thank you for the compliment. The rock outweighs the model by a couple orders of magnitude, so it is very stable. Why do you think it would get knocked around?
-
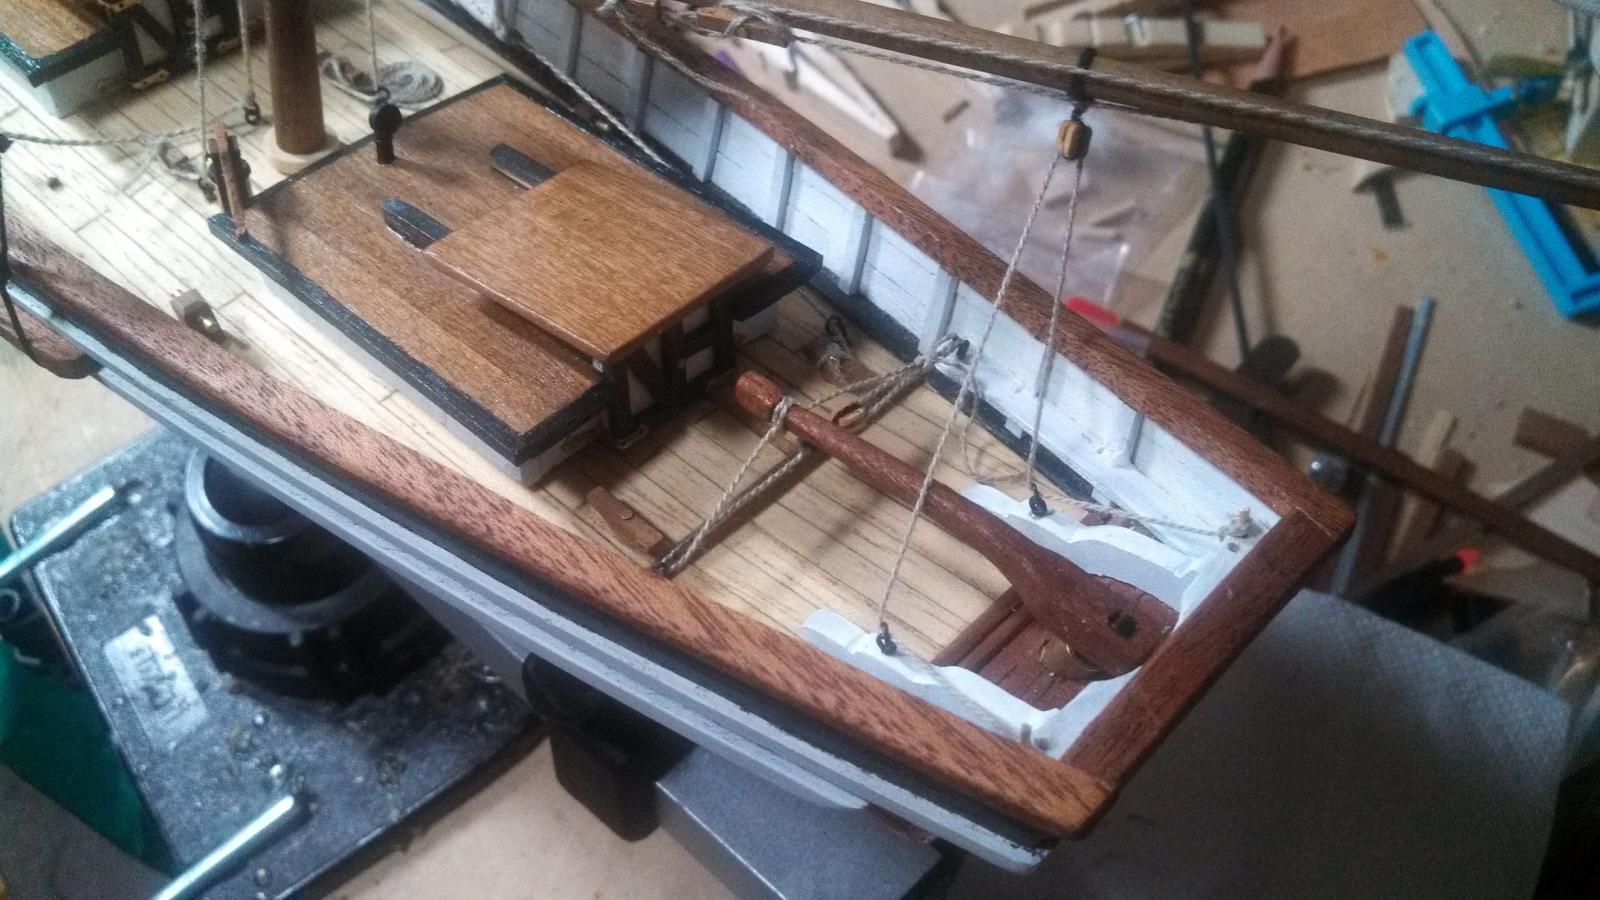
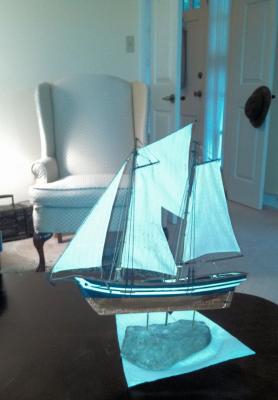
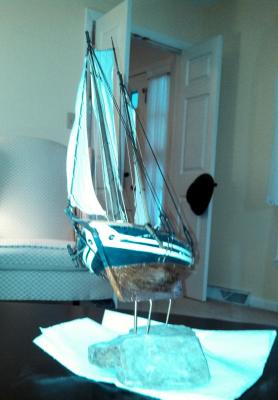
Well, I'm definitely closing in on this one. Today I finished my rope coils and hanks. I'm not completely satisfied with the rigging- there are lots of things technically wrong that bug me, but honestly, I don't know how the ship was actually rigged and I think that it looks nice. For example the sheets are sometimes tied directly to eye bolts with a coil of rope nearby, when I know that there should have been more. But, I am happy. Especially given the kit and my level or ability and patience, I think she looks pretty good. I selected a rock and bored holes in it, bored holes in the false keel. I've known how I was going to mount her for weeks. The photos below show my "mock up" to see what I thought. I stole the idea from a photo I saw somewhere- maybe even on this board. Thanks to whoever did it first, and I am sorry I don't know your name. I think I've given it enough of a twist to "make it mine." As soon as I am happy, I will put glue water on the sails to make them billowing and fix the lines stiff so that they will hold the sails out as though in a strong breeze. I think I will probably lower the whole boat about one inch, but I like the pitch and yaw. SWMBO says its too steep because you can't see all the work on the deck, but although I love and respect her opinion, I"m thinking I may not follow her sage advice. After everything is mounted, there will be touch up, of course, and that should be that. If anyone is interested, I might post the text of the book I'm writing to go with it for my brother and his betrothed. (BTW, that hat does NOT always hang on the door knob. I'm not sure how it got in so many photos!)


- 125 replies
-
- 2
-
-
- swift
- artesania latina
- (and 1 more)
-
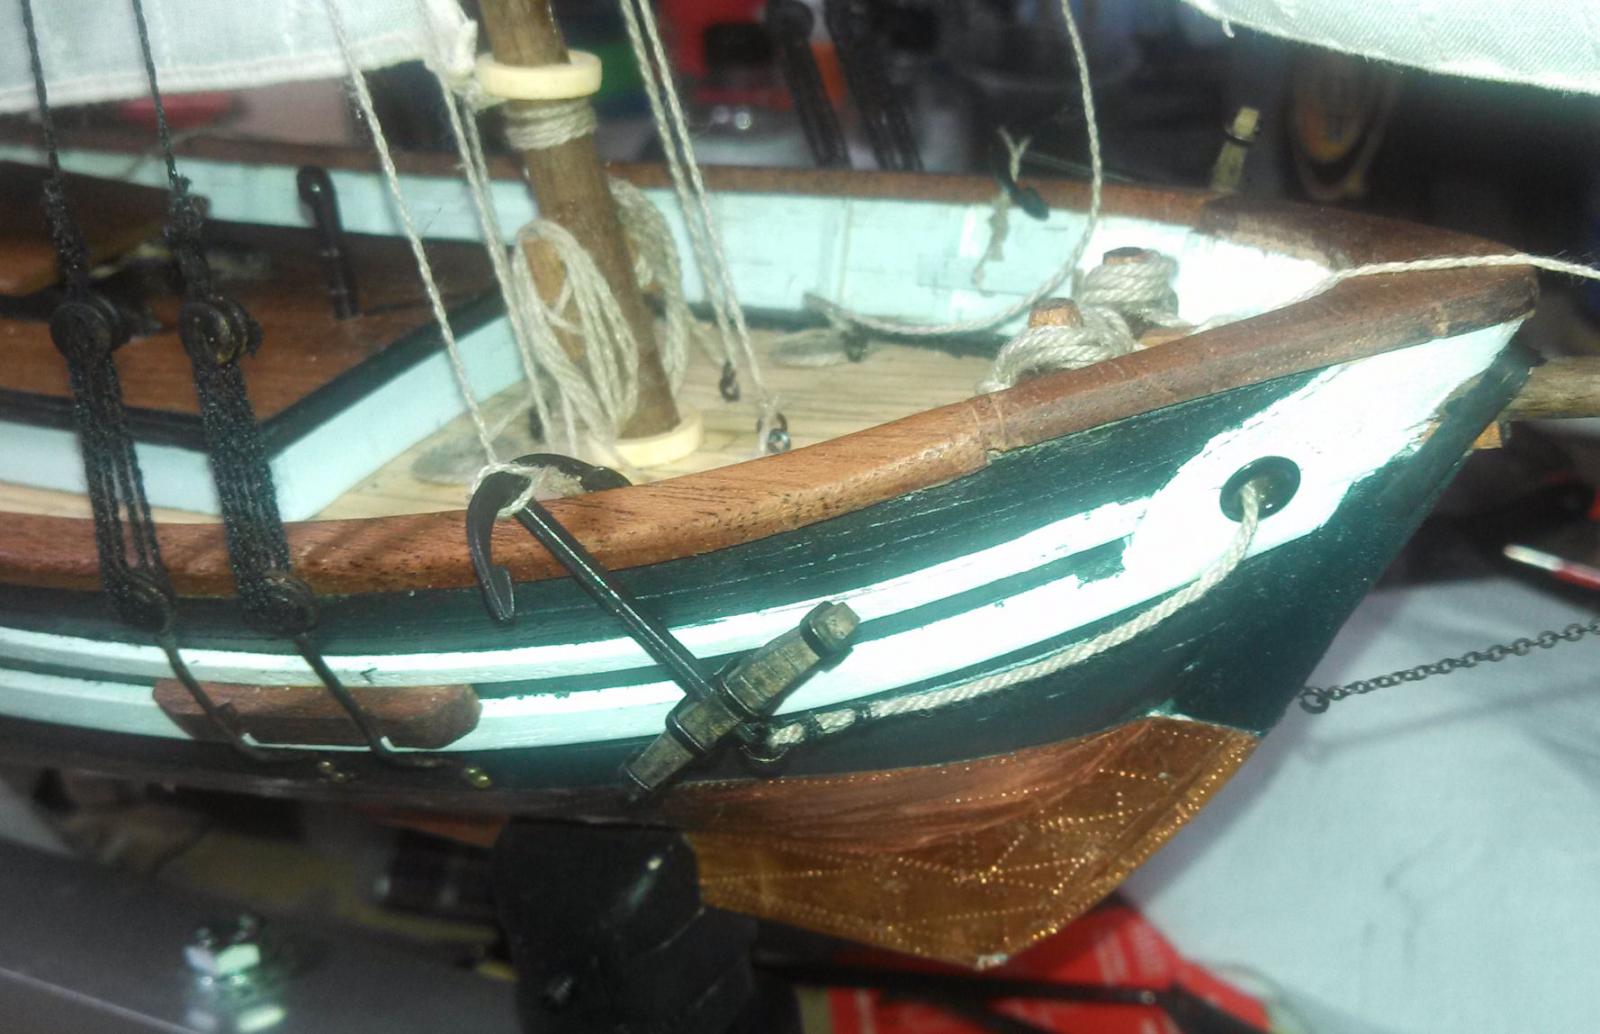
Put a few minutes on her today. First, I worked on the replacement anchors I bought. Everything came in brass and light wood, so I did various things until I was happy with the way they look. I hung them on some home-made rope (drill press version- I dont have a rope walk), and took some black thread to seize the rope. I don't think the color of the seizing line should not actually be black, now that I think about it, but I like it. I made several rope colls for the deck and some hanks to hang for various jobs. I tied off the sheets, boom ropes and rigged a rope for the tiller, so that the tillerman could go downstairs for a cup of tea on occassion. Here she sits today. Finnally, I am seriously considering how to display her. I have an affinity for rocks I suppose, for this rock is really appealing to me.


- 125 replies
-
- 1
-
-
- swift
- artesania latina
- (and 1 more)
-
Thanks for the comments. I too really like the way the color and such worked out. Too bad no one would have seen that copper in real life! Please excuse the following- I know I have the names wrong, but I hope I'm making myself clear. I've got some photos of real pilot boats I'm studying. The most surprising thing to me so far is that the rear sheet for the stay sail (that is the topmost sail that is attached to the stay from the forward mast to the top of the flag mast- shown in some diagrams as a "fisherman's sail") actually attaches to the very end of the rear boom. I have no finding of where the forward sheet would go, but it would be near the main mast somewhere. AS A HINT: If you are going to put a full set of sails on this boat, you need to leave the flag mast thicker than indicated in the instructions. It becomes structural when it has sails on it, and the instructions (not considering sails) suggest you taper it to a very fine point.
-
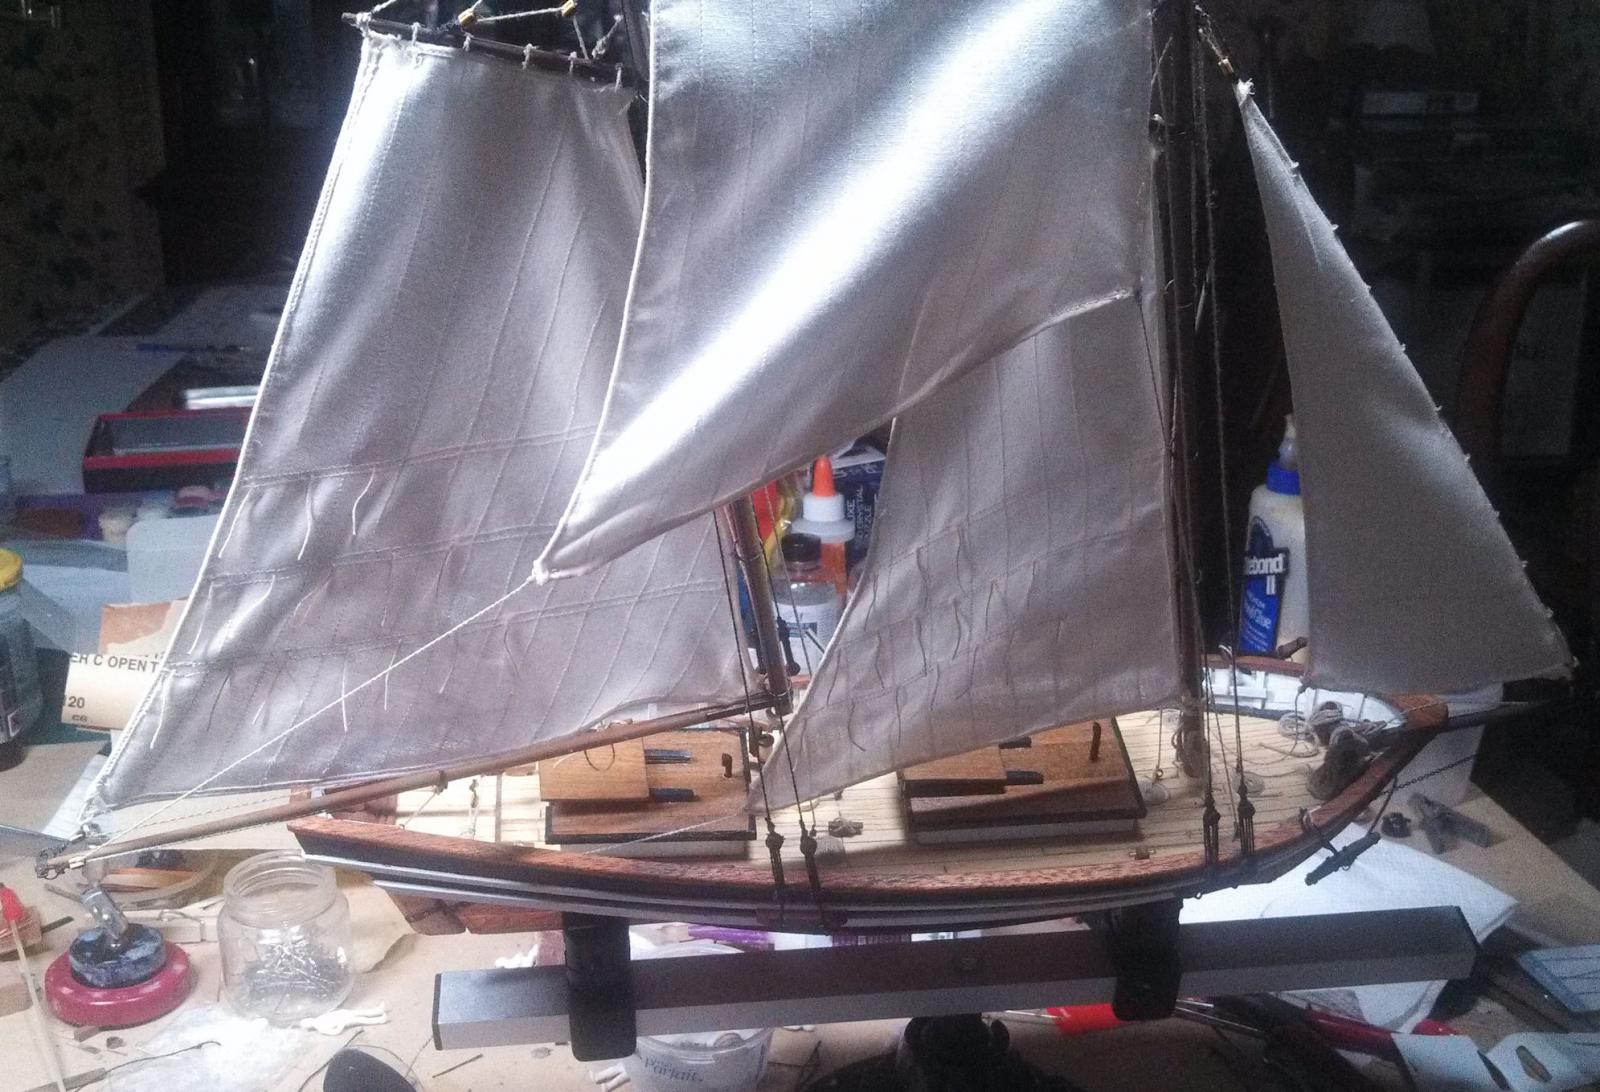
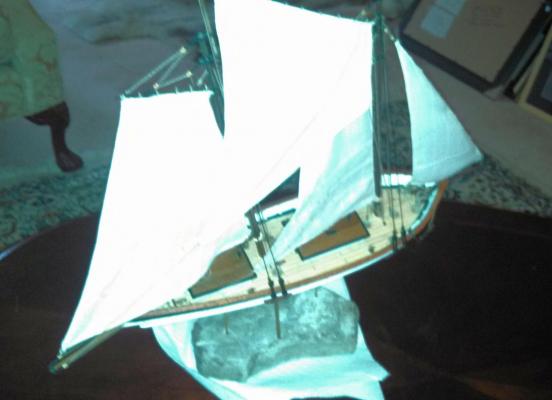
Well crud. Last night I worked very hard on a post that included lovely pictures and I see it isn't here. I am sure I looked at the preview and exited without pressing "post" - I've done it before. So, to repeat: The sails are all on and I'm mostly happy with them. There are a few problems, but such is life. The MAIN issue is that the model does not have enough points to belay the sheets. It was clearly designed for the spars alone. I'm going to have to do a bit a reading and review some photos to see what to do about this. For example, the stay sail has two lines that have nowhere to go. For anyone who is adding sails to this old model, note that it does not have near enough mast hoops- my kit had five per mast and there should have easily been twice that many. I didn't recognize the problem until the mast and spars were stepped and mounted and I haven't come up with a good way to add any. Additionally, of course, they should be wood and not metal. Anyway, here is a photo. I should have cropped it, but it looks rather dramatic, so I'm leaving it "as is."

- 125 replies
-
- 1
-
-
- swift
- artesania latina
- (and 1 more)
-
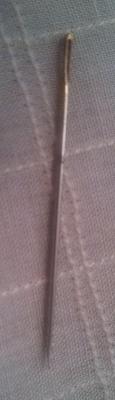
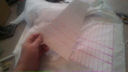
Spent some time on her today. First, I finished the sails. Each edge seam was sewn and a rope threaded through. I realize this is against most advice, but the seems are very small and I think they look good. I also added the reefing lines in accordance with the diagrams supplied for the later kit. I find it amusing that I asked to borrow one of my wife's needles for the reefing lines. The one she gave me has rust spots and a bent tip. At least I don't have to worry about messing it up too much! I put the job sail on and some of the running rigging. I am not sure where to belay the sheet for the jib sail- and am really hoping I used those terms correctly. Little sailor gal, however, seems comfortable with the work, and had found a home in the rigging. How she got there without ratlines, I don't know. I really want to add ratlines, but the ships at Mystic Harbor comparable did not have them and neither do the ones painted for photographed where I have found them. I hope to complete the running rigging and be ready to fix the sails in an inflated position tomorrow. I already know how I'm going to mount here- but I'm looking for the right supplies.


-
Concerning Sails: I have courtesy of another member, photos of the sail plans on the new model. He carefully marked dimensions on them as well. The new model mast positions and spar sizes are not identical to the old one, but I used them as guides for the new model. PM me an email and I'd be happy to forward the photos. Concerning Speed: I believe it is safe to say that our objects are quite different. You are making a work of unique art, I am building a model on which I am experimenting to learn. Art takes longer! Rus: I agree that the main problem with scale is the width of the companionways. These are big enough to be a entrance into a grand ballroom. That said, like you, I think they are passable from a aesthetic viewpoint. Thanks for the comments Wayne. I've tried to learn a lot on this model while creating a unique gift. I'm thinking it will do.
-
I ordered some scale people off the internet to put with my model. I did not want to make a dinaroma dynorama diaroma one of them things where the boat looks like it is part of a real world scene, so I ordered white people at 1:48, the scale of the model. I was intending that others would understand the size of the boat- but it turns out that I was the first one surprised. This was a BIG little boat! I had imagine it much smaller. The photos here don't really give it justice, because the contrast isn't good, but in real life they look nice on the boat. The only down side is that I think the companionways are way out of scale- this of course from a dry-lander, but I did visit a couple of ports recently.


-
I used to drive a big old cab over semi made by GMC called an Astro. Most people hated that truck (we'll avoid why, less this become too much about trucks), but I loved it. My favorite part was the HUGE steering wheel mounted almost horizontally! Never drove a bus, but if it had that big wheel, well, I'm not retired yet!
-
Comments invited, btw. As a beginner, I'd appreciate any input- even if you think I've done it wrong. (Just be nice- I can be kind of sensitive)
-
Here is what I did this weekend. First, I decided to leave the spar attachments. The plans were followed and the result, if not accurate, is at least reasonably acceptable to the eye. I started on some of the running rigging using kit provided rope. I didn't like the look of it- too light and too bland, so I found some thread I liked and got out the power drill. Half an hour later I had some rope I like better. I'm thinking its too thick, but it only has a total of four threads in it, so.... well, we'll see. Finally, I made some paper sails and with the help of SWMBO started making them. First time for everything- hope they turn out.


-
Spar attachment to mast- boats, early 1800's
PopJack replied to PopJack's topic in Masting, rigging and sails
Here is a photo of the plan sheet and a photo of how it looks on the boat right now. The wood ring is intended to be raised to support the boom and fixed in place. I haven't done that yet.

-
I am building a kit LA's Swift, which is a 60 foot +/- schooner used as a pilot boat in the early 1800's. The kit shows the spars attached to the masts with a metal strip that basically just wraps around the mast. Tom Cunliffe's "Pilots- the world of pilotage under sail and oar" has several contemporary paintings that would seem to indicate that some spars were in fact attached with what would probably have been an iron strap around the mast. There is also one photograph where I could interpret what I am seeing this way. That said, many of the early paintings show virtually no detail, and in many it appears that the top spars are either of one unit with the masts, or have been inserted in holes drilled in the main mast in such a fashion as to make them immobile! (I guess you could save on rope!). Several photographs also factually contradict this mounting method for boats built just a few years later. So, to my question: Except for the plans that come with this kit and a few water color paintings from the 1800's everything I see says the spars should be attached with wooden jaws and parrels. The lower booms should sit on a boom rest, the top being supported by a throat halyard. Does anyone know of any evidence that the "metal strap" method was ever used? I am working on a learning project, but this detail is starting to really bug me. I am considering redoing the spars. Thanks for you expertise and help.
-
Please forgive a non-expert opinion from a dry-lander here, but I have read that the reasons the sails had seams was because the width of fabric available from which to make them was limited, thus multiple pieces were sewn together. As time progressed and wider fabric bolts progressed, so did the wider or non-seamed sail. The seams in photographs were quite pronounced- because of fabric overlap I would assume- but I have seen several photographs where this was true. This would lead me to believe that the seams should definitely run through any painted on decoration.
-
Finished the standing rigging today and could close in and finish tomorrow if I just followed instructions. There are two things bothering me right now. First, I want to put some sails on her. Thanks to Mr. Rogers, I now have a plan to make them from. I've been wondering about silly things like, "how white" should they be? I've made up some tea so we'll see what they look like. The other thing is the connection between the masts and the spars. The plan and instructions show what I have done. That is, there is a brass strip bent around the mast. In reviewing period paintings there appears to be some justification for this- quite a few of the paintings show the joint as a painted strip that could well be a piece of iron or something. That said, some also show no joint at all, they if you took them literally, the mast was drille and the spars hammered into a permanent joint. So, the question becomes, "do I leave well enough alone" or do I "do the dreaded re-work thing," remove the sparts, make jaws and parrels, etc. etc. I will make a decision tomorrow.
-
Oh my. I have now seen excellence.
-
I really enjoyed reading your progress so far. It is a beautiful boat and the fit and finish are outstanding.
-
Started working on the standing rigging. I tried to tie a monkey's fist- I thought that it was likely that was used on real ships. Tying a monkey's fist at this scale is WAY beyond what I can do. Edit: Just found out that the traditional know was a Matthew Walker knot. It looks hard to do on full scale, but when I have time I'll see if I can do one on "scale" rope. I'm not really that confident. Edited Again: Well, the traditional knot is not a Matthew Walker, its something else. One of my leassons from visiting the Constitution, though, was even at 1:1 its hard to see the knot's makeup and it's not a big as I thought. Also, the loose end of a deadeye wasn't handled like I thought it was- live and learn.
-
The box shows the rigging done in two different colors. The standing rigging is shown in tan and everything else in a thick white. Interestingly, the kit only came with two weights of white cotton thread- a heavy cord like kite string and a thread. (remember, this is the OLD kit) I wanted to be more authentic (if not perfect), so I got some black thread and made rope. I don't have a rope walk, but I do have a power drill. The first rope I made had three cords of three threads. This was too thick for the boat (by my eye, anyway). So I made some with two cords of two threads. This is actually a bit thin. I'm thinking the Goldylocks rope may be either three cords of two threads or two cords of three threads. Deadeyes are finished up and on the hull. Will be starting standing rigging soon. ============ I've also been wondering why I hate re-work so much. I'm thinking its because I've made furniture for money. When you mess up a piece of furniture and have to rework it, there is a considerable cost both in materials and in time. Additionally, if you have used dyes or stains on the wood, it can be very difficult to make the replacement piece look right- differences in grain will change the amount of stain different pieces of wood of the same species takes, and dyes mix differently. Anyway, although I will probably never be patient, I've got to realize that my current lumber supply is probably around 1000 board feet of various woods and frankly., I could build quite a few model boats and not put a dent in it. Live and learn.
-
Well, Wayne- you are right. After I quit whining like a spoiled brat, I decided I was not going to be able to look at this boat with that mistake on it. So today I took a small set of side cutters and cut through the braces and removed them. I peeled them off rather than lifting, and they came off with only a little trouble. I had applied oil to the mast prior the glue and I think that kept it from bonding to strongly. There was some damage to the mast- but I was able to make the new braces to fit in nearly the same location and cover it up pretty well. I then made the dead eye braces and soldered the dead eyes in place. New Braces In Place Deadeyes. The ones that look burnt look that way because... wait for it.... they are burnt. Anyway, the brass is soldered.


- 125 replies
-
- 2
-
-
- swift
- artesania latina
- (and 1 more)
-
Thanks for the comments. When I made the metal pieces I had it in my head wrong. The rigging will work fine. It is glued and hammered on and then crimped. I suppose I could take a small side grinder and cut them off... but I'm thinking I'm not. I am willing to let it go so that I don't have to re-do all the work.
- 125 replies
-
- 1
-
-
- swift
- artesania latina
- (and 1 more)
-
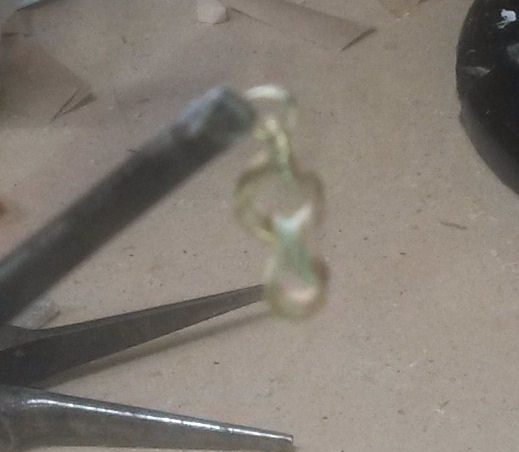
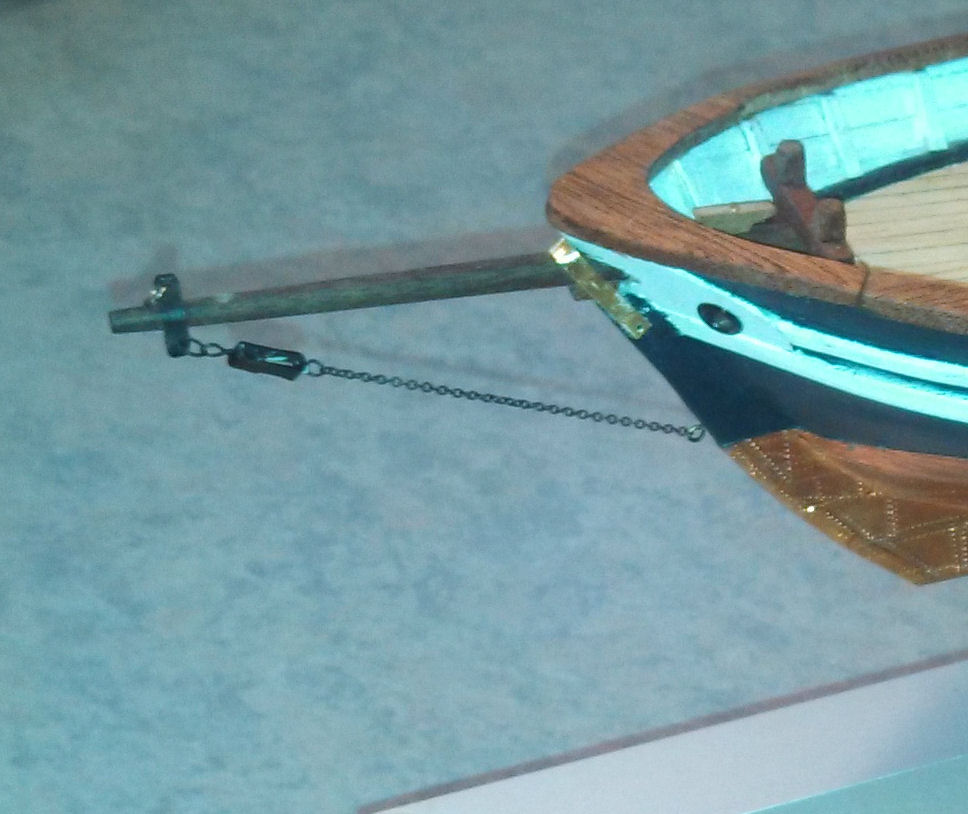
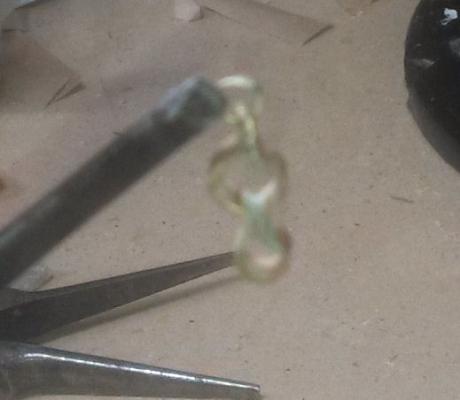
Thanks for the comment Wayne. I am actually pretty bumbed out about it. I want to finish the little boat up so I can start a new project, and I don't want to start from scratch with cutting the old mast off and then redrilling the deck and everything- so it will stay. But still.... Here is a photo of my turnbuckle. I'm pretty proud of how this all came out. The kit did not have any kind of stay for the bottom of the bow sprint, but all of the photos and paintings I could find of pilot boats had them, so I fabricated it. I also found some photos of things like turnbuckles and pulleys that on the model look out of scale to my eye. In the old photos though, those things were BIG! In the end making them look better probably reduces authenticity. Funny ole world, ain't it? I note in the photo that I still need to darken that brass strip- probably would have been wise to do that before I mounted it.eh? And here sits my biggest screw up to date.


-
I set the mast today and realized a major mistake. I have placed the flag mast on the wrong side of the main mast. This is not a simple fix- as the metal braces I was so proud of have been sized for the mast and drilled to accept rings for the running rigging. I have made the decision that since everything is glued together I am not changing it. So- well shoot me.