tkay11
-
Posts
1,827 -
Joined
-
Last visited
Content Type
Profiles
Forums
Gallery
Events
Everything posted by tkay11
-

Proxxon Micro Planer DH40 - owner feedback??
tkay11 replied to rtropp's topic in Modeling tools and Workshop Equipment
I posted the full set of links at http://modelshipworld.com/index.php/topic/5592-model-ship-building-secrets-dvd/?p=272804 Tony -
Original Rigging for Cutters of 1763: with a Jib boom?
tkay11 replied to Gregor's topic in Masting, rigging and sails
A pity there were no replies as I was looking forward to some thoughts! Tony -
Welcome to the forum! I too found George Bandurek's book very helpful. He posts on the forum from time to time, so he may well pop in to comment. I'll be interested to see whether you follow his method of making the guns. You'll see plans for a 3-pounder in the general database of the forum. I just scaled down the drawings of the 4-pounder in the Anatomy of the Ship book on the Alert and followed the barrel dimensions for 3-pounders given in his book. I found that Goodwin's barrel dimensions differ slightly from those for the Armstrong 3-pounder plans, but I don't know which would have been the more correct. However, the difference is small enough not to be noticeable. You'll have a very helpful audience, I'm sure, with all the Cutter followers here! Tony
- 29 replies
-
- 2
-

-
- sherbourne
- caldercraft
- (and 1 more)
-
I too thought I'd build the kit 'as is' just to learn the basic skills and have a rough idea of how it all fitted together. However it wasn't long before I was tinkering away because of how it looked or how others on the forum were doing their models or because of what I'd read -- and at each step I thought to myself "That's it, no more tinkering, I'll just get on with the rest of the kit." So it'll be interesting to see how strong your resolve is! You don't really have to think about mounting the model beyond considering whether you want to do more than place it on the kit stand -- which is fine. I just decided to put bolts in more for the learning experience. I have no illusions whatsoever that when/if I finish I won't have something of great perfection and I'll probably give it away to the local barber's shop or library -- should they even want something like that. As to instructions, many complain about the lack of instructions in almost all kits. However, there are a few which give more detailed instructions than others, but they also tend to be more expensive. I wouldn't blame the manufacturers too much, though. From their point of view the majority of kits are unfinished, and amongst those that finish the manufacturers might think that if they do they'll have been tinkering for themselves. They are also aware that there are many ways to approach building -- the planking is a good example. Jotika are reckoned amongst the better of the manufacturers. However, don't worry too much. Even if you do stick rigourously to the kit parts, you should be fine now that you know you can look at other builds and ask questions when you come across a problem. Even the most expert builders on this forum started somewhere. They often point to their own learning mistakes and are very happy to answer questions whilst saying there is no such thing as a dumb question when it comes to modelling ships. Dan Vadas (Danvad) even started a thread on how people fix their own boo-boos. Tony
- 23 replies
-
- 1
-
-
- sherbourne
- caldercraft
- (and 1 more)
-
I forgot to add that Chuck's build of the cutter Cheerful is being followed by many of us as a great example of craftmanship and thinking. You can find it at http://modelshipworld.com/index.php/topic/8131-hm-cutter-cheerful-1806-148-scale-by-chuck/. His latest posts on planking (which includes two videos) are really worth looking at. Tony
- 23 replies
-
- 1
-
-
- sherbourne
- caldercraft
- (and 1 more)
-
Kester's right. Reading ahead is really important! Unfortunately, the instructions with the kit are so basic that some things are hard to plan for. That's when it becomes really useful to read as many build logs of the model you have, and there are some books it's also worth getting if you think you're going to be interested in making it more accurate in reference to the look of the pumps, the guns, and the rigging. Many of these things are discussed in the build logs on this forum, as you may well have noticed. I have noticed that I have spent far more time reading and planning before each different part of the model -- although unfortunately I still miss things out. I also have probably made 4 attempts on each part before getting it to a personal level of satisfaction (it's always a compromise, so it depends on your level of obsession/fanaticism as well!). For example, I have just finished my fourth bowsprit and am just about to move to making the different parts for it (cranse iron, inhaul/outhaul ring, rigging). But I regard it all as part of the fun. There's one modeller on this forum whose motto is that each part is a different model, so for any one build you have hundreds of models! I go along with that idea. Just to add to Kester's list, many have found the gunports to be the wrong size for the guns and carriages included in the kit. It's really worth making one gun early on and trying to fit it to the different gunports. I ended up making my own cannon to be the correct size for the 3-pounders that the Sherbourne is supposed to have carried. Others have filed out the gunports to allow the guns to fit. It's just another of those things you have to consider for yourself. Tony
- 23 replies
-
- 1
-
-
- sherbourne
- caldercraft
- (and 1 more)
-
As far as I remember, I sanded the bottom edges of the bulkheads until they were flush with the central frame. Your picture shows that, just as in mine, some of the bulkheads are flush and the others are not. I added the keel, stem and stern post before planking. However, since then I noted that quite a few people plank first and then add the stem, keel and stern. I have often thought that that would be an easier way to go as you are then not worried about getting the planks flush with the keel etc when you have no rabbet into which you can insert planks. It also would make sure you don't damage the stem, stern and keel by sanding or filing the planking. I had a lot of scuff marks on my stem, stern and keel as a result. At this stage you also need to think about two other aspects: 1. Make sure you drill the holes in the stem for the main stay before you glue it on. You might also want to drill 5 rather than the 3 holes recommended in the kit. Kester (Stockholm Tar) and I have only drilled three, but if you look at Dirk's (Dubz) and Gregor's builds they started with three, but then, on discovering that cutters of the period had 5 holes, cut a section off the stem and replaced it with a section into which they had drilled 5 holes. I don't think it will matter very much unless you come across a stickler for historical accuracy. 2. Consider how you will mount the final model. Some people like to drill holes in the keel and bulkheads for nuts to be able to take mounting screws. However, if you are going to place it on the kit stand then of course this won't be an issue. Tony
-
I think that a very high proportion of modellers fill in at least the bow and the stern because you have such strong curves for the planking in these areas. I chose to do it all the way round as I thought it would make planking easier as well as making the shaping easier. Quite a few others do that too. I used balsa, but in general most prefer basswood/lime as it shapes better than balsa while still being easy to cut and sand, and takes glue as well as nails when planking. In my next build, if I build using bulkheads, then I'll be using the stronger wood. To my mind filling between all the bulkheads makes a lot of sense. In addition to making the shaping and planking easier, it also makes the model more robust. However, please do note that I am still on my very first build, so I am certainly no guru in this department! Tony
- 23 replies
-
- 2
-
-
- sherbourne
- caldercraft
- (and 1 more)
-
Great to have another Sherbourne being built. I'm looking forward to seeing how your build goes. I did the same as Kester -- no rabbet and I simply sanded at the keel area to do the bearding until I was satisfied that after planking the width at the keel would be the same as the rudder. Just measure the width of the rudder and then the width of all the planks. You then subtract the one from the other to find the width you have to achieve at the keel. The bearding just makes sure that the planks lie smoothly towards the keel. I also made the process easier by using filling blocks between the bulkeads so that it was obvious when the run of the planking would be smooth. I hope that makes sense, but if not then come back with more questions. You'll find that forum members are very generous in their support! Tony
- 23 replies
-
- 1
-
-
- sherbourne
- caldercraft
- (and 1 more)
-
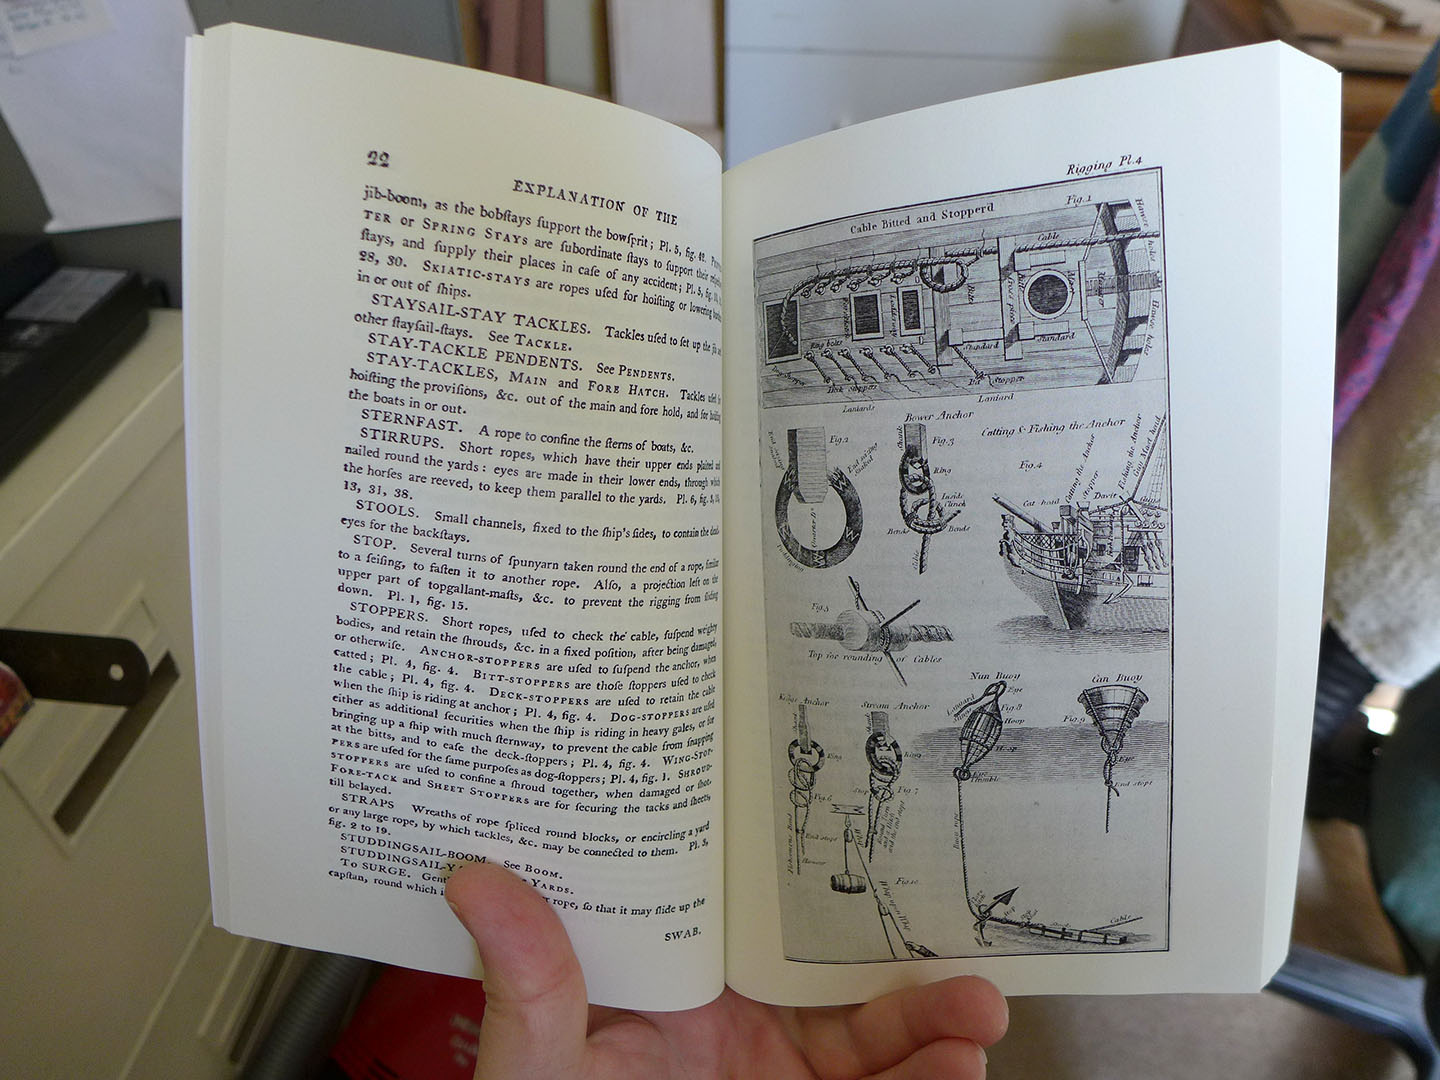
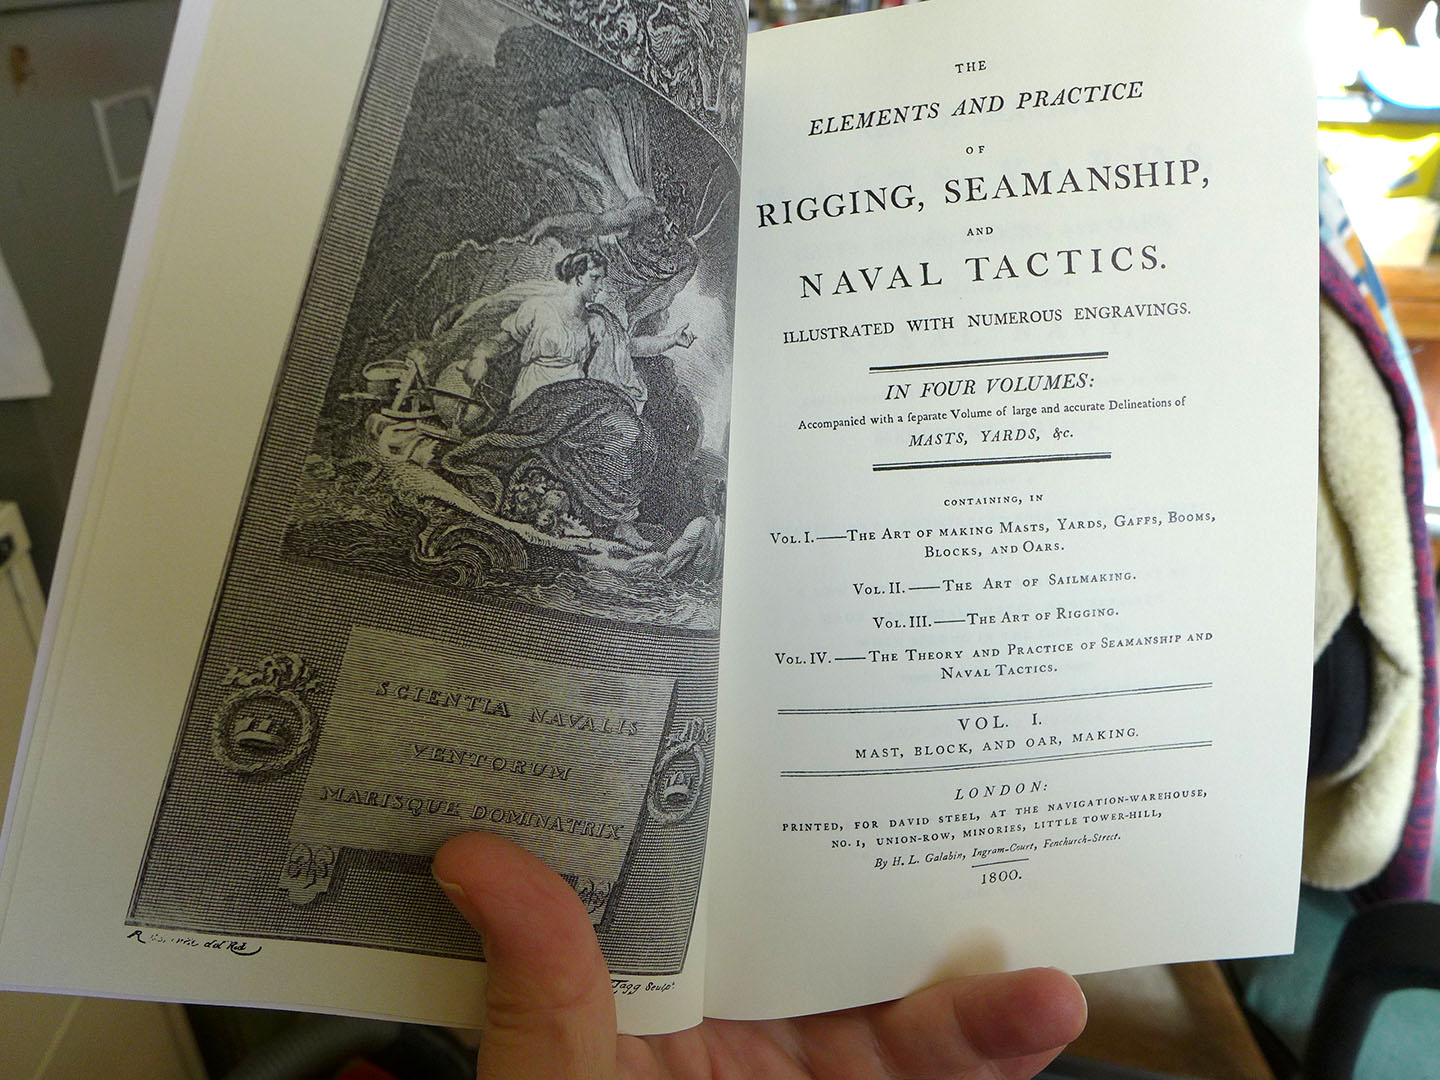
Phil, to my mind the facsimile is very clear, as in the photos I posted, and easy to read. The NRG article didn't really discuss the 1800 edition in any detail, and the volumes I have are a straight facsimile of that 1800 edition -- bar the 5 plates I mentioned. As the San Francisco edition is also the 1800 one, the plates are easily obtainable from their web page. As stated in the NRG article, though, it is important to read every word of Steel, as he states quite that it is impossible to write a simple linear narrative. Thus in looking up the various aspects of bowsprit making and rigging I have had to look across two volumes in separate places. I really appreciate the detail given by Steel, although my 1763 cutter will have differences from some of the dimensions he provides since he deals with ships current at the turn of the century. Thanks again for all your help and advice about this. Tony
-
Rigging a bowsprit heel rope on Cutter Sherbourne 1763
tkay11 replied to tkay11's topic in Masting, rigging and sails
And here's a better one. It's from 'Fore and Aft Seamanship for Yachtsmen: With Names of Ropes, Sails, and Spars' by Charles Wilson in 1878. It says: "Q. How would you reef a Cutter’s bowsprit? A: Slack up all the gear. Reeve a heel rope and heave taut upon it, and take out the fid. Slack the bowsprit in to the second or third fid hole, as required, ship the fid, and then set up the gear. Some vessels are fitted with a rack and pinion wheel, with a handle similar to that of a windlass for reefing the bowsprit." Tony- 14 replies
-
- 1
-
-
- Heel rope
- Sherbourne
- (and 1 more)
-
Rigging a bowsprit heel rope on Cutter Sherbourne 1763
tkay11 replied to tkay11's topic in Masting, rigging and sails
OK, after a bit more web searching, here are two more links. The first refers to modern bowsprits which are much lighter: http://www.classicboat.co.uk/forums/showthread.php?t=189329&page=2. The second appears to suggest that bowsprits were moved in and out according to the sea, but gives no mention of sheaves or methods. http://www.allthingsransome.net/literary/knight6.htm. It should also be noted that Steel only mentions hauling the bowsprit out with the heel rope, and does not say anything about hauling it in. This might strengthen Kester's and SpyGlass' suggestions about hauling it in with manpower. Tony- 14 replies
-
- 1
-
-
- Heel rope
- Sherbourne
- (and 1 more)
-
Rigging a bowsprit heel rope on Cutter Sherbourne 1763
tkay11 replied to tkay11's topic in Masting, rigging and sails
Taking a hint from what Brady says in 'The Kedge Anchor; or, Young Sailors' Assistant' (https://books.google.co.uk/books?id=RvvBAgAAQBAJ&pg=PA52&lpg=PA52&dq=bowsprit+heel+fitting&source=bl&ots=fNp6eQe0a7&sig=k9G-34BqKNoBidgYTrWcdYDyVB4&hl=en&sa=X&ei=Uj7sVOXoC4X3O9H7gcAO&ved=0CDkQ6AEwBTgK#v=onepage&q=bowsprit%20heel%20fitting&f=false) where they talk about taking in a bowsprit for fitting, blocks might have also been attached to the main mast. This might have given extra mechanical leverage. Tony -
Rigging a bowsprit heel rope on Cutter Sherbourne 1763
tkay11 replied to tkay11's topic in Masting, rigging and sails
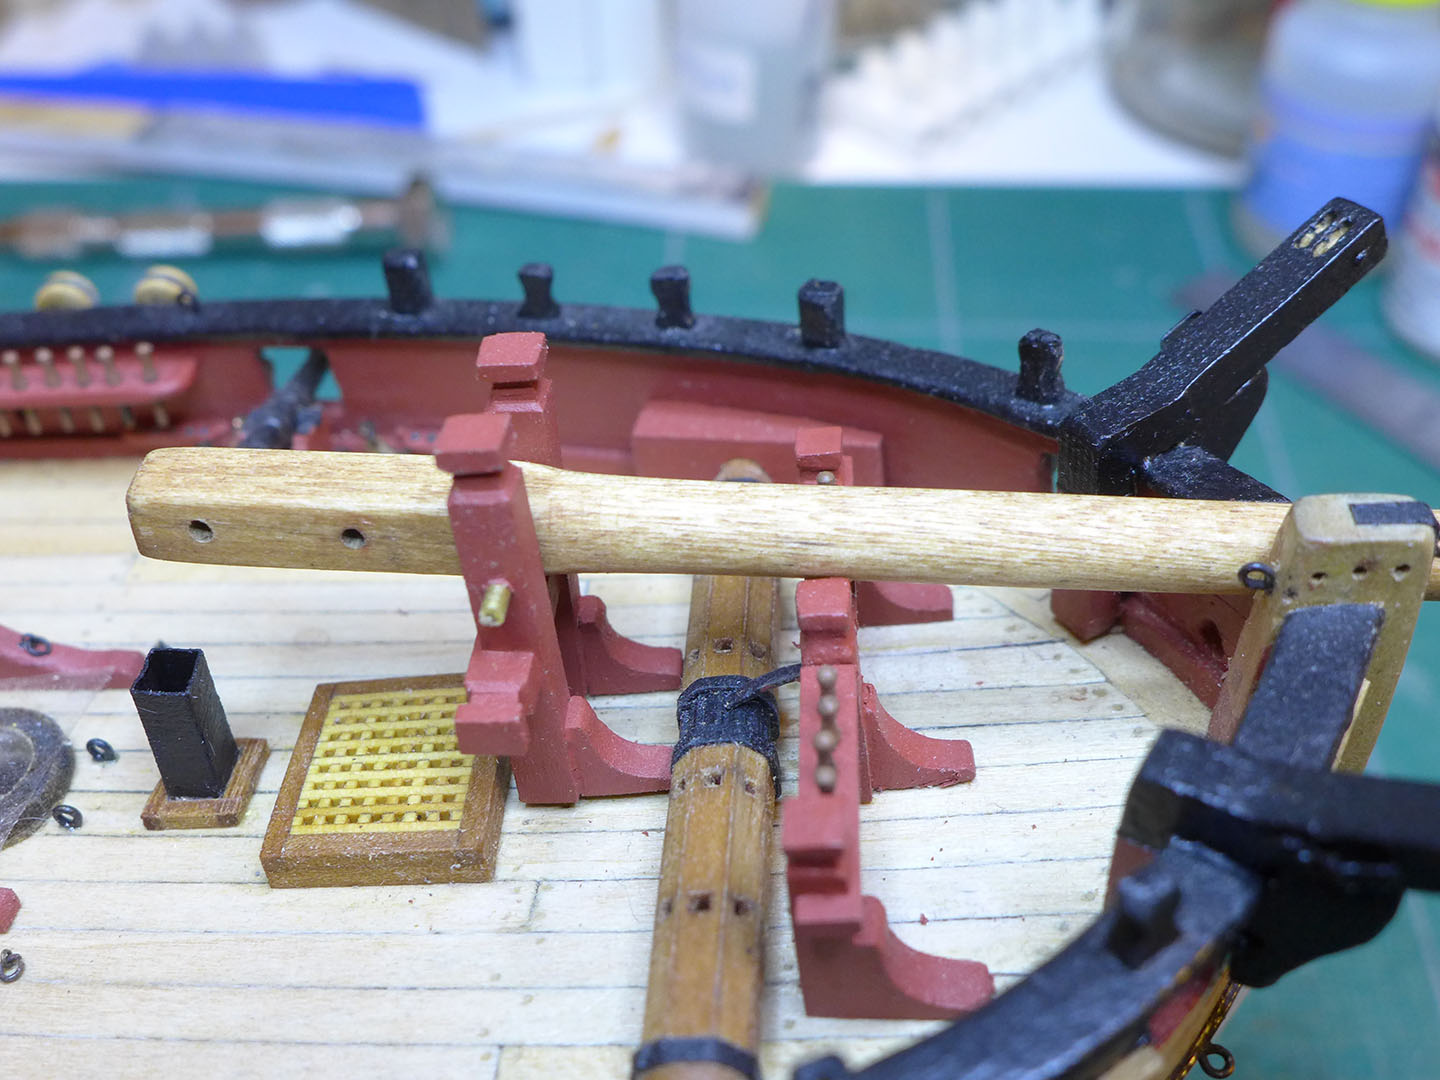
Great description, SpyGlass. The right hand sid of your drawing is exactly how I see the outhaul of the bowsprit. The inward is as you described it before. Your experience and interpretation are invaluable. I fully understand now your explanation that it was not really a 'running' change. It makes sense. The difficulty with the left hand drawing is that the windlass in all the Sherbourne models is fore of the bowsprit step and the fid holes in the bowsprit. Another thought is that your suggestion of hauling it in with a single eyebolt seems to put a lot of strain on that eyebolt for such a heavy spar. Might it have been a bolt that went right across like a fid iron, with rope wound round both sides? I attach the diagram of the bowsprit from the cutter Alert AOTS book by Goodwin. I also attach a picture of a rough-up first attempt at fitting the bowsprit which shows the relative position of the windlass. The bowsprit in this picture is run in to its full extent. Tony

-
Rigging a bowsprit heel rope on Cutter Sherbourne 1763
tkay11 replied to tkay11's topic in Masting, rigging and sails
Thanks, Kester. I was thinking it wouldn't be permanently rigged as I suspect the way it is rigged would be different for moving the bowsprit outwards and inwards. I was looking at the position of my windlass and it's clear that the fid holes in the bowsprit heel lie aft of or immediately above it. This would make it very difficult for a sheave at the very heel (aft of the fid holes) to work as any rope would then have to go round the bowsprit step. The kit plans, and several cutter models I have seen show three fid holes. I presume they allowed for the three positions that could be adopted by the bowsprit. This would mean removing the iron bar which runs through the bowsprit step and the fid hole, then moving the bowsprit so that relevant fid holeis in alignment. I have seen pictures of a few models with such a bar going through the step and the fid holes. My puzzle then remains: no matter where a sheave is placed in the heel, how would it work to move the bowsprit? According to Steel the rope starts at an eye-bolt in the bow, goes through the sheave in the heel, then goes to a timber head and thence to the windlass. If the timber head he mentions is forward of the windlass, then that makes some mechanical sense: at least when moving the bowsprit outwards -- although the rope would be moving around the timber head. For this to work, the sheave would have to be forward of the fid holes in order to avoid going round the bowsprit step. It's when pulling the bowsprit inwards that the sheave does not make particular sense if the rope starts by being attached to an eye-bolt in the bow, as I don't see how the windlass would then come into play. That's why I wondered if it was handled differently when being pulled inwards -- as suggested by SpyGlass in his earlier note. It is indeed odd that it is hard (at least on the internet) to find much detail about this in diagrams, pictures or explanations (although Steel seems at least to describe the geometry in words, and makes it clear that a sheave in the heel was a way of moving it) as I thought that one of the key aspects of a cutter was its movable bowsprit. It may be one of those things that is so abundantly obvious to a seafarer that it wasn't worth mentioning. Tony- 14 replies
-
- 1
-
-
- Heel rope
- Sherbourne
- (and 1 more)
-
Rigging a bowsprit heel rope on Cutter Sherbourne 1763
tkay11 replied to tkay11's topic in Masting, rigging and sails
Yes, SpyGlass, I hadn't thought through the business of using the eyes on the heel. Good thought! I presume the sheave would be right at the heel, before the three holes for the fid. In terms of a fitting, wouldn't the ring round the bowsprit that is attached to the stem act as a stop? You could then say, without too much of a smile on your face, "The butt stop's here!" Tony -
Rigging a bowsprit heel rope on Cutter Sherbourne 1763
tkay11 replied to tkay11's topic in Masting, rigging and sails
That's very interesting, SpyGlass. I hadn't seen the quote, and although I have just purchased the Cambridge Steel reprint I hadn't seen the quote there either -- so I'll have a look there. I've had another look at the illustration you referenced, and now see that the place marked 'm' in fact refers to the bowsprit and not (as I had thought) to a sheave underneath. I can understand how the rope might push the bowsprit in if the sheave is horizontal as in the diagram and the rope is pulled by the windlass round a timberhead forward of the sheave. As for pulling it in, would it be that the rope is wound round a timber head more to the rear? Thanks for any further guidance! Tony -
Rigging a bowsprit heel rope on Cutter Sherbourne 1763
tkay11 replied to tkay11's topic in Masting, rigging and sails
Thanks, SpyGlass. I had seen that illustration whilst doing a web search and understand that the whole lot has to be done inboard, but it didn't seem to match how the bowsprit on a cutter of 1763 would be rigged with a sheave on the heel. I also noted a lot of references to current methods of hauling a bowsprit on sailing boats, but again what I saw didn't quite match how the bowsprit on my cutter is set up. I should also say that I am aware that rigging before 1780 or so was different, so it's possible that Steel is referring to an newer type of rigging of the bowsprit heel. All the same, since it is a running bowsprit, there should be ways of hauling it in and out. Tony -
Just as a follow up to this thread, I have now received the first three volumes of Steel's Elements and Practice of Rigging, Seamanship, and Naval Tactics in the Cambridge University re-print of the 1800 Edition held in their university library. It seems to me that it is pretty much identical to the version printed by the San Francisco Maritime National Park Association at http://www.maritime.org/doc/steel/index.htm, as given by Mark (SJSoane) earlier -- with the exception of the 5 very large plates of the masts and spars which are easily accessible at the site. I very much like this edition. At first I was a bit thrown by the 'long s' used. This very closely resembles an 'f', but is distinguishable by the fact that the cross bar on 'f' is only to one side on the long 's'. Once I had recognised this the reading became easy. The main reason I like it is because it is very much preferable to reading on screen, and, in addition, because each order is freshly printed for each customer, I have a brand new book that is the size of an ordinary hand-held paperback -- albeit with the old typeface. The plates are a bit harder to see than in the original, but the attached photos should give you an idea of how it looks. I thoroughly recommend these three volumes. I haven't ordered the 4th, so can't comment on that volume. If you click on the pictures, you should see a larger version. Tony

-
In his table of dimensions for 90-ton cutters, Steel gives the dimensions of the heel rope for the bowsprit, and describes the heel rope as follows: the "Heel-rope reeves through a leading block, hooked to an eye-bolt in the bow, then through a sheave-hole in the heel of the bowsprit, and the standing part makes fast to a timber head or eye-bolt, and the leading part is connected to the windlass". I find this a bit hard to follow, as I understand that the heel rope is to haul the bowsprit out. I wonder how the mechanics of this worked. So I would be grateful if any one could point me to drawings, pictures or models that demonstrate how this is rigged. It may also be that the ropes are generally left off whilst not positioning the bowsprit, but I am particularly interested in how the sheave was placed in the heel of the bowsprit. As usual, any advice from the more knowledgeable will be gratefully received! Thanks Tony
- 14 replies
-
- 1
-
-
- Heel rope
- Sherbourne
- (and 1 more)
-
One of the problems of ordering stuff from the USA for the UK is that the import and duty charges on both purchase and shipping costs are so high -- in addition to the handling charges levied by the post office. So with the shipping costs being high for the passage to the UK, it makes it an expensive option. Tony
-
Aah! I had thought you were using the etched surface as the final surface. Tony
-
That's wonderfully helpful, Gregor. Thanks very much. I note you have treenails only on one side of the deck. Is there a reason for that? Tony
-
The cheapest piece of boxwood that I have found in the UK is from old boxwood rules/rulers that you can find on eBay. The cheapest old ones (generally labelled 'vintage') go for about £3.50 inc p&p for a 3 foot folding rule and slightly less for the 2ft versions -- although you have to be patient and keep a good eye out for them at this price. Occasionally a brand new version crops up even cheaper when the seller is not aware how much more they can get if they brand their rule as 'vintage' -- I bought a new unopened 3ft boxwood rule for £2.70 inc p&p from eBay in January. You have to search both 'rule' and 'ruler'. This means longer sets of results than if you combine with 'boxwood', but you then catch the sellers that omit the word. I had a search follower set up on eBay that would email me whenever new rulers came up for auction. That way you don't have to keep searching yourself. These rulers are a good size (about 4.6mm x 25mm) for such small blocks and you can make enough for several models out of even a 2ft rule. It is also useful for making deck fittings and other small pieces such as boom crutches, cannon barrels, cleats etc. An advantage of the rulers is that they are made from pure boxwood which has no defects and is not going to warp. I've also bought a 1ft 2"x2" length of Castello Boxwood from Exotic Hardwoods UK (http://www.exotichardwoodsukltd.com) for £7.50. They also do nice pear cuts. Their postage was £6.50 for that as well as two 2ft x 2" x 2" pieces of pear. These pieces were only lumber cut, not milled, so I have had to finish them myself. I have yet to try the Castello Boxwood for making blocks, but I am told its qualities are very similar to boxwood. You can get milled strips of boxwood at a very reasonable price (especially as the Euro is now so low against the pound) from Arkowood online shop in Germany. You can see an example at http://www.arkowood-shop.de/product_info.php?info=p4763_holzbrettchen-buchsbaum-8-x-50-x-500-mm.html for €16.50 for a 8mm x 50mm x 500mm of boxwood. Their shipping to the UK is a standard €16.50, so it helps to buy as many strips as possible to make it more economical. They also sell milled castello boxwood and pear. Tony
-
Wonderful to watch another build by you, Gregor. I am intrigued by the laser cutting process, but especially by the deck. It looks as though you have used the service to inscribe all the planking and other deck details. Is this correct? If so, are there special instructions for the cutters to burn only a fraction of a millimetre into the deck for those details? Excuse my ignorance about laser cutting, but looks so useful that I thought it would be nice to find out. Tony