Supplies of the Ship Modeler's Handbook are running out. Get your copy NOW before they are gone! Click on photo to order.
×


tkay11
-
Posts
1,822 -
Joined
-
Last visited
Content Type
Profiles
Forums
Gallery
Events
Everything posted by tkay11
-
What type of lacquer do you use, Wefalck? Nail lacquer? Tony
-

Colouring mono-filament line for seizing line on blocks
tkay11 replied to tkay11's topic in Masting, rigging and sails
That's a great idea, Tom. Thanks very much. The kind of thing that's obvious but requires thought -- which I didn't have! Tony -
Colouring mono-filament line for seizing line on blocks
tkay11 replied to tkay11's topic in Masting, rigging and sails
Thanks for the interest, Tom. It's simply because the thinnest thread I can find is Denier 100 and 0.25mm thick. This is the same thickness as the thread I use to strop the blocks. So when I come to seize the blocks, using the same diameter thread looks silly and out of scale. I have noticed, as I said, people using monofilament and fishing line for various types of rigging, so I thought I'd aske the questions. 0.12mm diameter line would be the equivalent of 1" circumference rope at the 1:64 scale I am working at, so that seems a reasonable width to aim at. As to tying it, I had been thinking it would be a combination of knot and CA glue, but maybe my idea is simply mistaken. I've also thought of three-stranded braided fishing line. If you know of thread finer than the Cordonnet 100 I found, then of course it would be great to know about. Basically I'm all ears when it comes to advice about this as I've not done anything like this before. Tony -
Colouring mono-filament line for seizing line on blocks
tkay11 replied to tkay11's topic in Masting, rigging and sails
OK, I've found more colours available after changing the way I was searching, but I'd still like to know about the possibility of colouring transparent monofilament. Thanks everyone! Tony -
I have been learning how to seize the line on the blocks I've made, and have found that the 0.25mm thread I'm using still seems a bit too large. I've also noticed that many of you use mono-filament fishing line which I see goes down to 0.05mm or so. However, it seems that the monofilament line comes either in transparent, yellow or black, and I haven't seen any in other shades. Is it possible to colour such line, and, if so, how? Thanks, as always, for any experience and advice! Tony
-
Got it! At last! Thanks a lot for the time you've taken to get through to my old addled brain, Andy! Tony
-
The most silent disk sander
tkay11 replied to Mike Y's topic in Modeling tools and Workshop Equipment
I agree with Richard. My Proxxon sander runs very quiet without a vac. But I agree that noisiness is fairly subjective. Let me say I find the noise of the vacuum cleaner nearly unbearable. Tony -
Thanks for trying to help me, Andy, but I can see I am missing something vital. It could be I am using the wrong terms. The way I am using 'line to be served' means for me the thicker rope around which is coiled the thinner rope. Isn't that thicker rope just strung along the top -- i.e. the two parts holding the thicker rope are at the top? With that thicker rope strung across the top, I have seen that the thinner rope is held at one end of the thicker rope, the thicker rope rotated, and the thinner rope then fed along that thicker rope by hand, thus being wrapped around the thicker rope. Is that right? So my question is how the bottom shaft plays a part in this. Does that make sense as a question? Sorry if it doesn't but I'd be glad of further help! Tony
-
I am thinking of building a serving machine, but there's one thing I can't quite get my head around. I get the idea of the top line which rotates so that thread can be coiled around it whilst holding one end of the thread by hand and feeding it. However I don't understand the need for a geared rotating bottom shaft. What is the function of that? I've not seen it being used in any of the videos or pictures I have seen of serving machines so far. Sorry if this is blindingly obvious to everyone else! Tony
-
US Brig Syren 1803 by danri - Scale 1:64
tkay11 replied to danri's topic in - Build logs for subjects built 1801 - 1850
Yes, I like the belaying pins very much too. Any hints as to how you made them? In a lathe or drill etc? Or just by hand with a file? Tony -
Very interesting, Gregor. Thanks a lot. I like the book too -- you are probably pleased with seeing all those gunport lids. I suppose you'll notice that Peterssen also put lids on his gunport drawings. Tony
- 210 replies
-
- 1
-

-
- Sherbourne
- Cutter
- (and 5 more)
-
This kind of thing does take careful measurement and patience. I cut before laying the plank, but always oversize so that I can then trim it down wherever necessary. If the walnut is breaking, then you can always wipe it with a dilute solution of PVA and let it dry a while before planking. Heat will allow it to bend easily. As to cutting the walnut, I use a single-sided razor blade in a thick handle (e.g. http://www.amazon.co.uk/Stanley-Razor-Edge-Scraper-Blades/dp/B0001IW65I/ref=sr_1_2?ie=UTF8&qid=1399985407&sr=8-2&keywords=single+sided+razor+blades), or else a scalpel with a new heavy blade. I'm not quite clear what you mean by cutting in situ -- something I would imagine could be fairly risky in terms of damaging the hull and making mistakes. That shouldn't be necessary. One edge (as far as I know, and that is of course very little) will always be a straight edge, and the other you will be cutting to fit. If the fit is wrong, just cut another piece. That would be much harder to do if you try to do it in situ. Others may, as usual, have better ideas. I'm just throwing in my experience. Tony
-
Some build their own clamps. I just used finger pressure till the PVA glue set (about 30 secs). Some have a mixture of PVA and CA, using CA in just a couple of spots and the PVA over the rest of the plank. If the CA is just soaking into the wood, you might try the thicker CA glues. I am sure others will come up with better answers. Tony
-
After much consideration my first build will be:
tkay11 replied to rdowsett's topic in Wood ship model kits
It's a lovely model. I would have started with that myself, except it wasn't in stock at the time. Looking forward to your build log. Tony -
Thanks, Jan. We're all hoping things are going well with your health and looking forward to having you back on your build. Tony
-
Great work, Gregor, and tremendously helpful. Thanks Tony
-
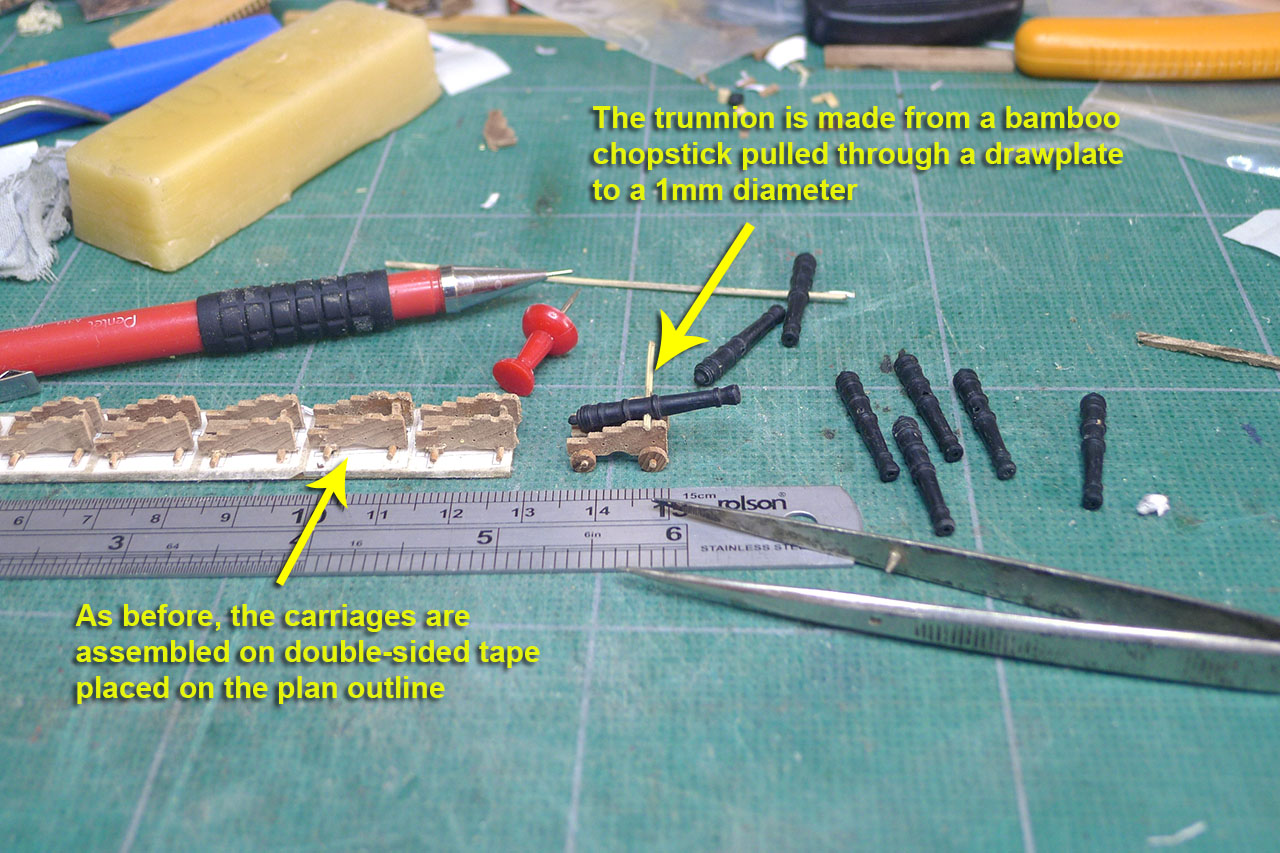
Just as a small addendum to the build log, I forgot to mention how important it was for me not to try to put too much detail into the carriages, as I found before that when doing so (with my existing skills) the results could be messy and detract from a reasonable interpretation at this scale. So I have deliberately left out the detailed bolts of the cap squares, the pins on the axle trees, the chains to the cap squares, the separation of the planking on the sides of the carriages, the details of the tucks, and a host of other important aspects of a real cannon. I'm not sure where this places me in relation to authenticity. Perhaps it is a mix of consistency with the remainder of the build, what is achievable at scale with the materials and tools used, level of personal confidence, and with an understanding of the limitation of the skills for my particular level of experience (and shakiness of hands) that defines the 'authenticity'. With such a definition, 'authenticity' would have very different meanings for each individual builder. Tony
- 269 replies
-
- 2
-
-
- Caldercraft
- First build
- (and 3 more)
-
Thanks, Gregor and Kester. The size mismatch has been commented on by so many previously that now I do think it is worth it to re-size the cannon. Re-sizing, yes that I can do. However, as to finish and crispness, those I have a lot to learn about yet -- although I do appreciate the kind comments. I'm definitely still learning about the sharpness of blades, thinness of paint, which files to use and how, applying varnish etc. It is the patient exploration of all this that is not only enjoyable, but very calming. The quiet contemplation that goes with thinking how to go about a problem is very satisfying -- whenever I have a boring meeting to attend it gives me a certain wicked pleasure to go back to thinking how to do something with the model rather than having to listen to the same old platitudes, group think and the drive to mediocrity that most groups strive for. Tony
- 269 replies
-
- 3
-
-
- Caldercraft
- First build
- (and 3 more)
-
Thanks a lot, guys, for the comments, likes and the continuing encouragement. It's quite clear that without the experience I've gained from you and the forum I'd never even have attempted working with a wood lathe -- as you have seen I spent a long time trying to make it work just with the kit barrels rather than accepting that it was just too big. I'm really glad you made the suggestion to use ebony, Nigel -- I now feel much more confident about using it in the future. It certainly was made easier by spending time on learning how to use the lathe with the pear and boxwood barrels. Onwards! (Well, step by little step, anyway) Tony
- 269 replies
-
- 1
-
-
- Caldercraft
- First build
- (and 3 more)
-
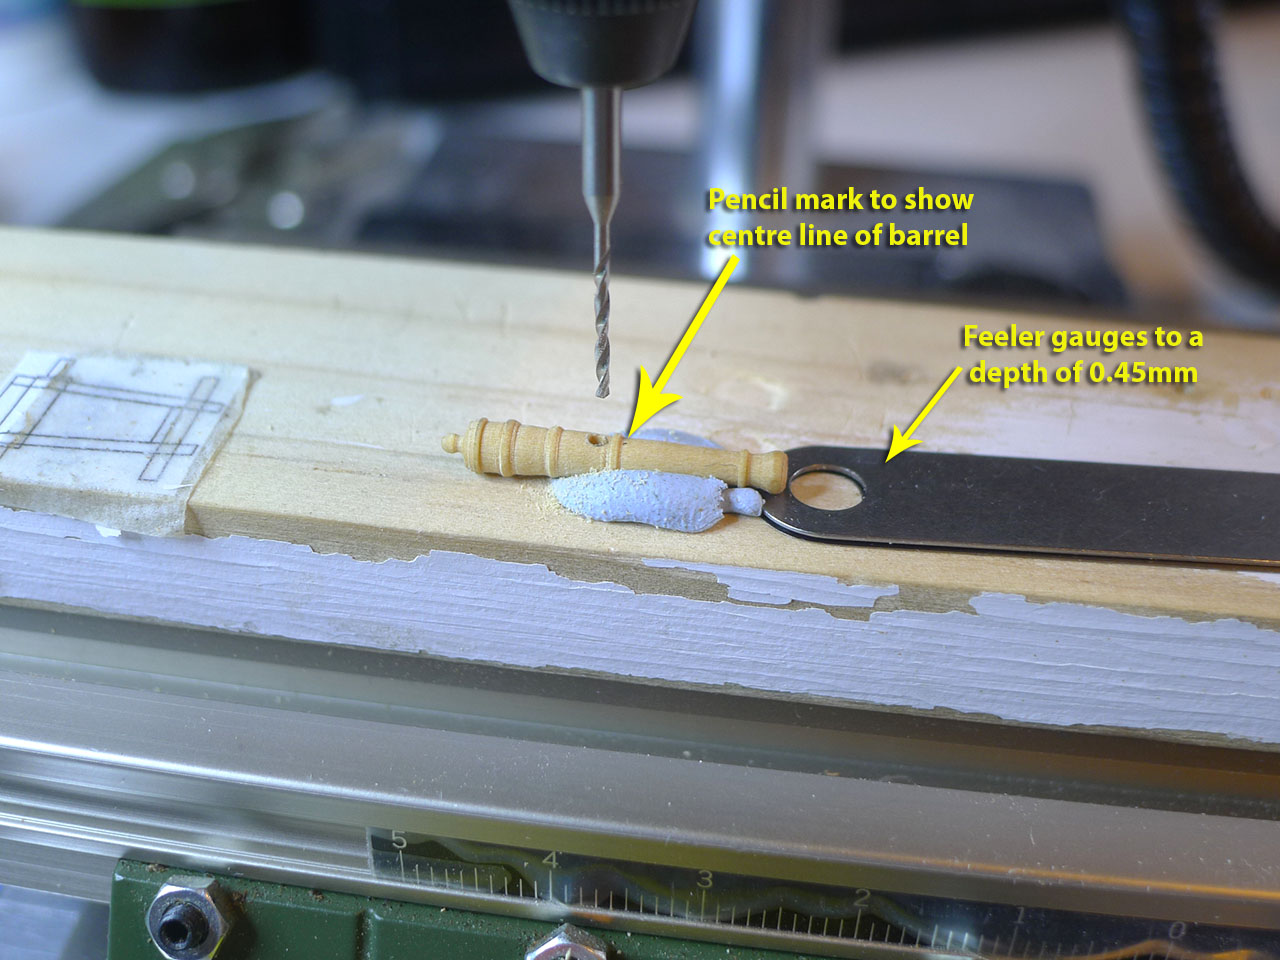
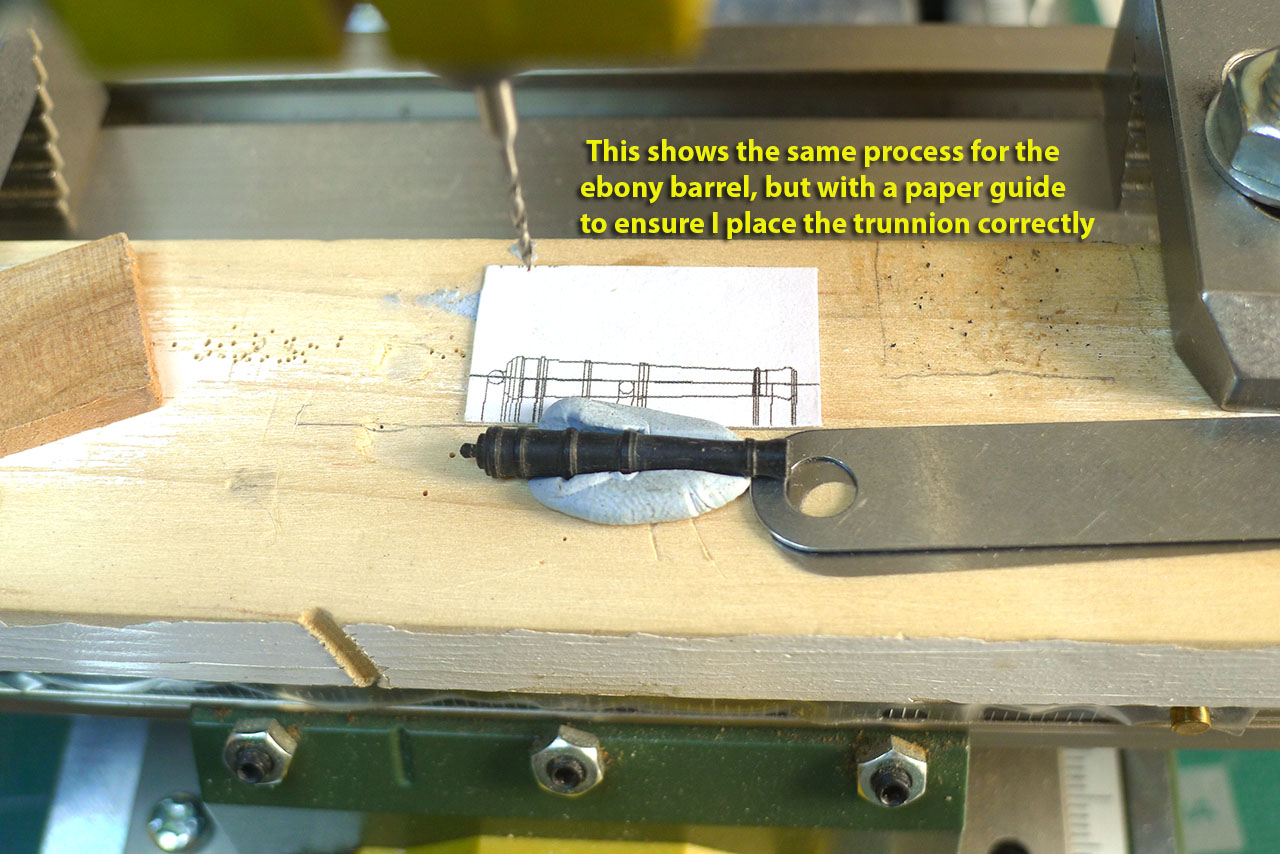
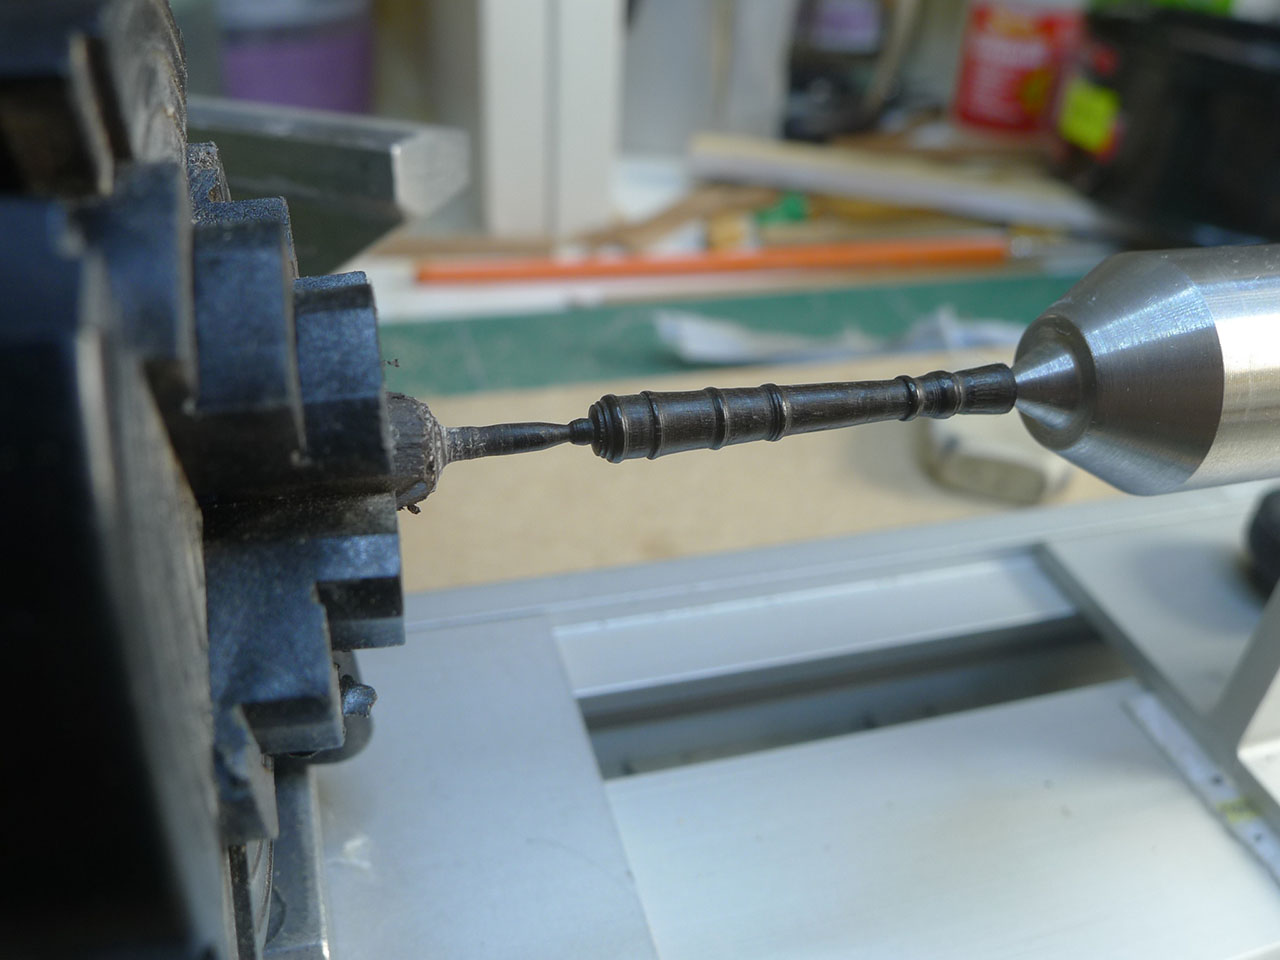
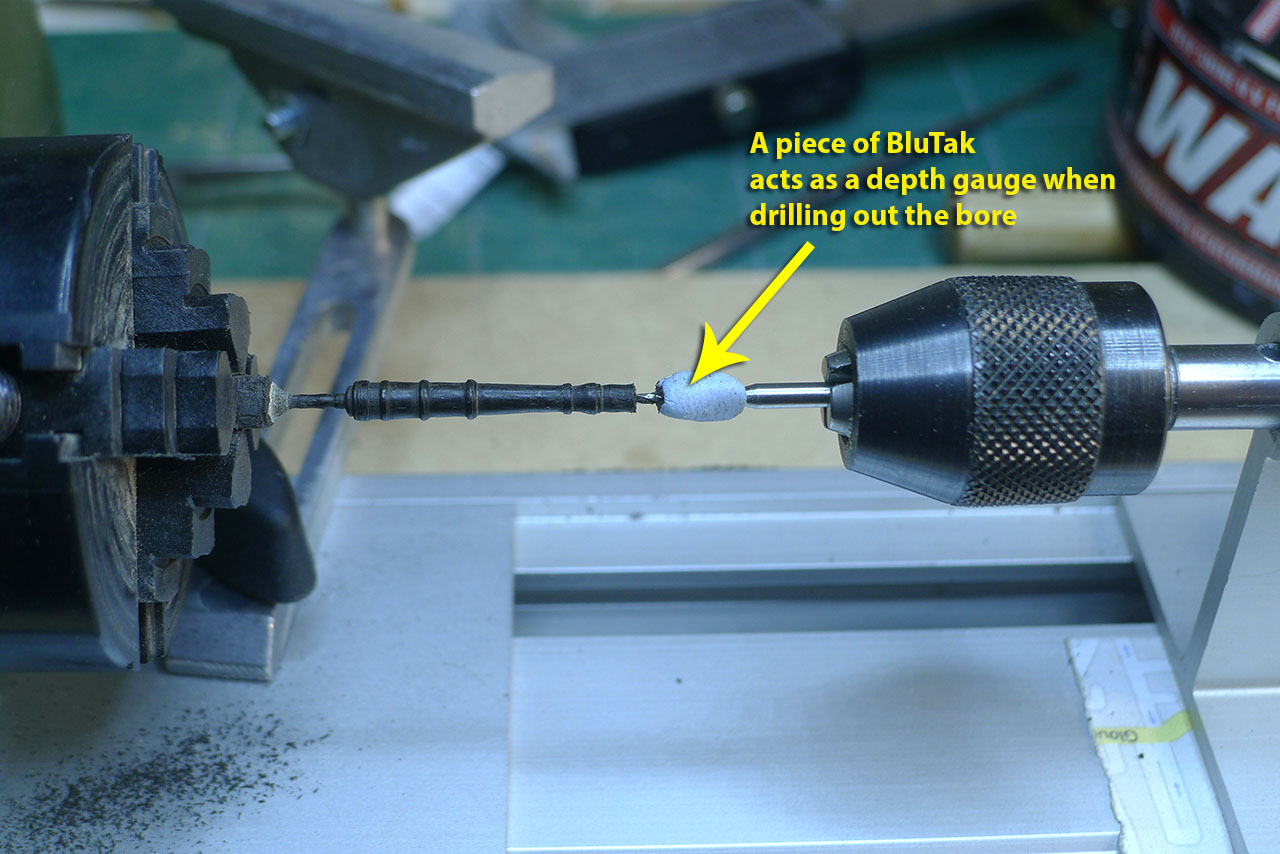
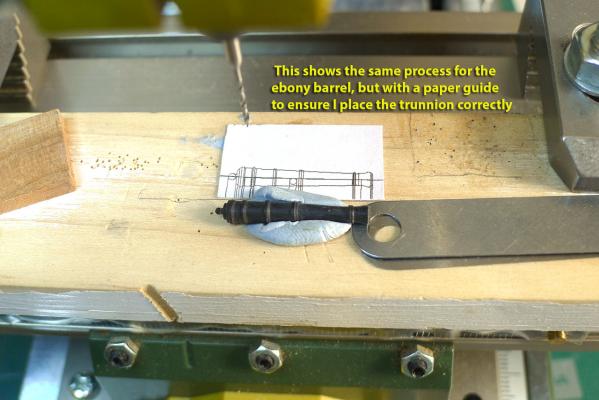
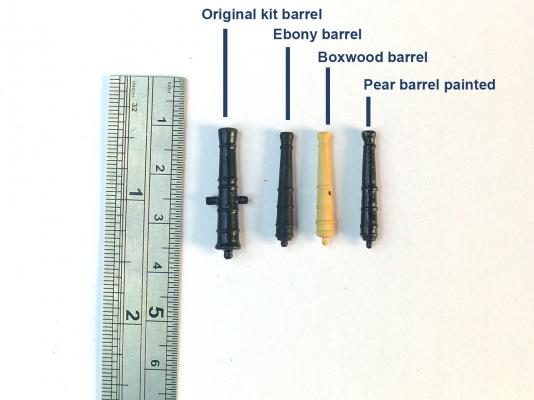
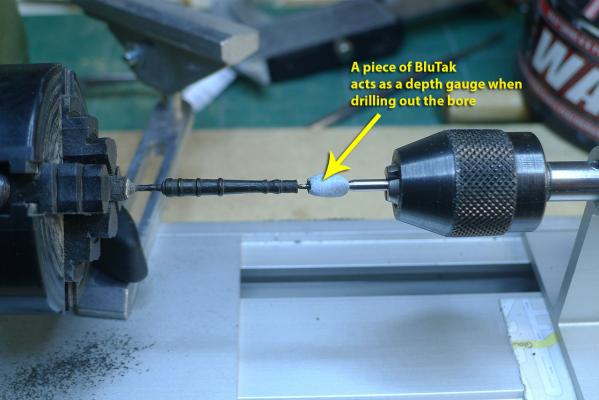
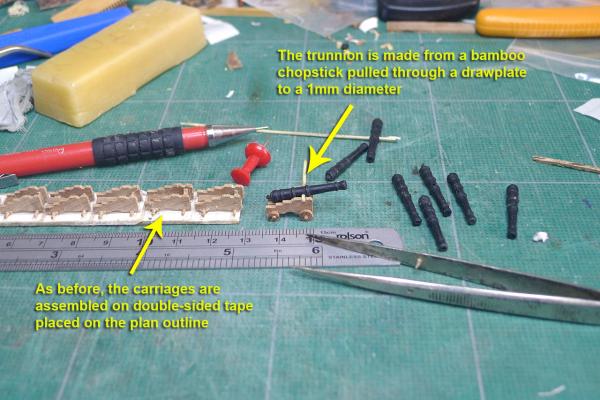
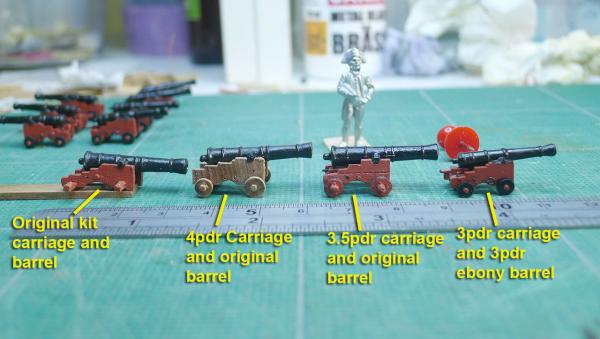
Ebony cannon Well, after turning 8 barrels from boxwood (I had decided that it would be overkill to try casting from resin, and it did only take a day to do) I did decide to follow Nigel's suggestion and turn the cannon in ebony after all. It seemed to me that boxwood allowed a little more accuracy, but the appearance after painting wasn’t as nice as that of ebony. I also decided to make the carriages at the same scale as for the 3pdr cannon. I won’t go into the process of making the carriages smaller, as I used the same techniques as for the 3.5pdr carriages that I made last time. To make sure I didn’t go off the line too much when drilling out the bore, I used BluTak (a kind of putty) to act as a depth gauge. Holes for the trunnions I had not covered in my last posting how I drilled the holes for the trunnions. This had caused me to think a while because I needed to drill a horizontal hole through a barrel that has a changing diameter along its length. In the end, the answer was simple. Using the CAD drawings I found that in order to lay the barrel so that the centre line was perfectly horizontal, I’d need to raise the edge of the muzzle swelling by 0.45mm. So I rested and held the barrel on a plank with some BluTak and placed the muzzle on some feeler gauges that combined to a depth of 0.45mm. This assembly was fixed to my x-y table and a 1mm hole drilled through so that the top of the trunnion went through the central line of the bore. You’ll note the faint pencil mark in front of the reinforce ring that shows the centre line of the barrel. The trunnions The trunnions themselves were again made from strips off a bamboo chopstick pulled through a drawplate to 1mm diameter. You can see the different barrels from ebony, boxwood and painted pear when compared to the original barrel below. Finally, you can compare the carriages and barrels as they went through their evolution. (For those with questions about the acrobatic abilities of the captain, he is not standing on the barrel, but is behind). Should you ask whether it was worth it to make a small difference to the size of the cannon and their carriages, all I can say is that they now fit the cannon ports much better. That as well as the fact that I've improved my skills slightly as a result of all this fiddling around. Now I will be working on the rigging for the cannon, and I've started to plan for the belaying pins and racks. Tony


- 269 replies
-
- 16
-
-
- Caldercraft
- First build
- (and 3 more)
-
Now you see how satisfying that motivation can be. It brings happiness and laughter to your life. Long may it continue. And Gregor. And Kester. And Mark. And Eamonn. And Chuck. And Jay. Oh, dear, now I'll have to start the list of all the members of MSW. Let me work on it. It might provide some motivation for my build.... Tony
- 210 replies
-
- 4
-
-
- Sherbourne
- Cutter
- (and 5 more)
-
Dirk, if you didn't know it already, your entire motivation to build is to provide my instruction at no cost. Tony
- 210 replies
-
- 2
-
-
- Sherbourne
- Cutter
- (and 5 more)
-
It's like you were reading my mind, Gregor, because I have been ruminating about a serving machine, and I had entirely missed Marc's build. So I am delighted at the link and will be building my own machine on those plans as well. Thank you very much, and, equally, congratulations on another nice piece of work, Dr. M. Tony the Preserved
-
Nigel, could you say who your supplier of the black tissue paper is in the UK. My initial search came up with sites that do not specify the weight of the paper. Thanks Tony
-
Great to see the first stage done. Really pleasing, isn't it! You've made a nice job of it. It will be very exciting to see the Sherbourne fitted with a landing pad for the quadcopter. Possibly a first on this forum, and it will lay to rest all the discussions about where to put the ship's boat -- it's now the ship's quadcopter, which clearly couldn't be towed behind, unless on a raft of course. You might have to make the mainsheet a bit smaller, though, if you do have a landing pad. Like you, I found pencil to be a very nice method of caulking. In terms of planking, the planking patterns above and below the wale seemed to me to be a bit different and I seem to remember that I treated them separately -- measuring to and from the wale's position above and below. For the area beneath the wale I don't think there's any defined wisdom as to whether you start at the top or at the garboard. I went the way of the tutorial on this forum by starting at the garboard, but I also laid planking at the wale and worked my way toward the middle. You might also think about whether you use the kit wood for the second planking or whether you buy thinner planking which is easier to lay (especially if, like me, you haven't cut a rabbet or left enough space for the 1mm wood supplied). As for the dust it makes a superb filler when mixed with dilute PVA -- and it certainly saves on buying special filler. I am sure, though, that others with more experience will be chipping in with their advice. My own is based on a rather hazy memory. Tony