EdatWycliffe
-
Posts
119 -
Joined
-
Last visited
Content Type
Profiles
Forums
Gallery
Events
Everything posted by EdatWycliffe
-
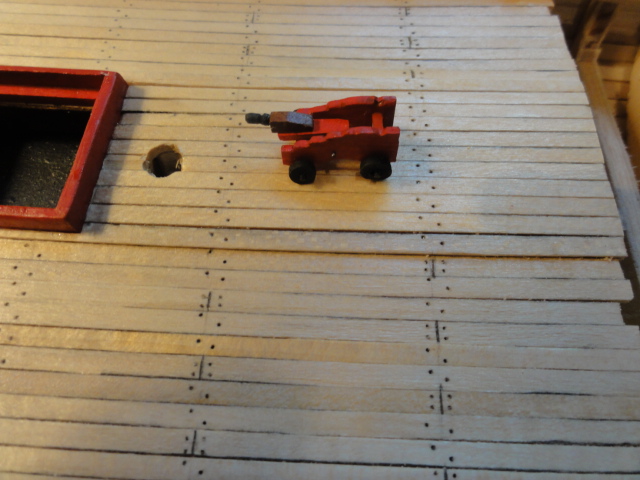
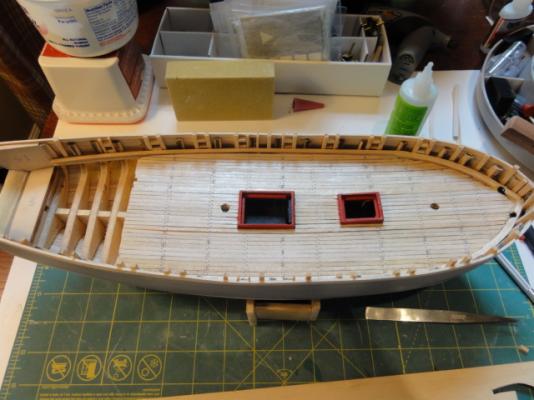
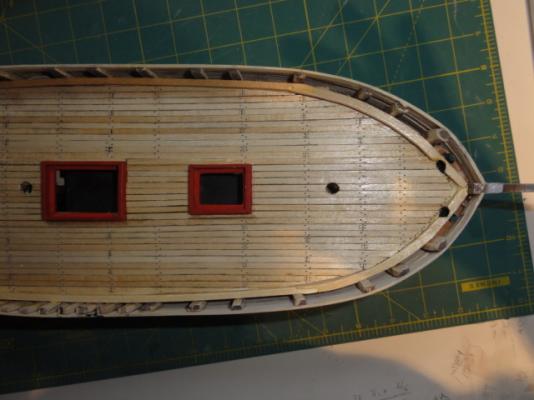
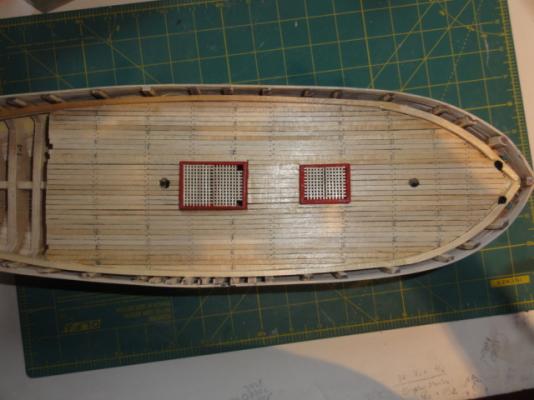
I've finished framing the gun ports. It was more difficult than I thought. The vertical supports were easy except that a few faux bulkheads that simulate frames on the starboard side were smack in the middle of the place where I needed to put vertical supports for the gun ports. So, I had to cut those few faux frames off above the deck line and move on. The horizontal supports are small (about 1/4" ) and not so easy to handle and the bottom horizontal supports can slip down into the hull between the waterway and the planking. My set of tweezers came in handy placing the supports into position. I used CA to glue the supports. Attached are a photo of the test gun carriage used to determine whether an additional hull plank was needed (it was) and a couple of photos of the gun port framing. I'm now opening the gun ports. I suspect that I'll need to do a lot of cleaning so that the ports align and are about the same size. I also have to decide whether to open up the "port" that's within the great cabin or just treat it as a "window" as Bob did. BTW, thanks for the info behind the holes in the aft hatch. Regards, Ed

-
Ken, the hatches look fine. It's difficult to tell, but I think that the way I constructed the hatch coamings, the grating area was less than your hatches. I just had enough to finish the job. Are you going to cut the forward corners of the aft hatch? I note that Bob Rafine did that to accommodate ropes passing into the hatch. I'm not sure what the ropes are for, but I figure that if Bob did it, it was a necessary detail. I finished my test cannon to measure the height at which the barrel meets the hull planks. I need to add another plank. I had an extra carriage from the four packs I purchased from Syren My second try was a success. I fashioned the quoin handle by chucking a 1/16 square piece of wood in my Dremel and using it like a lathe. I used needle point files to carve the design. This was a very neat trick I learned from a download on the Syren website. I'll post a photo or two tomorrow. Really enjoying your build. Regards, Ed
-
Thanks, Bob. I sanded the planks so much to fair the deck, I'm afraid that they are too thin in many places to sand more. I'll do it better on the next build. Qs: I'm having a tough time assembling the cannon carriages. The axels all seem to be the same length, so it's difficult to determine the correct angle of the cheeks. (I understand that the forward section of the carriage is narrower than the aft section.) Any suggestions? Do you use a tool other than a #22 Xacto for removing fragile laser-cut parts from the board? Thanks much, Ed
-
Looks great, Ken. The bulkhead fairing and the filler blocks look exceptional. I purchased cannon carriages and gun barrels from Syren and I just tried to put together the first carriage. I really botched it. They are delicate and extracting the parts in tact from the board is difficult. Your cannons look good. How did you determine the angle of the cheeks. I understand that the distance between the cheeks at the forward carriage is narrower than at the aft, but how did you determine the distances apart? Did you make a jig? Or did you keep the cheeks parallel? Thanks. Ed
-
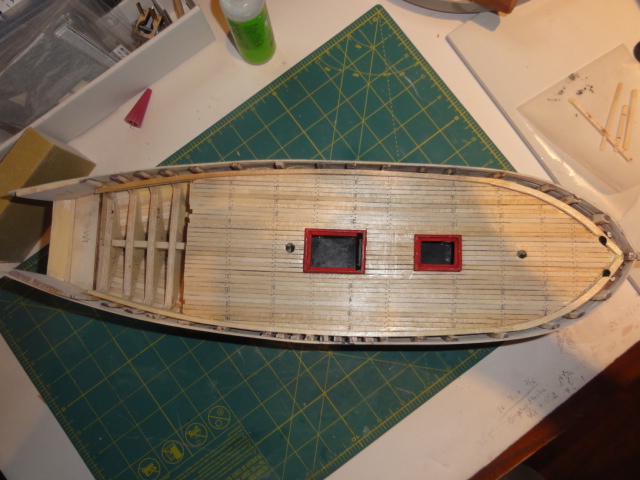
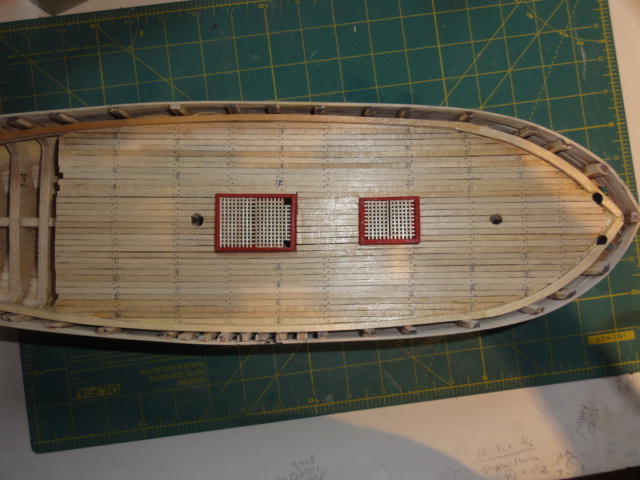
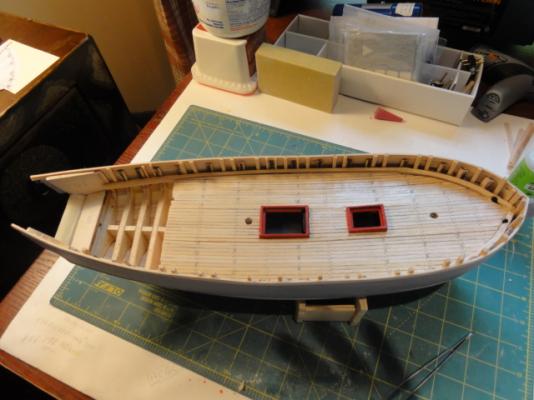
These are a few more photos. I've completed the deck planking, including a pad. I'm reminded how important it is to fair the bulkheads properly so that the planks lay naturally. I had to use a few shims so that the deck lay in a somewhat acceptable fashion. I tried to simulate proper lumber length by creasing the planks and tree nails by drilling holes. The creases and holes were highlighted with a .05 mechanical pencil. It looks OK, I guess, but I think that the 1/8 " planks were too narrow (I might have substituted 3/16" planks) and I could not figure out how to get brown Elmer's wood putty into the small holes without ruining the finish on the deck. [Any suggestions would be appreciated.] I placed the covering board per plans. It's now time for framing the gun ports. I'll probably have to add a plank or two so that the barrels are centered in the gun port frame. Still enjoying immensely and learning a great deal (mostly from Bob Rafine's log and my own errors). Ken, how is your FA build progressing?

-
Thanks much, Bob. I just finished deck planking, including the pad, using the 1/8 stock supplied with the kit. The ship would have looked better with the 3/16 planking without the deck pad. For this ship, I'll test out a 3/16 margin, but I'll probably end up building the waterway per the plans if I can't get it to look right. Also, even though I used 1/8 stock, I'm going to try to emulate butt joints on the deck by creasing the planks per your plan and simulating tree nails with a #78 drill bit and Elmer's walnut wood filer. I'll attach some photos when I've completed these next steps. I appreciate the help. Ed
-
Bob, soon I'll be ready to add the covering board over the waterway. The plans seem to require the covering board to lie on top of the waterway parallel to the deck. The photos of your ship appear to place the covering board along the waterway at an angle with the bottom touching the deck. Is that an illusion? Did you use stock wider than 1/8 inch? Your photos and your advice are terrific. Thanks. Ed
-
Bob, two questions about your decking that looks fabulous. 1. Did you cut the planks to length or are they full runs with creases to simulate cuts to length? And 2. What rule did you use for measuring the plank lengths as you crosse the deck from S to P? I'd like to attempt the same look. Thanks much. Ed
-
Thanks, Ken. I think that I'll paint this time, but the natural look is kinda neat. I need to improve the way I fair the bulkheads. That will help planking a lot. Also, I still am not very good at reading the plans showing the ship's curves and the water lines. I need to find some basic literature on interpreting hull planking schemes. All in all, I'm improving my skills and enjoying the hobby immensely. I appreciate your help and your build log. Take care.
-
This starts my build log for MSW's Fair American. Mainly I'm following the Lauck Street Shipyard Practicum Kitbashed to simulate plank on frame and to open the great cabin. The following are photos of the build to date. This and the next three photos show the hull fully planked sanded and a coat of polycrylic. I may need to add an additional plank after the deck is laid depending on the relationship between the height of the cannon barrel and the gun port. The first photo shows the kit-bashed cutout simulating a plank on frame model on the starboard side. (One day maybe I'll be accomplished enough to build one.). The next three photos show the stern, bow and bottom (keel up) of the ship. I've primed (using automobile gray spray primer) and sanded twice since these photos. The fifth photo shows a top view of the bulwarks almost ready for the deck planks. I've decided to add the hatches first so that the deck pad will fit neatly around the hatch coamings. The sixth and seventh photos show hatches under construction. (Thanks, Fiffuerres, Rafine and KenW for the great help.) That's it for now.


-
Thanks, Ken. Hopefully, I'll be able to post some photos tomorrow. I ordered some parts from MSW three weeks ago and just got an email explaining that they are several weeks behind filling orders. Still, hope you got your keel by now. Kind regards.
-
Enjoying your log. Very nice work. It's time I started a build log for Fair American, but I can't figure out how to do it under the new MSW. Can you please point me in the right direction? Thanks.
-
Figuerres, your instructions and photos are very helpful. The analogy to windows and doors works well for me. I very much appreciate the time and effort you took! Just ending a trip to Portugal. When I return, I'll build the hatches and post photos. Thanks, again.
-
She's absolutely beautiful. Thanks for sharing.
-
Thanks, Bob. It does help. Ed.
-
Thanks, Ken. Also receiving help from Figuerres who has a terrific build log.
-
Thanks much. I've never built frames so I've got no relevant experience. I rechecked the plans. The coamings look like one piece and the note on the plans says "cut ledge to suit grating." So, I assume that I should use the 5/32 piece for the outer frame and the 3/32 piece for the inner frame and then sand down the ledge so that the top of the grating is even with the top of the 5/32 piece. The major flaw in this plan is that once I lay the deck pad, which is 3/32 high, the hatch will lay only 1/16" above the deck. That seems too low. Ill be patent and wait until you have time. Appreciate the help!!
-
Figuerres, perhaps you can help with a couple of questions regarding coamings and grating on Fair American. I just finished planking the hull, my first pob ship. (I recently completed Phantom, my first ship ever and had so much enjoyment that I've become an enthusiast.) I've run into a problem with the plans/part list with respect to the hatch coamings. I want to build and install the coamings and grating before laying the deck pad, but I can't figure out what the parts list means by the 3/32 x 3/32 "upper" hatch coaming and the 5/32 x 5/32 "lower" hatch coaming. Also there is an unnamed part on the parts list below the lower hatch coaming that is 3/16 x 3/16. I can't tell if that is a part of the coaming construction. In short, how do I construct the coamings for the fore and aft hatches?Also, is the plan accurate w/r/t the number of horizontal and vertical pieces in the grating? I'd be truly appreciative of the help. Thanks.
-
Great photos and log. It will be very helpful! Perhaps you can help me with a couple of questions regarding coamings and grating on Fair American. I just finished planking the hull, my first pob ship. (I recently completed Phantom, my first ship ever and had so much enjoyment that I've become an enthusiast.) I've run into a problem with the plans/part list--the hatch coamings. I want to build and install the coamings and grating before laying the deck pad, but I can't figure out what the parts list means by the 3/32 x 3/32 "upper" hatch coaming and the 5/32 x 5/32 "lower" hatch coaming. Also there is an unnamed part on the parts list below the lower hatch coaming that is 3/16 x 3/16. I can't tell if that is a part of the coaming construction. In short, how do I construct the coamings for the fore and aft hatches?Also, is the plan accurate w/r/t the number of horizontal and vertical pieces in the grating? I'd be truly appreciative of the help. Thanks.
-
Thanks Augie. Appreciate the response.
-
Dear Augie and Ken: I just finished planking the hull of Fair American, my first pob ship. (I recently completed Phantom, my first ship ever and had so much enjoyment that I've become an enthusiast.) Now I've run into my first problem with the plans--the hatch coamings. I want to build and install the coamings and grating before laying the deck pad, but I can't figure out what the parts list means by the 3/32 x 3/32 "upper" hatch coaming and the 5/32 x 5/32 "lower" hatch coaming. Also there is an unnamed part below the lower hatch coaming that is 3/16 x 3/16. Can't tell if that is a part of the coaming construction. In short, how do I construct the coamings for the fore and aft hatches?Also, is the plan accurate w/r/t the number of horizontal and vertical pieces in the grating? I'd be truly appreciative of the help. Thanks. P.S. WHere can I find Rafine,s build log?
-
FAIR AMERICA KIT BUILD - moved by moderator
EdatWycliffe replied to cruiseholidays1's topic in Wood ship model kits
I'm building Fair American and cannot figure out the hatch coamings. The parts list states "upper hatch coaming" is 3/32 x 3/32 and "lower hatch coaming" is 5/32 x 5/32. First, what does upper and lower refer to? Second, the plans show the coamings on both hatches raised above the deck pad. But he deck pad is also 3/32 high which would make it even with at least one of the coamings. Help, please! How are the coamings for Fair American structured? Thanks.